Getting started with Attendances in Odoo
Getting started with Attendances in Odoo
With the Odoo software, you can easily manage employees attendance at the workplace, integrate the biometric timekeeping and view the analysis reports on log in/logout data, etc. Therefore, the human resources management and wage calculation could be simpler, more exact and reduce the resource consumption.
Requirements
This tutorial requires the installation of the following applications/modules:
- Attendances
Attendances app installation
To use the features of the Attendances module, navigate to Odoo Apps, enter the keyword “Attendance” on the searching toolbar and then, click on Install.
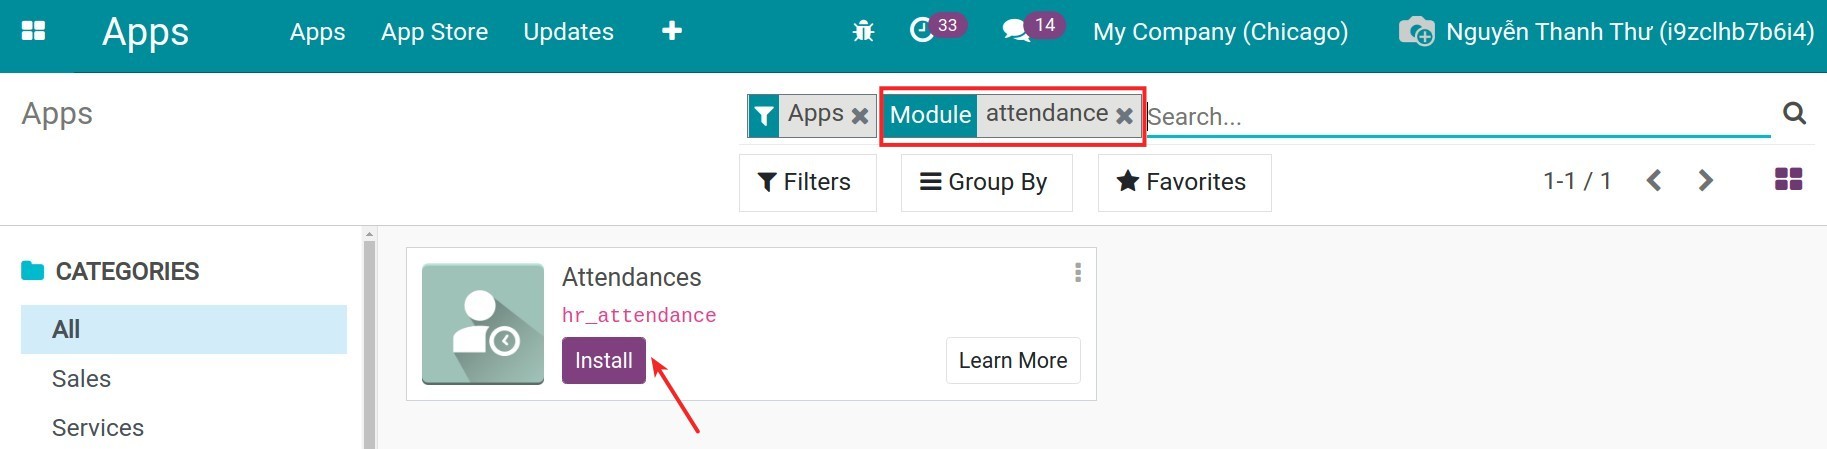
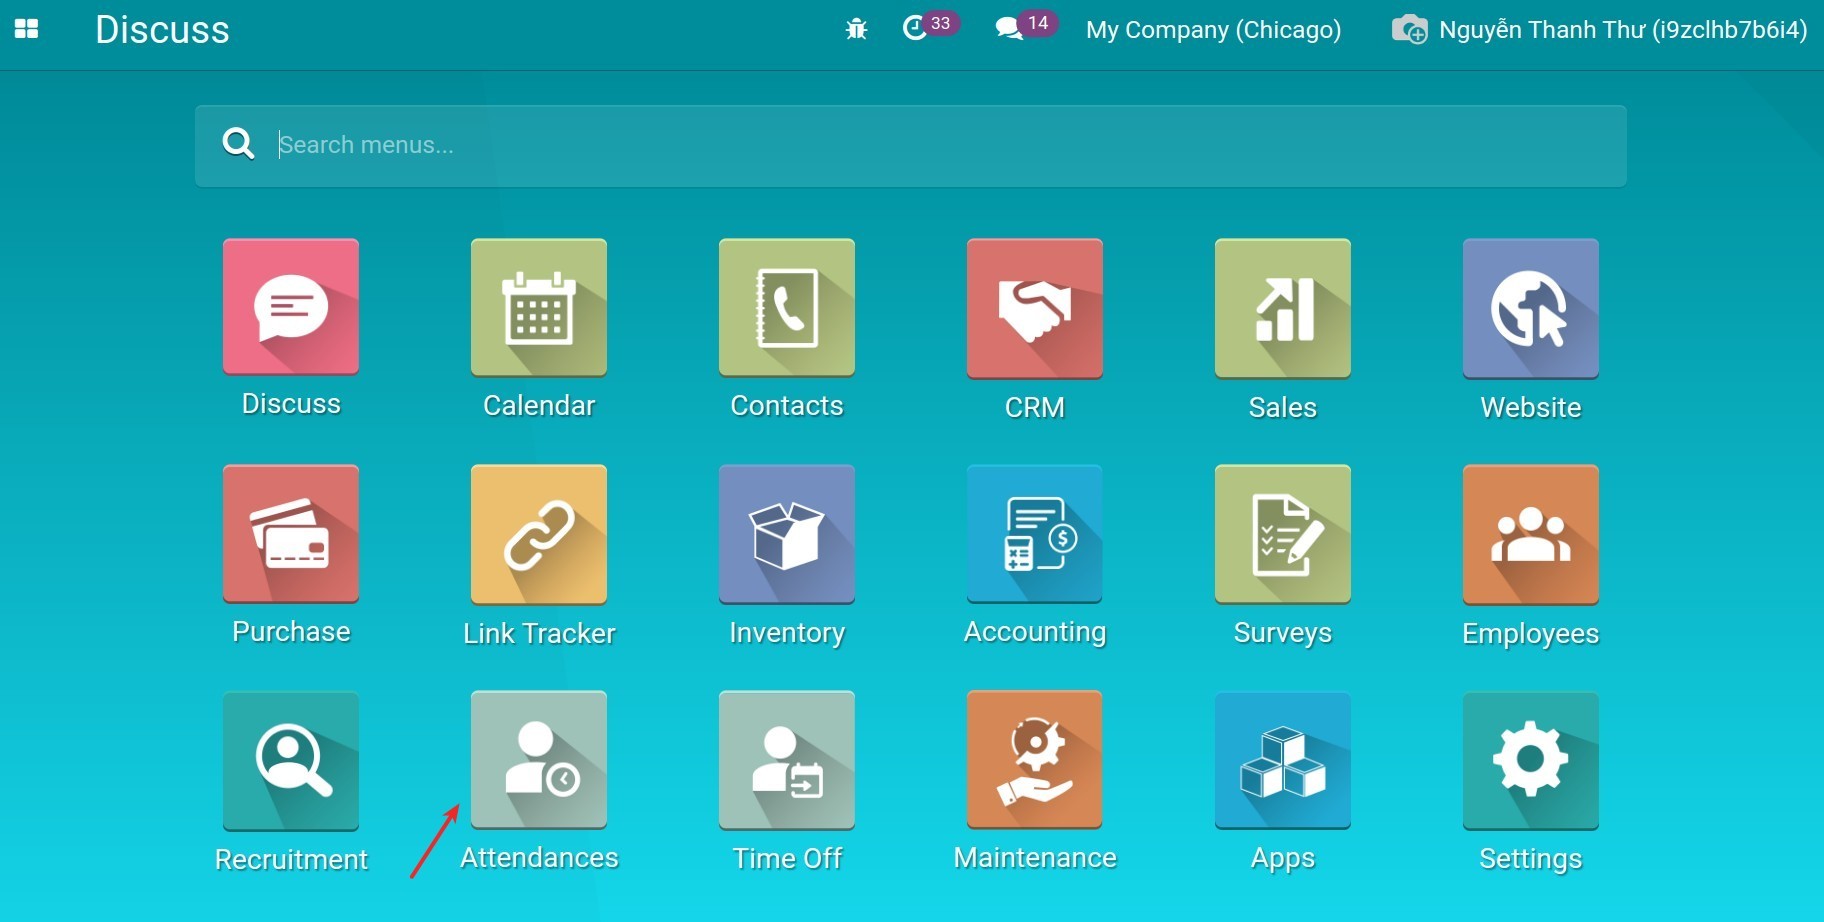
After finishing, you can see the Attendance module in the main view.
Access rights
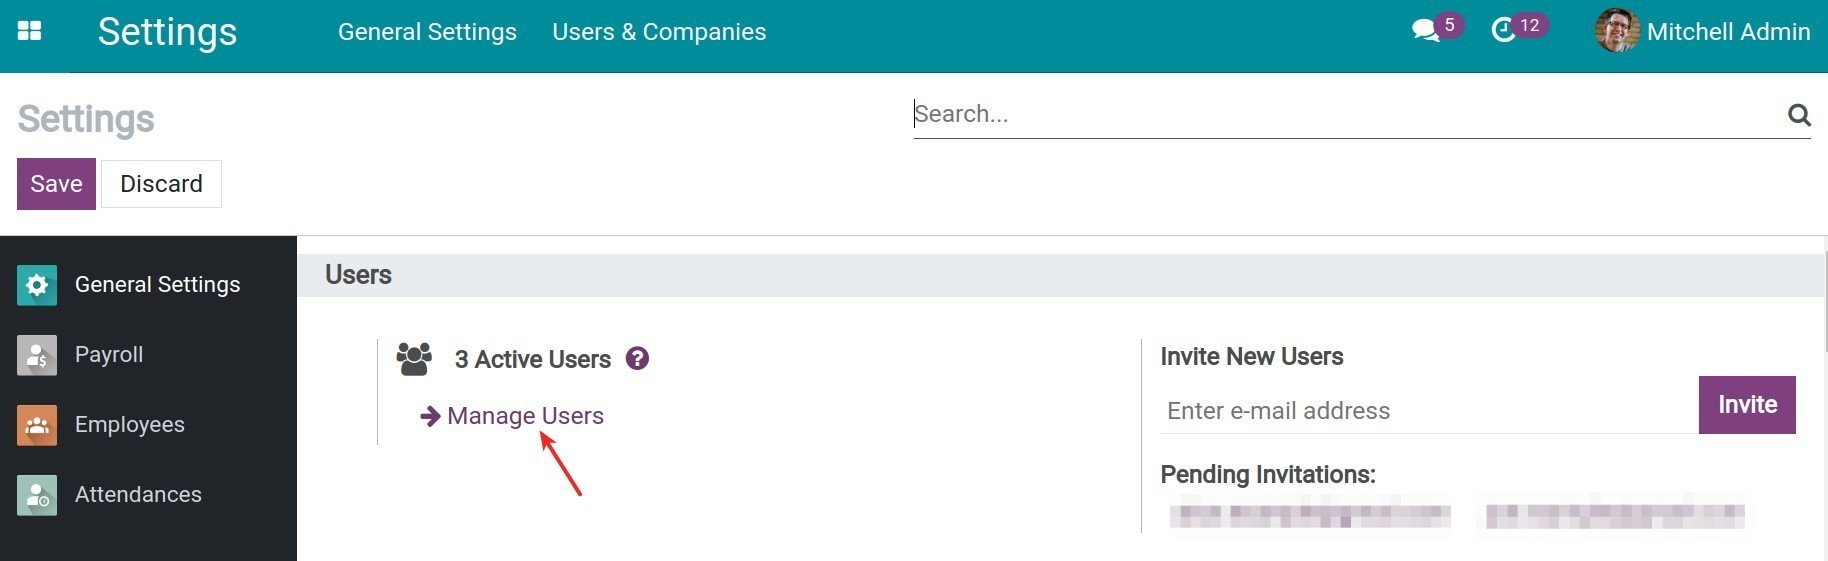
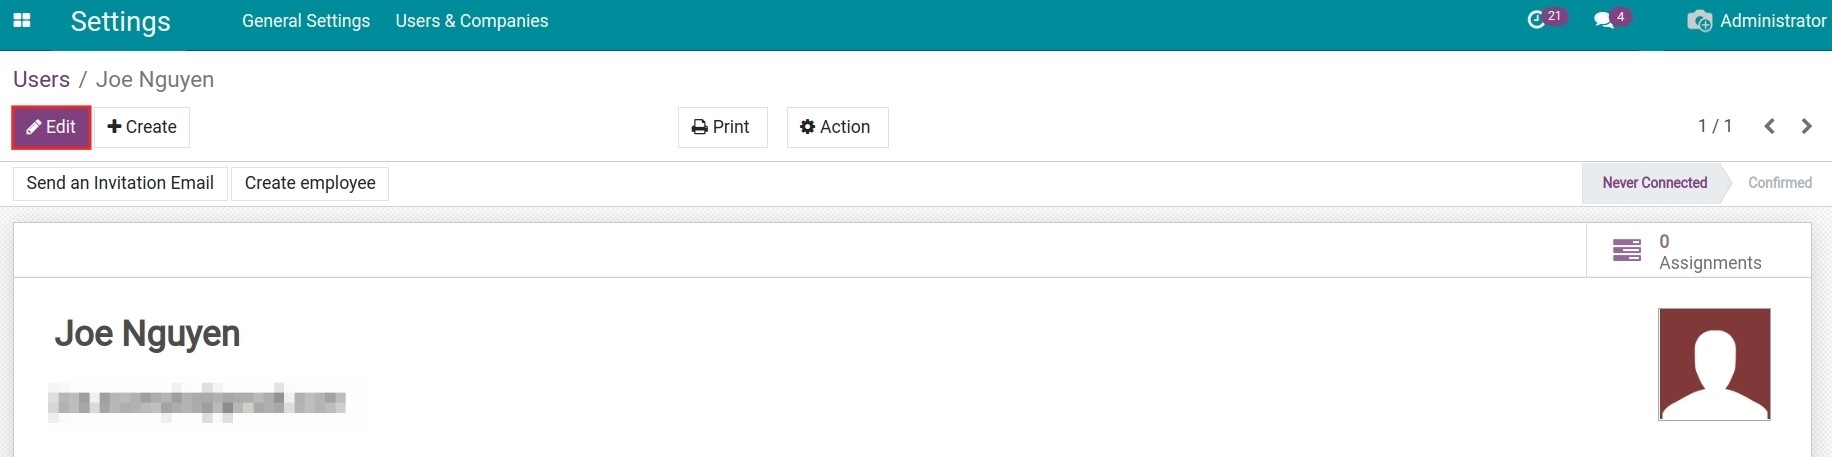
To grant access rights to the user account in the Attendances module, navigate to Settings module.

Click on Manage Users.
Find and click on the user account that you want to change his/her access rights.
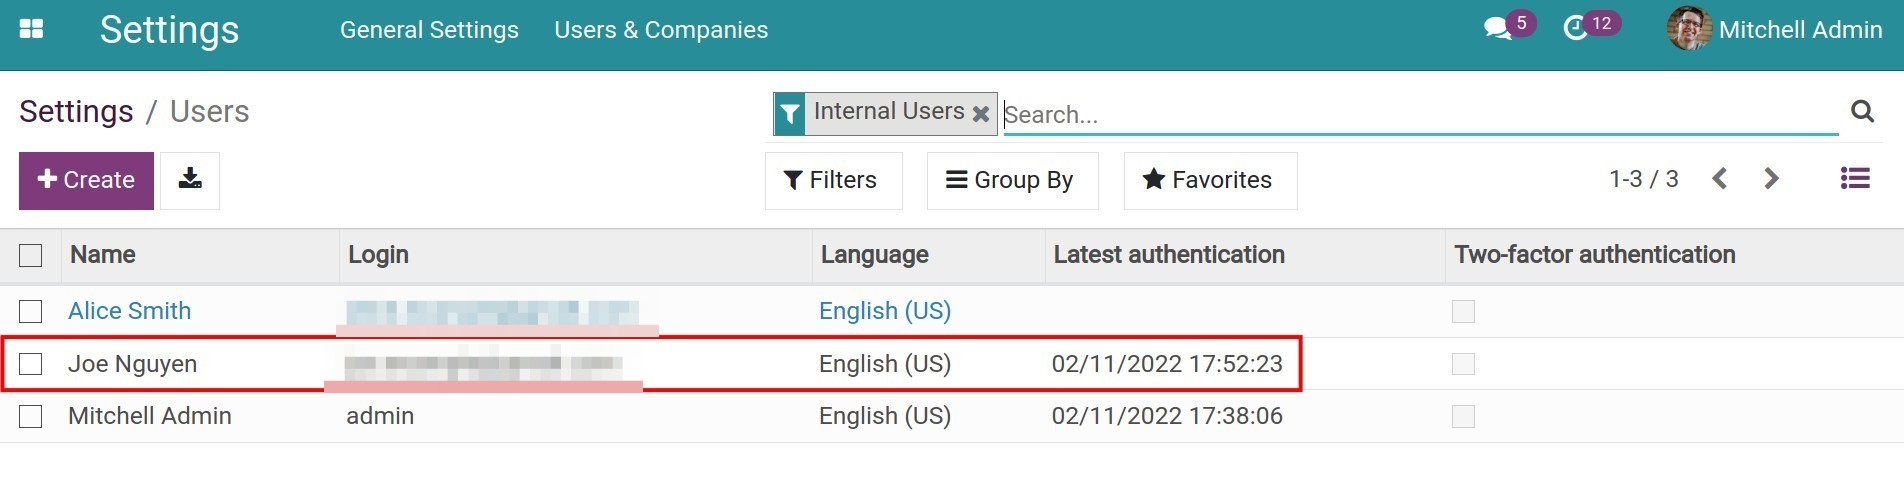
Click on Edit button in the user account.
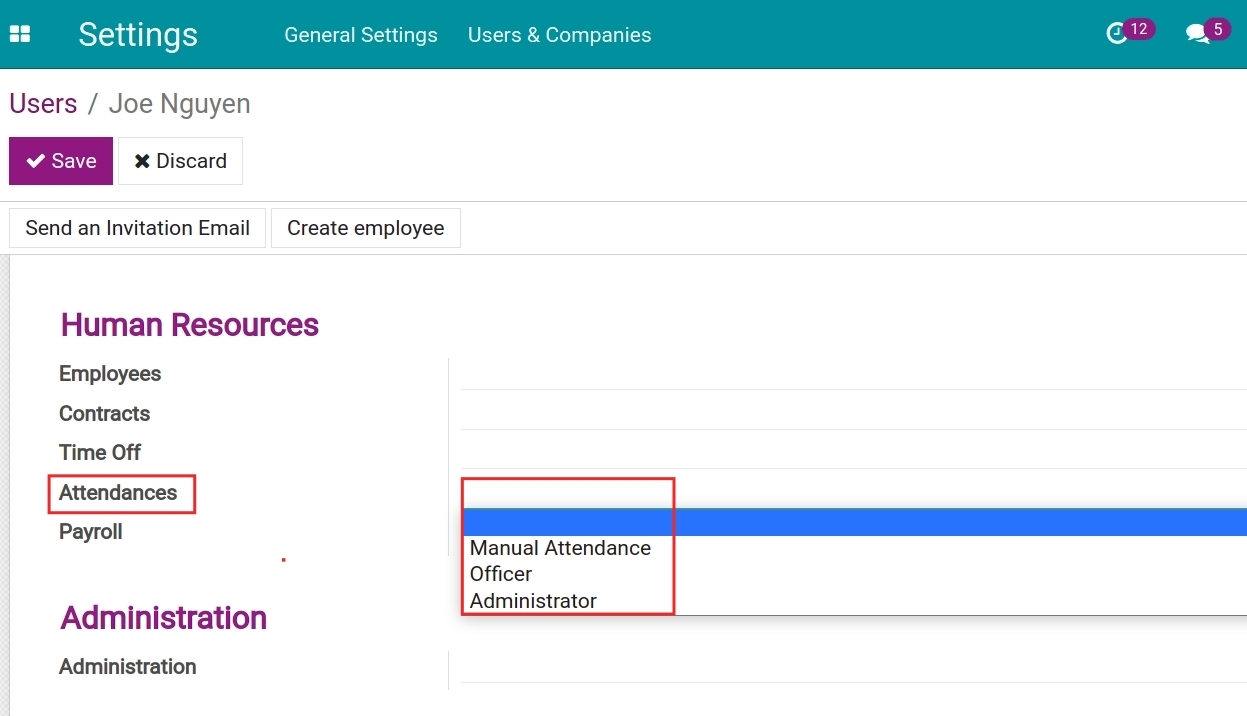
The Attendances access rights:
- Blank: the user has no right to access Attendances.
- Manual Attendance: has the right to manually attend on oneself.
- Officer: the user has the rights to manually attend on oneself, show the attendances data, the company’s employees list and analysis report on attendances.
- Administrator: the user has all Access Rights to Attendance module.
See also
Related article
- Biometric attendance device intergration
- Link Attendance device users with employees in Viindoo system
Optional module
- Biometric Attendance Device
- Payroll Attendance
Biometric attendance device intergration
Biometric attendance device intergration
Odoo software supports biometric attendance device integration. Timekeeping using biometric attendance devices brings much value to your company’s attendance management process:
- Guarantee consistency, make sure there is no mistake in the result;
- Prevent cheating in attendance;
- Time-saving for the attendance managing process;
- Etc.
Requirements
This tutorial requires the installation of the following applications/modules:
- Attendances
- Biometric Attendance Device
How to install the module
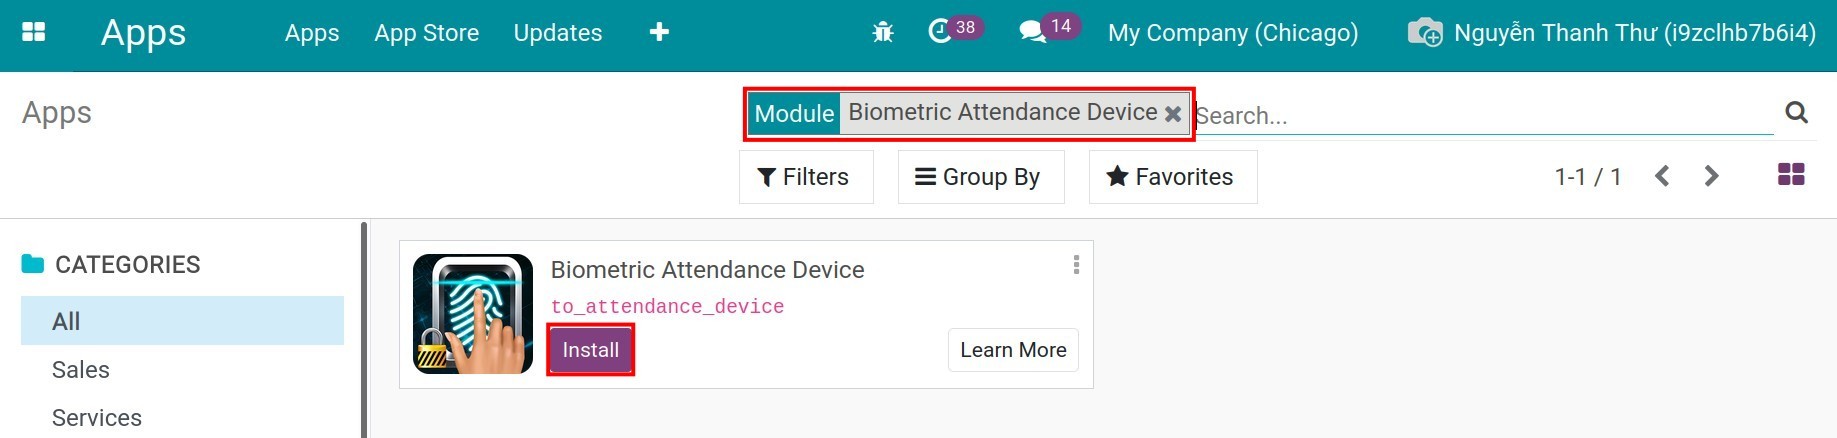
To use the Attendance device integration function, you need to install the Biometric Attendance Device module (to_attendance_device).
Access Apps, search for “Biometric Attendance Device”, and then press Install.
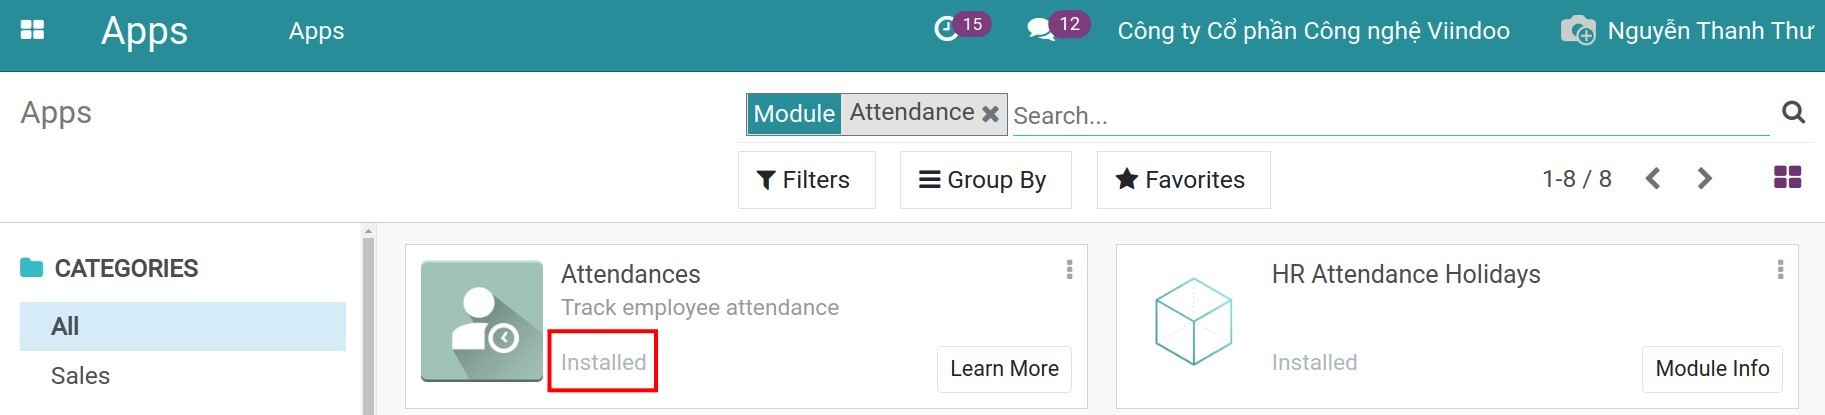
After installing the module, the system will auto-install the Attendances module (hr_attendance), which allows you to manage the attendance data using the Biometric Attendance Device module.
How to set up
Set up biometric attendance devices
Note
Currently, Odoo software is designed to be able to integrate with every attendance device on the ZKTeco platform.
Enter Attendances app, select Attendance Machines > Machines Manager.

At the device information view, press Create.

A Devices Information view will appear.
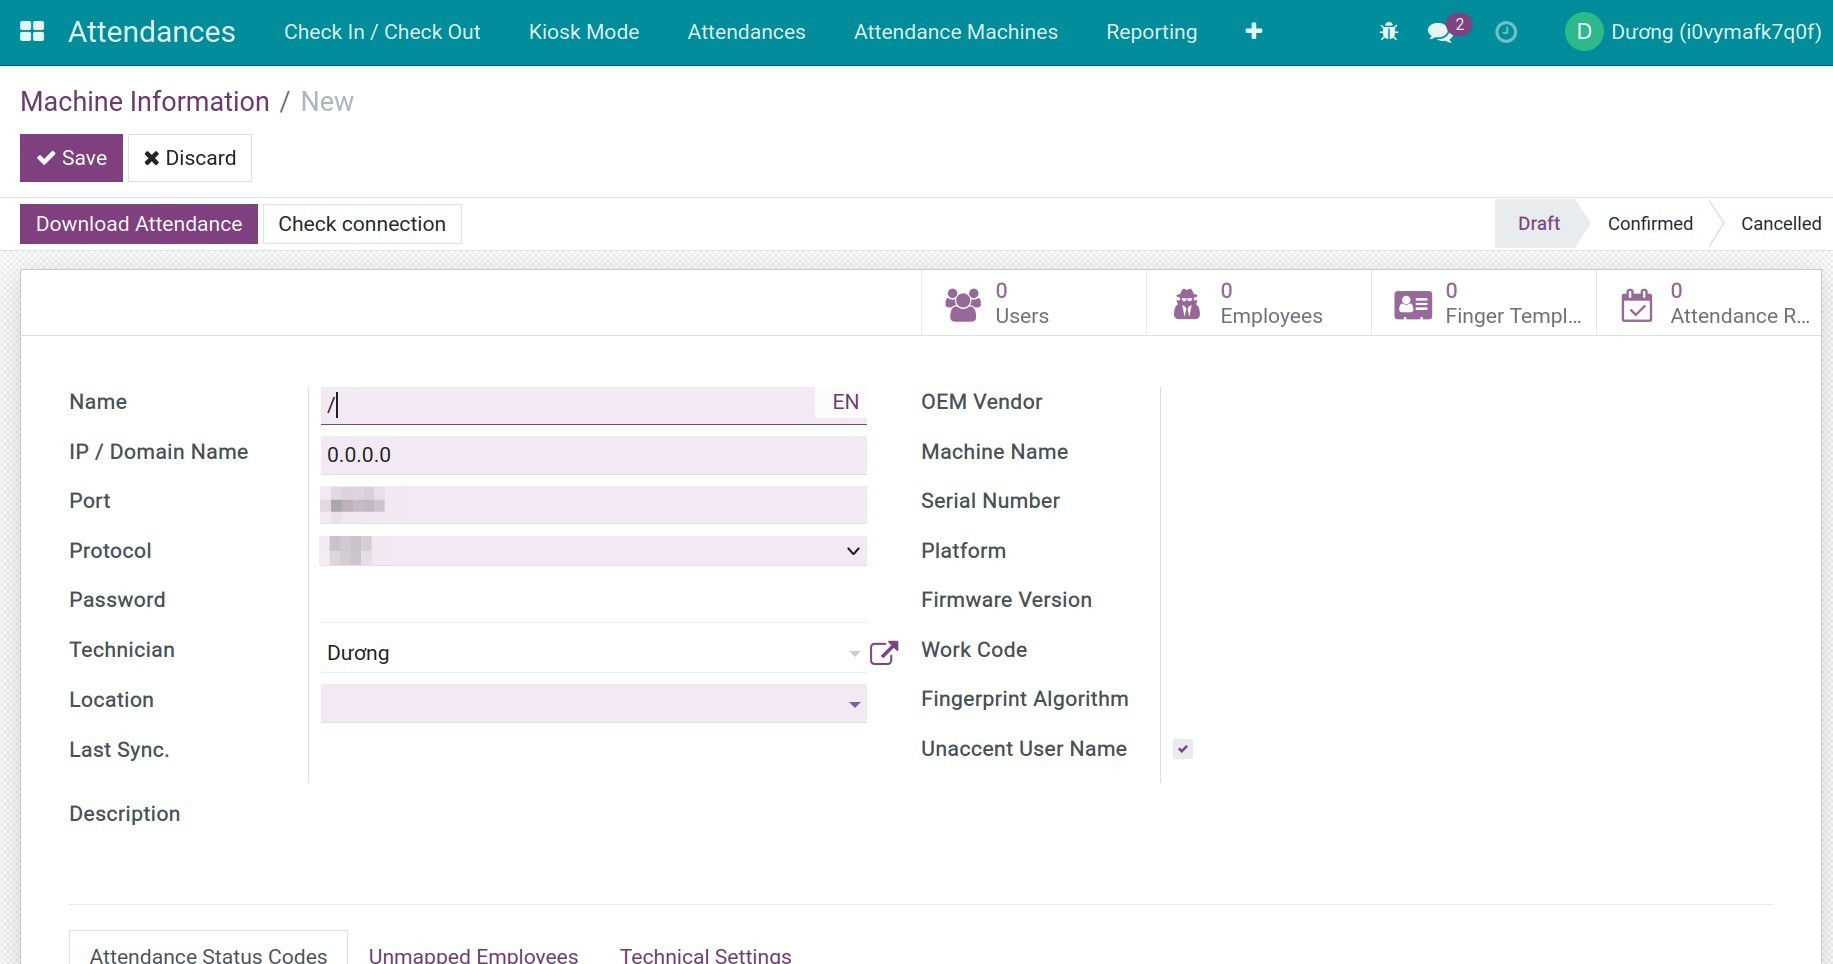
Fill in the needed information as follow.
General information
Enter the following information:
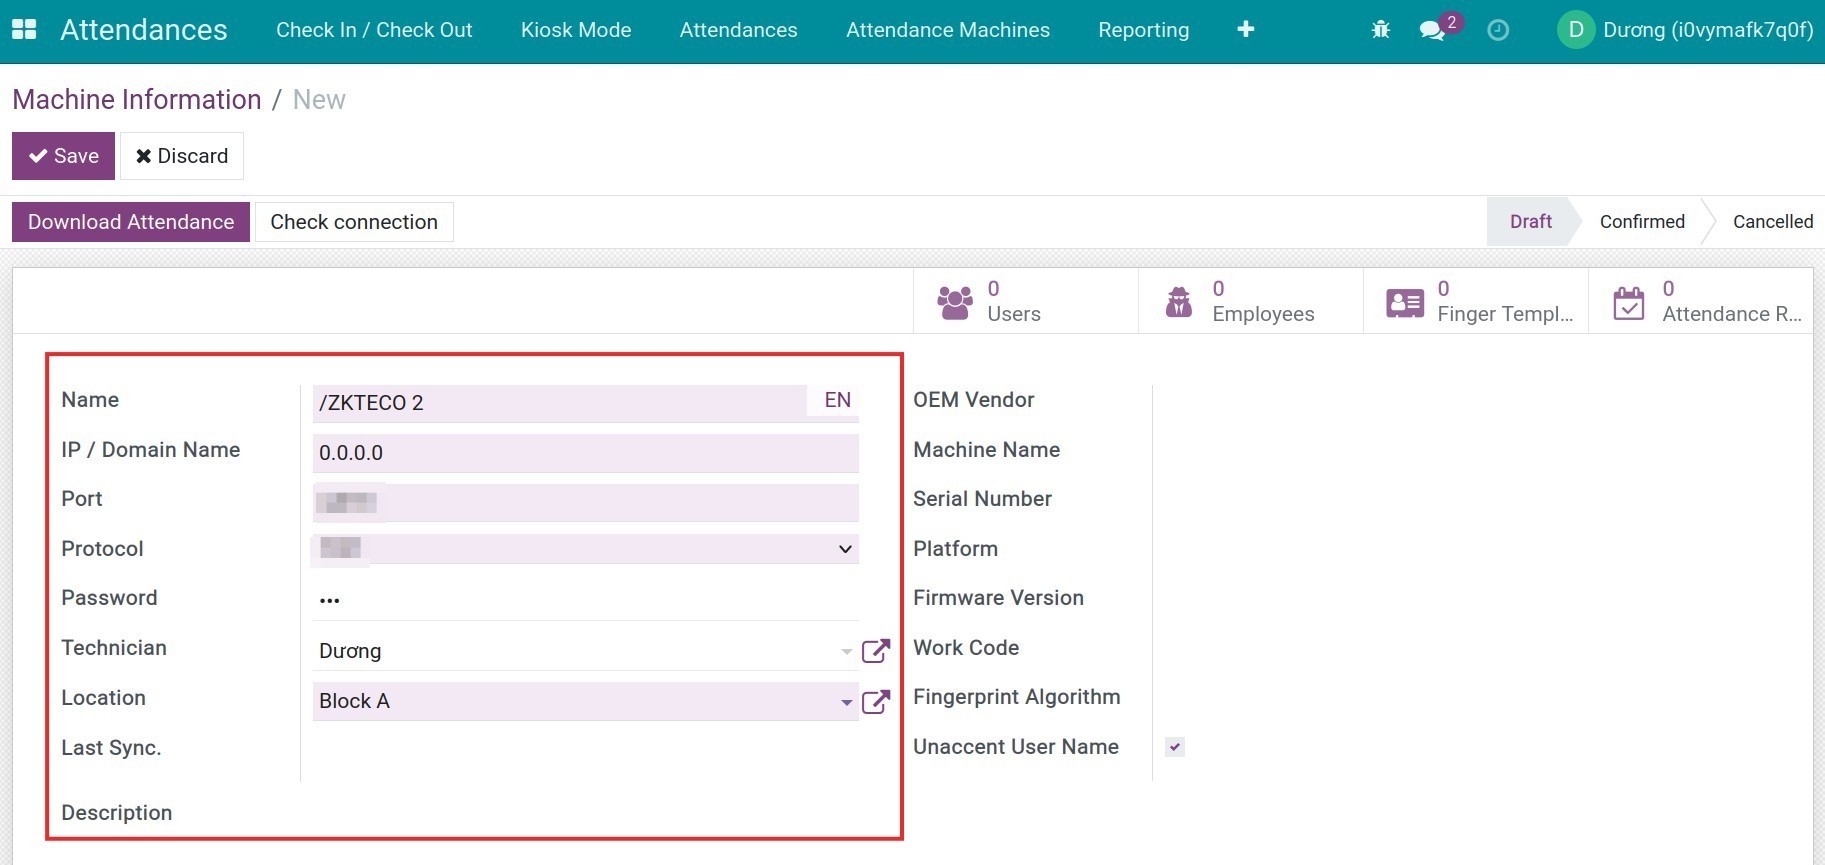
- Name: the name of the device. You should select the most recognizable name for the device, for example ZKTeco K14 No.1.
- IP/Domain Name: is the address connected to the Attendance device.
- For the connection in the local network, it is the IP set up on the device.
- For connections from the internet, this is the company’s static IP. This address is provided by the internet service provider you are using. You need to configure NAT/Portfowarding to route connections from Static IP to the internal IP address of the attendance device.
- Port: is the port to connect to the device.
- For connection in the local network, this port coincides with the port installed in the device.
- For connections from the internet, you need to configure NAT/Portfowarding to route from the external port to the internal port (which is the port installed in the device).
Note
IP/Domain and Port are two parameters set up on the time attendance device to connect the attendance device with your software system. Therefore, make sure to enter the correct parameters to be able to successfully connect to the attendance device you want.
- Protocol: TCP or UDP protocol. If your device is an old version and doesn’t support TCP then you should select UDP.
- Password: Create a password to confirm your identity. For example, the person in charge of the attendance device needs to insert this password in order to add more users.
- Technician: The employee in charge of this device.
- Location: Where the device is put, for example Gate no.1 of building A.
- Last Sync.: Show the latest time the device is synced, the system will auto-update after every synchronization.
- Description: Note, description for the device.
- Unaccent User Name: User name without an accent.
- Besides, when you press Get Machine Info, the system will automatically update the following info:
- OEM Vendor;
- Device Name;
- Serial Number;
- Platform;
- Firmware Version;
- Work Code;
- Fingerprint Algorithm.
Attendance Status Codes tab
This is the summary of the employees’ Attendance Status Codes set in the device. The manager will use this information to know if the attendance is a normal or an overtime one, in order to calculate the employee’s salary.
Here is how it display.
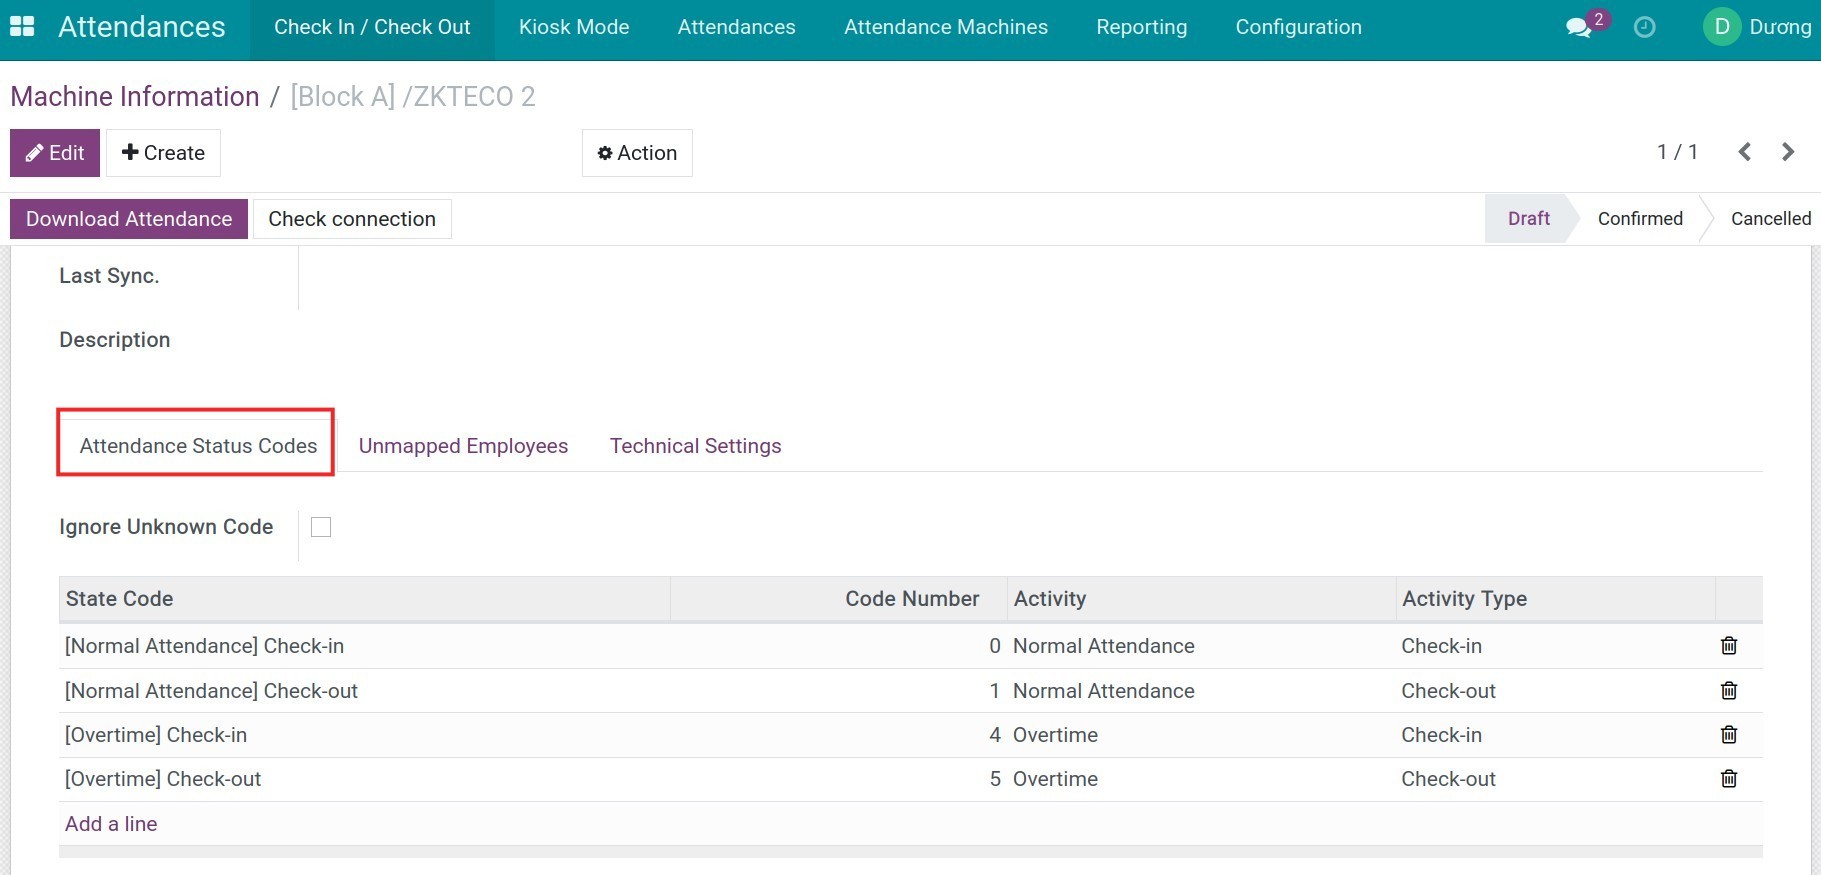
You need to pay attention to the following information:
- Ignore Unknown Code: If checked, when you download attendance, the system will automatically ignore the Code that doesn’t belonged to the Attendance Status Codes.
- Attendance Status Codes:
- State Code: State codes are set in the Attendance device, to show if an attendance is check-in or check-out, normal attendance or overtime. Select the Bin icon or Add a line to delete/add a State code.
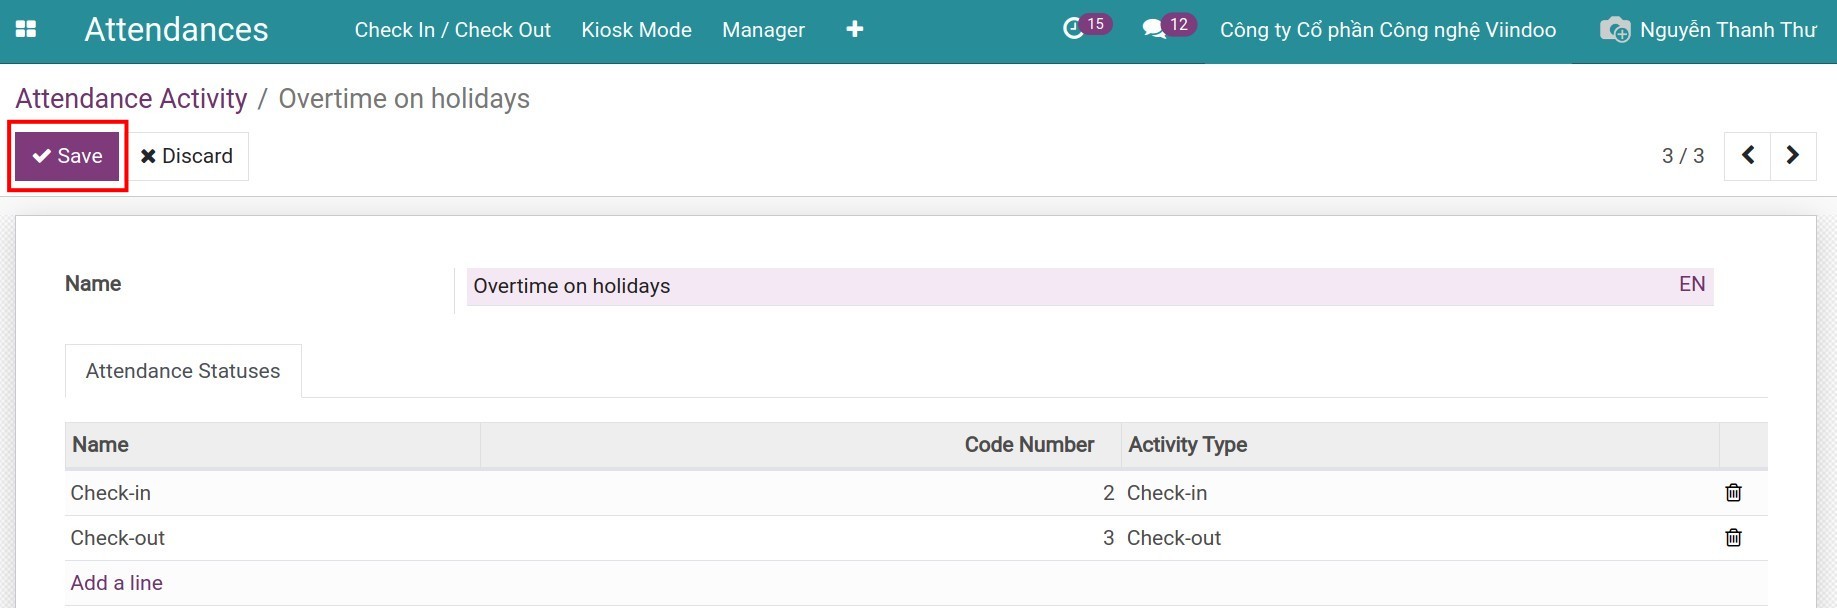
- If there is not enough state code to serve your purpose, you can set up more Attendance Status Codes by accessing Attendances > Configuration > Attendance Activity. The system will create 2 default activities: Normal Attendance, Overtime. You can click on an activity to edit or create more activities by clicking Create:
- Name: The name of the activity, for example, overtime, normal attendance, etc.
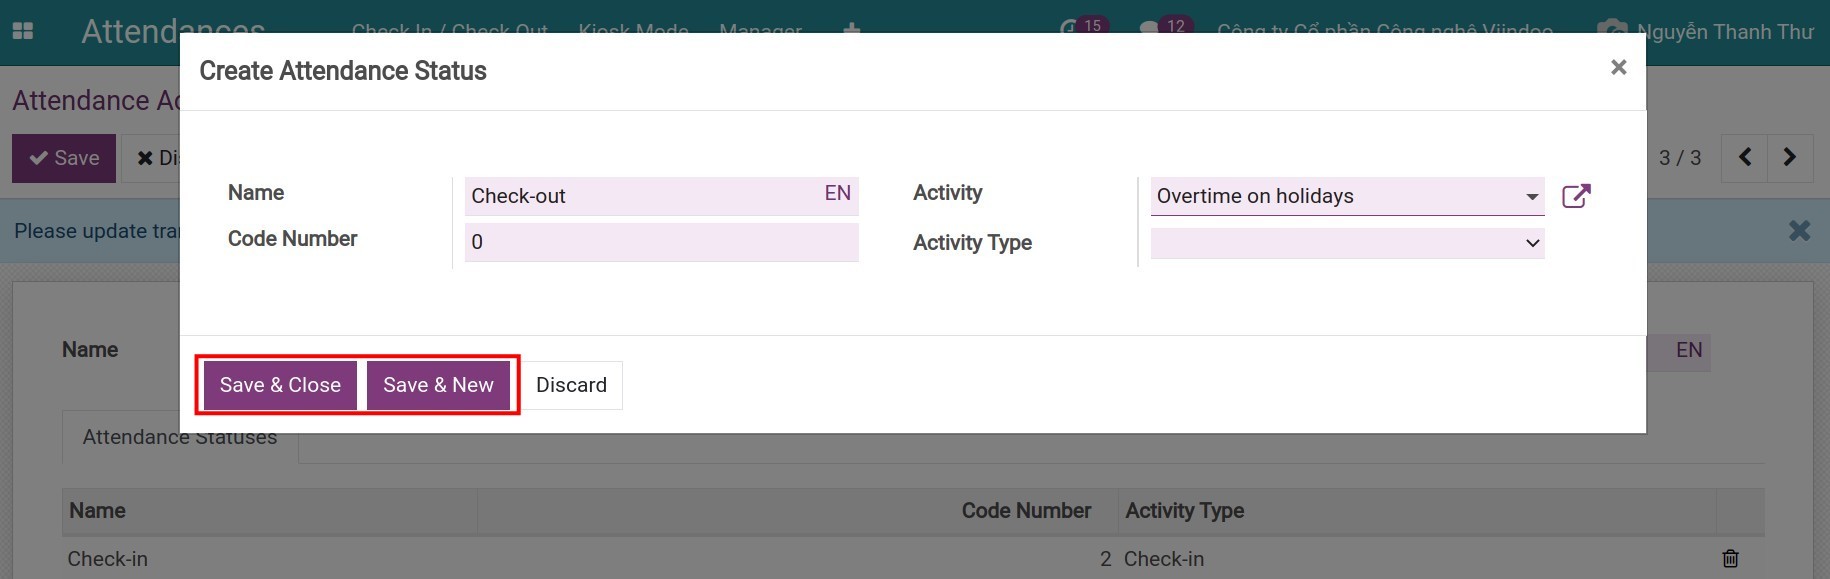
- Attendance Status: create an attendance status for this activity. Click on Add a line, a Create Attendance Status pop-up will appear:
- Name: The status name, for example, Check-In, Check-Out, Start Overtime, etc.
- Code Number: The code of this status, need to be an integer value and not a duplicate of another activity, status code.
- Activity: Select the activity that you have just created. If it’s not on the list, you can Discard the status and then Save the activity and then go back to Create Attendance Status.
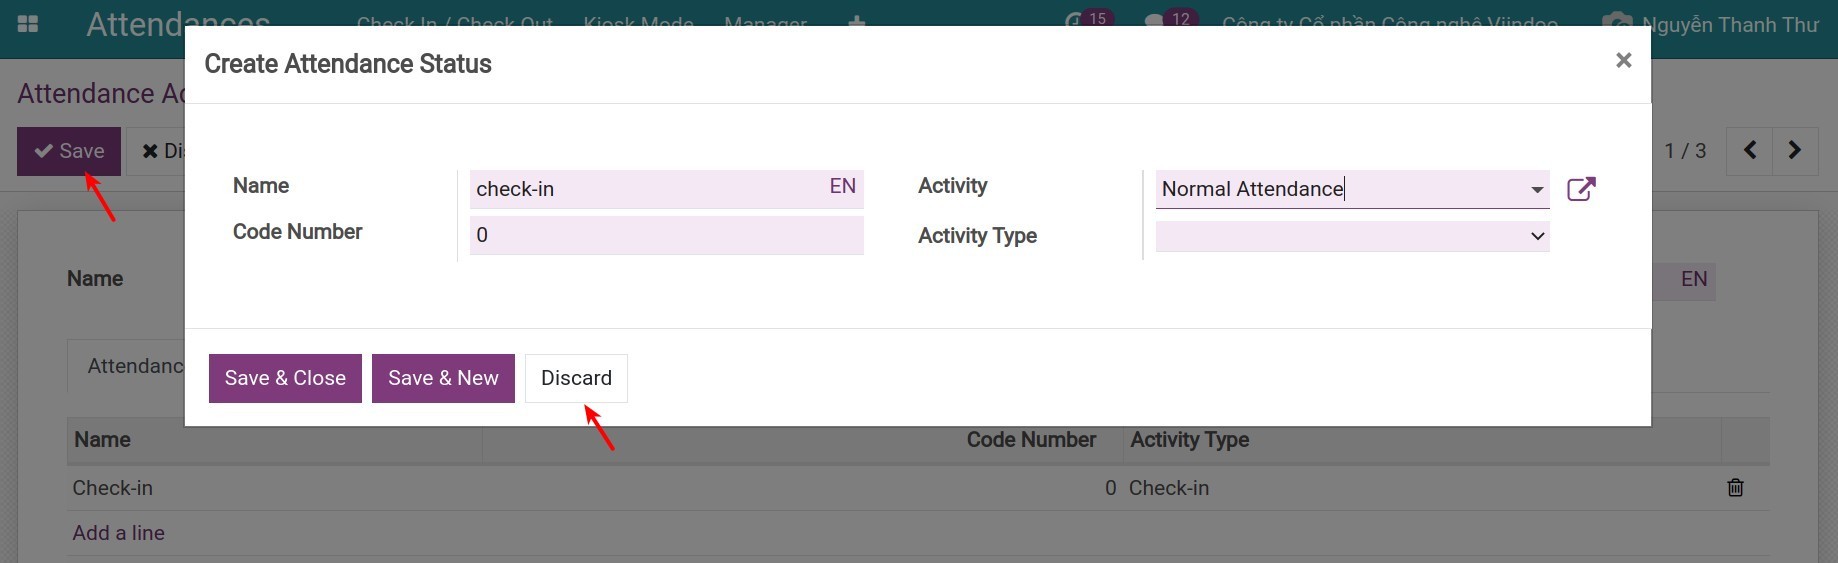
- Activity Type: select Check-In or Check-out, depend on the name of the status.
- After filling in all the information, press Save & Close. To create a new Attendance Status, select Save & New.
- To save the setting on Attendance Activity, press Save.
Technical Settings Tab
Input the technical information of the attendance device.
Here is how it display. You need to pay attention to the following information:
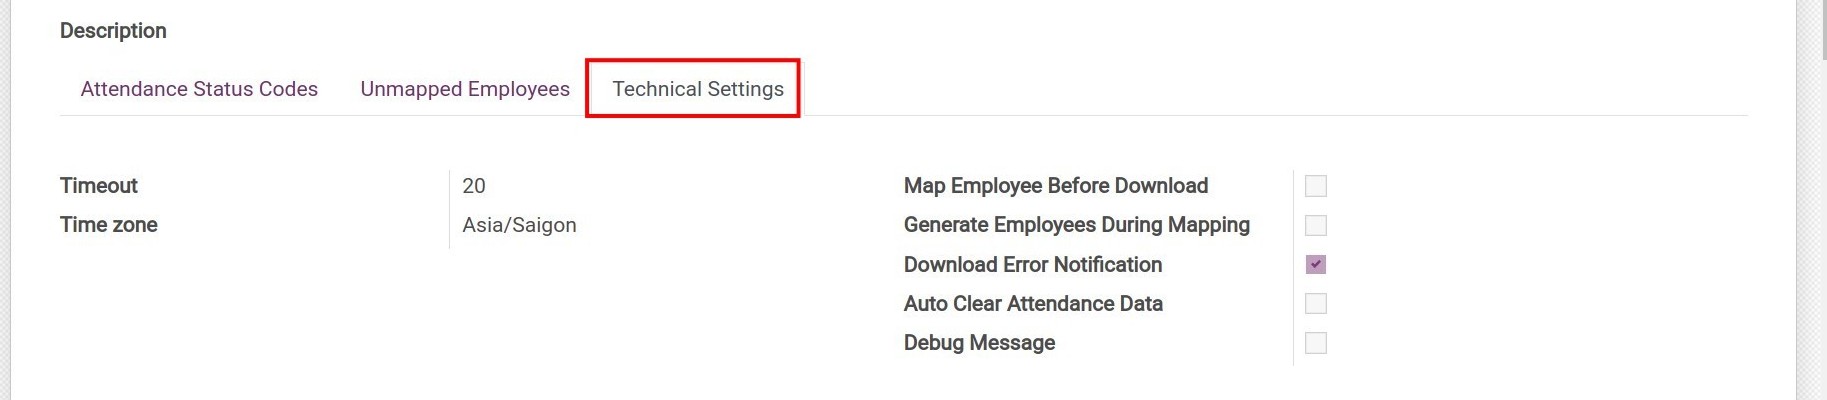
- Timeout: the maximum time to connect with the attendance device. Unit: seconds;
- Timezone: the device’s timezone, the date and time in the attendance report will be update based on this timezone. The system will update the timezone base on the value set on the timezone of the attendance device creator.
- Map Employee Before Download: If checked, the system will map the users of the attendance device with the employees of the system (if available) before downloading data.
- Generate Employee During Mapping: If checked, the system will auto-create new employees for the attendance device users that don’t match employee data of the system, and then map them together.
- Download Error Notification: If checked,the system will send a notification when there is an error during download, to help the manager quickly find the error and fix them.
- Auto Clear Attendance Data: If checked, the system will automatically clear the attendance data on the device after synchronization with Odoo system to avoid full data.
- Debug Message: send notifications in the Open Chatter when there is an error, to help with the debug process.
Upload employees list to the attendance machine
To reduce the workload when importing data into the attendance machine, you can upload the employee list to the attendance device.
Devices Information statuses and buttons
Device status
After filling in all the information and save, the status of the device is Draft.
Before bringing the attendance device into use, navigate to Attendance > Attendance Machines > Machines Manager, select the device and then press Confirmed on the Devices Informations view.
If the device is no longer in use, navigate to Attendance > Attendance Machines > Machines Manager, select the device and press Cancelled on the Devices Informations view. The status will change to Cancelled.

Use active buttons on the Devices Information view
On the Devices Information view, you can see the following buttons:
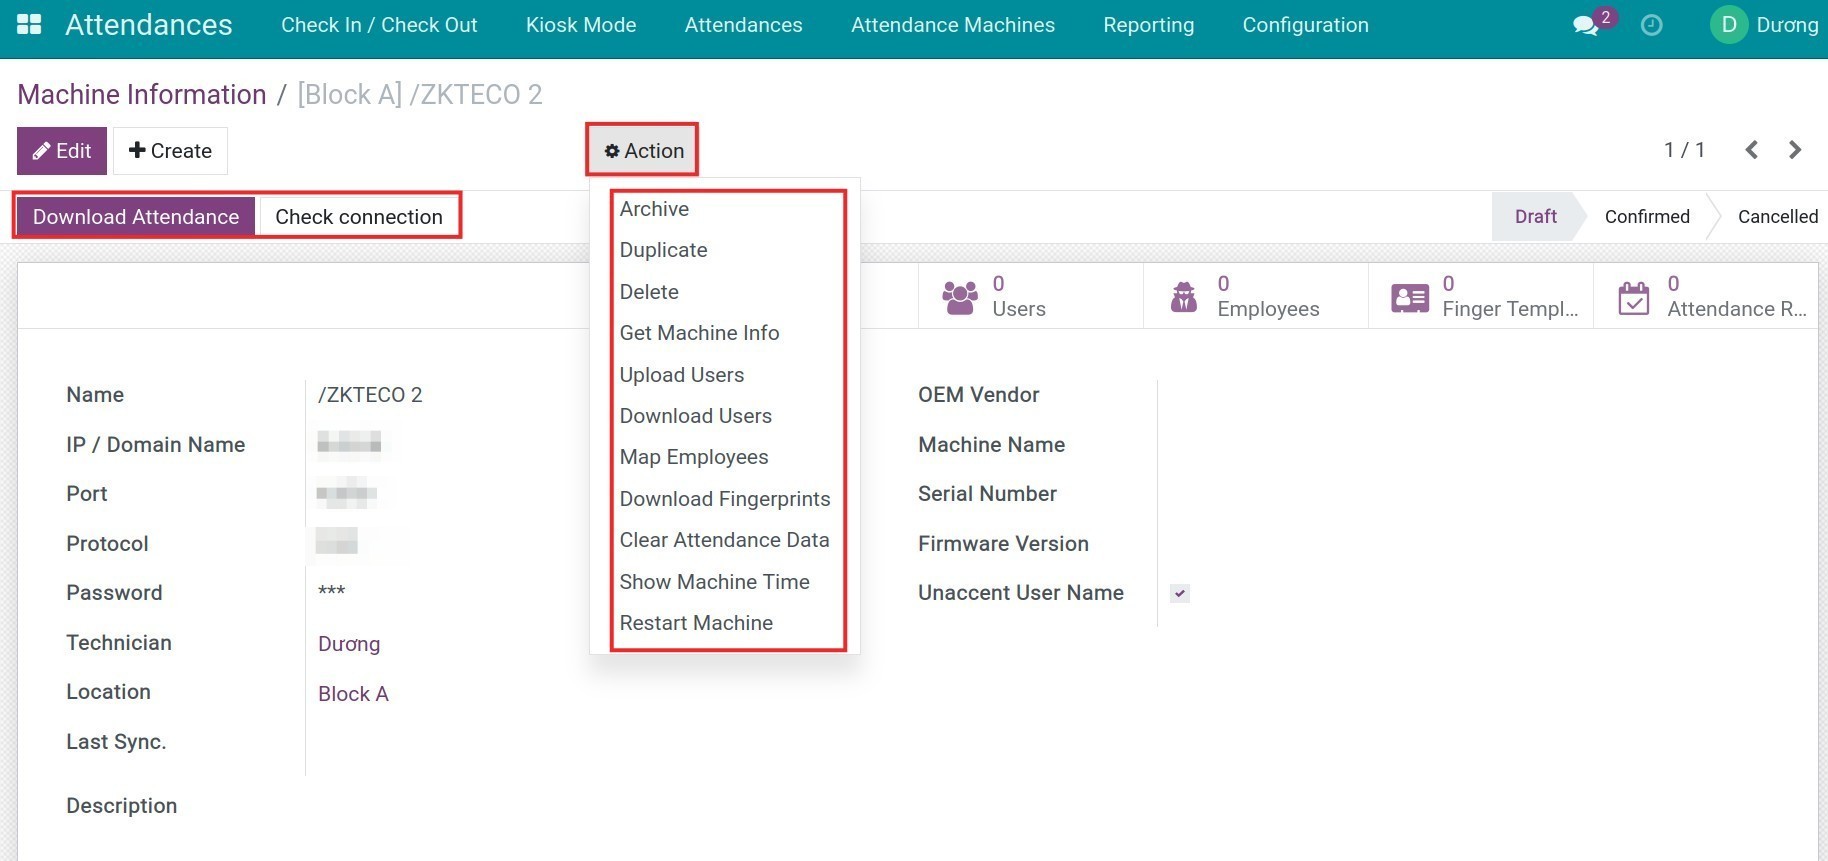
You can press on the buttons to perform the following actions:
- Check connection: check the connection with the attendance device.
- Get Machine Info: Connect with the device and automatically update the information into the system: OEM Vendor, Device name, etc.
- Download Attendace: Download attendance data from the device to Odoo system.
- Download Users: Download the users list that is set on the attendance device.
- Upload Users: Upload the employees list to the attendance device.
- Map Employees: Map the employees with users set on the attendance device.
- Download Fingersprints: Download the employee fingers template from the Attendance device.
- Clear Attendance Data: Clear all the data from the attendance device.
- Restart Machine: Restart the attendance device.
- Show Machine Time: Show the attendance device real time. The time set in the attendance device can be more/less or equal to the time set in the Odoo system (Activate debug mode to view this feature).
See also
Related article
- Manage attendance data
Optional module
- HR Attendance Validation
- Payroll Attendance
Link Attendance device users with employees in Odoo system
Link Attendance device users with employees in Odoo system
When using Odoo Attendance app, you can create and map attendance device users with employees in the Odoo instance to manage the check-in/check-out process and attendance data..
Requirements
This tutorial requires the installation of the following applications/modules:
- Attendances
Upload the employee list to the attendance device
First, enter the Employee app and change to the List view.
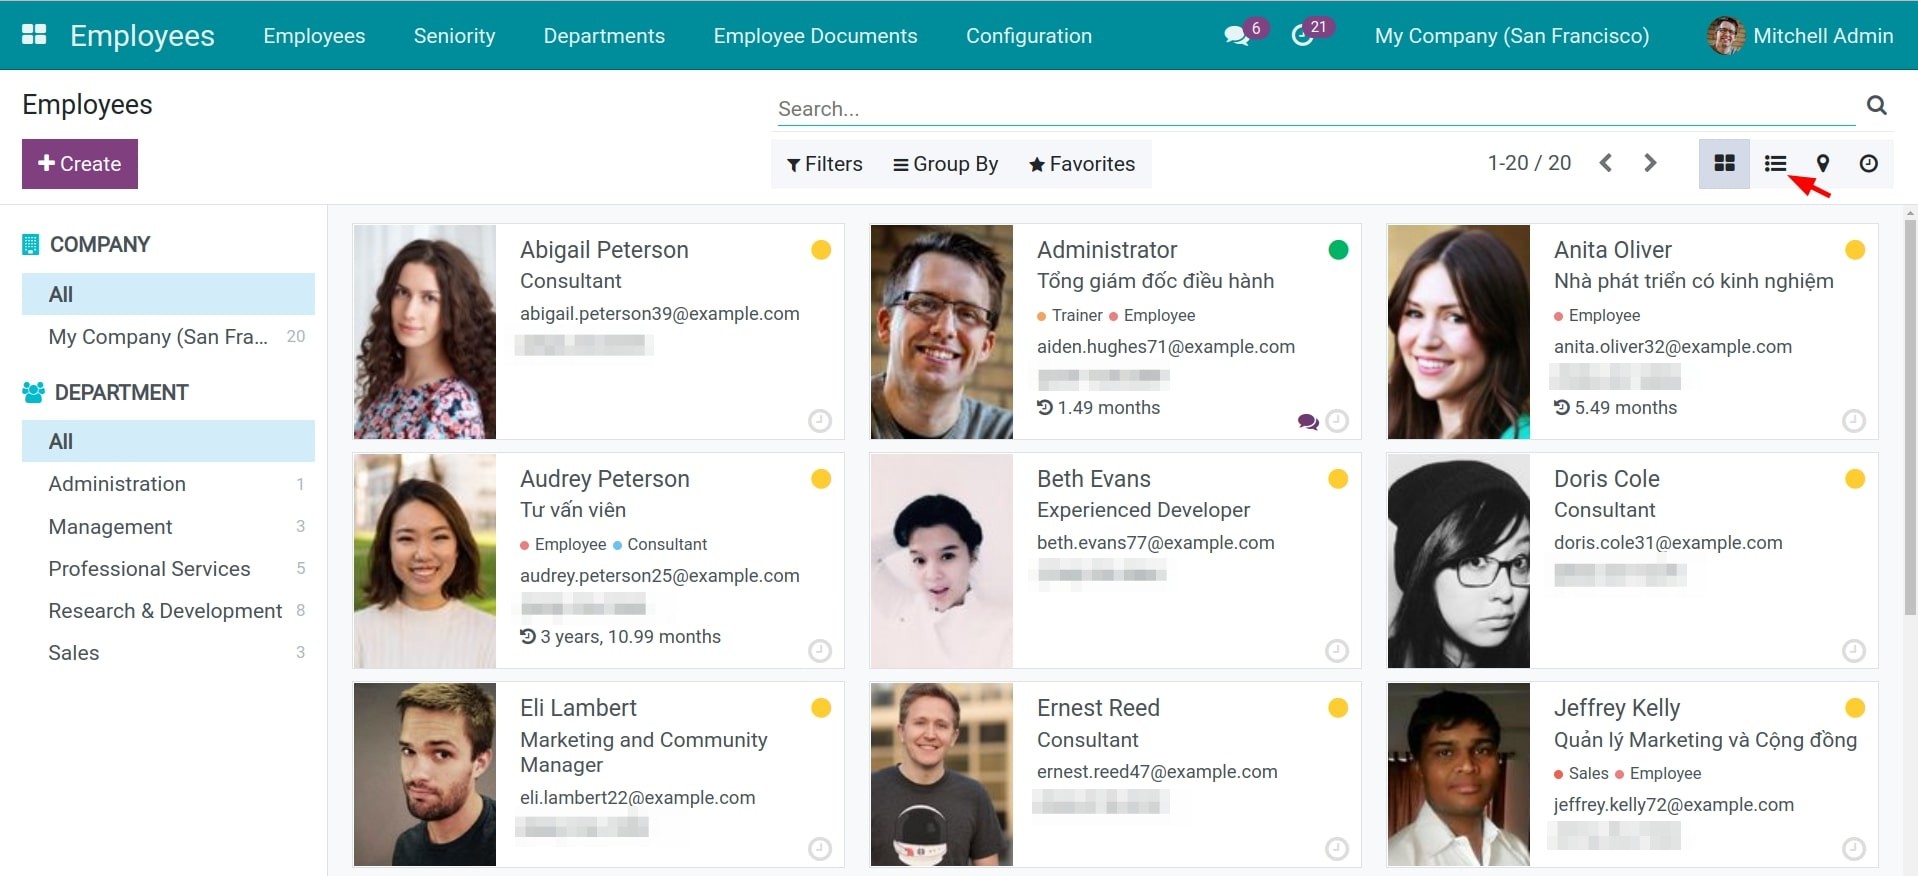
If the employee number exceeds 80, you need to adjust the displayed number to the max employee number. Then select the top box to select the whole list.
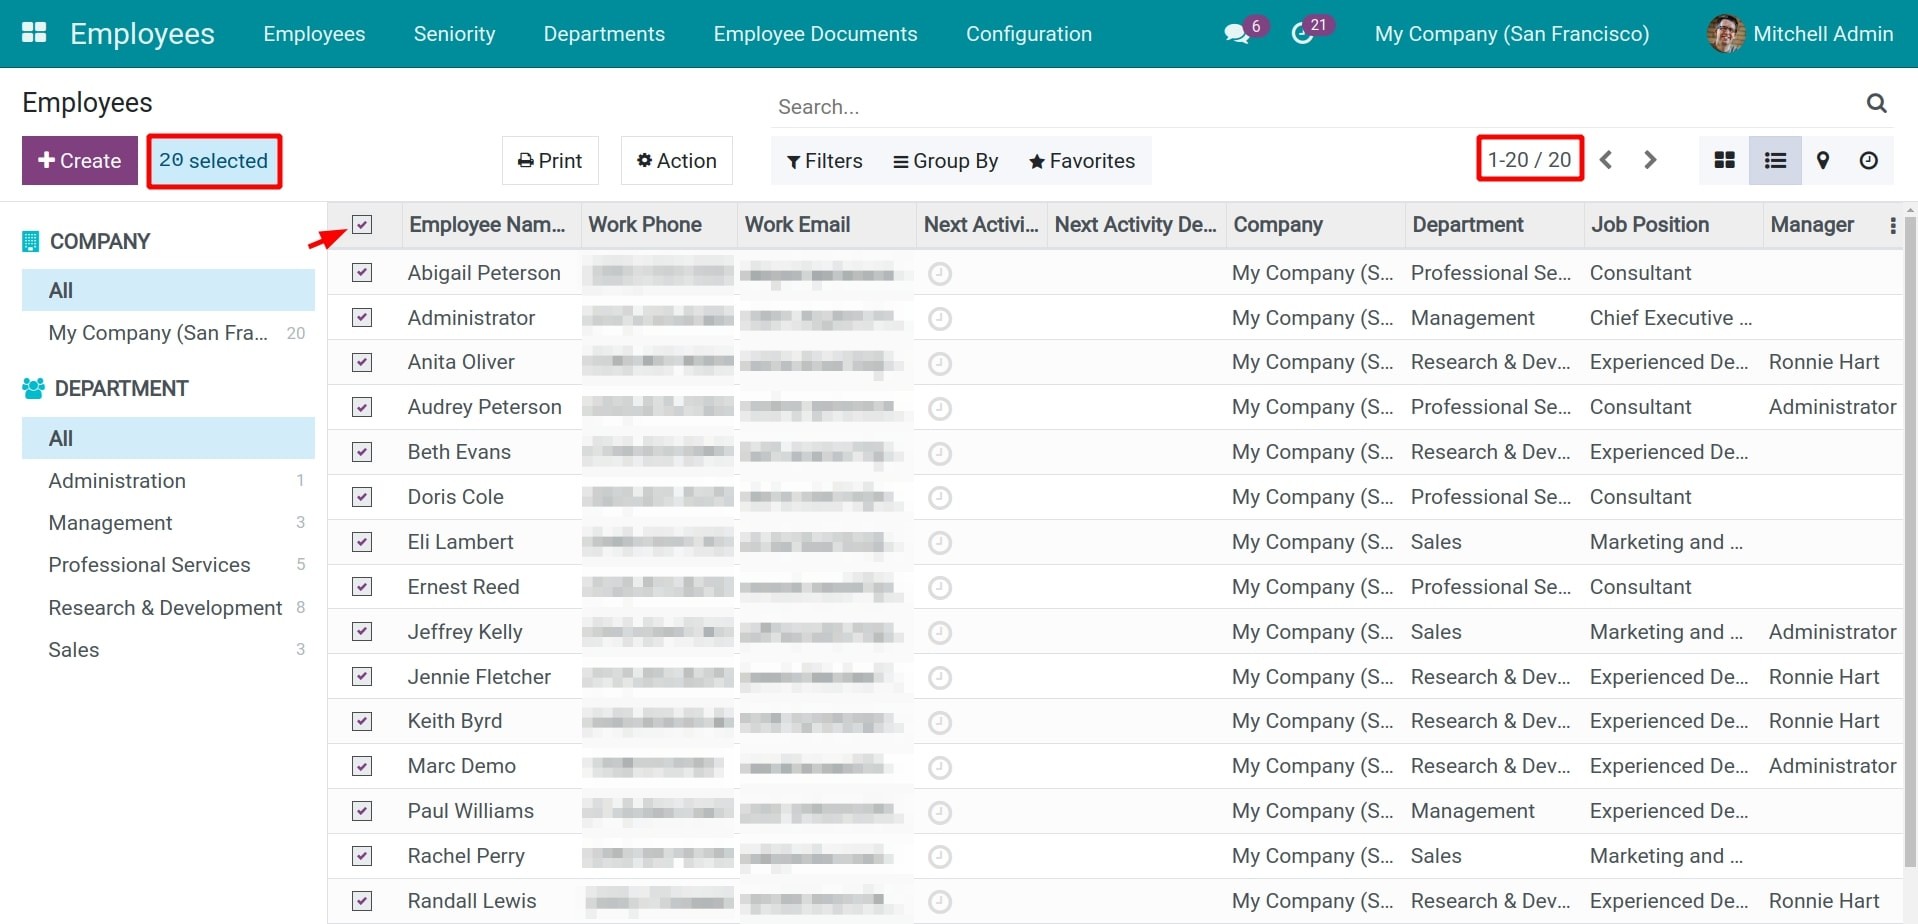
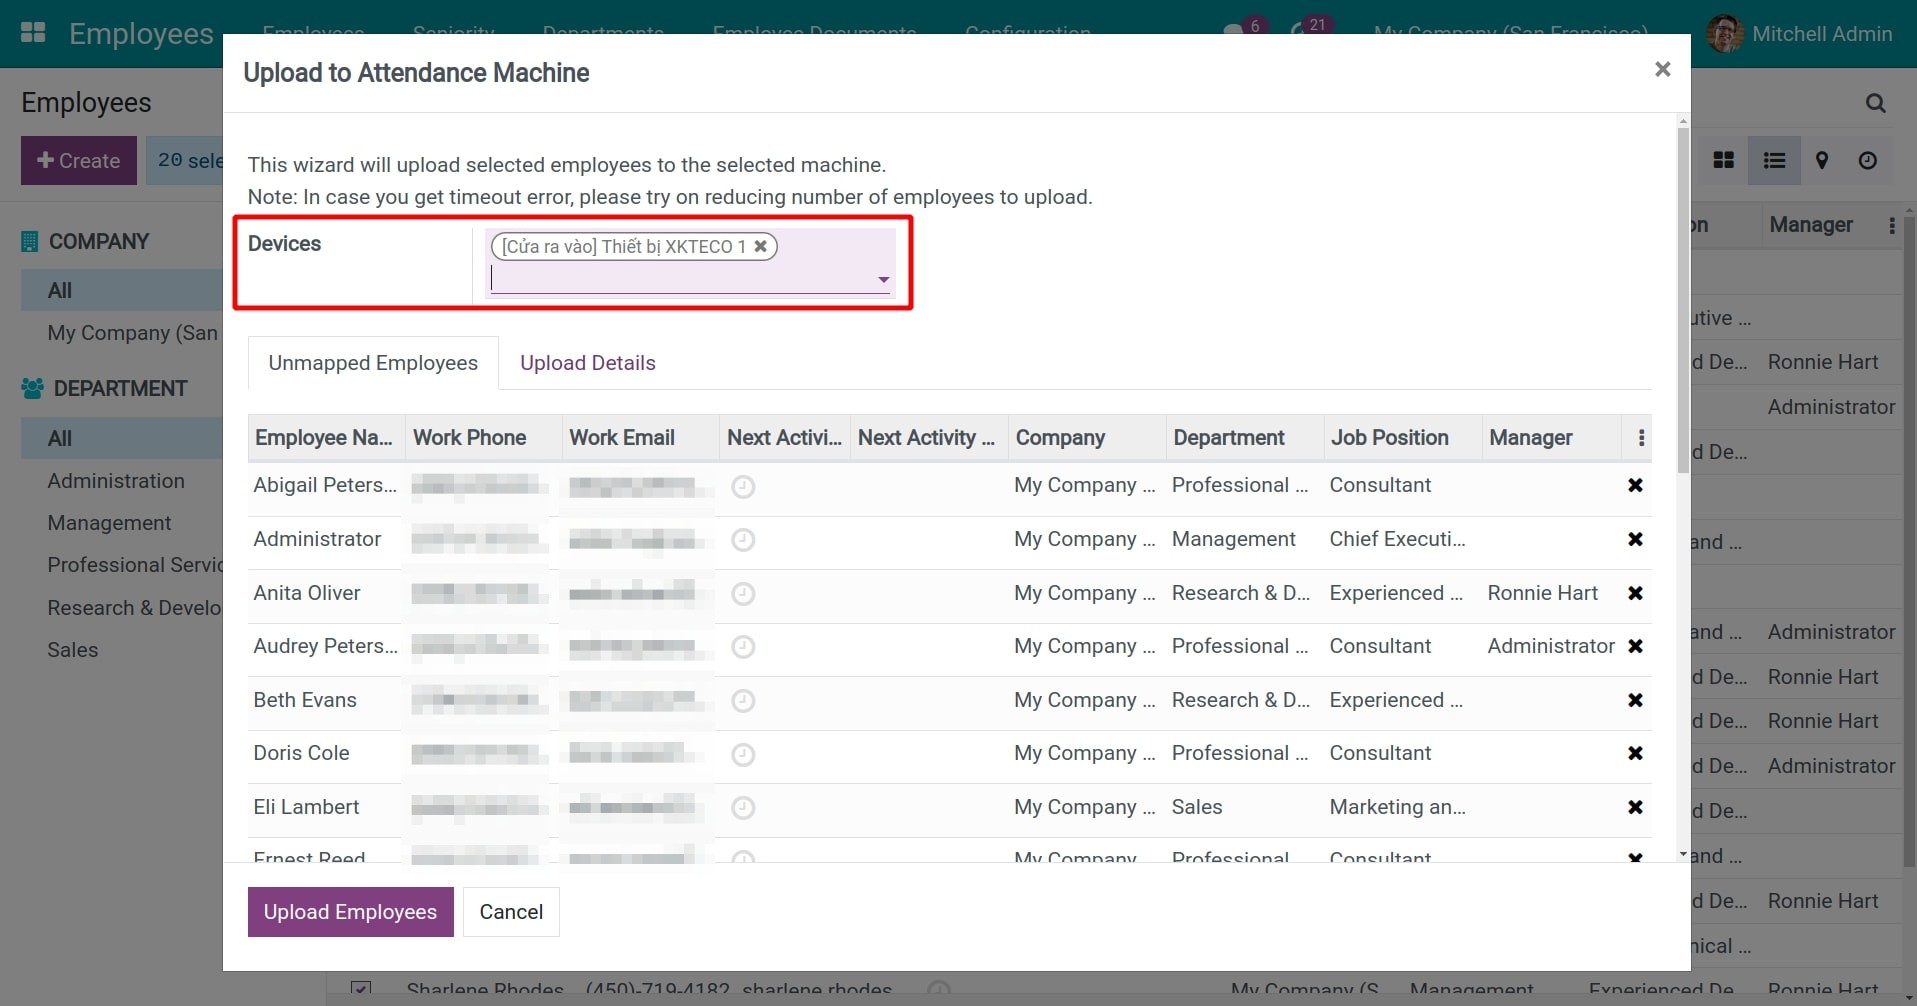
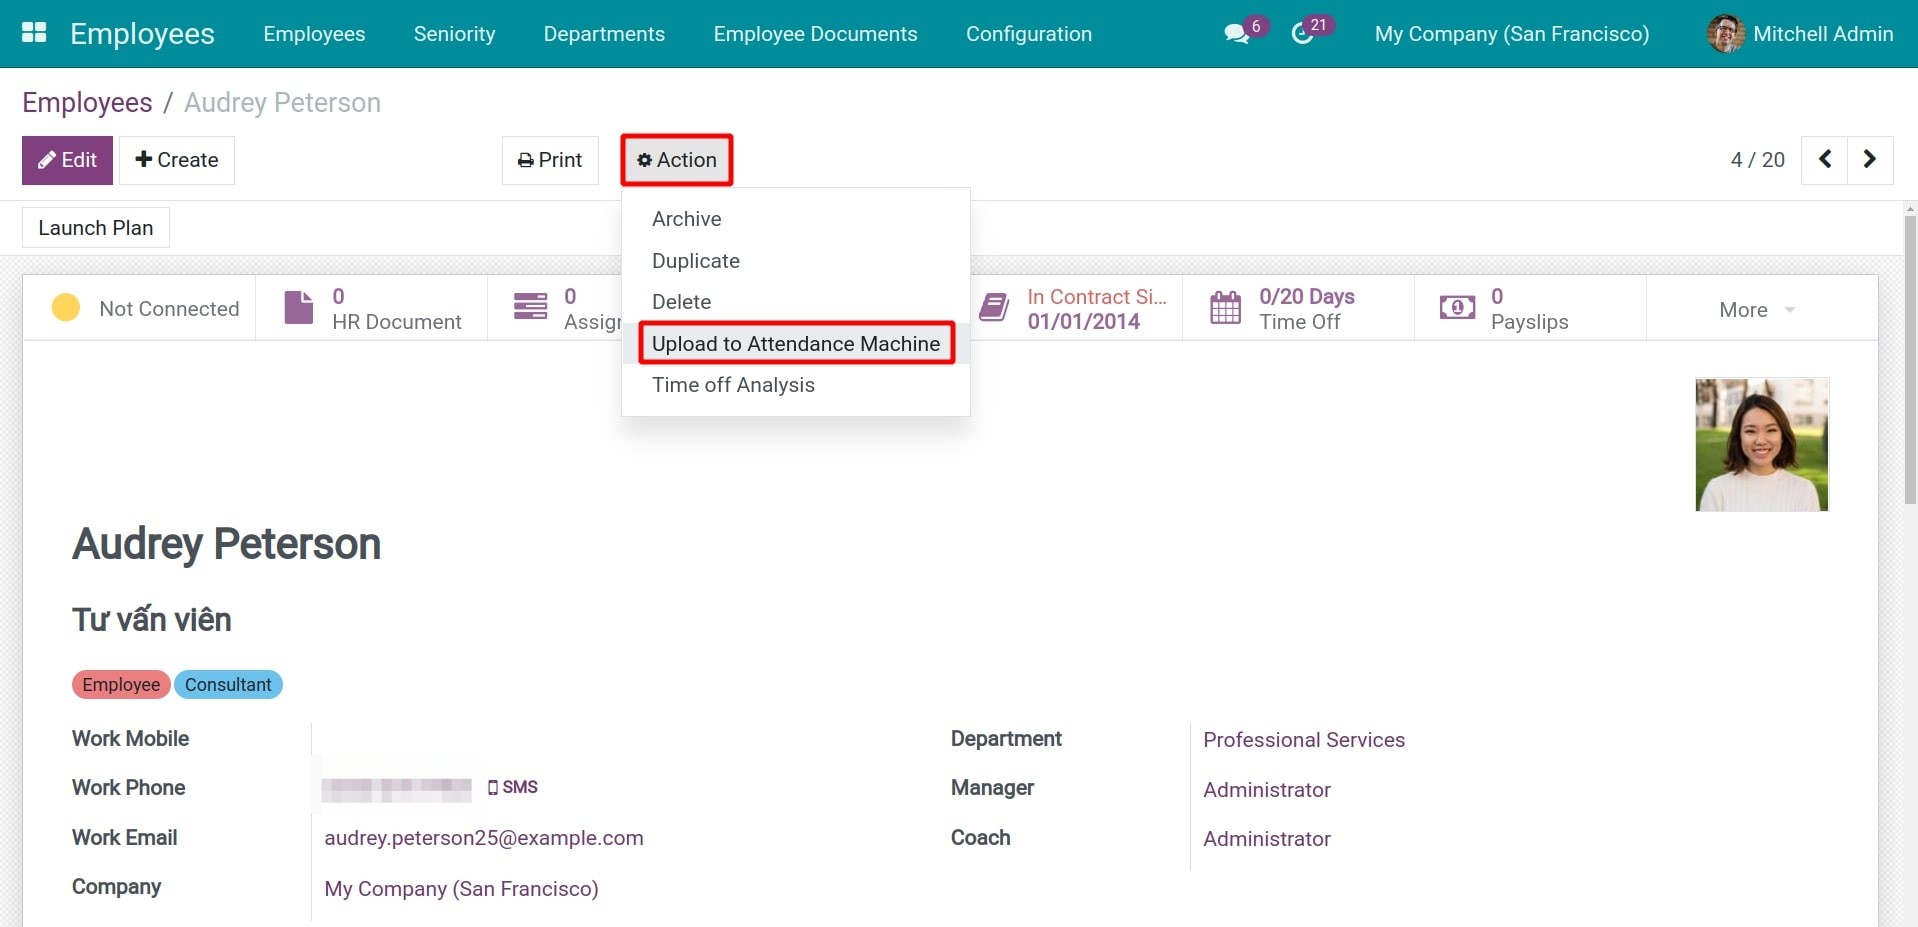
Press Action > Upload to Attendance Machine.
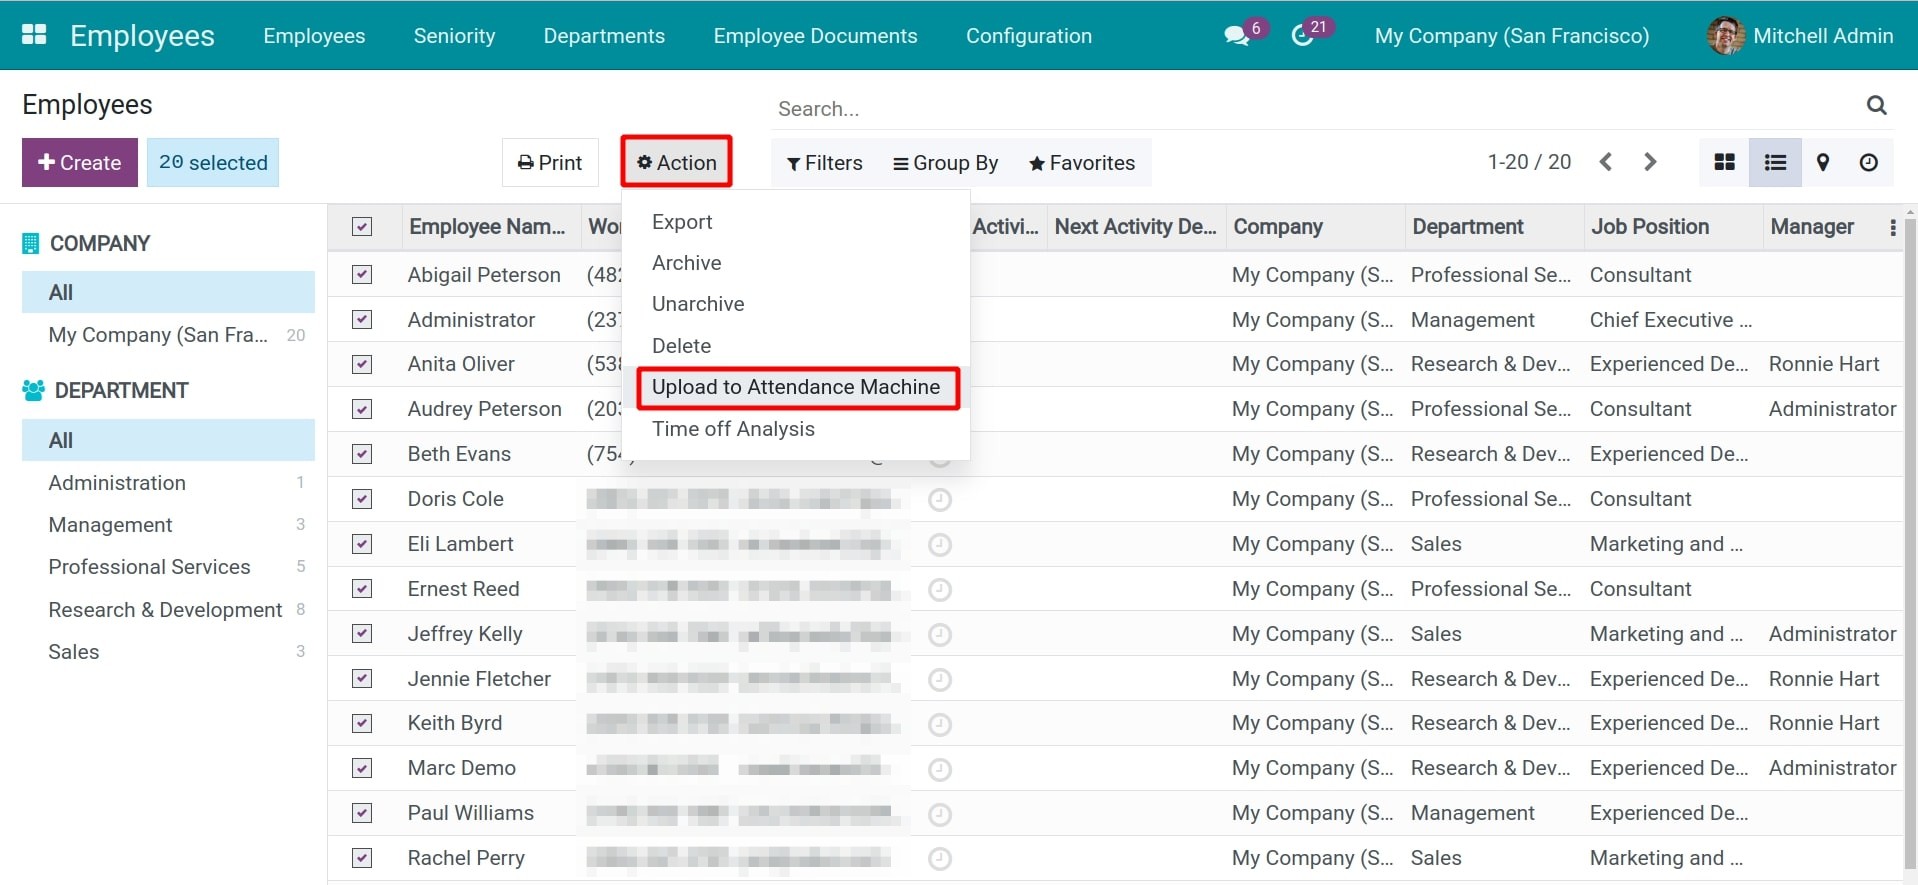
Select the Devices you want to upload the employee list to, carefully check the list before upload, then press Upload Employee.
Register recognition for employees
After uploading the employee list, users will be auto-created on the attendance device based on the employee list you uploaded. Now, you can access Users > User list on the attendance device and then registing recognition for the employees using fingerprint, facial recognition, cards, etc. depending on the device that you are using.
Tip
- If your company has many employees with the same name (e.g. you have 2 employees named Alex Wich), you should separate the process for these employees as the following steps:
- Upload the first Alex Wich to the attendance device (recognize him using the information on the employee profile, e.g. department, date of birth, etc.).
- Registering recognition for him (fingerprint, facial, card, etc.). After successfully registering, the Employee list will display Alex Wich with the fingerprint icon next to his name.
- Repeat the steps for the remaining Alex Wich. On the registering recognition step, select the employee that doesn’t have the fingerprint icon next to him.
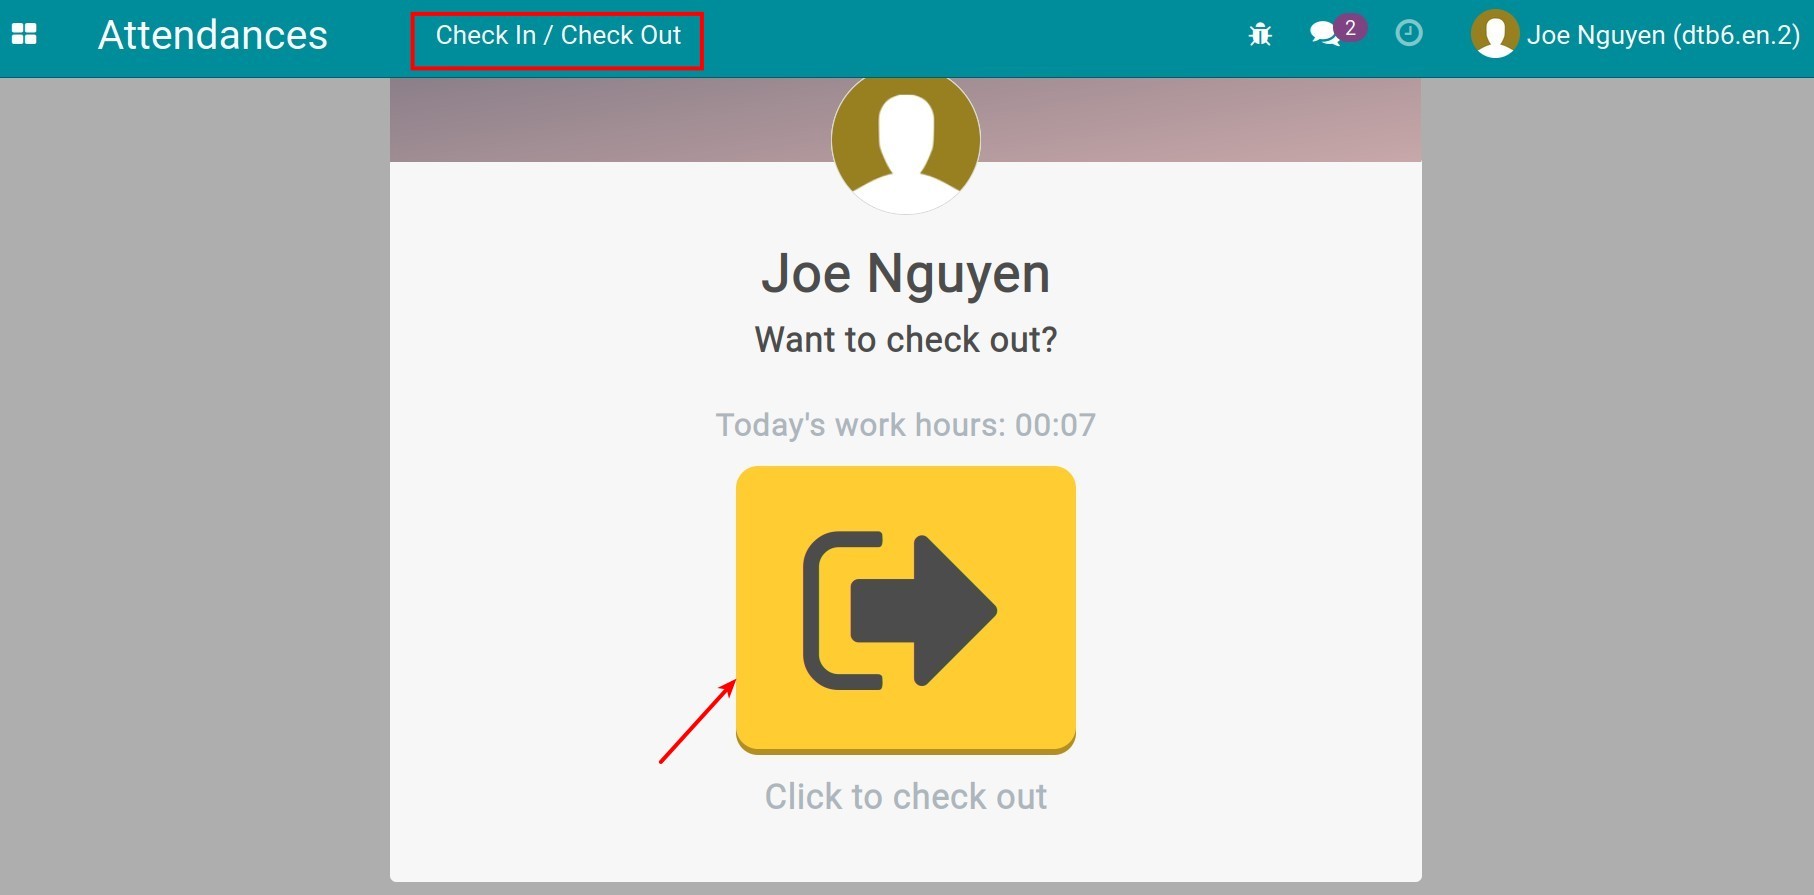
- When this user check-in or check-out, the software will recognize the right employee.
Link the attendance device users with the employee in the Odoo system
To use the check-in/check-out feature as well as manage the employee’s attendance data, you need to make sure that the attendance device is mapped with the employees in the Odoo system.
It might occur a situation where the employee number doesn’t match the attendance device user number. This issue will occur when:
- The employee hasn’t been registering on the attendance device. In this case, you need to find the corresponding employee profile, upload the employee to the attendance device, and then register recognition for this user.
- The employee is already registered for recognition but the system hasn’t mapped the data yet: the user name on the device isn’t mapped to the employee’s name, the employee has been created on the device but hasn’t been mapped, etc. Follow the steps below to map the user of the attendance device with the employee on the Odoo system:
- Navigate to Attendances > Attendance Machines > Machines Manager, select the device you want to check and then select the Unmapped Employees tab.
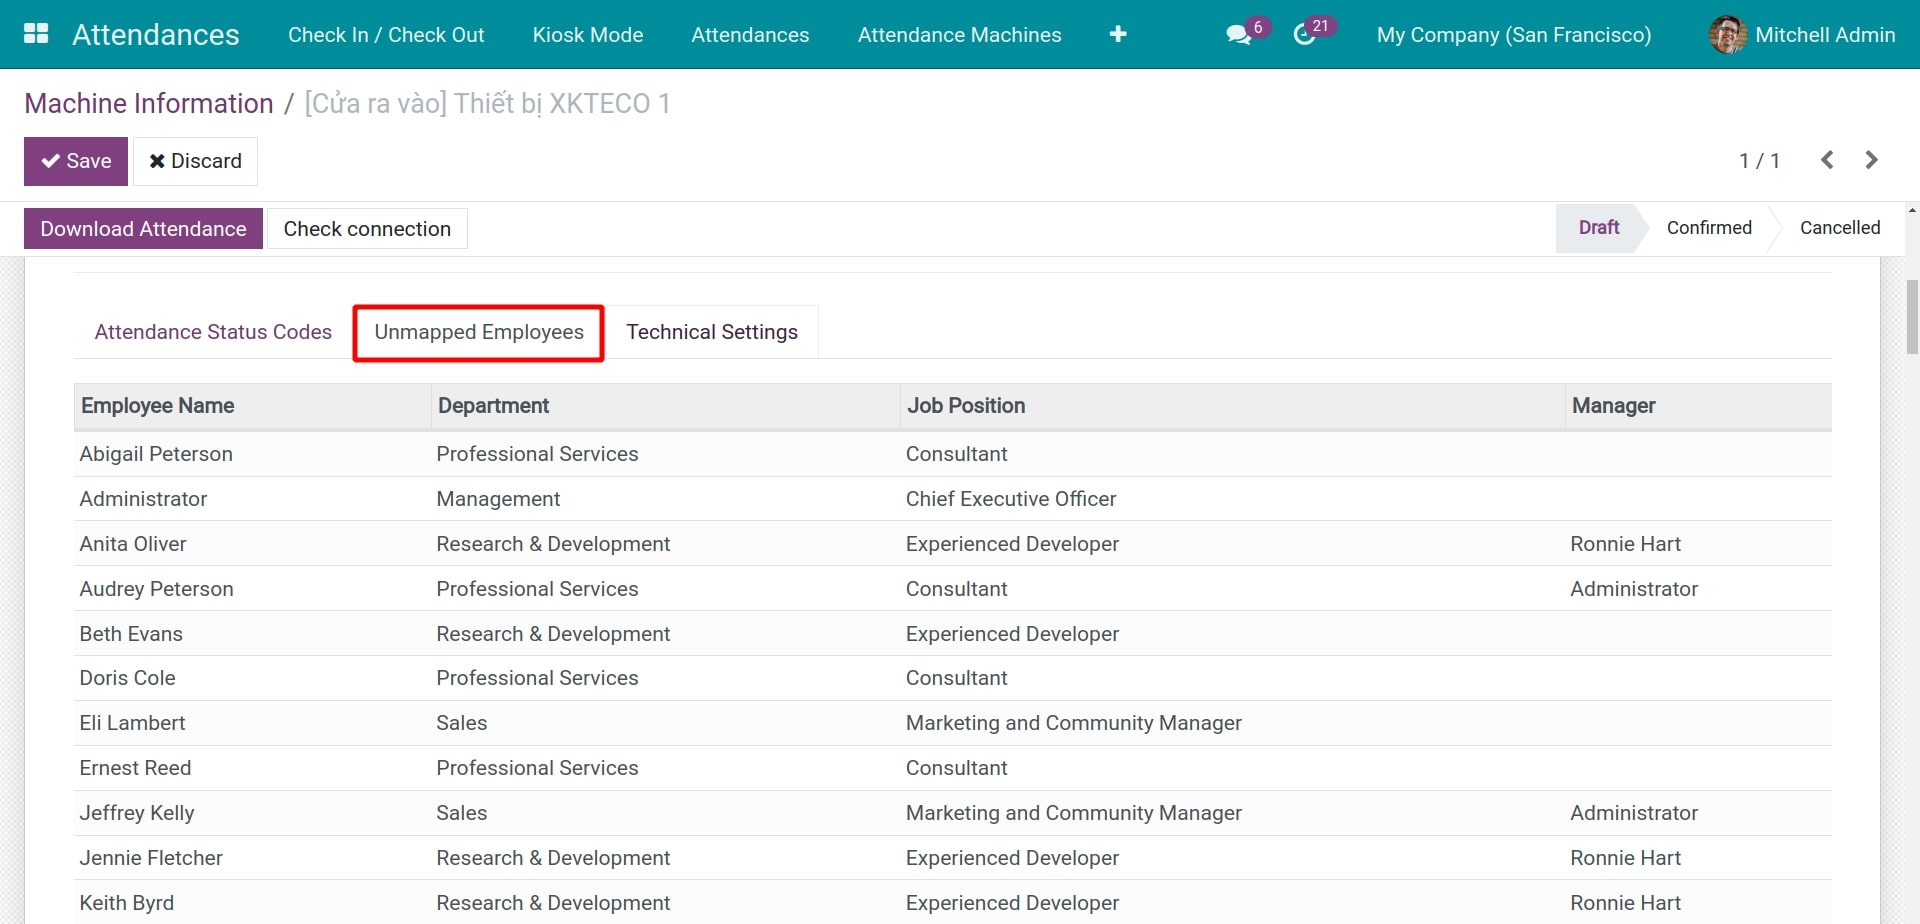
- Choose Action > Map Employees and the system will map the device users and the system’s employees that have the same name together (regardless of uppercase/lowercase).
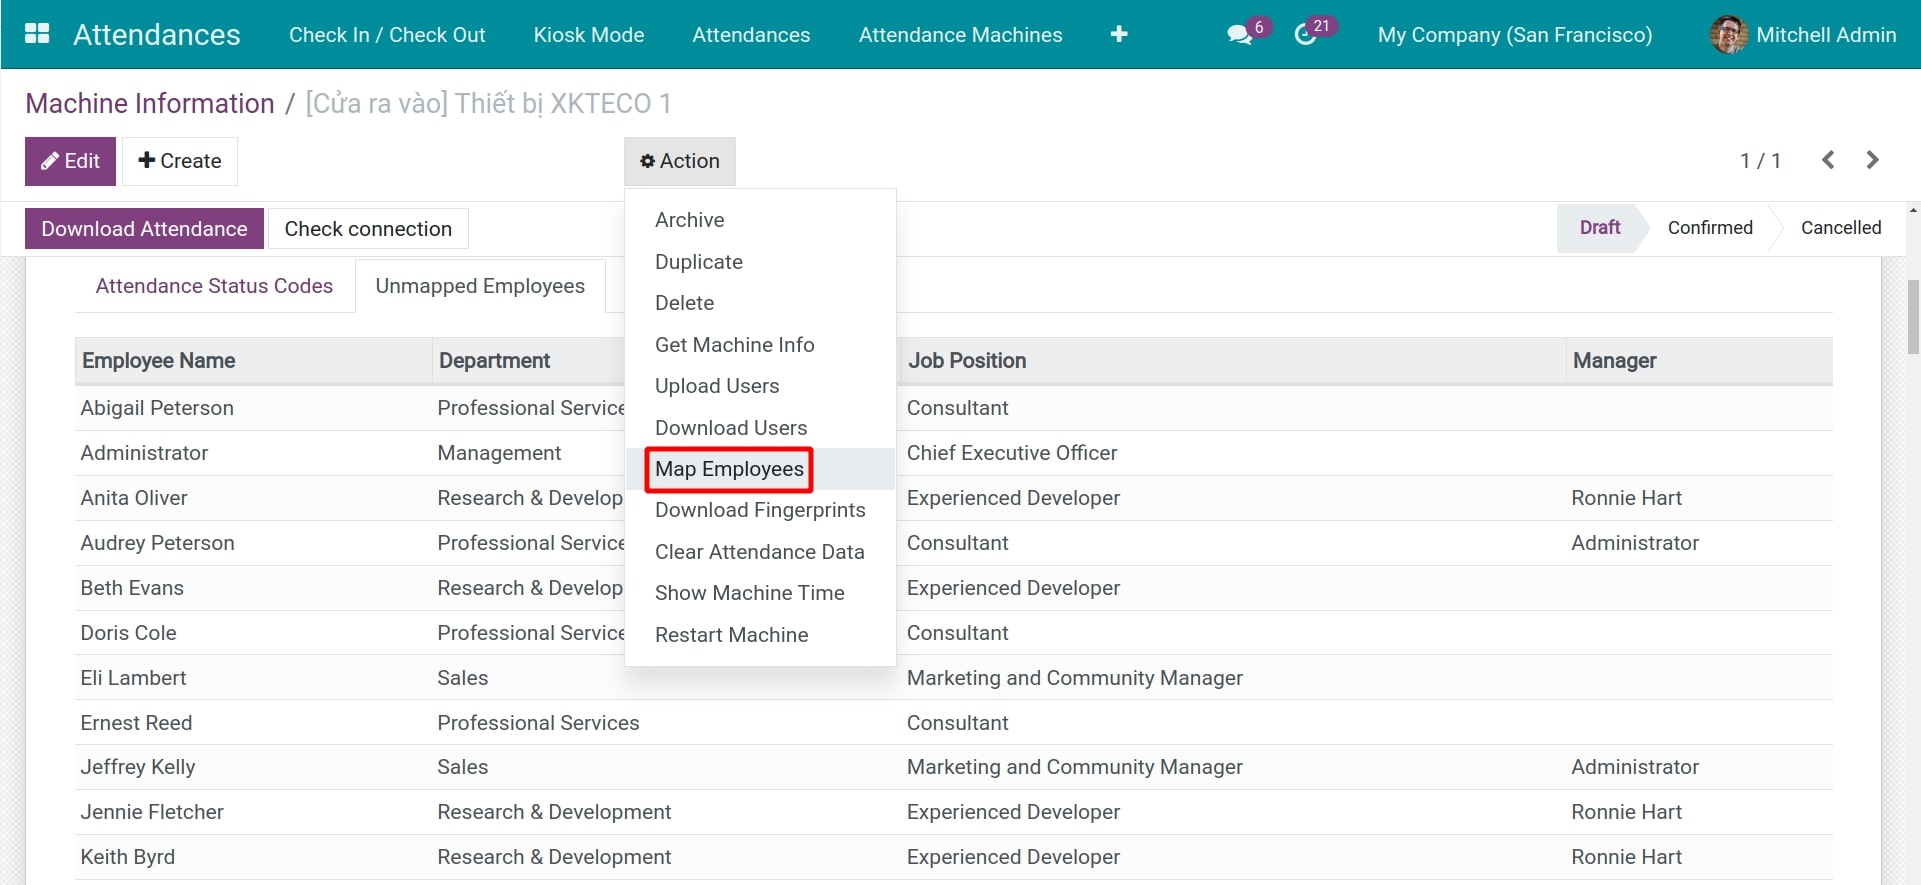
- Check the result by viewing the unmapped employees on the Unmapped Employee tab:
- If this list is empty: all the employee has been mapped.
- If it is not empty: you need to change the attendance user’s name with the steps below.
Manage unmapped employees
Enter the attendance device, on the User list, find the user you need, and then fix his/her name so that it matches his/her name on the Odoo system.
On the Odoo system, navigate to Attendances > Attendance Machines > Machines Manager, select the device, and choose Action > Map Employees.
See also
Related article
- Attendance Analysis Reports
Optional module
- Biometric Attendance Device
- Payroll Attendance
Manage attendance data
Manage attendance data
This document shows you how to manage attendance data recorded from attendance devices and manage valid attendance data in with Odoo Attendance software.
Requirements
This tutorial requires the installation of the following applications/modules:
- Attendances
- Employees
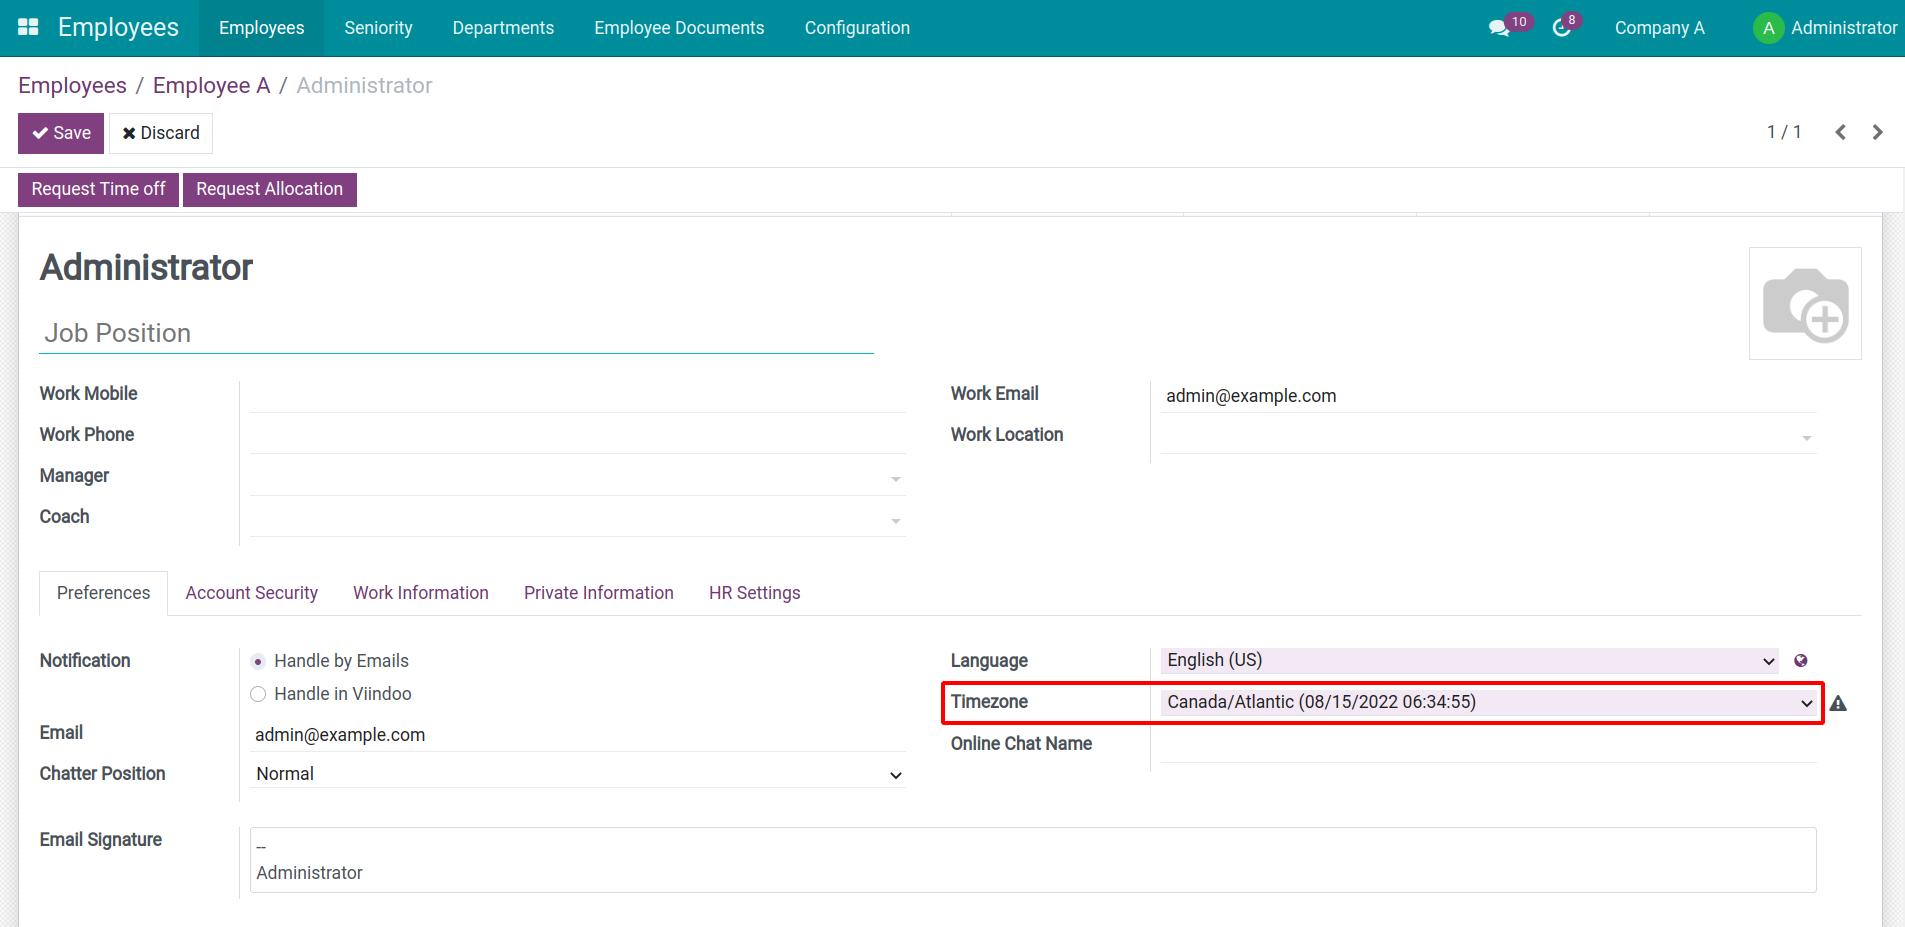
Manage the employee Working Hours and Timezone
Attendance data will be calculated based on the Working Hours and the Timezone applicable to the employee. So first, you need to make sure the following information:
- Setting up a Working Hours and Timezone for employees in accordance with reality in Work information tab on Employee information form.
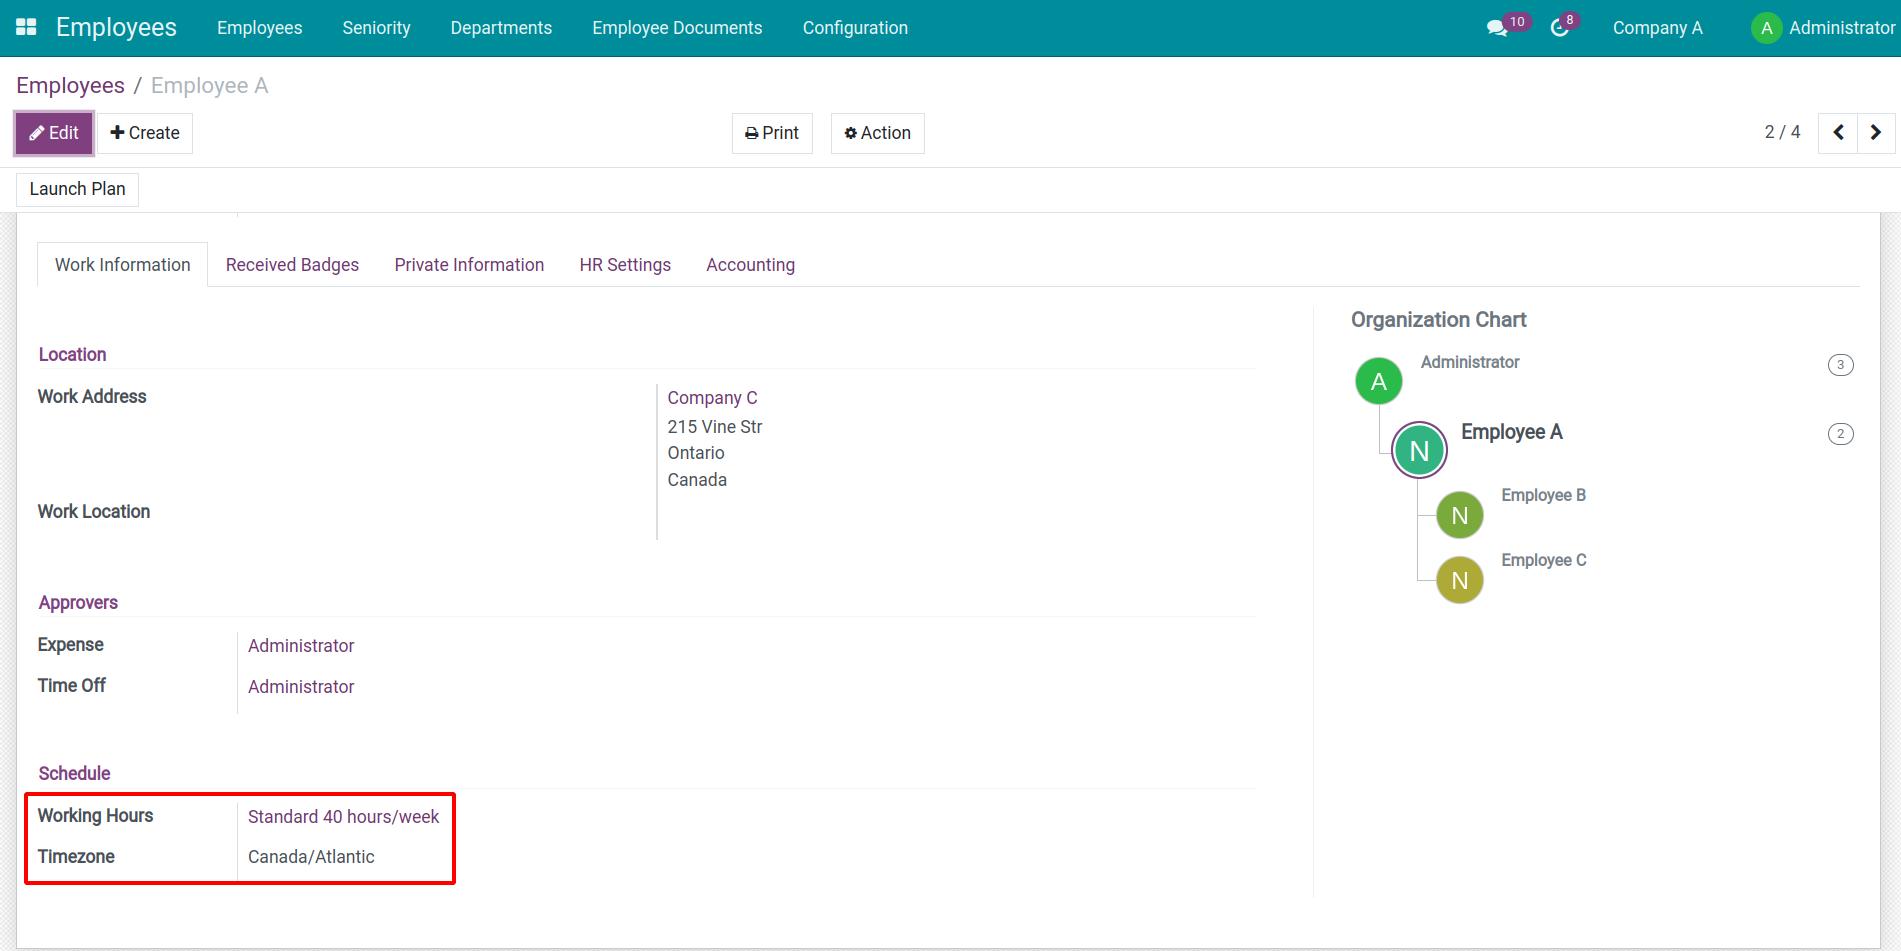
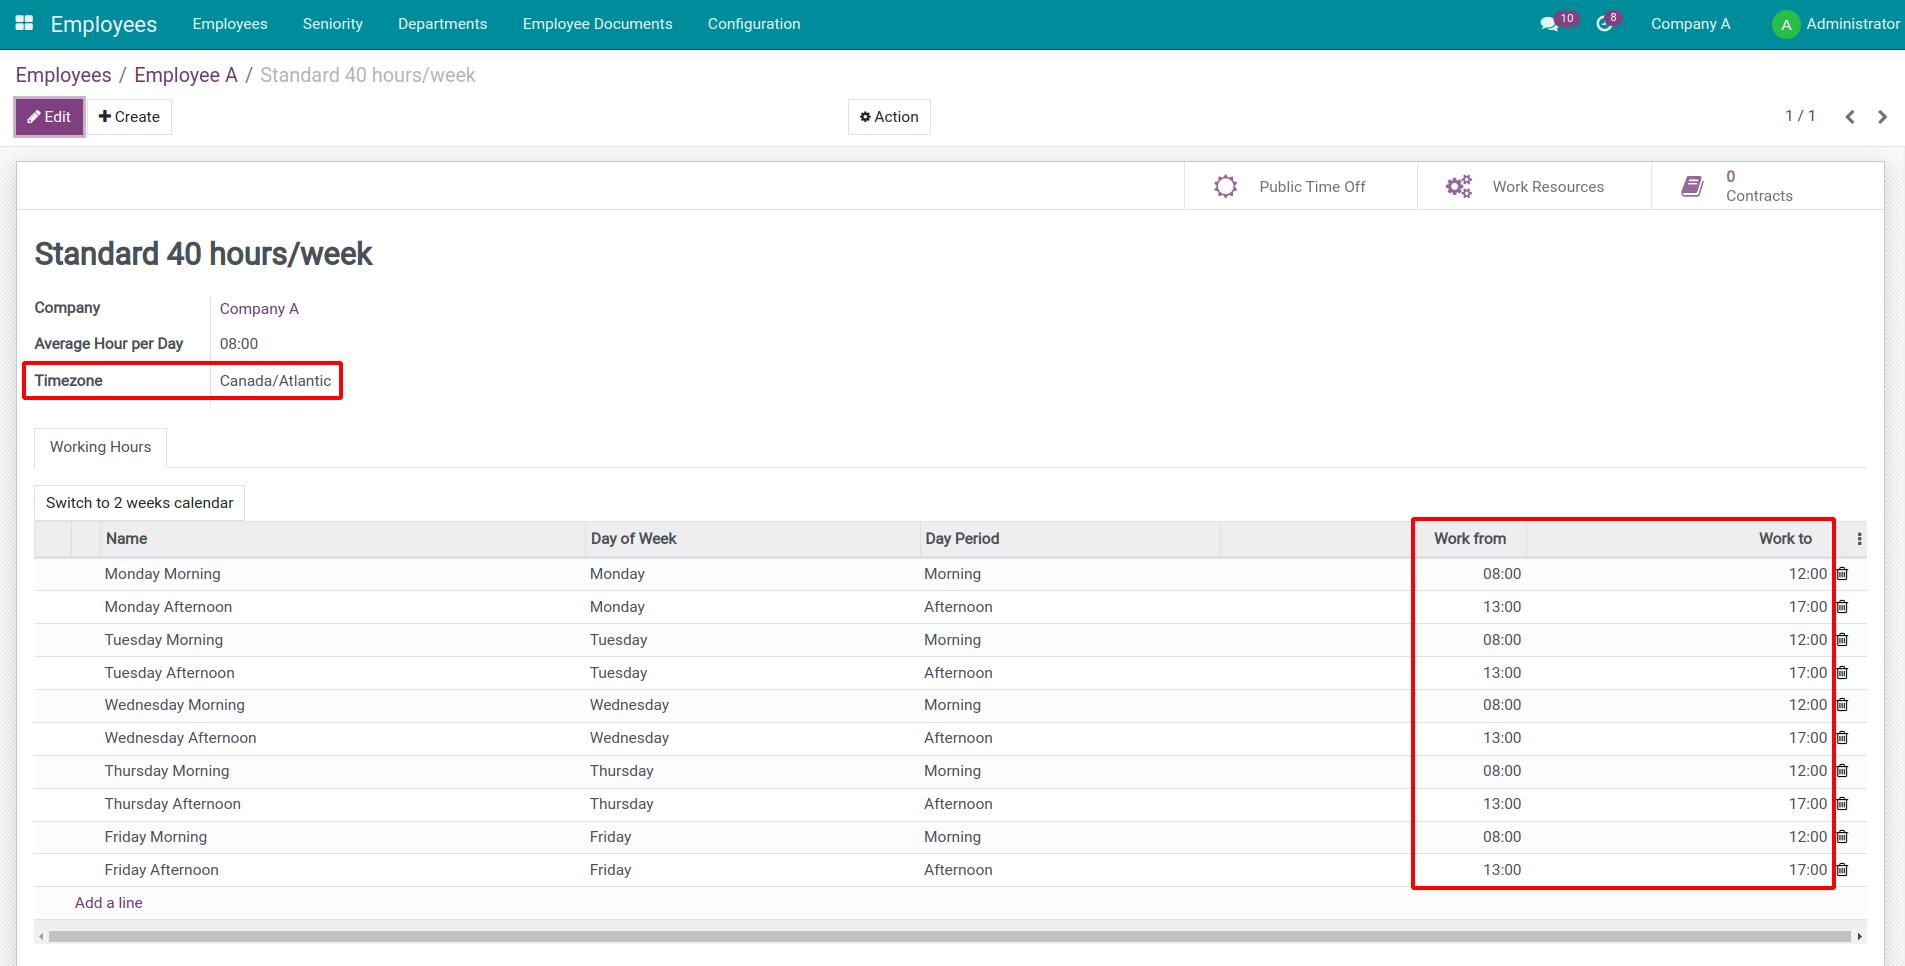
- Employees use the timezone set up above to check in/check out.
Follow and manage attendance data recorded from attendance device
If your company has the integrated biometric attendance devices and you are authorized as Administrator on the module Attendance, you can view and manage the attendance data recorded by the attendance devices.
You access to the module Attendances > Attendance Machines > Attendance Data. Attendance data of employees will be recorded here.

- Timestamp: date and time of employee’s attendance.
- Machine User: the user account, set up on the attendance devices.
- Machine Attendance State: code number shows the activity of Check-in or Check-out, Overtime or Normal Attendance on the employee’s attendance device. This code number is set based on Attendance Devices > Attendance Status.

- Software Attendance State: the attendance status on the software, interpreted from the attendance status above. This field is to match the attendance status on the attendance device with the attendance status on the software. For example with attendance Status is 0, the software will automatically fill in as [Normal Attendance] Check In.
- Employee: the name of employees on the software corresponding to the device user.
- HR Attendance: employee’s attendance data on the software after being matched with the attendance data on the attendance device.
- Attendance Machine: employee on any attendance device.
Follow and manage valid attendance data
Valid attendance data is data which is automatically calculated by the software to produce valid results, based on the above attendance data on the attendance device. For example: an employee can clock in multiple times, the software automatically records the first check-in and check-out. Then based on the working hours set up for the employee, the software calculates the number of Late Coming Hours, Early Leave Hours, Valid Attendance Hours,… This data will be used for HR management, payroll for employees.
Users with the authorized Attendance group of Administrators and over can view, create and edit valid attendance data. You access the module Attendances > Attendances.
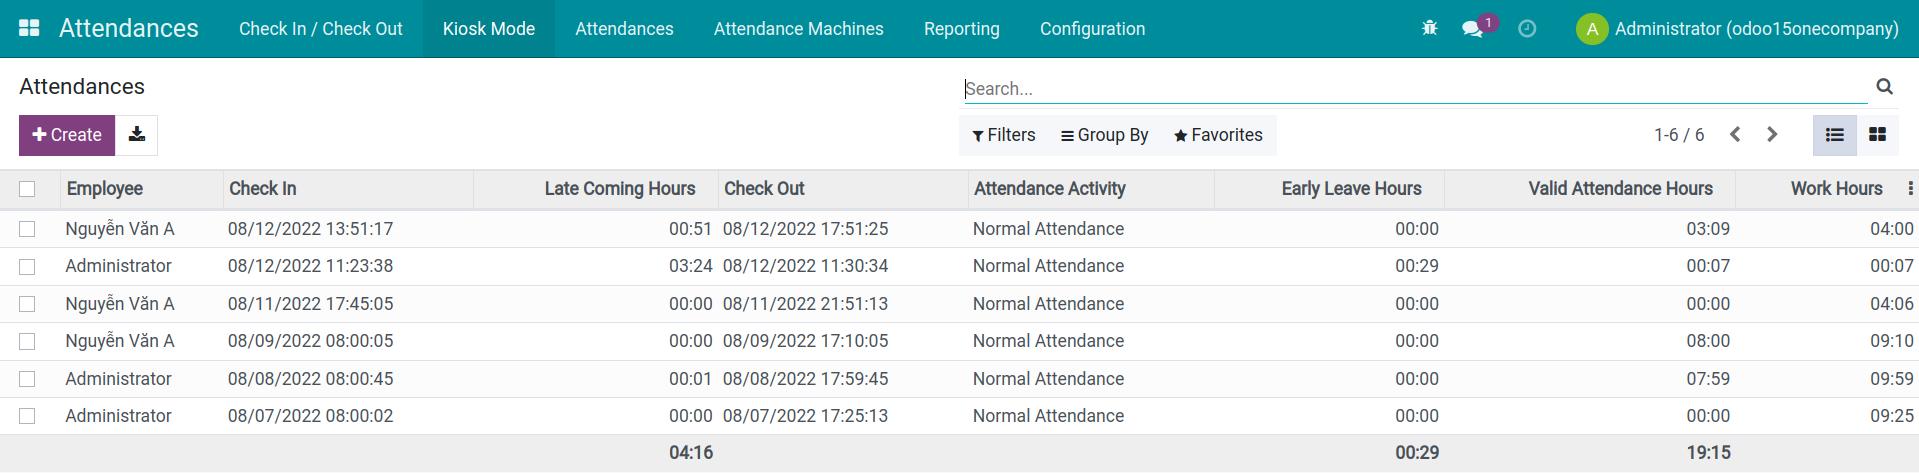
Information on data columns:
- Employee: This record belongs to which employee.
- Check In, Check Out: valid date and time employee check in, check out.
- Late Coming Hours: the number of hours employees check in later compared to regulations. Late Coming Hours = Actual Check In - Working Hours set up on Schedule (the “Work from” field on Working Hours).
- Early Leave Hours: the number of hours employees leave earlier than compared to regulations. Early Leave Hours = Working Hours set up on Schedule (the “Work to” field on Working Hours) - Actual Check Out.
- Attendance Activity: select the attendance activity type from the list of configured attendance activity based on your company’s criteria.
- Valid Attendance Hours: the actual number of hours the employee is present that matches with Working Hours. If an employee checks in/check out later/earlier than Working Hours, the system will not be counted here. Valid Attendance Hours = Check Out set up on Working Hours - Check In set up on Working Hours - Late Coming Hours - Early Leave Hours.
- Work Hours: actual working hours of employees. Work Hours = Check out - Check in.
See also
Related article
- Attendance Analysis Reports
Optional module
- Biometric Attendance Device
- Payroll Attendance
Check-in/check-out management based on shift planning
Check-in/check-out management based on shift planning
1. Objective
This system allows for automatic classification of attendance records based on three main criteria:
- Criteria 1: Employee shift planning boolean
- Criteria 2: Timestamp gap
- Criteria 3: Attendance tolerances (lateness and early leave)
2. Key Features
- Shift-Based Attendance (Boolean-Driven): Depending on the employee's shift planning boolean, the attendance record will be classified accordingly.
- Duplicate Record Handling: Any potential duplicate attendance records will be automatically ignored based on the timestamp gap criteria.
- Attendance Tolerances: Configurable tolerances for both lateness and early leave to manage attendance behavior.
3. System Configuration
A. Criteria 1: Employee Shift Planning Boolean
- When Shift Planning Boolean is not set:

- The first attendance record of the day is classified as Check-in.
- The next attendance record within the same day is classified as Check-out.
- The day ends at 23:59 (System Check-out).
- After a closed attendance day, the next record will always be classified as Check-in.
- Employee checks in at 8:00 AM and checks out at 5:00 PM within the same day.
- The system will mark 5:00 PM as the employee's check-out and classify the next record the following day as a check-in.
- When Shift Planning Boolean is set:

- The first attendance record is classified as Check-in.
- The next attendance record, even if it occurs the next day, will be classified as Check-out.
- The attendance day ends after a configurable period (for example, 10 hours).
- After the closed attendance day, the next record is classified as Check-in.
- Employee checks in at 9:00 PM and checks out at 7:00 AM the following day (after 10 hours).
- The system will classify 7:00 AM as a check-out and the next record as a check-in.
B. Criteria 2: Timestamp Gap
- In case the attendance machine does not prevent duplicate attendance records, Odoo will use a configurable timestamp gap to ignore duplicate records.
- If any record falls within the defined gap period, the system will automatically ignore it.
Example Scenario:- If two records are recorded at 8:00 AM and 8:05 AM, and the timestamp gap is configured for 15 minutes, Odoo will ignore the second record at 8:05 AM.
C. Criteria 3: Attendance Tolerances
- Attendance Lateness Tolerances:
- Set a tolerance period after which an employee is considered late.
- Example: If the tolerance period is set to 20 minutes, any check-in beyond the scheduled time + 20 minutes will be classified as late.
- Attendance Early Leave Tolerances:
- Set a tolerance period after which an employee is considered to have left early.
- Example: If the tolerance period is set to 15 minutes, any check-out before the scheduled end time - 15 minutes will be classified as early leave.
- An employee is supposed to check-in at 9:00 AM, but they check in at 9:25 AM. With a lateness tolerance set to 20 minutes, the employee will be marked as late because they exceeded the allowed tolerance.
- If an employee checks out at 4:45 PM, but the early leave tolerance is set to 15 minutes and the scheduled end time is 5:00 PM, they will not be considered to have left early.
4. Attendance Workflow Based on Criteria
Scenario 1: Without Shift Planning
- Employee's day ends at 23:59.
- Attendance is calculated by pairing the check-in and check-out records within the same day.
Scenario 2: With Shift Planning
- The day ends based on the configurable shift duration (for example, 10 hours).
- Check-in and check-out records can span across multiple days.
Scenario 3: Duplicate Record Handling
- Attendance machines that generate duplicate records are handled by the system by ignoring any records that fall within the defined timestamp gap.
Scenario 4: Attendance Tolerances
- The system automatically identifies lateness and early leave based on the configured tolerance periods.
This updated manual now incorporates the third criteria—Attendance Tolerances—for better control over attendance behavior. Let me know if there are any further adjustments or additions you'd like!
Attendance Analysis Reports
Attendance Analysis Reports
Requirements
This tutorial requires the installation of the following applications/modules:
- Attendances
To view the Attendance Reports on Odoo software, navigate to the Attendances app > Reporting.
View the Chart report
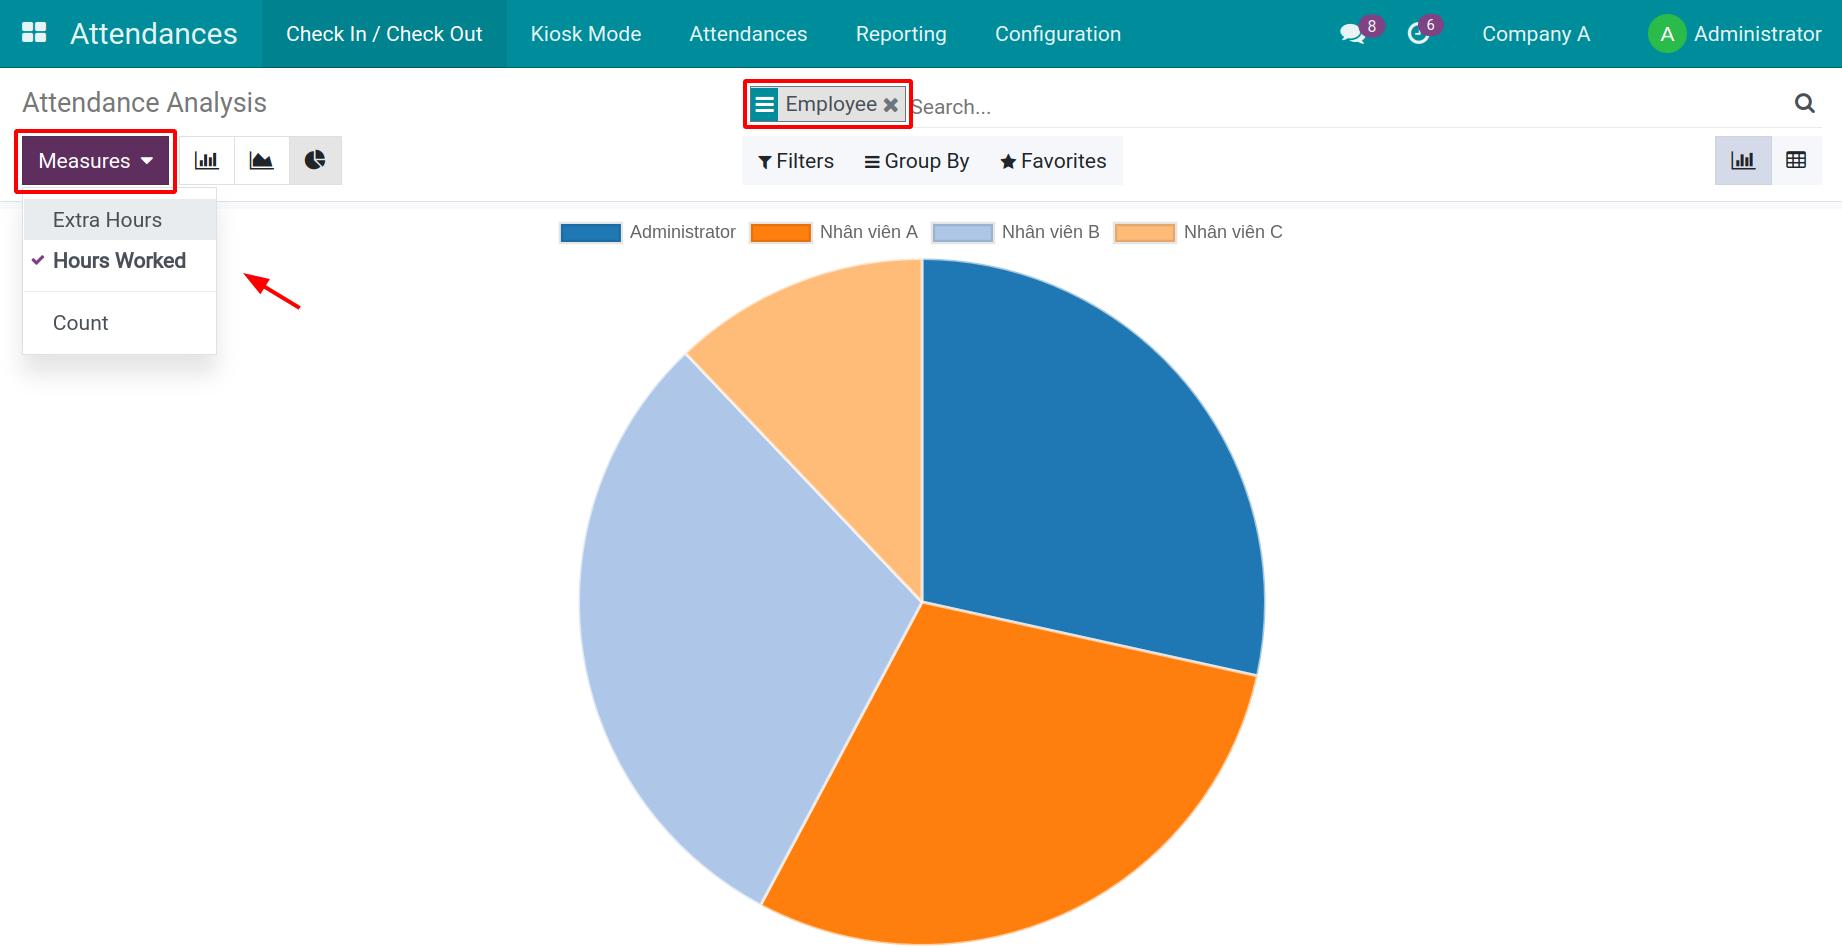
When you enter the reporting view, by default, the system will view the Chart report. The default report will be a monthly bar chart report with Hours Worked for the vertical axis and quantity of Check In for the horizontal axis.
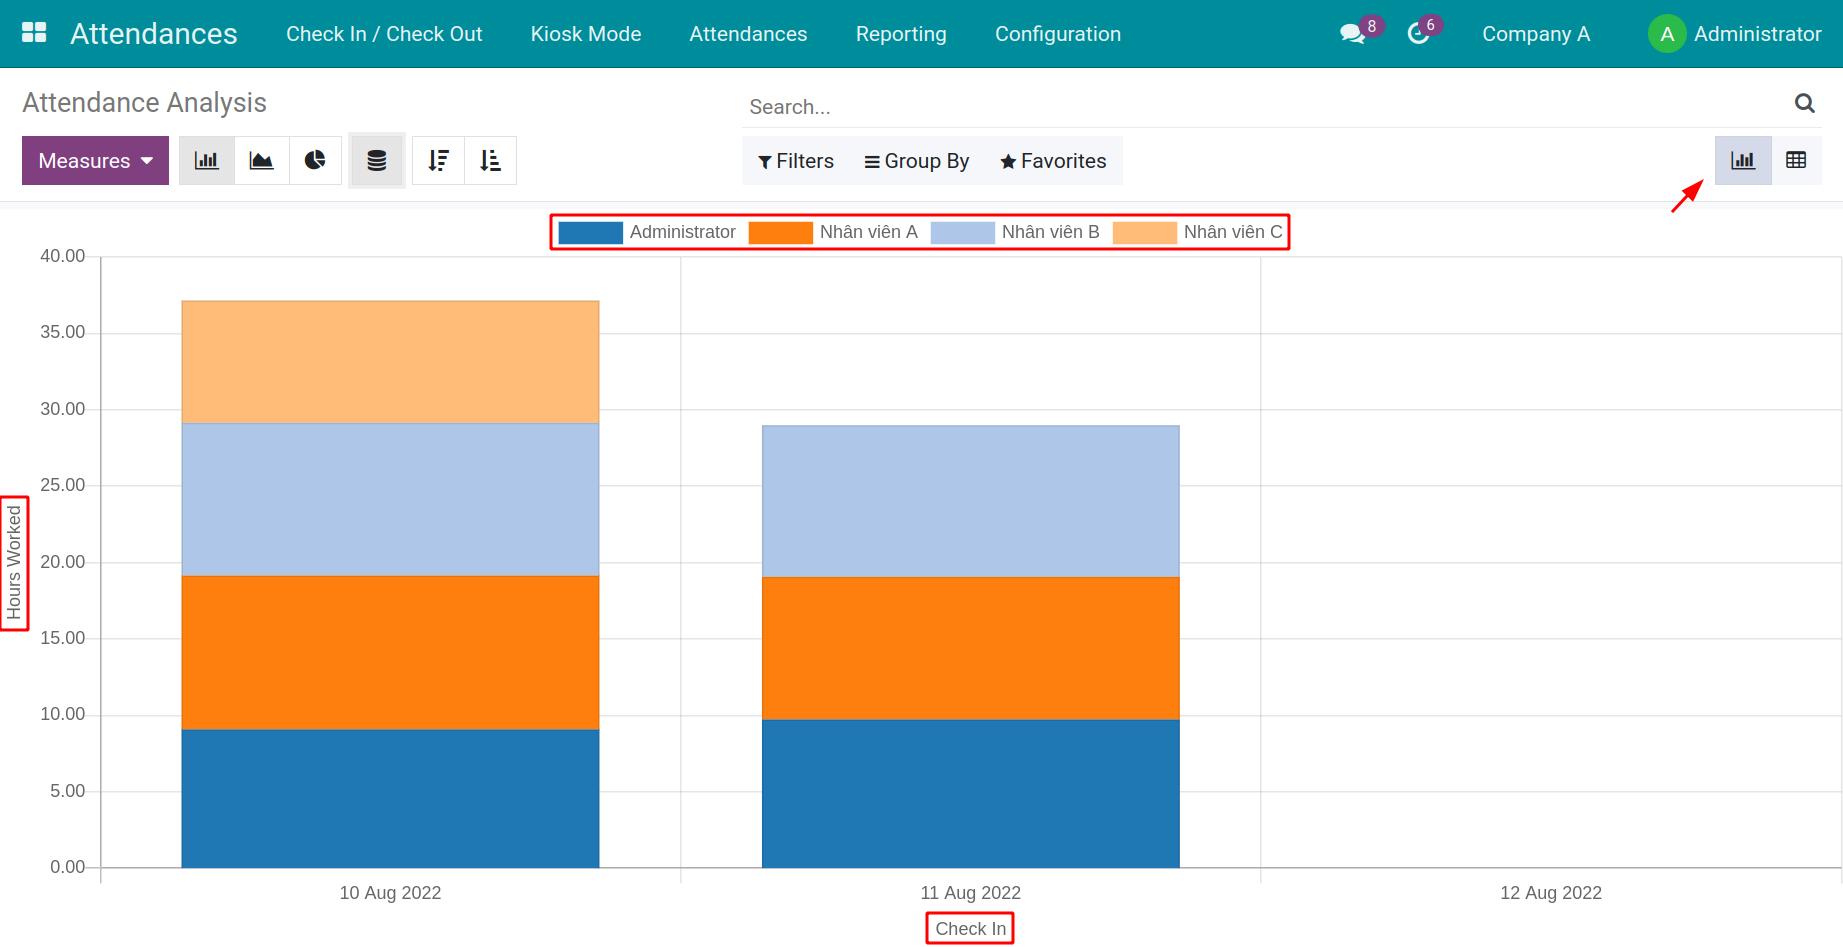
To change the criteria for the vertical axis, select another value on the Measures.
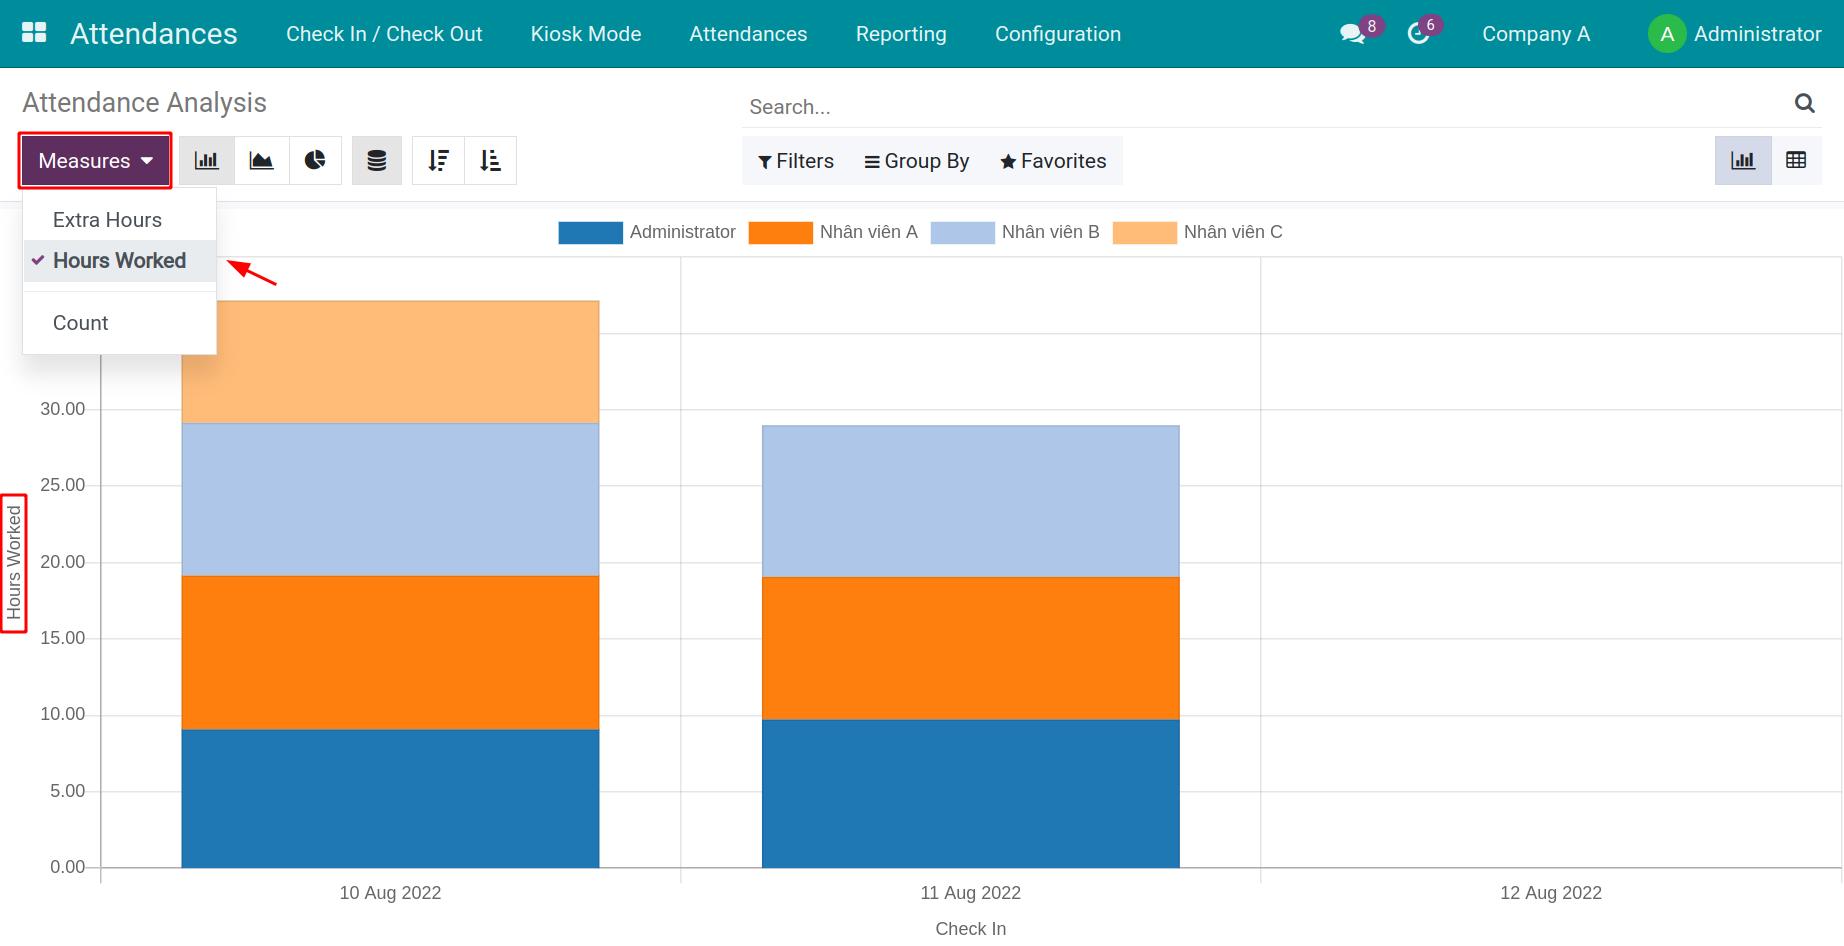
To change the criteria on the horizontal axis, you can use the filter and group tools. When there are multiple criteria on the horizontal axis, the system will show a Stacked report, making it a lot easier to understand.

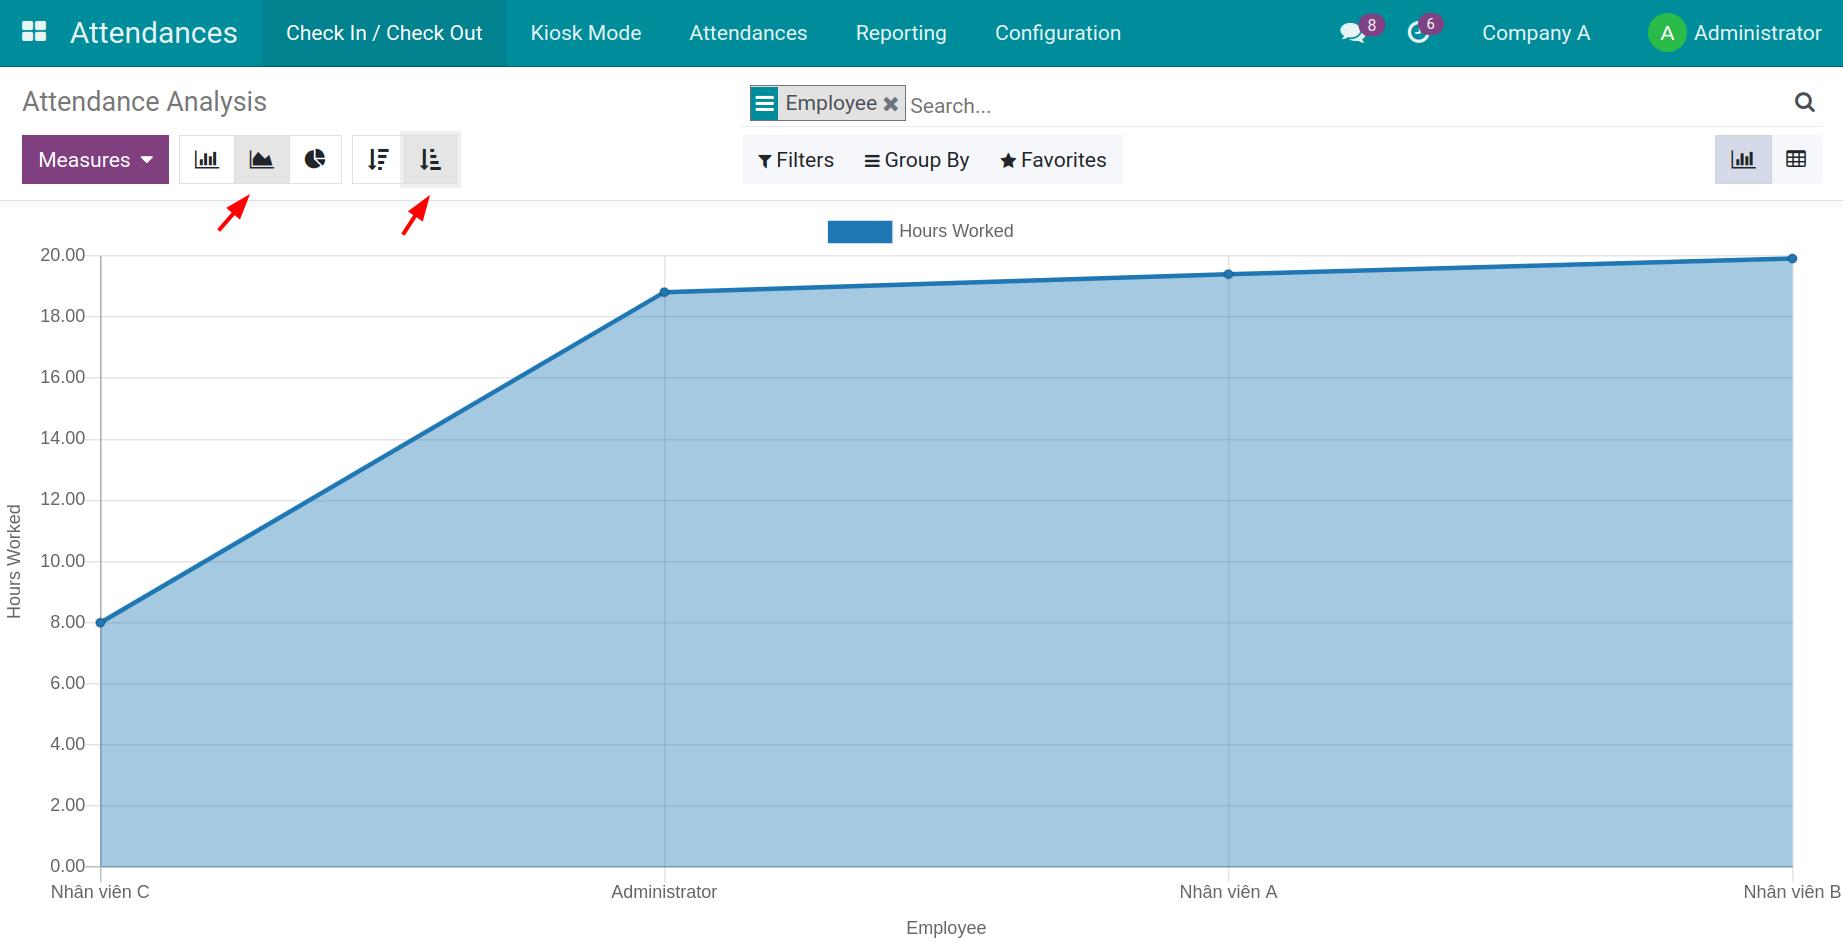
Besides the Bar chart, you can also view the same report using the Line chart and Pie chart.
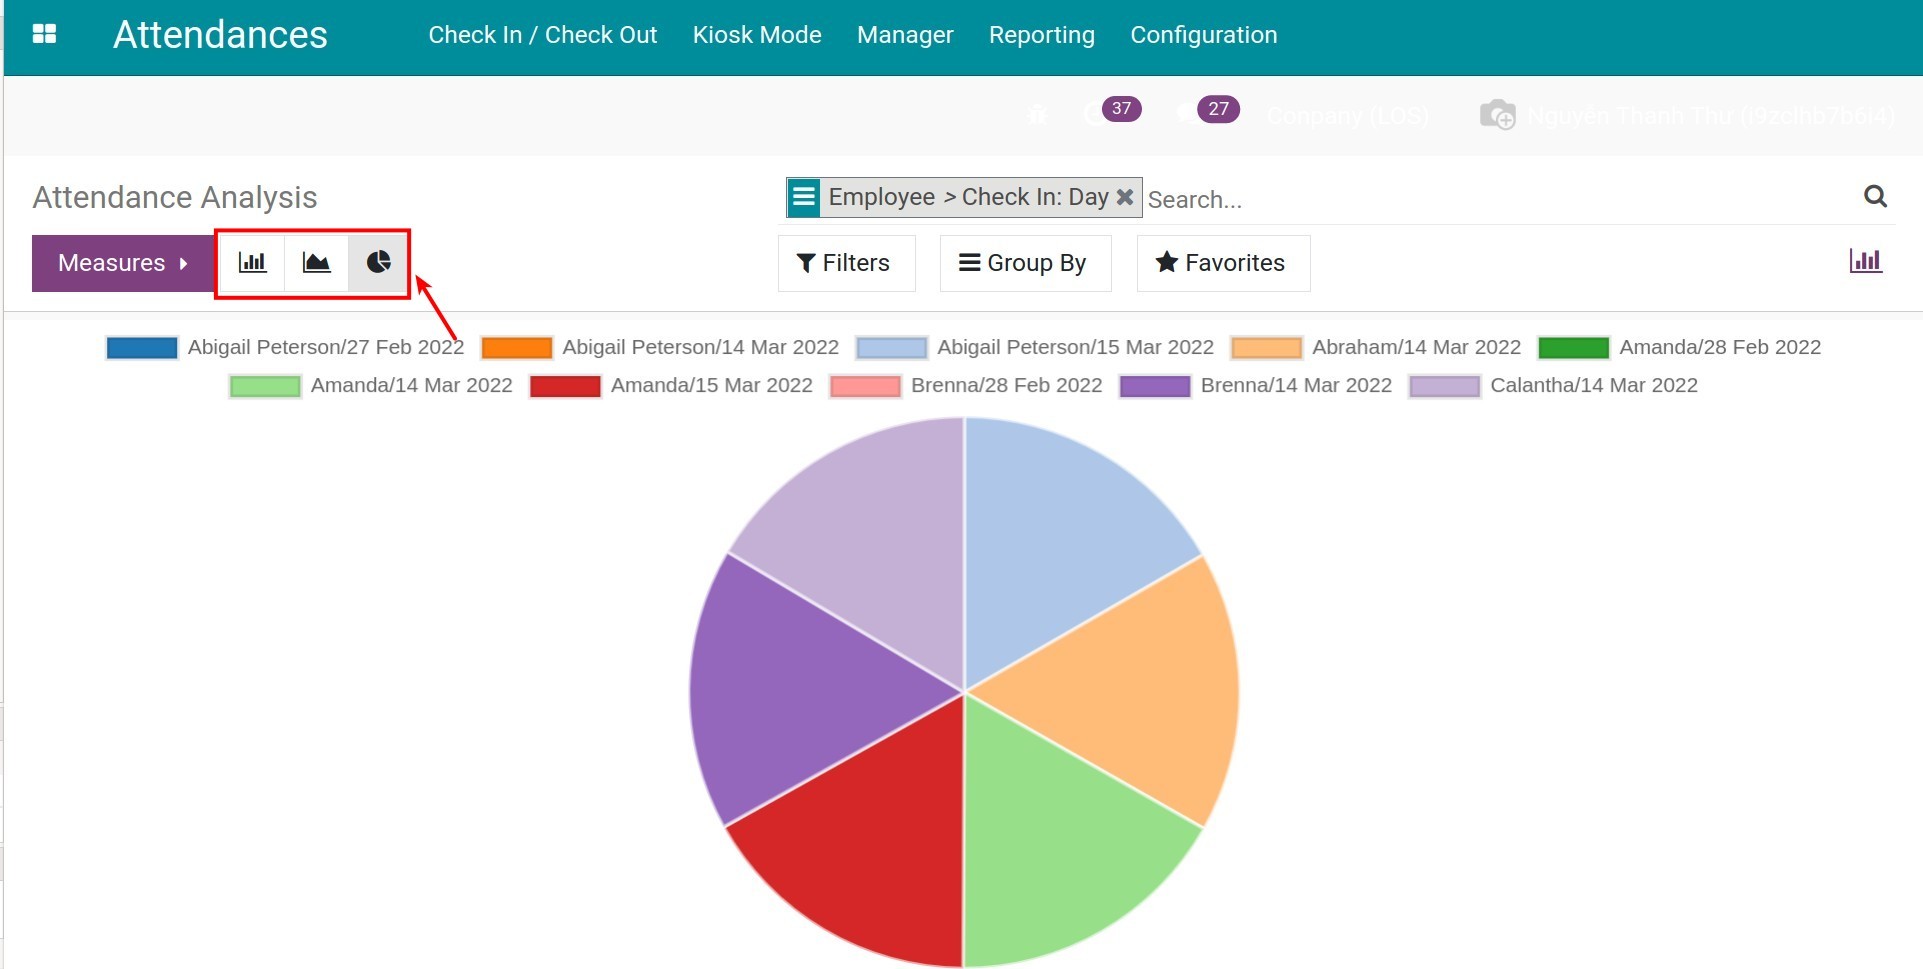
Use the Measures and filter, group tools to view the report for the needed criteria.
Using the Bar chart and Line chart, you can select Descending/Ascending to view the report, making it more convenient for you when giving quotations.
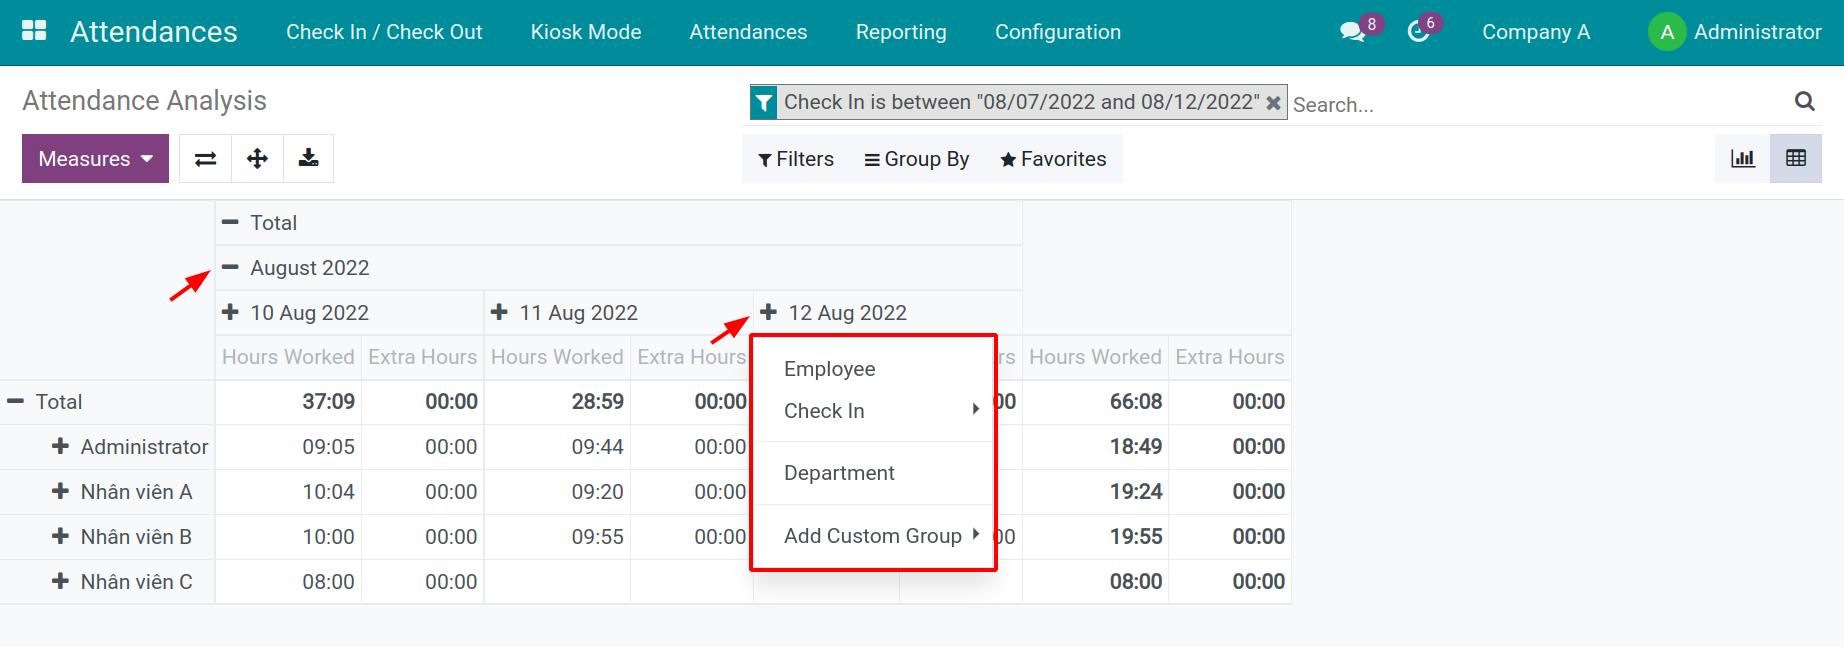
View the Pivot report
To view the Pivot report, select the Pivot icon.
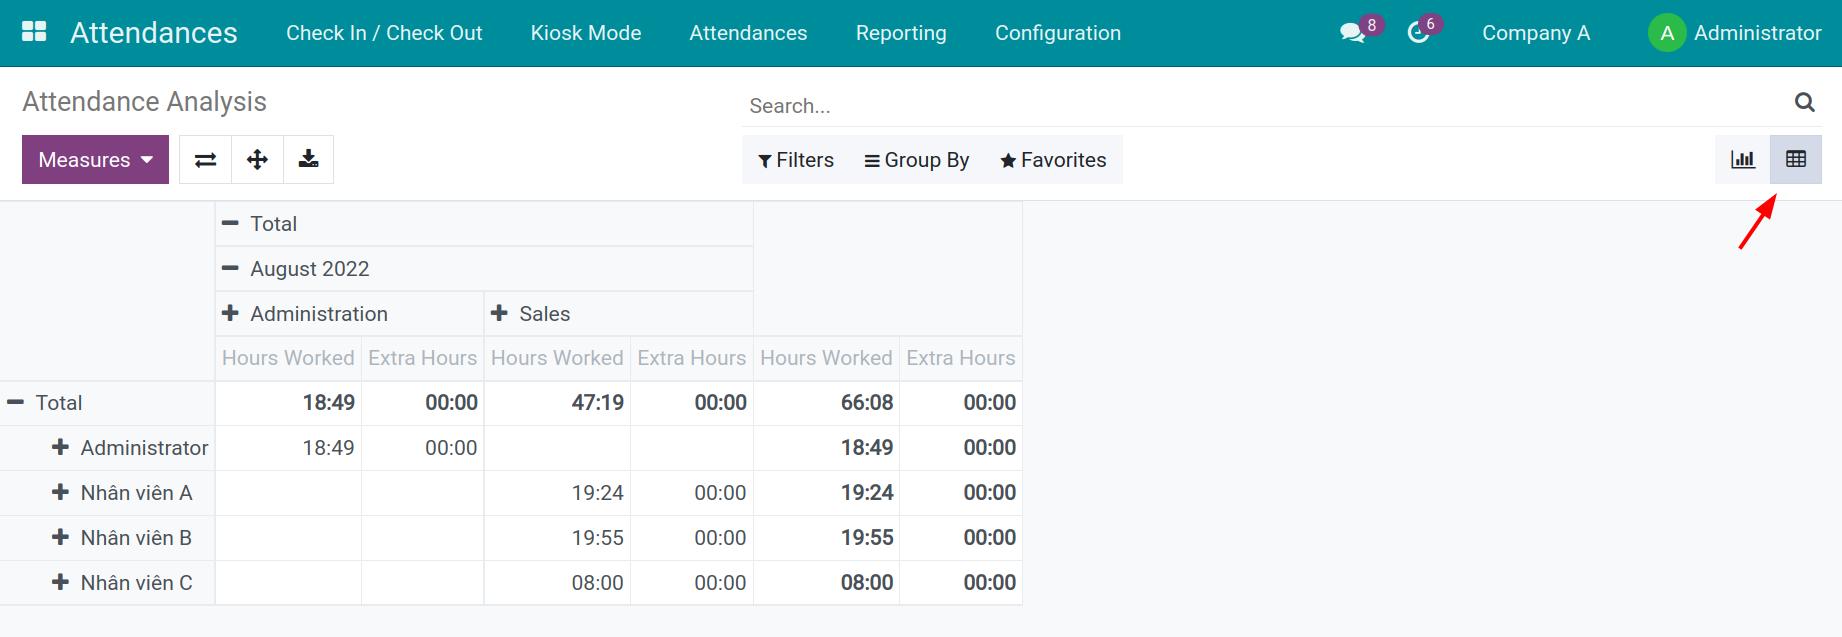
You can use the filter, group tools to view the needed reports.
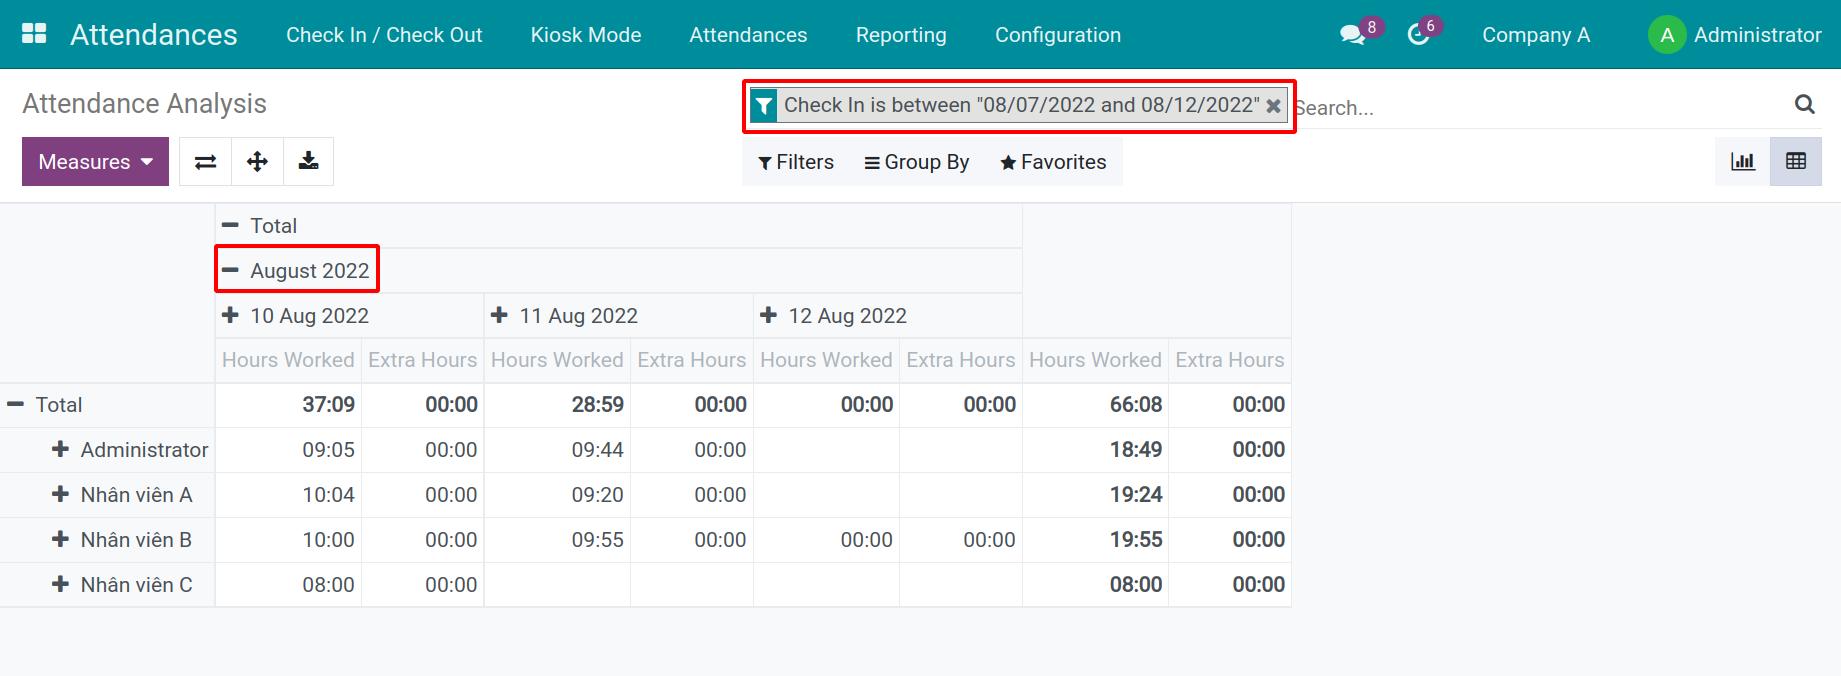
Select the suggested value on the Measures to view on the report. You can select multiple values.
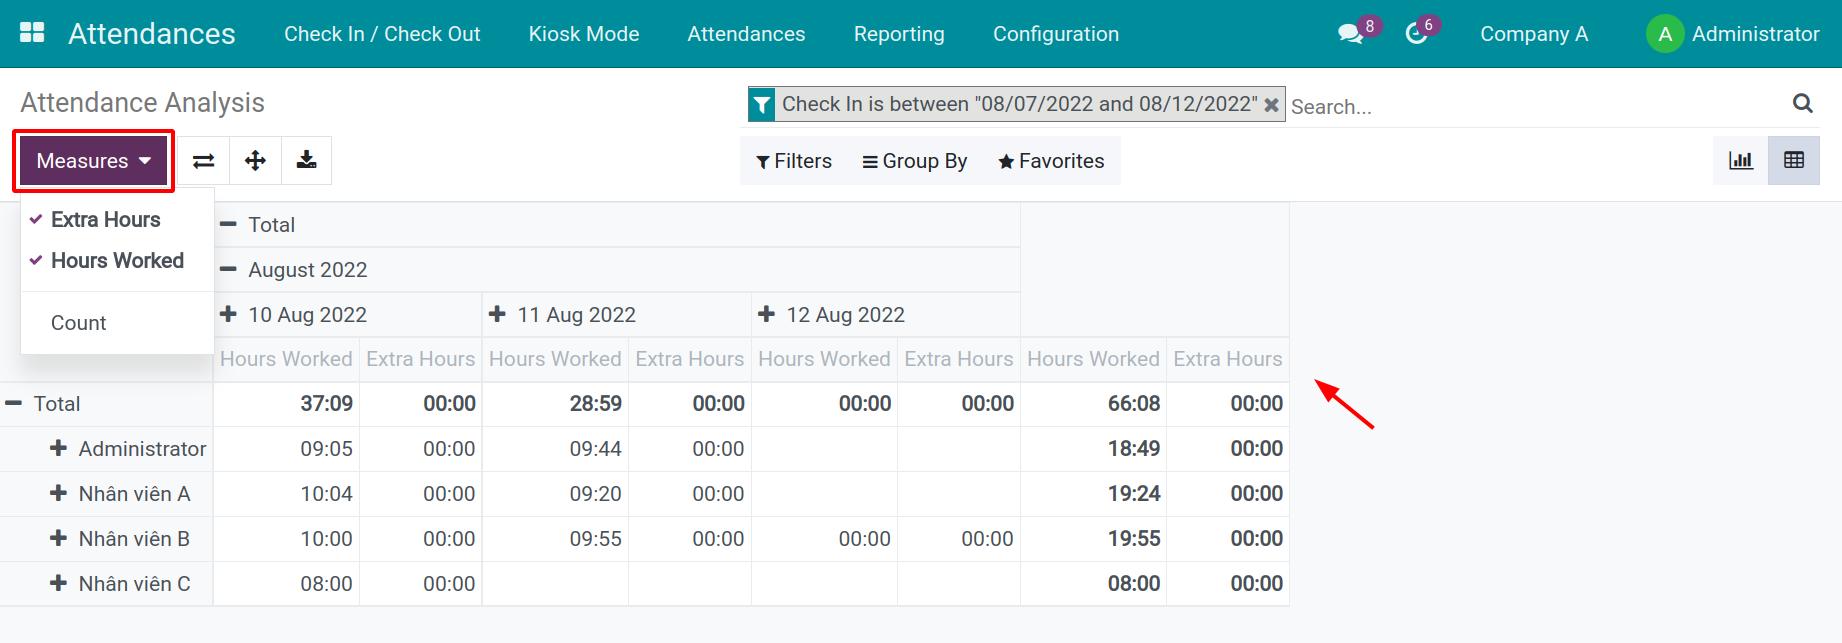
If the values on the Measure aren’t detailed enough, you can press the “-”/”+” icon on the criteria.
See also
Related article
- Getting started with Odoo Payroll app
Optional module
- Biometric Attendance Device
- Payroll Attendance
Attendance Management User Guide
Attendance Management User Guide
Absence & Overtime Automation
🌟 1. Introduction
Managing employee attendance is a critical part of HR operations. The Attendance Management module has been designed to simplify this process by automatically analyzing daily attendance activities and converting them into meaningful HR data such as:
- Presence time
- Lateness
- Early departures
- Absences
- Overtime
This information is seamlessly shared with the Absence and Overtime modules, ensuring that payroll calculations remain accurate and transparent.
The objective of this module is to reduce manual intervention, minimize errors, and provide a reliable daily attendance evaluation for every eligible employee.
📍 How to access Attendance Management
Menu path : → Attendance Management

⚙️ 2. How the System Works
Every day, the system runs an automated process (scheduler) at a predefined time — typically late in the evening (for example, 23:00). During this process, the system:
- Reviews all active employees
- Retrieves their daily attendance activity
- Checks time off and holidays
- Calculates attendance indicators
- Generates a daily Attendance Management record
- Creates related Absence and Overtime documents
These documents are then sent for managerial approval before impacting payroll.

👤 3. Who Is Included in Attendance Processing?
Not all employees are processed automatically. An employee is included only if:
- The employee is active
- The employment contract is valid
- The contract does not have the “Ignore Attendance” option enabled
For each eligible employee, the system generates only one attendance record per day, ensuring consistency and avoiding duplication.

📅 4. Understanding Day Types
To ensure fair calculations, the system identifies the nature of each day:
- Working Day: Standard company workday (Monday–Friday)
- Weekend: Saturday or Sunday
- Holiday: Company-wide public holiday
- Time Off: Approved leave for the employee
- Mixed Day: Combination of work and time off
If the day is a full holiday or approved leave, the system does not create an attendance record, as no evaluation is required.

⏱️ 5. Attendance Tolerance — Flexibility in Evaluation
The module introduces tolerance rules to avoid penalizing employees for minor delays.
Examples of tolerance usage:
- If an employee checks in slightly late but within tolerance, the system adjusts the effective check-in time
- If an employee leaves slightly early within tolerance, the check-out is adjusted
Tolerance settings typically include:
- Lateness tolerance (e.g., 20 minutes)
- Early leave tolerance (e.g., 15 minutes)
This ensures a fair and realistic evaluation of working time.

🧮 6. How Attendance Indicators Are Calculated

✅ Presence Time
Presence time reflects the actual working duration, considering:
- Planned working schedule
- Daily attendance activity
- Tolerance adjustments
- Lunch break exclusion

⏰ Late Arrival
An employee is marked late when the first check-in occurs after the planned start time (beyond tolerance).

🚪 Early Departure
Early leave is identified when the last check-out occurs before the planned end time (beyond tolerance).

💰 Overtime
Overtime is calculated only for employees whose contract allows overtime.
The system compares planned working hours with actual activity and computes the excess time accordingly.

❌ Absences
Absence duration is calculated by comparing expected working hours with actual presence time.

🔁 7. Approval Workflow and Payroll Integration
After calculations:
- Absence and Overtime records are created automatically
- These records appear in a “Waiting for Approval” state
- Managers review and approve them
- Approved entries are transferred to payroll inputs
This approval step ensures HR control and prevents incorrect payroll entries.


🗓️ 8. Shift Employees and Planning Integration
Some employees work under rotating or flexible schedules. For these employees:
- The “Shift Employee” option must be enabled
- Working hours are retrieved from the Planning module instead of standard schedules
- A Planning Manager is responsible for managing their schedule
Employees without this option remain under standard company working hours.

🚫 9. When Attendance Records Are Not Generated
The system intentionally avoids generating attendance records in specific scenarios:
Scenario 1 — Contract Exclusion
If the contract has Ignore Attendance enabled.
Scenario 2 — Approved Time Off
If the employee has approved leave covering the day.
Scenario 3 — Holiday + Non-Shift Employee
If the day is a global holiday and the employee is not scheduled as a shift worker.
✅ 10. Benefits of the Attendance Management Module
This solution provides several advantages:
✔ Eliminates manual attendance calculations
✔ Ensures objective and consistent evaluation
✔ Improves payroll accuracy
✔ Enhances HR visibility on employee attendance behavior
✔ Supports both fixed and shift-based working models