Configure Bank Accounts
Configure Bank Accounts
Requirements
This tutorial requires the installation of the following applications/modules:
Accounting & Finance
Contact
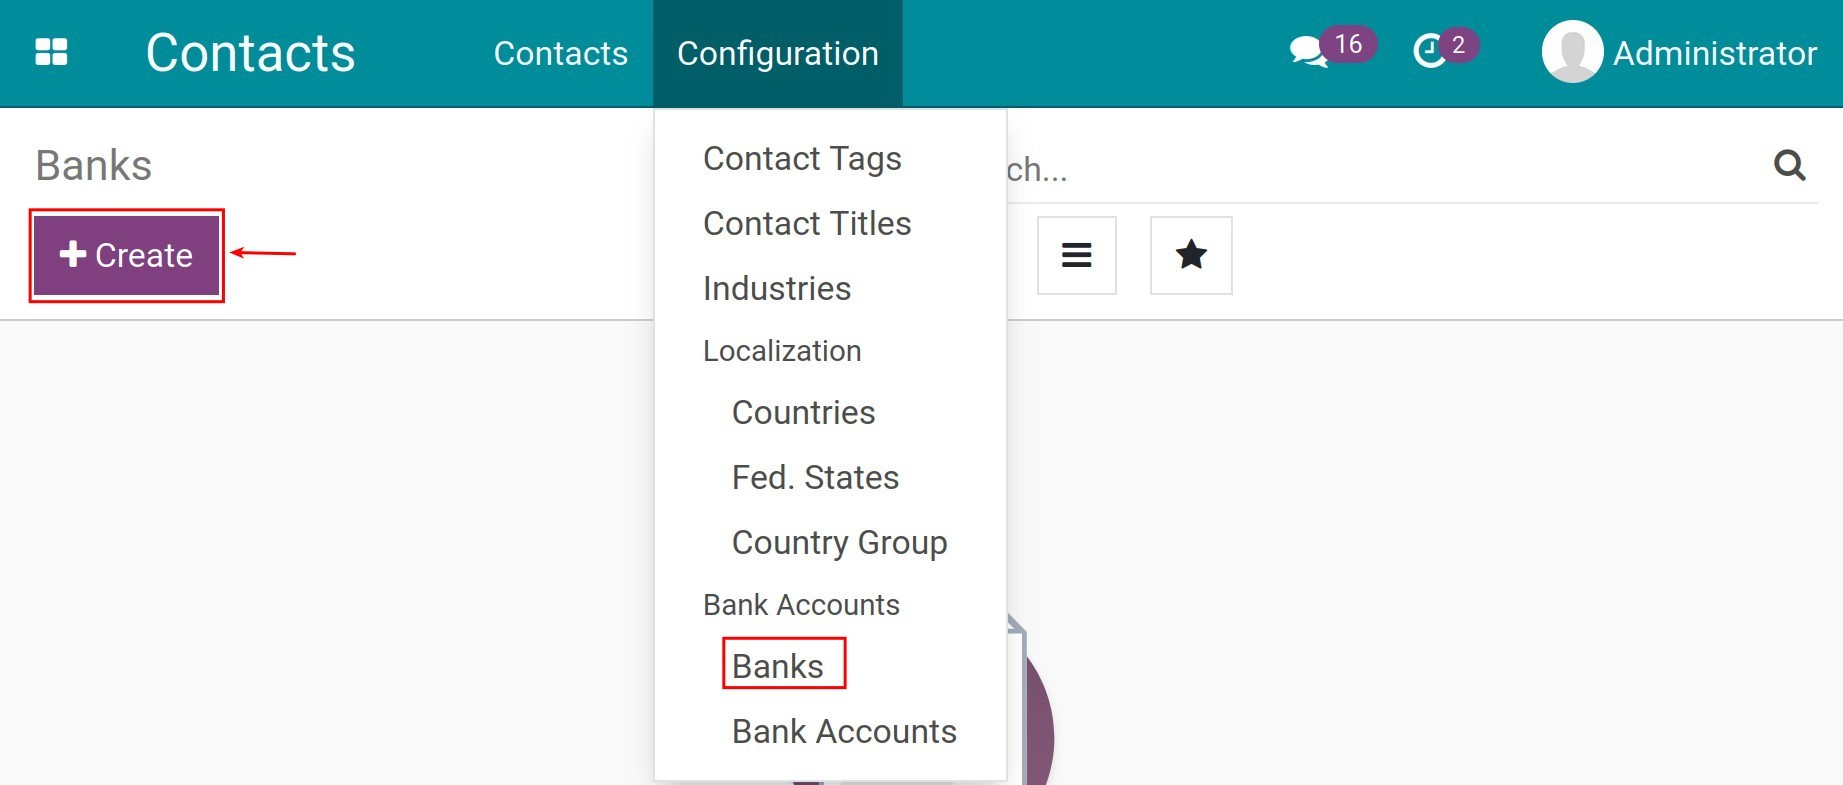
Create a bank
To create a new Bank, navigate to Contacts ‣ Configuration ‣ Banks, click Create to create new bank information.
You need to fill information as follow:
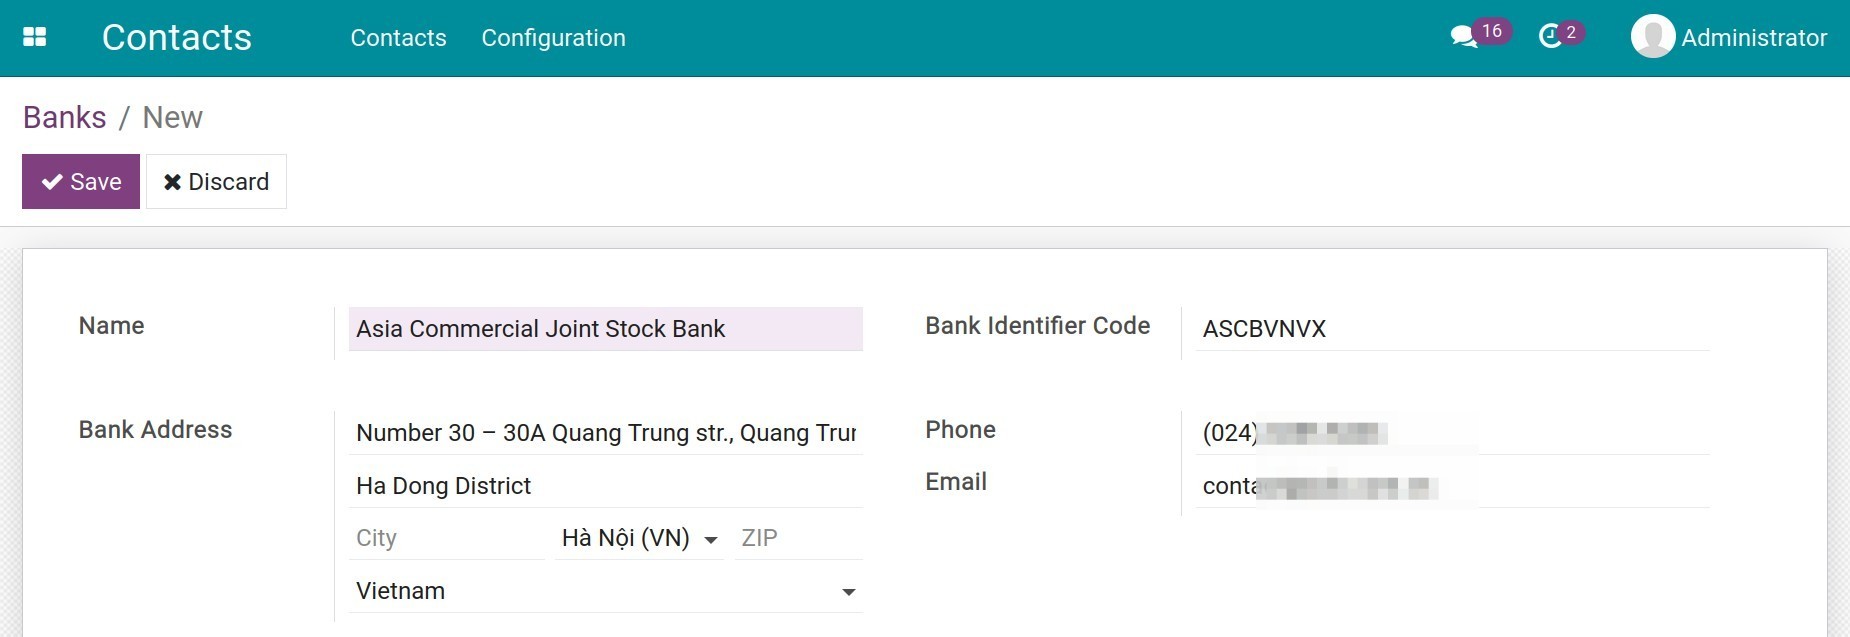
Name: Add your bank name.
Bank Identifier Code: The identifier code according to the international standard convention created by the Society for Worldwide Interbank Financial Telecommunication, also known as the BIC code or SWIFT code.
Bank Address: fully address including street, city, ZIP (if any), country.
Phone/Email: Phone number and email of the bank.
Click Save to save information.
Create a new bank account
To create a new Bank Account in Accounting & Finance Management software , navigate to Accounting ‣ Configuration ‣ Add a Bank Account :
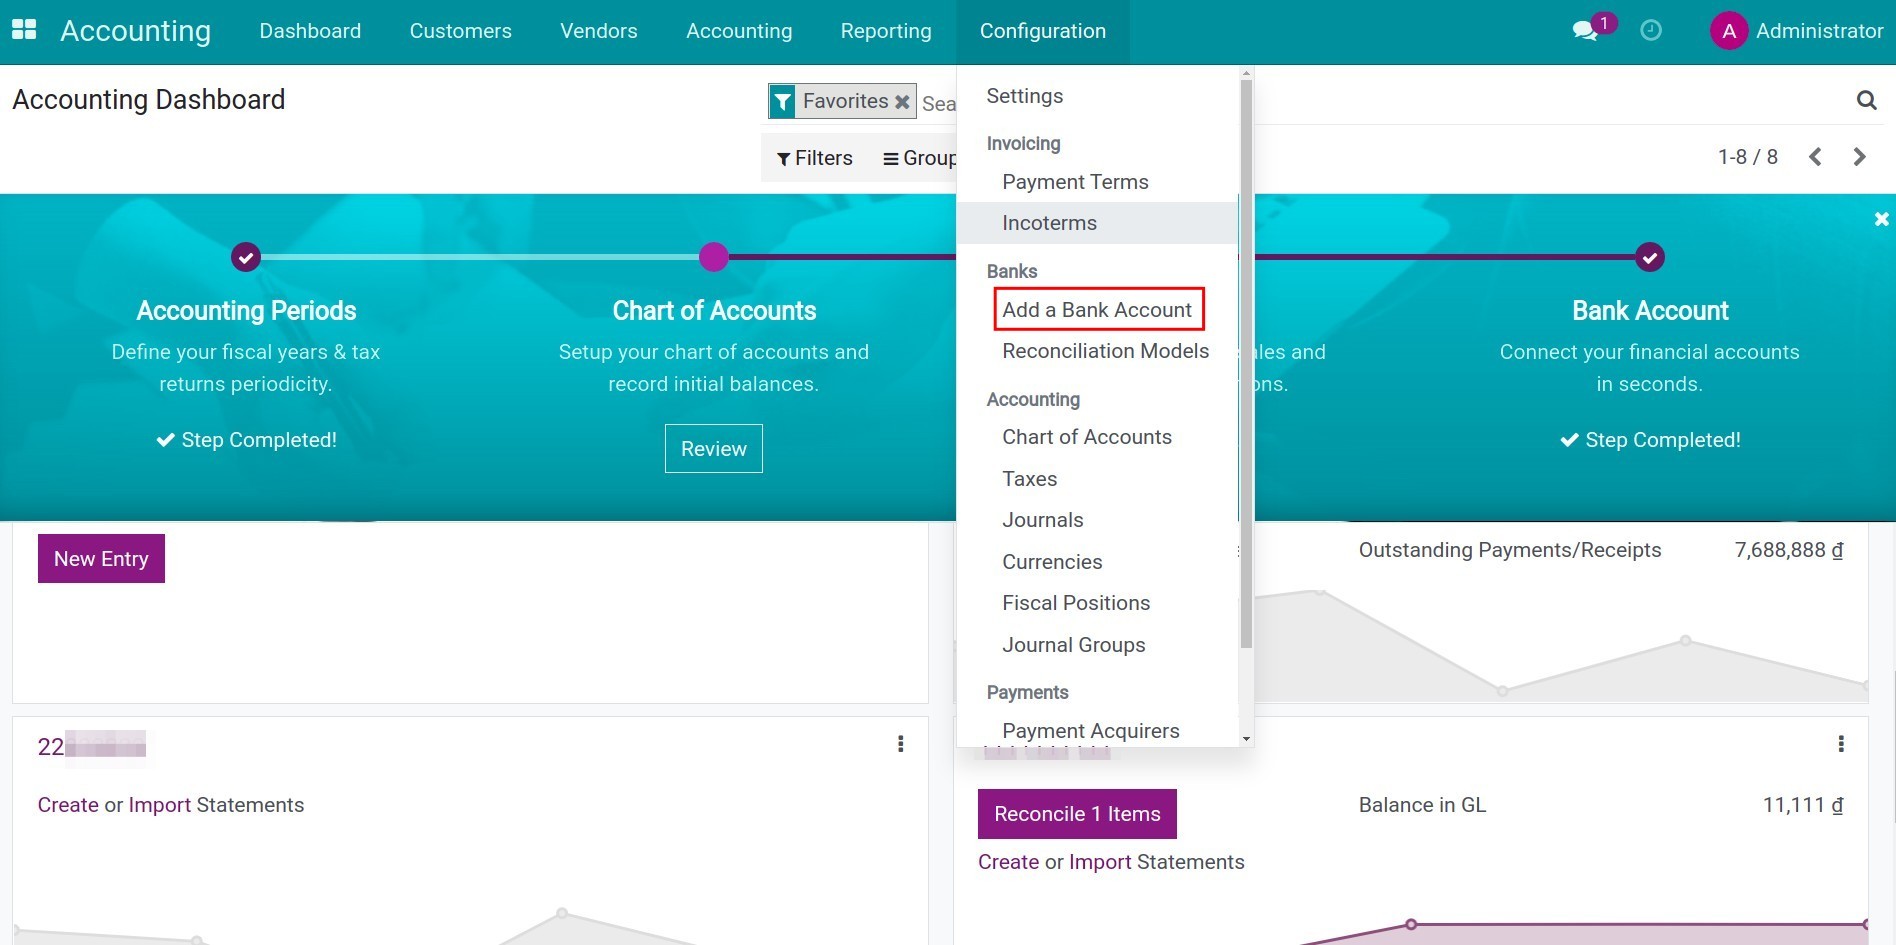
On the pop-up window, you need to fill in the following information:
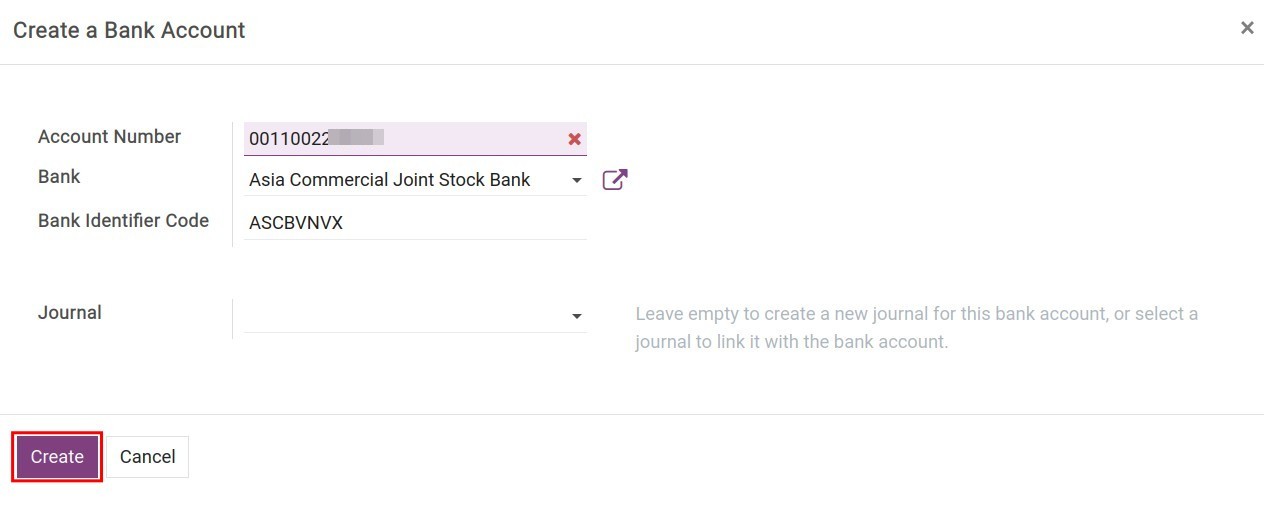
Account Number: Add your bank account number.
Bank: Choose a Bank from the existing bank list.
Bank Identified Code: Automatically filled from the setup bank information.
Journals: Choose from the existing Journals to link a Journal to the bank account. In case this field is empty, a new Journal will be automatically created for the new bank account.
Note
You can also create a new Bank Account by navigating to Contacts ‣ Configuration ‣ Bank Accounts. All the existing bank accounts in the system are compiled here, including your company bank accounts and your partners’ ones.
Warning
A Journal is created and linked to a newly created bank account only when said bank account is created from the Accounting app.
Configure Bank account Journal
Navigate to Accounting ‣ Configuration ‣ Journals, find the Journal that you want to configure then press Edit:
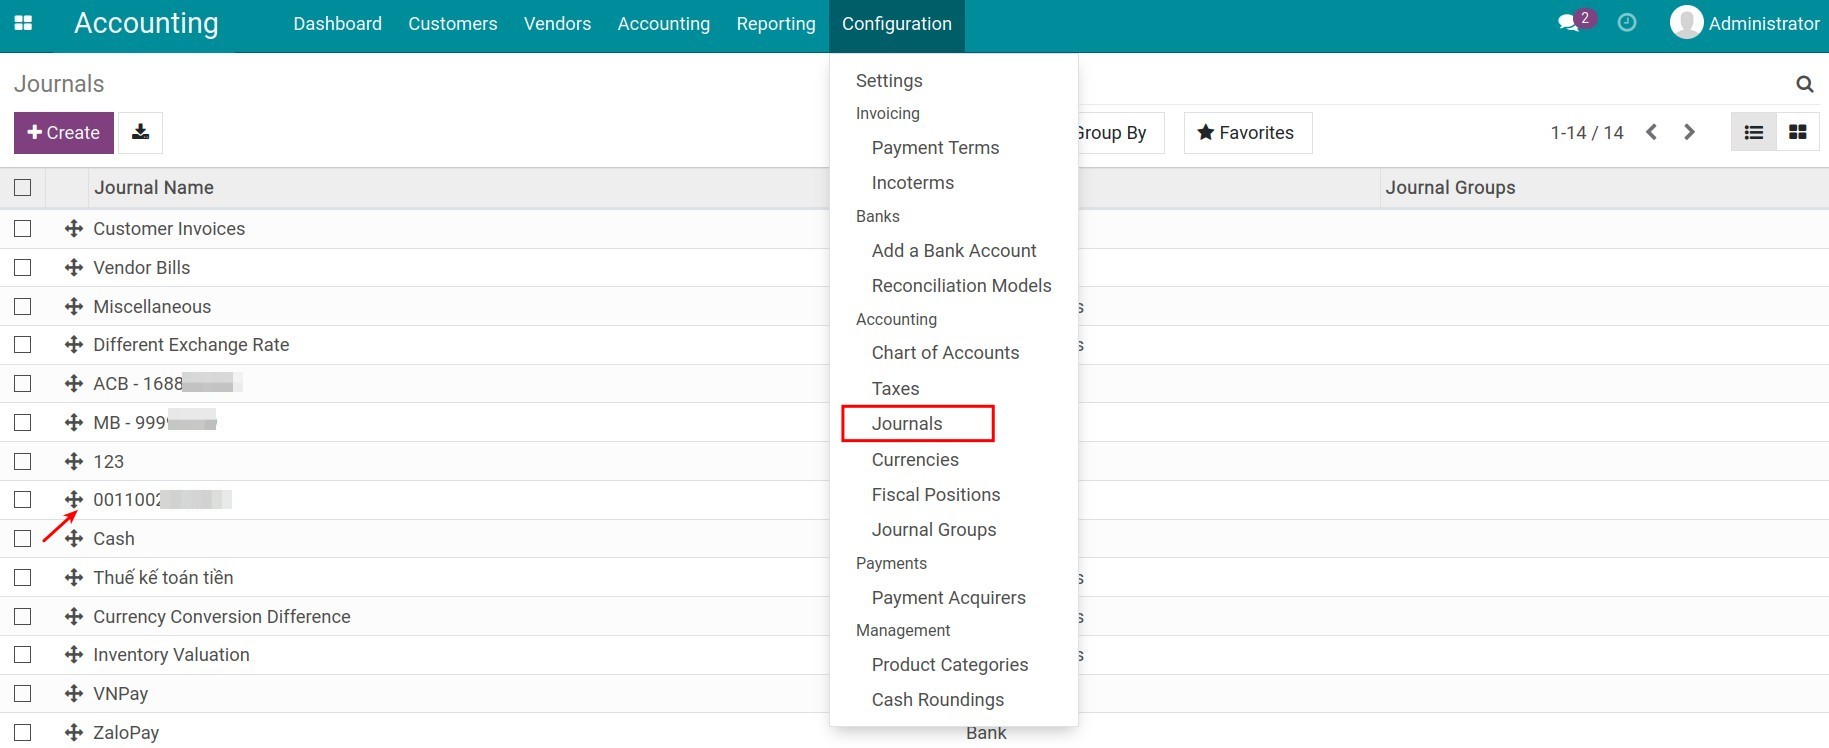
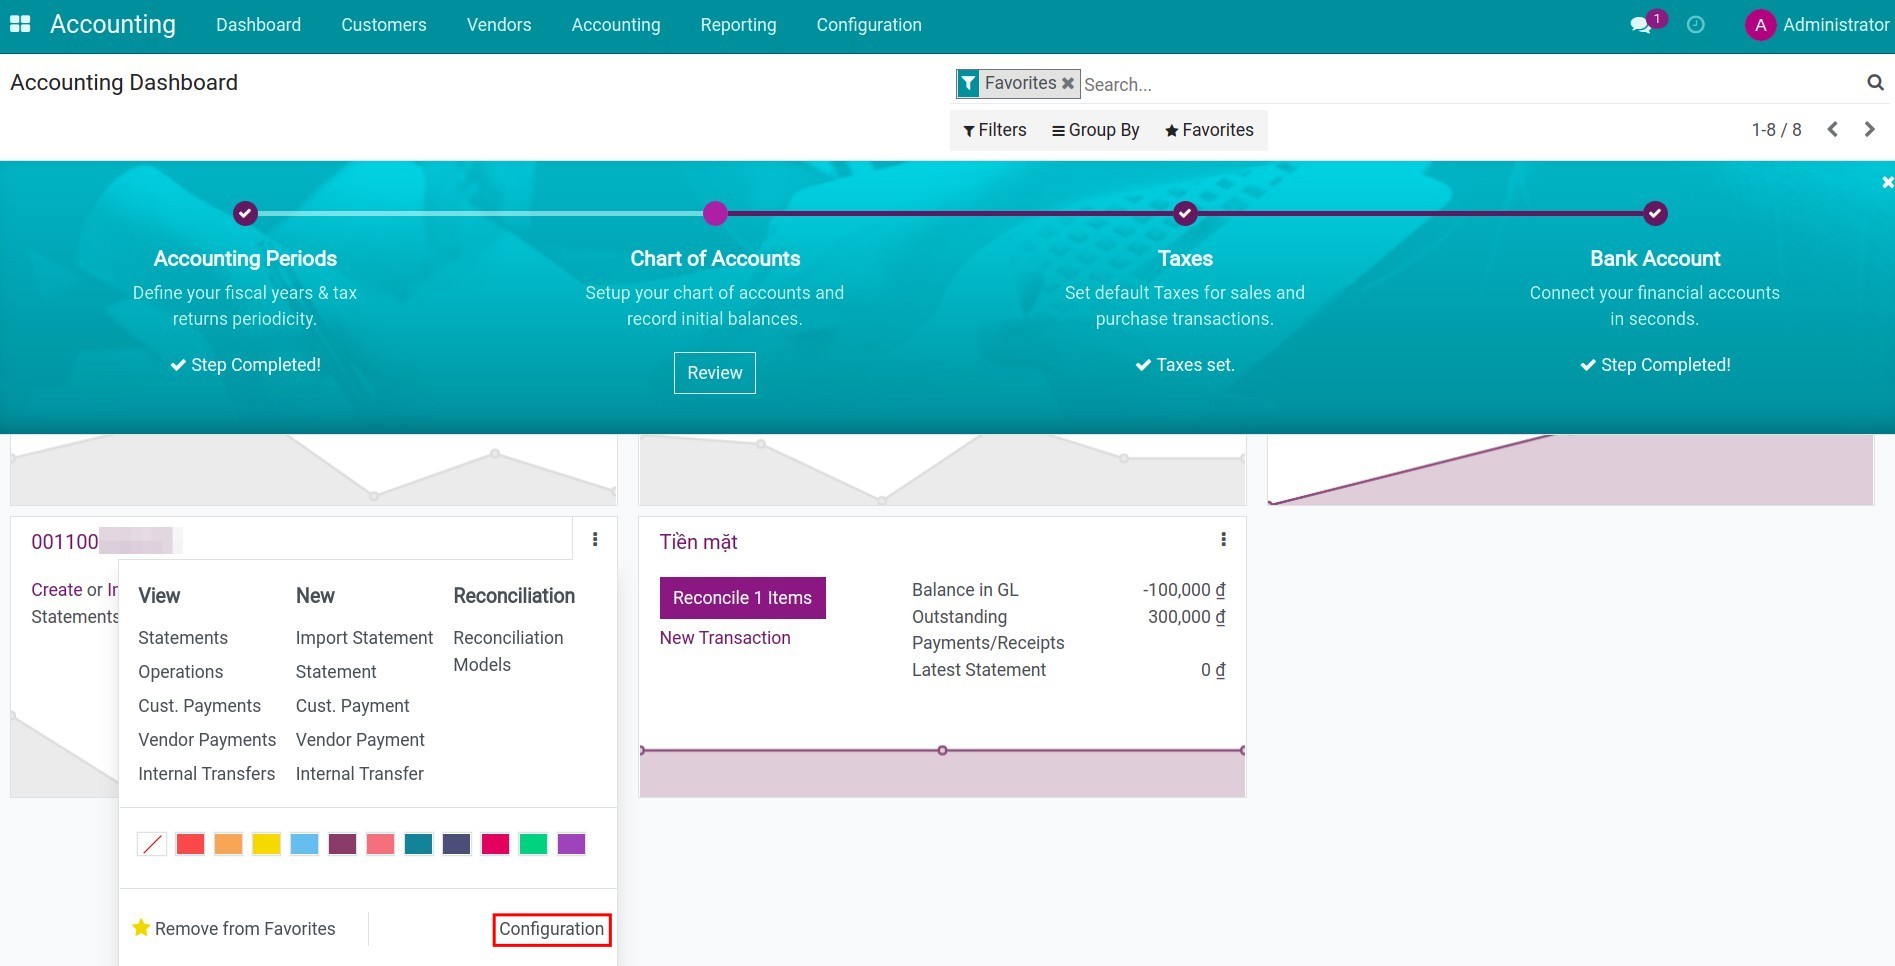
Or navigate directly from Accounting ‣ Dashboard, find the Journal to work on, and choose Configuration:
Some important information for the Journal configuration are:
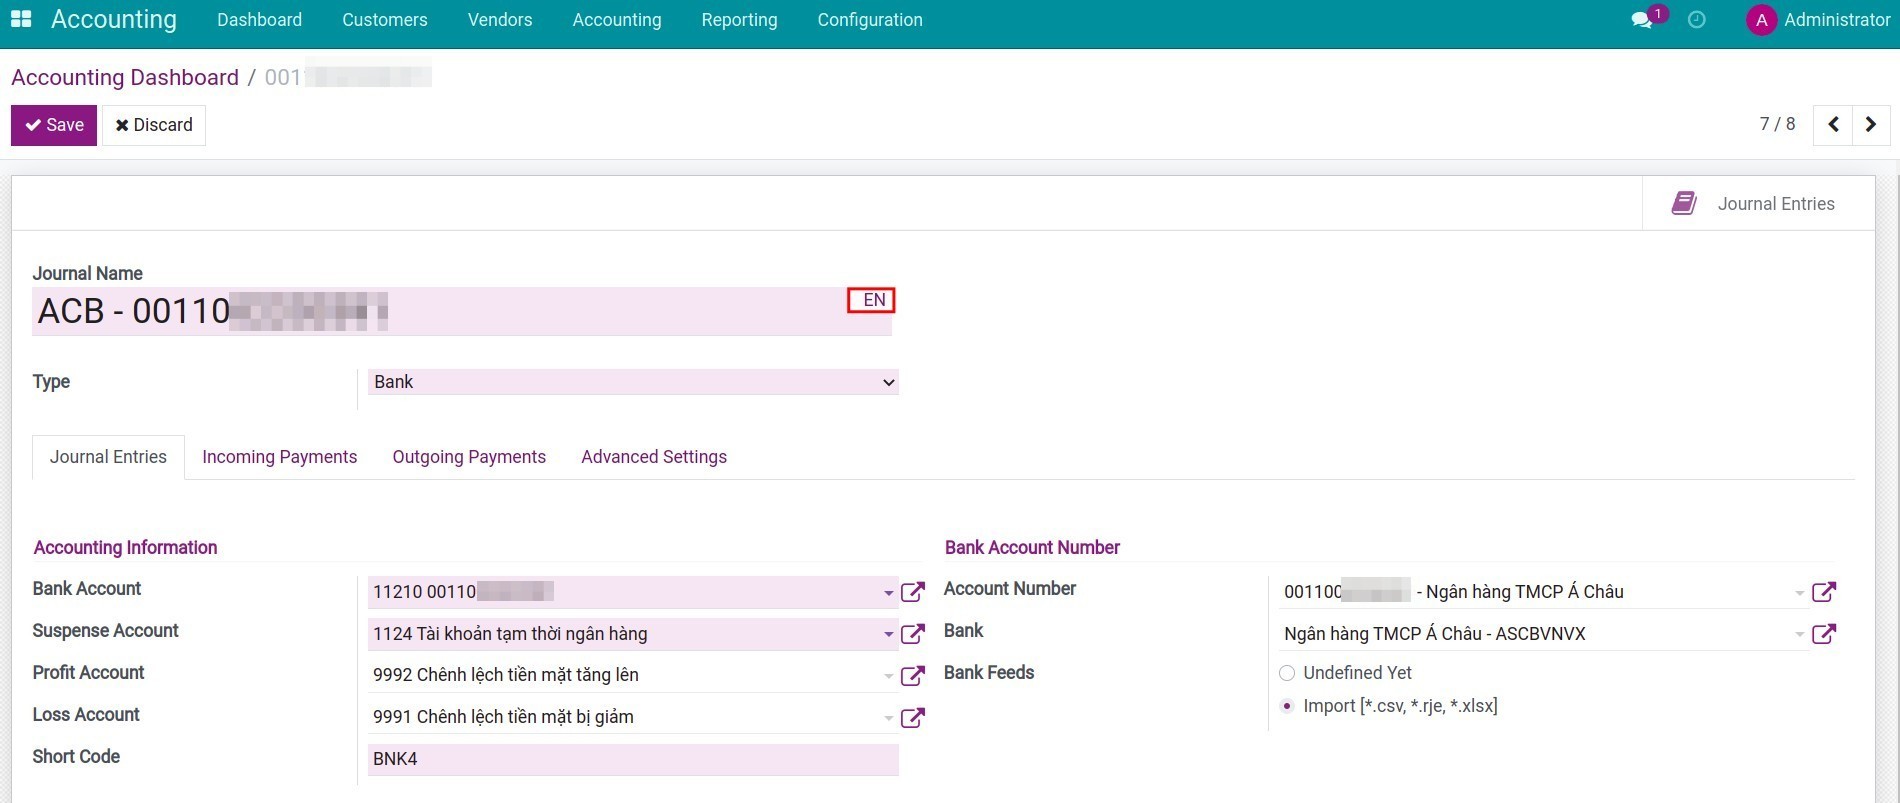
Journal Name: The bank account number is used by default. However, you can modify the Journal name as you desire.
Tip
You can press on the EN letters to translate your Journal name to other languages if you use more than 1 language in your software. To activate new language, see more on Installing & Using multilingual guidelines.
Type: Choose a Journal type fr-om the existing list. Since this Journal is generated from a bank account, the Journal Type is Bank by default.
Journal Entries tab:
Accounting information:
Bank Account: The system automatically generates a unique bank account code (Bank deposits) linked to the bank account number to record all the transactions related to the said bank account. Even so, you can edit the Bank Account label if needed. For further information, read our article on Chart of accounts.
Suspense Account: The default account is Bank Suspense Account: This account temporarily records lines from the bank statement and will be reconciled with payments recorded in the system.
Profit Account: The account is used to record the excess amount due to the difference between the bank statement and the posted data on the system.
Loss Account: The account is used to record the missing amount due to the difference between the bank statement and the posted data on the system.
Short Code: A code for the Journal is suggested here but you also can modify it if needed. However, please bear in mind that it must be a unique code in the system.
Currency: Choose a currency for the Journal. If left empty, the currency will be the default one set up for your company.
Bank Account Number:
Account Number: It’s the information provided when the bank account is created.
Bank: The information is inherited from the bank account creation.
Bank Feeds: Select a tool to import bank statements from CSV; RJE or XLXS format.
Incoming Payments tab:
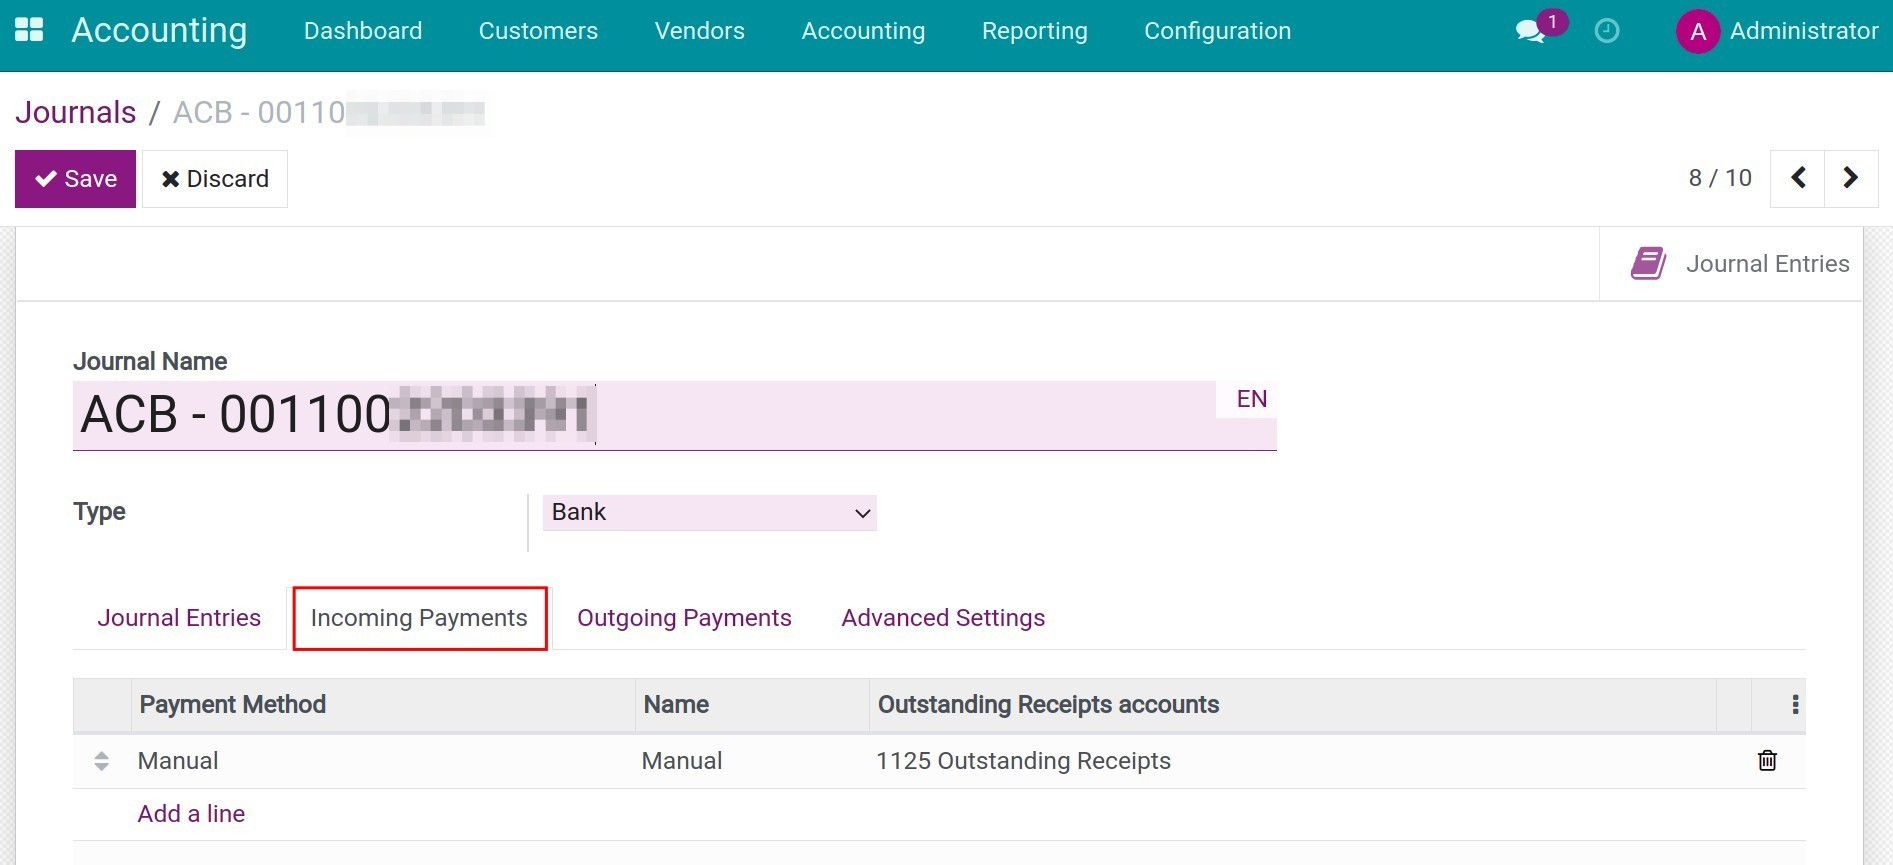
Payment method: For the payment transactions outside of the system, such as cash, cheque, or Internet banking, manual payment creation is activated by default. Select Add a line to add other payment methods.
Name: Name of the payment method.
Outstanding receipts account: You choose the Outstanding receipts account to record related transactions such as collecting money from invoices or making payments. In the reconciliation process, the related transactions will be reconciled with the Outstanding receipts account instead of the Receivables account.
Outgoing Payments tab:
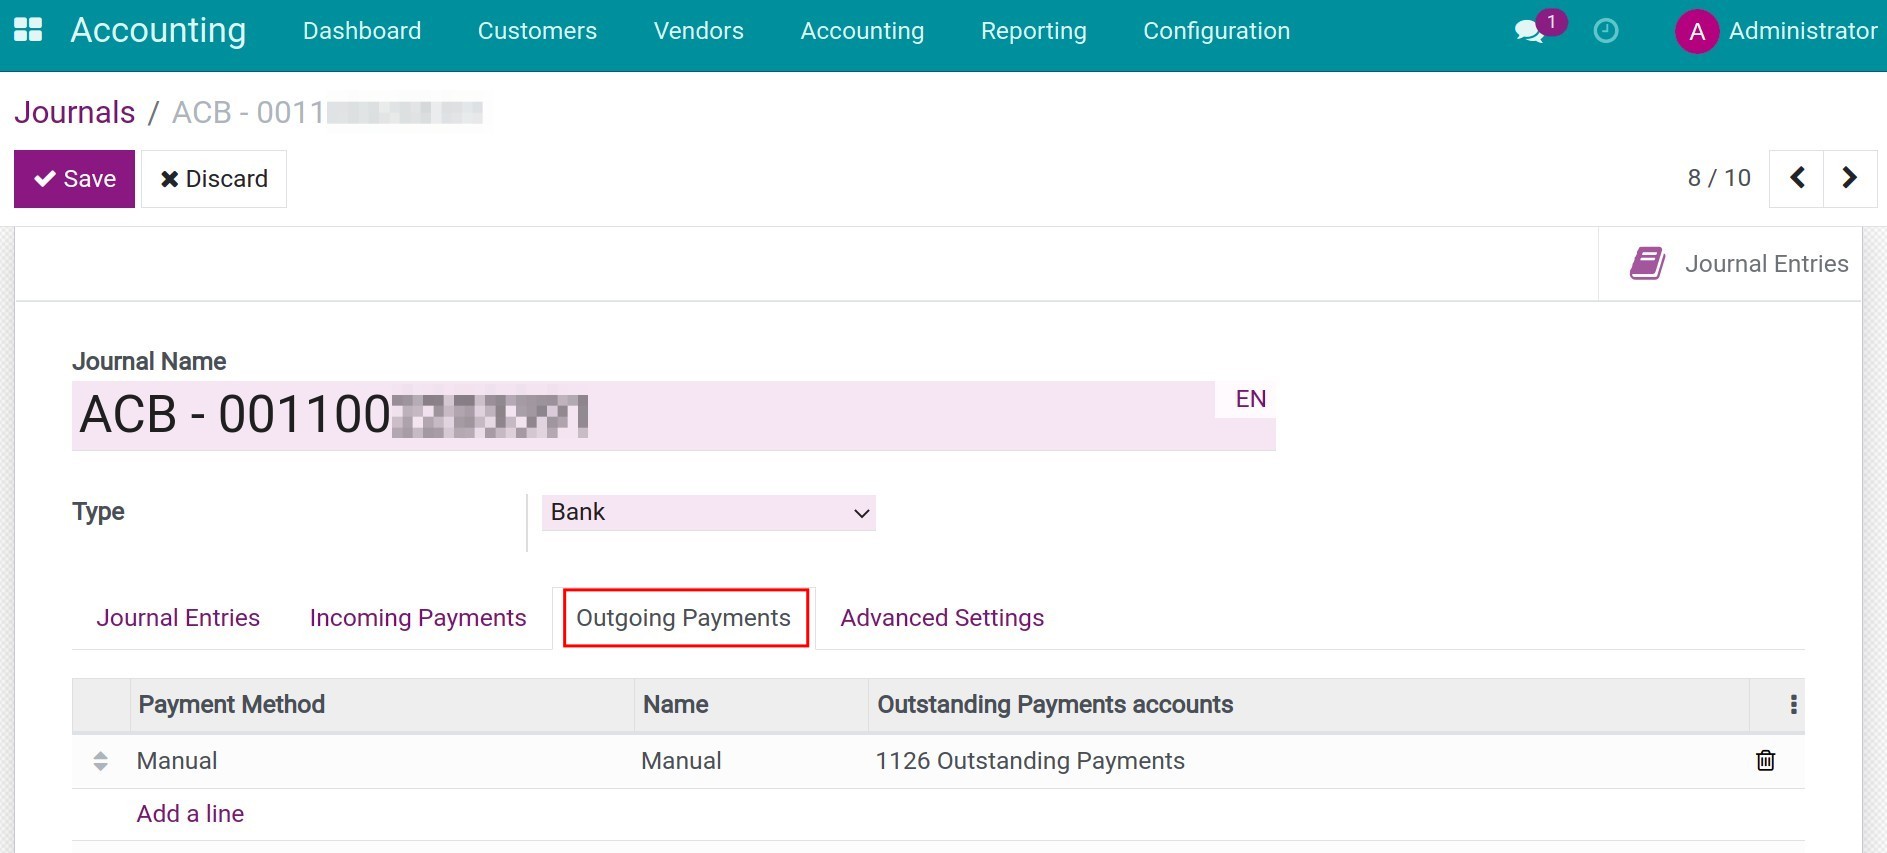
Payments method: For the payment transactions outside of the system, such as cash, cheque, or Internet banking, manual payment creation is activated by default. Select Add a line to add other payment methods.
Name: Name of the payment method.
Outstanding payments accounts: You choose the Outstanding payments accounts to record related transactions such as paying money for a vendor bill or making payments. In the reconciliation process, these transactions are reconciled with the Outstanding Payments account instead of the Payables account.
Note
Outstanding Receipts and Outstanding Payments accounts are used to record accurately the incoming or outgoing payments at the moment such transactions happen.
Example: When you send a payment to a Vendor, you will make a transfer order to your bank and wait for the bank to perform that transaction. This transfer may take some time to move money from your bank account to the Vendor’s bank account. At this moment, your transfer order creation is credited to your Outstanding Payments account. Upon receiving your bank statement regarding this transfer order, you will be able to record and reconcile it to nullify the value of the Outstanding Payments account.
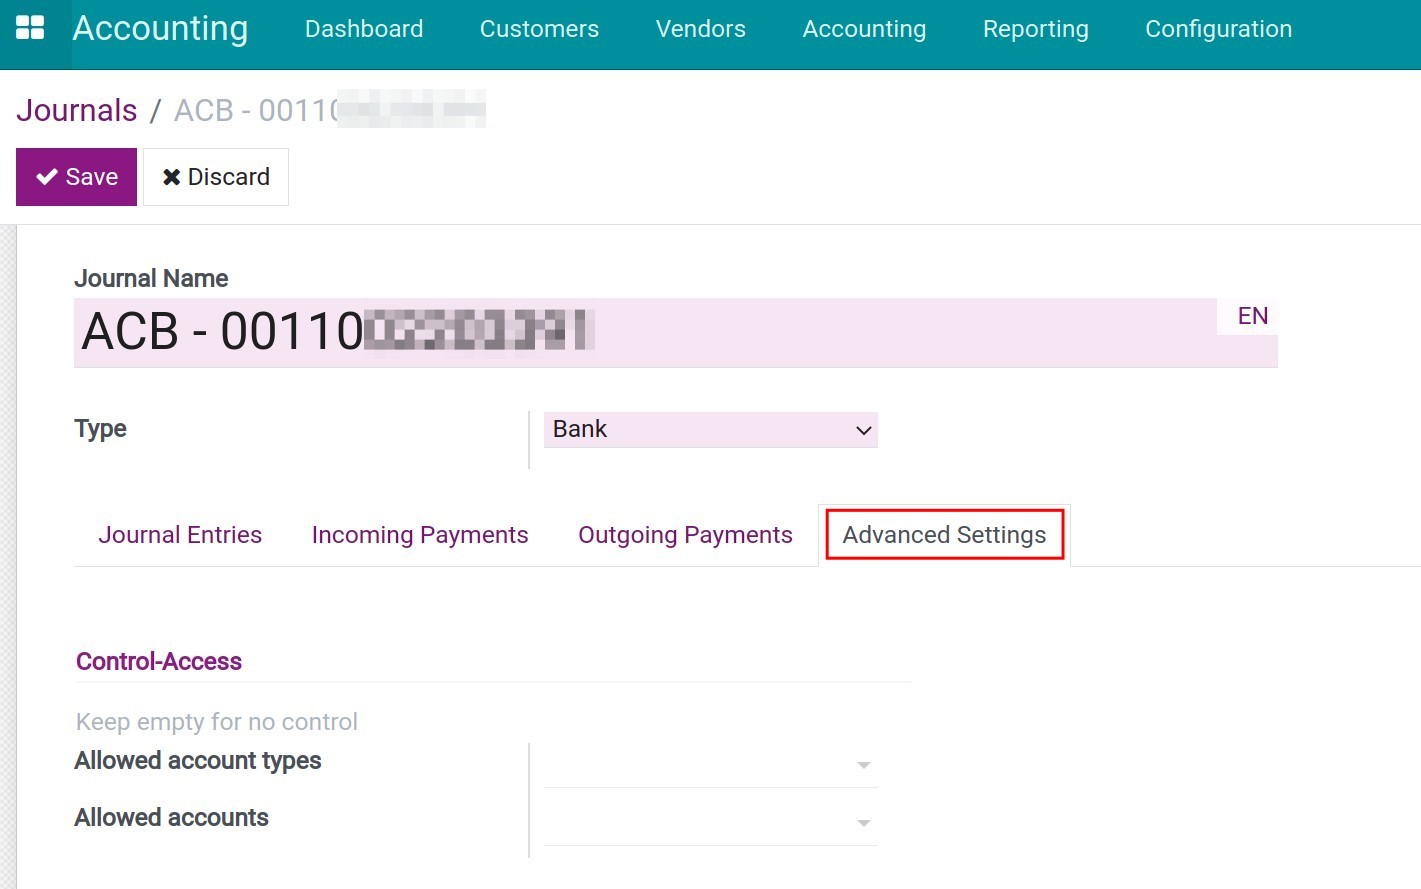
Advanced Settings tab: You can set up allowed account types and account to control selection or keep them empty for no control in this Journal.
Allowed account types: Select the account types that can have access to this Journal.
Allowed accounts: Select the accounts that can use this Journal.
Click Save to save the bank journal setting information.
See also
Related article
Transfer between internal bank accounts
Transfer between Bank account and Cash on hand
Time deposit transactions
Budget Management
Budget Management
Requirements
This tutorial requires the installation of the following applications/modules:
iSuite Accounting & Finance
iSuite Budget
The Budgets app is where you make the necessary configurations, create and keep tracking of the budgets, and view the budgets analysis reports. The management can be done by using:
Budgetary Positions: through accounting accounts;
Analytic Accounts;
Combination of Budgetary Positions and Analytic Accounts.
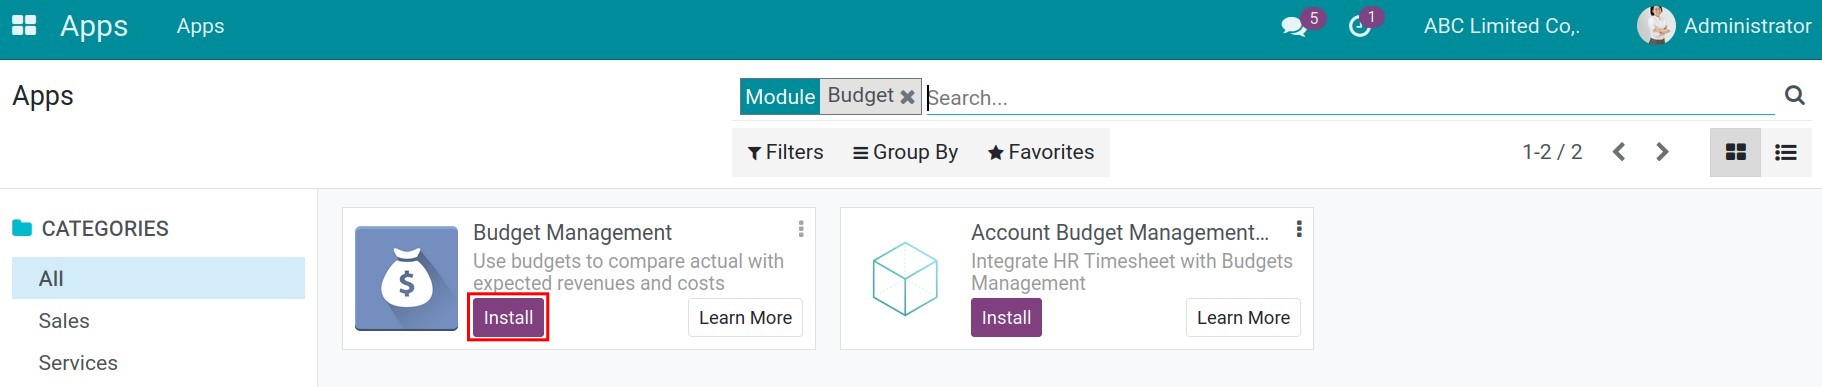
Install Budget Management app
Navigate to Apps, find the Budgets, click on Install.
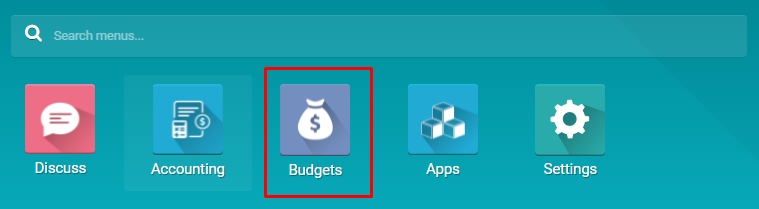
After installing, the Budgets app will be available on the main menu.
User access rights
With Budget App, iSuite system supplies these user access rights:
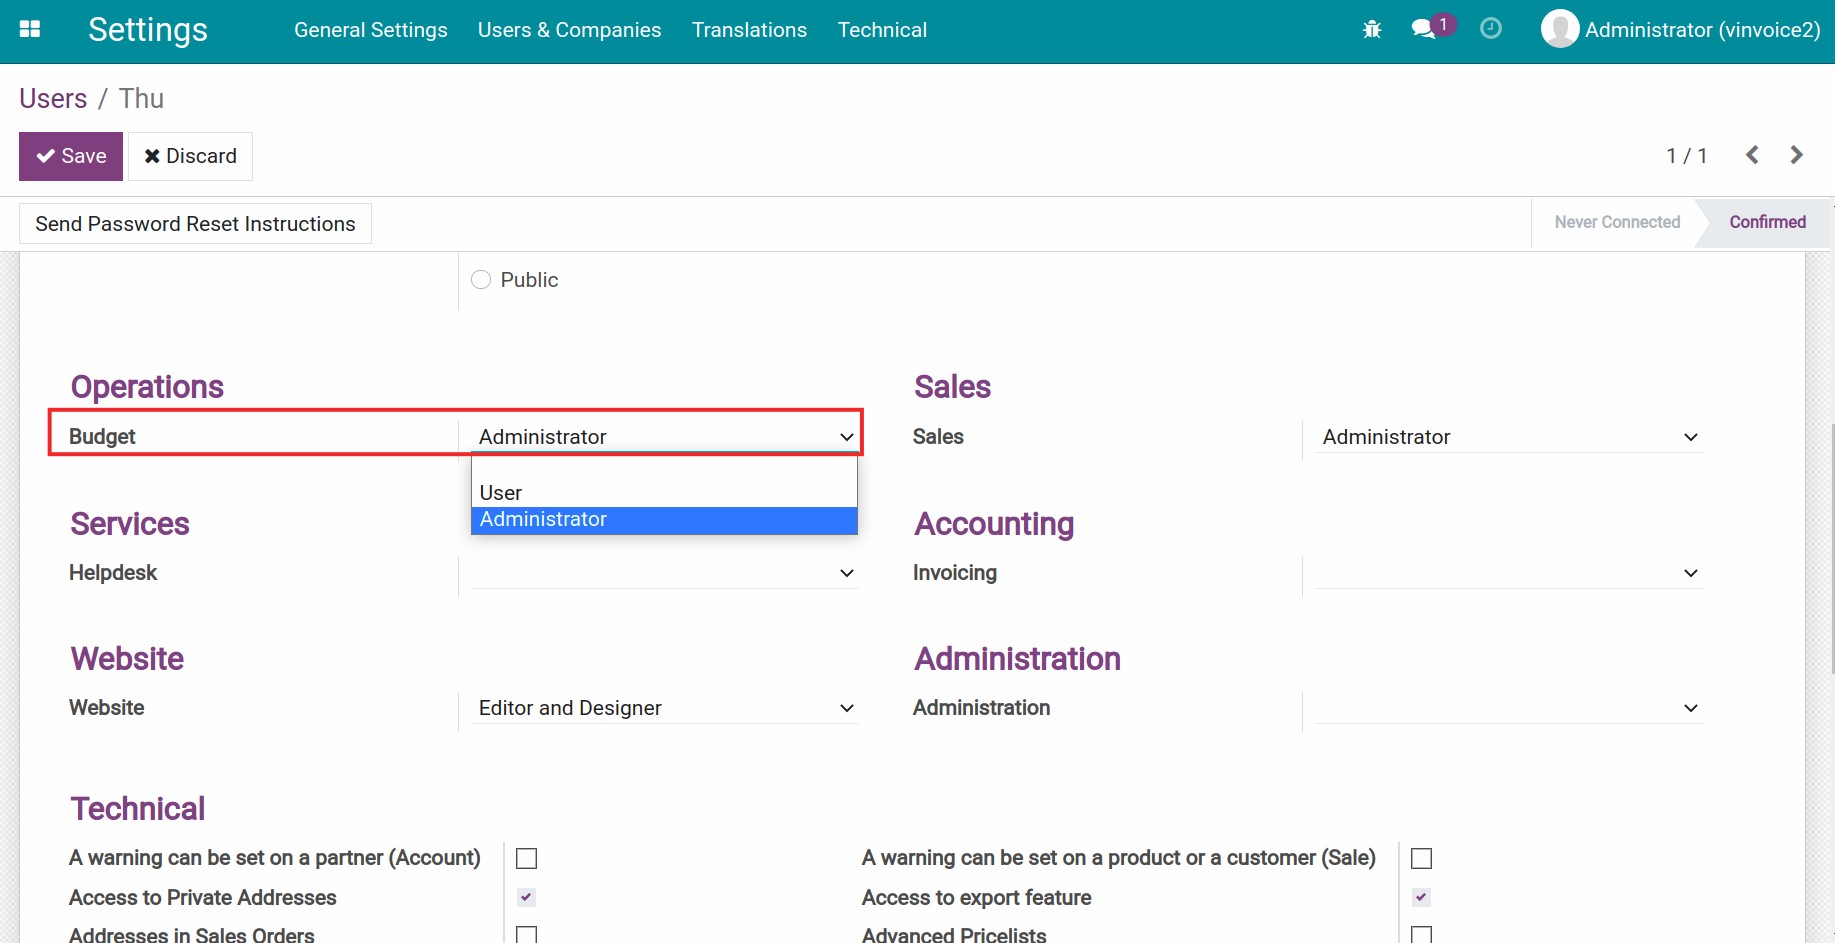
Leave it blank: User can’t see or access to Budget App.
User: User can create Budget, edit, delete or see the Budget Analysis reporting of budget that he/she created. User can’t create, edit or delete a Budgetary Positions.
Administrator: User can create, edit or delete a Budgetary Positions, Budget and see the Budget Analysis reporting.
Create the tools for managing budget
Analytic Account
Analytic Account is a tool to collect revenue/expenses related to a specific budget. You need to set an analytic account on the related revenue/expense accounting entries to create links to the budget.
Budgetary Positions
Budgetary Positions is built to help budget managers collect revenue/expenses based on the financial accounting accounts.
In Settings, on the view to enable the Budgets Management feature, you will see a shortcut for creating Budgetary Positions.

Click on Budgetary Positions to create a budgetary position. Or, you can also do it by navigating to Budgets ‣ Budgetary Positions ‣ Create.

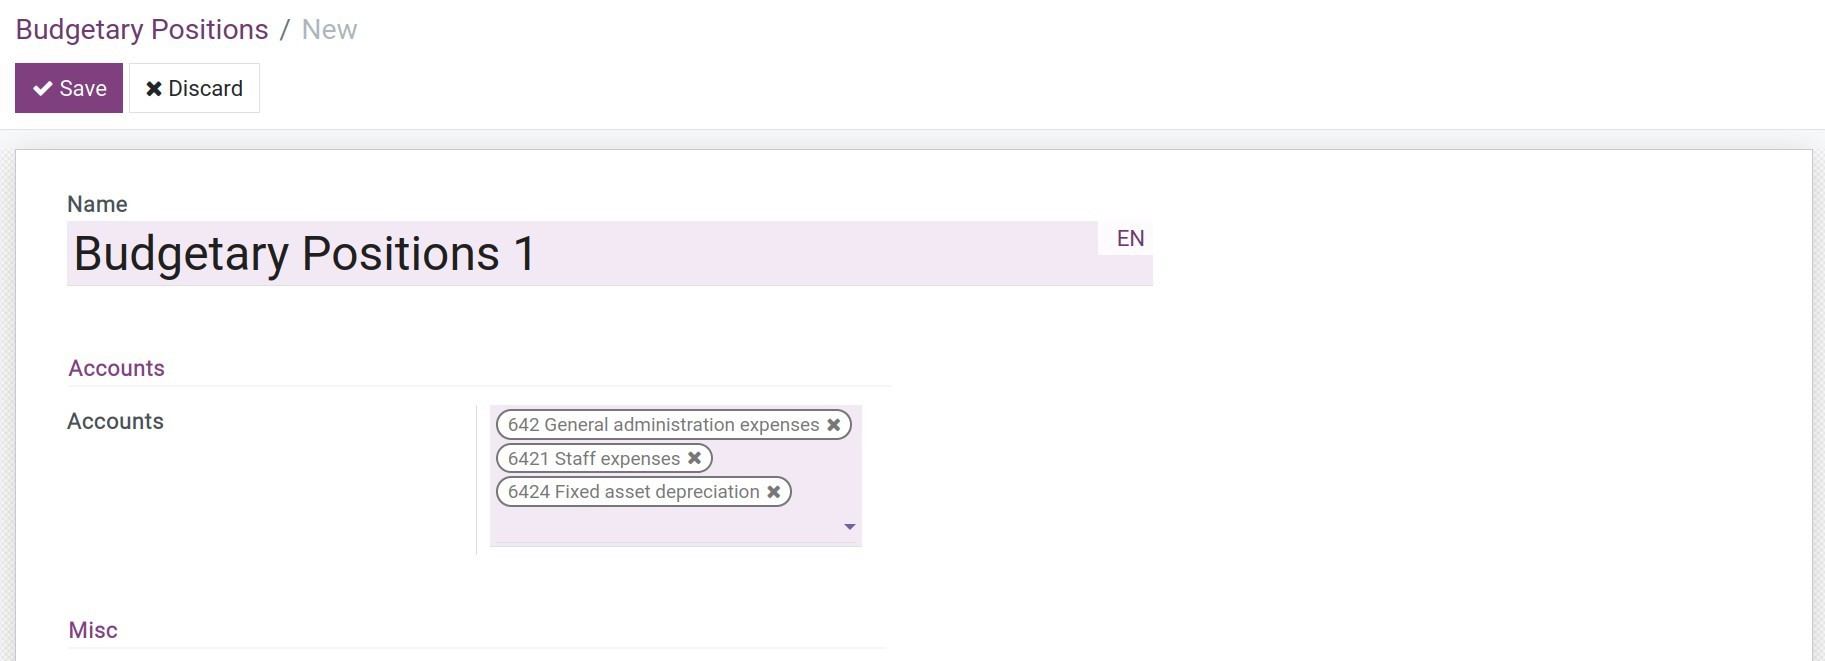
For instance, when creating a budget to track the office expenses. We will create a budgetary position with the name Budgetary Position 1. The expenses will be registered to these accounts:
Account 6421: Staff expenses;
Account 6423: Office equipment expenses;
Account 6424: Fixed asset depreciation.
The information of the Budgetary Position 1 will be entered as follows:
Budget Management
Create budget
For example, we create a budget for Office expenses in 2022 at 200.000.000 VND. Follow these steps to create a new budget:
Navigate to Budgets > Budgets > Create to create a budget

Fill in General information
Enter the following information:
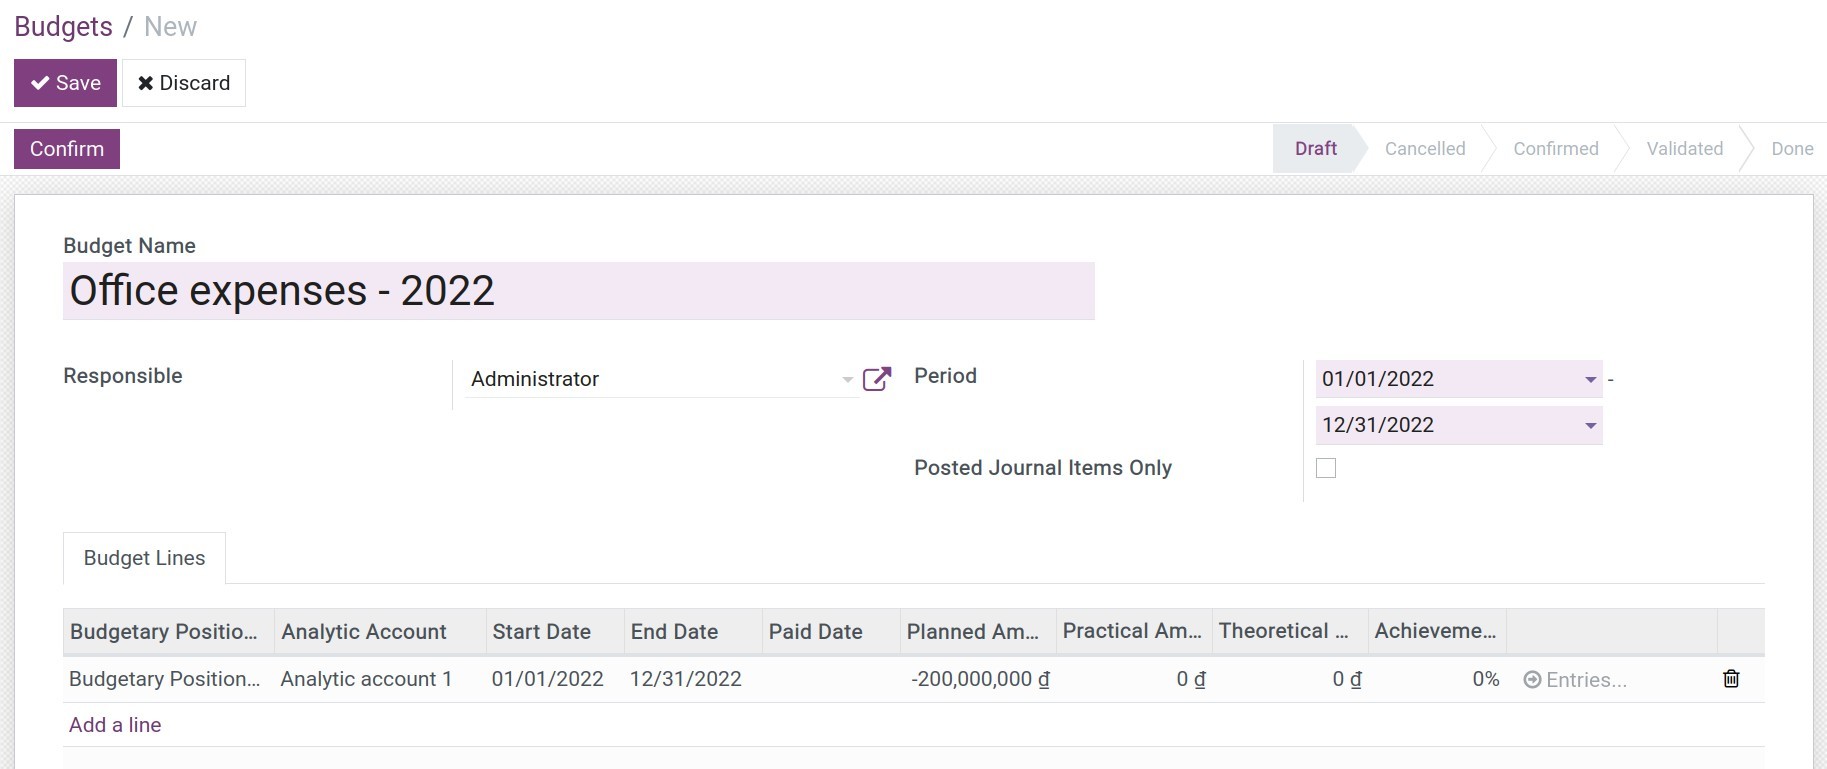
Budget Name: Name of the budget - Office expenses - 2022;
Period: Planned start date and end date - From 01/01/2022 to 31/12/2022;
Posted Journal Items Only: This feature will affect the way the data is collected to the budget:
- Budget using only Budgetary Positions:
- Checked: Only posted journal entries will be added to the Practical Amount for calculation.
- Not checked: All draft and posted journal entries will be added to the Practical Amount for calculation.
- Budget using only Analytic Accounts:
- Whether this field is checked or not, only posted analytic accounting entries will be added to the Practical Amount.
- Budget using the combination of Budgetary Positions and Analytic Accounts:
- Whether this field is checked or not, only analytic accounting entries that contain posted journal entries will be added to the Practical Amount for calculation.
- Budget using only Budgetary Positions:
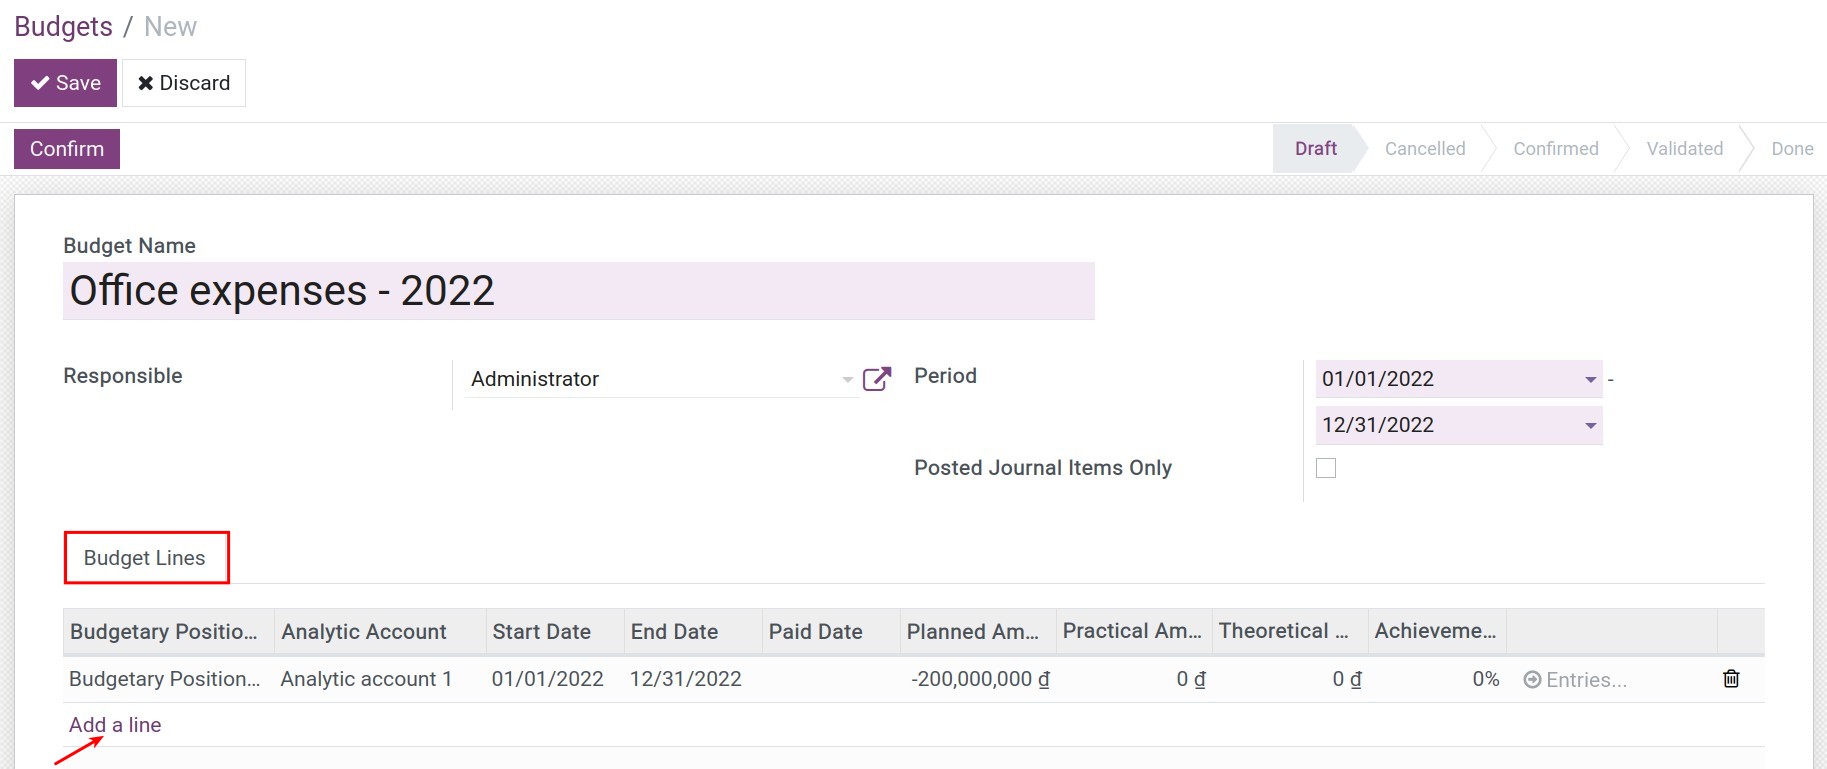
Fill in Budget Lines information
Click on Add a line then enter the following information:
Budgetary Positions: Select the Budgetary Positions if you want to manage your budget by budgetary positions. It can be empty if you manage budget by analytic account.
Analytic Account: Select the Analytic Account if you want to manage your budget by analytic account. It can be empty if you manage budget by budgetary positions.
Note
You can manage a budget by using Budgetary Positions or Analytic Accounts or both of them.
The combination of Budgetary Positions and Analytic Accounts makes budget analysis more detailed and multi-dimensional.
Select both Analytic Account and Budgetary Positions, then fill in the other fields following the instruction above.
Started Date/End Date: Automatically field based on budget Period that you enterd in the above general information. You can edit them if you want.
Paid Date: Paid Date is used for Theoretical Amount computation.
If Paid Date is specified later than today, the Theoretical Amount will be zero.
If Paid Date is earlier than today,the Theoretical Amount will be equal to the Planned Amount.
In case no Paid Date is specified, the Theoretical Amount will be calculated based on the elapsed time counting from the Start Date.
Planned Amount: Enter negative numbers upon money out and positive numbers upon money in.
Practical Amount: Every Journal Item amount, whose accounting date is within the budget period, will be added to this value if satisfy one of the following conditions:
The Journal Item contains the corresponding Analytic Account (if the budget is managed by using Analytic Account).
The Journal Item contains the corresponding accounting account that has been selected in the Budget Position (if the budget is managed by using Budget Position).
Both of the two conditions above (if the budget is managemed by using Analytic Account and Budget Position).
Theoretical Amount: The planned value to be achieved at present. The system will automatically calculate by the following formula:
Theoretical Amount = Planned amount per day * The number of days counted from the start date to the present.
Planned amount per day = Planned Amount / The number of days in the budget period.
Achievement: The percentage of Practical Amount in comparison to Theoretical Amount.
After entering all the information, click on Save. Then, click on Confirm and Approve to enable the budget.
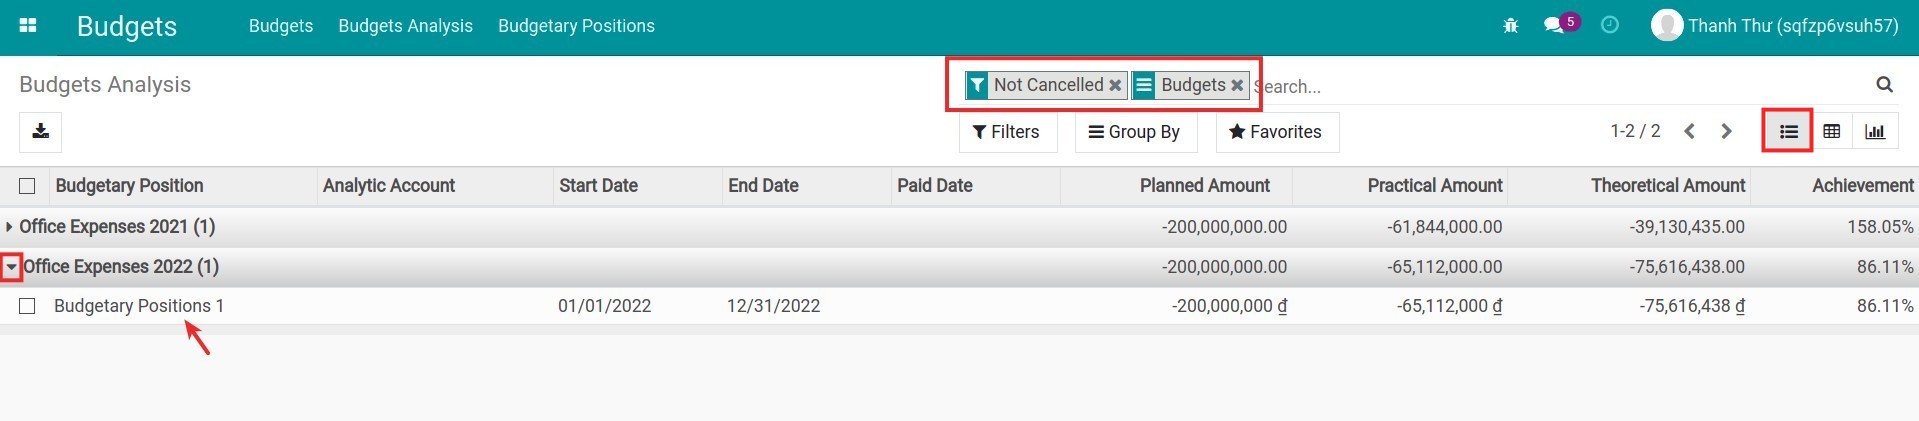
Budget Analysis
To see Budget Analysis Reporting, you go to Budget > Budget Analysis. Here, you can see a list of all the budget with Not Cancelled filter and Budgets group.
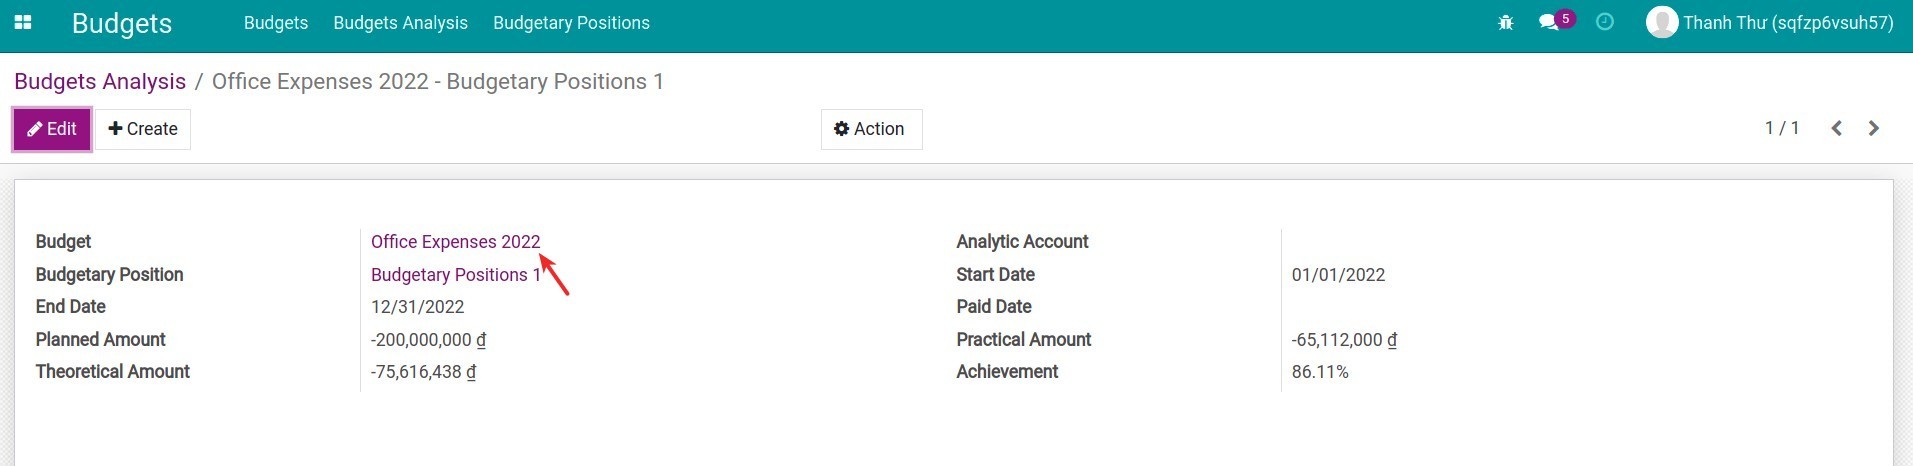
Click on the triangle icon to show detail lines and go to Budget view.
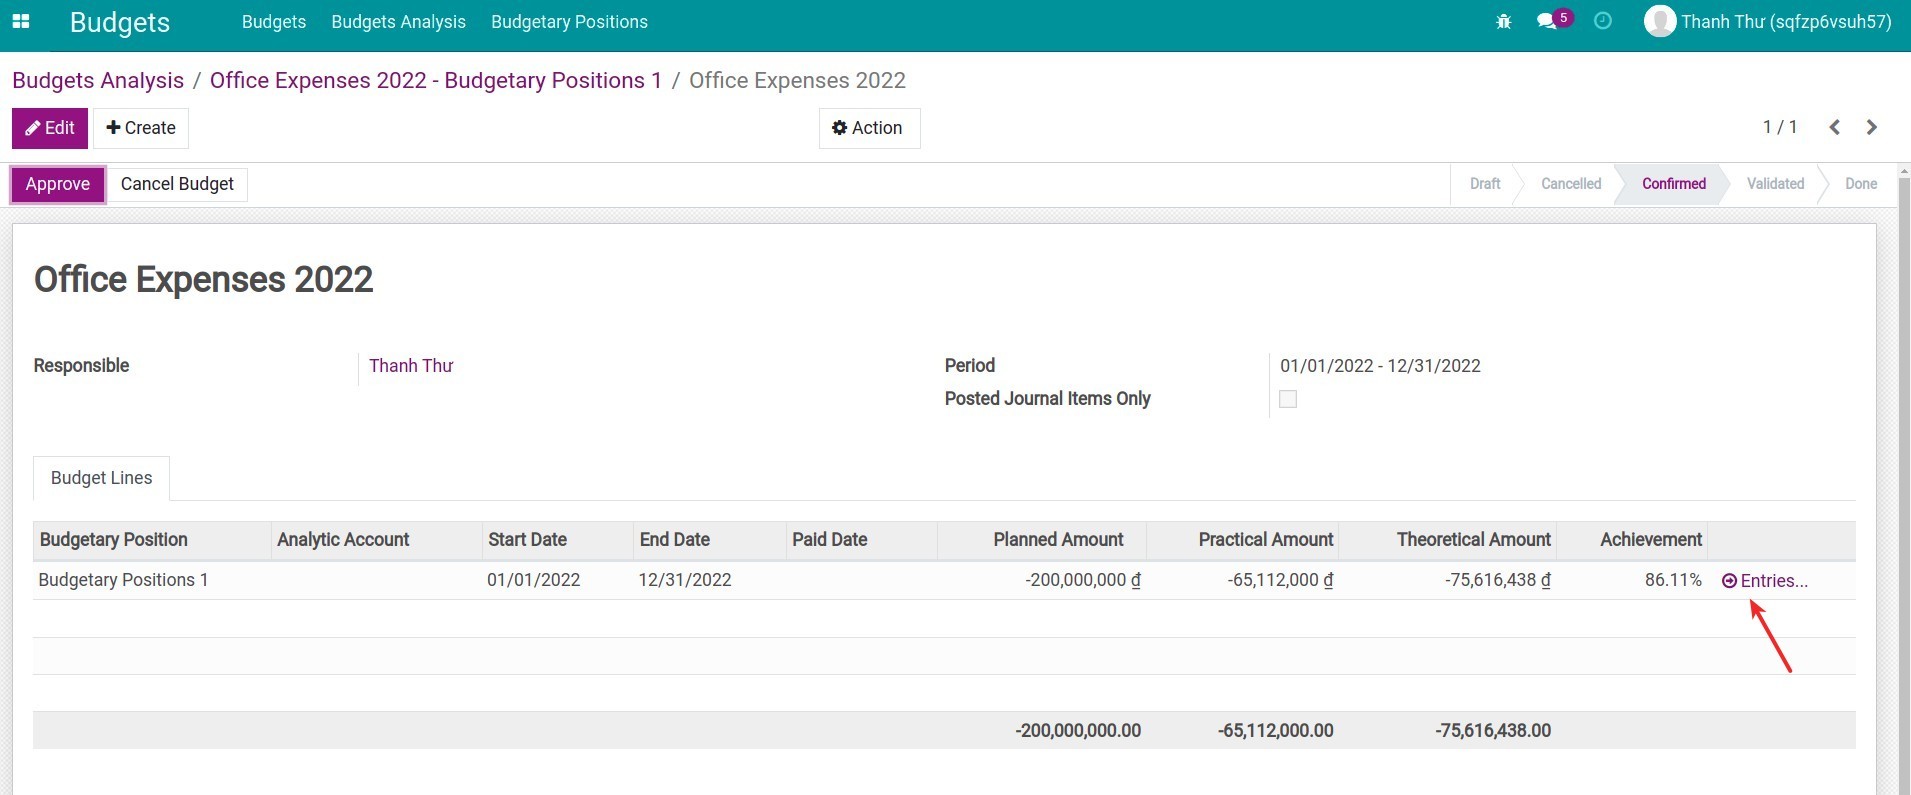
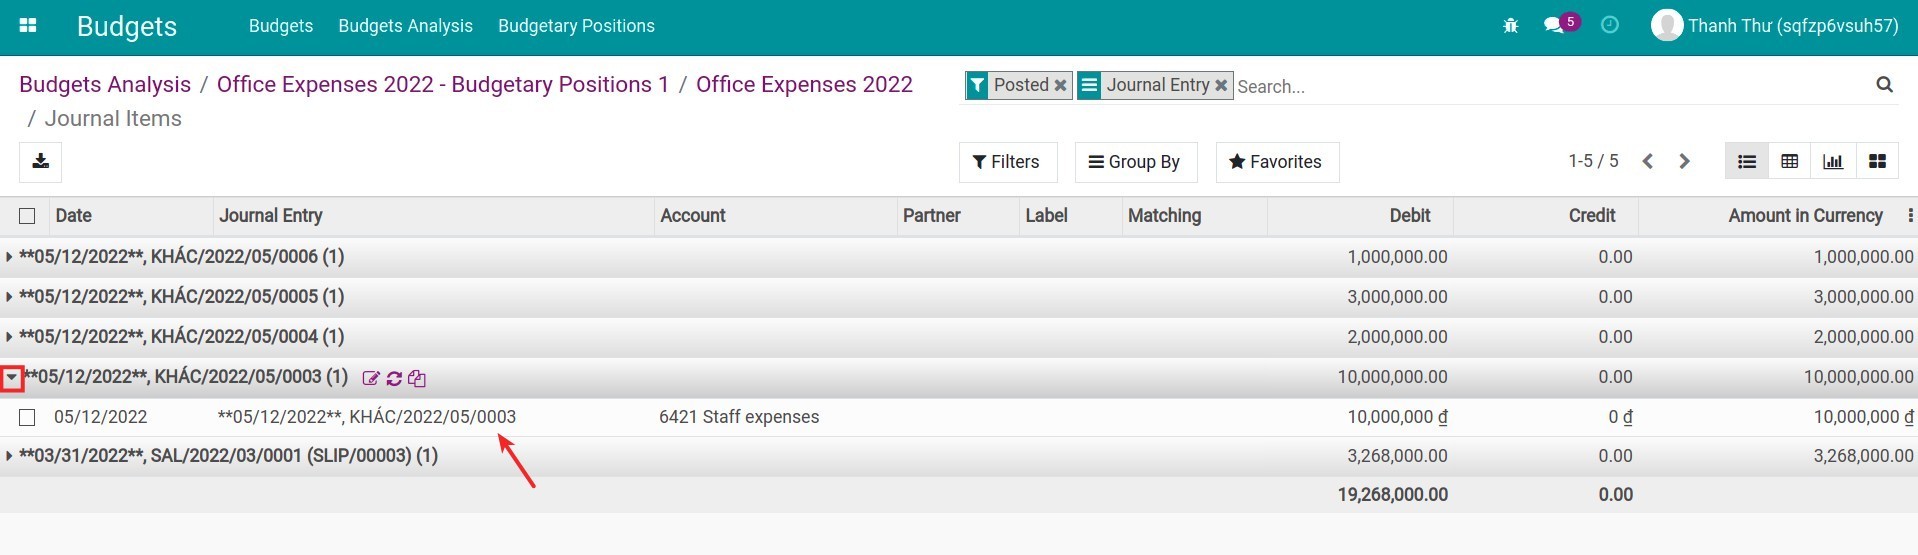
In the budget view, click on Entries to see all the Journal Items.
Budgets in the Viindoo system give you an intuitive, instant view to evaluate the budget, to see if it sticking to the plan and on the right track. From there, you can make adjustments to accomplish your plan for the rest of the time. Based on the old data, you can review, compare and plan more effectively.
See also
Related article
Analytic account in Viindoo
Closing a fiscal year in iSuite
Closing a fiscal year in iSuite
Requirements
This tutorial requires the installation of the following applications/modules:
- isuite Finance & Accounting
One thing that all accountants have to do at the end of the year is to close the fiscal year to prevent adjusting the journal entries when the data of the reports have been closed.
There are two ways to close a fiscal year on the iSuite Accounting app:
- Navigate to Accounting > Accounting > Lock Dates, the user will be navigated to Lock your Fiscal Period view.
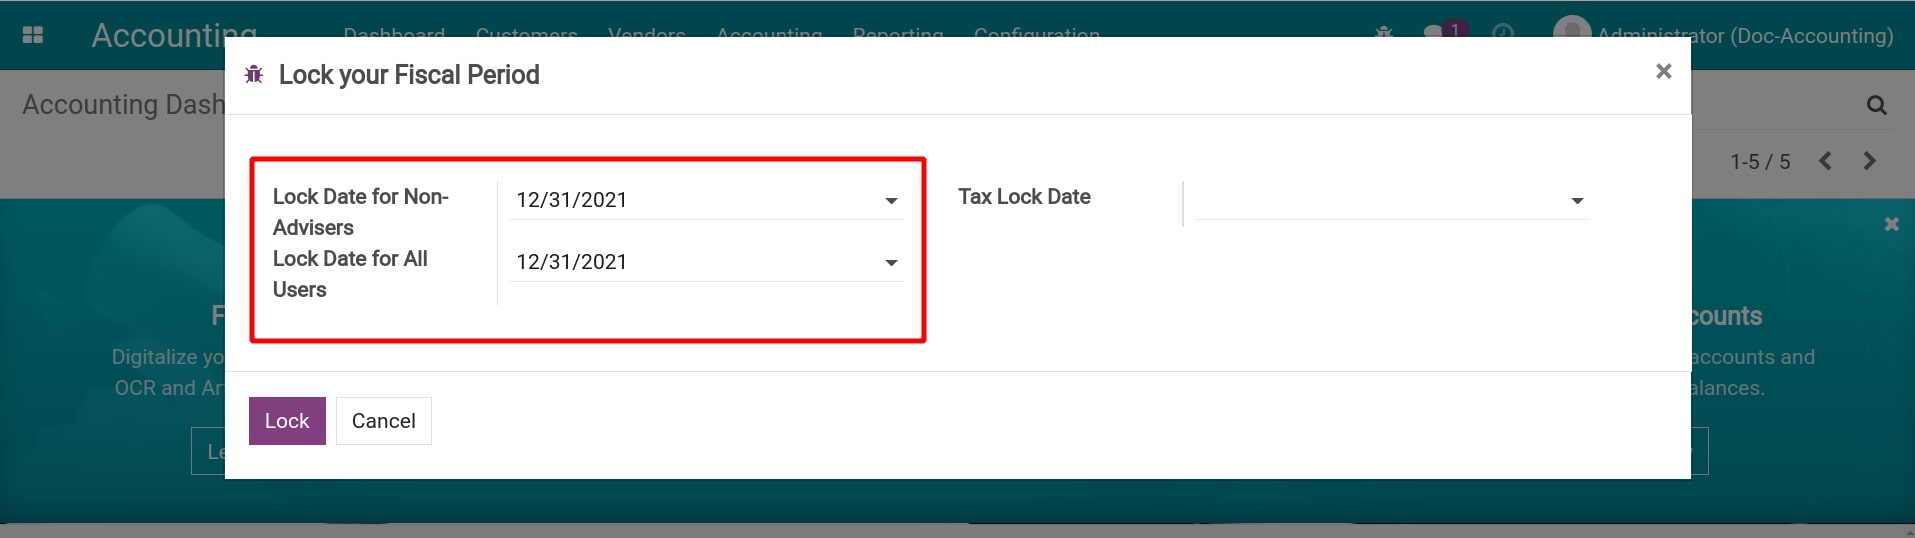
On this view, users enter the lock dates information:
- Lock Date for Non-Advisers: Accounting data with an accounting date before or equal to the date set here will not be edited by users except those who have the Administrator right of the Accounting.
- Lock Date for All Users: All users will not be able to edit accounting data with the accounting dates before or equal to the date set here.
- Tax Lock Date: All users will note be able to edit tax accounting data before or equal to the date set here.
Warning
To enter this view, the user needs to have the Administrator right of Accounting .
After entering the information, press Lock to finish closing the fiscal year.
- Navigate to Accounting > Configuration > Settings, find the Fiscal Period Closing field at the Fiscal Periods section.
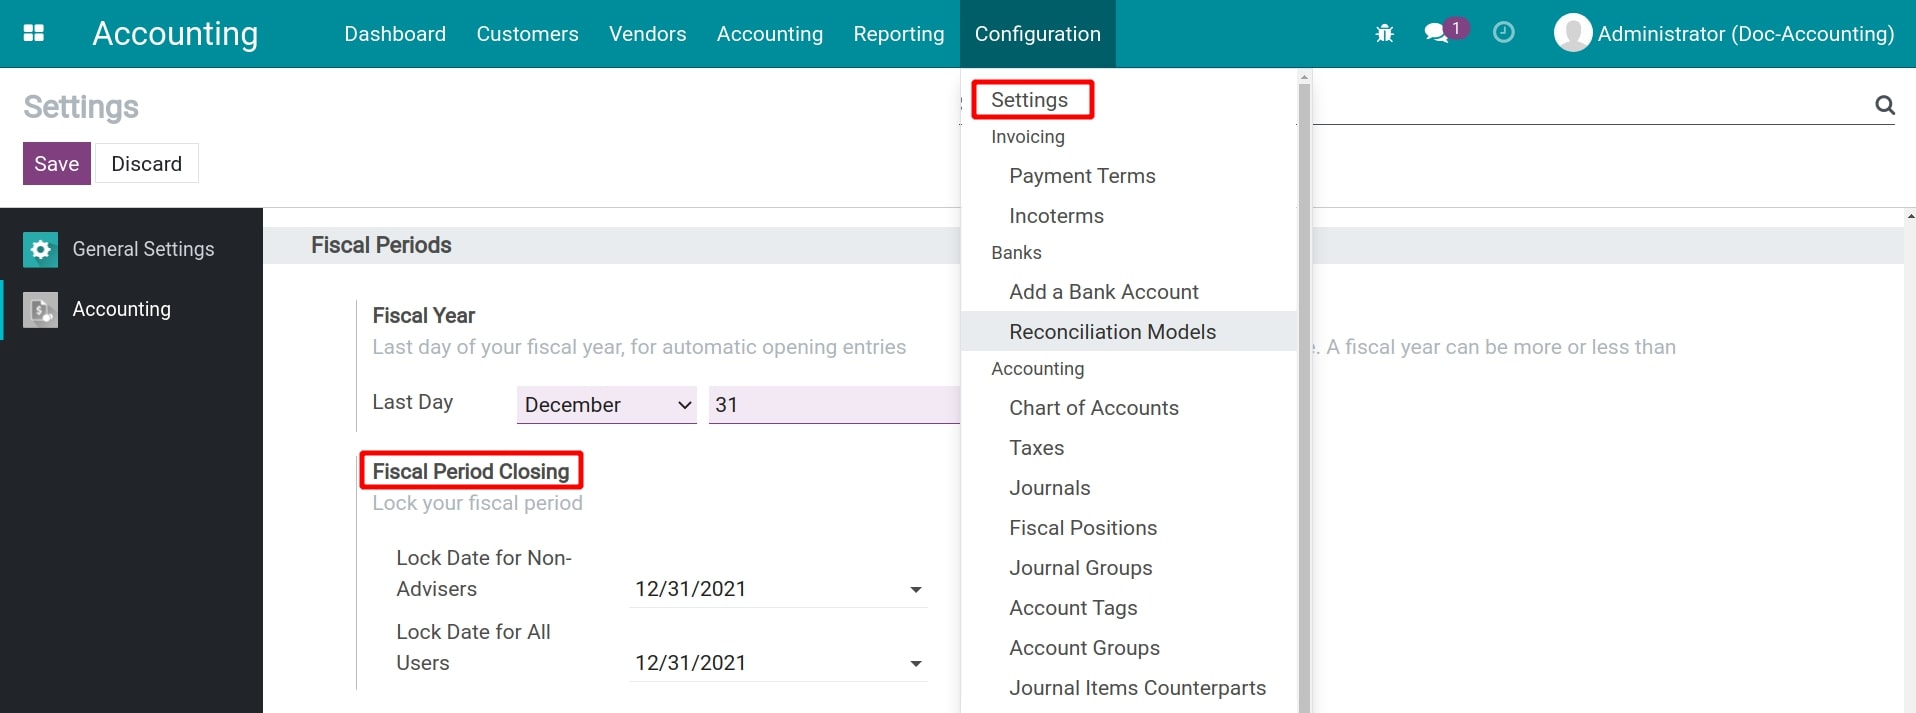
Enter the information the same way as in the first method.
See also
Related article
Creating Default Analytic Account
Creating Default Analytic Account
Requirements
This tutorial requires the installation of the following applications/modules:
iSuite Accounting & Finance
iSuite Purchase
The analytic default setting rules in iSuite support you in managing the different aspects of business operations more accurately by configuring the rules for automatically identifying the accounting account, the analytic tags by products, partners, user accounts, etc…
To use this feature, navigate to Accounting > Configuration > Setting, turn on Analytic Accounting and Analytic Tags then press Save.

Analytic Defaults Rules Configuration
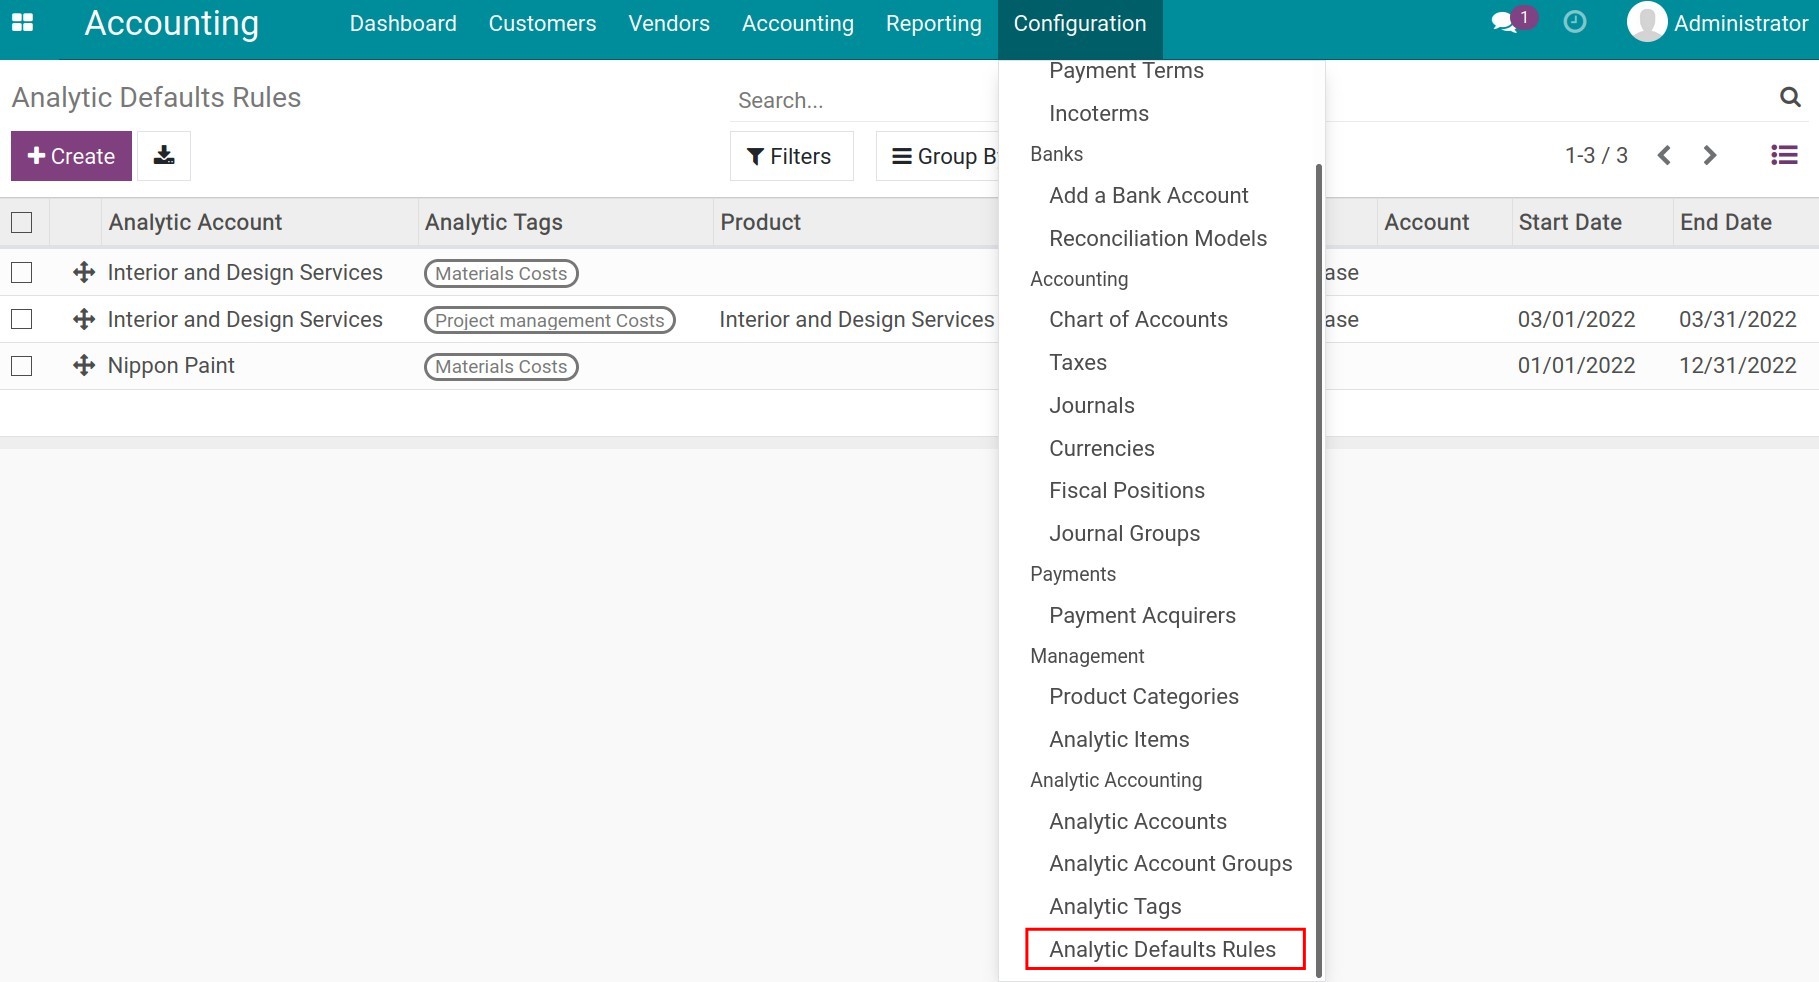
To create a new rule, you navigate to Accounting > Configuration > Analytic Defaults Rules:
Click on the Create button to open the view for configuring, then you need to enter the following information:
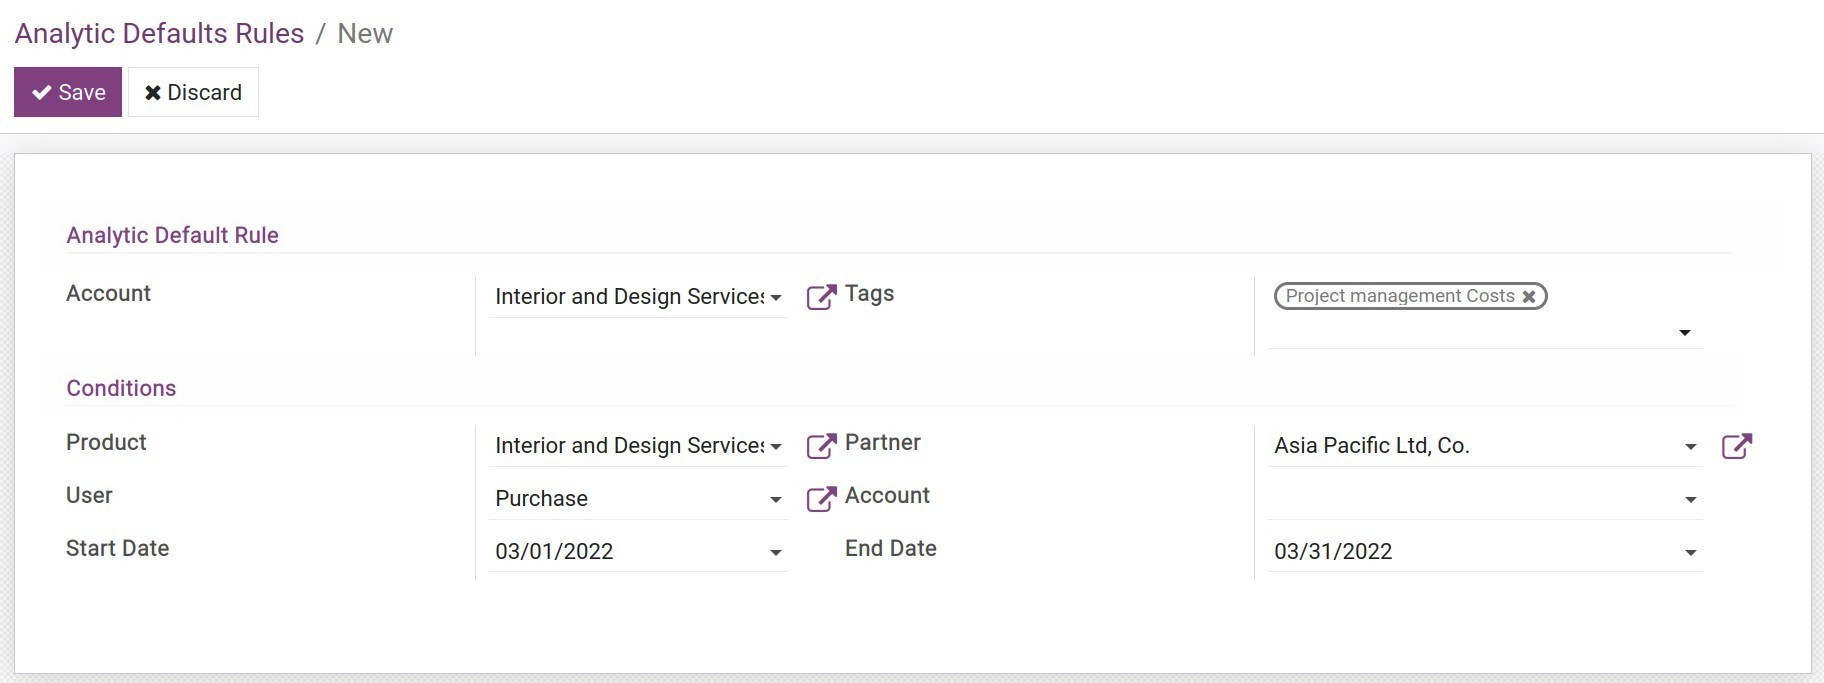
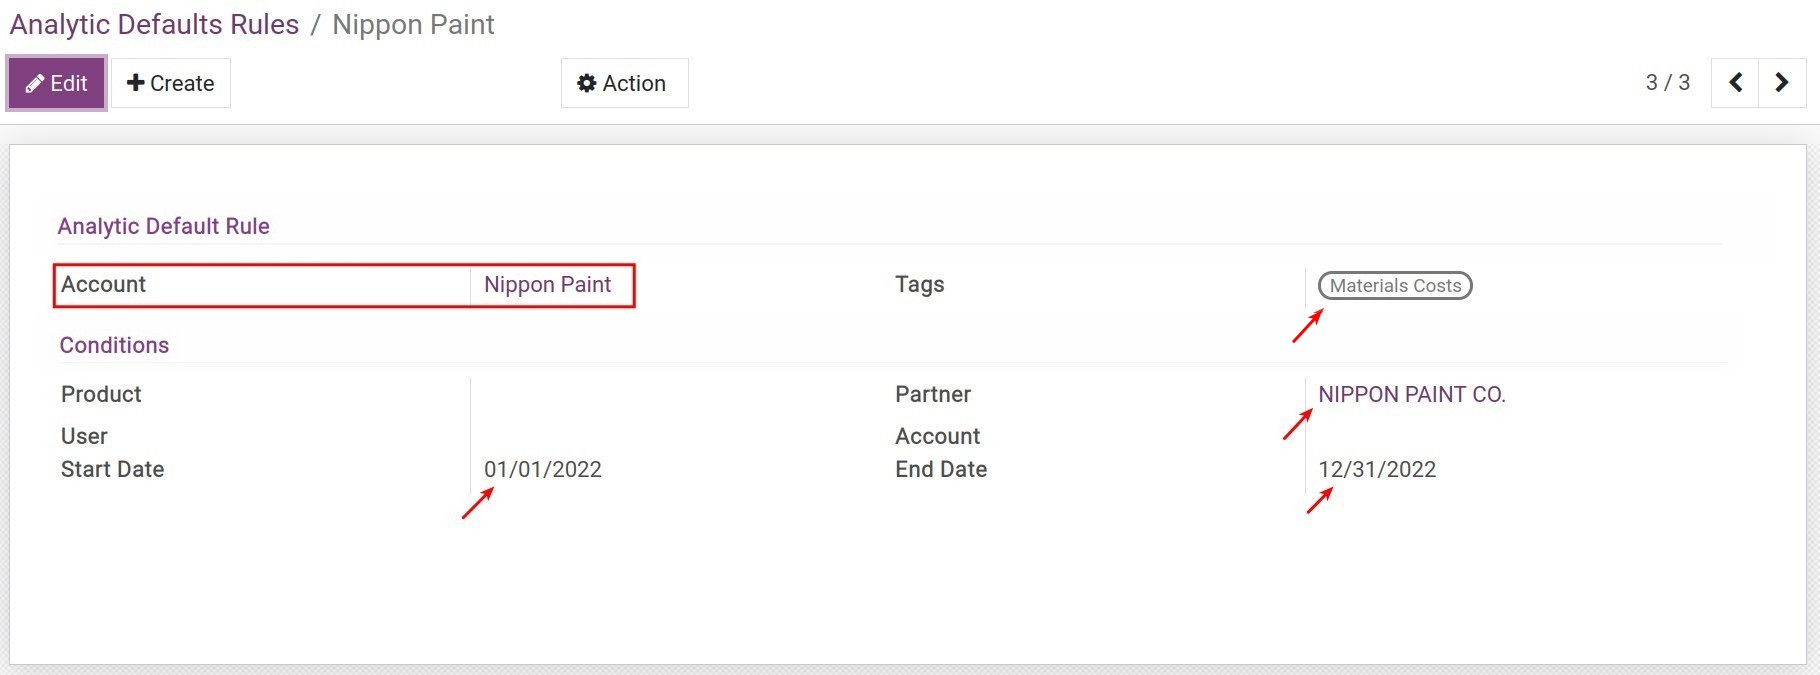
Analytic Default Rule:
Account: Select the analytic account to configure the rules in the list of analytic account in iSuite.
Tags: Select the needed analytic tags to configure.
Conditions:
Product: Select a product from the product list. The related accounting arising from this product will be attached to the above analytic account and the analytic tag by default.
Partner: This analytic account/analytic tag will be attached to all the journal items related to the selected partner.
User: Select a user account in the system. The journal items created by this user will be attached to the chosen analytic tag above.
Account: Select an accounting account that needs to be attached to the analytic account/analytic tags for analysis.
Start Date: Enter the effective start date of the analytic default rule.
End Date: Enter the expiration date of the analytic default rule.
Tip
Depending on your demands and the management purposes, you can flexibly use the above information to create the rules for attaching the default analytic account/analytic tags without filling in all the required fields above.
Use the Analytic Default Rules
For instance, you need to track and manage the related costs of the vendor Nippon Paint Co, Ltd in 2022. You will create an analytic default rule as below:
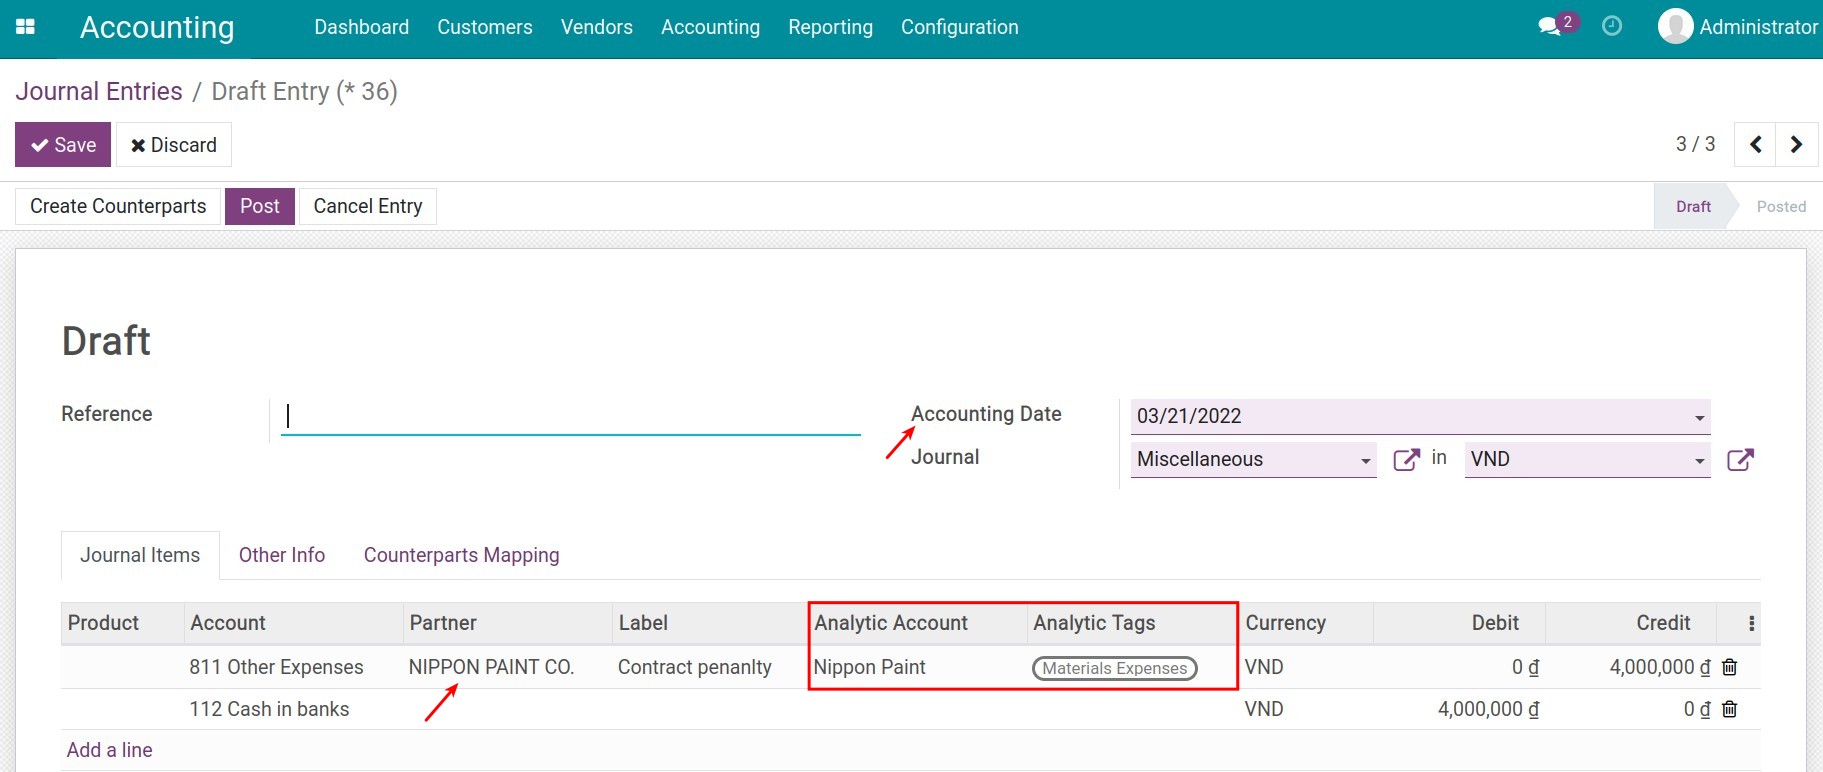
Thus, whenever occurring an expense is related to this vendor, the system will automatically attach the analytic account and the analytic tags as configuration. To illustrate:
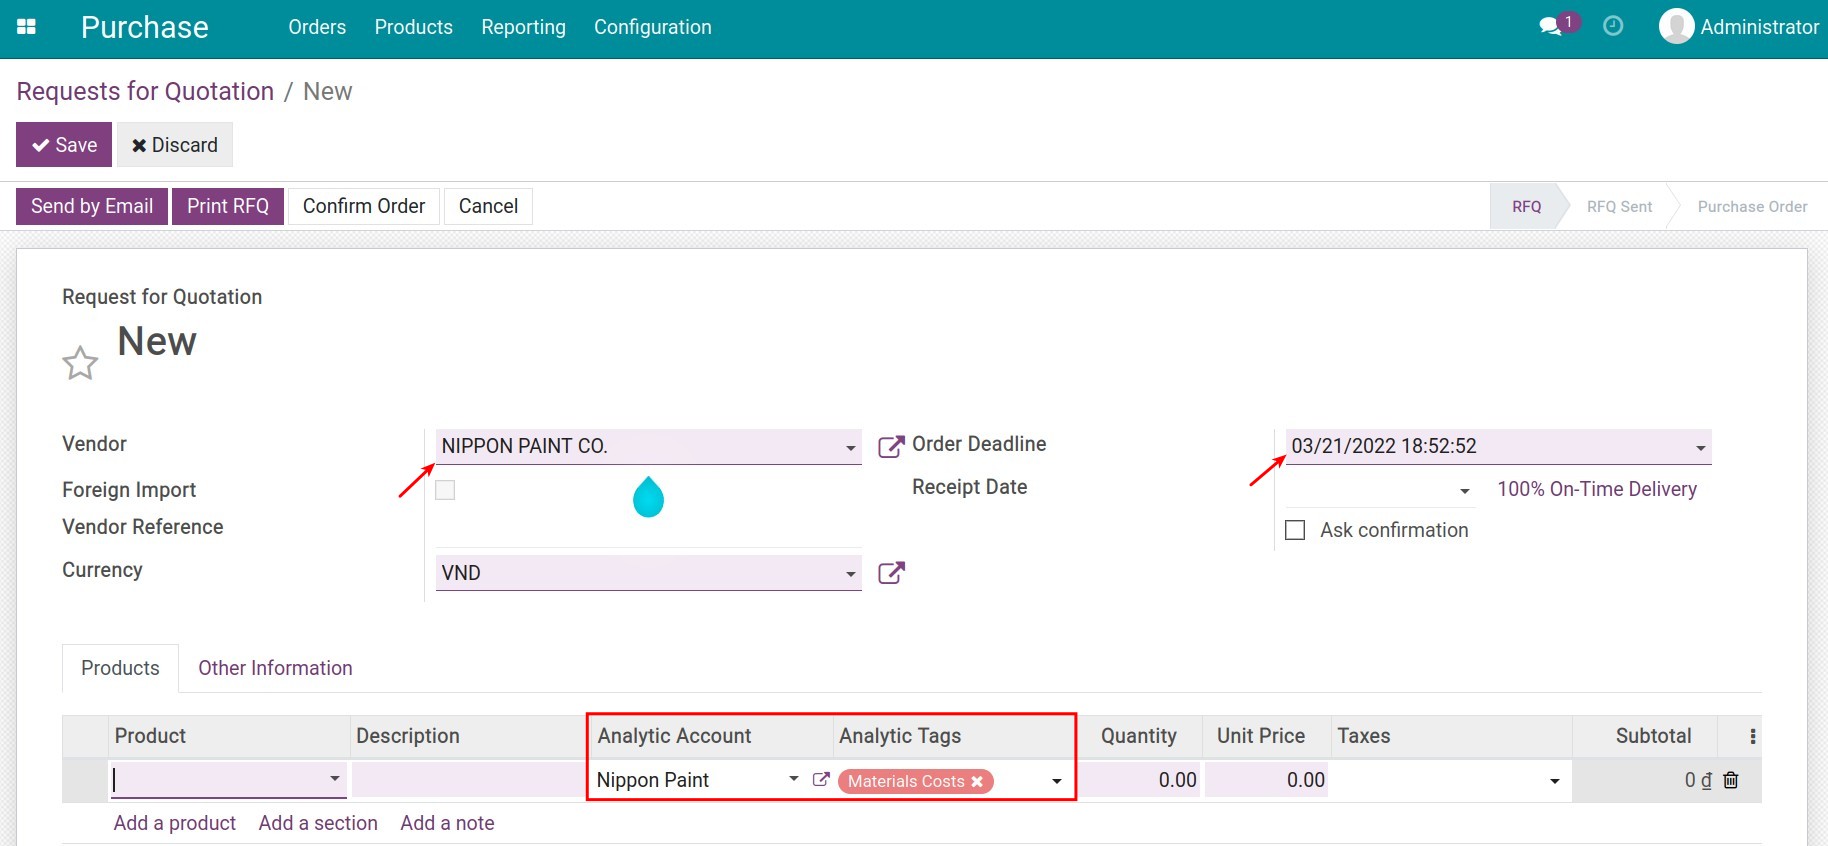
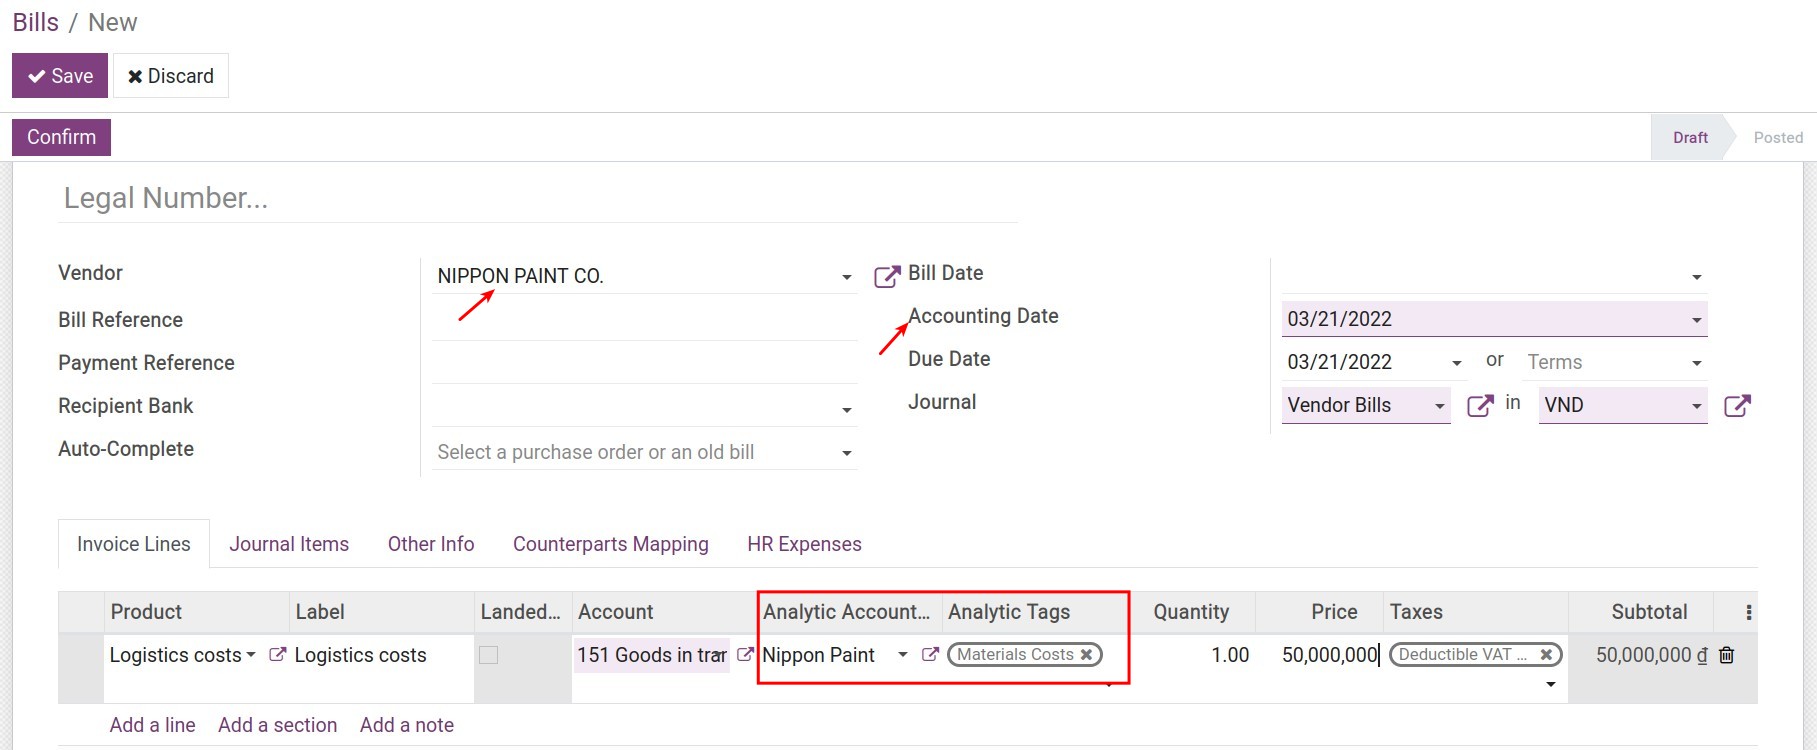
Journal entries
See also
Related article
Budget Management
Expenses and revenue management in iSuite Accounting
Track employee costs in project management
Asset liquidation
Asset liquidation
Assets in enterprises constantly changing. In the course of operation, enterprises may arise the need to Liquidize assets. This article guides you through the steps of asset liquidation with iSuite software.
Requirements
This tutorial requires the installation of the following applications/modules:
Accounting & Finance
Assets Management
Chart of Accounts
Case 1: Liquidize depreciating asset
On the view of the asset in a running depreciation, choose Sell.
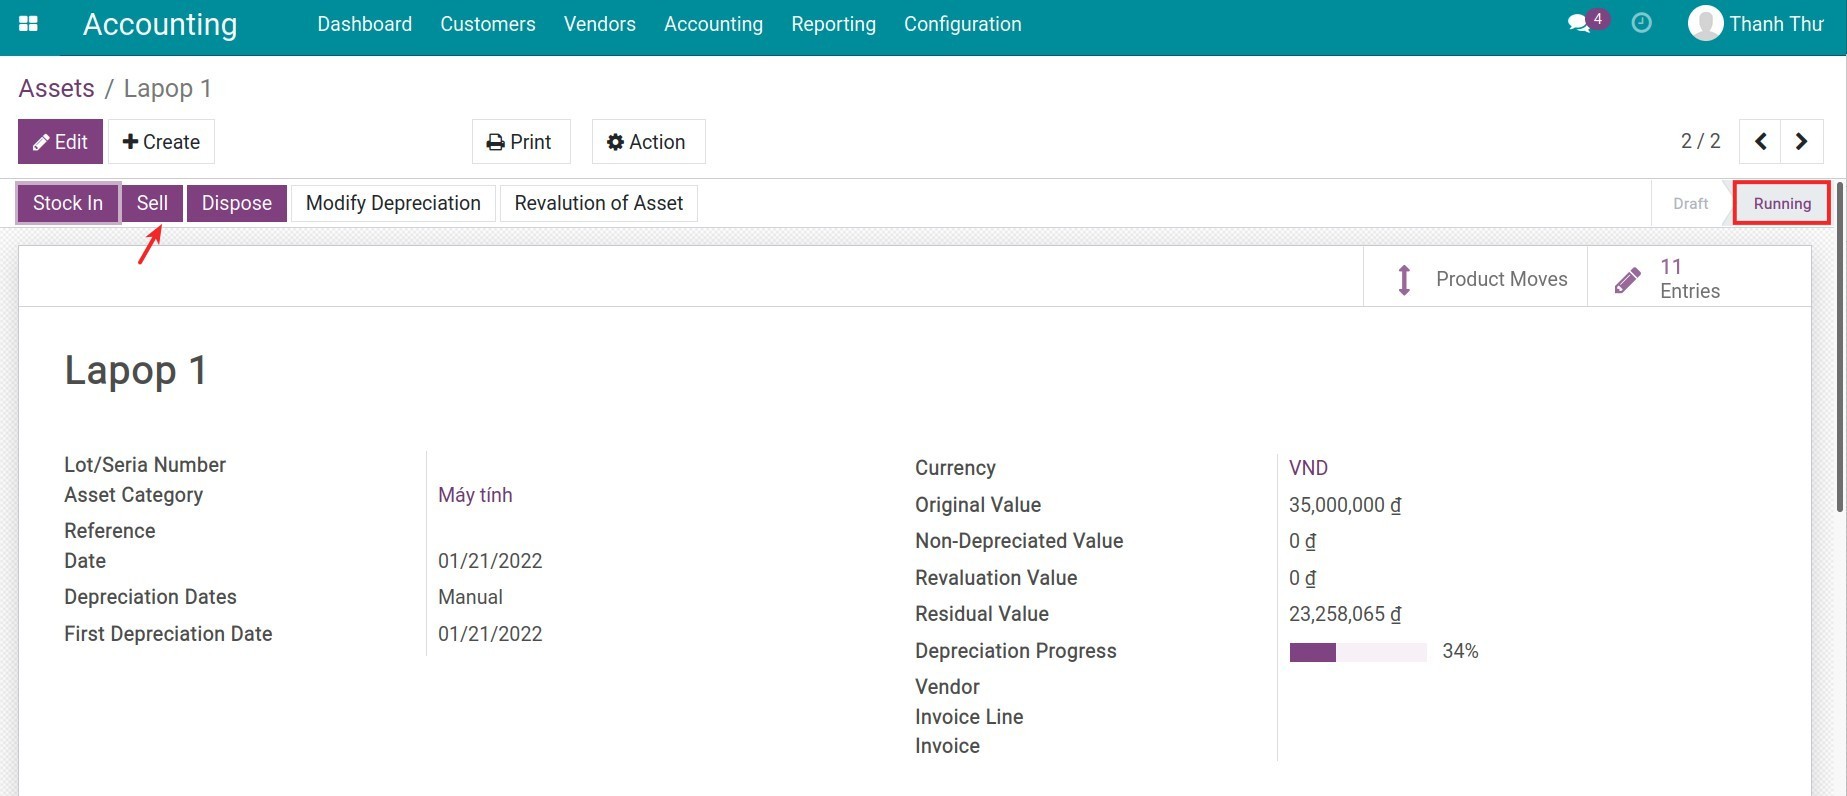
A pop-up window appears, asking for the following information:
Stopped Depreciating Date: The final date of the amortization period, a required field.
Sales Invoice Date: The invoicing date.
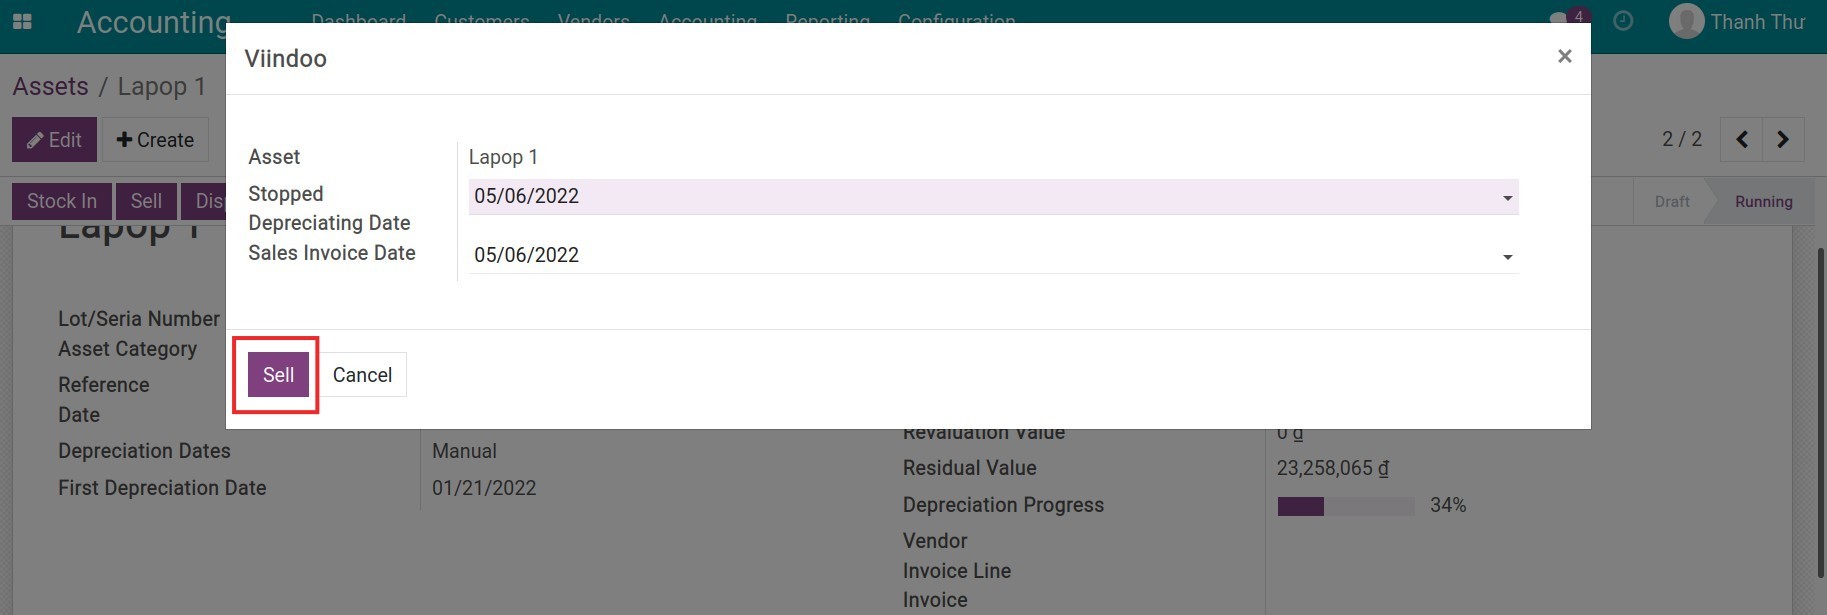
Note
Stopped Depreciating Date can be different from the Sales Invoice Date.
It’s necessary to post all the depreciation entries before the liquidation moment.
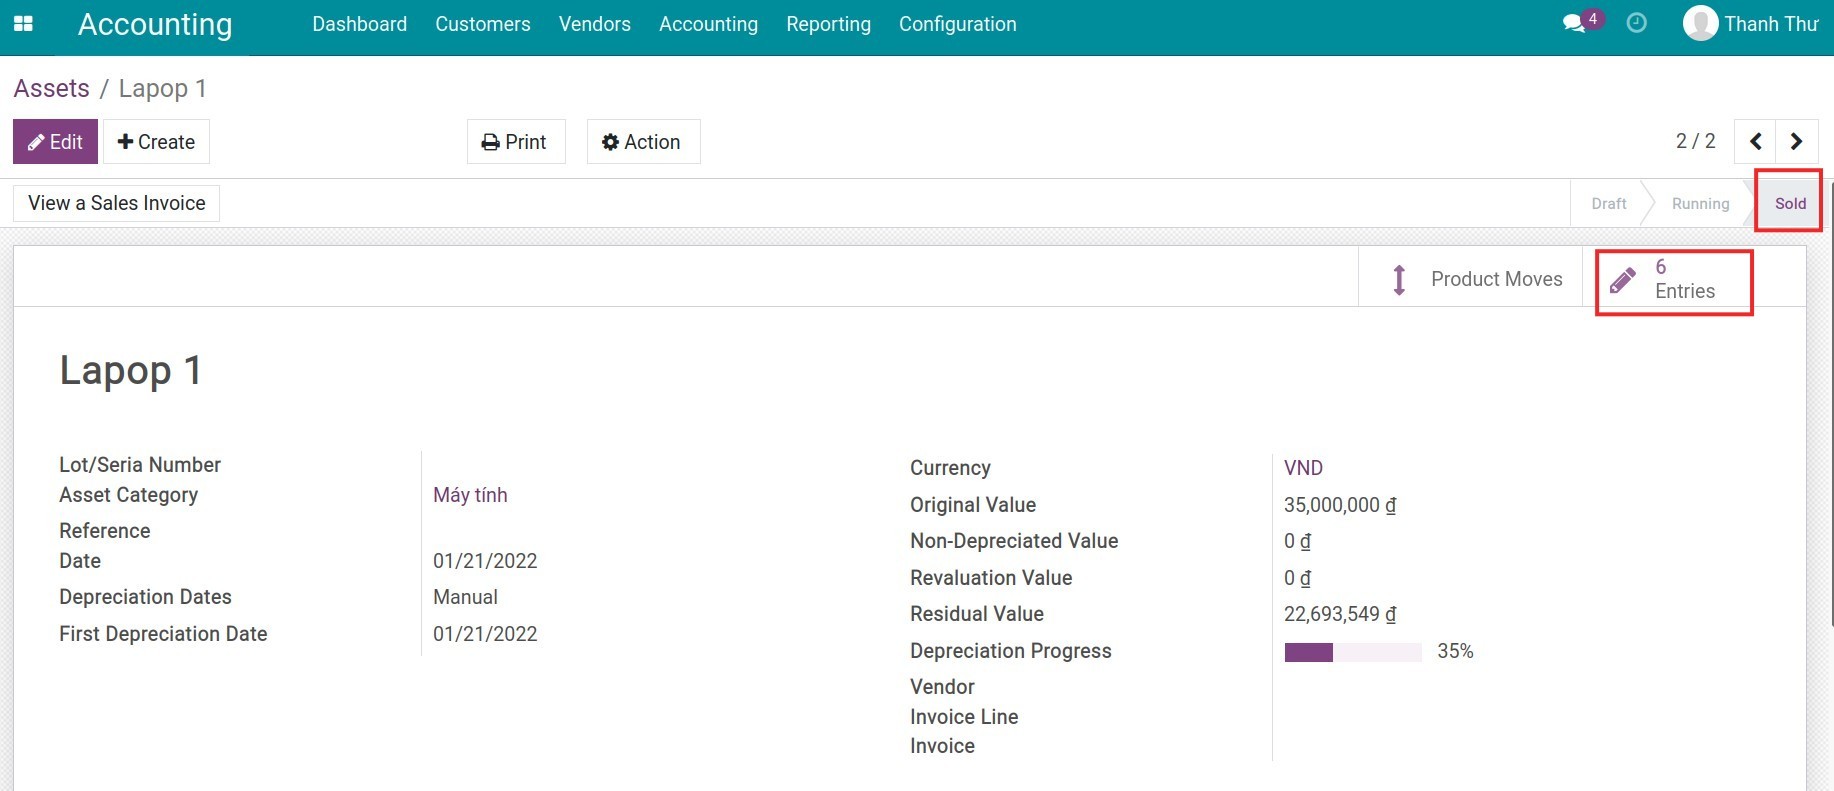
Press Sell. The asset will stop being depreciated, its stage will change from Running to Sold. The system then recalculates the depreciated value at the stopped depreciating moment to create a journal entry to adjust the previously recorded depreciation expense.
Press on Entries to check recalculated data by the system.
See also
Manually create an Asset in iSuite
Example:
Laptop 2.
Original price: 35.000.000 VND.
First Depreciation Date: 01/01/2022.
Number of Entries: 10.
Depreciation method: Linear.
Recurrent Depreciated Value: 3.500.000 VND.
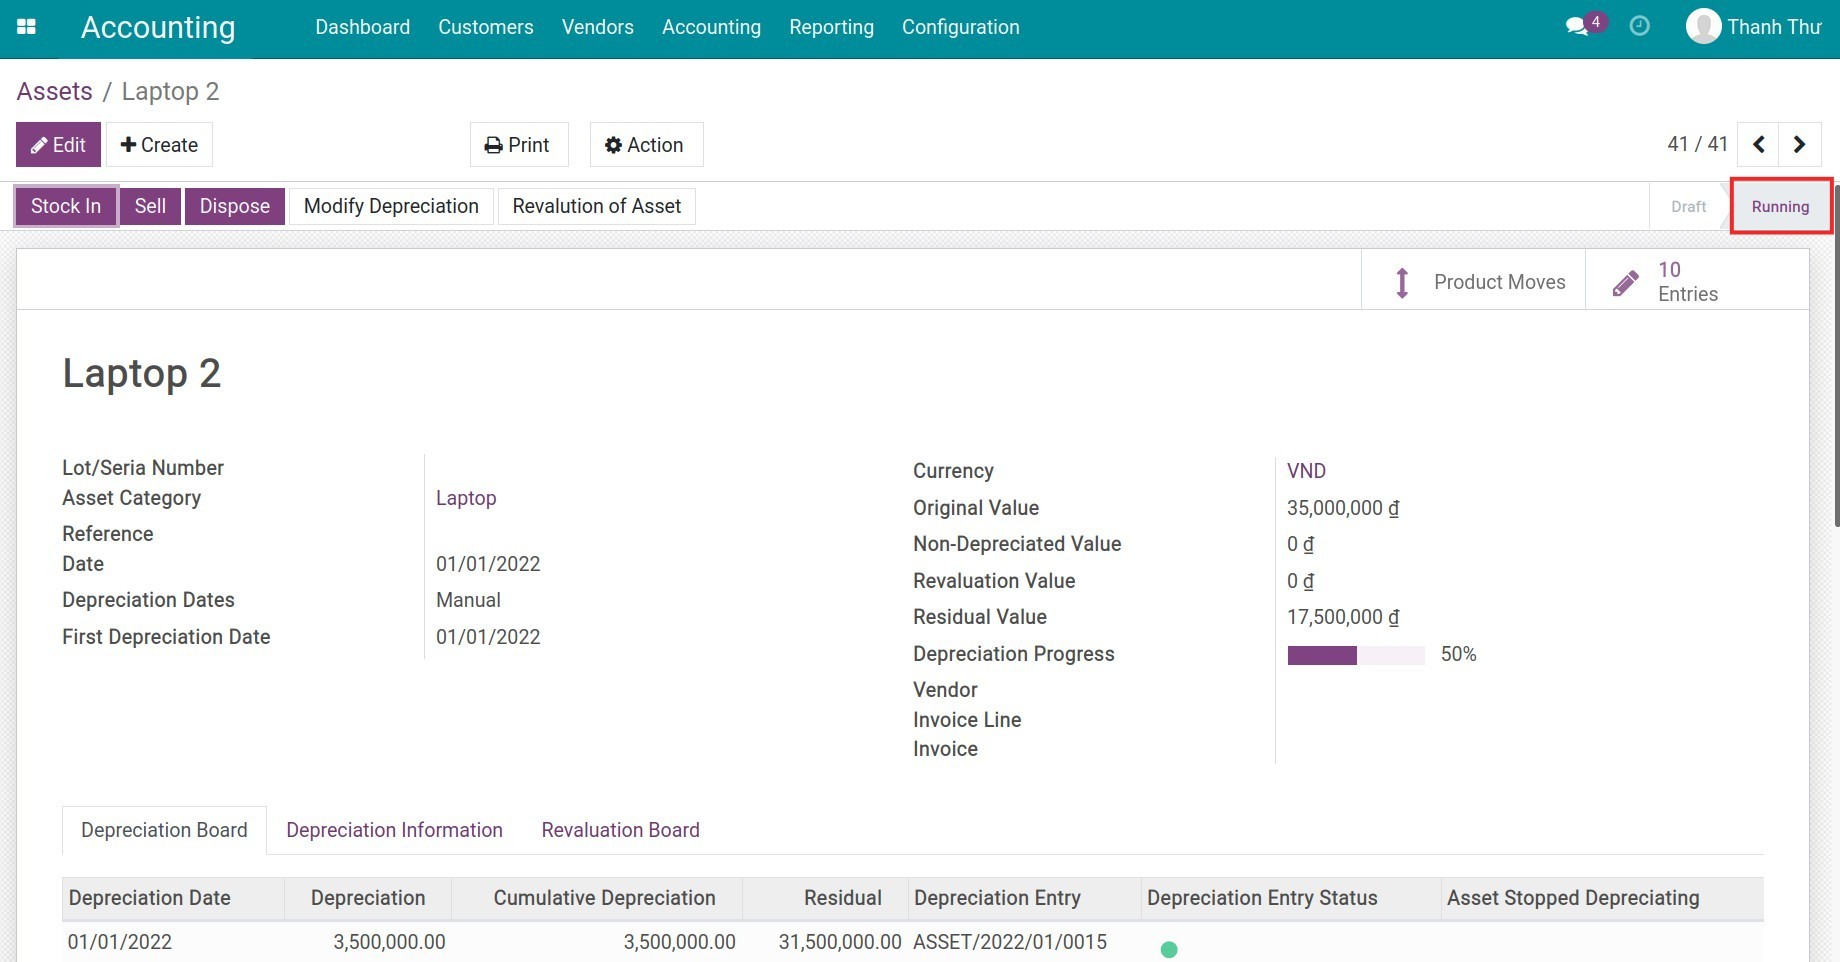
Recent days journal:
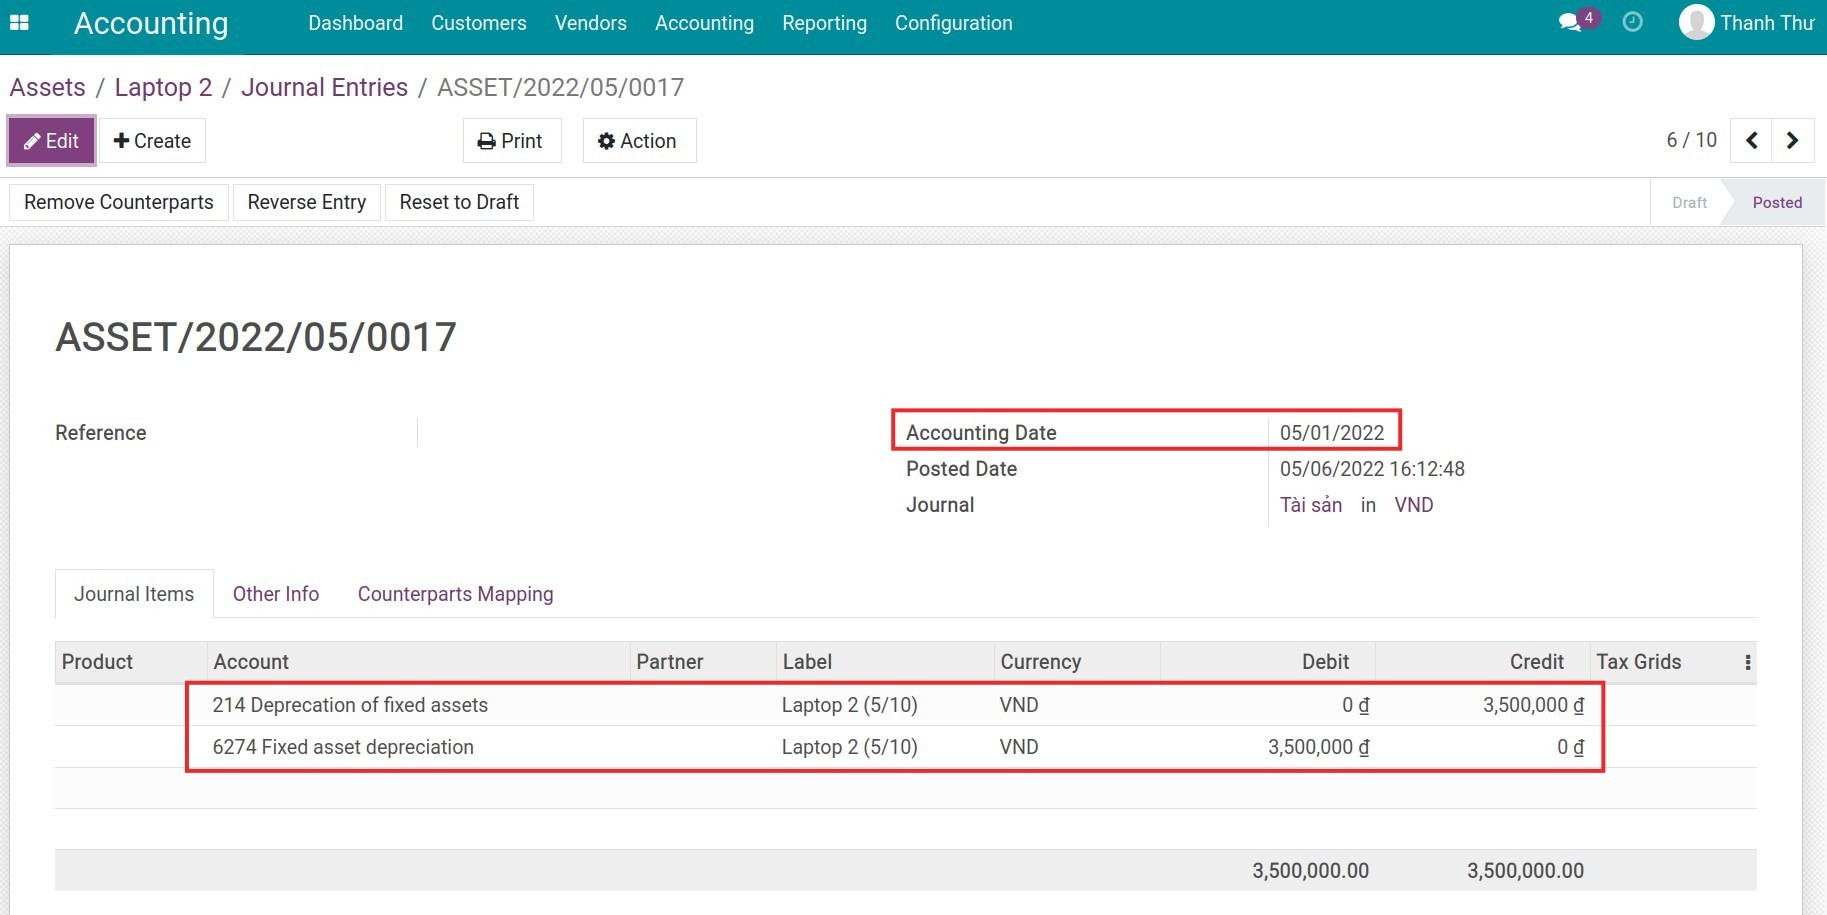
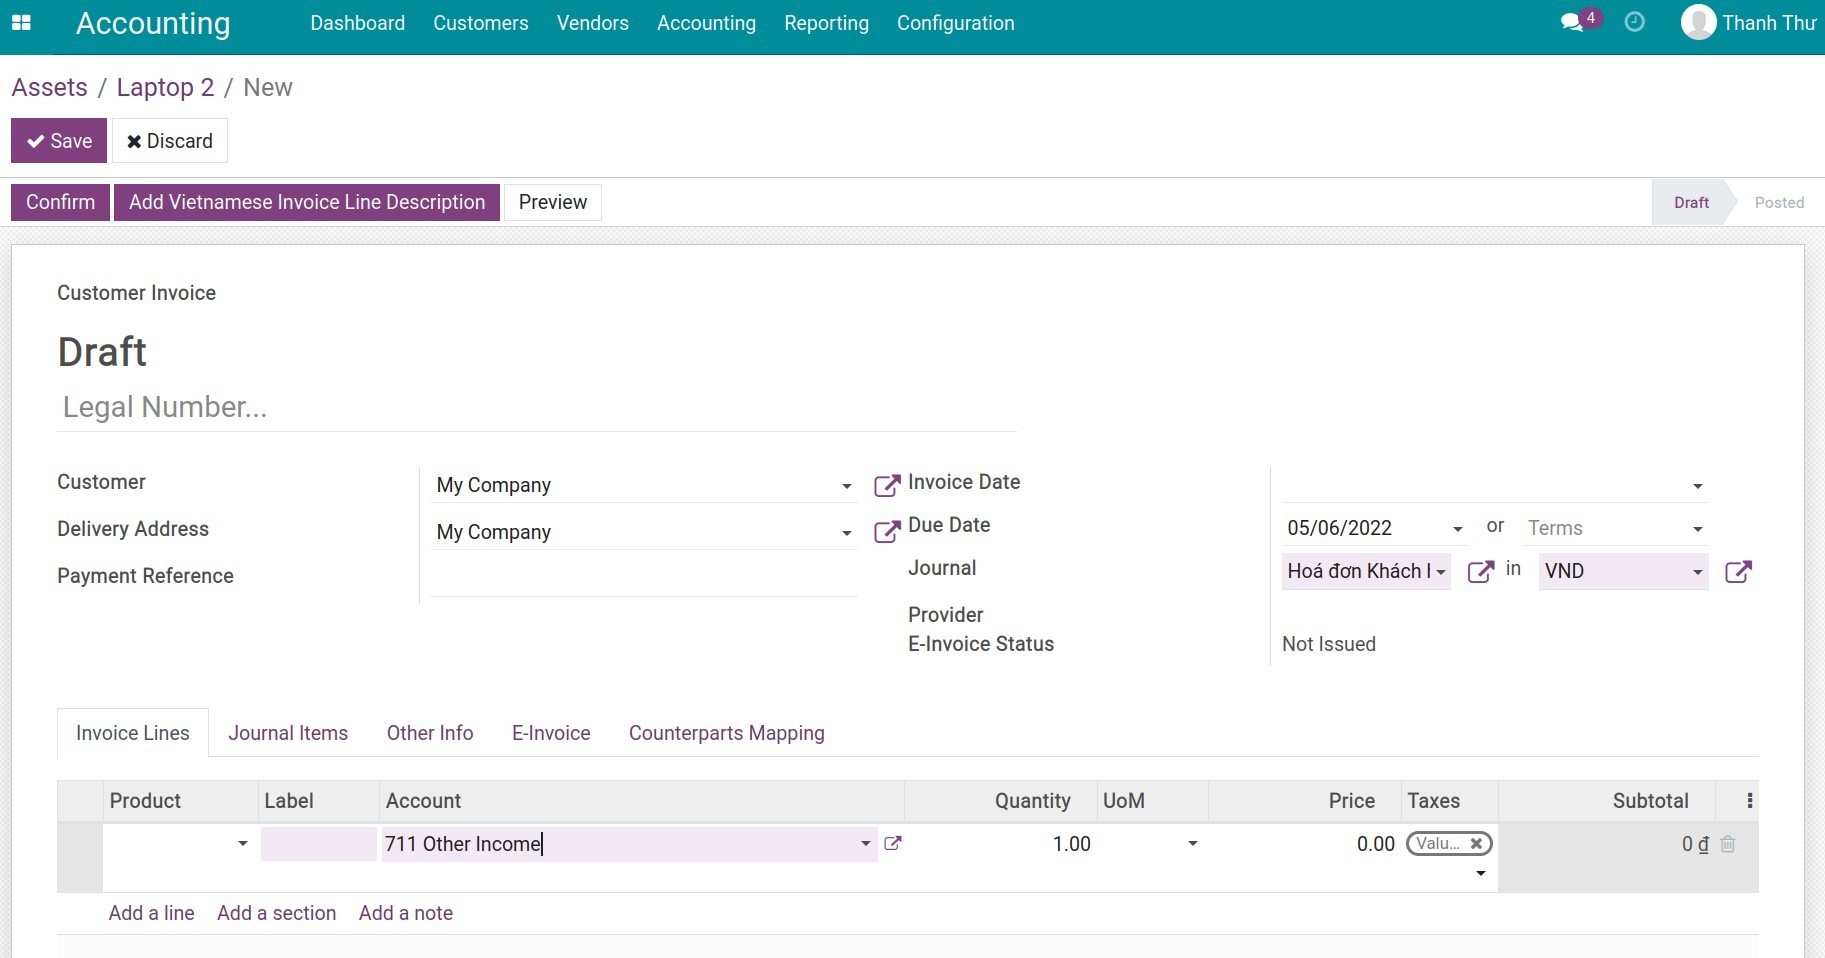
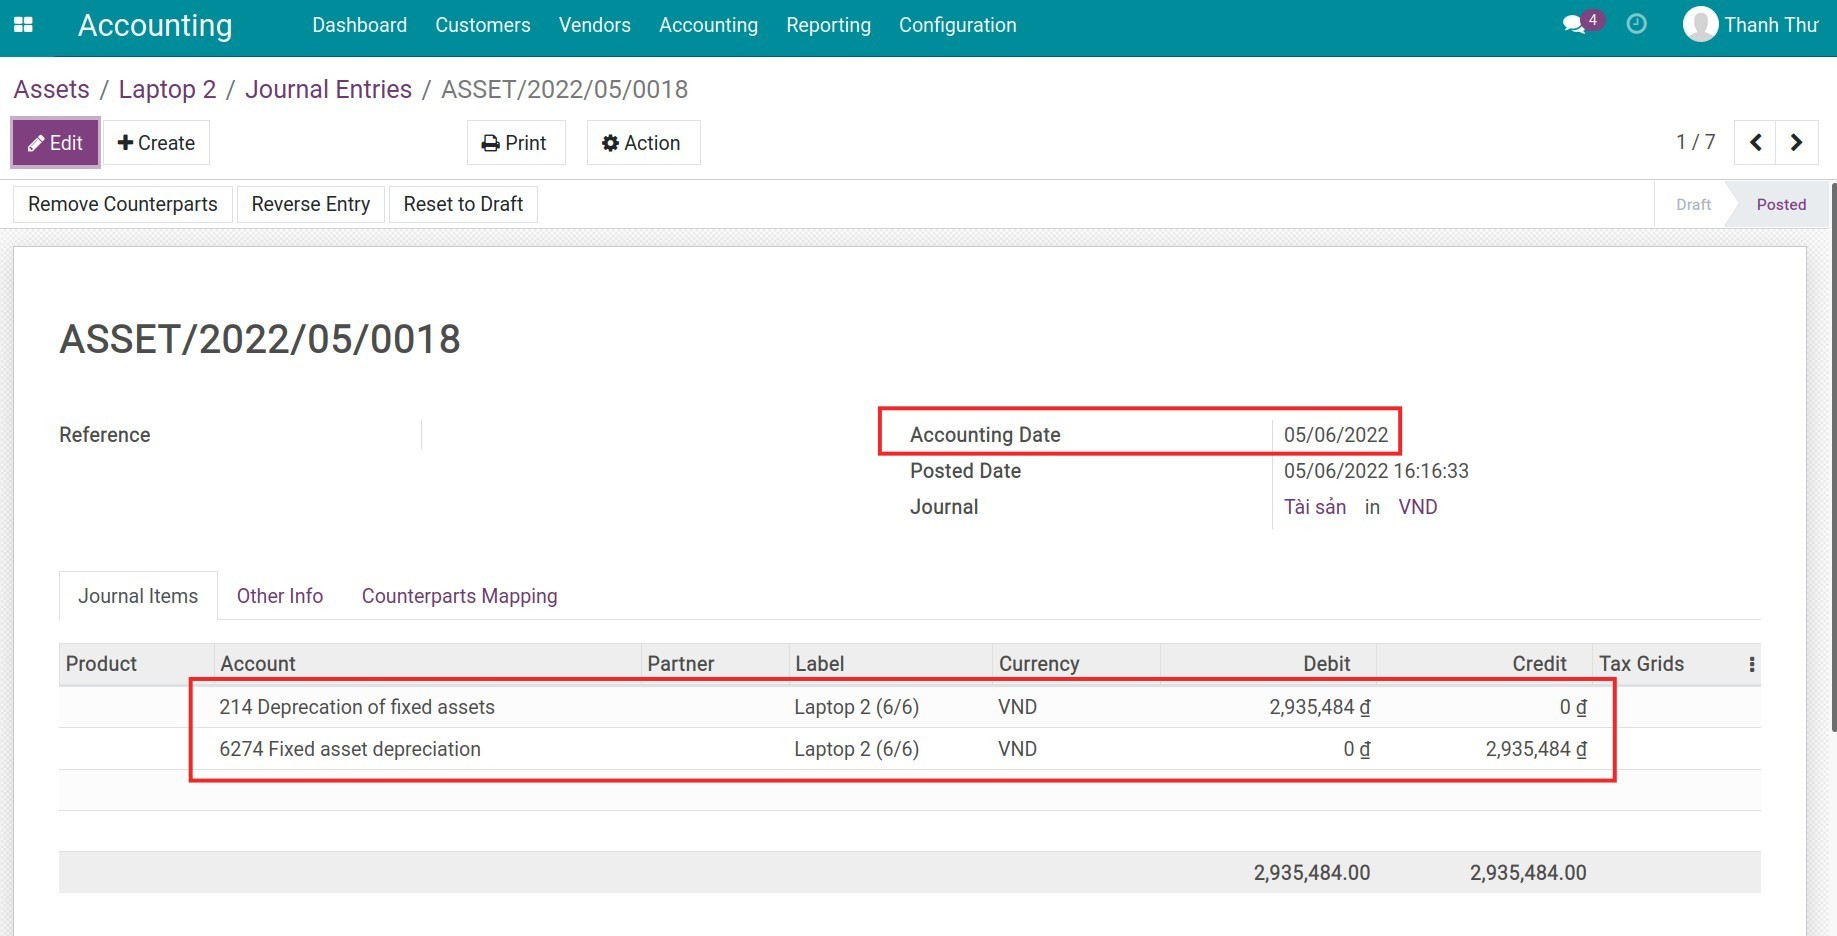
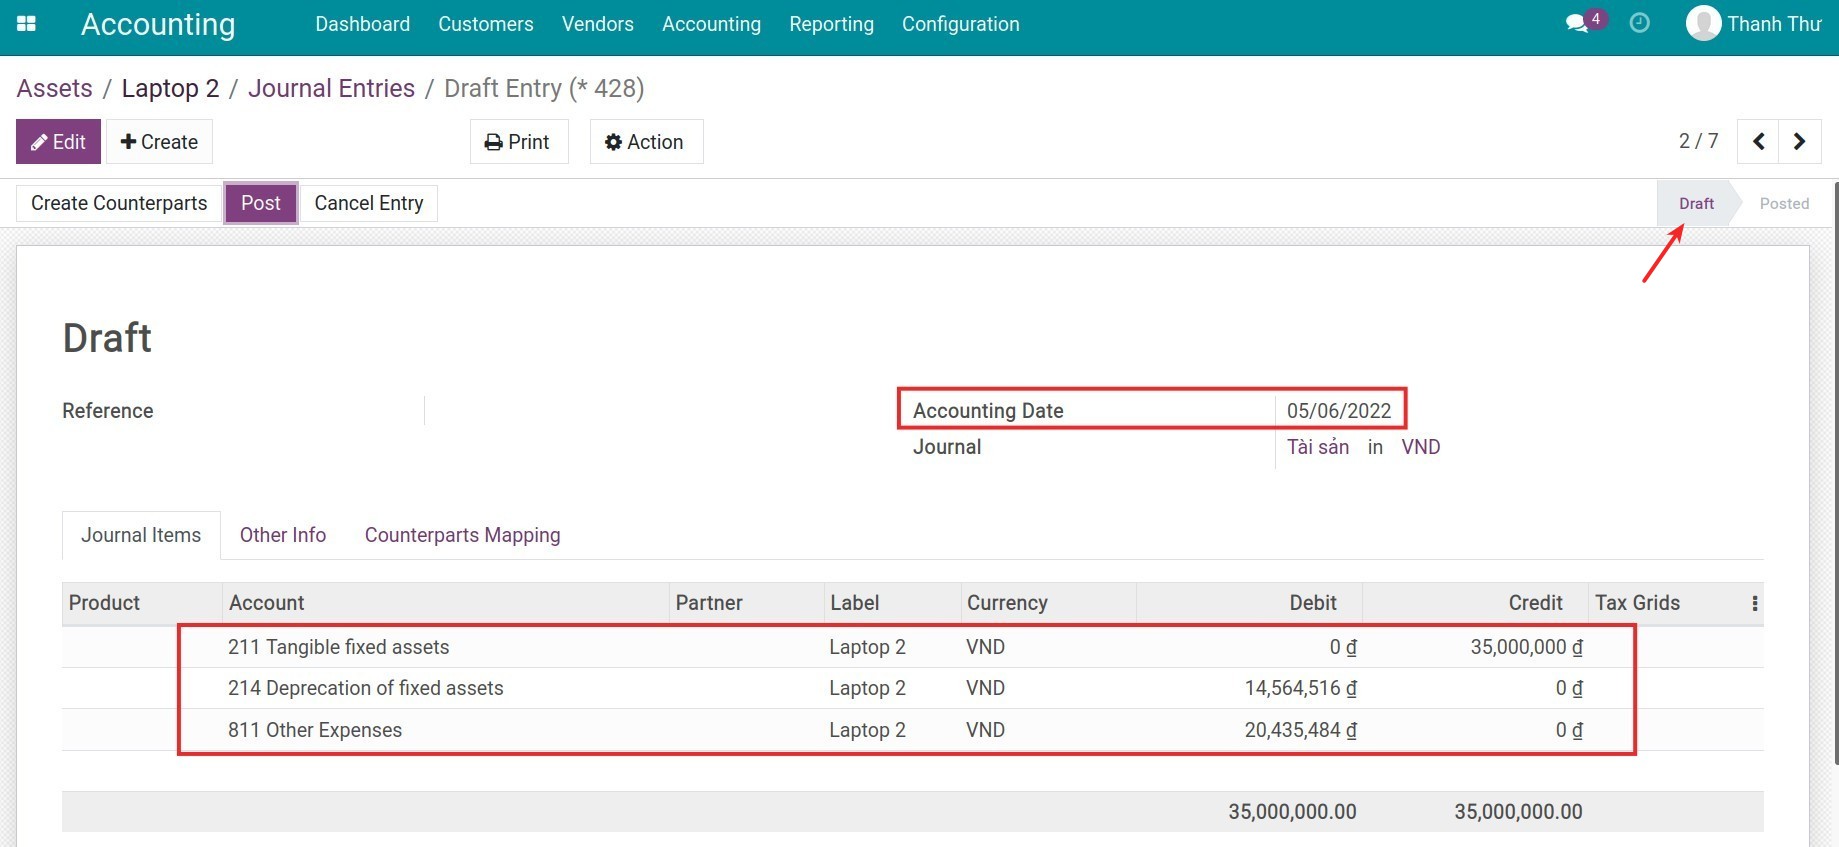
Press Sell, enter Accounting Date: 05/06/2022. The system suggests an invoice for asset liquidation in the Draft stage. You can add more information and record the liquidation profit.
On the Asset view, recalculate the data as below: The Cumulative Depreciation in last entry (from 01/05/2022 to 31/05/2022) is 17.500.000, because you Sell the Asset on 06/05/2022 so the reduction (from 07/05/2022 to 31/05/2022) is 3.500.000 / 31 * (31 - 6 + 1) = 2.935.4838,71 VND (May has 31 days):
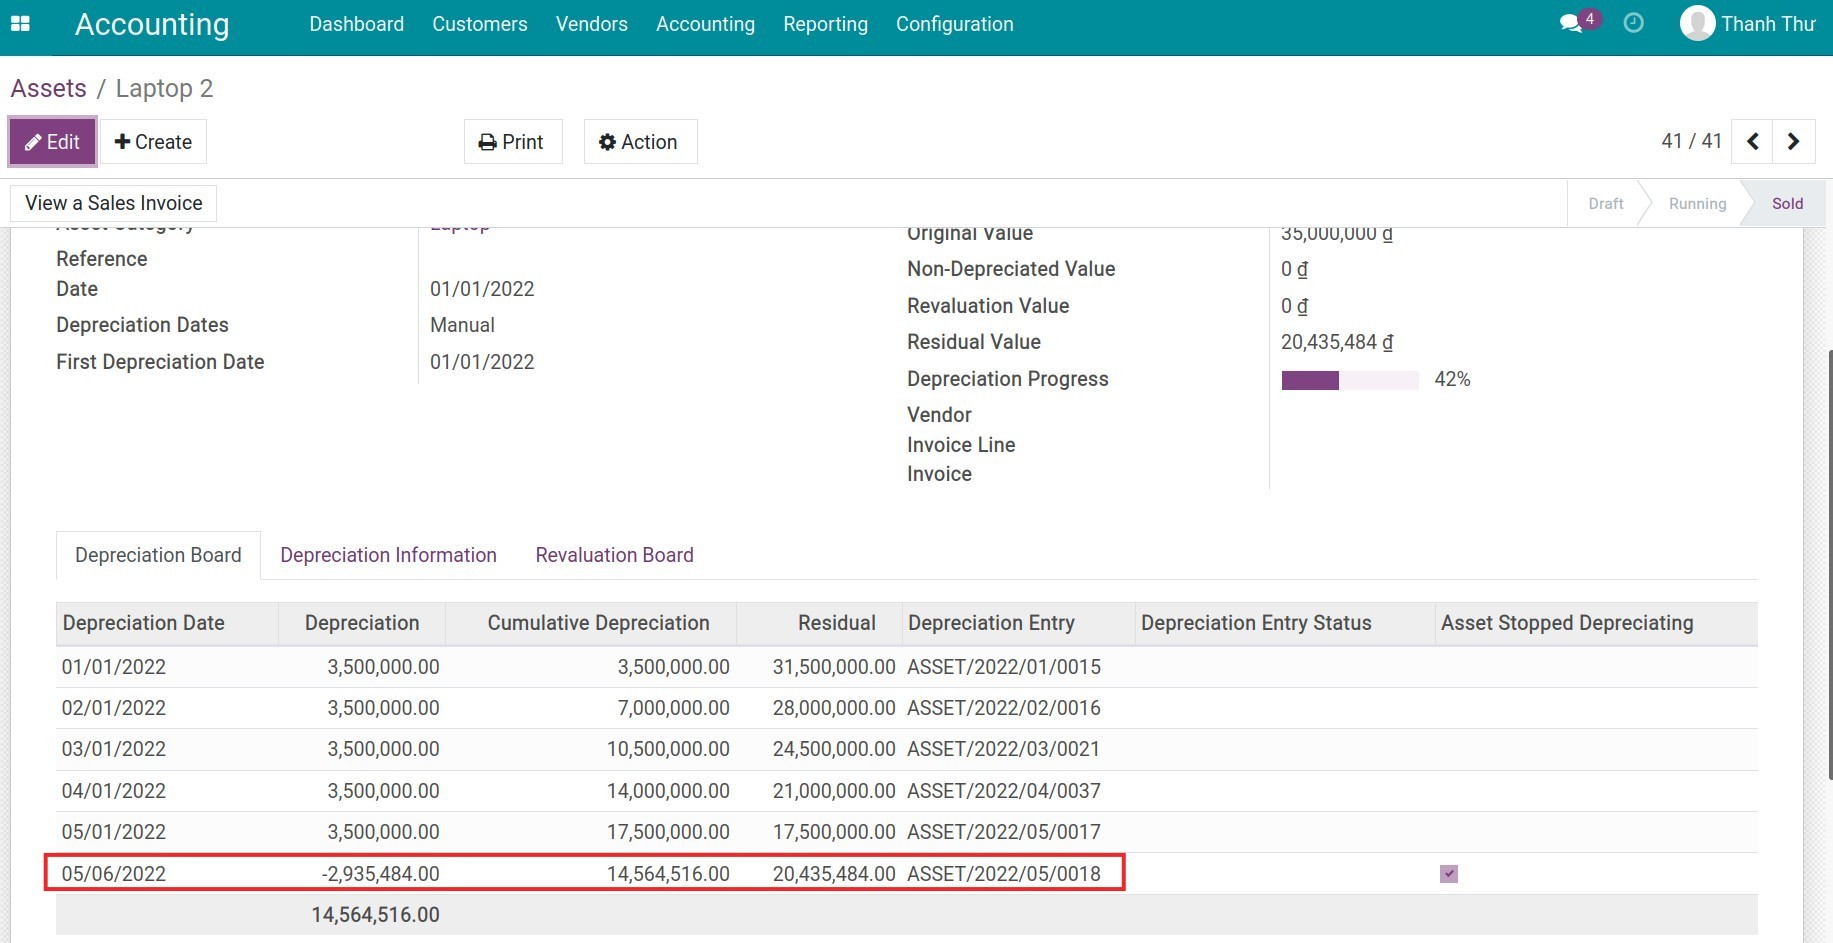
Press on the Entries button on the asset view to see all of the journal entries related to this asset. You can also click on the write-down depreciated value entries and the write-off asset entry to see details of corresponding journal items.
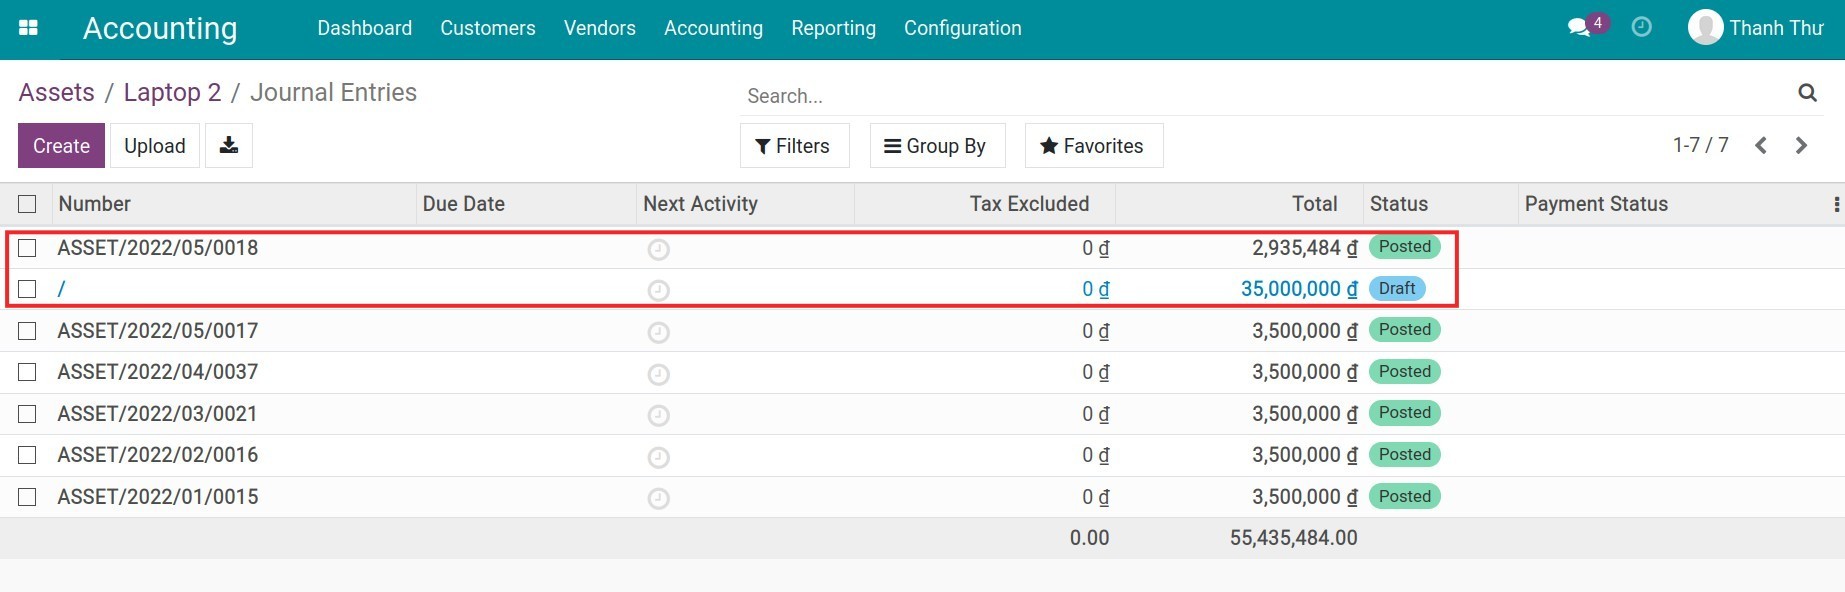
Write-down depreciated value entry:
Write-off asset entry in Draft stage:
See also
Configure charts of accounts and depreciation method for Assets Category
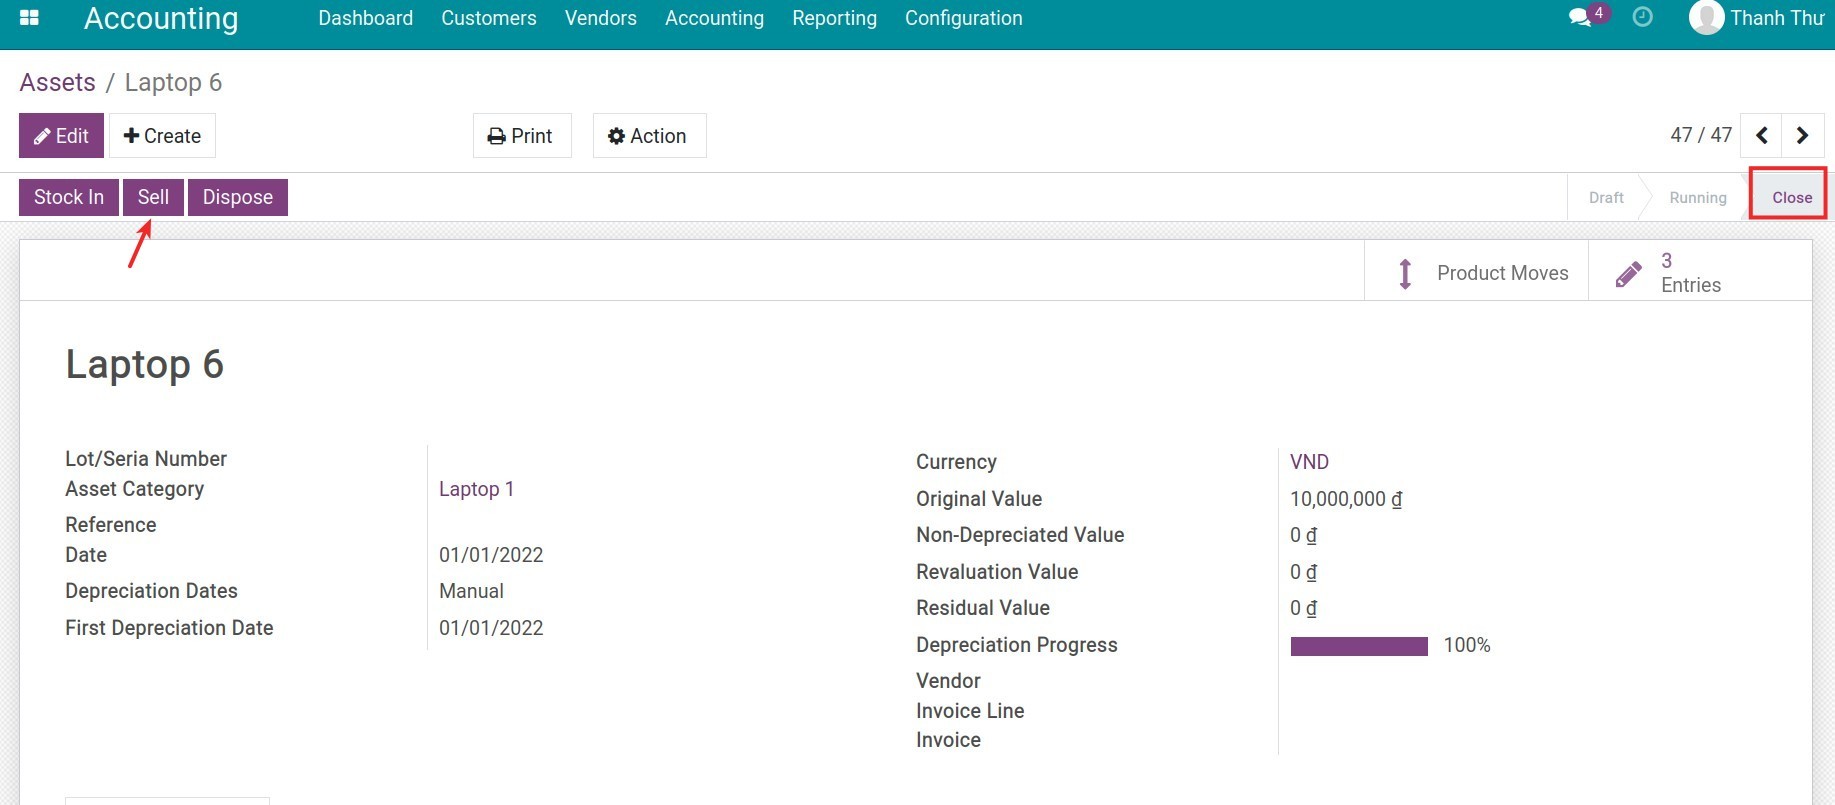
Case 2: Liquidize depreciated Asset
On the asset in stage Close, choose Sell.
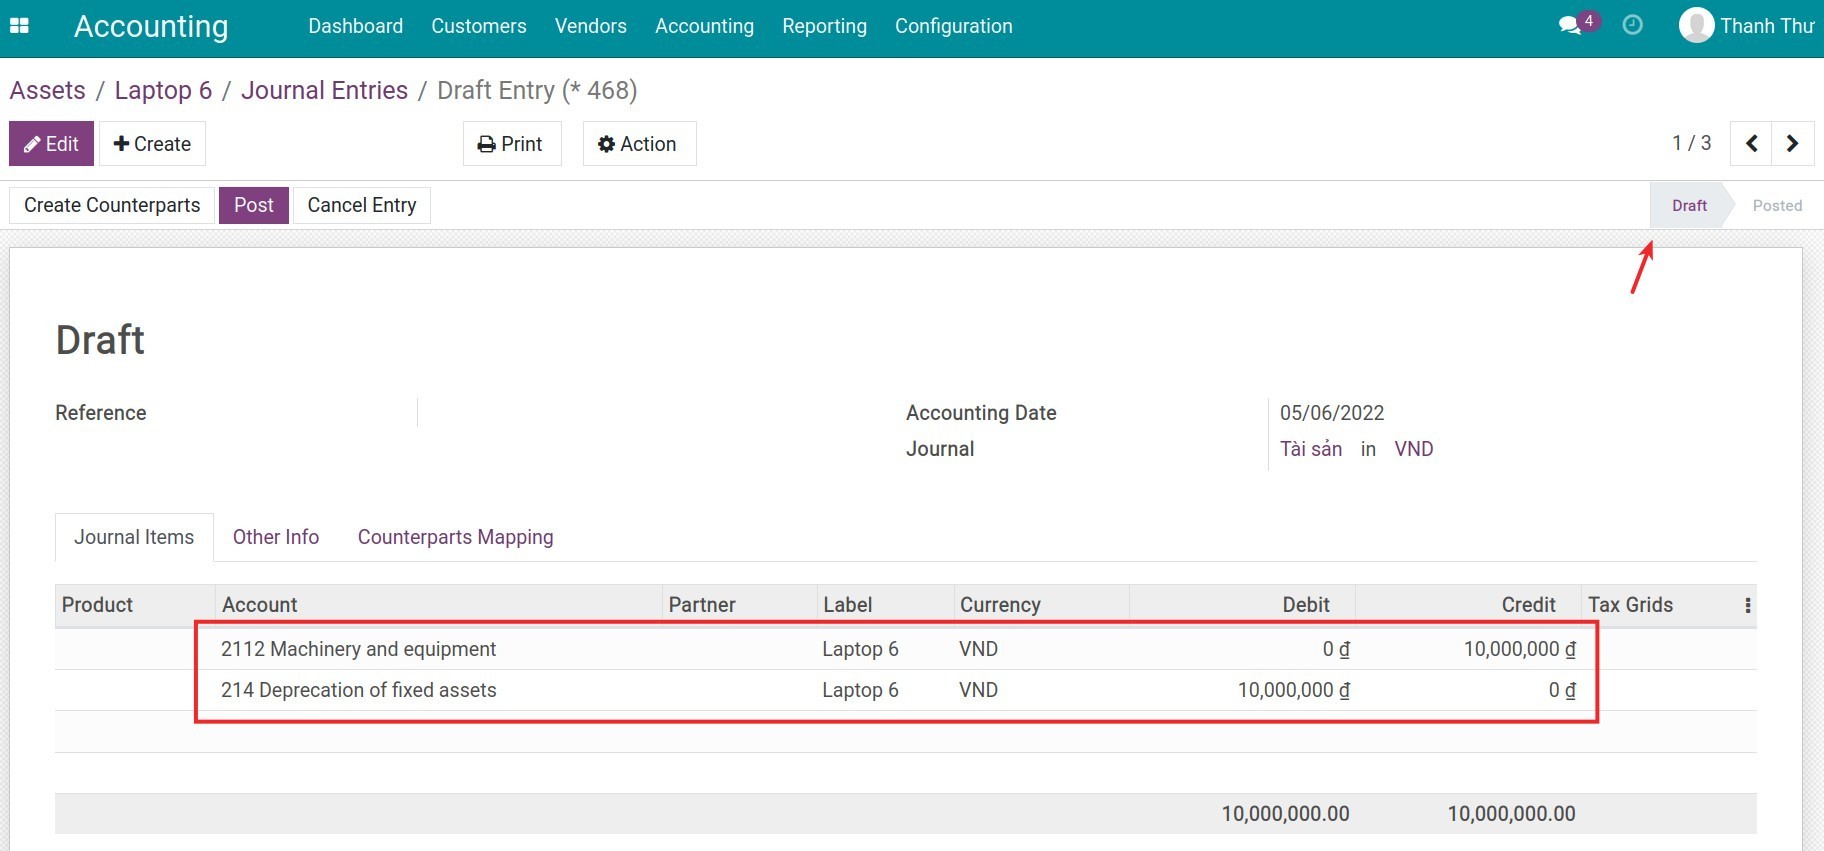
Similar to the previous case, the system asks for Stopped Depreciating Date and Sales Invoice Date to record the asset liquidation. Choose dates accordingly and press Sell. System then suggests a draft invoice for asset liquidation.
Simultaneously, write-off asset journal entries are created. You need to check the data on these entries and post them once done.
Now, the asset stage will change from Close to Sold.
See also
Related article
Asset Revaluation
Buying and stocking assets
Optional module
Stock Asset Equipment
Stock Asset
Assets Purchase
Steps to import opening balance
Steps to import opening balance
When you start working on the initial setup of iSuite Accounting management software, one of the most important tasks is importing the opening balance of accounting accounts. This article will show you not only steps to prepare and import the accounting opening balance but also some tips for specific cases that might happen during the importing process.
Requirements
This tutorial requires the installation of the following applications/modules:
Accounting & Finance
Data preparation
Before uploading data to the Viindoo Accounting software, you need to prepare the input data according to the Viindoo data structure. This step helps to reduce the data input time and manual modification later on, avoiding unnecessary mistakes while using the system.
Configure basic accounting information
Depending on your business management needs, you need to configure the basic accounting system before using. Some of the basic information such as: fiscal year, currencies, taxes and tax rules, etc.
The accountant needs to review the chart of accounts that are being used, compare it with the ones provided by the localization packages in iSuite then create additional accounts according to the management needs.
Prepare compatible input data for iSuite data structure
If your business has been in operation for a while, there must be some transactions and accounting data available. At the time of preparation for transfer, accountants need to close operations in the old bookkeeping system and prepare input data that is compatible with the data structure of the Viindoo system.
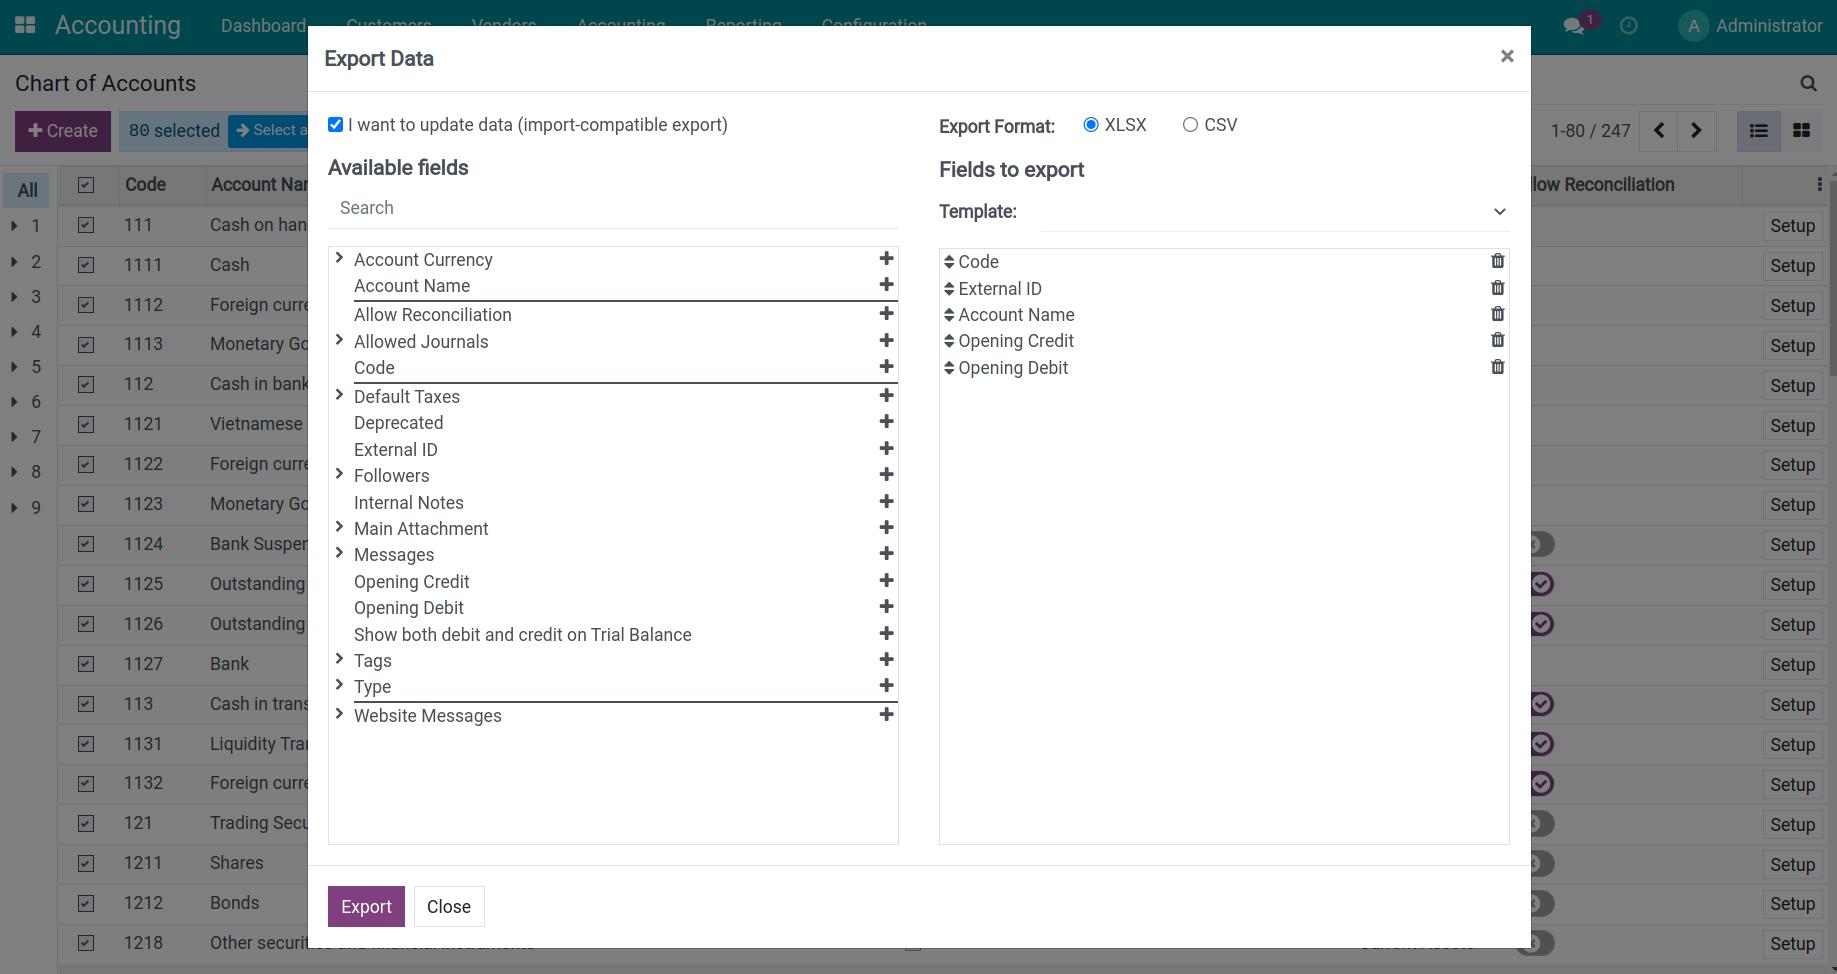
In the Accounting software, navigate to Configuration > Chart of Accounts to see the existing chart of accounts list in your system. From here, you can use the export data feature to download the data structure of the account in the Balance Sheet.
Export the following fields:
Account Code;
Account External ID;
Account Name;
Opening Debit;
Opening Credit.
Import opening balance
Import opening balance in Chart of Accounts
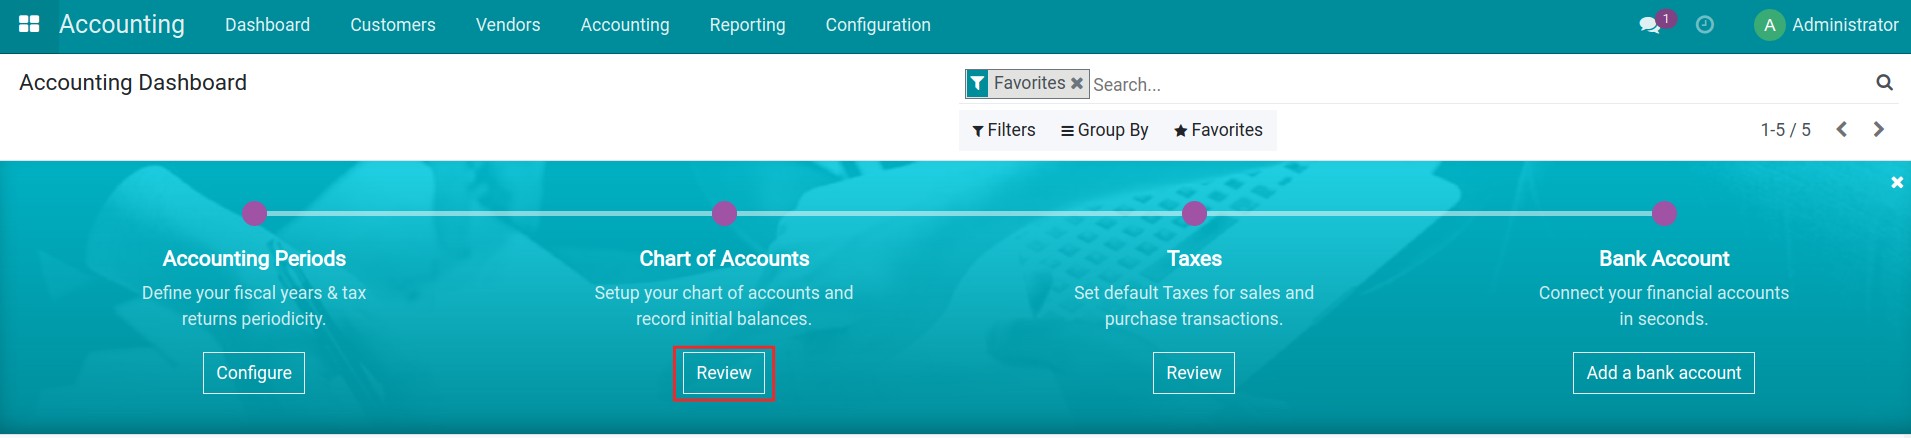
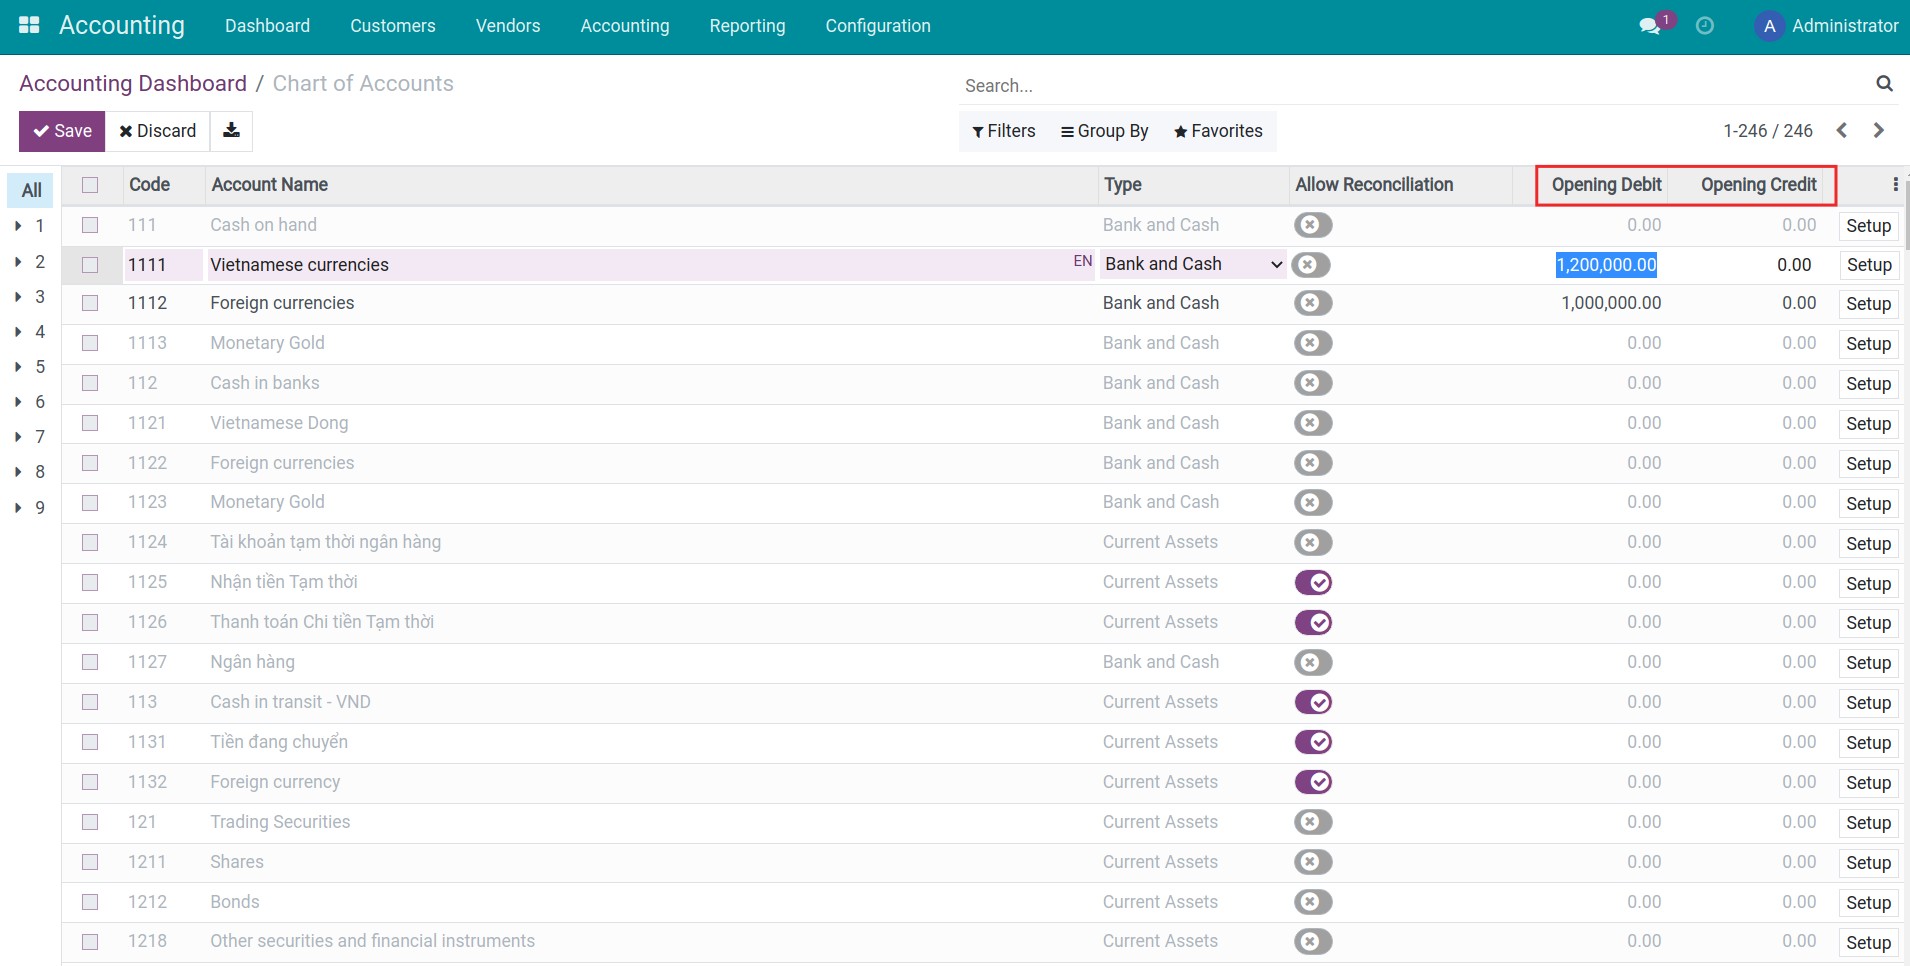
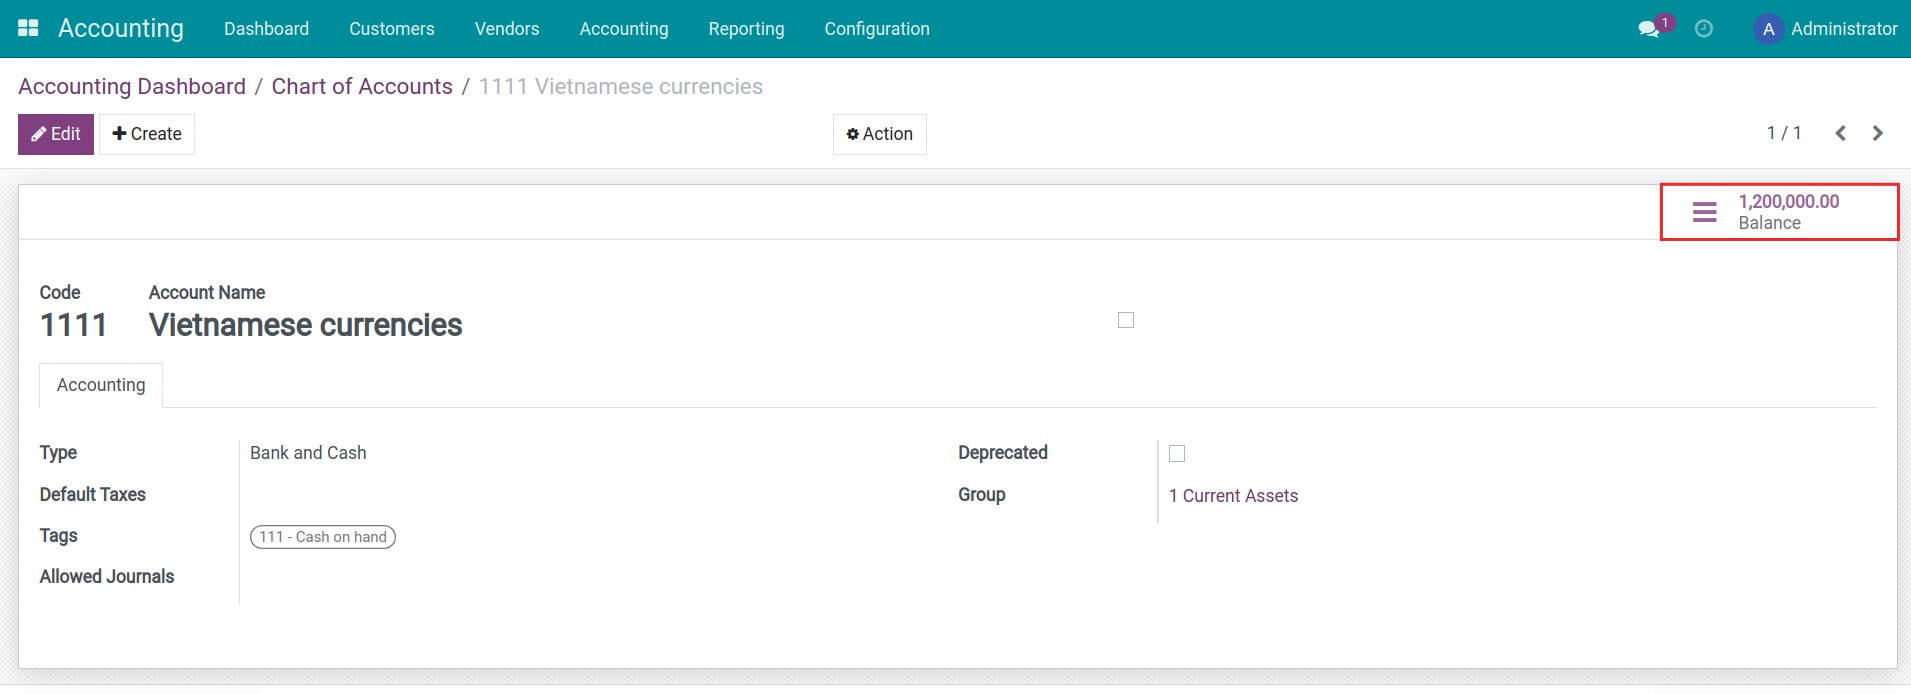
First, you navigate to Accounting > Accounting Dashboard > Chart of Accounts, select Review.
Here, you choose any account and fill in the balance in the field Opening Debit for Accounts with a balance on the Debit side and fill in Opening Credit for Accounts with a balance on the Credit side.
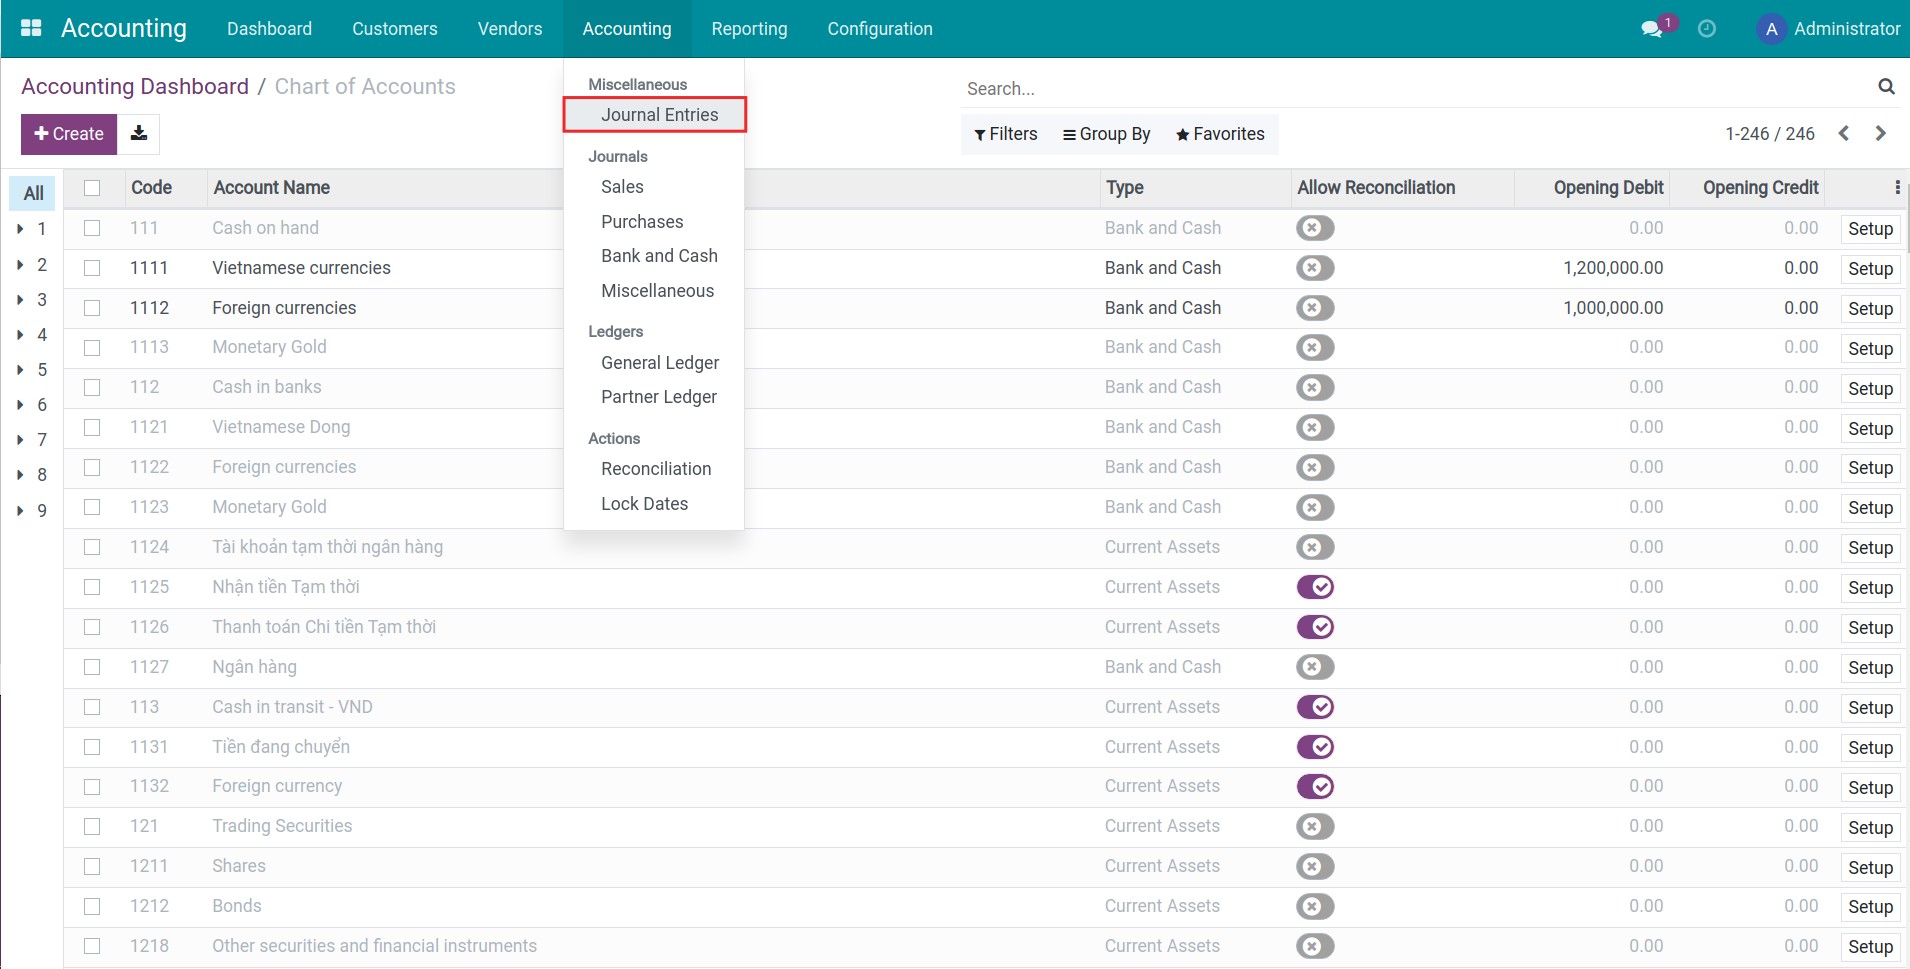
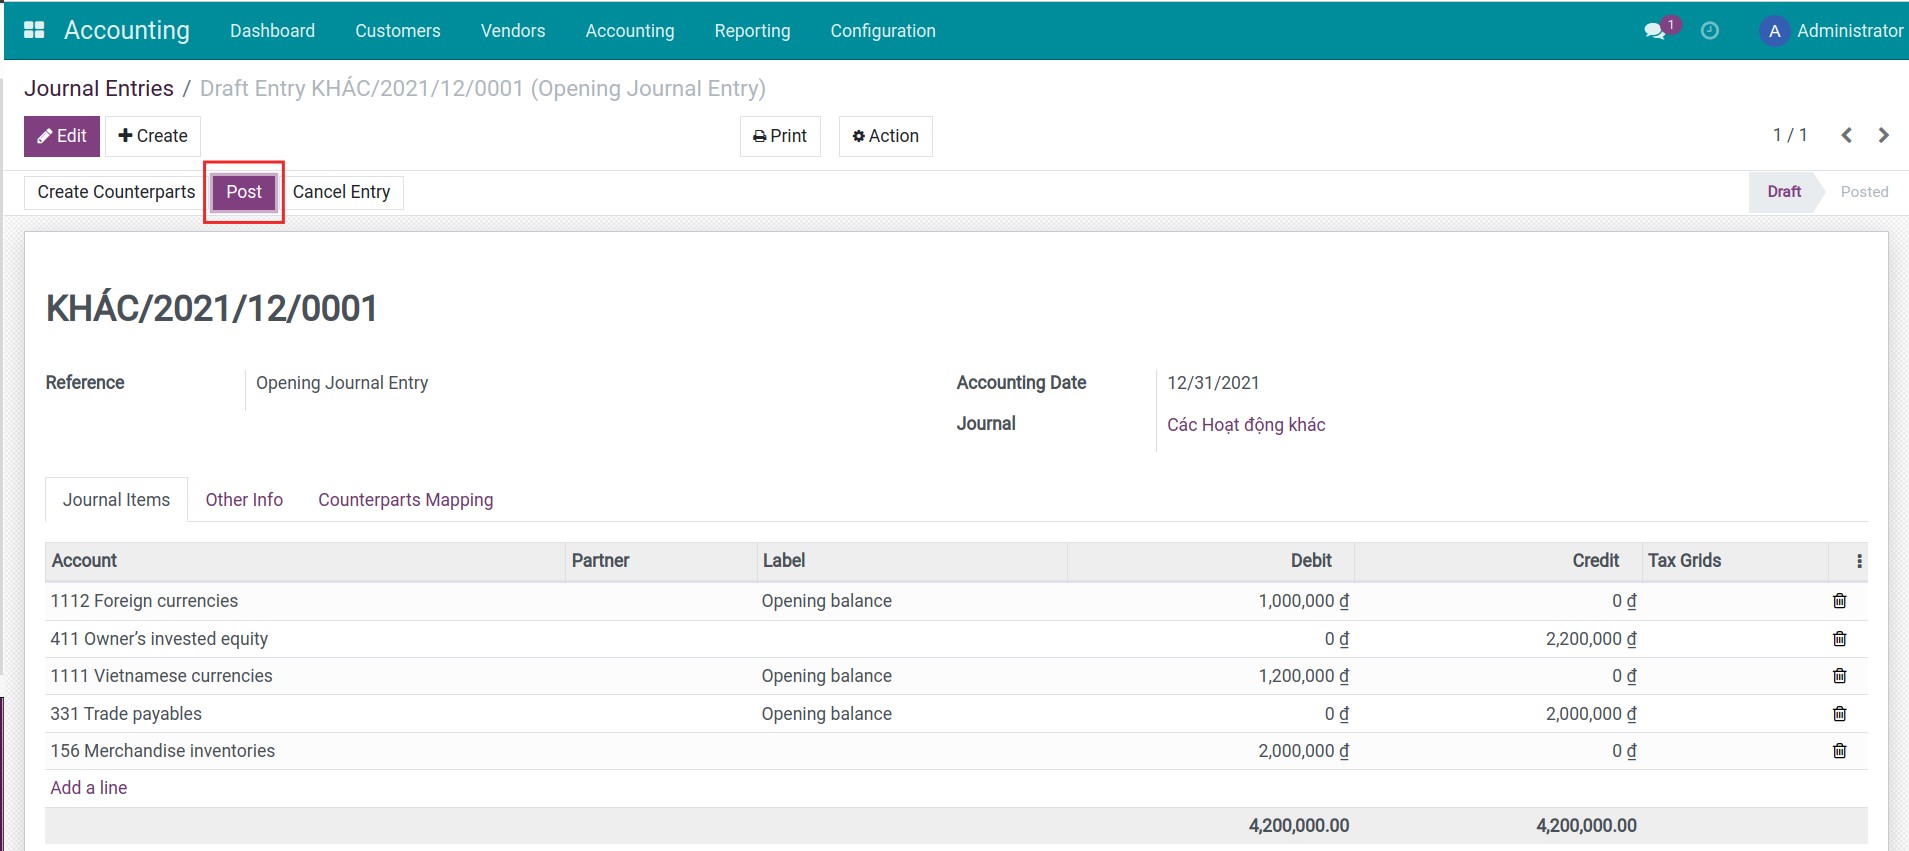
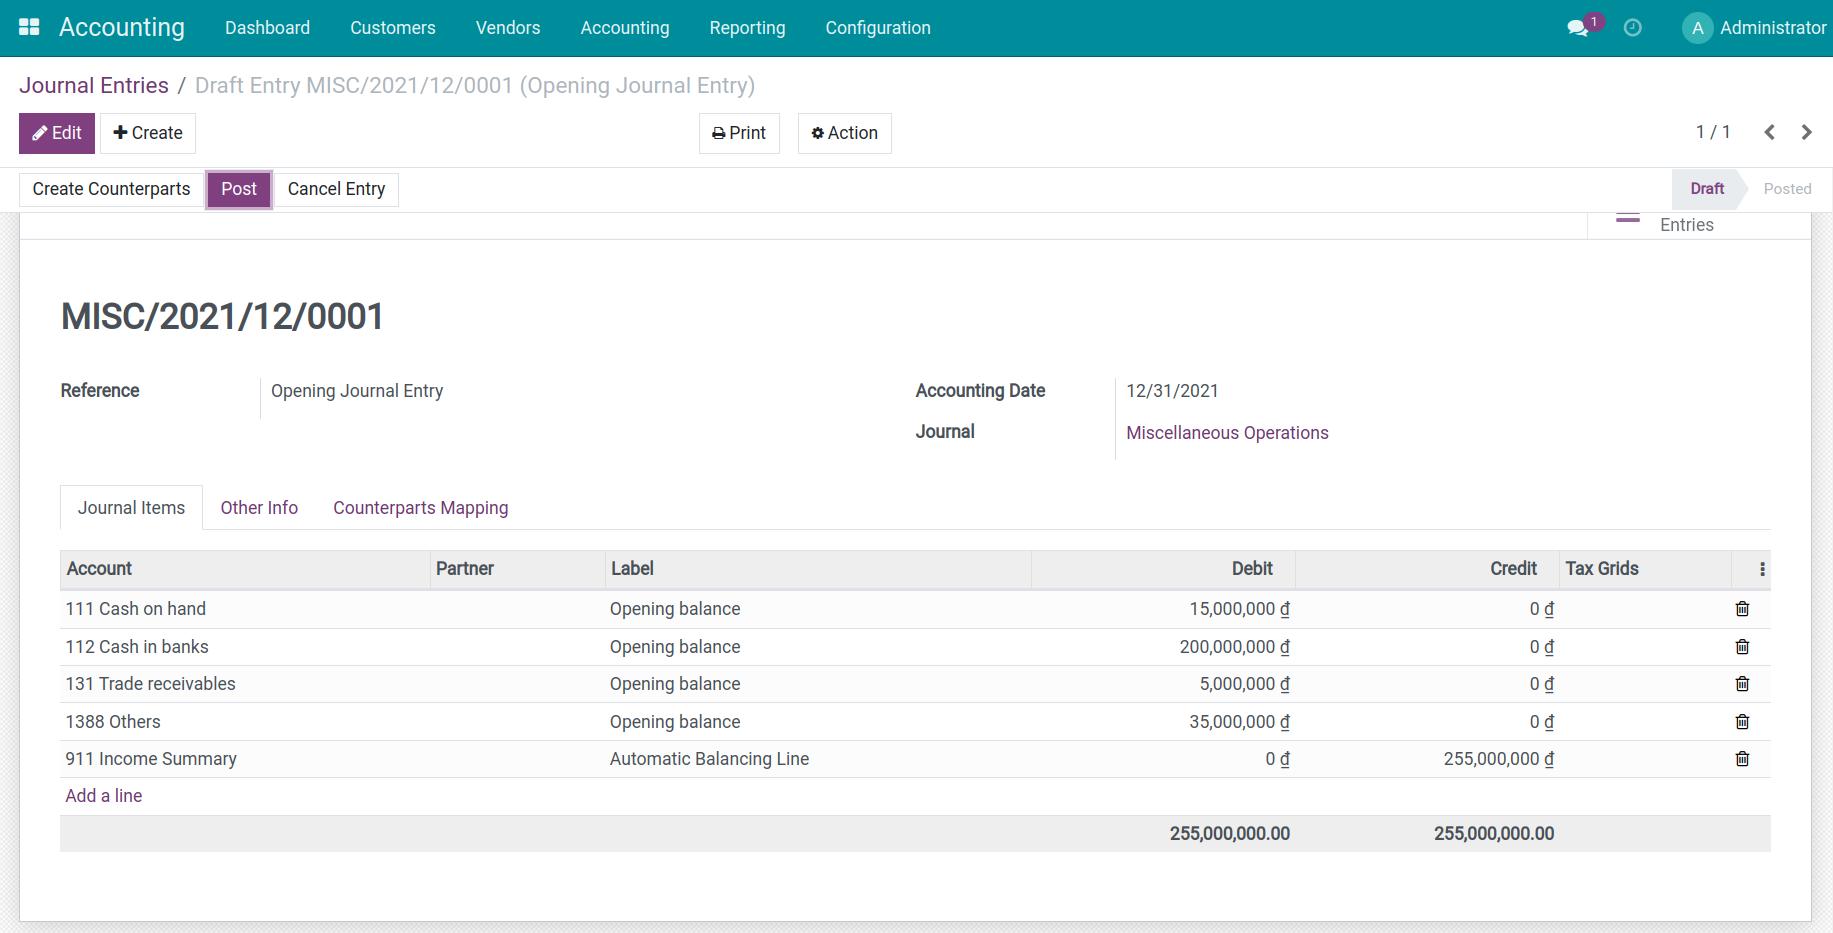
After filling in the opening balance for the Accounts, you navigate to Accounting > Journal Entries, select the entry with Reference as Opening Journal Entry.
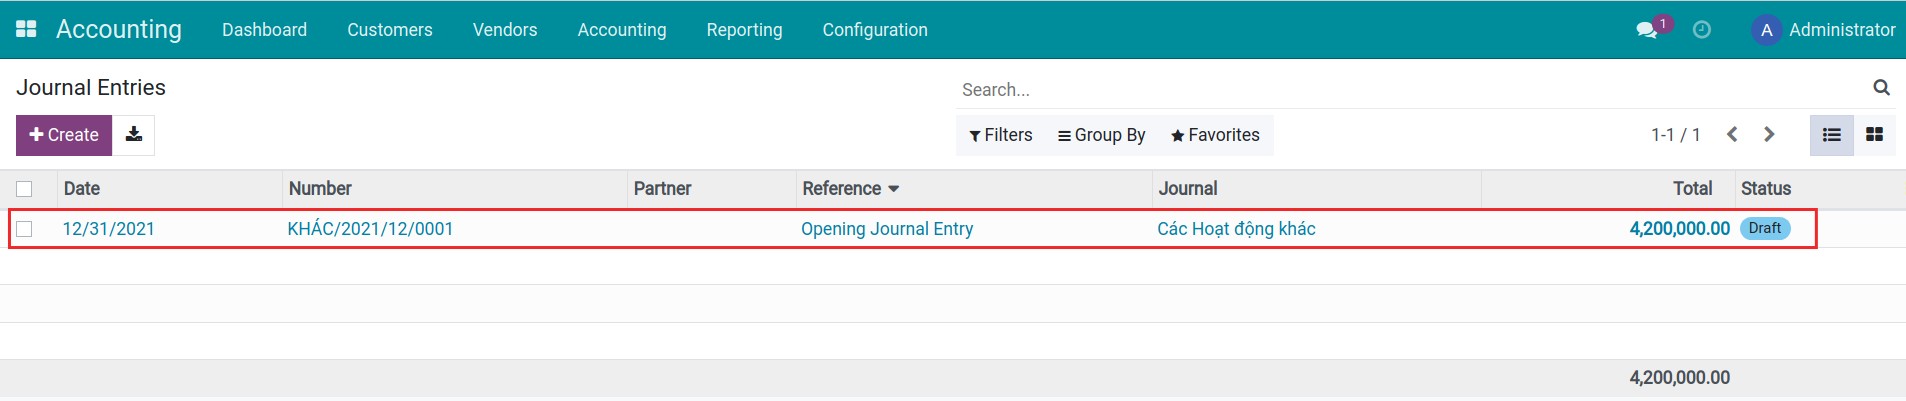
You press Post to post the fill in the opening balance entries.
Note
When posting the the fill in the opening balance entries, the Opening Debit and Opening Credit fields in the Chart of Accounts will be hidden. Therefore, you need to add the opening balance of the accounts and then Post entries.
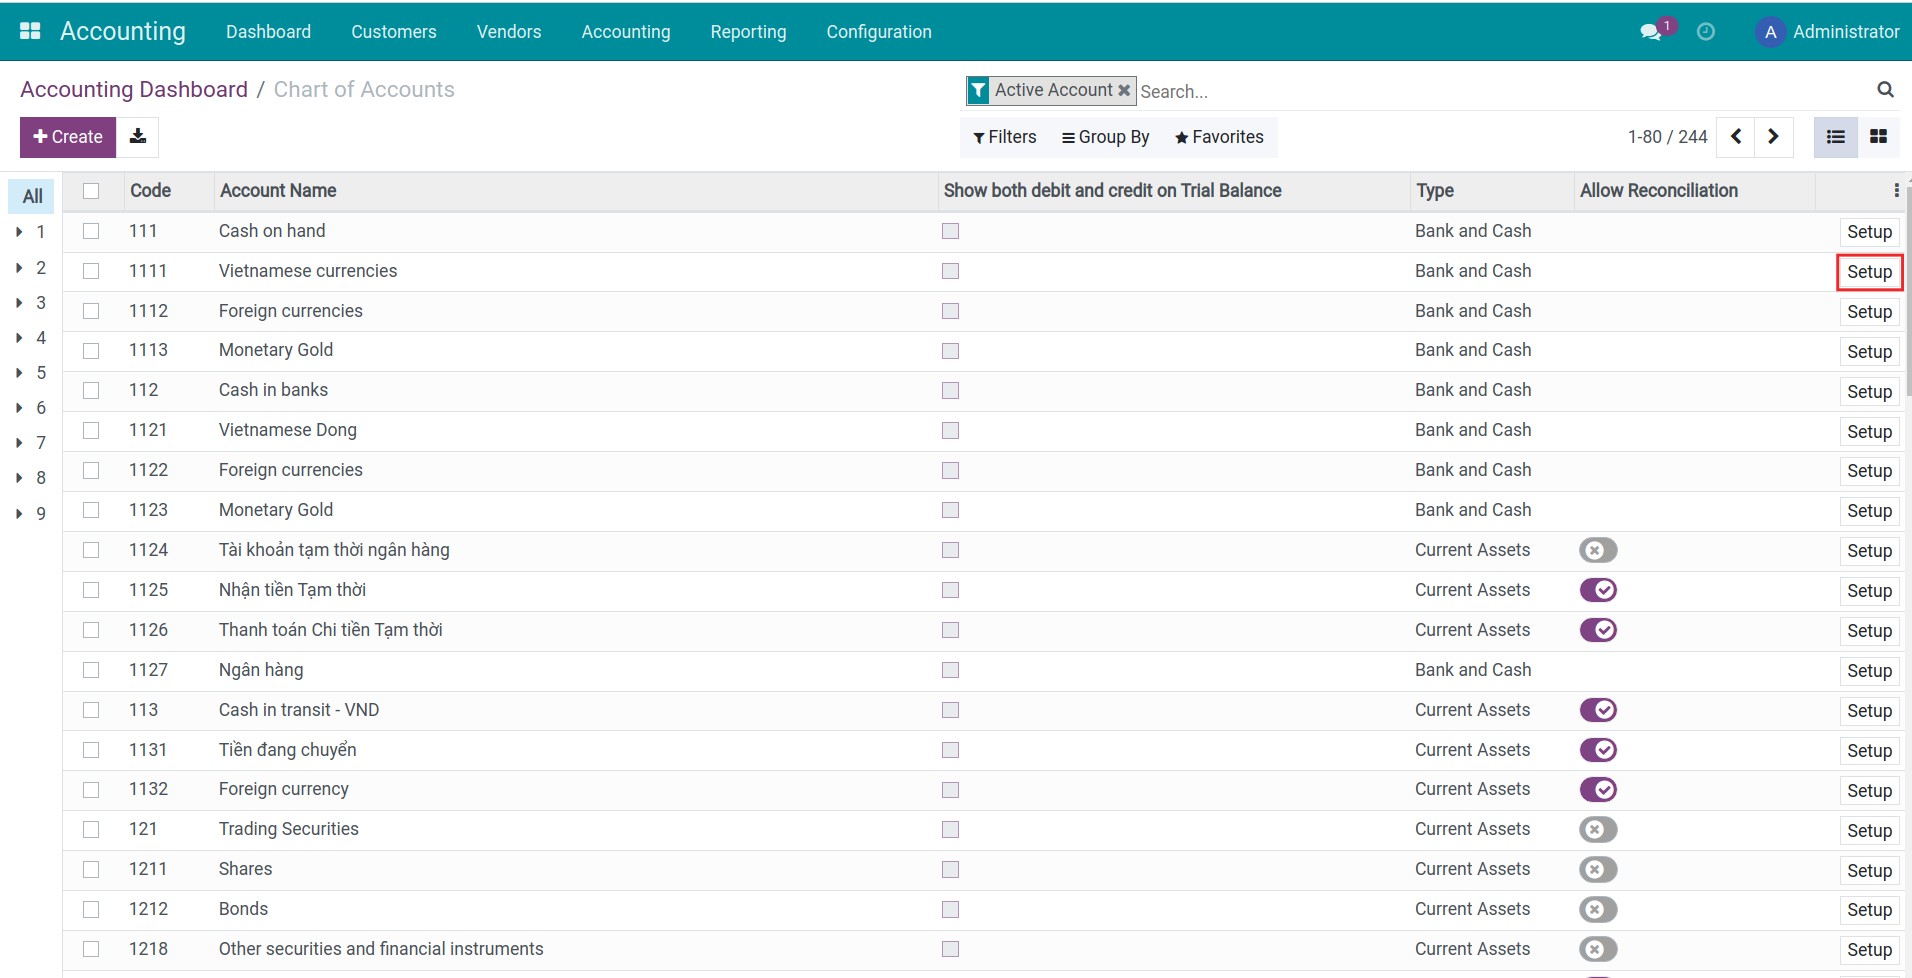
After posting, you navigate to Accounting > Accounting Dashboard > Chart of Accounts and choose Chart of accounts set, press Setup in each Account to see it’s balance.
Import data in bulk
On the data template exported from the system, add the opening debit and credit for each account.

The opening balance of each account should be the total balance until right before the moment your business officially starts using the iSuite Accounting system. On the other hand, pay attention and review the difference between the opening debit and credit, and make sure that Total Debit Balance = Total Credit Balance.
Tips for the data input process:
If your business possesses various bank accounts, you can create one accounting account for each bank account and import the opening balance with the data template.
For aged payable/receivable accounts related to various partners (such as 141 - Advance, 334 - Employee Payables, 131 - Accounts Receivable, etc.), the accountant can add the opening balance of the account, then create a journal entry to register the debit/credit amount of each partner.
The opening balance of inventory accounts (such as inventories in transit, materials, etc.) needs to be imported into the system from the Inventory software.
Note
Any difference between Opening Debit and Opening Credit will be registered in the 911- Income Summary by default. However, if you don’t want to use this account, create a new account named 999 to record this difference.
Account 999 will be reconciled with journal items created from the inventory adjustment and won’t be displayed on accounting reports.
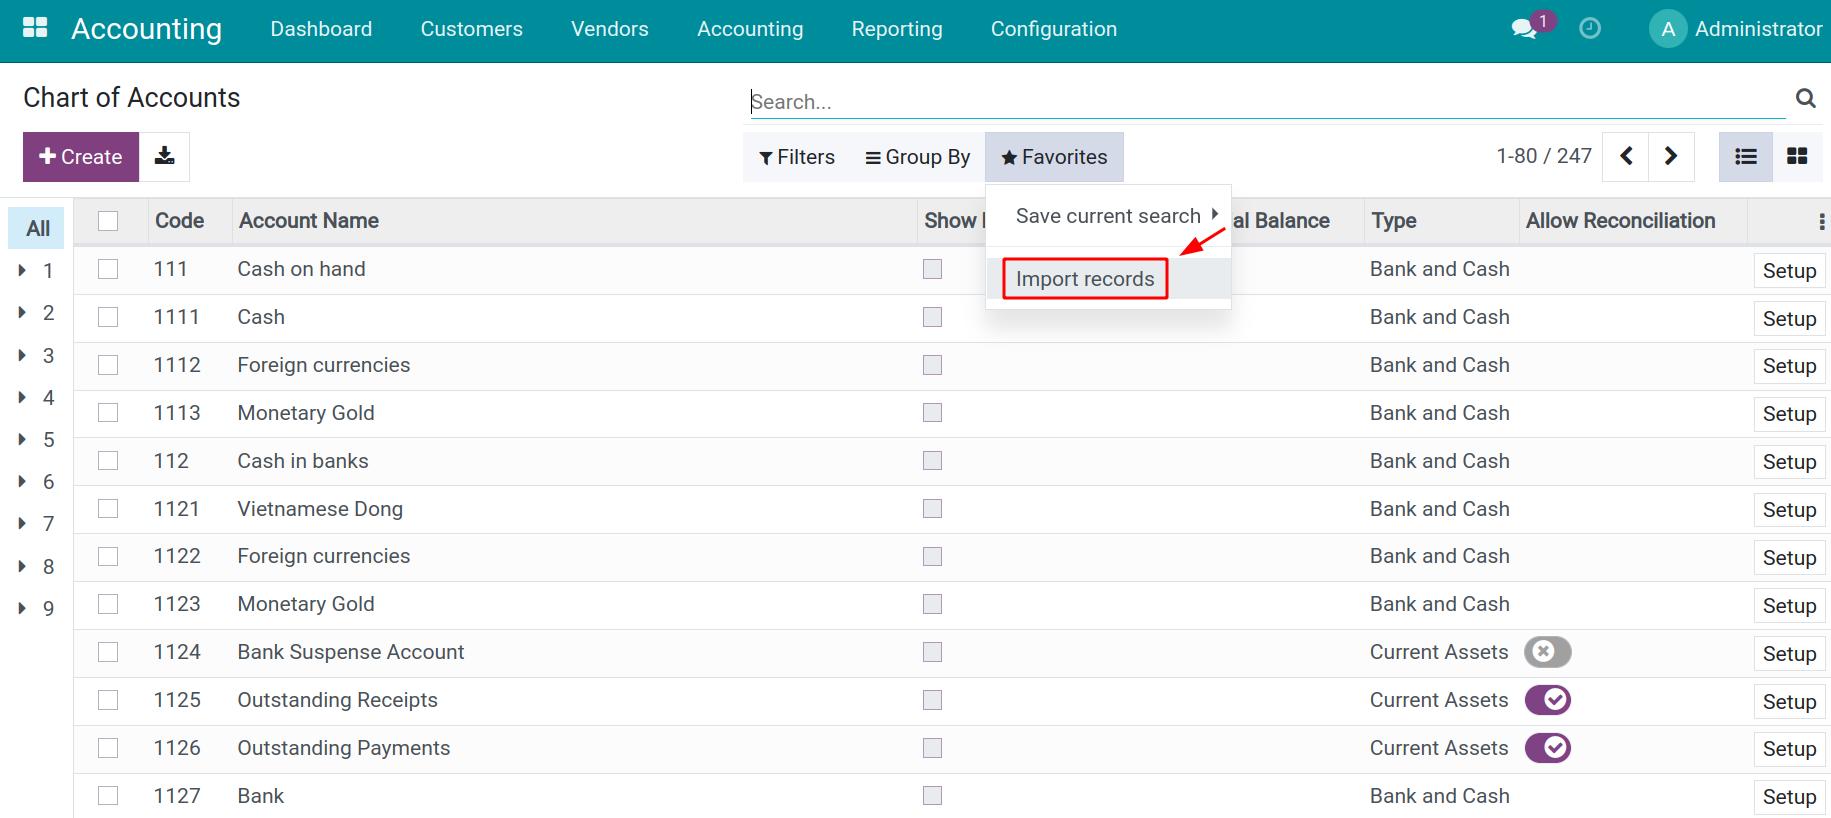
After validating the data quality, from the Chart of Accounts view, upload the final opening balance data file to the system by using the import data feature.

Once finish importing the opening balance to the system, a journal entry with all the journal items is automatically created with an Opening Journal Entry label. To view this entry, navigate to Accounting > Accounting > Journal Entries.
Adjust opening journal entry data
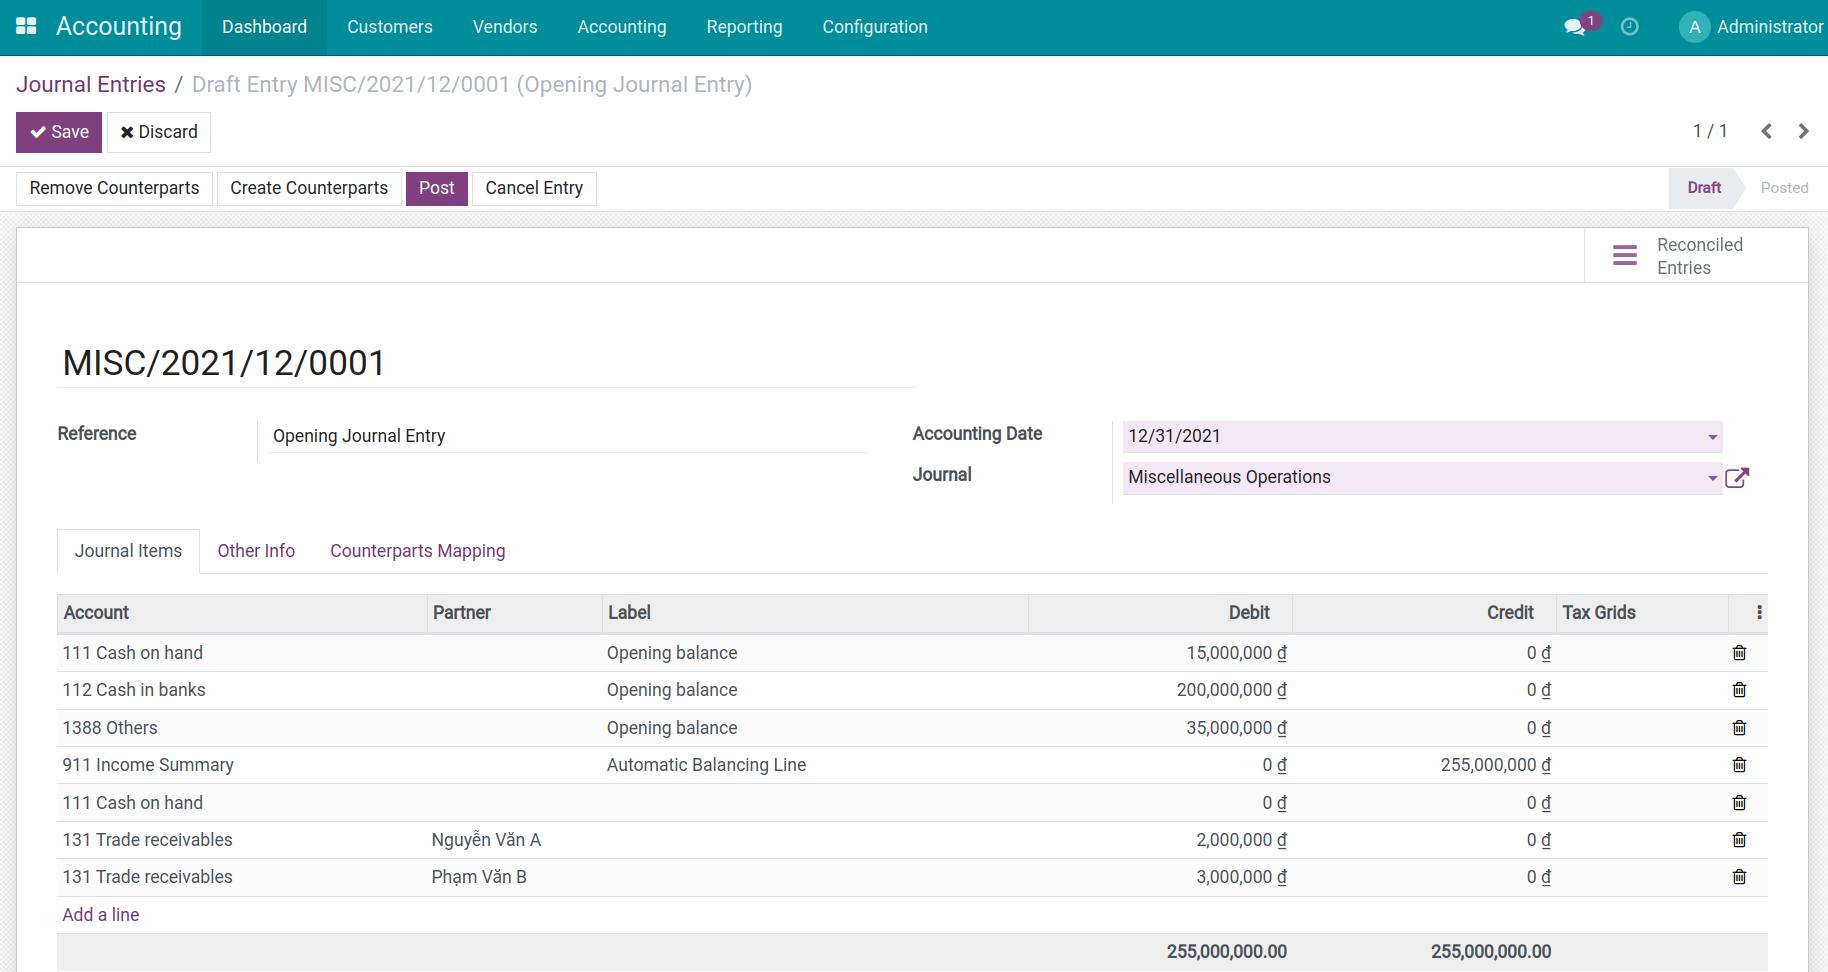
On the opening journal entry, journal item of each receivable/payable account is automatically created with the total balance of that account according to your input data. For accounts that involve various partners at the same time, you need to split the total balance into different journal items, one partner per item with the respective opening balance.
In case there are many accounting transactions related to various vendors, customers, or employees, use the import data input feature to save time.
To accurately import data, include the following fields in the data structure template:
Partner External ID;
Journal items External ID;
Journal External ID;
Journal items/Debit;
Journal items/Credit;
Journal entry reference.
After reviewing the Opening Balance Entry with your real accounting data, press Post to finish the importing opening balance process.
Note
Accounts involving employees (for example 334 - Employee Payables, 138 - Other Receivables, etc.): Use the employee’s personal account as partner information.
Account 141 - Advance: Select the Employee Advance Journal.
See also
Related article
Steps to import opening balance for Asset
Accounting reports available in iSuite
Process of customer invoicing, payment and reconciliation
Title
Text!
Point 1.
Point 2.
Point 3.
Point 4.
Process of customer invoicing, payment and reconciliation
Process of customer invoicing, payment and reconciliation
Each company has its own invoicing and payment policies and there might be even more policies applied flexibly on each product or service type. Therefore, in order to facilitate the process, Viindoo offers a versatile flow of invoicing and payments. You can choose to have:
Issue an invoice before delivering products;
Deliver products then issue an invoice;
One order per invoice;
One order split into various invoices;
One order per payment;
One order split into various payments;
One payment for multiple invoices;
etc.
Requirements
This tutorial requires the installation of the following applications/modules:
Accounting & Finance
Account bank statement import
Configure invoicing policies
iSuite Accounting app supports two invoice issuing methods:
Invoice what is ordered : Customers will be invoiced once the sales order is confirmed.
Invoice what is delivered : Customers will be invoiced only when the delivery is done.
Create a draft invoice
You can create a draft invoice in 2 ways:
Salesperson can create draft invoices right from the sales order interface . In this case, the created draft invoices will inherit all necessary information for payment such as information about the ordered product/service and delivery, information regarding payment terms, etc. from the sales order.
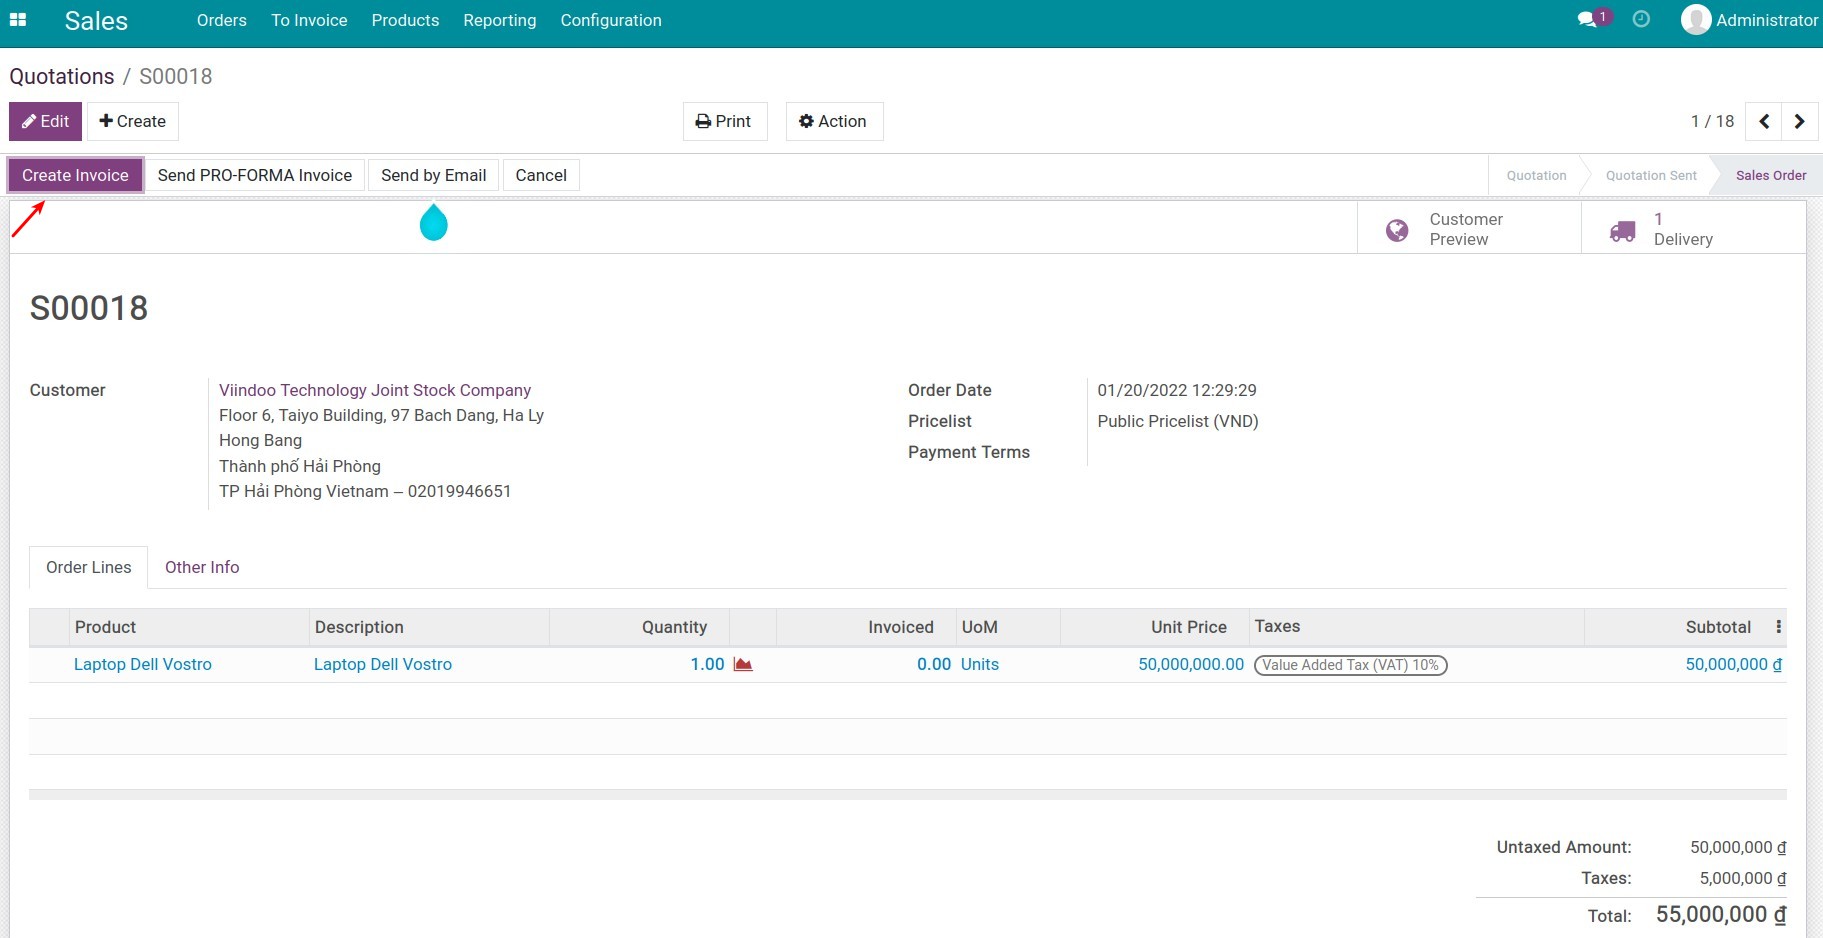
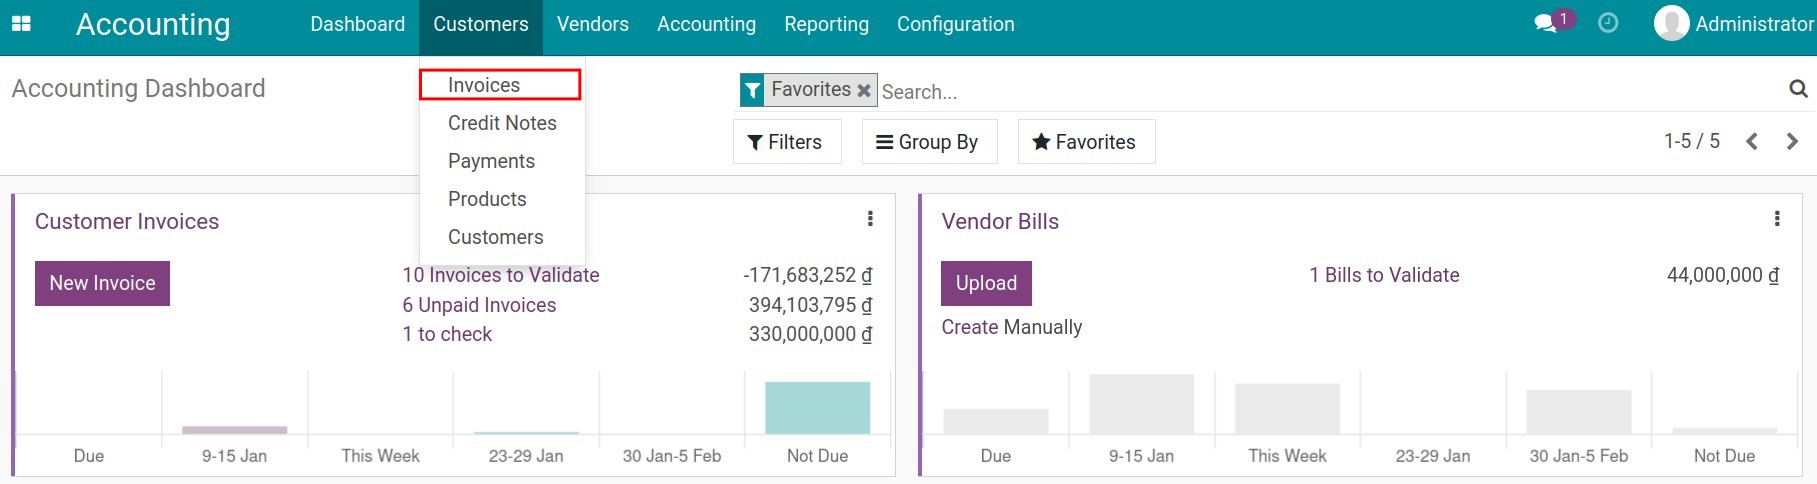
The accountant can also create a draft invoice by navigating to Accounting ‣ Customers ‣ Invoices ‣ Create.
Note
If you create a draft invoice from Accounting app, you can’t link invoice with the sales order.
Confirm an invoice
When an invoice is confirmed, a unique invoice number is created in Viindoo. On the other hand, you can also use the invoice number that is registered with your tax authority in order to reflect the transactions on tax reports:
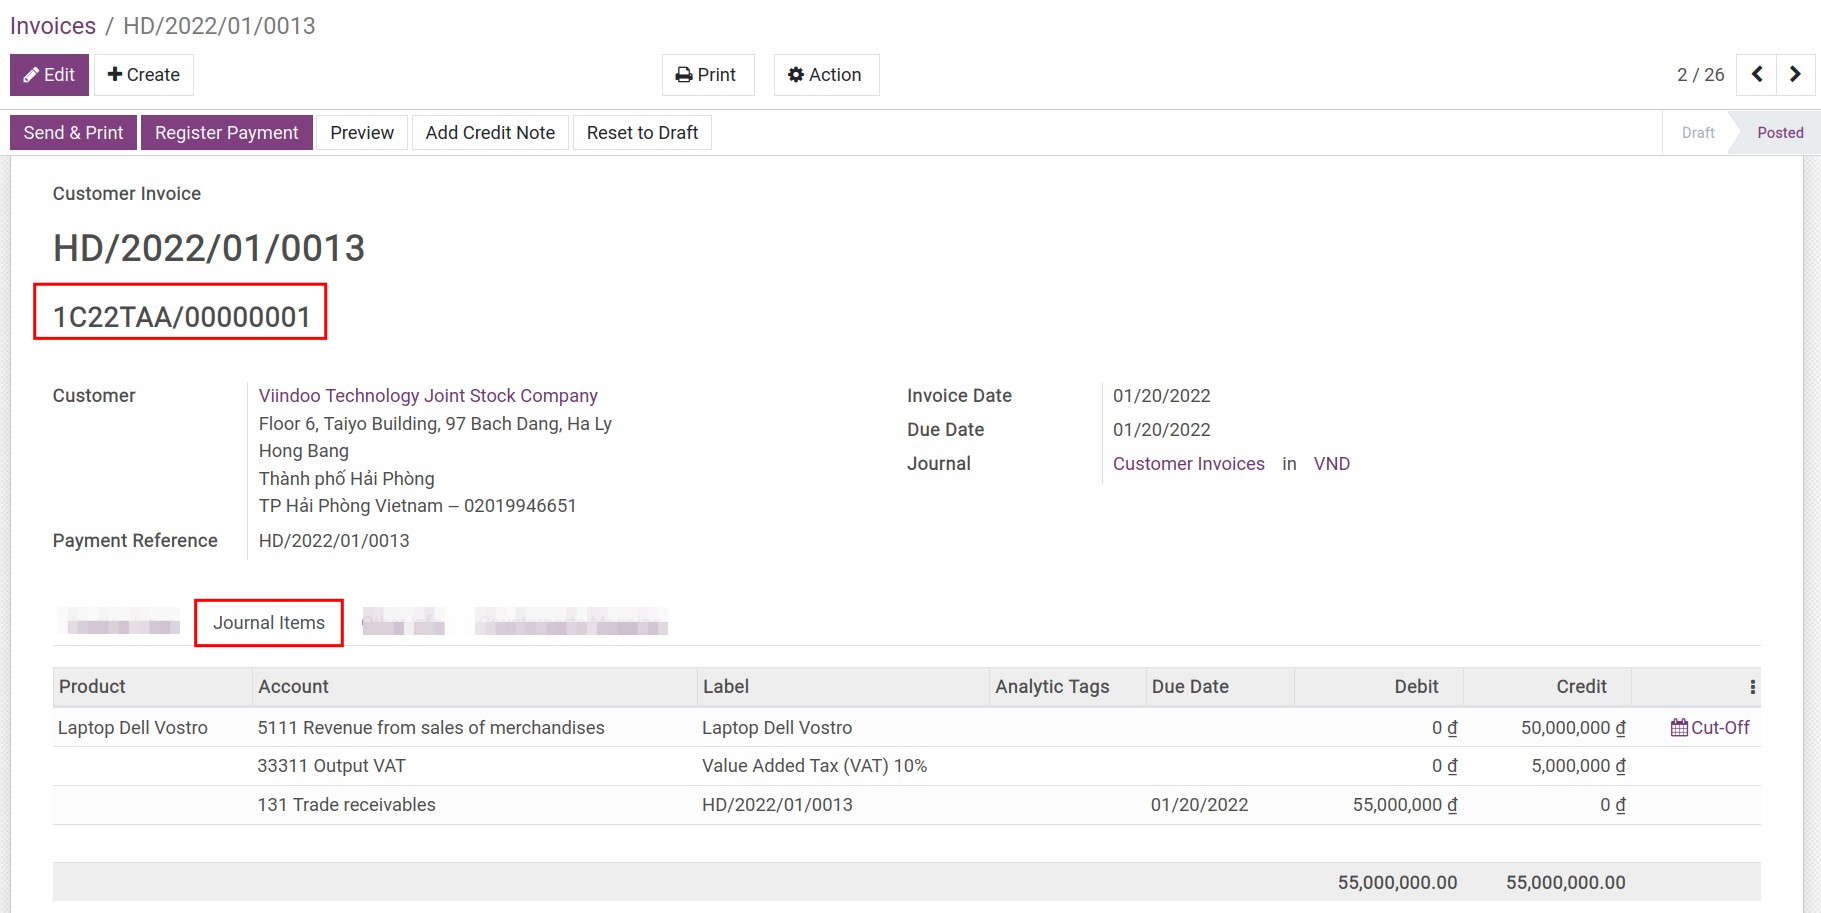
A single journal entry related to this invoice will also be posted once the invoice is validated. You can see more details of the entry from the tab Journal items on the invoice form view.
Note
Invoices in draft state will have no impact on the accounting system numbers. Only when these invoices are validated then the new data is recorded and updated in accounting journals.
Send invoices to customer
After validating customer invoices, you can send those to your customer directly using Send & Print function from the invoice interface:
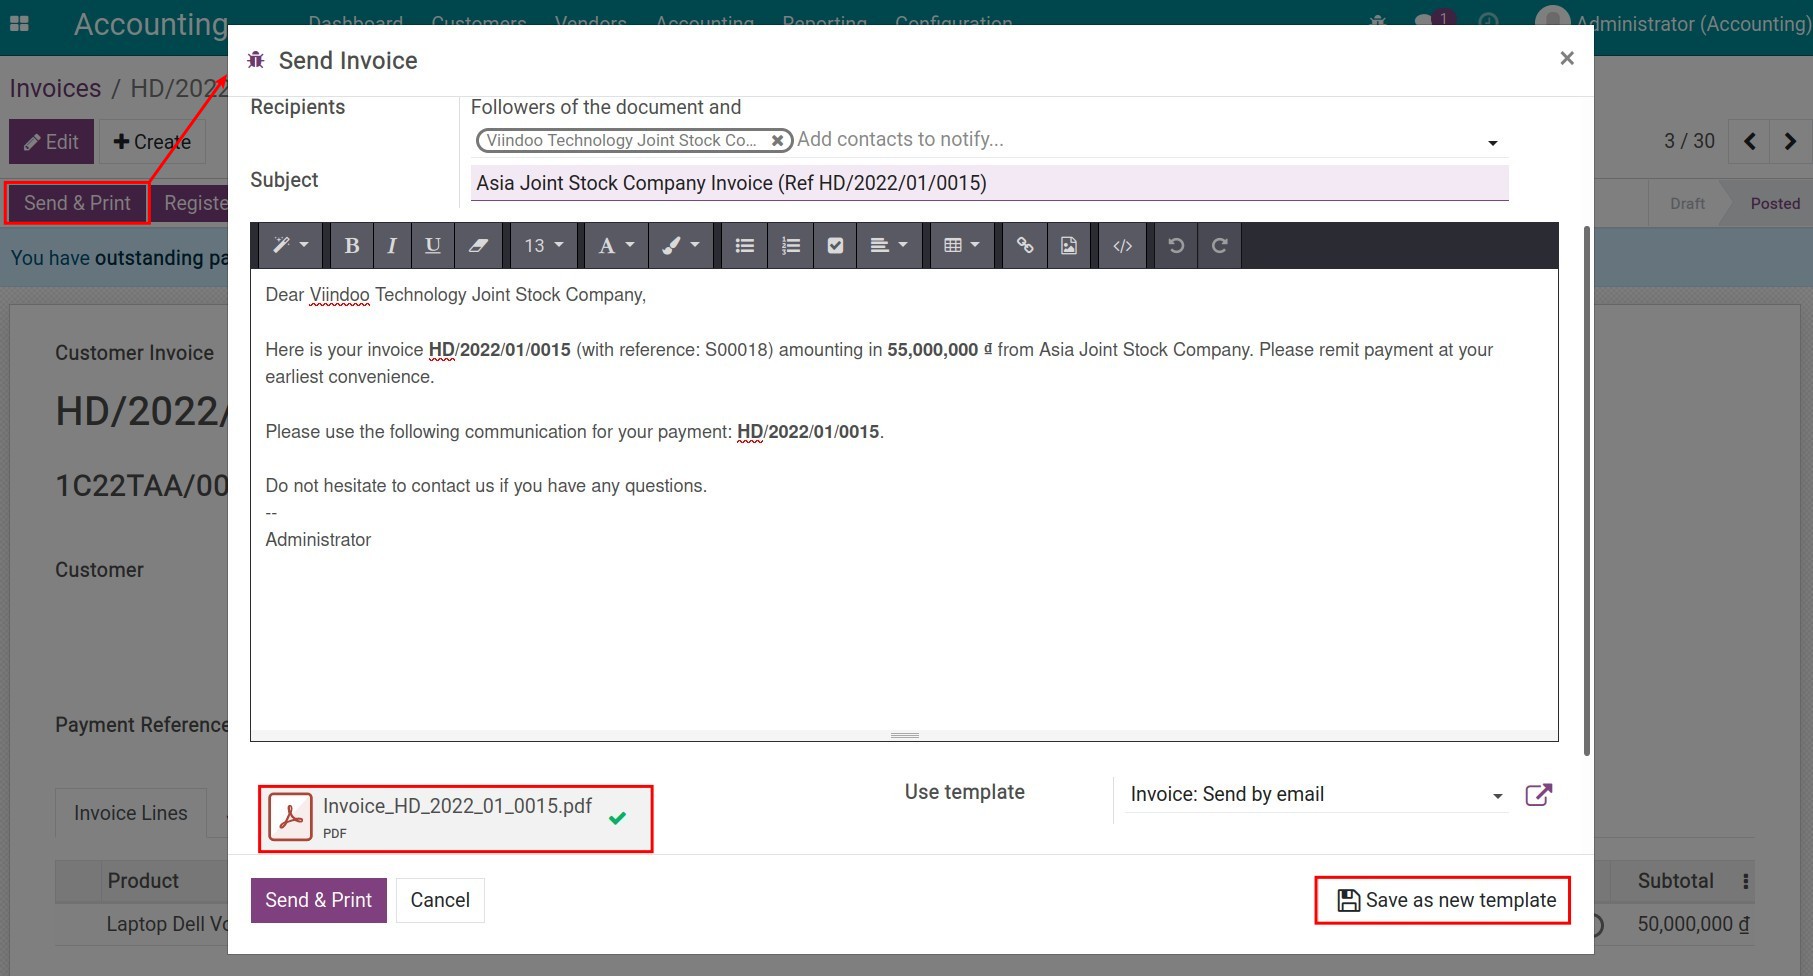
From here, you can write or edit the email message (you can also save it as a new email template if you would want to reuse it in the future) and hit Send & Print button to send the message via email with the PDF version of the invoice as an attachment to your customer.
Note
When an email message is generated, the software recognizes customers’ preferred languages set up on their contact details and updates the email template language accordingly.
Payments
There are two ways to register payments:
Directly from the invoice;
Create a stand-alone payment .
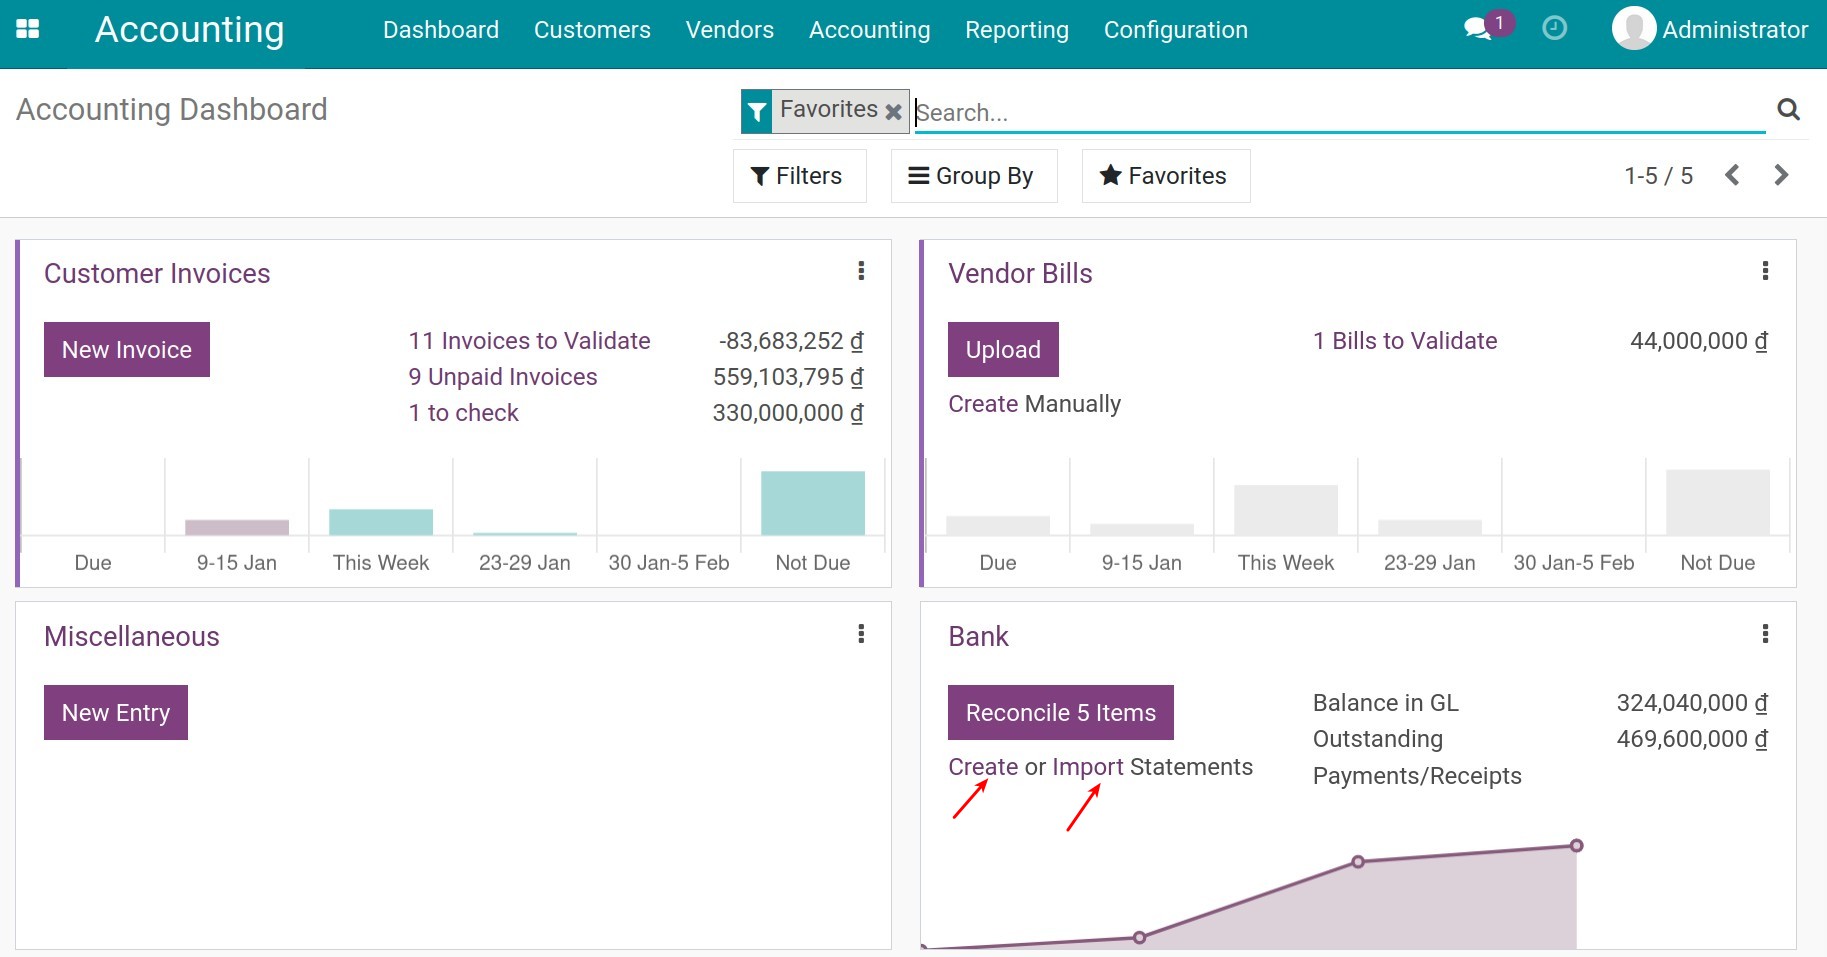
Register bank statement & payment reconciliation
Register bank statement
With Viindoo, you can register bank reconciliation manually or import them in bulk from CSV or RJE files. To do so, navigate to Accounting ‣ Dashboard, choose journal of the bank that needs to be reconciled and record the bank statement:
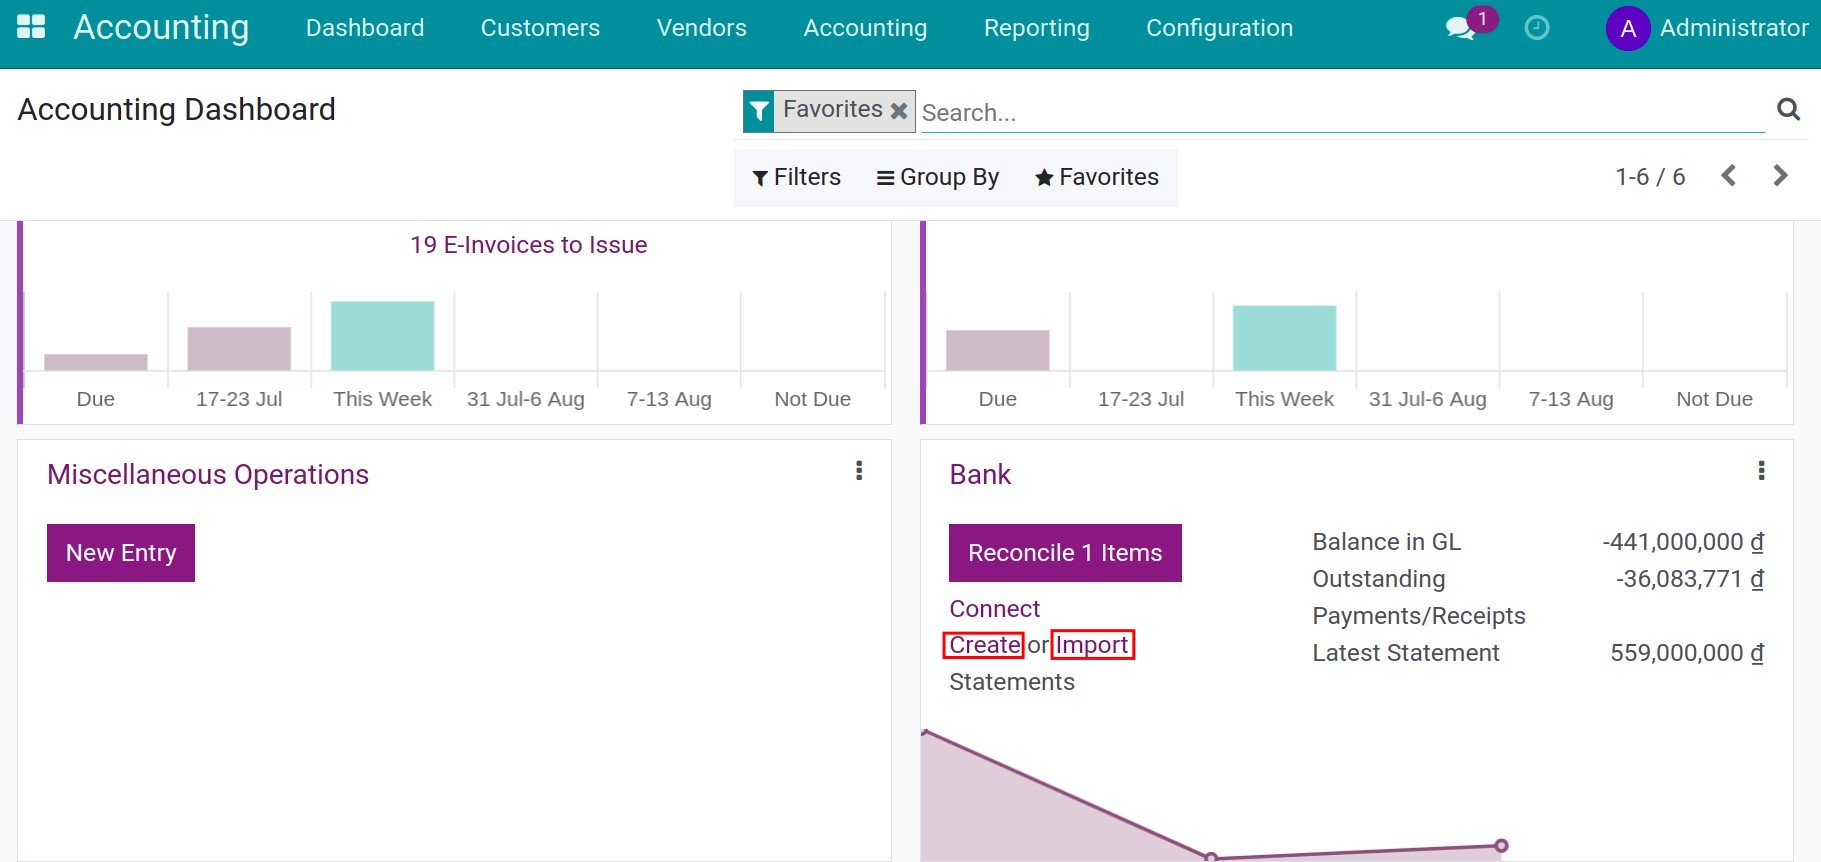
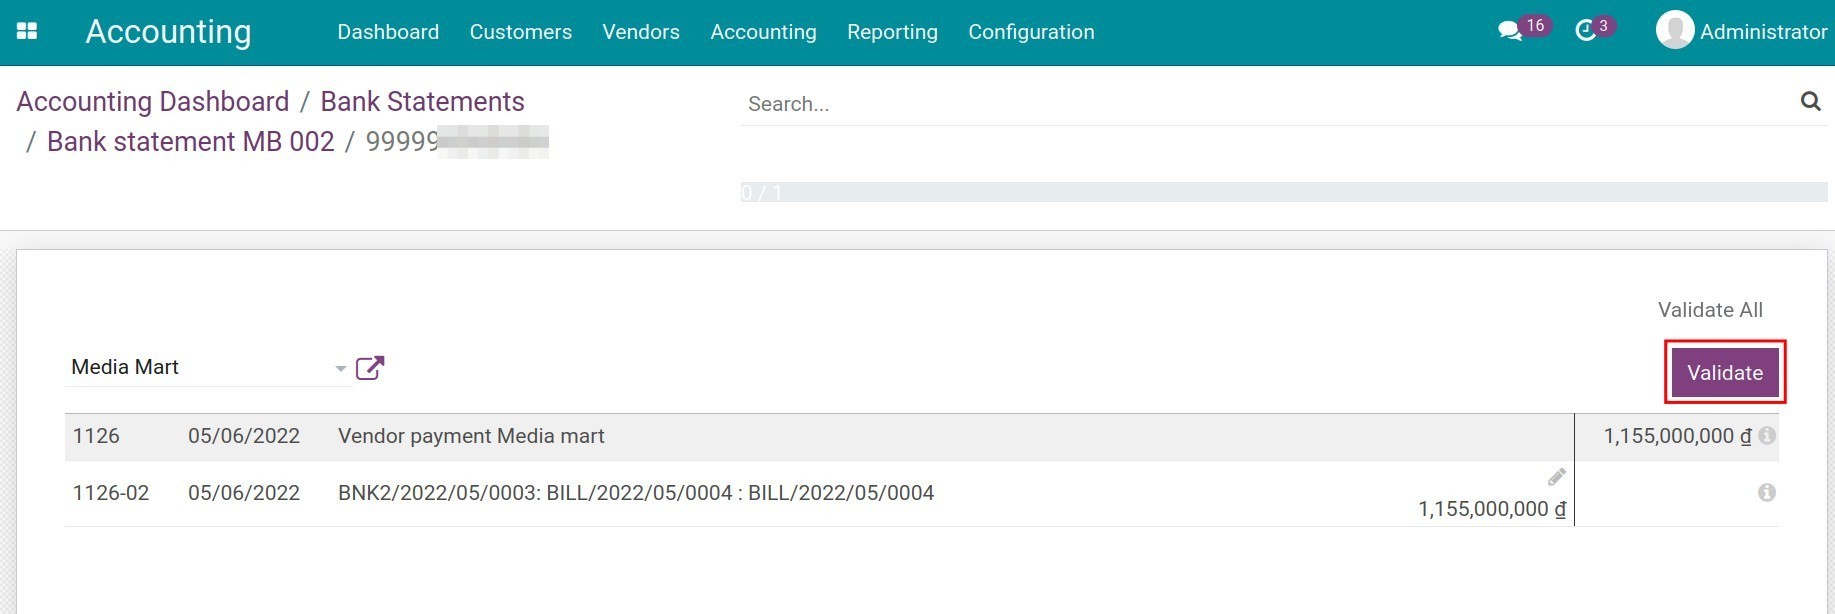
Payment Reconciliation
After validating the statement, you can reconcile the amount of money received from payments with this bank statement:

Keep track of a payment
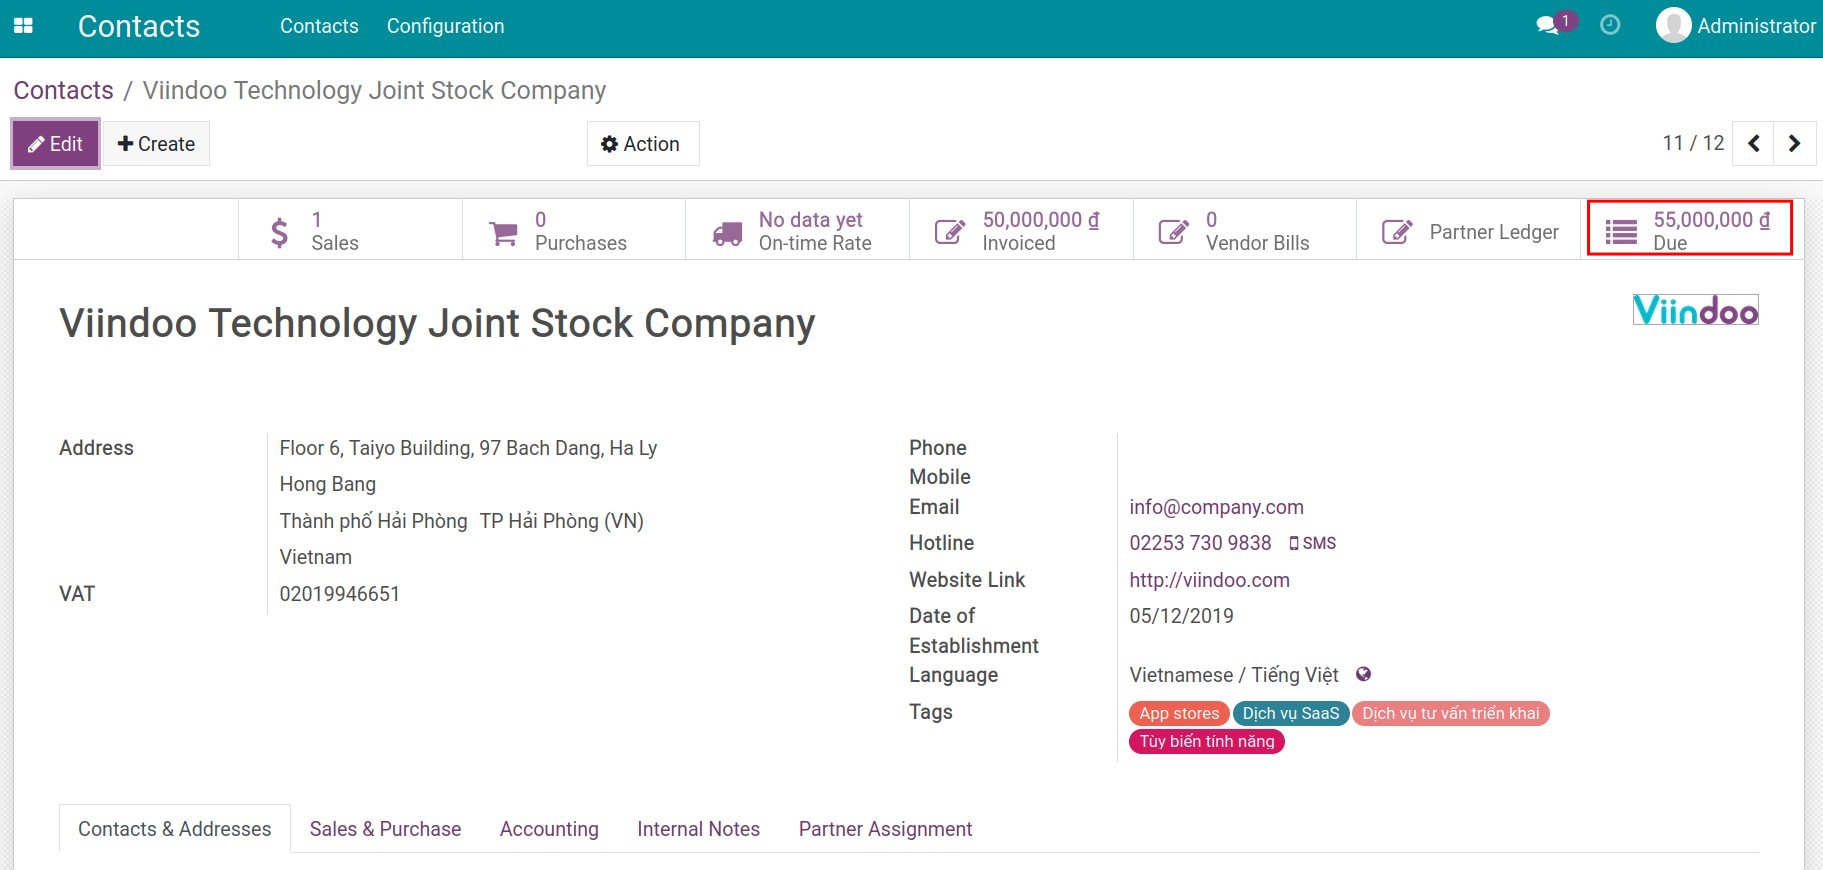
In preparation for reducing the delay of customers’ payments, as a liabilities accountant, you need to closely monitor and regularly stay in touch with customers. With Viindoo, you can track due debt directly on customer’s contact. Navigate to Contacts, then choose a customer’s contact and you can see the due of the customer:
Reporting
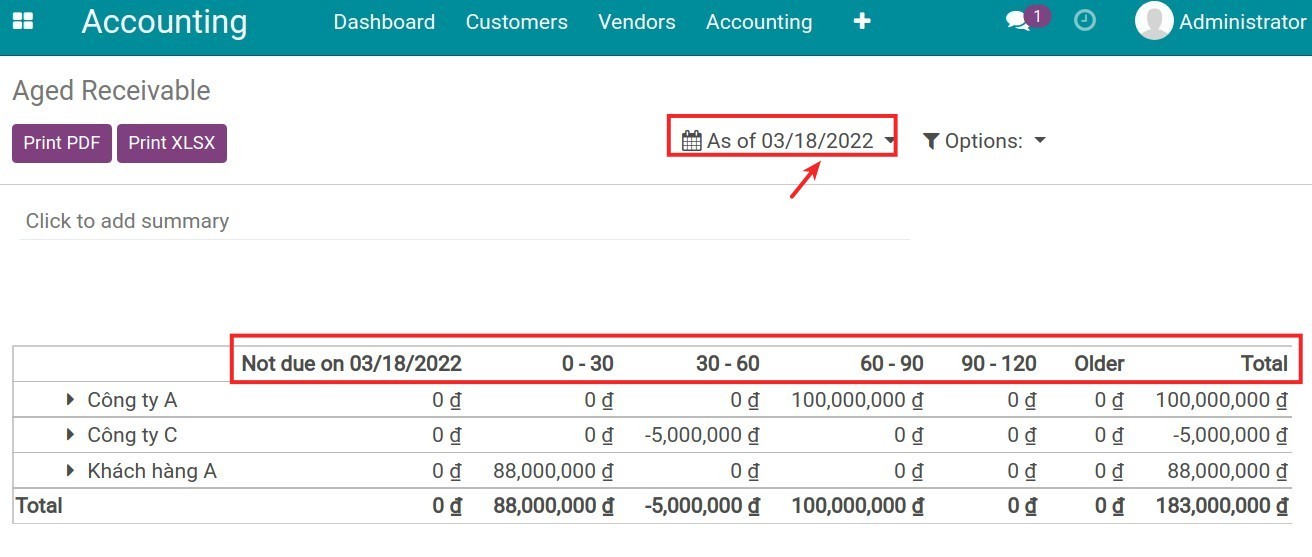
Payments due can be monitored by navigate to Accounting ‣ Reporting ‣ Aged Receivable:
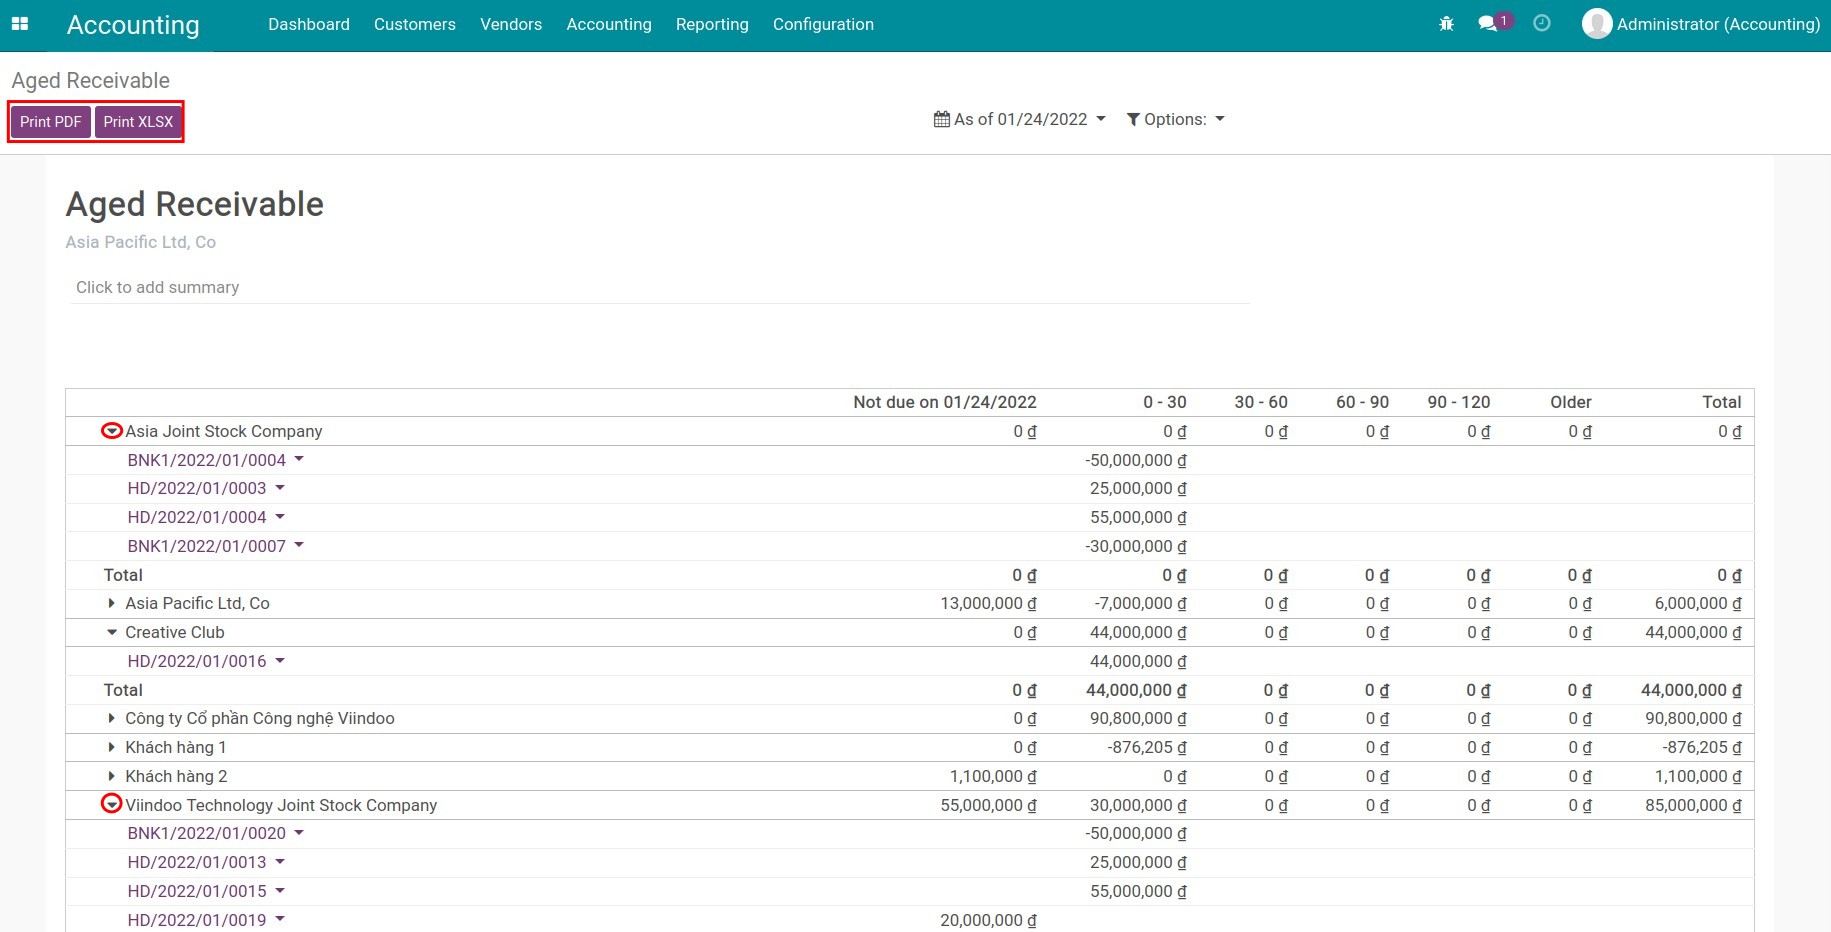
In each report, you can click on the customers’ names to see the details of each transaction.
See also
Related article
Configure Cash Rounding method
Configure Payment Terms
Process a cash discount
Set up Payment Service Providers in Viindoo
Set up Payment Service Providers in iSuite
Requirements
This tutorial requires the installation of the following applications/modules:
Accounting & Finance
MoMo payment acquirer
Introduction
In the current context, most economic transactions can be processed online. iSuite Enterprise Management Software provides many online payment methods to help you close sales orders faster, providing more efficient and convenient tools for customers. There are two main types of payment methods: Payment through a third party service (the payment will be kept at the intermediary’s account, then transferred back to your bank account) and the bank transfer (the payment will be transferred directly to your bank account).
Bank transfer
This is the default method when you use online payments. With this method, you will need to provide detailed information on bank accounts on the website and the payment gateway. Then, customers will transfer money directly to your account via internet banking.
Payment via Payment acquirers
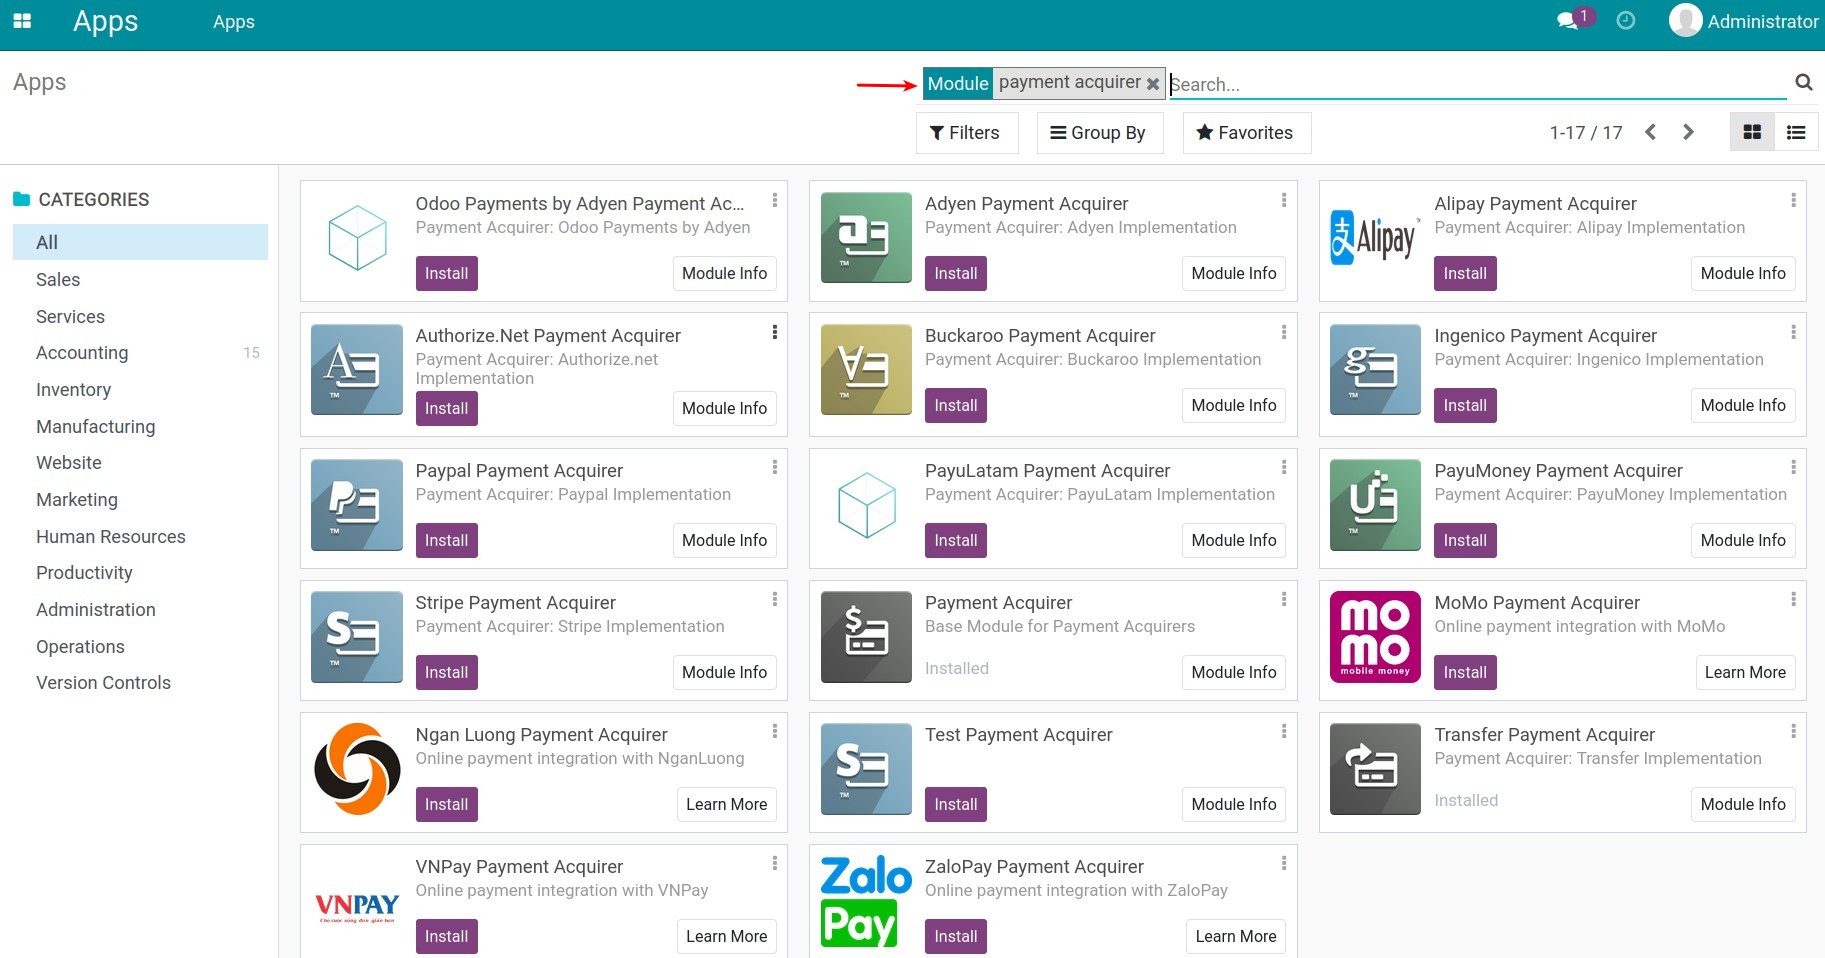
Using this payment method, your customers will be navigated to the payment acquirer interface and proceed to pay. Viindoo has integration with many payment acquirers such as:
|
|
|
|
|
|
|
|
|
|
|
|
|
|
To use these payment services above, you go to iSuite Apps, turn off the Apps filter, and then use the filter tool to search for the suitable payment apps and install:
Payment acquirer configuration
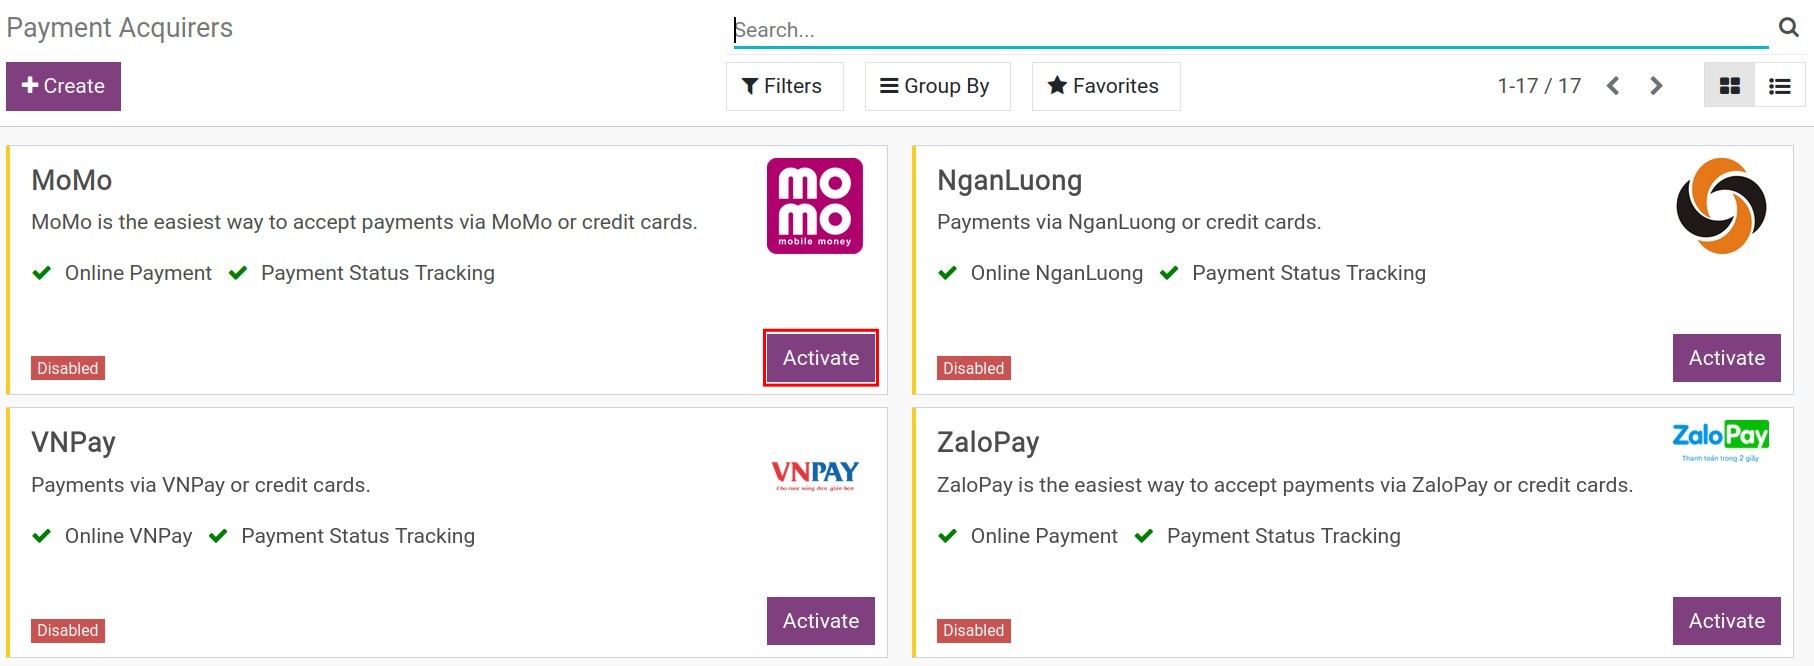
To configure a payment acquirer, navigate to Accounting ‣ Configuration ‣ Payment Acquirers:
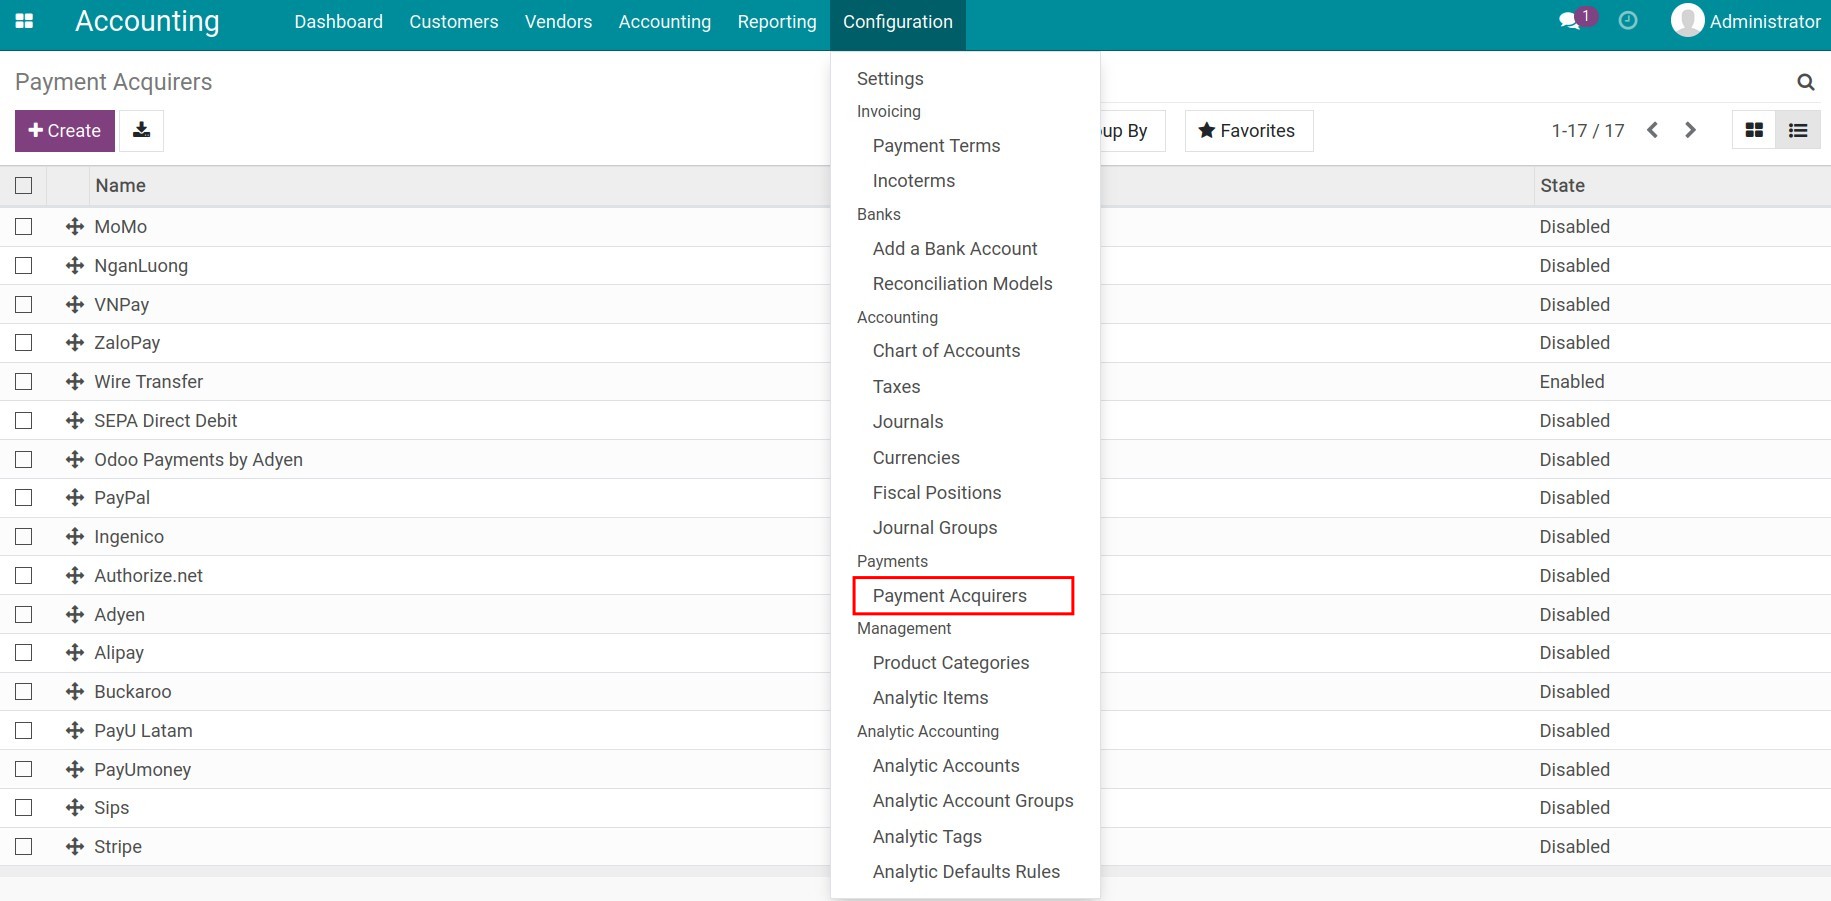
Head to the needed payment acquirer to use, then click on the Activate button.
Now the payment acquirer view is opened for you to configure the information:
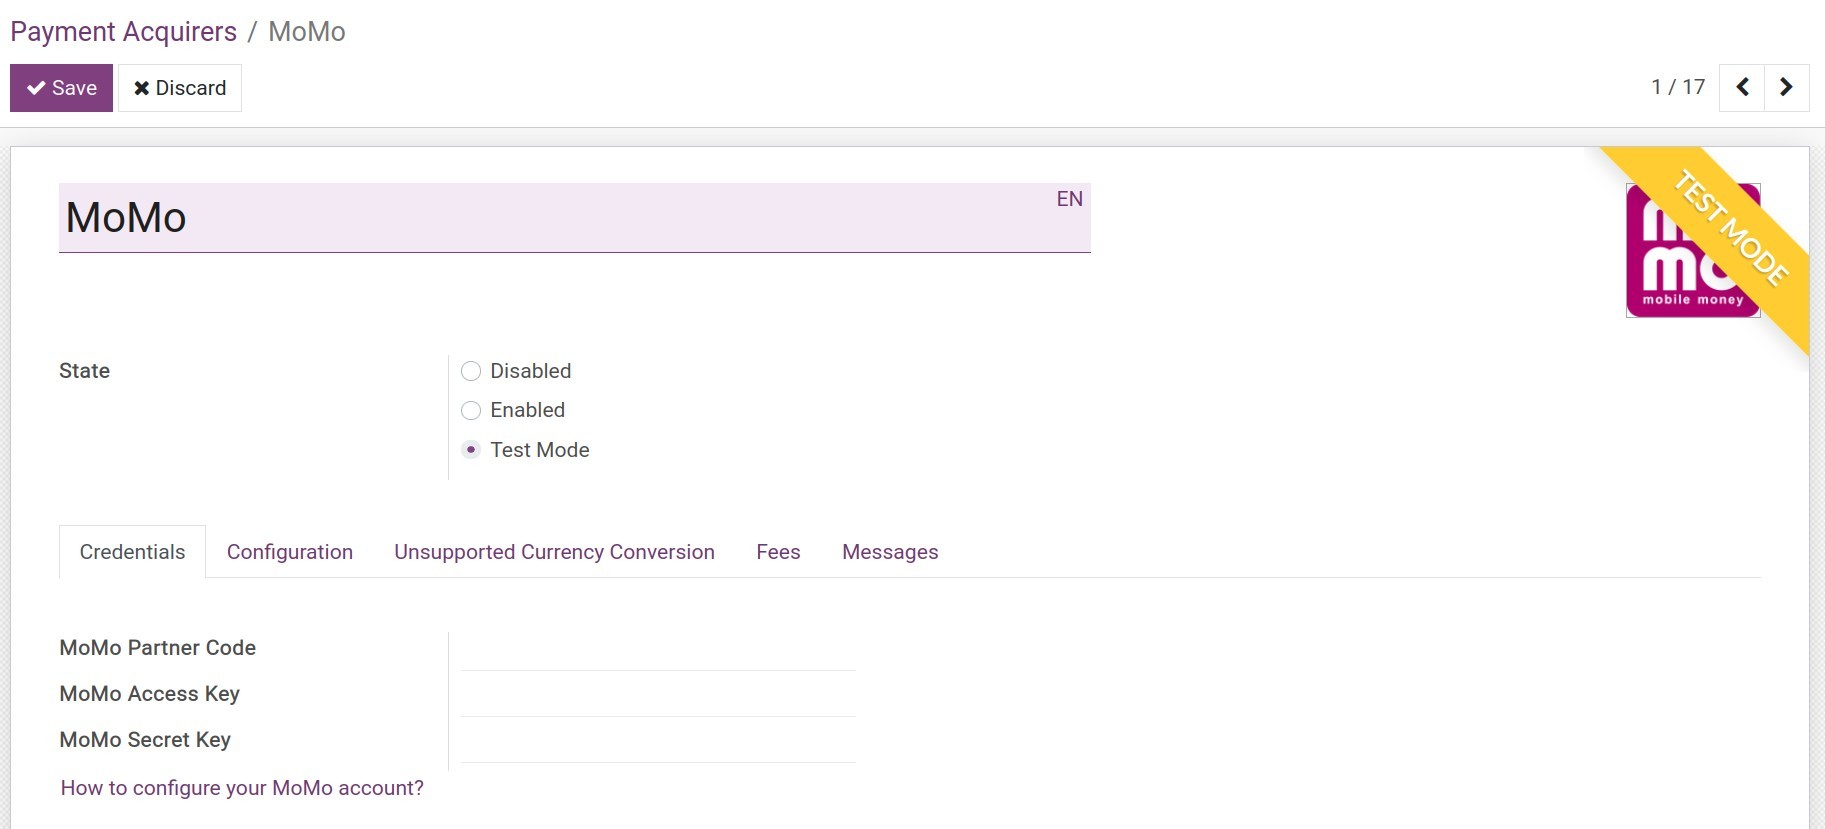
State: Select the options below to change the payment service provider’s status:
Disabled: This payment acquirer cannot be used;
Enabled: When you want to use this payment acquirer;
Test Mode: Choose when you want to test this payment acquirer.
Credentials tab:
A place for declaring the affiliate information that the payment acquirer provides to you;
Click on the link for navigating to the payment acquirer’s instruction page.
Configuration tab:
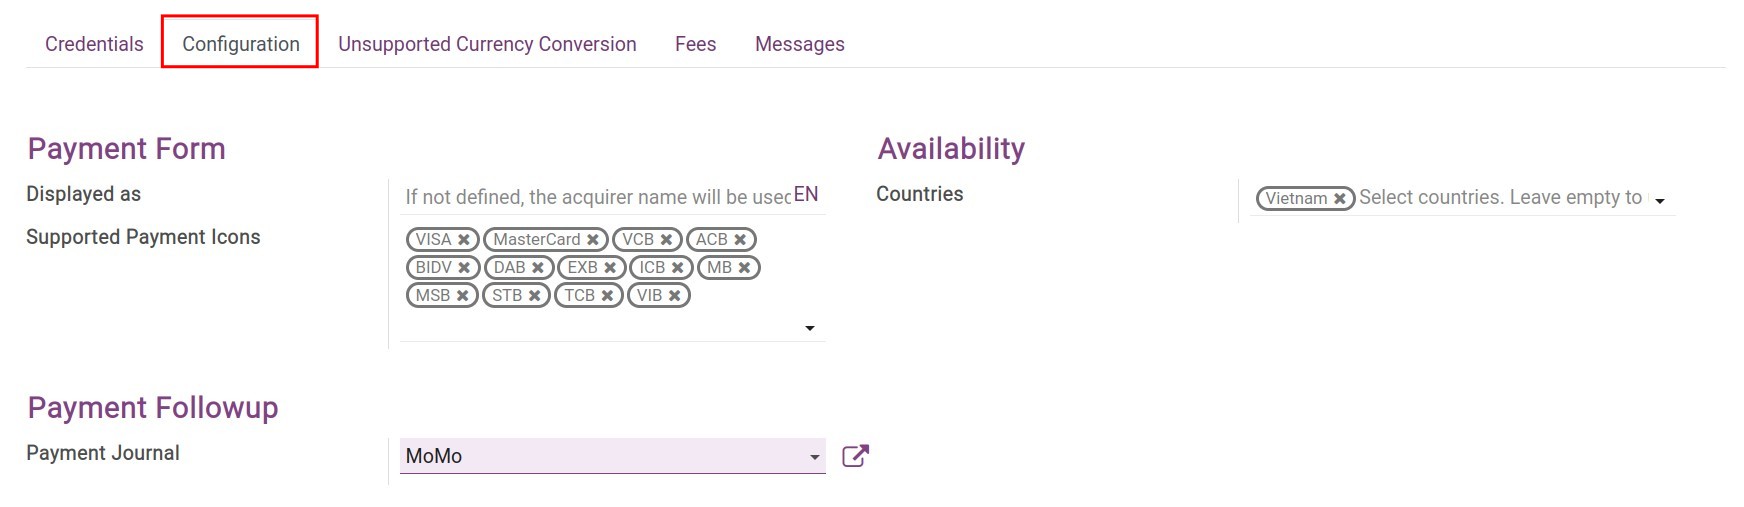
Payment Form:
Displayed as: Declare the display name of the payment method. If not, the system will use the name of the payment acquirer;
Supported Payment Icons: Choose from the list of the payment symbols so that customers can see what payment types this acquirer supports.
Payment Followup:
Payment Journal: Select a journal to record the payments from this acquirer.
Availability:
Country: Select the countries in which you want this acquirer to apply.
Unsupported Currency Conversion tab:
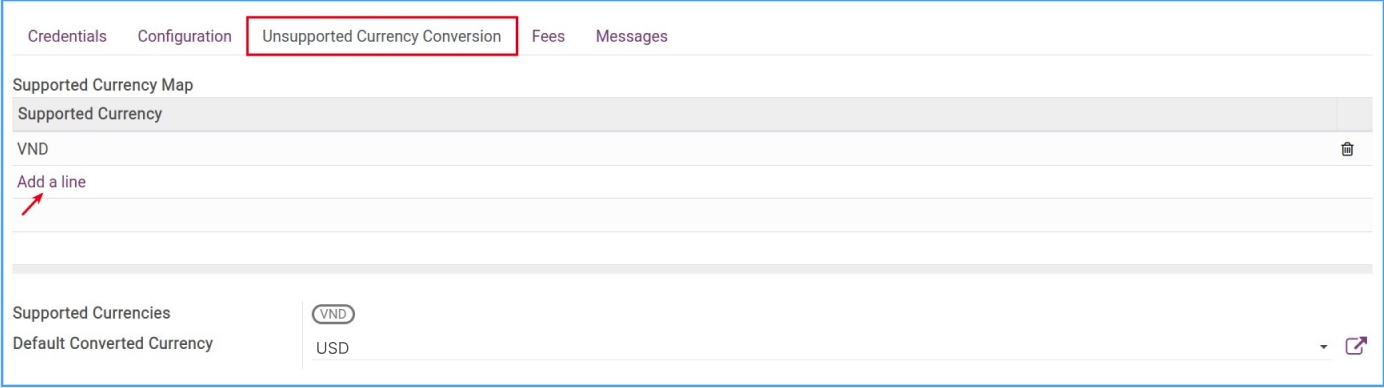
To add a currency that is supported to payment with this acquirer, click on Add a line and choose from the list of supported currencies (Note: you need to enable the Multi-currencies system to apply multiple currencies to payments).
Default Converted Currency: When occurring the currencies which differ from those supported by the acquirer, the system will convert them to the default currency that is being configured here.
For instance: Your bill is calculated in VND (Vietnamese Dong) while it is not supported by the acquirer. During the online payment process, this currency will be converted to the default currency.
Fees tab:
 When enabling the Add Extra Fees feature, the system will allow you to declare the money exchange fees from the payment acquirer to your company’s account.
Message tab:
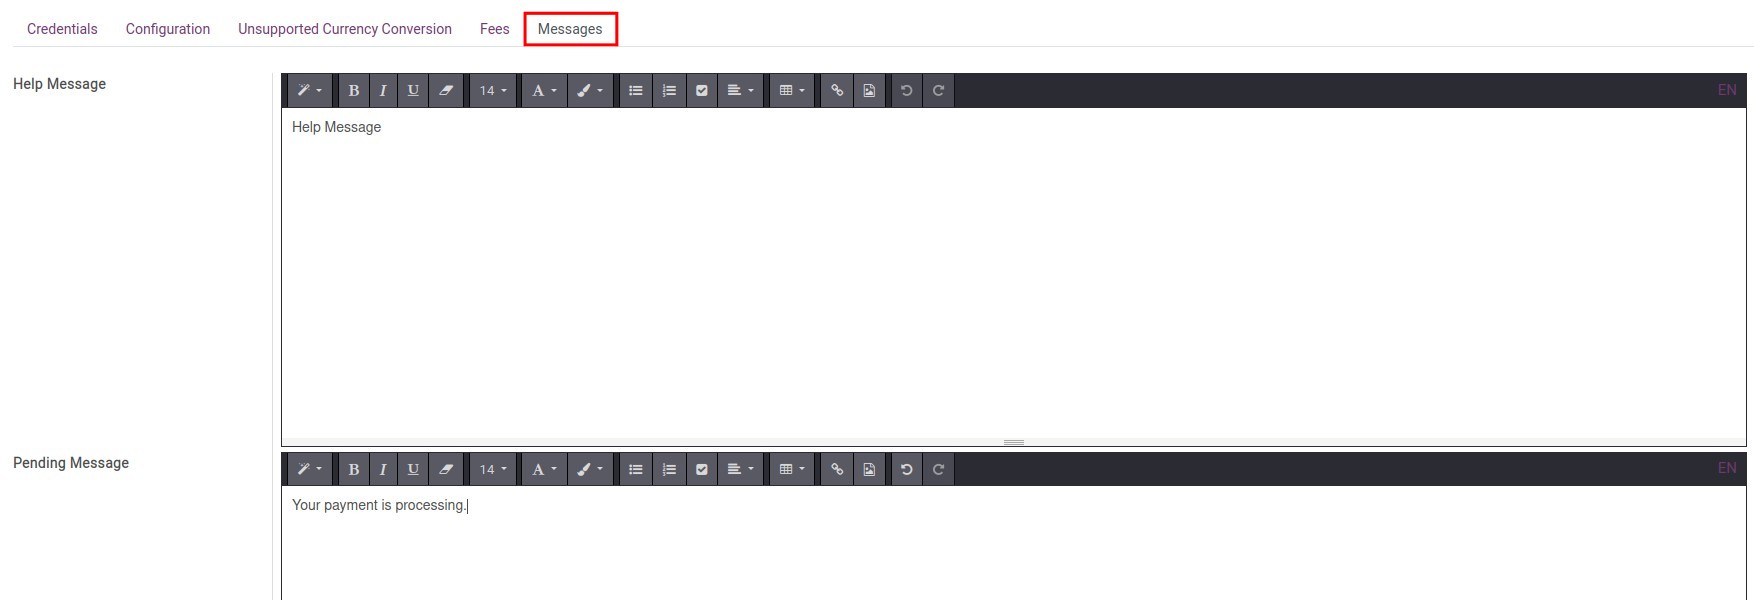 A place to declare the messages which are:
Help Message;
Pending Message;
Complete Message;
Cancel Message.
Accounting reports available in iSuite
Accounting reports available in iSuite
Requirements
This tutorial requires the installation of the following applications/modules:
iSuite Accounting & Finance
In the iSuite system, you can use a couple of general reports in various countries.
Some featured general reports in iSuite Accounting app:
- GAAP Statements:
Profit and Loss;
Balance Sheet;
Cash Flow Statement.
- Partner Reports:
Aged Payable;
Aged Receivable;
Partner Ledger.
- Business Statements:
Executive Summary.
- Audit Reports:
Tax Report;
General Ledger.
- Trial Balance
etc.
General characteristics of the reports
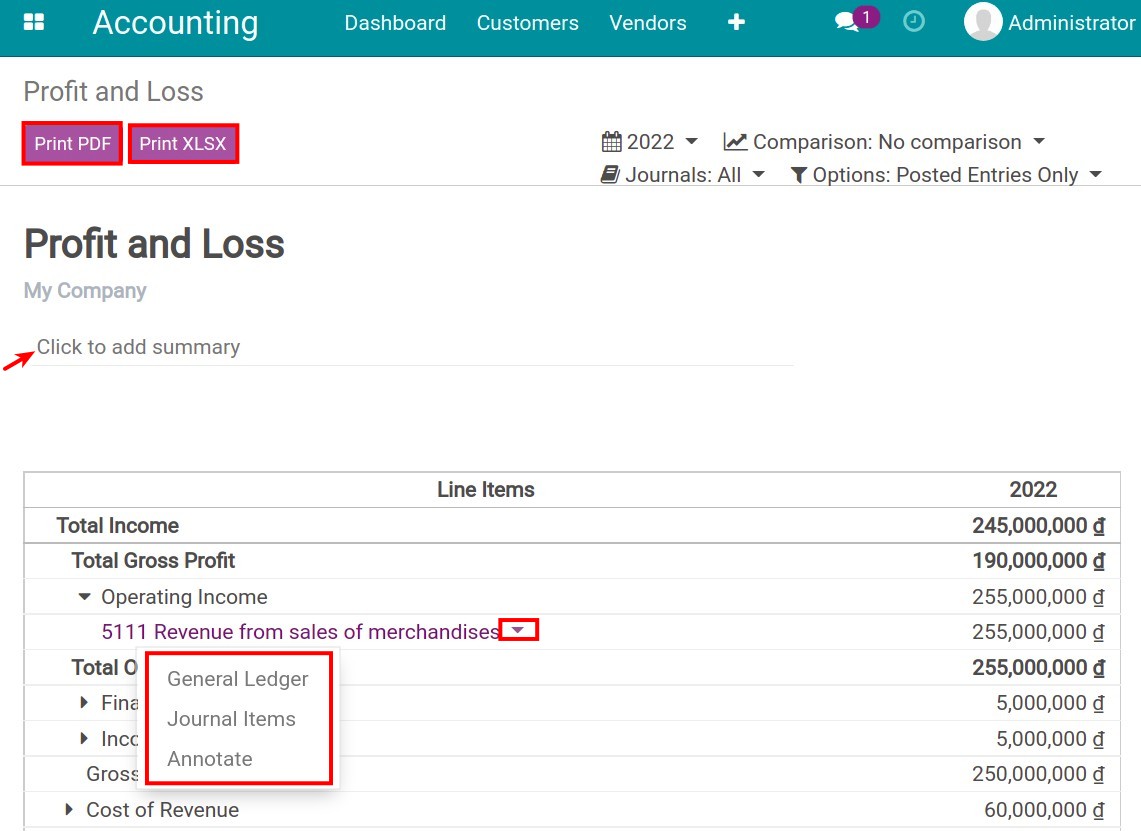
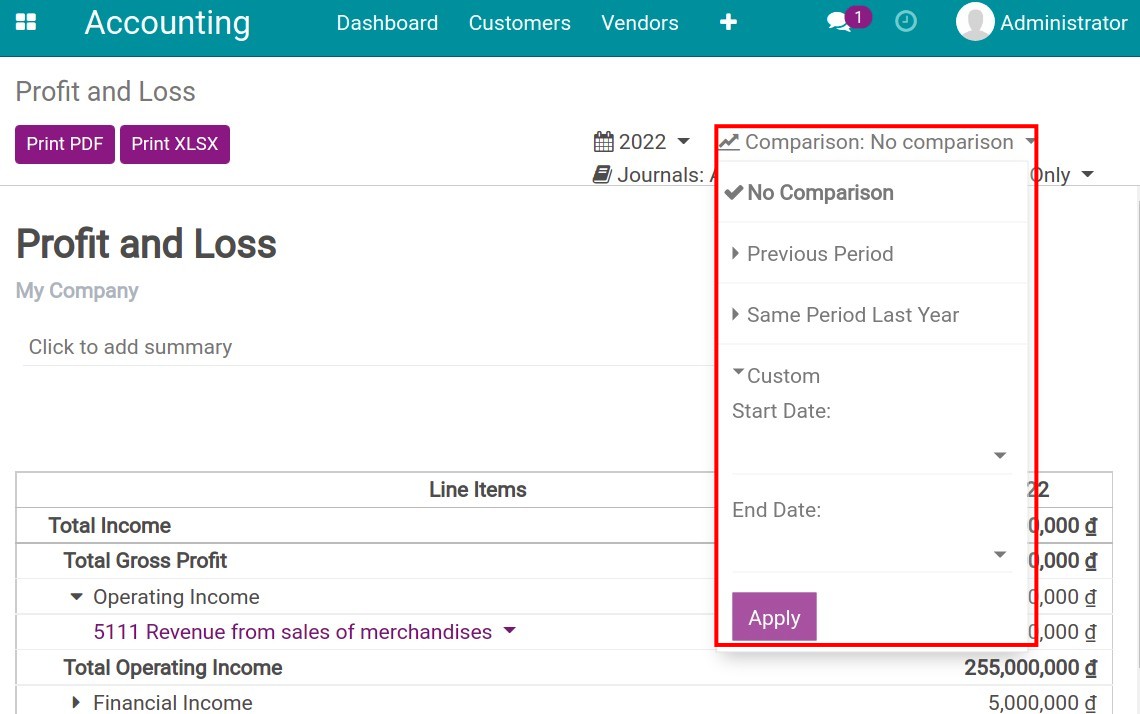
You can add content to the footnotes of report pages and print them to PDF or Excel files. To view specific data, you can click on an item in the report and see details in General Ledger or Journal Items.
You can compare data between different periods of time such as comparing with the previous one, with the same period of last year, or view data of a determined period. It’s a useful tool that helps you compare the fluctuation of each financial indicator, by selecting a certain time period.
General reports in iSuite
To view reports, navigate to Accounting > Reporting and select a report according to your needs:
Balance Sheet
Balance Sheet shows a quick view of assets data, liabilities, and owner’s equity of your business at a certain time.
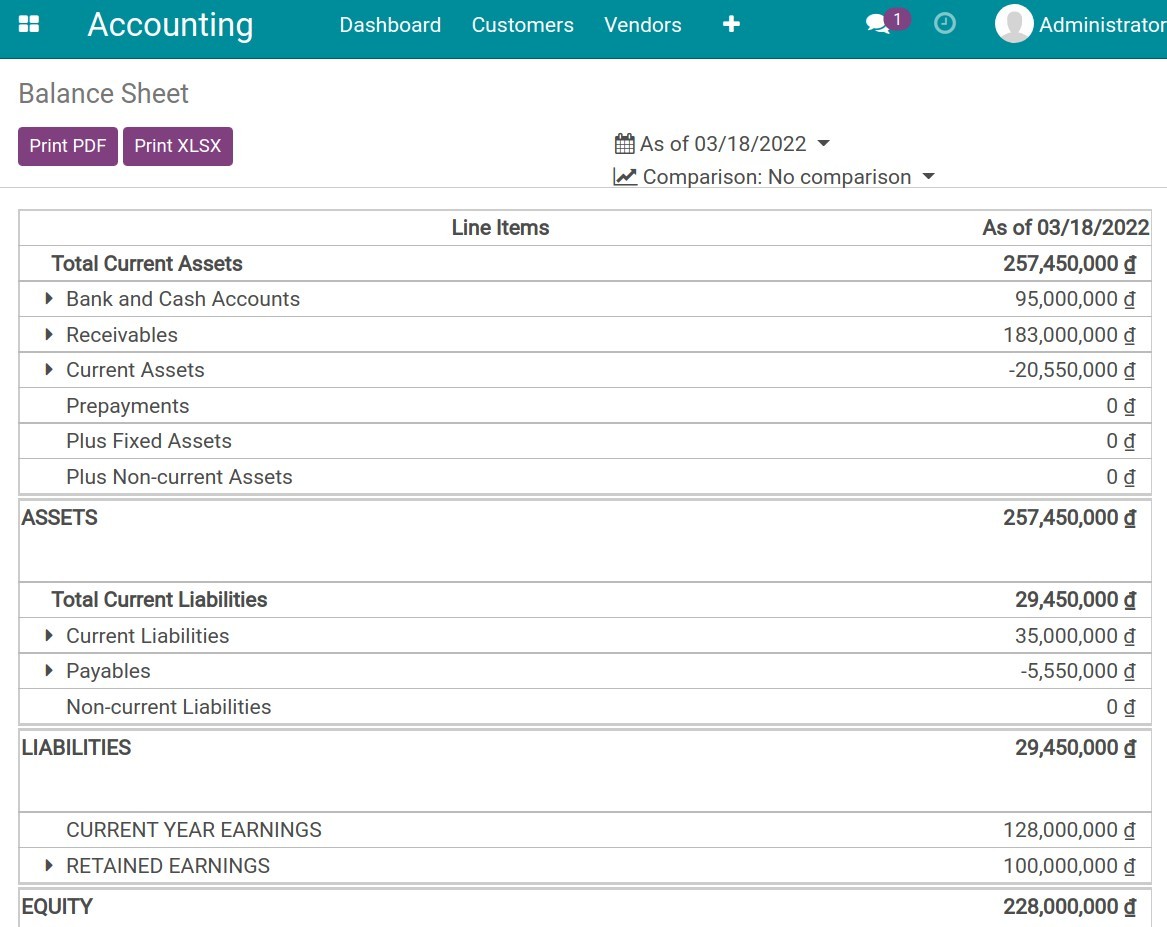
Note
See details about Balance Sheet according to Vietnam Accounting Standard.
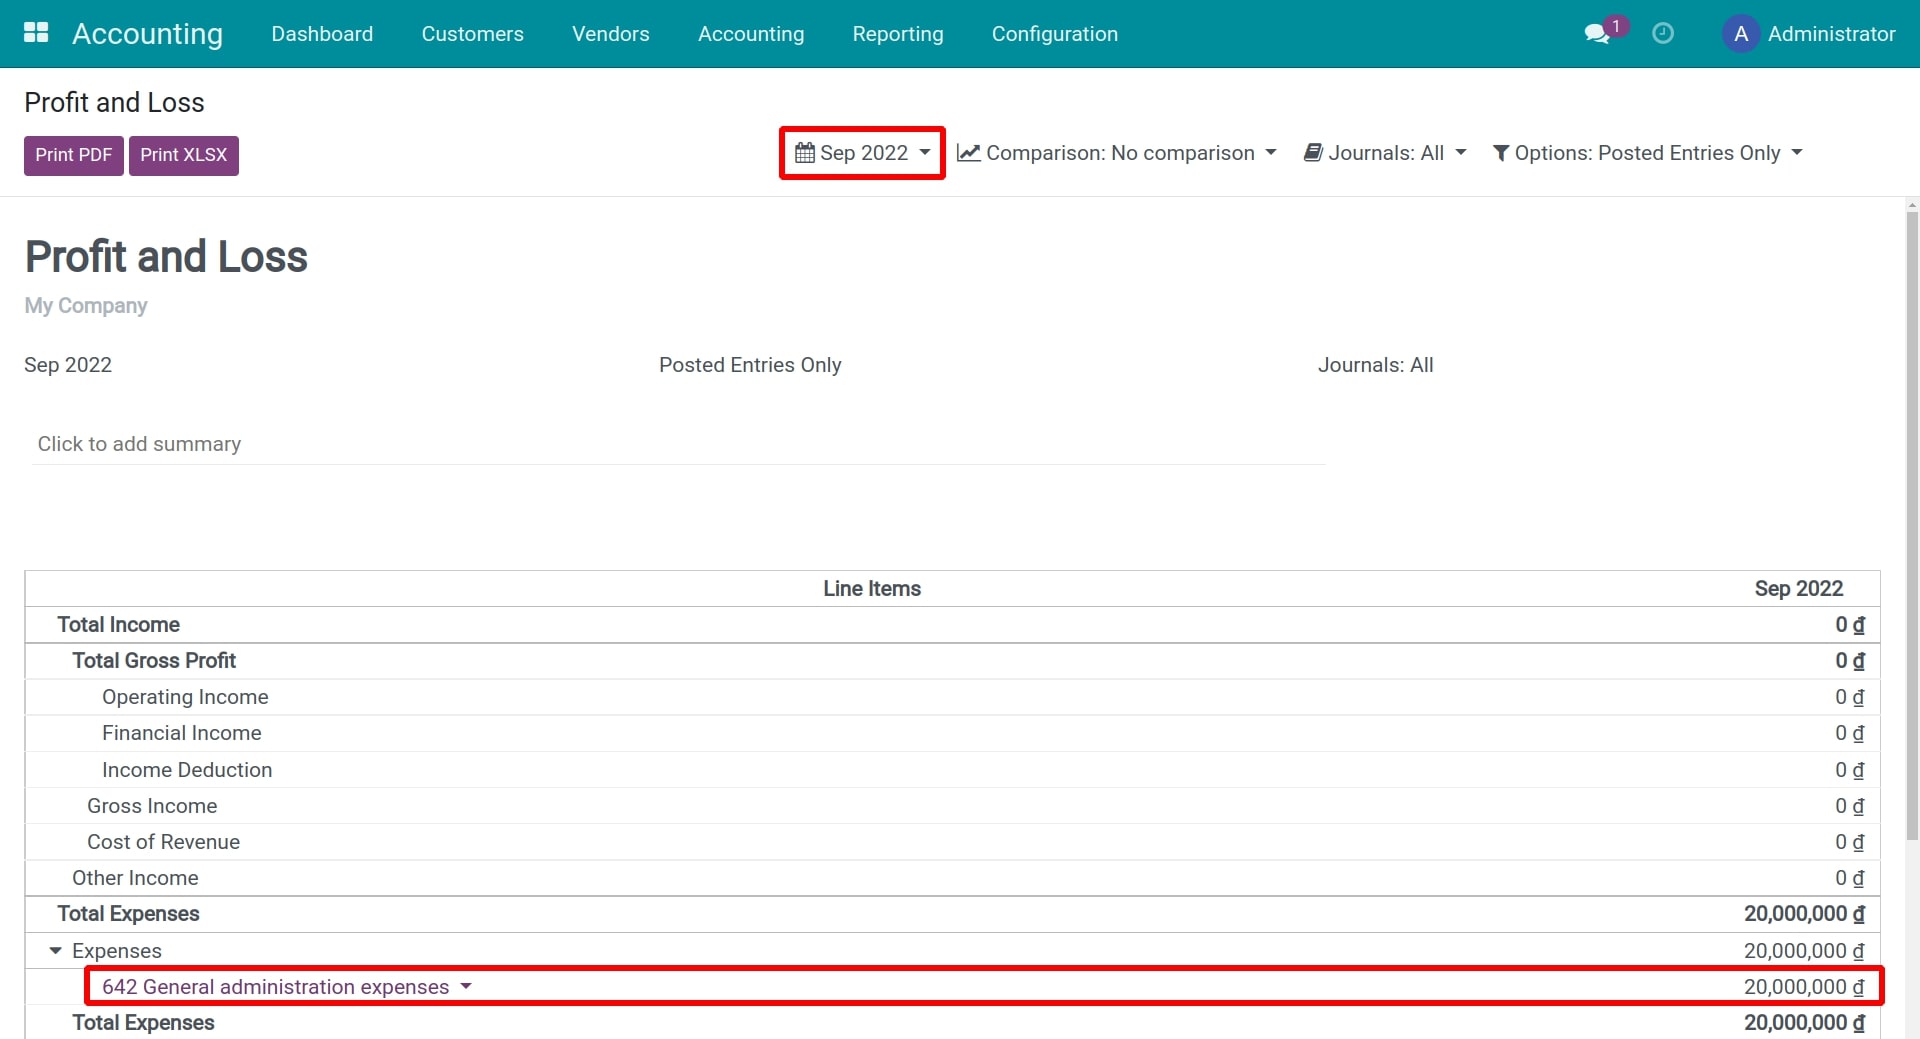
Profit and Loss
The profit/loss statement shows the balance between revenue and expenses in each accounting period. This report is a tool to present the profitability and business operation status of the business.
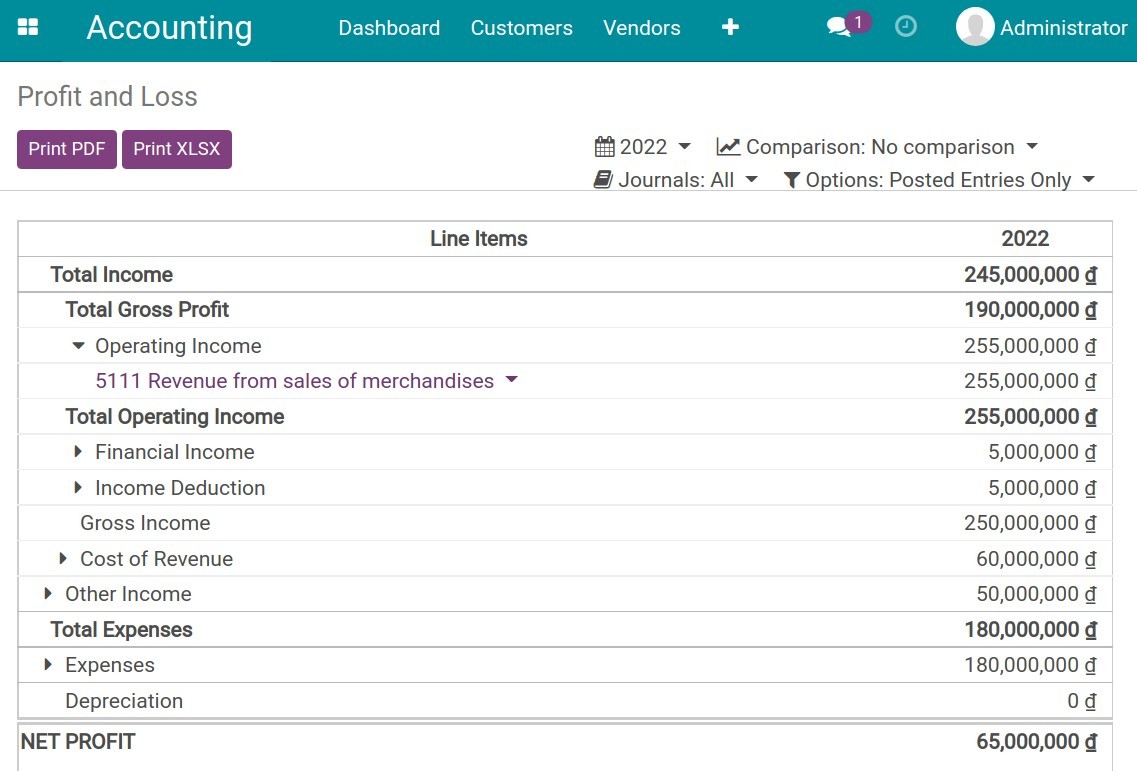
Note
See details about Profit and Loss according to CEMAC Accounting Standard.
Cash Flow Statement
The Cash Flow Statement is a report that shows the cash inflows and outflows of a business in a determined period. This statement helps managers control the cash flow, balance the revenue and expenditure, and be proactive in finance.
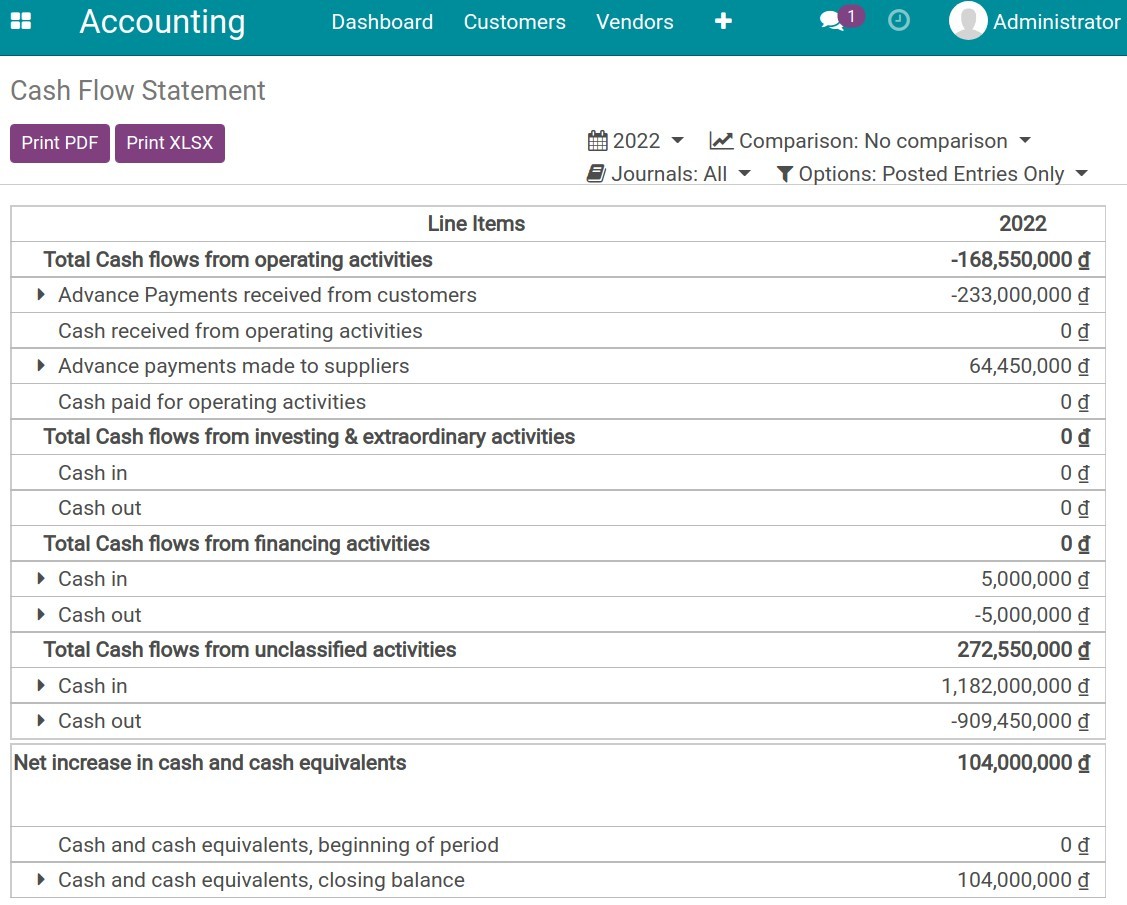
Note
See details about Cash Flow Statement according to CEMAC Accounting Standard.
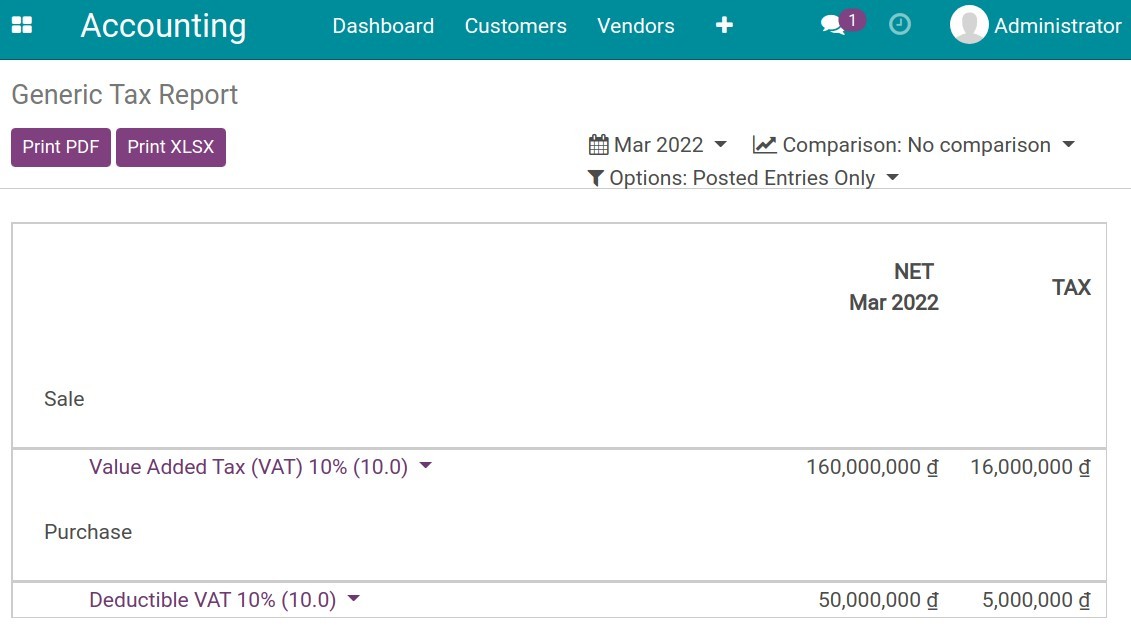
Tax Report
This report allows you to see the net amount and tax amount grouped by type of purchase and sale.
Aged Payable/Receivable reports
This is a type of payables/receivables report , used for tracking the payables/receivables of each customer and vendor by time purpose. There are two types: Aged Receivable and Aged Payable. These reports help businesses understand the due time of each debt for each partner. From there, businesses can come up with a reasonable method to collect the debt from each customer or pay the provider on time. This is the noticeable difference of the aged payable/receivable report compared to other payable/receivable statements.
Aged Receivable
Aged Payable
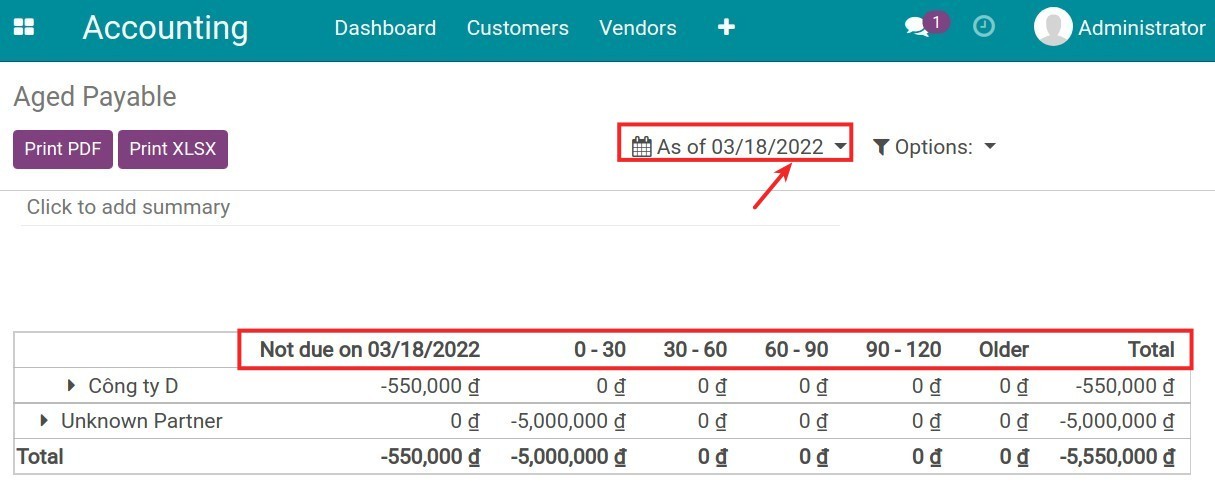
In which, at a specific time that you configured in this report:
Not due + a specific time: Undue payables/receivables.
0-30: Overdue payables/receivables overdue from 0-30 days ago.
30-60: Overdue payables/receivables from 30-60 days ago.
60-90: Overdue payables/receivables from 60-90 days ago.
90-120: Overdue payables/receivables from 90-120 days ago.
Older: Payables/receivables overdue for more than 120 days.
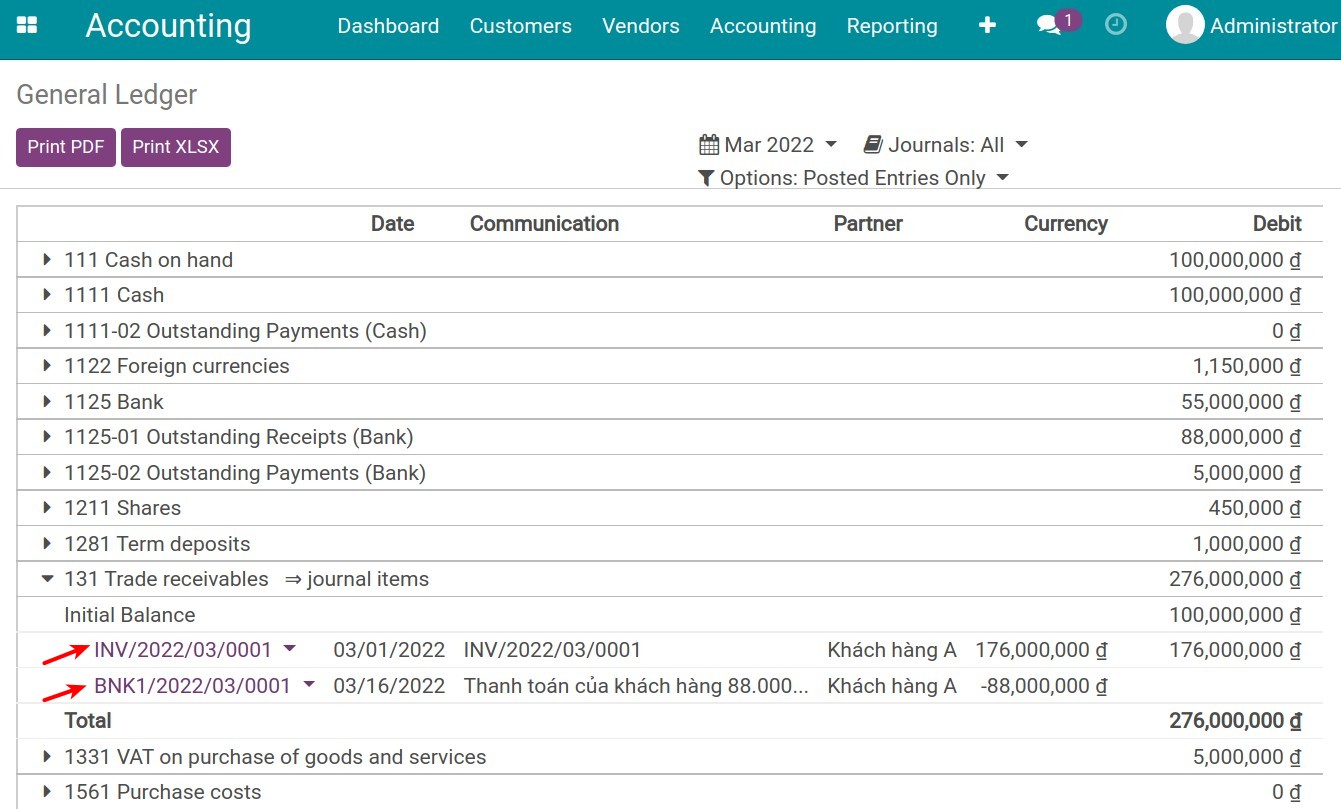
General Ledger
On General Ledger, each account will be displayed on a line and you can see details of each line by clicking on that journal entry.
See also
Related article
Reports according to Vietnam Accounting Standard
How to exclude journal items from Financial Reports
Optional module
Accounting Analysis
Accounting Reports
Assets Management
Account Balance Carry Forward
Account Counterparts
Cash on hand management
Cash on hand management
Requirements
This tutorial requires the installation of the following applications/modules:
Accounting & Finance
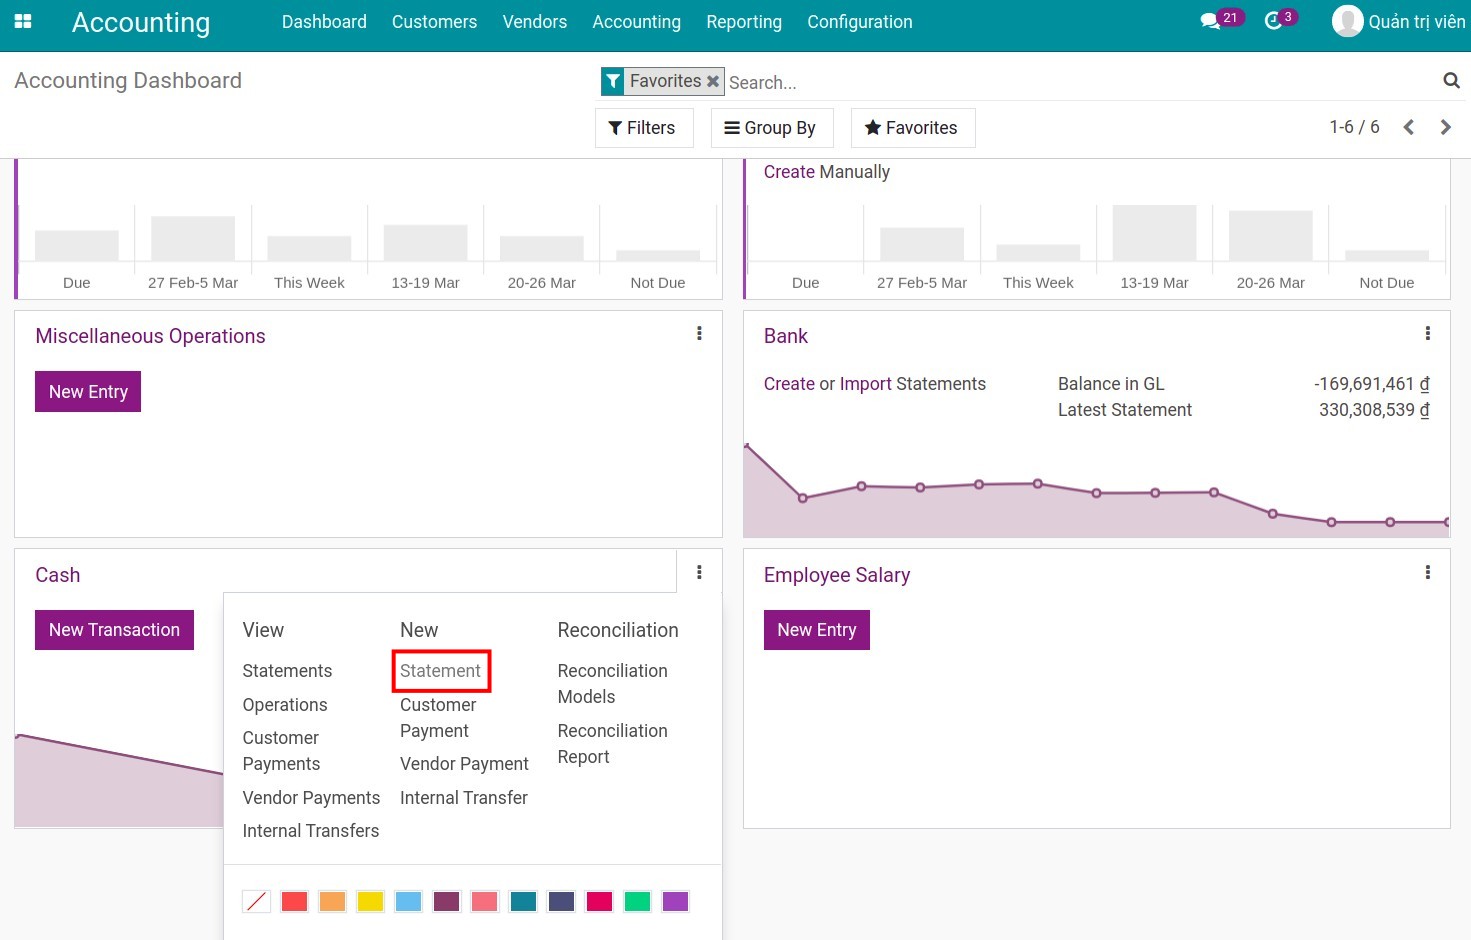
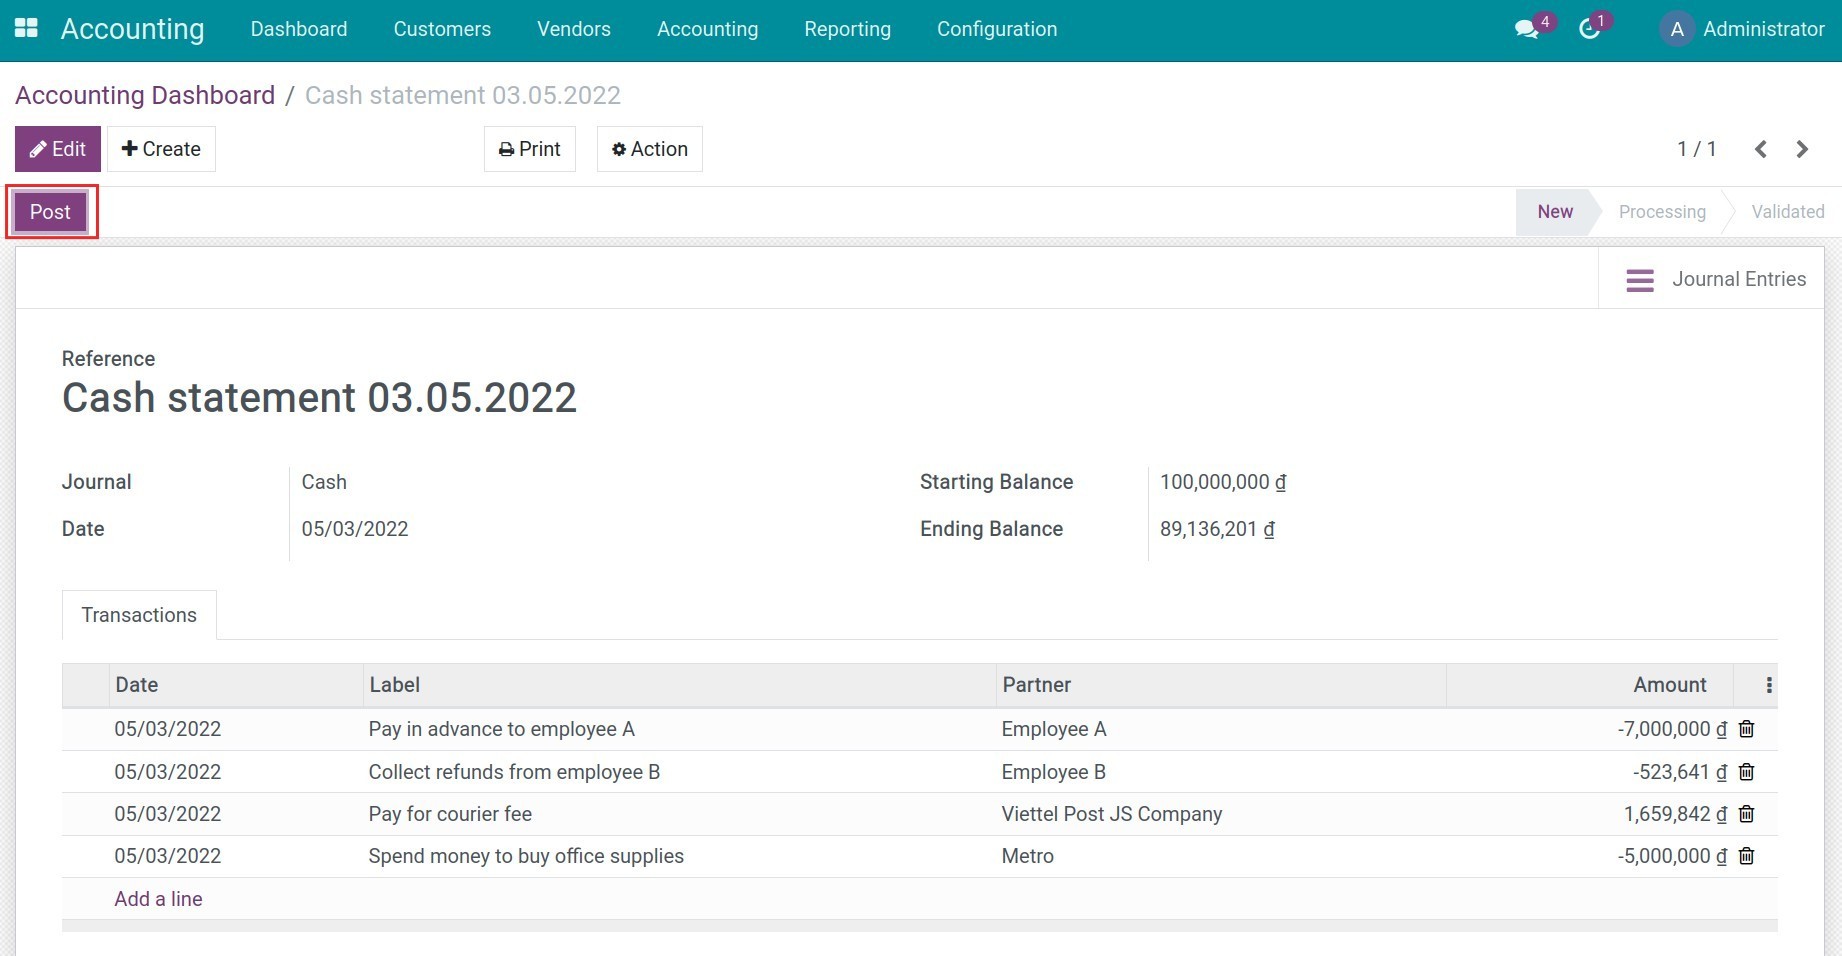
Cash statement creation
On the view Accounting Dashboard of the Accounting app , go to Cash section and hit New transaction.
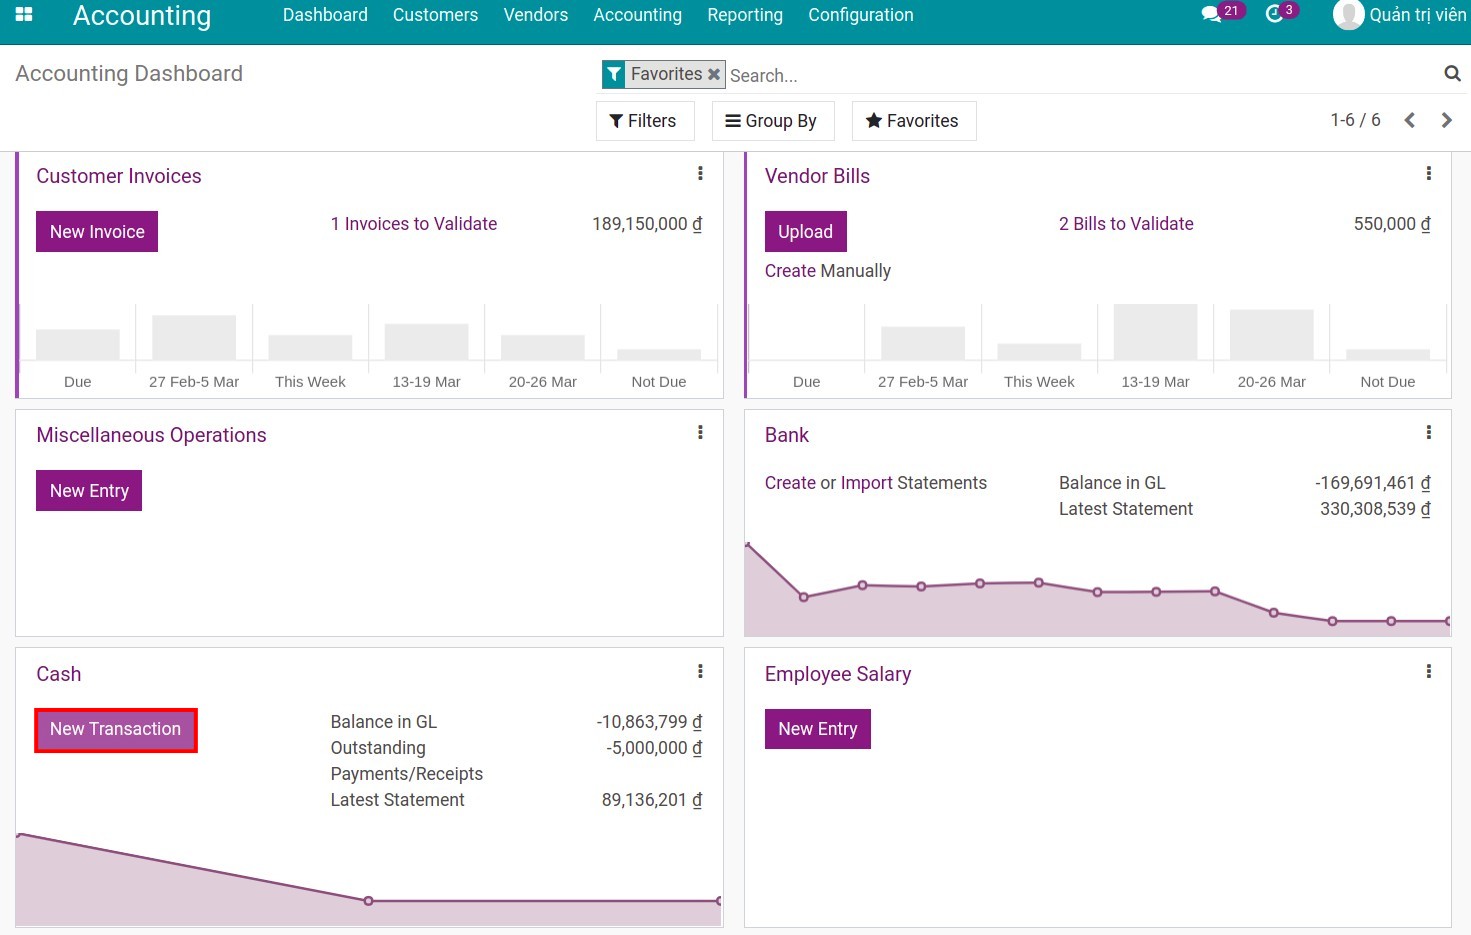
Alternatively, also in Cash section, hit on the Kebab menu icon (ie. three vertical dots icon) and select Statement on the New column.
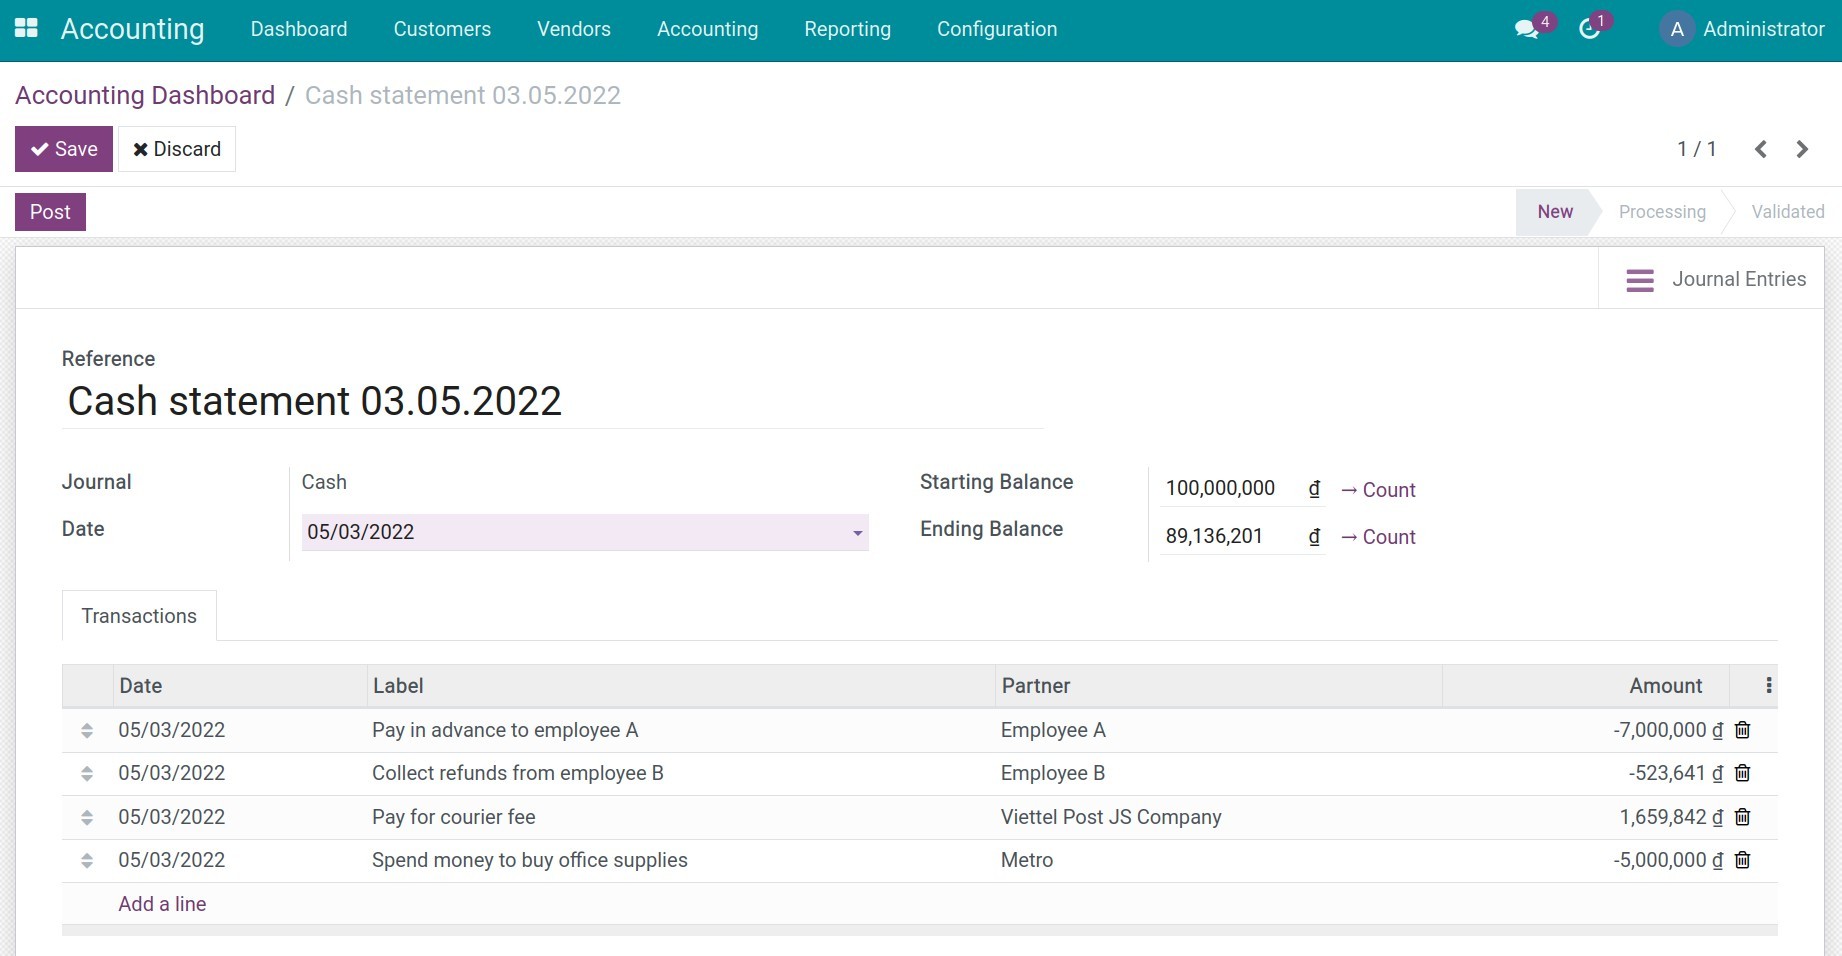
Recording on the cash statement is similar to recording cash receipts and cash payments in the cash journal. On this new view, enter the following information:
Reference: for information search purposes. There should be information of the time (e.g. date) so that it is easy to find and easy to read.
Journal: select the accounting journal in which you keep track of each cash on hand fund.
Date: the date the statement was created.
Starting balance: enter the actual balance in the cash on hand fund when the recording of the statement is started.
Ending balance: enter actual balance in cash on hand fund when the recording of the statement is stopped.
Computed balance: the formula is: starting balance + all the amounts of cash in/out transactions. This balance will be compared with the ending balance. When this balance is posted, a journal entry will be created to record the difference, if any.
Transactions tab: enter the details of cash transactions during the day.
Note
Use negative numbers to record the money out. Use positive numbers to record the money in.
On the statement, the partner information must be filled in correctly and completely (the payer/receiver) for monitoring and reconciliation.
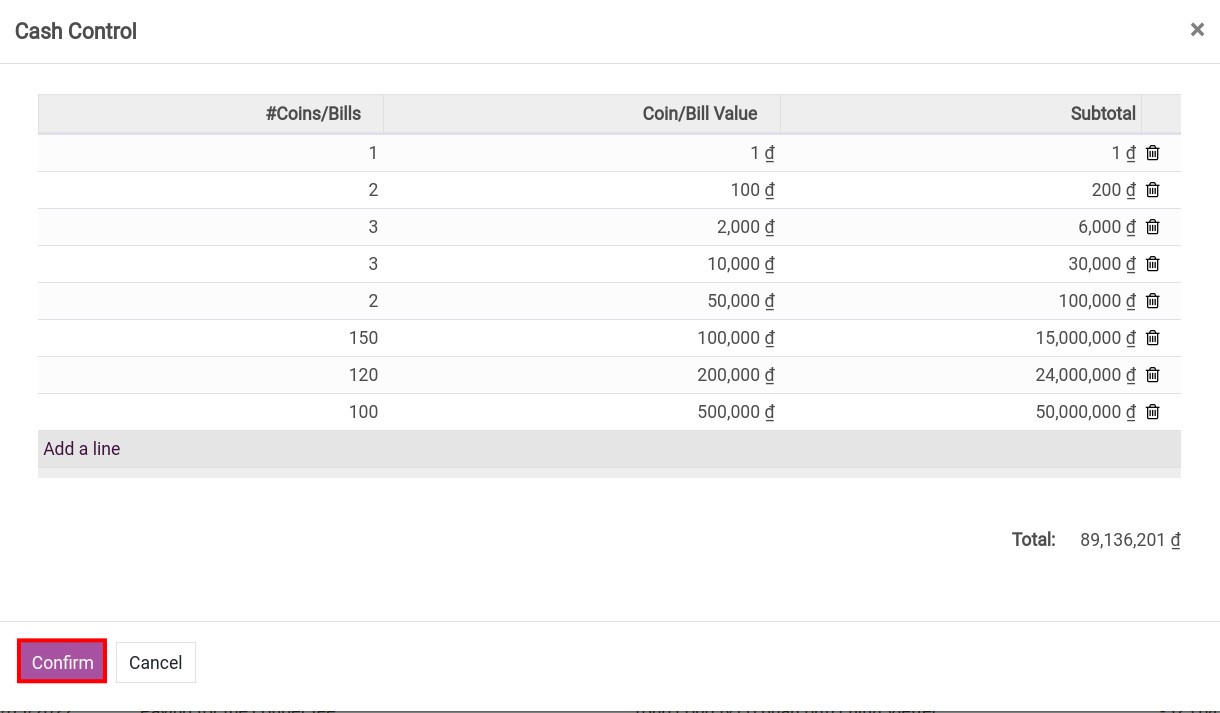
Cash on hand Counting
On the view of creating a statement, hit Count to perform an actual cash counting in the fund, which is based on the face value and the quantity.
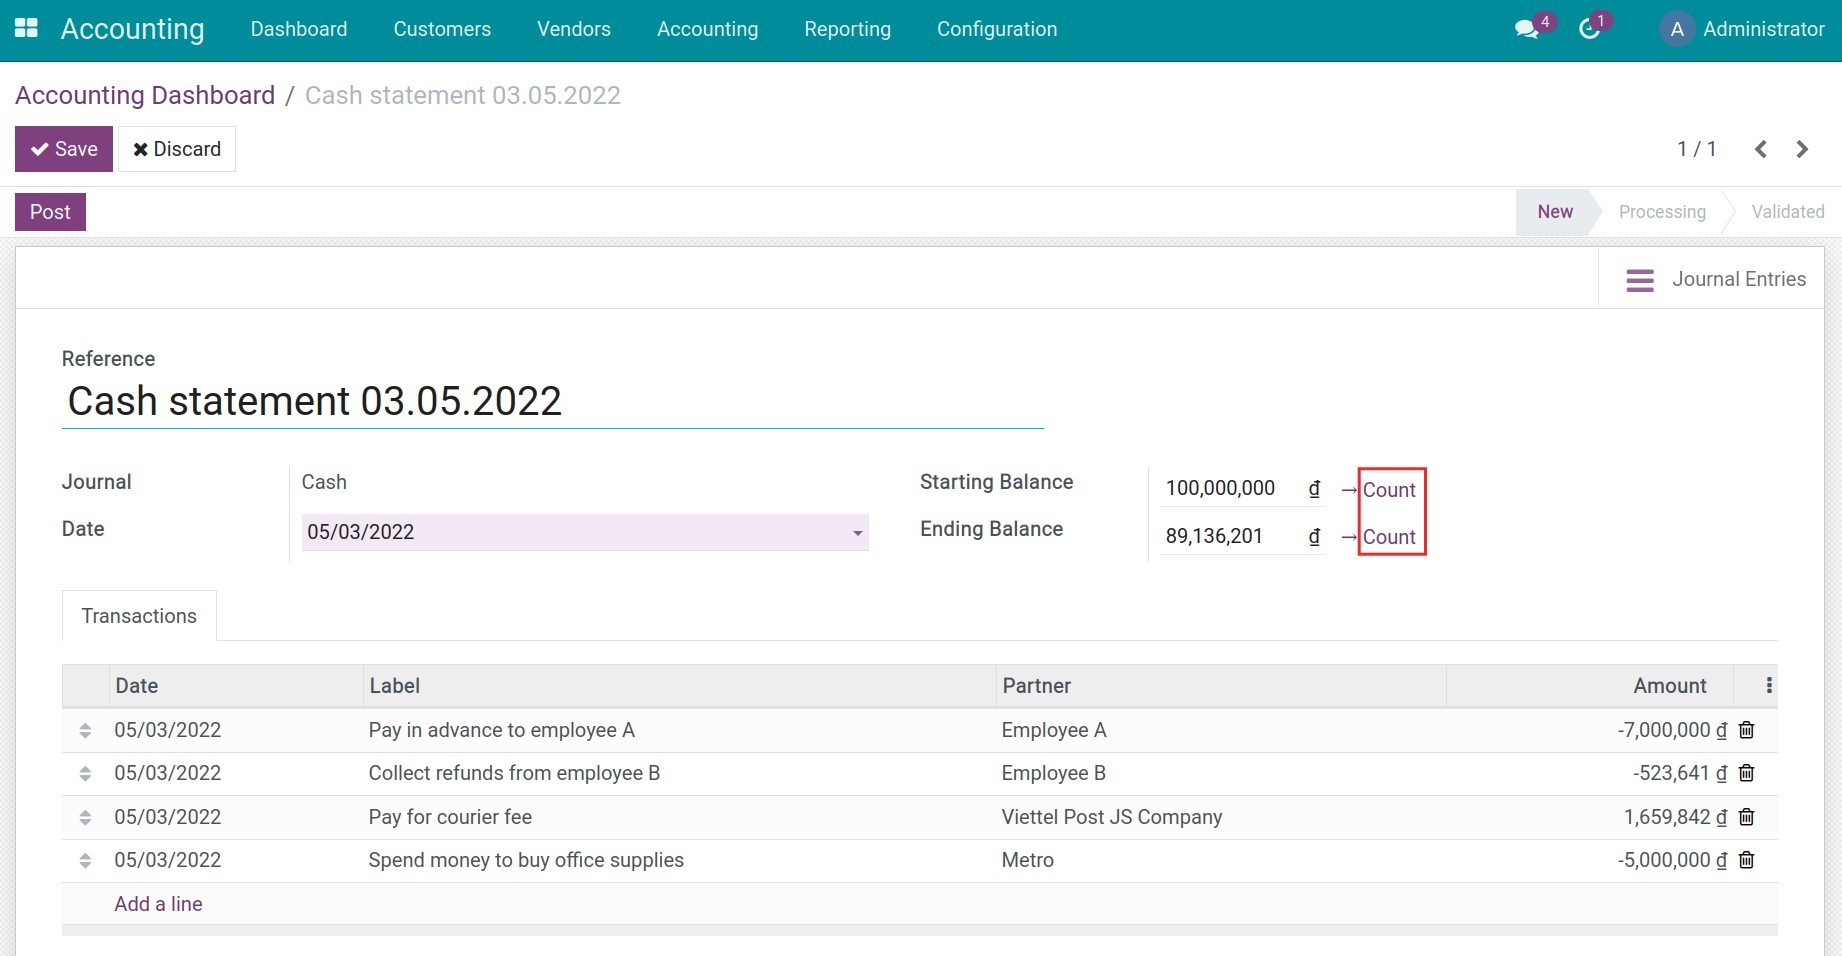
Hit Confirm to complete the cash on hand counting.
Cash receipts/payments reconciliation
As you know, the reconciliation of the cashier’s statement with the accounting journals is necessary to make the funds transparent.
After entering the statement entry is completed, hit Post.
Hit the Reconcile button. The system will automatically identify and suggest the corresponding arising amounts.
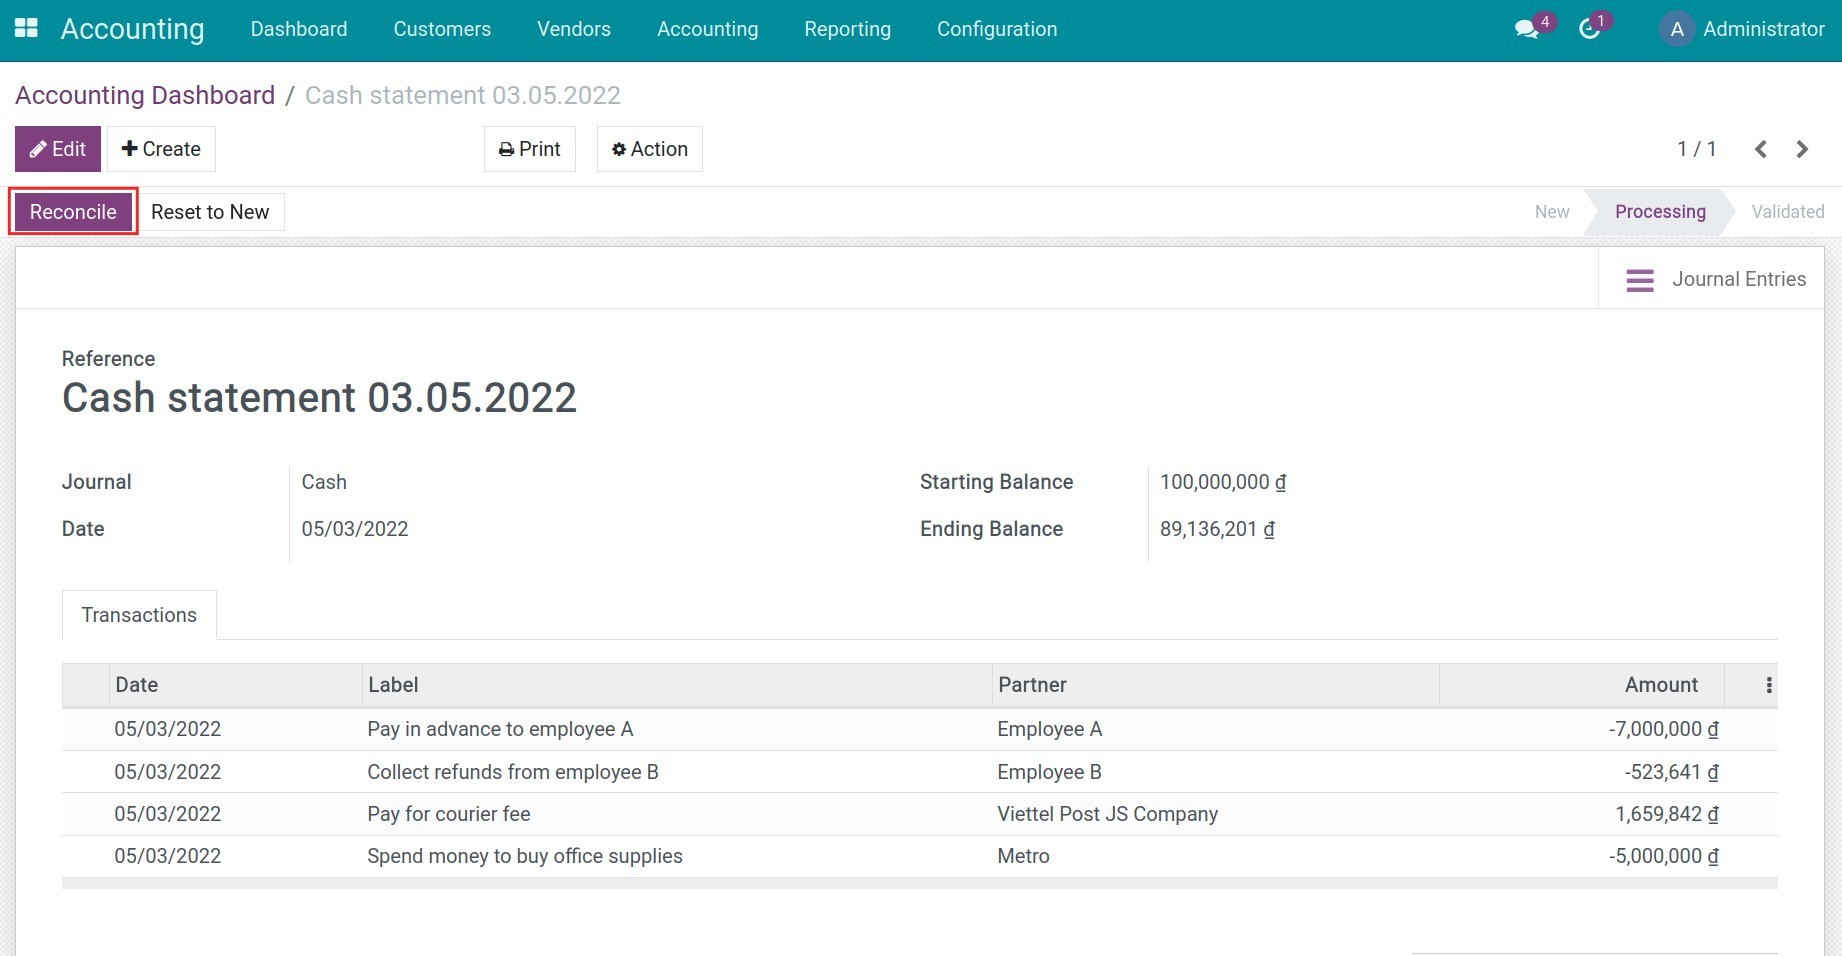
Check the information and hit Validate.

At this step the behaviors of the system will be:
For a transaction that has a payment slip, the system will generate a matching code to identify this transaction as completed.

Note
To see the Journal Item and the matching codes, you must enable the developer mode in the system.
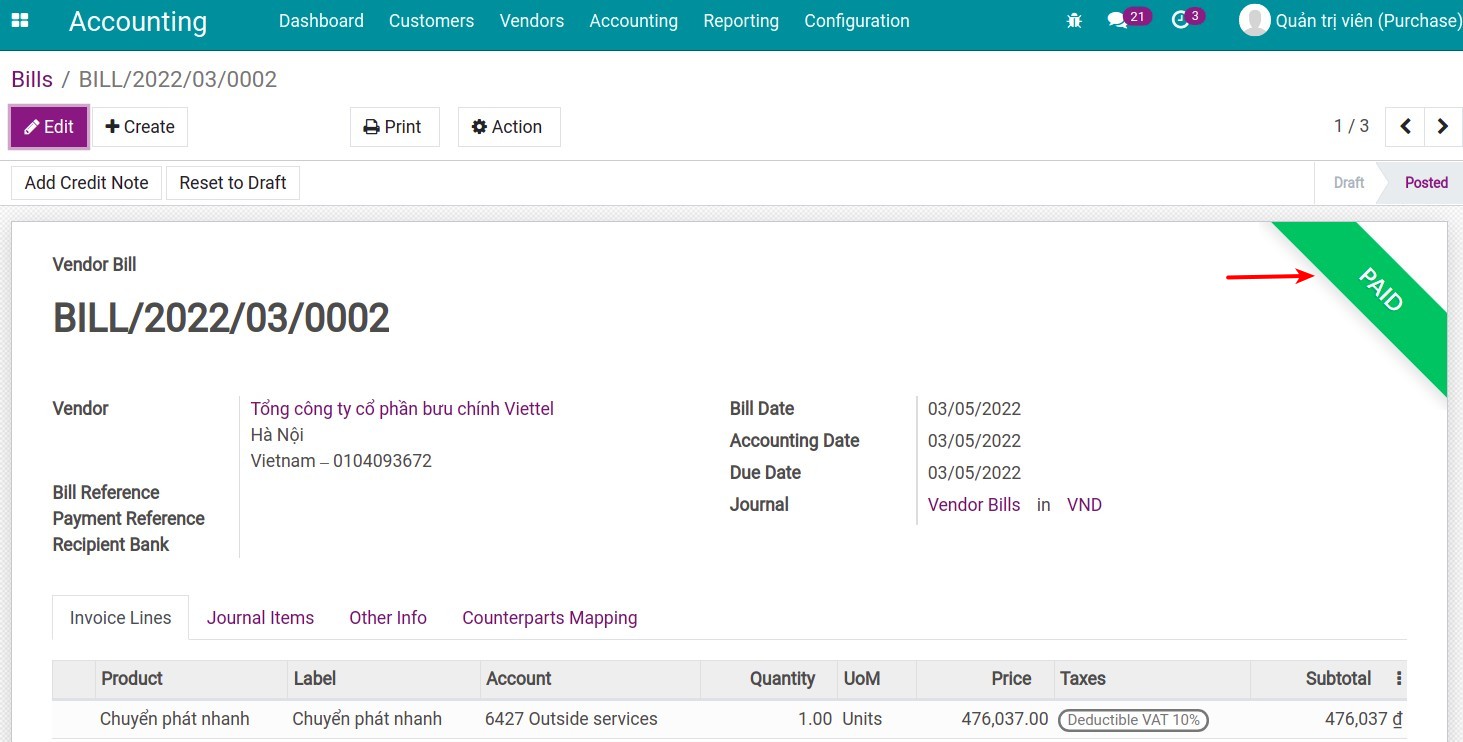
For a transaction that has not yet issued a payment slip but has a Vendor bill, the status of the invoice will be changed to Paid and the debt will be 0. A journal entry will be automatically created to register payment .
After the reconciliation and counting is completed, then do the saving and validation.
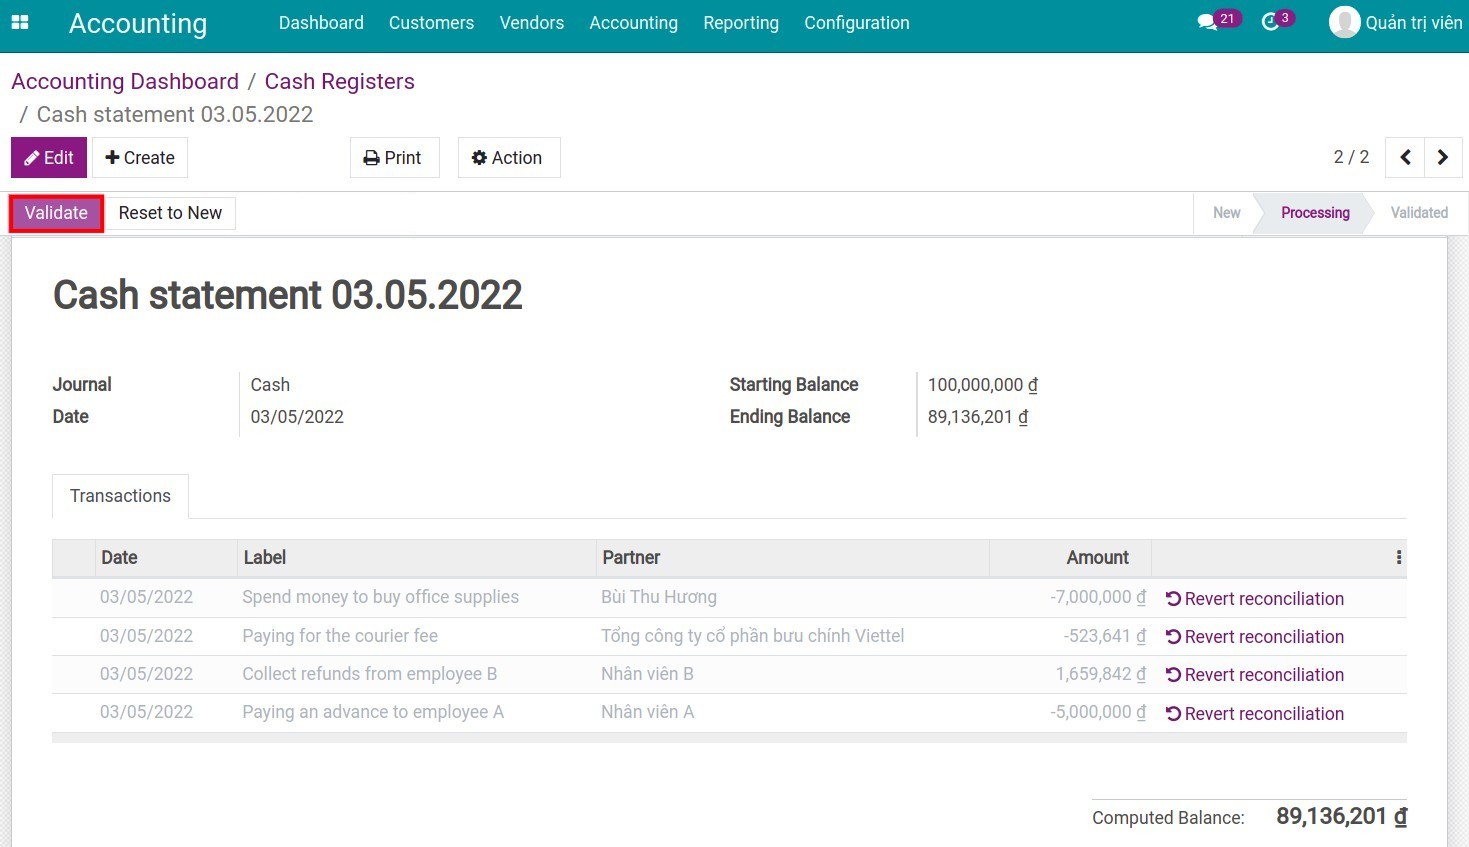
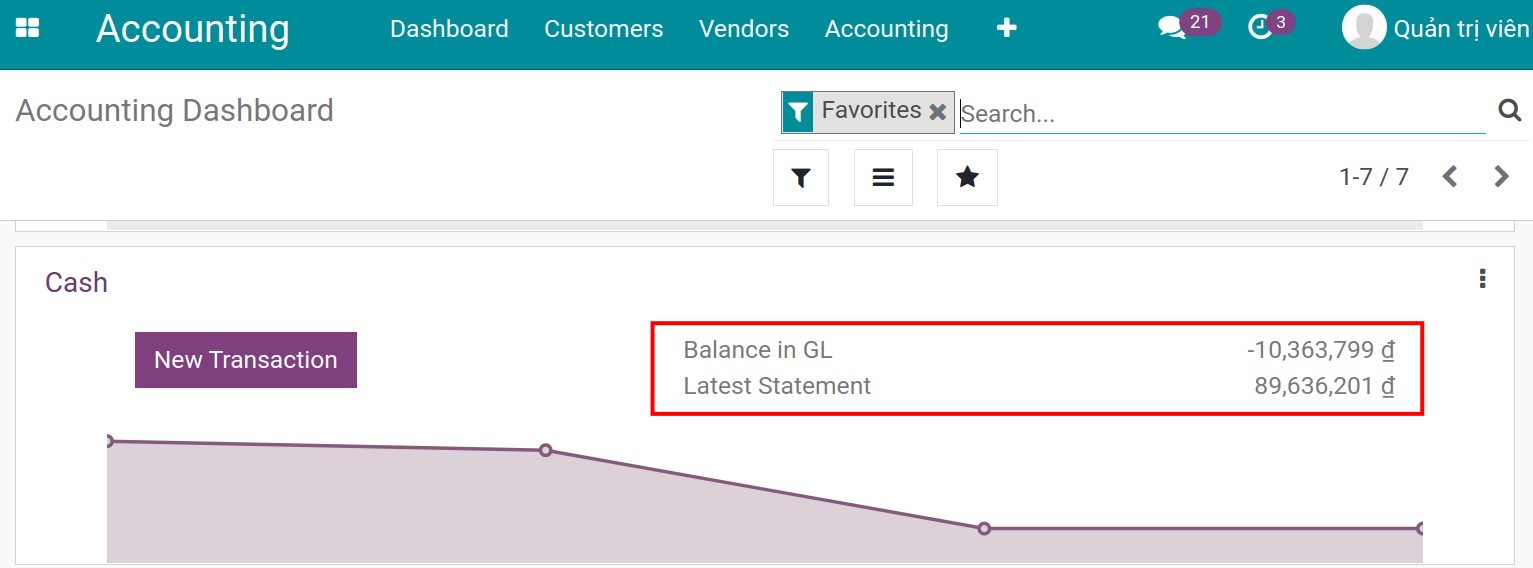
The status of the statement has been changed from Processing to Validated. On the view of the Accounting Dashboard, in the cash journal you will see the balance recorded in the General Ledger and the actual balance of the latest statement. If there is a difference you will also see the information here.
Cases occurring when counting cash on hand
Counting of excess funds
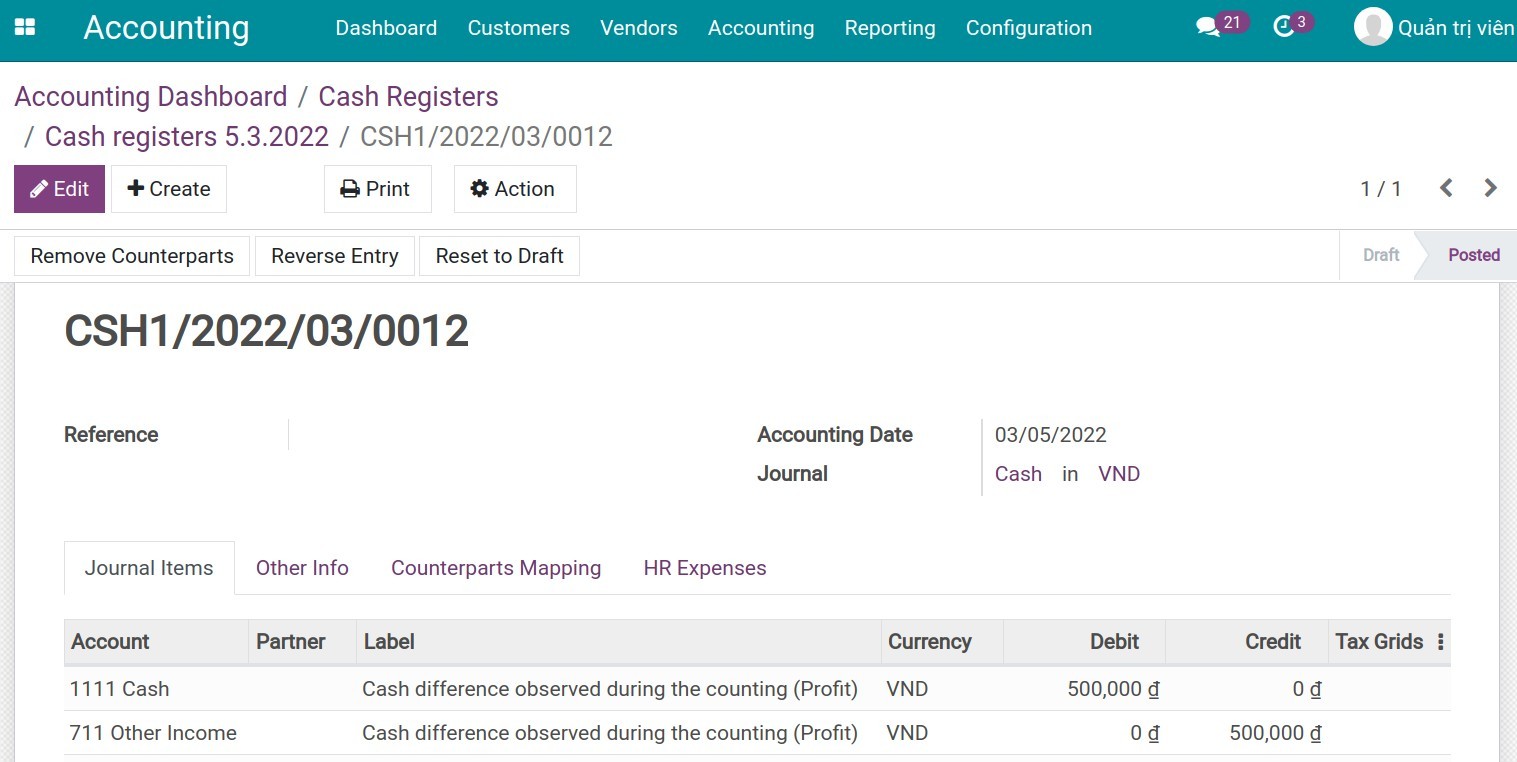
The ending balance after counting in the fund exceeds the computed balance. After saving and posting, the system will automatically generate a statement line recording the amount in excess with the content Cash difference observed during the counting (Profit).
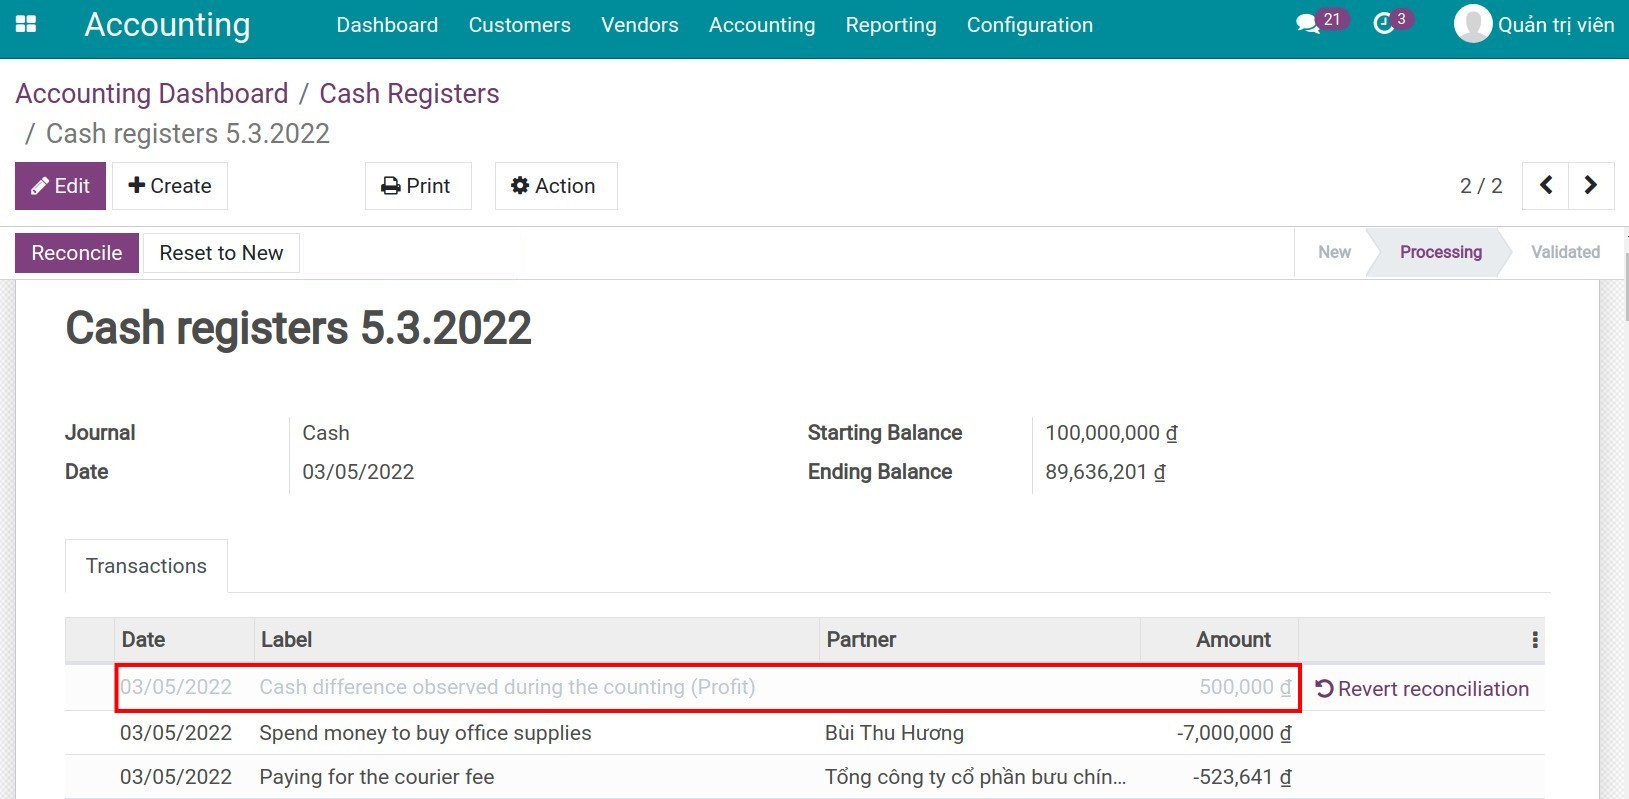
Another accounting entry is generated, recording this cash difference as increase in the cash journal and the status of this entry is now Posted.
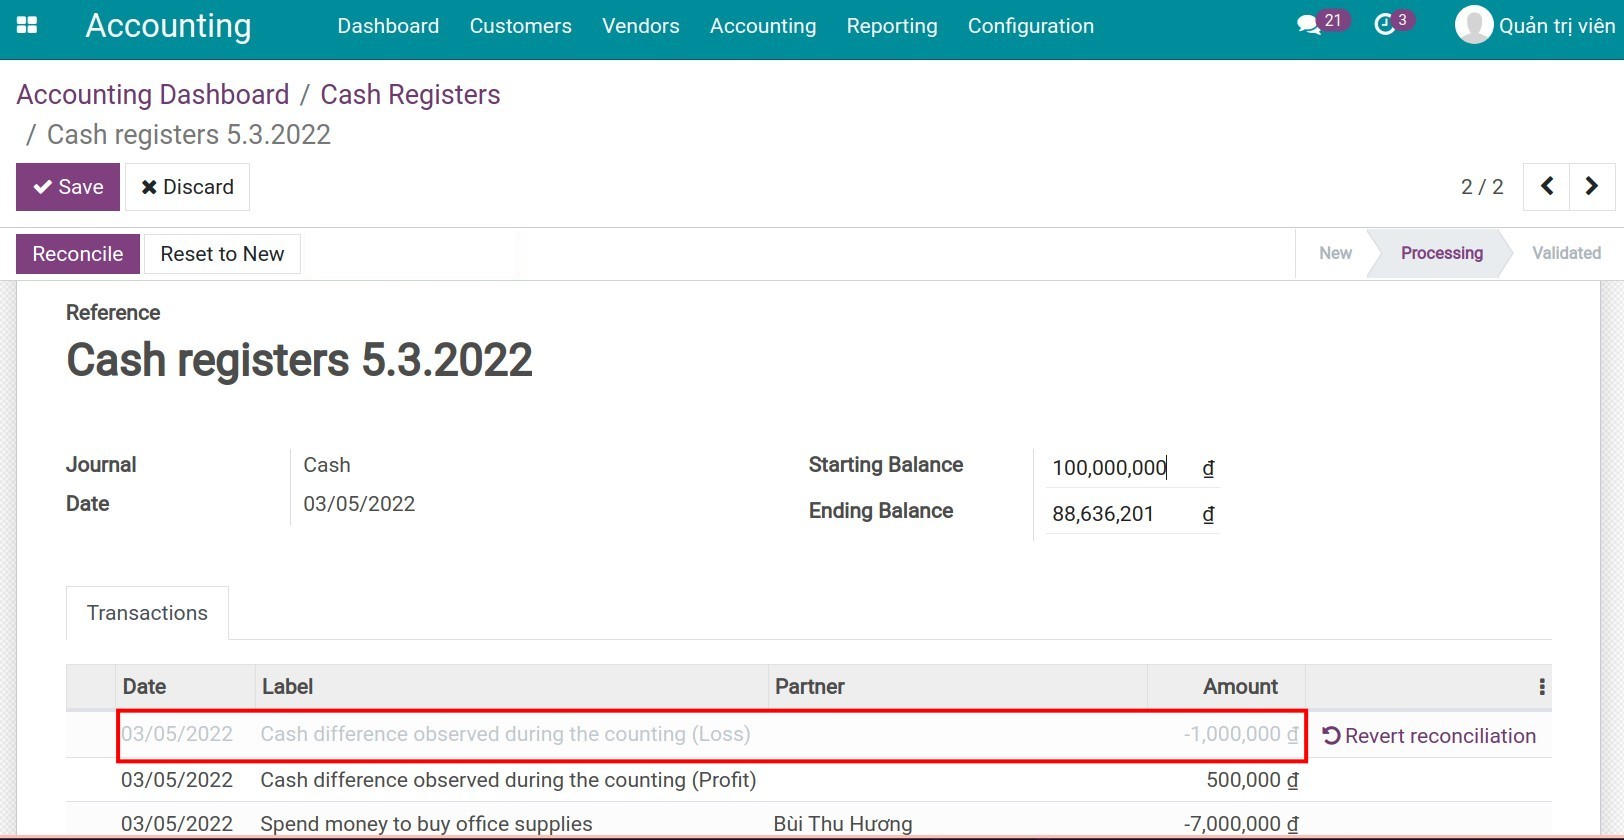
Counting of shortage of funds
Similarly, when there is a shortage of funds, the system also automatically generates a statement line recording the missing amount with the content Cash difference observed during the counting (Loss). An accounting entry, which is also automatically generated, records this amount missing in the cash journal.
The difference between the starting balance of this period and the ending balance of the previous period
Normally, the system will automatically convert the ending balance of the previous period to the starting balance of the new statement. However, these data can be adjusted and if you do it, it will lead to data heterogeneity (mismatch). The system will display a warning as shown below.
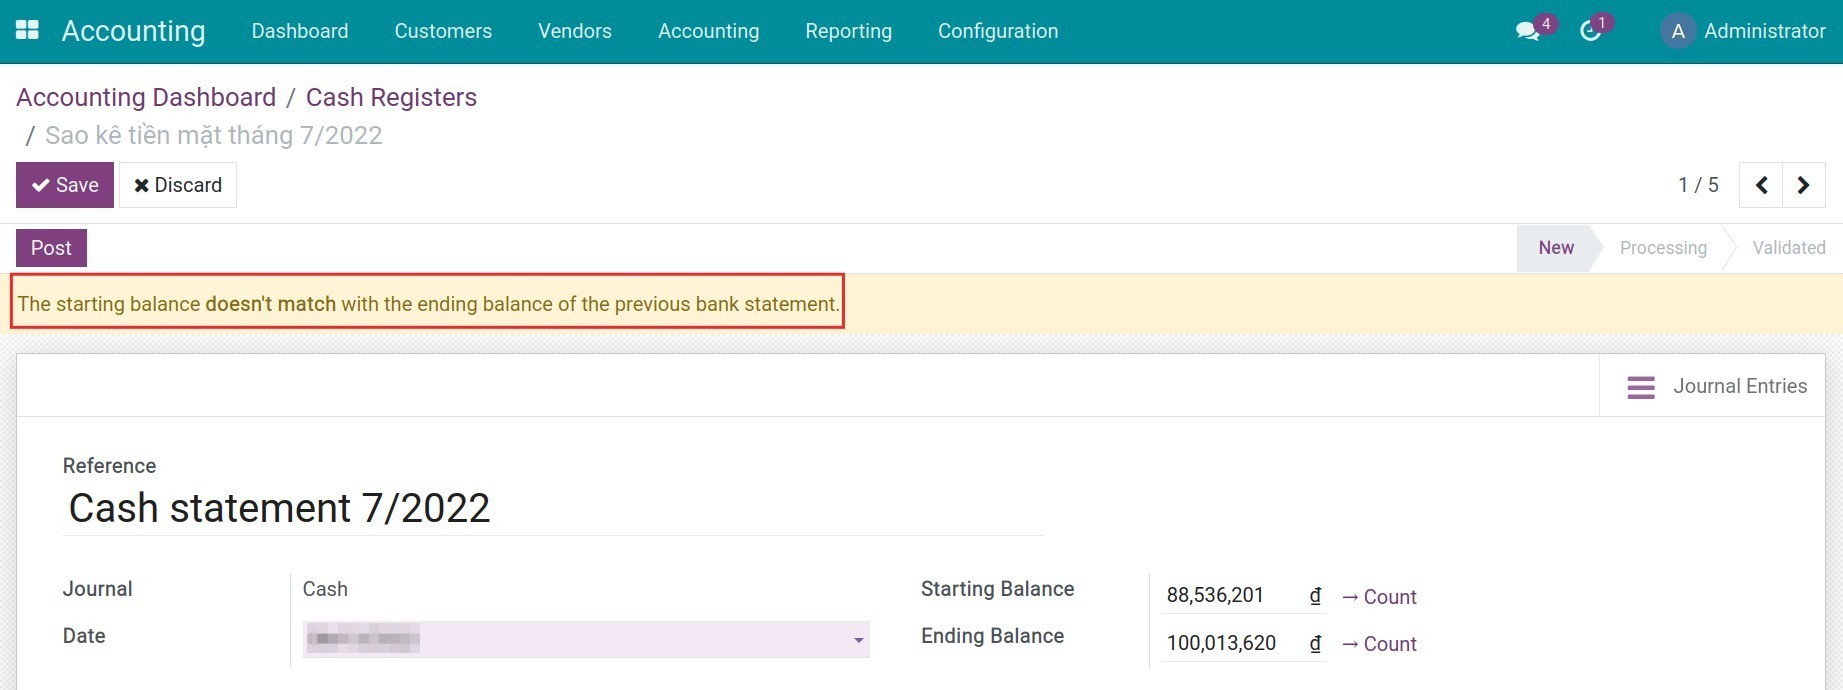
Note
If you want to deactivate the warning, you must find the mistake and solve it by filling the matching starting balance.
See also
Related article
Foreign currencies management
How to handle Petty Cash in Odoo
How to delete an invoice that has already used a sequence
Configure charts of accounts and depreciation method for Assets Category
Assets of an enterprise are both tangible and intangible resources owned, controlled, and distributed by that enterprise, to create economic value.
iSuite brings to customers different ways to create an asset:
Create assets directly at the Assets menu;
Create assets from Vendor bills;
Create assets from Stock receipts - Stock deliveries.
Whatever the approach you choose, you still need to create an Asset Category first. This is the place to classify and track an asset. An asset belonging to this Asset Category will inherit all configurations of that category. Each asset might have its own characteristics that need to be configured differently from the settings of the asset category. This topic will be explored in other articles. In this article, we will focus on how to set up an Asset Category.
Requirements
This tutorial requires the installation of the following applications/modules:
Assets Management
Accounting & Finance
Chart of Accounts
Configure Asset Category
To reduce time in creating a new asset, you can create an asset category beforehand. Having a dedicated asset category is very useful when your company frequently uses one asset type or assets have similarities such as: being used by one department, having similar depreciation period, etc. Normally, the person that can create a new asset category in the system is the Administrator of the Accounting app.
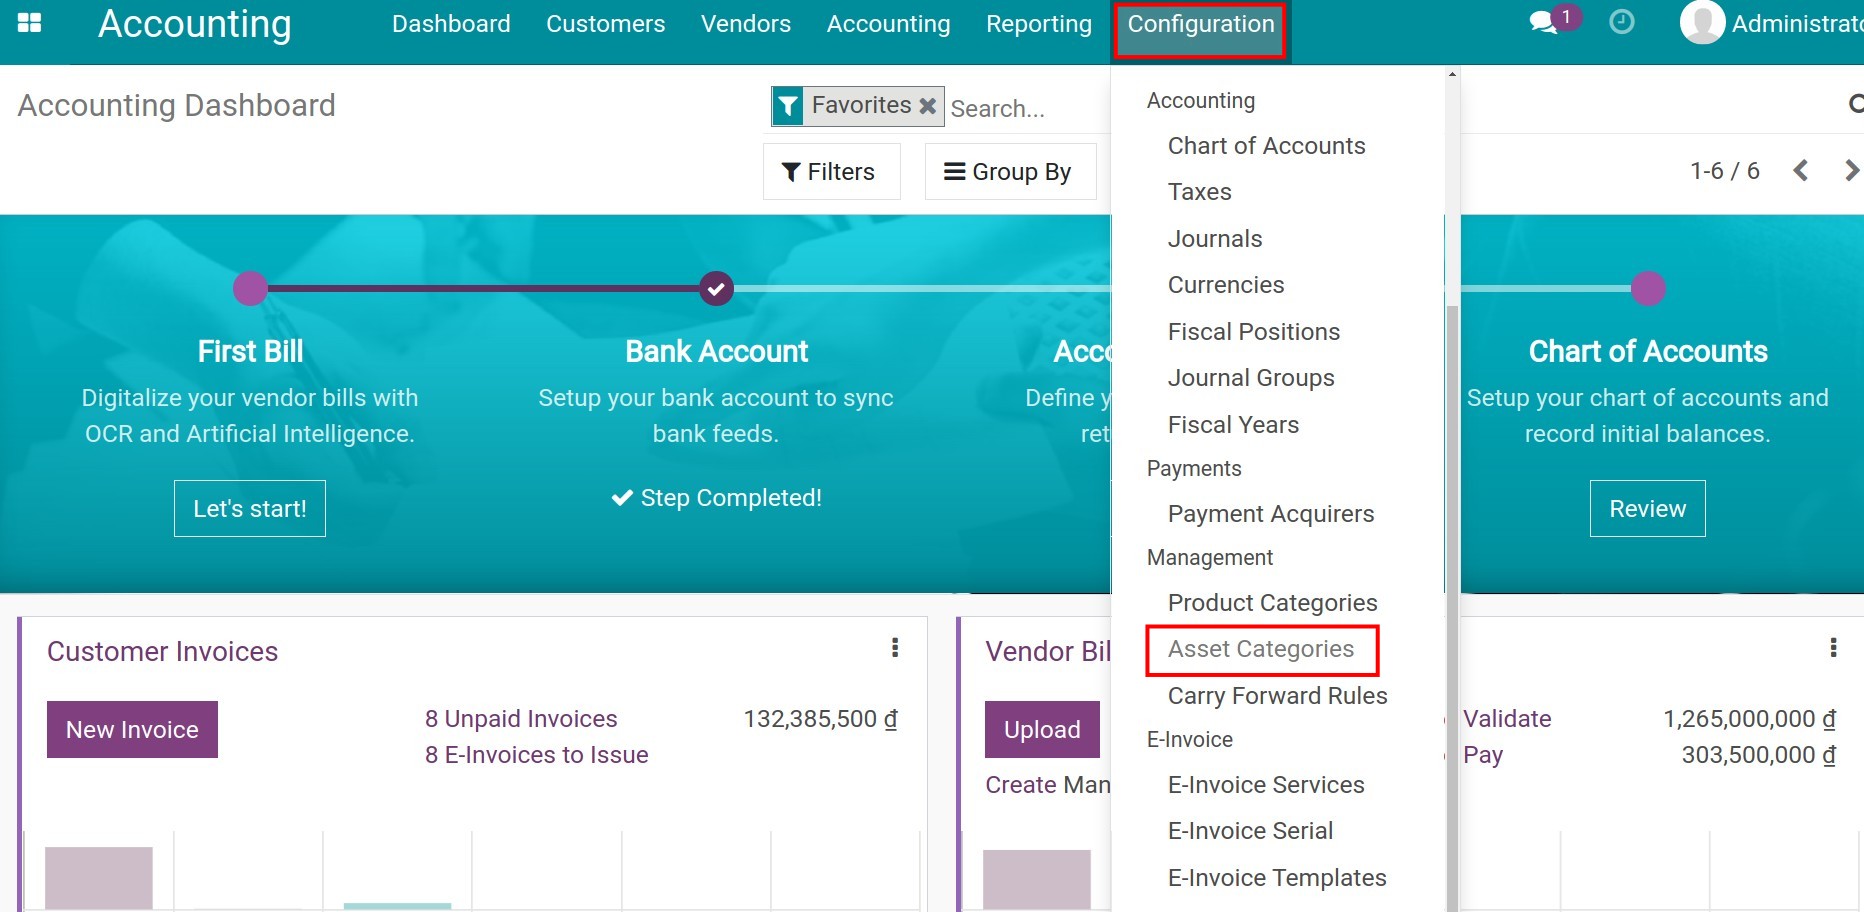
To create a new asset category, navigate to Accounting ‣ Configuration ‣ Asset Category ‣ Create.
Then, you need to configure information for this newly created asset category.
Above is the example to set the information of Asset Category.
Asset Category
In this field, you have to put a suitable asset category name for management and monitoring purposes.
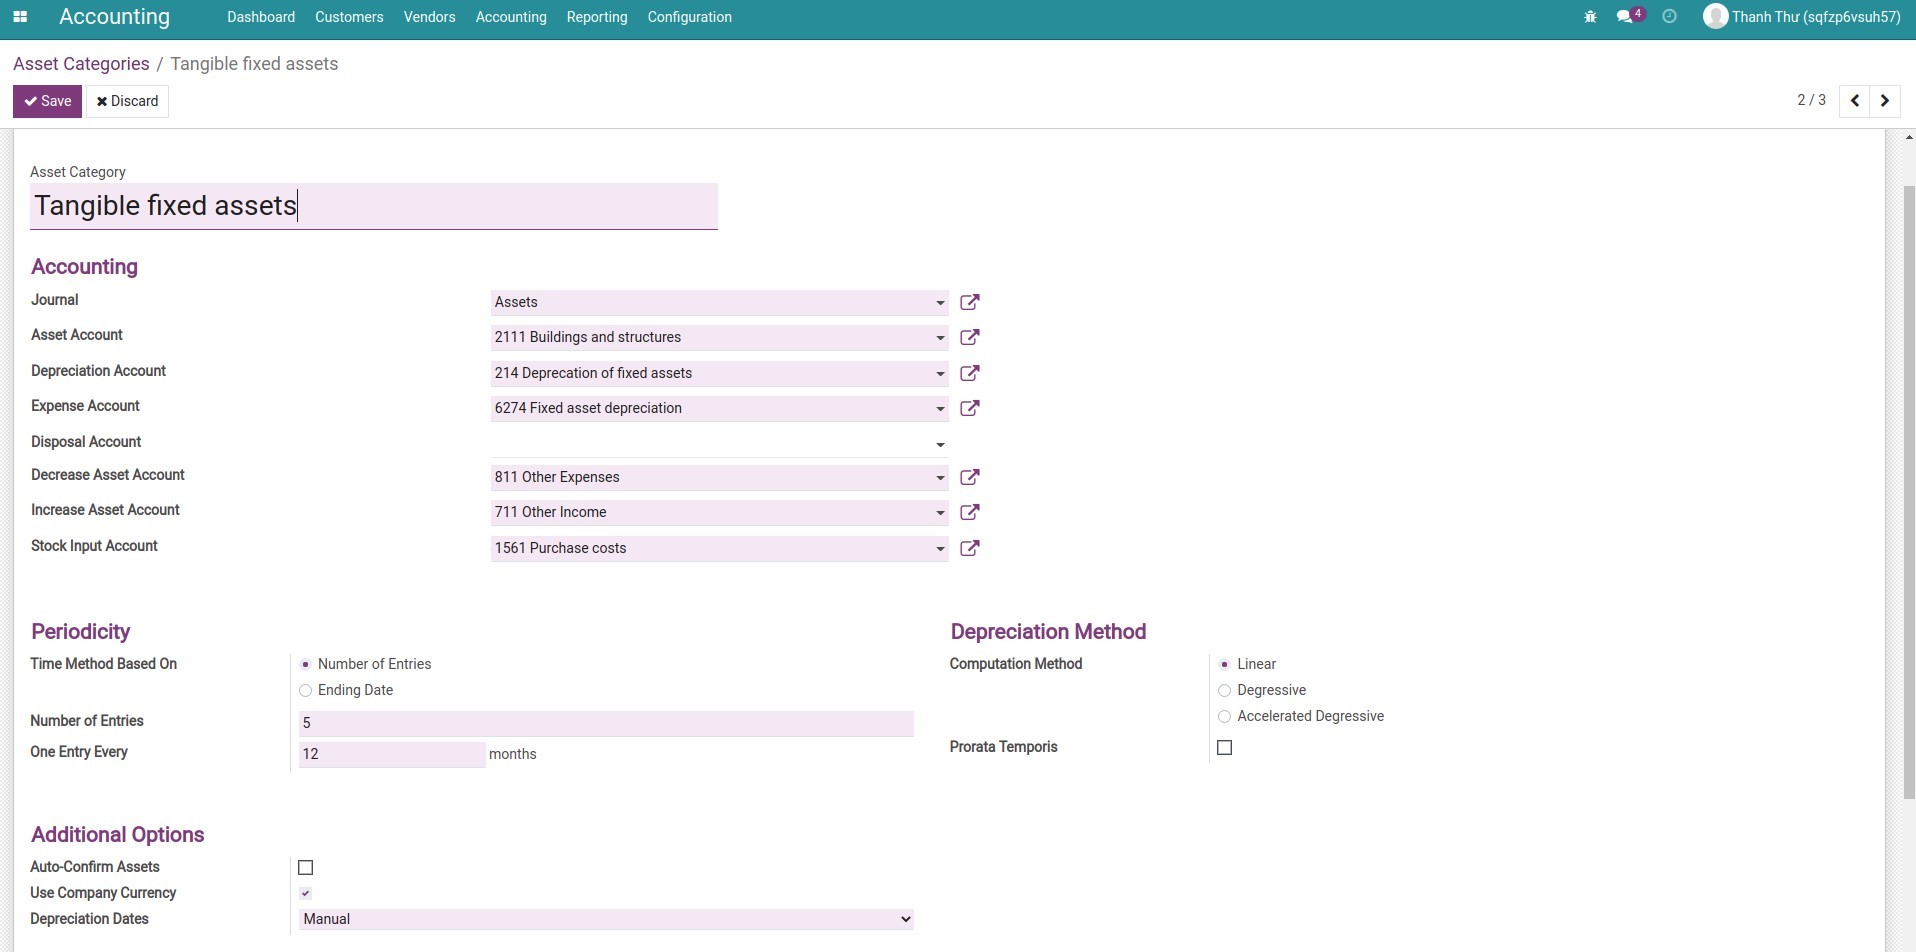
Accounting
In this section, you need to add the following required information:
Journals: Choose the appropriate journal which will be used to record the entries.
Asset Account: An account to record the purchase or use of the asset at its original price.
Depreciation Account: An account that holds the depreciation amount of the asset.
Expense Account: An account to record depreciation amount as expense periodically.
Decrease Asset Account: An account to record the decreasing value in the revaluation of the asset.
Increase Asset Account: An account to record the increasing value in the revaluation of the asset.
Note
This information can be adjusted for each Asset to suit different purposes.
See also
Manually create an Asset in iSuite
Periodicity
In this section, you need to add the following information:
Time Method Based on: Select one of the two options to depreciate an asset by the Number of entries or Ending date.
Number of Entries:
Number of Entries: Enter the number of depreciation times needed to depreciate an asset.
One Entry Every (Period Length): The time measured by month(s) between two periods of depreciation.
Ending date:
One Entry Every (Period Length): Similar to the Number of Entries, it’s the time measured by month(s) between two periods of depreciation.
Ending date: Enter the day that the depreciation stops.
Depreciation Methods
iSuite provides 3 depreciation methods:
Linear method;
Degressive method;
Accelerated degressive method.
Prorata Temporis:
Enabled: Indicates that the first depreciation entry for the assets belonging to this asset category is calculated from the asset date instead of the first day of January or the start date of the Fiscal Year.
Disabled: Indicates that the first depreciation entry for the assets belonging to this Asset Category is calculated by dividing evenly according to the number of depreciation, starting on the first day of January/Start date of the Fiscal Year.
See also
Asset Management
Additional Options
Auto-Confirm Assets: If enabled, the system will automatically confirm the assets of this category when created by invoices.
Use Company Currency: If enabled, the value of assets generated from invoices for this category will always be converted to the company’s currency.
Depreciation Dates:
Based on the last day of the month: The depreciation entry will be colligated and displayed on the last days of the month.
Manual: Depreciation entry will be displayed depending on the manually configured date of the accountant.
Clicking on the Save button, the process of creating Asset Category is completed.
Furthermore, you can use this function in managing a group of assets related to instruments, tools, and prepaid expenses.
See also
Related article
Buying and stocking assets
Optional module
Inventory Assets
Stock Asset Equipment
Visual Accounting Analysis (with Pivot and Graph)
Visual Accounting Analysis (with Pivot and Graph)
iSuite Accounting app provides you with a set of dynamic accounting analysis reports with intuitive visualization in pivot or graph, giving you a more in-depth analysis of financial accounts and management accounting accounts.
Requirements
This tutorial requires the installation of the following applications/modules:
iSuite Accounting & Finance
Entries Analysis Report
The journal entries analysis report is built based on the analysis of journal entries generated in the accounting system through measures and filtering/grouping criteria. From this analysis, you can get the best overview of the company’s accounting situation.
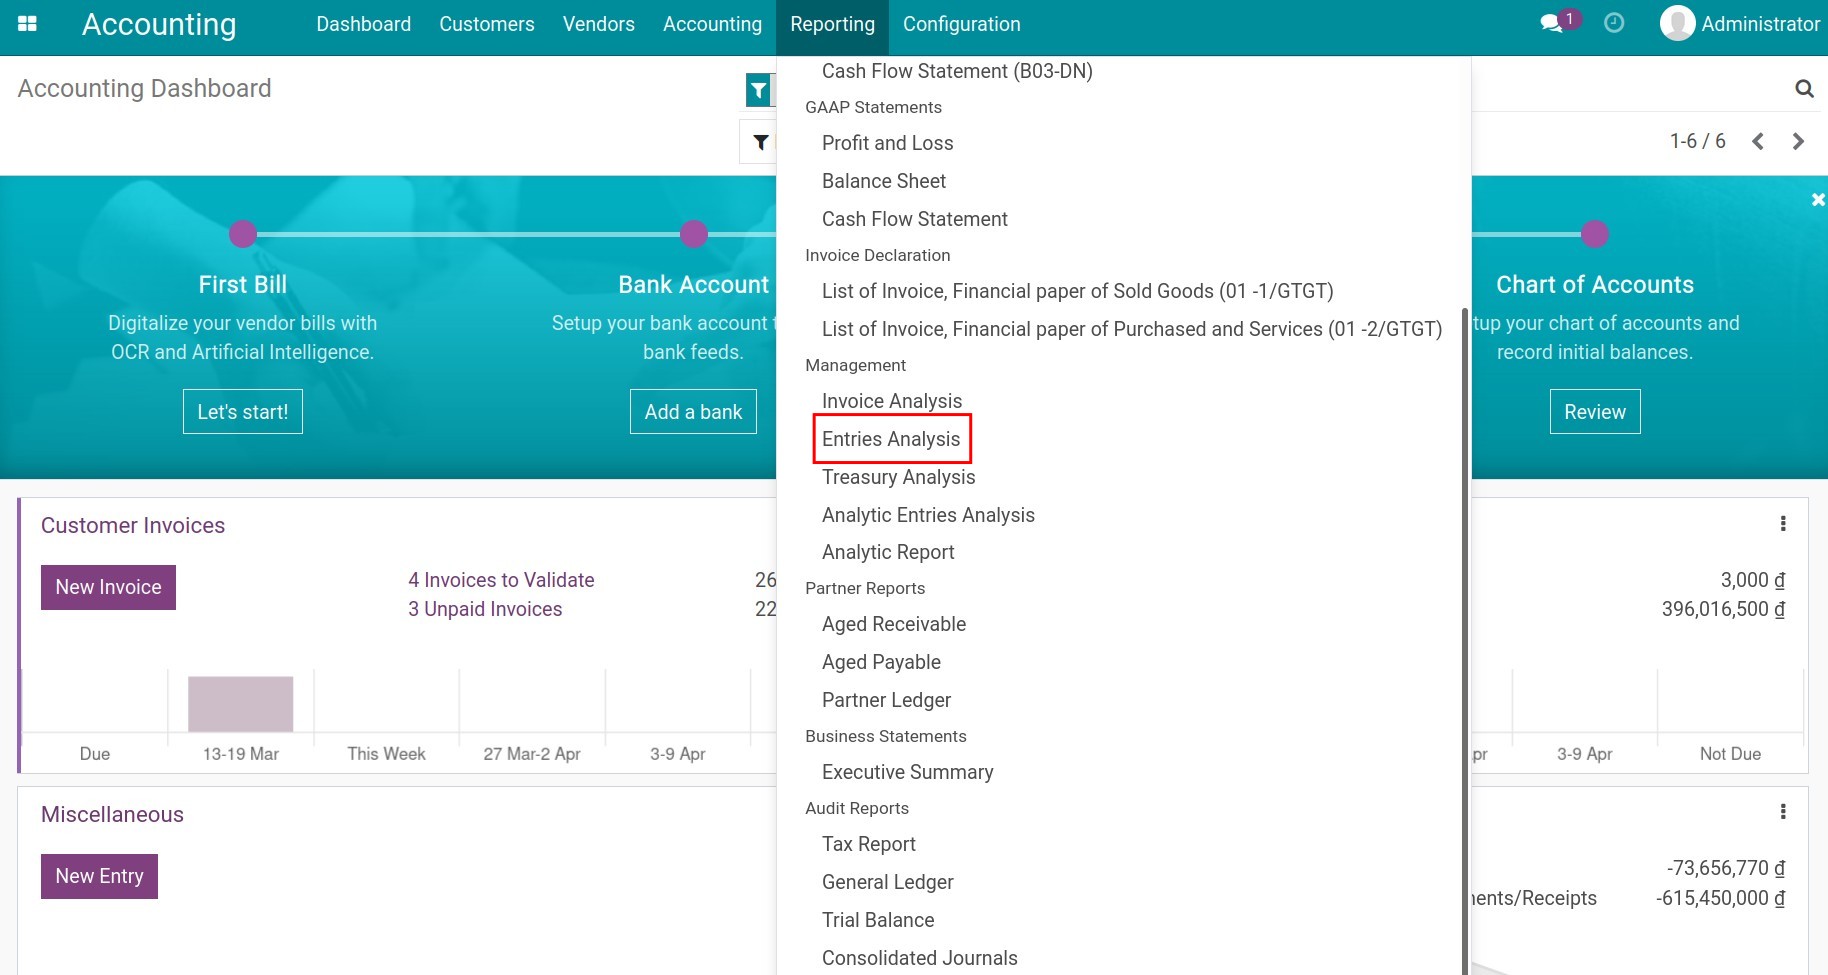
To view the journal entries analysis report, navigate to Accounting ‣ Reporting ‣ Entries Analysis:
Depending on your needs, you can flexibly use the following measures:
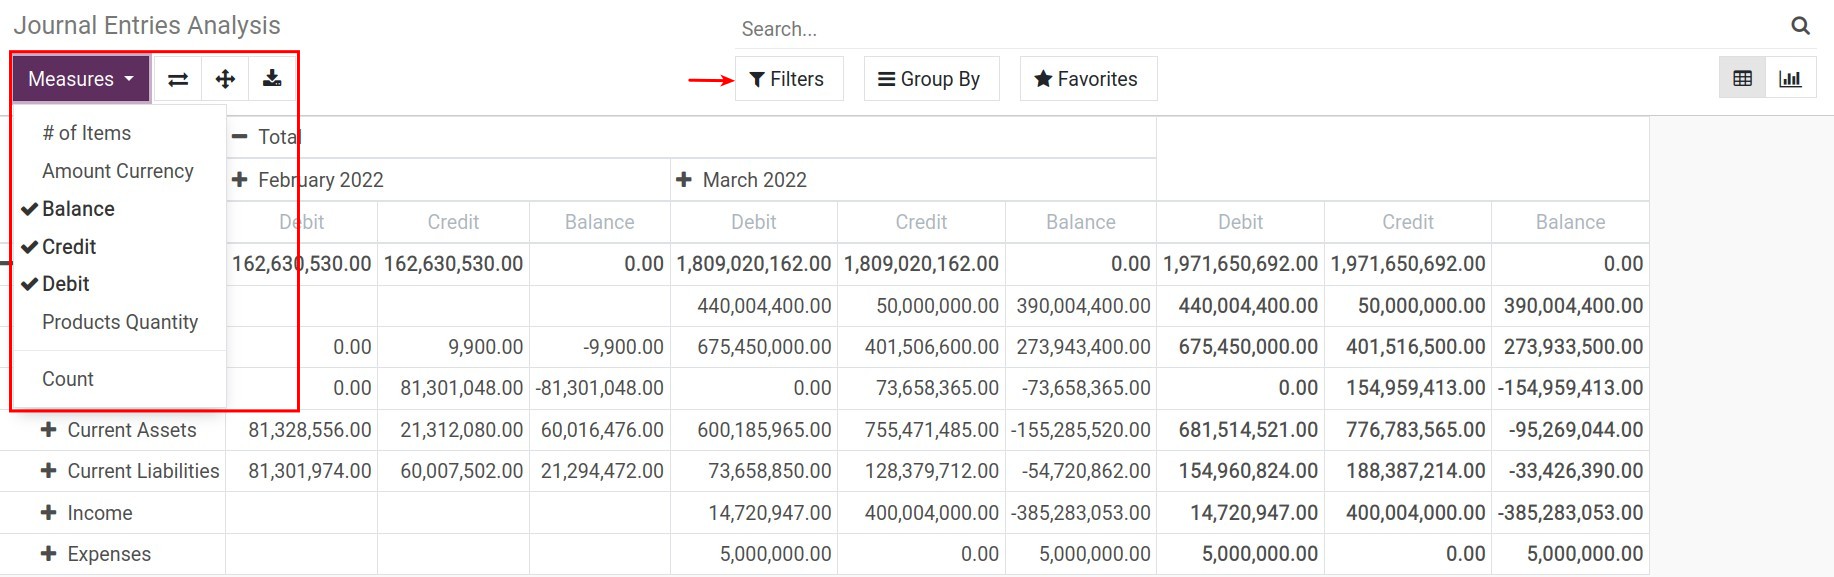
Credit;
Debit;
Balance;
Amount Currency;
# of Items;
Products Quantity;
Count.
Besides, depending on the purpose, you can use the filter and grouping tools to view the report in other criteria.
You can save the report as favorites to use as default later on or share it with other users:
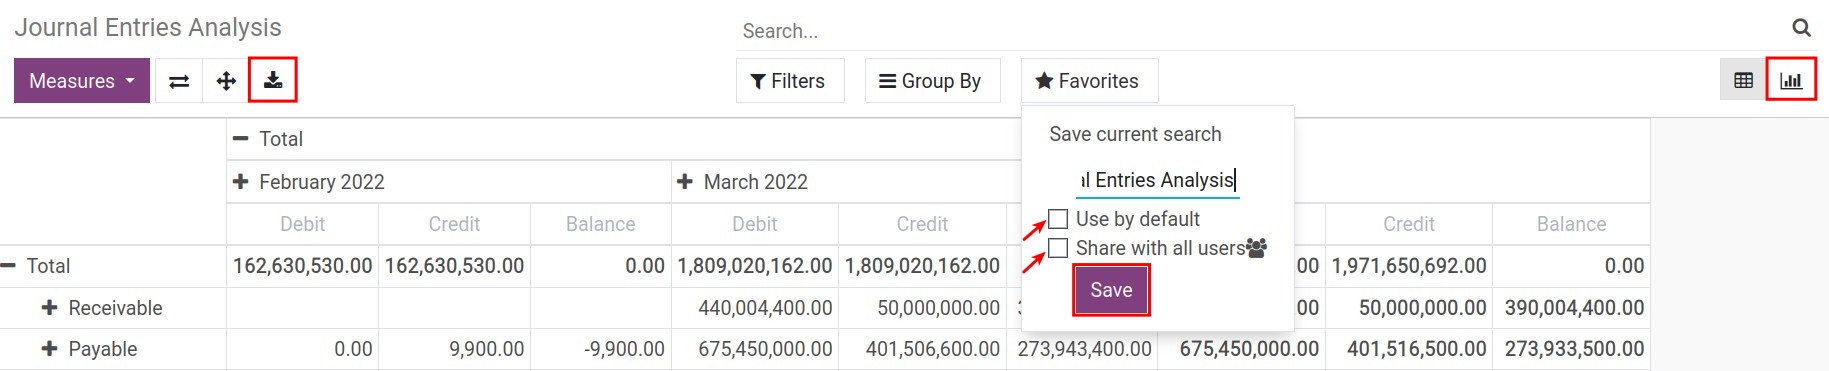
Supported report types:
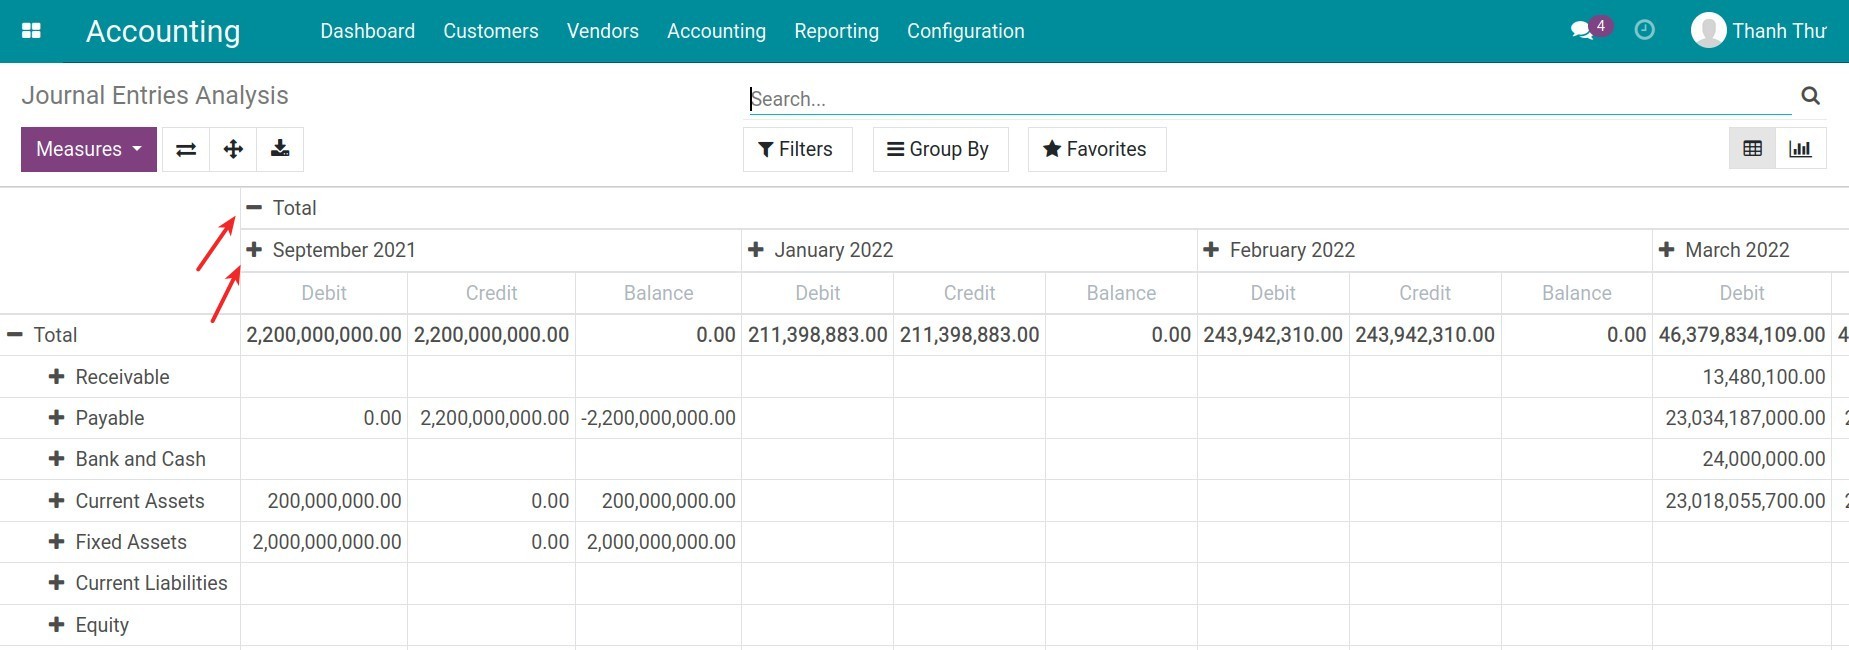
Dynamic pivot report, user-friendly and can be downloaded to an excel file. You can click on the “+”/”-” icon to extend/close the evaluation criteria:
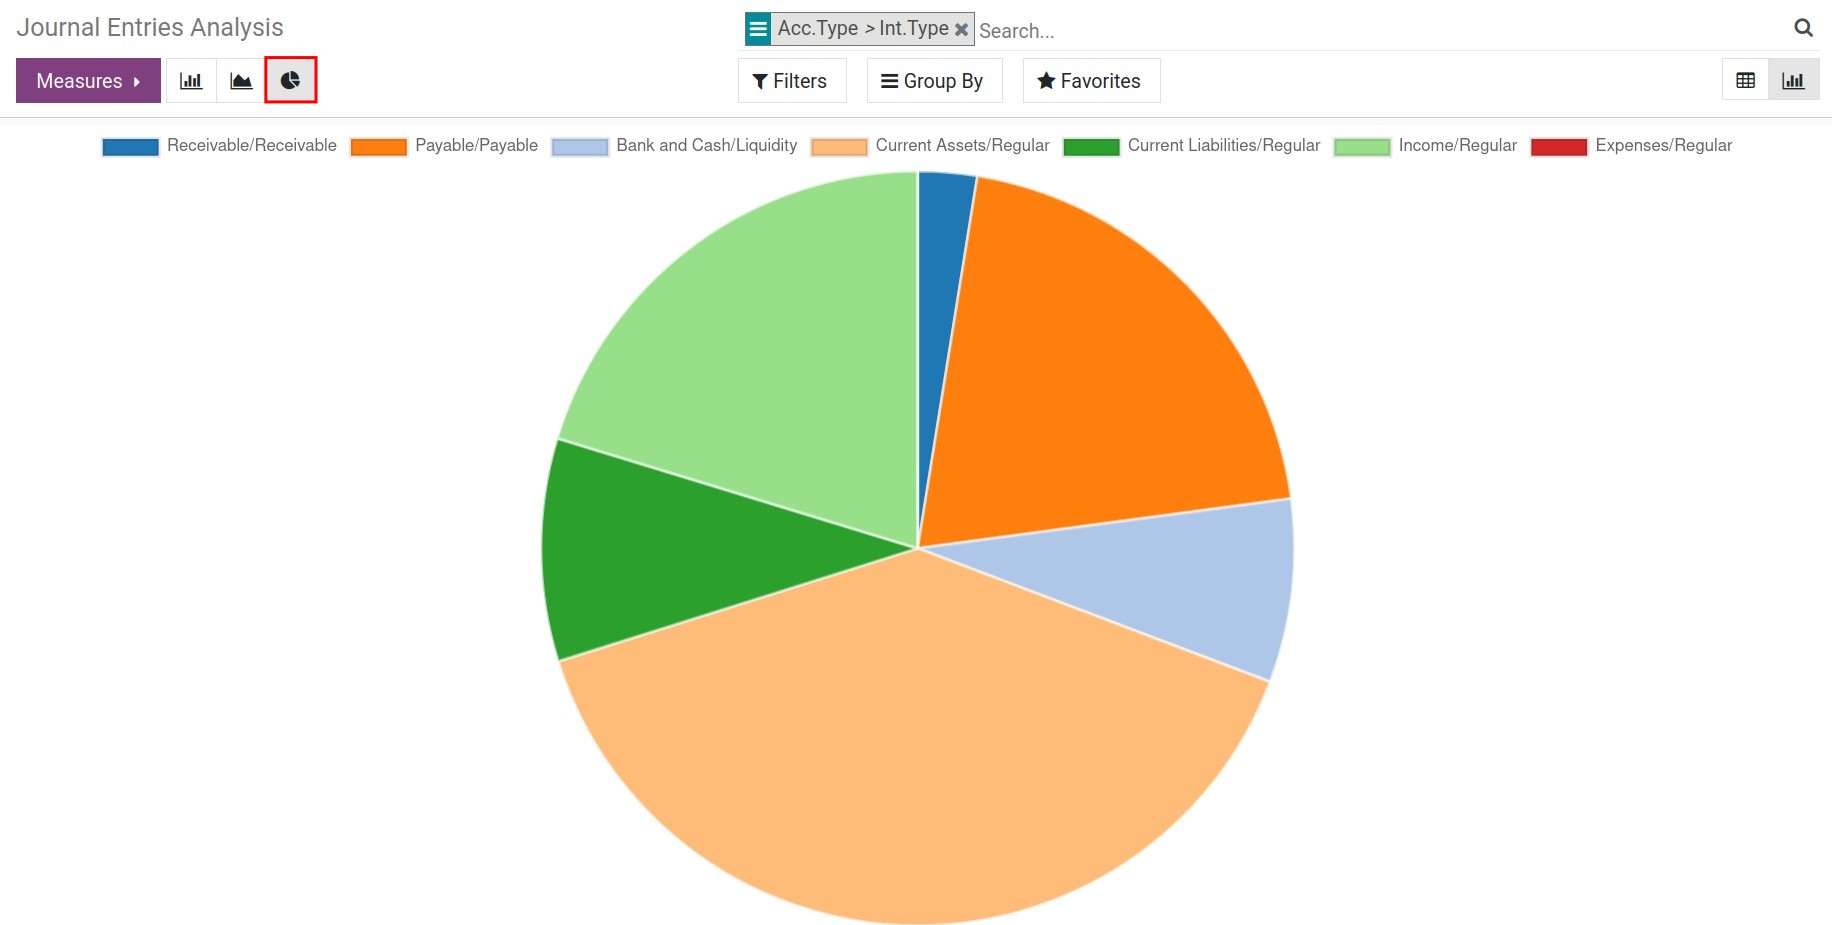
Report visual graph can be viewed in various types such as bar, line, or pie chart:
Bar chart
Line chart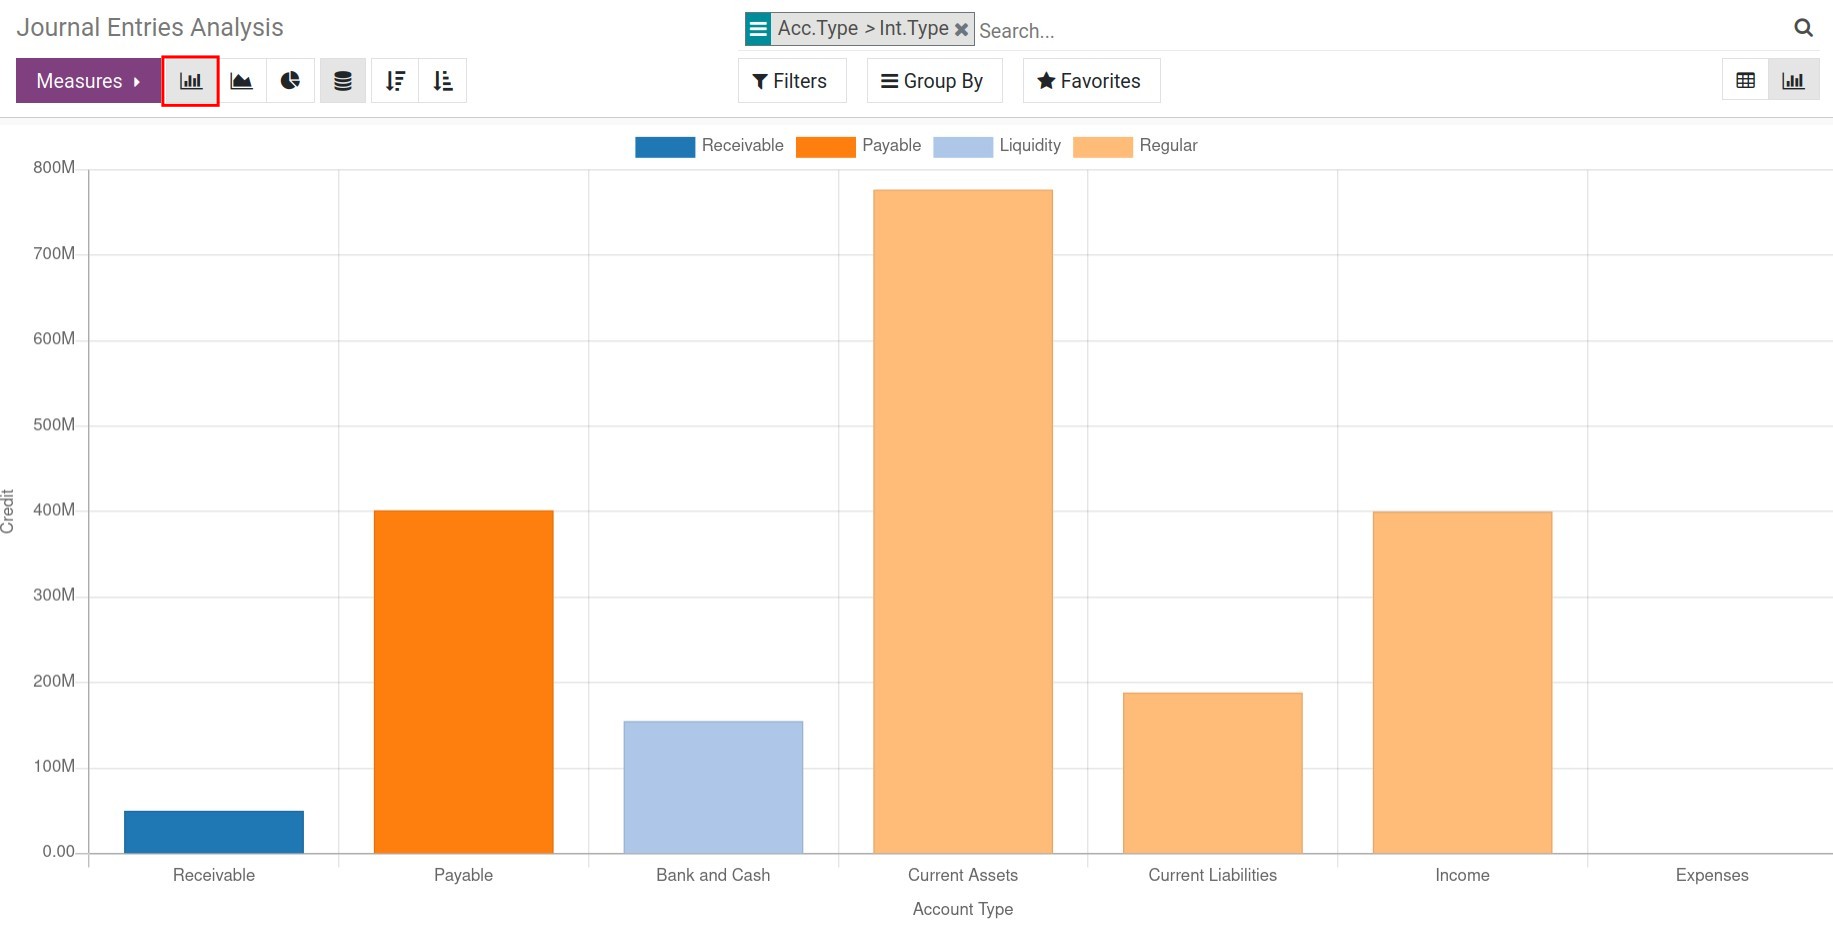
Pie chart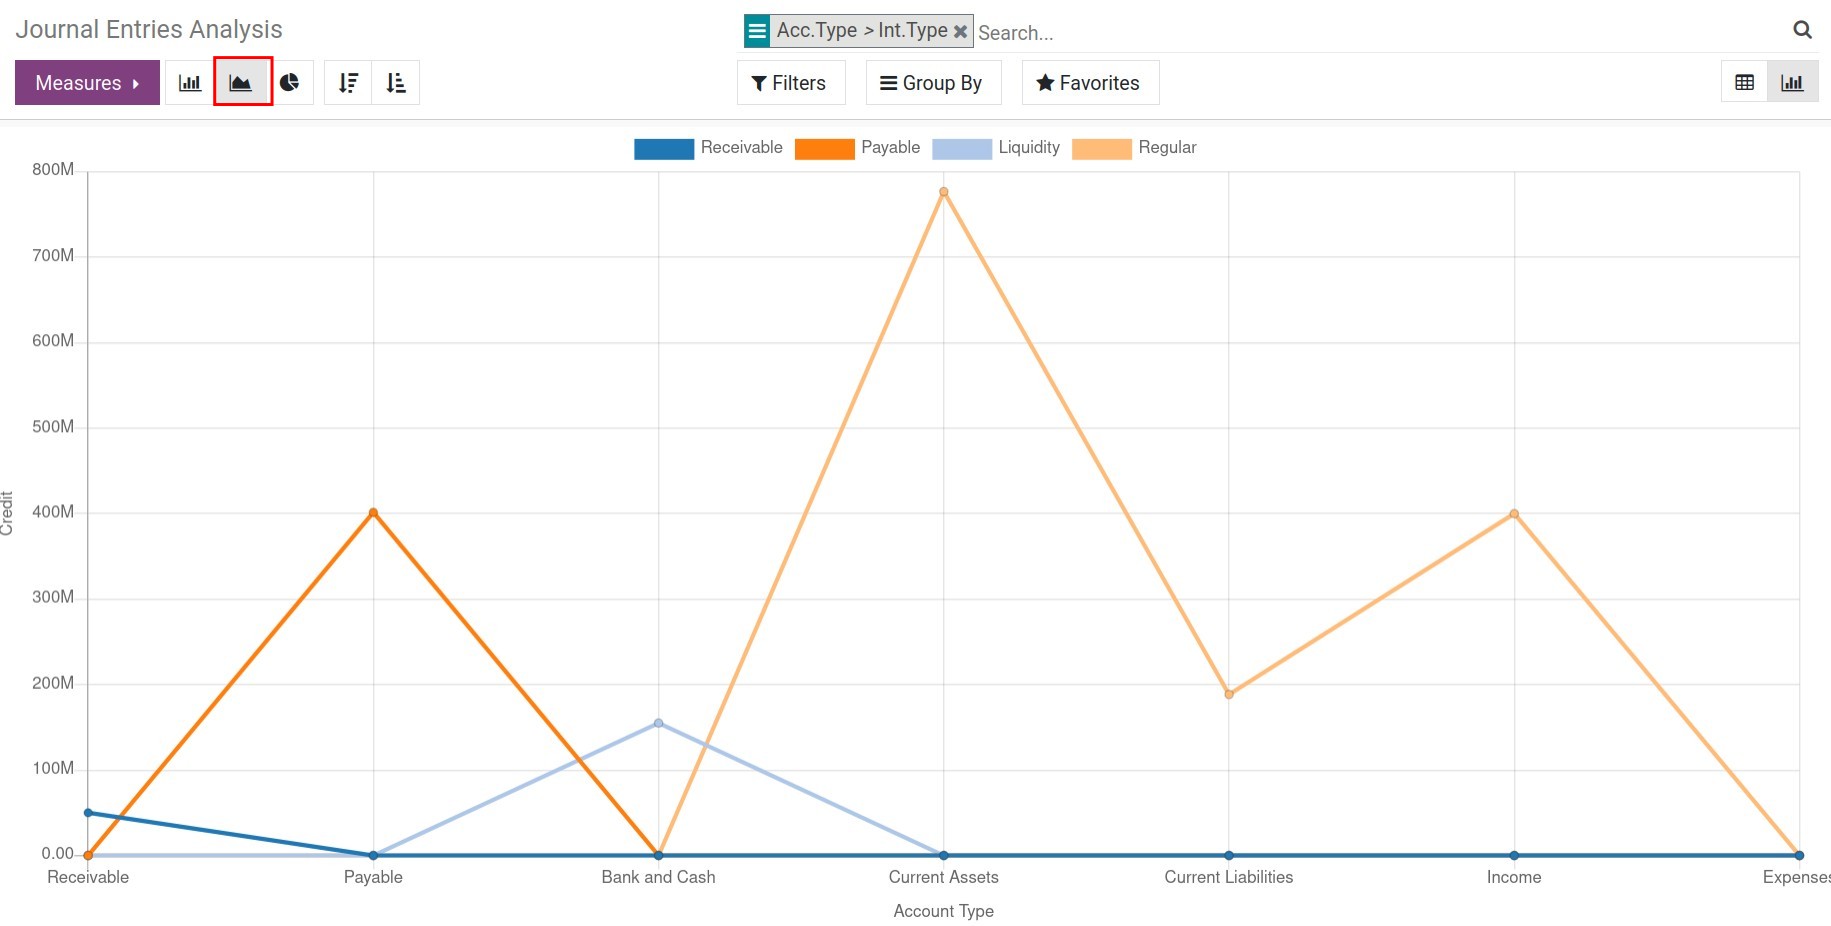
Analytic Entries Analysis Report
The Analytic Entries Analysis Report provides you with a tool to analyze analytic entries, which gives managers a multi-dimensional overview of the analytic entries.
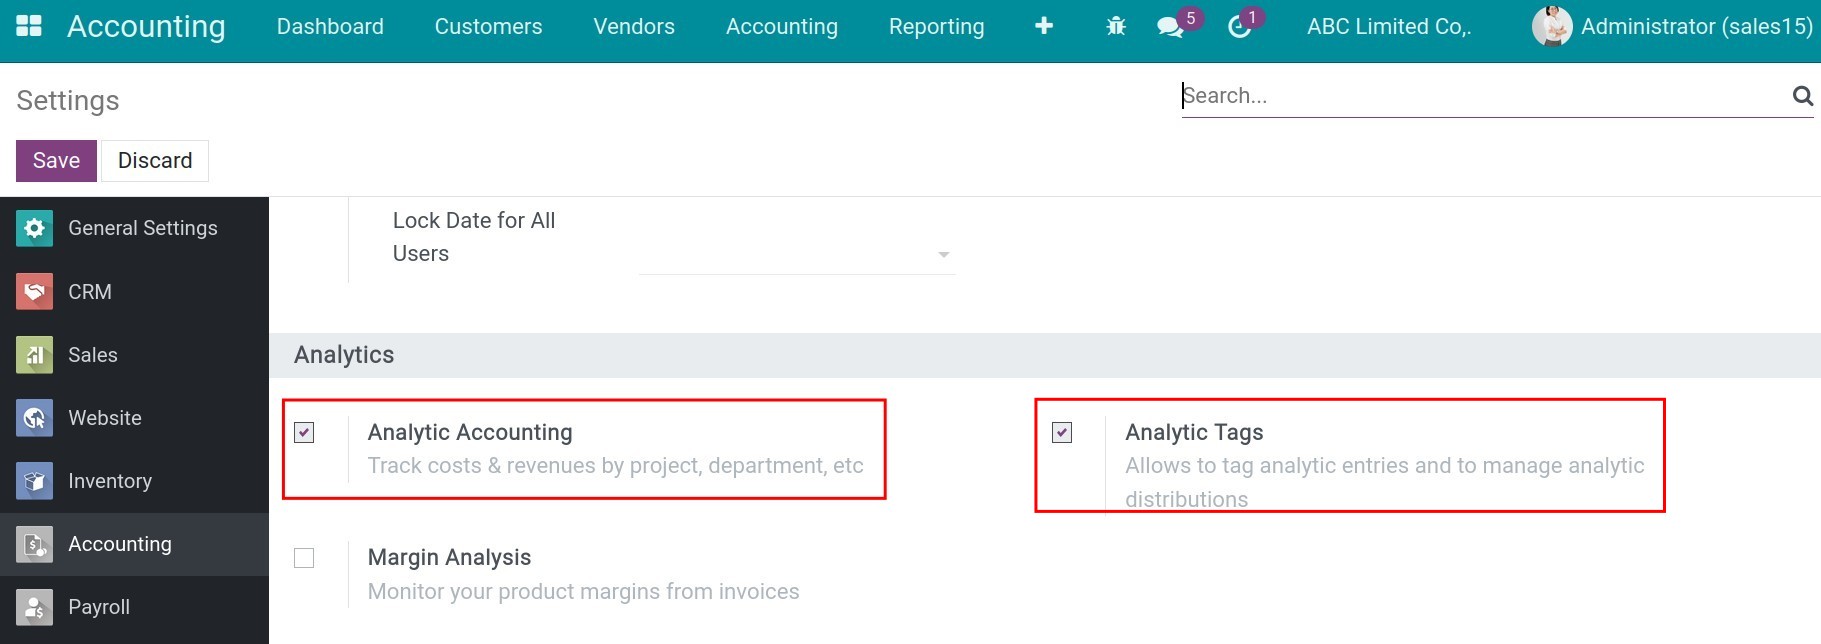
To see this report, you need to go to Accounting > Configure > Settings, turn on Analytic Accounting feature then press Save.
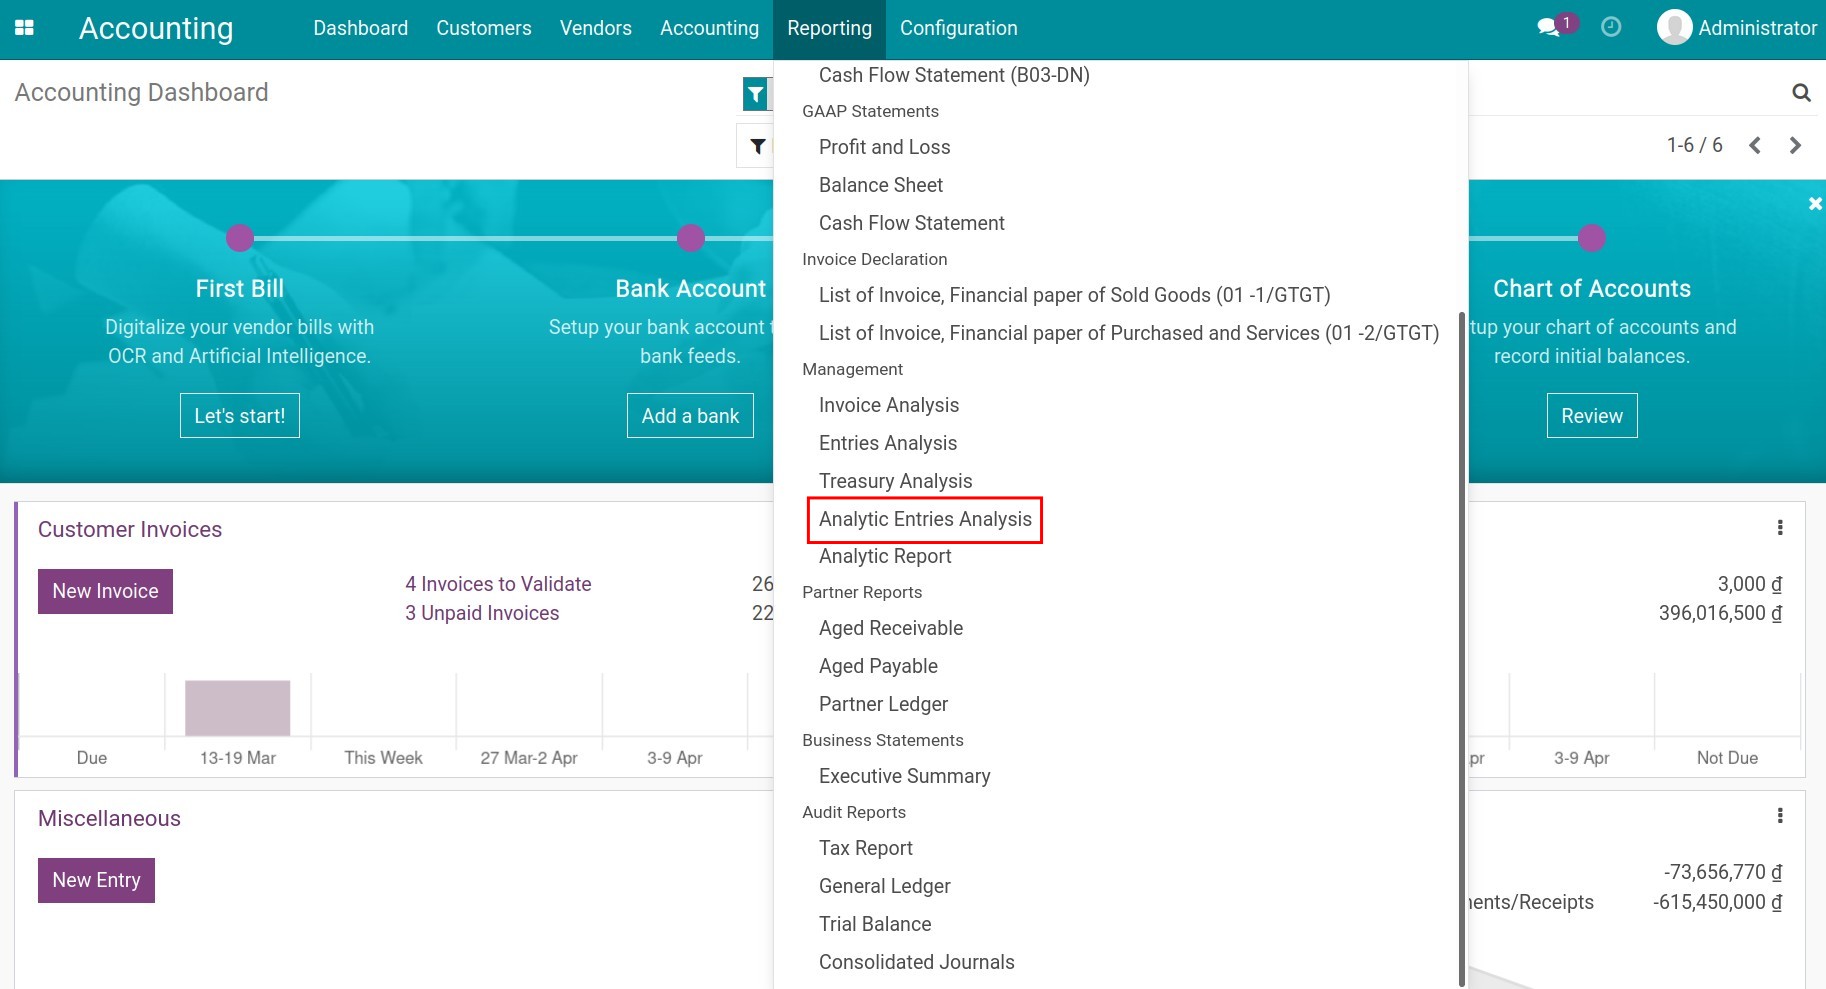
Navigate to Accounting > Reporting > Analytic Entries Analysis:
Similar to the journal entries analysis report, with the analytic entries analysis report, you can:
View reports in pivot or graph format with different chart types.
Pivot report:
Graph report: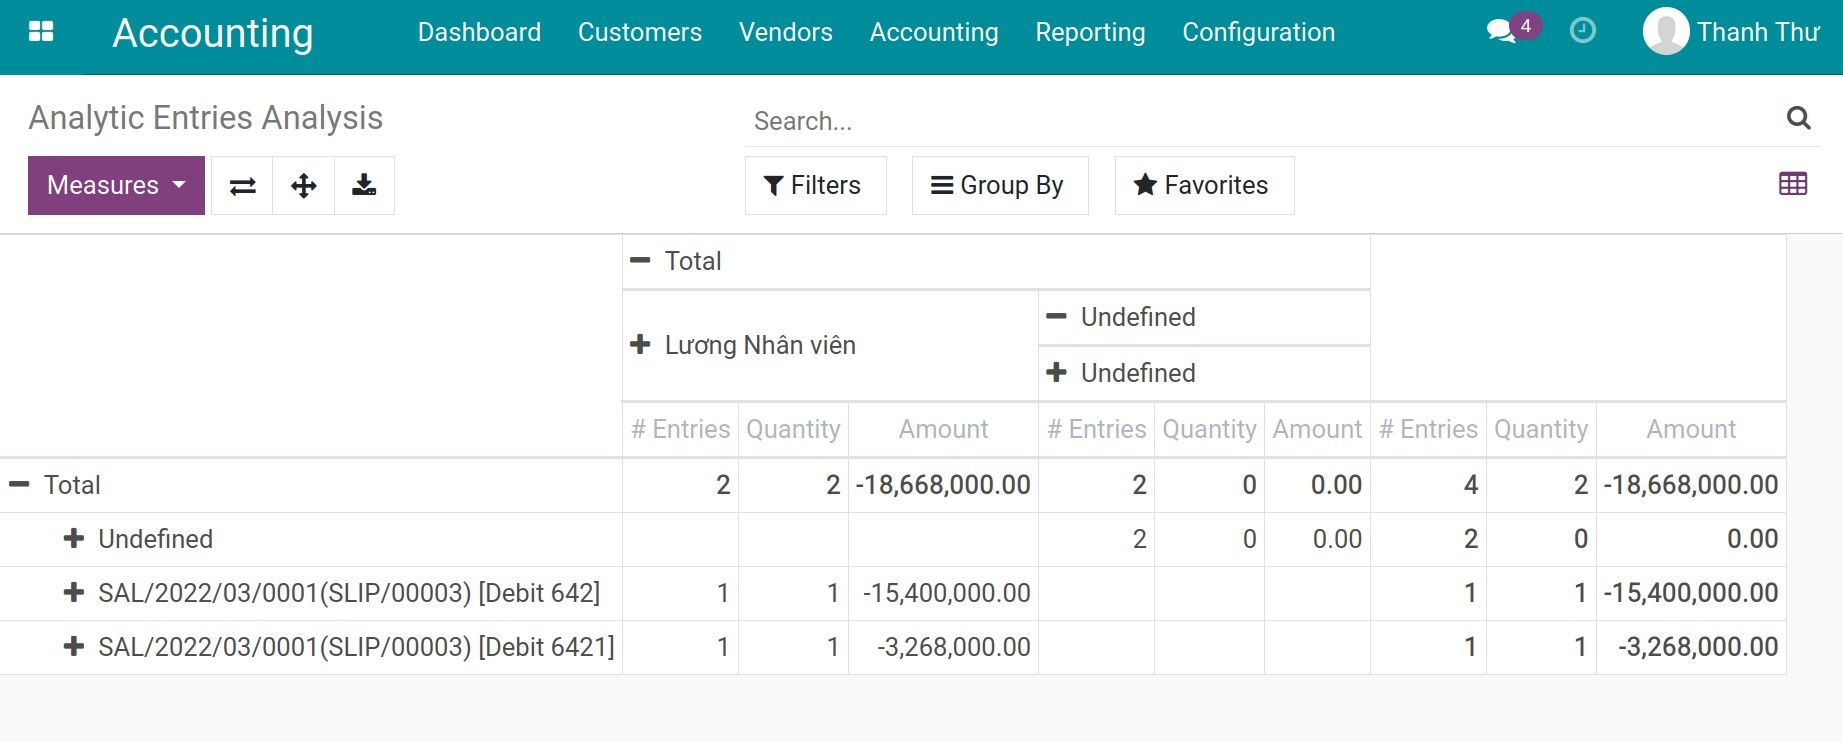
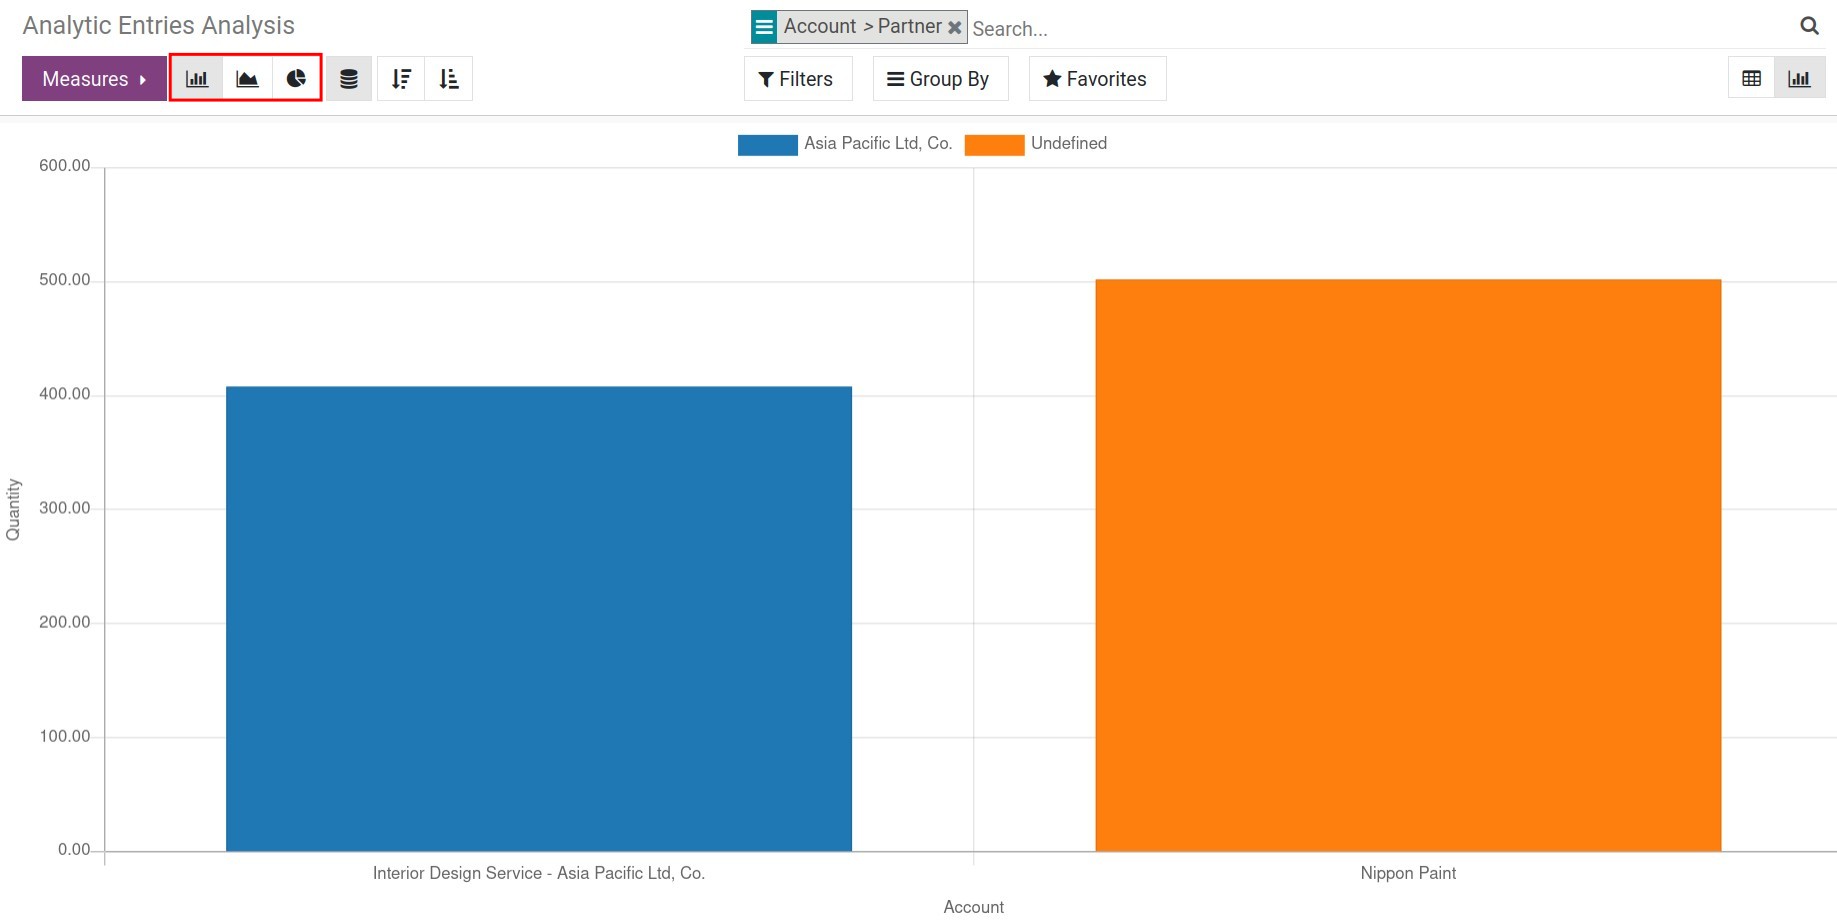
Flexible use of measures to generate reports tailored to each need:
# Entries;
Quantity;
Amount;
Count.
Save the report to the favorites filter for later use.
See also
Related article
Accounting reports available iniSuite
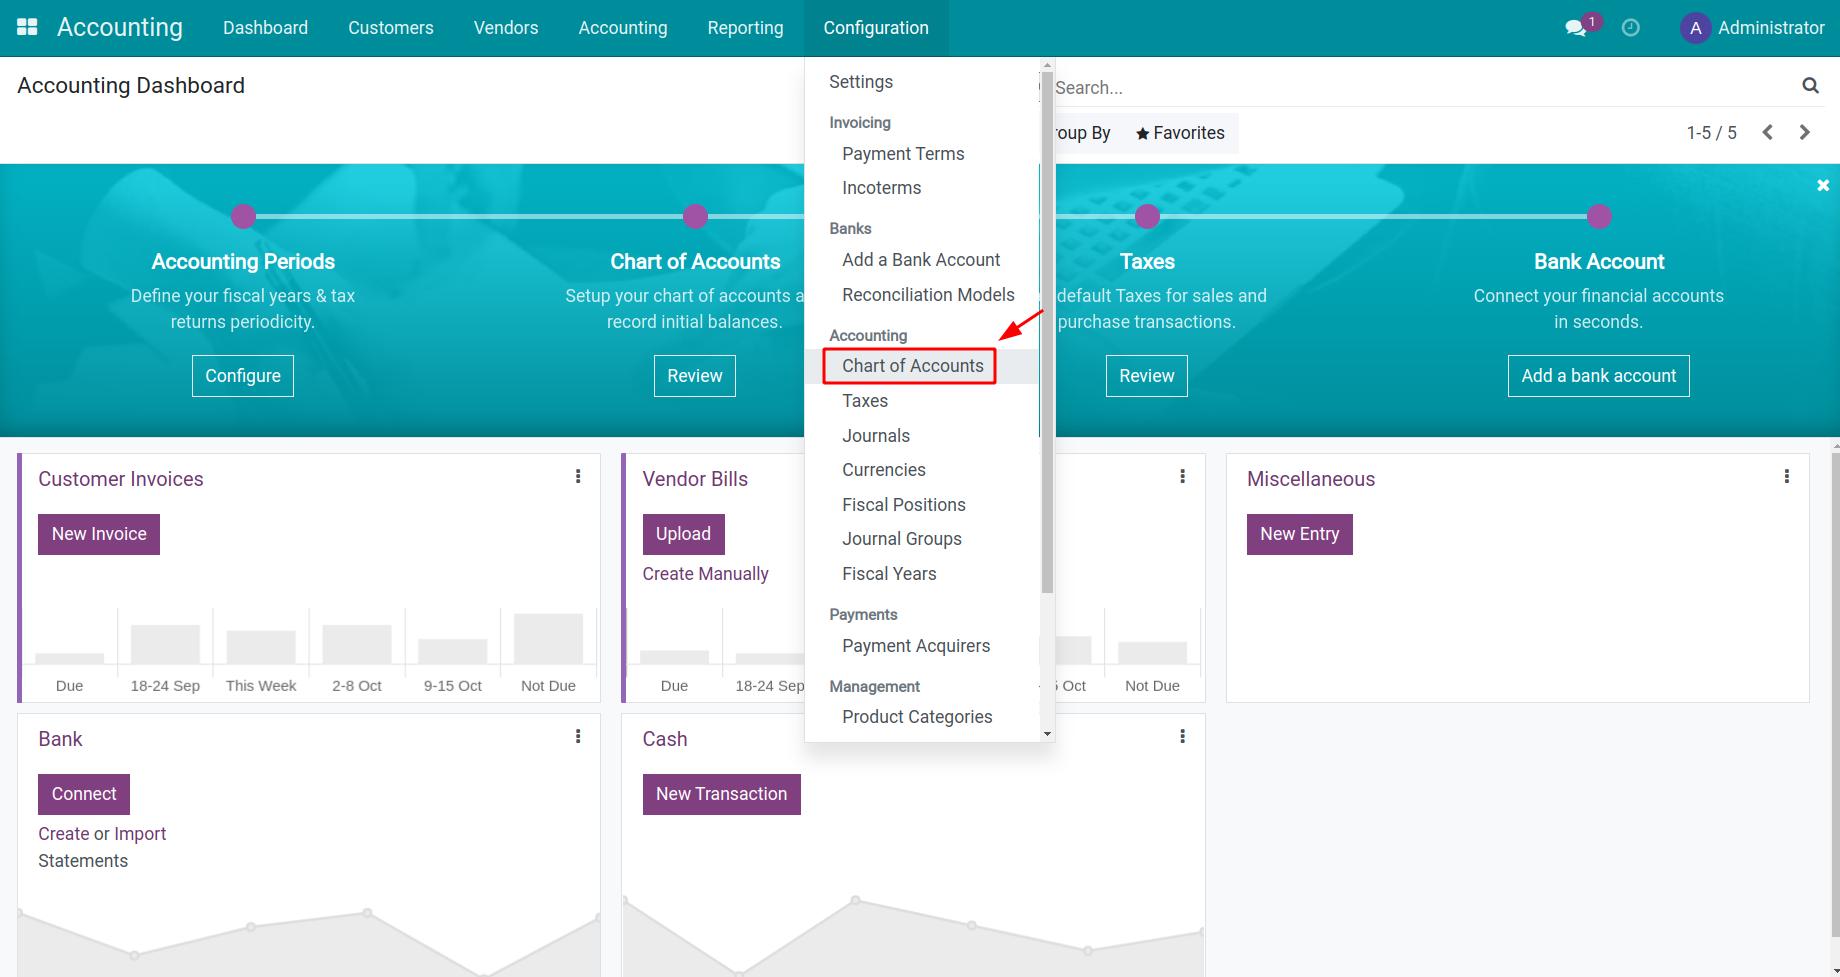
Chart of Accounts
Chart of Accounts
When installing the iSuite Accounting & Finance Management , based on the country that you have chosen when initializing the system, iSuite will automatically recognize and install the corresponding Fiscal Localization Package. For example, if the selected country is Equatorial Guinea, then the SYSCOHADA Chart of Accounts is installed; if the country is China then the Chinese Chart of Accounts is implemented; etc.
Requirements
This tutorial requires the installation of the following applications/modules:
Accounting & Finance
SYSCOHADA Chart of Accounts
Select Chart of Accounts
As mentioned above, if the system is informed that the company is in Equatorial Guinea then iSuite Enterprise Management Solutions will automatically recognize and install the fiscal localization and chart of accounts based on SYSCOHADA accountancy law.
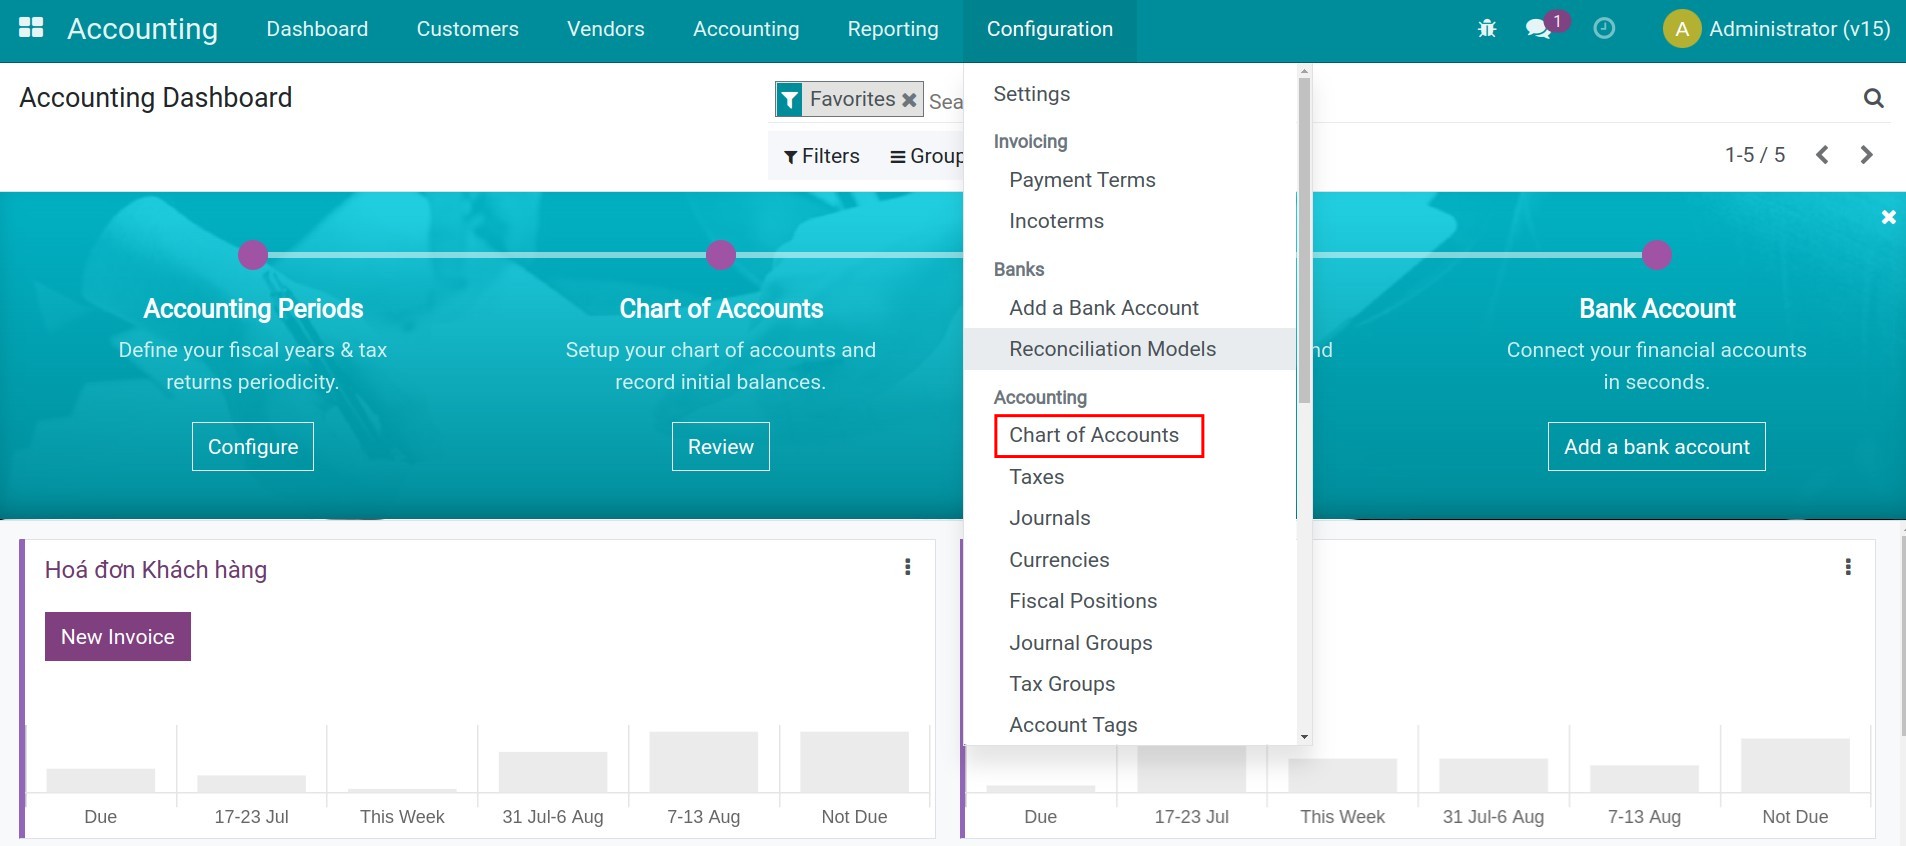
Navigate to Accounting ‣ Configuration, move to Fiscal Localization section, and select:
SYSCOHADA- Chart of Accounts

Warning
You will not be able to change the chart of accounts for a company if there are already accounting entries existing in the company.
Configure Account
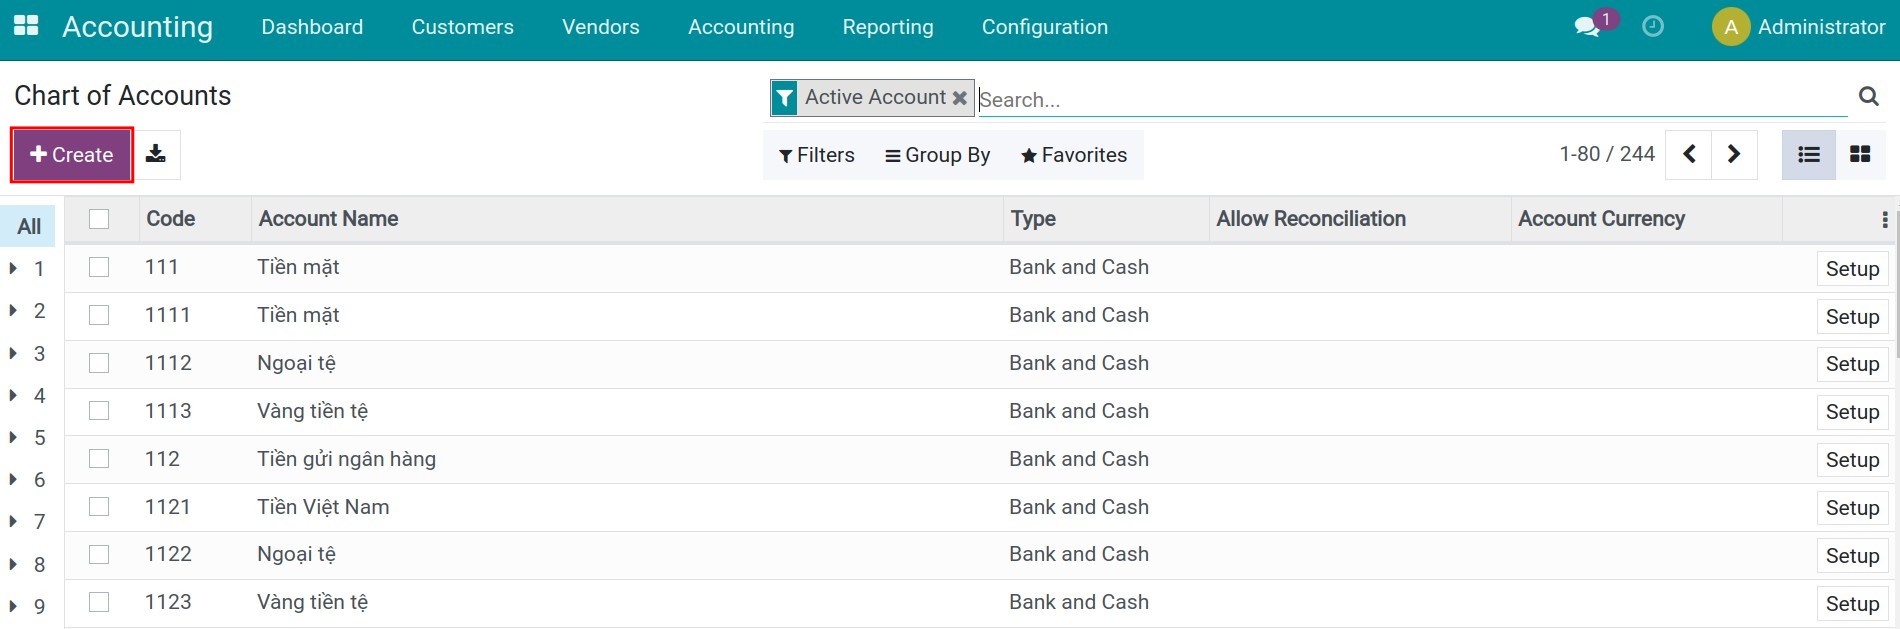
By default, when you select a Chart of Accounts, iSuite will install a few main accounts base on fiscal localization. Access Accounting ‣ Configuration ‣ Chart of Accounts:
You can use the Group by function to group the account by Account types/Account groups, etc. depending on your purpose of use. More details about group by or filter function at Filter, Groups and Search use cases.
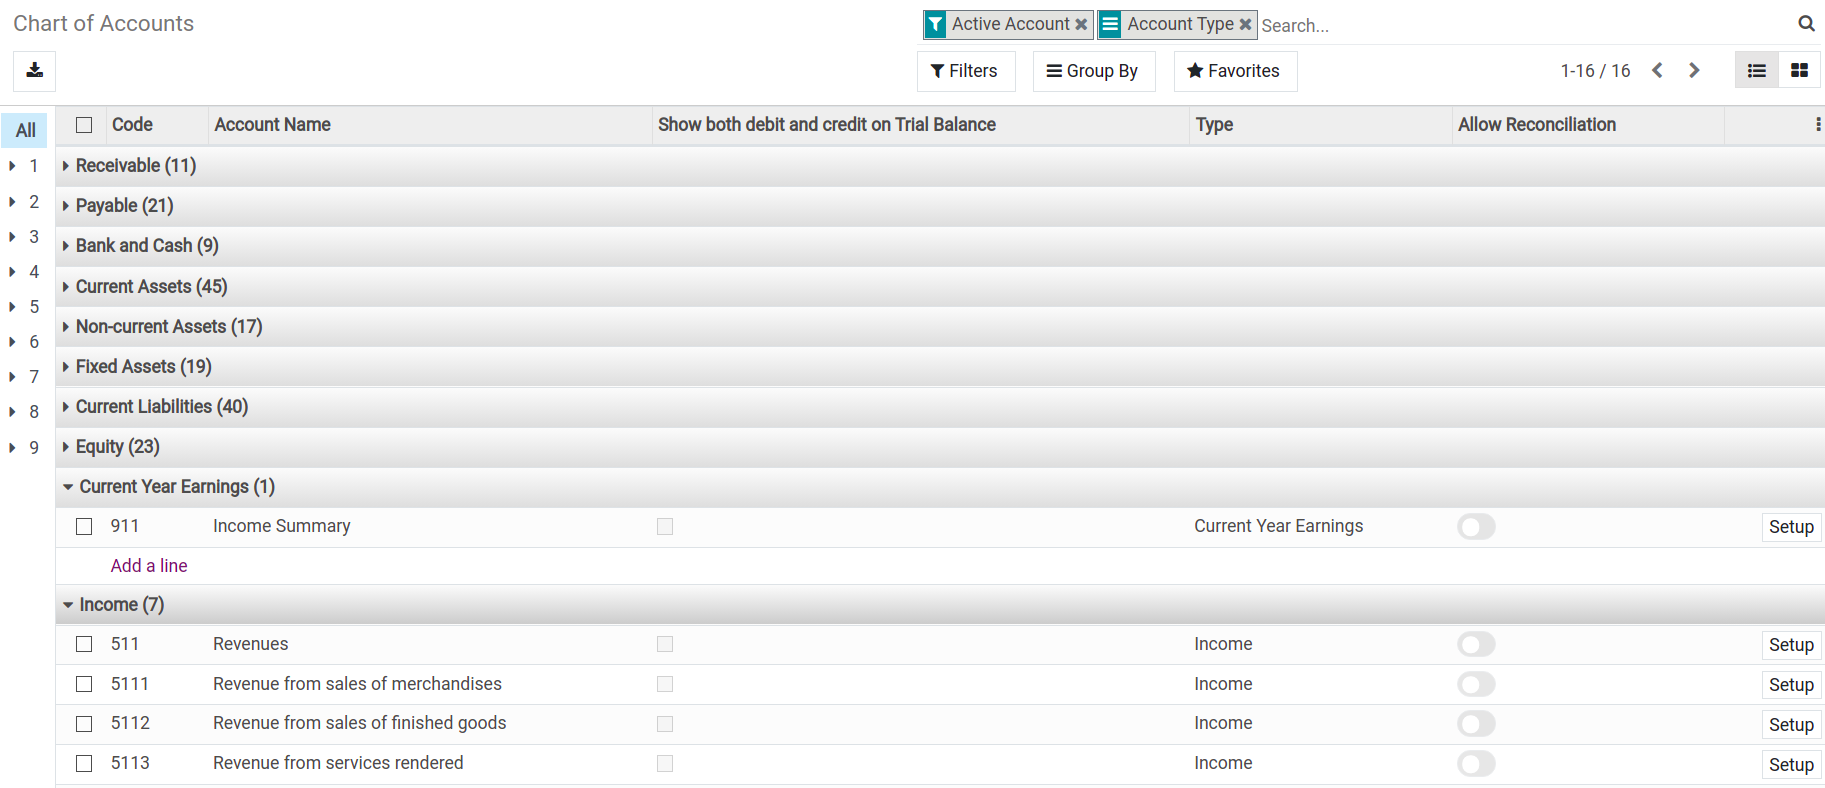
Each account has its own setup, you can access it by clicking on the Setup button at the end of each line.
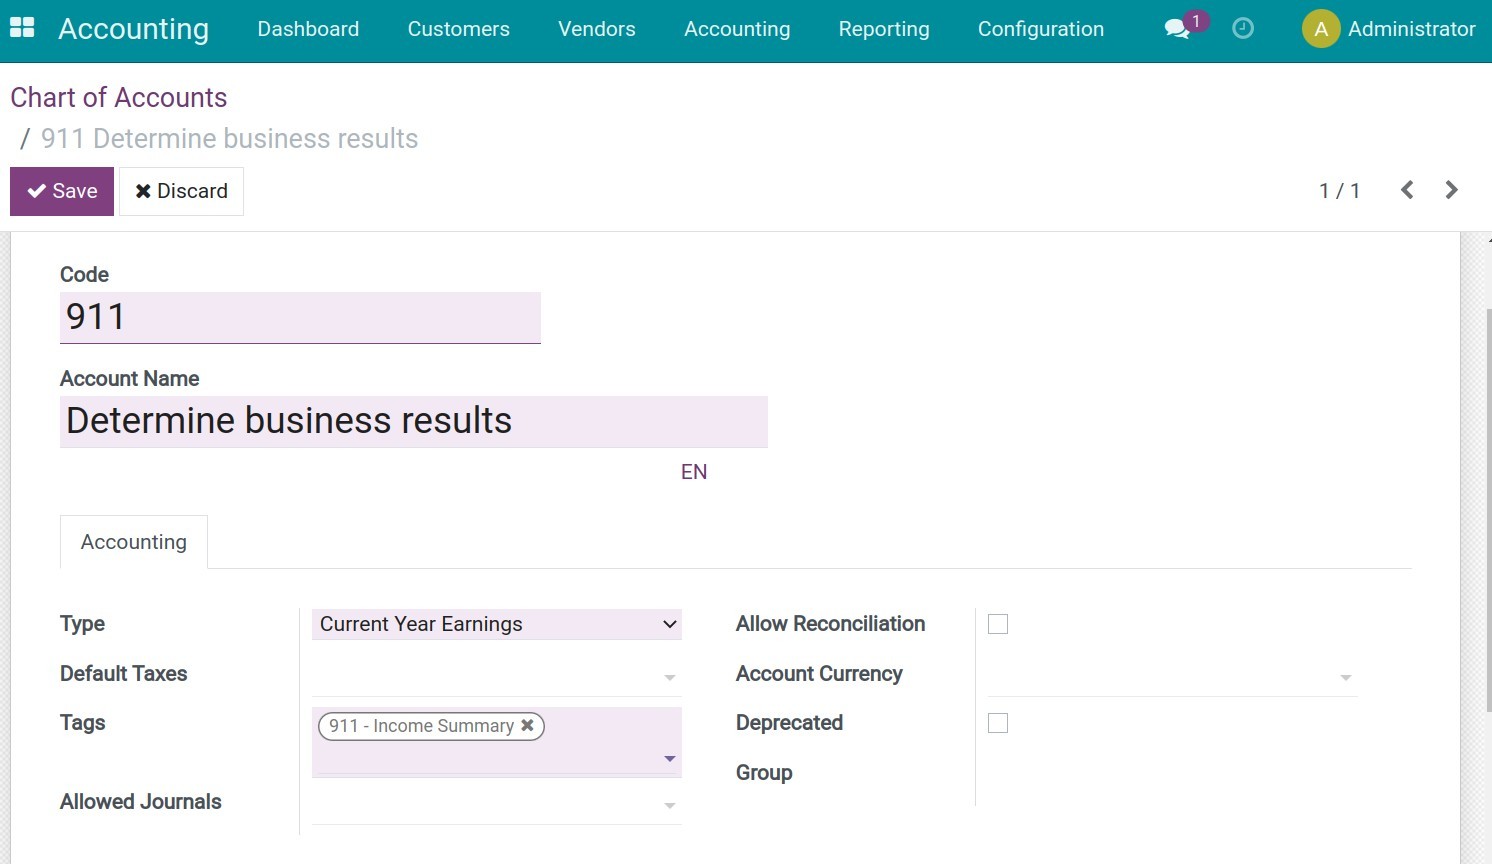
In which:
Code: An account number according to the regulation of your Country´s Ministry of Finance.
Account name: An account name corresponds to the code.
Type: Choose a suitable type to use for information purposes to generate financial reports, set the rules to close the fiscal year, and generate opening entries.
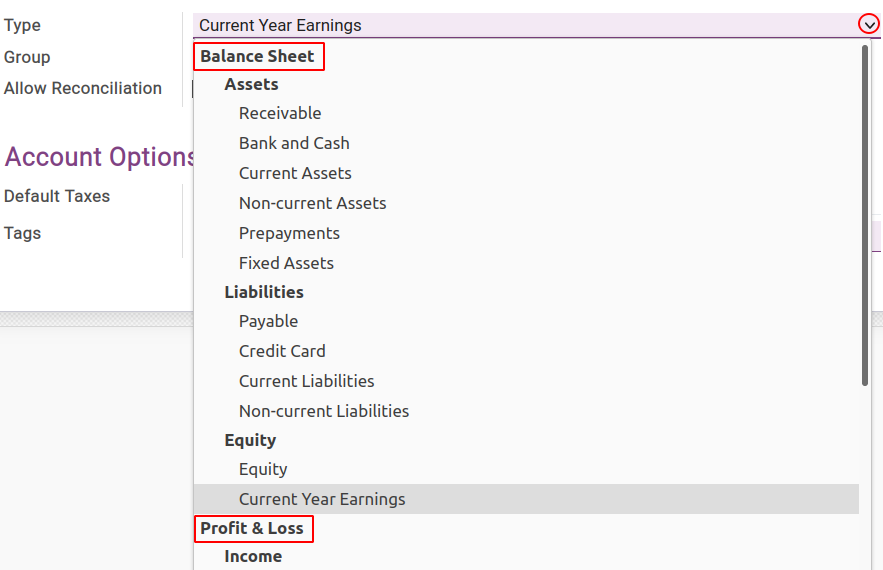
- Group: Account group will change depending on the chosen Type.
Allow Reconciliation: If checked, the system will automatically recognize and reconcile the transactions of this account. This field is displayed depending on the chosen account Type above.
Deprecated If checked, the account will not be used in the system.
Default Taxes: The chosen tax will automatically show up whenever this account is used.
Allowed Journal: Allows using this account on the chosen journals.
Tag: Select the most suitable tags for this account so that you can filter it more easily on reports such as Cash Flow Statement. To configure a tags, see on Tax reports using tax grids.
You can also create new accounts if needed by clicking on Create at the Chart of account home screen and then filling in the mentioned information.
See also
Related article
Main concepts of Accounting and Invoicing in iSuite
How to apply cut-off in iSuite Accounting
How to apply cut-off in iSuite Accounting
Viindoo provides the Cut-off feature that helps you to separate the total revenue/expense on a Customer Invoice/Vendor Bill at different times. In this article, I will write about the case when you need to separate the expense, you can do the same with the revenue.
Requirements
This tutorial requires the installation of the following applications/modules:
Accounting
Accounting Reports
Tip
In order to implement the following steps, make sure you understand the operations of the Vendor Bill on the iSuite system.
Firstly, go to Accounting > Vendors > Bills and select the bill that needs to be adjusted.
Note
This feature is just available on the posted journal entries and the journal items of the Profit and Loss type.
In the Journal Items tab, at the recorded value of the expense account, you click on the Cut-off button.
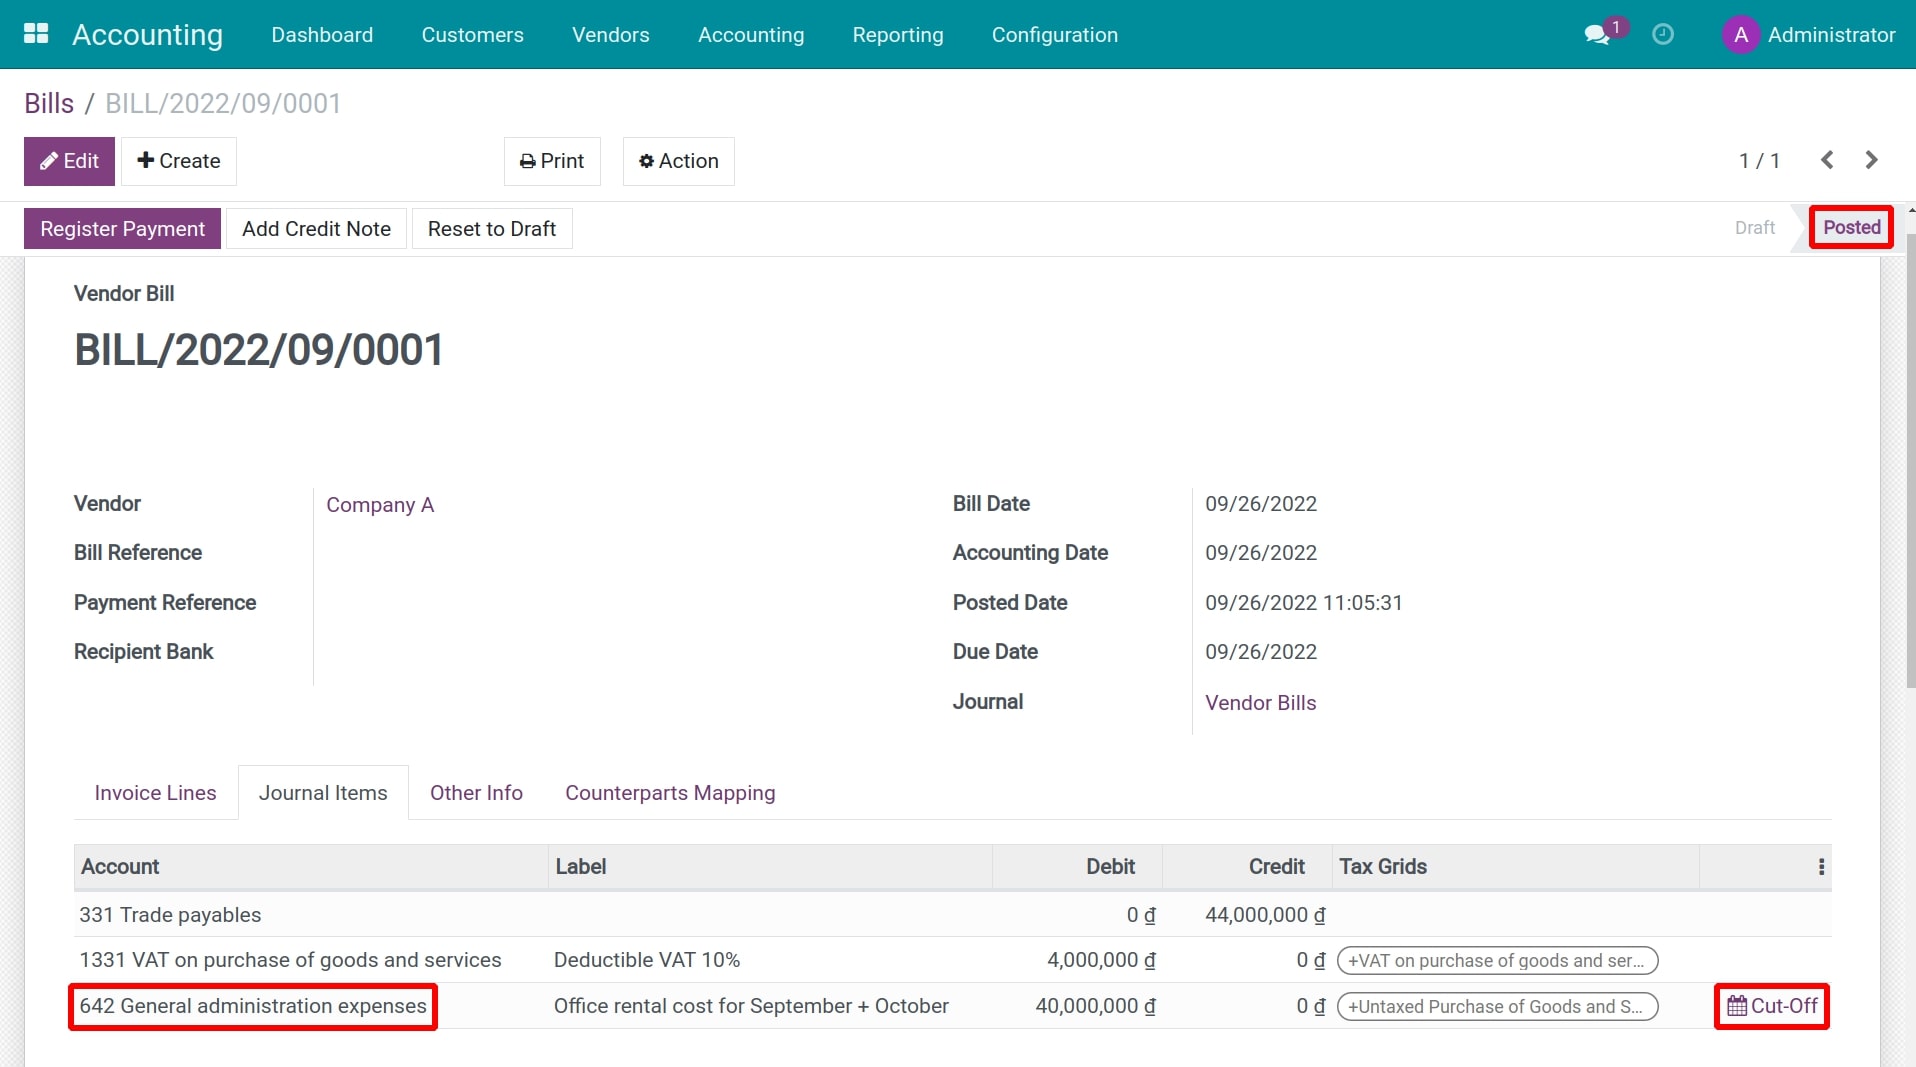
A pop-up window will appear for you to enter the parameters of the auto-generated entries which will separate the expense.
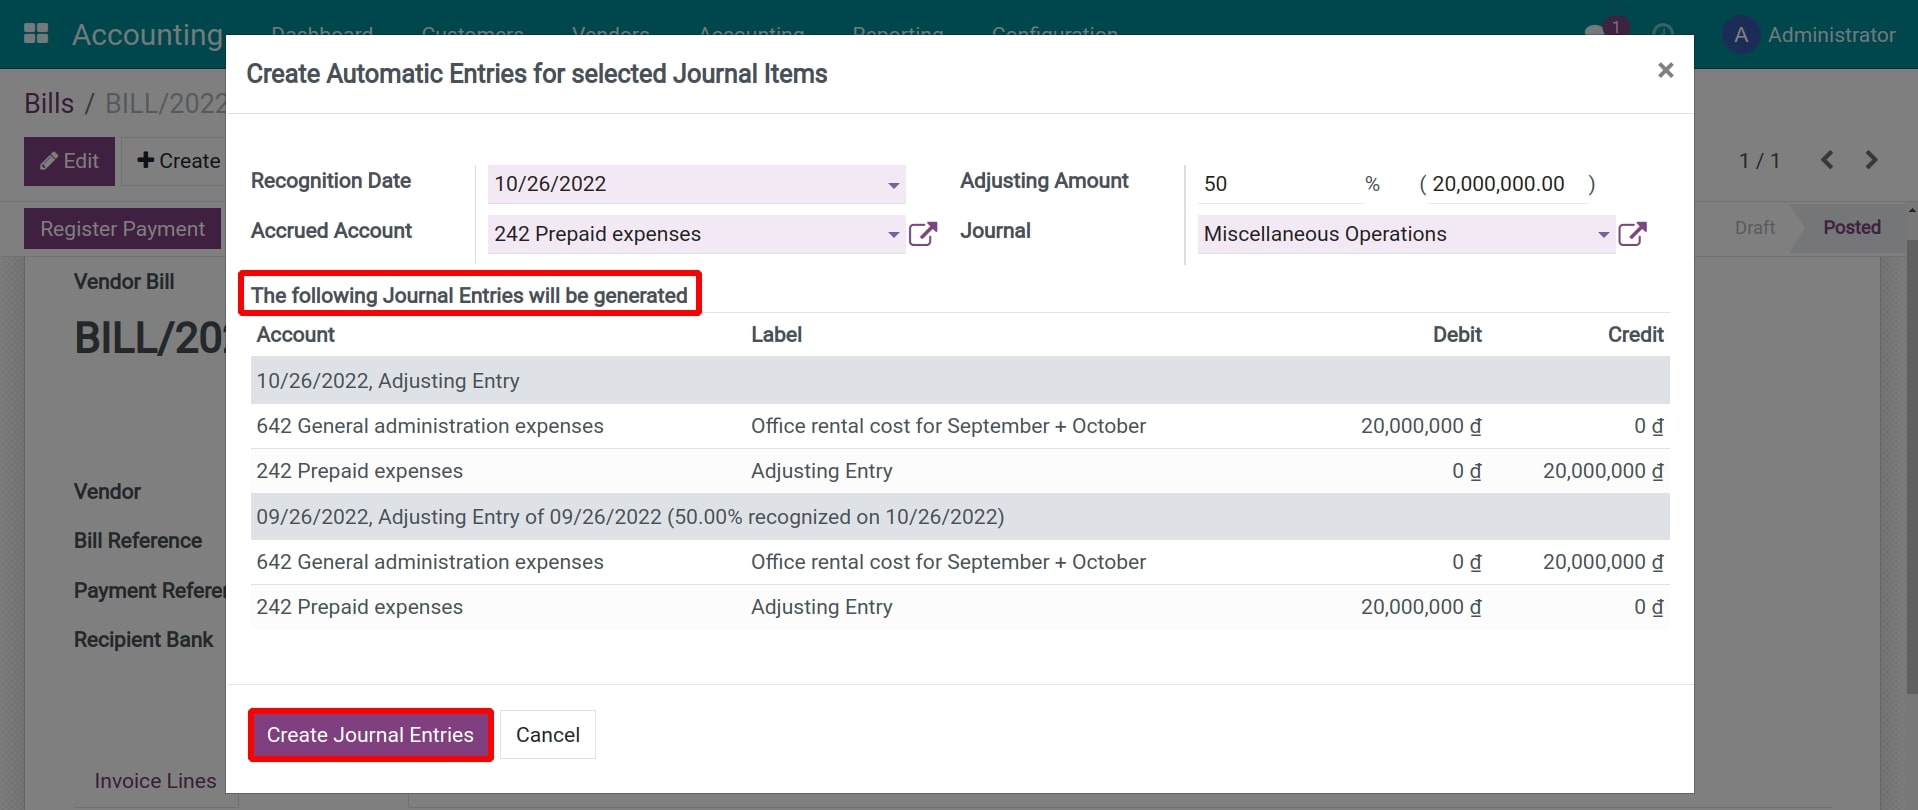
You enter the following parameters:
Recognition Date: the time at which the expense is separated from the bill is considered as valid.
Accrued Account: the temporary account to transfer the amount to be separated from the expense before re-recording to the expense account at a valid time.
Adjusting Amount: the amount needs to be separated from the expenses.
Journal: journal applied on auto-generated entries.
You can preview the entries that will be generated by this setting under The following Journal Entries will be generated.
The entries generated after you select Create Entries are as:
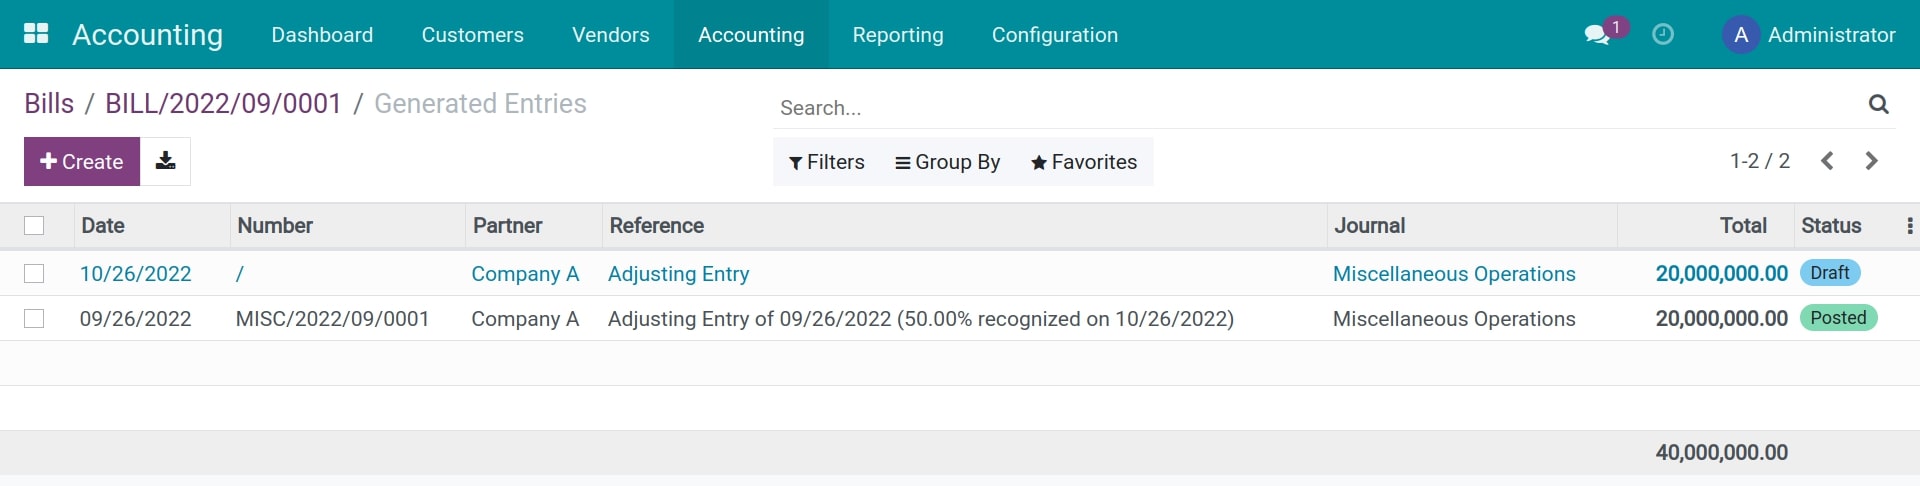
The first entry will reduce the amount recorded on the expense account (the amount you entered in the Adjusting Amount field) and move it to the Accrued Account.

The second entry will transfer the amount recorded on the Accrued Account to the expense account at the due date established on the Recognition Date field.
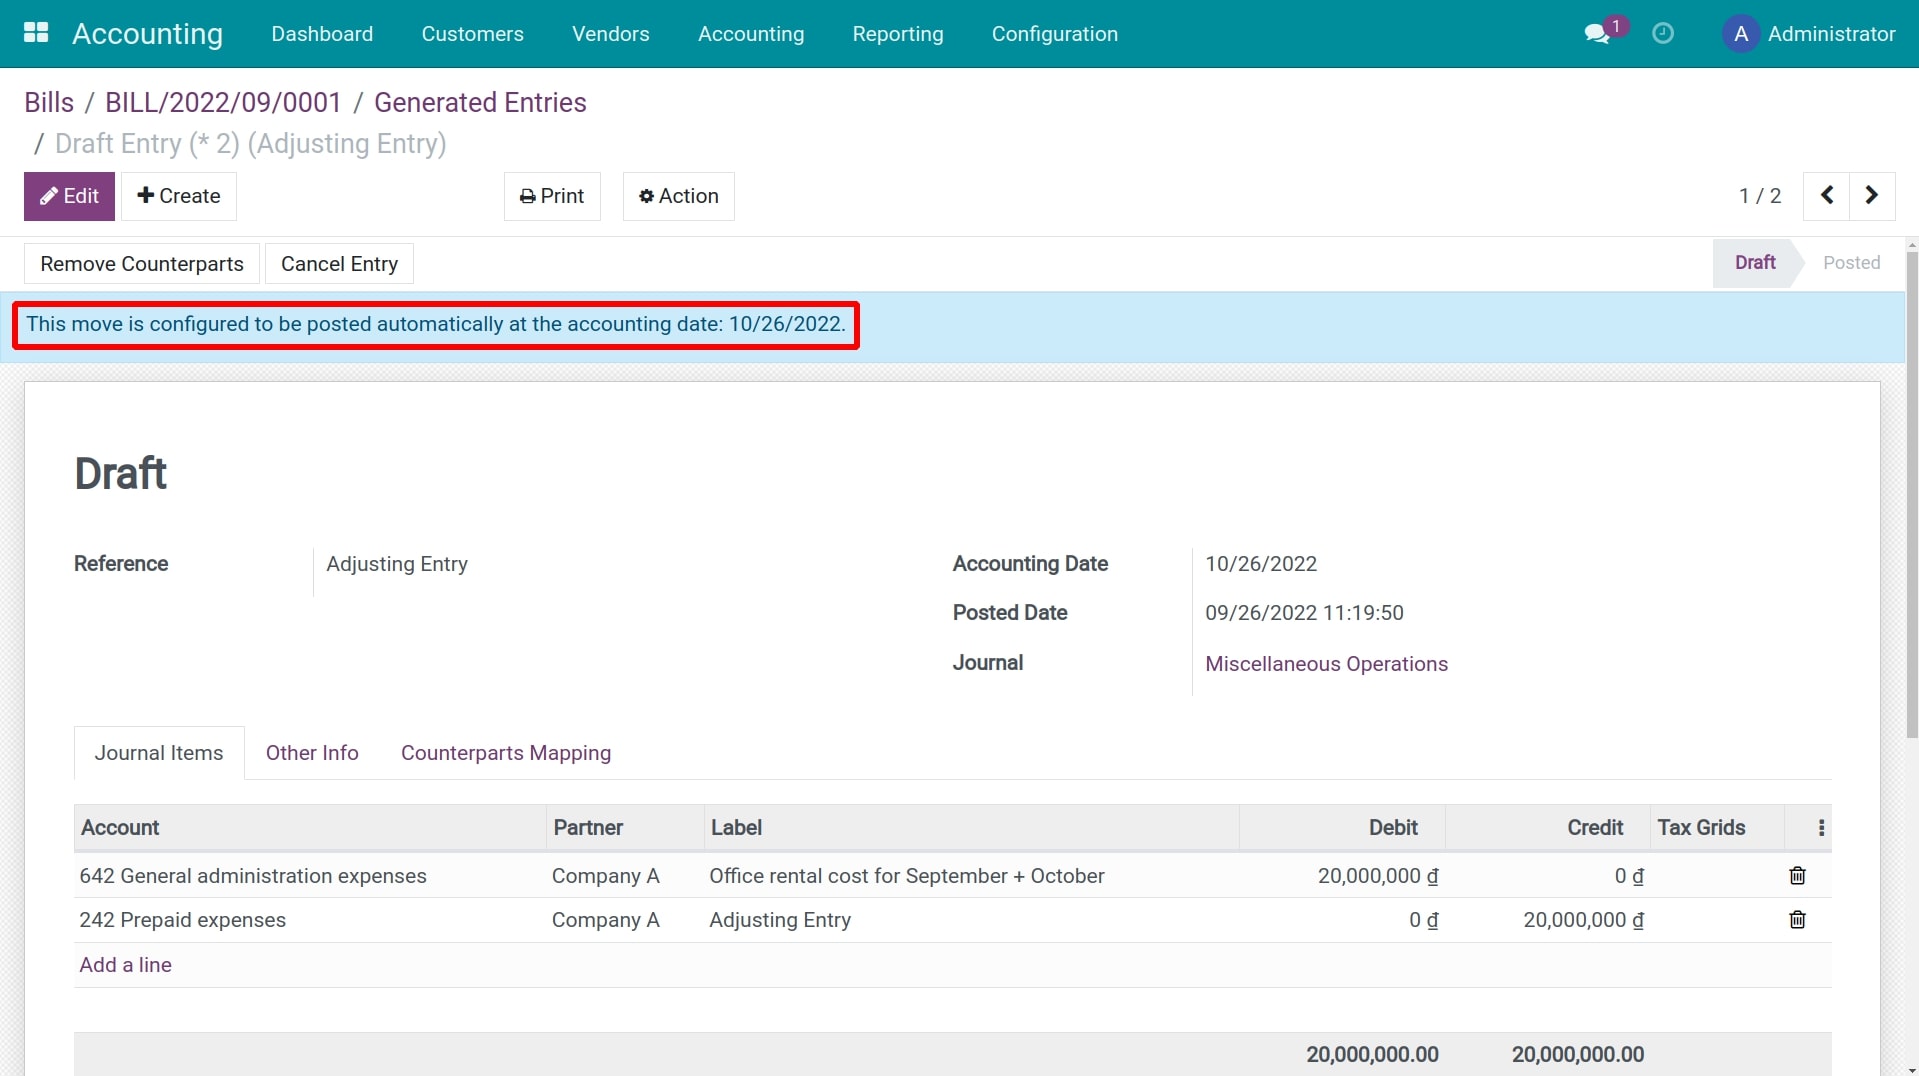
If Recognition Date is in the future, the entry will be configured to be automatically posted on that date, and if it is in the past, the entry will be posted immediately.
Now check the Profit and Loss report, you can see that the expense recorded on the original Vendor Bill has been split in two, one is recorded at the accounting date and the other is recorded at the Recognition Date.
See also
Related article
Pay various distinctive bills at the same time
Online payment activation and usage
Online payment activation and usage
Requirements
This tutorial requires the installation of the following applications/modules:
Accounting & Finance
For the purpose of having a fast and convenient payment process, and also to facilitate the deal closing process, iSuite Enterprise Management Software offers various online payment methods, supported by common services such as Internet banking, MoMo wallet, ZaloPay, VNPAY, etc.
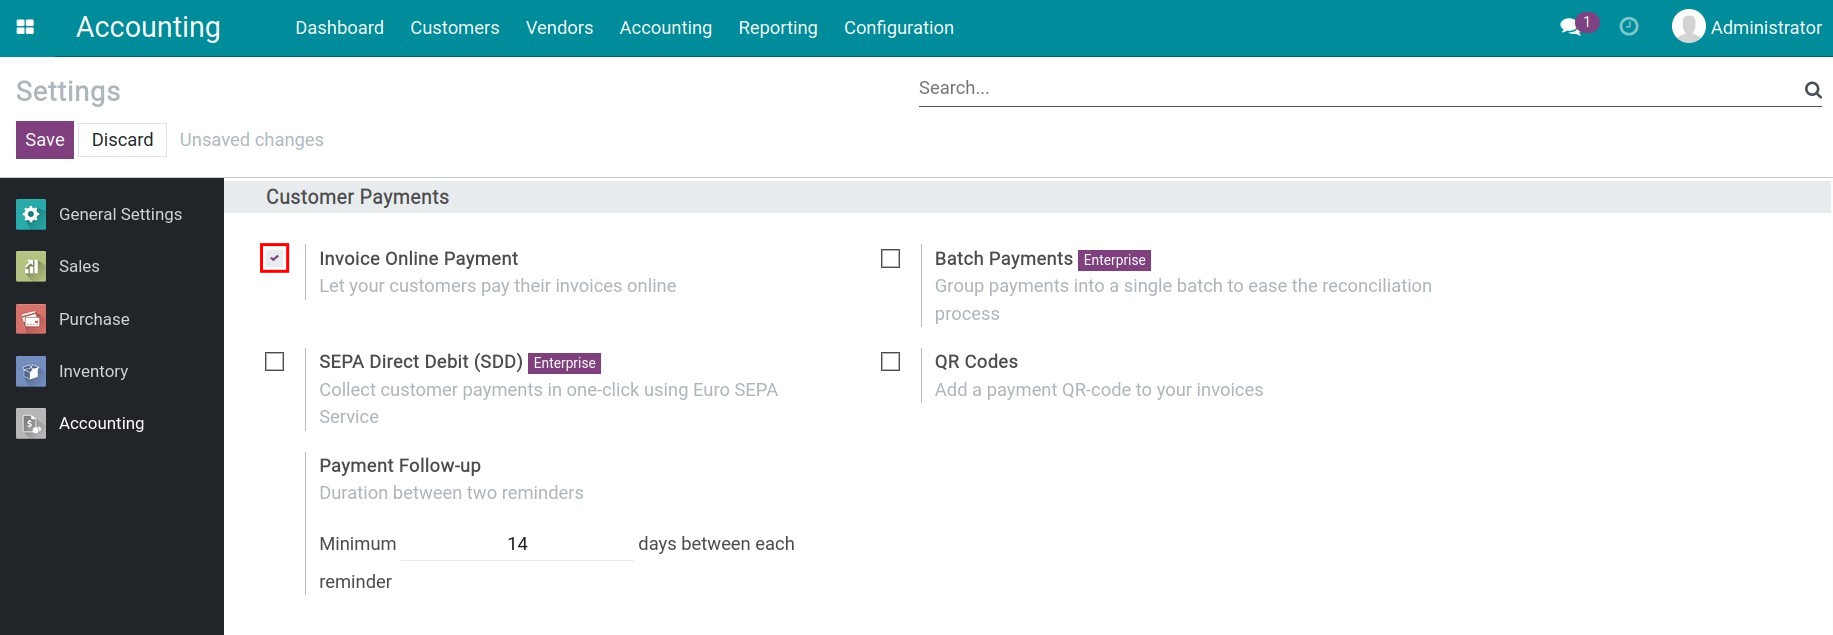
Activate Invoice Online Payment
To activate the online payment feature, navigate to Accounting ‣ Configuration, go to the Customer Payments field, and activate Invoice Online Payment.
At the customer invoice, click the Preview button to preview the invoice directly on the website.
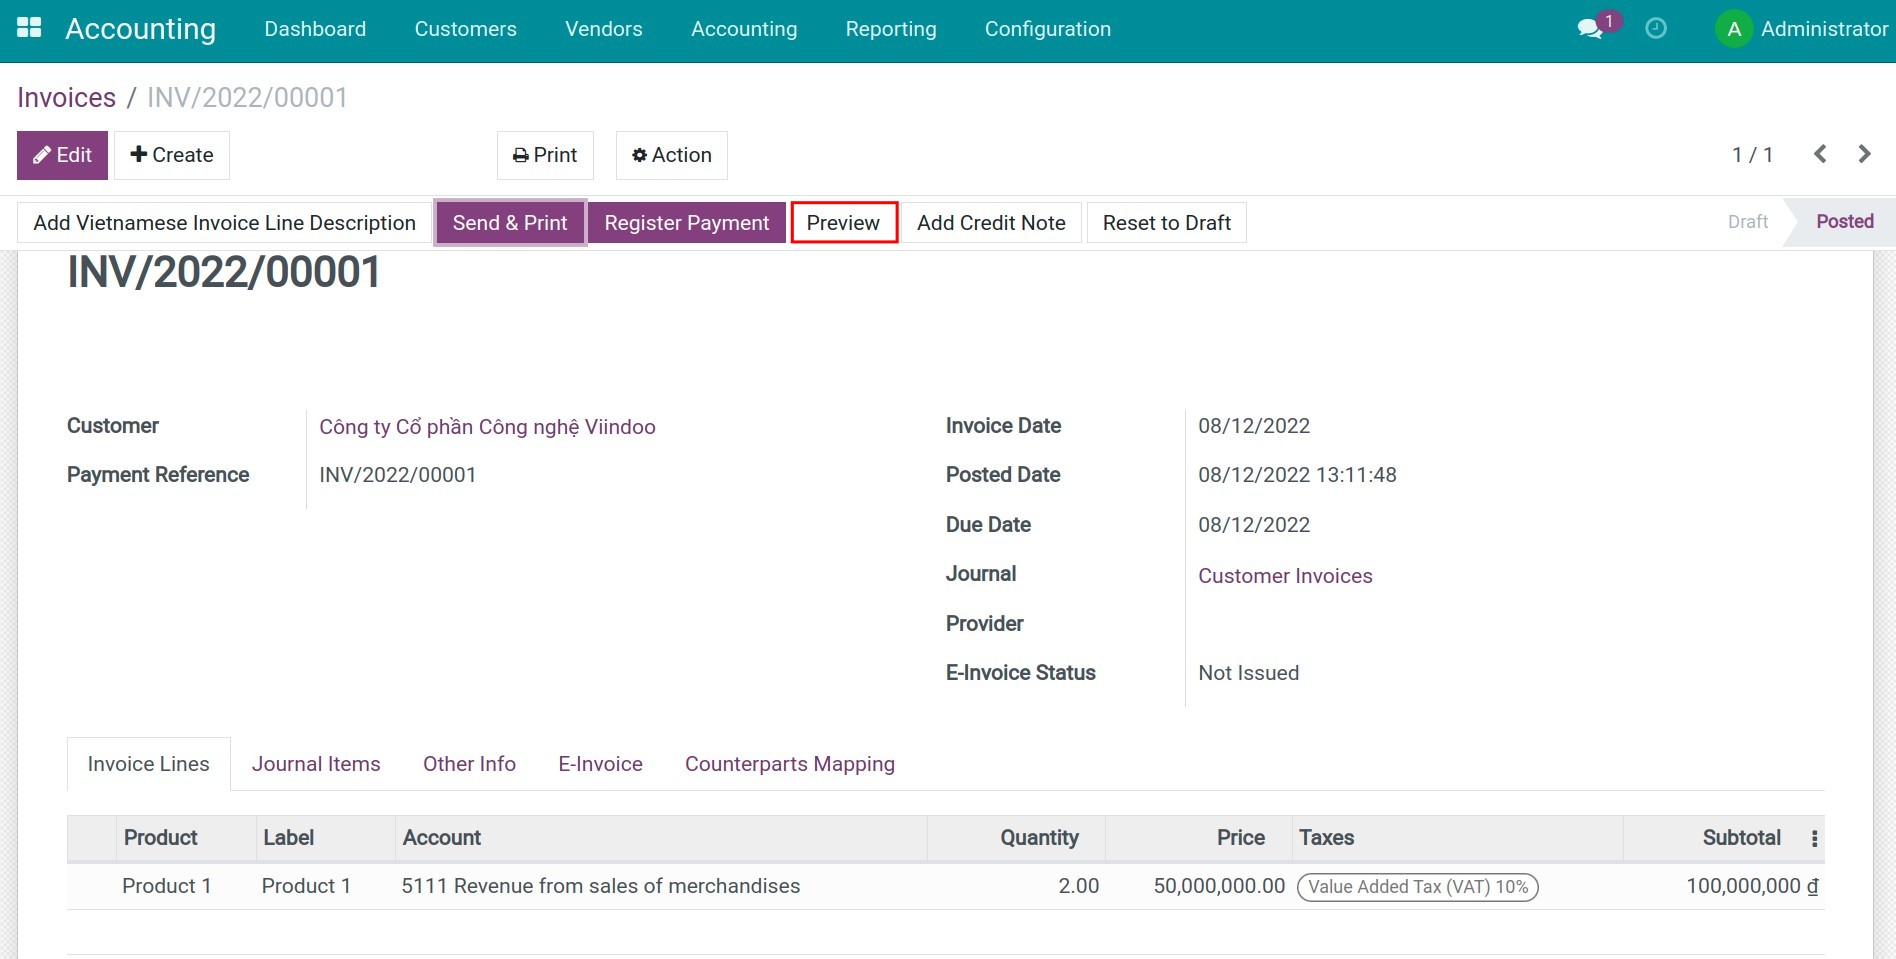
When pressing this button, you will be able to preview the details of the invoice before sending it to your customer:
Customer online payment view
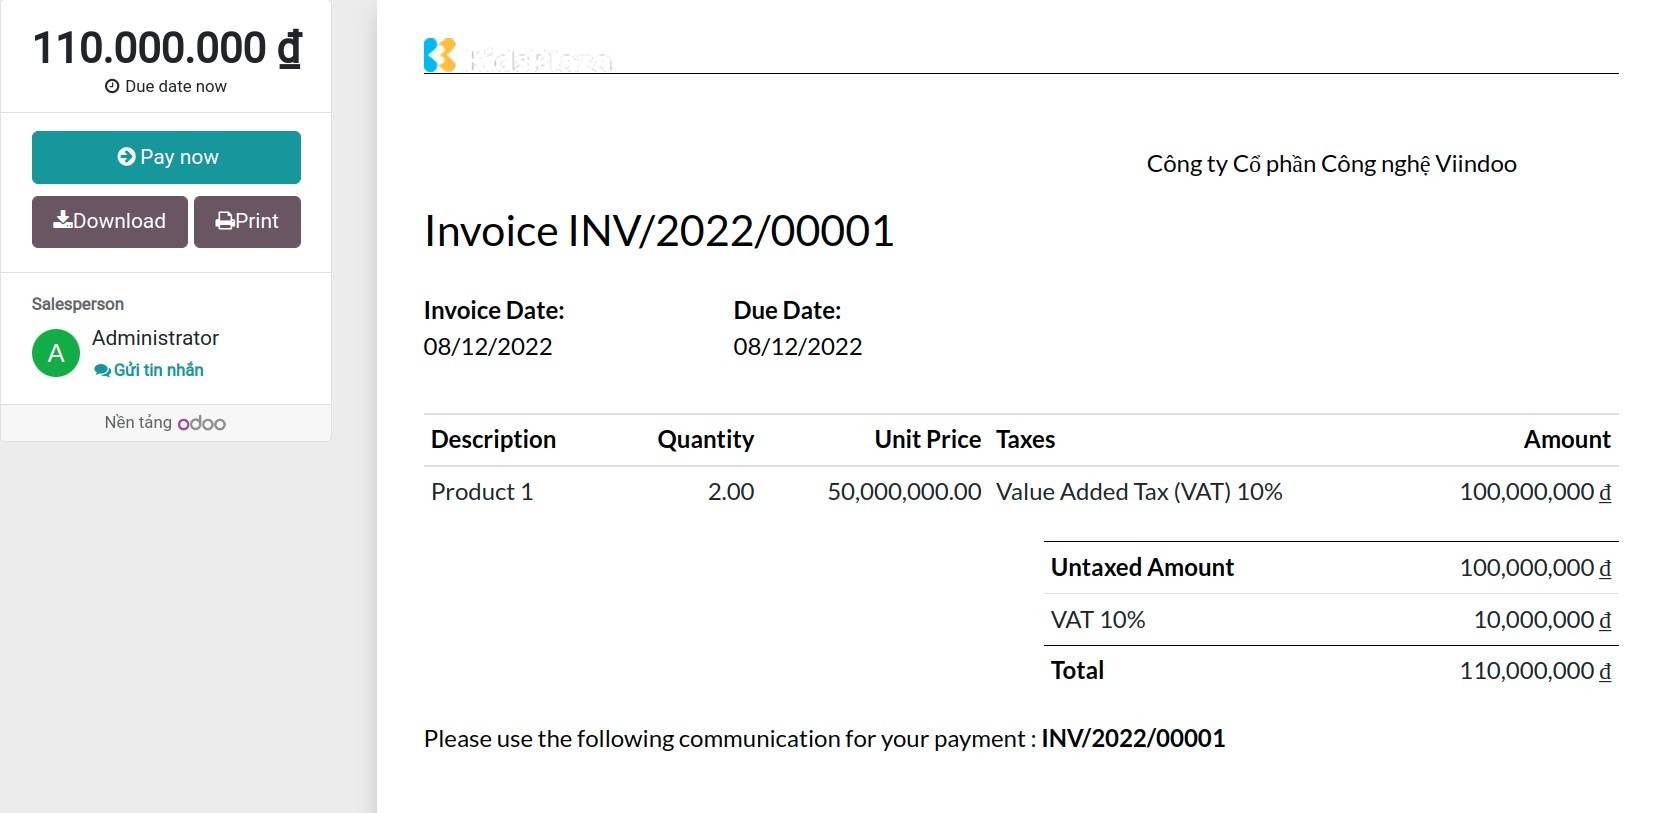
When the customer receives an email with the invoice that you send via email, they can see the invoice content by pressing the View Invoice button on this email:
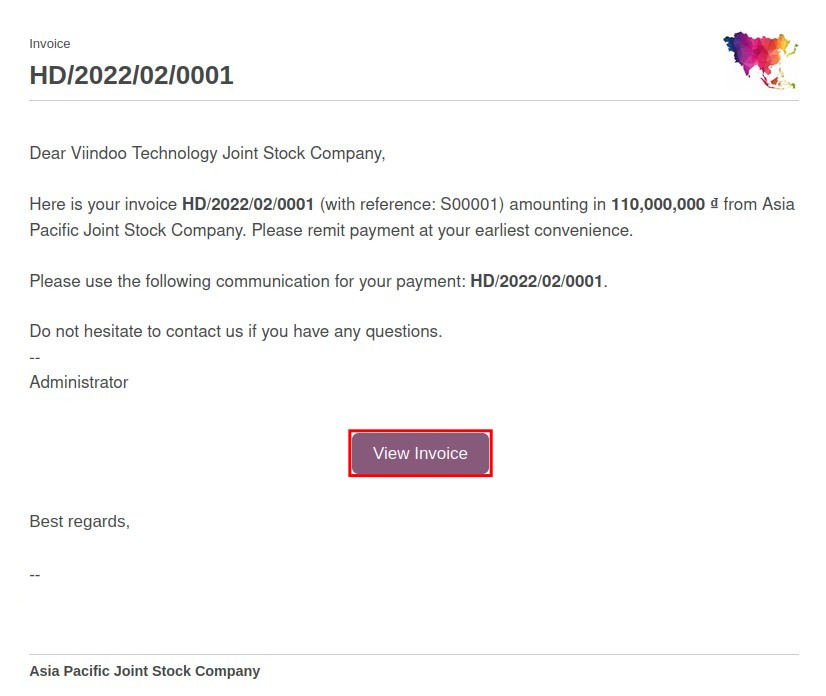
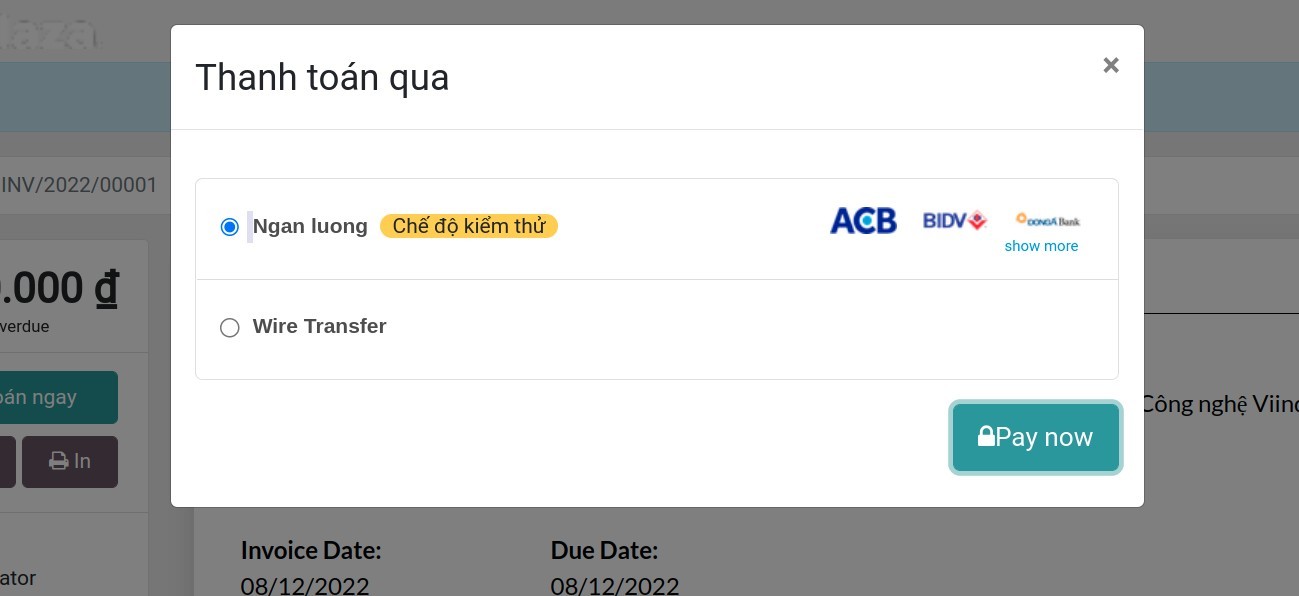
They can process the payment for this invoice accounting with Pay Now:

At this stage, the customer can choose theirs prefer Payment Acquirer such as ZaloPay, VNPAY or bank transfer, etc.
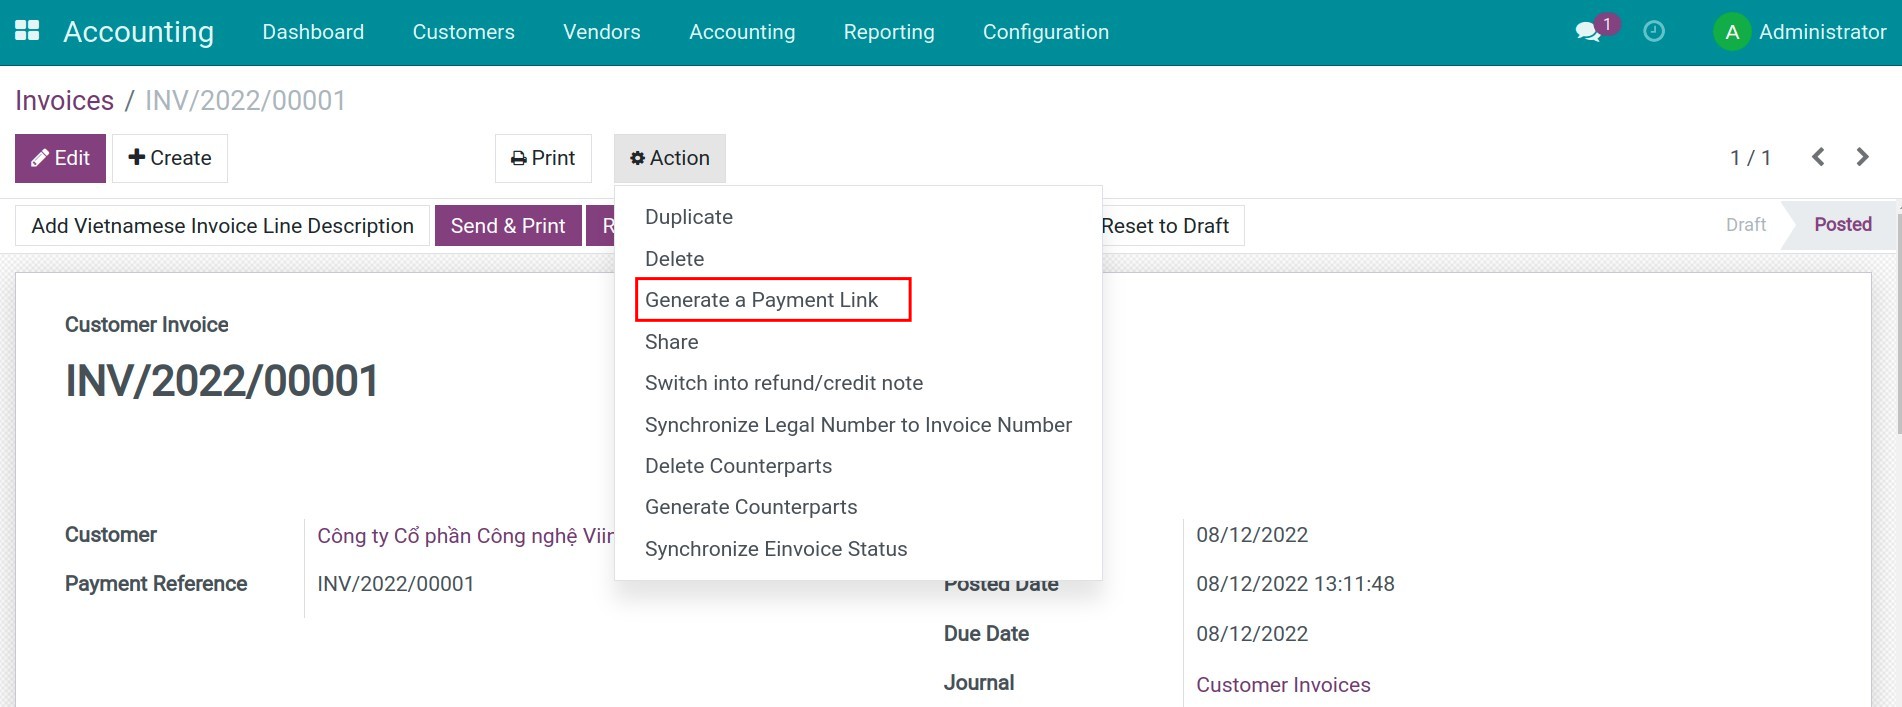
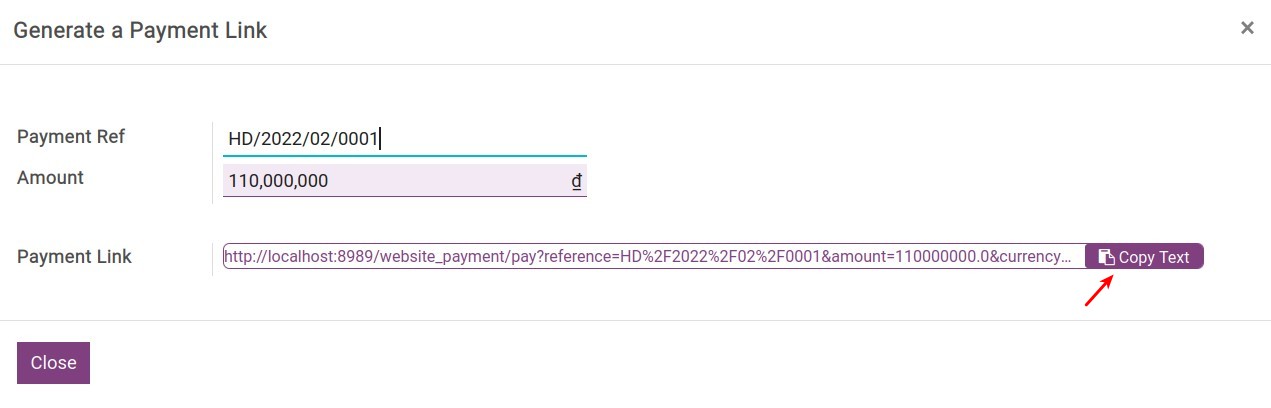
On the other hand, you can also create a payment link right from the Invoice by navigating to Action ‣ Generate a Payment Link:
You can send this payment link to your customer via messages or other communication methods by copying the URL:
Tip
You can also create a payment link by sending an email from a quotation. More details on Activate online payment in Viindoo.
See also
Related article
How to make a payment with Momo
How to make a payment with NganLuong
How to make a payment with Paypal
How to make a payment with Paypal
How to make a payment with Paypal
Requirements
This tutorial requires the installation of the following applications/modules:
Accounting & Finance
Paypal payment acquirer
Paypal - Unsupported currency support
Paypal payment configuration
Currently, Paypal payment is very popular in the world, it helps customers pay for online transactions. iSuite Enterprise Management Software provides an online payment solution to integrate Paypal with the Sales app to make it more convenient for the customers during the payment process.
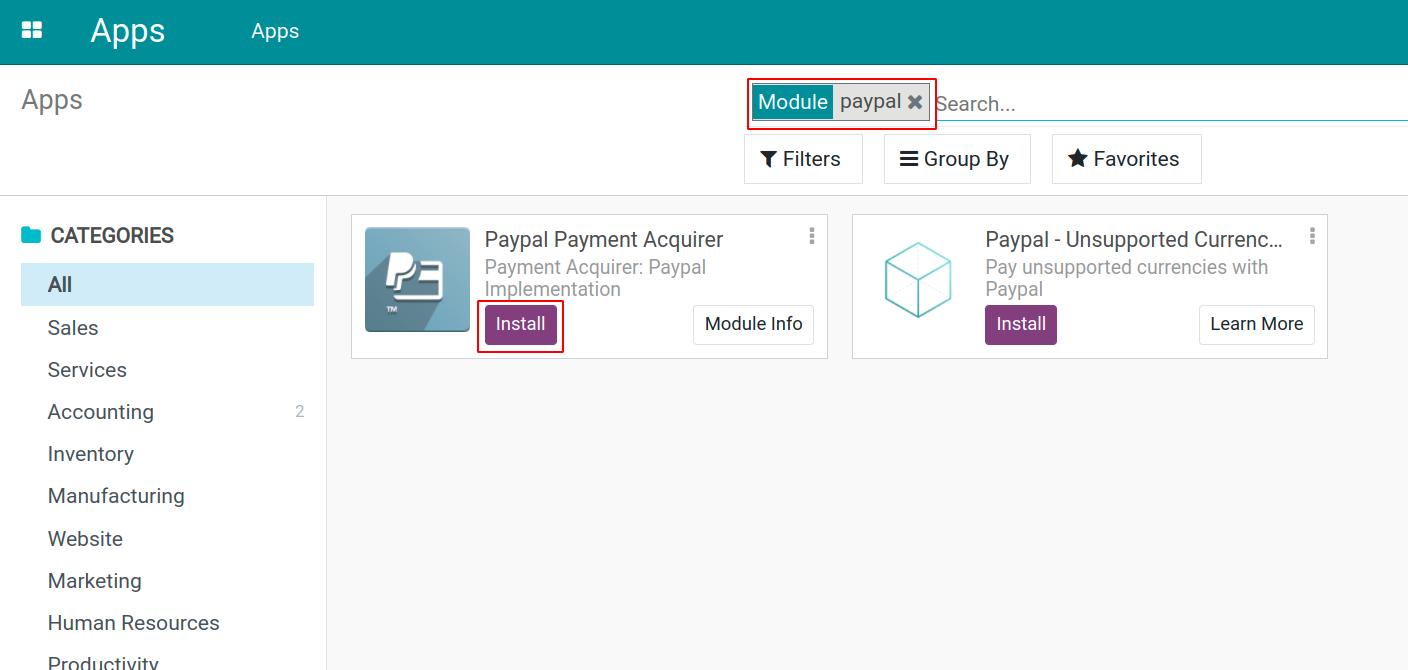
Enter Apps, type and search the Paypal Payment Acquirer using the “paypal” keyword. Select the module and press Install.
If you are using a currency that is not supported by Paypal, you can install the Paypal - Unsupported Currency Support module to change your currency into a currency that is supported by Paypal before sending the payment data to Paypal.
After installing, start setting up the Paypal configuration. Navigate to Accounting > Configuration > Payment Acquirers, select Paypal to set up the confirmation information. In this article, we will use a Sandbox Paypal account and install the Paypal - Unsupported Currency Support module to proceed with the payment.
Note
You need to create a seller, buyer account on Paypal before configuring on the Viindoo system.
At the Paypal payment configuration view, select a state:
Disable: Select if you don’t want to use Paypal for online payment.
Enable: Activate for using on the real enviroment.
Test Mode: Test before moving into the real enviroment
Warning
If you use Paypal in a test mode and use a Paypal Sandbox account, change the state to Test mode. You can activate on test data before moving to your real data.
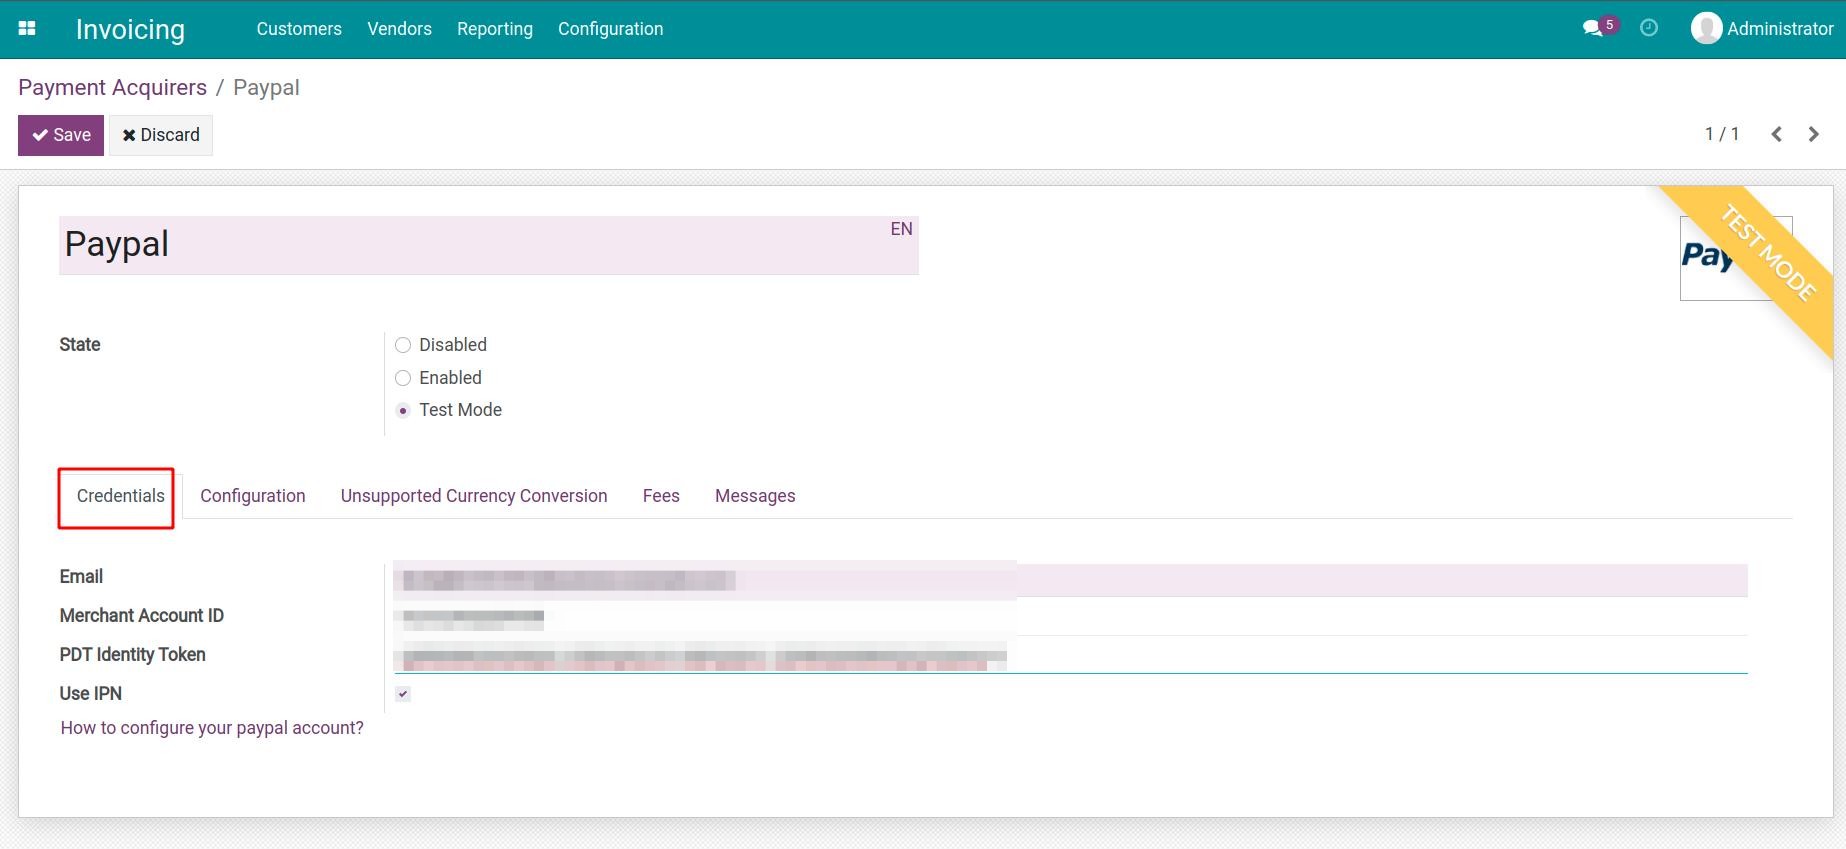
At the Credentials tab, enter the confirmation information:
Email: The seller’s Paypal-registed email address.
Merchant Account ID: Paypal will provide you this information when you register an account.
PDT Identity Token: Allow you to receive a successful payment notification after the payment is made.
Use IPN: If enabled, the payment transaction’s status is updated automatically according to the messages receiving from Paypal.
After fulfil the information, press Save to finish the setup.
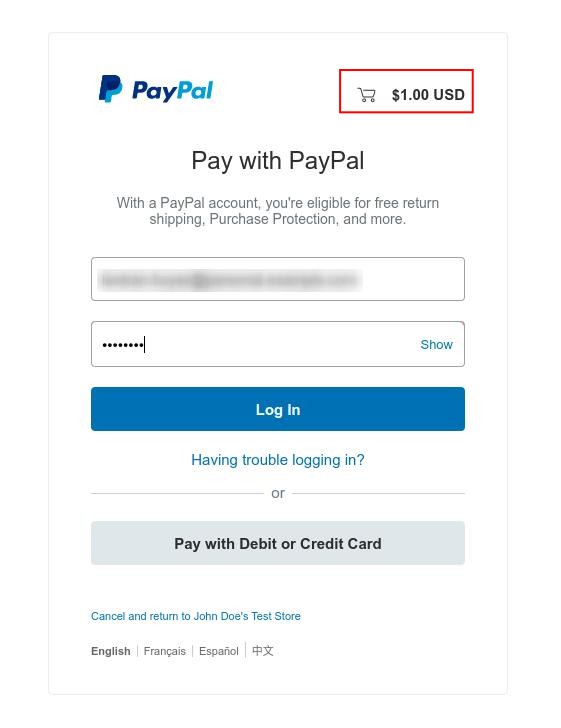
Pay with Paypal
Suppose you are a customer on an E-commerce website using the Paypal payment with the above setting.
When you make an order. On the payment view, select the Paypal payment and press Pay Now.
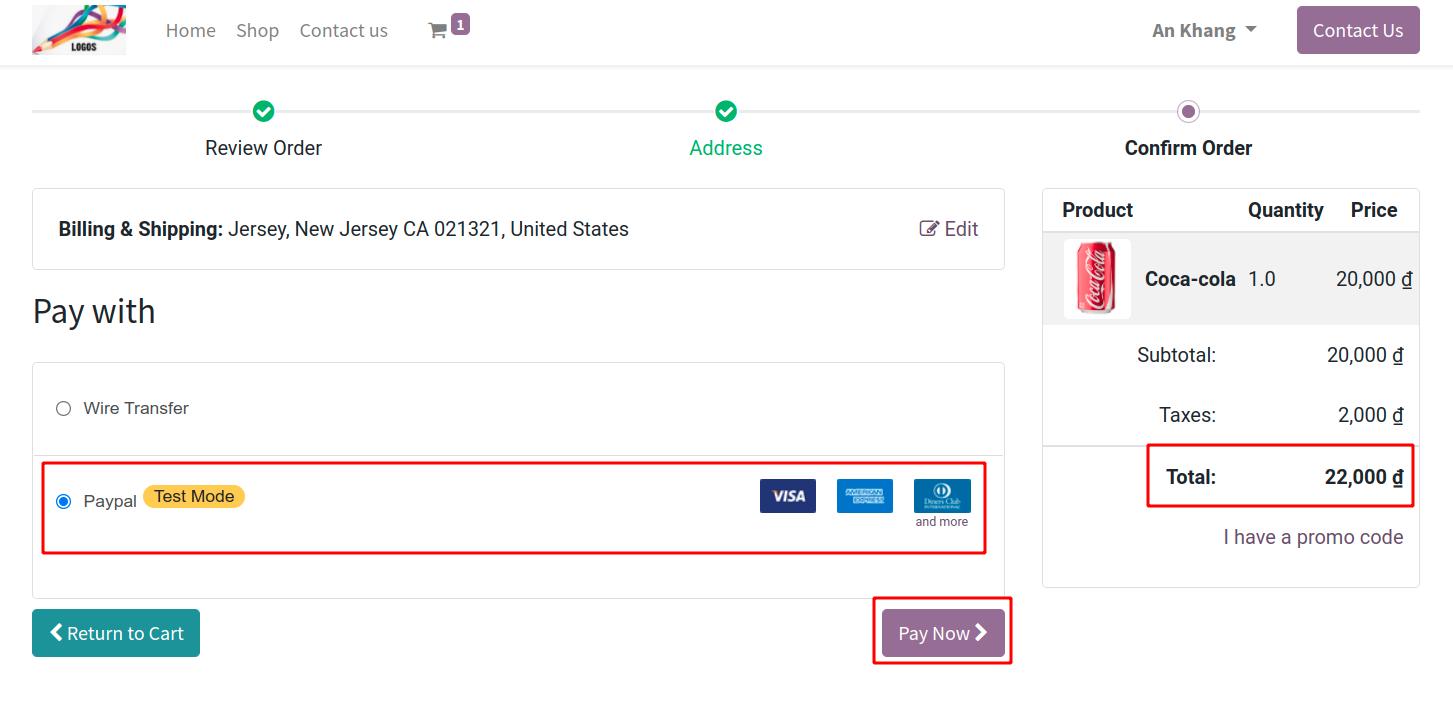
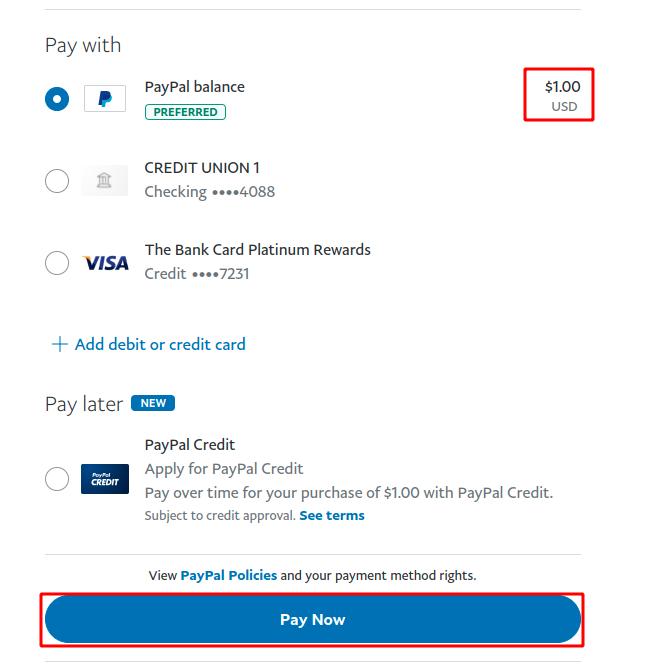
The system will navigate to the Paypal page so you can proceed with the payment. Log in to your Paypal account and proceed with the payment.
If the currency used on the E-commerce page is not supported by Paypal, the system will auto-exchange the payment amount to a supported currency. For example, exchange VND to USD with the rate: 1 USD = 22.000 VND.
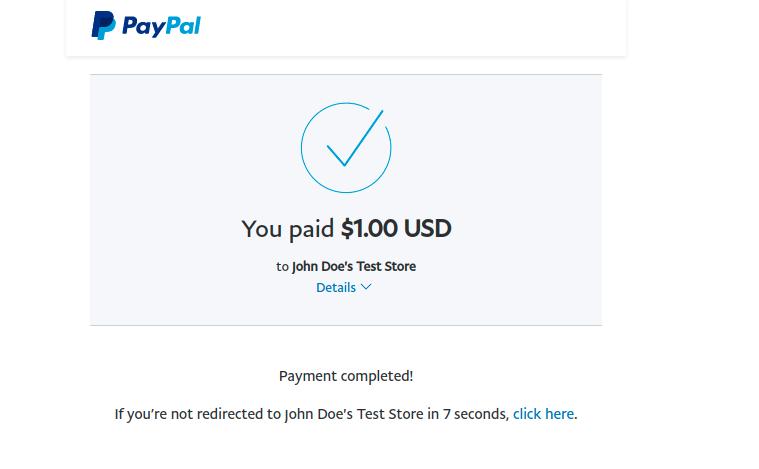
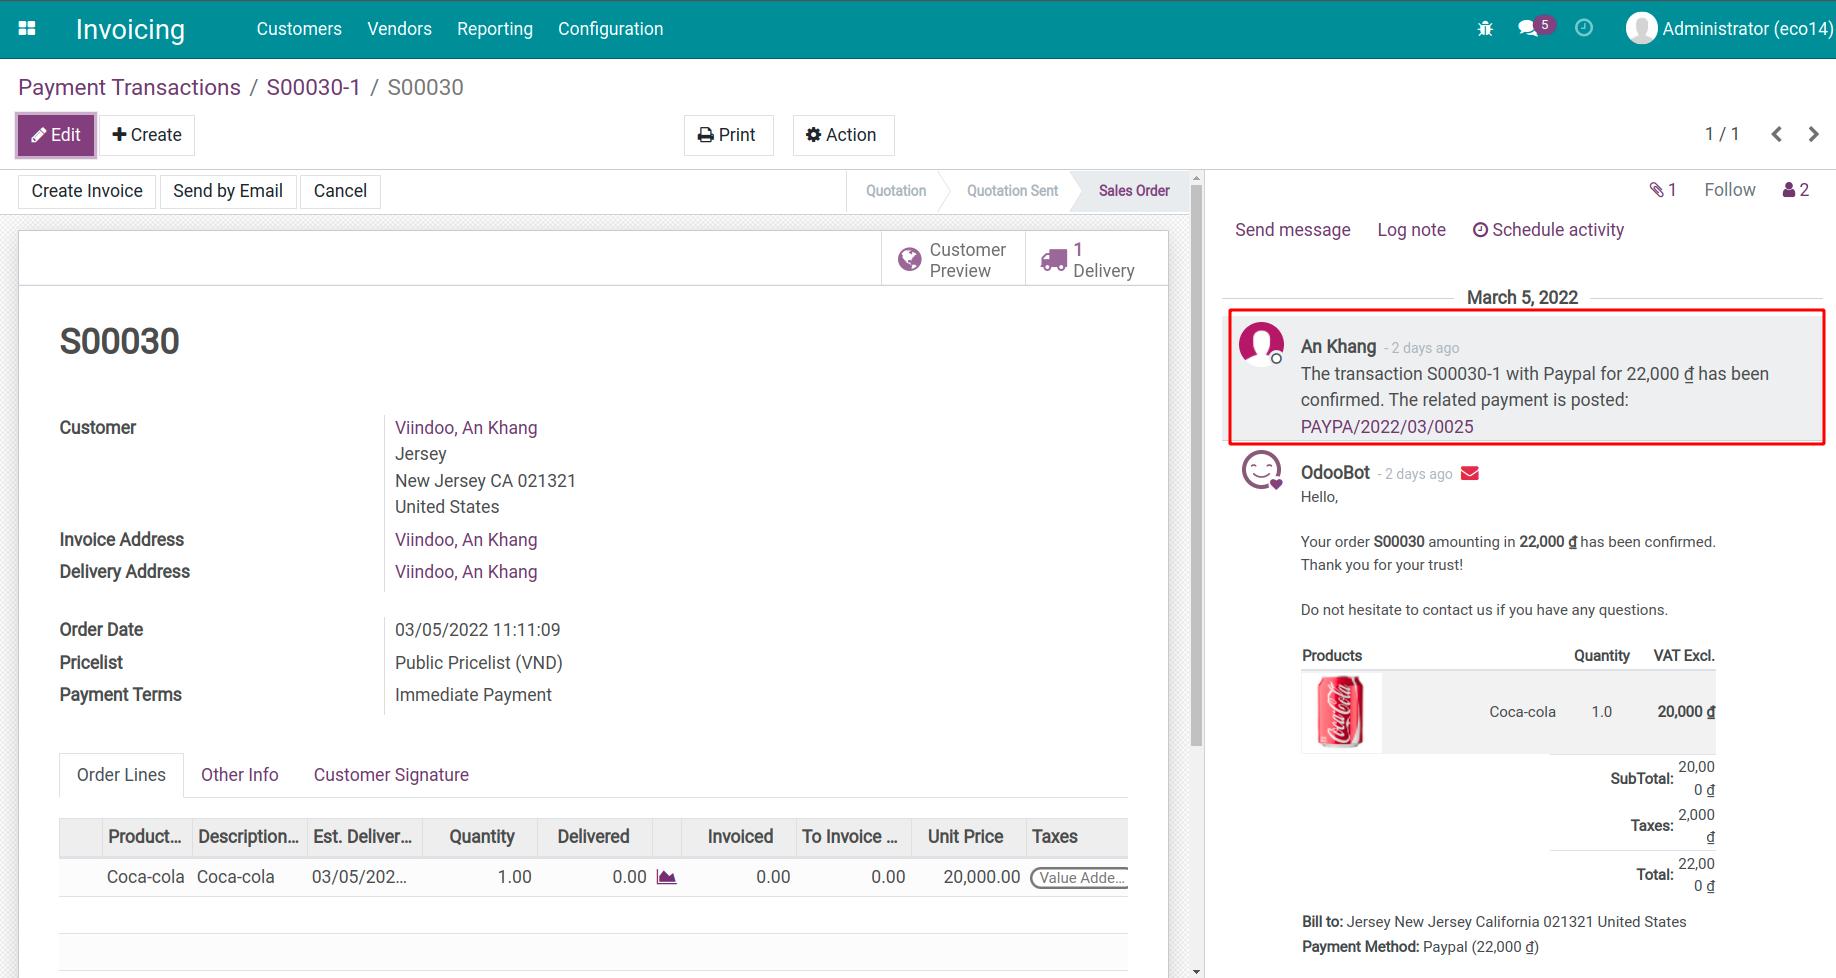
After finishing the Paypal payment, the system will navigate you back to the E-commerce site where you made the order to confirm the payment.
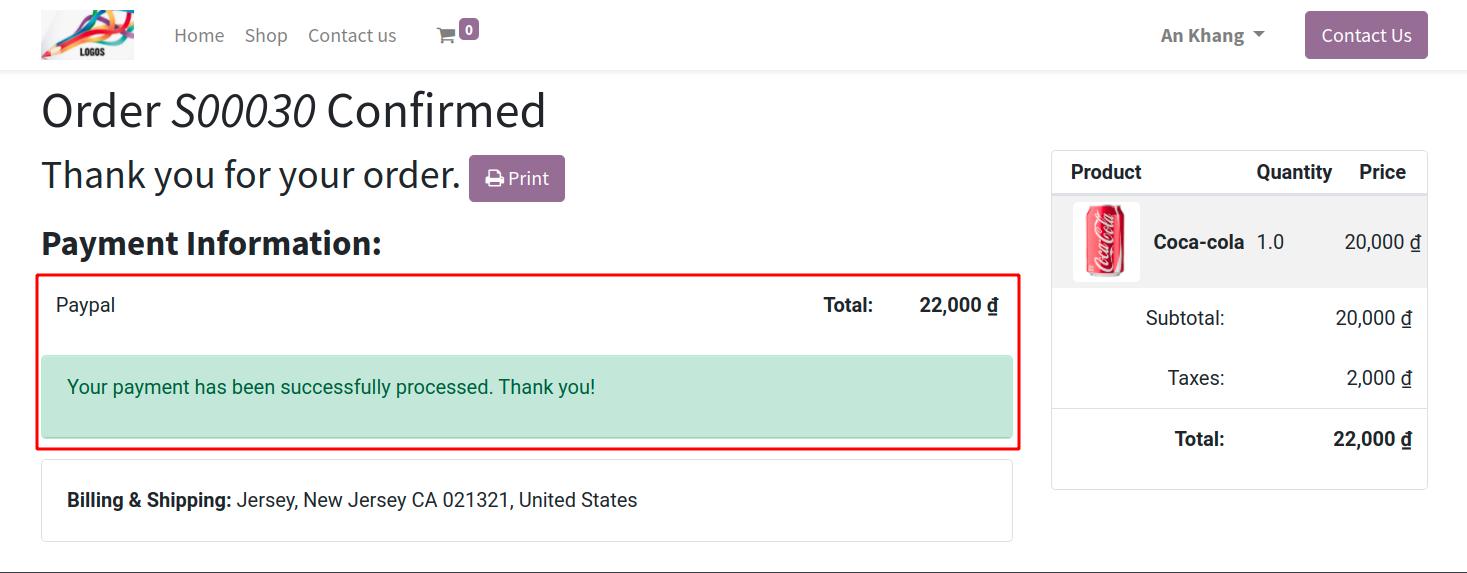
The seller’s system will also record your transaction at Accounting > Configuration > Payment Transactions.
Note
To see this menu, you need to activate the developer mode.
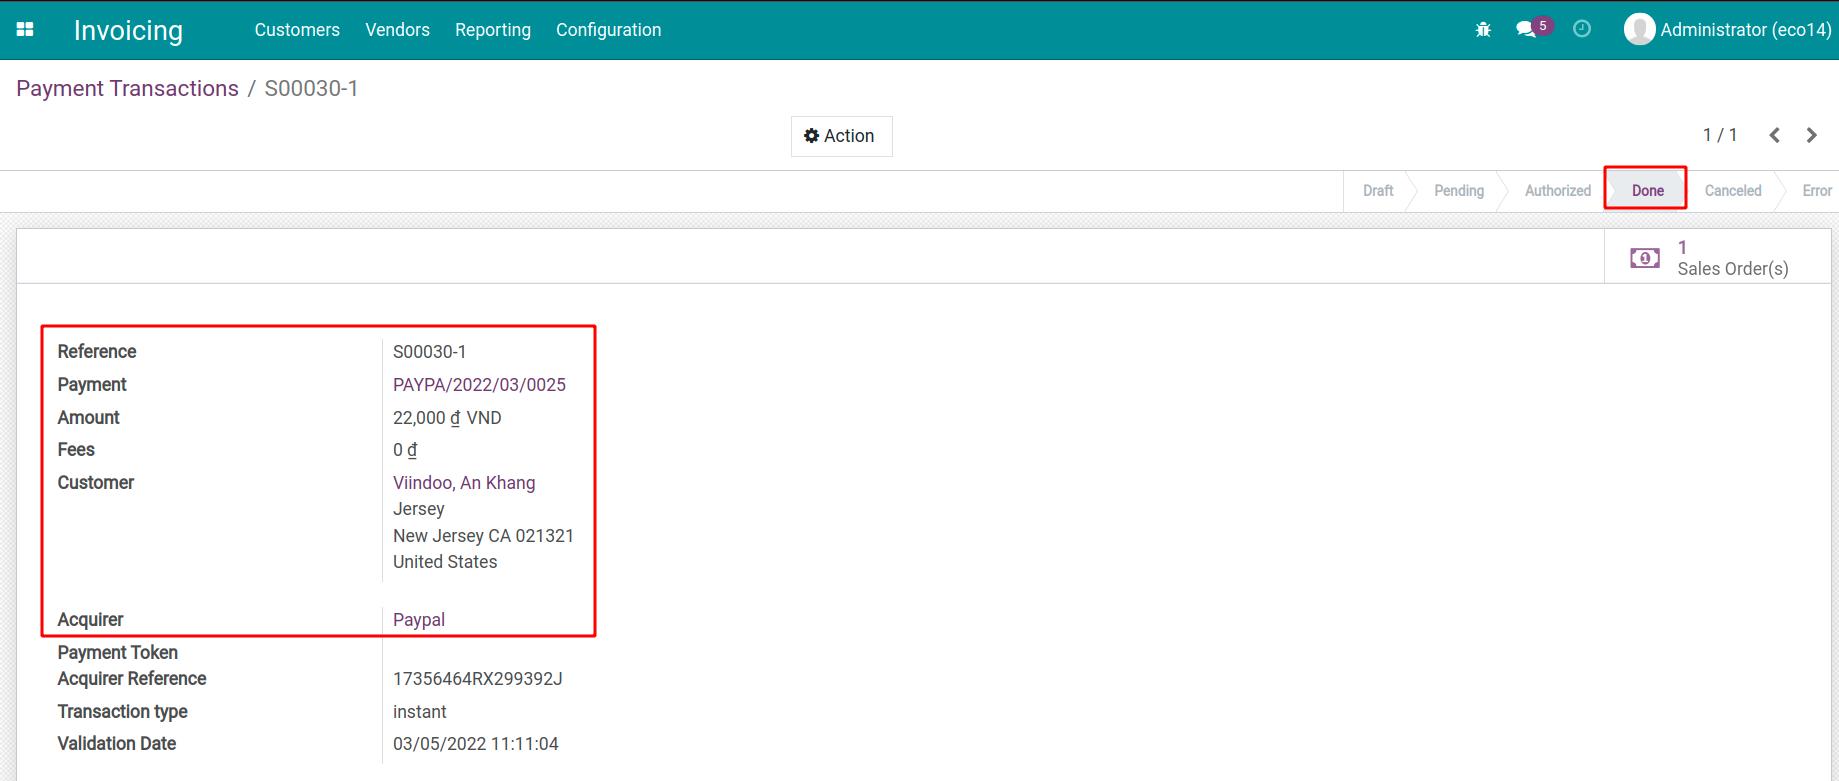
The order detail will also appear on the payment history.
Tip
With the above steps, you can also pay with Paypal in case the invoice is sent by the seller.
See also
Related article
How to make a payment with VNPay
How to make a payment with Zalopay
Process of vendor invoicing, payment and reconciliation
Process of vendor invoicing, payment and reconciliation
Each vendor has its own pricing, invoicing, and payment policies. With the iSuite system, you can not only set up various purchasing prices from different vendors but also proceed with the payment more effectively (not too late or too soon from the payment deadline). Besides, the iSuite Accounting app also provides tools that help you keep track of the Aged payables to the vendor.
Requirements
This tutorial requires the installation of the following applications/modules:
iSuite Invoicing
iSuite Accounting & Finance
Create a Vendor bill
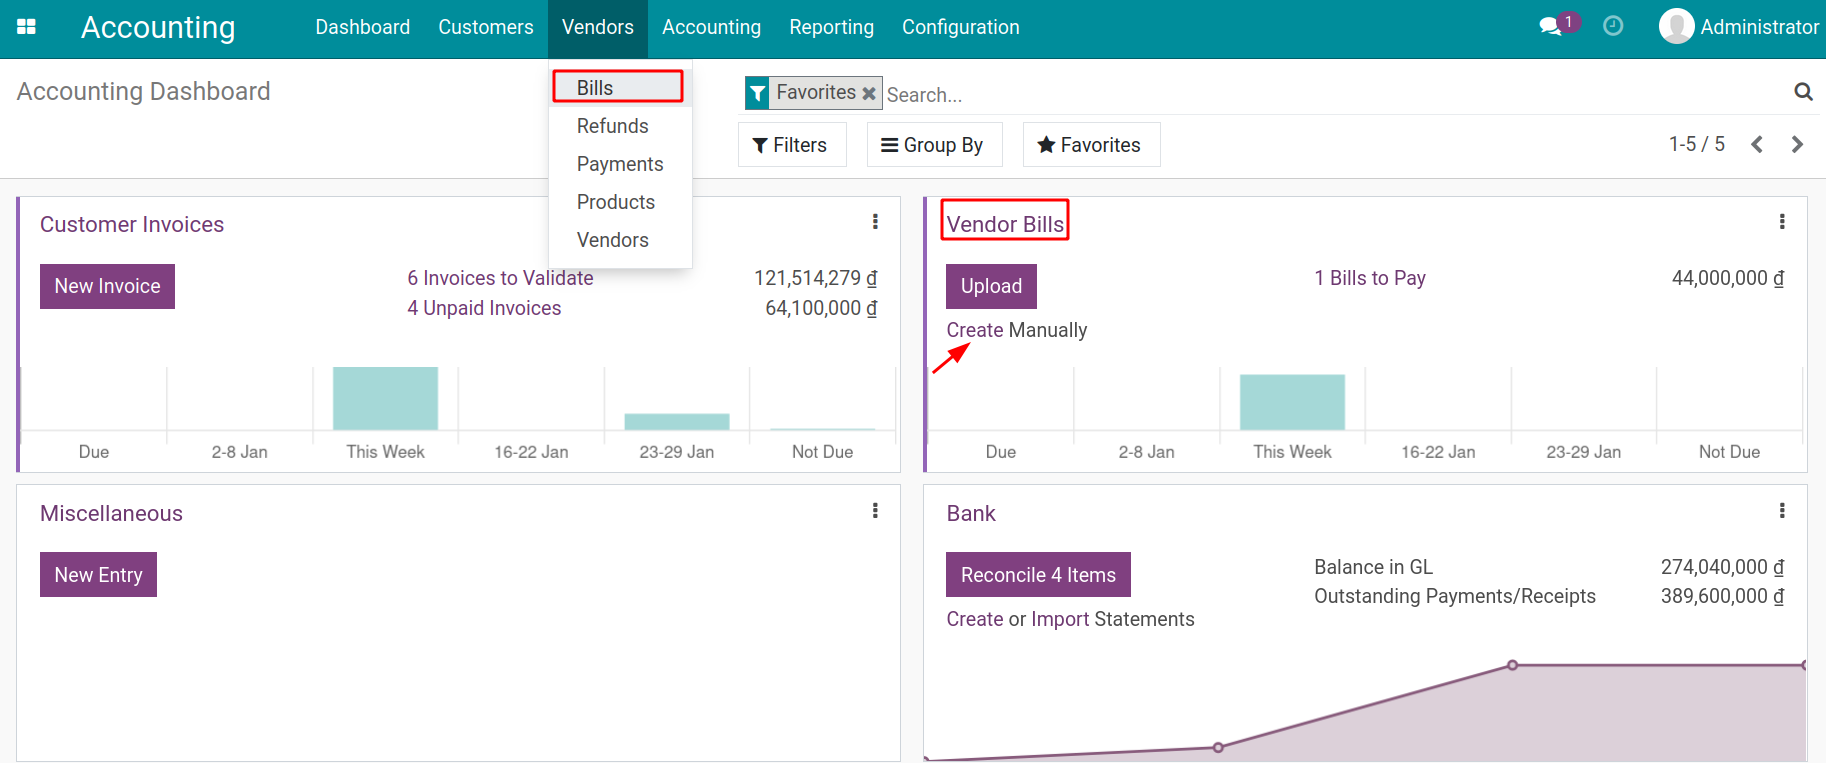
When receiving a vendor bill, you can record this data by accessing Accounting ‣ Vendors ‣ Bills or go directly from Dashboard ‣ Vendor Bills ‣ Create Manually. For more details, you can also read the article How to create and manage vendor bills.
Confirm Vendor bill
When a bill is confirmed, all the journal entries related to that bill will be posted. To view the Journal Items, select the Journal Items tab:
Then, you can check the reports on Profit and Loss , Balance Sheet , and Trial Balance to see how these journal items affect the accounting data.
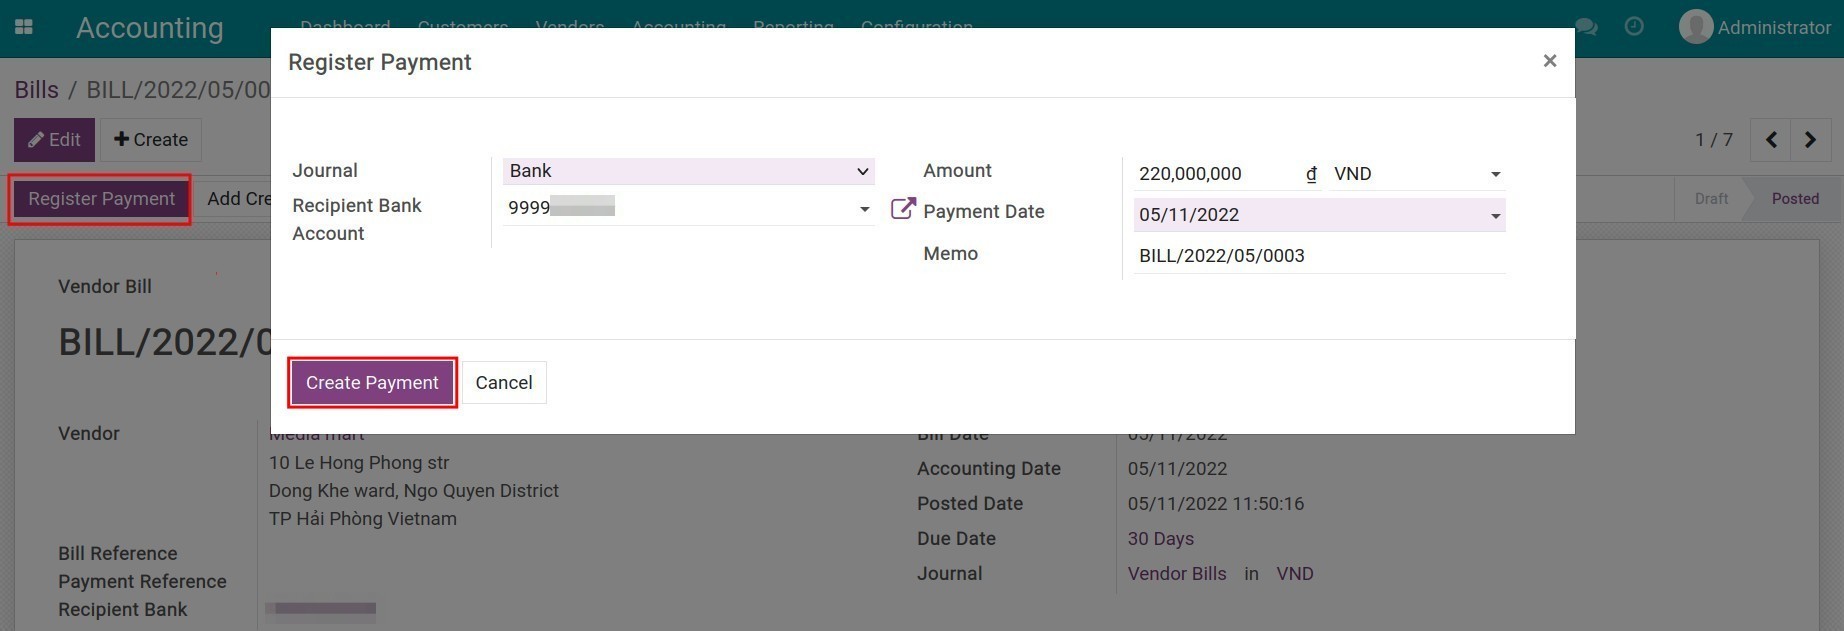
Create Payment
You can create a payment directly on the bill by clicking on Register Payment:
See also
How to record customer payments
Register bank statement & payment reconciliation
With Viindoo, you can register bank reconciliation manually or import them in bulk from CSV or RJE files.
Once everything is done, you can reconcile the amount of money received from payments with this bank statement:
Accounts Payable Reports
To keep track of payable and payment due of vendors, you can check the Partner Ledger report or the Aged payable report by navigating to Accounting ‣ Reporting ‣ Partner Ledger or Accounting ‣ Reporting ‣ Aged Payable:
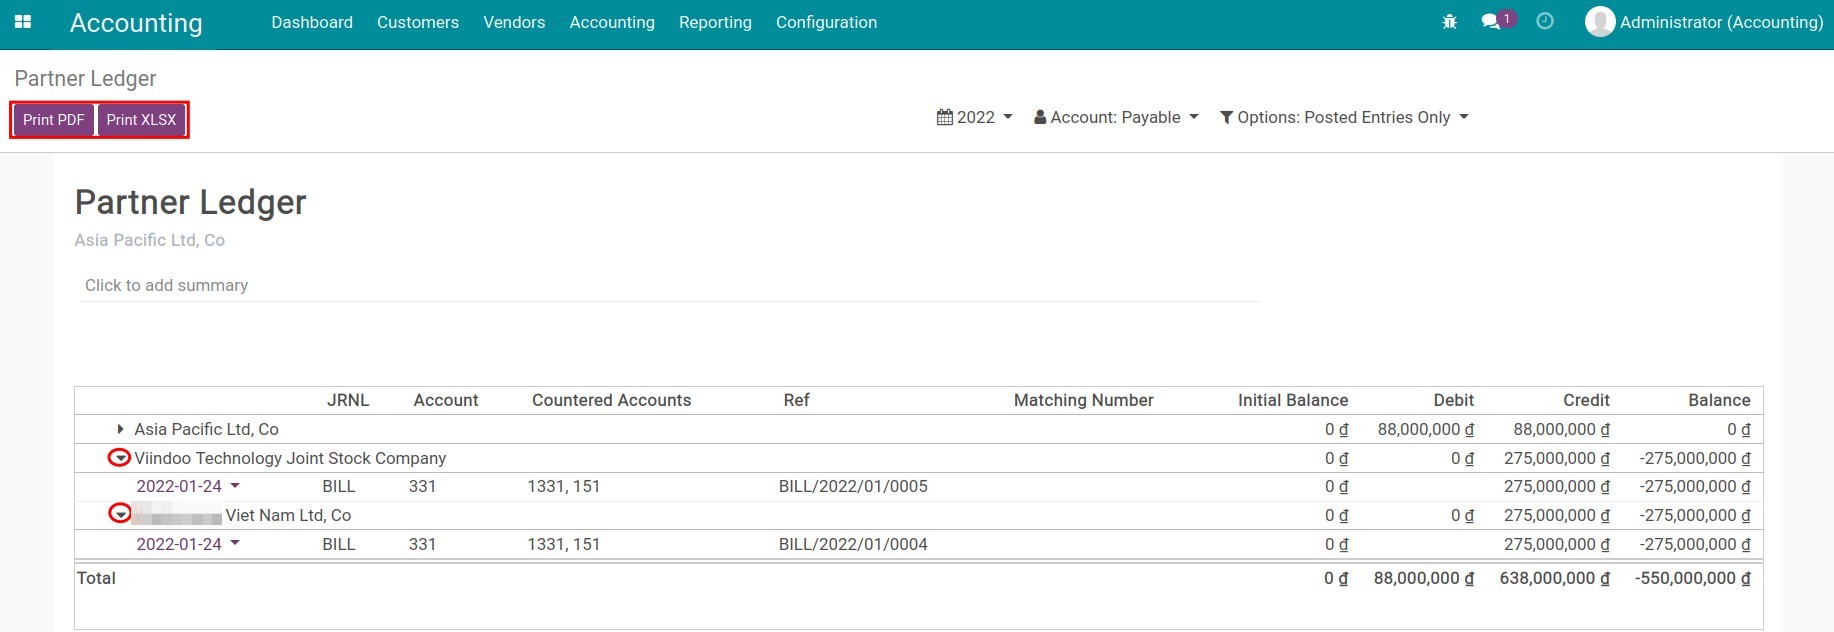
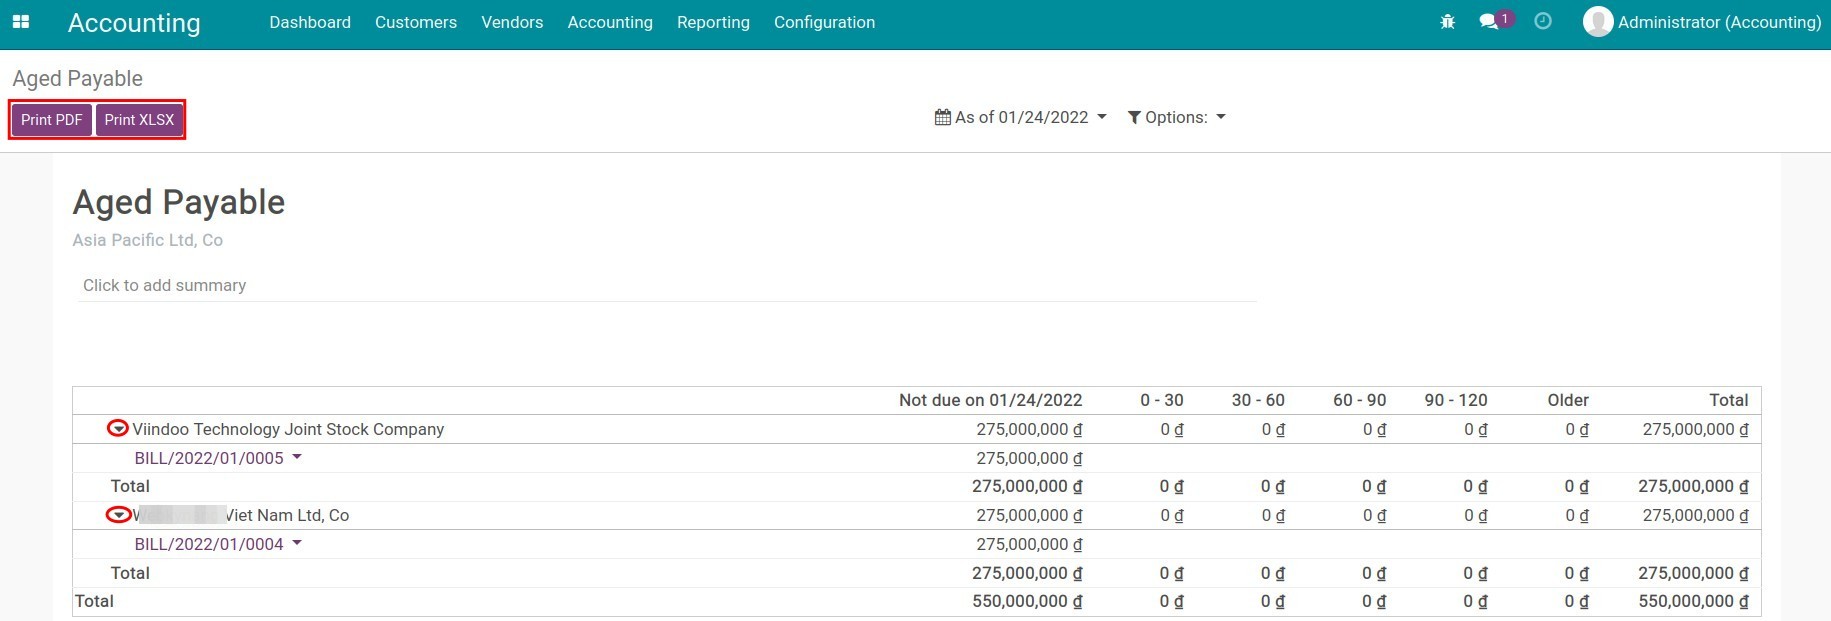
On each report, you can select the vendor name to see the journal items attack to the vendor’s payable. You can also print the reports in PDF or Excel to serve your work.
See also
Related Article
How to create Purchase Receipts
Vendor Bills Management
Vendor Bills Management
Vendor bills management in the iSuite Accounting app is integrated and linked to the Purchase app (in case this app is already installed) or can also be used independently. Therefore, the feature is accessible from both the Purchase and Accounting modules.
Requirements
This tutorial requires the installation of the following applications/modules:
iSuite Invoicing
iSuite Accounting & Finance
iSuite Purchase
Manage Vendor bills in the Purchase app
Vendor bills created from a purchase order will inherit all the data such as product, price list, tax, payment terms, etc. of the original purchase order. For more information, have a look at the How to create vendor bills from purchase order article.
Manage Vendor Bills in the Accounting app
You can create a vendor bill by navigating to Accounting ‣ Vendors ‣ Bills ‣ Create or from Dashboard ‣ Vendor Bills ‣ Create Manually:
A bill view with all the details is shown below:
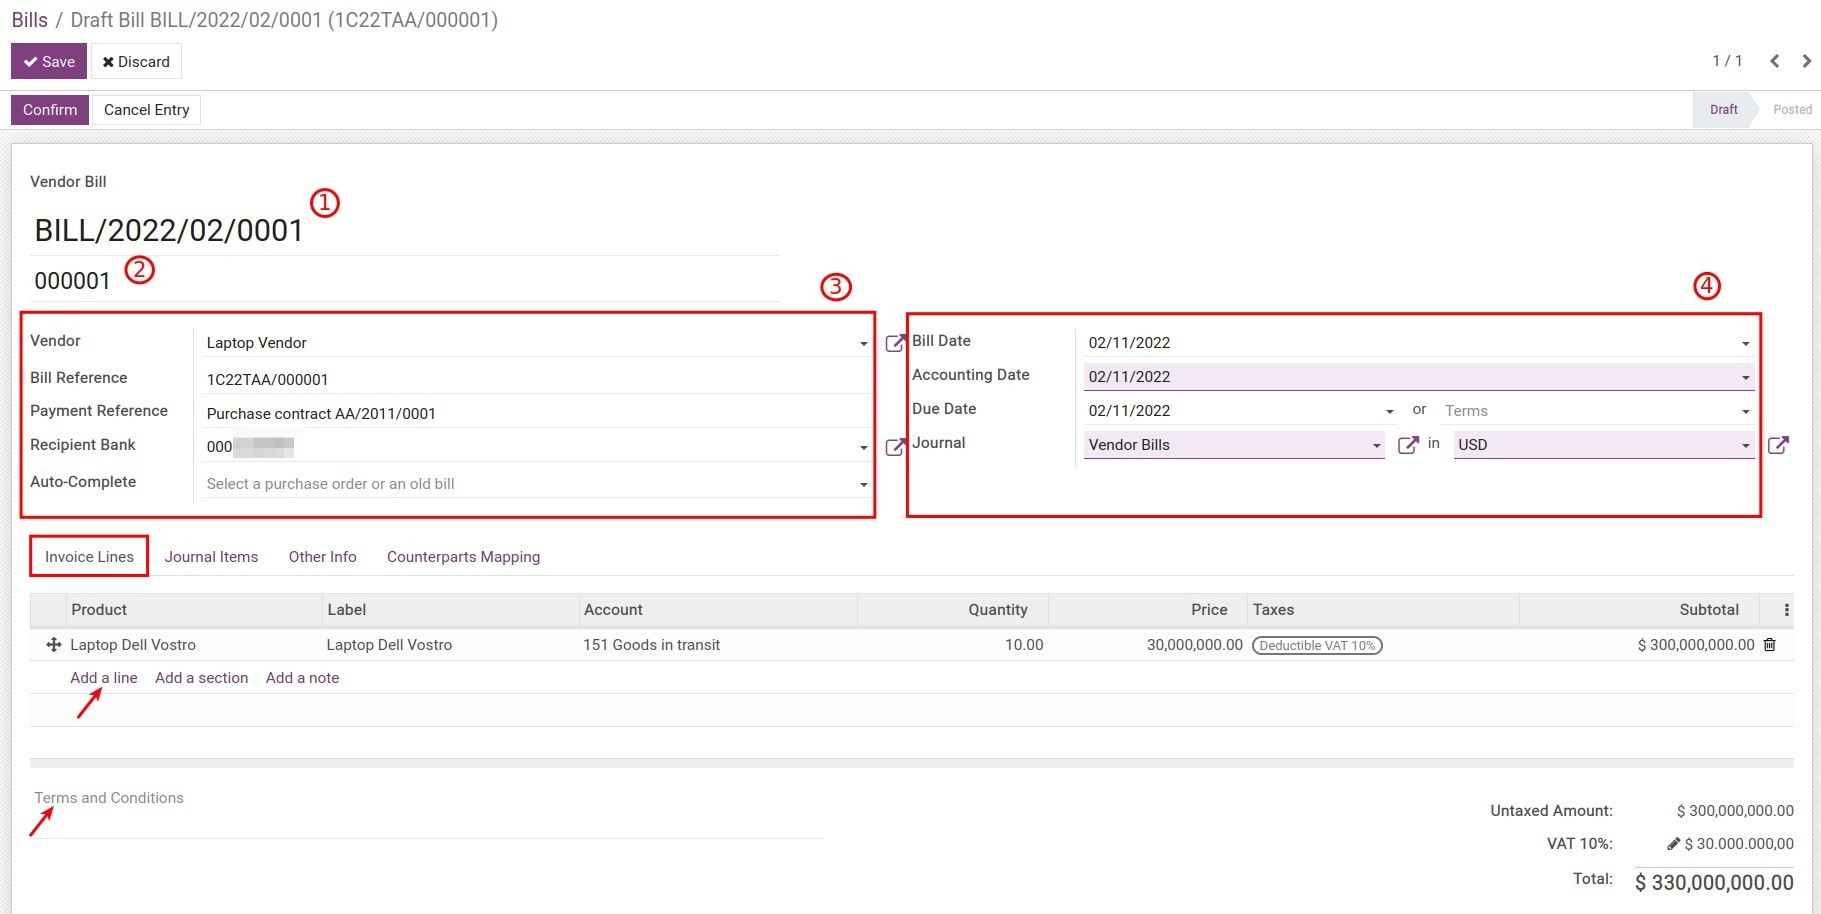
In which:
Vendor bill number is automatically created by the system;
Legal Number: The VAT number used for legal invoice identification purposes.
Vendor information:
- Vendor: Choose one from your Vendor list.
Bill Reference: Add the serial of the VAT number.
Payment Reference: The payment reference shown on the label of the account payable on the General Ledger, Account Detail Sheet, etc.
Recipient Bank: The vendor bank account number configured on the contact.
Auto-Complete: Select a purchase order or an old bill of the same vendor if you want to use the details of the previous bill on the current one.
Bill date information:
- Bill Date: The real bill date.
Accounting Date: The date when this bill is recorded in a journal.
Due Date: The payment date or choose a Payment term.
Journal: Choose a journal to record this vendor bill.
Currency (available if the Multi-currencies feature is activated).
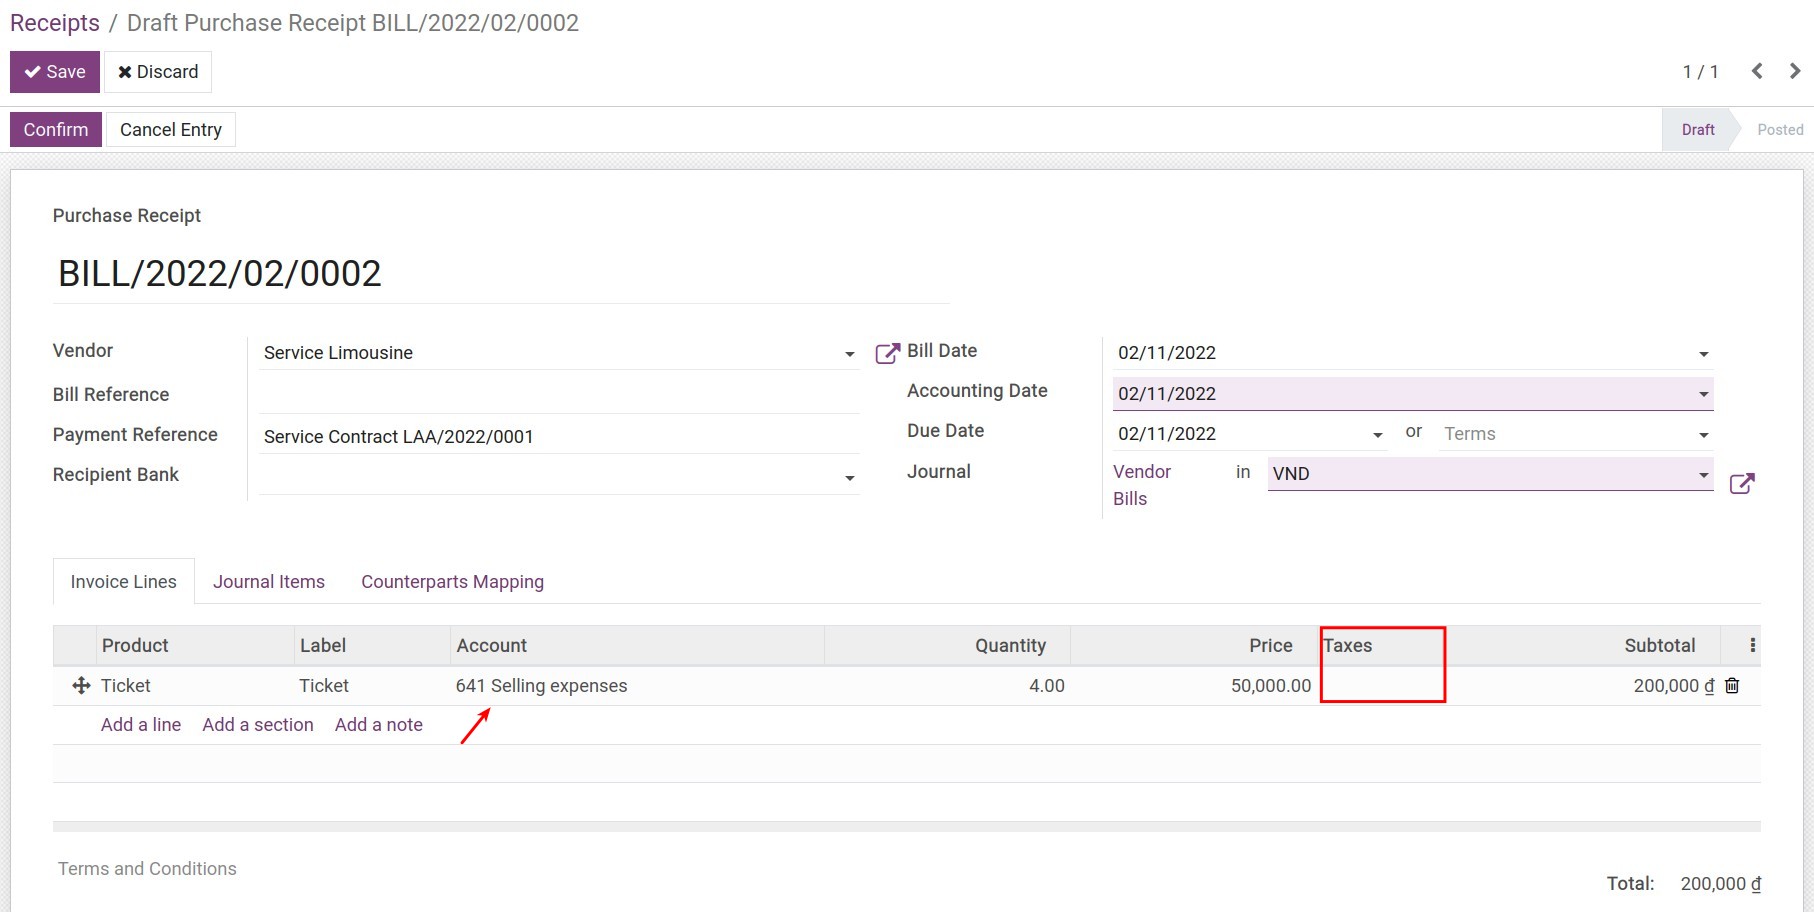
Invoice Lines tab: Record details about products provided by the Vendor:
Press on Add a line to choose:
- Product: Choose one from the products, services list or you can create a new one.
Account: The account where the vendor bill is recorded once confirmed. (See more on Configure account on Product categories.)
Quantity: The quantity of the product/service.
UoM: The Purchase Unit of Measure of the product/service.
Price: Price of the product/service.
Taxes: Taxes applied on this bill. You can choose from the list of existing taxes.
Subtotal: Total value of the bill line before taxes.
Purchase Order: Information of the related purchase order if this bill is created from the purchase order view. Press on the purchase order to see detailed information.

When the price list of the products/services and taxes are applied, the untaxed amount, taxes amount, and the total value of the bill will be automatically calculated.
Besides, you can also record other terms such as delivery, storage, etc. in Terms and Conditions.
Journal Items tab: See all the journal items created from the bill:

Other Info tab: Other accounting information:
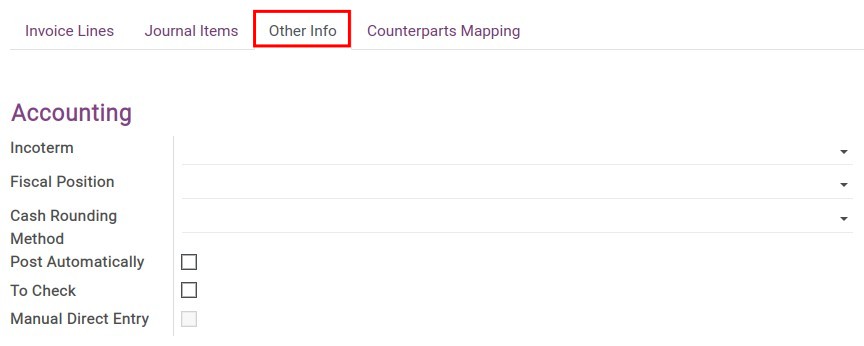
- Incoterm: Choose one of the Incoterm if this is an importation bill.
Fiscal Position: Select the fiscal position applied for this vendor’s bill.
Cash Rounding Method: Select the configured rounding method. This option shows only when you activate the Cash Rounding feature. Find more details in the Configure Cash Rounding method article.
Post Automatically: Once activated, the bill will be automatically recorded on the accounting date.
To Check: In case you are not sure about the information on the bill, you can activate this feature to mark it for a later check-up.
Manual Direct Entry: If you duplicate a journal entry of vendor bill from Accounting ‣ Accounting ‣ Journal Entries then this field is automatically activated.
Counterparts Mapping tab:
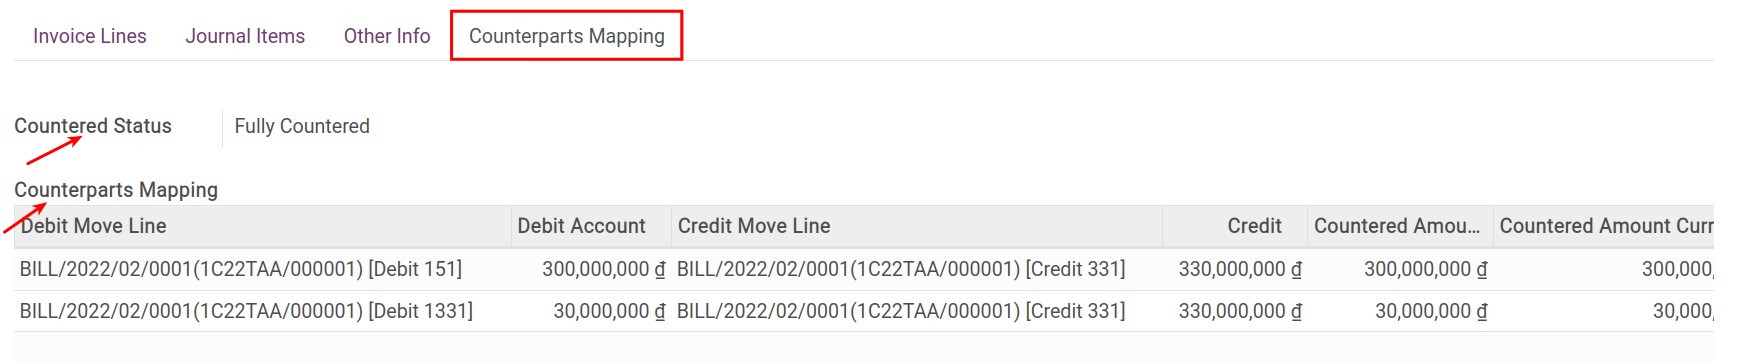
- Provide information about counterparts of accounts in the vendor journal entries to get data on the targets in future reports.
Countered Status: This is the state of the counterpart status of this journal entry. When the invoice is confirmed, the system automatically generates the counterparts and the countered status is Fully Countered.
See also
Related Article
How to create Purchase Receipts
Prepaid expense management
How to create Purchase Receipts
How to create Purchase Receipts
Purchase Receipts is a document confirming the completion of payment and delivery of the Supplier’s products/services.
Requirements
This tutorial requires the installation of the following applications/modules:
iSuite Invoicing
iSuite Accounting & Finance
iSuite Purchase
Purchase Receipt from purchase order
Configure the Purchase Receipts feature
To use this feature on the Accounting application in Viindoo, you need to install the Purchase Receipt module by going to Apps and then using Filter to search for the Purchase Receipts (to_purchase_receipt) module. Click Install to install the module.
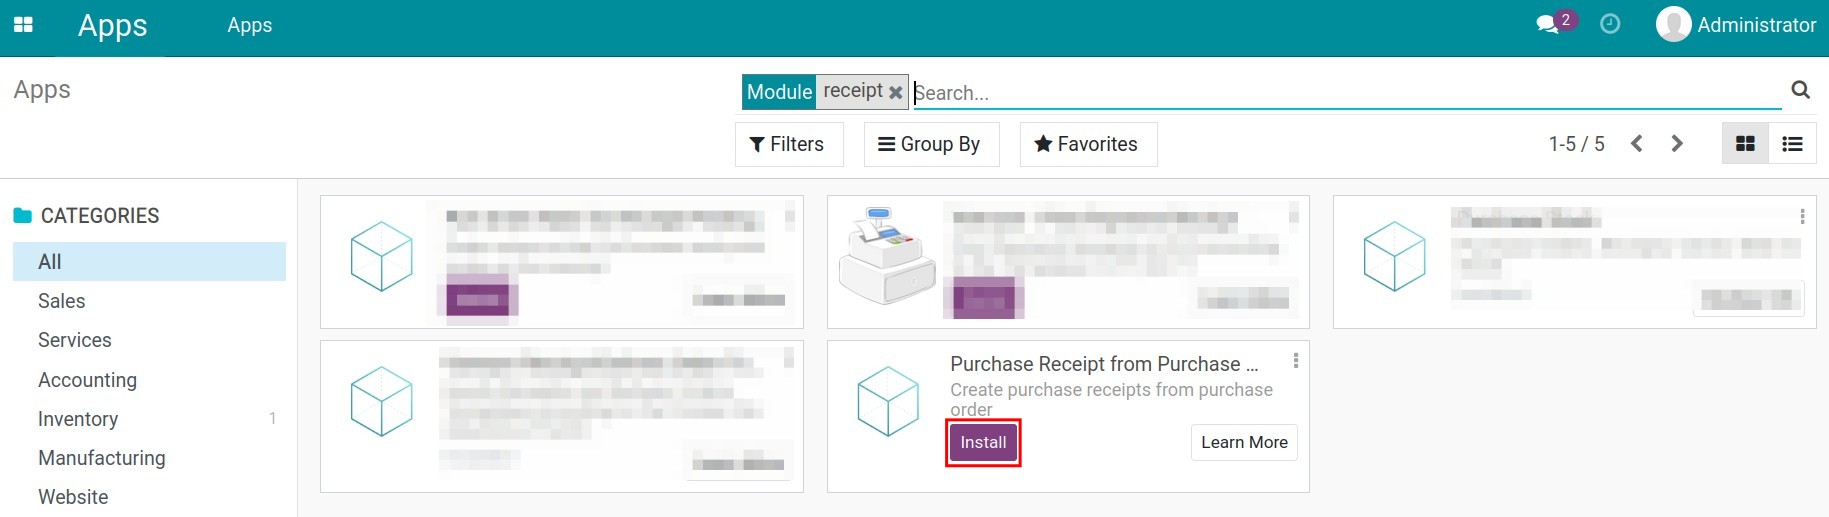
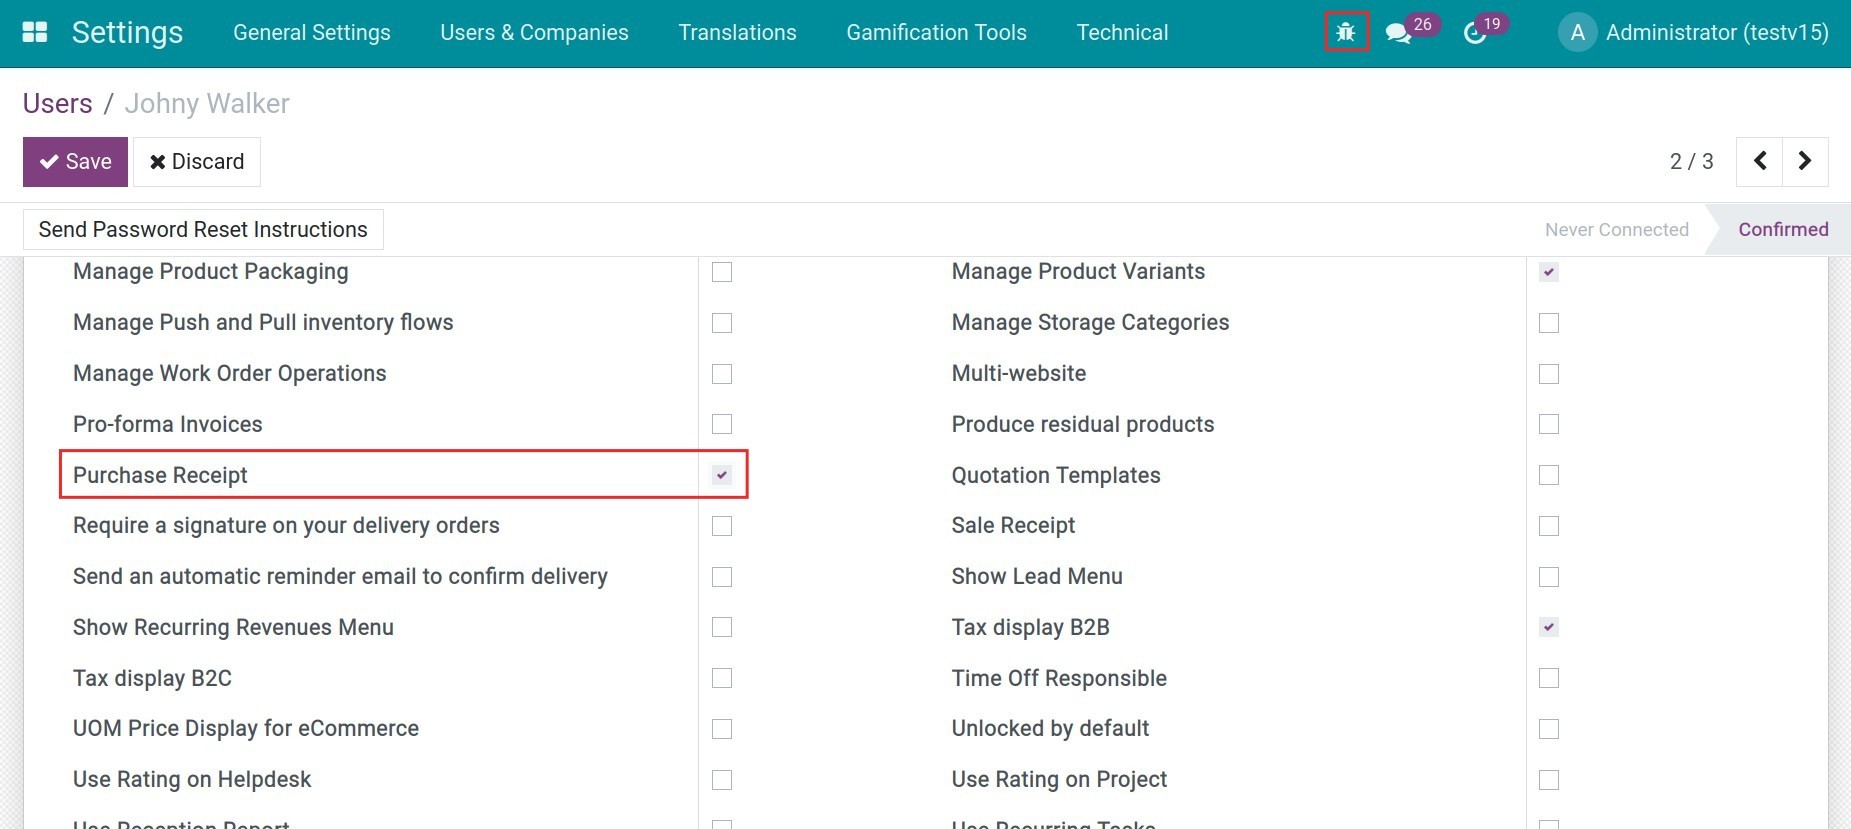
After installing the module, you need to configure the advanced access right for accountant by navigating to Settings ‣ Users & Companies ‣ Users, activate the developer mode and choose Purchase Receipt:
Next, after confirming the purchase order, you will see a Create Receipt button next to the Create Bill one:
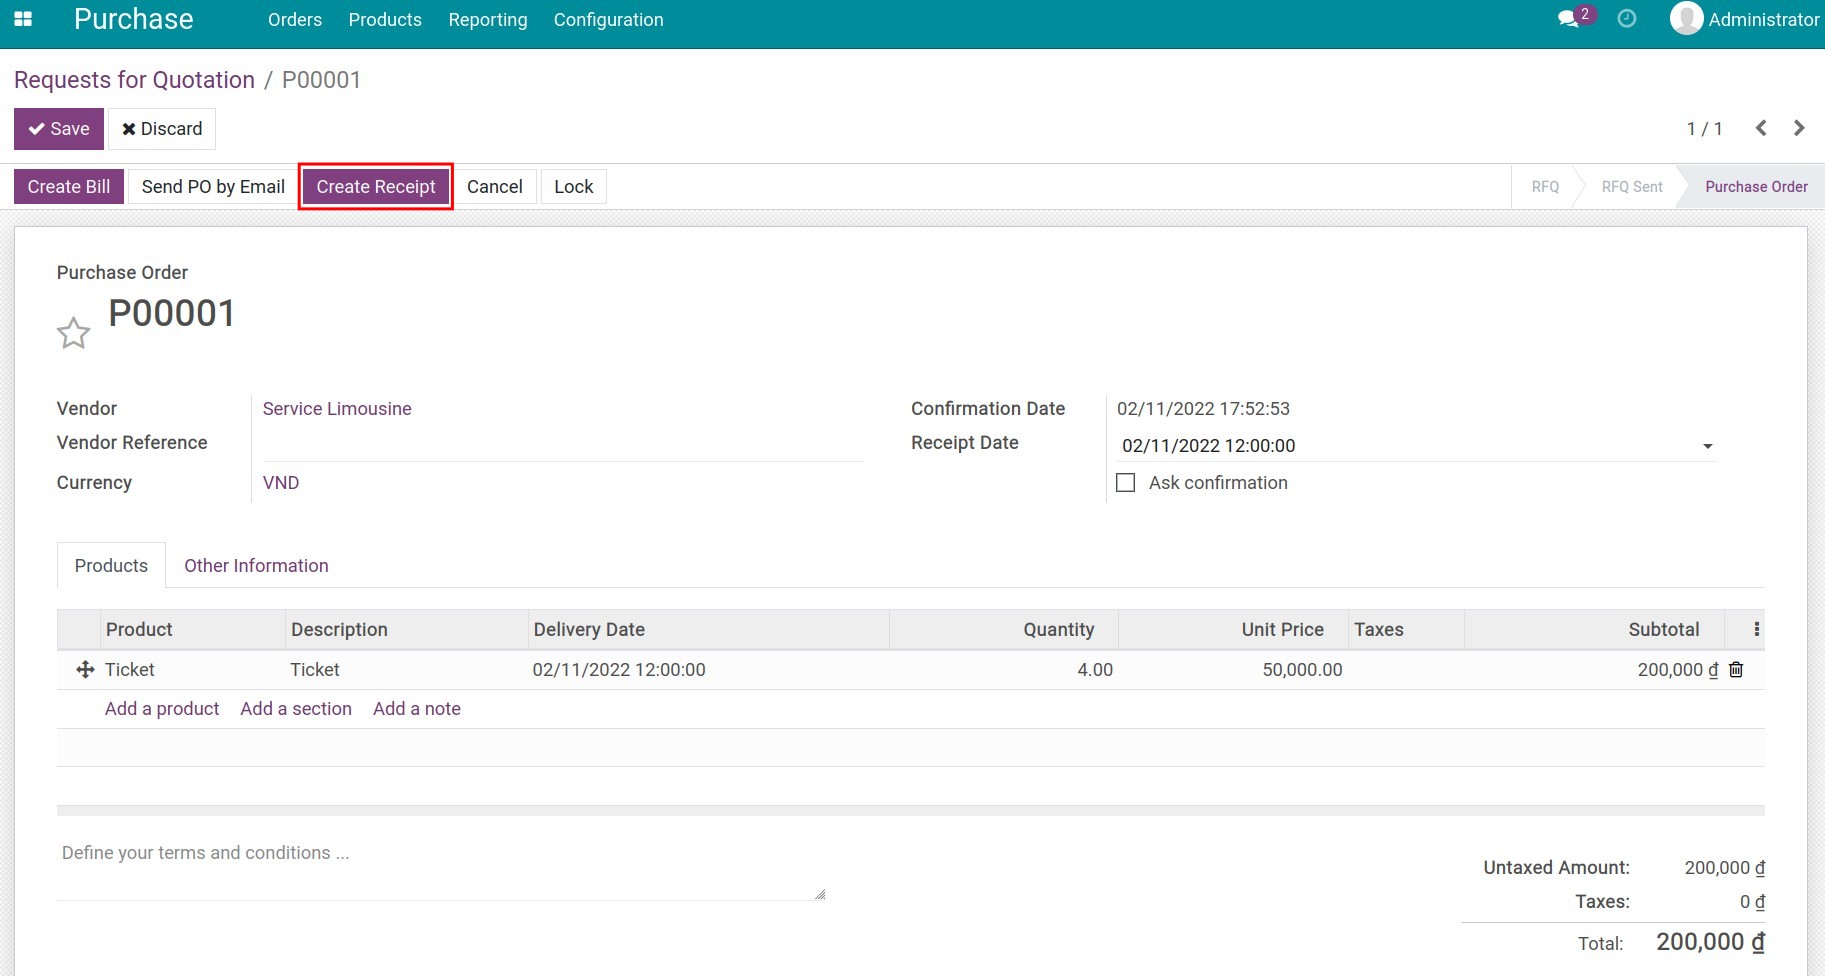
Note
For purchase orders that have already been invoiced, you will not be able to create a purchase receipt on the purchase orders form.
Similar when it comes to Vendor Bills, you can directly create a purchase receipt and take advantage of information from the purchase order.
How to use Purchase Receipt
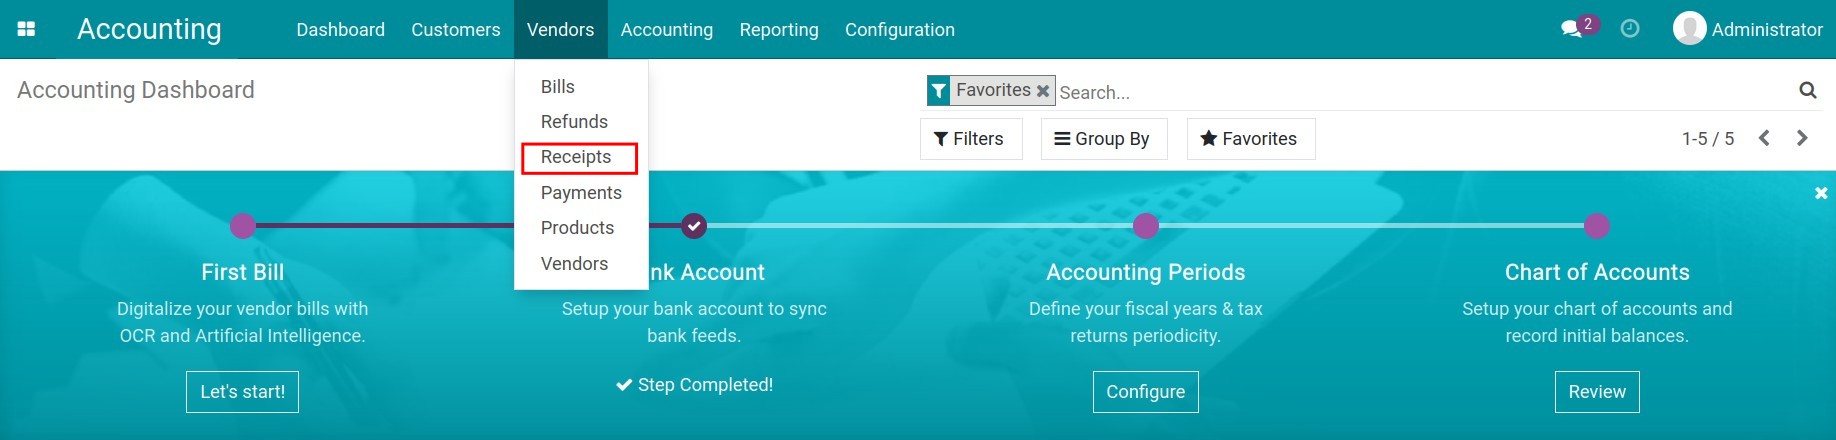
To record a new purchase receipt, navigate to Accounting ‣ Vendors ‣ Receipts:
Click on the Create and fill out it the form in the similar steps to create Vendor Bills:
Tip
Purchase receipts do not record tax, so on the receipts form, you can uncheck the Taxes. In addition, you can also change the accounting account when confirming the purchase receipt by selecting the accounting account in the Account or you can also configure the default account on Product Category of the Product.
See also
Related Article
Prepaid expense management
How to refund in iSuite Accounting
How to refund in iSuite Accounting
How to refund in iSuite Accounting
Requirements
This tutorial requires the installation of the following applications/modules:
iSuite Invoicing
iSuite Accounting & Finance
iSuite Purchase
A refund is a sum of money from suppliers which is returned to you in the following cases:
Return of defective/damaged products;
The vendor registers the wrong price/quantity of goods, etc.
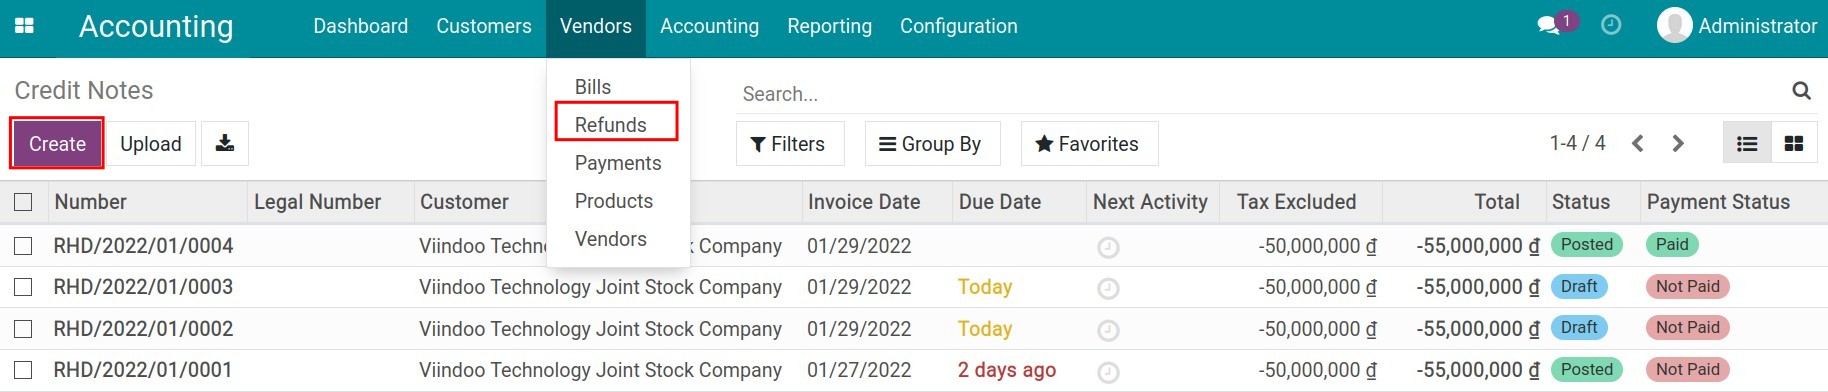
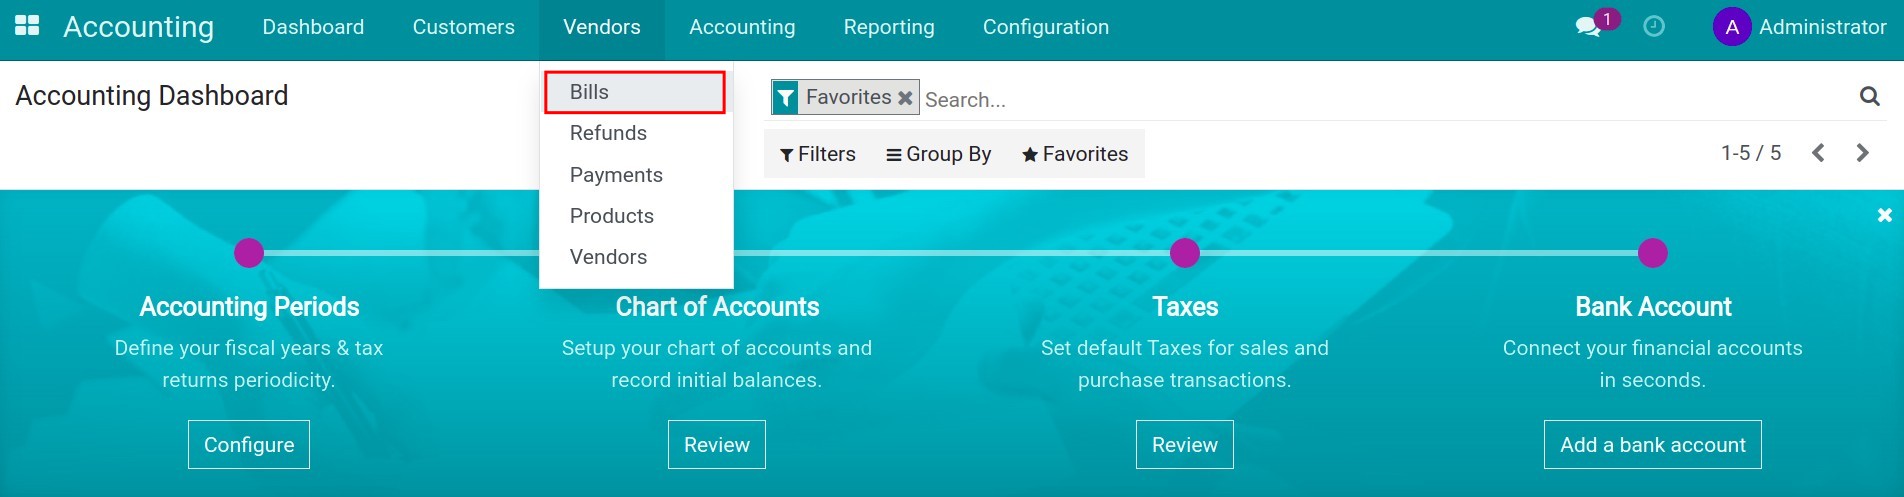
To create refunds, navigate to Accounting ‣ Vendors ‣ Refunds:
Or you can also create directly in the supplier’s invoice by clicking the button Add Credit Note. Then do the same operations as with Credit notes.
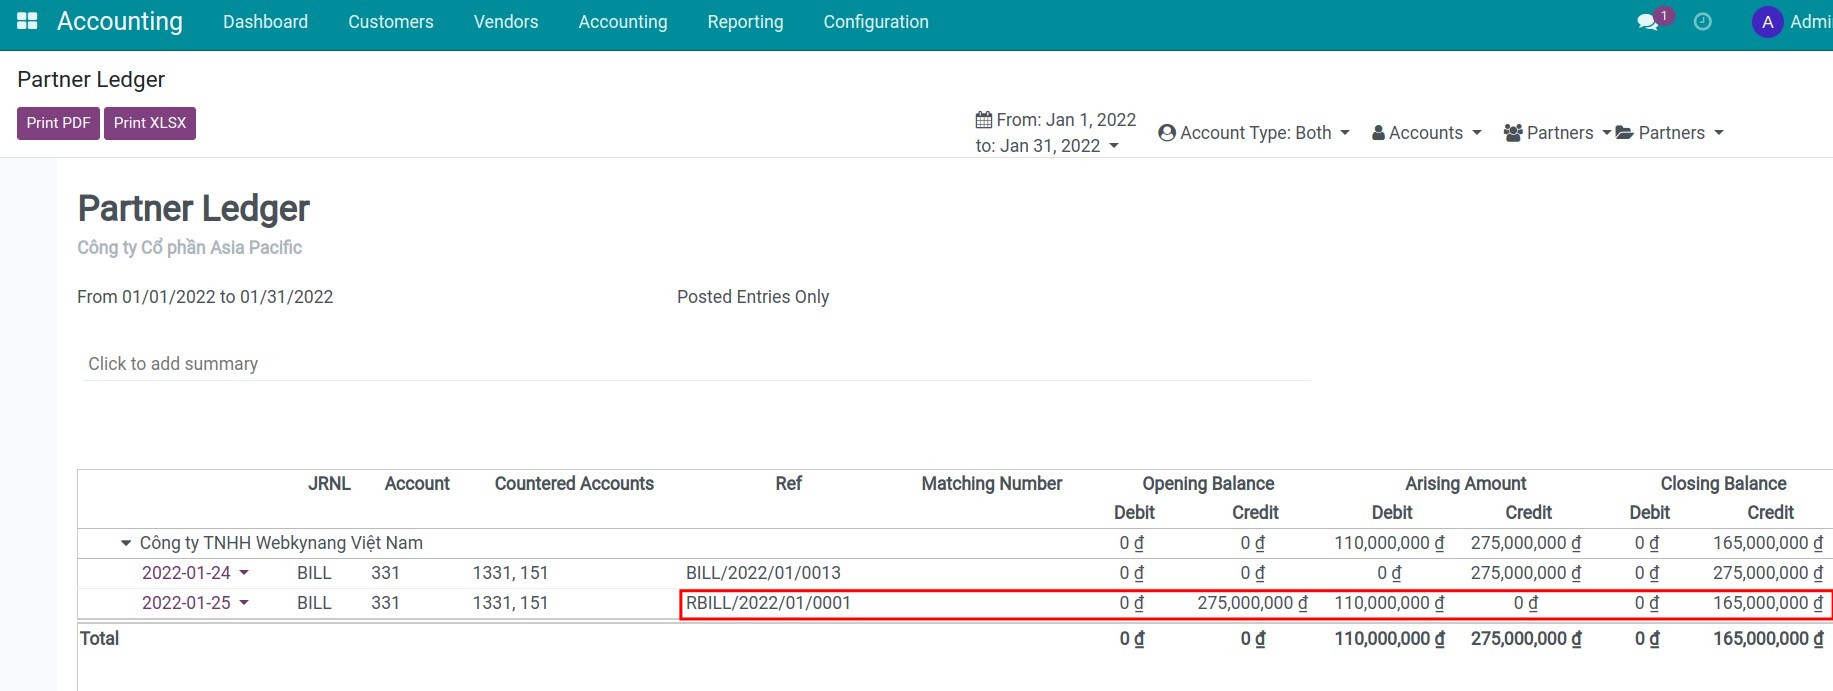
When validating invoices with refunds, the account 331 - Trade payables, product value, and taxes will be reduced, you can view the entries at the Journal Items tab or the Partner Ledger Report (Accounting ‣ Reporting ‣ Partner Ledger).

Note
Actually, both credit notes and refunds are documents recording debt reduction, but with two different objects: Credit notes for customers and Refunds for suppliers.
See also
Related article
Pay various distinctive bills at the same time
How to apply cut-off in iSuite Accounting
How to apply cut-off in iSuite Accounting
iSuite provides the Cut-off feature that helps you to separate the total revenue/expense on a Customer Invoice/Vendor Bill at different times. In this article, I will write about the case when you need to separate the expense, you can do the same with the revenue.
Requirements
This tutorial requires the installation of the following applications/modules:
Accounting
Accounting Reports
Tip
In order to implement the following steps, make sure you understand the operations of the Vendor Bill on the Viindoo system.
Firstly, go to Accounting > Vendors > Bills and select the bill that needs to be adjusted.
Note
This feature is just available on the posted journal entries and the journal items of the Profit and Loss type.
In the Journal Items tab, at the recorded value of the expense account, you click on the Cut-off button.
A pop-up window will appear for you to enter the parameters of the auto-generated entries which will separate the expense.
You enter the following parameters:
Recognition Date: the time at which the expense is separated from the bill is considered as valid.
Accrued Account: the temporary account to transfer the amount to be separated from the expense before re-recording to the expense account at a valid time.
Adjusting Amount: the amount needs to be separated from the expenses.
Journal: journal applied on auto-generated entries.
You can preview the entries that will be generated by this setting under The following Journal Entries will be generated.
The entries generated after you select Create Entries are as:
The first entry will reduce the amount recorded on the expense account (the amount you entered in the Adjusting Amount field) and move it to the Accrued Account.
The second entry will transfer the amount recorded on the Accrued Account to the expense account at the due date established on the Recognition Date field.
If Recognition Date is in the future, the entry will be configured to be automatically posted on that date, and if it is in the past, the entry will be posted immediately.
Now check the Profit and Loss report, you can see that the expense recorded on the original Vendor Bill has been split in two, one is recorded at the accounting date and the other is recorded at the Recognition Date.
See also
Related article
Pay various distinctive bills at the same time
Pay various distinctive bills at the same time
Pay various distinctive bills at the same time
In reality, with payments, we don’t always pay one bill at a time. There are many situations where accountants need to make one payment for multiple bills to save time and the transaction fees. To simplify your work, iSuite Accounting Software supports paying multiple bills all together in one payment while still being able to track the receivables and payables of each bill.
Requirements
This tutorial requires the installation of the following applications/modules:
iSuite Invoicing
iSuite Accounting & Finance
To create a payment for various customer invoices or vendor bills all at once, navigate to Accounting ‣ Customers ‣ Invoices for customer invoices, or Accounting ‣ Vendors ‣ Bills in case of vendor bills:
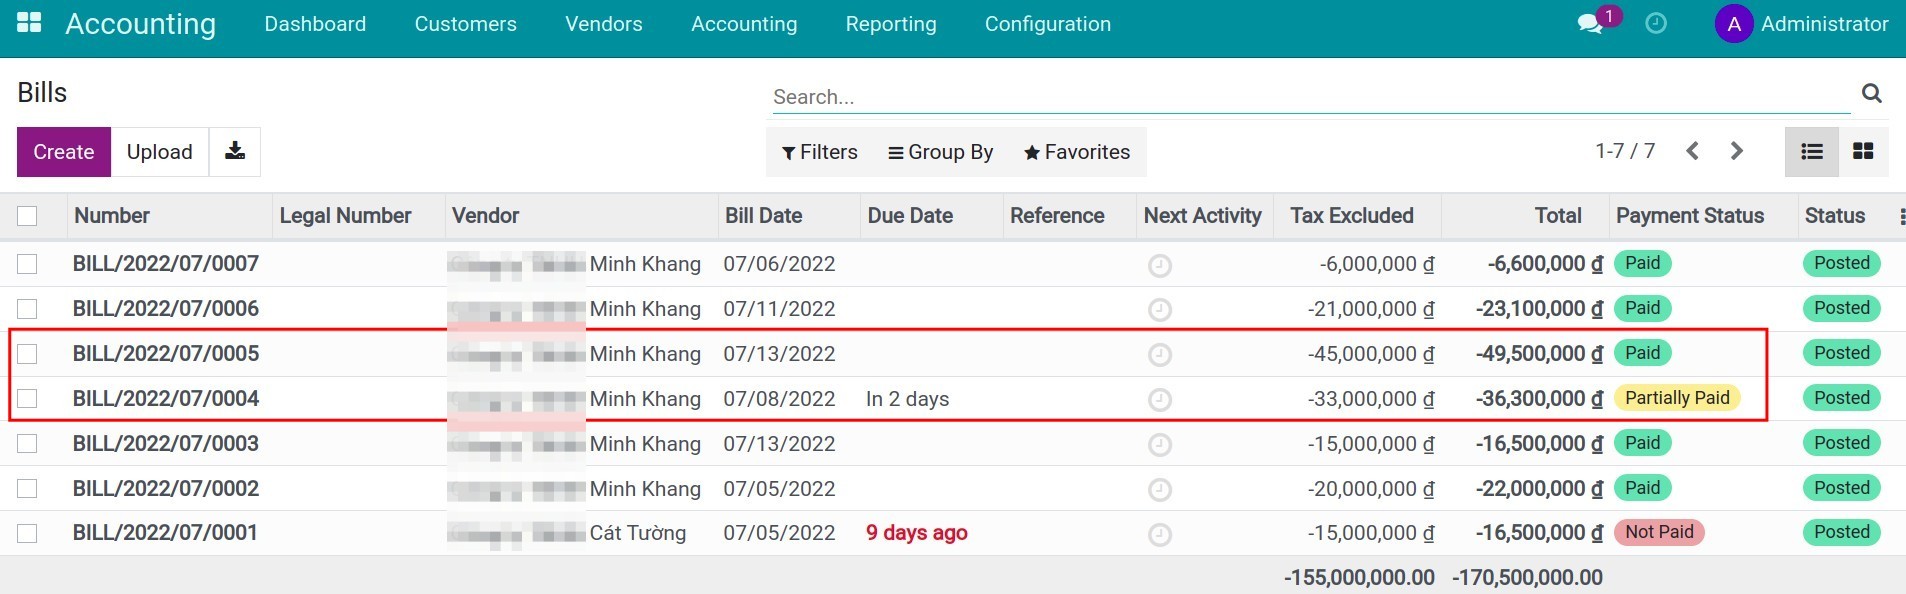
In the bills list, choose the bills of the same vendor that you need to register payment:
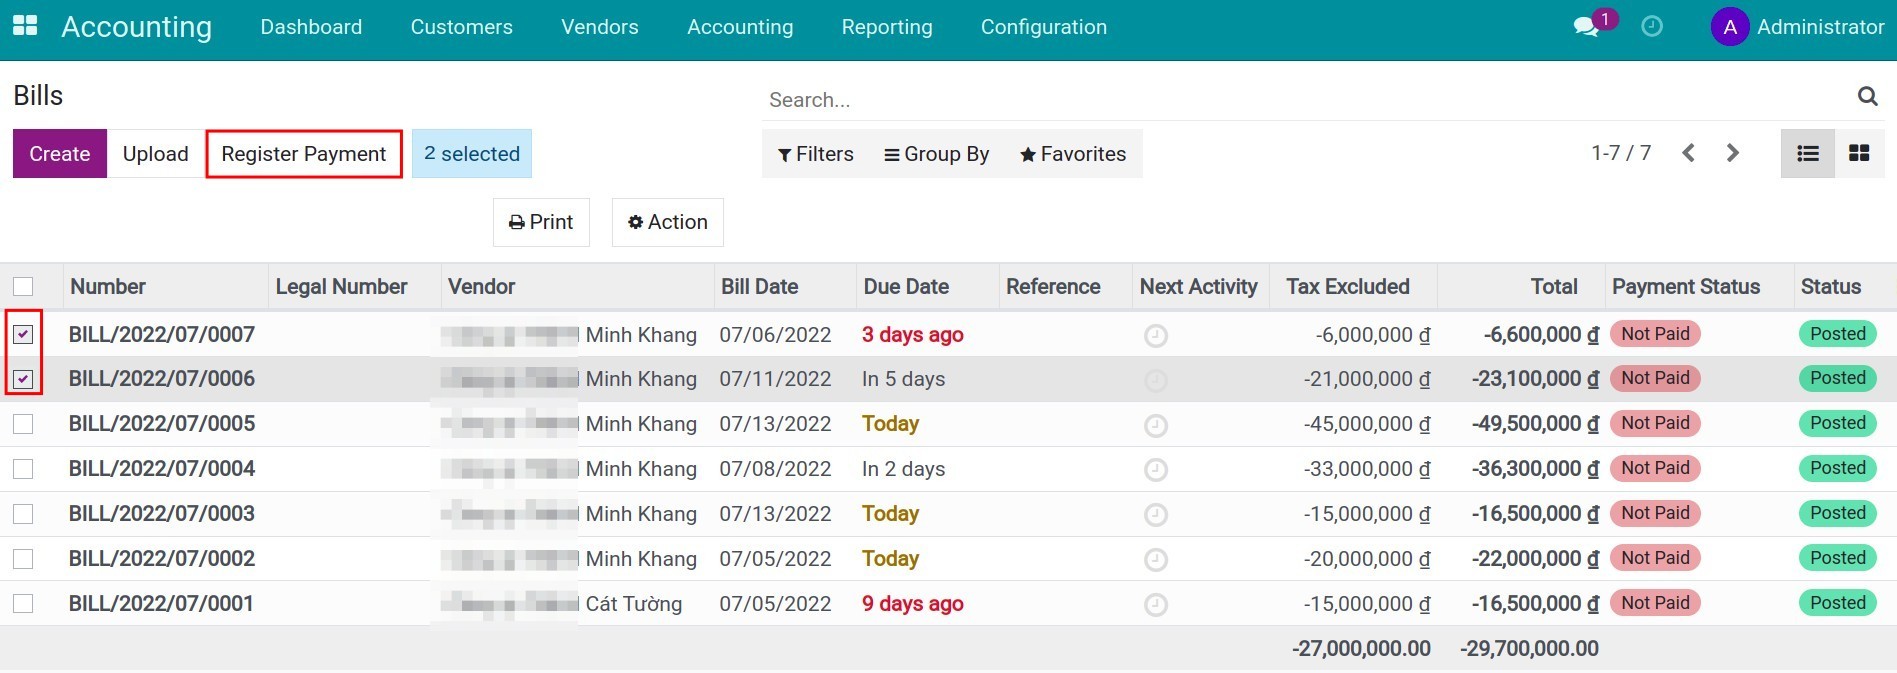
In case you want to choose all the unpaid bills of the same vendor, you can use the filter and group feature to search, then choose all bills by checking the square box on the header:
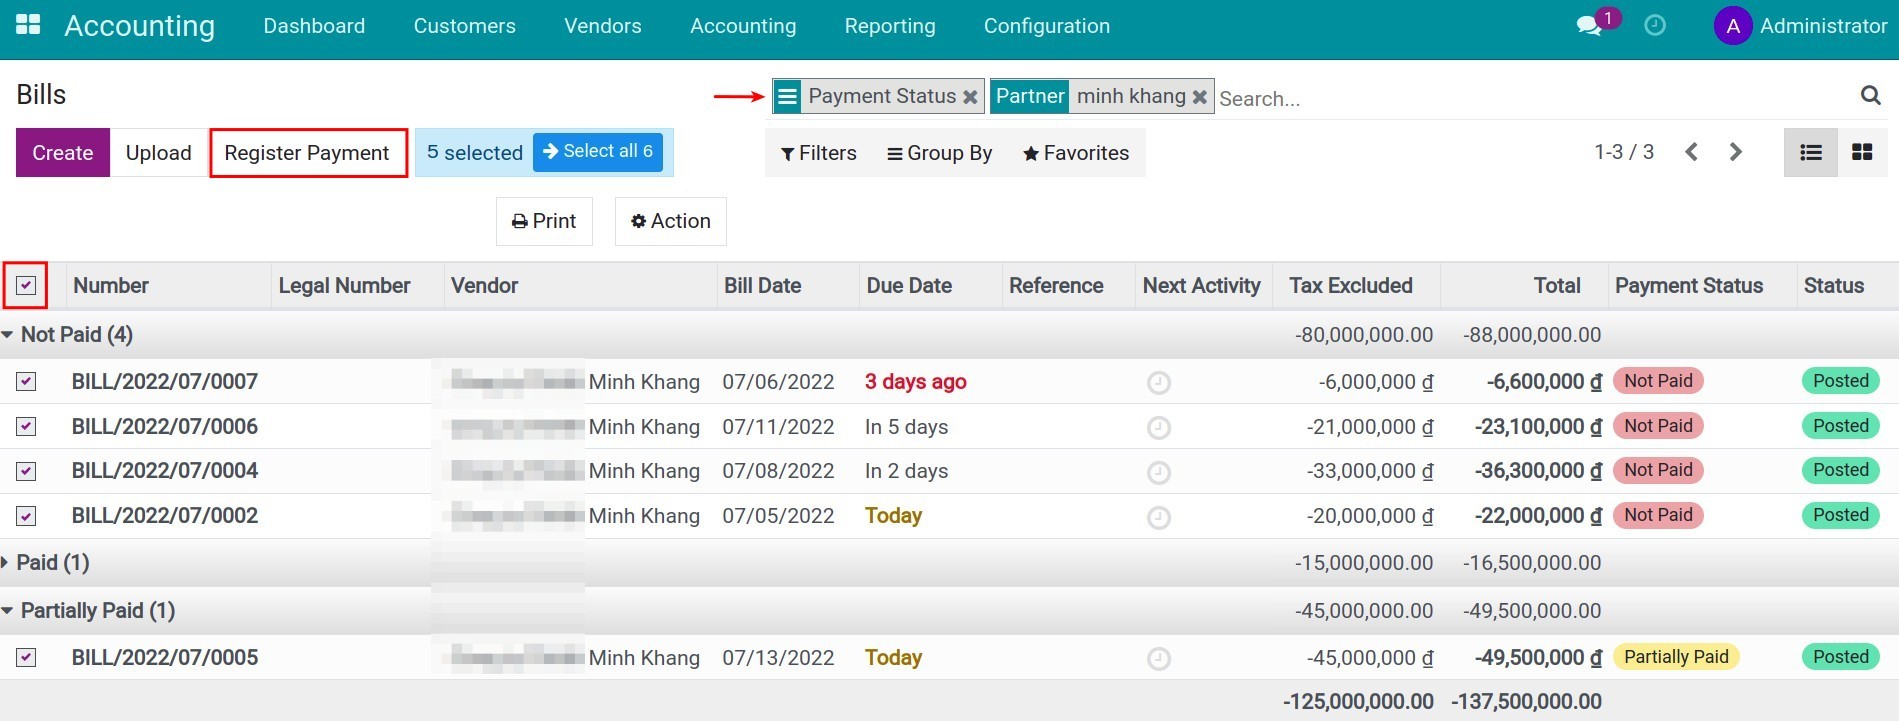
Warning
You can register payment for bills that are in the Posted Status and the Payment Status is Not Paid or Partially Paid.
Once selected, press Register Payment. The Register Payment window will pop up where you can fill in the following information:
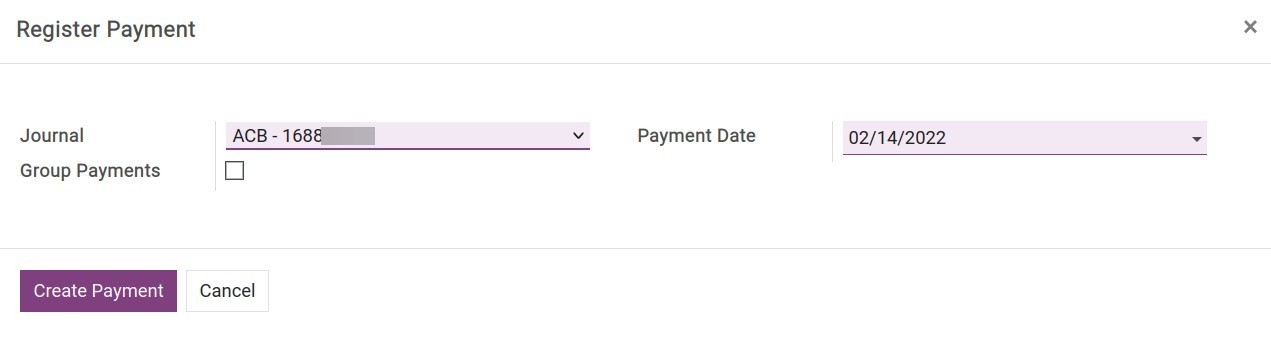
Journal: Select the journal of the payable or receivable account.
Payment date: Record the date of receipt or payment.
Group Payments: If disabled, a payment slip will be generated for each selected invoice/bill respectively. If this feature is enabled, a unique payment slip will be generated with a value equal to the total value of selected invoices/bills and the following fields will also be displayed:
Recipient Bank Account;
Amount: The total amount of selected invoices;
Currencies: You can select another currency for this payment aside from the company’s main currency.

After filling in the above information, press Create Payment and you will be redirected to the payment interface:

You can see all the bills linked to a payment by going to the Bills button on the top right corner of the screen. When payments are registered by this method, the bills will be automatic Confirmed. Besides, each bill is automatically reconciled with this payment:

If your invoices/bills have a different due date, then when you Register Payment, the Group Payments field is also be displayed. The reconciliation will then be done in the due date order.
When the total paid amount is different with the invoices/bills total value, the Payment Difference field will appear on the Register Payment panel to display the difference amount.
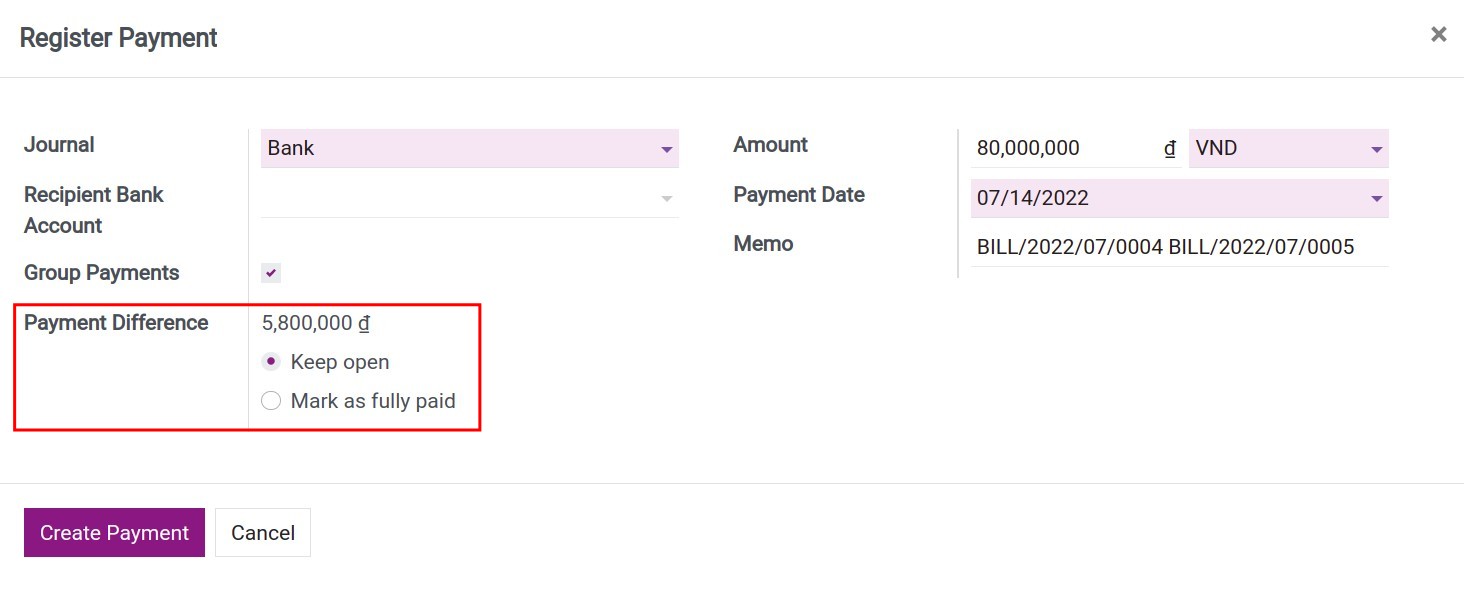
The system suggests the two following options:
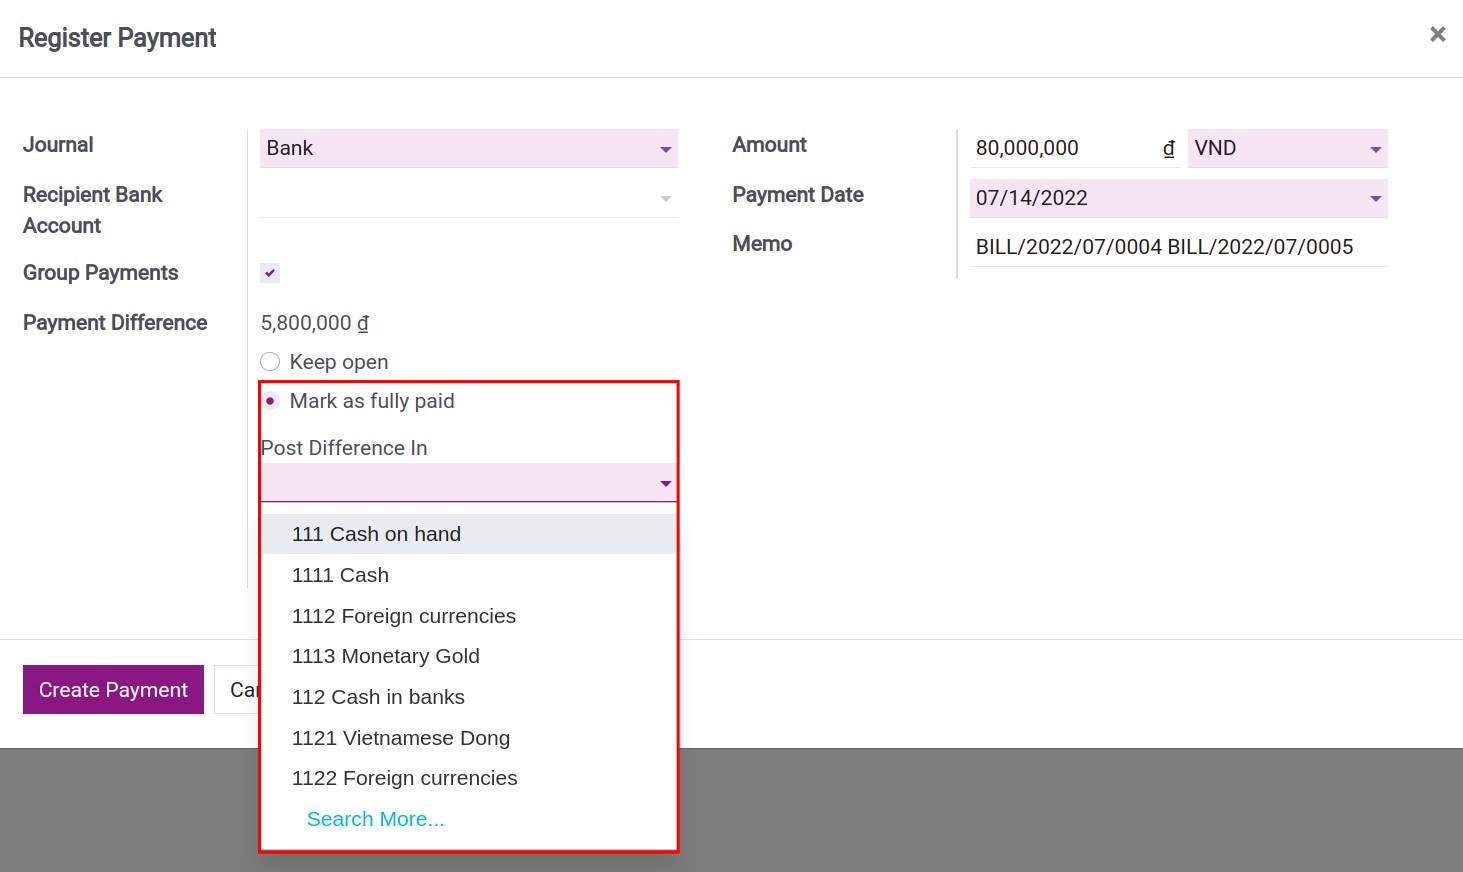
Keep open: If the amount is smaller than the invoice value, the payment status will be changed to Partially Paid. If the amount is higher than the invoice value, the payment status will be changed to Paid accordingly.
Mark as fully paid: If enabled, you need to select the corresponding accounting accounts to post this payment difference.
Press Create Payment and review the automatically posted journal entries.
See also
Related Article
Taxes and tax rules configuration
Time deposit transactions
Time deposit transactions
This article will guide you through the process of creating a time deposit transaction, and record the time deposit interest and the final settlement.
Requirements
This tutorial requires the installation of the following applications/modules:
Accounting & Finance
Make a time deposit
To record a time deposit transaction, you need to do the following steps:
Create a cash-out payment
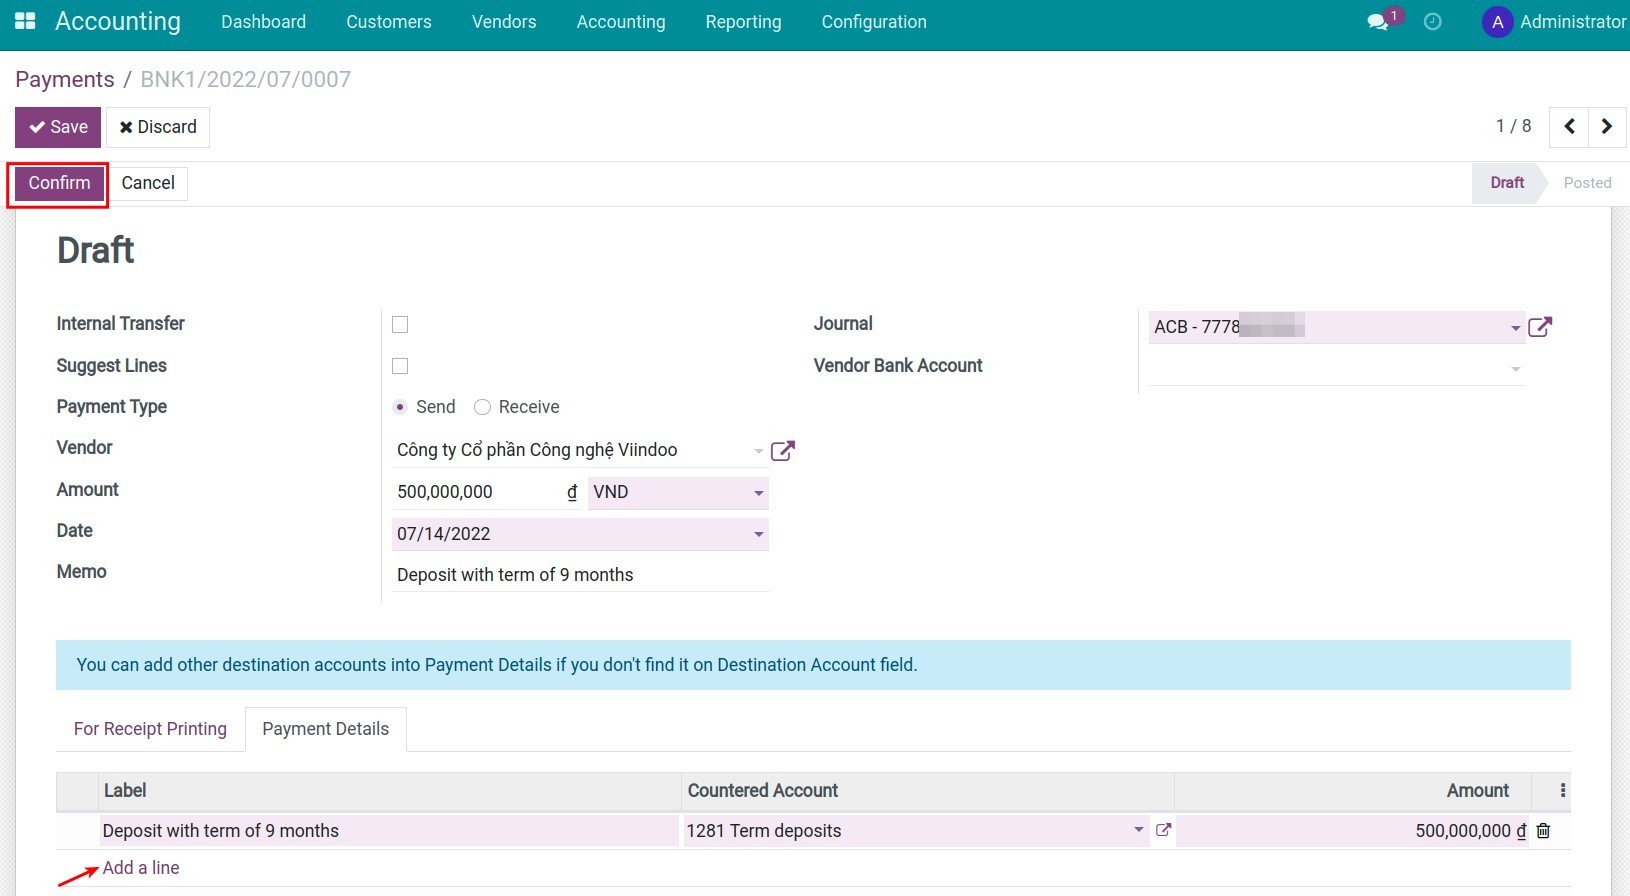
Navigate to Accounting ‣ Vendors ‣ Payments to create a payment:
In which:
Payment Type: Send;
Vendor: Choose your company’s contact;
Amount: The value of this time deposit (This amount will be updated automatically according to the value that you add to the Payment Details area);
Journal: Choose the journal of the cash-out account;
Recipient Bank Account: Select the receiving bank account number. Refer to How to create a bank account;
At the Payment details tab, press Add a line to enter the payment details:
Press Confirm. Select Journal Entry to see the generated entries:Label: Enter the payment description;
Countered Account: Choose the account that records the Short term investment until the due maturity date (For example 1281 - Time deposit);
Amount: Record the value of this time deposit.
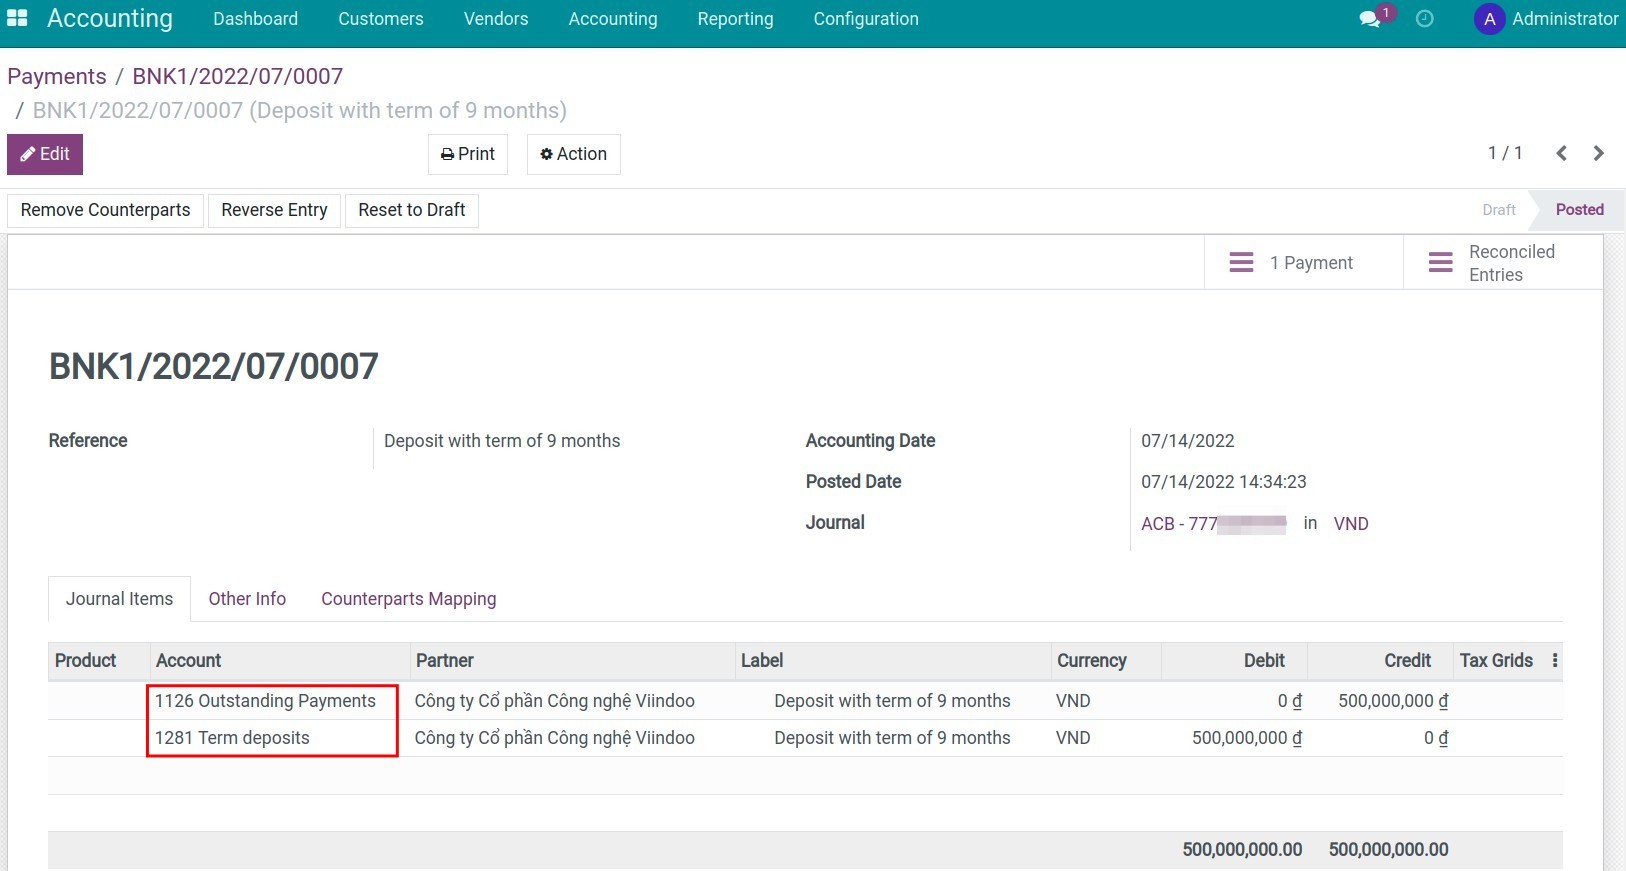
Create a bank statement and reconciliation
Navigate to Accounting ‣ Dashboard, select the bank account where you deposited the money, create a bank statement. Fill in the information about the partner and the amount:
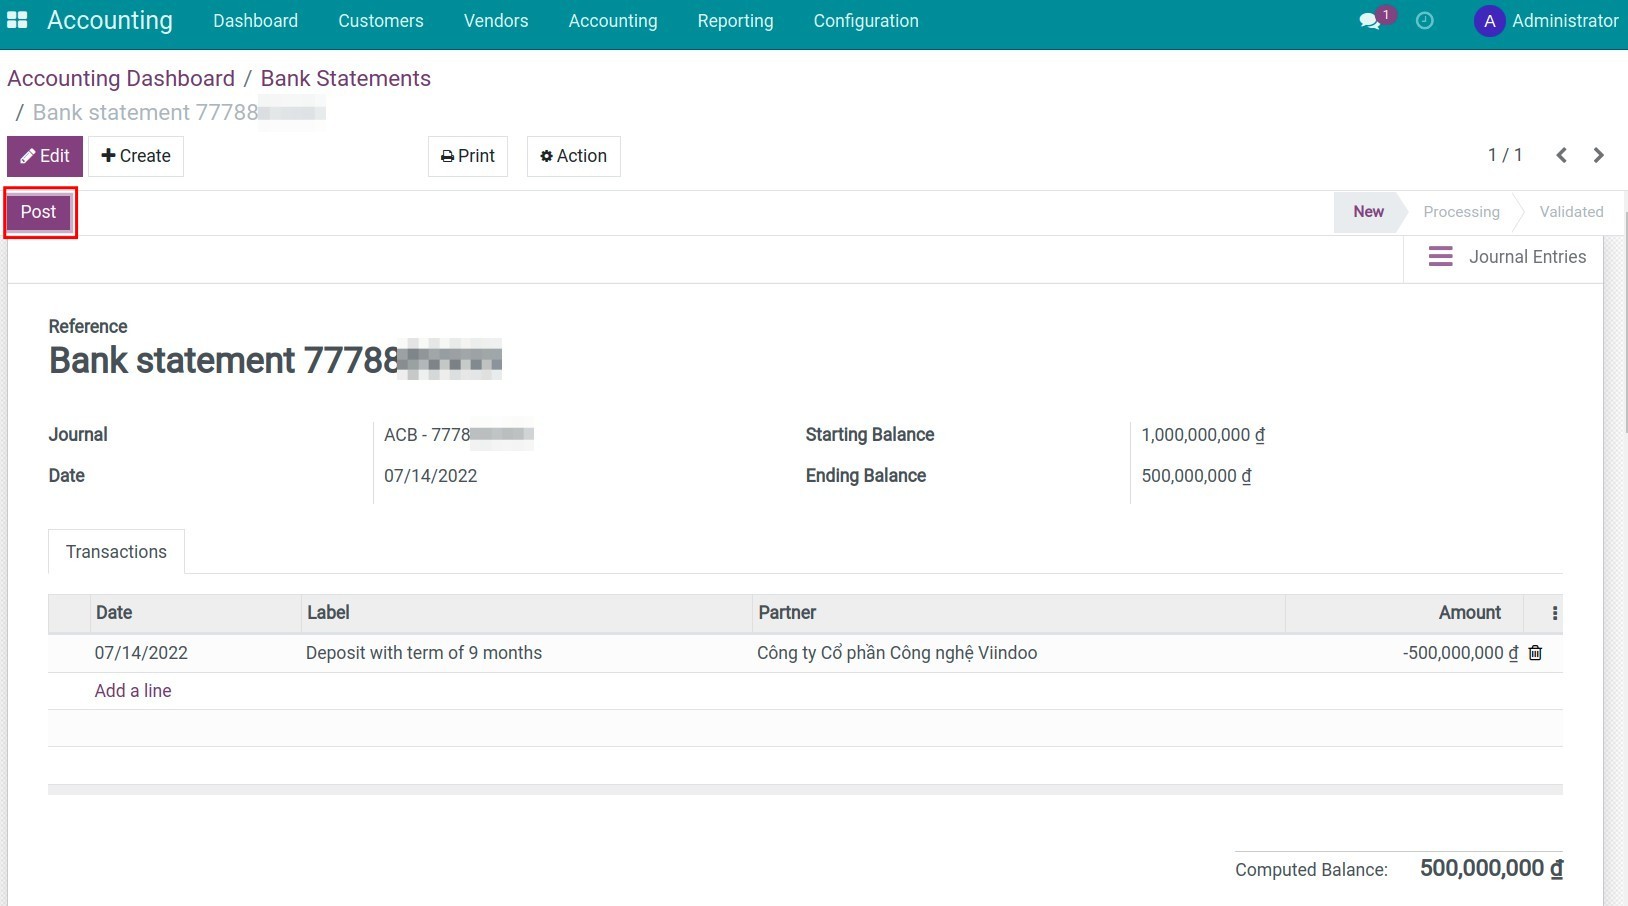
Click Post > Reconcile, the system will automatically check and compare it with the previously created payment slip. Back to the statement, select Journal Entries to see the generated entries:
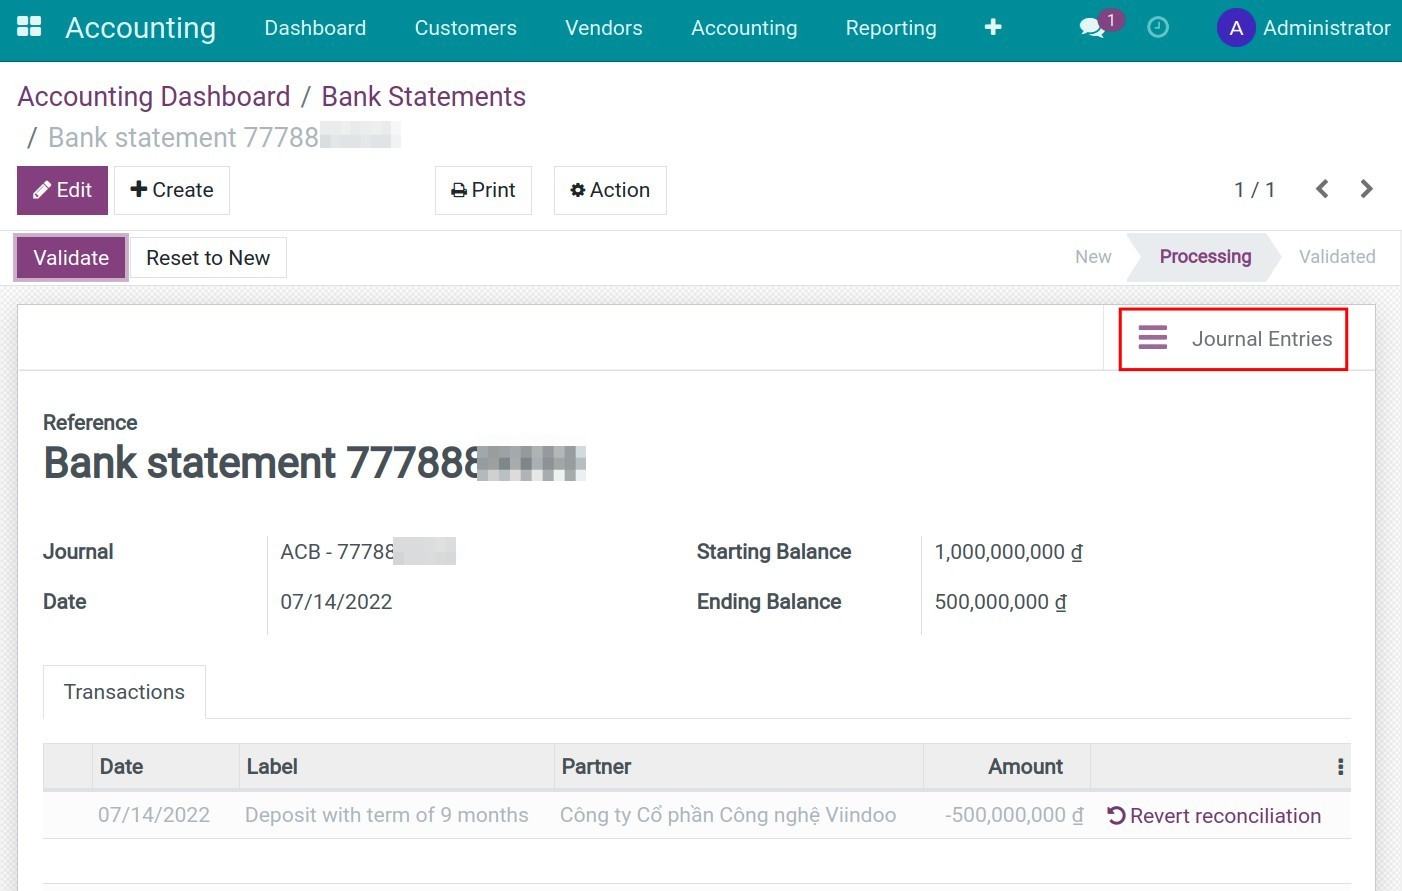
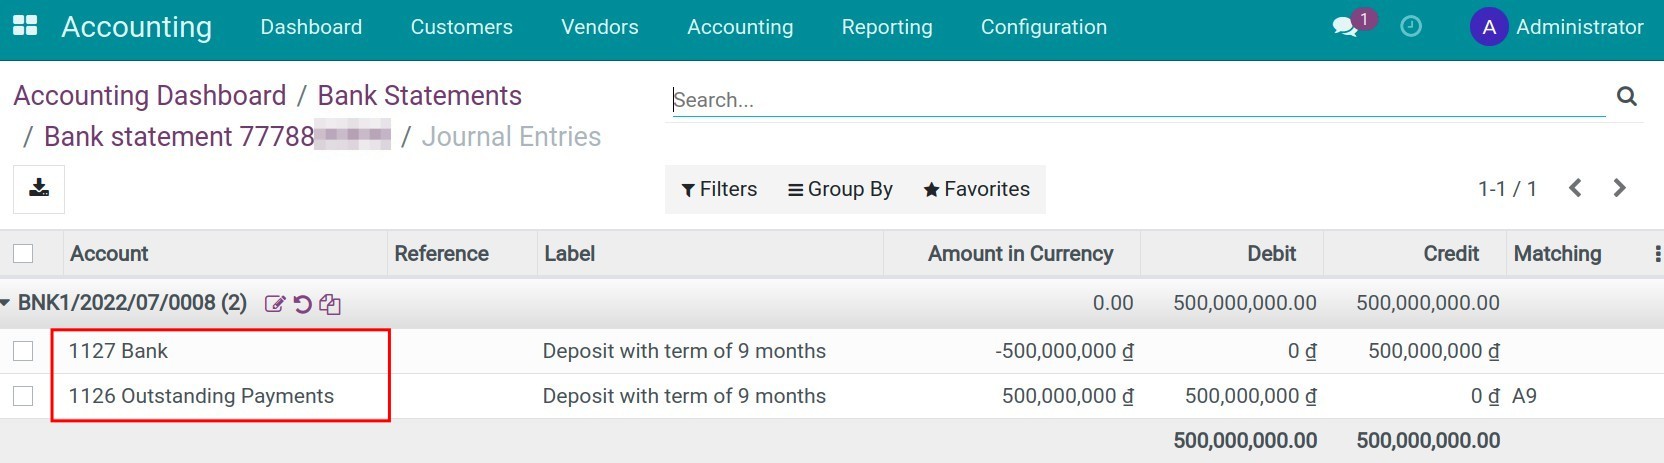
Now, you have completed the recording of a time deposit transaction process in Viindoo Enterprise Management Solutions .
Recording deposit interest
Receive the principal amount together with interest
When you receive the time deposit interest document from the bank, navigate to Accounting ‣ Accounting ‣ Journal Entries, press Create to create a new journal entry recording this time deposit interest. Press Add a line to enter the details of journal items:
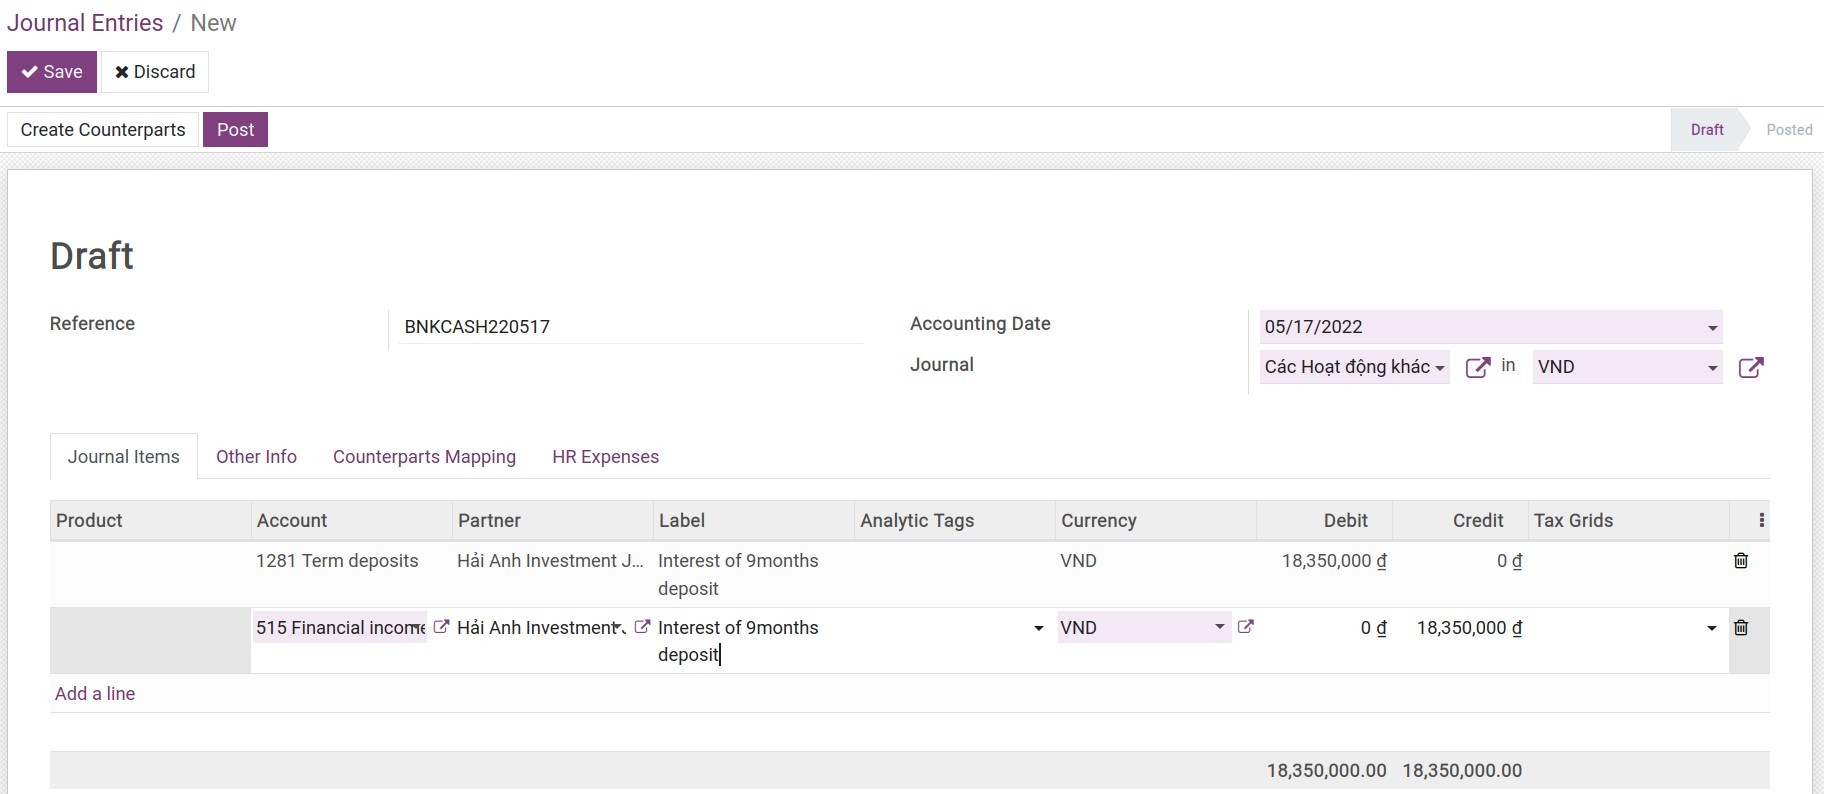
In which:
- Reference: Enter the internal reference number for tracking such as the time deposit passbook or the time deposit account certificate, etc;
Accounting Date: The date that this transaction is recorded;
Journal: Choose the Miscellaneous journal;
Account: Select an account to record the increment of the Short term investment (e.g. Account 1281) and the increment of the Financial activities income (e.g. Account 515);
Partner: Choose your company’s contact;
Label: Descriptions for the journal items;
Debit/Credit: Enter the corresponding amount;
Receive only interest on maturity date at the current bank account
Follow the steps at Record the demand deposit interest.
Time deposit settlement
With the final settlement business, you will do the against steps with making a time deposit business.
Create a cash-in payment
Following the below steps:
Navigate to Accounting ‣ Customers ‣ Payments, press Create to create a payment:
In while:
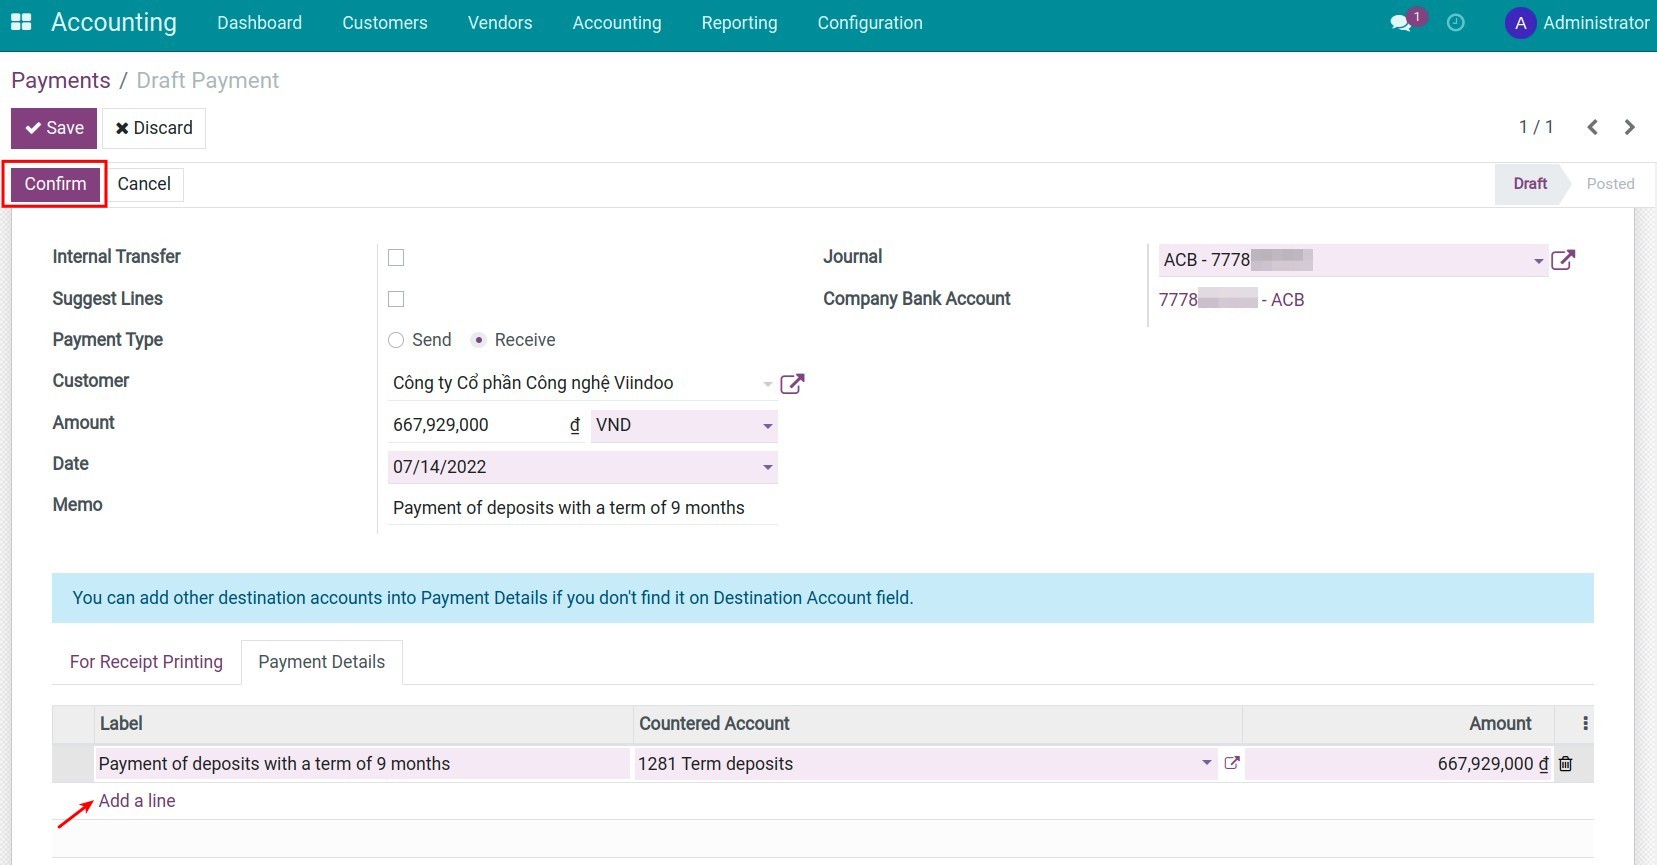
Payment Type: Receive;
Customer: Choose your company’s contact;
Amount: The amount of settlement (This amount will be updated automatically according to the value that you add to the Payment Details area);
Journal: Choose the journal of the recipient bank account;
Recipient Bank Account: The bank account number will be suggested automatically based on the chosen journal above;
At the Payment Details tab, press Add a line to enter the details of payment:
Press Confirm after adding the above information.Label: Enter the payment description;
Countered Account: Choose the account that records the Short term investment until the due maturity date (For example 1281 - Time deposit);
Amount: The amount of settlement.
Create a bank statement and reconciliation
When you receive the bank statement, you also need to create a statement and do the same reconciliation process as when you deposit your money.
See also
Related article
Manage Bank Statements
Steps in the bank reconciliation process
Create reconciliation model for deposit interest and bank fees
Manage Bank Statements
Manage Bank Statements
There are 2 methods to create a bank statement in the iSuite accounting app:
Create manually in the app;
Directly import with statements files.
Requirements
This tutorial requires the installation of the following applications/modules:
Accounting & Finance
Account bank statement import
Import RJE bank statement
Manually create a bank statement
In Viindoo Accounting & Finance Management , you can choose one of the following two methods to create a bank statement manually:
Method 1: Navigate to Accounting ‣ Dashboard, choose the desired bank journal then click Create.
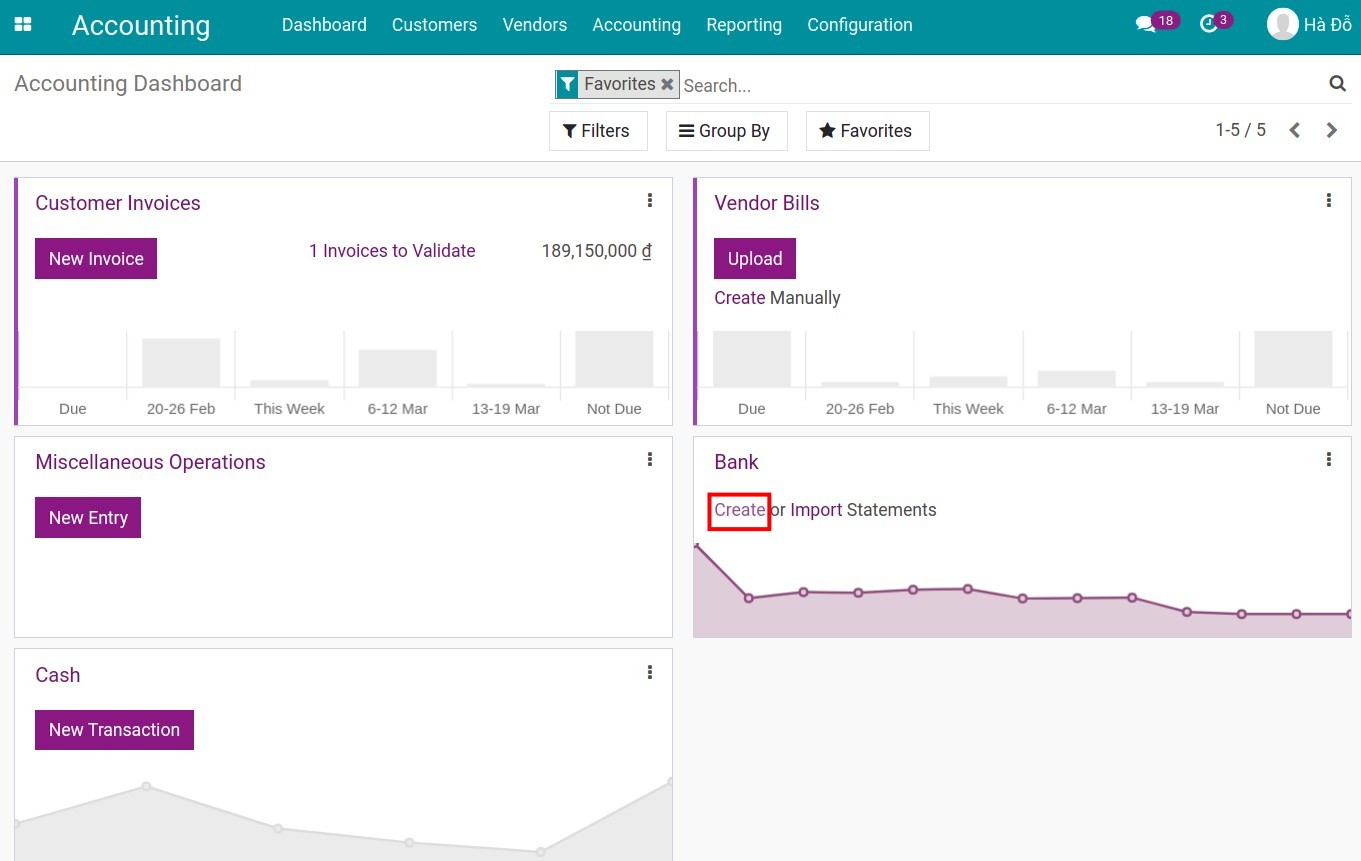
Method 2: Navigate to Accounting ‣ Dashboard, choose the desired bank journal, click on the Three dots icon at the right corner, choose Statement under the New section.
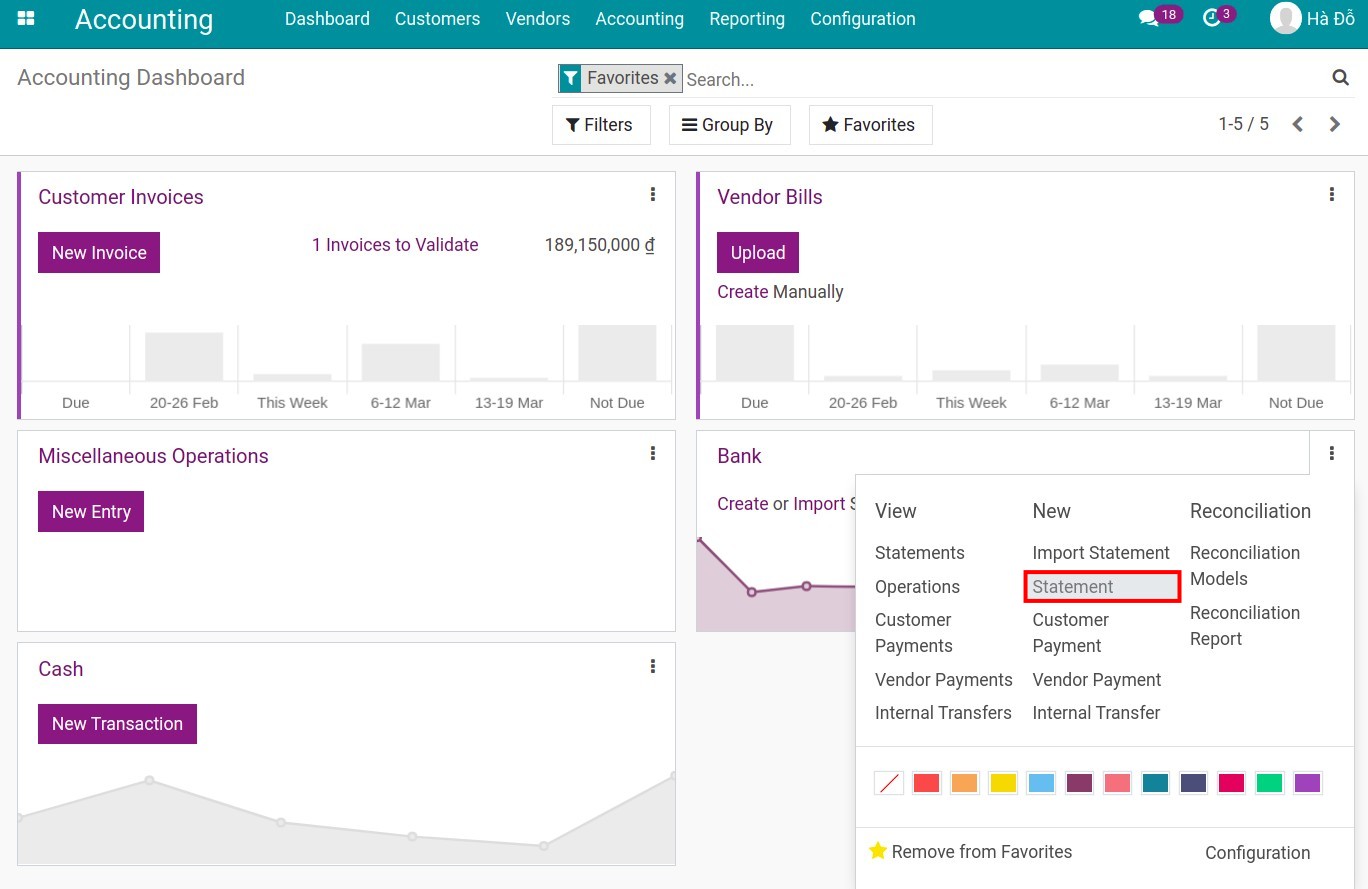
You need to fill in the information as follows:
Reference: Bank statement reference code that you received from the bank;
Date: The system shows automatically creation date but you can choose another day;
Starting Balance: Amount of starting balance on bank statement;
Ending Balance: Amount of ending balance on bank statement;
Transactions Tab: Add the respective statement line of each transaction, including information for Date, Label, Partner, Amount fields to speed up the reconciliation process.
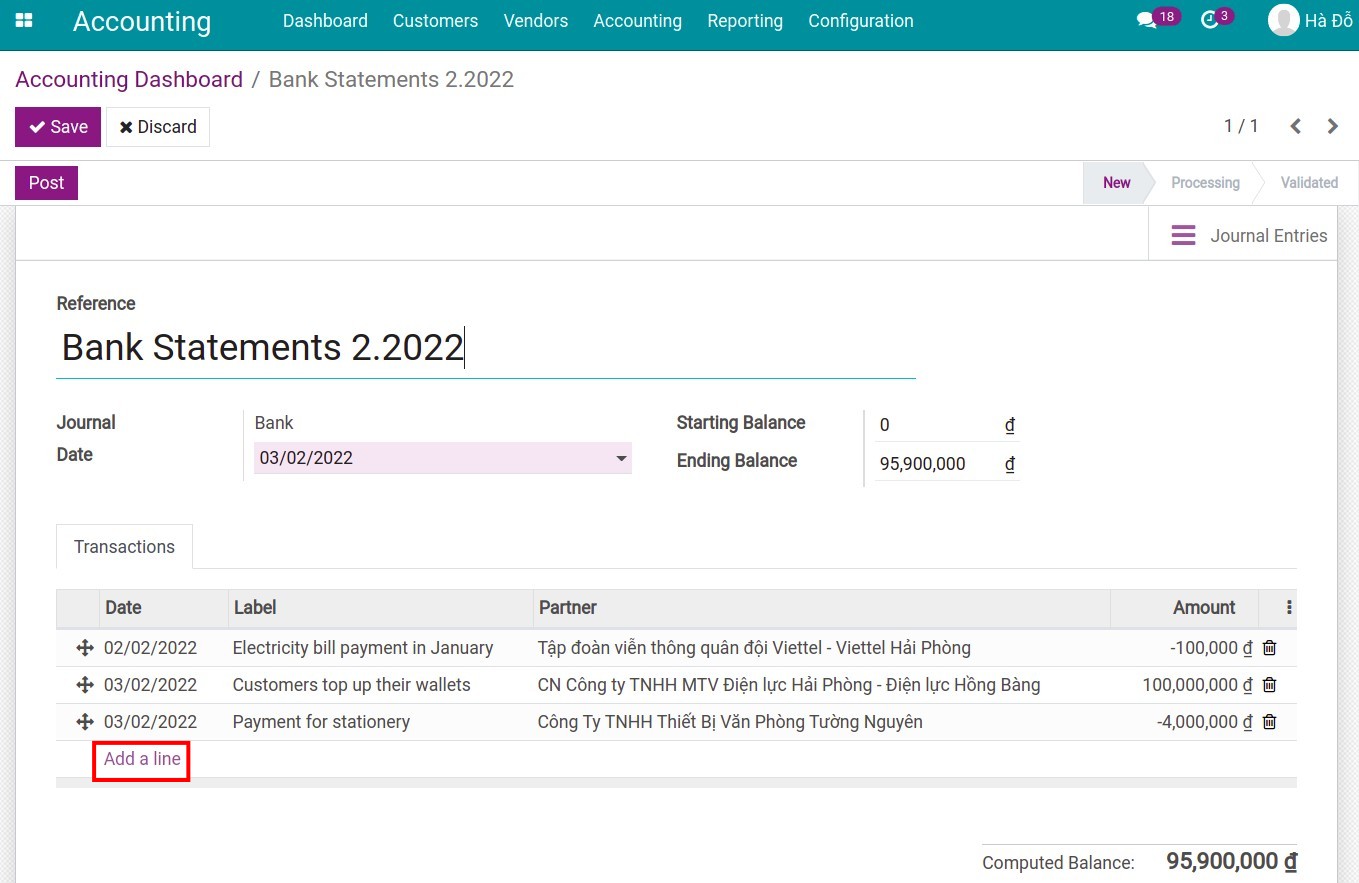
Warning
Before posting the bank statement, you should ensure that the computed balance is equal to the ending balance.
Import a bank statements file
To use this feature, you can also choose from one of the following two methods:
Method 1: Navigate to Accounting ‣ Dashboard, choose the Bank journal then press Import.

Method 2: Navigate to Accounting ‣ Dashboard, choose the Bank journal , click on the Three dots icon at the right corner, choose Import Statement under the New section.
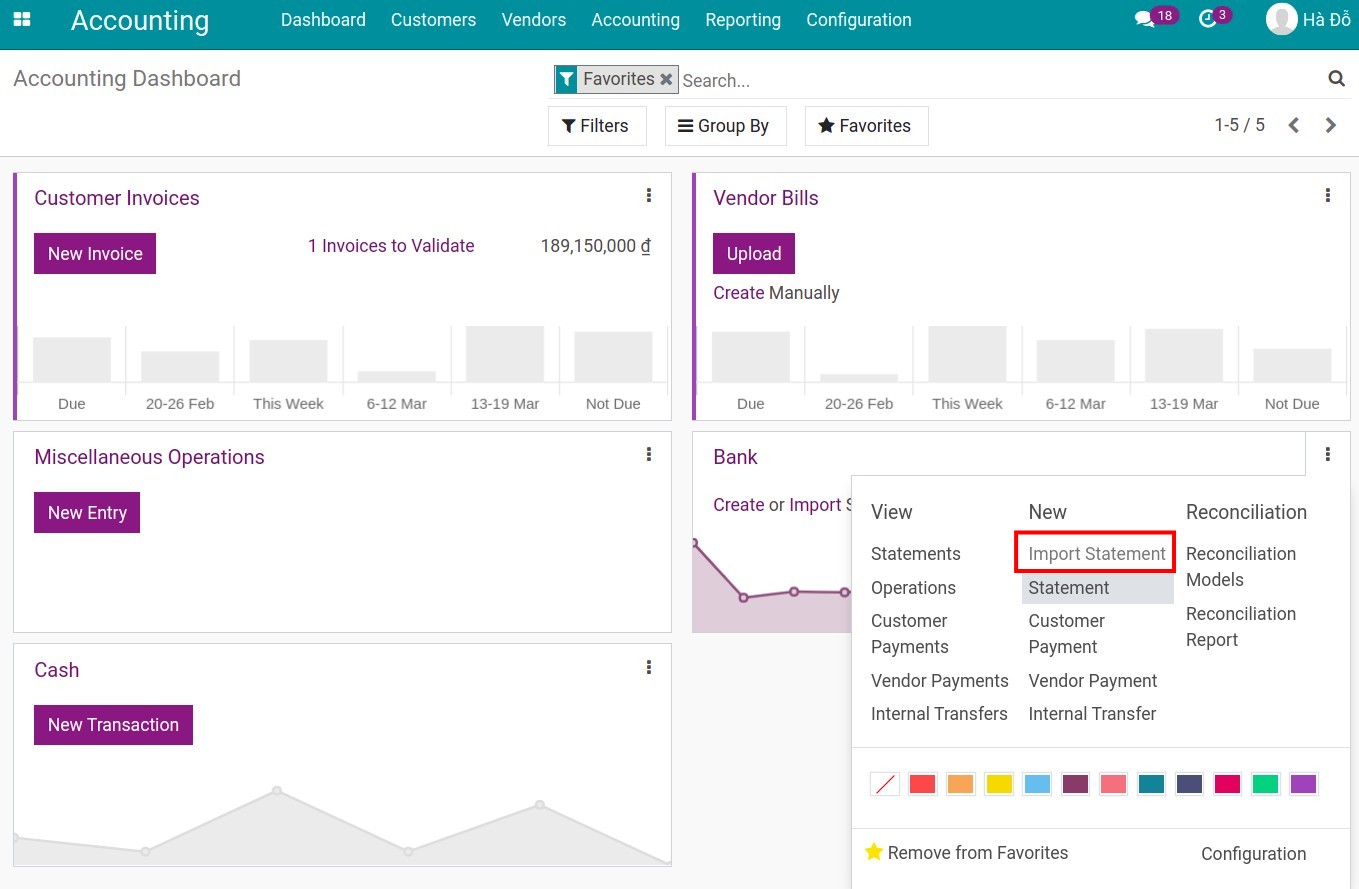
The system will inform you about the supported file formats such as Comma Separated Values (.csv), Excel (.xlsx), or Remote Job Entry (.RJE). By using Select files you can upload files in one of the above formats into the software.
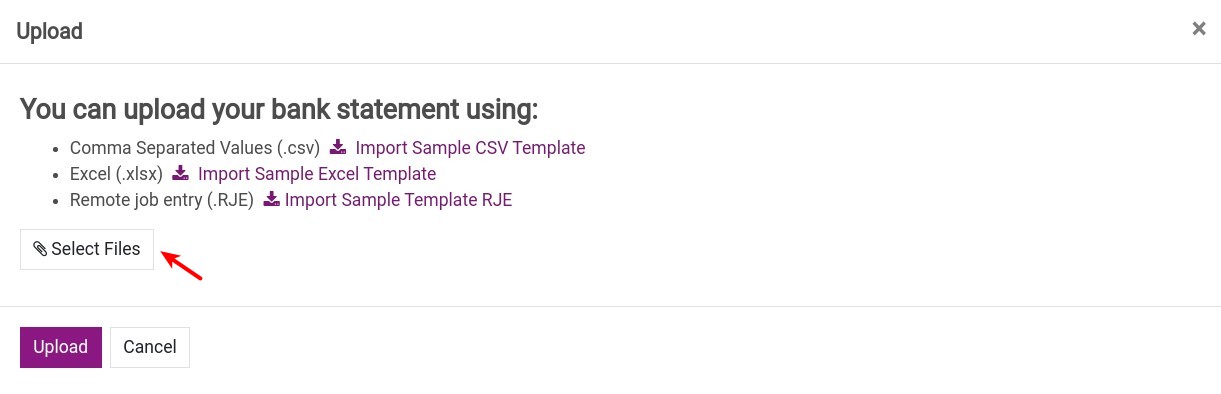
Below is an example of data imported from a Remote Job Entry (.RJE) file.
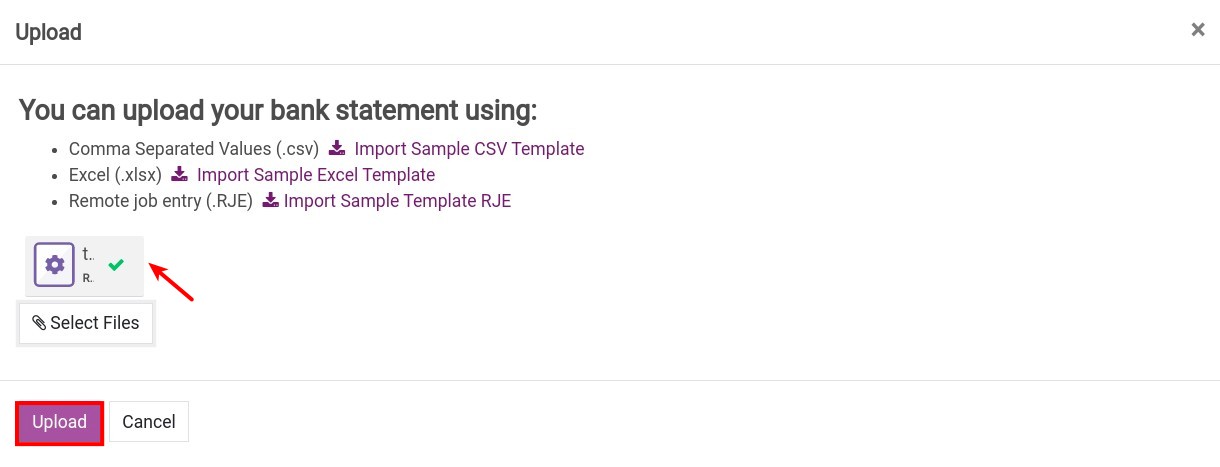
Press Upload to complete the data importing process, check and add missing information such as statement description, partner, etc. to finish the reconciliation.
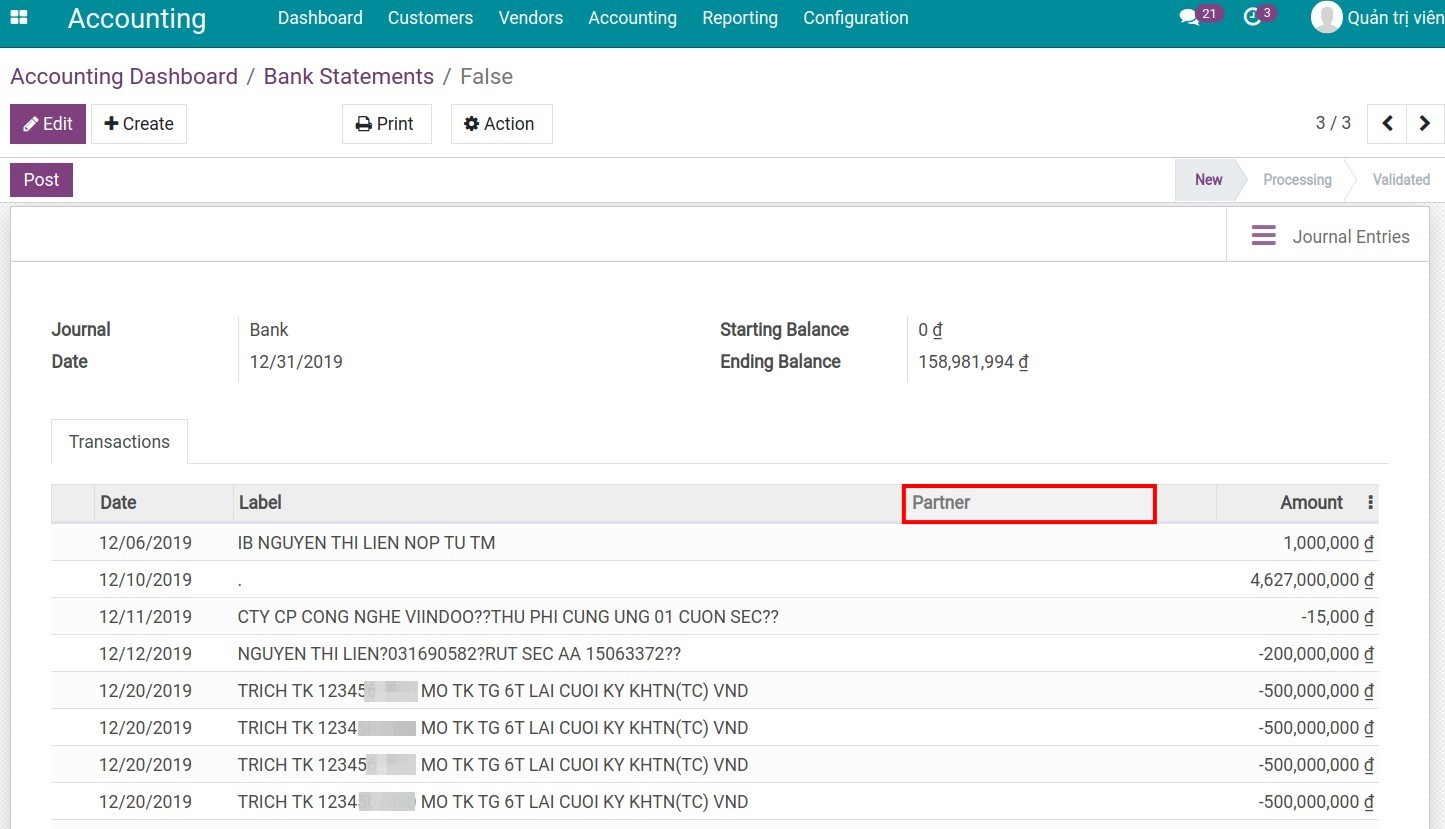
Note
With files in RJE format, the bank account number on the file must match with the bank account number on the chosen journal.
Files in Excel and CSV format must have all the information of the partner and label.
See also
Related article
Create reconciliation model for deposit interest and bank fees
Cash on hand management
Create reconciliation model for deposit interest and bank fees
Create reconciliation model for deposit interest and bank fees
The bank statement reconciliation feature of Viindoo Enterprise Management Solutions makes checking and controlling money data simpler. In this process, there are transactions that often arise or are repetitive, which makes the accountant spend extra time on picking up data for accounting such as Bank fees, Deposit interest , etc. Setting up the Reconciliation model beforehand will speed up these tasks for the treasurer.
Requirements
This tutorial requires the installation of the following applications/modules:
Accounting & Finance
Account counterparts
Reconciliation models
Button to generate counterpart entry.
Rule to suggest counterpart entry.
Rule to match invoices/bills.
Button to generate counterpart entry
To create a new reconciliation model, on the Accounting app with the Administrator right , you can navigate by two methods:
Method 1: Accounting ‣ Dashboard, on the Bank Journals or the Cash one , click on the Three vertical dots icon and choose Reconciliation Models.
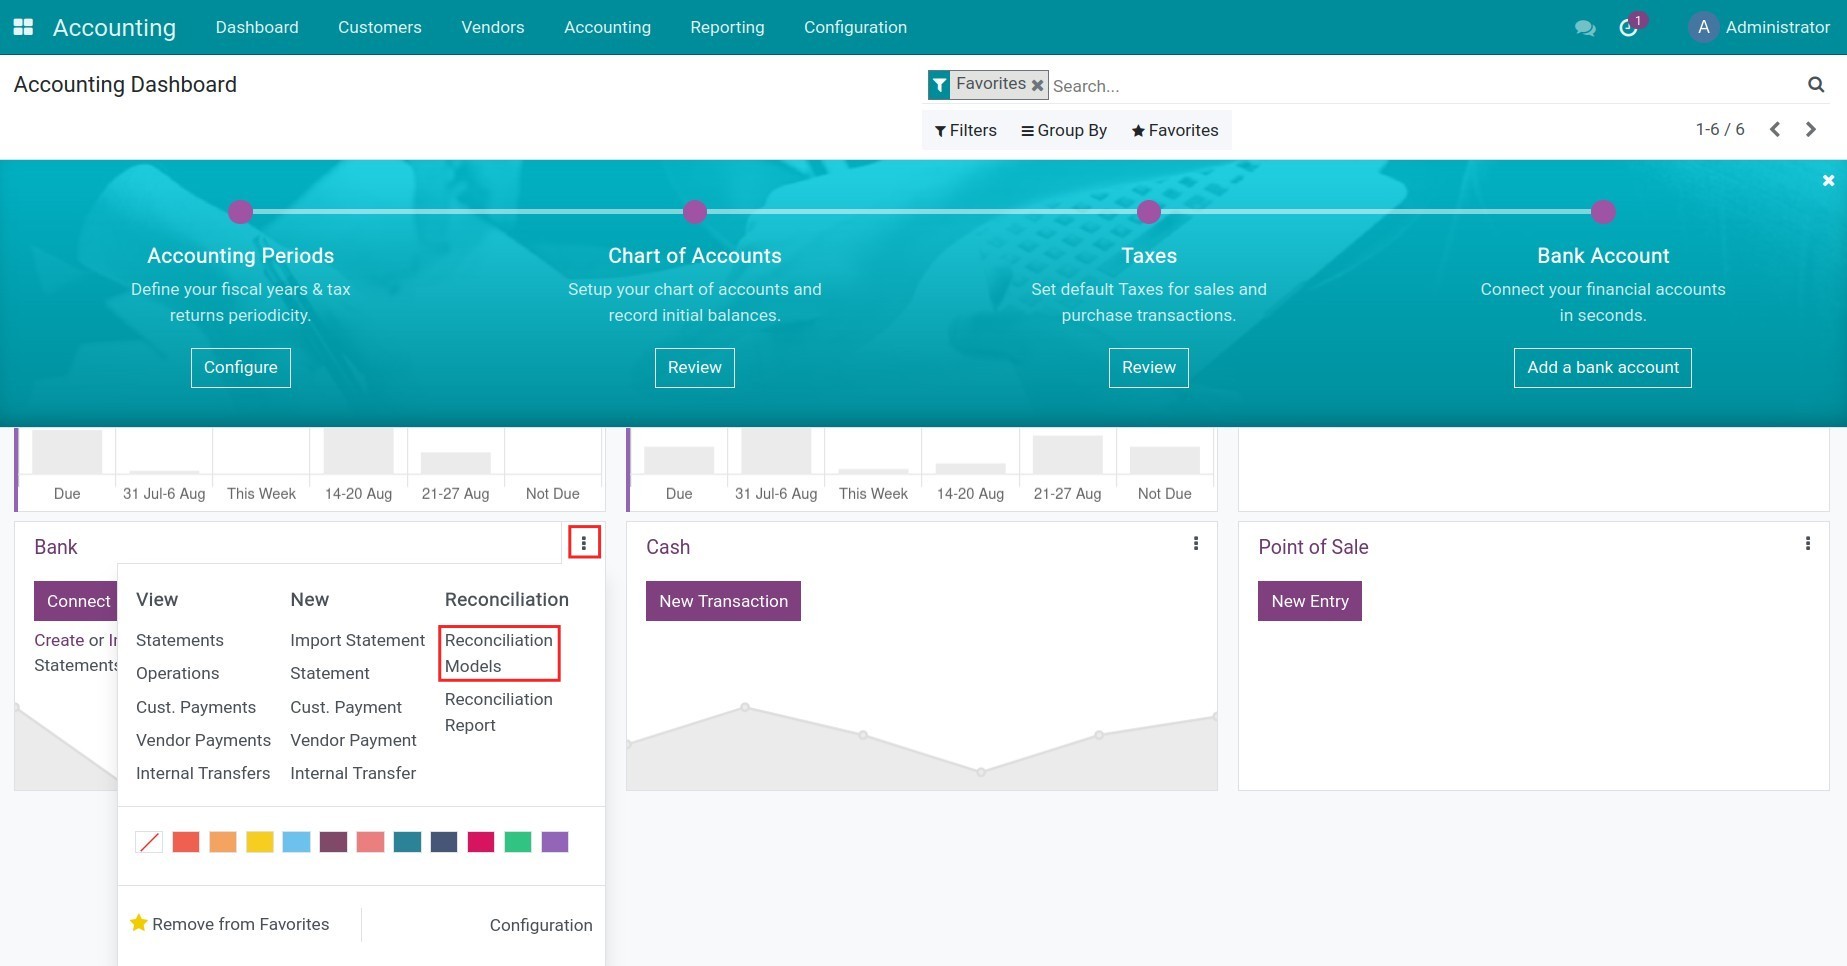
Method 2: Accounting ‣ Configuration ‣ Bank ‣ Reconciliation Models.
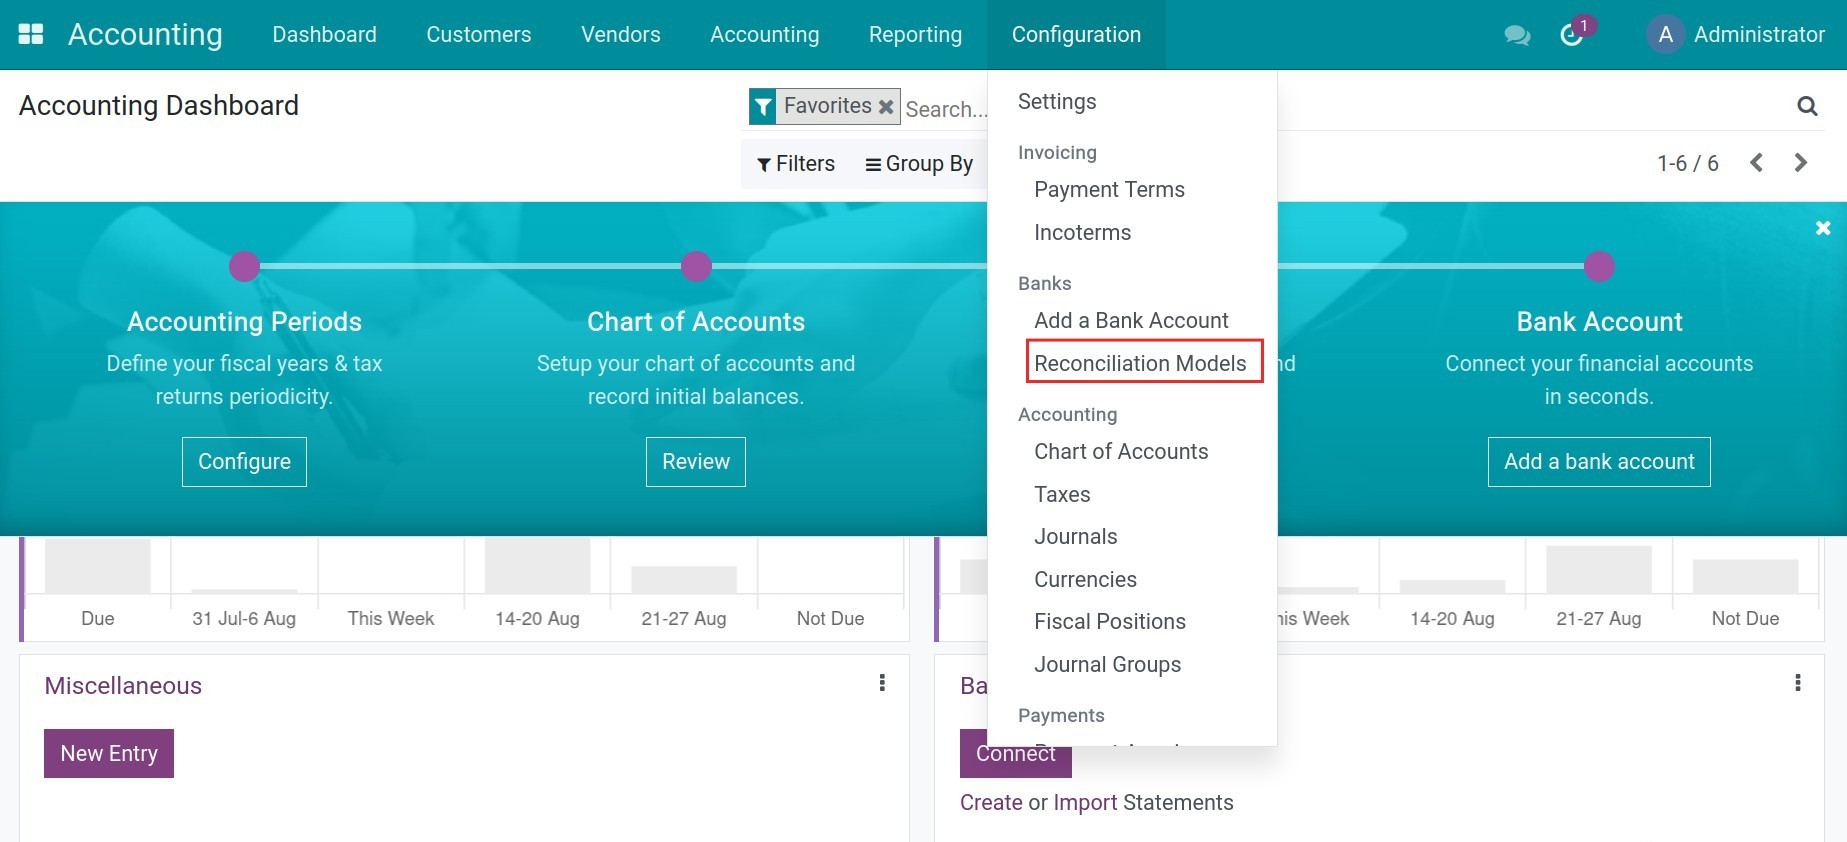
Press Create button and add the following required information:

Reconciliation model information:
Name: Add a short and comprehensive name.
Type: Select Button to generate counterpart entry.
To Check: If checked, the journal entry created from this reconciliation model will be added to the To Check field in the Other info tab to mark waiting for the user to check all the information.
Conditions on Bank Statement Line:
Journals Availability: The reconciliation subject will be displayed with the chosen journal.
Counterpart Entries:
Account: Select the counterpart account of the money account.
Amount Type: Select the suitable type.
Fixed: Used in case you usually have a fixed amount of transactions;
Percentage of balance: Used in case the system calculates a defined percentage of total bank transactions;
Percentage of statement line: Used in case the system calculates a defined percentage of statement line;
From label: Used to get value according to certain criteria in statement label (Example: Get numeric values (Amount) found on bank statement label). To write this formula you need to have knowledge of Regex.
Analytic Account: This can be used for analyzing and managing according to the needs of the administrator.
Analytic Tags: This can be used for grouping and searching purposes.
Journal Item Label: The content of the generated journal entries.

Press Save and the reconciliation model is now created.
When you reconcile a bank statement, you can use the available buttons in the Manual Operations tab to automatically add pre-configured information from the reconciliation models.
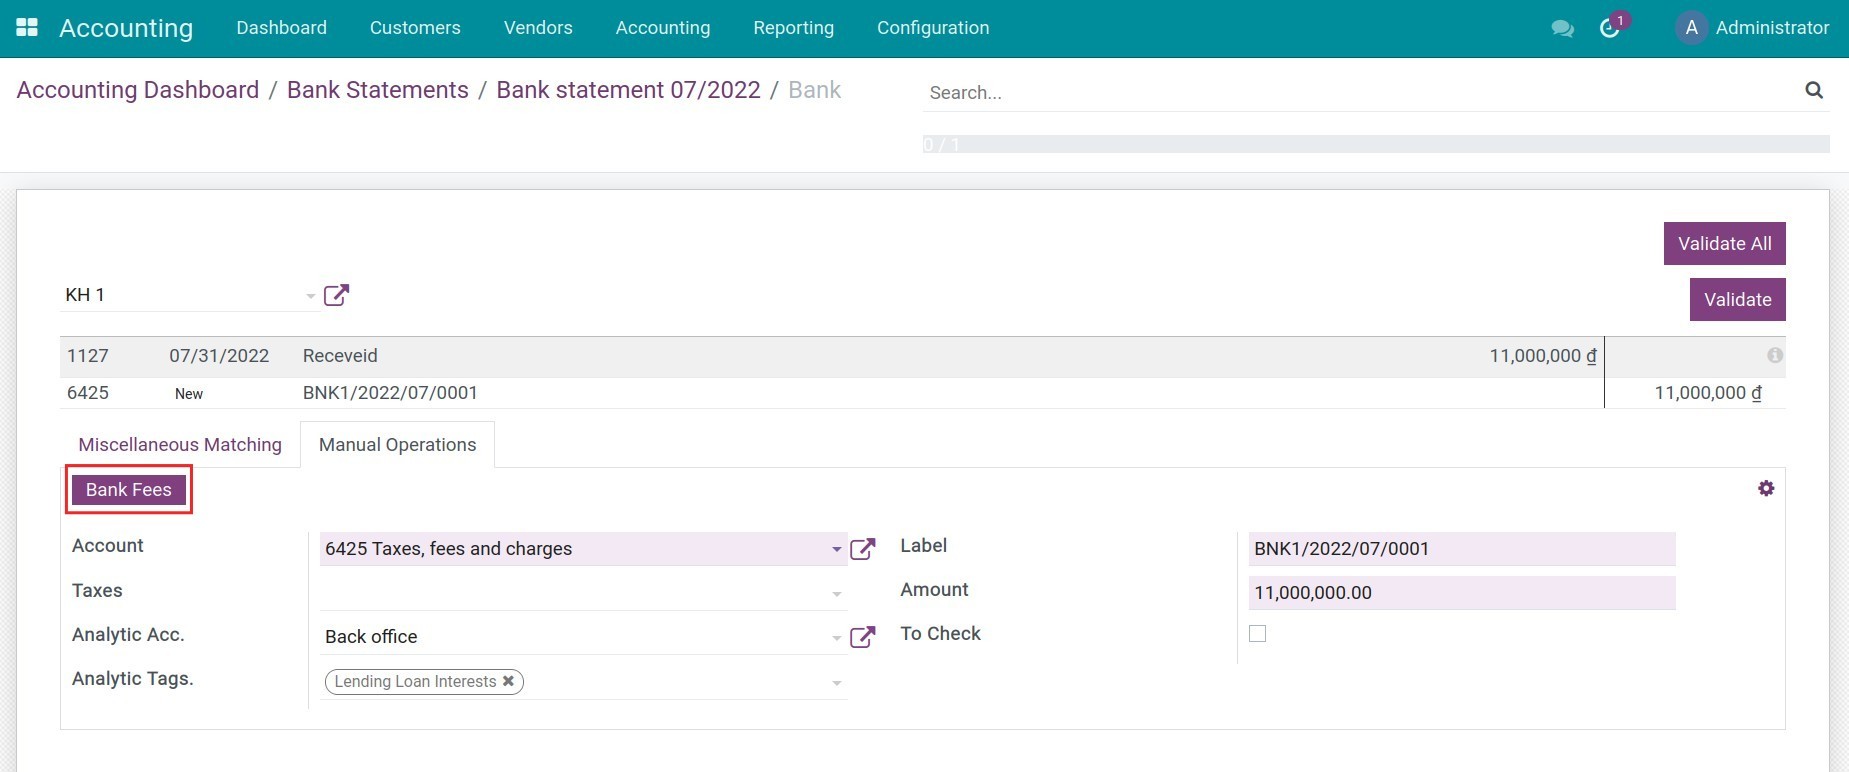
Do the final check for the starting and ending balance on the bank statement then press Validate. The bank statement status will be changed from Processing to Validated.
Rule to suggest counterpart entry
This reconciliation model suggests right away the counterpart values need to be confirmed. The automation is done based on the set of conditions configured on said model.

Reconciliation model information:
Name: Add a short and comprehensive name.
Type: Choose Rule to suggest counterpart entry.
Auto-validate: If checked, when reconciling a bank statement, the reconcile action is automatically confirmed and journal items will be created based on the configuration of the reconciliation model.
Tab Bank Transactions Conditions:
Journals Availability: The reconciliation subject will be displayed with the chosen journal.
Amount Type: The reconciliation is applied for the following transaction types:
Amount Received: Applies to received money only.
Amount Paid: Applies to the paid money only.
Amount Paid/Received: Applied for both types.
Amount Condition: The reconciliation will be applied when the amount of money is smaller, bigger, or in a determined range.
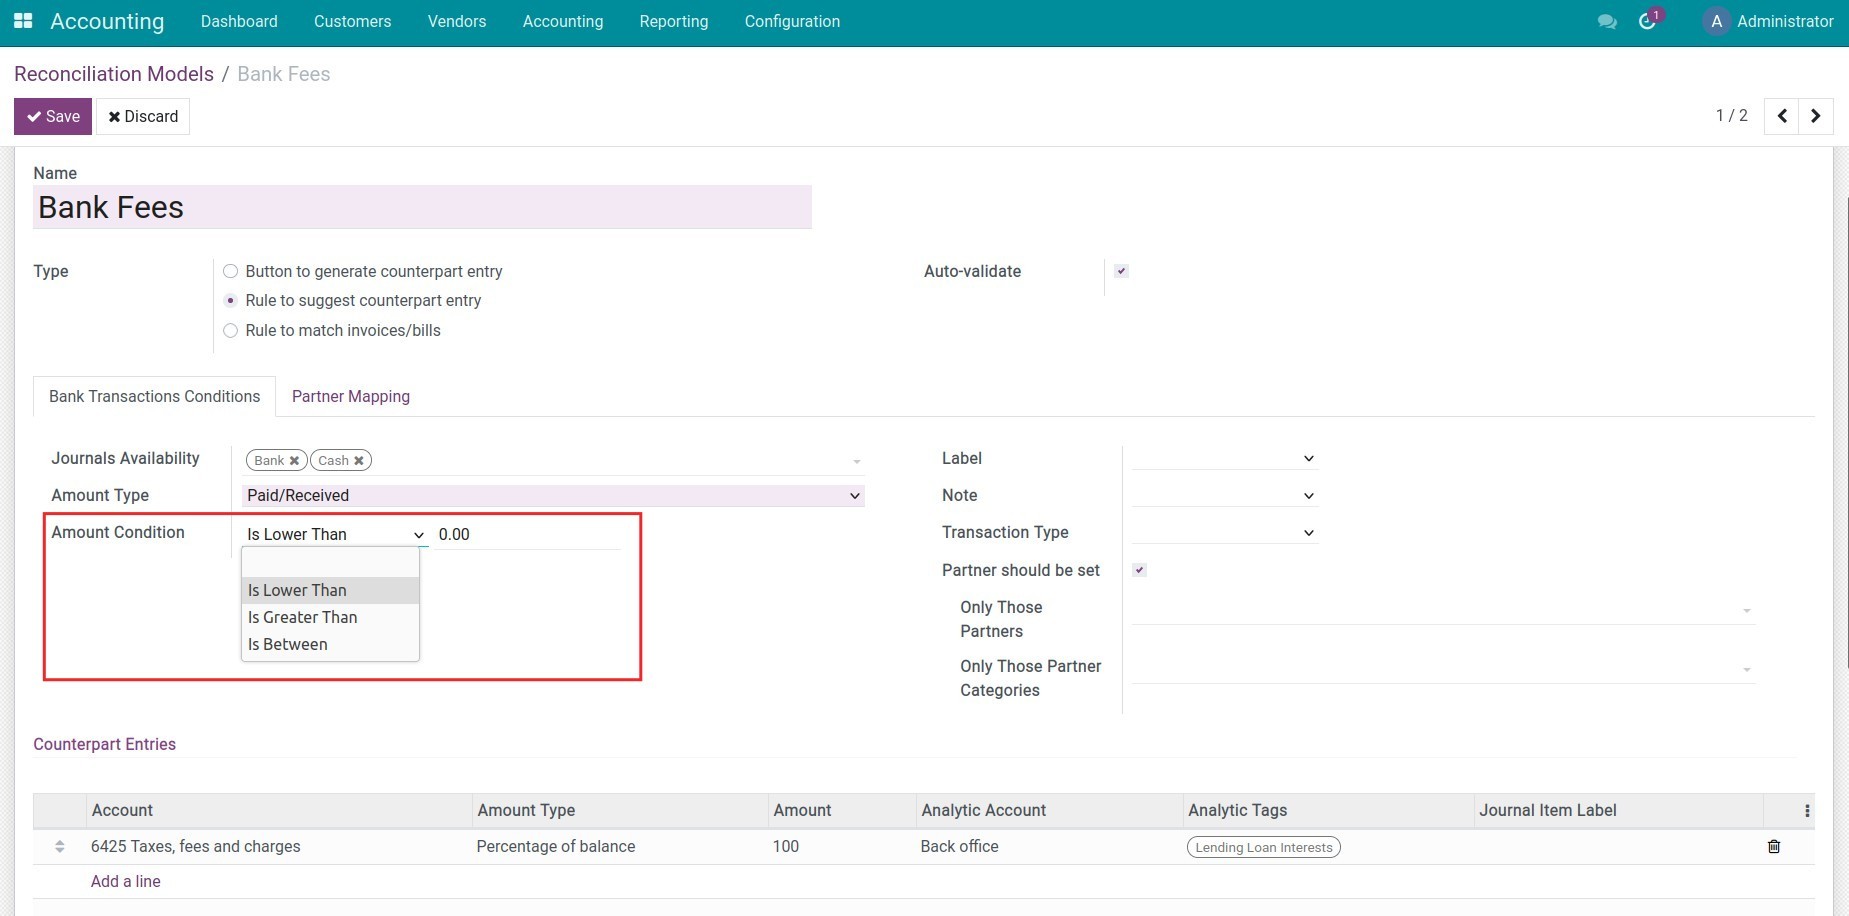
Label: The reconciliation will be automatically confirmed if the transaction’s description:
Contains: The description must contain the value written in this field.
Not Contains: The description does not contain the value written in this field.
Match Regex: Determine the content based on your own rules.
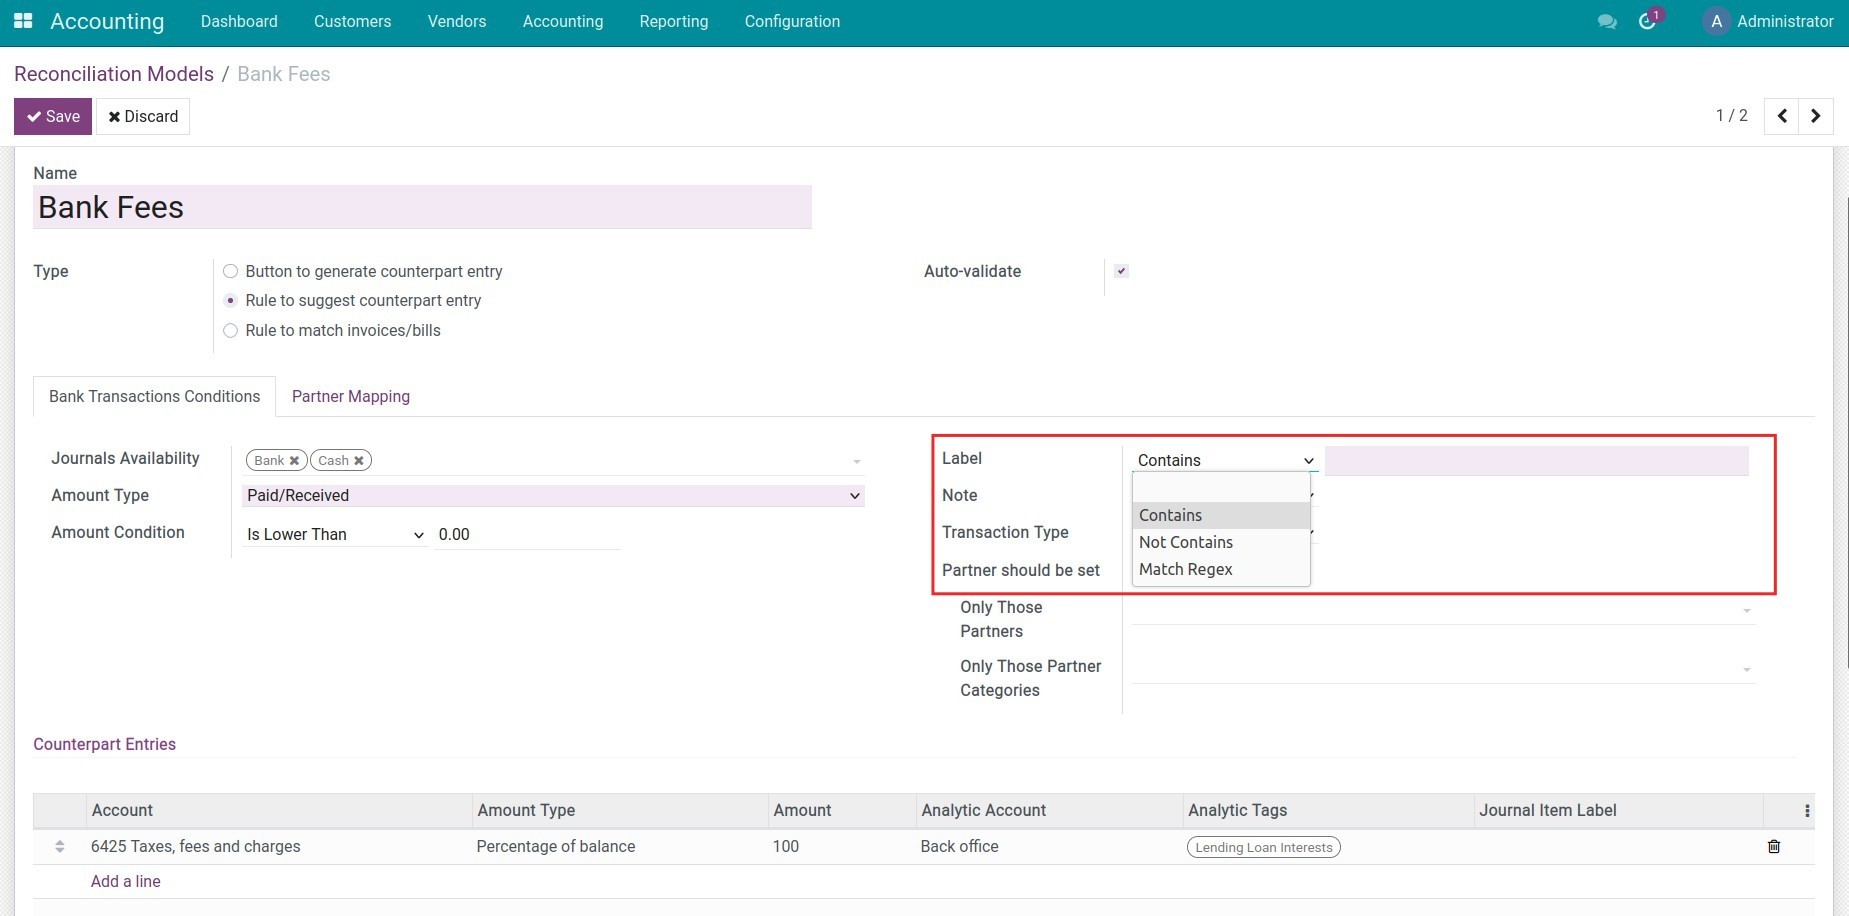
Note
Regex is the abbreviation of Regular Expression. Regular Expression is extremely useful in extracting information from a piece of text. It looks for characters in the text that match a specific rule.
Note: The reconciliation is applied only on transactions that satisfy the conditions on the note (similar to the Label field).
Transaction Type: The reconciliation model is applied only on transactions that satisfy the conditions (similar to the Label field).
Partner should be set: If checked, the reconciliation mechanism is applied to Customers/Providers. These subjects can be reduced with the following conditions:
Only Those Partners.
Only Those Partner Categories.
Counterpart Entries: Refer to the settings of the Button to generate counterpart entry model for more information.
Tab Partner Mapping: You can create multiple conditions for partner mapping, each line is a corresponding partner with the find conditions in the Label and Notes fields.
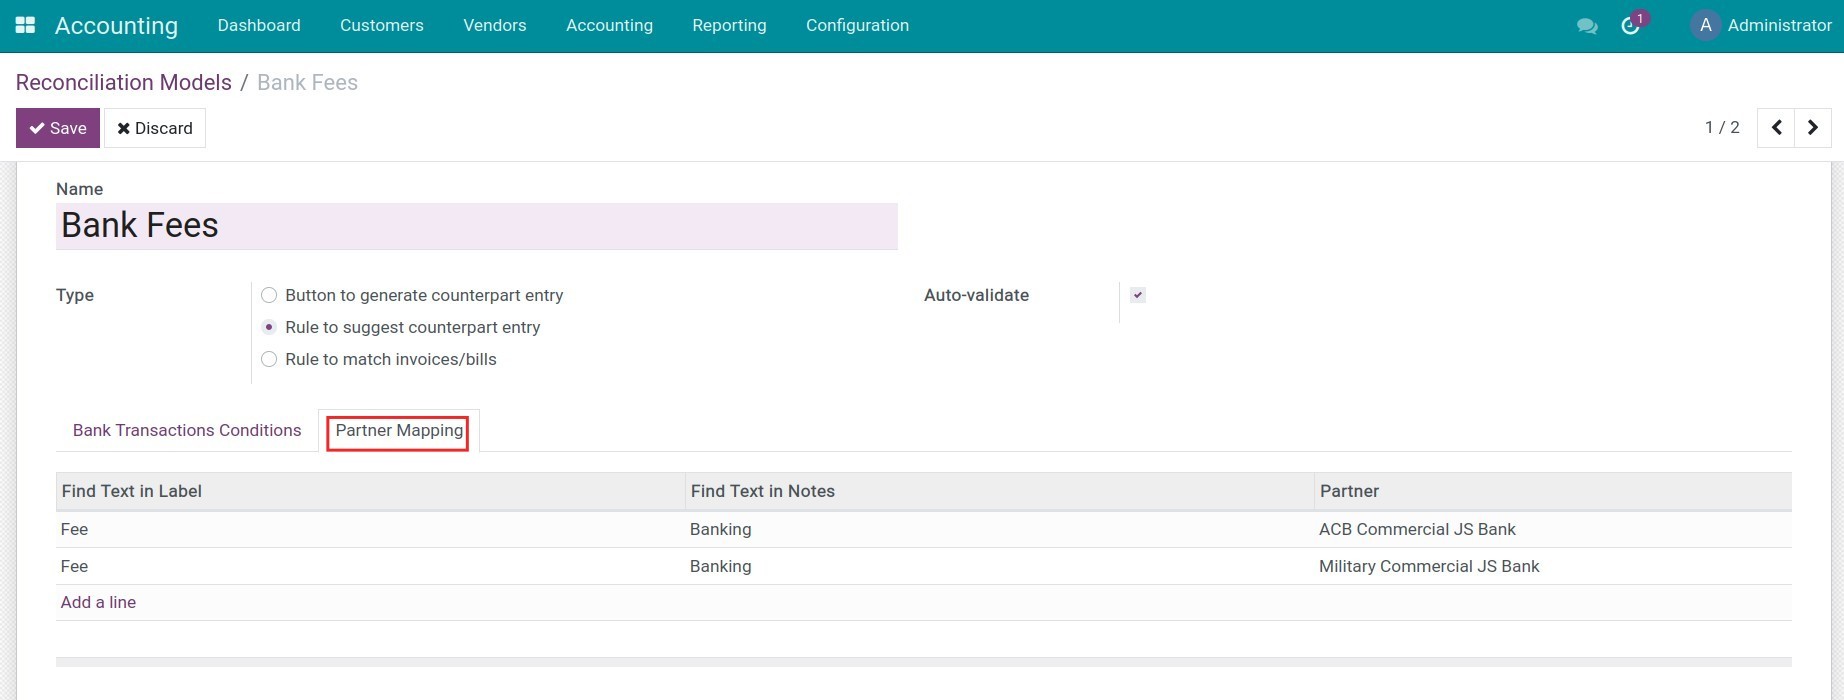
Press Save. With the above example, the conditions set for the reconciliation model are:
Label contains: fee.
Counterpart Entries:
Account: 6425
Amount Type: Percentage of balance.
Amount: 100
When you create a bank statement and select Reconcile, the system will automatically search and match each journal item with the bank statement as in the image below.
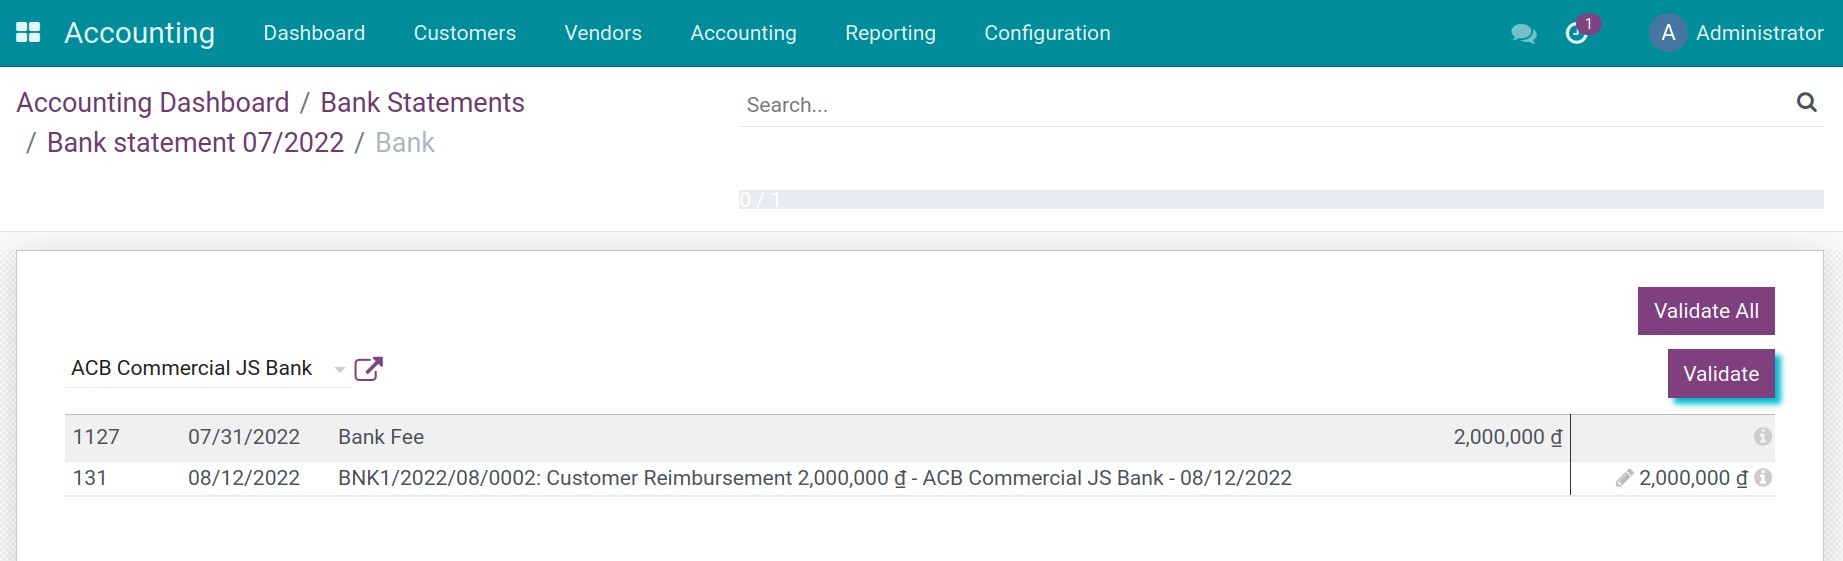
Finally, you have to validate the bank statement to finish the reconciliation process.
Rule to match invoices/bills
This type of reconciliation model will automatically choose the right customer invoice or vendor bill that matches the payment amount. The configuration for this model is similar to the one for the Suggestion counterpart values model. However, you need to pay attention to the following fields:
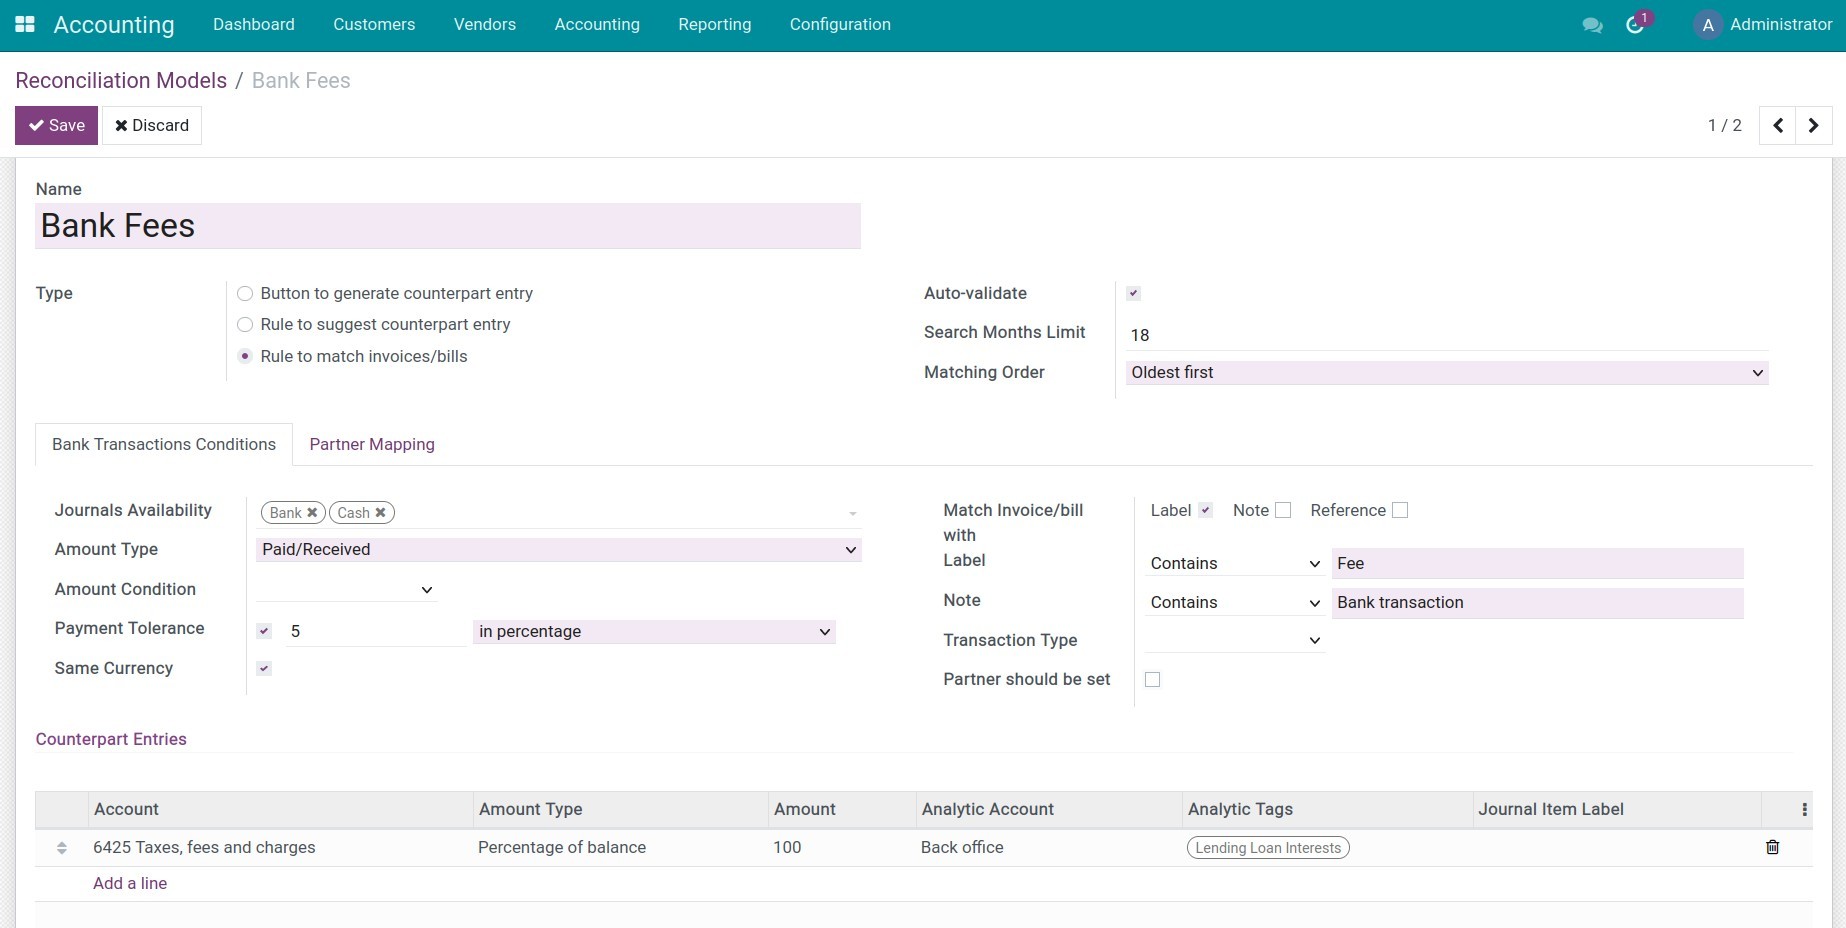
Reconciliation model information
Past Months Limit: Number of months in the past to consider accounting incursions when this condition applies.
Matching Order: Choose the transactions matching order, there are 2 options:
Oldest first.
Newest first.
Tab Bank Transactions Conditions
Same Currency: If checked, only the journal items in the same currencies can be reconciled.
Payment Tolerance: The acceptable payment amount difference in percentage or in absolute amount. This will be used in case of underpayment.
Match Invoice/bill with: If checked, it will increase the ability to find the exact invoice that matches the payment.
Tab Partner Mapping: Fill the information to map partner.
Click Save. You need to add the full name of the customer or provider when reconciling from a bank statement. The system will search and match the invoice that was created earlier.
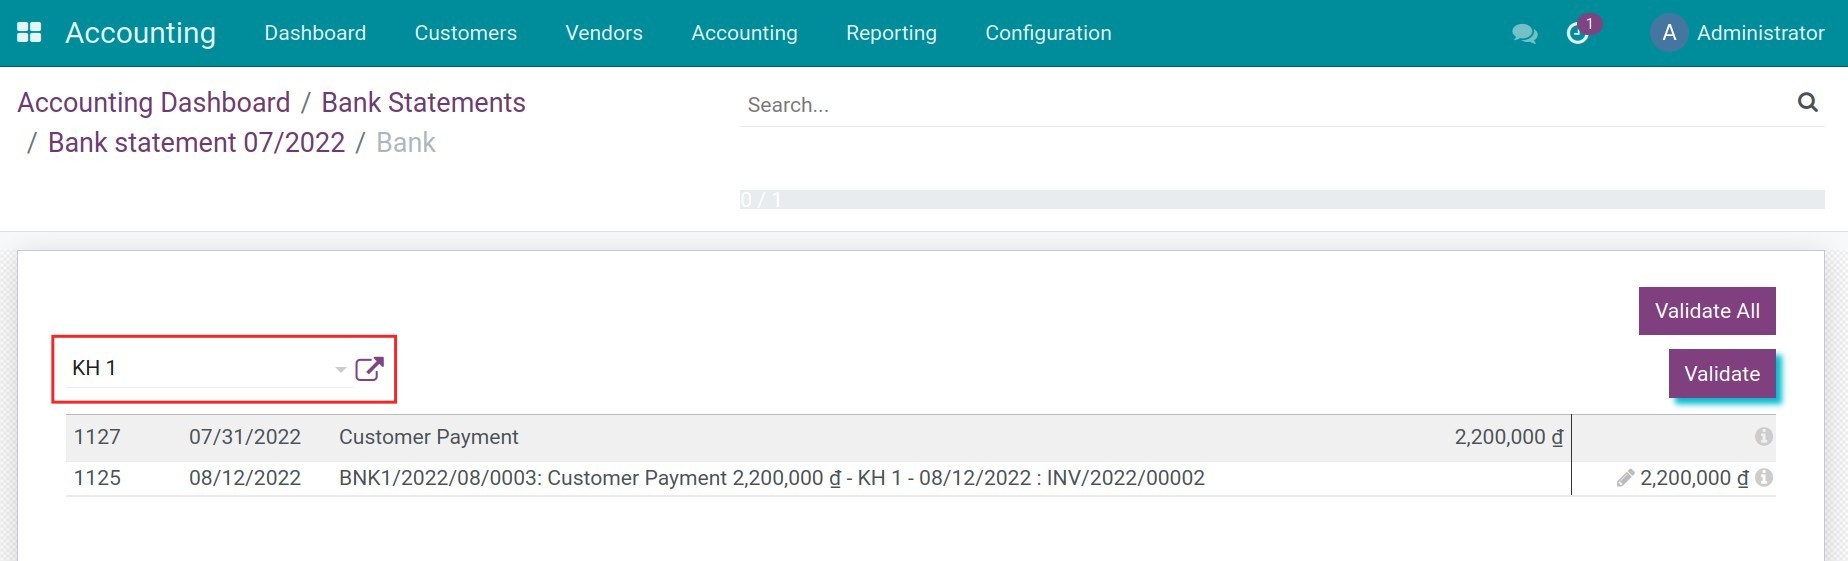
Then press Validate to proceed with the reconciliation and also Validate the bank statement.
See also
Related article
Cash on hand management
Foreign currencies management
Accounting configuration for salary rules
Accounting configuration for salary rules
To record salary costs, employee liabilities, insurance liabilities, labor union fees, etc., and other related payments, Odoo provides integration between the Payroll app and the Accounting app when installing the iSuite Accounting & Finance app.
Requirements
This tutorial requires the installation of the following applications/modules:
- Accounting & Finance
- Payroll
General settings
Navigate to Payroll ‣ Configuration ‣ Settings then go to the Accounting section:
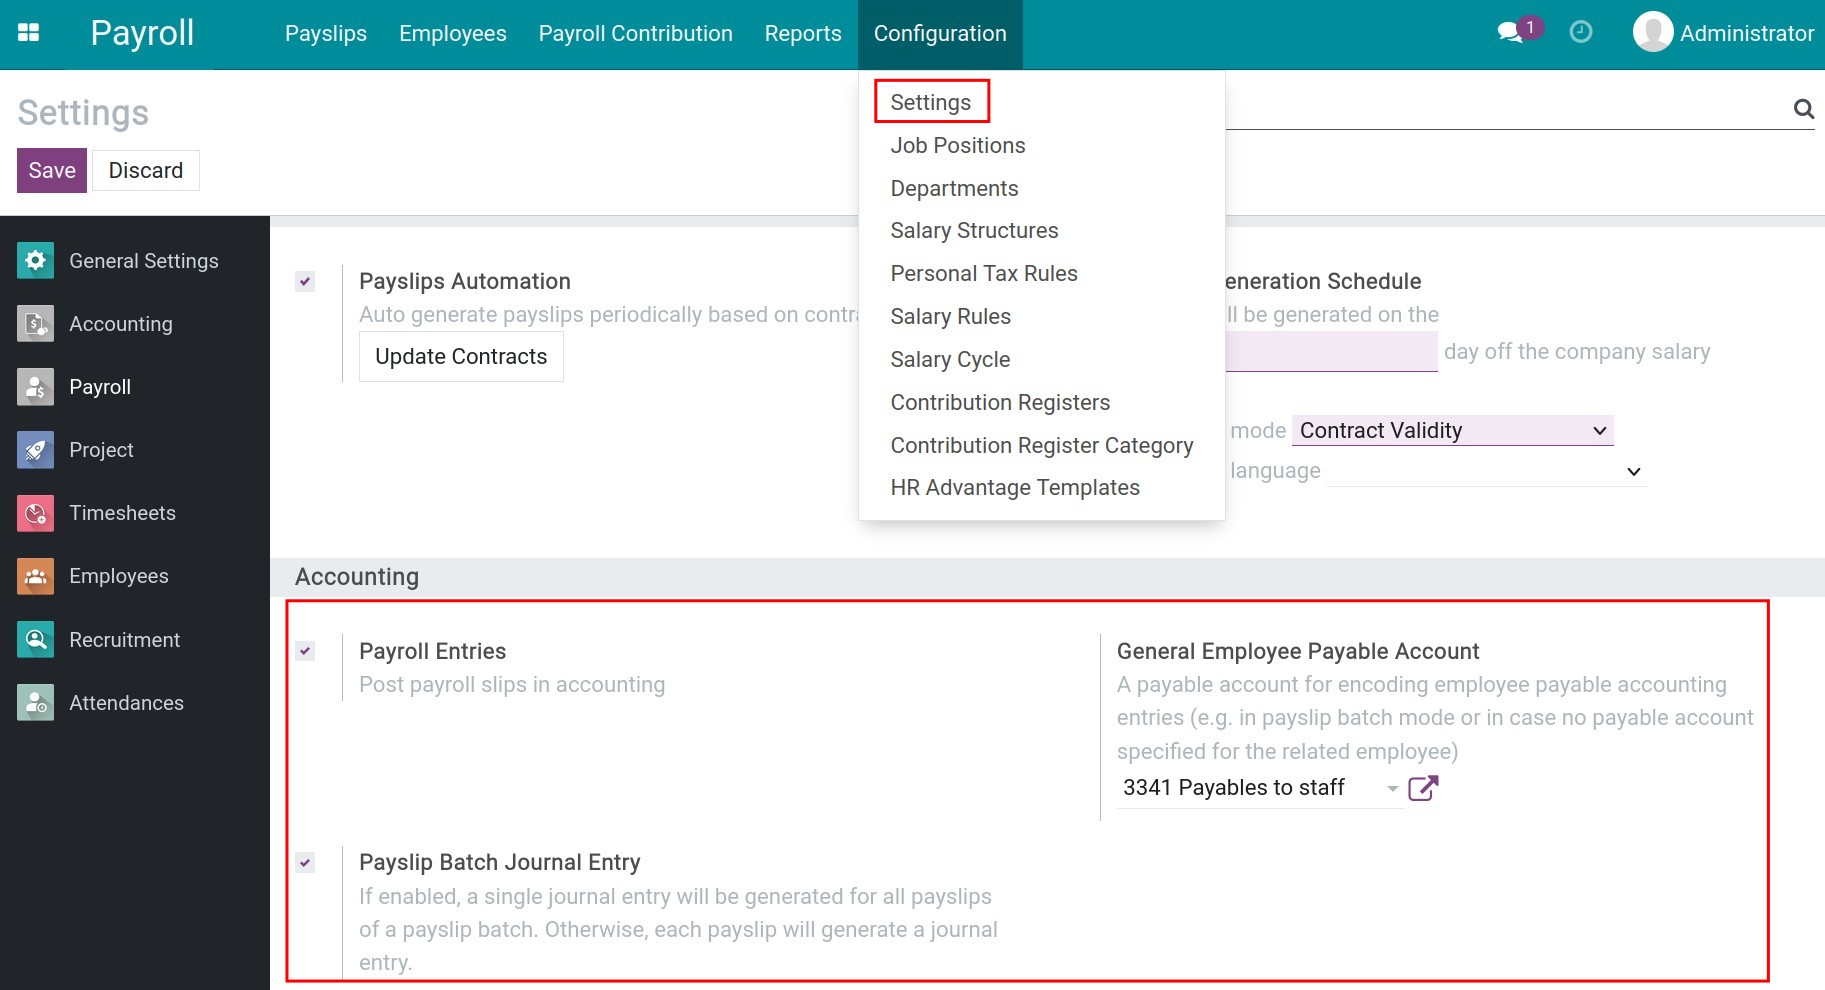
From here, you can enable the following features:
- Payroll Entries: Post payroll entries in accounting automatically;
- Payslip Batch Journal Entry:
- If enabled, a single journal entry will be generated for all payslips when you don’t want to manage the details of each employee.
- If not enabled, each payslip will generate a journal entry for each employee.
- General Employee Payable Account: Select a payable account to record employee payable accounting entries.
Configure salary rules
To configure a salary rule, navigate to Payroll ‣ Configuration ‣ Salary Rules, check off the Structure filter then find the salary rule that you need to work on. You go to the Accounting tab and press Edit:
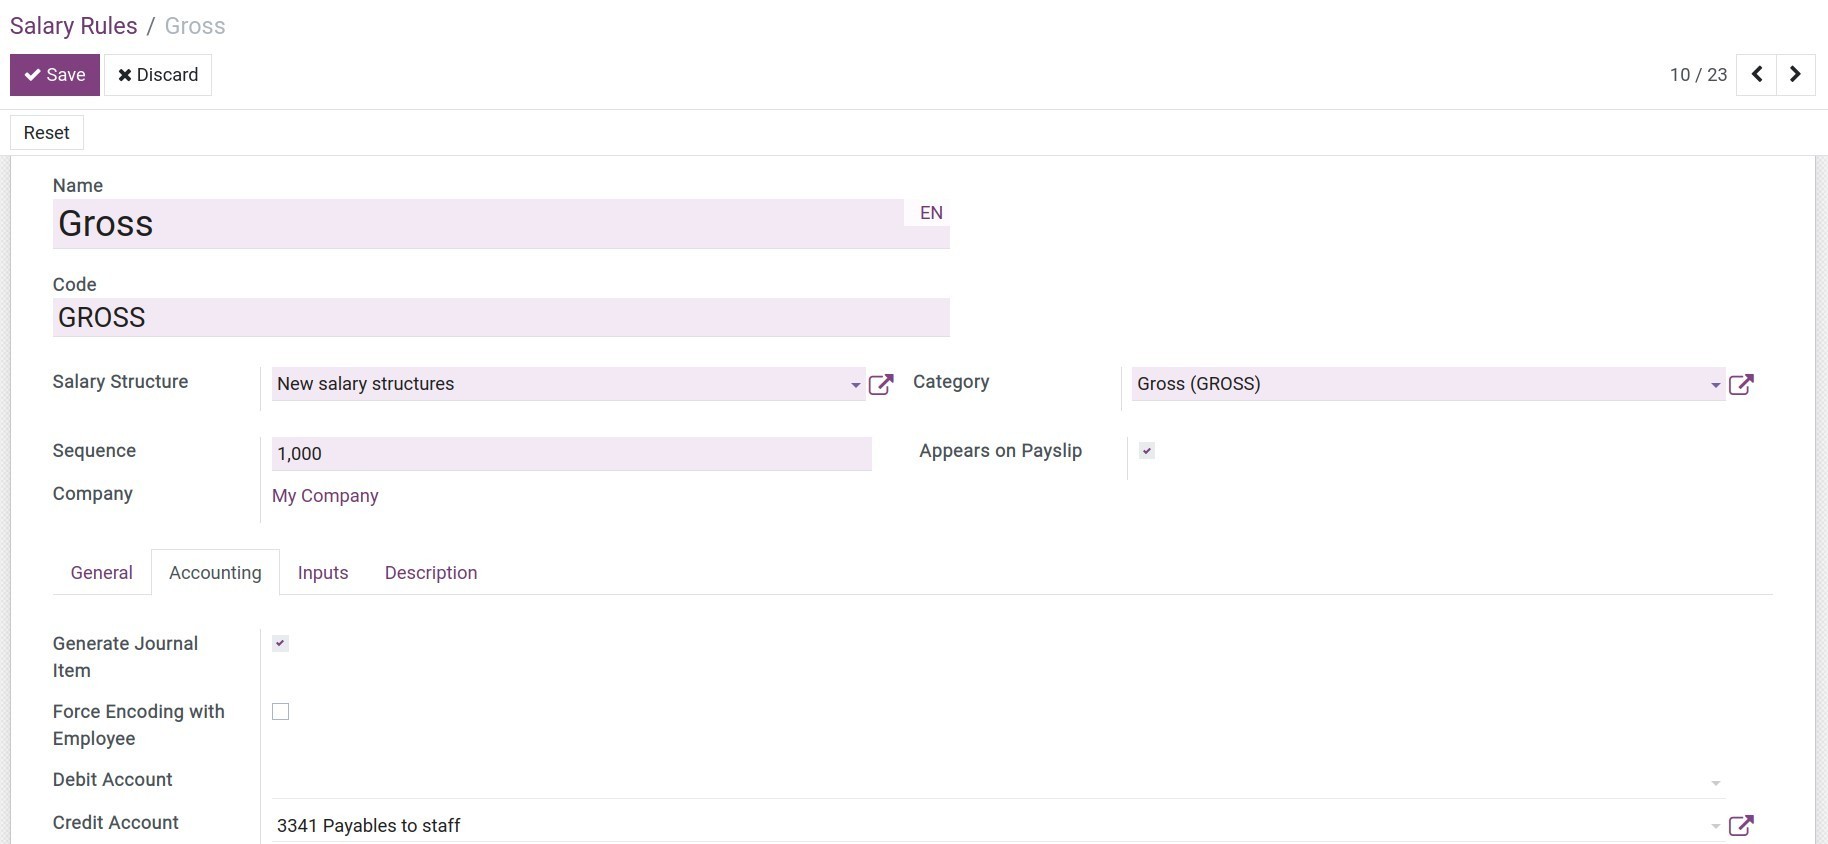
- Generate Journal Item: Enable if you want to create journal items for the salary entries.
- Force Encoding with Employee: If enable, accounting journal items generated by this rule will always be encoded with the private address of the employee as accounting partner, no matter the company’s Payslip batch journal entry mode is enabled or disabled.
- Debit Account: Select the debit account for accounting entries.
- Credit Account: Select the credit account for accounting entries.
You need to configure an expense account on each salary rule when you don’t distinguish salary costs for each department or each employee. In case you want to distinguish salary costs for each department or each employee, you need to configure an expense account on each department/labor contract.
- Record the salary costs on each department: Configure the expense account on the department’s settings.
To set up an expense account for each department, navigate to Payroll ‣ Configuration ‣ Departments and configure the accounting account on the Expense Account field:

- Record the salary costs on each employee: Configure the expense account on the labor contract settings.
To set up an expense account for each employee contract, navigate to Payroll ‣ Employees ‣ Contracts, find the contract that you need to configure, and select an account for the Expense Account field:
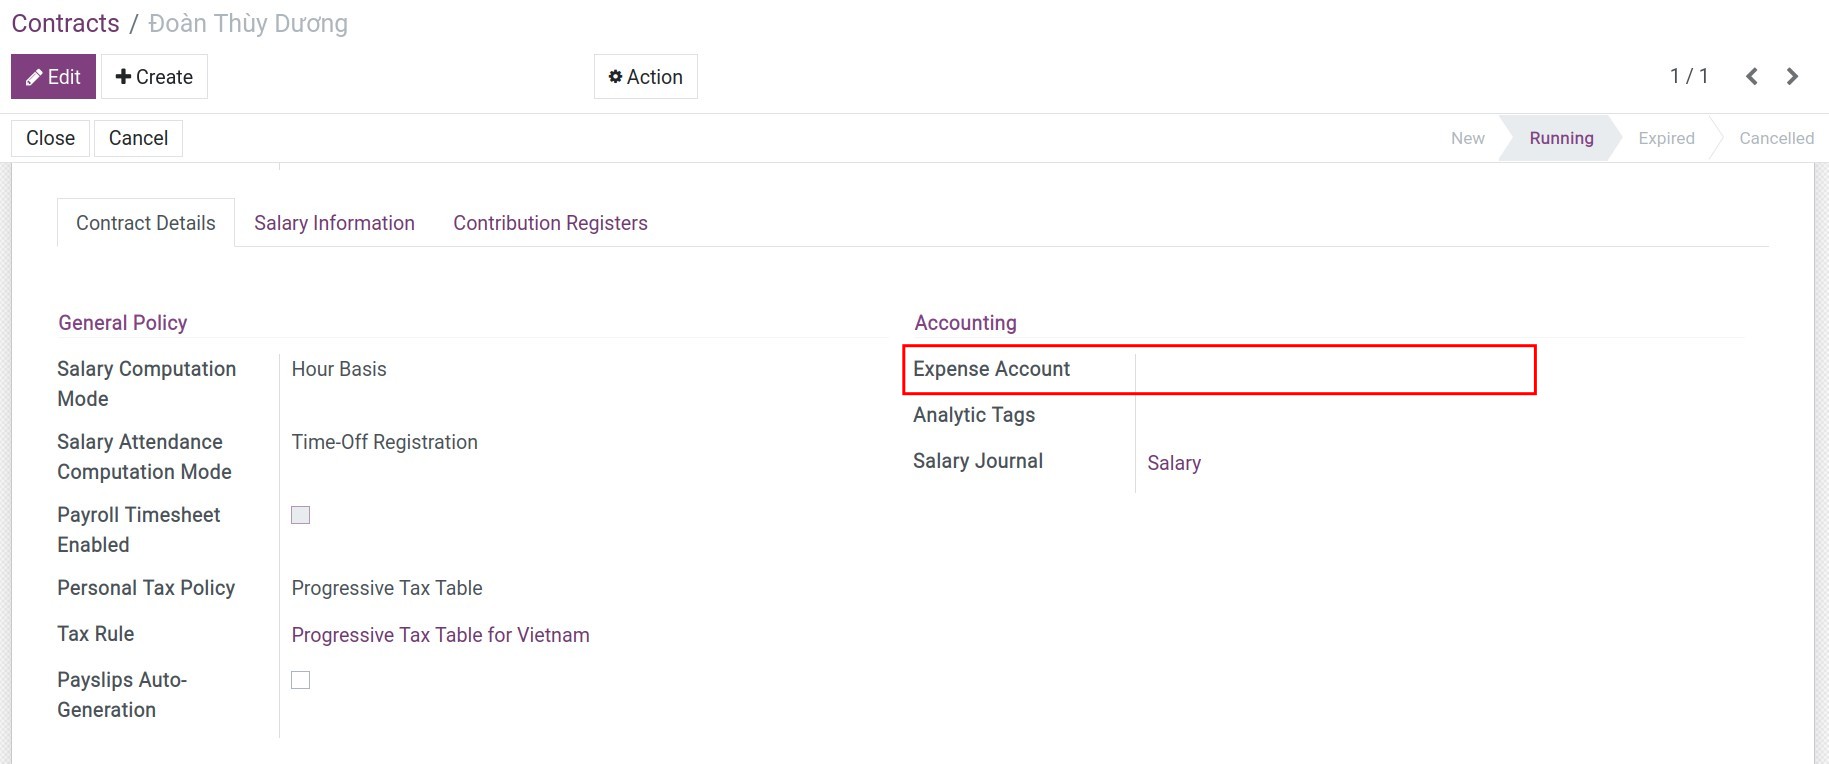
Note
In case all three places have an expense account configured, the software will prioritize in order: salary rules, contract, and the last one is department.
Salary rules examples
1. Gross salary rule
For the Gross salary rule, configure the accounting accounts as follows:
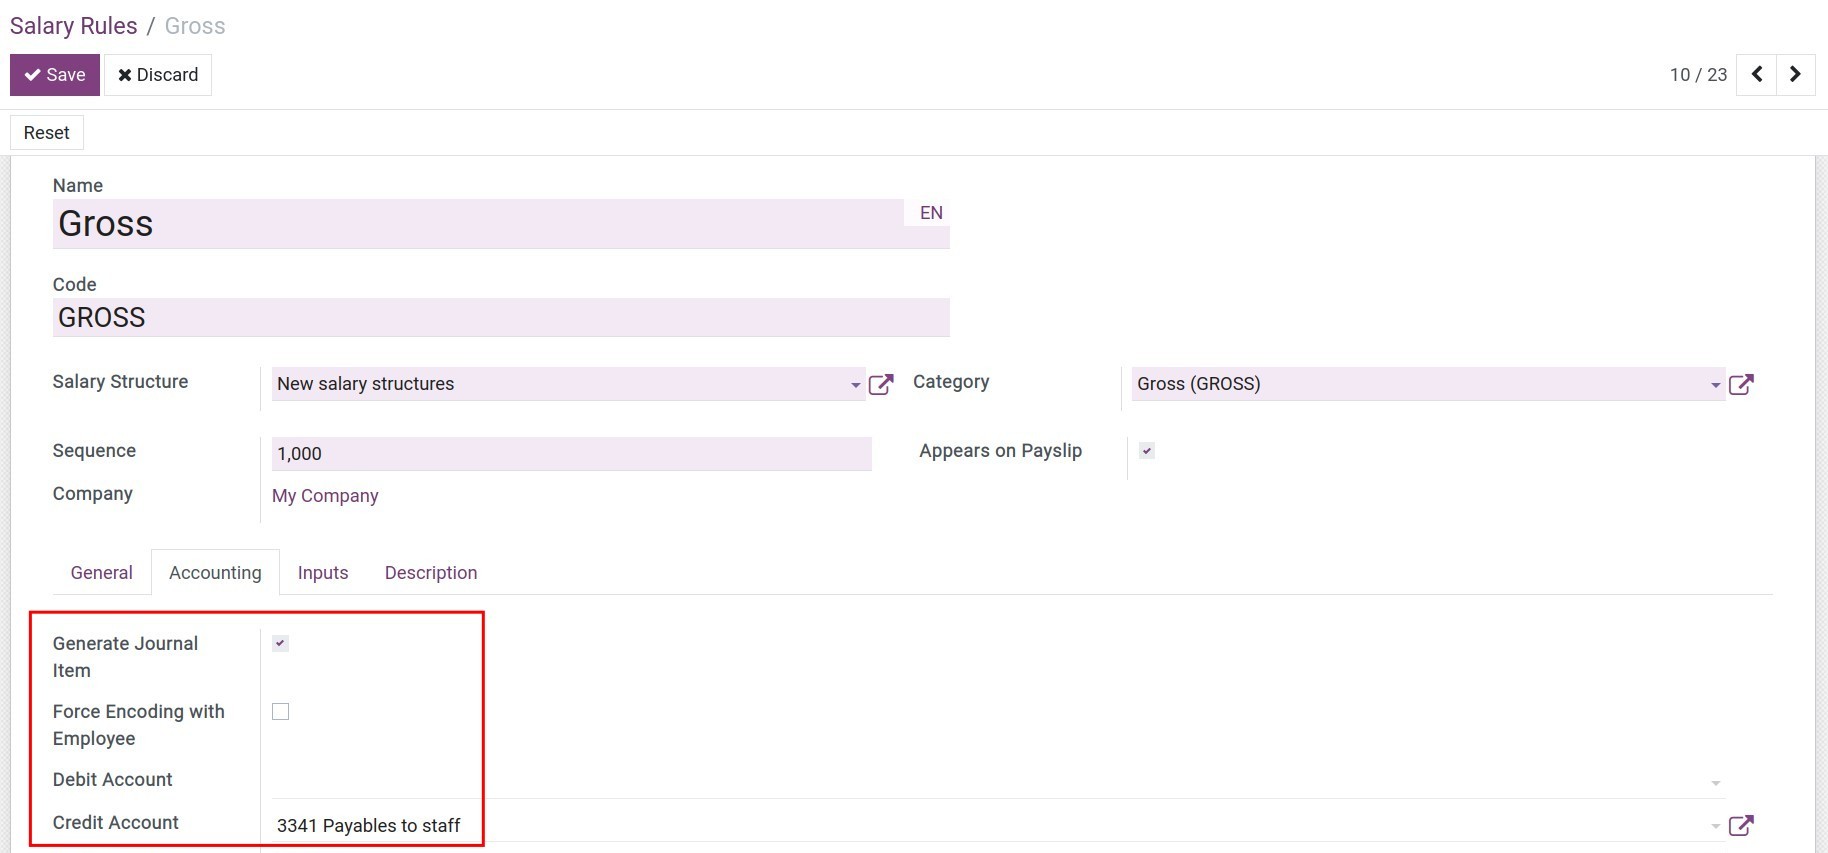
- Debit Account: Select a debit account for the expenses entries of your company. Leave empty if you want to record salary costs for each employee or department.
- Credit Account: Select the Payables to staff account.
2. Salary rules for employee insurance, labor union fees, personal income tax
For salary rules related to employee contributions such as insurances, including social insurance, health insurance, unemployment insurance, labor union fees or personal income taxes, etc., configure the accounting accounts as below:
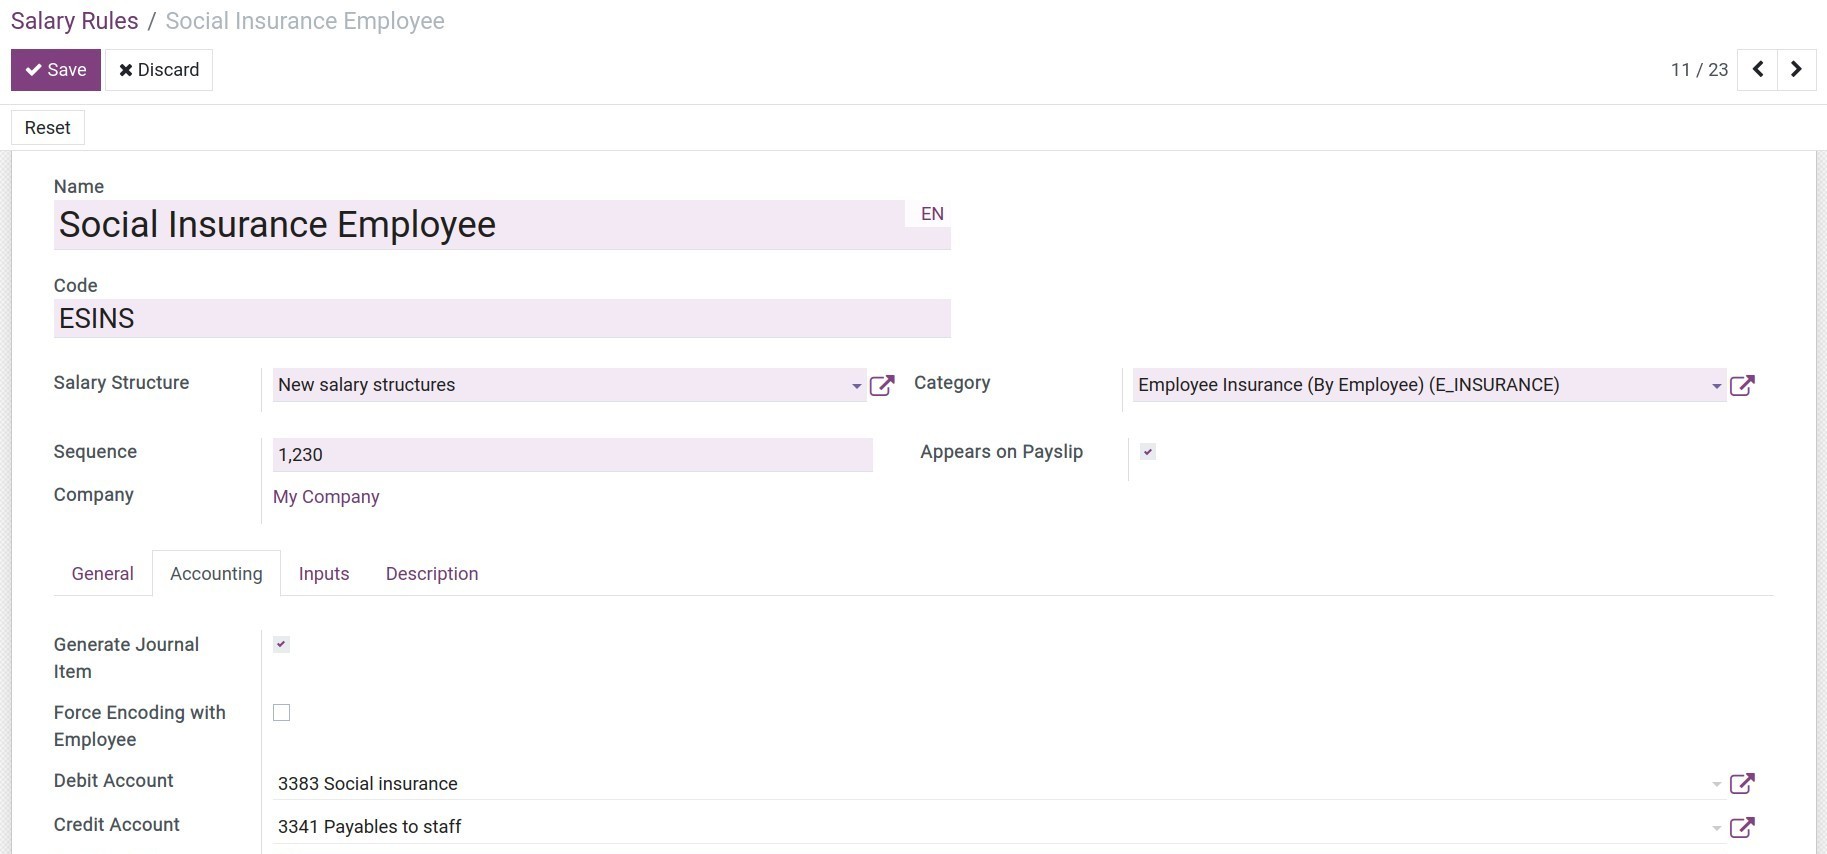
Because the Employee Insurance (by employee) on payslip is “-” amount:
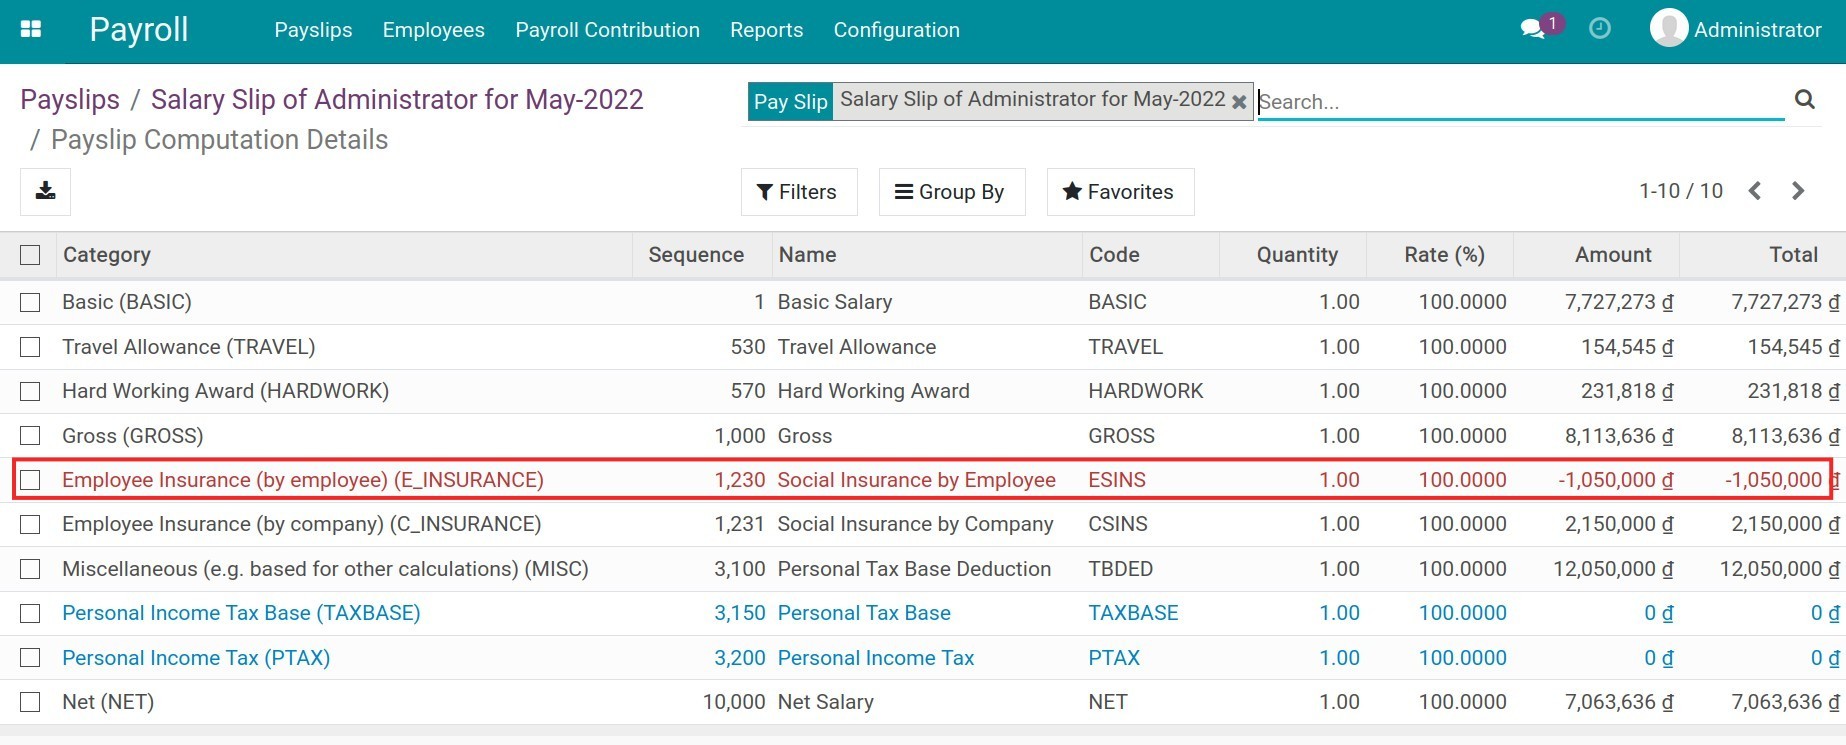
Therefore, you need to enter the following information:
- Debit Account: Select an accounting account to record the employee’s contributions.
- Credit Account: Select the Payables to staff account.
When there is a journal item, the system registers Debit 3341/Credit 3383.
Note
- For journal items related to the Payables to staff account, if this account is not configured on salary rules, the General Employee Payable account will be used instead. In this case, the Payables to staff account will be reconciled automatically between debit and credit.
3. Salary rules related to company expenses
You can configure accounting accounts for salary rules related to company expenses such as social insurance, health insurance, unemployment insurance, labor union fees, etc. as follows:
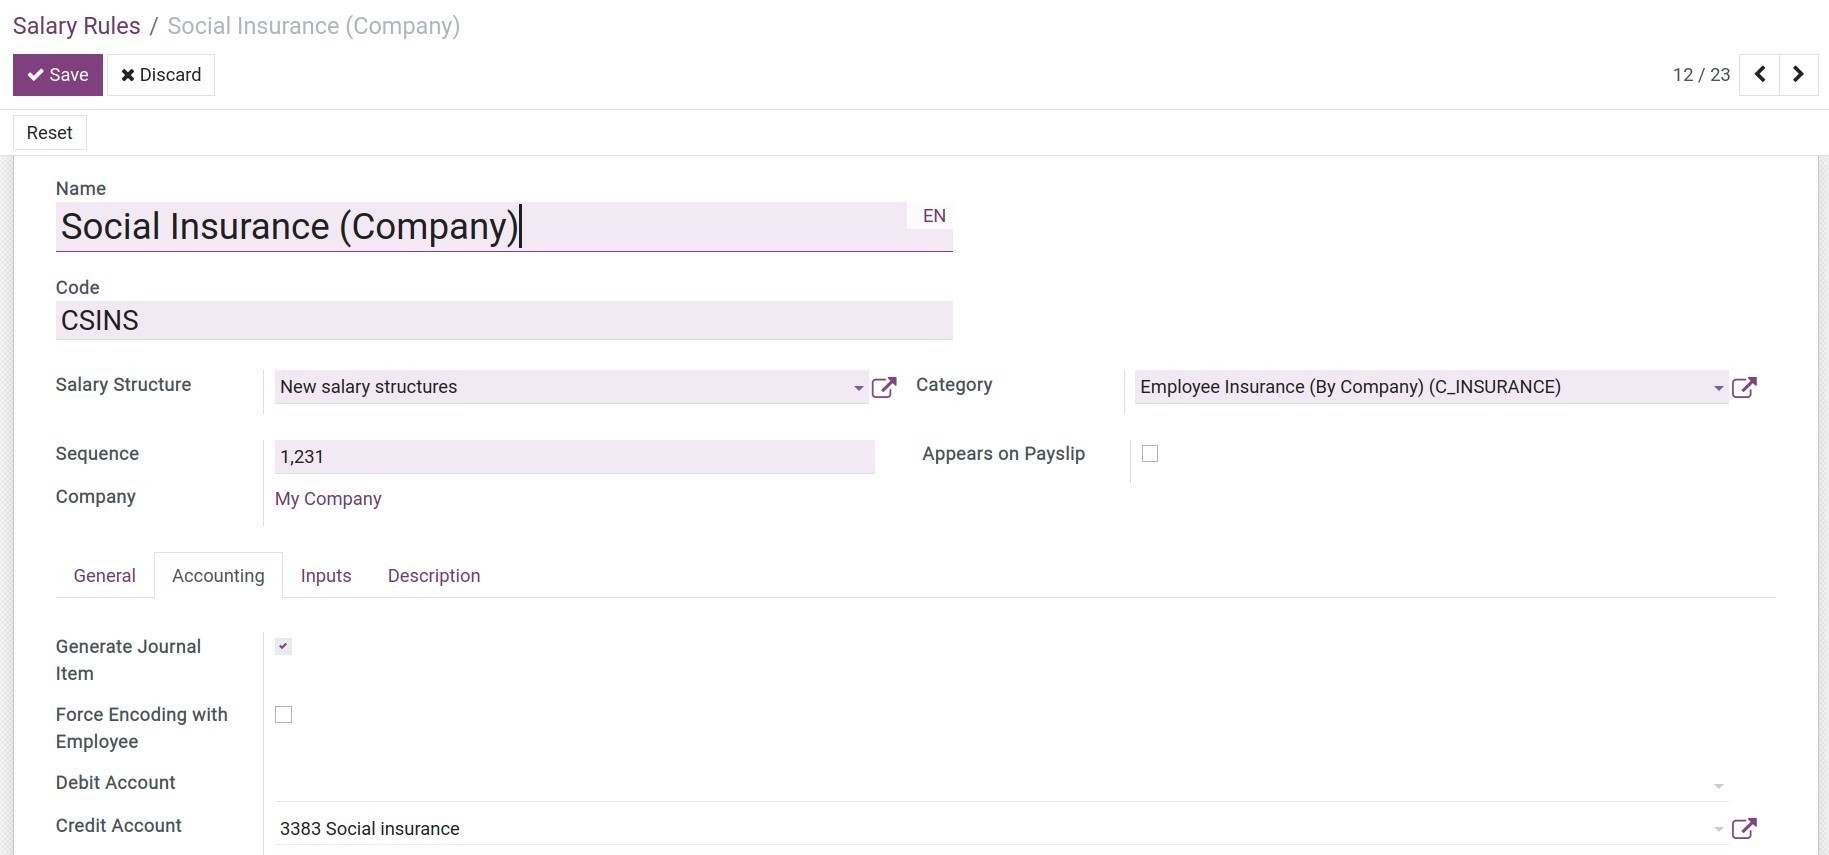
- Debit Account: Select the debit account that records the company’s expenses entries. Leave empty if you want to record expenses on each department’s account.
- Credit Account: Select the reciprocal account of the company’s expenses account.
See also
Related article
- Salary and the deductions payments
Analytic account in iSuite
Analytic account in iSuite
Management accounting has an important role in corporate management. Based on the information provided by the management accountant, managers can plan strategies, make decisions and control the operations of the business.
Requirements
This tutorial requires the installation of the following applications/modules:
Accounting, Payroll, Manufacturing
With administrator permission, you can activate the Analytic Accounting feature by navigating to Settings ‣ Accounting ‣ Analytics:
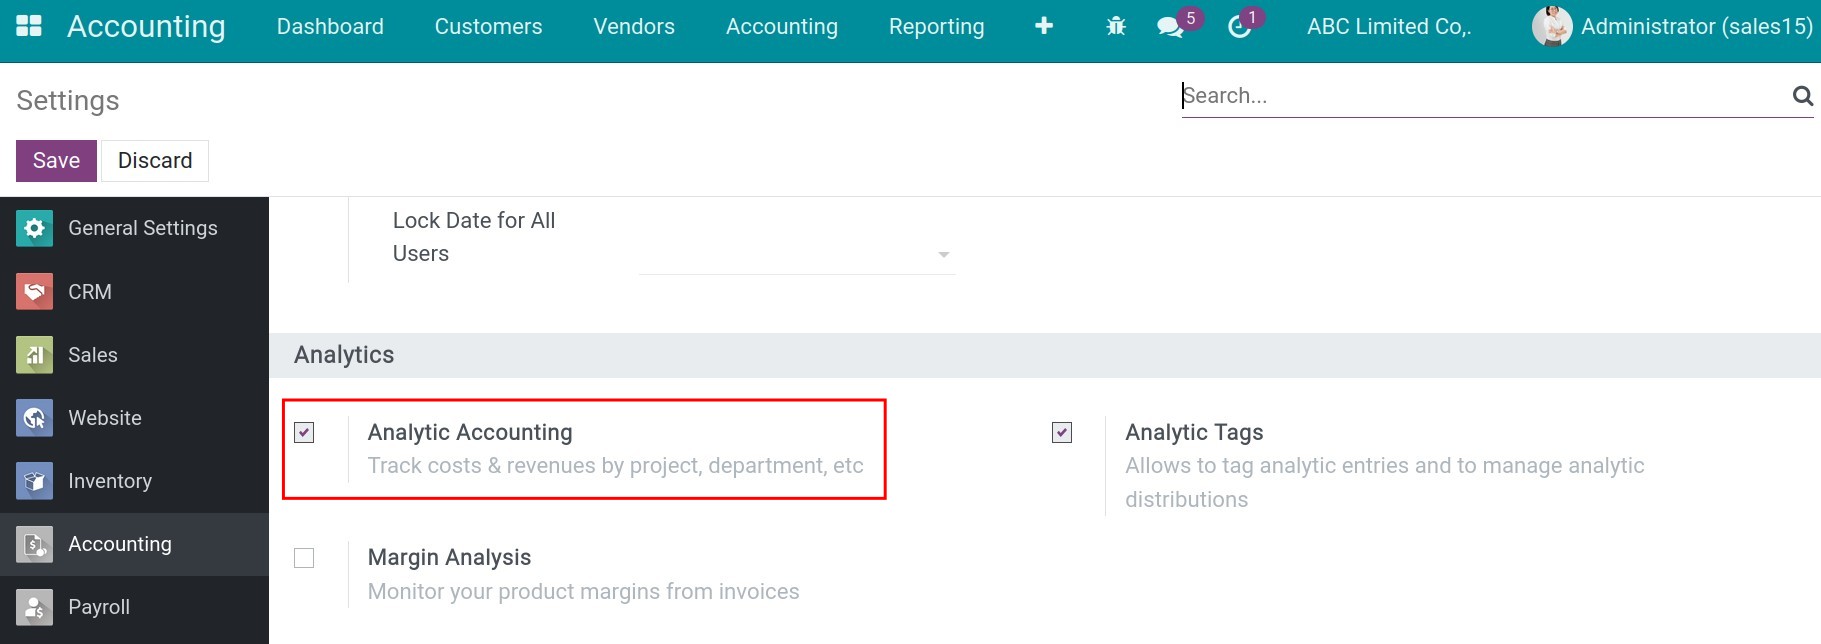
Once done, go to the Accounting app and create new analytic accounts according to the purpose of your Analytic Report. Navigate to Configuration ‣ Analytic Accounts.
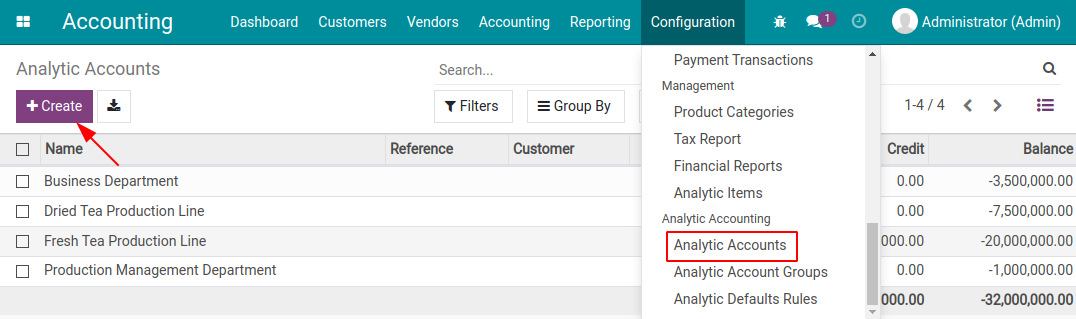
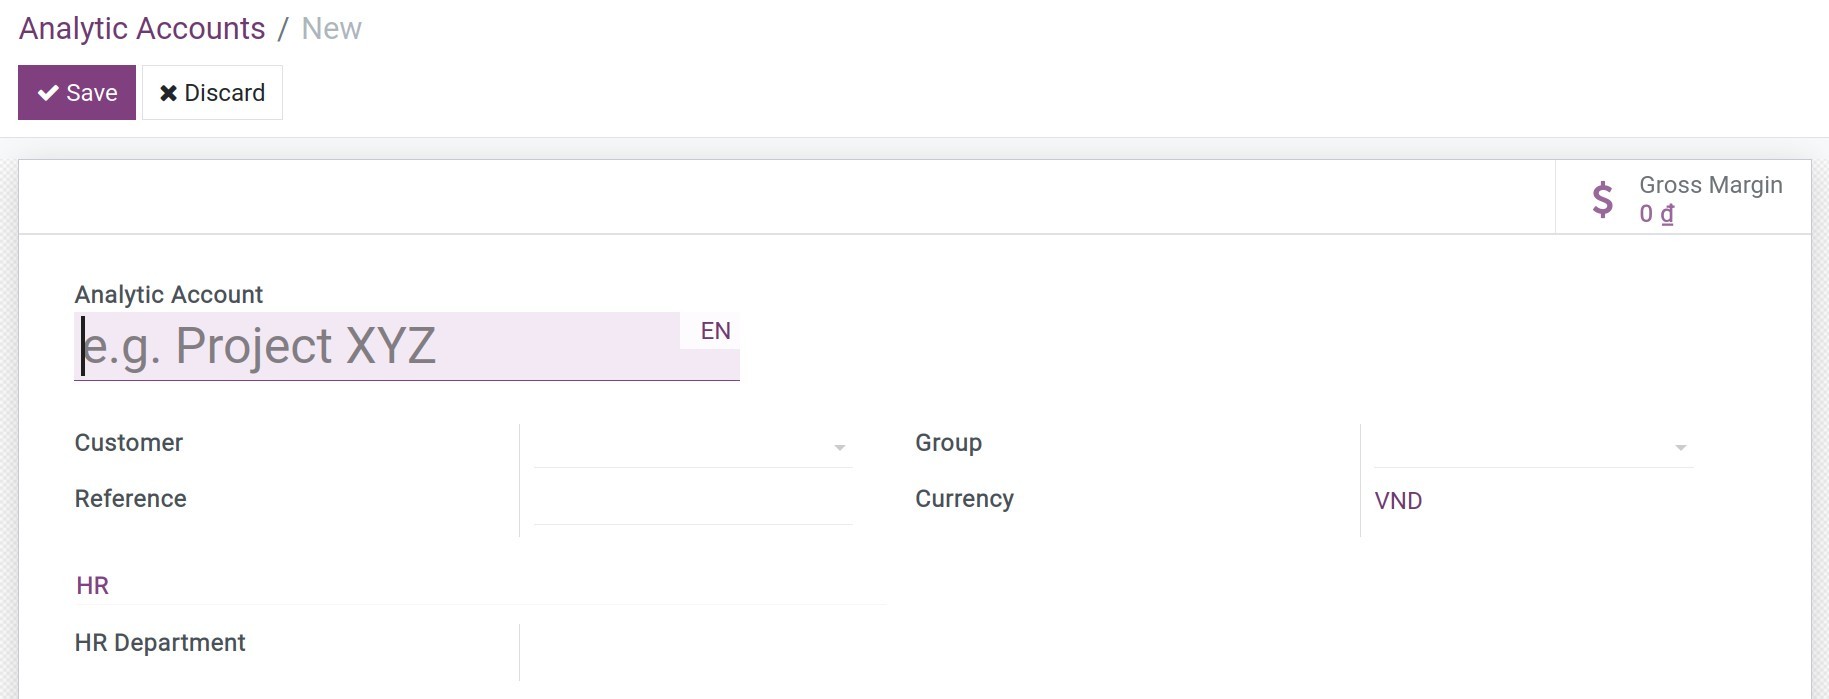
Analytic Account: analytic ccount’s name. For example: ABC project, XYZ department, etc.
Reference: sources, documents leading to this Analytic Account or Analytic Account code.
Customer: customer you want to follow cost, revenue by this Analytic Account, you can leave it blank if you don’t allocate to any specific customer.
Group: select the group that will help you easily find and classify Analytic accounts. If there is no suitable group, you can go to Accounting ‣ Configuration ‣ Analytic Account Group ‣ Create to create.
Currency: the currency that will be shown in Analytic Report, configured according to the company’s currency.
HR - Department: when you choose this Analytic Account in a department, it will be recorded here.
To a better understanding of the Analytic Accounting feature in Viindoo, we will look into the following two use cases:
Production costs analysis of each department in an industrial company.
Performance analysis of employees in an ERP software consulting company.
Case 1: Production costs analysis of each department in an industrial company
In a tea production company, you will encounter production costs analytic reports structured into departments. The goal of these reports is to compare the revenue, costs, and profit margin of each department.
We will create a report to analyze the tea production cost of each department with the corresponding Analytic Account allocated as follow:
Sales department;
Dried Tea production line;
Fresh Tea production line;
Production management department.
The following table contains some examples of accounting entries allocated to the Analytic accounts above:
General accounts | Analytic accounts | ||||
|---|---|---|---|---|---|
Description | Accounts | Debit | Credit | Analytic accounts | Amount |
Raw tea leaves for production | 621 | 20.000.000 VND | Fresh Tea Production Line | -15.000.000 VND | |
Dried Tea production line | -5.000.000 VND | ||||
Unused tea leaves | 621 | 500.000 VND | Fresh Tea production line | 500.000 VND | |
Production line labor cost | 622 | 3.000.000 VND | Fresh Tea production line | -2.000.000 VND | |
Dried Tea production line | -1.000.000 VND | ||||
Factory staff costs | 627 | 1.000.000 VND | Production Management Department | -1.000.000 VND | |
Cost of machines | 627 | 5.000.000 VND | Fresh Tea production line | -3.500.000 VND | |
Dried Tea production line | -1.500.000 VND | ||||
Marketing cost | 641 | 2.500.000 VND | Business department | -2.500.000 VND |
In preparation for using the Viindoo Analytic Accounting feature efficiently to analyze the table above, it’s necessary to choose Analytic Account right on each:
Employee payroll journal entry: You can configure accounting for salary rules to record expensive for department or employee on Accounting configuration for salary rules.
Etc.
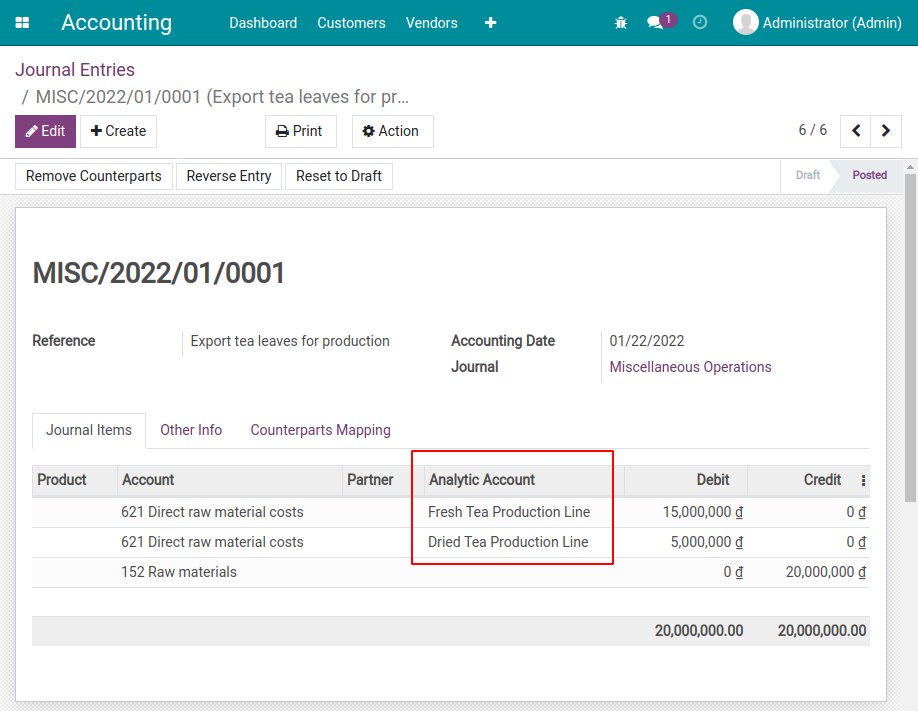
You can also Creating Default Analytic Account so the system will automatically attach the analytic account.
When an invoice or an item is registered in journals, journal entries and respective analytic accounting entries will be created. For each journal entry, there is at least one journal item to register costs that are allocated to each chosen Analytic account.
Go to Accounting > Reporting > Analytic Report. You can see the report about each analytic account.
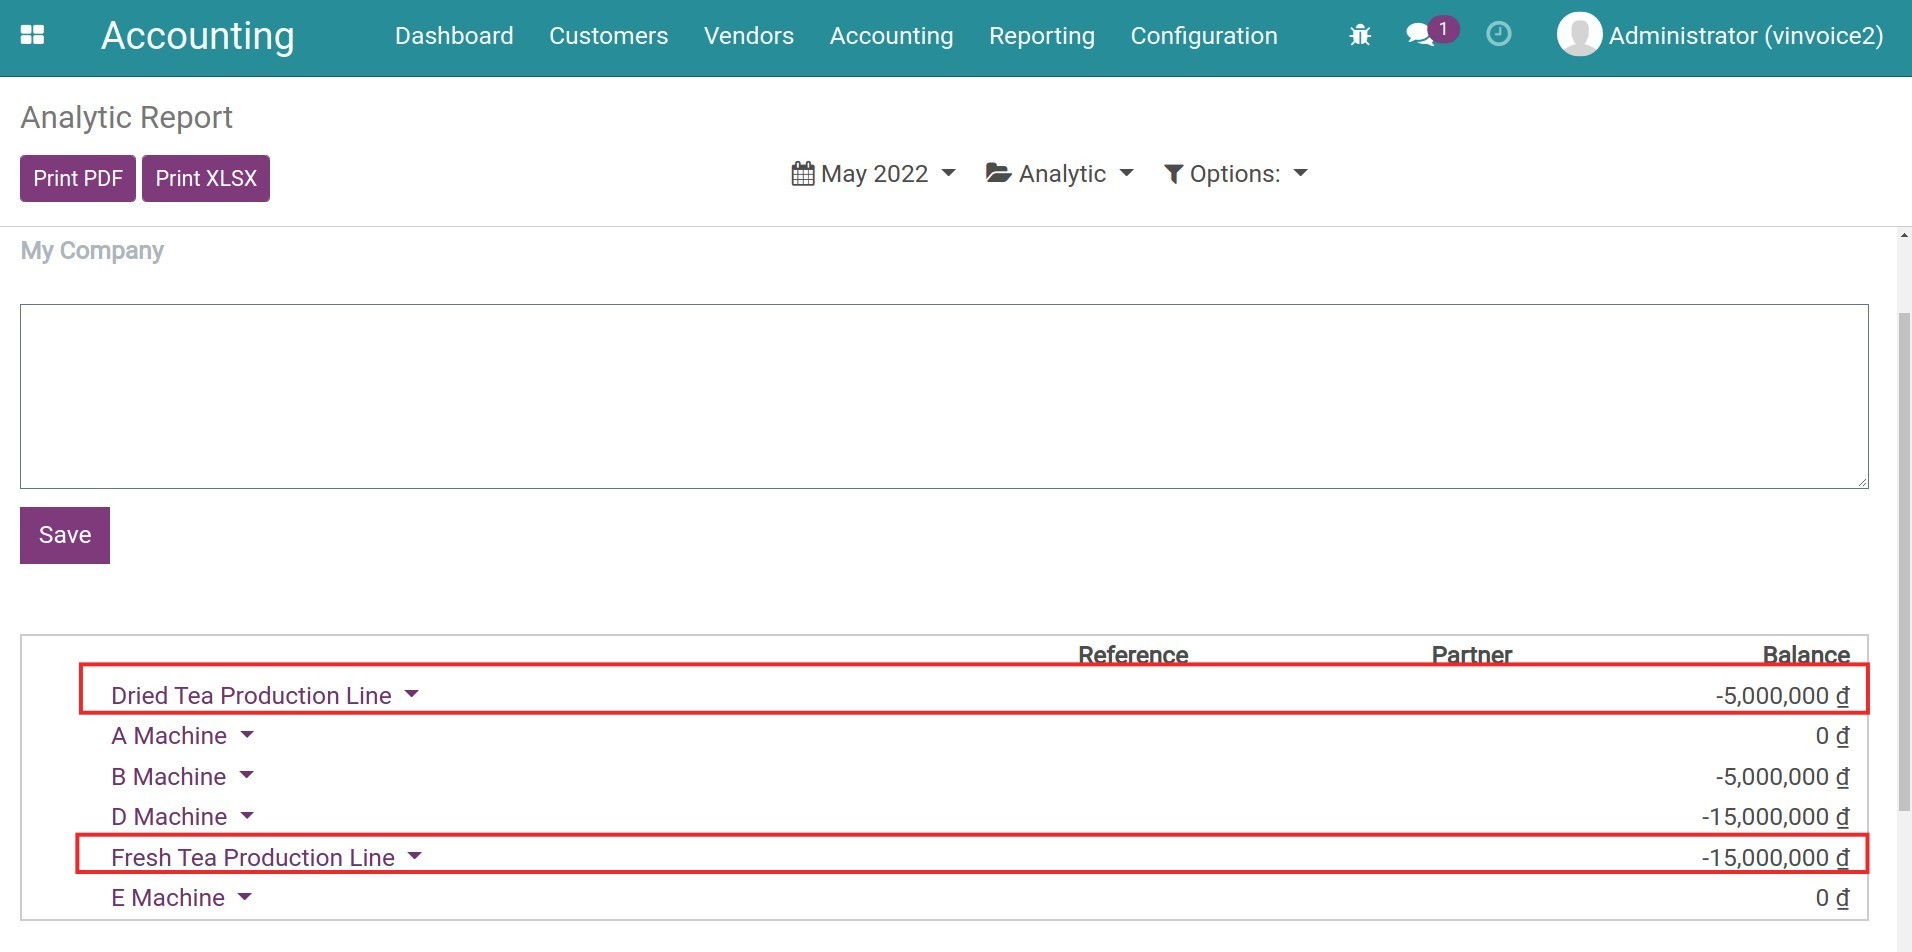
Click on the icon besides analytic account, and choose Analytic Entries to see all analytic entries.
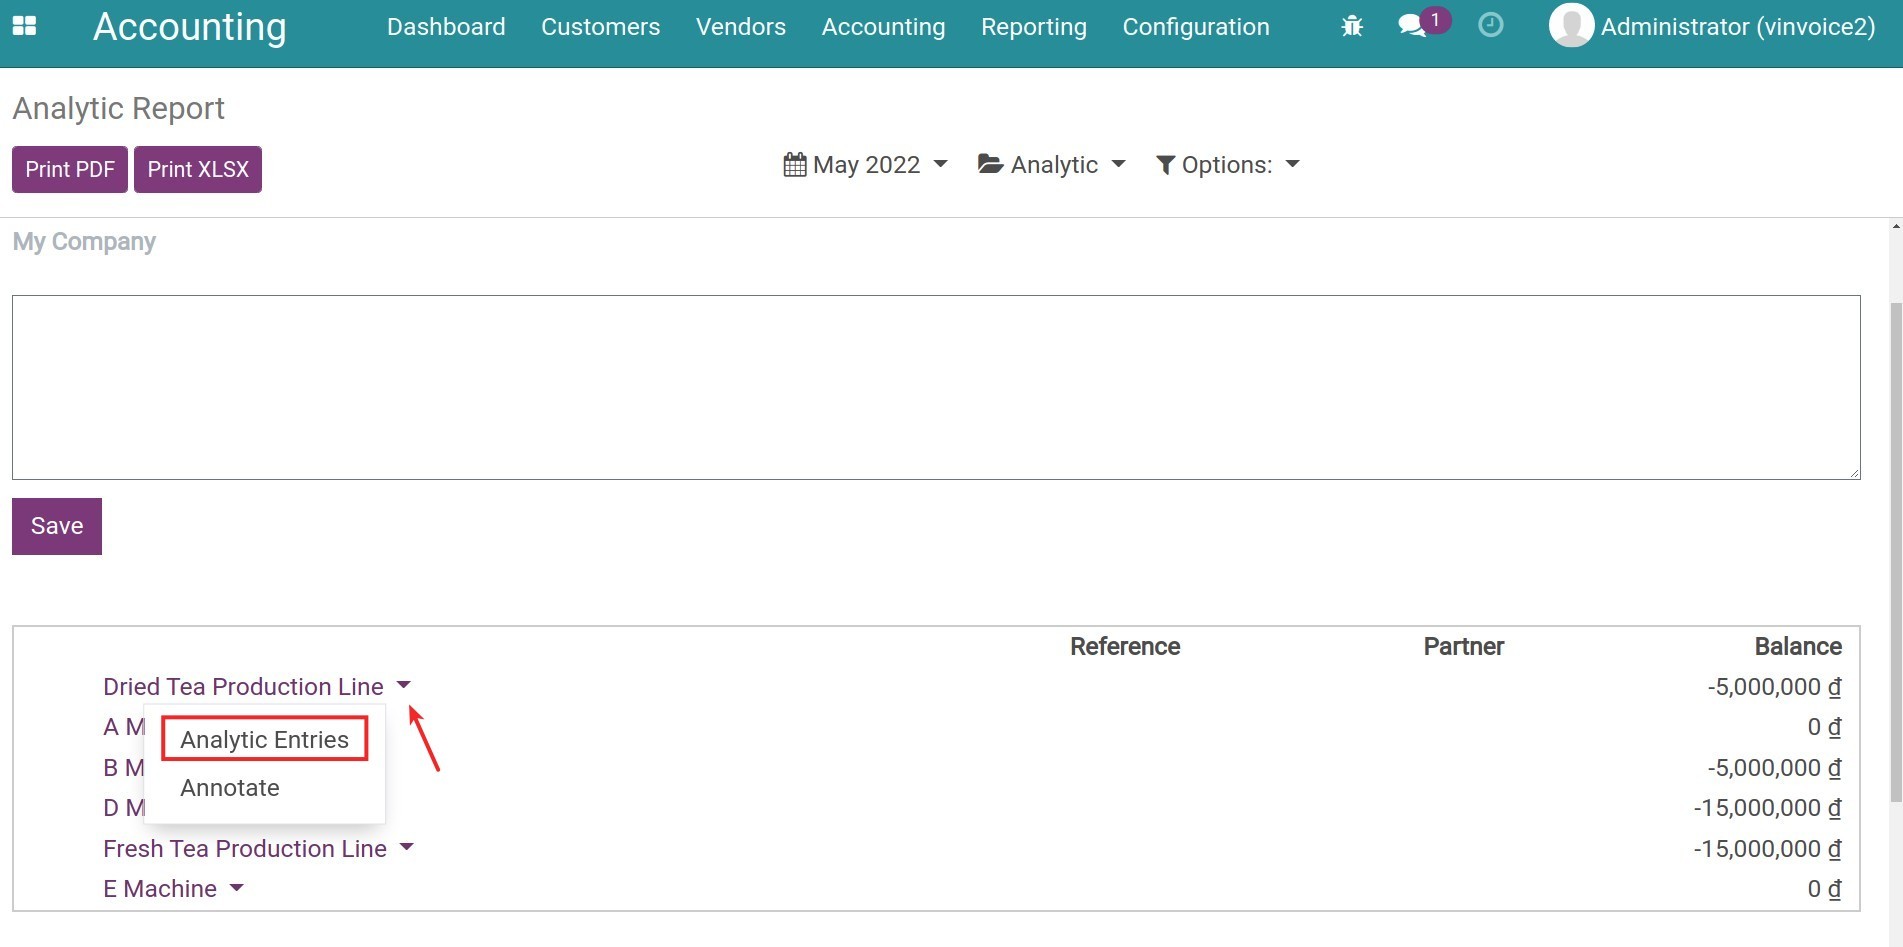
You can also click on the View pivot/View graph icon to see other types of reports. Click on each Analytic Entries to see details.
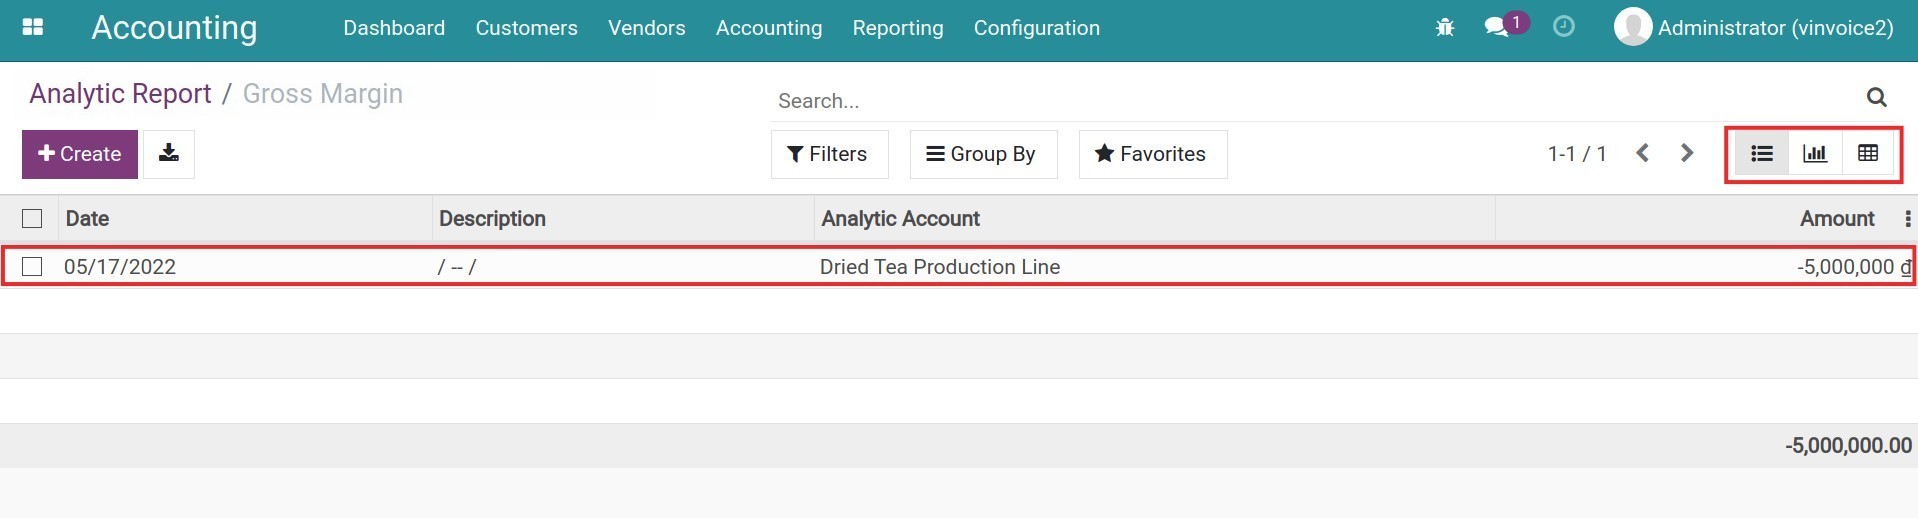
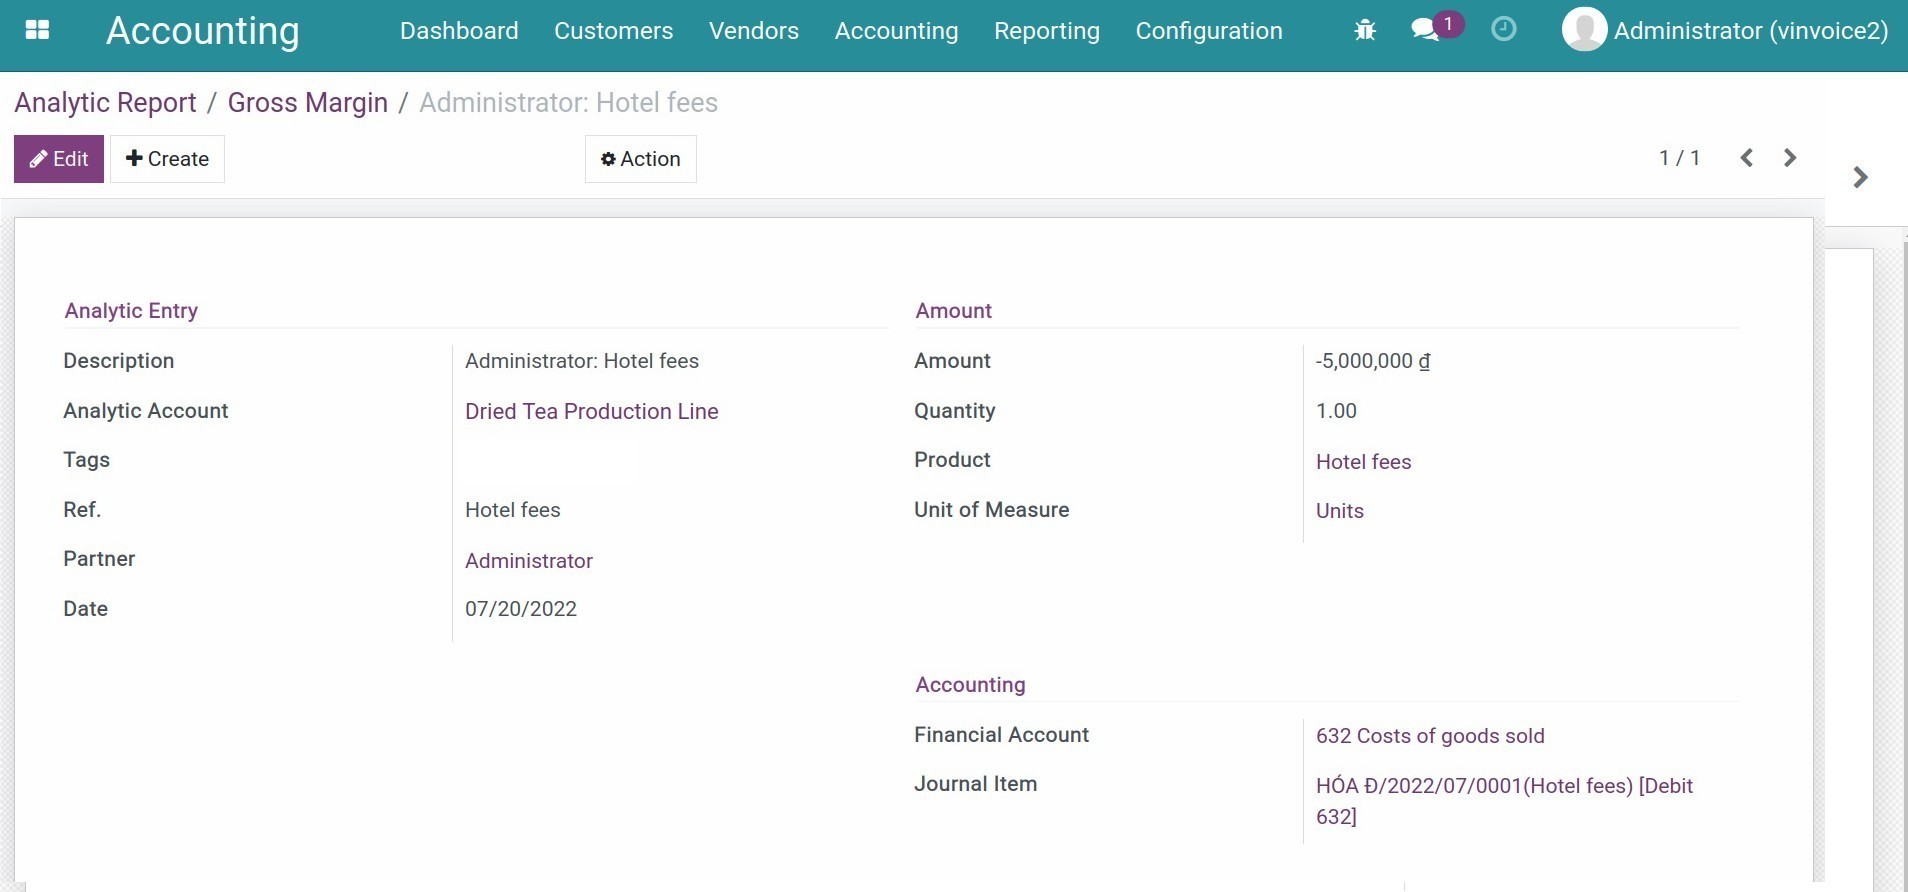
Case 2: Performance analysis of employees in an ERP software consulting company
Consulting companies tend to pay attention to the actual working hours that their employees spent on different contracts. The collected information then will be used to compare with the planned hours on the contract in order to analyze the efficiency in the implementation of said contract.
See also
This example sheet below is about ERP implementation consultants for customers Little Pi and Big Spa. We will see the profit efficiency of this project:
Description | Account | Debit | Credit | Analytic account | Amount |
|---|---|---|---|---|---|
Phuong Bui analyzed ERP implementation contract (12 hours) | Little Pi | -6.000.000 VND | |||
Phuong Bui analyzed ERP implementation contract (18 hours) | Big Spa | -9.000.000 VND | |||
Nam Truong analyzed customer’s requirements (15 hours) | Little Pi | -12.000.000 VND | |||
Nam Truong analyzed customer’s requirements (20 hours) | Big Spa | -16.000.000 VND | |||
ERP implementation consulting by Tam Vu (04 hours) | Little Pi | -4.000.000 VND | |||
ERP implementation consulting by Nguyet Do (05 hours) | Big Spa | -6.000.000 VND | |||
ERP Consulting & Implementation service | 511 | 80.000.000 VND | Little Pi | 80.000.000 VND | |
ERP Consulting & Implementation service | 511 | 50.000.000 VND | Big Spa | 50.000.000 VND | |
Stationary expenses | 642 | 2.000.000 VND | Little Pi | -2.000.000 VND | |
Transportation expenses | 641 | 3.000.000 VND | Little Pi | -3.000.000 VND |
In the example above, employees spent more time on the contract of Big Spa than on the one of Little Pi, which leads to a higher labor cost for Big Spa implementation than for Little Pi. However, the price of ERP Consulting and Implementation service on the Big Spa contract is lower than Little Pi’s. From this observation, it’s clear that the expense/revenue ratio of Little Pi is smaller.
Conclusion
You can use the Viindoo Analytic accounting feature in different modules such as Sales, Purchase, Projects, Budget Management, etc. for management purposes.
Especially, it’s possible to record analytic line which is not related to any financial transaction. Have a look at the instruction video below.
See also
Related article
Invoice delivery notes
Invoice delivery notes
A delivery note is a document that accompanies a shipment of goods. It provides a list of the products and quantity of the goods included in the delivery. A delivery note is also known as a 'dispatch note' or a 'goods received note'. iSuite allow you to print this document directly from invoice form.
required app: acs_invoice_delivery_note

The document is printed in the excel format, giving the flexibility to add changes

For technical assistance, contact support@isuite.cloud
How do the Suspense and Outstanding Payment accounts change the Journal Entries posted?
Note: The changes are “under the hood” and don’t affect the way users record payments or the bank reconciliation workflow.
They provide more accurate information, sooner, to support users who work with the bank account and/or who find problems during reconciliation. Only the journal entries created are different. Entering payments, reporting on them, etc. – is unchanged.
The Bank Account journal now has three additional accounts linked to it.
a suspense account where the counterpart to transactions reported by your bank (via a statement) are held until they are linked to a payment already in Odoo.
an outstanding payments account where outgoing payments are posted until they are linked to a withdrawal from your bank statement.
an outstanding receipts account where incoming payments are posted until they are linked with a deposit from your bank statement.

Odoo no longer posts entries directly to the bank account during payment recording, but rather moves them through the outstanding accounts and posts to the bank account when the bank verifies the same transaction has cleared the bank. This movement happens automatically for you when you reconcile the bank account with a bank statement - you don’t need to do any additional work.
Statement lines are now imported into the general ledger (via the suspense account) instead of being a separate model (operations or bank.statement.lines records at v13). You can search for bank statement lines in the same way you search for journal items. You can see the book balance and bank balance for every transaction posted in Odoo, and for every transaction posted by the Bank – in the same place.
After reconciling your bank statement, there will be no balances in any of these accounts. They are all transitory accounts.
Suspense account entries are moved to the corresponding outstanding account when matched (to clear the balance for that transaction in that account). This happens when a counterpart for the payment in the outstanding receipt or outstanding payment account is found and matched.
Benefits:
You always have an accurate bank balance in your general ledger (based on how often you synch or import statement information from your bank). You don’t have to reconcile a statement to see your bank balance in Odoo. You see the verified bank balance and the unverified bank balance on the Accounting dashboard for each Bank Account.
You can now find the entry or entries causing any difference between your GL balance and bank statement balance. After reconciling what matches: if you didn’t post something you can find those entries by looking in the suspense account. if you posted something twice, you can find those entries by looking in the outstanding payment account. Any bank statement line journal entry with an entry still in the suspense account is a problem (more about this later). This provides an answer to the question "Where is the unexplained difference?"
You can now manually reconcile Journal Entries using these outstanding accounts. This is particularly useful for liabilities that don’t have a corresponding Vendor Bill – like Payroll, Sales Tax, etc. or daily Sales and Income reports from systems external to Odoo.
Examples:
Record a Customer Payment (v13):

Record a Customer Payment (v14):

Notice how, at version 14, the payment is posted to the outstanding receipts account instead of the bank account.
Record your Bank Statement (v13):

(this creates a bank.statement.line entry)
Record your Bank Statement (v14)

(this creates a journal entry for every statement line, even before reconciliation starts. You can tell which bank statement lines are reconciled and which are not by looking for any that have a balance in the suspense account - read further to see what happens after reconciliation!)
Notice how we are now posting the verified bank transaction amount to the bank account and holding the credit in the suspense account until it is matched with a transaction in Odoo. This means Odoo will never post anything to a bank account that isn't verified by the bank!
Reconcile your Bank Statement (v13)

Reconcile your Bank Statement (v14)

Now, Odoo will update the Journal Entry created by the bank statement line:

We move the credit from the suspense account and replace it with a credit to the outstanding receipts account, which offsets the debit posted there when the payment was originally recorded in Odoo via Journal Entry BNK1/2020/10/0001 above.
* Remember BNK1/2020/10/0002 was created for us when the bank statement line was imported or live synched to Odoo, so now Odoo is just automatically updating that entry to clear the suspense account and balance the outstanding account.
The other part of this change that you need to be aware of is that Invoices and Bills now have an IN PAYMENT status which is another transitional status that these documents travel “through” in between when Odoo is told they are paid and when the bank confirms they are paid.
You will see this on Individual Invoices and Bills like this:


The IN PAYMENT status was optional at v13 but is now used for all payments to better help you identify bounced checks, fraudulent customer payments or funds to vendors that have not yet cleared the bank.
We hope you like the changes!
If you are a user who has ever had to troubleshoot discrepancies between Odoo and the Bank Statement, or who has needed to deal with funds not yet cleared in the bank, we believe you will find it much easier to work with Odoo now.
Current Year Earnings
Manually create an Asset in Viindoo
Requirements
This tutorial requires the installation of the following applications/modules:
Assets Management
Accounting & Finance
Vietnam Chart of Accounts
To manually create an Asset, to Accounting > Accounting > Assets > Create.
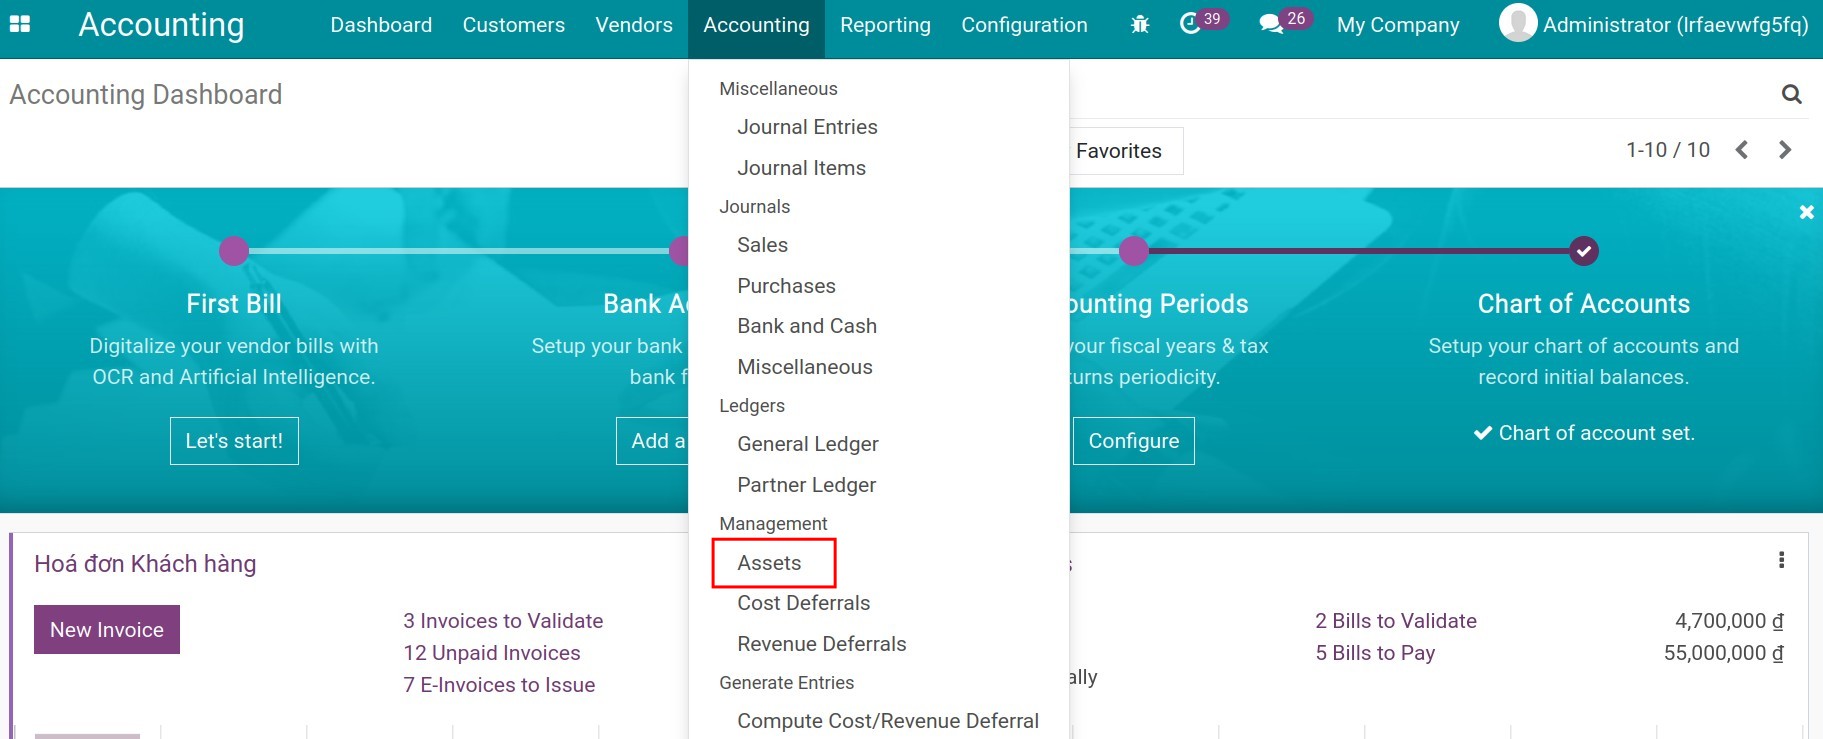
Configure Asset information
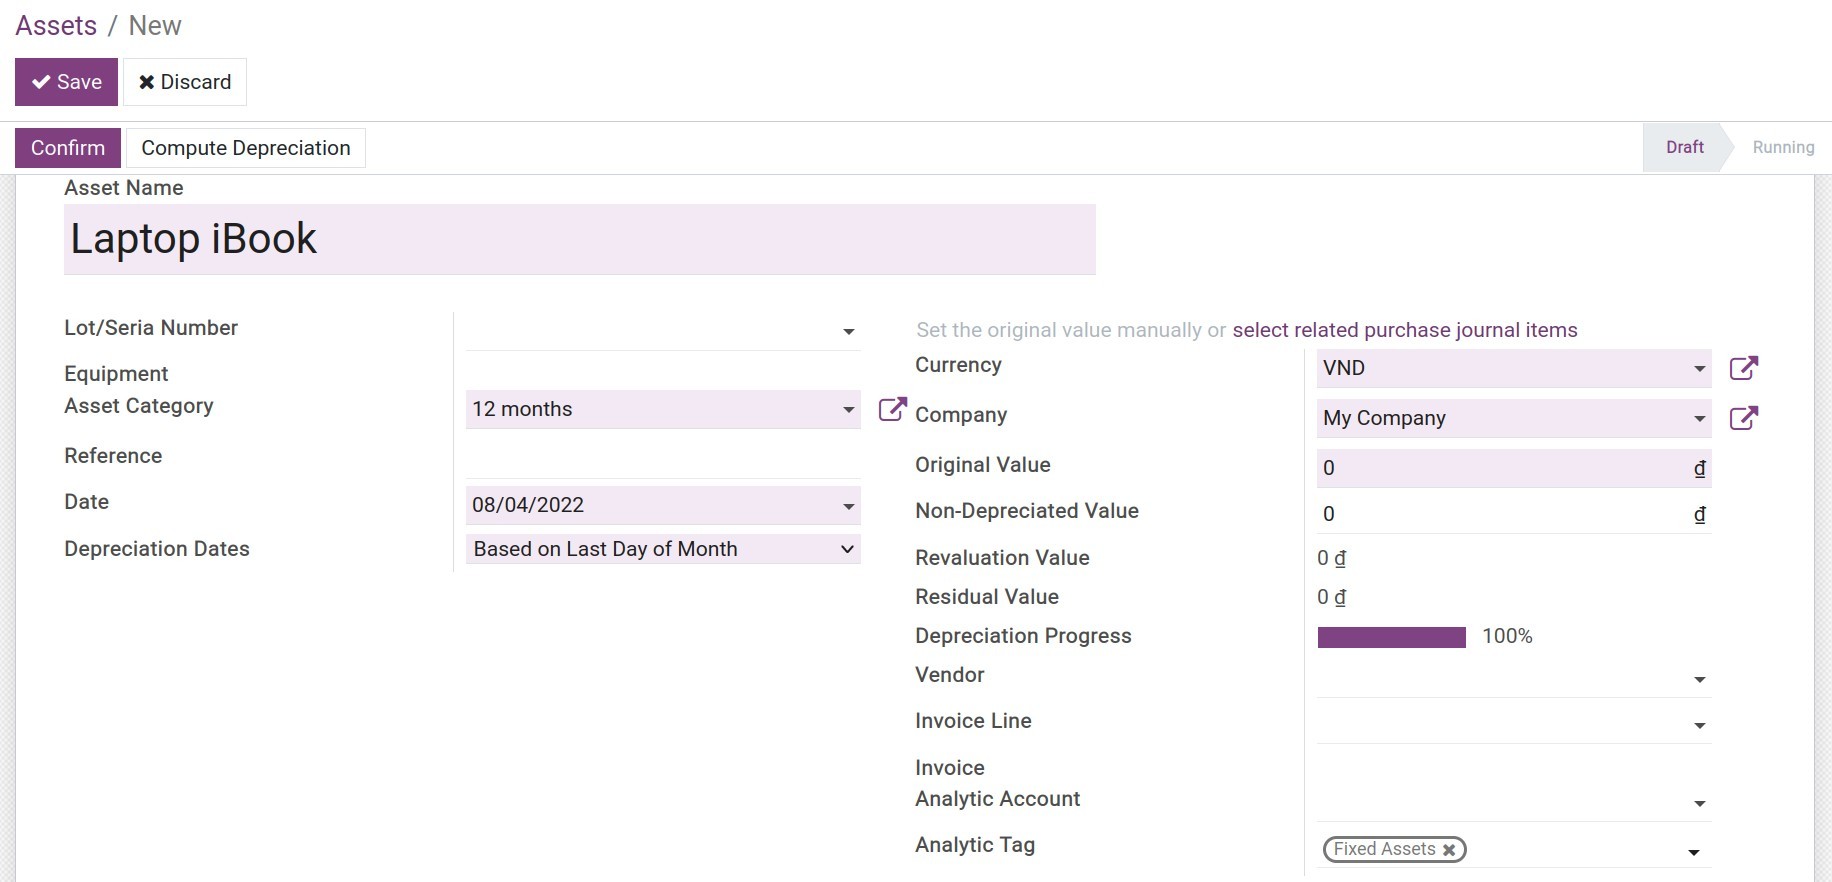
Asset Name: Insert a short descriptive name for the Asset.
Asset Category: Choose one from the available categories or create a new Asset Category.
Reference: Enter the number of invoices, transfer,… of Asset.
Date: Purchase/received date of Asset according to accounting vouchers.
Depreciation Date:
Based on Last Day of Month: Depreciation entries will be registered on the final date of each month.
Manual: Depreciation entries will be registered on the manually configured date. When you choose Manual, you need to enter the First Depreciation Date.
First Depreciation Date: The date when a depreciation entry is registered in the Asset journal. This date does not affect the calculation in case the Prorata Temporis option is activated (configure it on Depreciation Information tab or Assets Category. You have to set First Depreciation Date after Date that you purchase/received it.
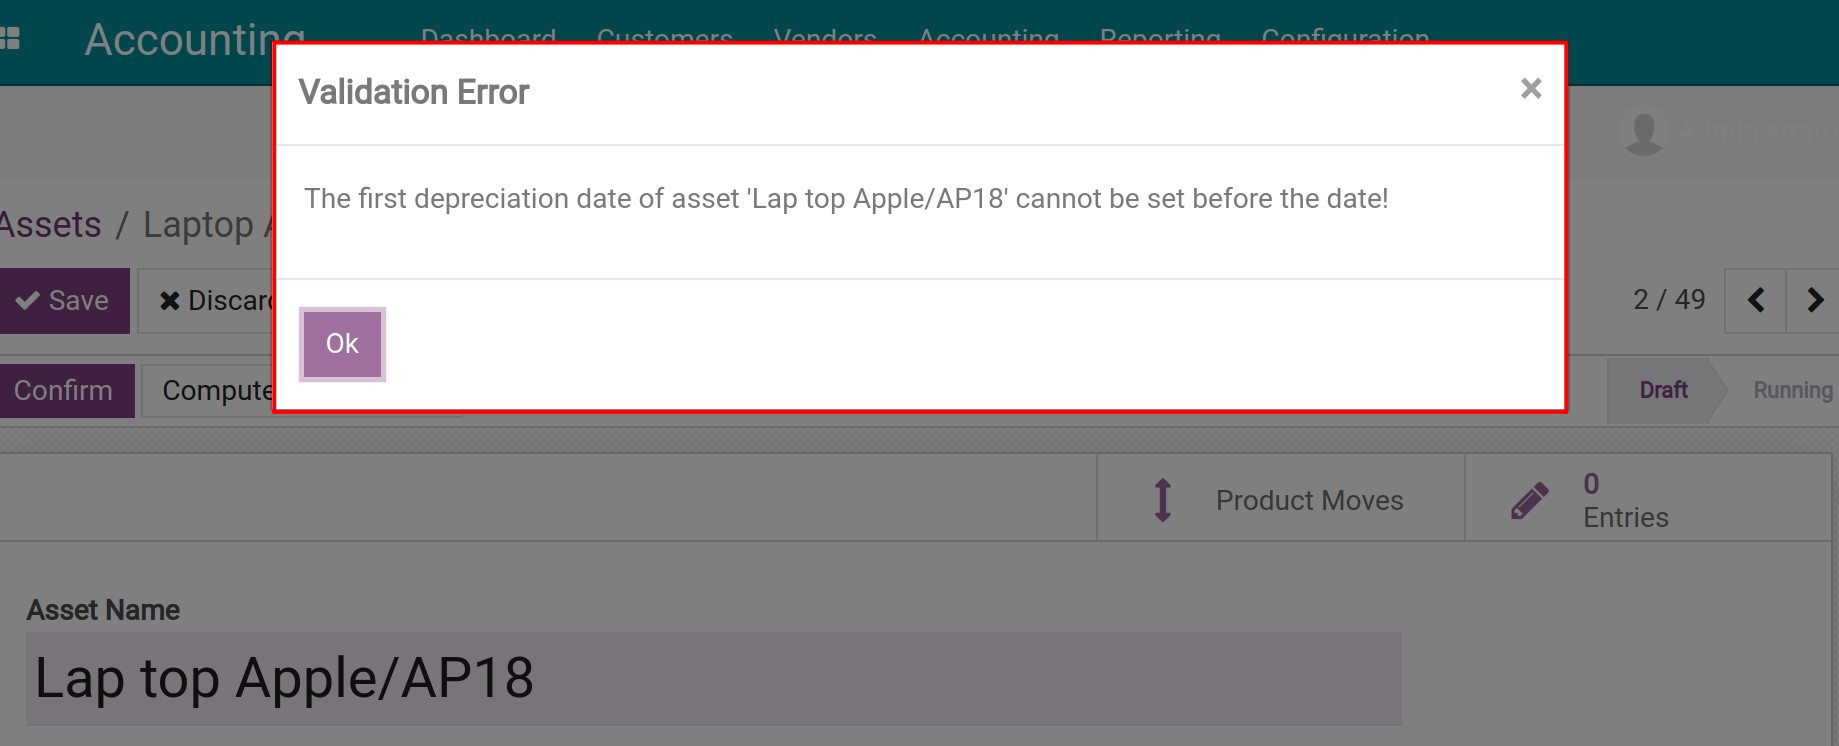
Original Value: Gross value of the asset.
Tip
The Original Value could be set from journal items by clicking on related purchase journal items.
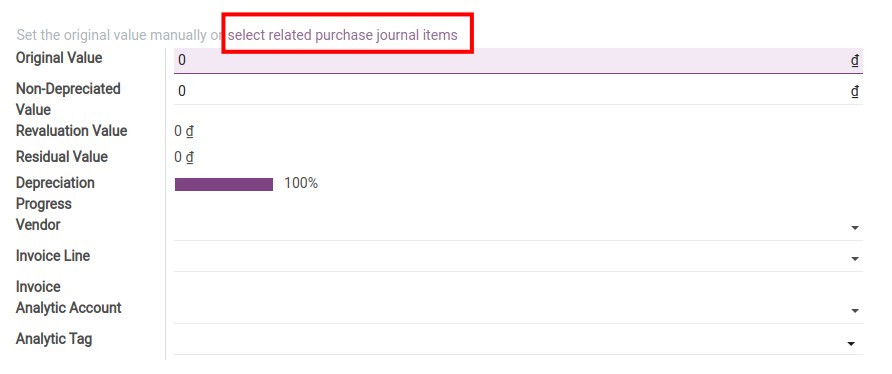
Non-Depreciated Value: The value without depreciation.
Revaluation Value: The increase or decrease in value of Assets after revaluation.
Residual Value: Equal to the Original Value minus the Non-Depreciated Value plus/minus Revaluation Value.
Depreciation Progress: Shows the percentage of Asset Value that has been recorded in Depreciation expense.
Vendor: The party that provides assets.
Invoice Line: Details of the arising accounting entry line reflect the value of Assets. Can be all or part of the Asset Value.
Invoice: An accounting entry reflects the Purchase Invoice of Assets.
Analytic Account: For administrative analysis.
Analytic Tag: For analysis, classification and the finance reports.
Configure Asset Depreciation Information
This tab is where you provide information related to computation methods and charts of accounts for the automatic journal items creation.

Once an Asset Category is chosen, all the configurations of said Asset Category will be reflected here. However, in some cases, if an Asset’s characteristic is different from its category, you could also configure those changes on this tab.
Example: An Asset Category has been set up with Computation Method: Linear but you want to configure the Accelerated Degressive computation method for a certain Asset that belongs to this category. You need to maintain other information and choose Computation Methods: Accelerated Degressive as follows:
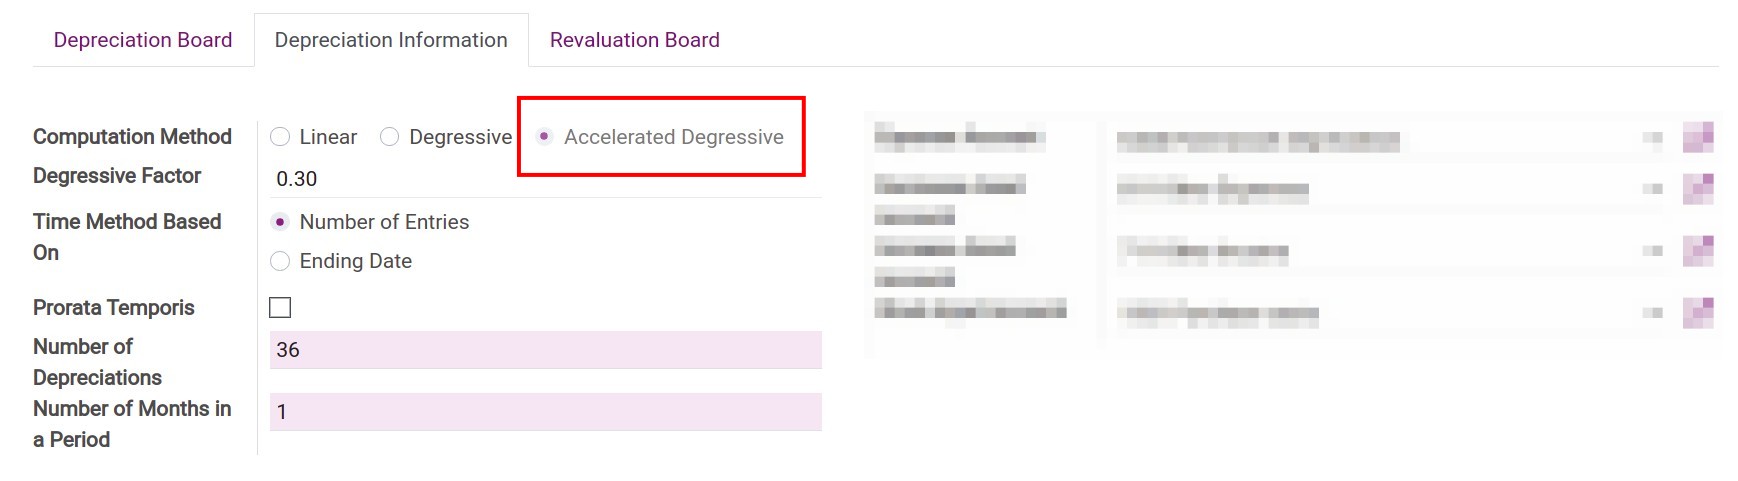
After all, click Save - a new asset is successfully created!
See also
Related article
Buying and stocking assets
Depreciation of Fixed Assets
Optional module
Inventory Assets
Stock Asset Equipment
Buying and stocking assets
Buying and stocking assets
There are various ways to create a new Asset in Viindoo Accounting app:
Create Asset entry manually;
Create Asset from a vendor bill;
Assets automatically created when transferred from stocks to start using.
Requirements
This tutorial requires the installation of the following applications/modules:
Accounting & Finance
Inventory
Purchase
Assets Management
Stock Asset
Assets Purchase
Chart of Accounts
Let’s have a look at the way Viindoo designs, structures, and uses the Asset module in different examples as follow:
Create Asset manually
You can read more about this on How to manually create an Asset in Viindoo.
Create Asset from vendor bill
This method can be used to track, amortize and depreciate different assets that are not stocked before using such as Fixed Assets, Tools and Equipment, and long-term Prepaid Expenses. We will show you the workflow of the method in the following example.
Example: You buy a plot of land at 2 billion Frs CFA. After finalizing all the paper works, you receive a Certificate of Land Use Rights. The value of this Intangible Fixed Asset is 2 billion Frs CFA.
In order to track and amortize this Asset, you need to do the following steps:
Step 1: Create a product.
You need to configure the corresponding asset category before creating a new product.
For conversing of a Product to an Asset, you type the information below:
Product Type: Service or Consumable Product.
Asset Category: Choose a suitable category for the asset. If you don’t do that, you can choose Asset Category on vendor bill.
Step 2: Create a vendor bill.
To create a bill, navigate to Accounting app > Vendors > Bills > Create.
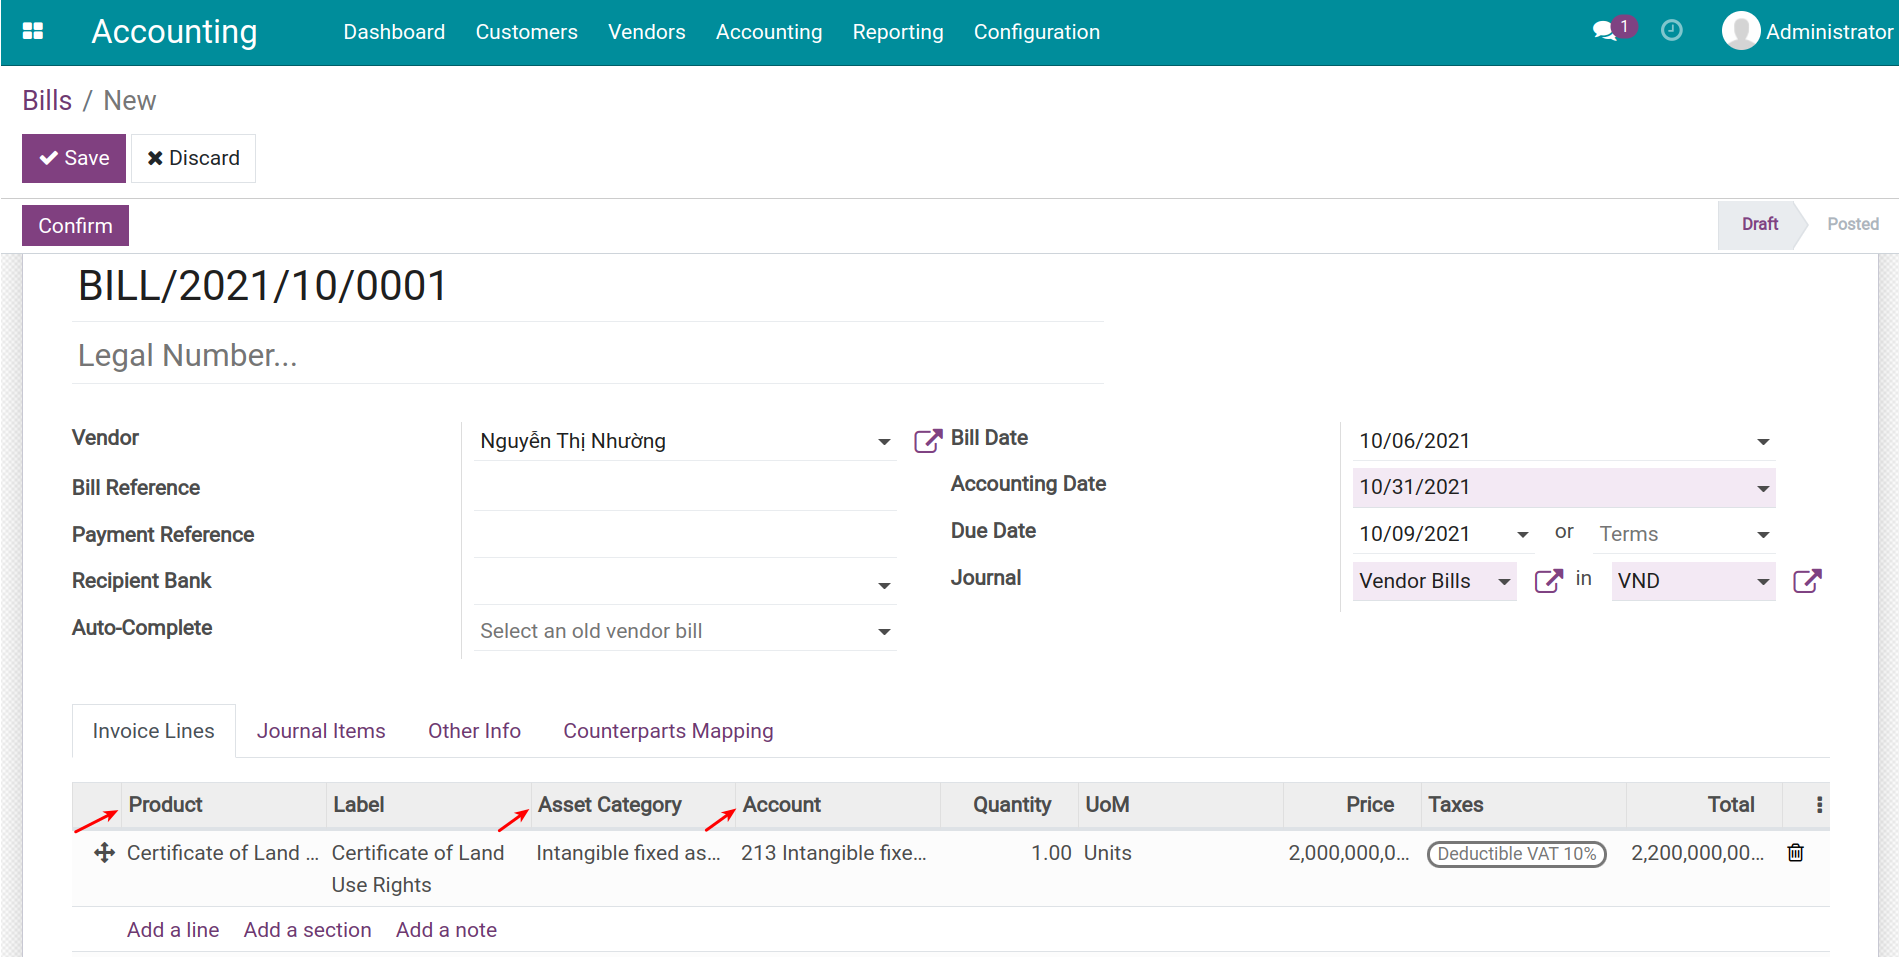
Note
When a product is chosen, its details will be reflected on the vendor bill. Configuring all of this information on the product form beforehand will help you save time on the bill creation process.
Press Confirm to change the bill status from Draft to Posted. Now, a View Assets button appears on the interface of this bill.
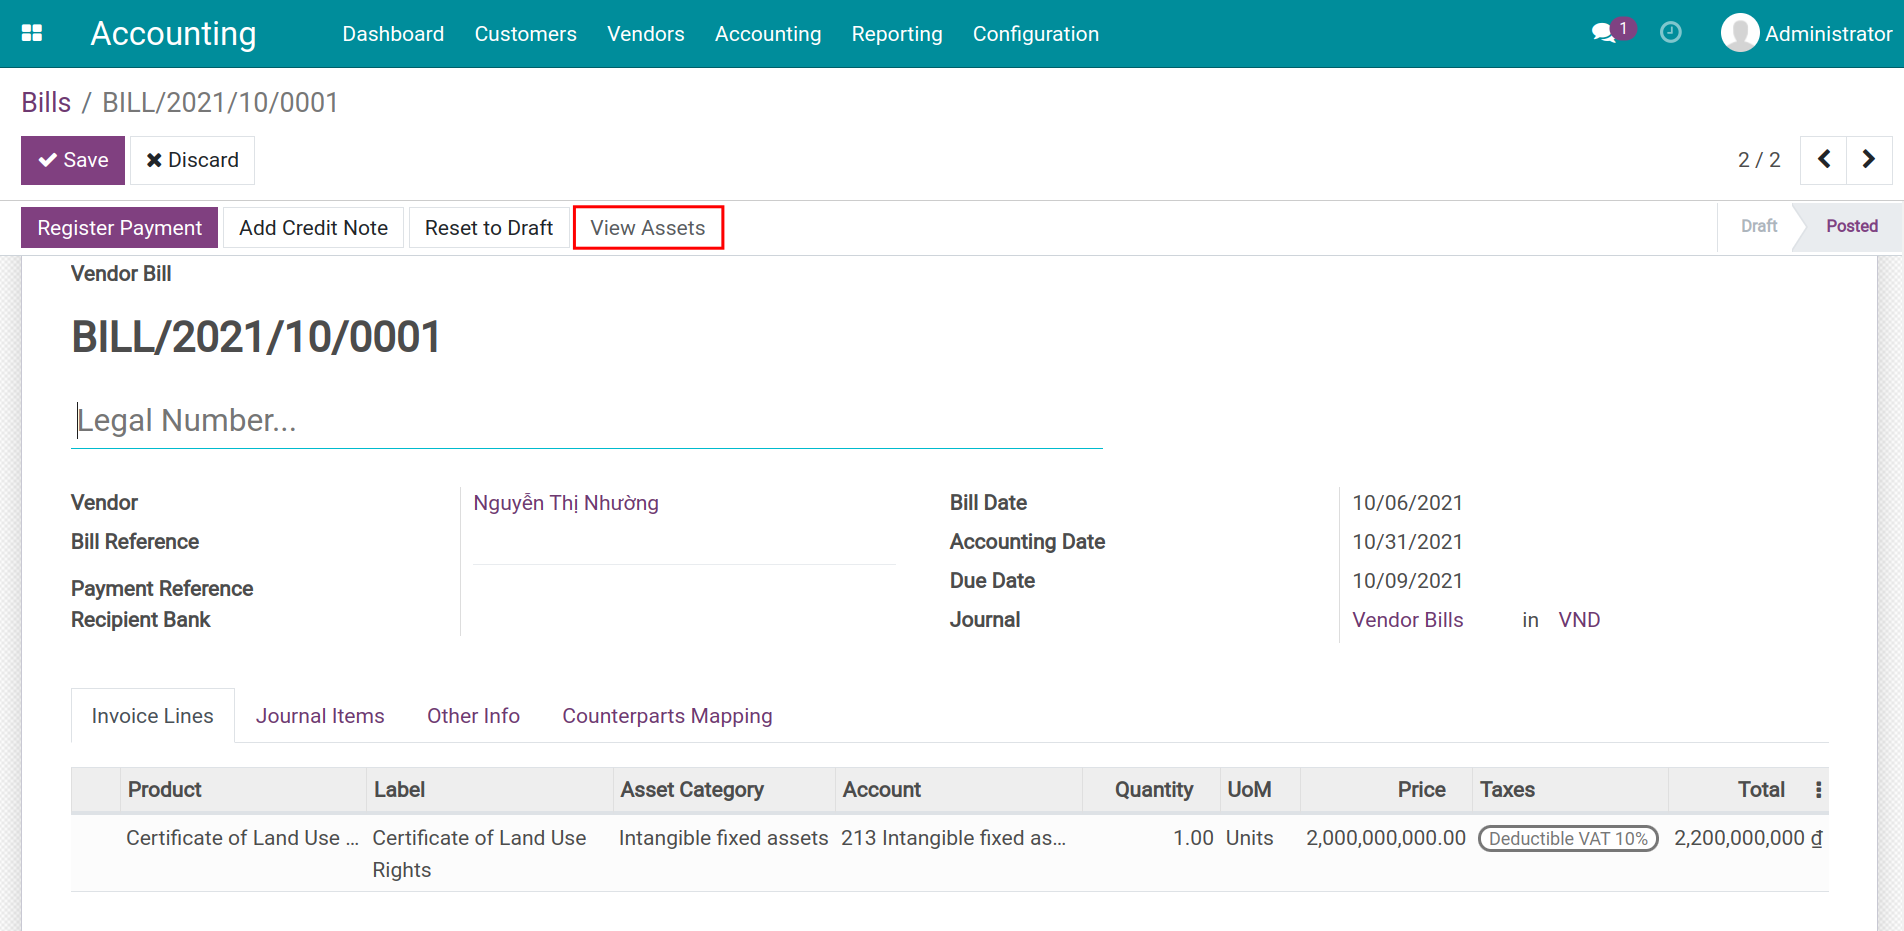
With View Assets, the system changes to the asset form in status Draft with all information inherited from Vendor Bill and assets category.
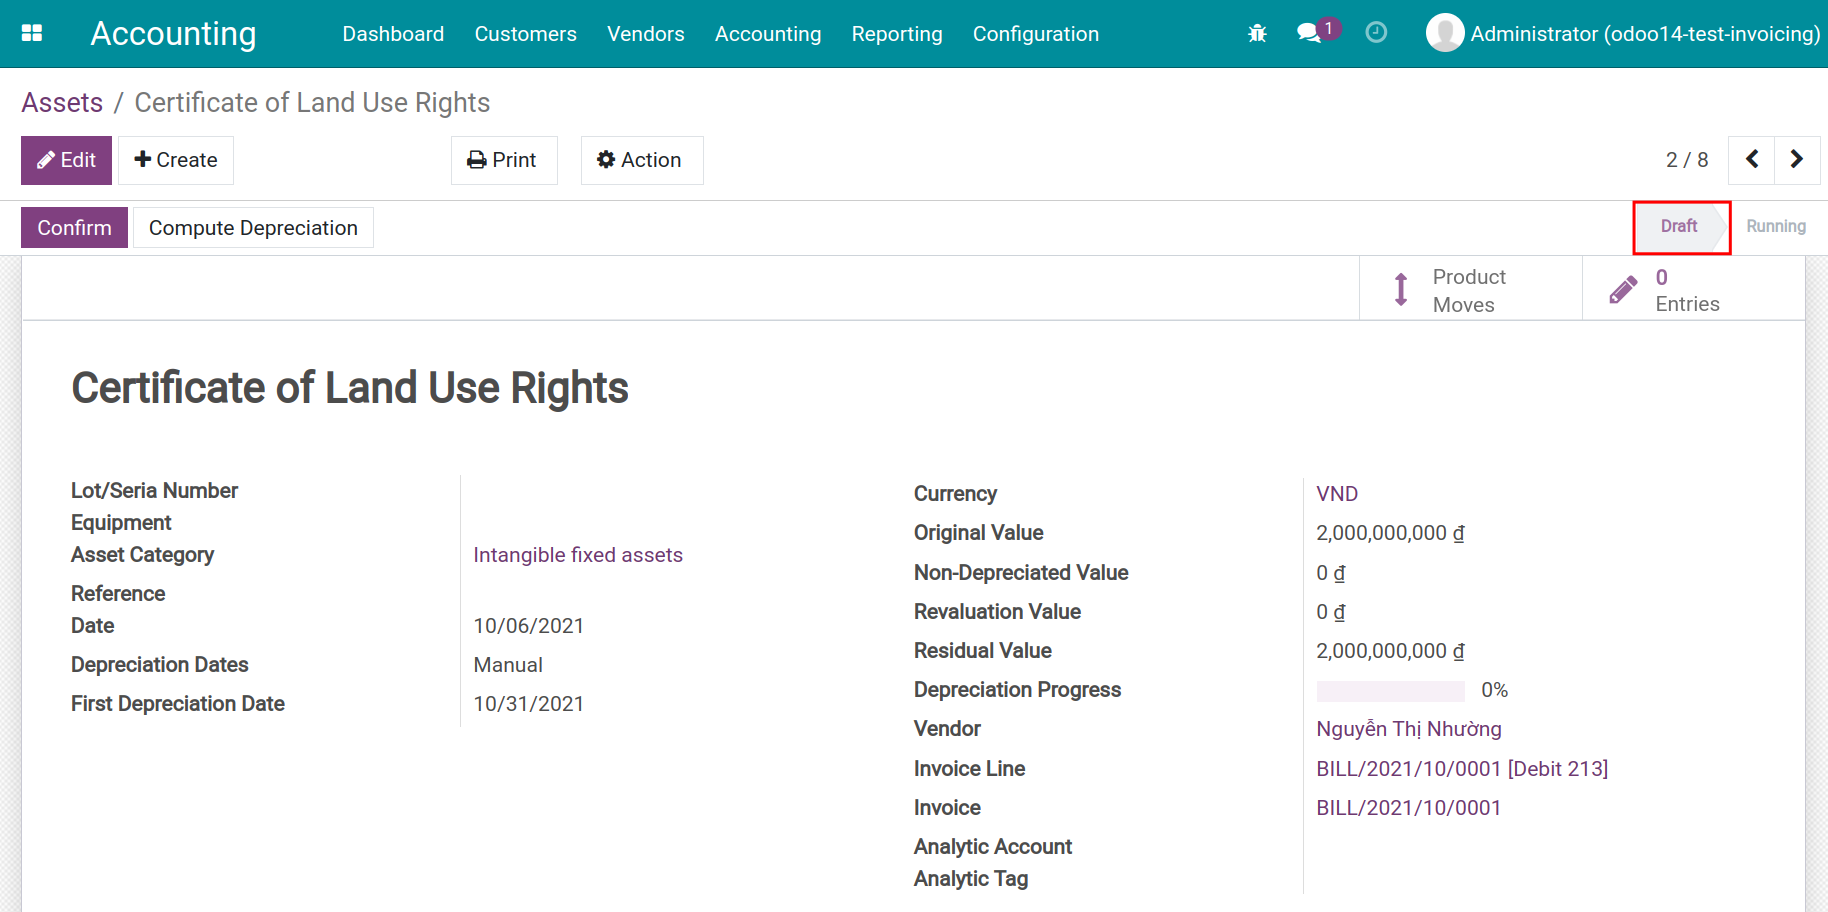
You can see the list of available Assets of your Company by navigating to Accounting app > Accounting > Assets.
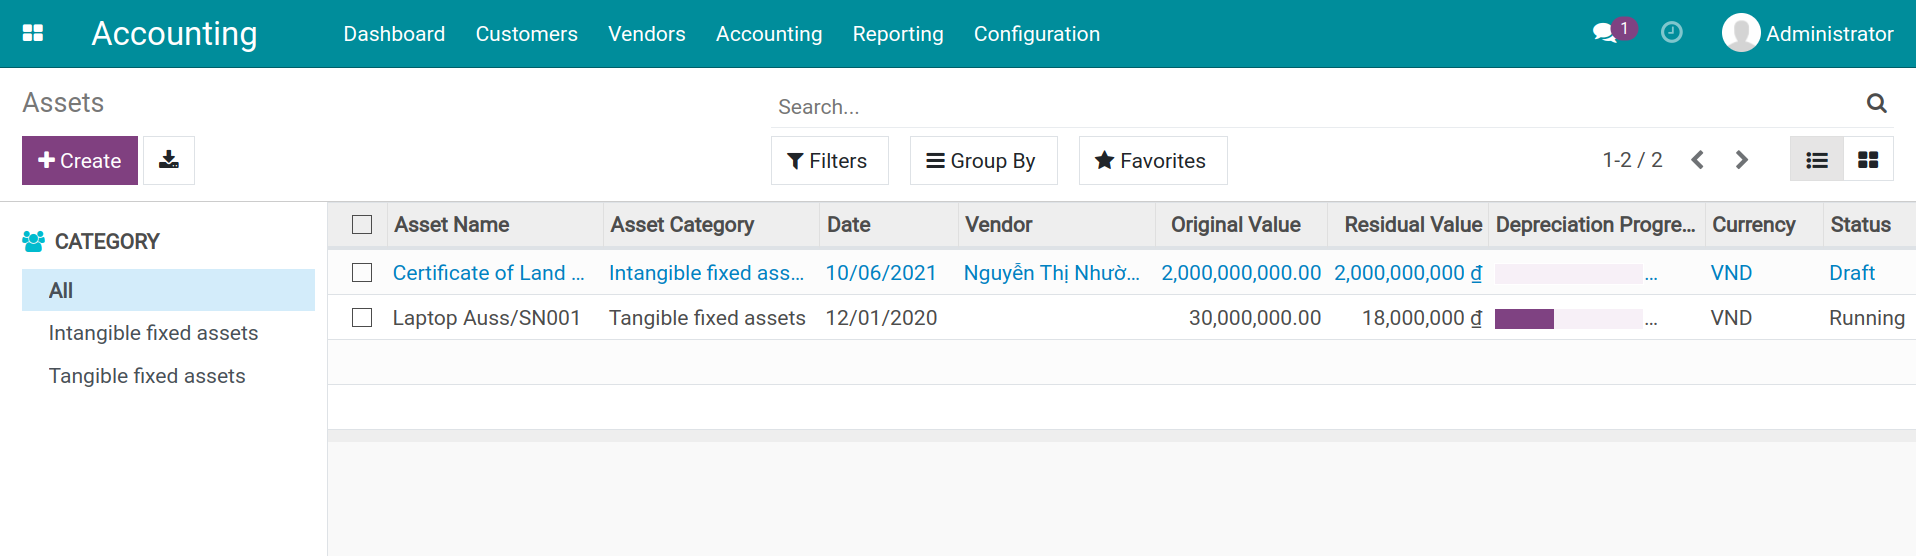
See also
Depreciation of Fixed Assets
Create an Asset from a storable product
This method can be applied to Fixed Assets, Tools and Equipment that are stocked before being used. Let’s take a look at the following example to see how this flow works.
Example: You buy 01 lot of laptop that includes 20 units for your employees. The value of each laptop unit is 35.000.000 Frs CFA. Products are delivered to the inventory then 5 are used.
Step 1: Create a product.
Read more about Steps to create a new product in this article.
This method can be applied when:
Product Type: Storable Product.
Tracebility: Tracking By Unique Serial Number or By Lots is required.
Asset Category: Choose a suitable category to track your asset.
Step 2: Create a purchase order - purchase - receive product.
In the Purchase application, create a Purchase order and Validate the number of products received is 20 units.
For more information about how to buy a storable product in Viindoo here.
Step 3: Create a bill.
Once you receive both products in your inventory and the bill from the provider, you can Create a bill and process to payment.
Step 4: Asset allocation.
To use Asset feature in Inventory App, you need to install Stock Asset App. See details: Setting Apps and Modules.
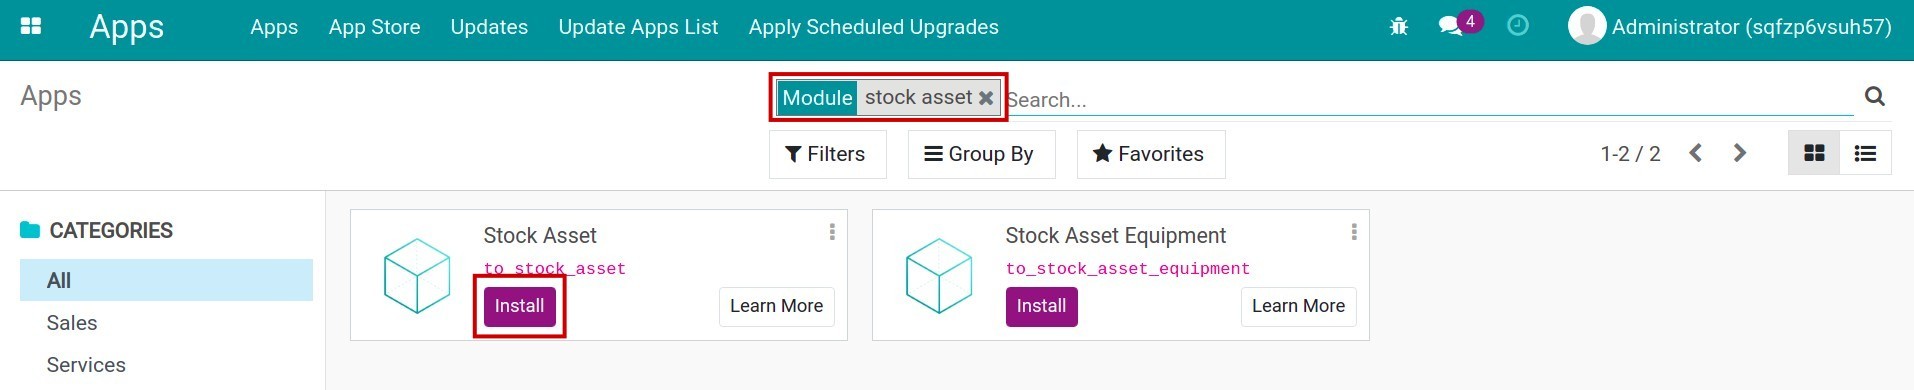
Create a new transfer to use an Asset by navigating to Inventory > Operations > Transfers > Create:
Insert the following information:
Operation Type: Asset Allocation.
On Operations tab:
Product/Demand: Enter the Product and the transfer demand amount of Products.
When you choose Save, the Mark as Todo button appears as the suggested next step.
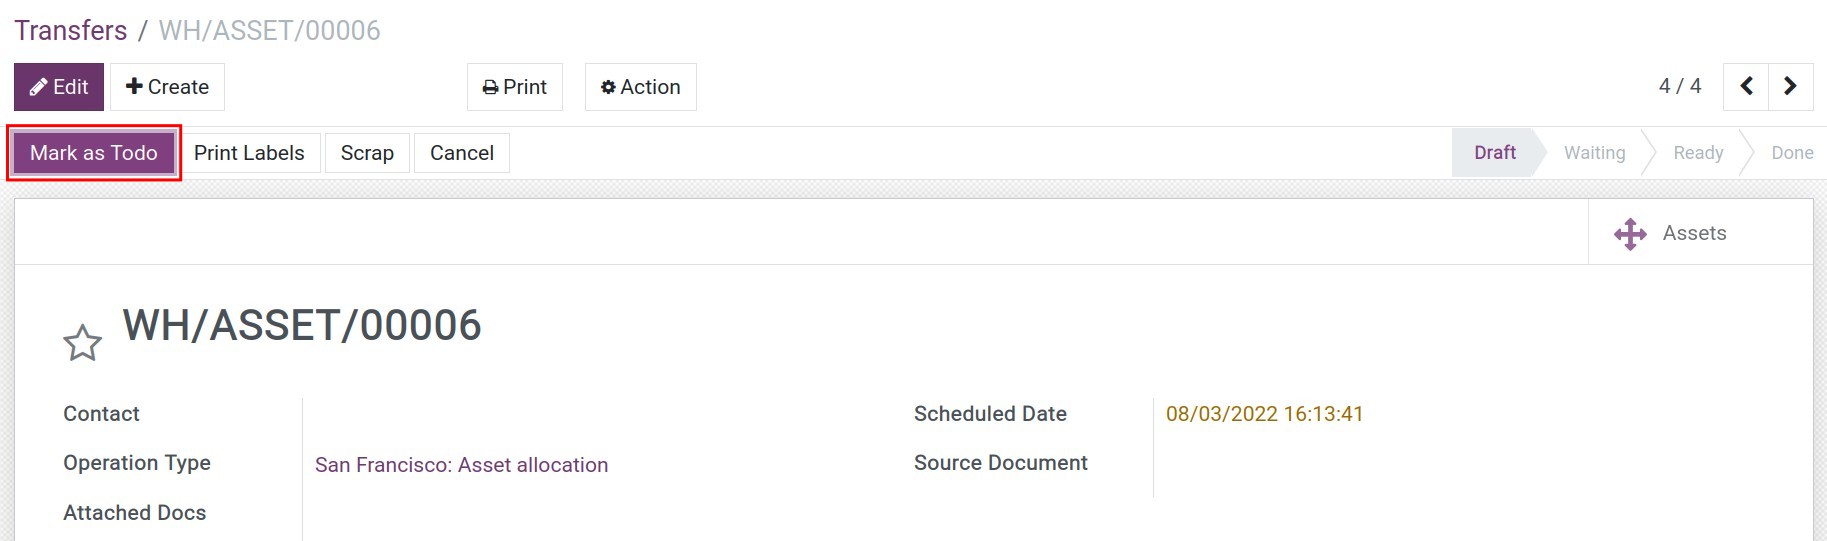
Press Mark as Todo, you can see the tab Detailed Operations. This is where you can assign a Lot/Serial Number to each outgoing product.
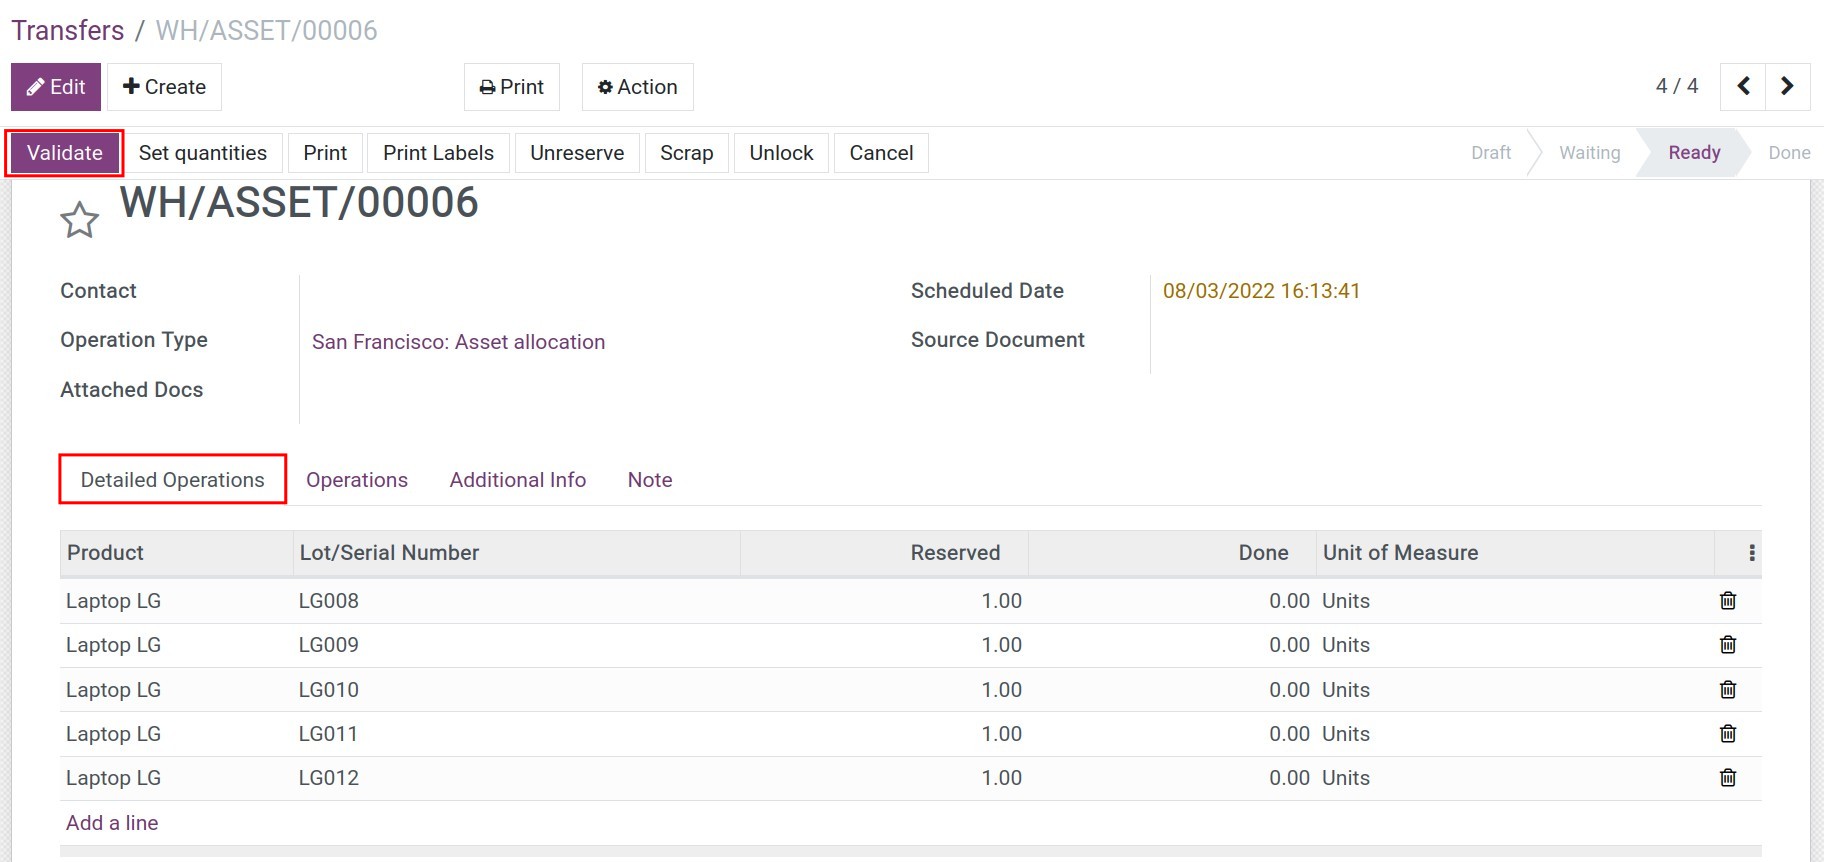
Choose Validate to confirm the operation. On the asset allocation interface appears a clickable button named Assets.
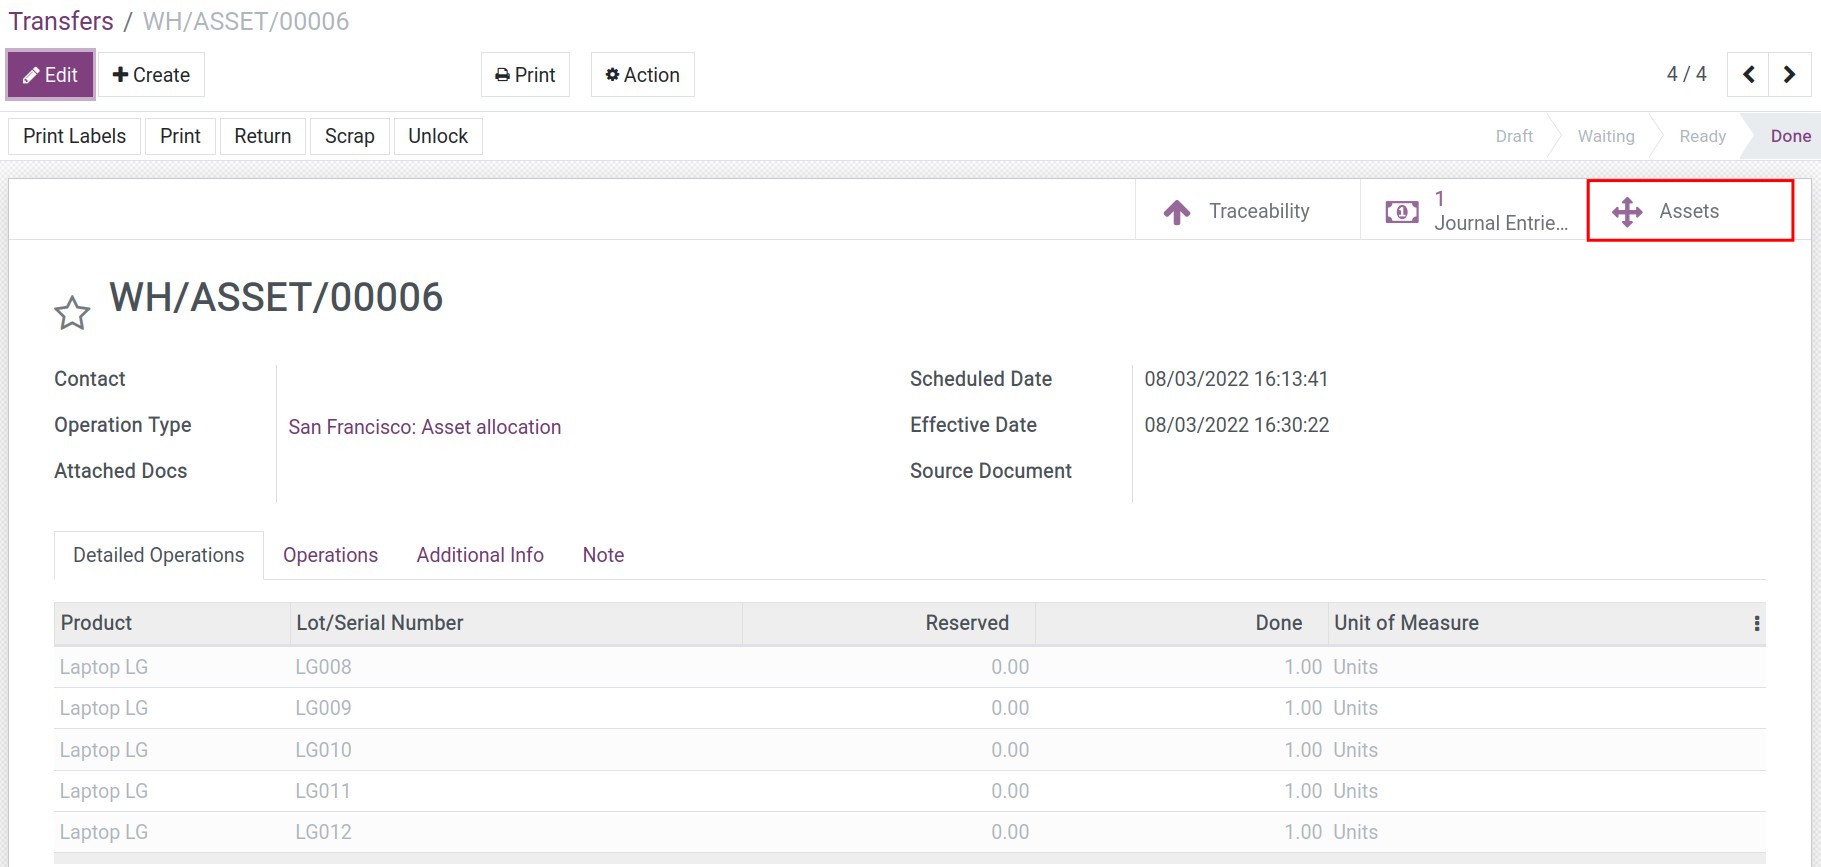
In Assets, you can see a list of all the Assets available in your system.
Similarly, you can see the full list of available Assets in your Company by navigating to Accounting app > Accounting > Assets. After that, you can start to depreciate of those assets.
See also
Related article
Asset disposal
Optional module
Stock Asset Equipment
Depreciation of Fixed Assets
General concept
Depreciation of an asset refers to an accounting method used to allocate the cost of an asset to its production and business expenses during its depreciation period.
Enterprises can actively decide the time to calculate the depreciation of Assets. However, Enterprises must comply with the time frame for depreciation issued by the authorities.
In Equtorial Guinea, you can see more details of the time frame for depreciation in Circular 45/2013/TT-BTC on the regime of management, use and depreciation of fixed assets.
Requirements
This tutorial requires the installation of the following applications/modules:
Accounting & Finance
Assets Management
Chart of Accounts
Depreciation of Assets
In previous articles, we showed you how to create a new Asset, and Asset Categories. In this article, we will show you how to check, configure information for each asset, and how to activate the asset depreciation.
Navigate to Accounting > Accounting > Assets.
The image above shows a list of Assets that have been created in Viindoo. The Status column shows whether the Asset has begun to depreciate.
See also
Configure charts of accounts and depreciation method for Assets Category
Check the depreciation of assets
Click on each Asset that is in Draft status then check each displayed information.
See also
Asset Revaluation
In this guideline, we will show you how to set up and calculate linear depreciation in Viindoo software. You can easily do the same with the other two methods: Degressive and Accelerated Degressive.
On the Depreciation tab, choose Computation Method is Linear. You need to care about Prorata Temporis: Ticking or not ticking this field will directly affect the depreciation calculation.
Case 1: Prorata Temporis is not ticked.
By setting as the example above:
Number of Depreciations is 60
Depreciation Board with 60 created depreciation entries.
Value of each depreciation entry: Calculated by dividing the Original Value by the Number of Depreciations:
2.000.000.000 / 60 = 33.333.333.
Case 2: Prorata Temporis is ticked.
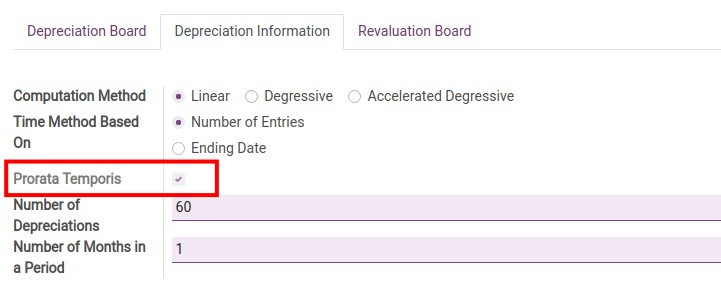
With the same setting as case 1, but Prorata Temporis is ticked:
Depreciation Board with 61 created depreciation entries.
First depreciation entry value: Calculated from Date in Asset Information.
According to the example above, the field Date is 10/10/2021, then the first depreciation entry value is calculated as:
(2.000 000.000 / 60 / 31 ) * 22 = 23.655.914.
In which:
60 is the Number of depreciation entries.
31 is the number of days in October.
22 is the number of days from 10/10/2021 to 31/10/2021.
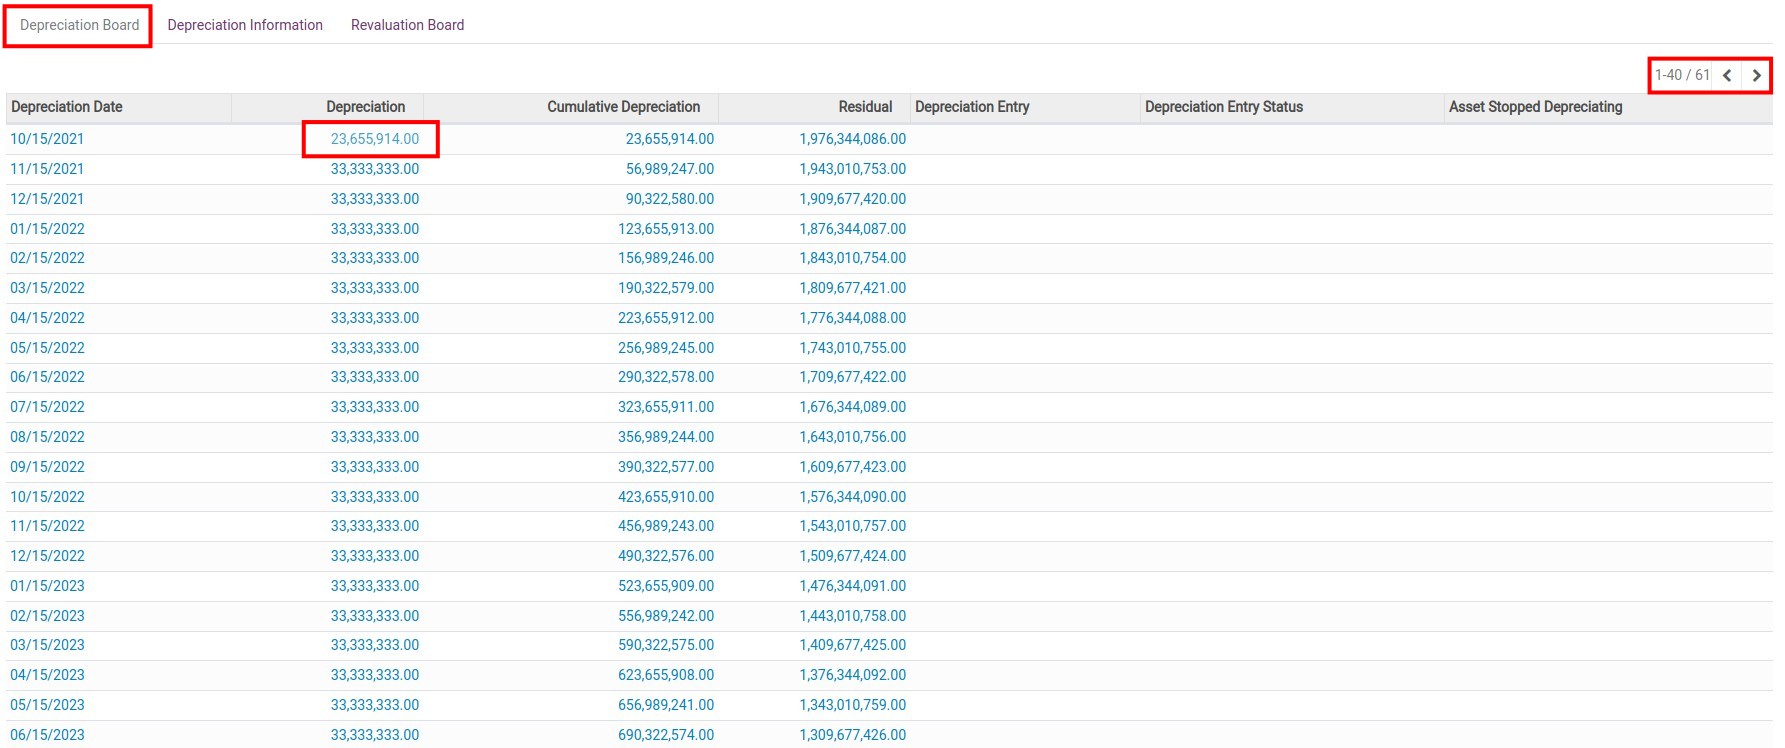
Start to depreciate
After you enter all the information, click Confirm. The asset will move to the Running status.
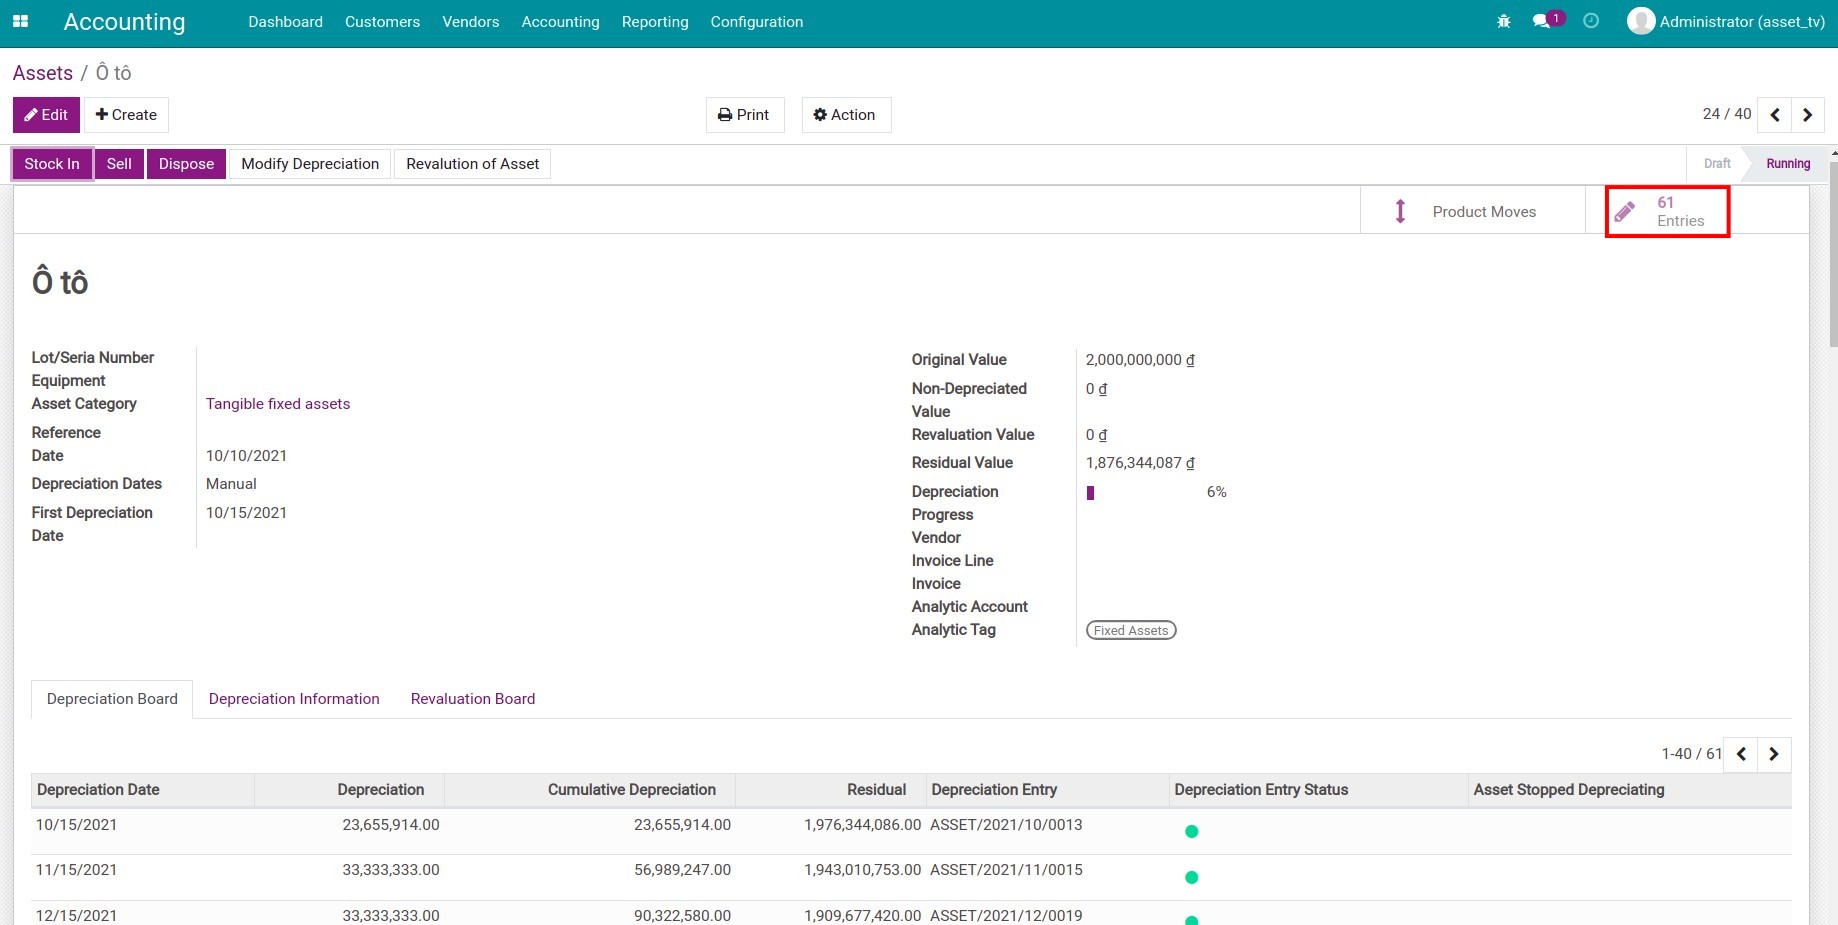
On the Asset form, the Entries button is displayed. Click on the Entries button, you will see all of the depreciation entries of this Asset. In the Depreciation Board tab, the Depreciation Entry Status column shows when the Asset is depreciating, what is the Cumulative Depreciation and the Residual Value of the Asset.
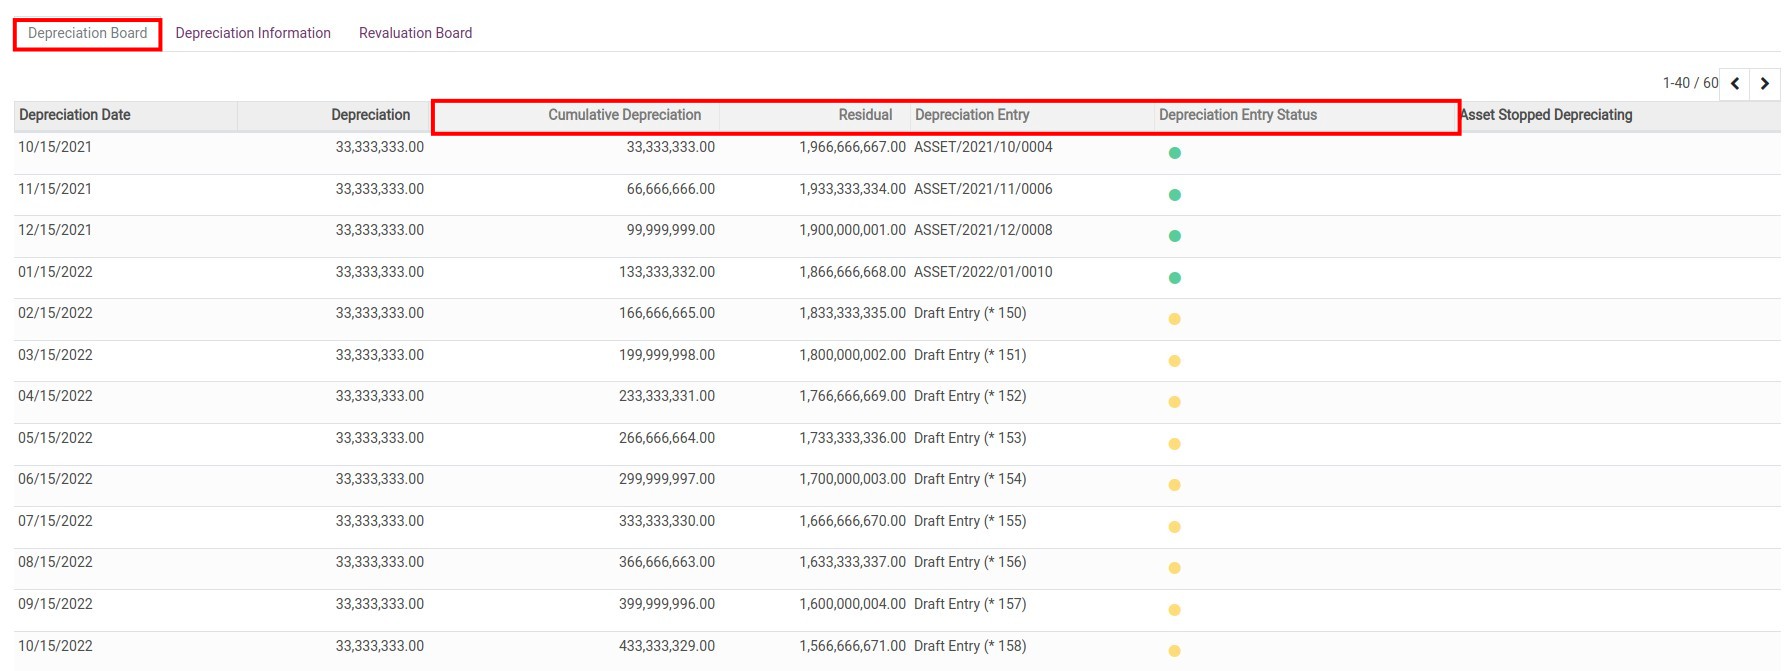
You can record the depreciation value of an asset by clicking on and posting each Draft entry.
Note
On top of that, Viindoo software supports users by periodically checking the Depreciation entries in Draft status that meet the date condition to posting them automatically.
See also
Related article
Asset disposal
Asset liquidation
Optional module
Stock Asset Equipment
Stock Asset
Assets Purchase
Asset disposal
Asset disposal
When an asset is put in use and the depreciation process already started, you still can perform other activities such as Sell, Dispose or Modify according to your needs. In this article, iSuite will introduce you to the Asset Disposal feature.
Requirements
This tutorial requires the installation of the following applications/modules:
Accounting & Finance
Assets Management
Chart of Accounts
Case 1: Dispose a depreciated Asset
On the depreciated Asset view, its stage is set as Close, press on Dispose.
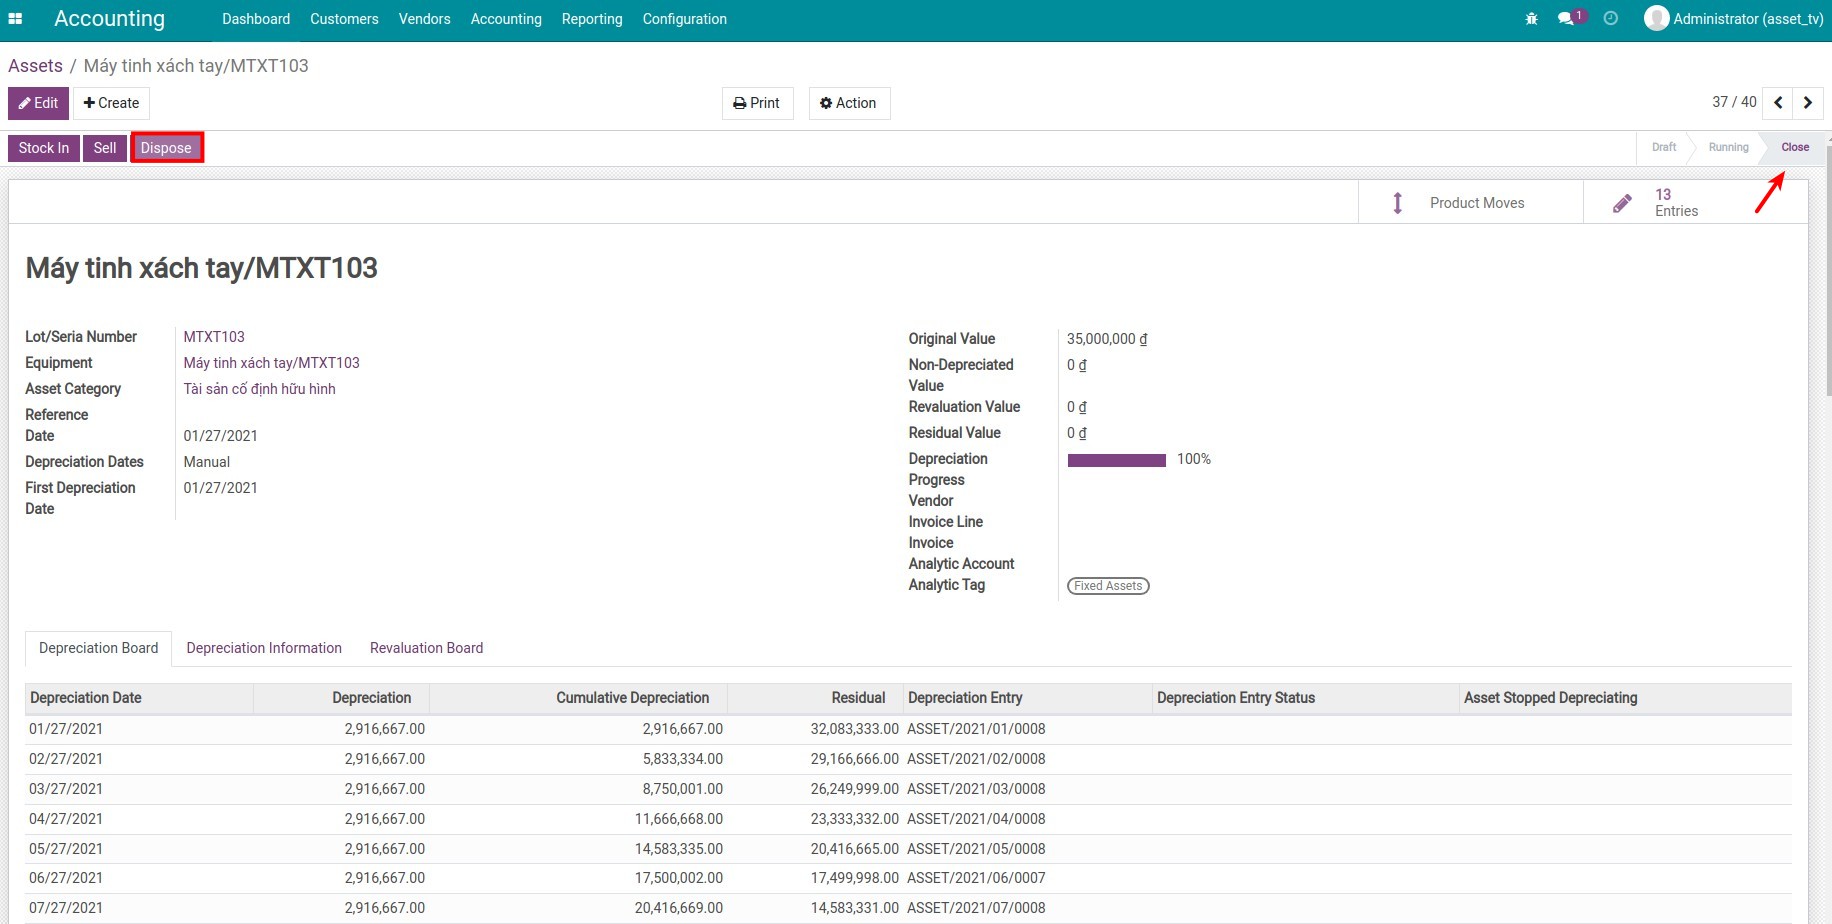
Here is where the system asks for the Disposed Date.
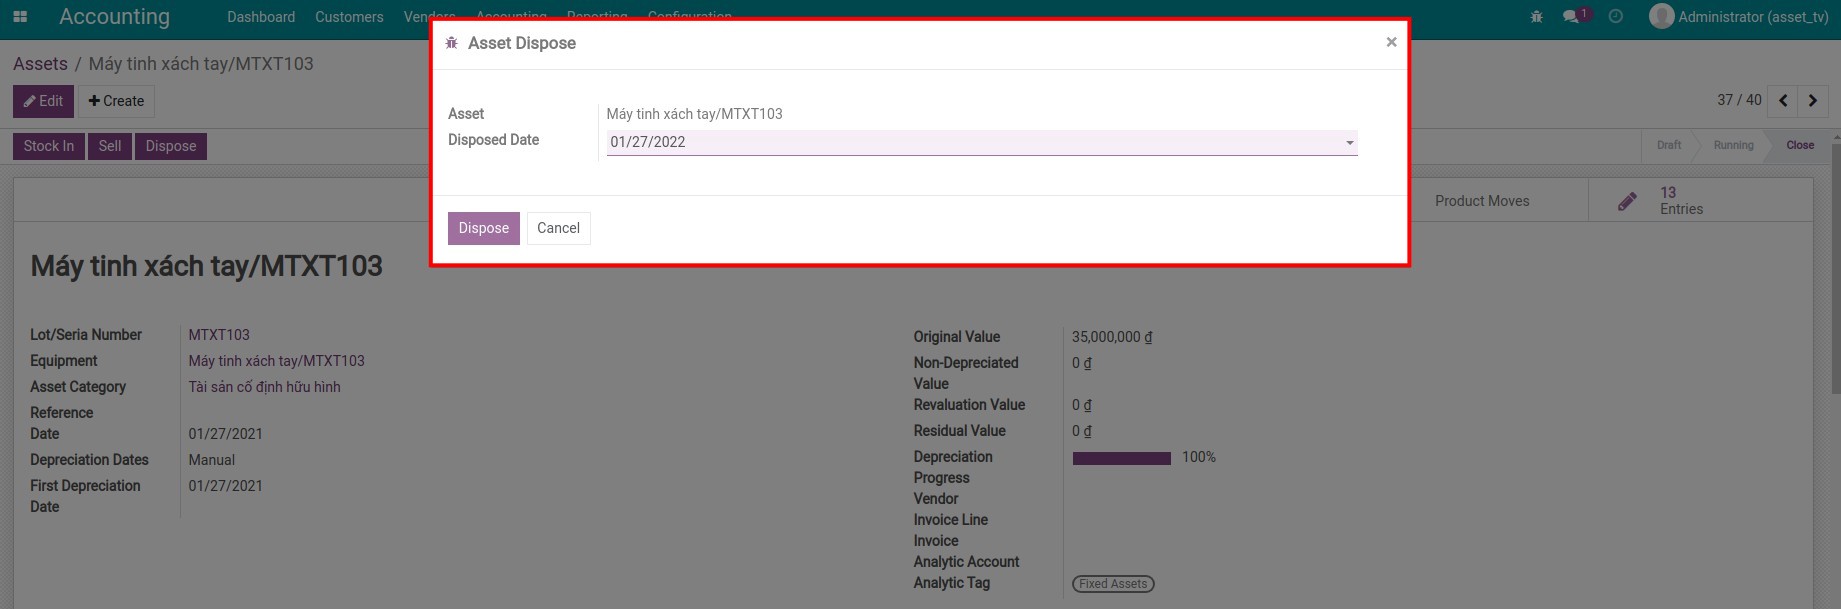
Note
The Disposed Date must be after the accounting date of the last journal items.
Press Dispose. The Asset stage will be changed from Close to Disposed. At the same time, the system will suggest a Journal entry for the Asset disposal in the Draft stage. To see this entry, go to Entries.
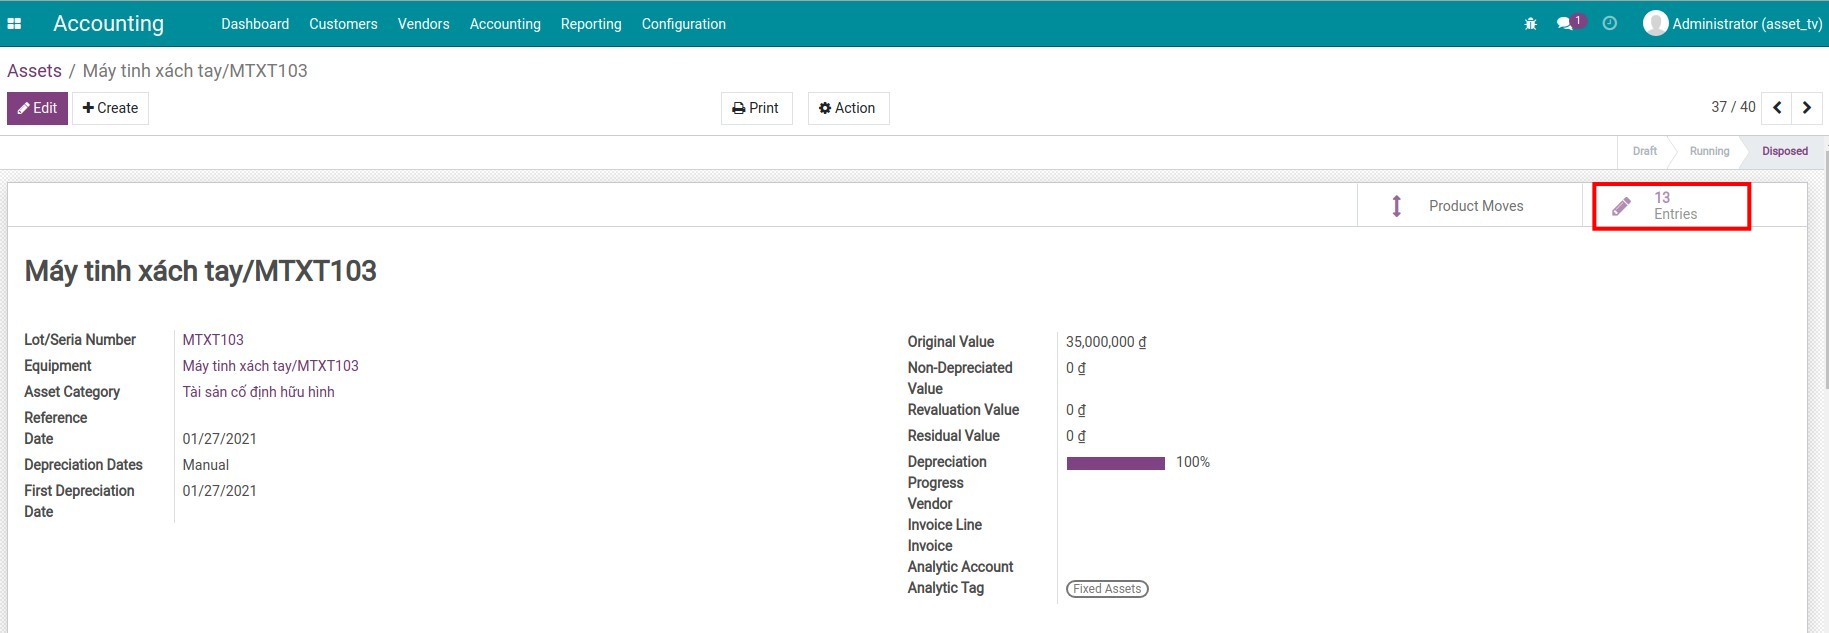
Below is an example of the Depreciated Asset disposal entry.
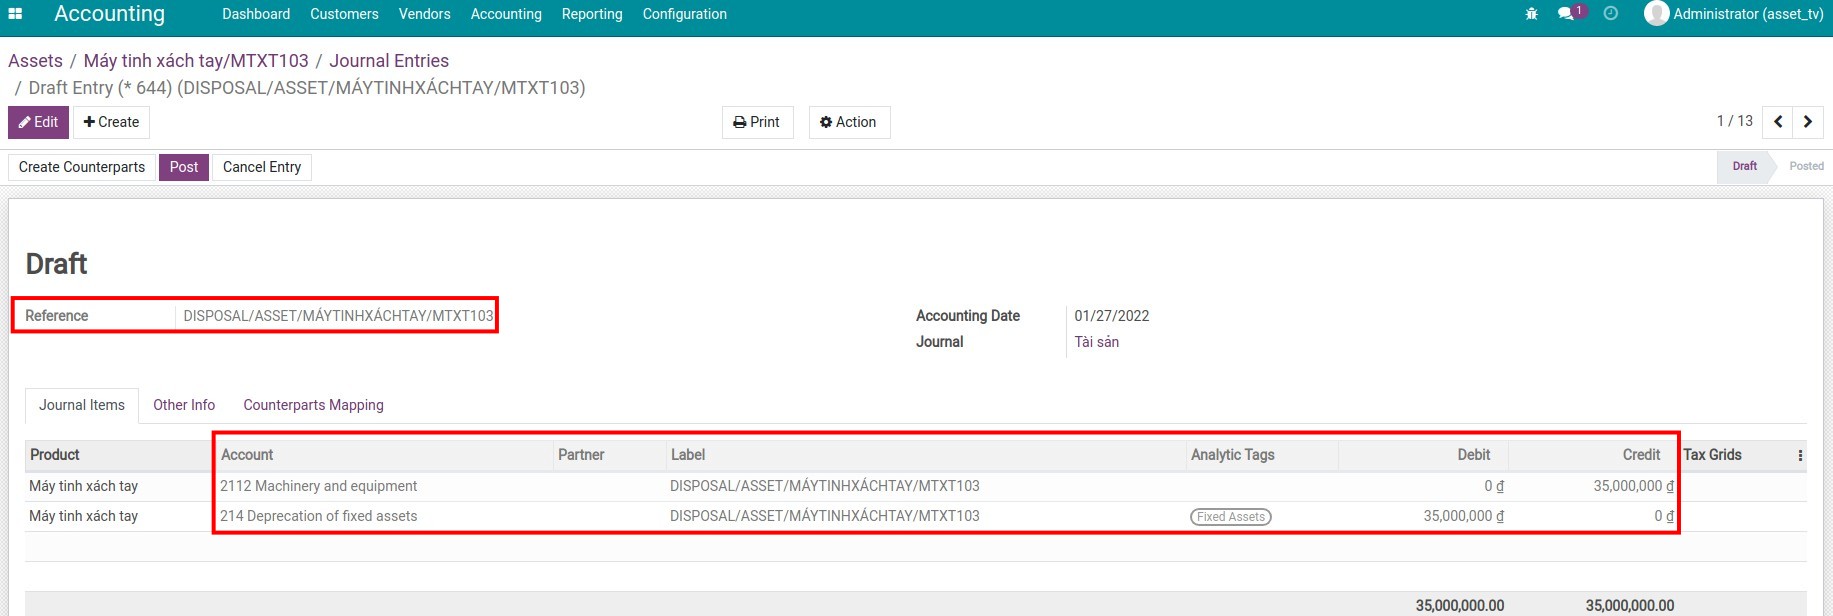
See also
Configure charts of accounts and depreciation method for Assets Category
Case 2: Dispose an Asset while being depreciated
On the Asset form which has the depreciation in the Running stage. Choose Dispose.
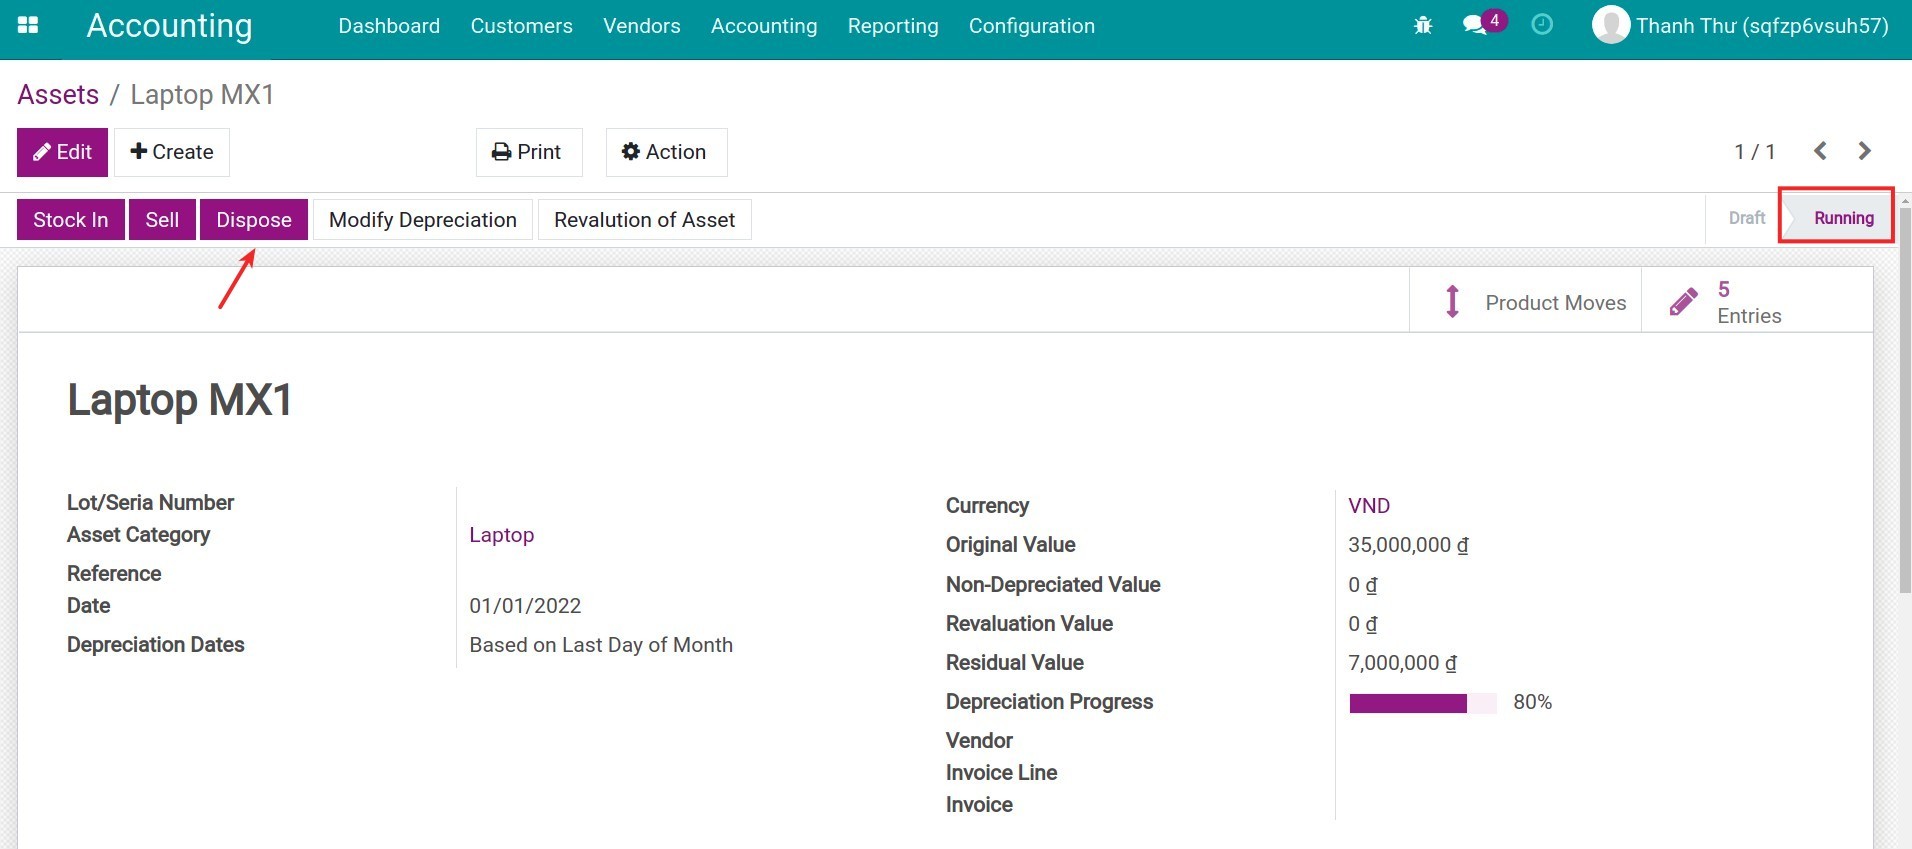
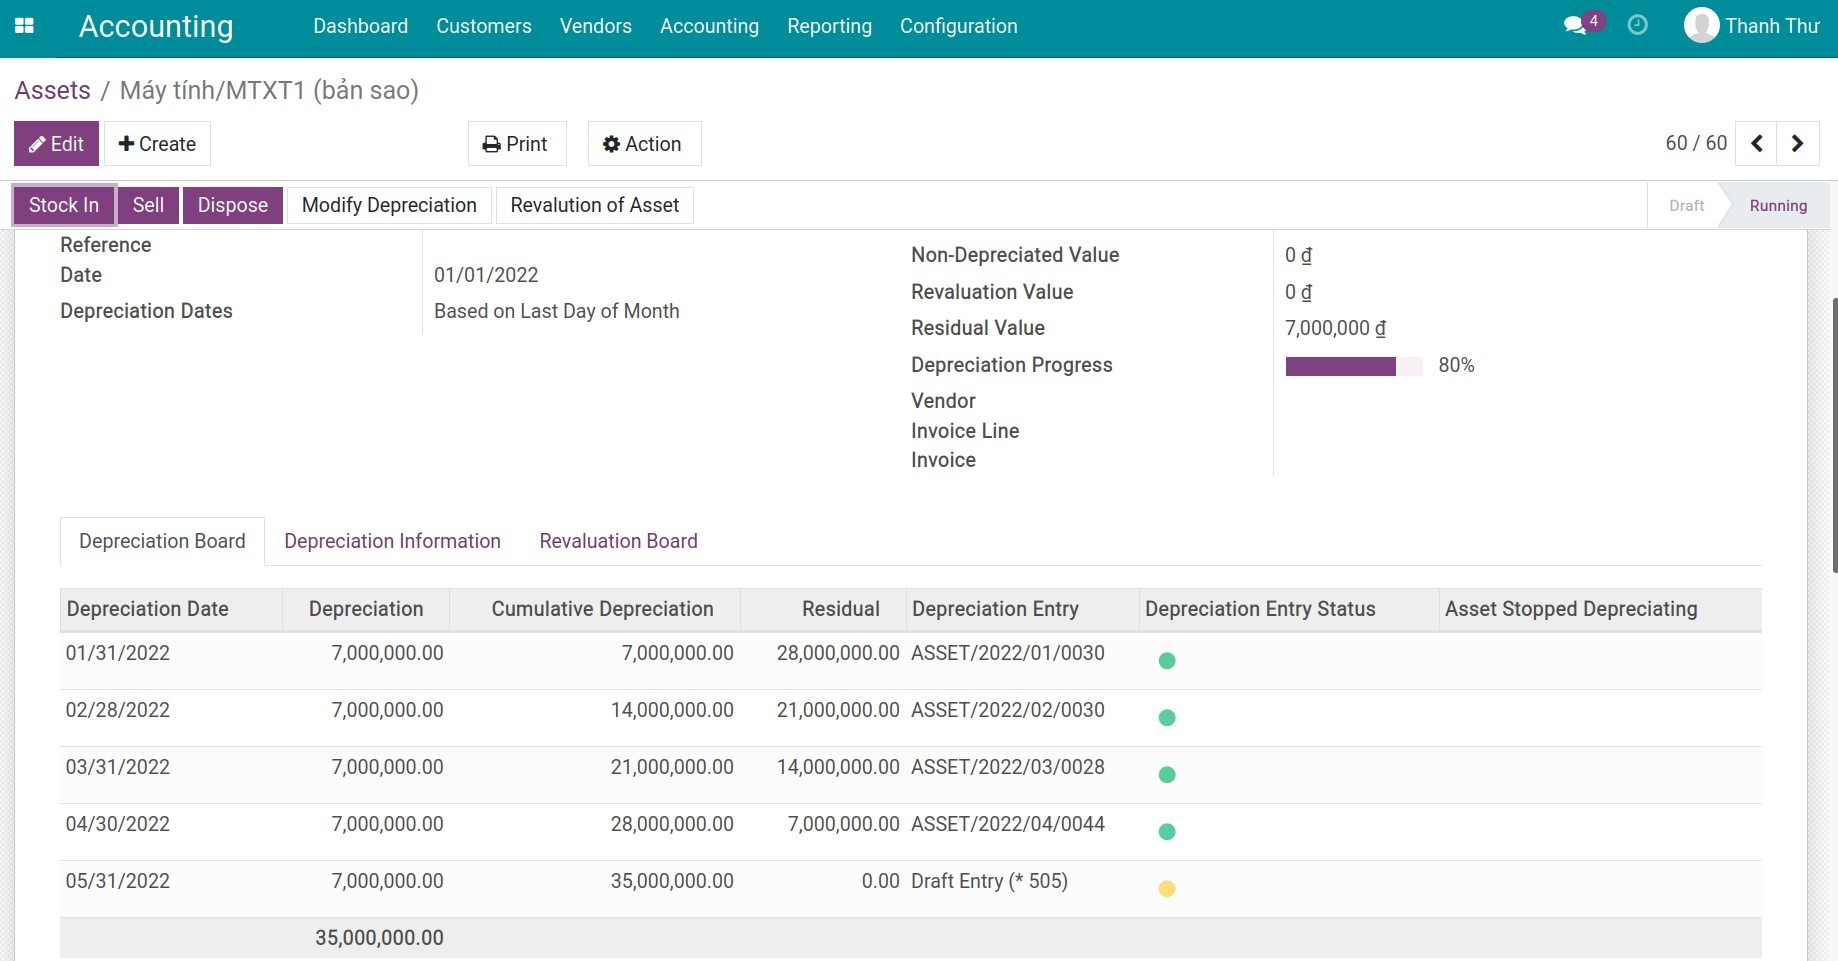
Similar to the first case, the system asks for a Disposed Date.
Dispose asset at the beginning of the next depreciation period.
In this example, the nearest depreciation date is 04/30/2022, change the Disposed Date to 05/01/2022 then press Dispose, and the Asset stage will be changed from Running to Disposed. This Asset will stop being depreciated at this time.
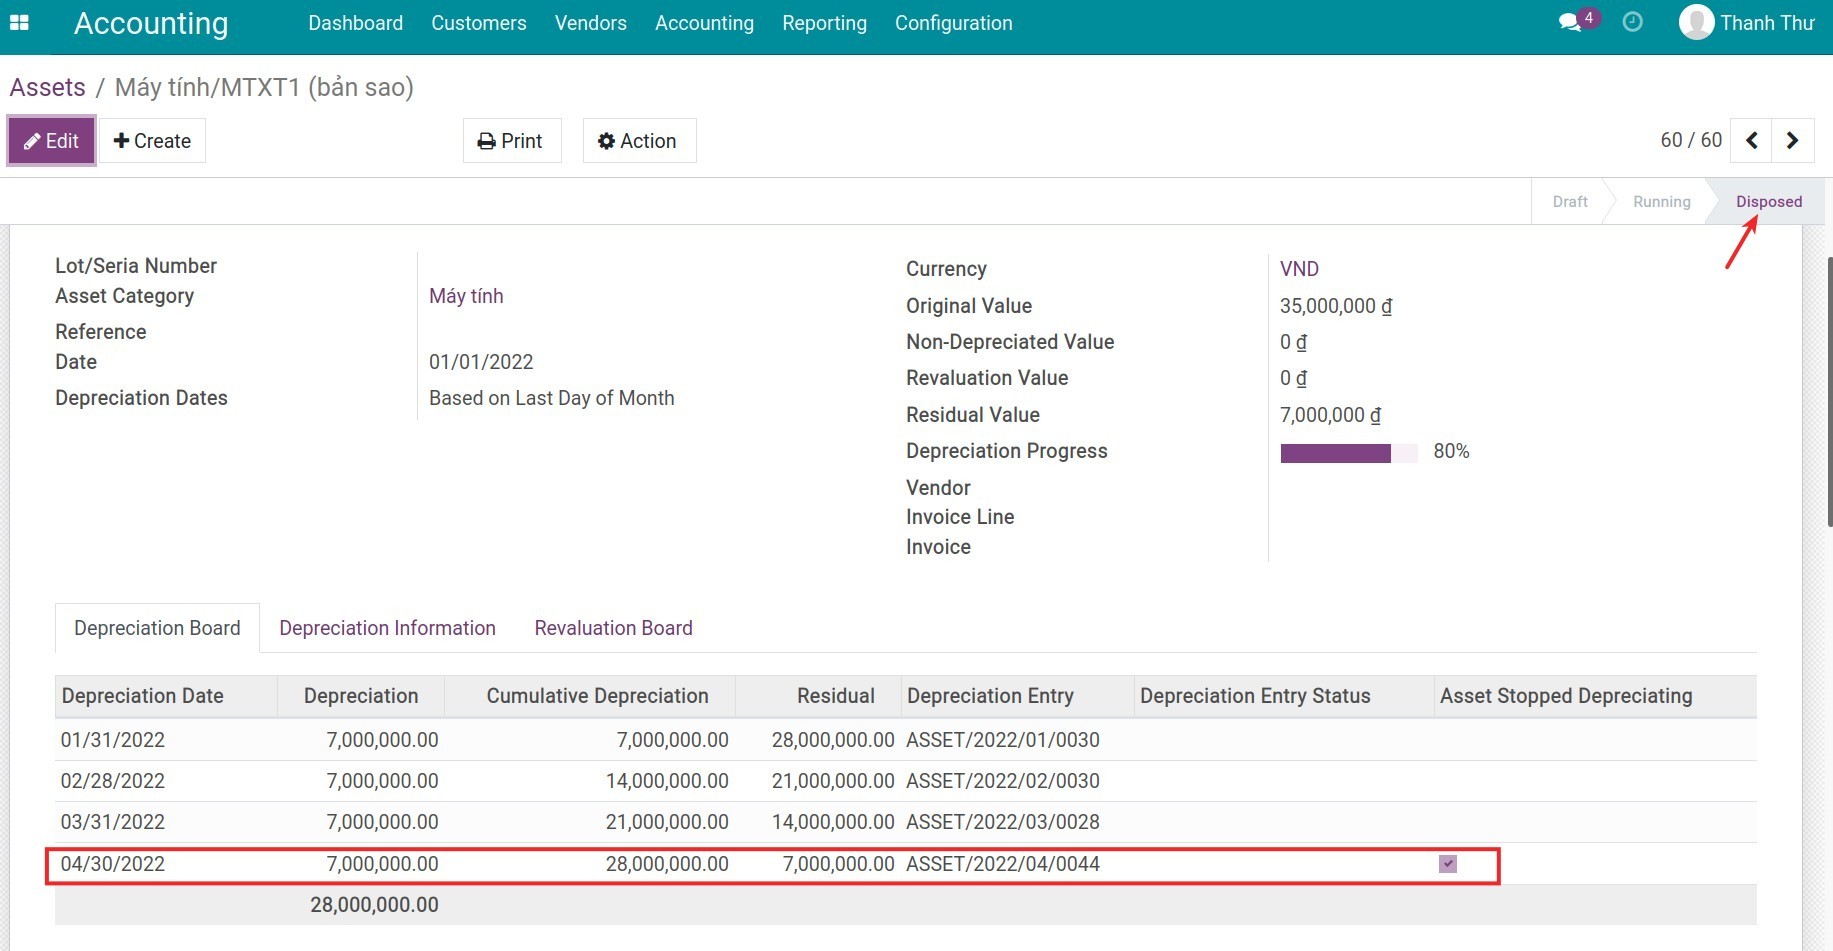
The system will then suggest an Asset disposal entry in stage Draft. To see this journal entry, choose Entries similar to the previous example.
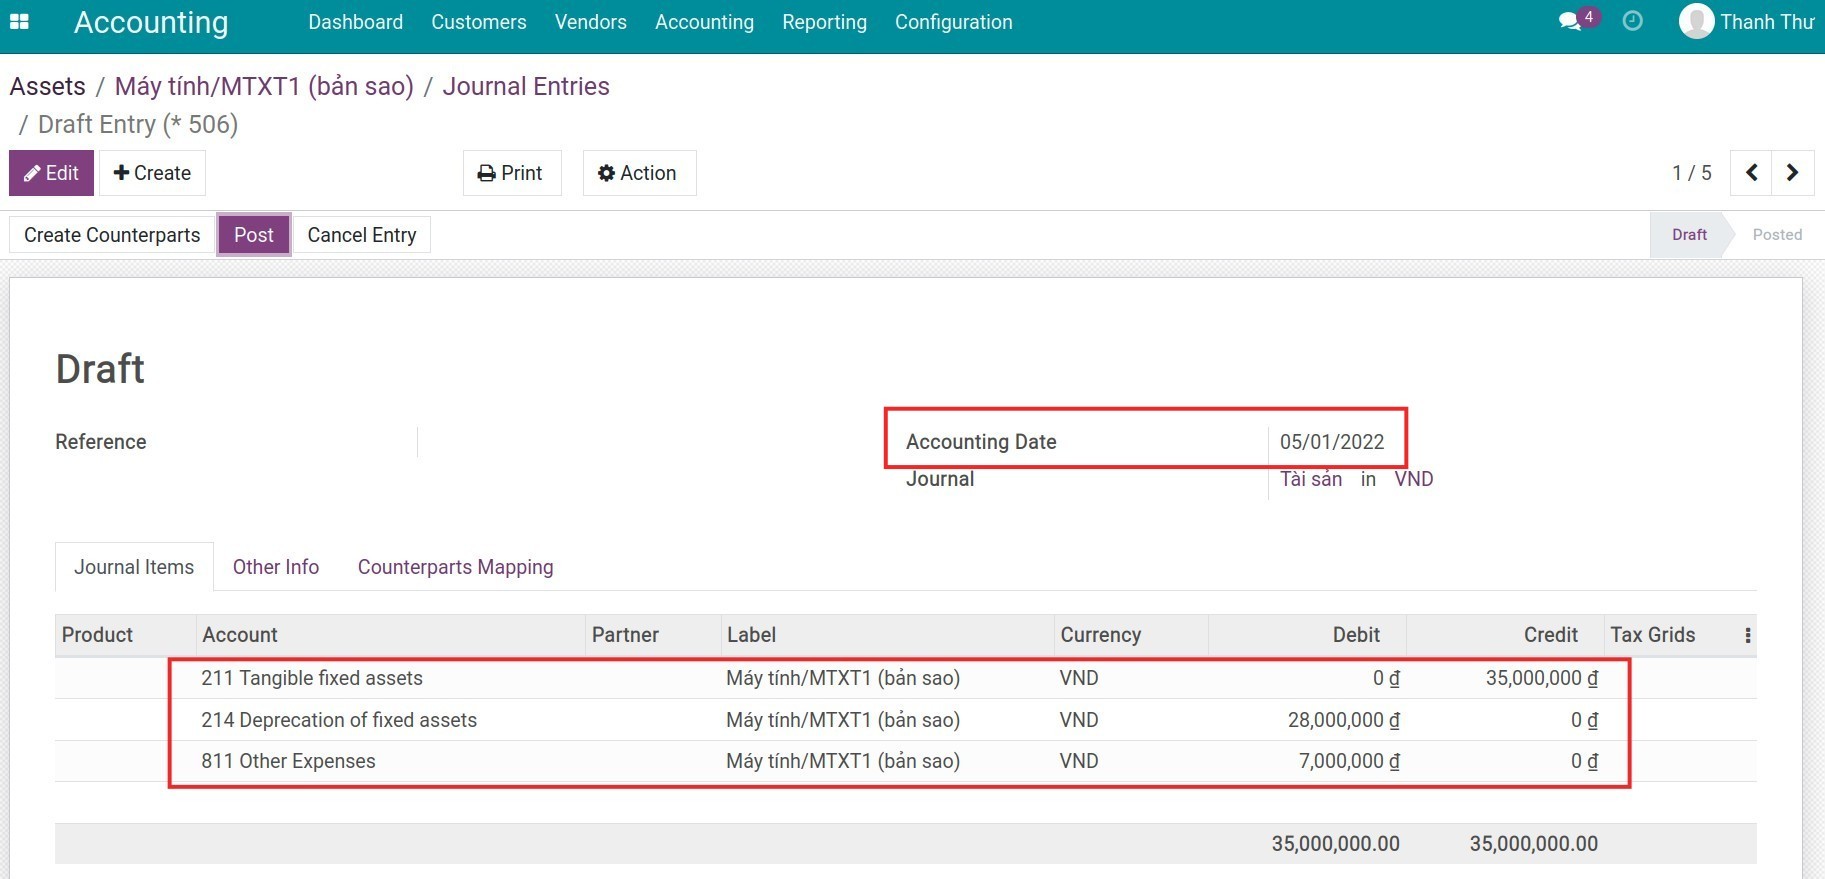
Dispose asset on a day different with the beginning of the next depreciation period.
In this example, the nearest depreciation date is 04/30/2022, change the Disposed Date to 05/06/2022 then press Dispose, and the Asset stage will be changed from Running to Disposed. The system will calculate the depreciated value of the last period and a Journal entry will be created to adjust the depreciated value of said period to stage Posted.
To see this Journal Entry, press on Entries.
Wipe out Asset entry:
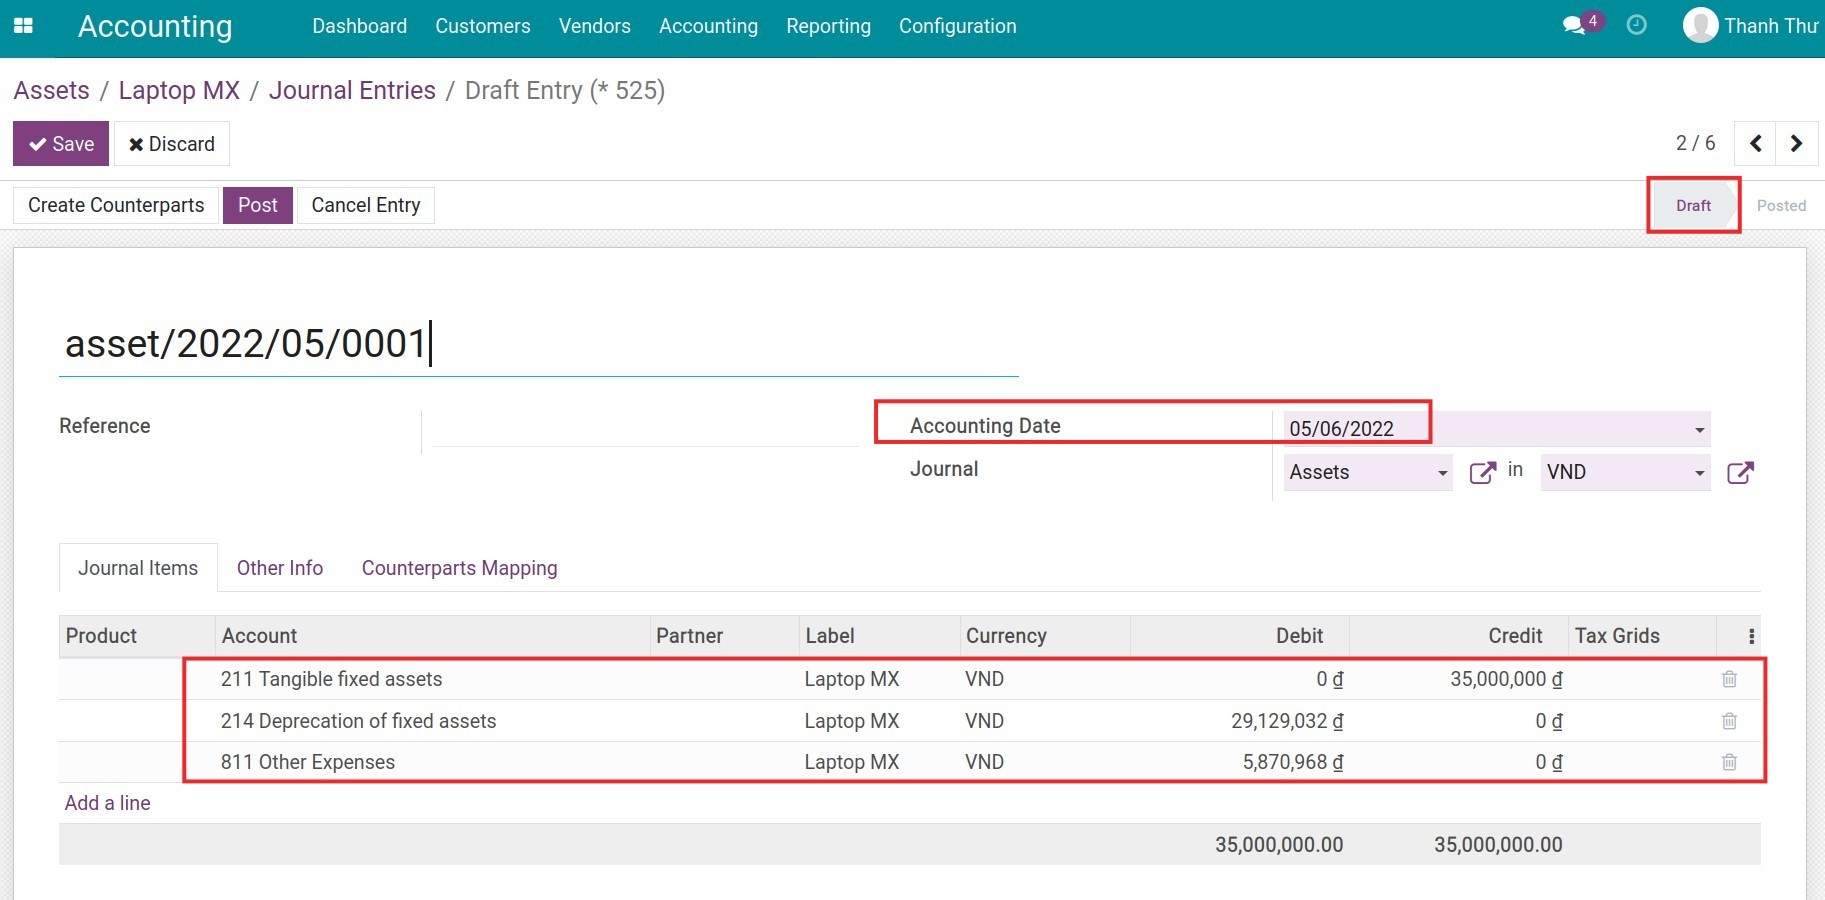
Adjust the depreciated value Asset entry:
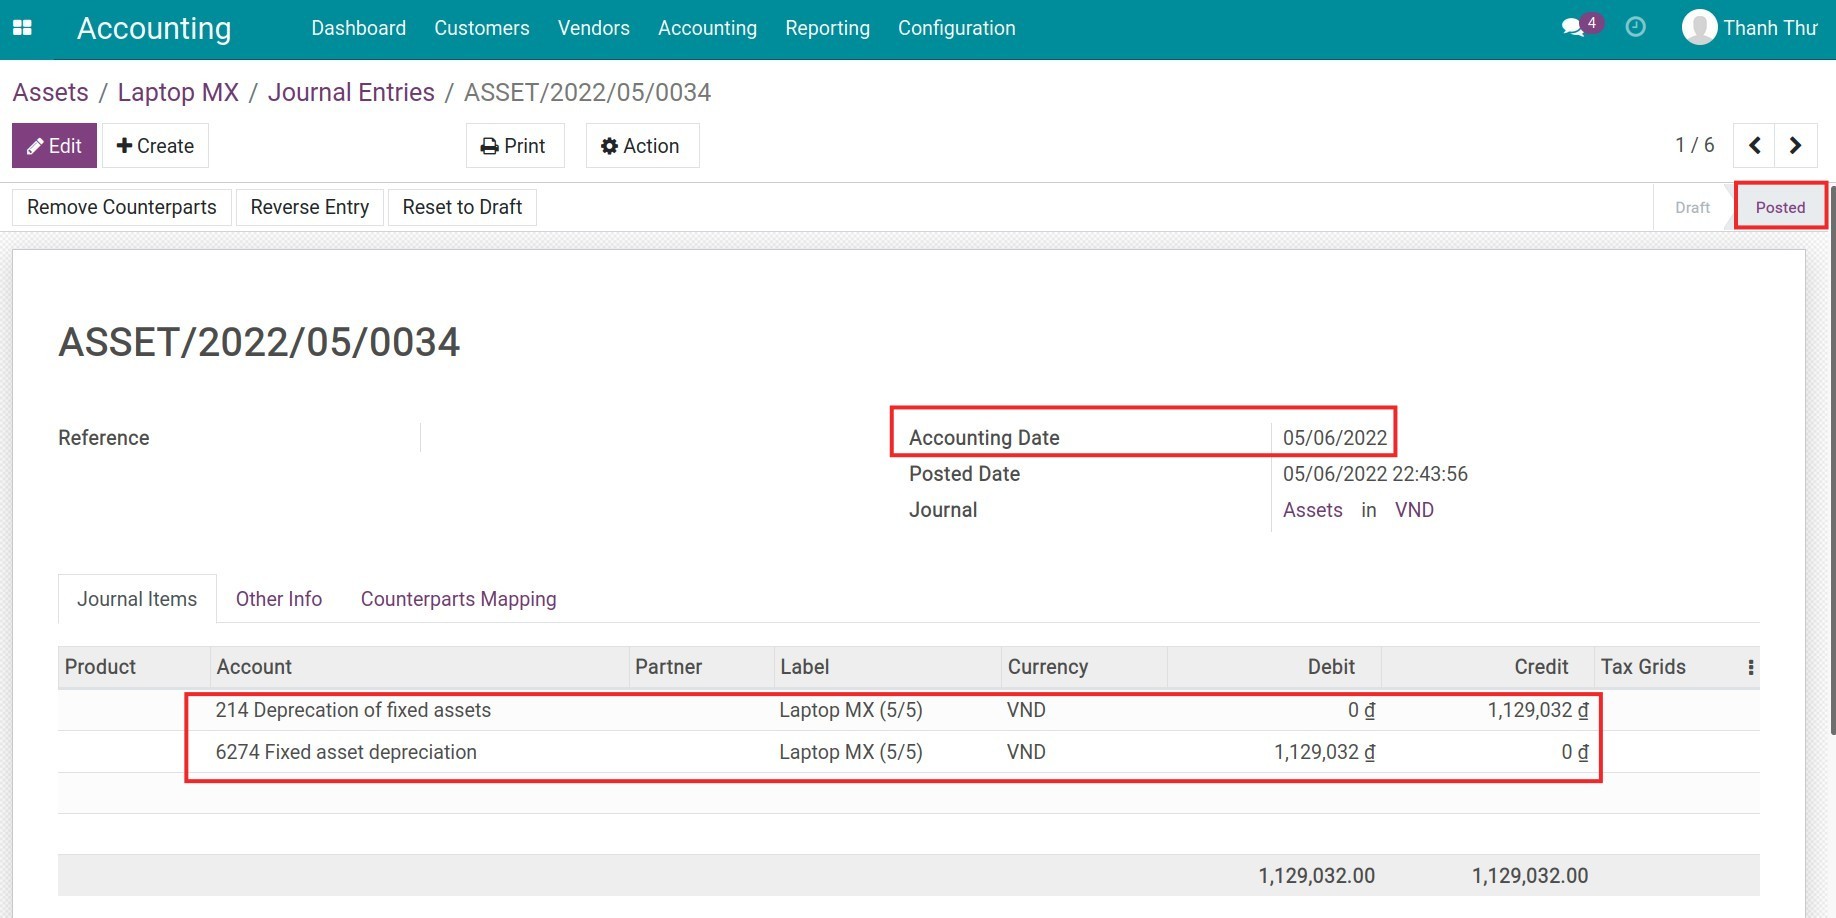
See also
Related article
Asset liquidation
Asset Revaluation
Optional module
Stock Asset Equipment
Stock Asset
Assets Purchase
Asset Revaluation
Asset Revaluation
In reality, some common reasons for an asset revaluation are:
Upgrade an asset.
Dismantling one or some parts of an asset.
Revaluate tangible assets to determine business value.
Asset revaluation for purpose of a joint venture, capital contribution, division, consolidation, or dissolution.
Revaluation at the request of the authority.
This article will show you steps to revaluate an asset in the Viindoo Accounting app.
Requirements
This tutorial requires the installation of the following applications/modules:
Accounting & Finance
Assets Management
Chart of Accounts
First, go to the asset view. The Asset you want to revaluate now has the Running stage.
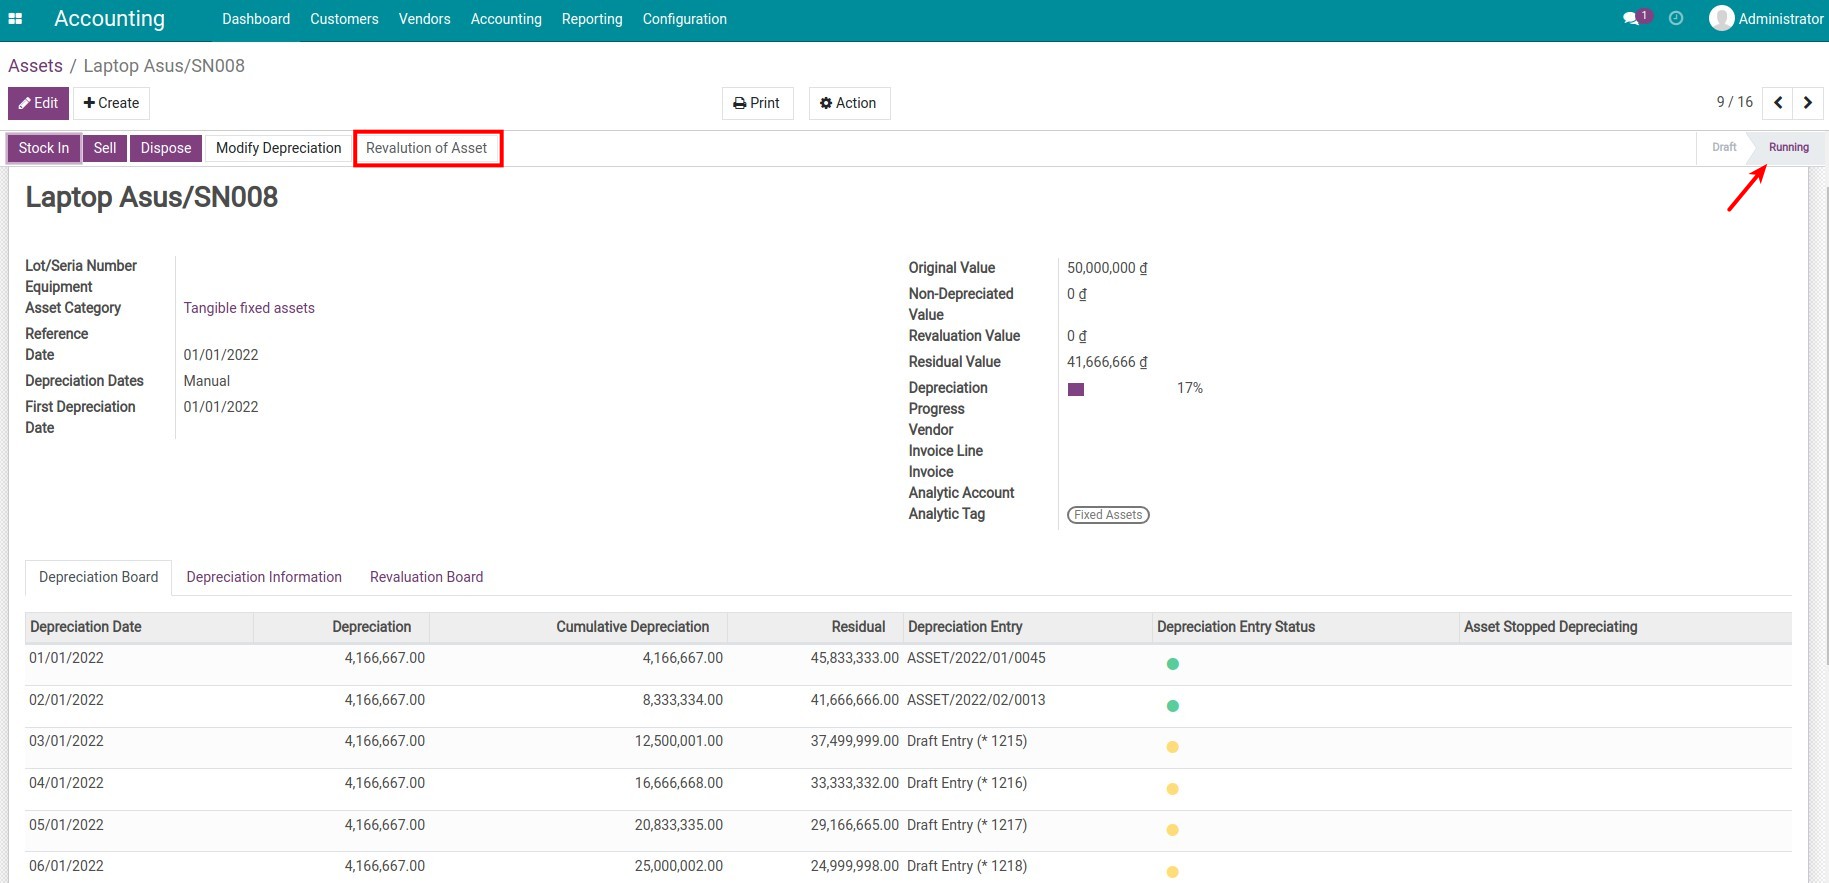
Press on Revaluation of Asset. A pop-up window appears where you need to add the following required information:
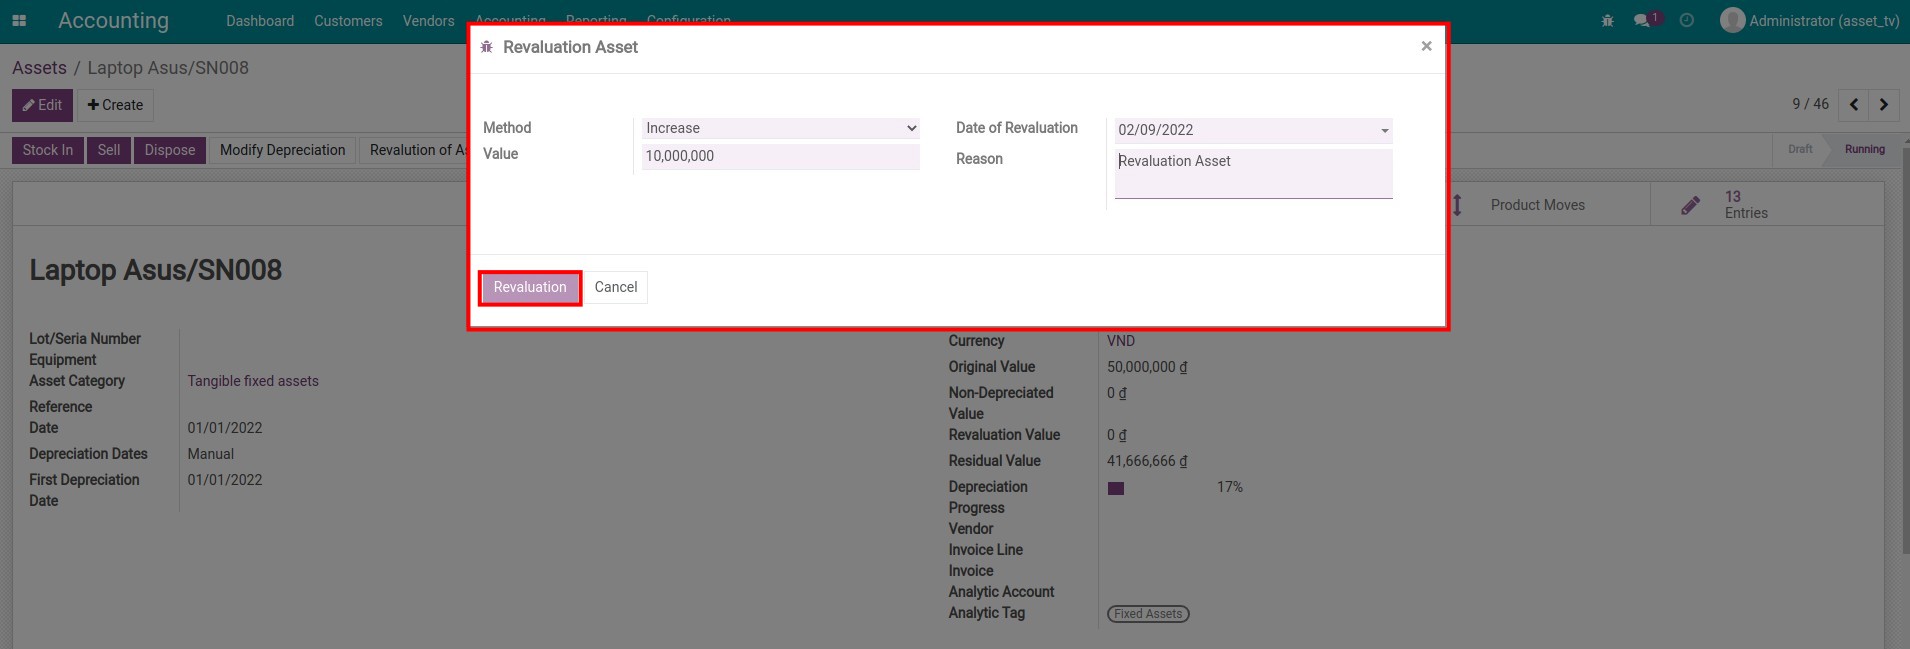
Method:
Increase.
Decrease.
Value: Add the increasing or decreasing amount from the value of the asset.
Date of Revaluation: The date when the asset revaluation is recorded.
Reason: The purpose of revaluating the asset.
Once you press on Revaluation, the system will re-calculate data of some fields on the asset as follows:
Asset information
Revaluation Value: Displays the increased or decreased value of the revaluated asset.
Residual Value: Recalculated as the Original Value plus (or minus) the Revaluation Value minus the Cumulative Depreciation value.
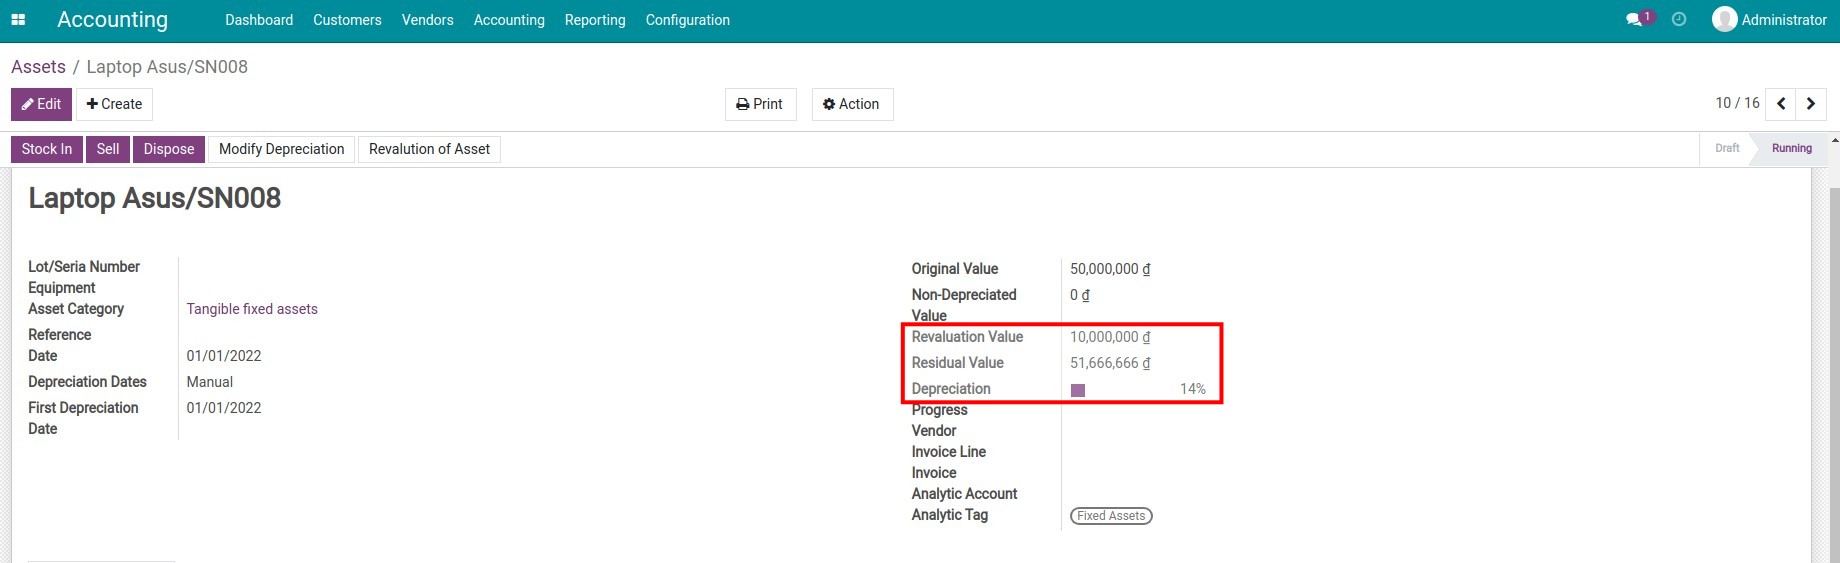
Revaluation Board
The system records an entry for each corresponding revaluation.

By pressing on each line, you can review the details of each asset revaluation operation.
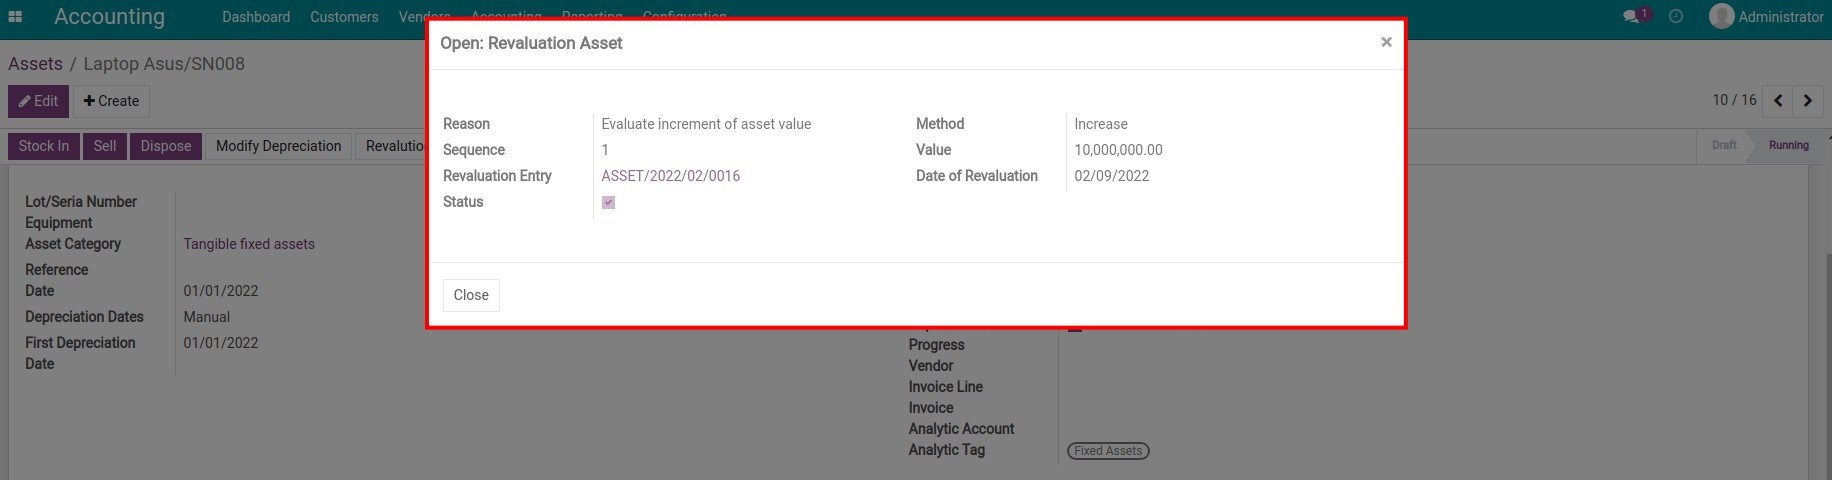
From here, you can post entries to the asset journal.
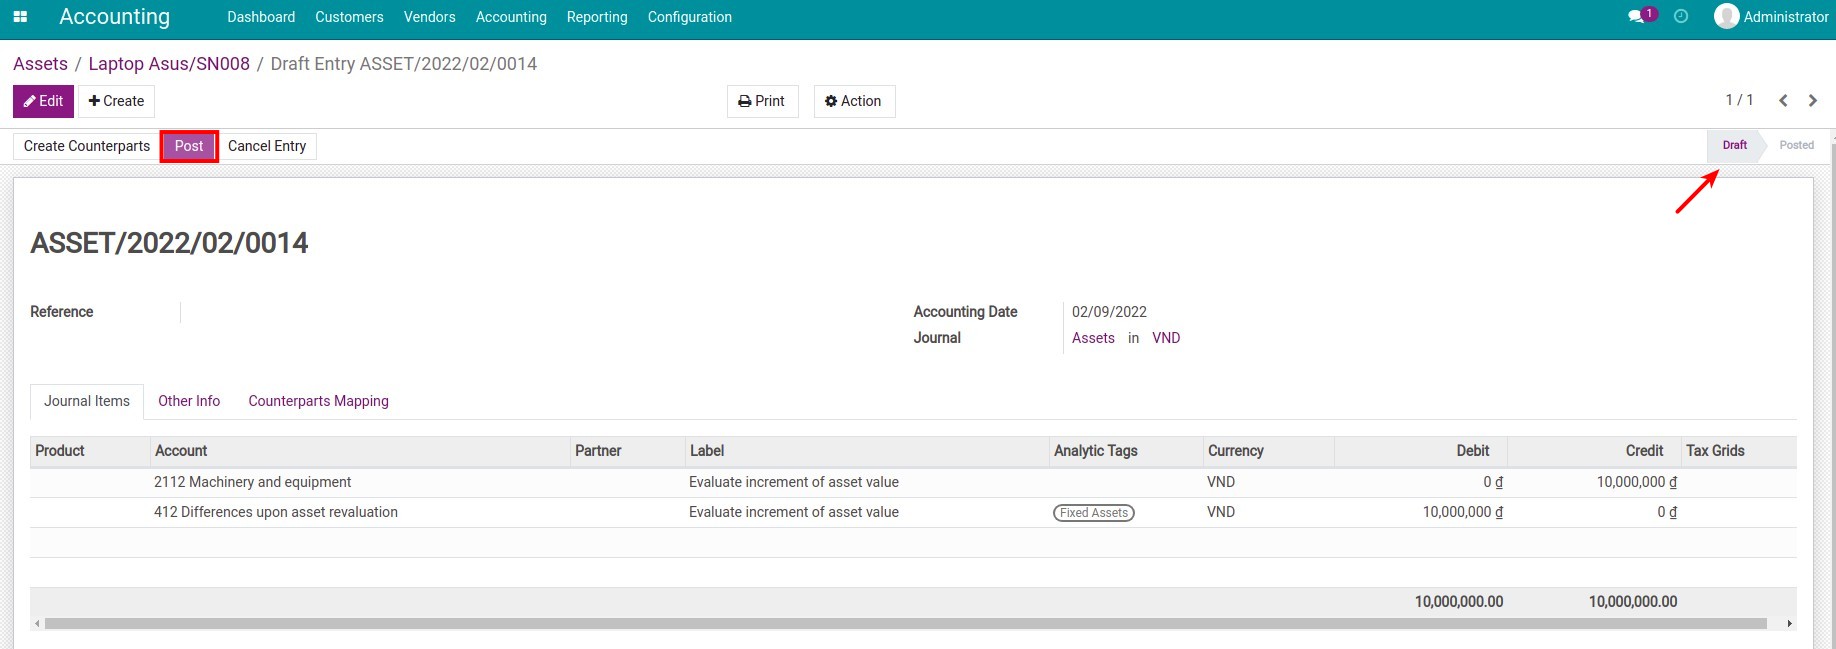
Depending on the increased or decreased value, the system adjusts the amortized value of the periods that have not been depreciated. The entries for the previous amortized periods are unchanged. To check this information, you can go back to the Depreciation Board tab.
Depreciation Board
Adjusted information are:
Depreciation: The Depreciation value of each amortization period is recalculated, starting from the adjusted month.
The Cumulative Depreciation and Residual columns are also recalculated according to the respective increased and decreased value.
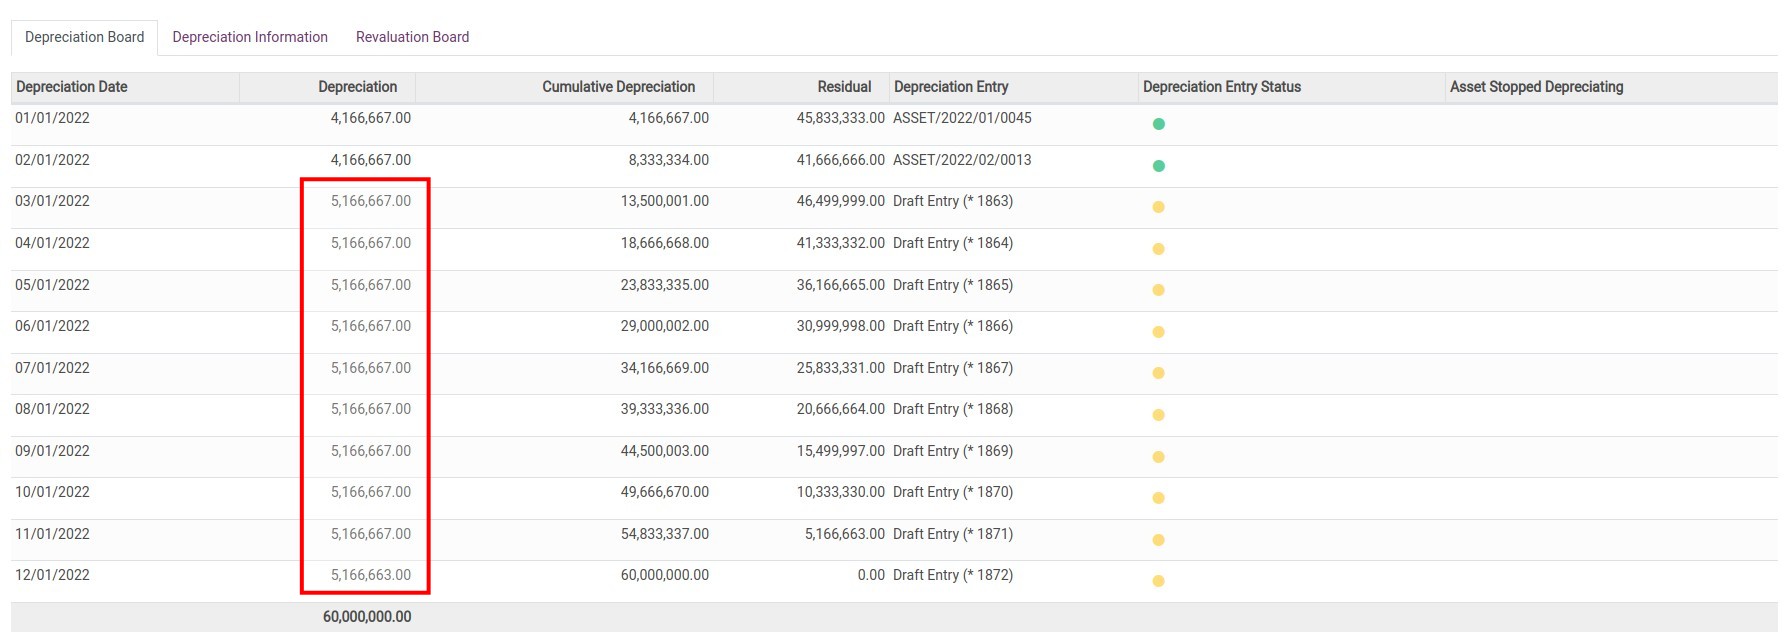
See also
Related article
Asset disposal
Accounting configuration for salary rules
Optional module
Stock Asset Equipment
Stock Asset
Assets Purchase
How to exclude journal items from Financial Reports
How to exclude journal items from Financial Reports
Requirements
This tutorial requires the installation of the following applications/modules:
Viindoo Accounting & Finance
CEMAC Chart of Accounts - Circular 200 and 133
In reality, companies may have internal journal entries that they don’t want to show on financial reports.
To assist accountants in accurately tracking the incurred costs of the company and preparing financial reports by the law, Viindoo provides a fairly simple and convenient tool.
First, navigate to Viindoo Apps, remove the Apps filter and search for module Accounting Reports - Report Exclusion ‣ Install:
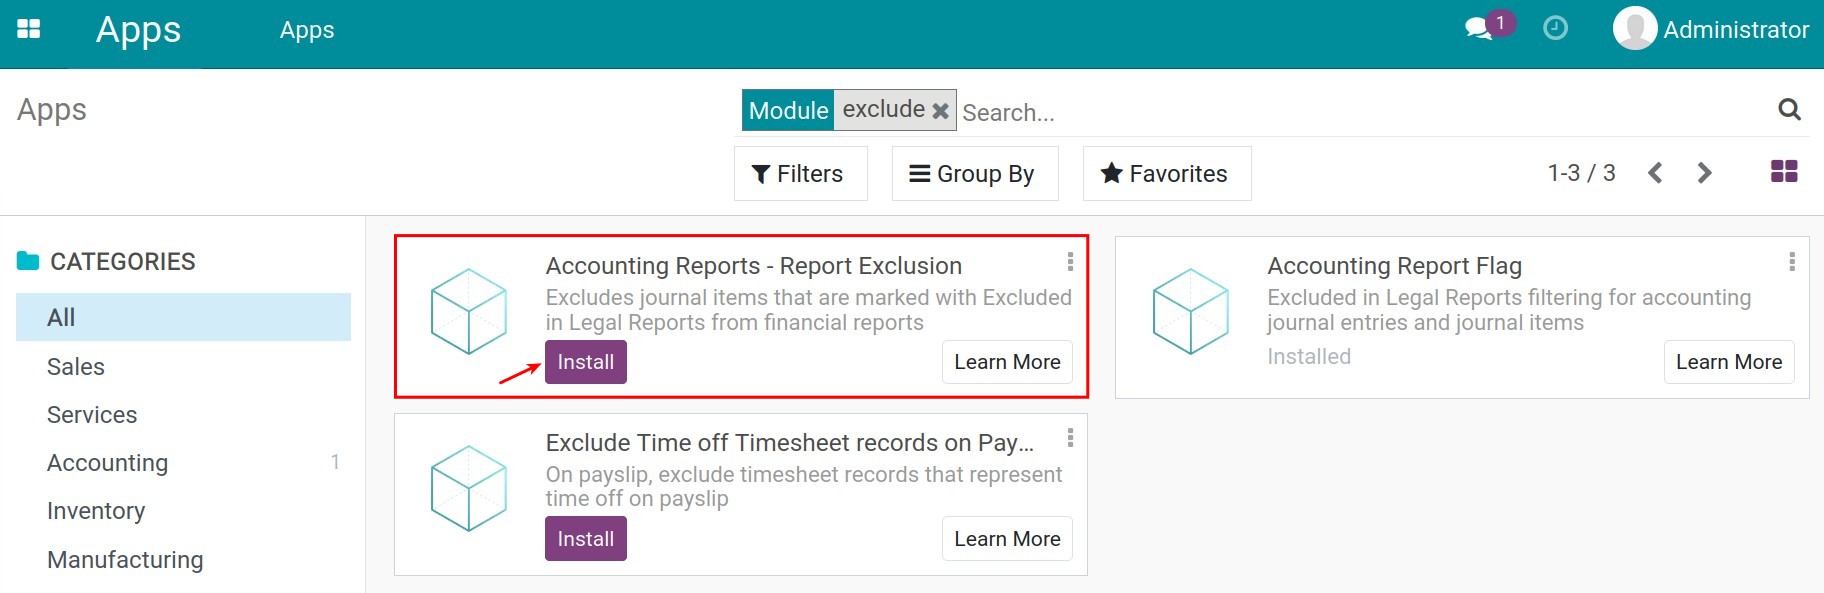
After installing the module, navigate to Accounting ‣ Accounting ‣ Journal Entries, there will be a field available to exclude the journal entries of legal reports:
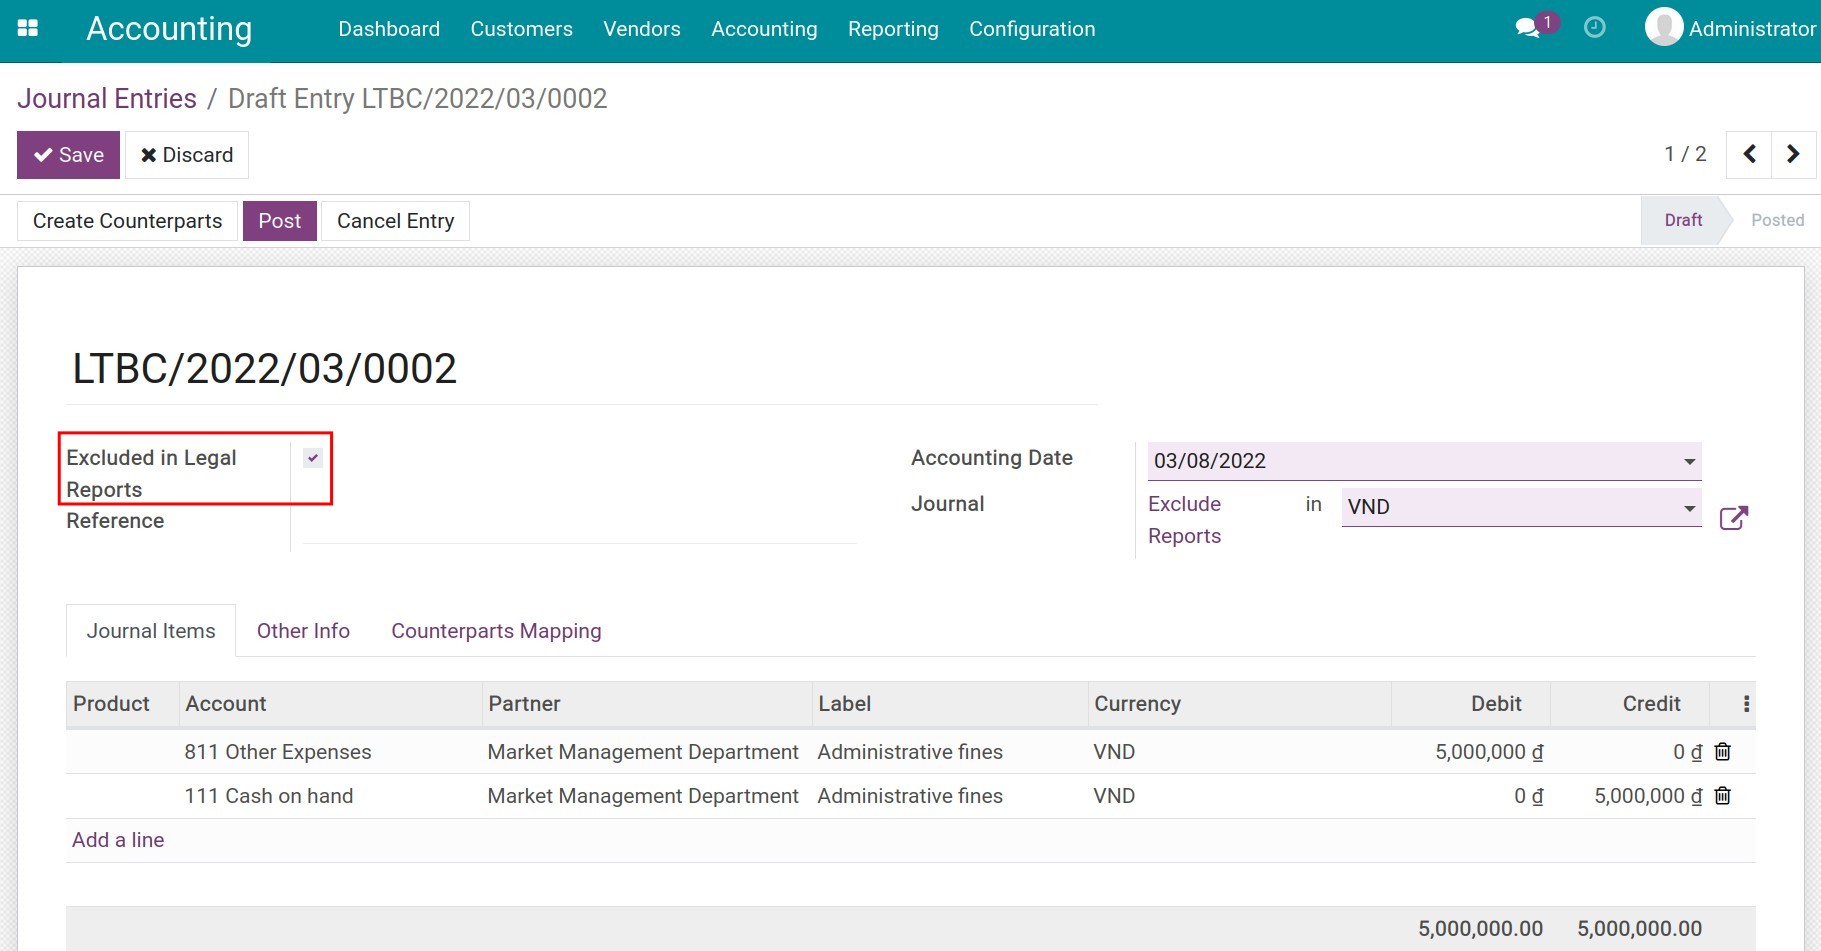
On financial reports in accordance with the law such as Profit and Loss, Balance Sheet, etc., there will be an additional filter for entries marked as excluded from legal reports:
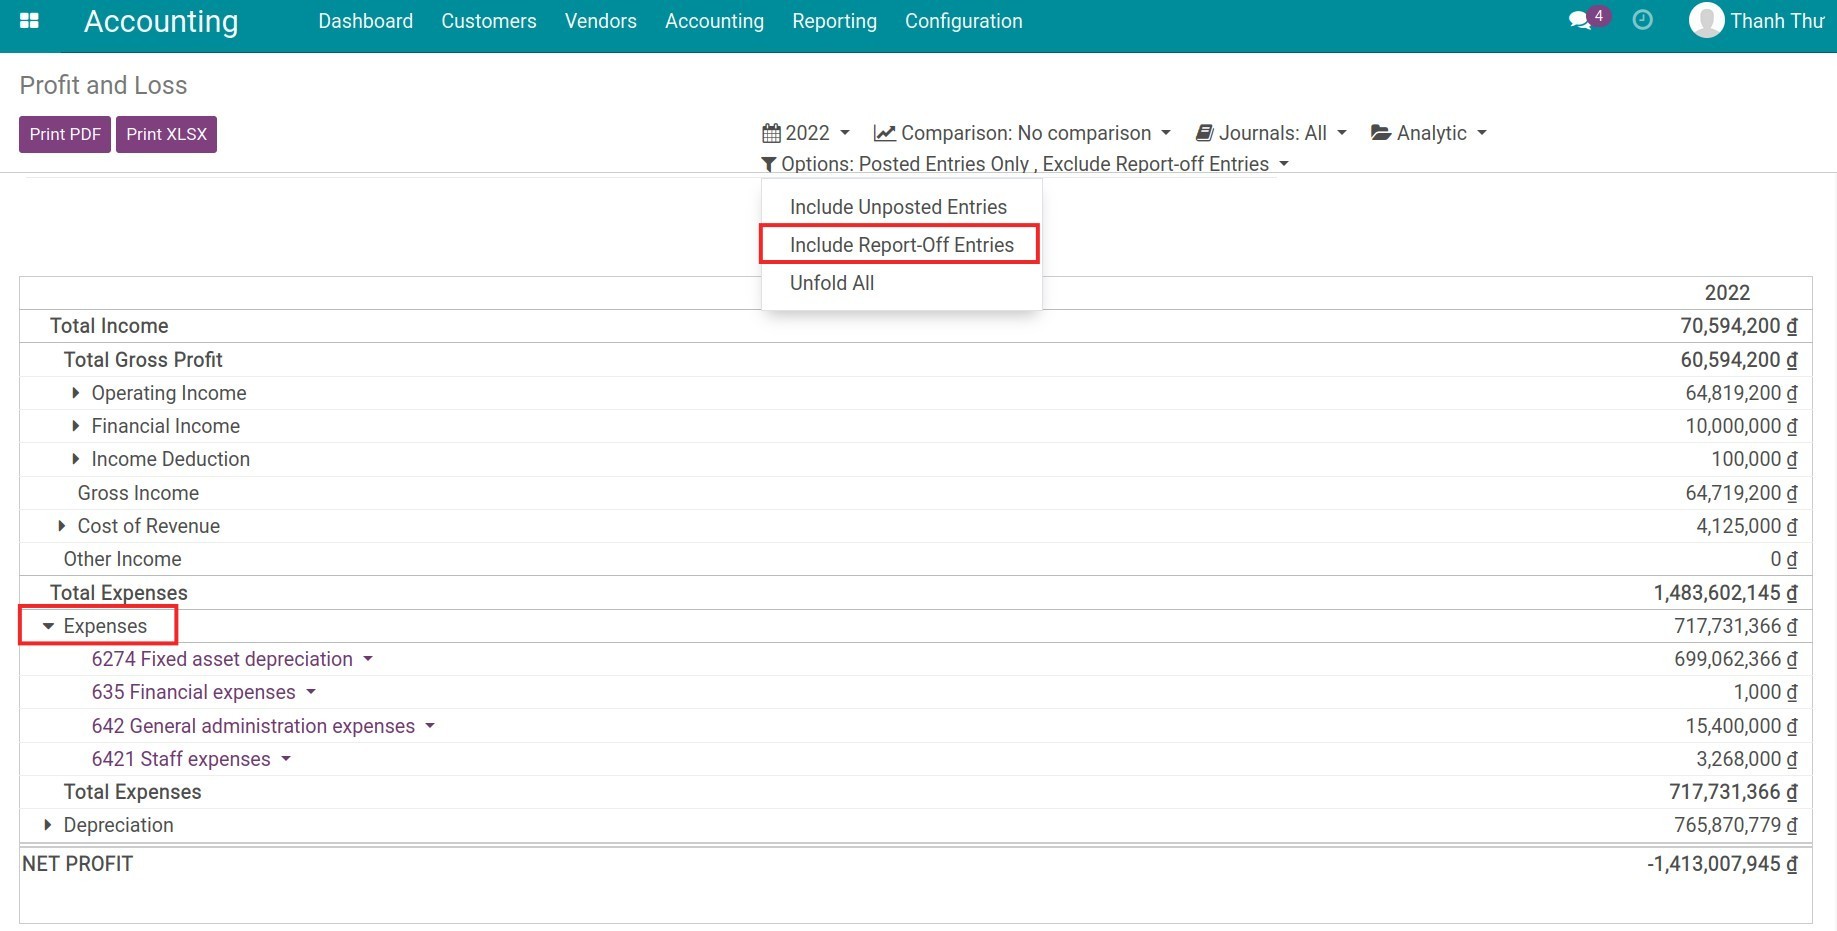
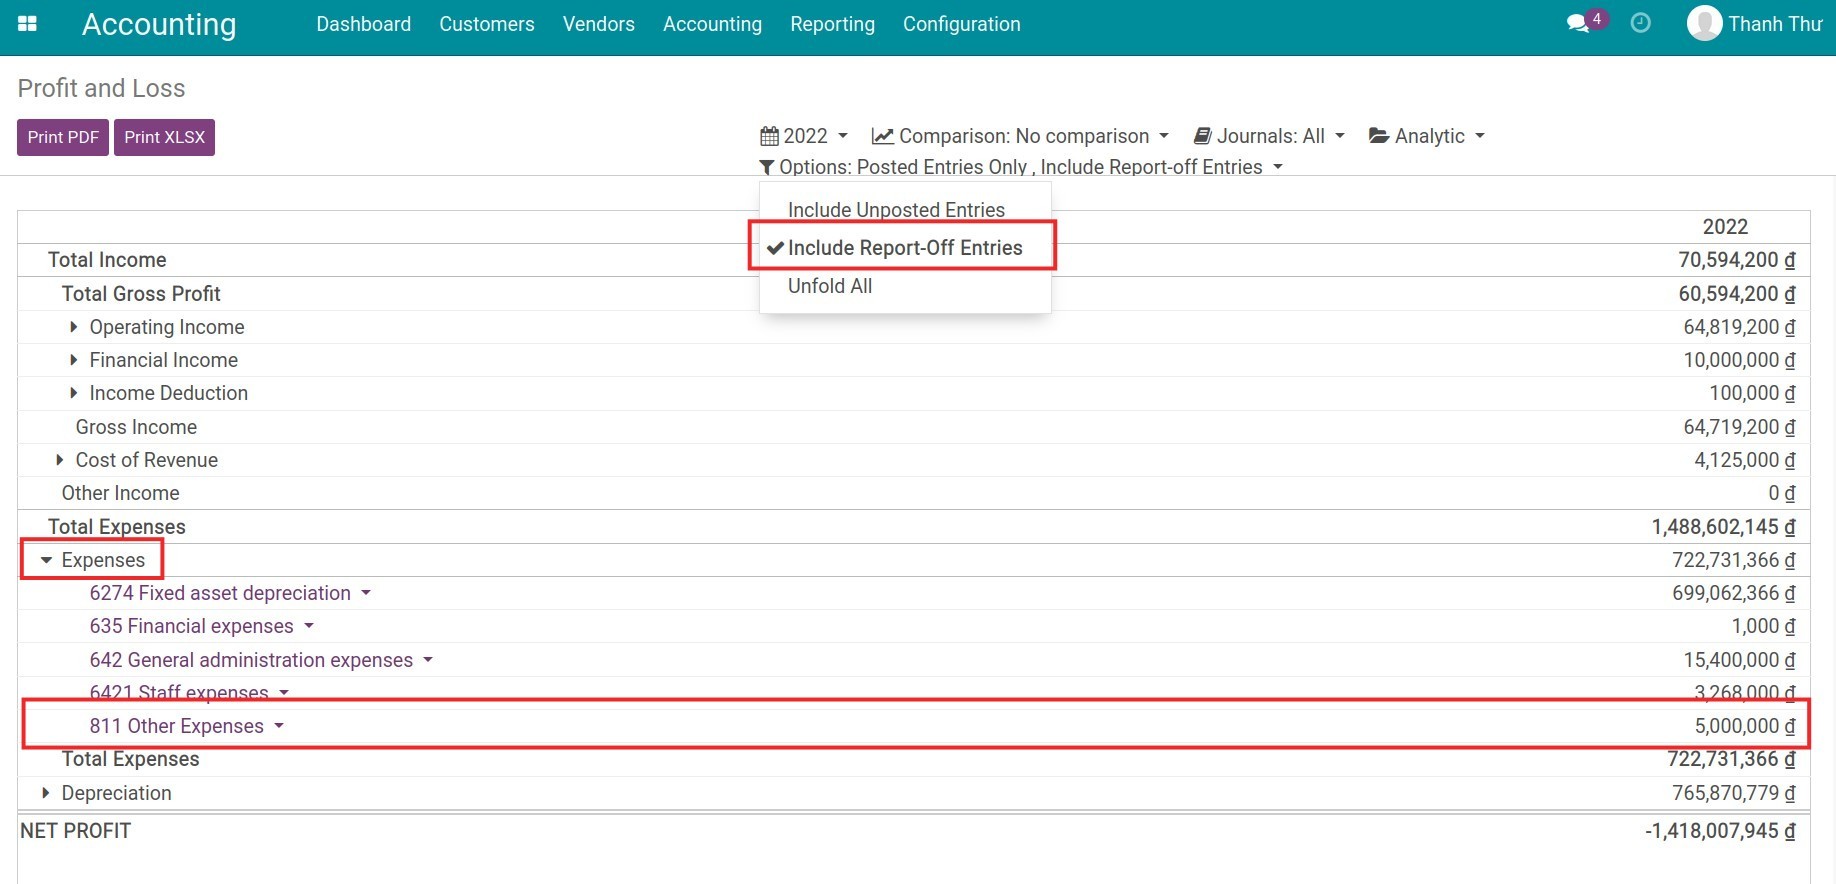
By using this feature, you can both view reports with the actual incurred expenses and view reports according to the accounting law easily and accurately.
See also
Related article
Visual Accounting Analysis (with Pivot and Graph)
Main concepts of Accounting and Invoicing in iSuite
How to configure iSuite Accounting and Invoicing before using
How to configure iSuite Accounting and Invoicing before using
This article guides you through the initial configuration when you first start using Accounting & Finance app on iSuite.
Requirements
This tutorial requires the installation of the following applications/modules:
Accounting & Finance
Install Accounting module
Access iSuite Apps, use the filter to search for Accounting & Finance app (to_account_accountant) and click Install.
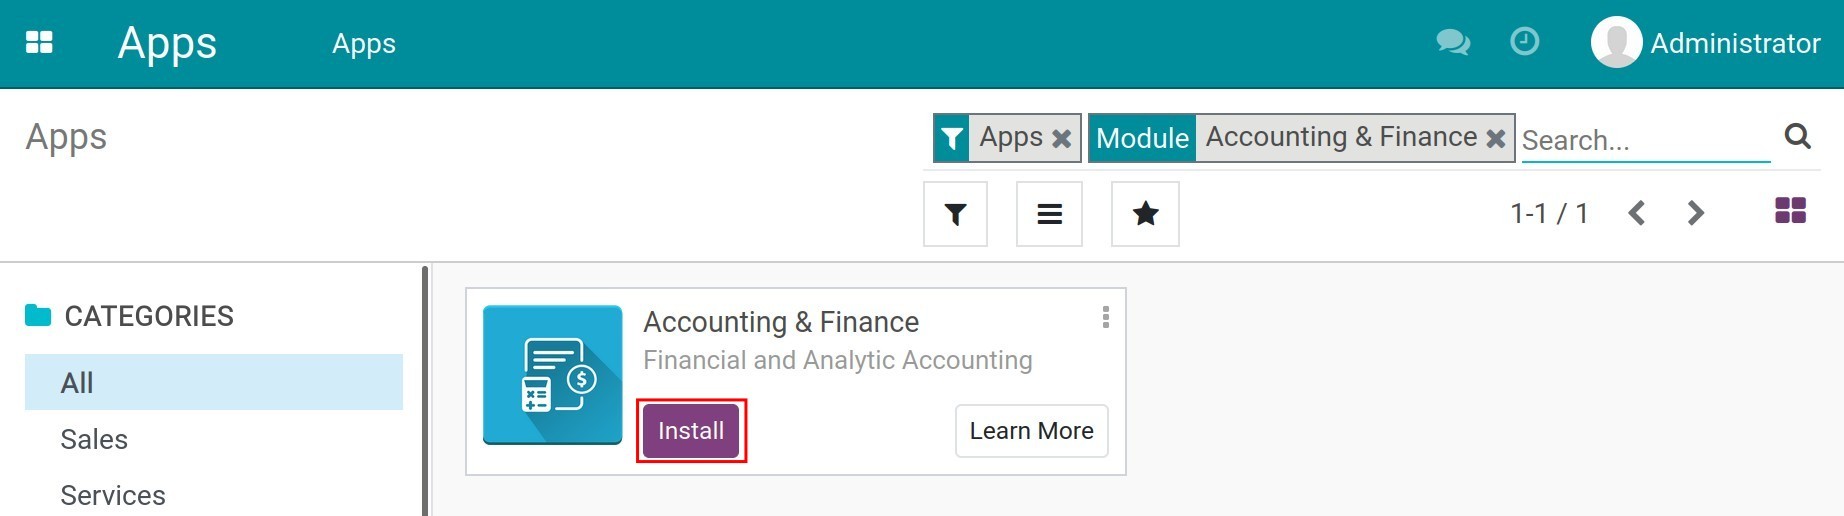
Configure Fiscal Localization
You can choose a fiscal package for the local country by accessing Accounting & Finance ‣ Configuration and going to the Fiscal Localization section:
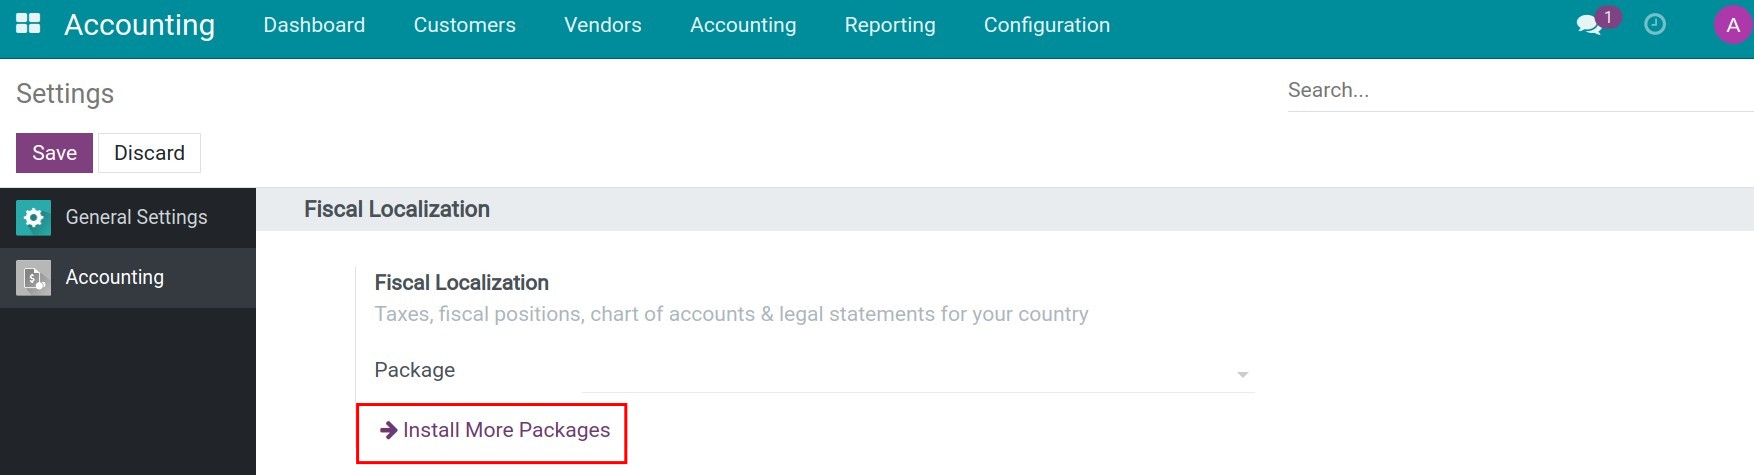
On the other hand, you can install another fiscal package by clicking on Install More Packages.
Warning
This feature can be configured as long as you haven’t posted any entry to your accounting system.
Configure Company’s information
Go to Settings ‣ General Settings ‣ Companies ‣ Update Info:
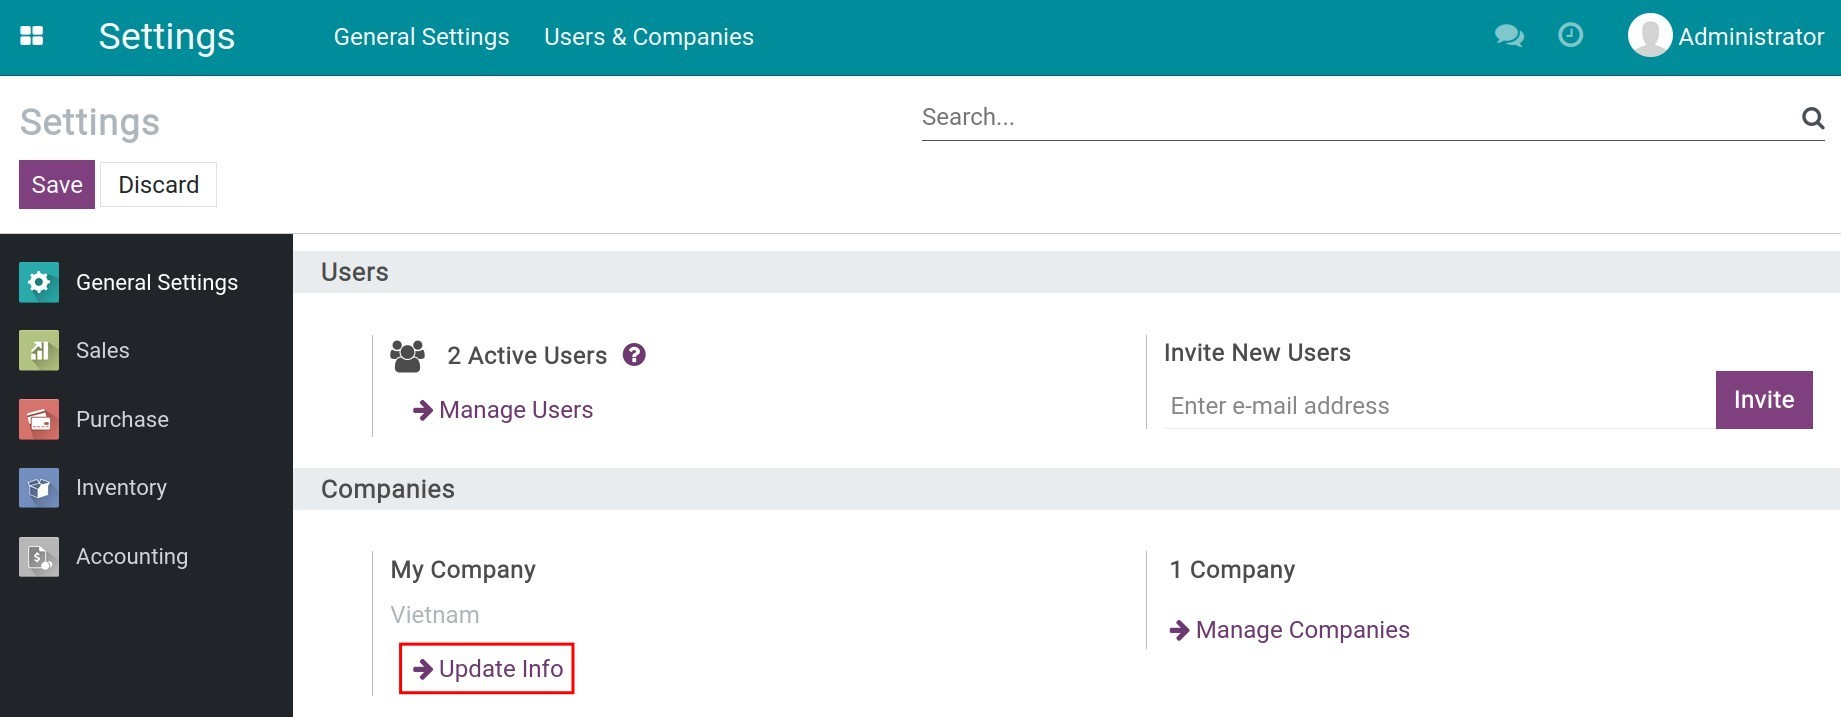
Now you can fill in the company information:

See also
Setting up for company and multi-company
Configure User access right
You need to configure access rights based on job positions for each individual to make sure that this person has enough access to work. Navigate to Settings ‣ Users & Companies ‣ Users, select the user account to set up, click Edit and move to Invoicing.
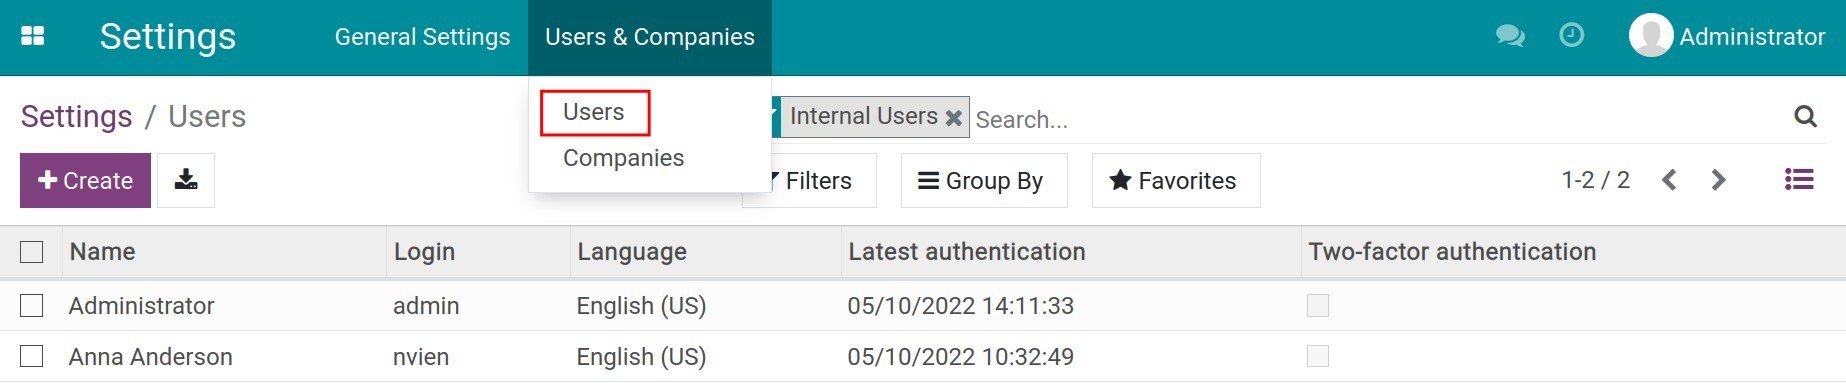
There are 4 access rights:
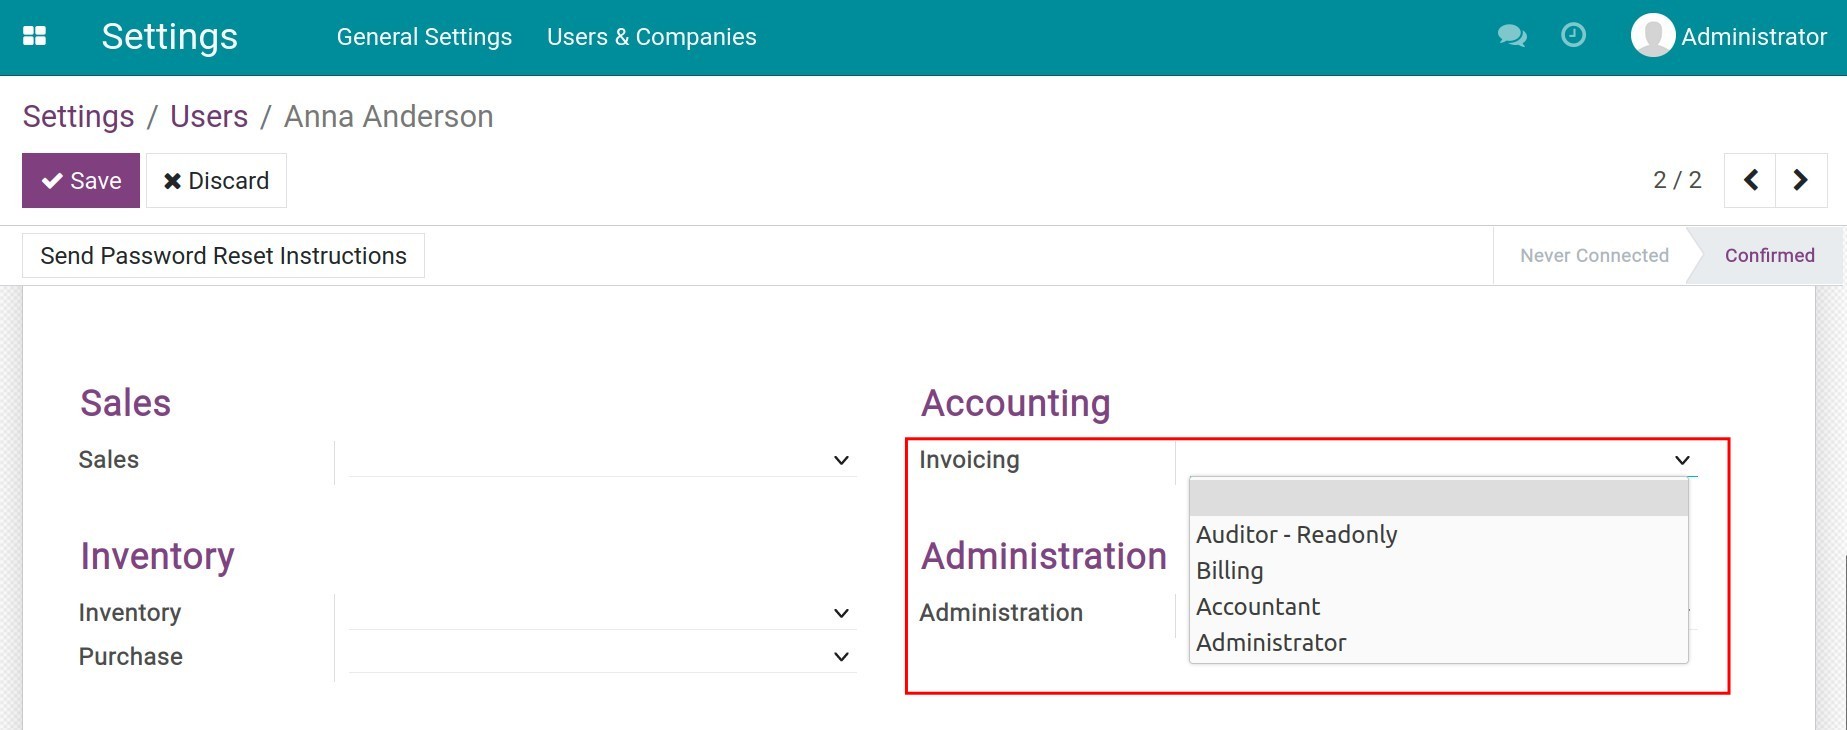
Auditor - Read-only: Only has the right to view all information related to customer/vendor invoices and payments, journal entries, bank statements, etc., and check some reports such as VAT Declaration , Profit and Loss, Balance Sheet , Cash Flow Statement and Invoice Analysis.
Billing: Can create/edit operations related to customer/vendor invoices and payment.
Accountant: Has full access right from the Billing access right, can create/import the statement and check all reports in the system.
Administrator: Has the full access right from the Accountant access right and can configure settings in the Accounting app.
Configuration Tips panel
Navigate to Accounting, you can see a Configuration Tips panel. If you don’t use this panel, you can click on the X icon to hide it away. Once hidden, it won’t be shown again.

Create the First Bill
Here, you can try the system-created sample vendor bill following the instructions, upload your first bill or try to send a sample vendor bill.
Note
To check the sample vendor bill, navigate to Accounting ‣ Vendors ‣ Bills. See more at Vendor Bills Management.
Add a Bank Account
To add the information of a new bank account for your company, click on the Add a bank button on the Configuration Tips panel then configure your bank account on the form with the following information:
See also
Configure Bank Accounts
Accounting Periods
Click on Configure at Accounting Periods, you can define the fiscal years of your company.
Note
You can change the last day of the fiscal year by navigating to Accounting ‣ Configuration and going to the Fiscal Periods section. You can read more details on Define your Fiscal Years.
Chart of Accounts
Click on Review in the Chart of Account section to view the chart of accounts in the system.
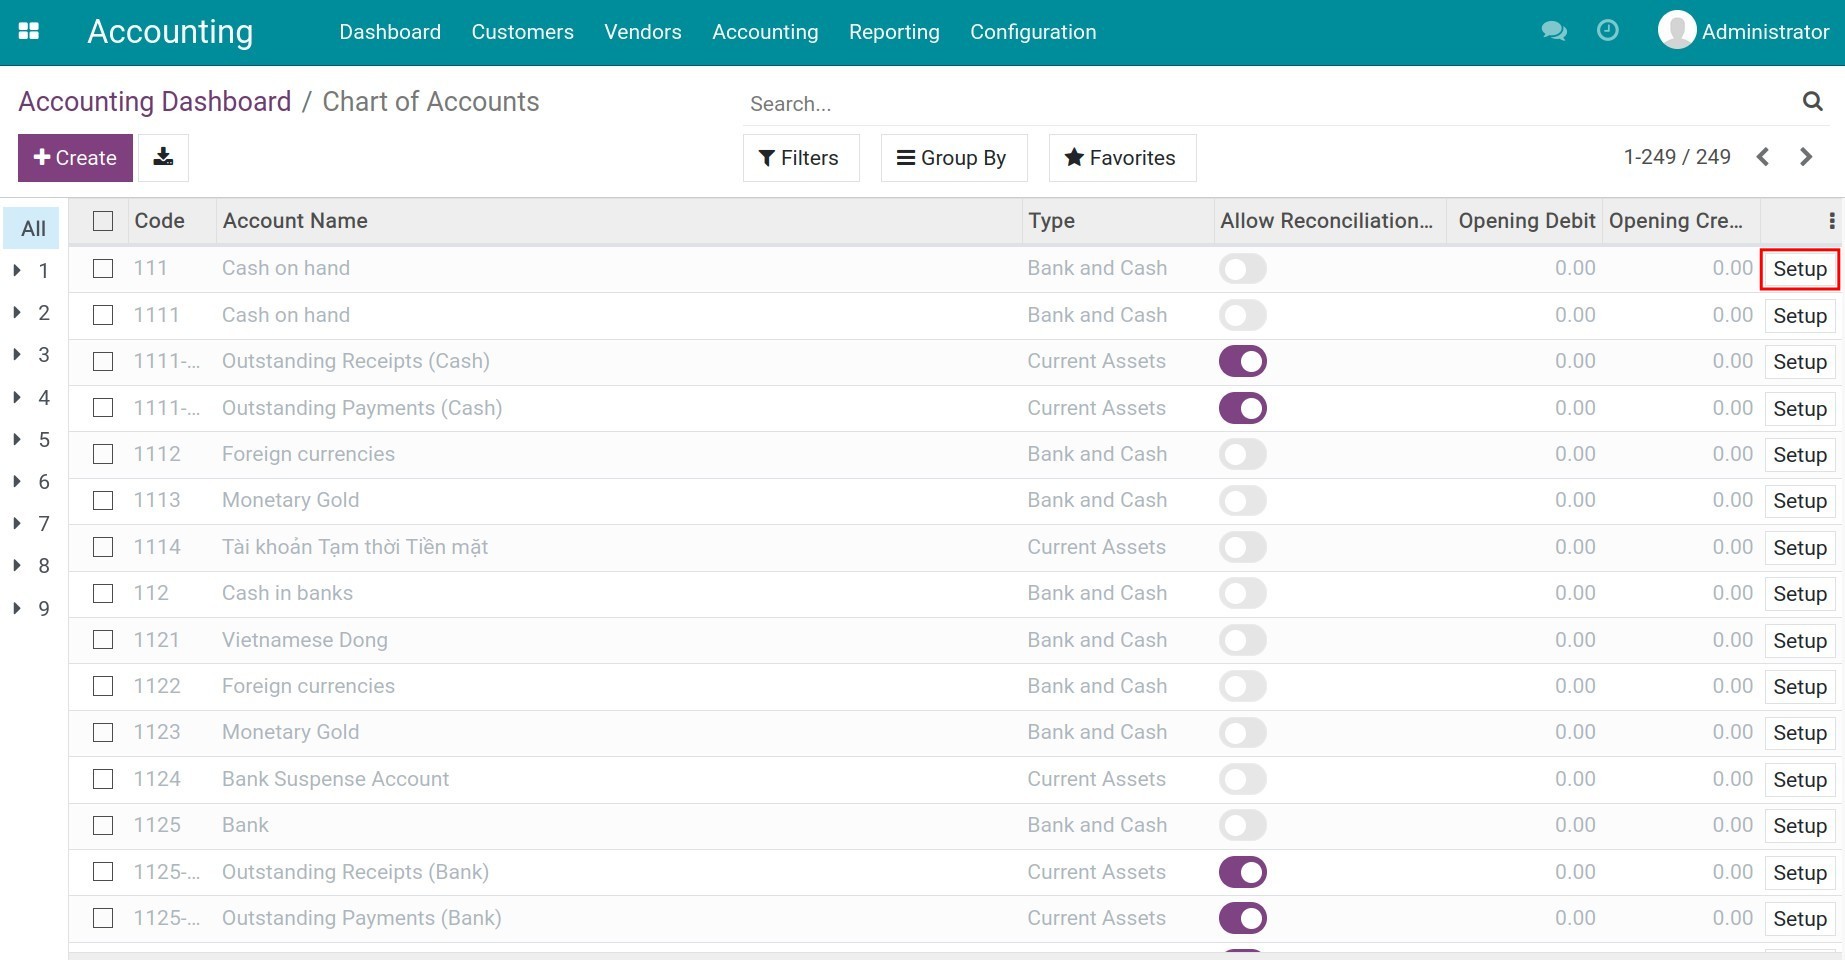
Here you can:
Configure your chart of accounts by clicking on the Setup button on the account that you want to edit.
Record initial balances for each account by modifying the Opening Debit or Opening Credit column.
See also
Related article
Chart of Accounts
Configure Cash Rounding method
Configure Cash Rounding method
Requirements
This tutorial requires the installation of the following applications/modules:
Accounting & Finance
There are various situations in accounting and payment where you have to round cash to the smallest currency, for example, summing sales order amount, taxing, etc. Each country has different rules in cash rounding. Viindoo Accounting application offers two strategies (modify as tax amount and add a rounding line) with three methods (half-up, up, and down).
Cash rounding configuration
To configure Cash rounding, go to Accounting ‣ Configuration ‣ Settings then activate the Cash rounding feature by checking the Cash Rounding option and pressing the Save button.
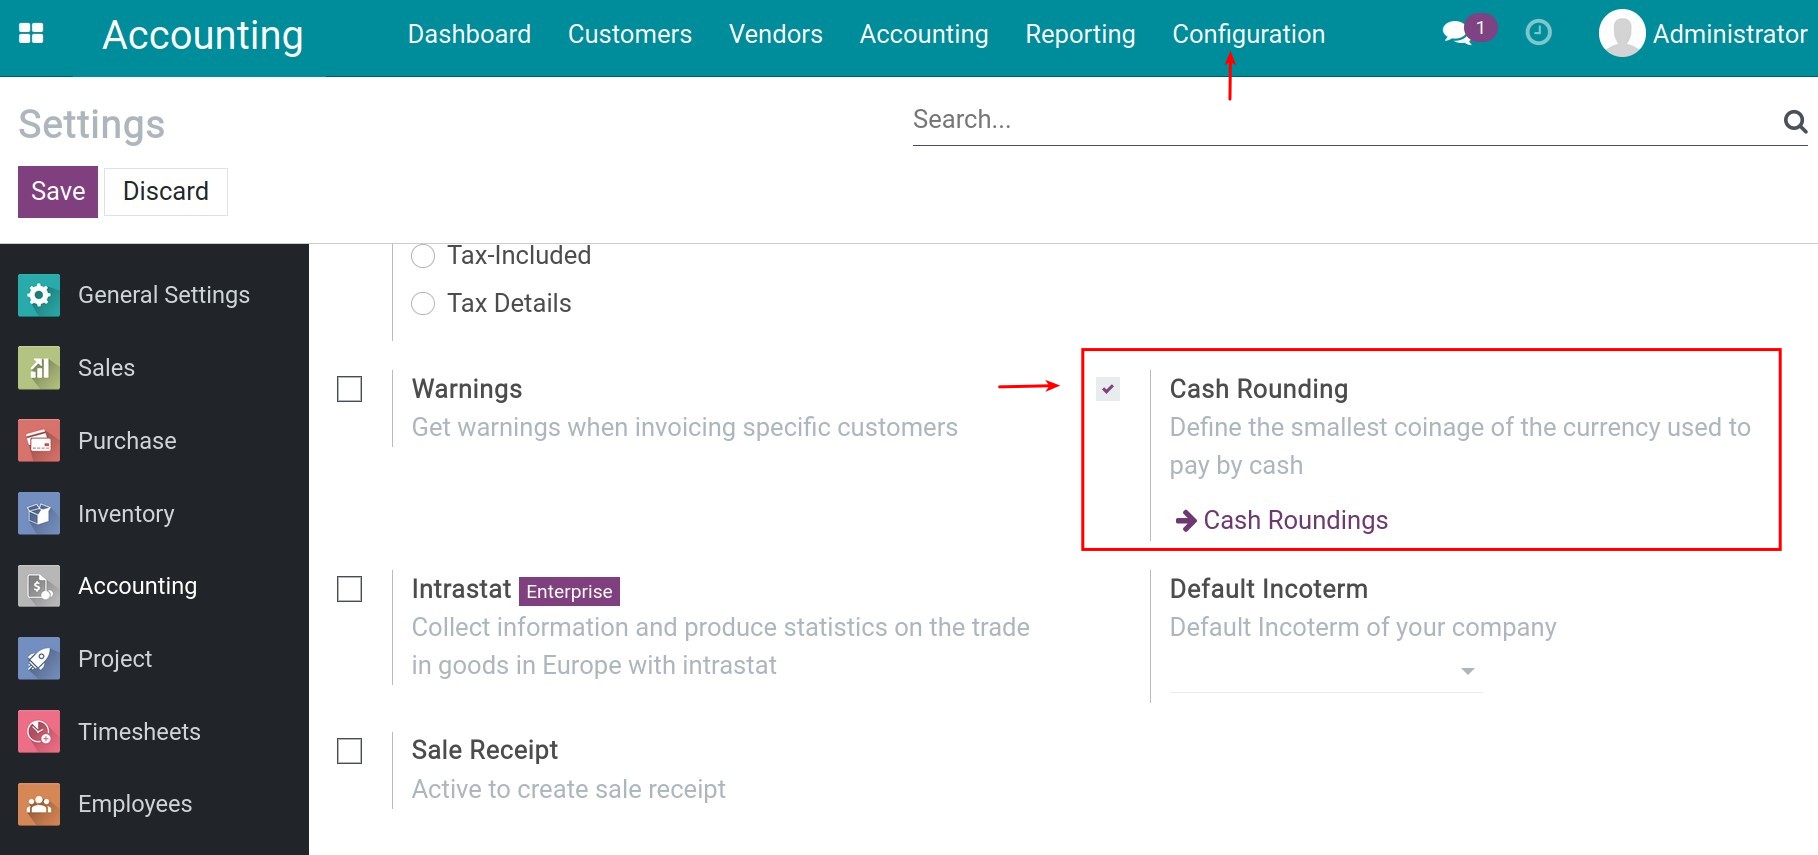
Next, back to Accounting application, access to Accounting ‣ Configuration ‣ Cash Roundings:
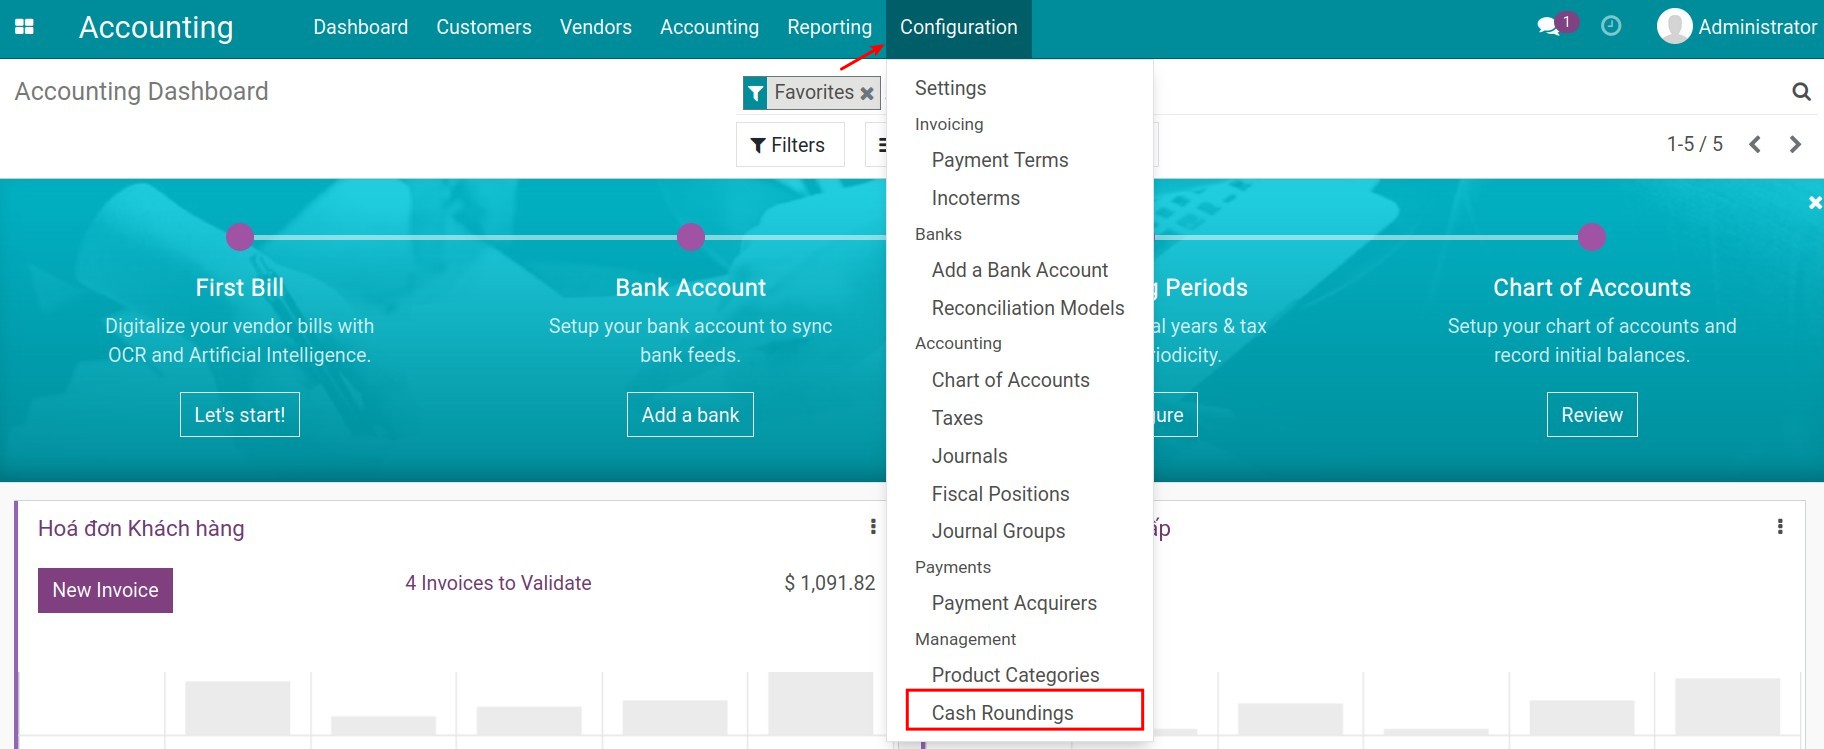
Select Create and fill in the form:
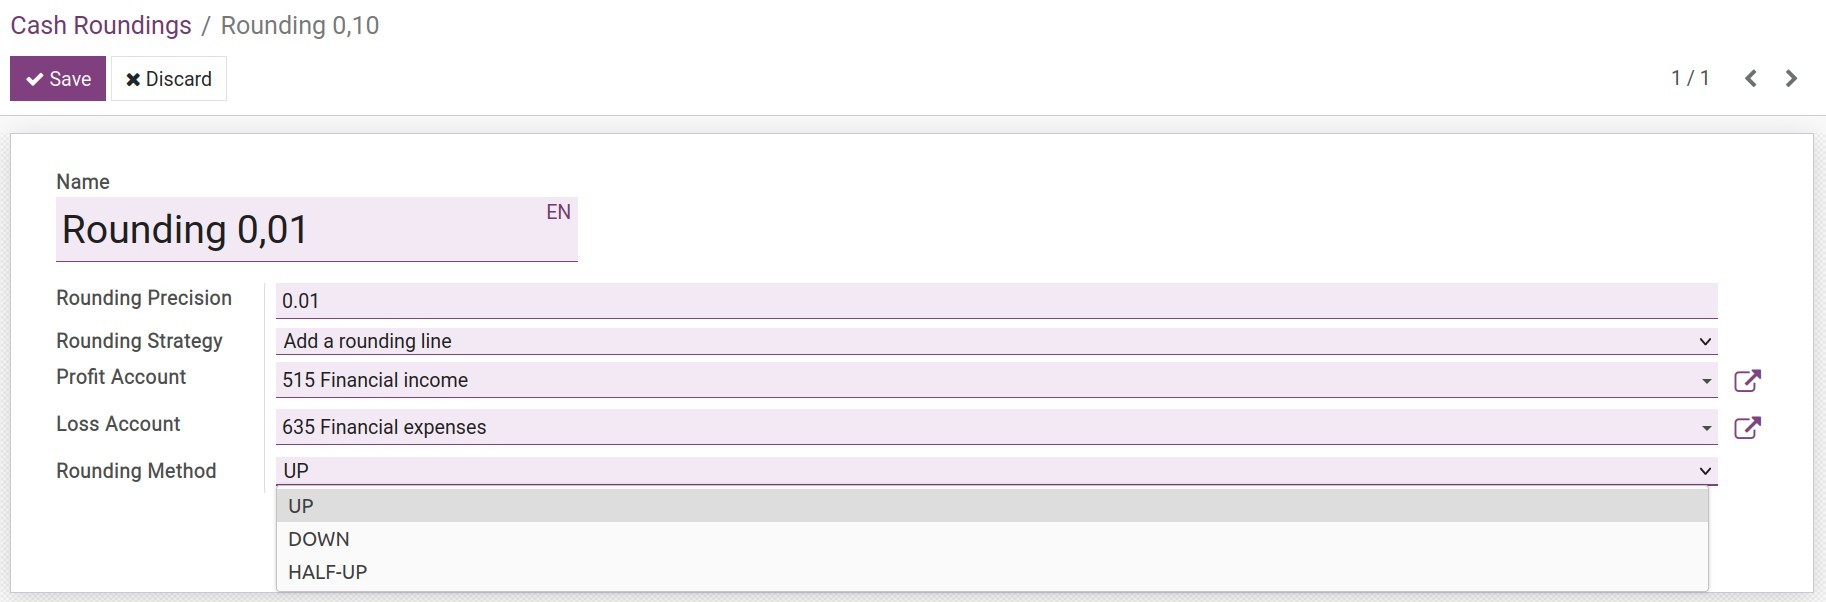
Name.
Rounding Precision: Define the non-zero smallest value of coinage that you want to round.
Rounding Strategy: Viindoo offers two strategies:
Add a rounding line: A line is automatically created to record the rounding. The different value after rounding is recorded in the profit or loss Account.
Profit Account: Records profit made from roundings, like Financial income.
Loss Account: Records loss from roundings, like Financial expenses.
Modify as tax amount: The tax amount will be rounded the value based on the below rounding methods and there is no rounding line created.
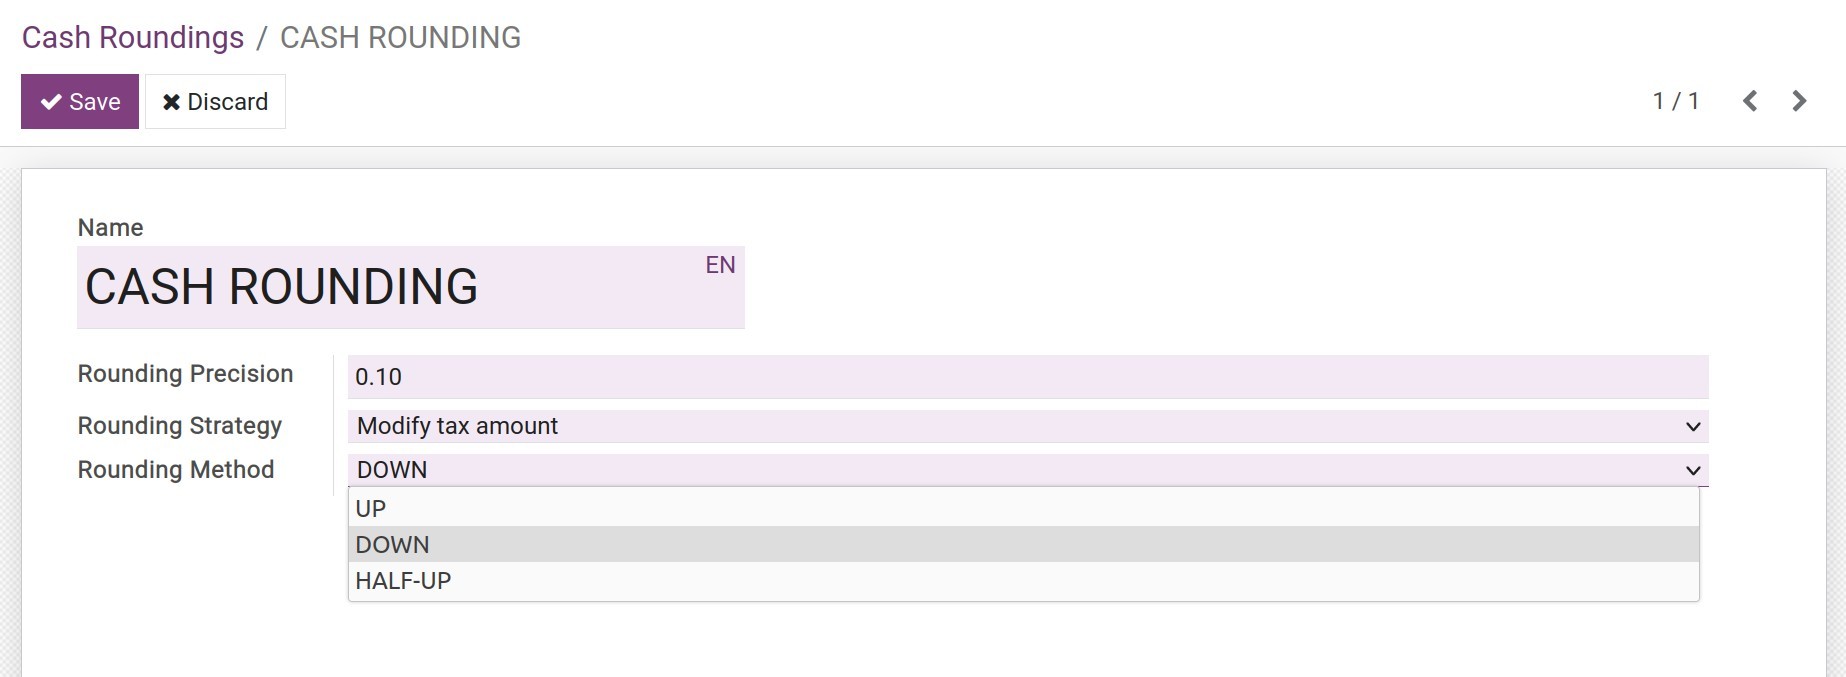
Rounding methods: Viindoo offers three methods
Up: The value is rounded up based on the rounding precision.
Down: The value is rounded down based on the rounding precision.
Half-up: This method is used in case of the fractional values. If the value is greater than or equal to half, round up. Otherwise, it will be rounded down.
Click Save to save information.
Apply cash roundings on invoices
On the draft invoice interface, open the Other info tab to select the Cash rounding rule:
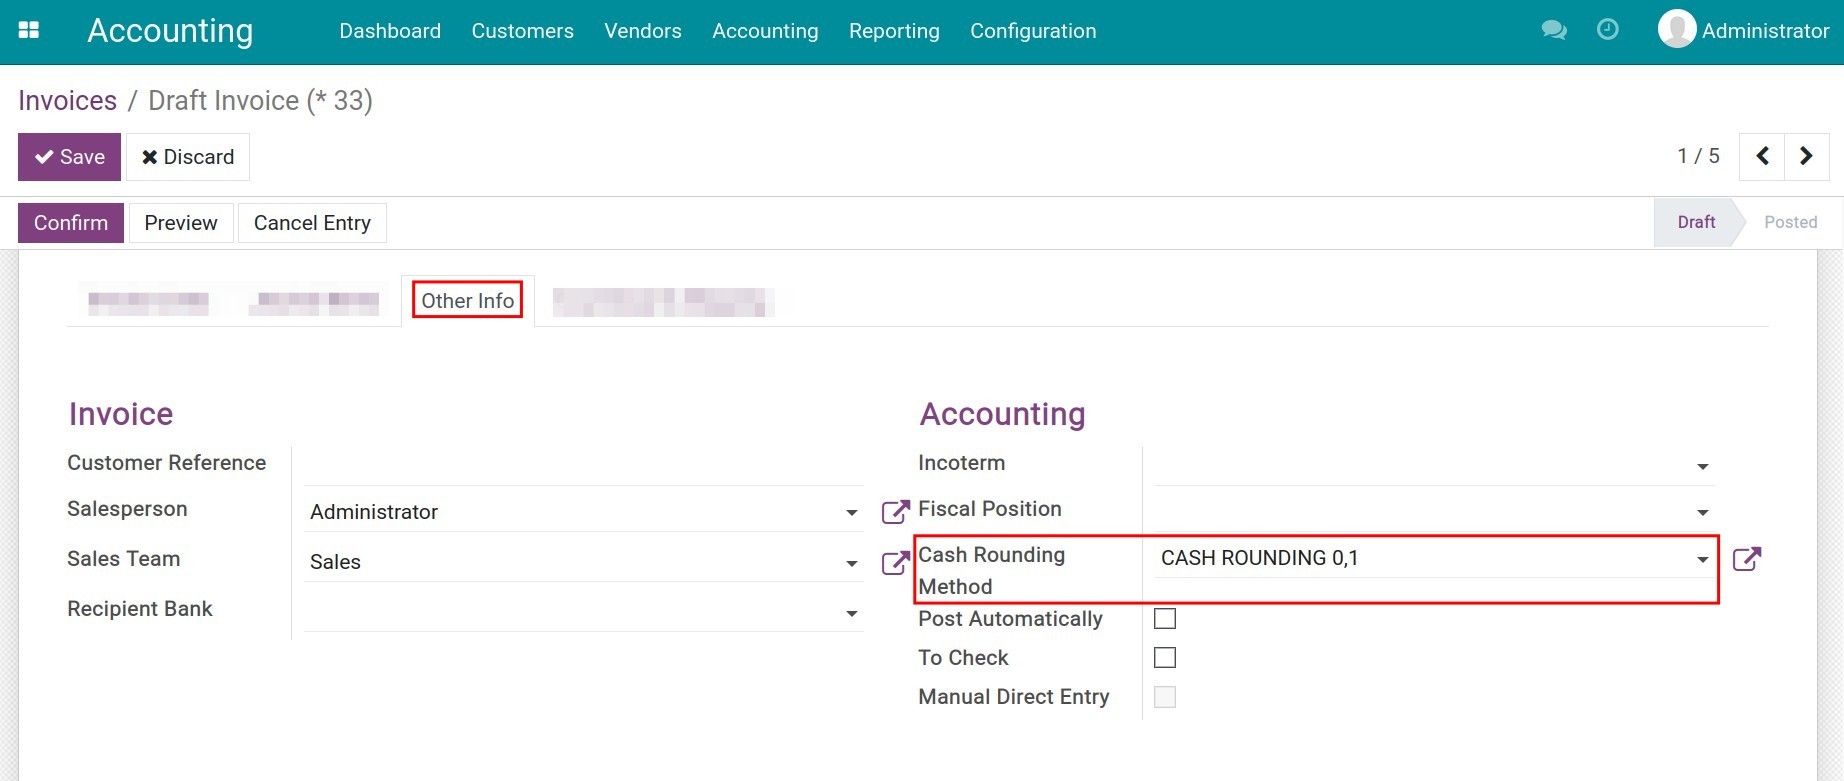
Examples
A sales invoice with information below:
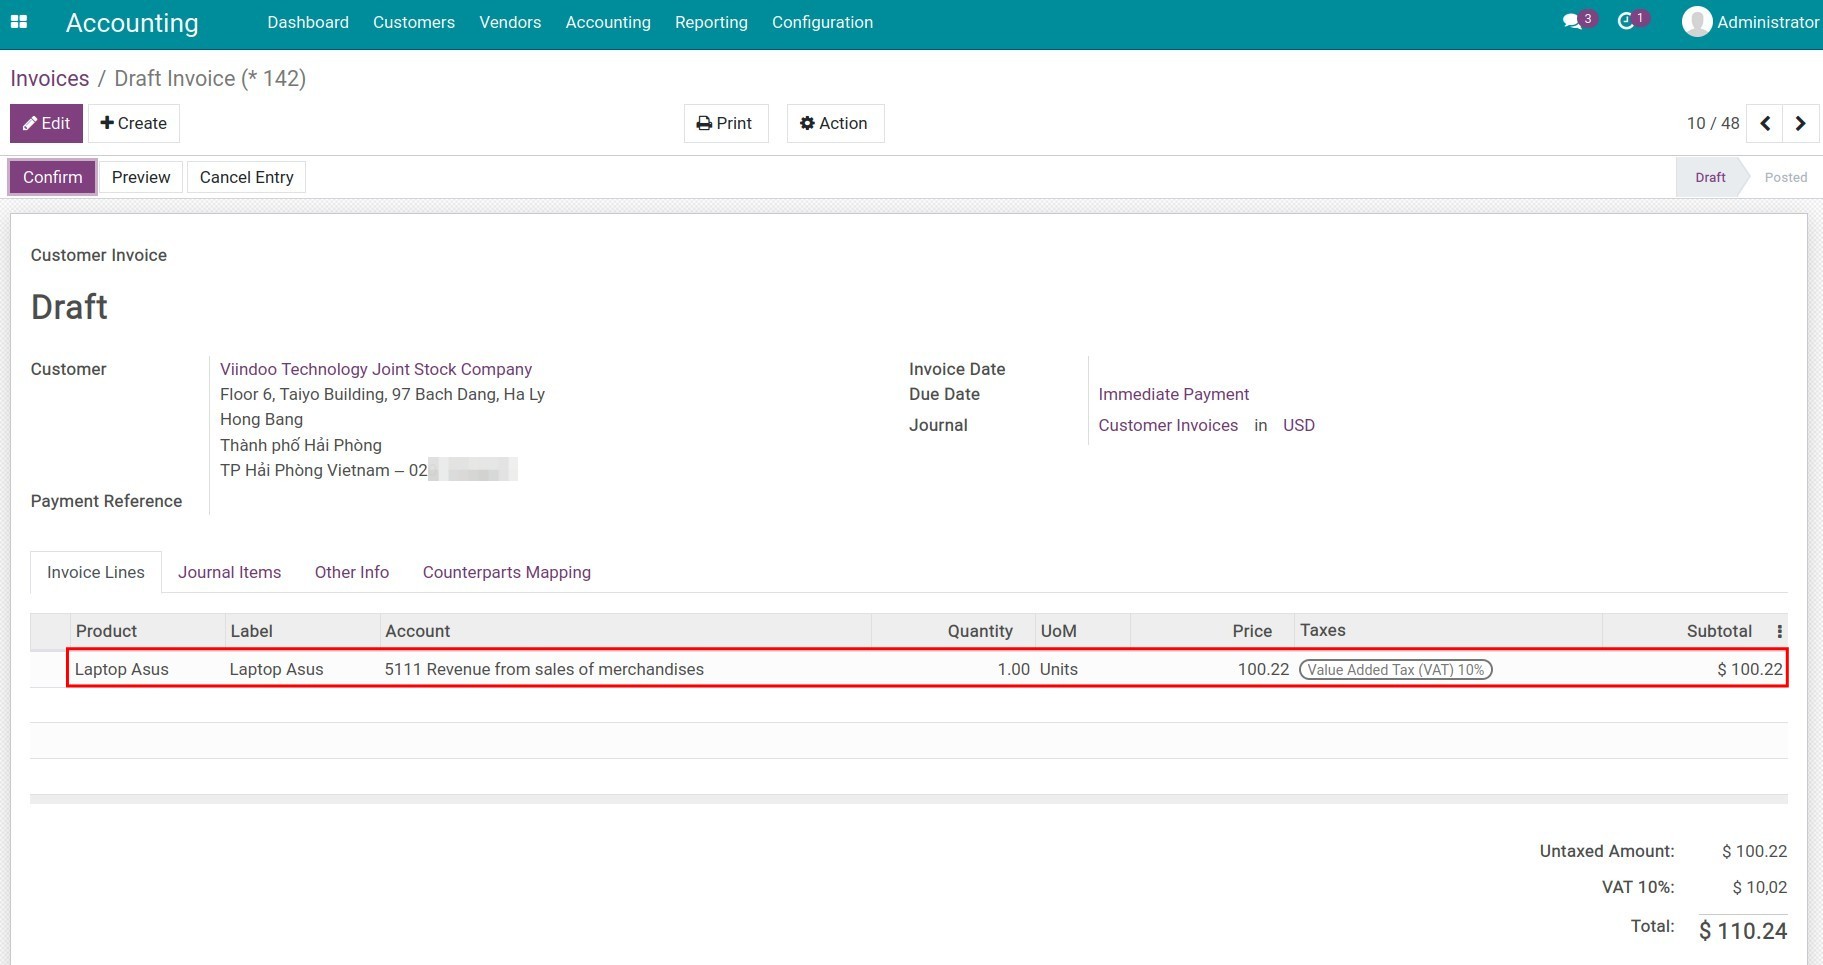
Case 1: Create a cash rounding rule by adding a rounding line:
Rounding precision: 0,1.
Rounding strategy: Add a rounding line.
Rounding method: Up.
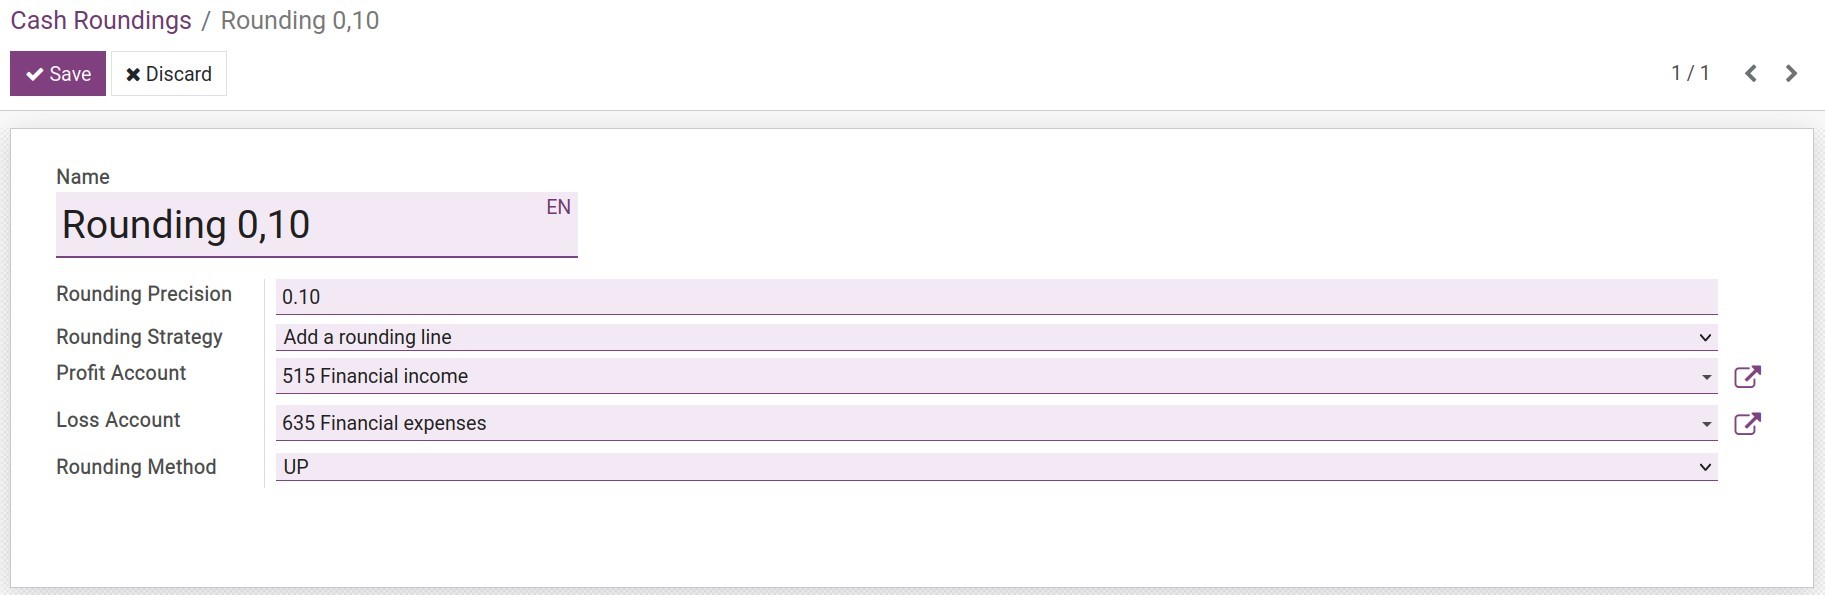
Apply the rounding rule to invoice:
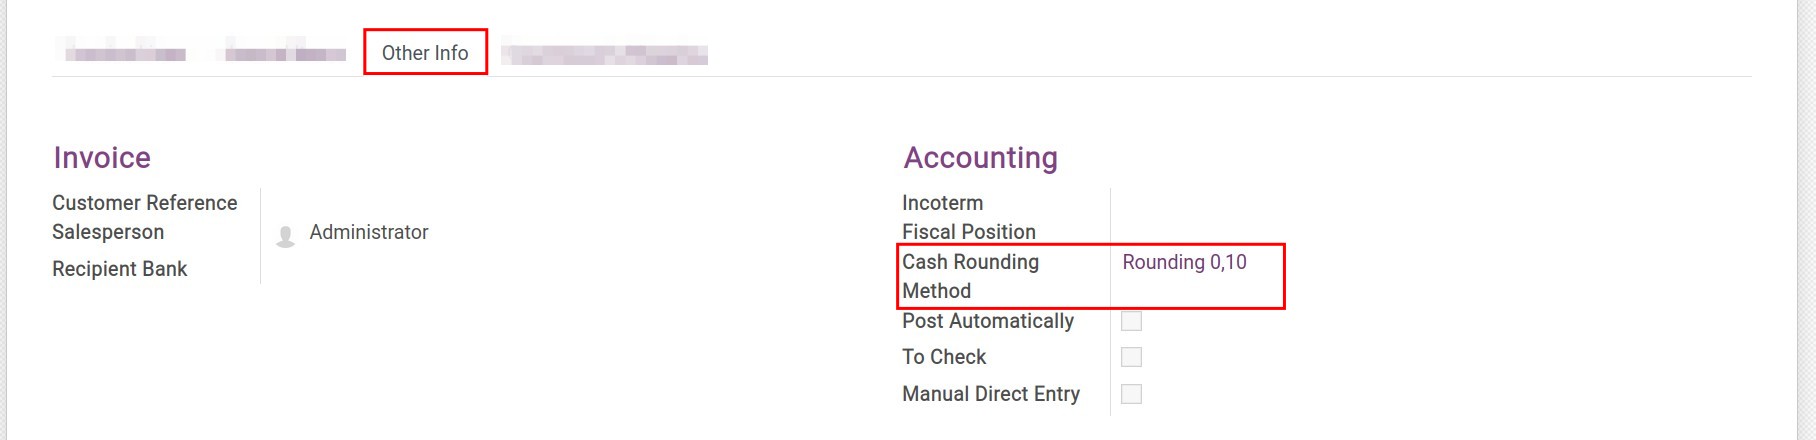
A line will be added to the invoice, rounding up the total invoice amount from 110,24 USD to 110,30 USD:
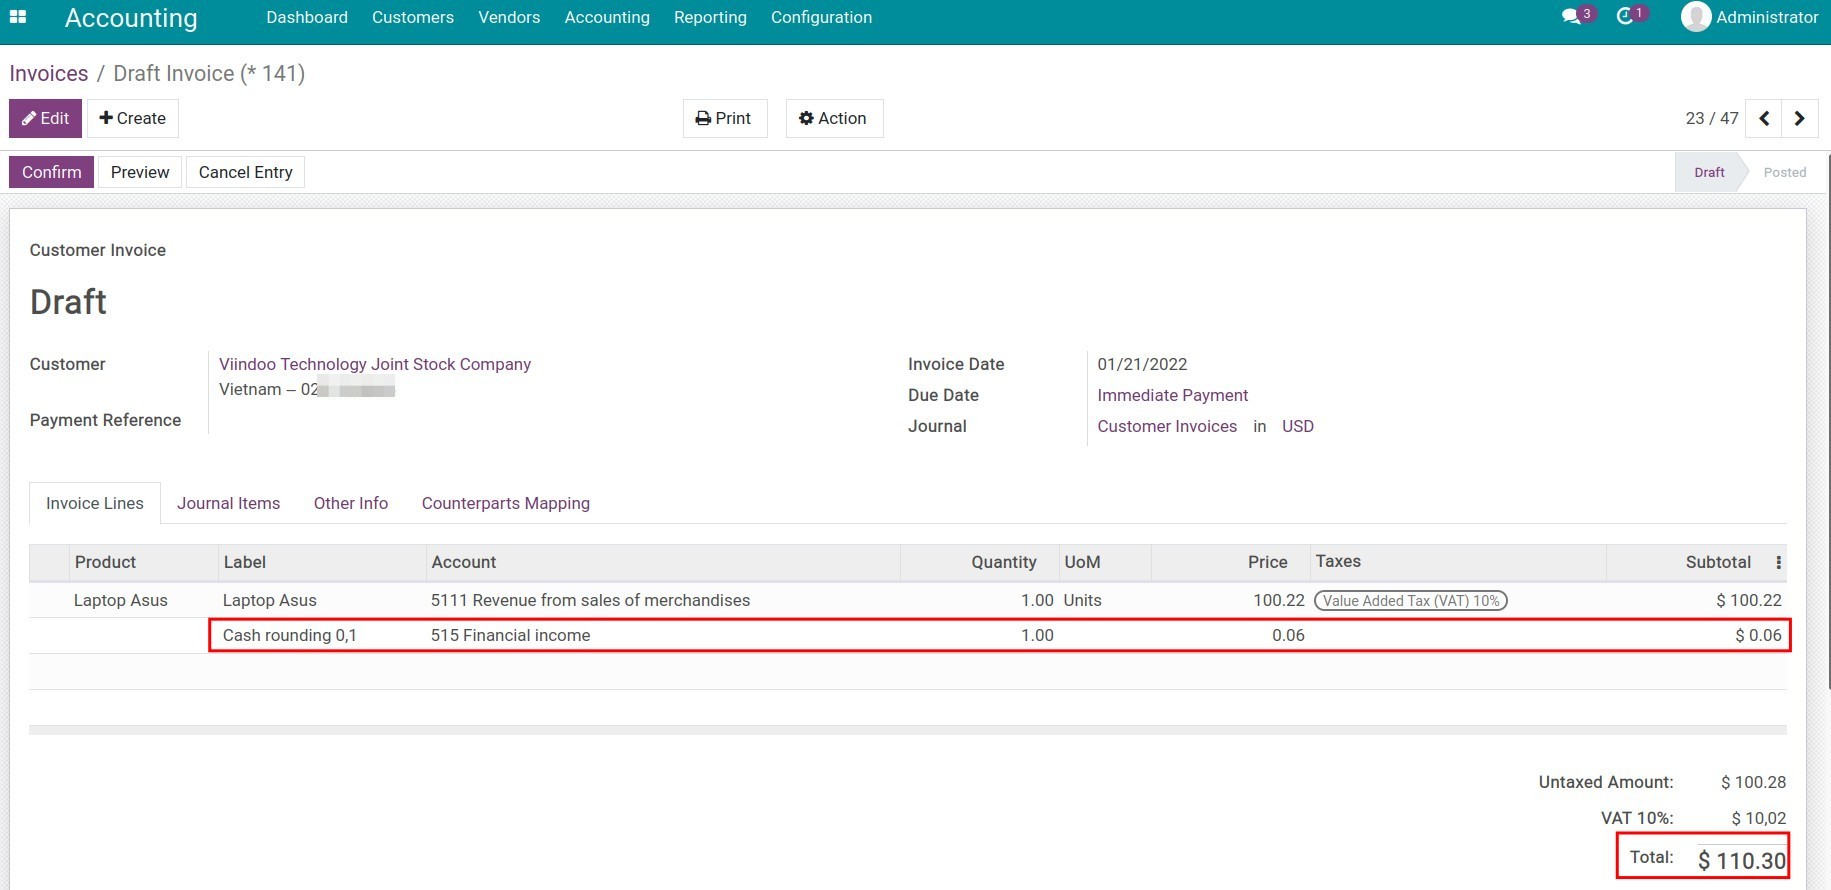
Note
The total is rounded to the nearest multiple of the smallest denomination, which may be higher or lower than the initial total.
Case 2: Create a rule which is rounded up by modifying as tax amount:
Rounding precision: 0,1.
Rounding strategy: Modify as tax amount.
Rounding method: Up.
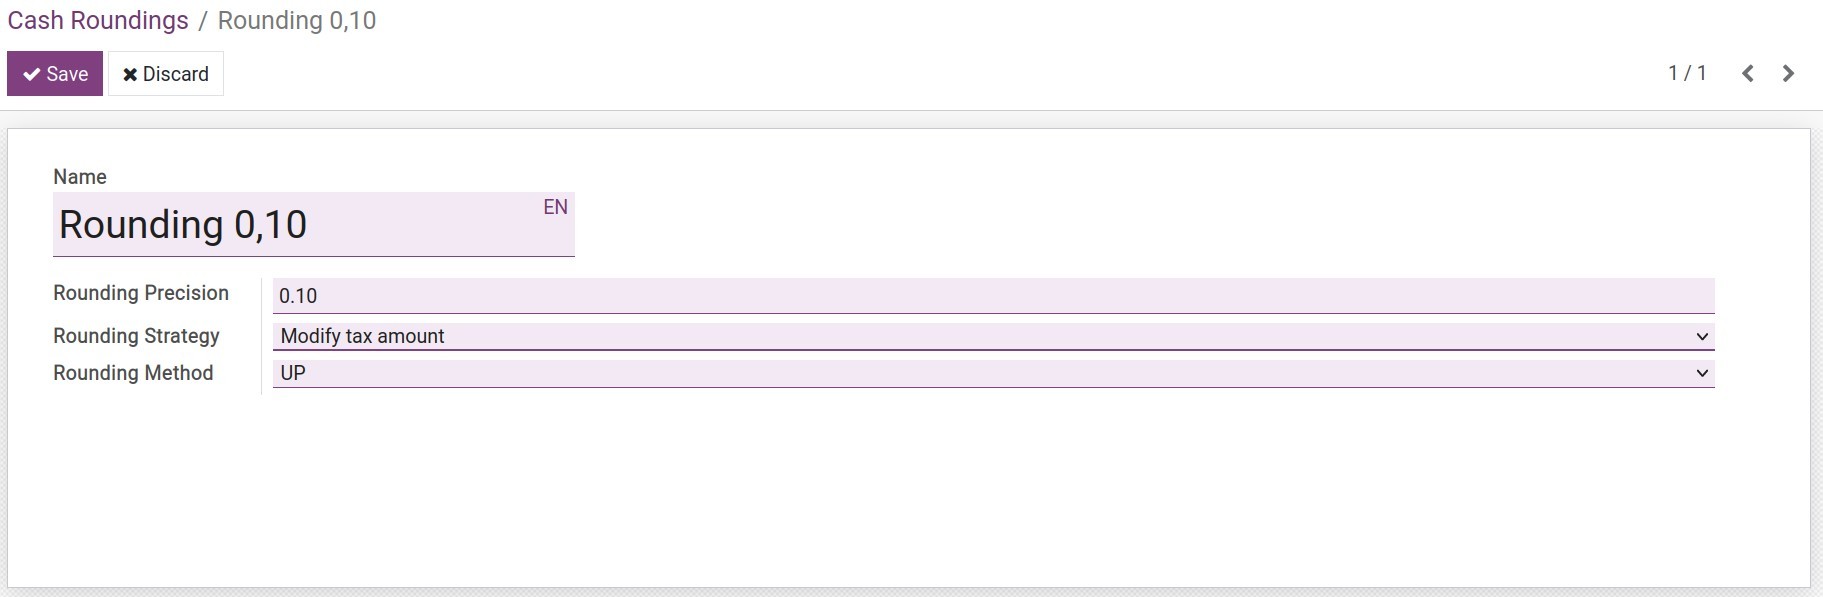
Apply the rounding rule to invoice:
The tax amount on the invoice is adjusted from 10,02 USD to 10, 06 USD in order to round up the total value of the invoice from 110,24 USD to 110,30 USD.
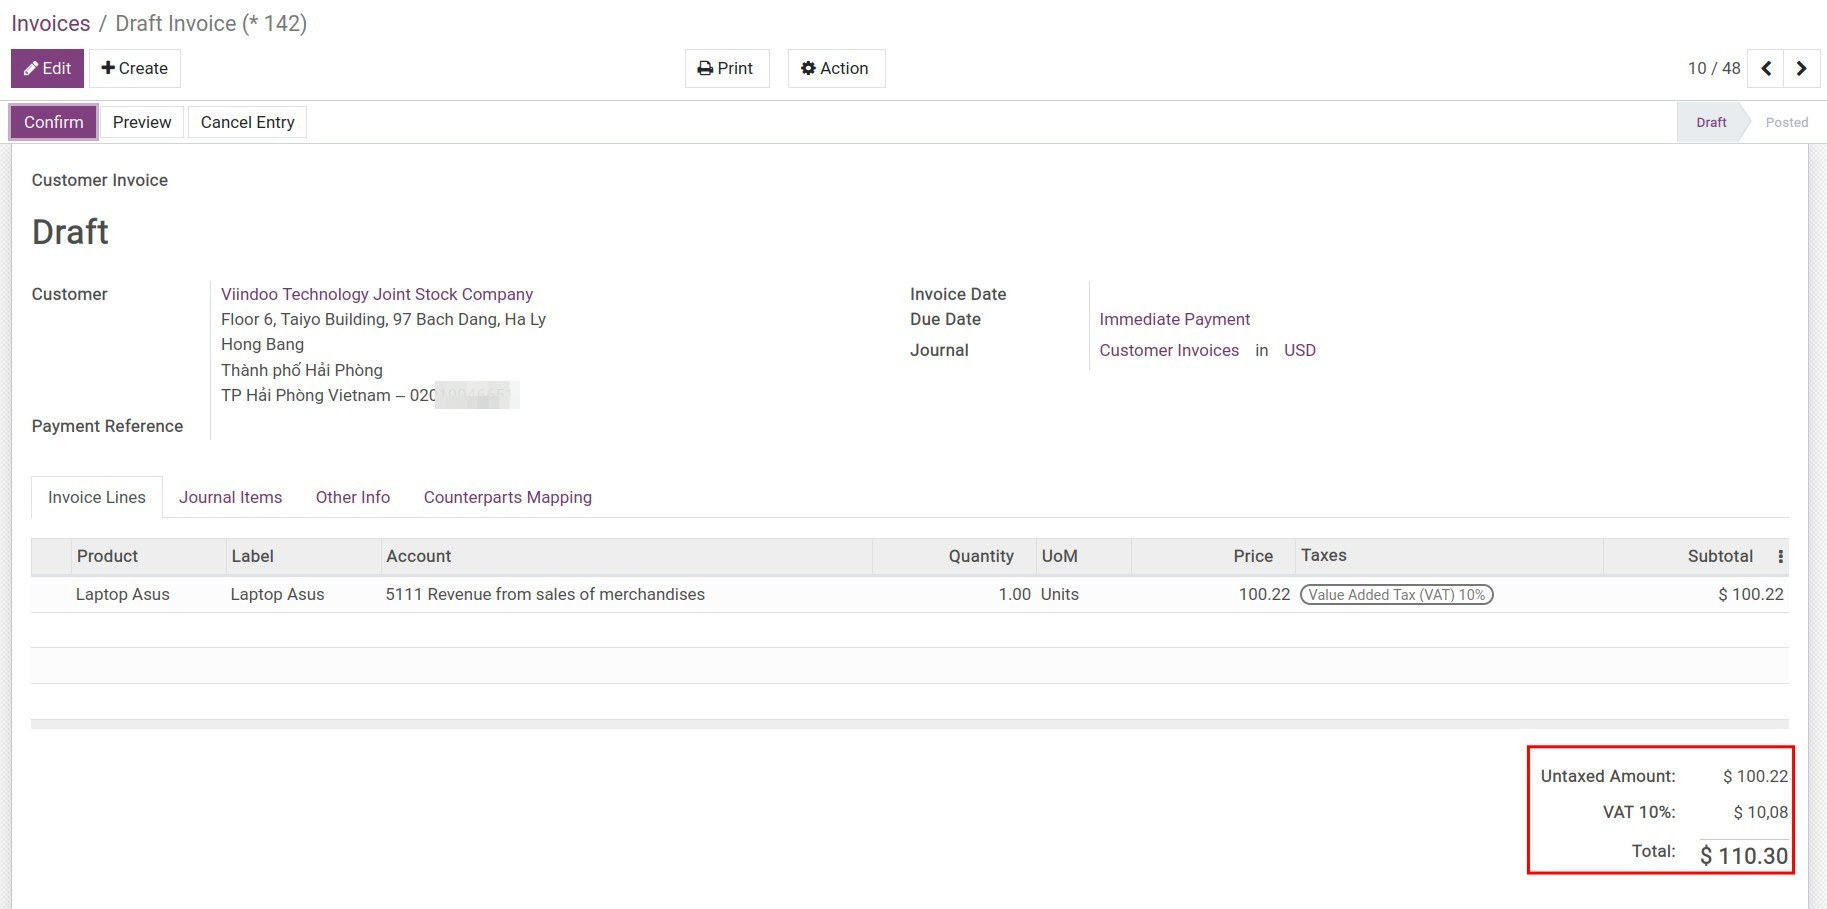
We hope that the above examples help you understand better the difference between the two cash rounding strategies in the Viindoo Accounting app.
See also
Related article
Configure Payment Terms
Process a cash discount
Configure Payment Terms
Configure Payment Terms
Requirements
This tutorial requires the installation of the following applications/modules:
Accounting & Finance
Payment terms are the determination of the payment value and due date for each purchase and sale transaction to ensure that payments are made on time and correctly. Using iSuite accounting software, you will only need to declare the payment terms once, and apply them to sale orders and invoices, then the payment schedule will be automatically computed.
The automatic calculation of due date and payment value is very useful in tracking the payment schedule of installment plans, paying in installments if your company applies these two forms of payment.
Configure Payment Terms
Payment Terms should be configured only by the person with the highest level of access in the Accounting app. Navigate to Accounting ‣ Configuration ‣ Payment Terms:
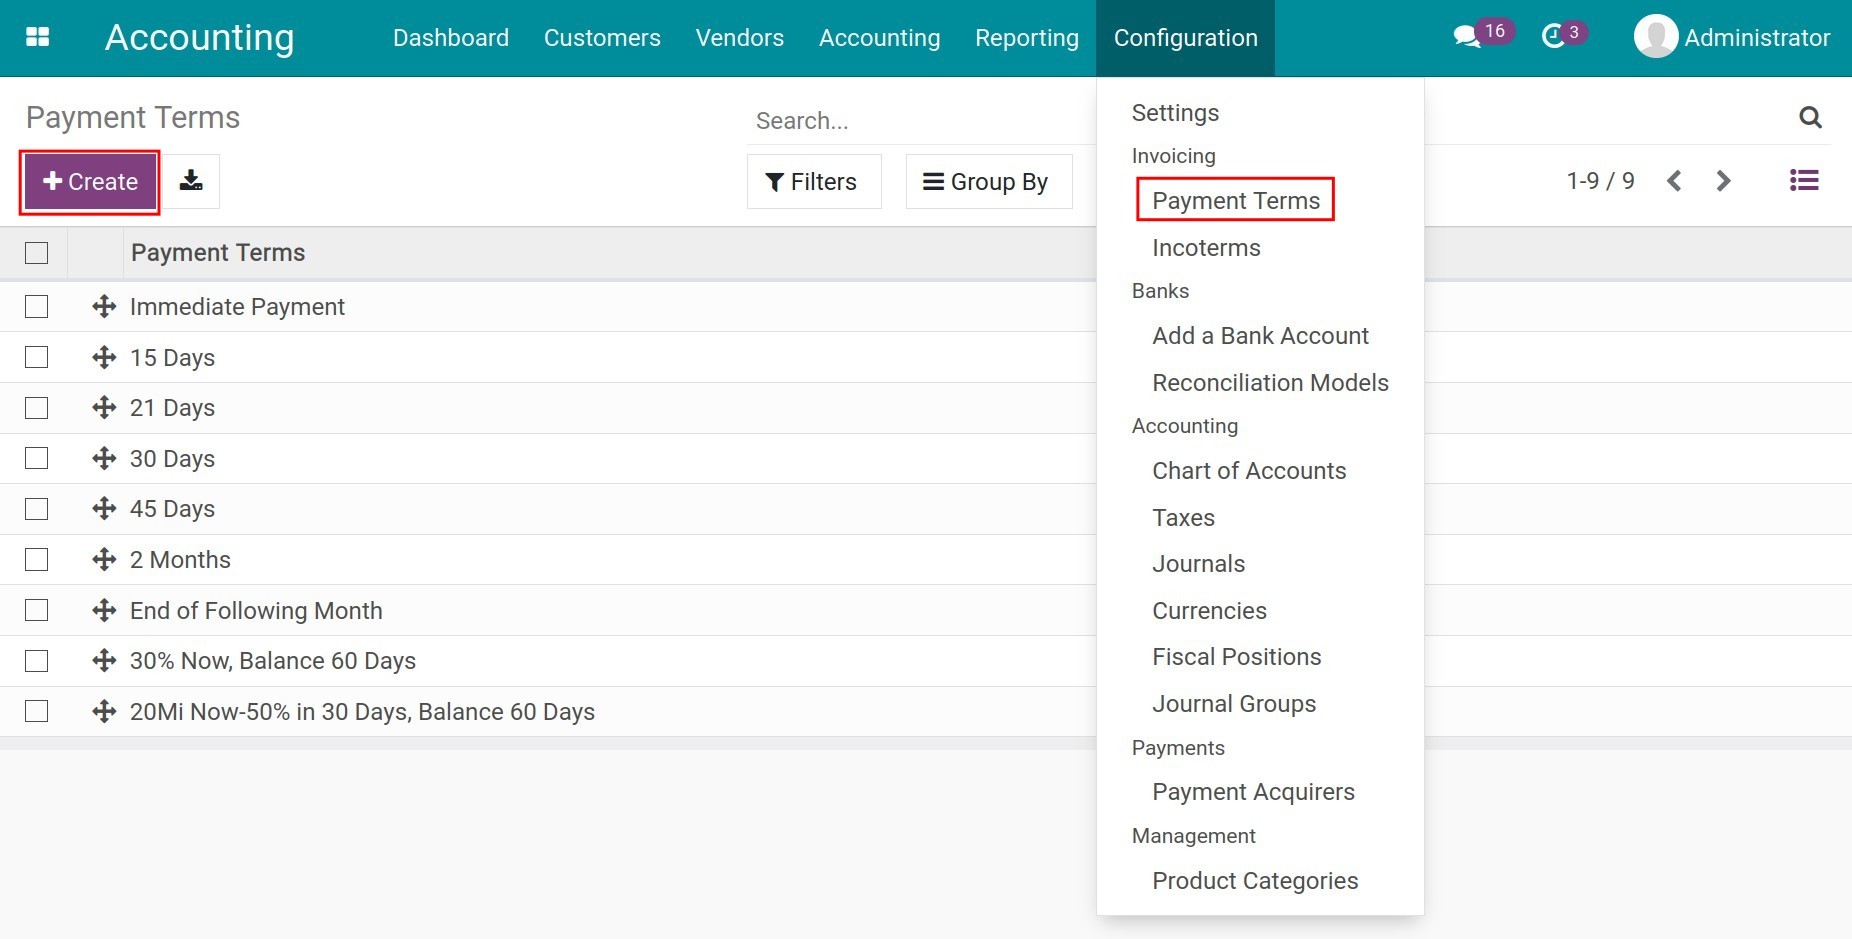
Press on Create and fill in the following information:
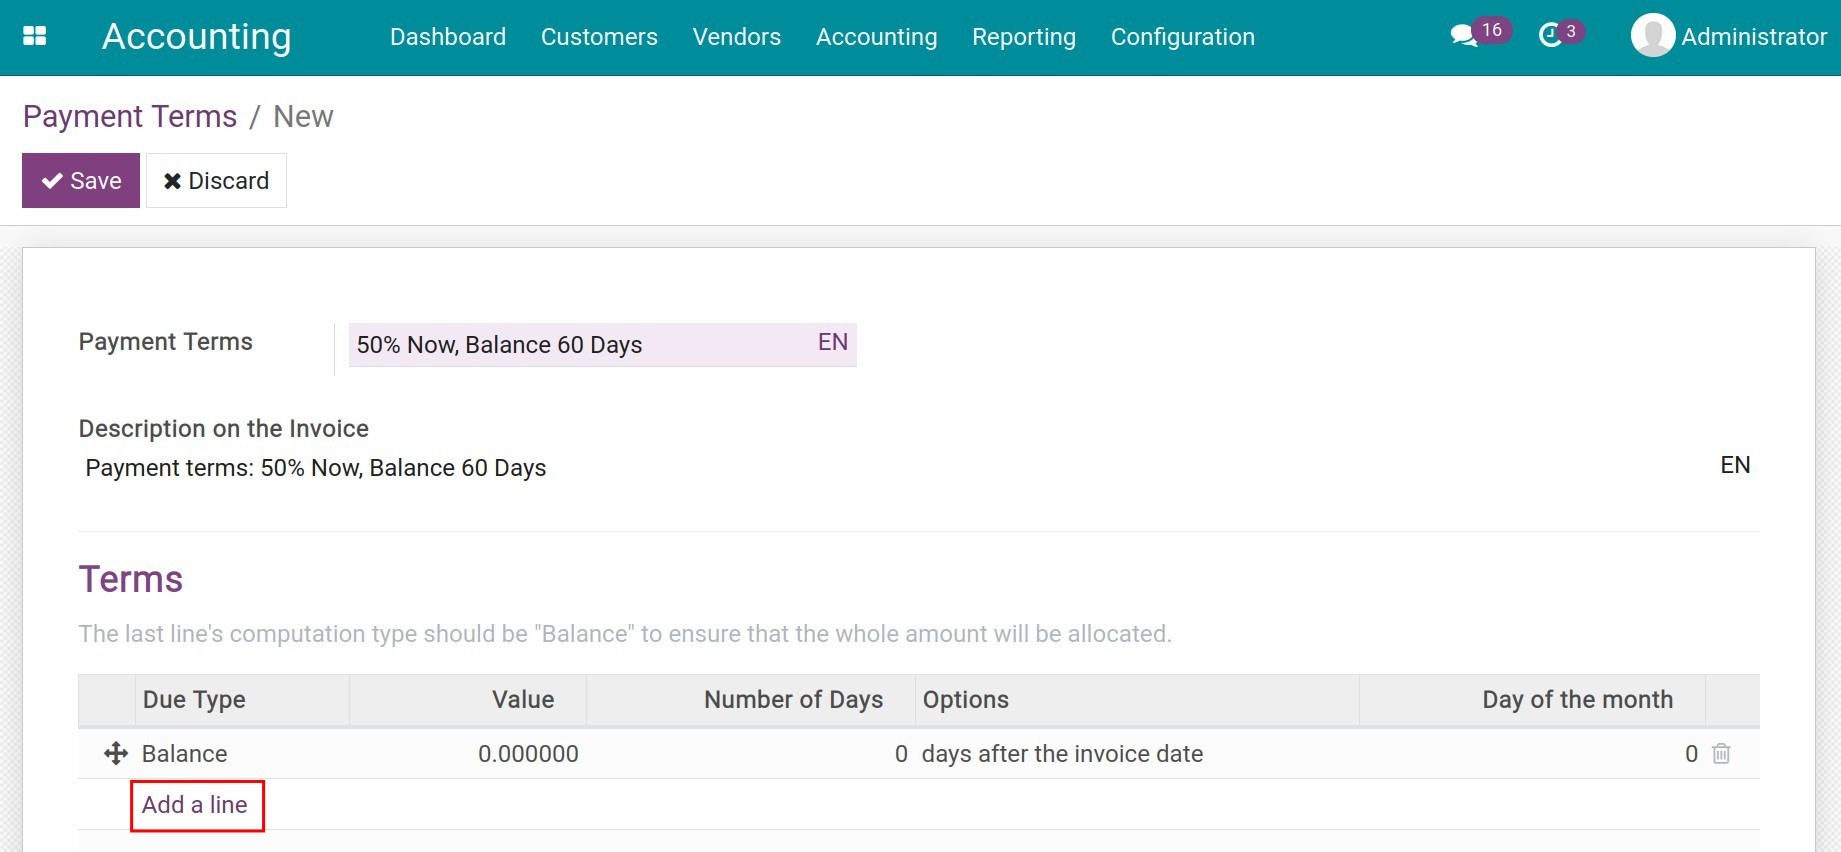
Payment Terms: Choose a name for your payment terms.
Description on the Invoice: Payment terms explanation for the customer will be displayed on the Description of invoices or vendor bills.
Terms: To add a rule for your payment terms, select Add a line and a window will be displayed where you can define the details of the rule:
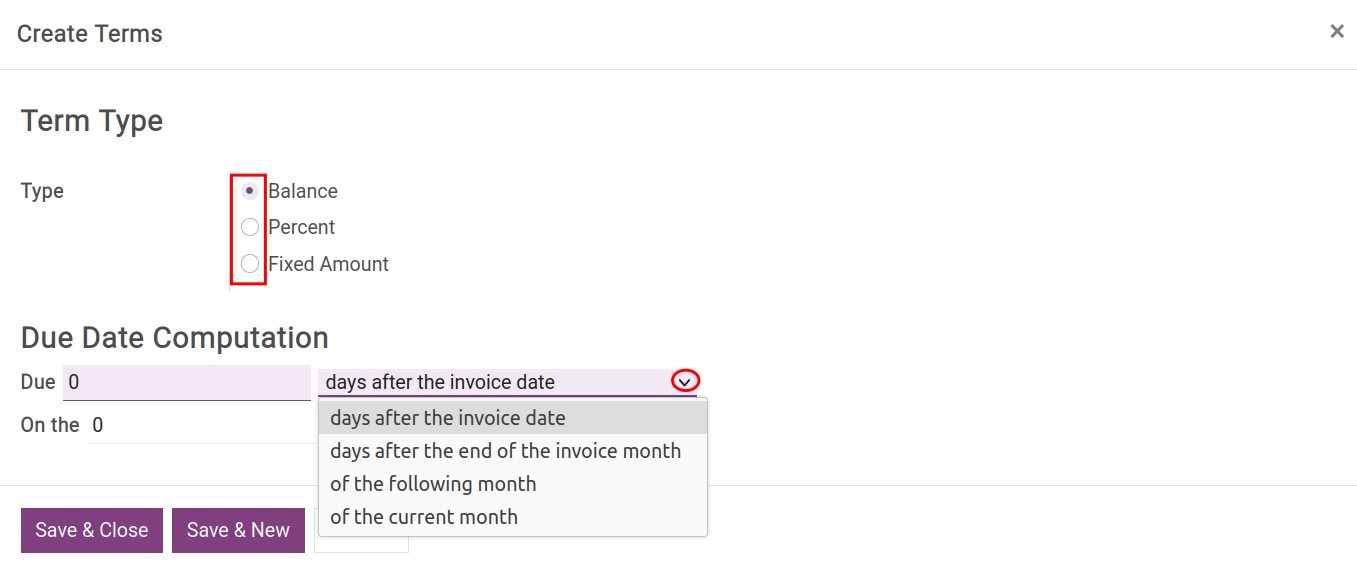
On this window, you need to add the following information:
Term Type: define the kind of valuation related to this payment terms line.
Percent: Percentage of invoice value needs to be paid.
Fixed Amount: The fixed amount of money needs to be paid if this payment term is chosen.
Balance: The leftover value of the invoice.
Due Date Computation:
Due: There are various options available for you to define the due date of the chosen value above:
Days after the invoice date;
Days after the end of the invoice month;
Of the following month;
Of the current month.
You also can define a specific date in the On the… of the month field with the Days after the invoice date option.
Note
Terms are calculated in the order they are established.
The rules of Balance should always be set up as the very last line.
An example of payment terms configuration: Pay 20.000.000 VND when the invoice is confirmed, 50% is due after 30 days, and the balance is due after 60 days.
First, pay 20.000.000 VND when the invoice is confirmed:
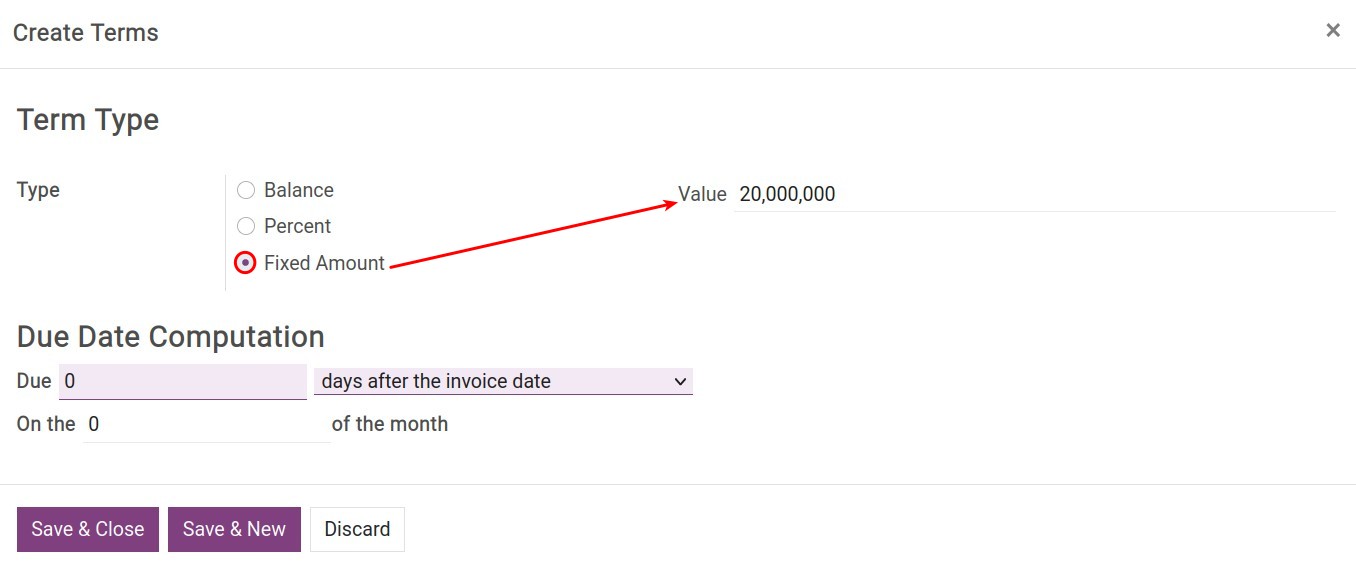
Next, 50% is due after 30 days:
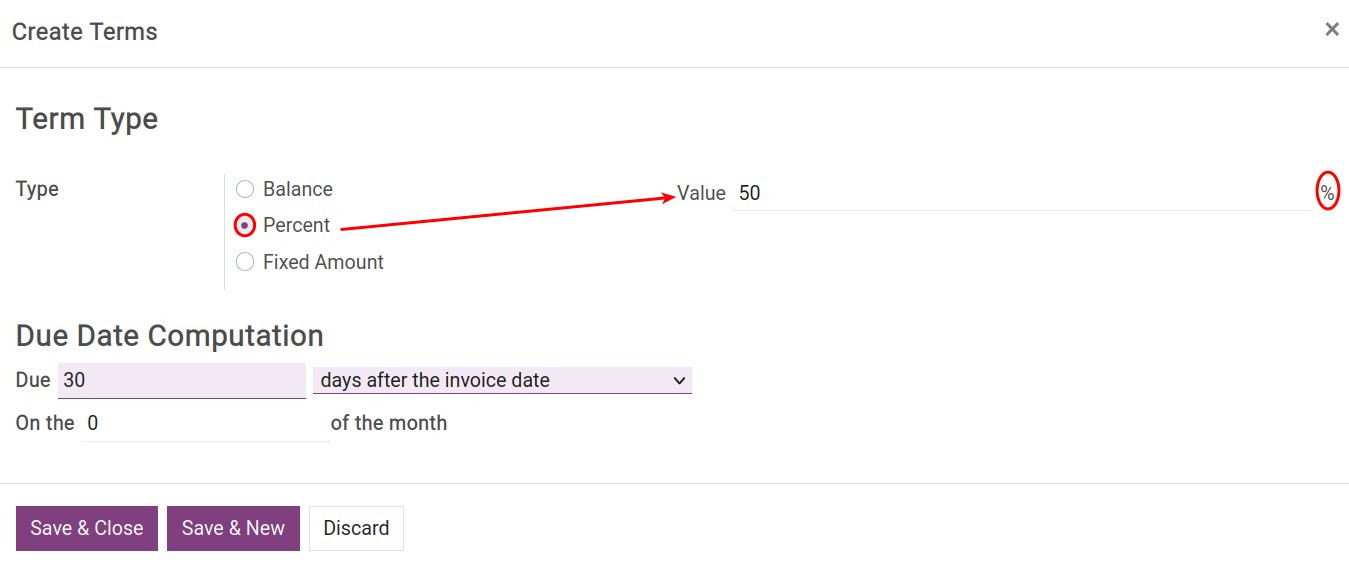
Finally, the balance:
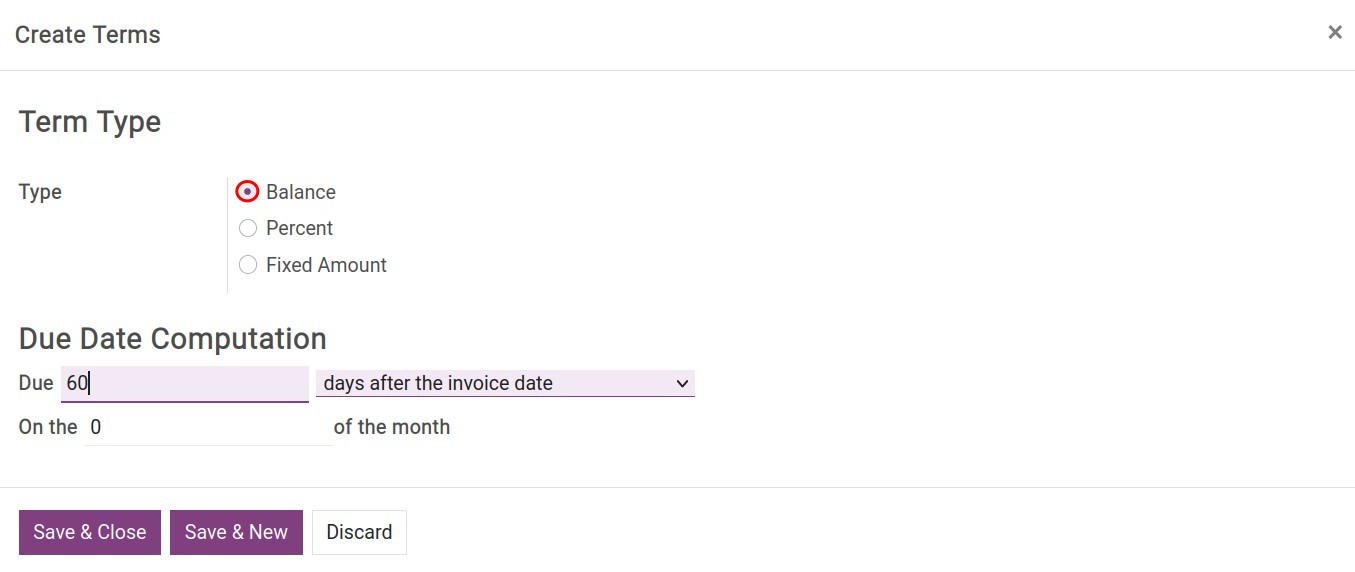
Payment terms usage
You can apply payment terms in different places such as:
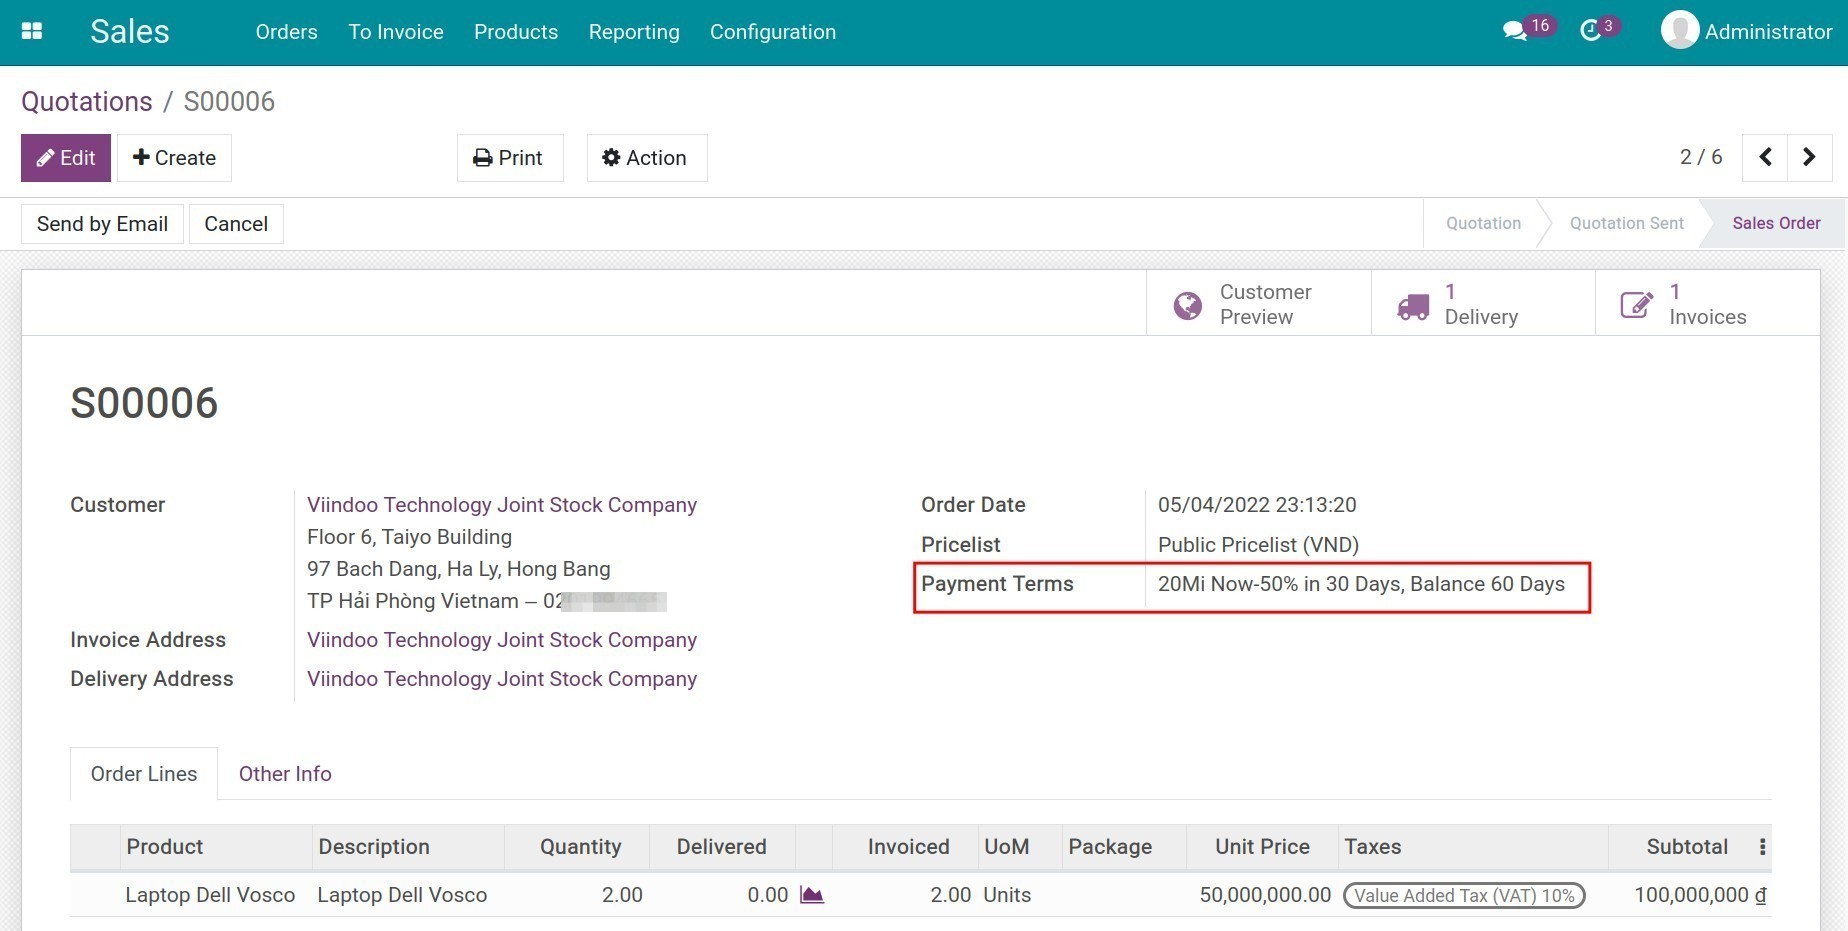
Note
When payment terms are applied on a sales quotation, invoices created from this quotation will have these payment terms applied by default.
Customer Invoice/ Vendor Bill:
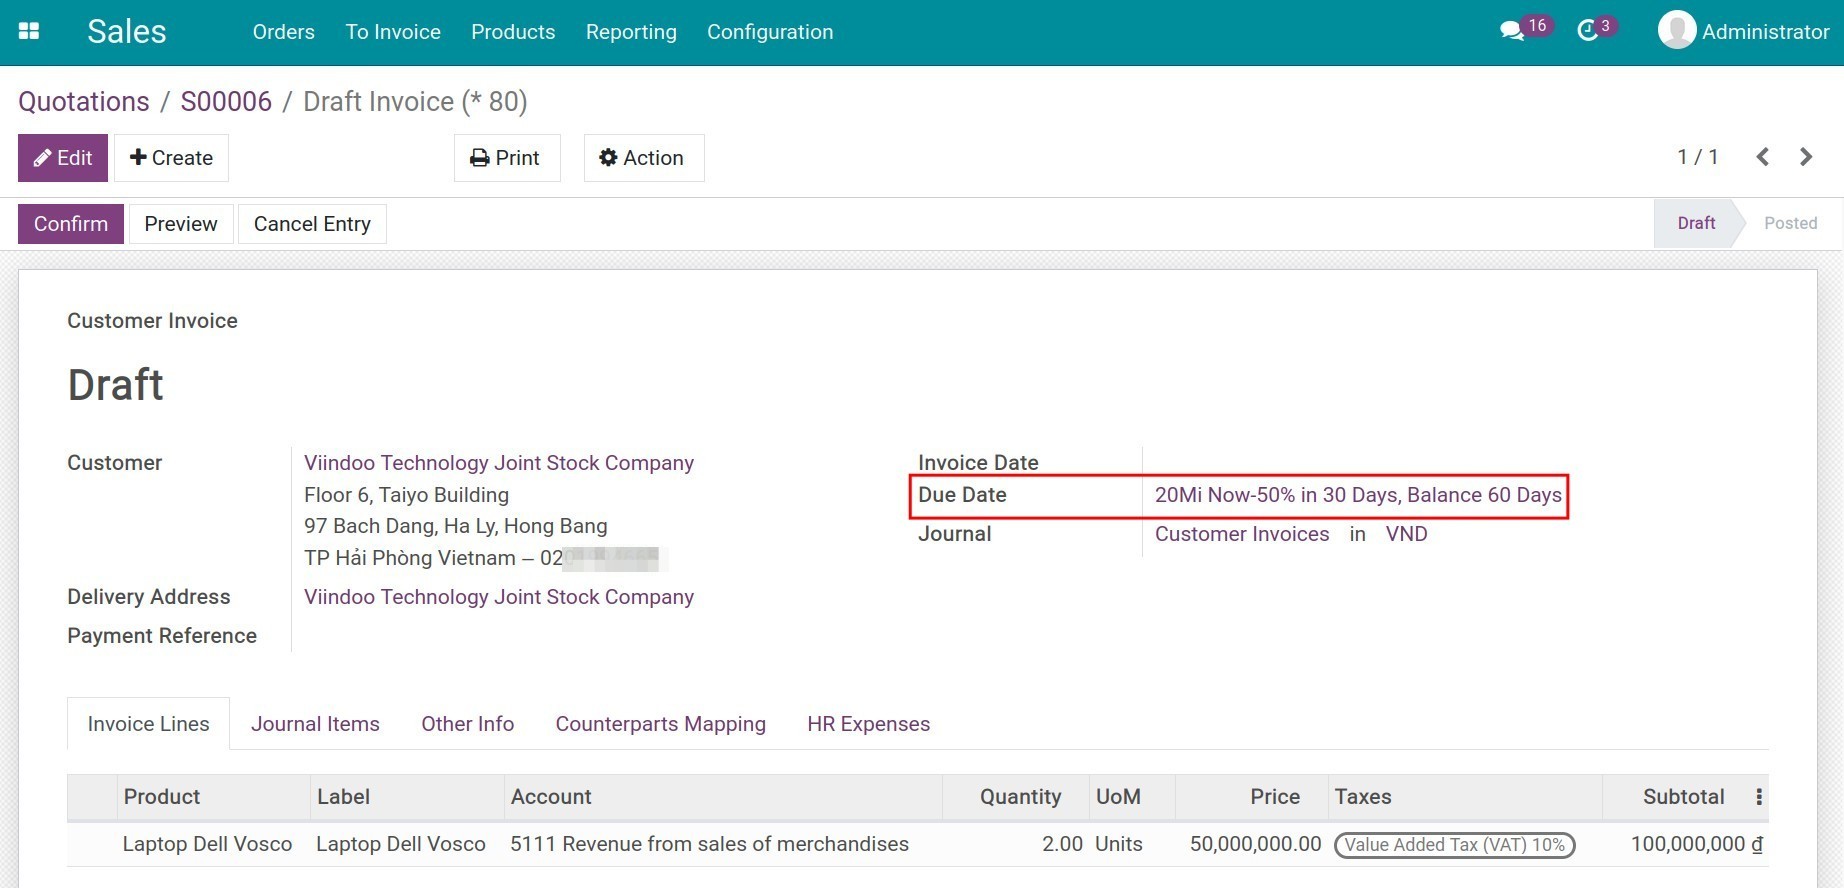
You can see the value and due date of the invoice by going to tab Journal Items:

You can set up Payment Terms for each customer or vendor by default when navigating to the Contacts app, choose the contact in question then go to tab Sales & Purchase:
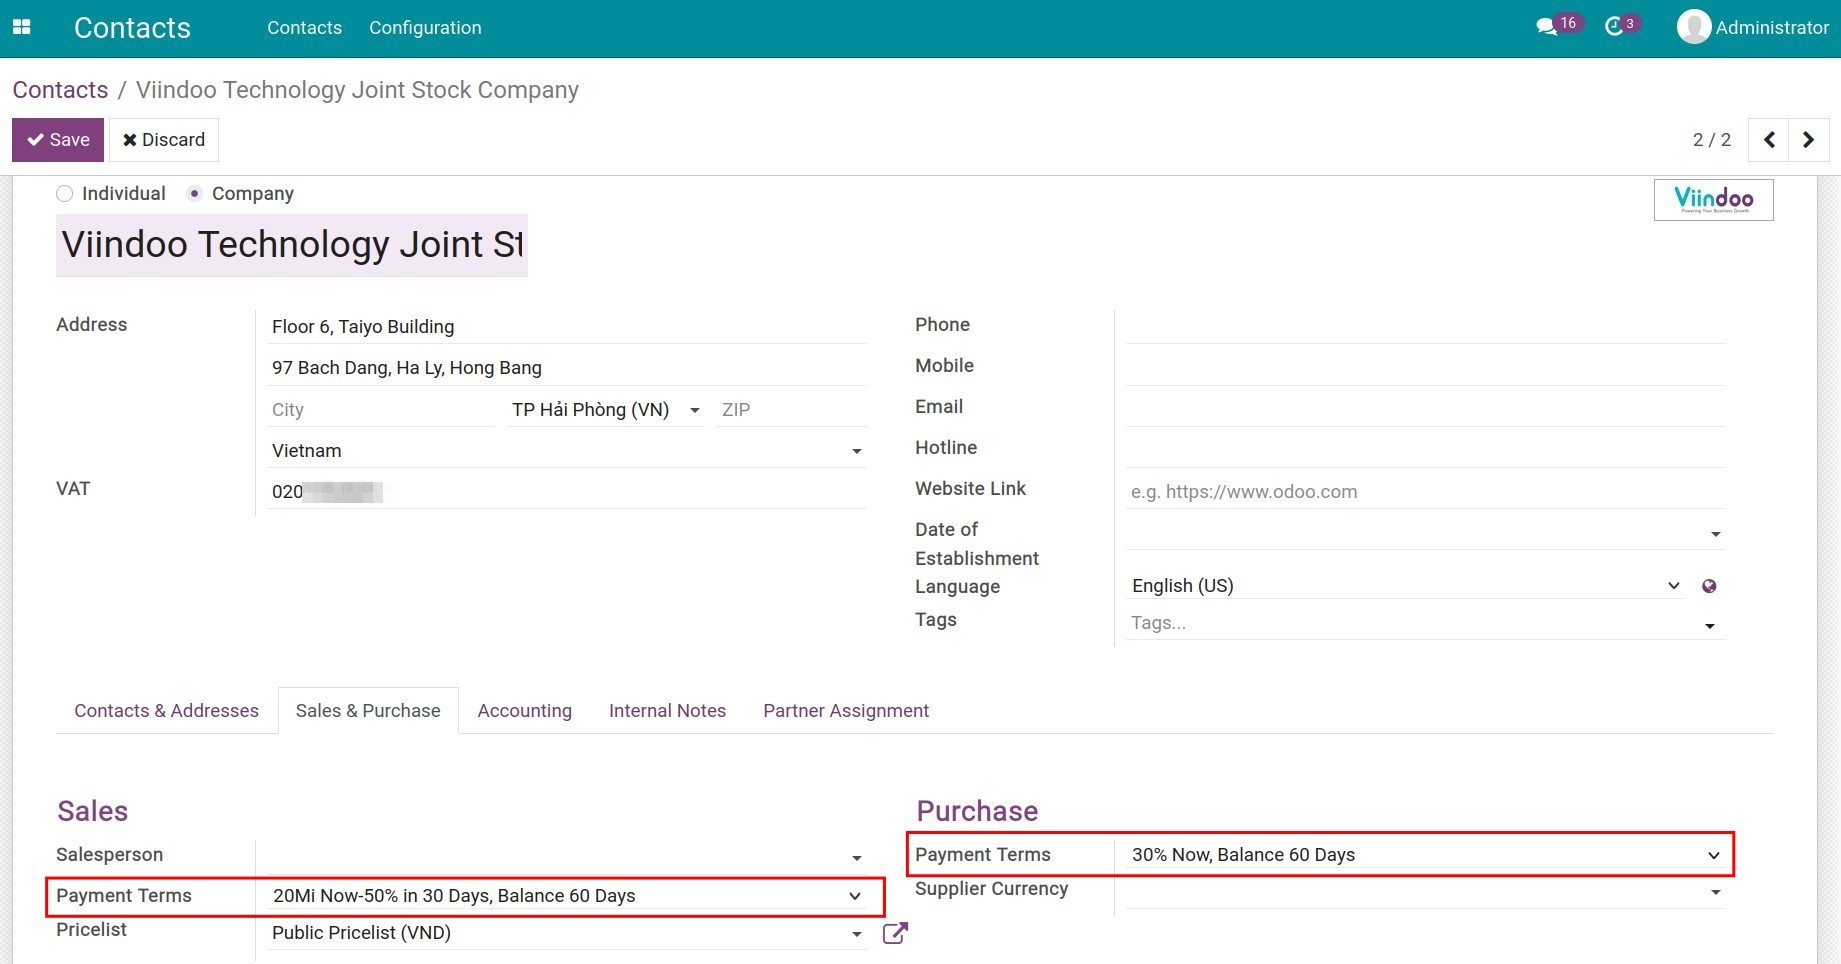
See also
Related article
Process a cash discount
Process a cash discount
Process a cash discount
Requirements
This tutorial requires the installation of the following applications/modules:
Accounting & Finance
With Viindoo accounting software , you can easily give and register cash discounts to your customer. Discounts can be given when the customer proceeds with the payment or after that.
To have a better idea of how to apply a cash discount on a customer payment, let’s take a look at the following example: When your customer pays within 10 days from the date of invoice, he/she will receive a 2% discount on the total value.
Set up cash discounts
First of all, we need to set up a payment term to register the pre-due payment which receives the 2% discount. Access Accounting ‣ Configuration ‣ Payment Terms:
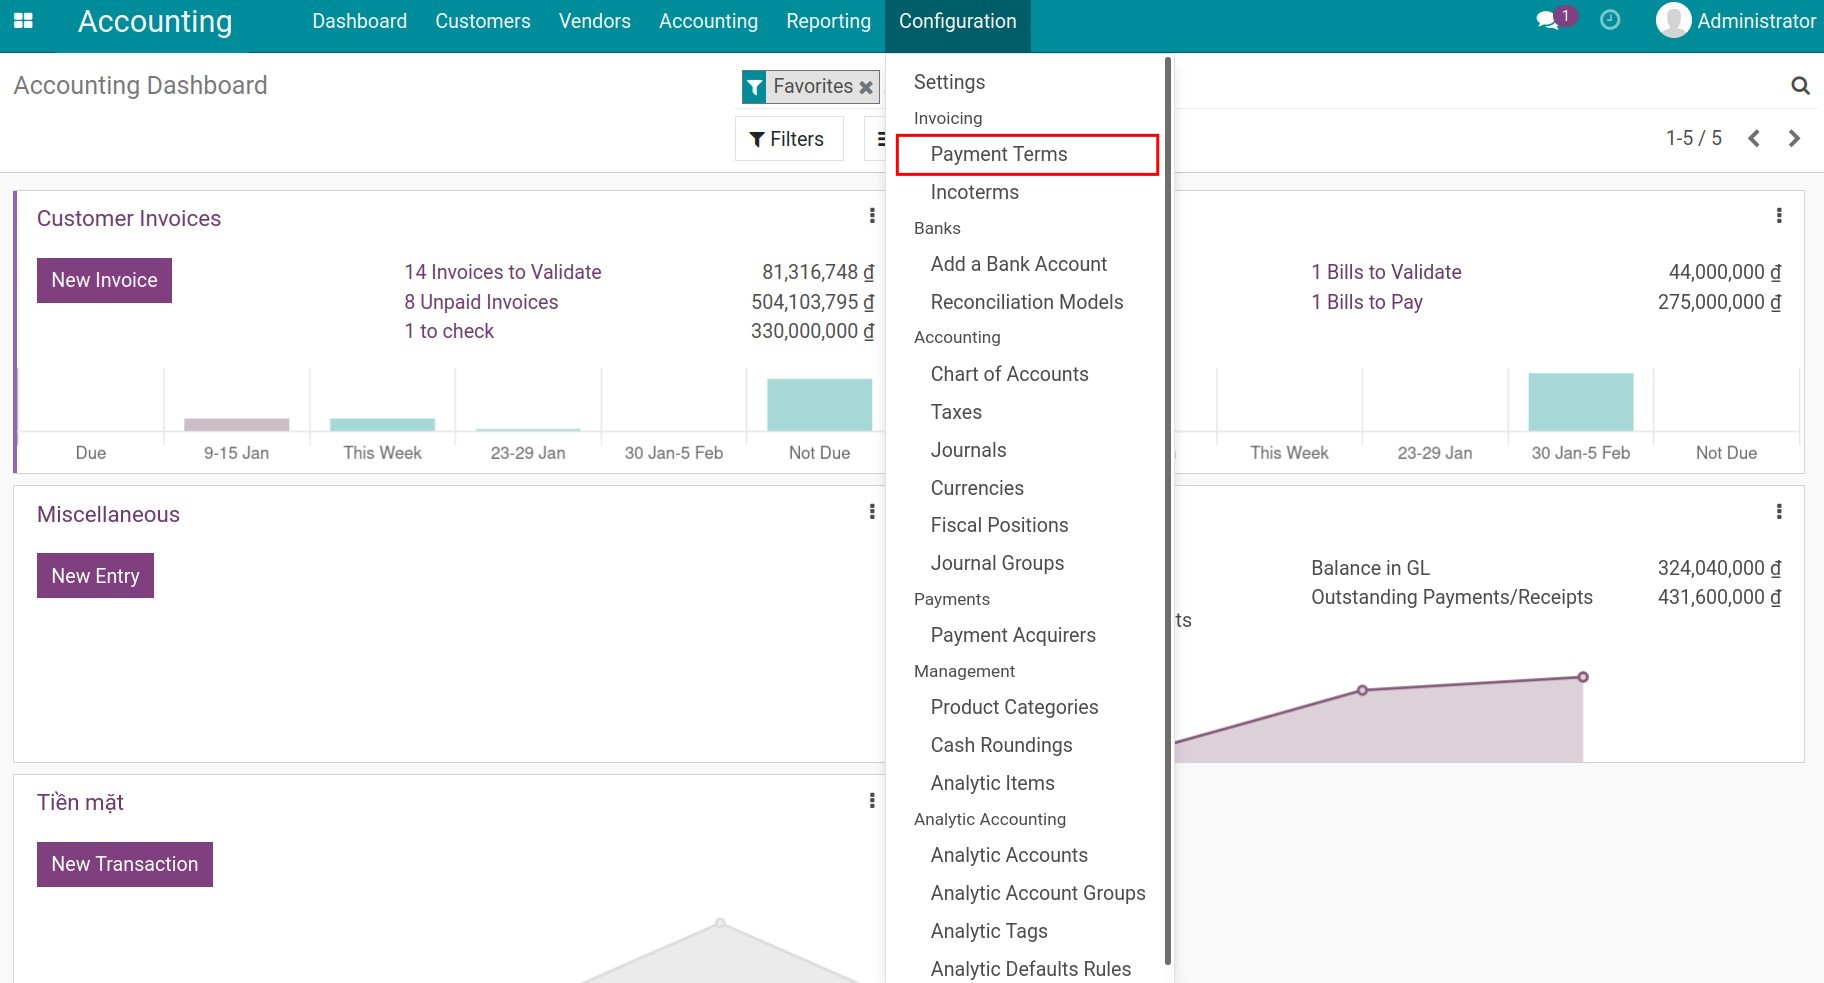
Configure the payment term as follow: 98% for the first 10 days after the invoice date, and the remaining 2% for 30 days after the invoice date:
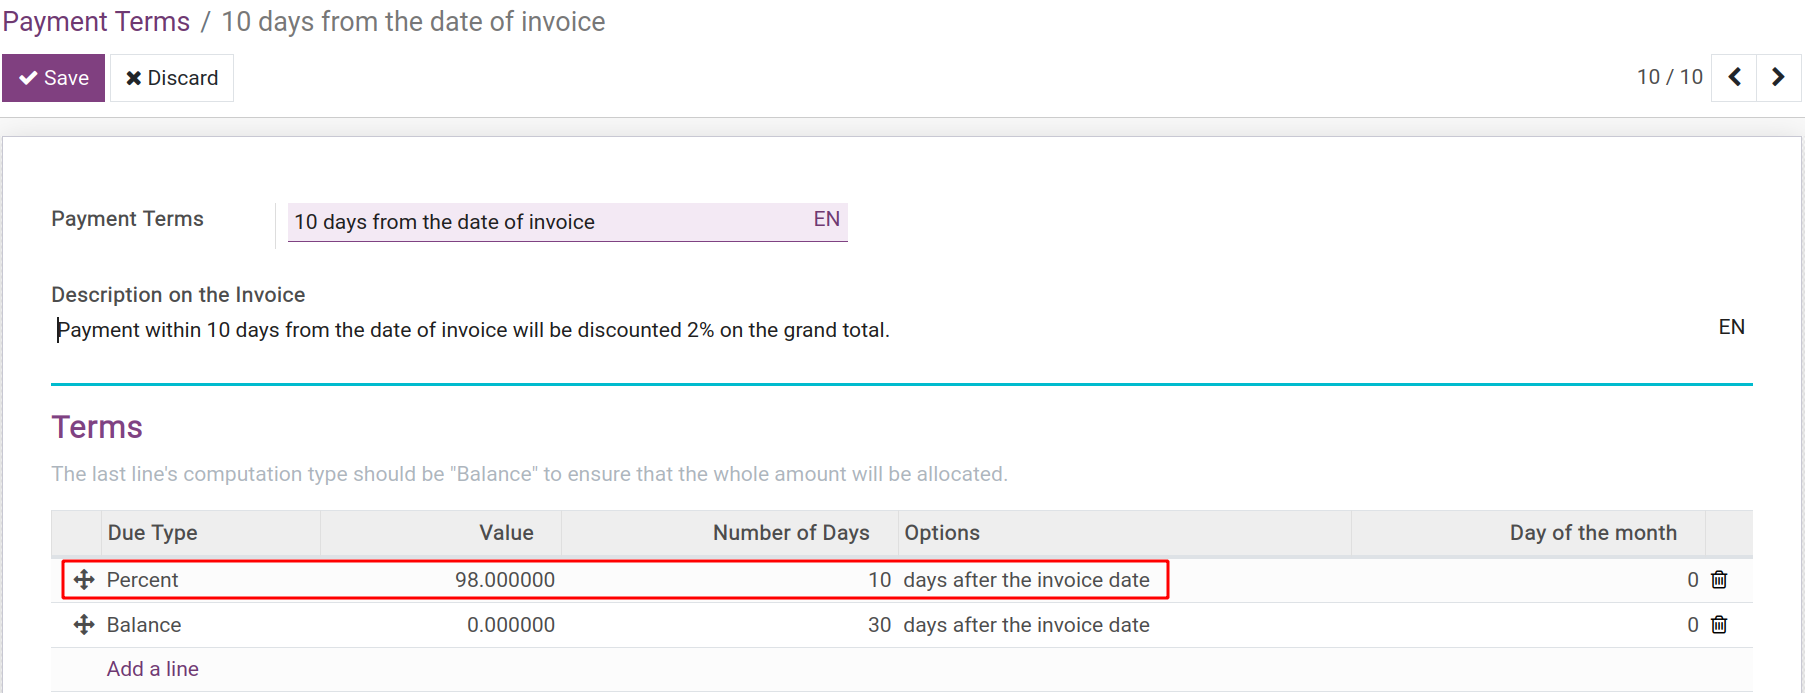
When a transaction occurs
After completing the transaction and creating the invoice for your customer, the system will automatically separate the receivable into 2 lines with respective deadlines (including the 2% discount for early payment). You can view them on the invoice at the Journal Items tab:
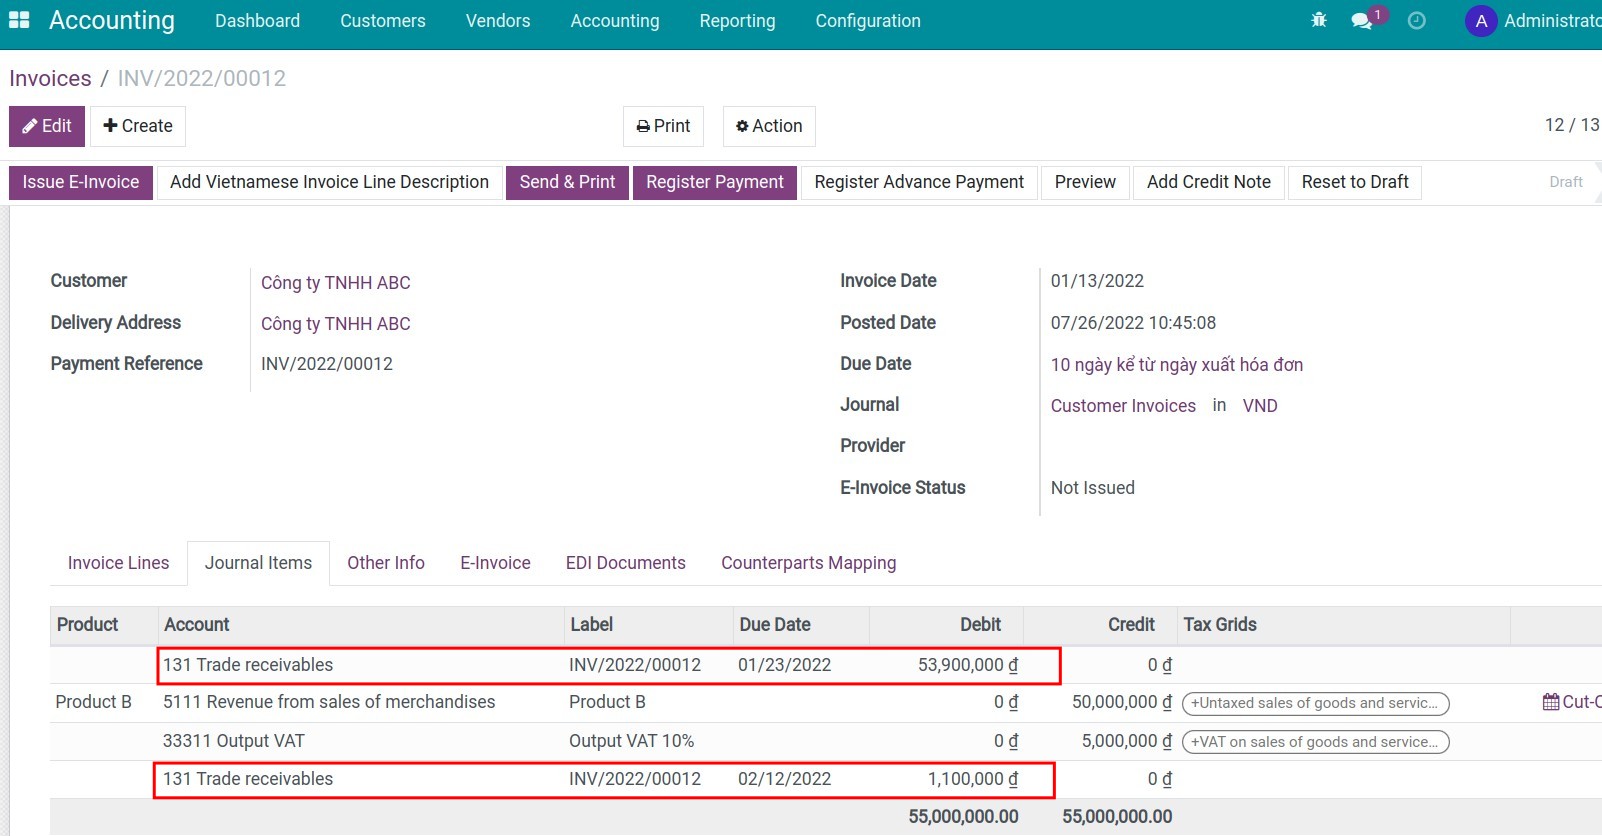
Register payment and cash discount
Customer pays before the due date and receives a discount
In our example, if our customers pay before the due date according to the payment term, they will get a 2% discount on the total amount. To register that payment directly from the invoice, access the invoice and select Register Payment:
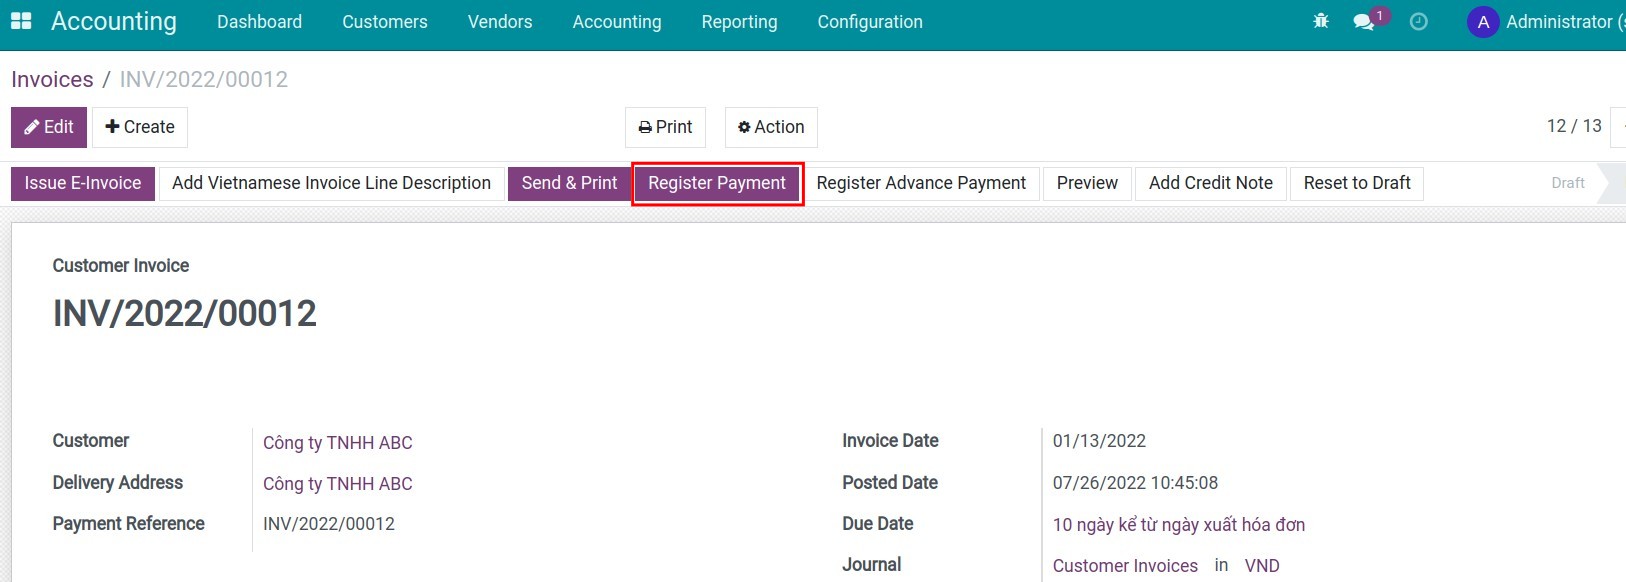
You need to fill the payment as follow:
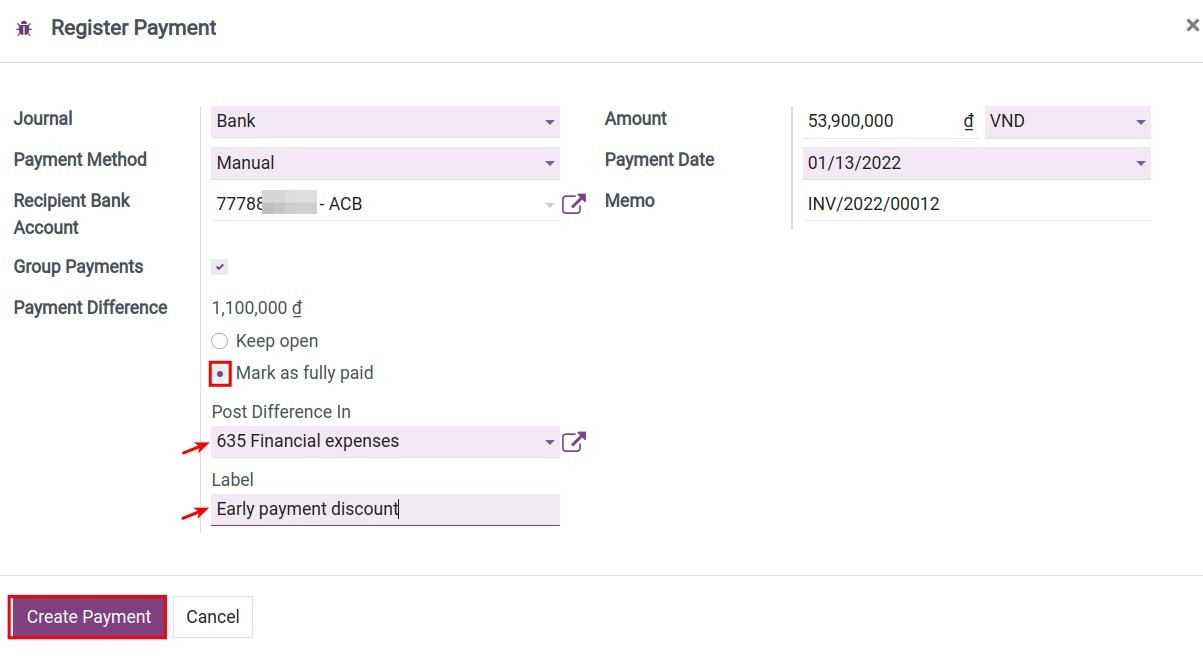
Journal: Choose the cash or bank journal that receives money from the customer;
Recipient Bank Account: The system will automatically fill the bank account declared on the chosen journal above.
Amount: Add the discounted amount and select Mark as fully paid. At this moment, you need to choose an accounting account to record the difference with the label displayed on the journal entry. In this example, you can choose 635 - Financial expenses.
Payment Date: By default, it will be the payment creation date on the system. You should change it to the actual payment receiving date.
Memo: Record the description with the invoice number of the customer payment.
Click Create Payment to record the customer payment. The customer invoice is now marked as Paid. To view the auto-generated difference, look at the bottom of the invoice and press the i icon to see the payment info, click Journal Entry in the right corner of the payment slip to see its details:
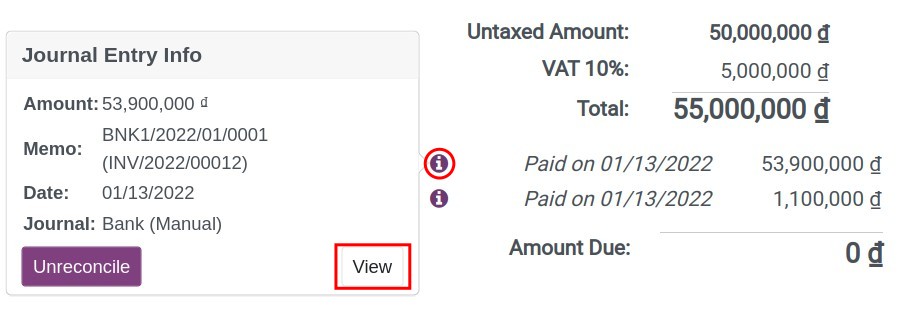
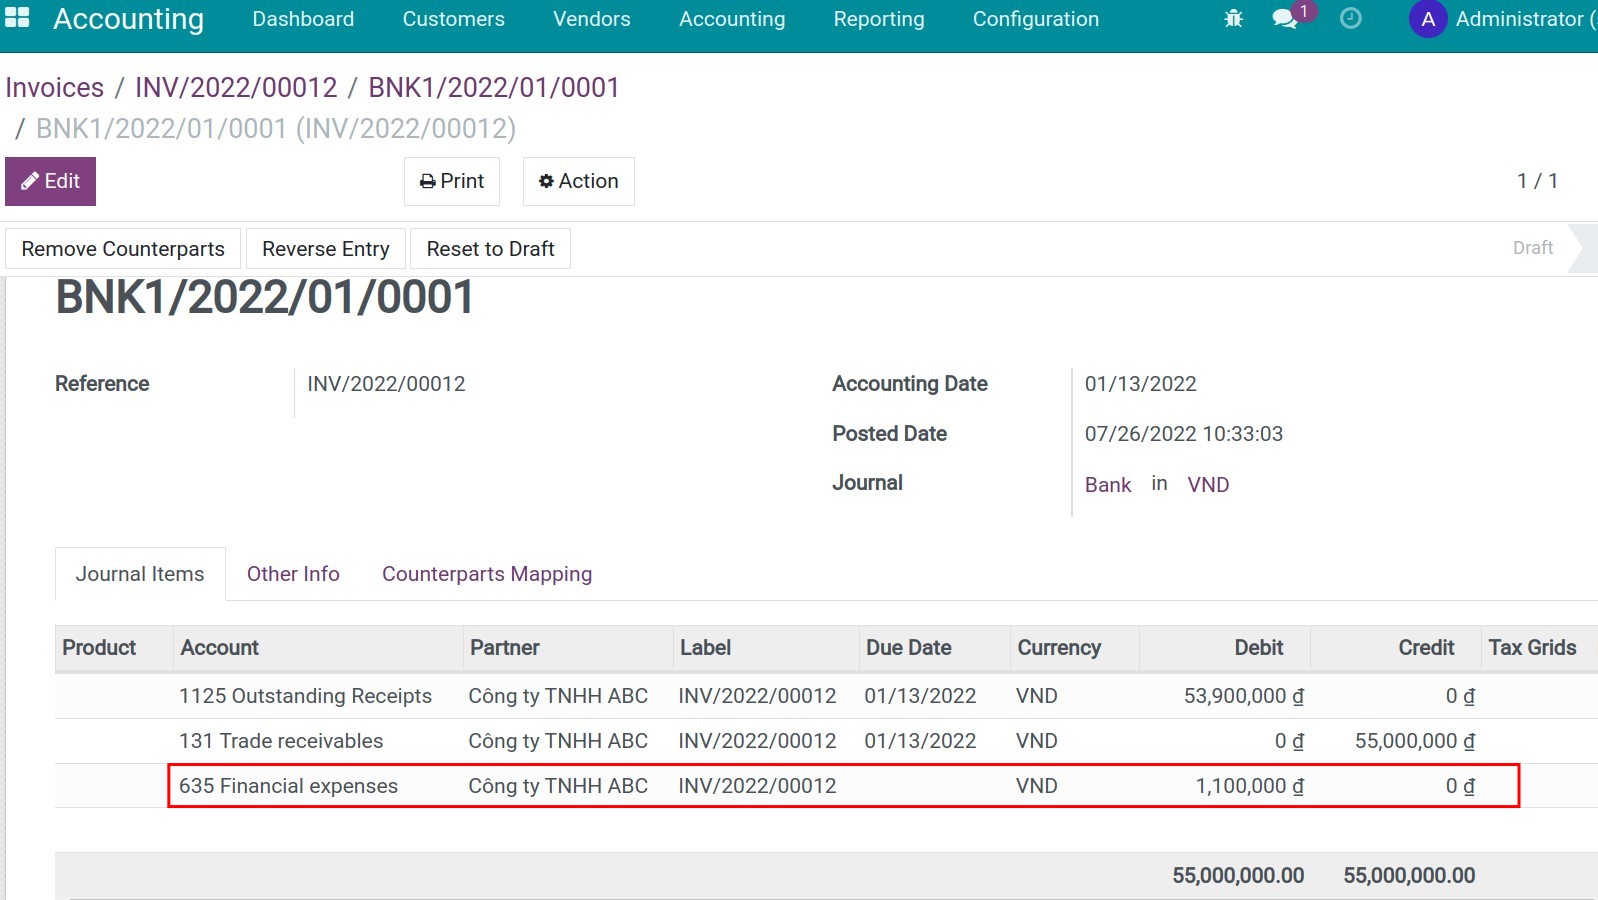
The system will automatically reconcile the related 131- Trade receivables. After activating developer mode, navigate to Accounting ‣ Accounting ‣ Journal Items to see details:
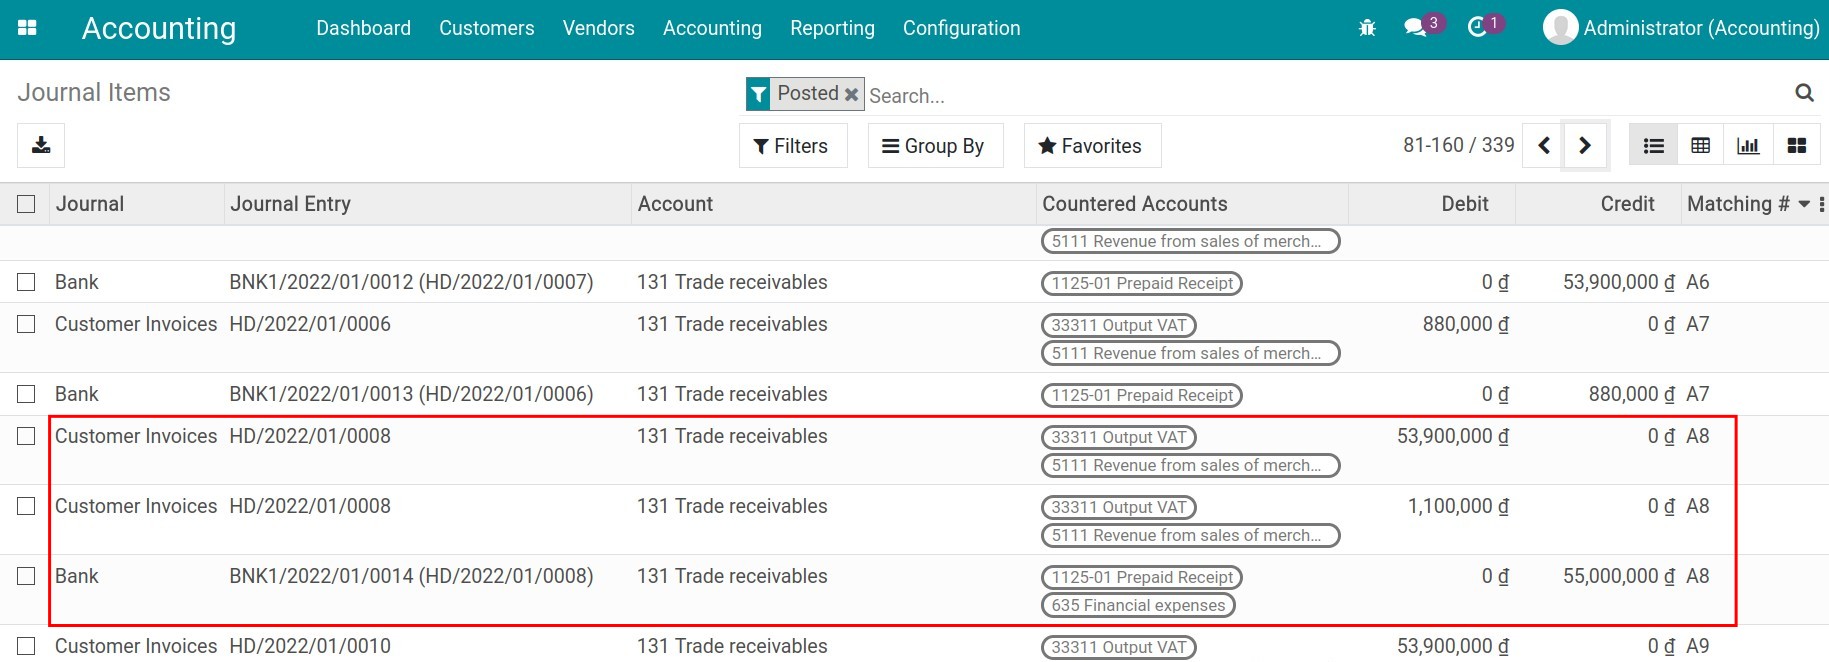
Tip
Besides from register payment from the invoice, you can also register a payment directly at Accounting ‣ Customers ‣ Payments. And then, to register the cash discount, you can use Journal entries or Reconciliation Models.
Customer pays after the due date and doesn’t receive discount
If customers pay later than pre-set due date, they won’t receive a 2% discount.
At the customer invoice, you will record the full amount of the invoice by clicking Register payment.
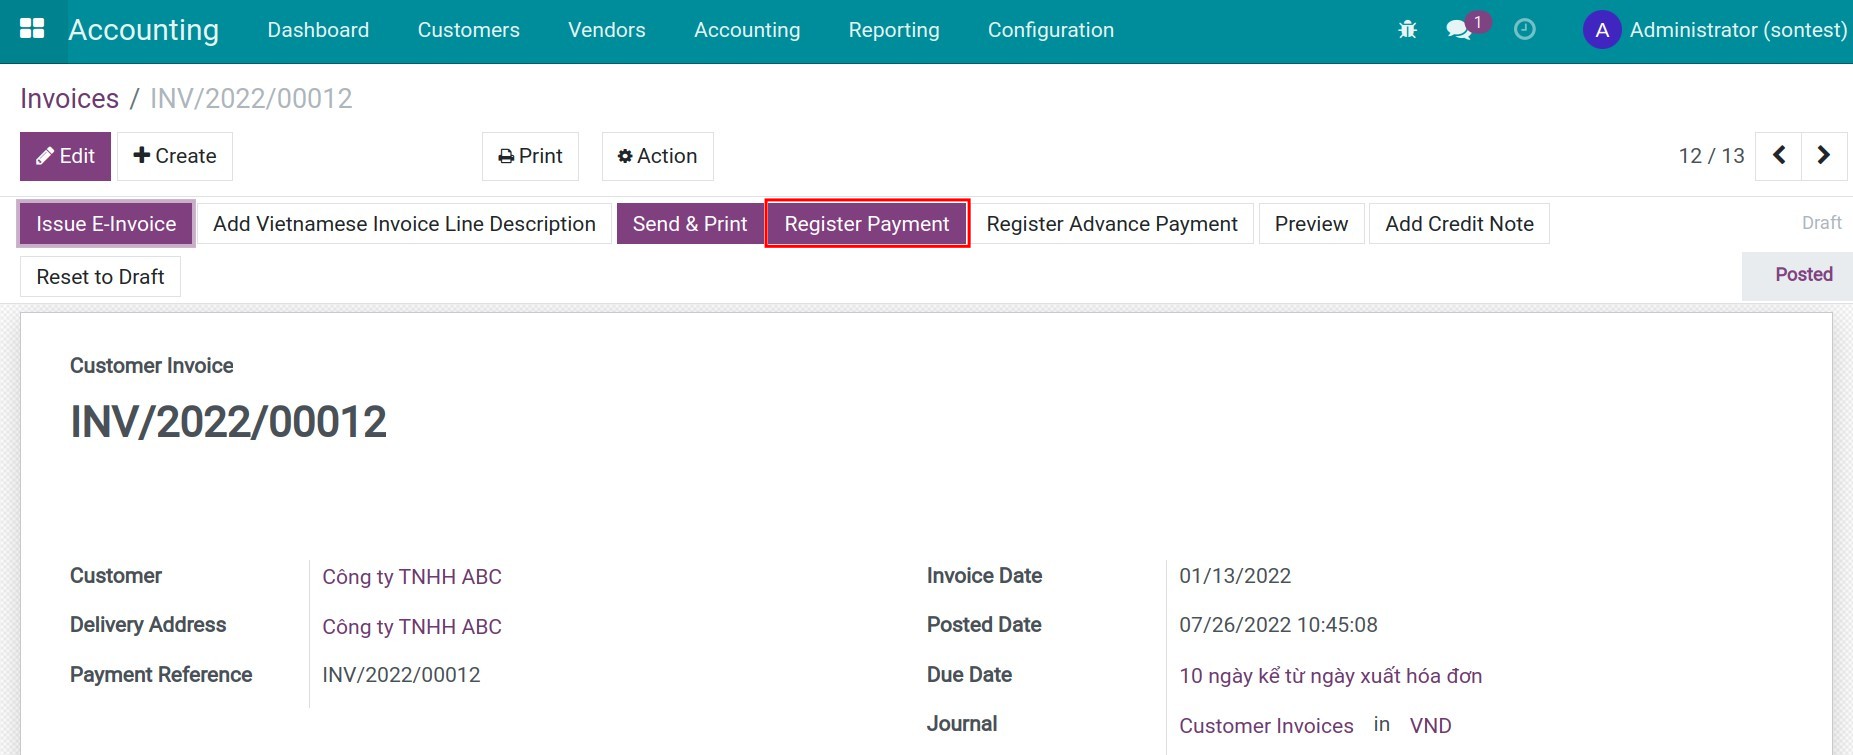
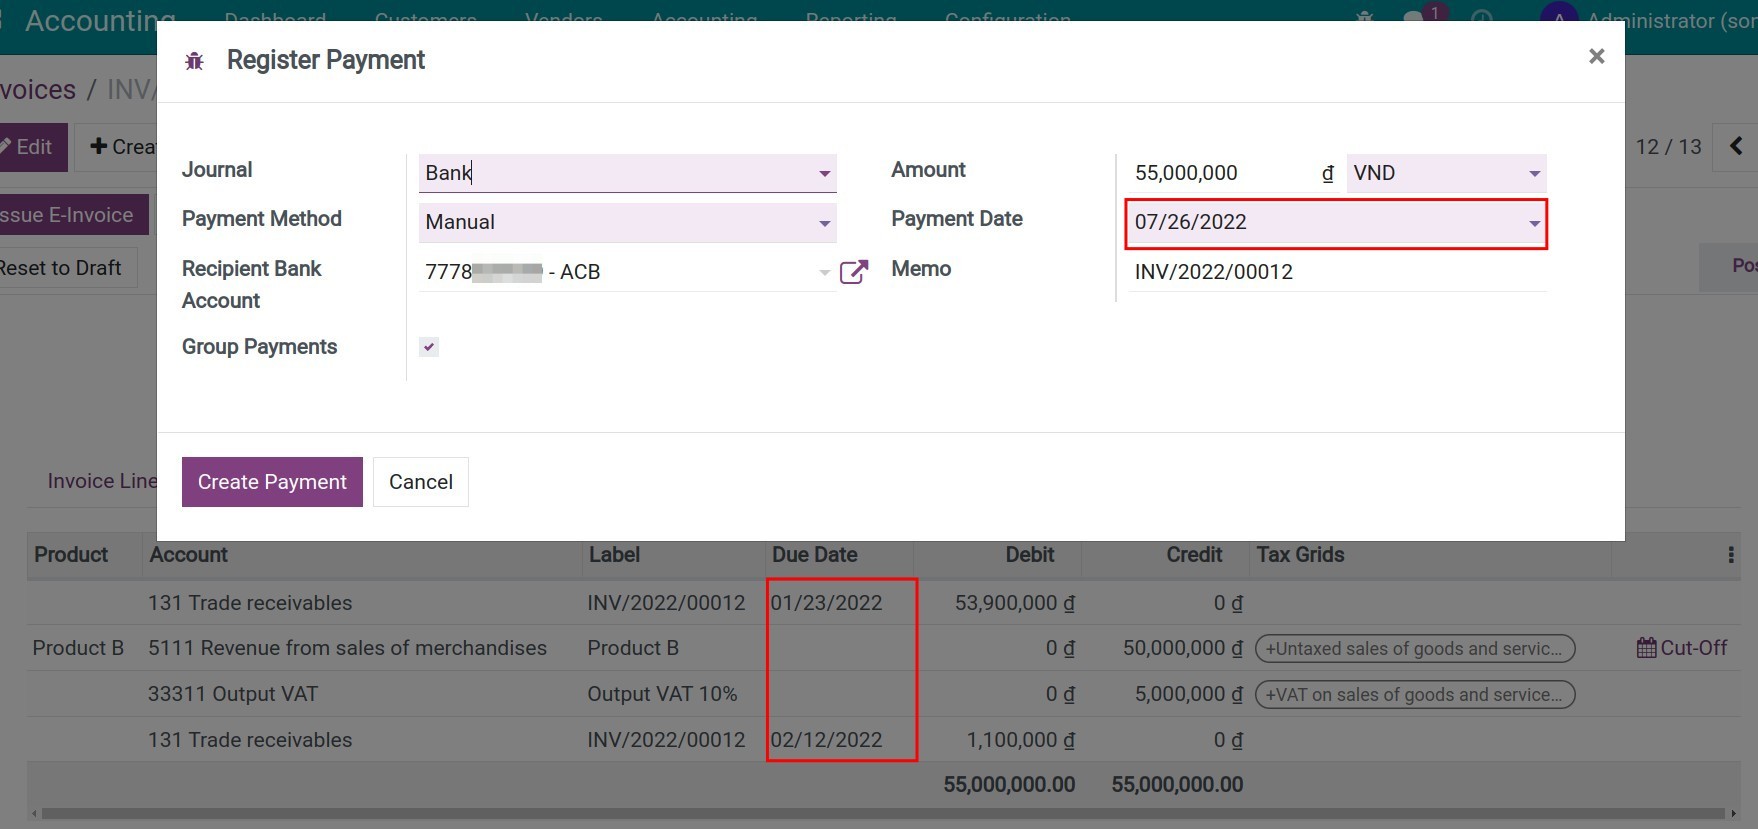
All customer debits with different due dates on this invoice will also be automatically reconciled and the invoice is marked as Paid.
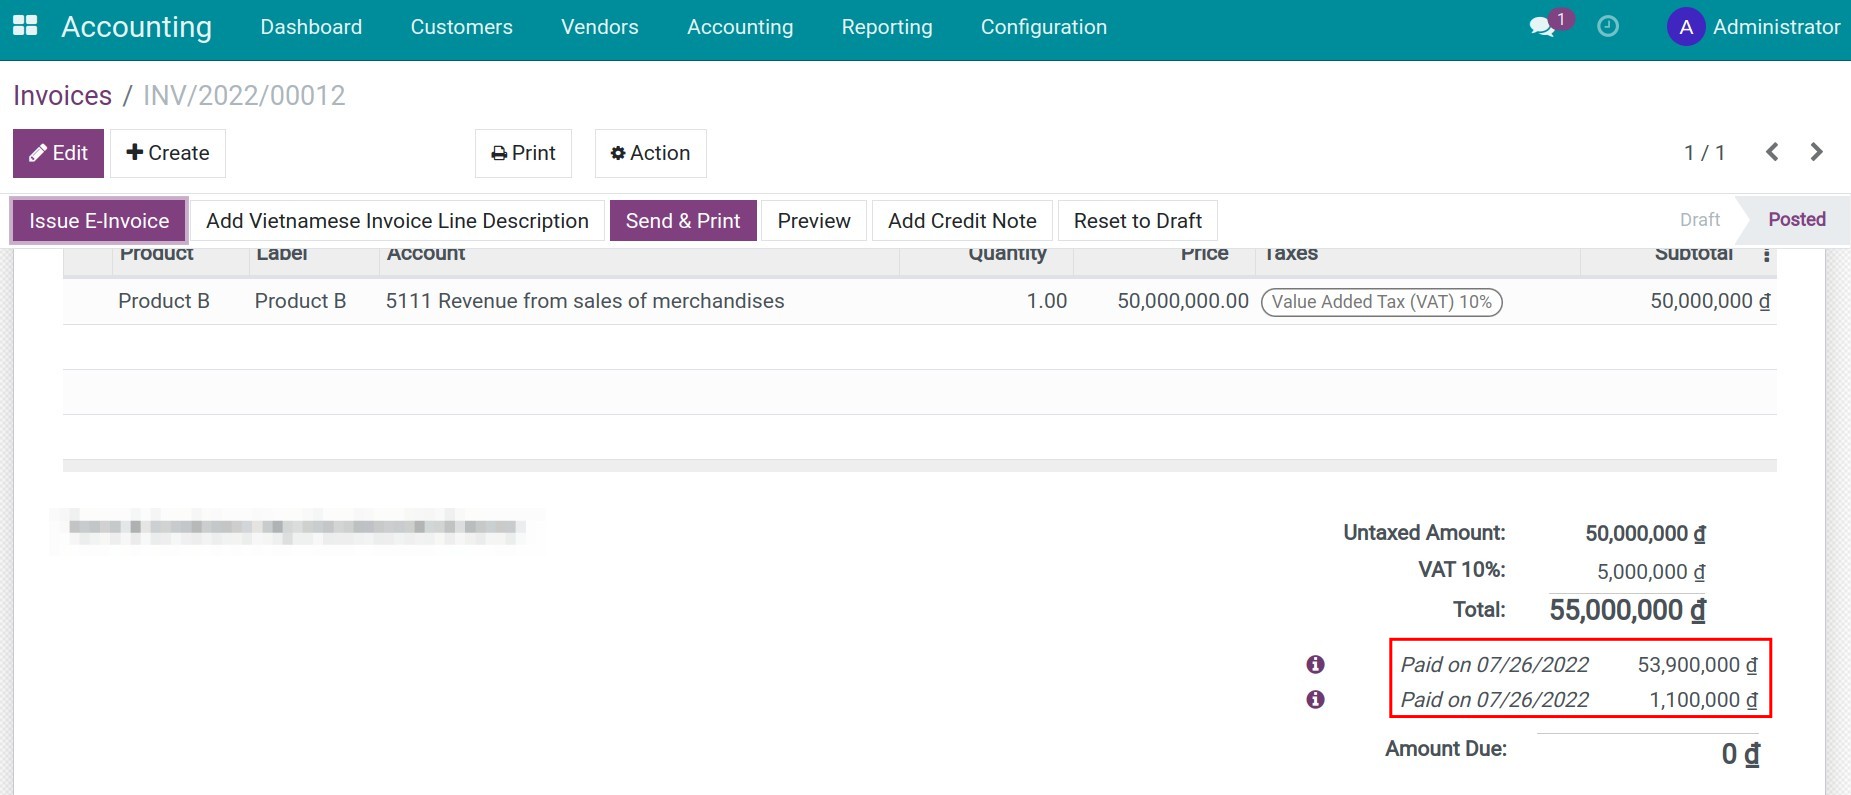
See also
Related article
Steps to create customer invoices
Steps to create customer invoices
Steps to create customer invoices
Requirements
This tutorial requires the installation of the following applications/modules:
Accounting & Finance
Configure invoicing policy
Depending on different businesses and products, each company will have different invoicing policies. With Viindoo Accounting & Finance Management, we make it easier for you by applying 2 invoicing policies:
Invoice what is ordered: Create an invoice for the ordered amount. You can choose to create invoices before or after delivering.
Invoice what is delivered: Create a partial invoice for the amount that is delivered.
Create an invoice from an order
Normally, the salesperson will be in charge of creating a draft invoice based on the sales order. Depending on different purposes and scenarios, you can choose different invoice types such as:
Regular invoice;
Down payment (percentage);
Down payment (fixed amount).
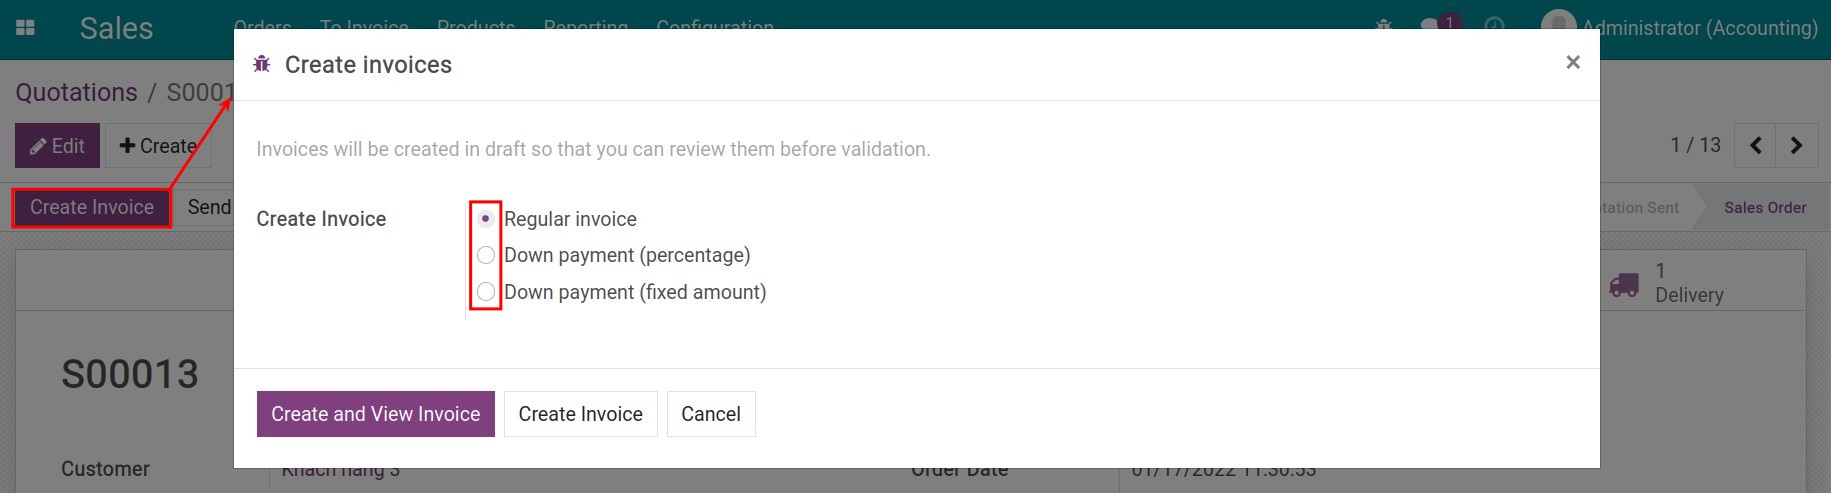
This invoice will inherit the order’s contents, the accountant then only has to check and confirm the invoice to register the related journal items. Navigate to Accounting ‣ Customers ‣ Invoices, and then use the filter/search to find the invoice:
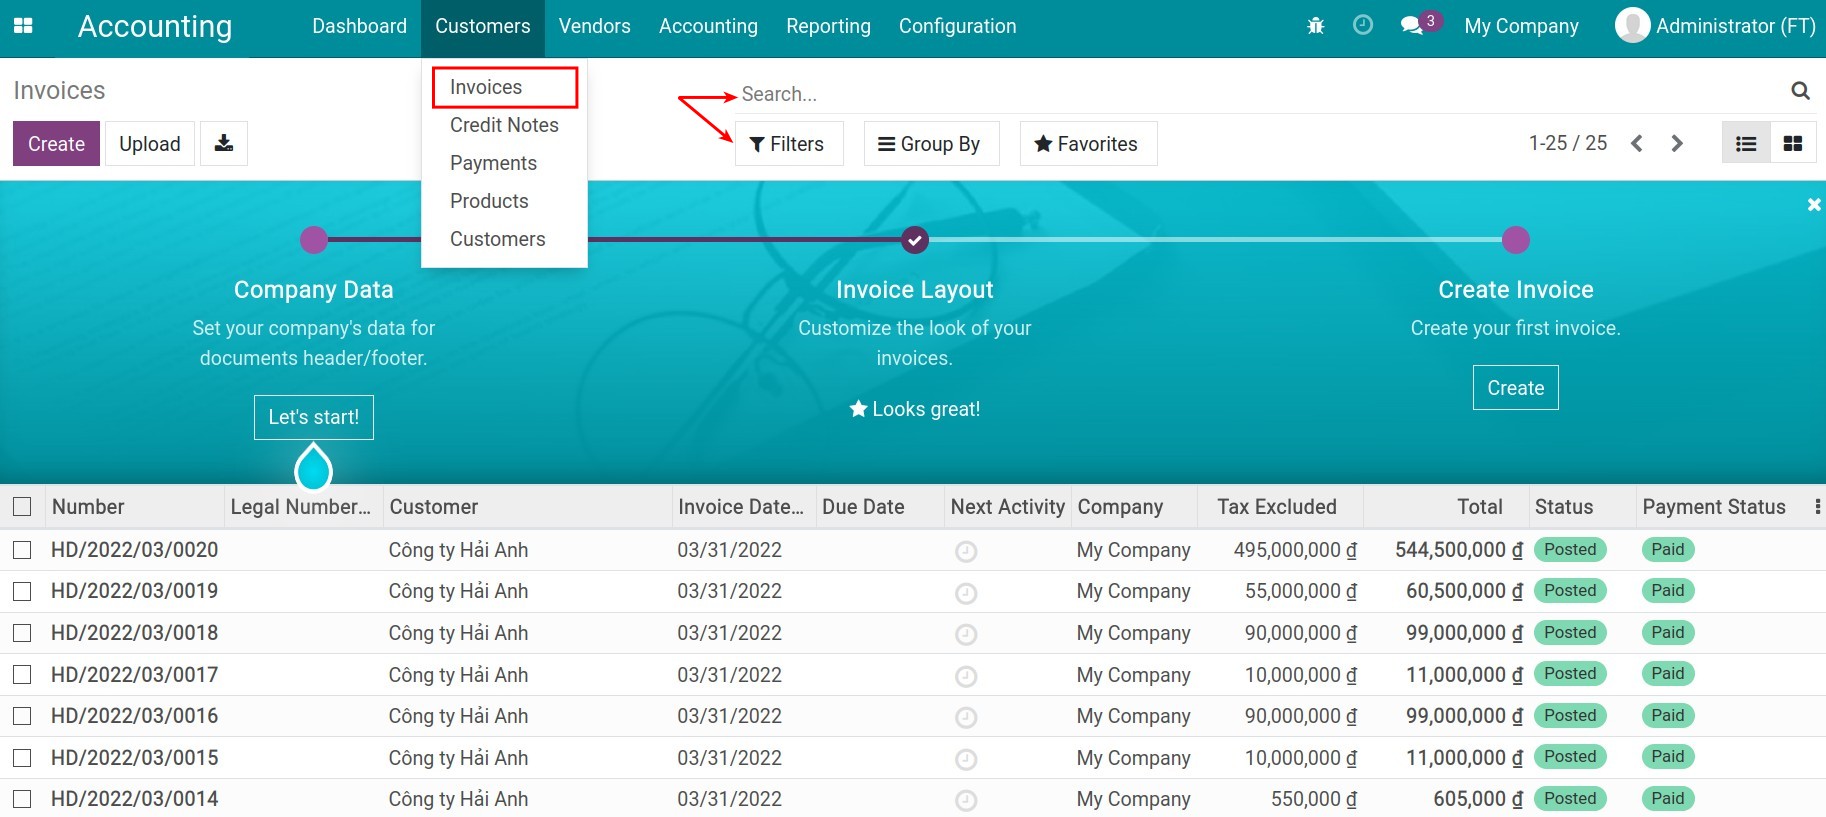
Then, you can select Confirm and view the content of the invoice entry at the Journal Items tab:
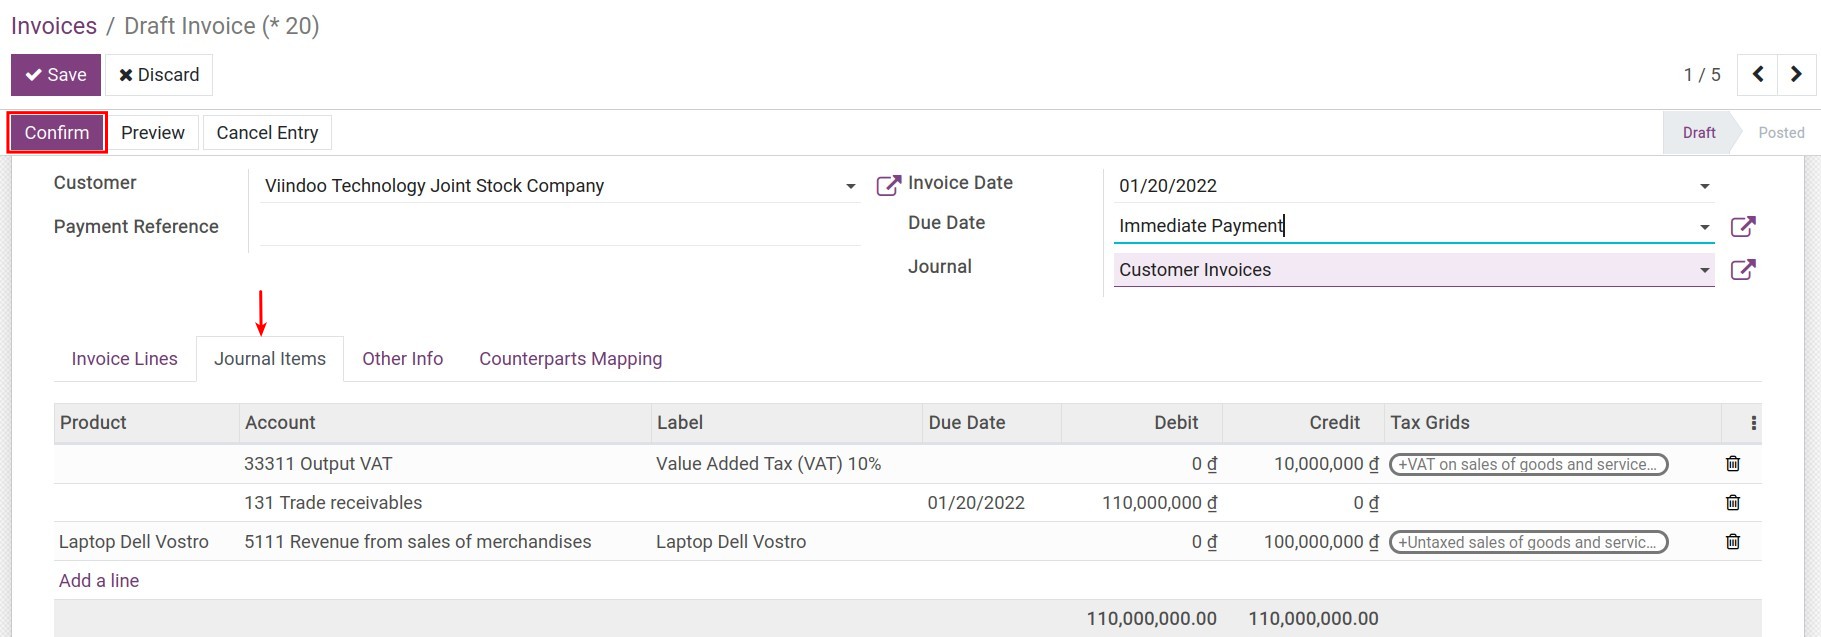
Create an invoice directly
In some special cases, the accountant needs to create the invoices directly, for example:
When you need to return cash to customers;
Cash a discount to your customer;
Or adjusting the pre-created invoices;
etc.
To create an invoice directly, access Accounting ‣ Customers ‣ Invoices ‣ Create:
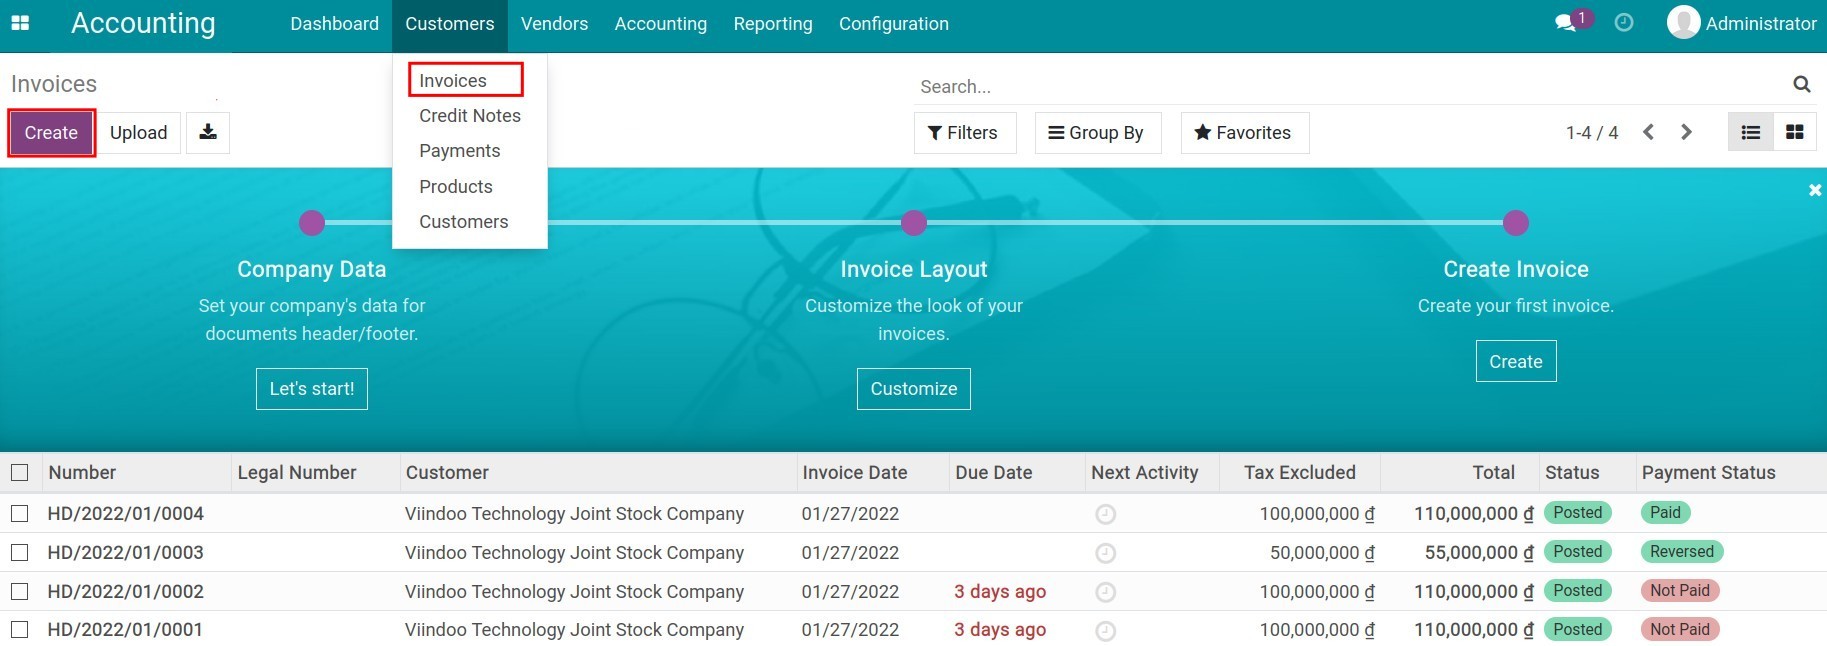
And then fill in the needed information:
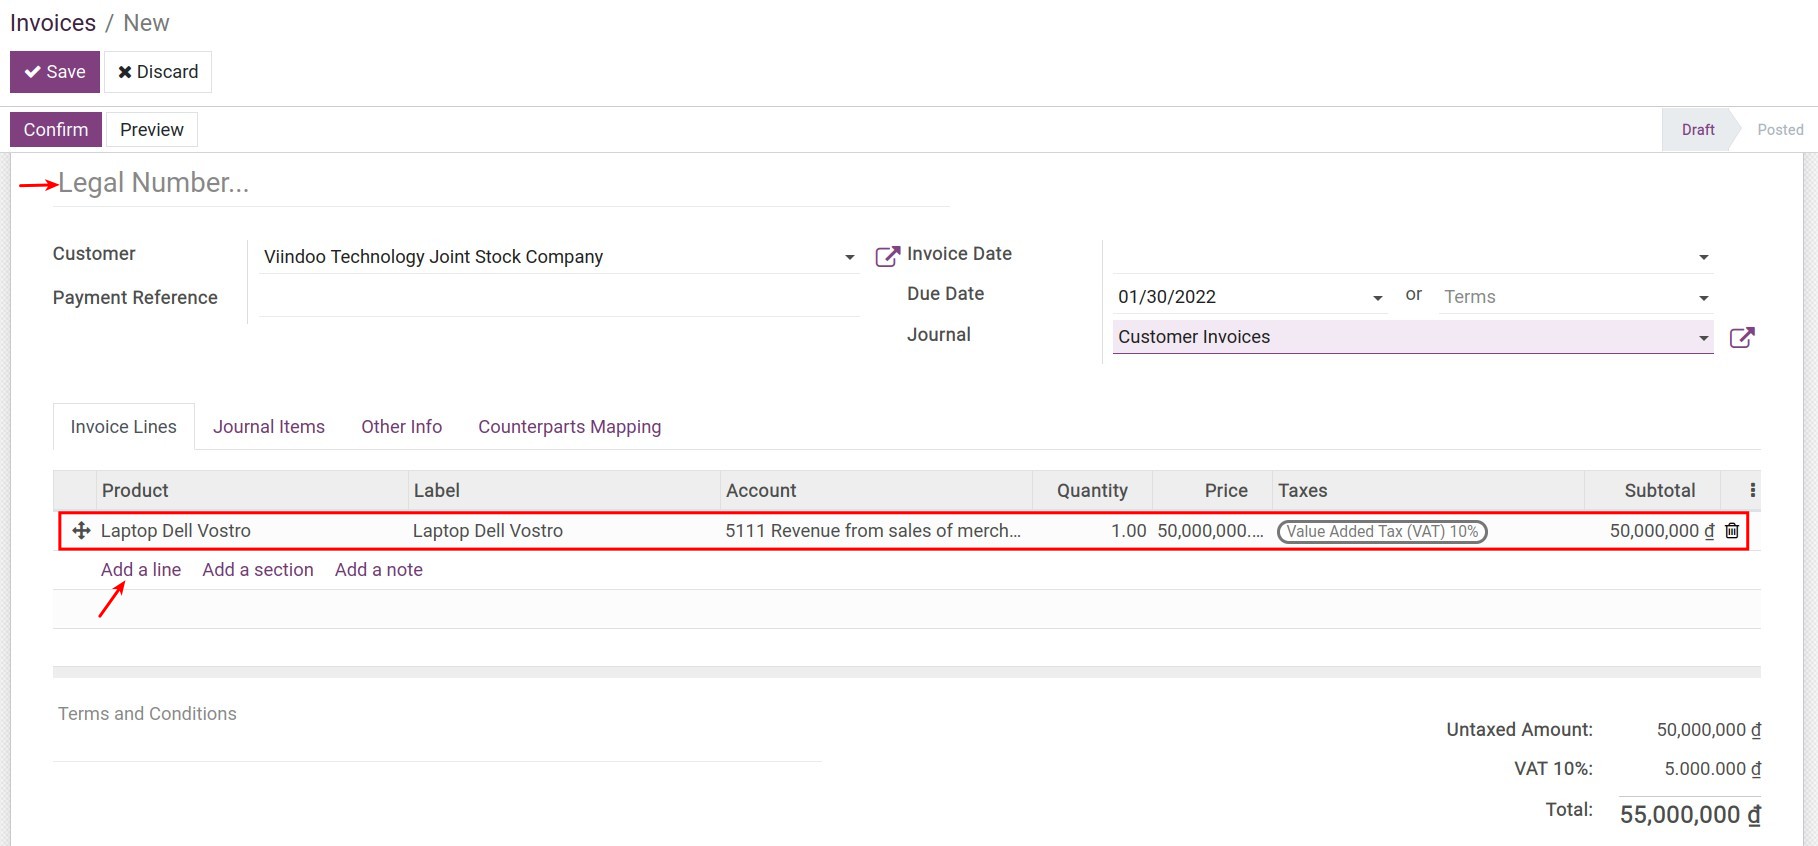
Legal number: Input the legal number.
Invoice date: The invoice register date.
Due date: Record the payment due date or select payment terms from the lists.
Journal: In the journal that will record the invoice, the default value will be Customer invoices, you can choose another journal.
“Invoice lines” tab: Record product, quantity, UoM, price, taxes. Select Add a line to add more products/services.
“Other Info” tab: Noticing the following info:
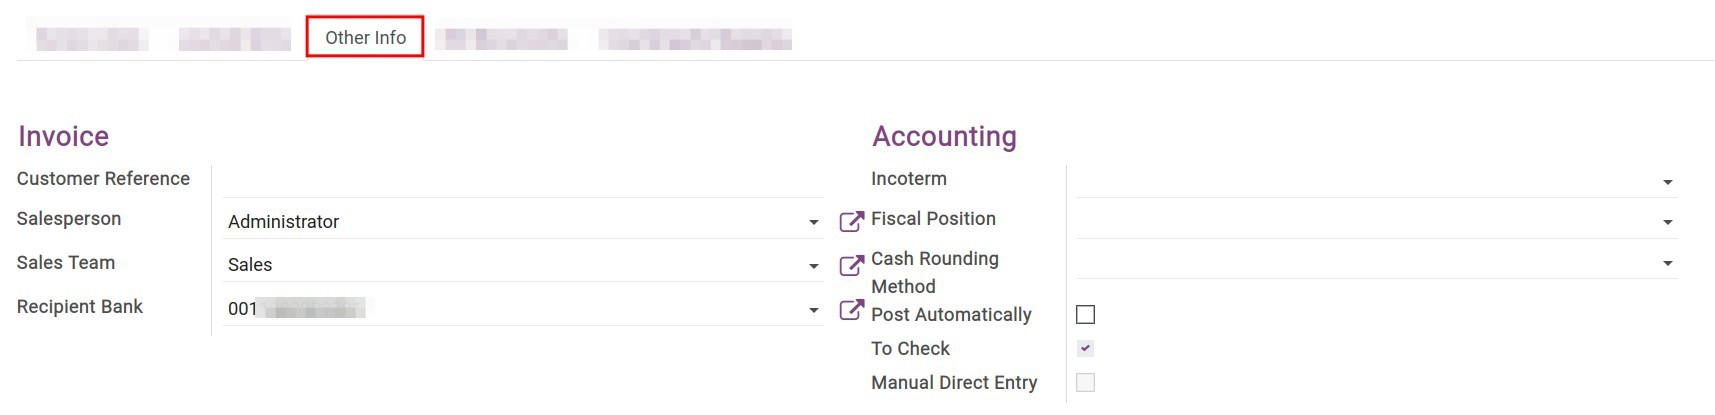
Customer reference: Created manually for internal managing purposes.
Salesperson: The default value will be the invoice creator. However you can switch to another employee.
Sales Team: The salesperson’s sales team.
Recipient Bank: The bank account that has been added in the customer info will be added to the invoice by default.
Fiscal Position: The fiscal policy that applied for this customer.
Cash Rounding Method: Record the cash rounding method.
Post automatically: If activated, the invoice will be registered at the Invoice date above.
To check: This function helps accountants mark the invoice that has unconfirmed information and needs to be re-check.
Manual Direct Entry: In this case, when you access Accounting ‣ Accounting ‣ Journal Entries and then duplicate a pre-created invoice to have a new draft, this function will be activated to help categorize the invoices.
Click Save to save information. Then you can confirm the invoice, register payment, and also reconcile the payment with a statement.
See also
Related article
How to use Credit Notes in Viindoo Accounting
How to use Credit Notes in Viindoo Accounting
How to use Credit Notes in iSuite Accounting
A credit note is a financial document issued by sellers to buyers to notify them that credit is being applied to their account. Credit notes are used in the following cases:
Goods returned from customers;
Pricing mistakes on customer invoices;
Etc.
There are two ways to issue a credit note:
Create directly on the invoice that needs to be adjusted;
Create a credit note manually.
Requirements
This tutorial requires the installation of the following applications/modules:
Accounting & Finance
Create a credit note directly on the invoice
Navigate to Accounting ‣ Customers ‣ Invoices, select the invoice to create a credit note, and click Add Credit Note:
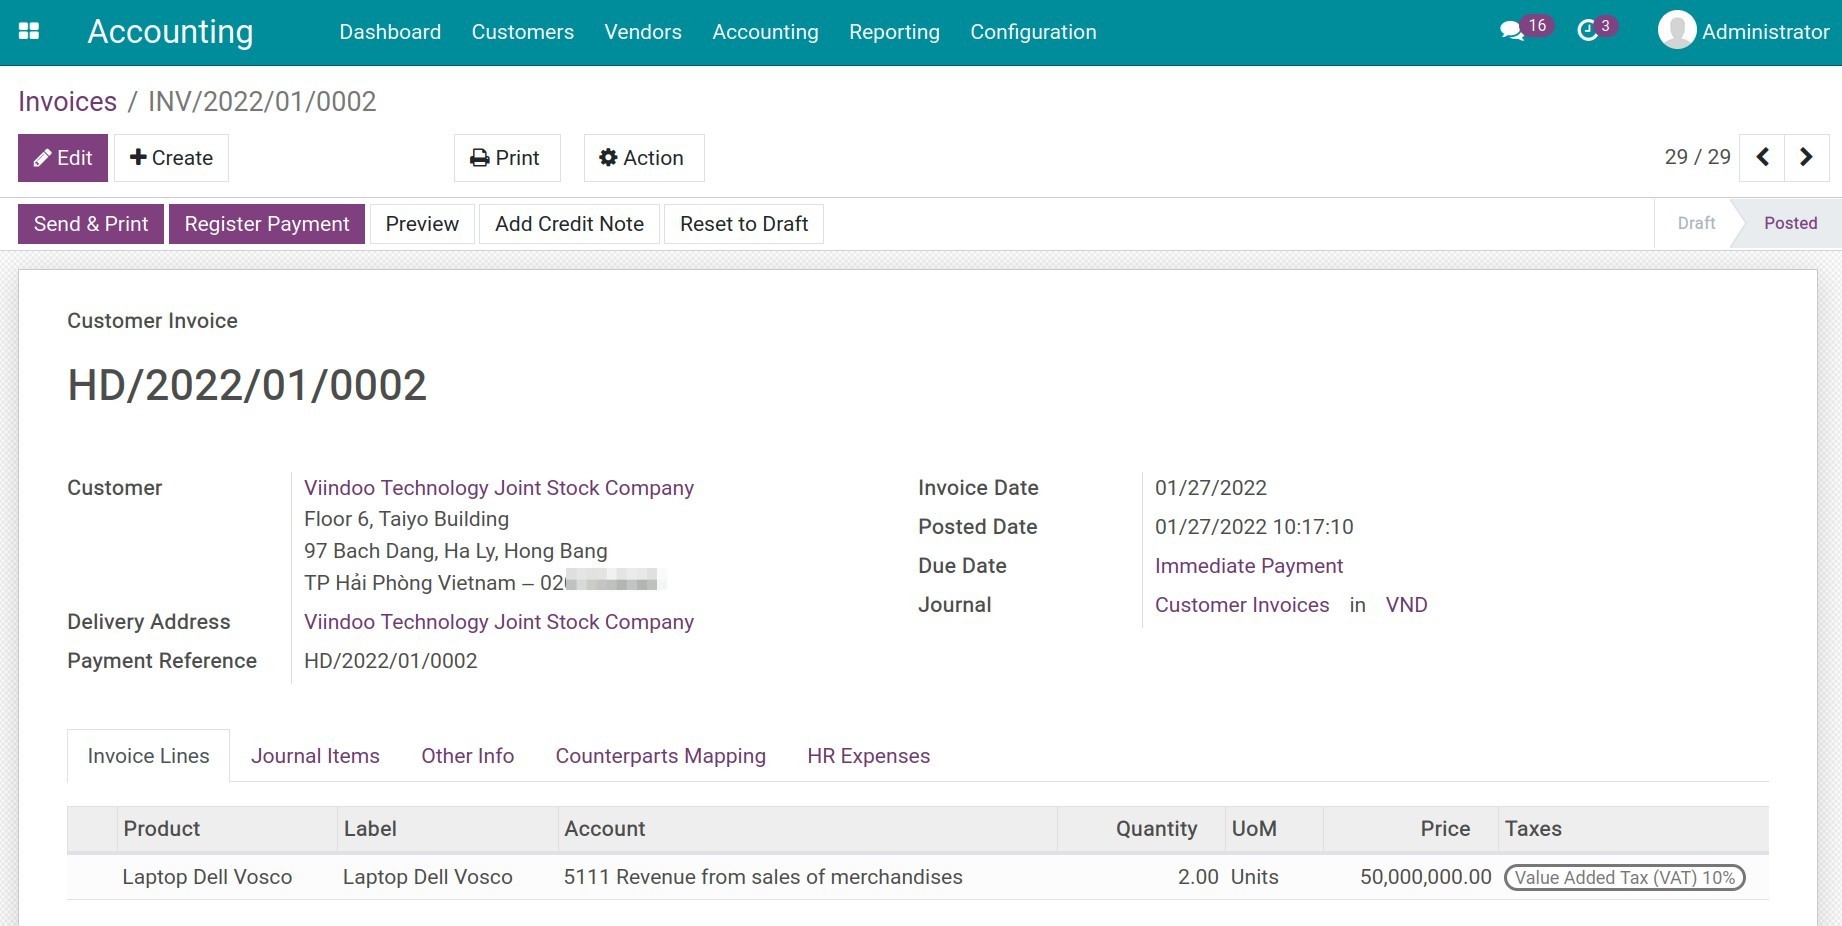
After that, a pop-up window appears:

At this stage, you need to take notice of the below fields:
Credit Method: There are 3 options for you to choose from:
Partial Refund: A credit note is created in draft and can be adjusted before being issued.
Full Refund: A credit note is automatically validated and reconciled with the original invoice.
Full refund and new draft invoice: A credit note is automatically validated and reconciled with the original invoice. The original invoice is duplicated into a new draft invoice.
Reason: The field records the reason of the credit note.
Reversal Date:
Specific: By selecting this option, you will be able to select the generated date for the credit note.
Journal Entry Date: By selecting this option, the date of the credit note will be taken according to the original invoice confirmation date.
Use Specific Journal: Choose a journal to register generated entries from this credit note and should be compatible with your invoice type. In this case, you choose Customer Invoices Journal.
After filling in the information fields, click Reverse to issue a credit note.
In case you select the Credit Method as Full Refund, the credit note is automatically confirmed and reconciled with the original invoice. The status of the original invoice will be Reversed; The credit note will have the status Paid:
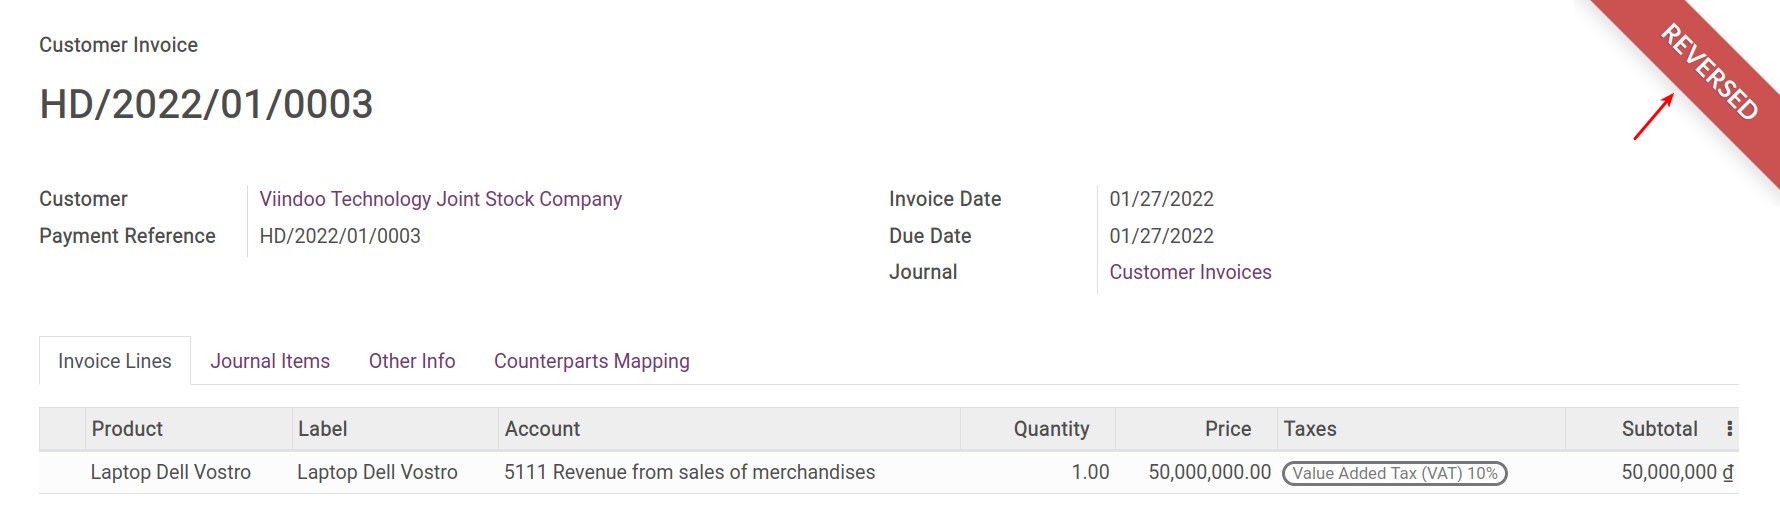
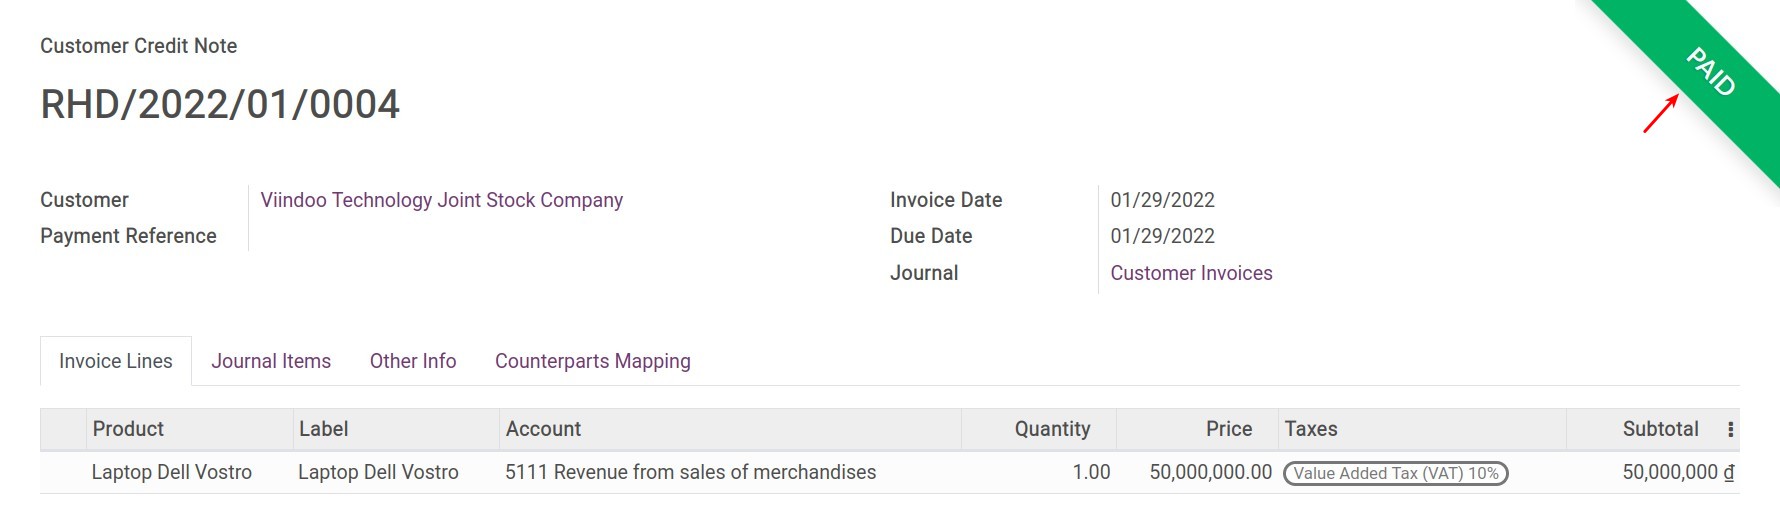
You can now navigate to Accounting ‣ Accounting ‣ Journal Items to view the reconciled entries:
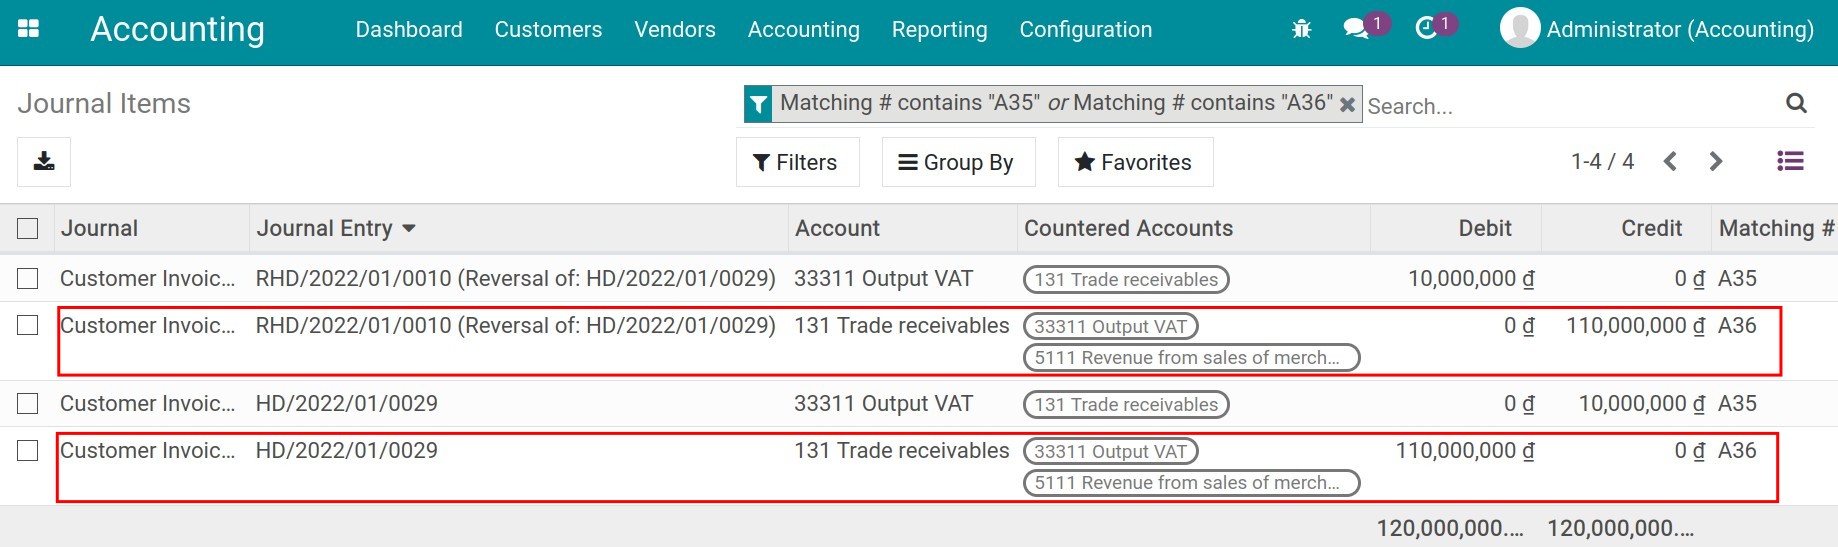
Note
Journal Items only displays when you activate developer mode.
In case you select the Credit Method as Full refund and new draft invoice, the credit note is automatically confirmed and reconciled with the original invoice. Also, the system will automatically duplicate the new draft invoice according to the original invoice.
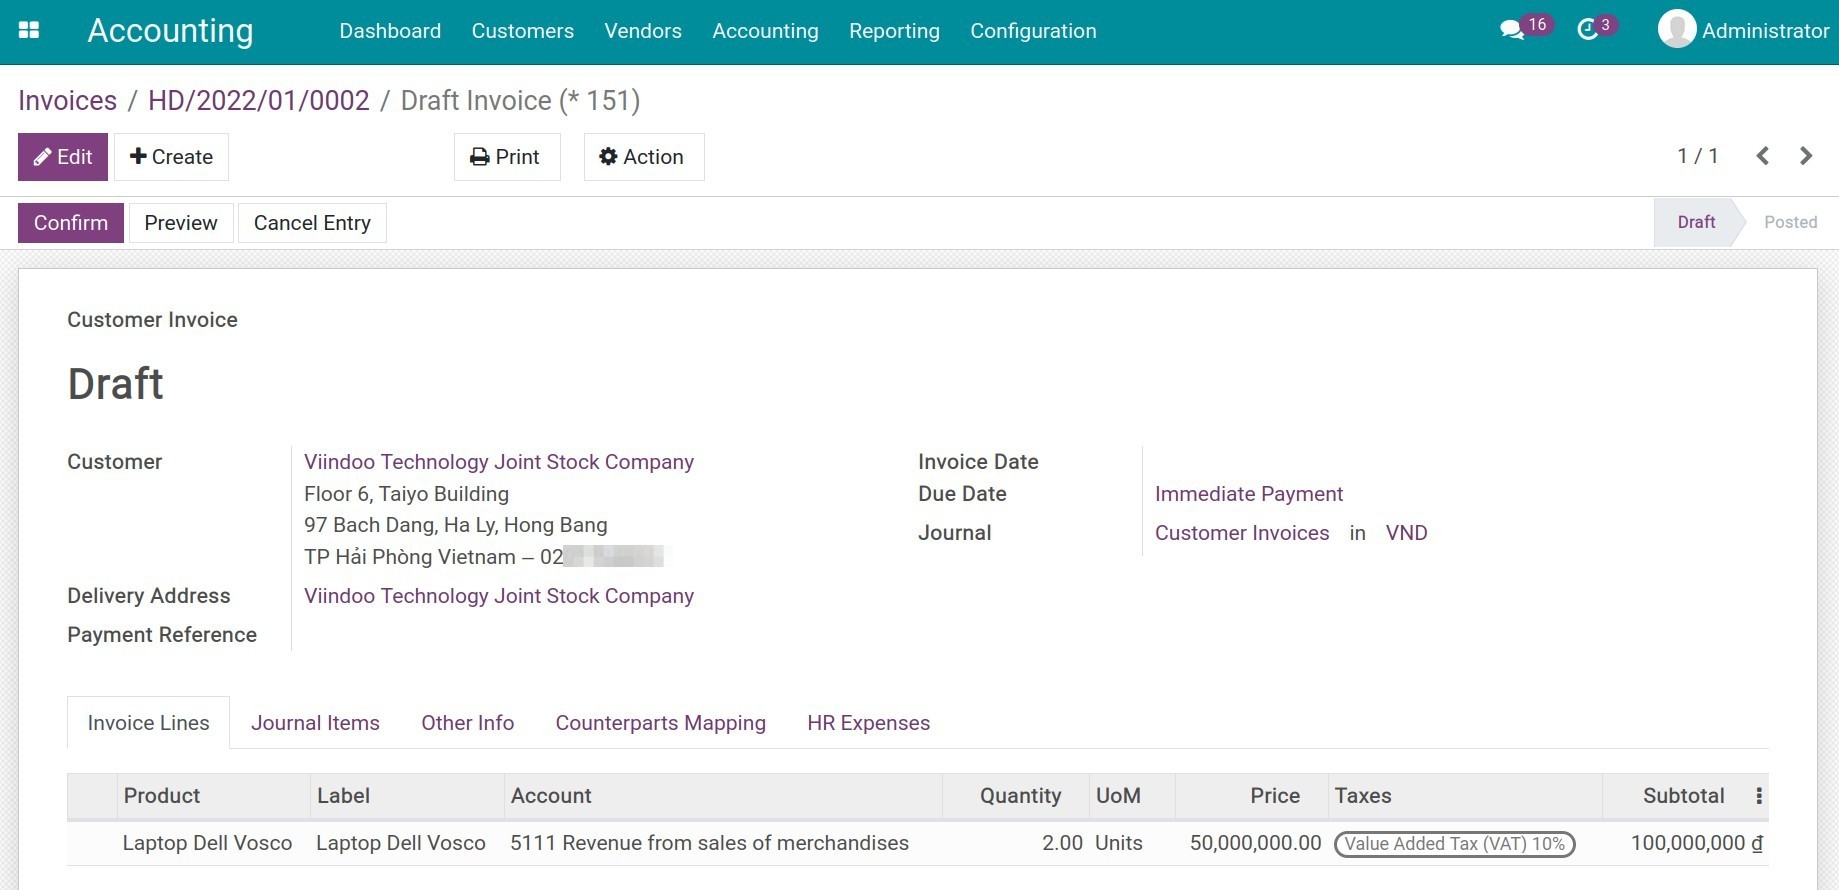
And if the Credit Method is Partial Refund, you can adjust the credit note invoice content before issuing it and view the generated reverse entries to the original confirmed invoice in the tab Journal Items:
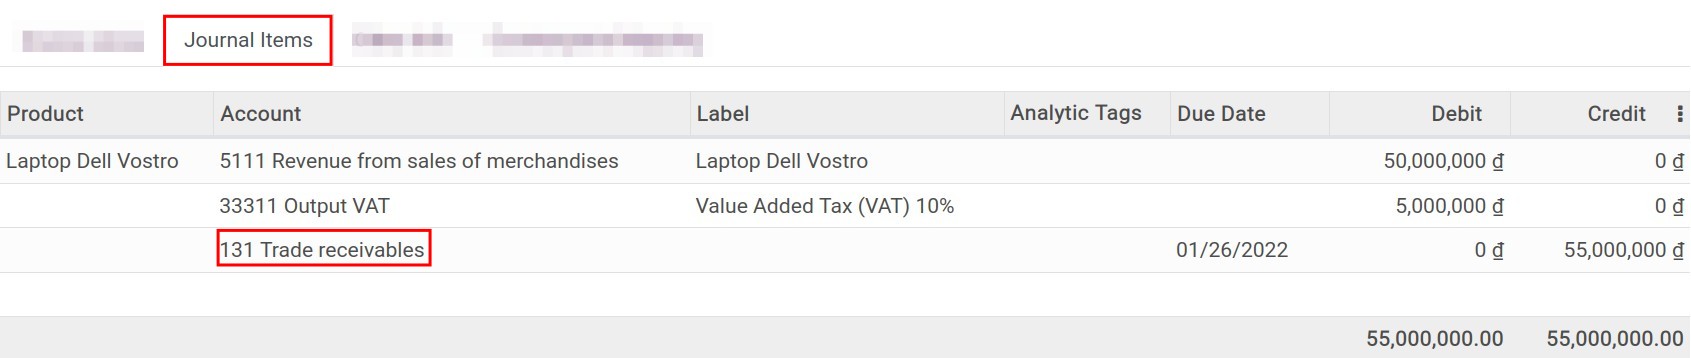
Note
For fully-paid invoices (in Paid status), only one credit method, which is Partial Refund, will be available.
If the invoice is partially paid, the pre-paid amount will be noted as an outstanding payment for this customer after creating a credit note.
After the credit note is confirmed, you can view changes in the customer’s liabilities by accessing Accounting ‣ Reporting ‣ Partner Ledger:
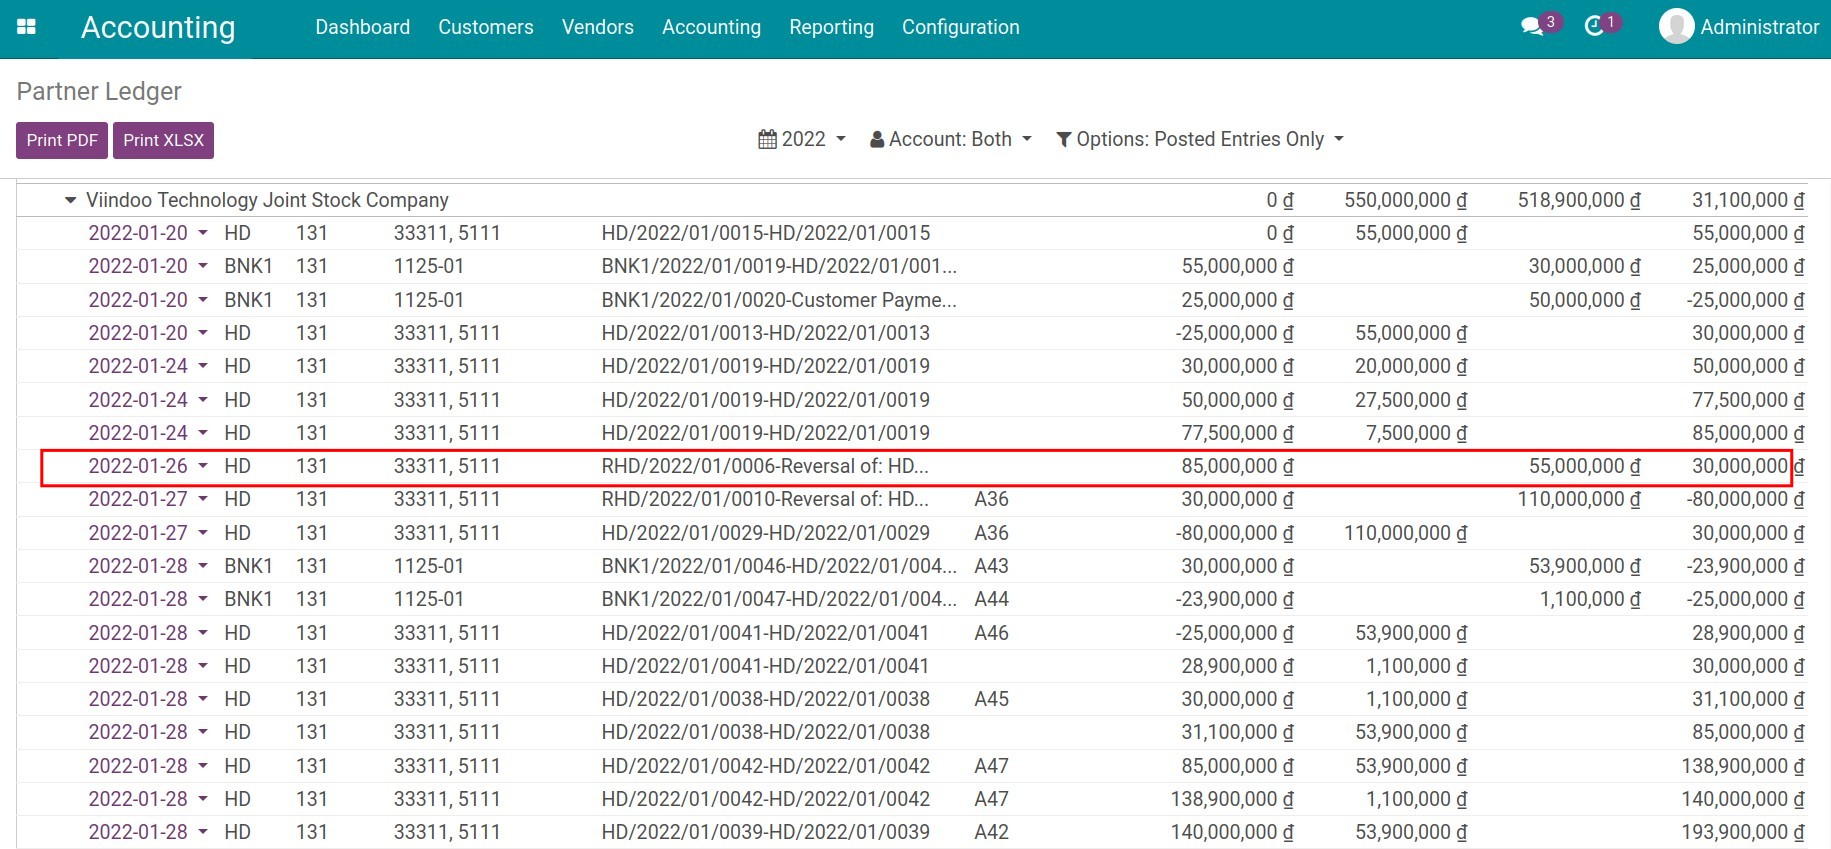
Create a credit note manually
To create a credit note manually, you can also navigate to Accounting ‣ Customers ‣ Credit Notes, click Create.
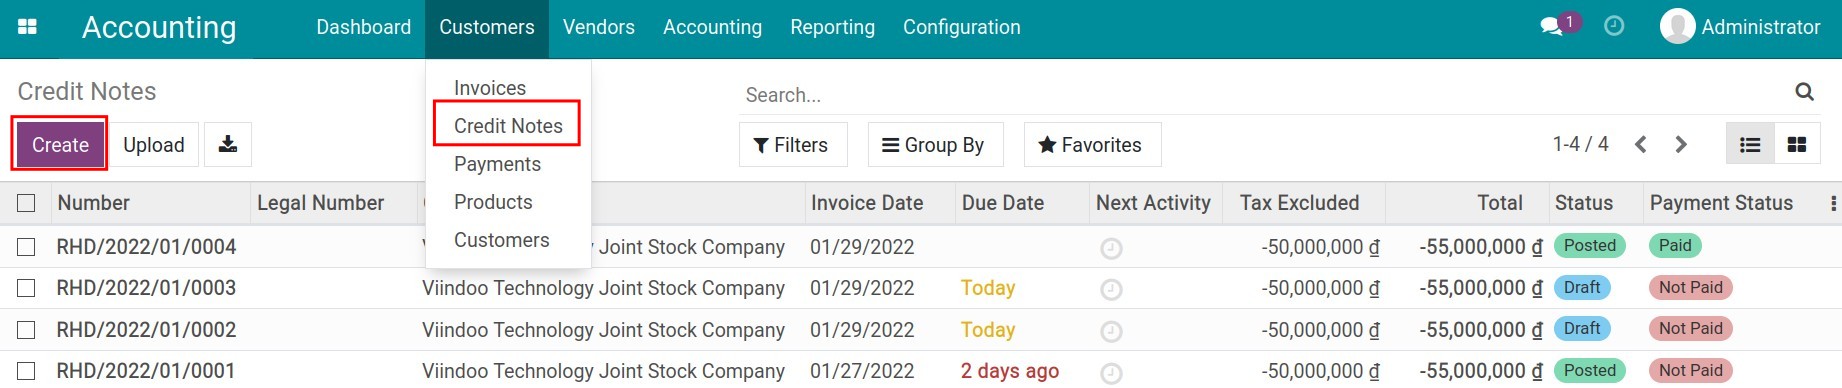
Then fill in the credit note:
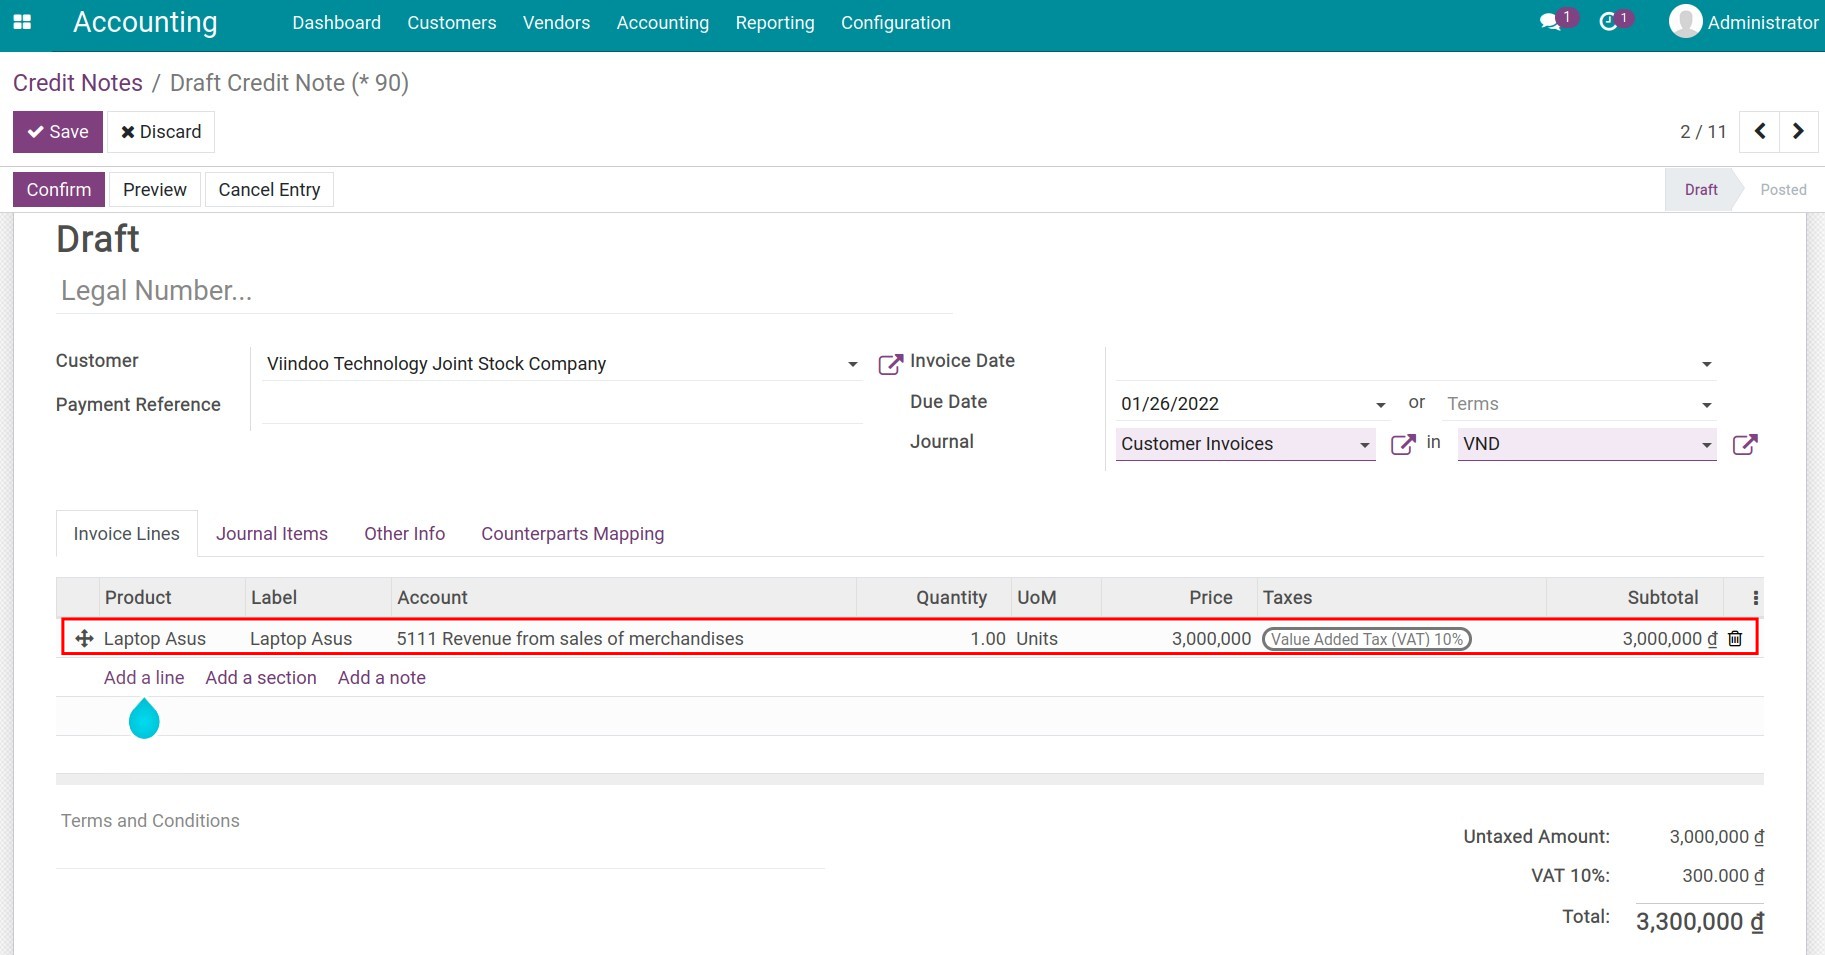
The information on the credit note is similar to the regular invoice. You can see more at How to create invoices. You can then also find out the customer’s remaining entries or liabilities at Partner Ledger.
See also
Related article
Manage Unearned Revenue
How to record customer payments
Set up Payment Service Providers in iSuite
Online payment activation and usage
How to record customer payments
How to record customer payments
In the iSuite Accounting app , payment can be linked directly with an invoice or be created independently. Depending on the situation, you can choose between:
Create payment from an invoice: A payment created from an invoice will be linked and reconciled directly with the said invoice then also reduce the amount due of the invoice. Each invoice can be linked with various payments until the total amount due of the invoice is reconciled completely.
Create stand-alone payment: Stand-alone payment won’t be linked with any invoice. Such payments will be recorded as outstanding credits that the partner has with your company. It means that in the future, these outstanding Credits can be used to pay future invoices or bills.
Requirements
This tutorial requires the installation of the following applications/modules:
Accounting & Finance
Create payment from an invoice
You can navigate to Accounting ‣ Customers ‣ Invoices, and choose the invoices that need to have a payment:
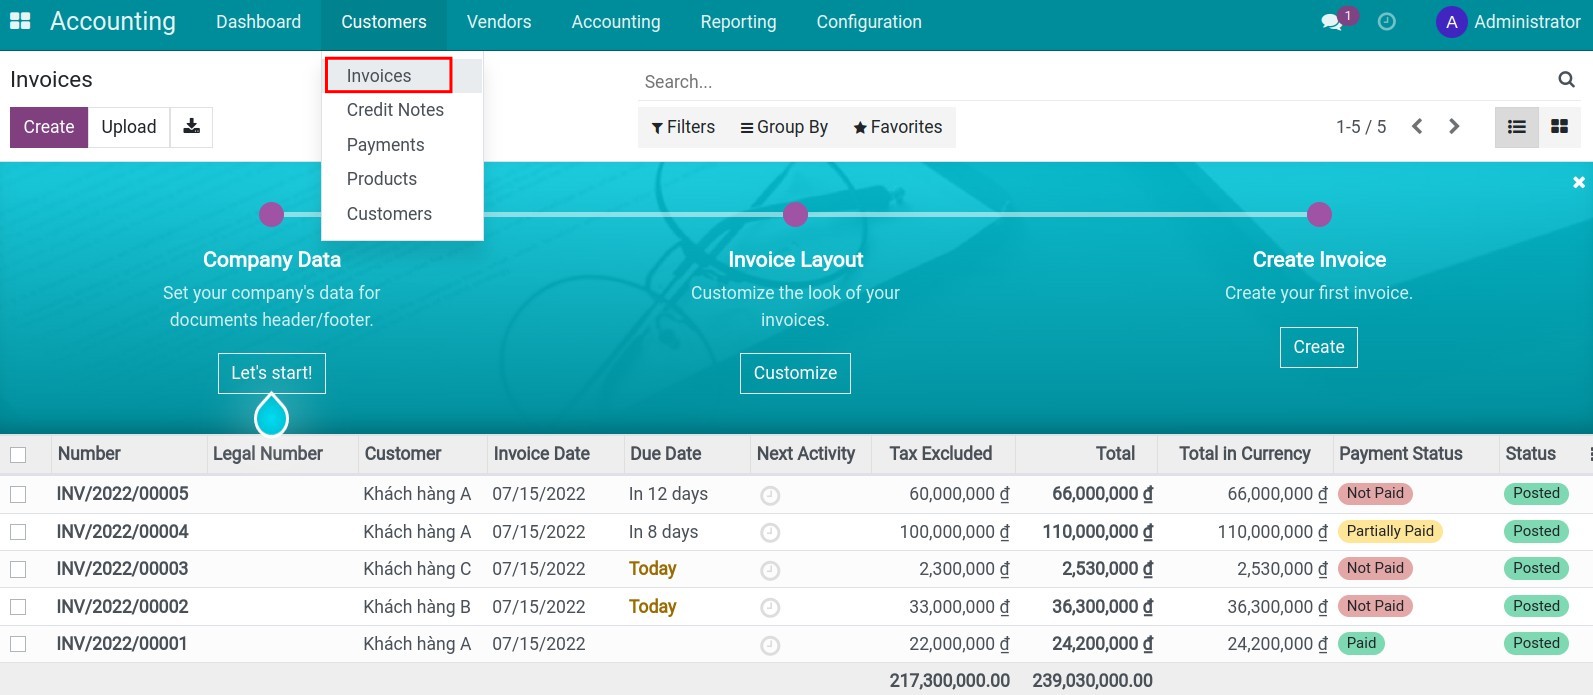
On the invoice interface in the state of books and due date, press Register Payment:
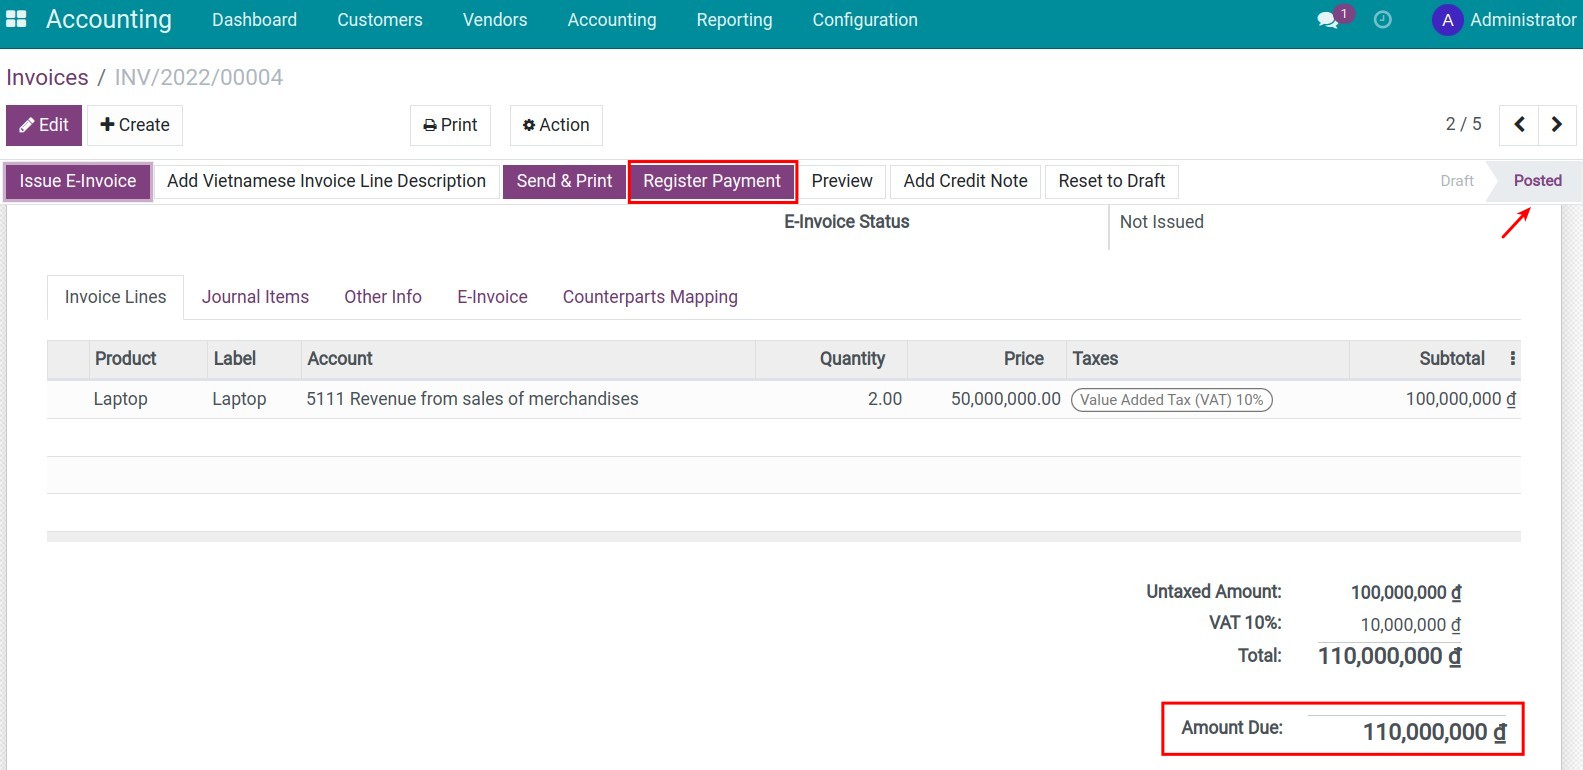
A Register Payment window will appear:
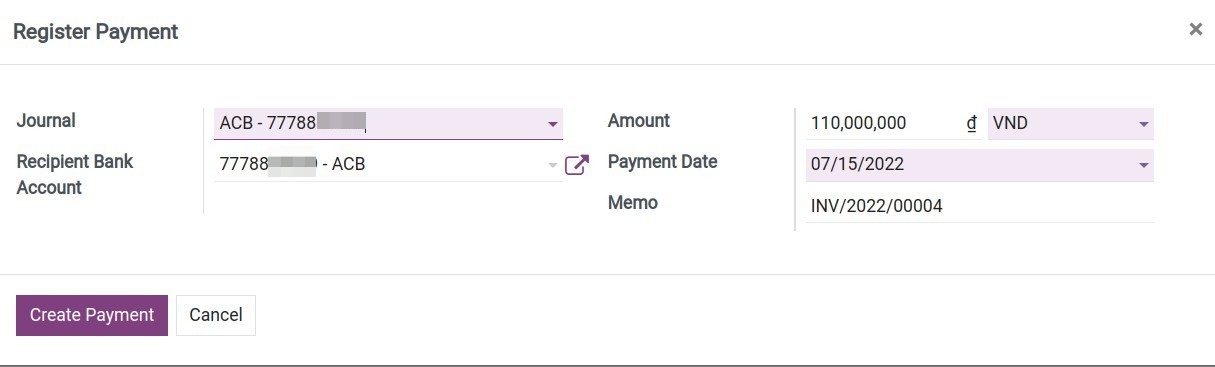
You need to pay attention to the following fields on the interface:
Journal: Choose a cash or bank account journal which will receive this payment.
Company Bank Account: The system will automatically fill the bank account declared on the chosen journal above.
Amount: Total payment value received from the customer. If the registered amount is smaller than the value of the invoice, you will have an option to deal with the payment difference:
Keep open: Keep creating new payments for this invoice. The status of the invoice is Partial.
Mark as fully paid: Cannot register more payments for this invoice. The status of the said invoice is Paid. When this option is chosen, you will be able to post the difference in your preferred account.
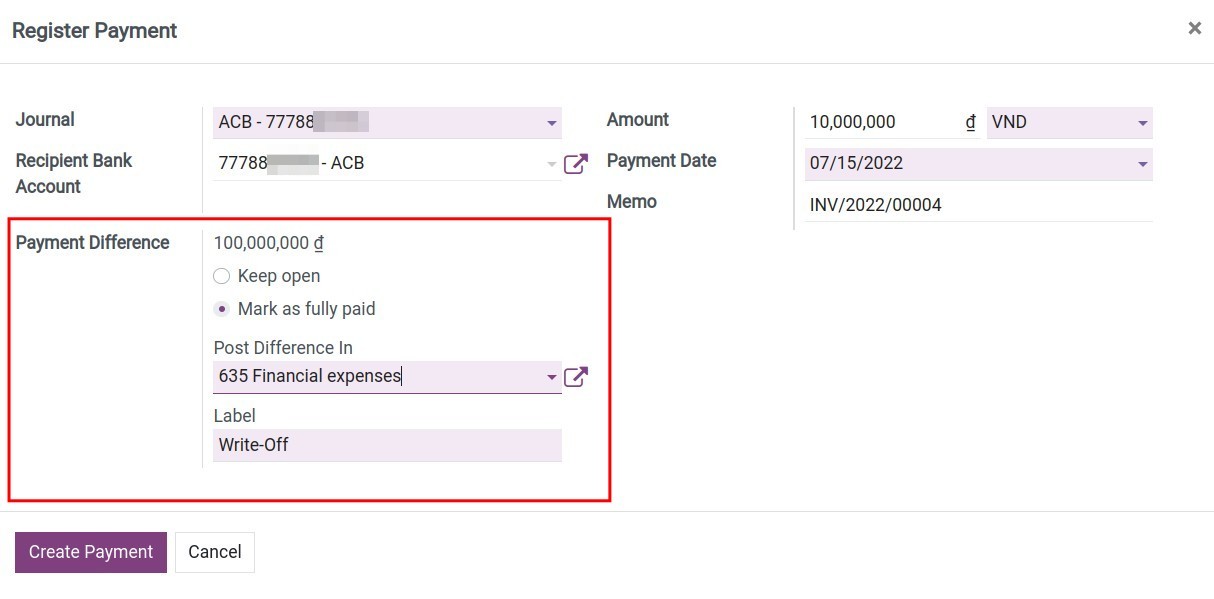
Payment Date: By default, it will be the payment creation date on the system. You should change it to the actual payment receiving date.
Memo: Record the description with the invoice number of the customer payment.
After filling in all the required information, press Create Payment.
Back to the invoice, you will see the payment is reconciled with the invoice, reducing the amount due:
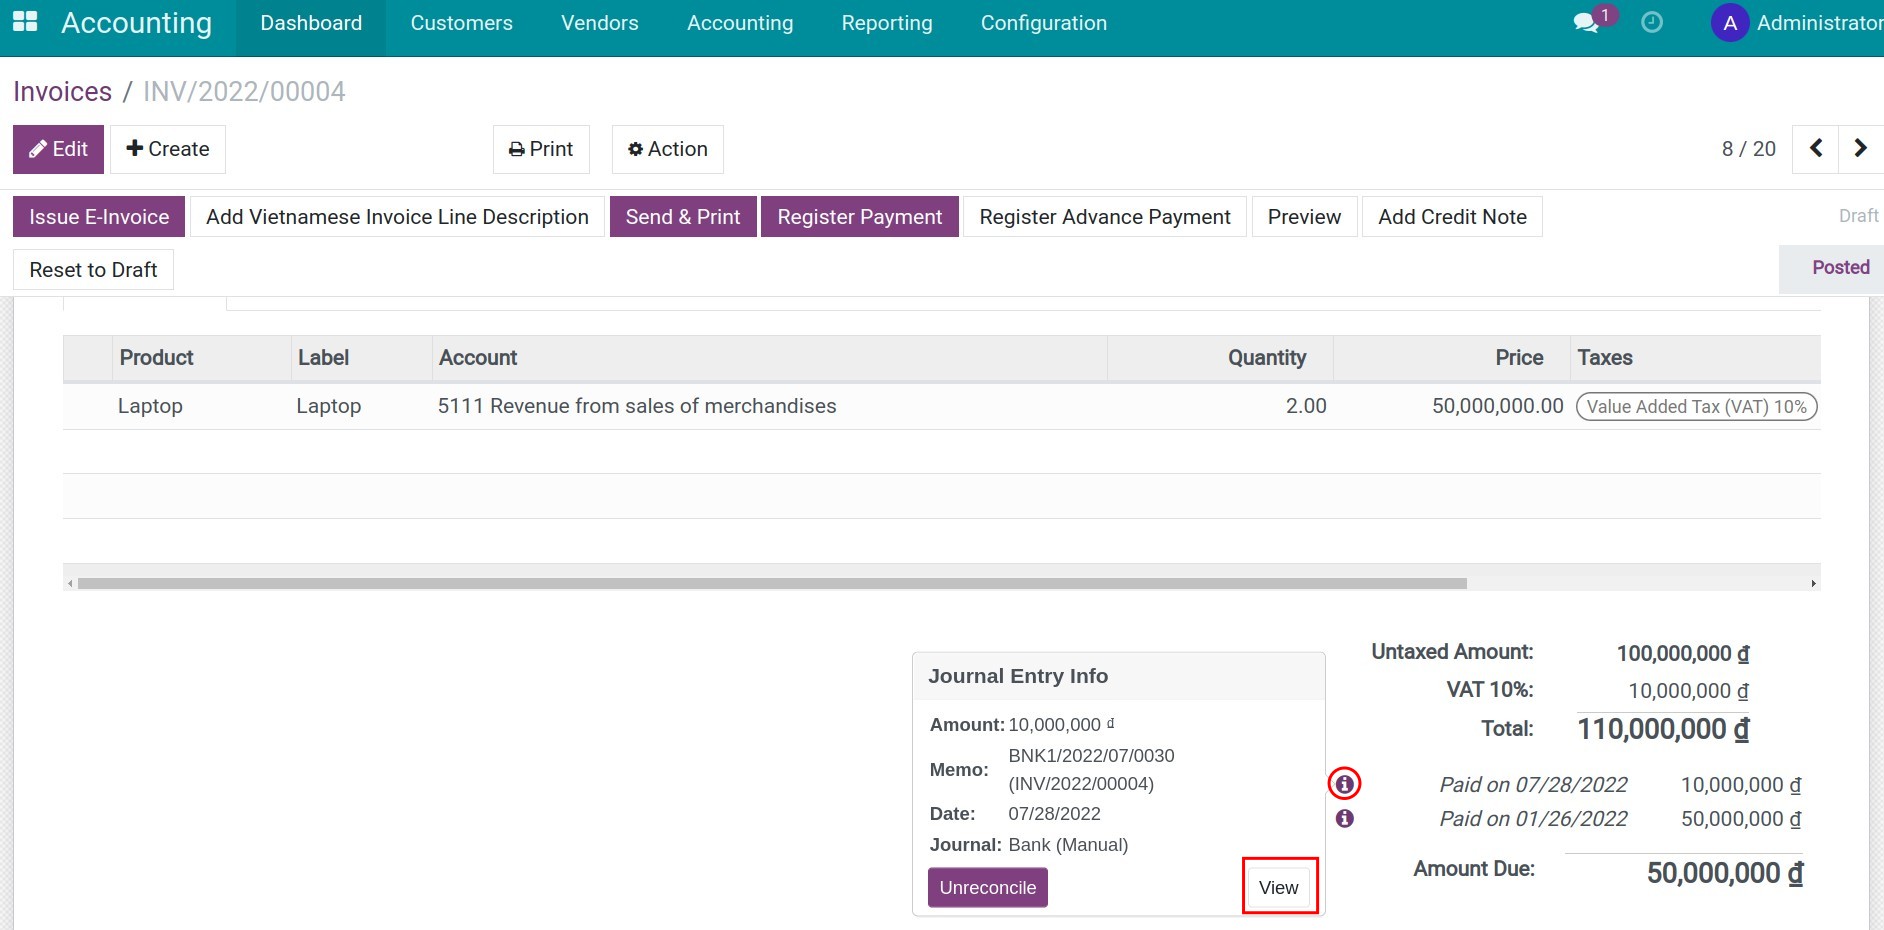
You can see details about the recorded payment by hovering over the green information icon and pressing View.
Note
If you press on Unreconcile, the payment will be unlinked with your invoice.
If you register a payment with a foreign currency, the system will automatically calculate and create a journal entry to record the currency exchange loss/gain posted at the time of reconciliation.
Create stand-alone payment
In some situations, you will need to create a stand-alone payment such as:
Customer pays in advance;
Customer overpays;
etc.
Navigate to Accounting ‣ Customers ‣ Payments:
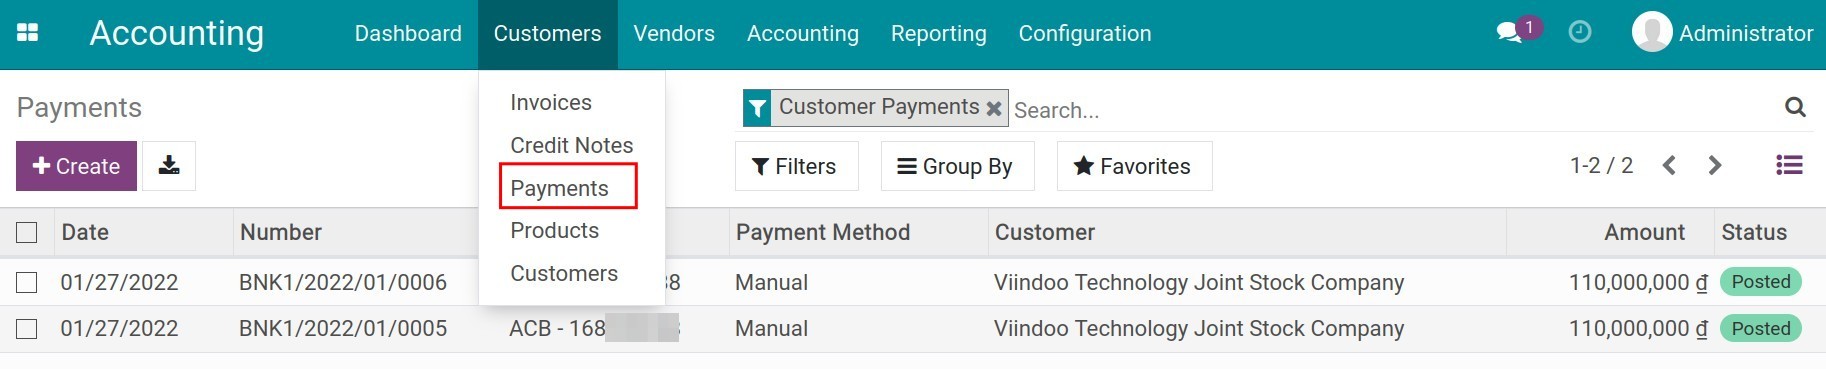
Then choose Create to record payment information:
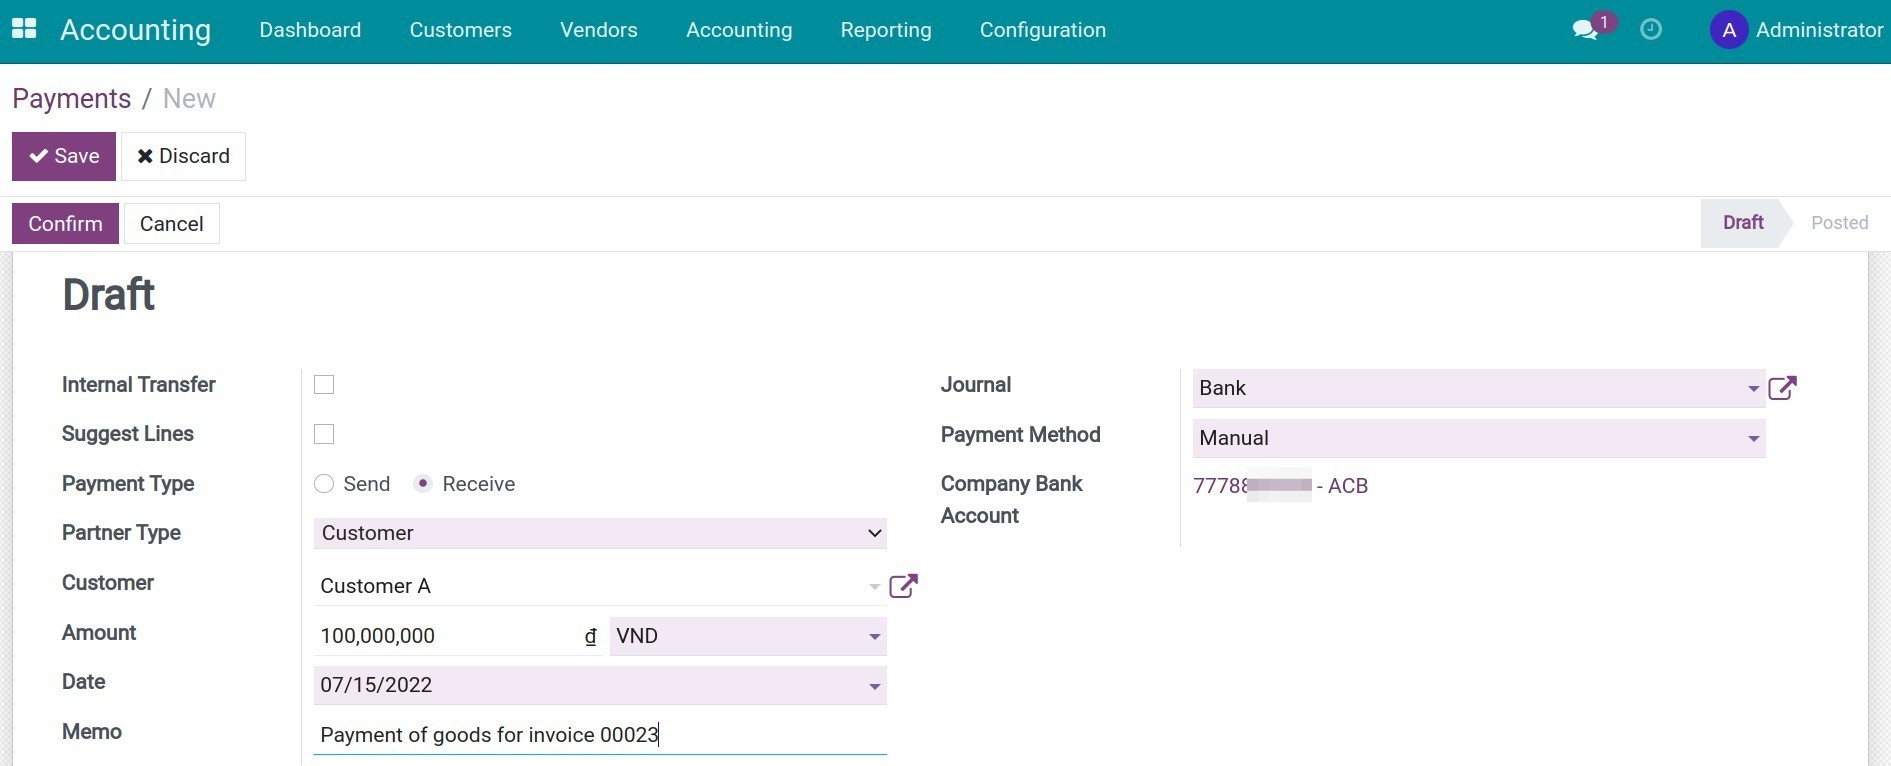
Internal Transfer: This field will be selected if this voucher is for an internal money transfer within your business. In this case, you should leave it unchecked as default.
Suggest Lines: If checked, the system will search for unreconciled transactions related to this partner and collect debts to fill in the Total line.
Payment Type: Choose Receive Money.
Partner Type: Choose Customer.
Customer: Choose a customer that will send money to your company.
Amount: The value to register together with the currency used in this payment.
Date: By default, it will be the payment creation date on the system. You should change it to the actual payment receiving date.
Memo: Record the description with the invoice number of the customer payment.
Journal: Choose cash or defined bank account journal which will be received customer payment.
Payment Method: Choose payment method.
Company Bank Account: The system will automatically fill the bank account declared on the chosen journal above.
Press Save > Confirm, the system will automatically generate a journal entry and you can view it directly by pressing the Journal entry button at the right corner on the payment slip interface.
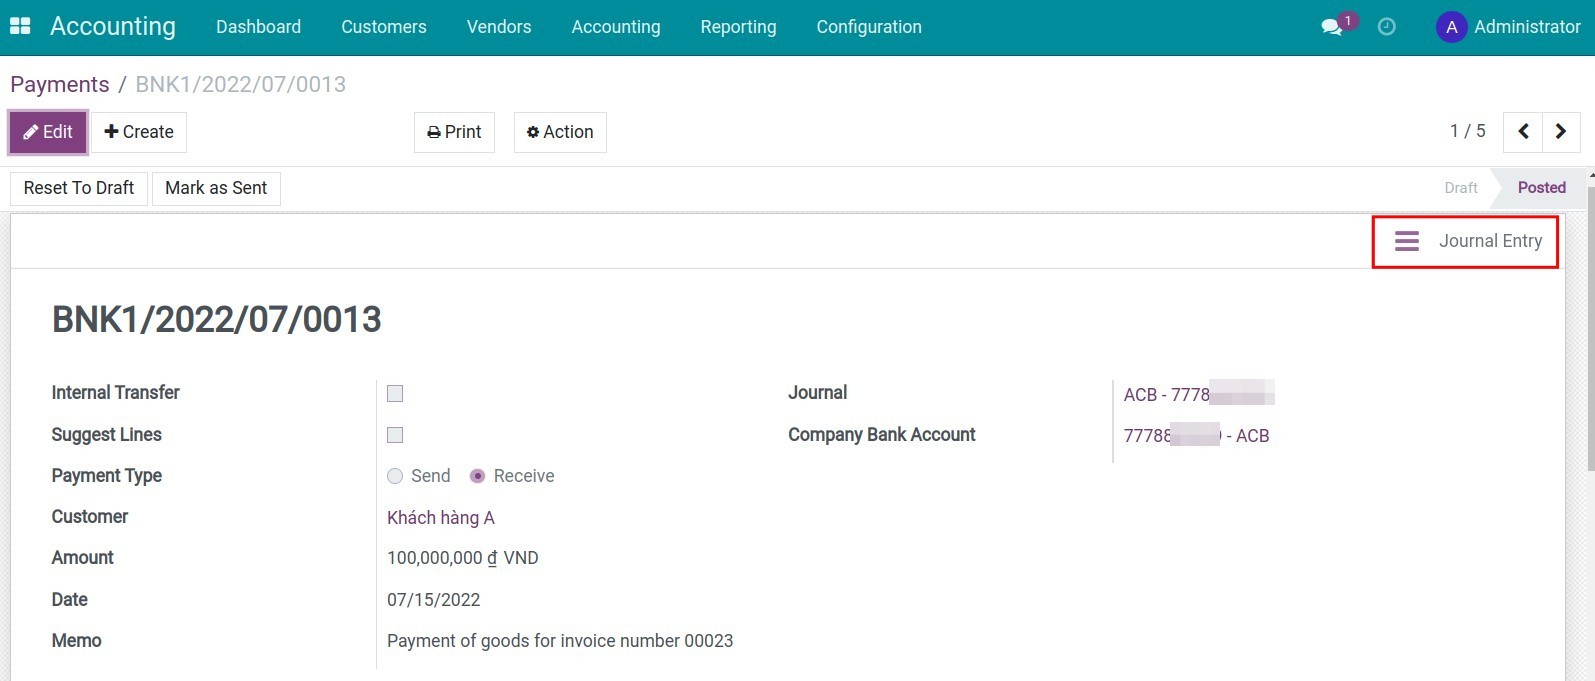
When creating an invoice related to a customer who has previously recorded a payment, the software will display a notification about the debt right on the invoice interface:
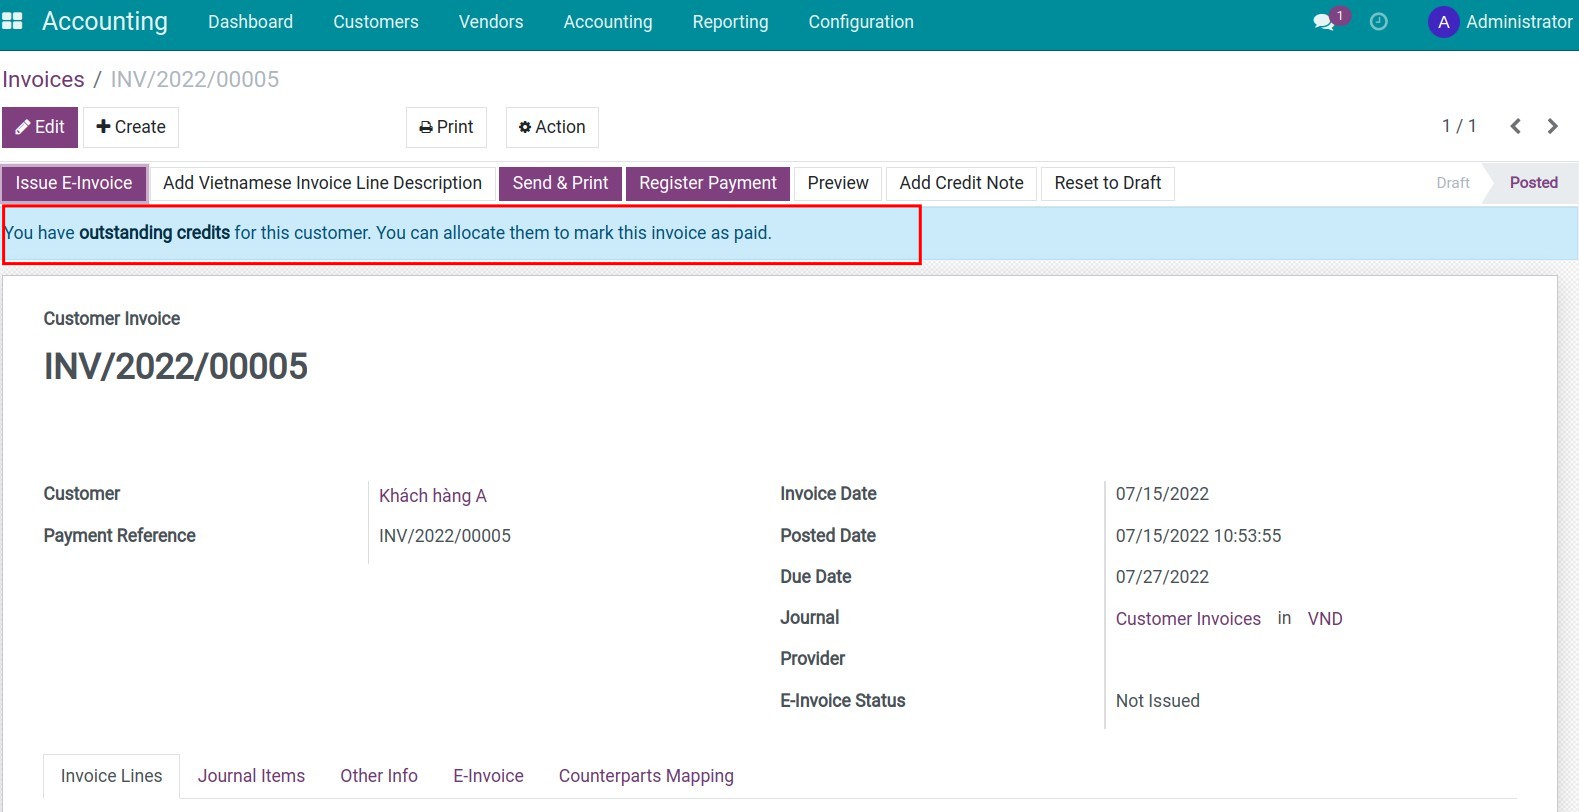
You can link this outstanding payment with your invoice by choosing Add at the bottom of the invoice:

Then, you can register a bank/cash statement and reconcile it with the recorded payment.
See also
Related article
Set up Payment Service Providers in iSuite
How to make a payment with Momo
How to make a payment with NganLuong
Taxes and tax rules configuration
Taxes and tax rules configuration
Requirements
This tutorial requires the installation of the following applications/modules:
iSuite Invoicing
Accounting & Finance Management
Tax activation
The iSuite Accounting app will configure some tax rules depending on the fiscal localization packages that were installed for your company. To activate or deactivate these rules, navigate to Accounting ‣ Configuration ‣ Taxes. You can choose the rules that you want to activate or deactivate rules at Active.
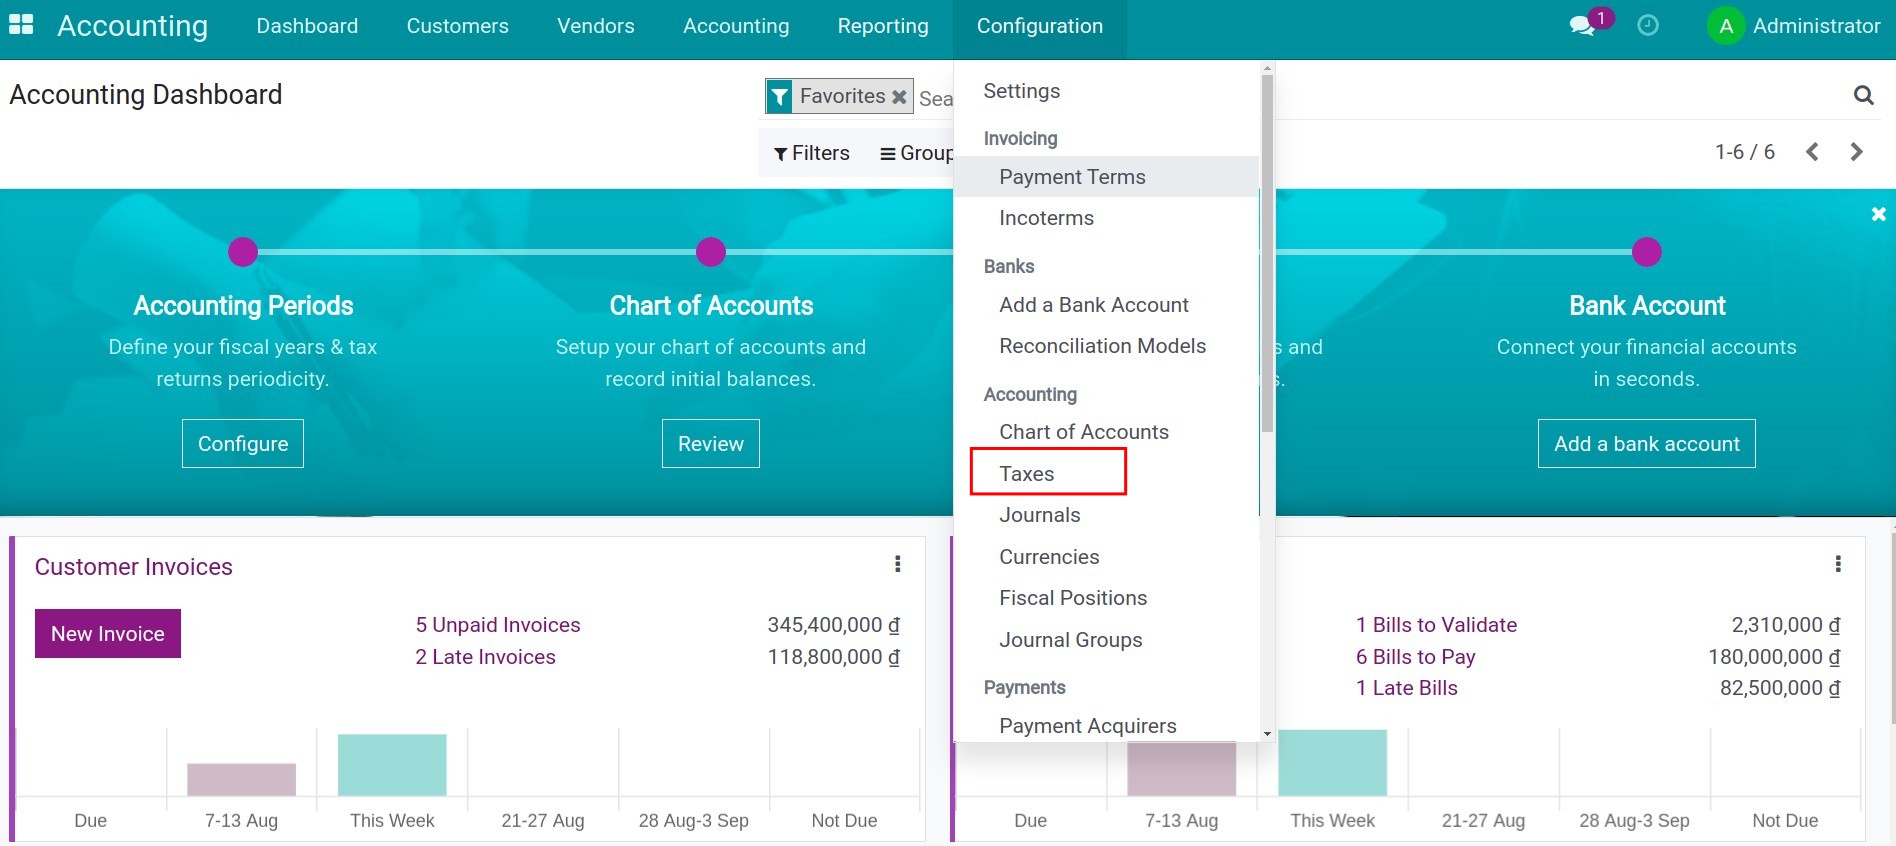
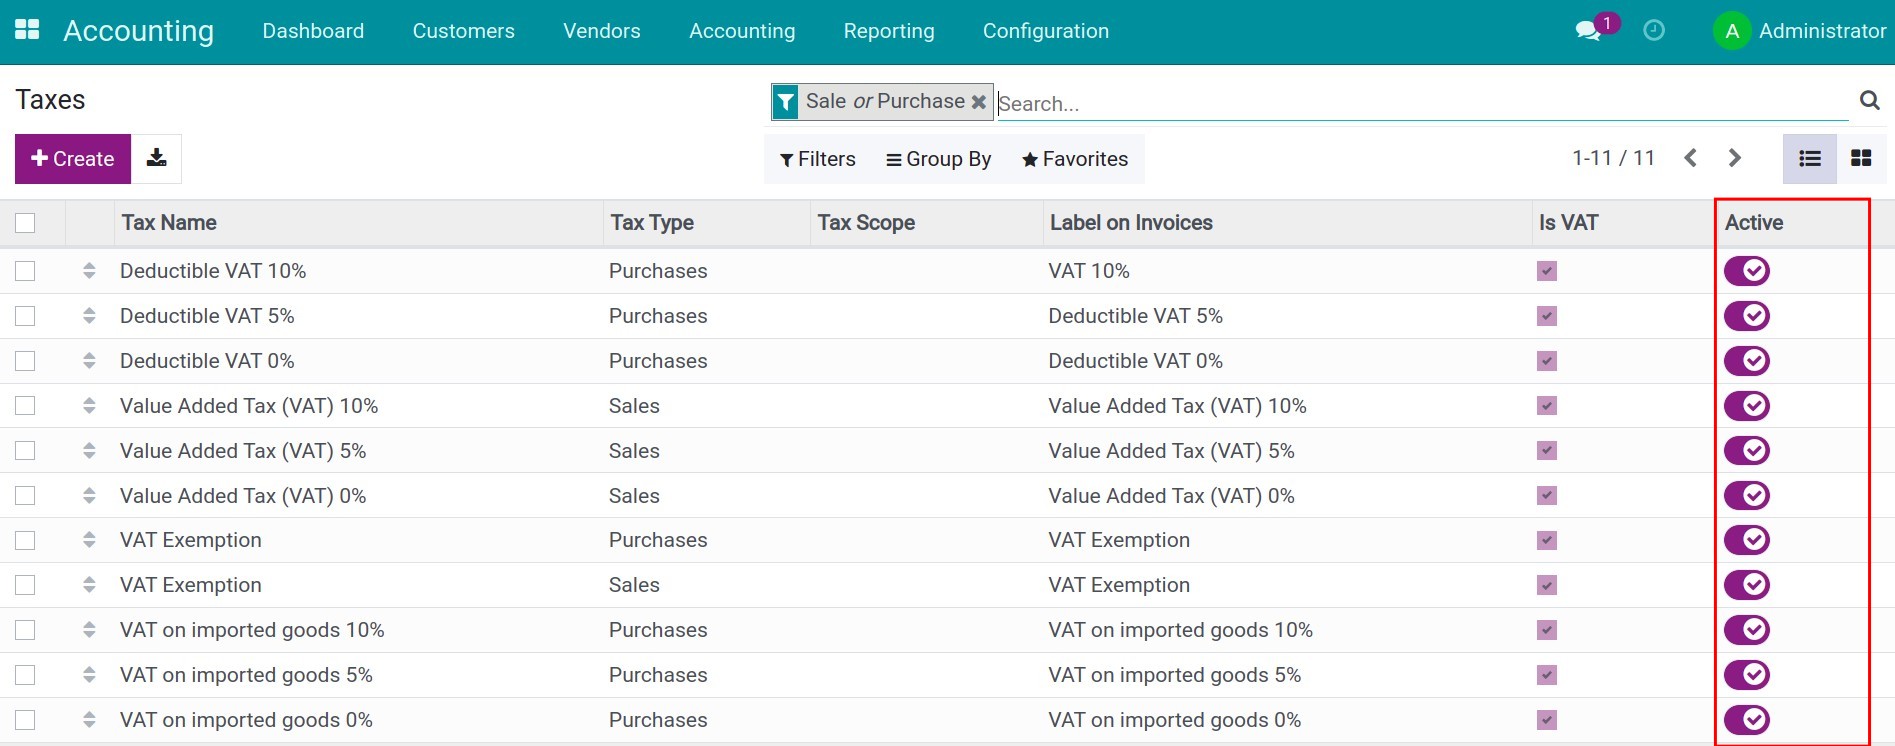
Tax configuration
To create a new tax, navigate to Accounting ‣ Configuration ‣ Taxes, click Create and add the required information.
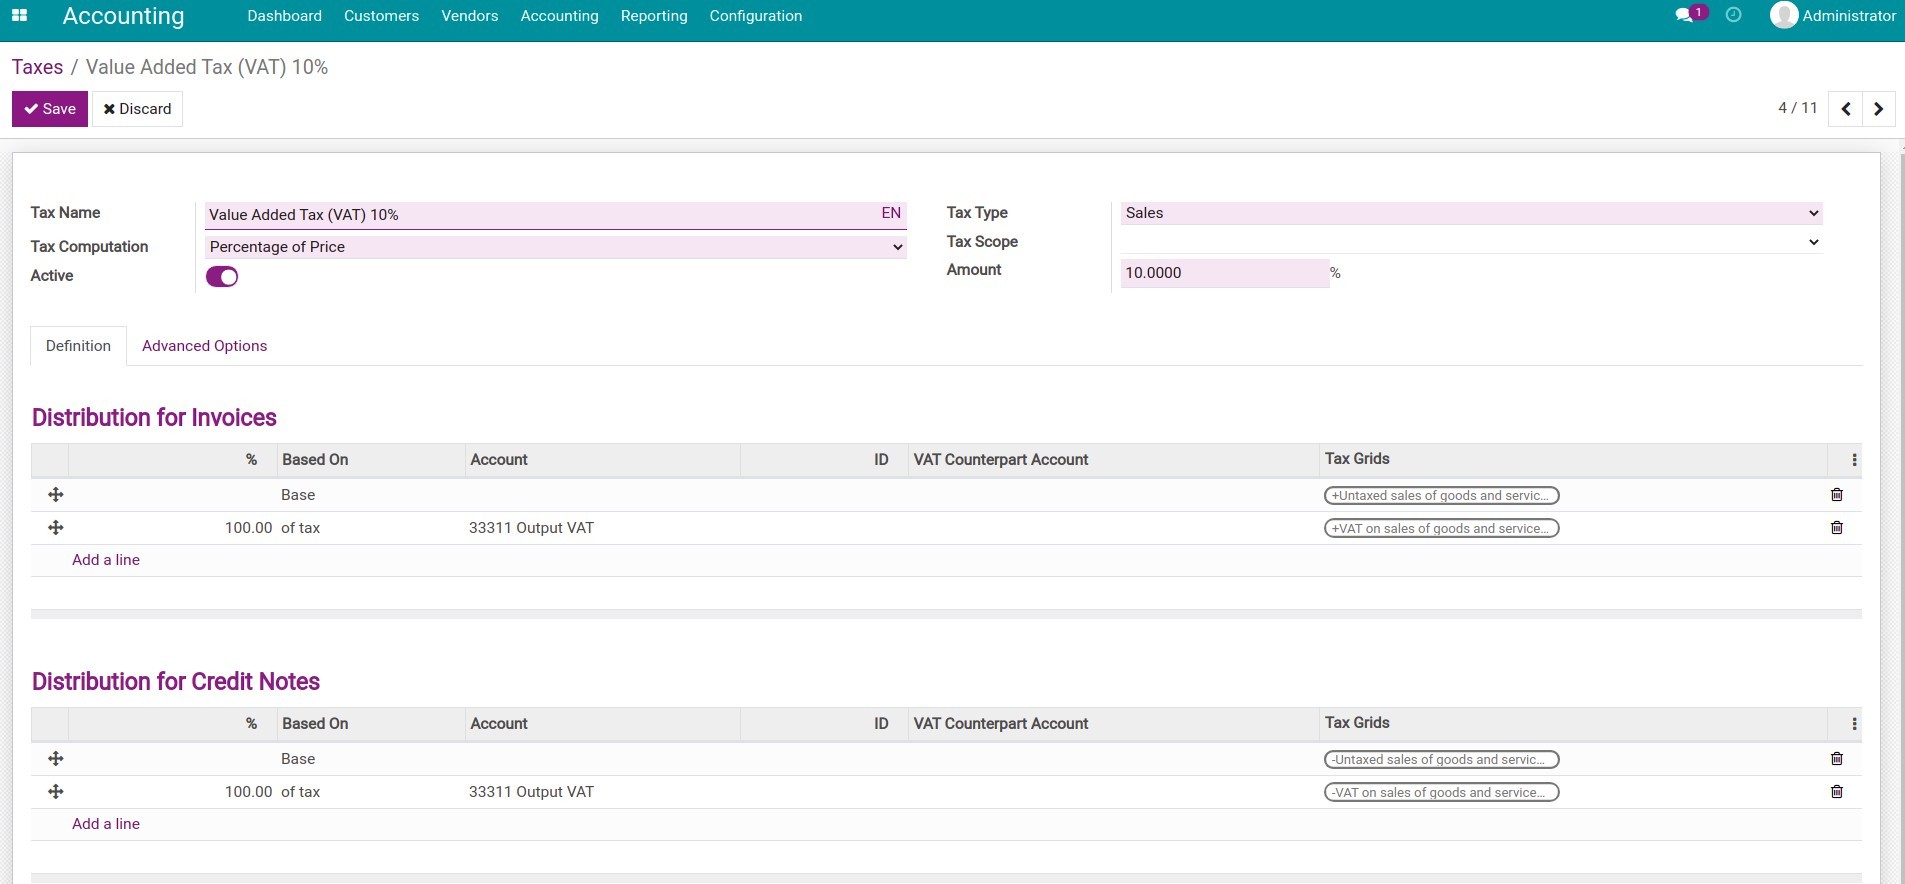
1. Basic information
Tax Name: This name will be displayed if this tax is selected. Therefore, you should choose a name that is easy to understand and recognize.
Tax Type: When this tax should be applied, including:
Sales: This tax is applicable on a sales ;
Purchases: This tax is applicable on a purchase ;
None: Stop using this tax.
Tax Computation: There are 04 options for the tax calculation:
Group of Taxes: Use various types of taxes in the calculation. Each tax is applied in the order in which it appears on this list.
Fixed: The tax rate is set up at a fixed amount and is not affected by the product value.
Percentage of Price: The tax value is the tax rate multiple by the price without tax. For example: A product has a sales price of 1,000,000 VND and apply the 10% tax rate. We have:
Price without tax
Tax
Tax value
Total
1,000,000
10%
100,000
1,100,000
Percentage of Price Tax included: The tax value is the price included tax divided by the tax rate. For example: A product has a sales price of 1,000,000 VND and the 10% tax rate is already included in the price. We have:
Price without tax
Tax
Total
Tax value
1,000,000
10%
1,000,000/(1-10%) = 1,111,111
1,111,111 * 10% = 111,111
Tax Scope: Apply this tax to one of the following product types:
Goods;
Services;
All: If left empty.
Active: Enable to use or disable to stop using this tax.
Note
It’s not possible to delete an in-used tax. You can only disable the Active field or select None in the Tax Type field to stop using the tax.
Amount: This field only appears when the Tax Computation is:
Fixed: Enter the fixed amount for the tax value.
Percentage of Price: Enter a percentage of the sales price for the tax calculation.
Percentage of Price Tax included: Enter a percentage of the total price for the tax calculation.
2. Definition tab
Depending on the method chosen on the Tax Computation field, different information will be displayed in this tab.
If Group of Taxes is chosen on the Tax Computation field: Here is where you can Add a line to incorporate taxes that should be applied in the calculation. Remember that the system will calculate taxes according to the sequence that you arranged.
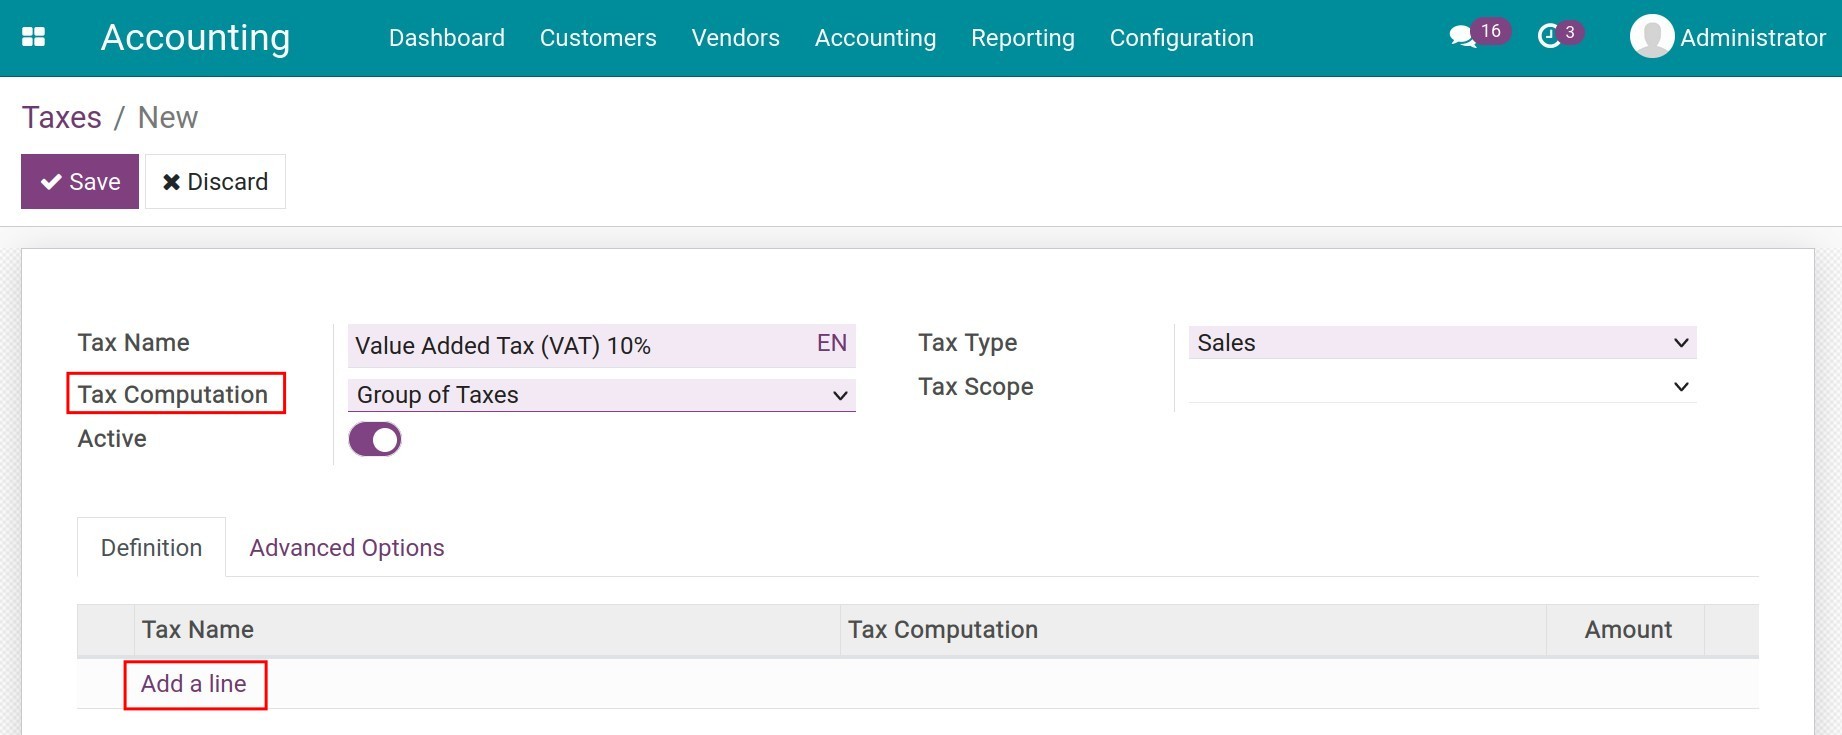
Choose the necessary taxes and press Select.
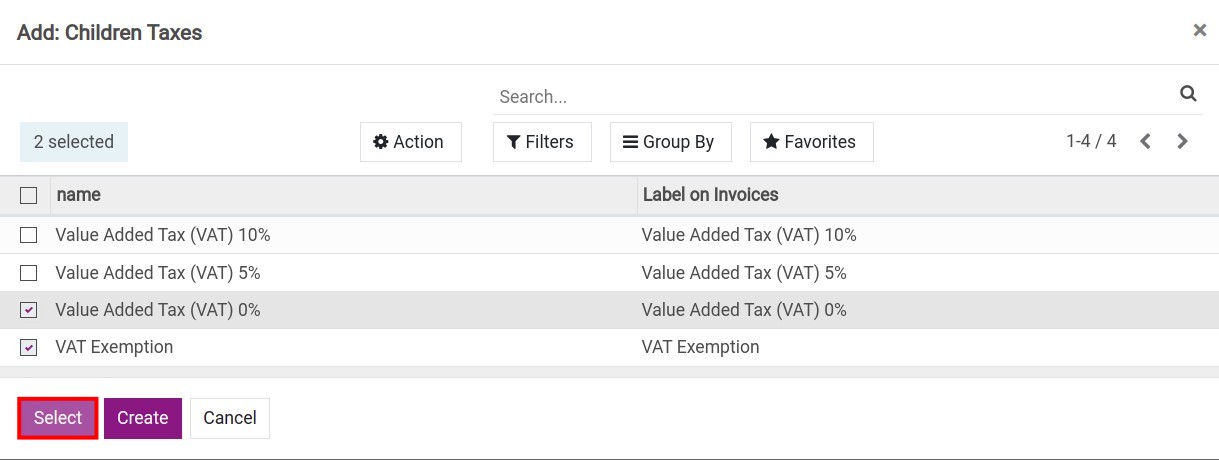
If any other method except Group of Taxes is chosen on the Tax Computation field: You need to configure information for two sections:
Distribution for Invoices : Allocation when tax is used on invoices.
Distribution for Credit Notes : Allocation when tax is used on credit notes.
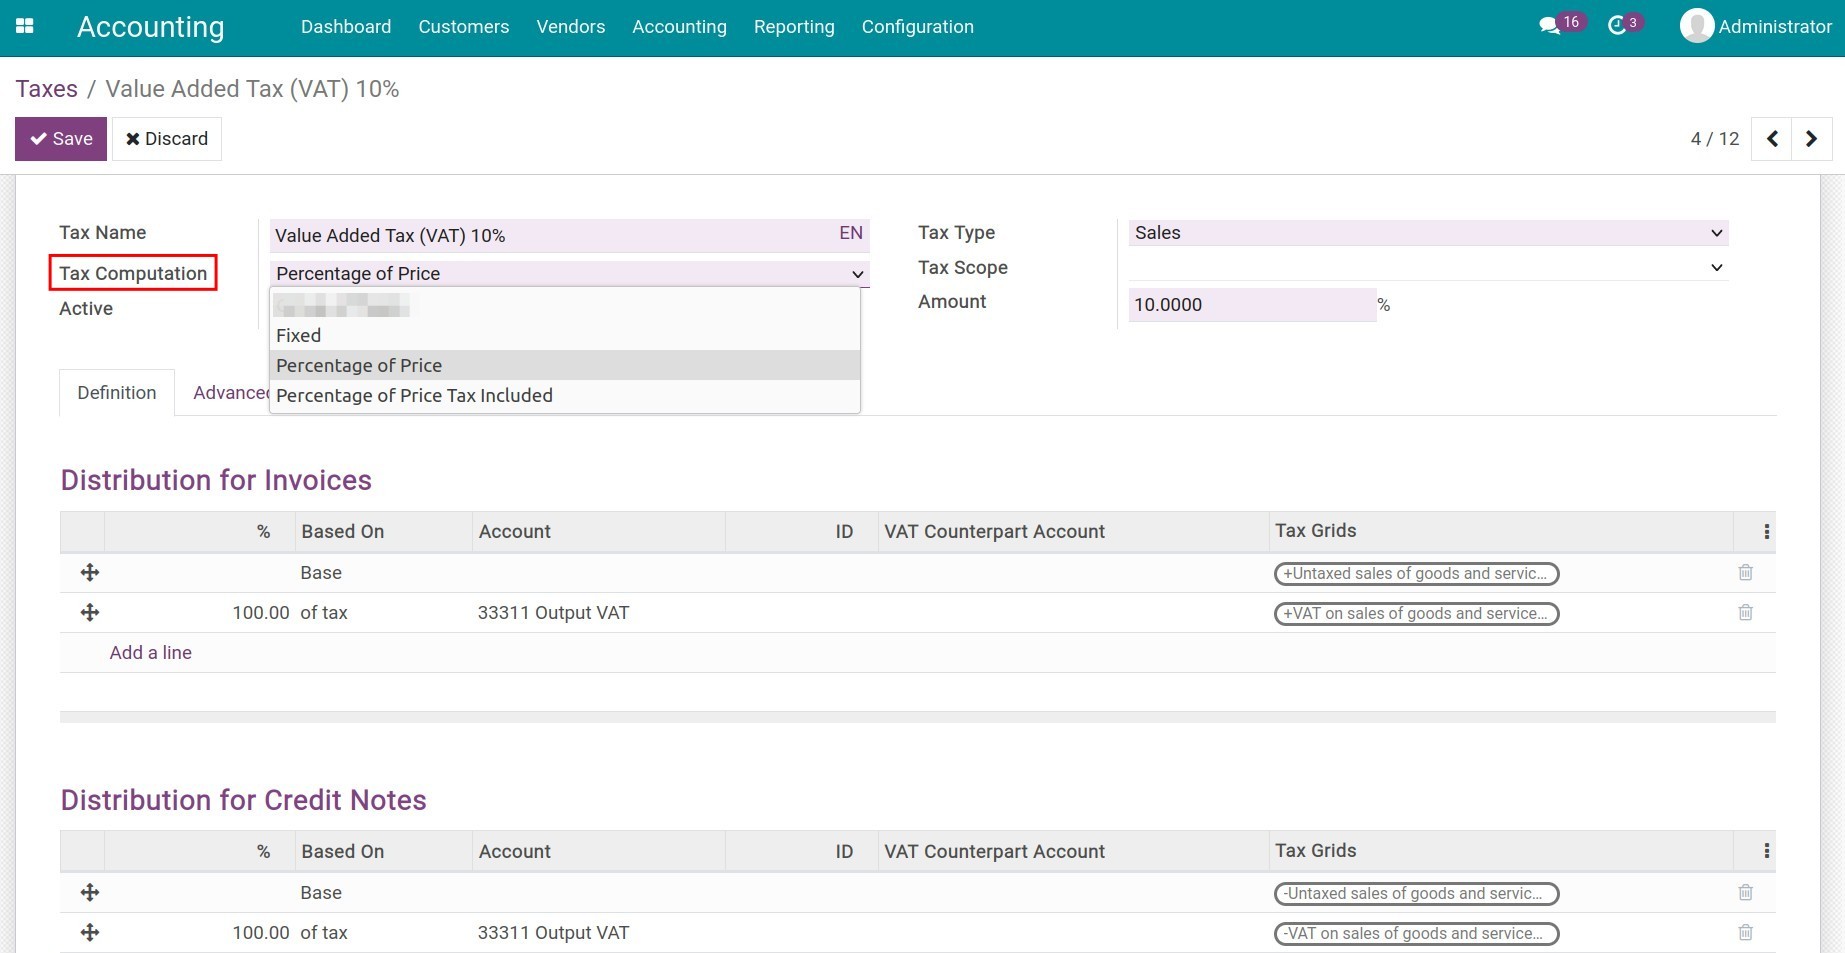
Based on:
Base: The value of goods in each invoice line.
% of tax: A percentage of the computed tax.
Account: The account to record the journal item of the tax value.
Tax Grids: Is used to generate Tax reports. See more at Accounting reports available in Viindoo.
3. Advanced Options tab
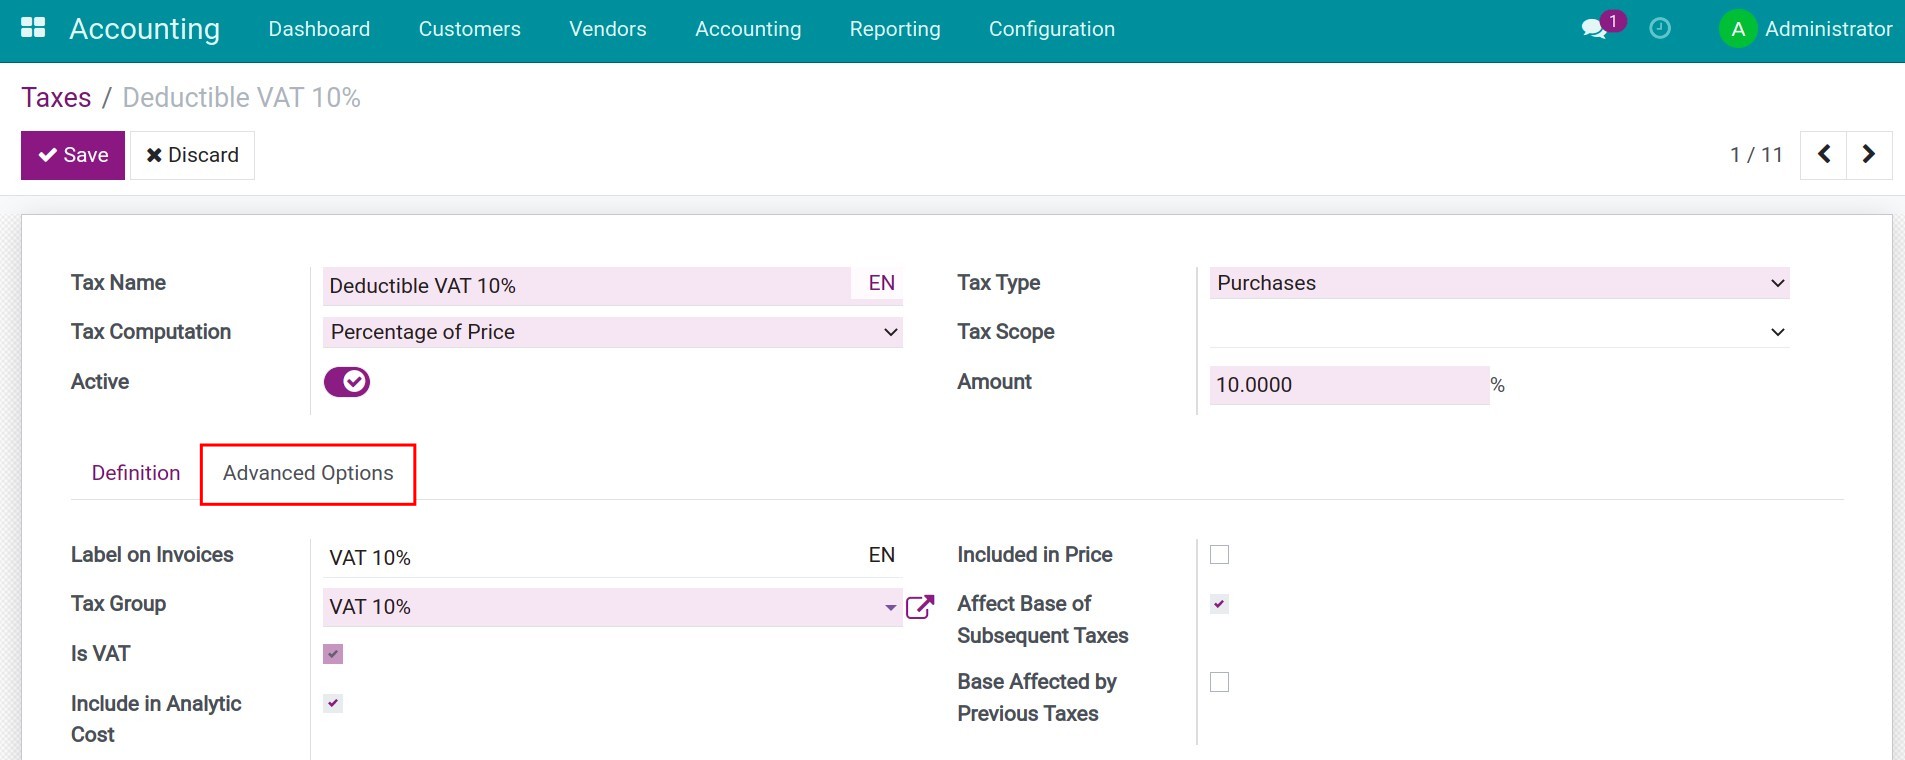
Labels on Invoices: Information from this field is visible on the invoice.

Tax Group: Taxes of the same characteristics should be grouped together. The group’s settings will be applied to each tax in the group. On the invoice, the tax amount of the taxes in the same group will be summed up and displayed in the same line as shown below:
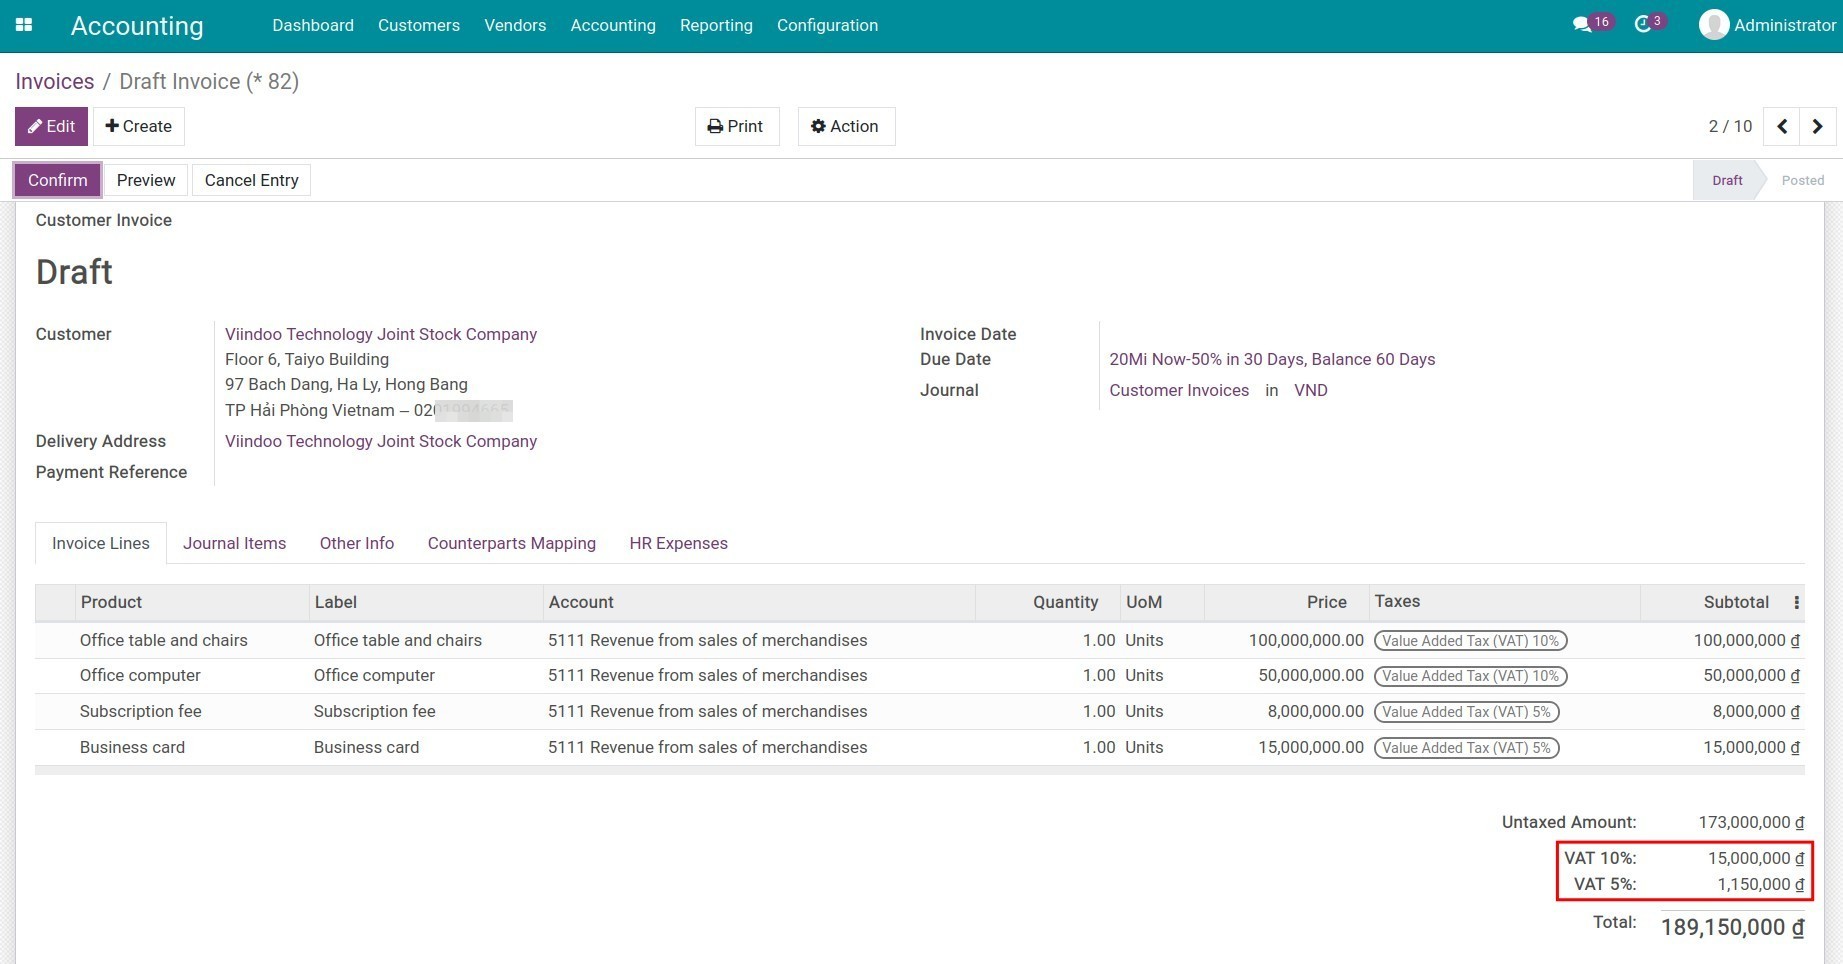
Is VAT: Is checked as a result of the VAT tax chosen on the Tax Group field.
Include in Analytic Cost: If checked, the tax value calculated from this tax will be included in the same analytic account chosen on the invoice line (if available). This option shows only when you activate Analytic Accounting. More details at Analytic account in Viindoo.
Included in Price: If checked, tax is already included in the product price. For example: A product has a sales price of 1,000,000 VND, with a tax rate of 10% included in the price.
Price with Tax included
Tax
Tax value
Price without tax
1,000,000
10%
90,909
909,091
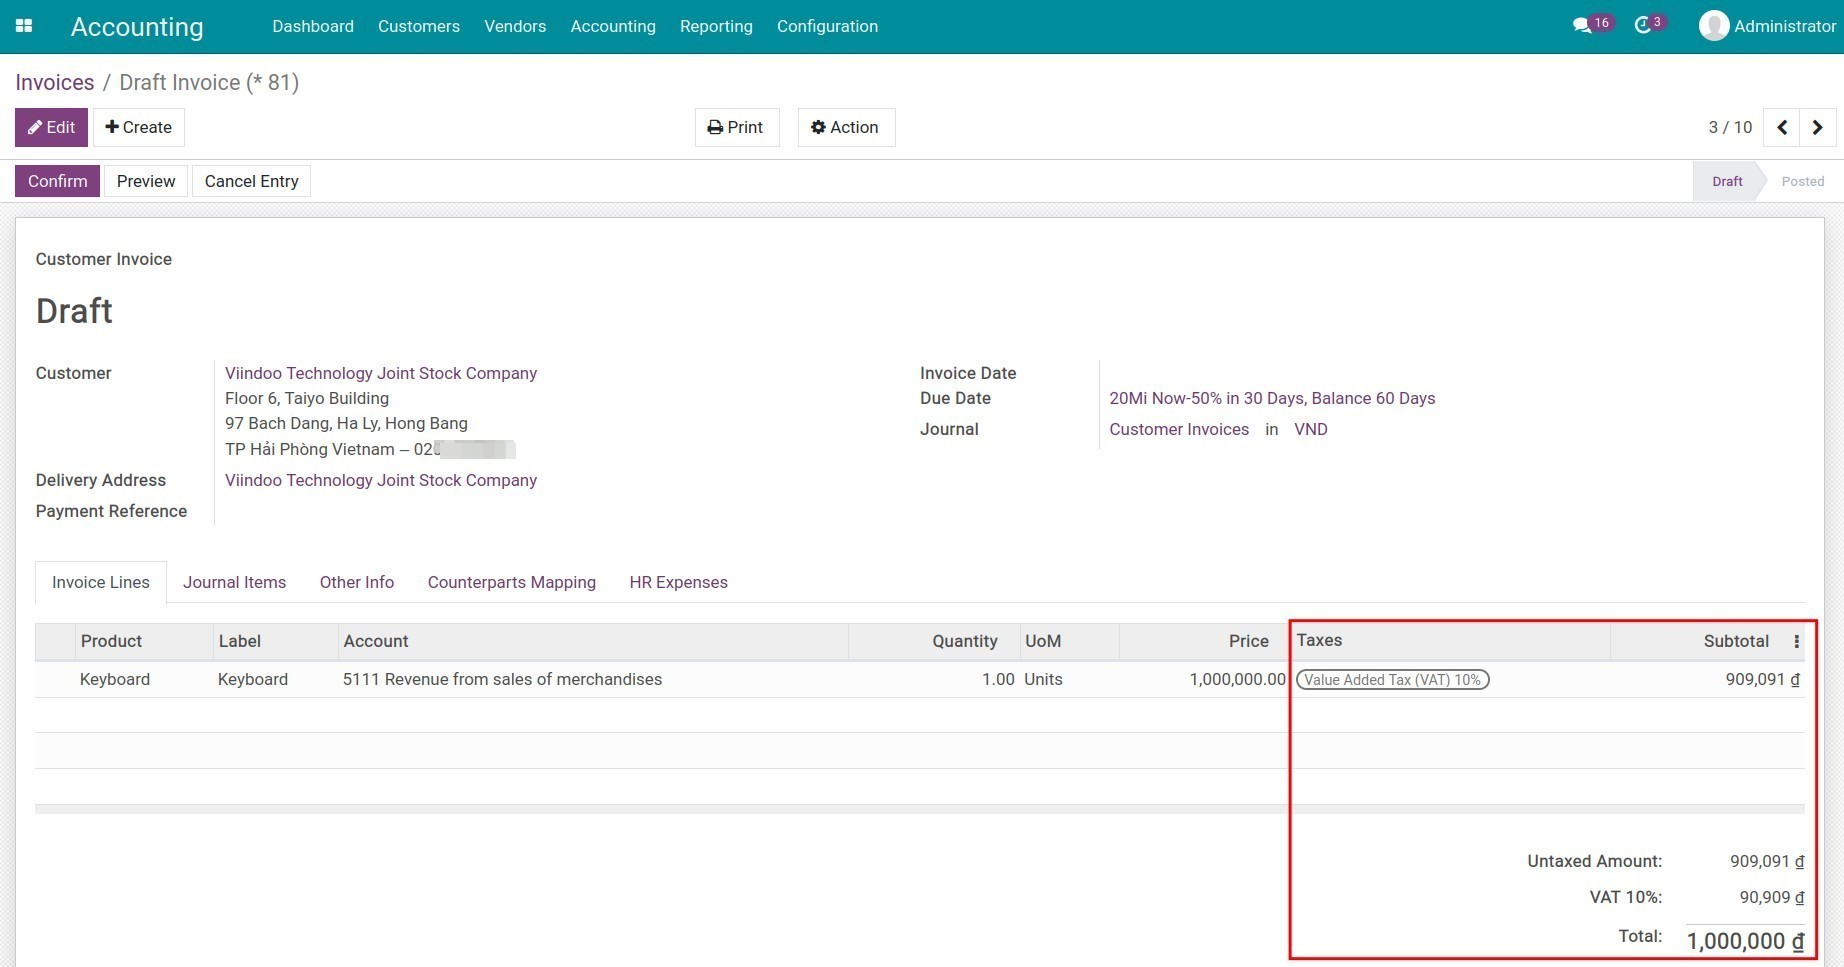
Affect Base of Subsequent Taxes: If checked, any subsequent taxes will be calculated based on the price with this tax included.
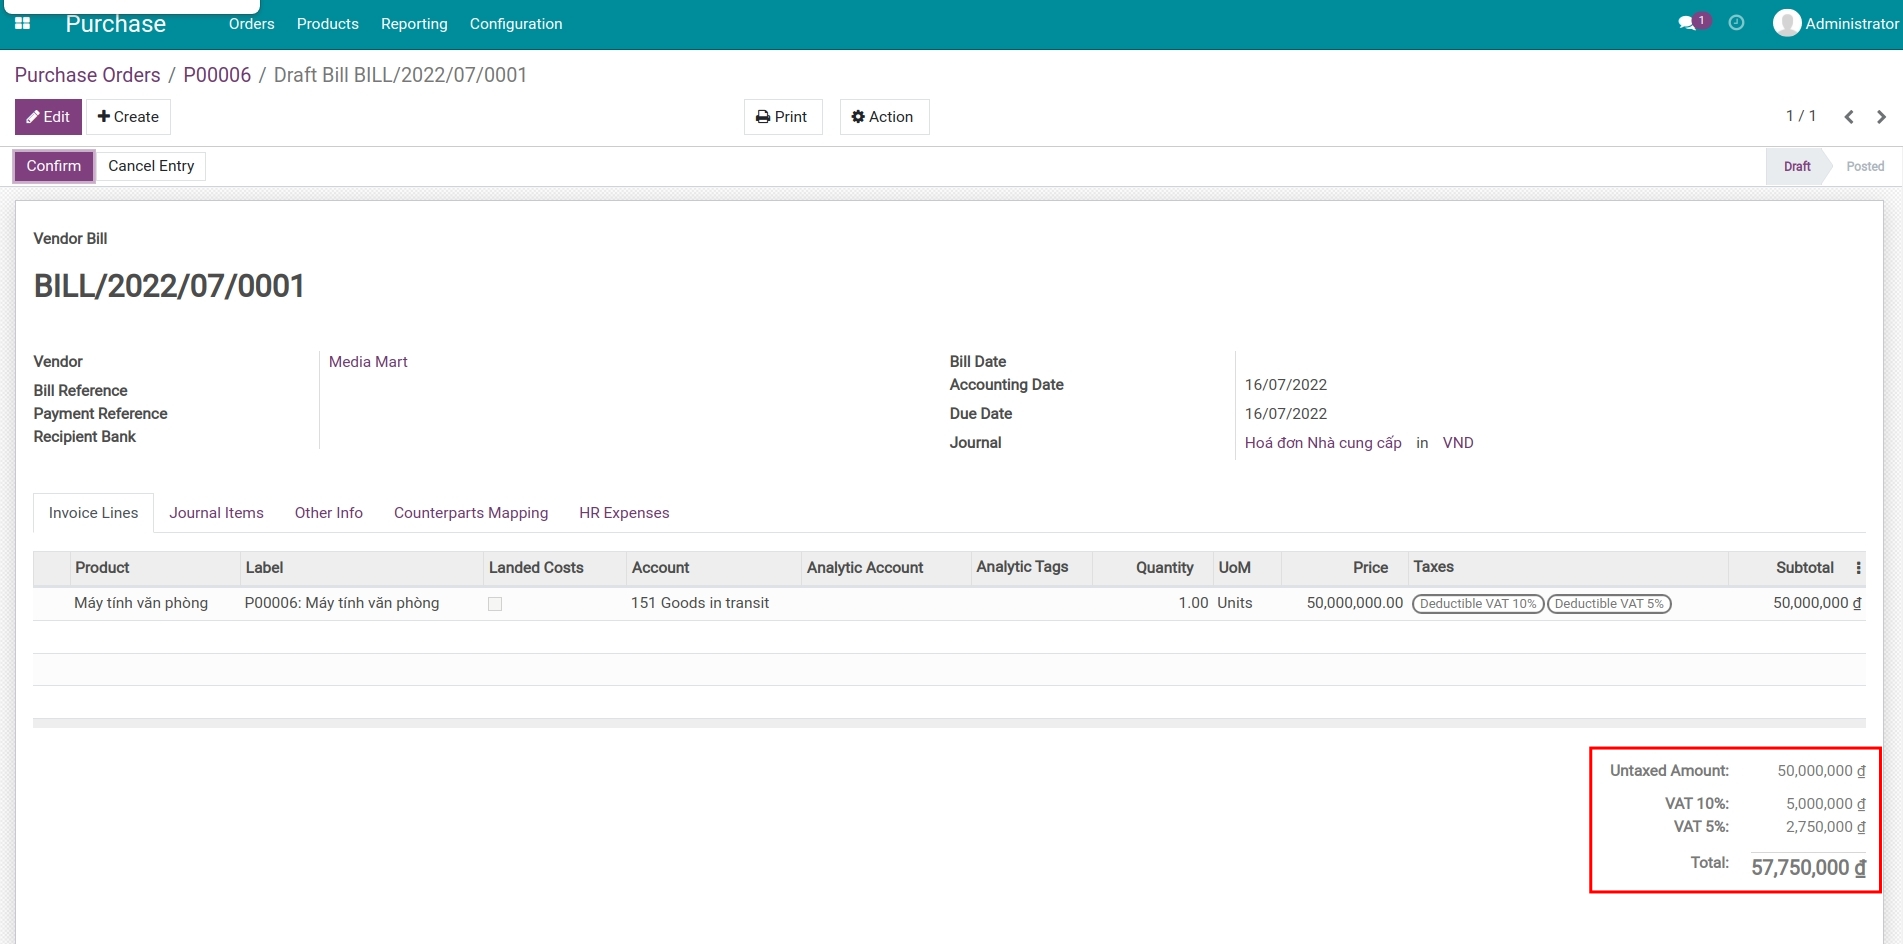
Base Affected by Previous Taxes: If checked, this tax will be applied to the value inclusive of taxes in the order that precedes it.
For example:
A product has a sales price of 2,000,000 VND:
In the Advanced Options tab, configure the taxes as follows:
VAT 10%: enable Affect Base of Subsequent Taxes.
VAT 5%: enable Base Affected by Previous Taxes.
On the invoice, the tax value will be affected as follows:
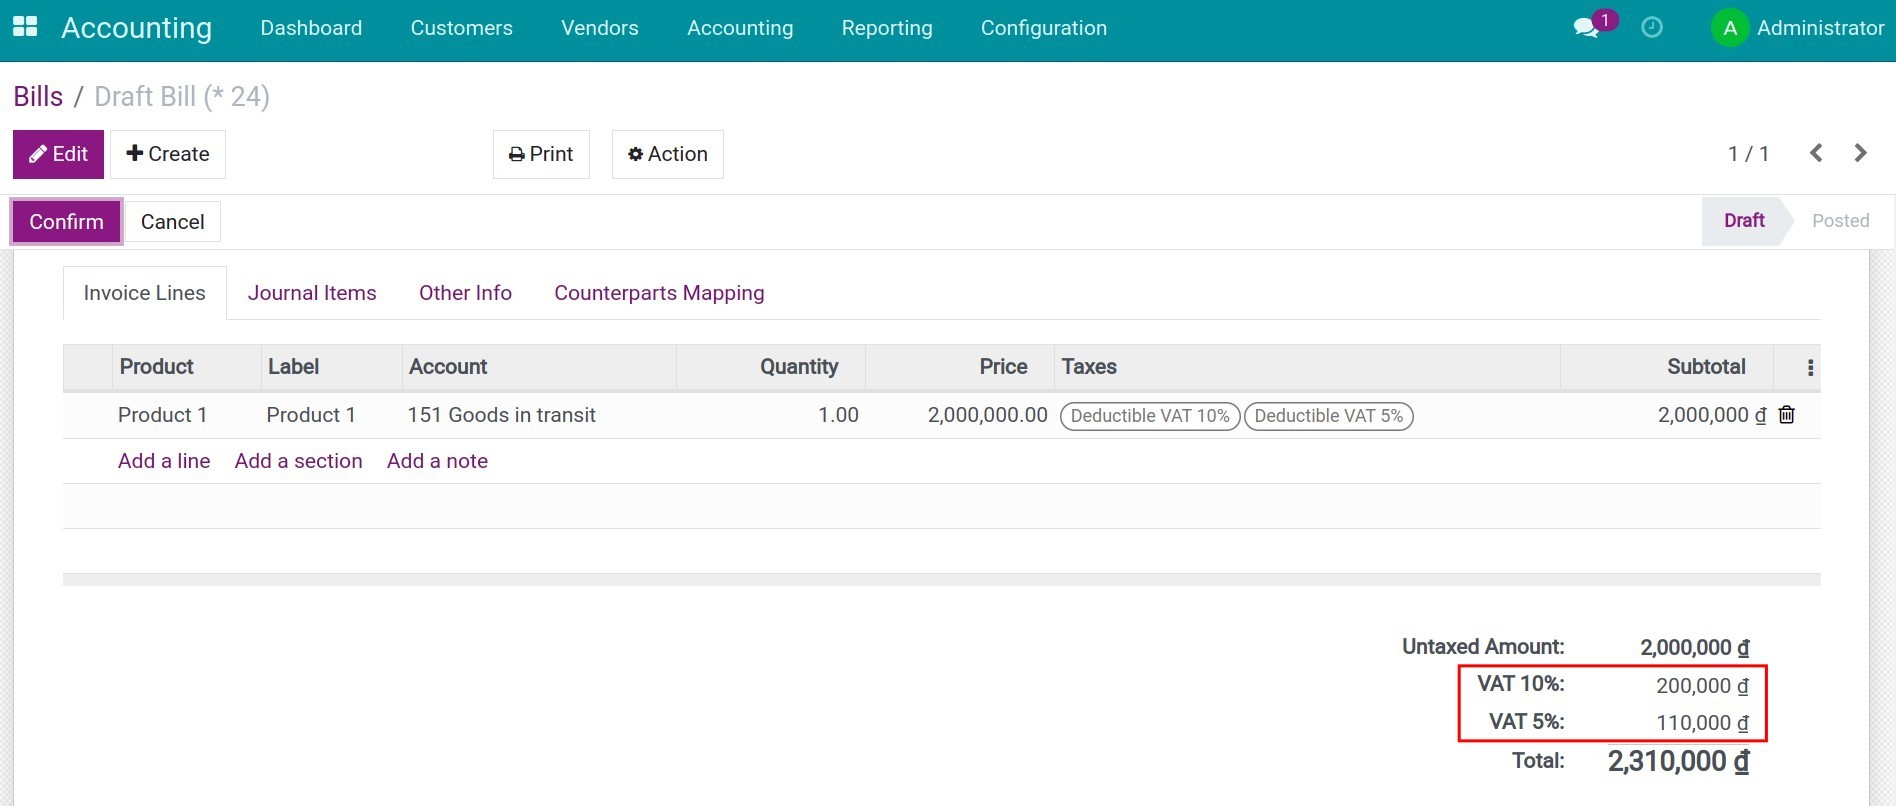
Warning
The order in which you add taxes on a product line affects how taxes are calculated.
See also
Related article
Default Taxes
Steps to setup Fiscal Position (Taxes and Accounts)
Transfer between internal bank accounts
Transfer between internal bank accounts
With this article, you will know how to transfer money between internal bank accounts.
For example: You have 2 bank accounts as follow:
ACB - 16888xxx;
MB - 99999xxx.
You want to transfer an amount of 100 millions VND from ACB to bank account MB.
Requirements
This tutorial requires the installation of the following applications/modules:
Accounting & Finance
Import RJE bank statement
Record payments between bank accounts
First, you have to create new bank journals for ACB and MB Bank. Steps to create, you see more on Configure Bank Accounts.
Create Send money payment
Navigate Accounting ‣ Dashboard, choose the ACB Bank journal, click on kebap menu and choose Internal transfer under New section to create a new internal transfer payment.
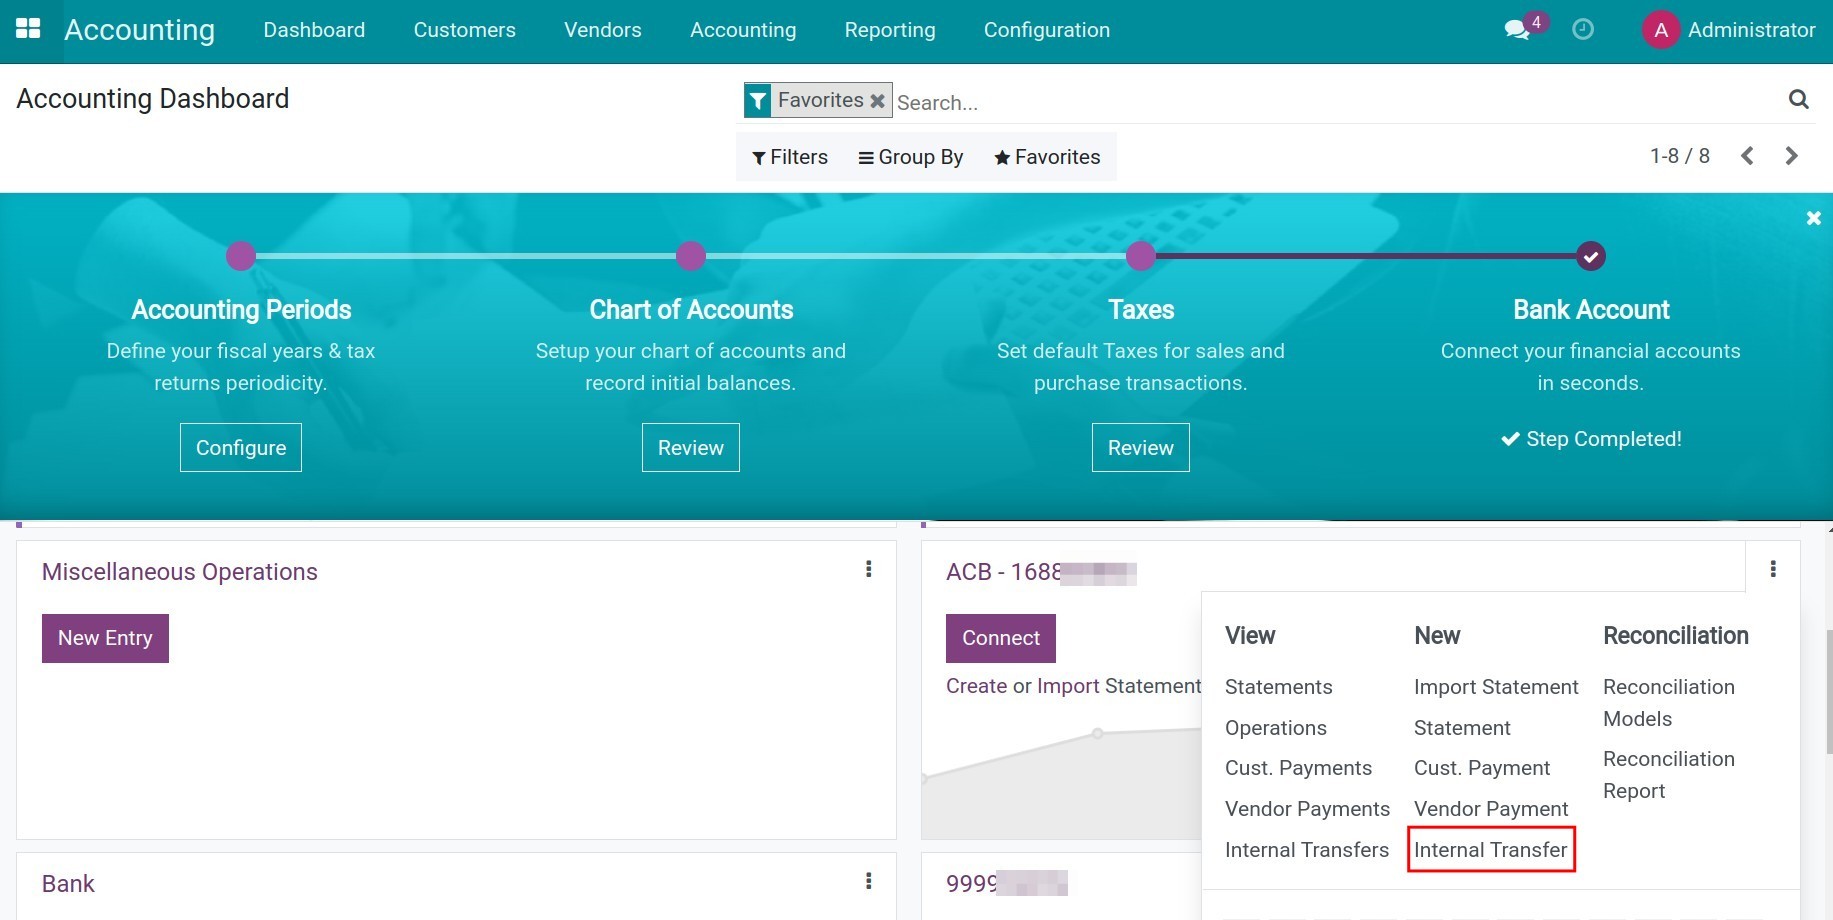
The payment information is set as follow:
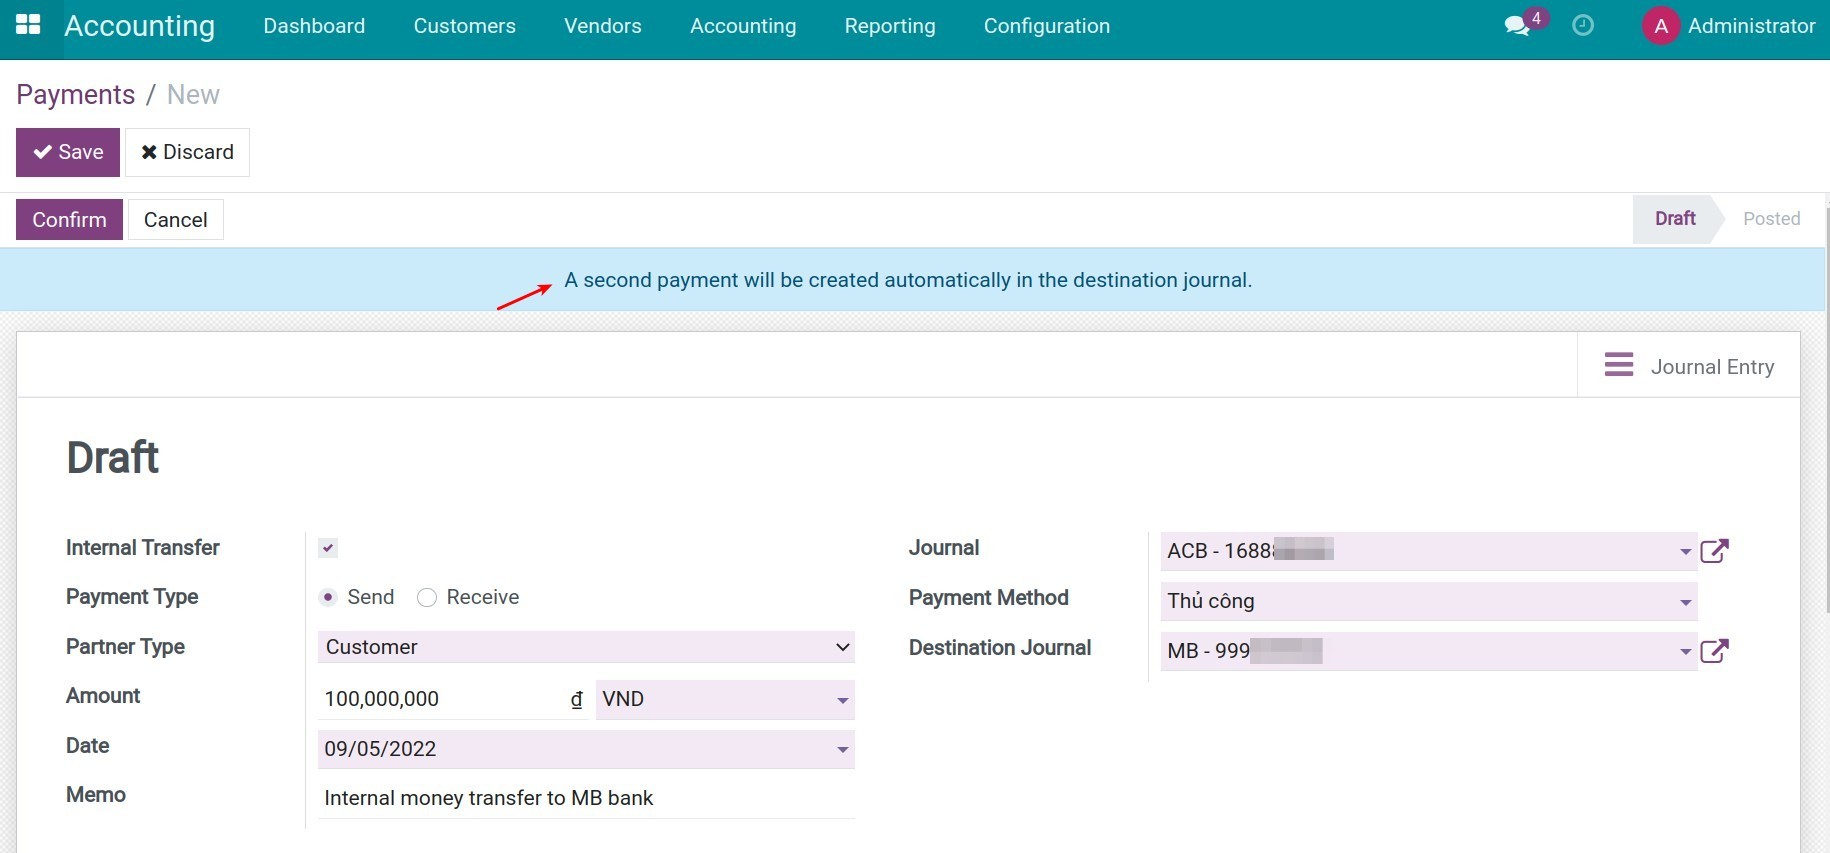
Internal Transfer: If enabled, a notification about the automatic creation of the second payment at the destination journal will be displayed.
Payment Type: Send;
Partner Type: Choose Customer or Vendor;
Amount: The amount that you want to deposit;
Journal: Choose the journal of the bank account that you use to send money. In this case, it will be the ACB Bank journal;
Payment Method: The system will suggest the configured method on the journal;
Destination Journal: Select the journal of the bank to which you will deposit money. In this case, it will be the MB Bank journal.
Click Save and Confirm, a payment to record the internal transfer from the ACB bank journal to the selected destination journal will be displayed. To view this payment, go to Accounting > Vendors > Payments, remove the default filter and search by the amount spent from the cash journal.

Create bank statements
After finishing payment, you need to record bank statement by importing manually or log bank statements in bulk using .CSV, .RJE or Excel (.XLSX) format. More details at Manage Bank Statements.
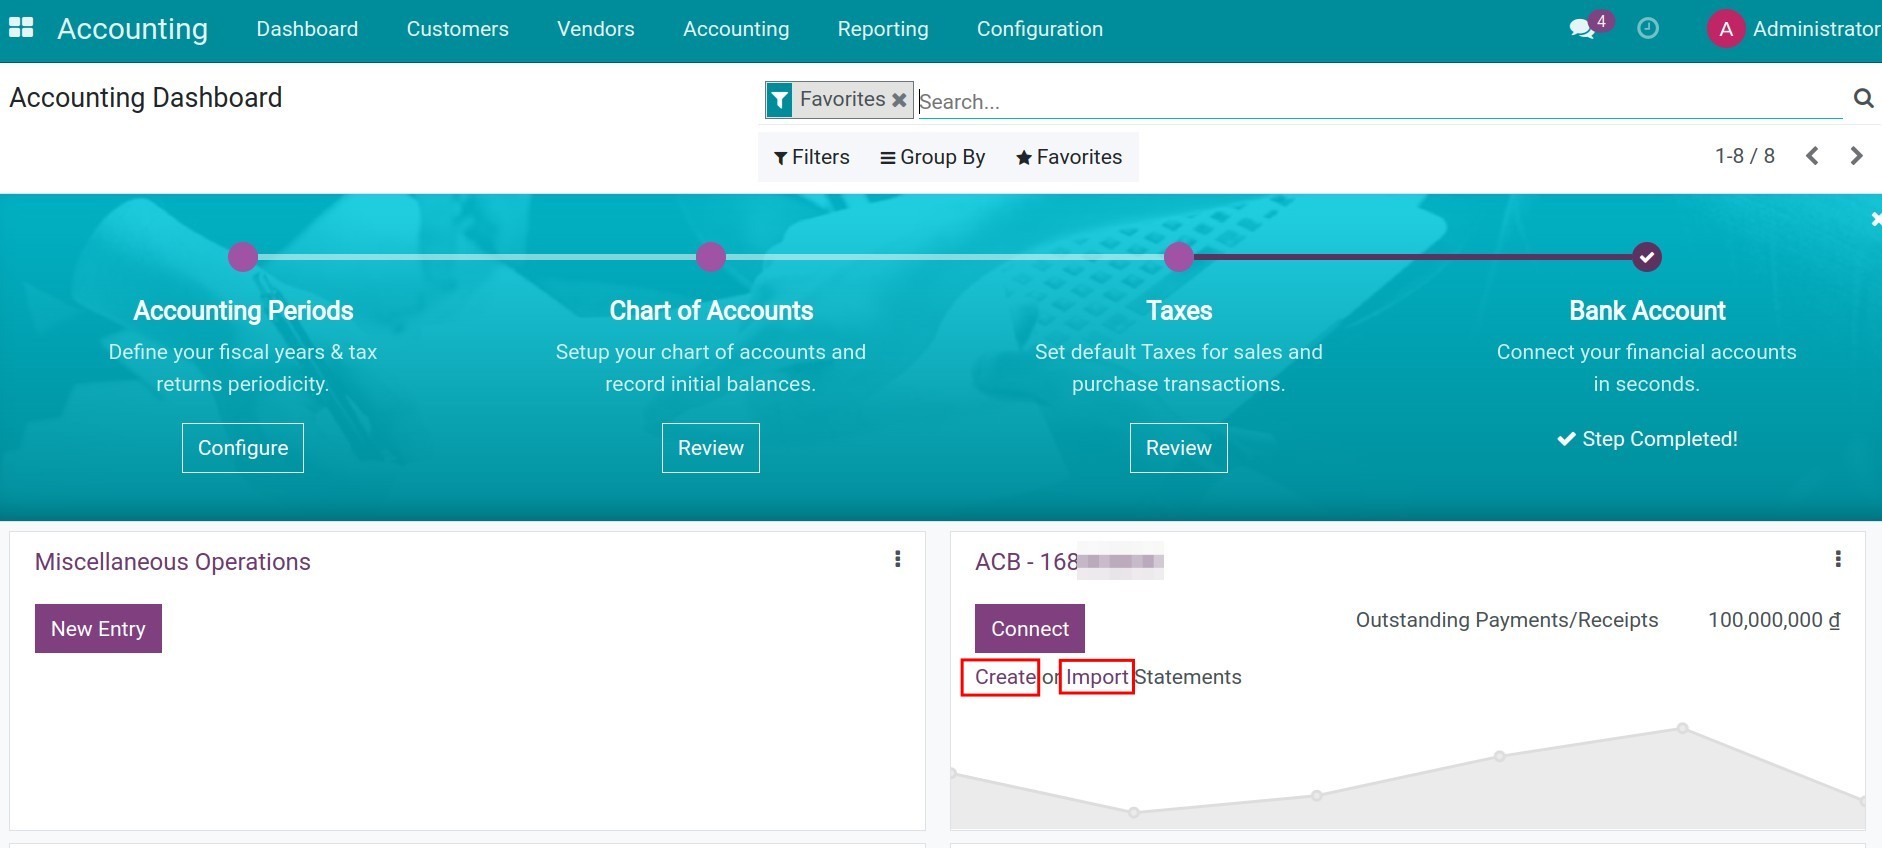
Note
Don’t forget to choose the partner as your company in the Partner field.
Reconcile bank statements
Once a bank statement is validated, you can reconcile this statement with existing payments.
At the Statement of the ACB bank account used to send money, click on Reconcile:
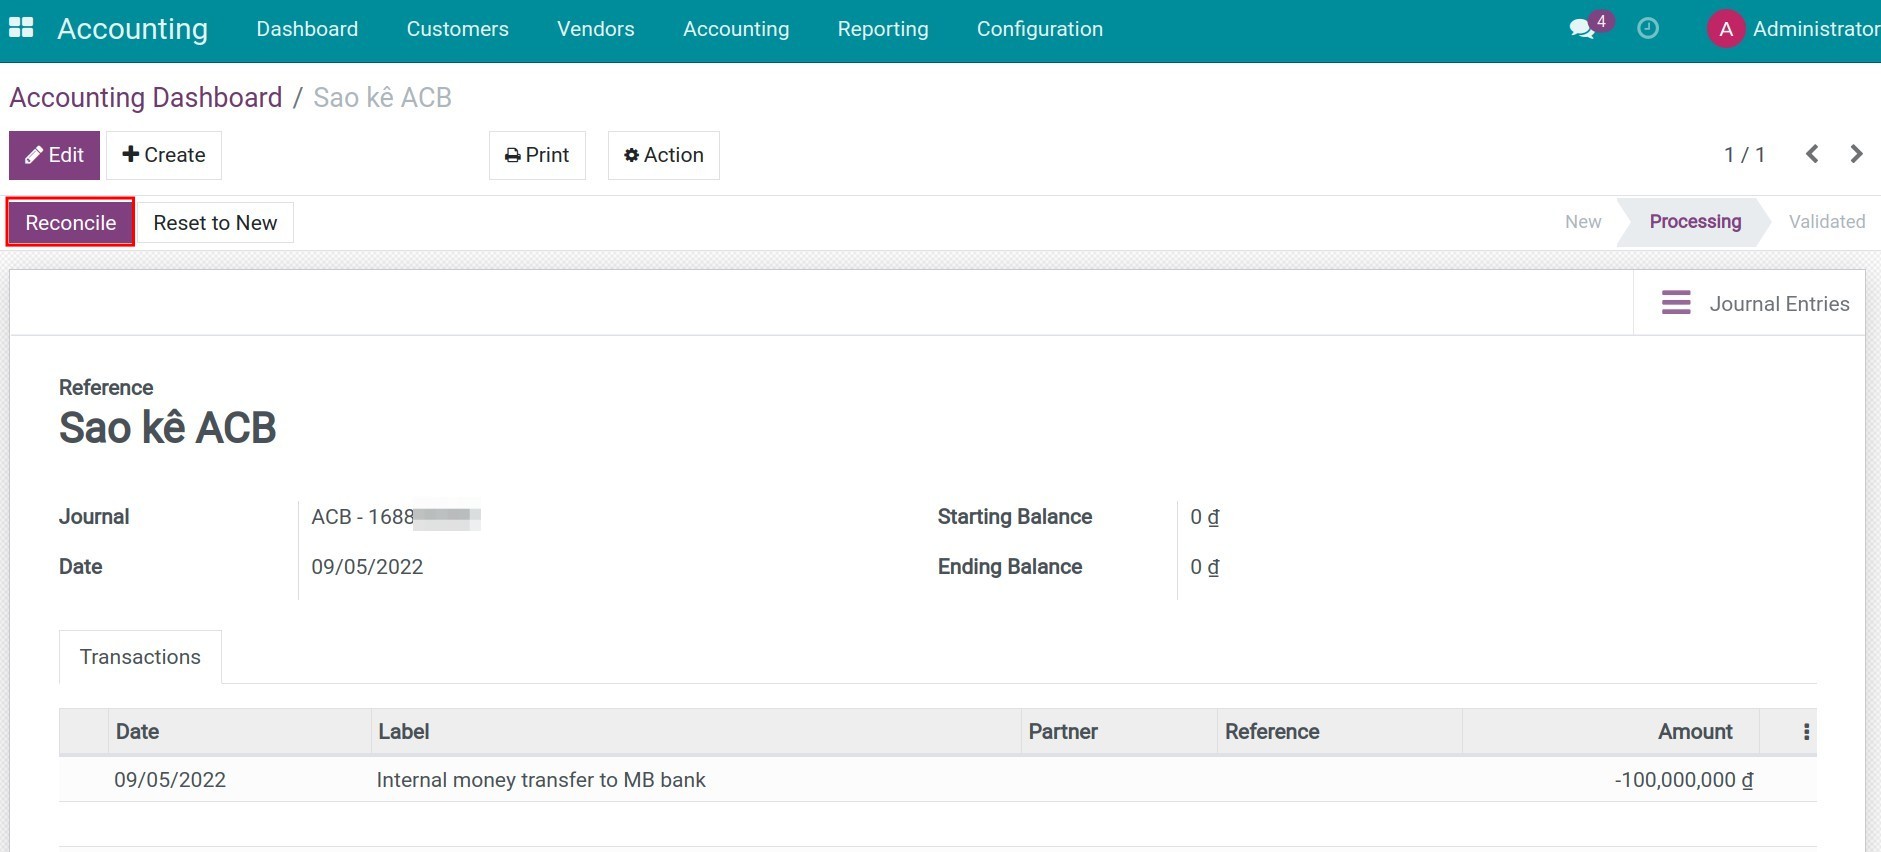
The system will suggest reconciliation models for journal entries related to this partner and this bank account. Press Validate to reconcile.
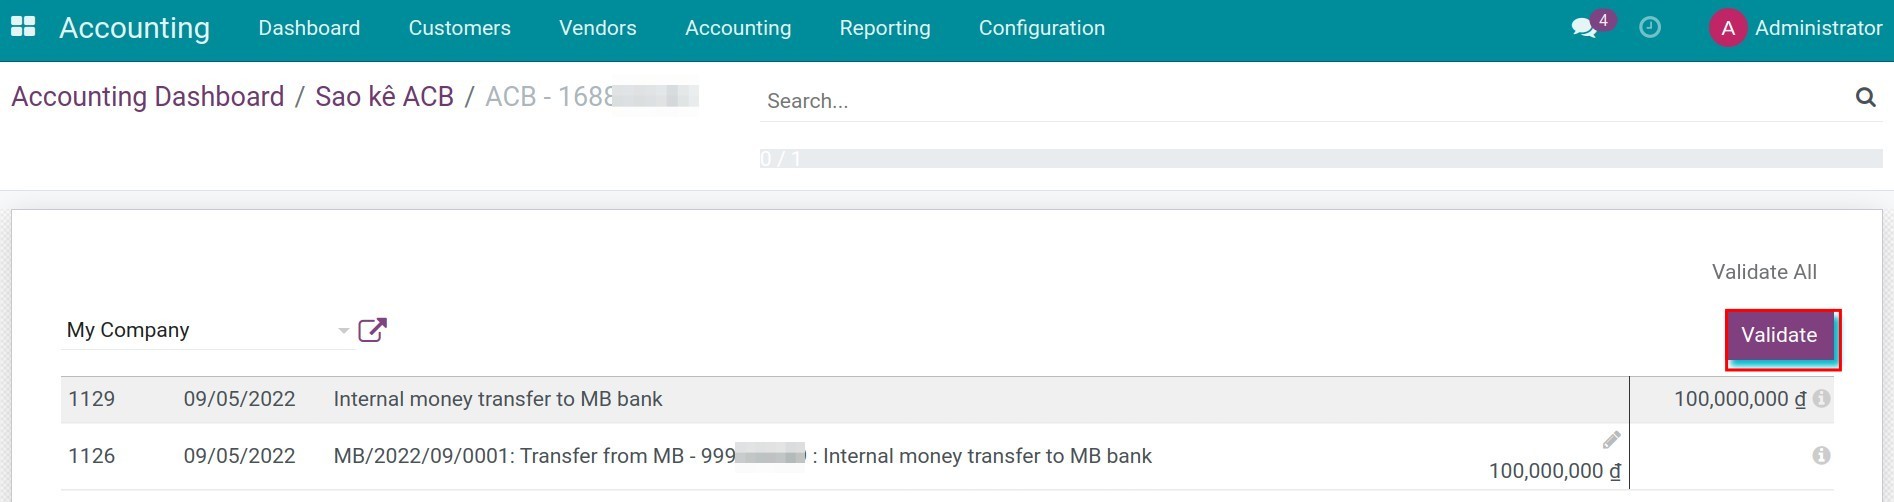
Similar, at the Statement of the MB bank account used to receive money, click on Reconcile:
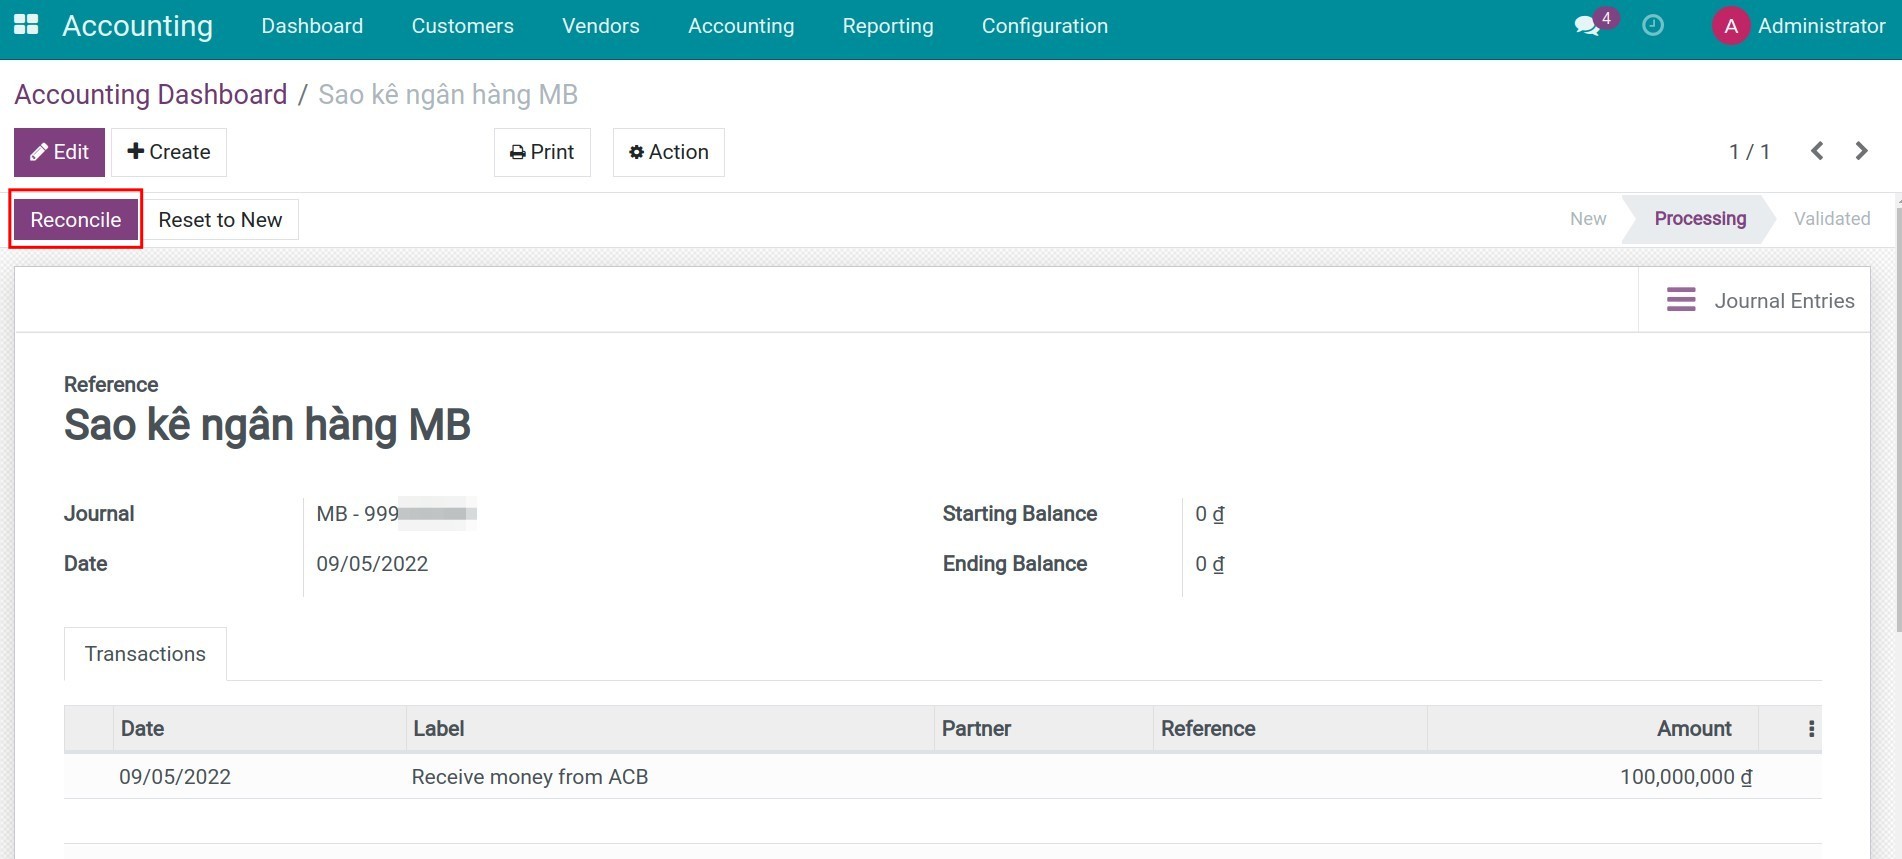
The system will also suggest reconciliation models for journal entries related to this partner and this bank account. Press Validate to reconcile.
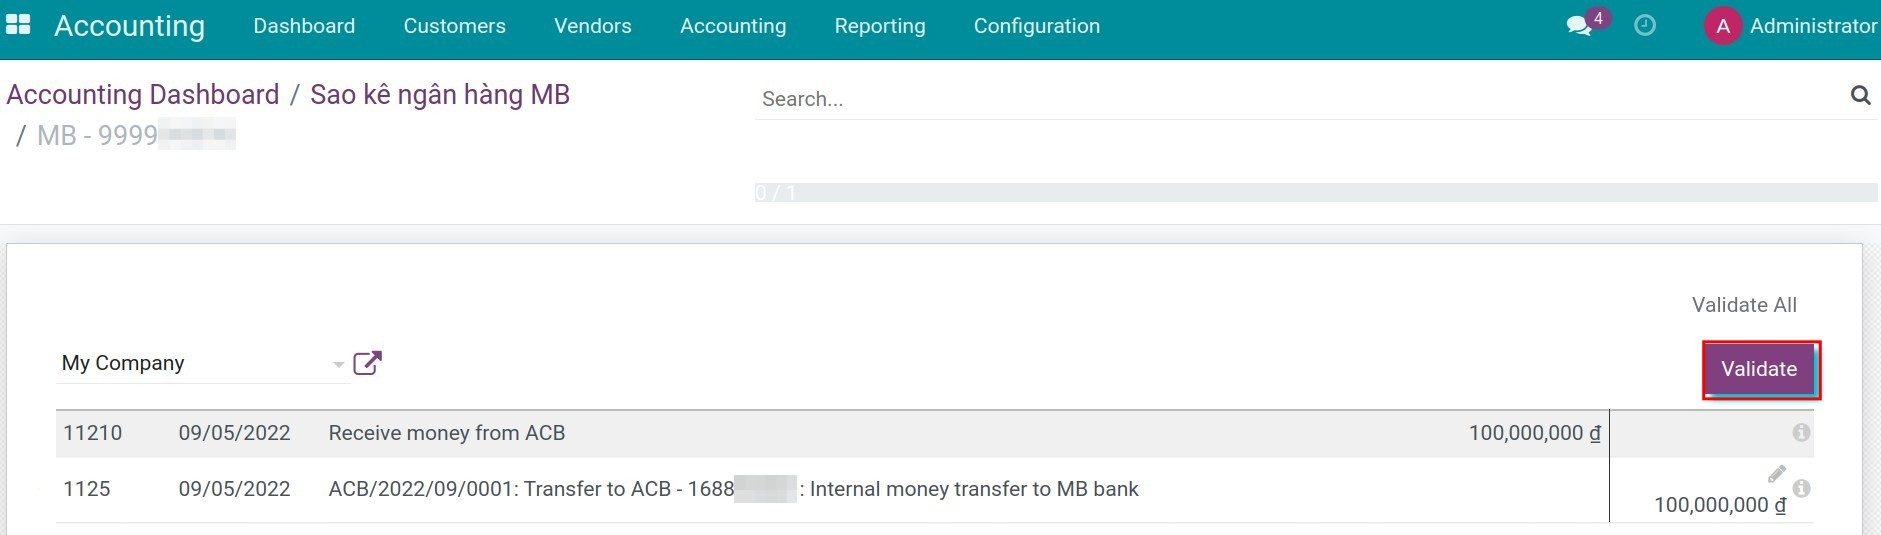
Once done, you can see the results of this internal transfer on reports such as Account Bank Deposit Book (S08-DN) by navigating to Accounting ‣ Reporting ‣ Account Bank Deposit Book (S08-DN) or on Trial Balance at Accounting ‣ Reporting ‣ Trial Balance:
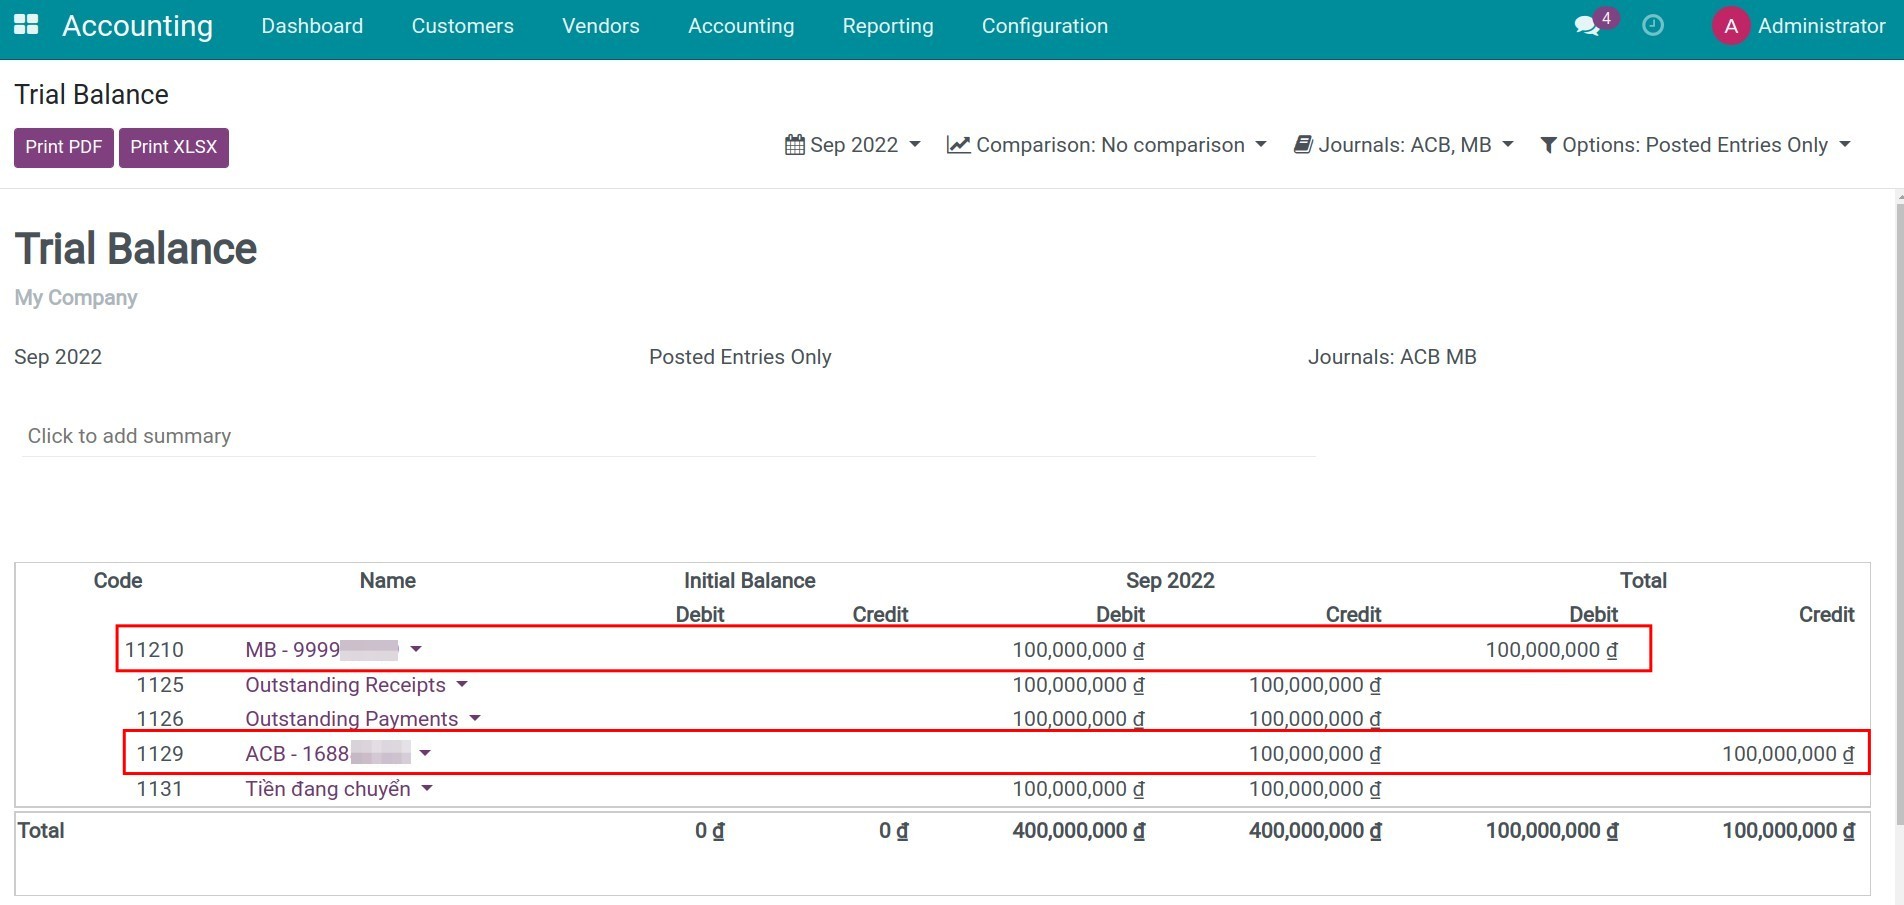
See also
Related article
Transfer between Bank account and Cash on hand
Time deposit transactions
Transfer between Bank account and Cash on hand
Transfer between Bank account and Cash on hand
Requirements
This tutorial requires the installation of the following applications/modules:
Accounting & Finance
Deposit money into a bank account
To deposit into your bank account, follow these steps:
Cash disbursement
Create an internal cash-out payment from the cash journal account
Navigate to Accounting ‣ Vendors ‣ Payments ‣ Create to create an internal transfer payment:
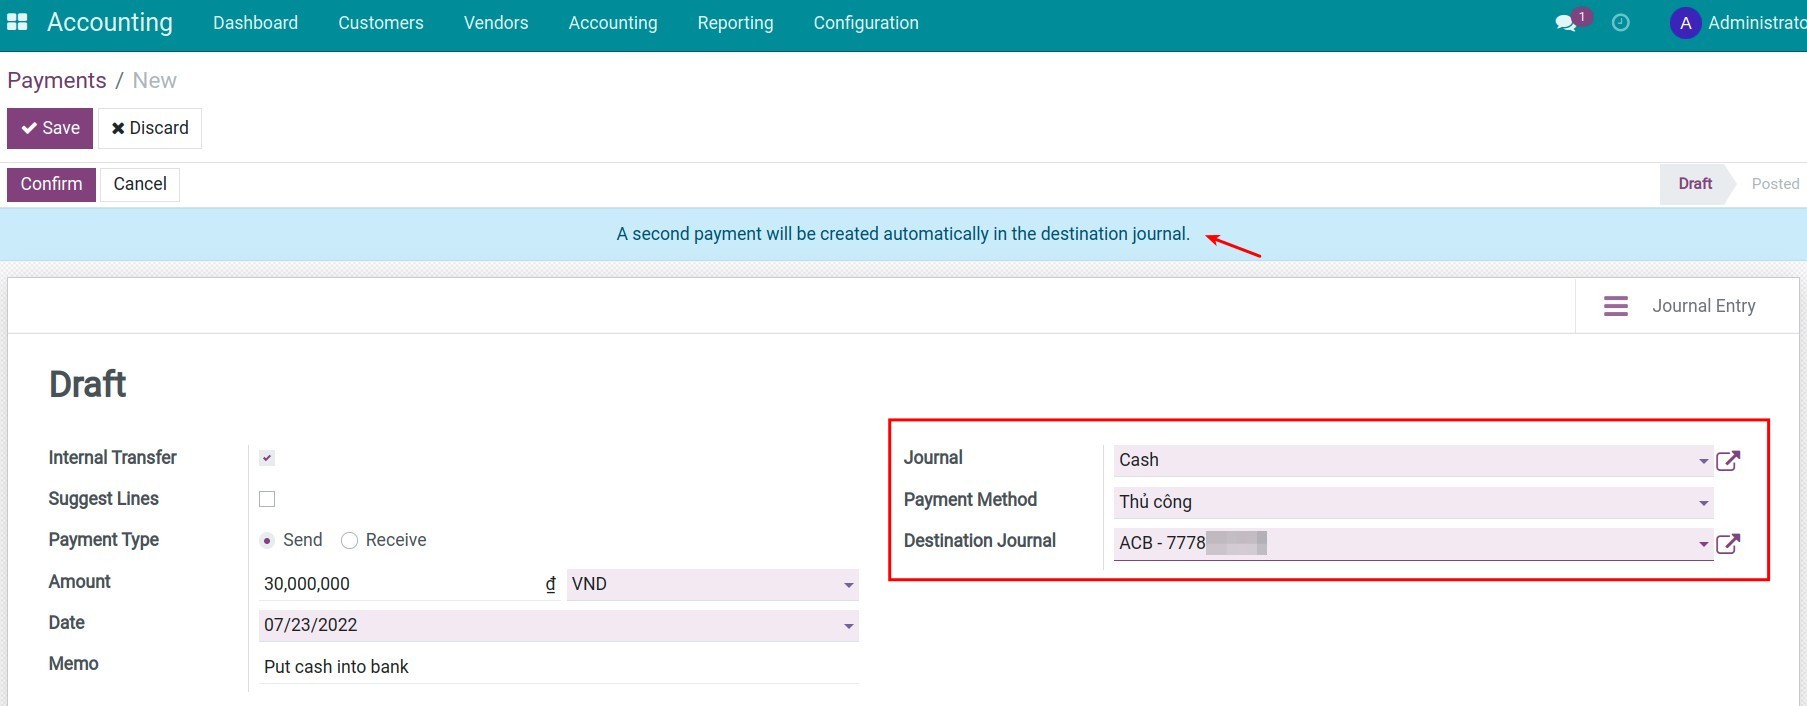
In which:
Internal Transfer: If enabled, a notification about the automatic creation of the second payment at the destination journal will be displayed.
Payment Type: Send;
Amount: The amount that you want to deposit;
Journal: Choose the Cash on hand journal;
Payment Method: The system will suggest the configured method on the journal;
Destination Journal: Select the journal of the bank to which you will deposit money.
Click Save and Confirm, a payment to record the internal transfer from the cash journal to the selected destination journal will be displayed. To view this payment, go to Accounting > Vendors > Payments, remove the default filter and search by the amount spent from the cash journal.
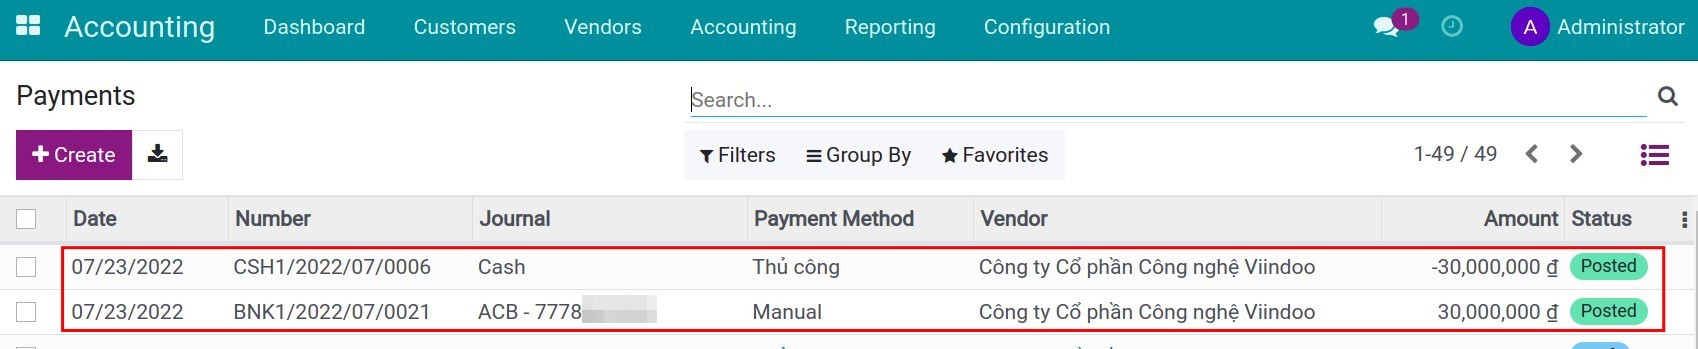
Reconciliation
For cash journal: Create a cash on hand statement and make a reconciliation between the cash-out payment and the cash on hand statement.
For bank journal: When receiving the bank statement, create a statement and reconcile it with the cash-in payment created above. See more at the articles How to create a bank statement and Bank reconciliation.
Withdraw money from the bank account and send it to cash on hand
Withdraw money
Create an internal cash-out payment from a bank journal
To record the withdrawal money transaction, navigate to Accounting ‣ Vendors ‣ Payments to create an internal transfer payment:
In which:
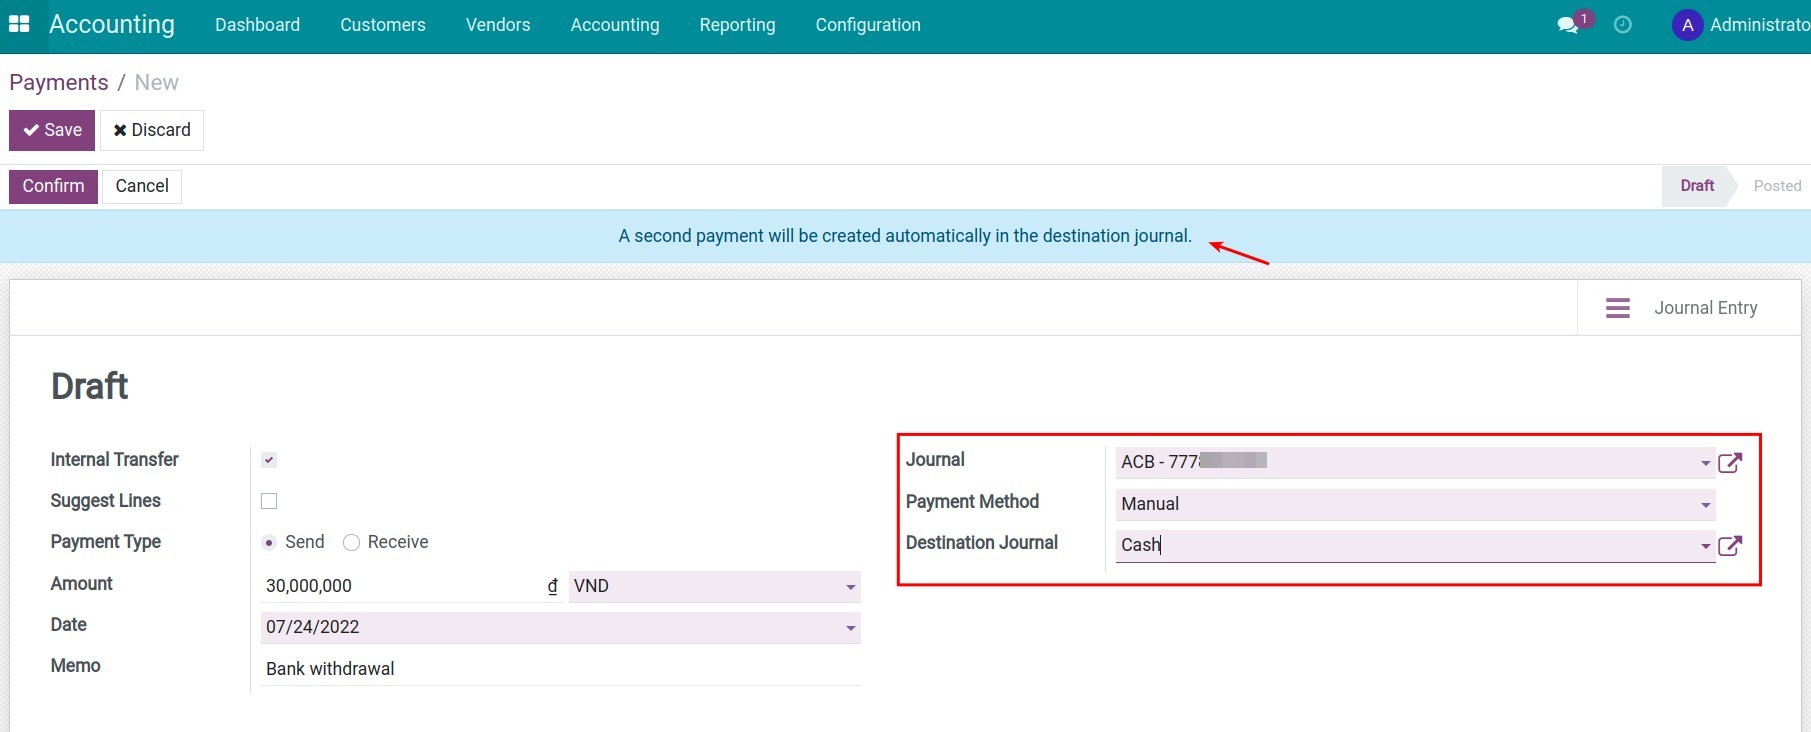
Internal Transfer: If enabled, a notification about the automatic creation of the second payment at the destination journal will be displayed.
Payment Type: Send;
Amount: The amount that you want to withdraw;
Journal: Choose the journal of the bank account that you want to withdraw;
Payment Method: The system will suggest the configured method on the journal;
Destination Journal: Select the journal of the cash that you will deposit money into.
Click Save and Confirm, and the system will automatically generate a payment recording the amount transferred internally from the bank journal to the selected cash destination journal. Similar to operations as cash out, you will see related payments.
Reconciliation
For bank journal: When receiving the bank statement, create a statement and reconcile it with the payment slip just created above.
For cash journal: Create a cash on hand statement and make a reconciliation between the cash-out payment and the cash on hand statement.
Register deposit interest
When you receive a statement of the amount of deposit interest, you need to create a statement in the Viindoo Accounting app:
Press Post then click on Reconcile:
At the bank statement reconciliation view, move to the Manual Operations tab:
Here you can:
Note
You (as Accounting module Admin) can use the reconciliation model to create rules for reconciling the deposit interest. So that, your staff can use the model to fit in.
Once done, press Confirm to finish the reconciliation:
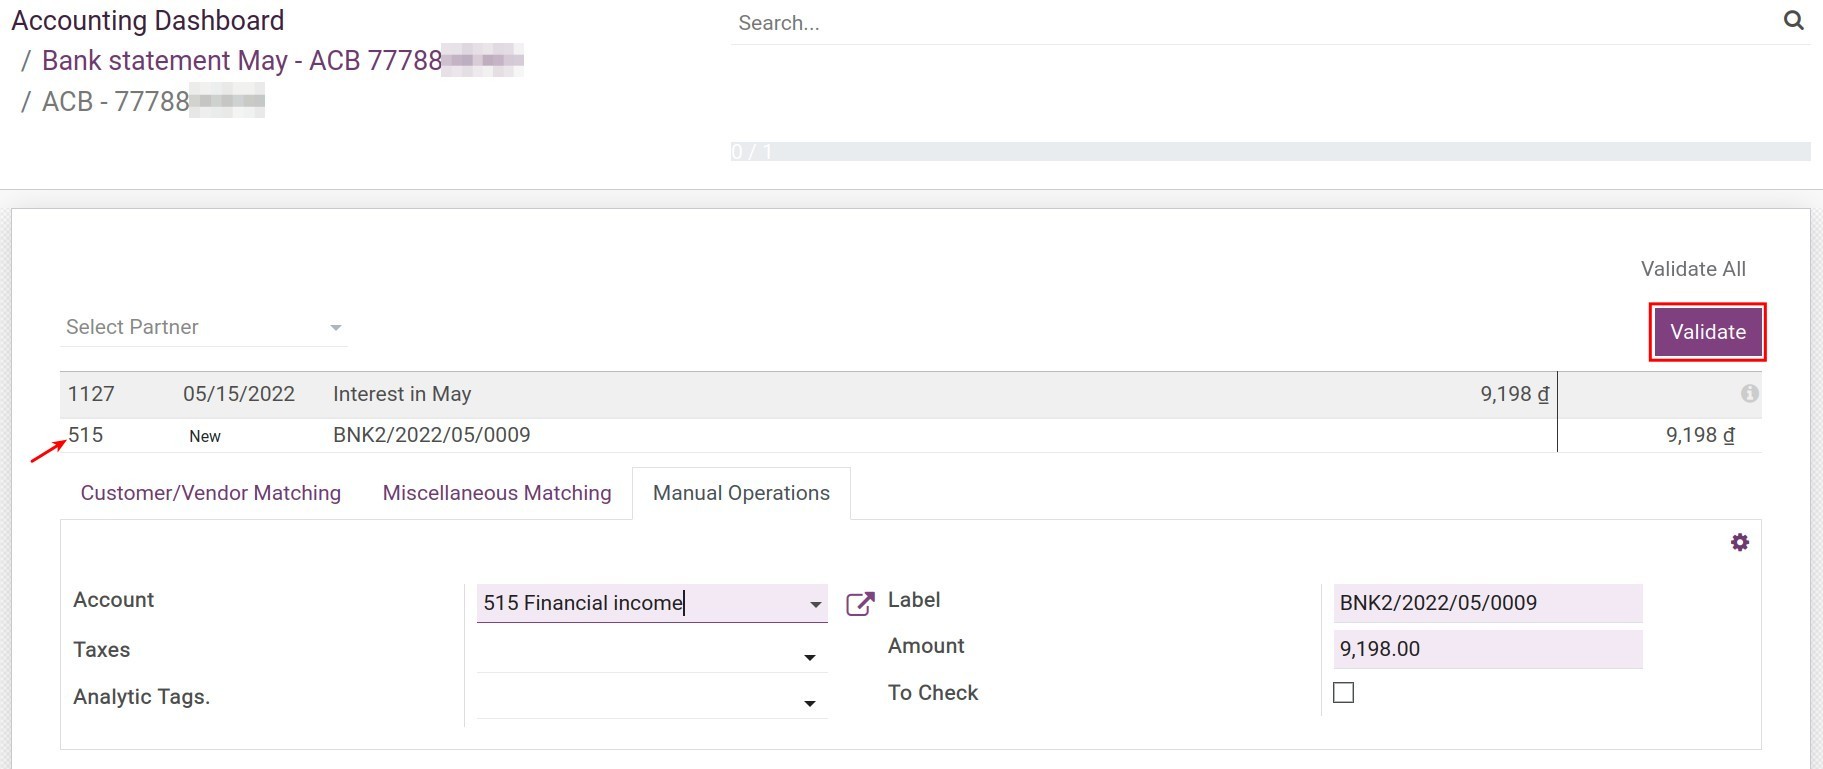
Back to the statement, you can see the related accounting items by going to Journal Entries:
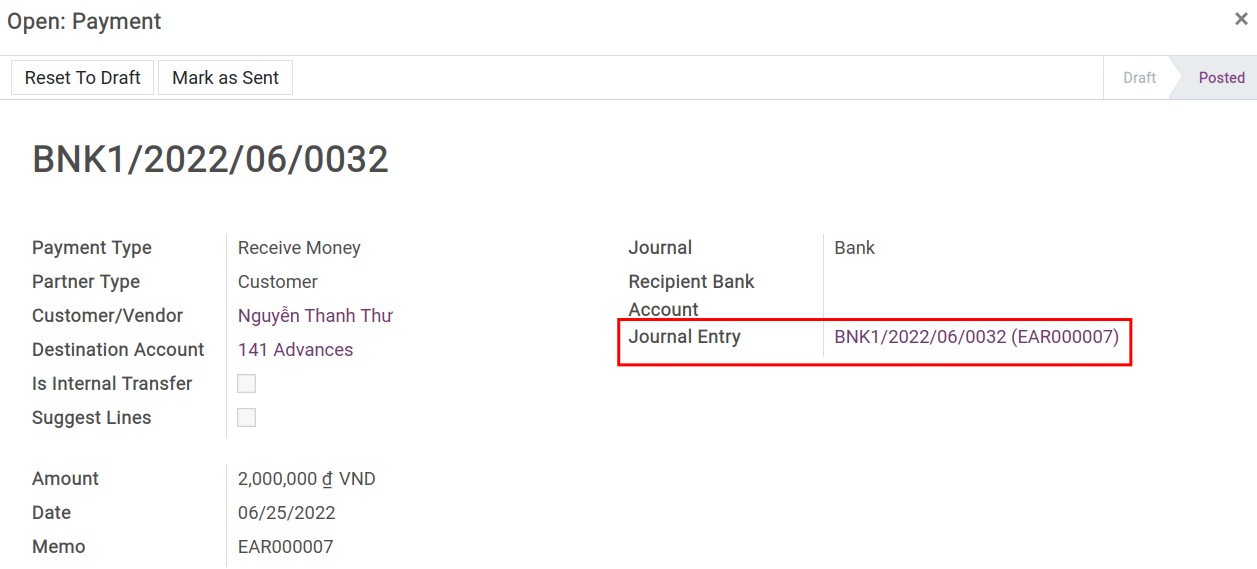
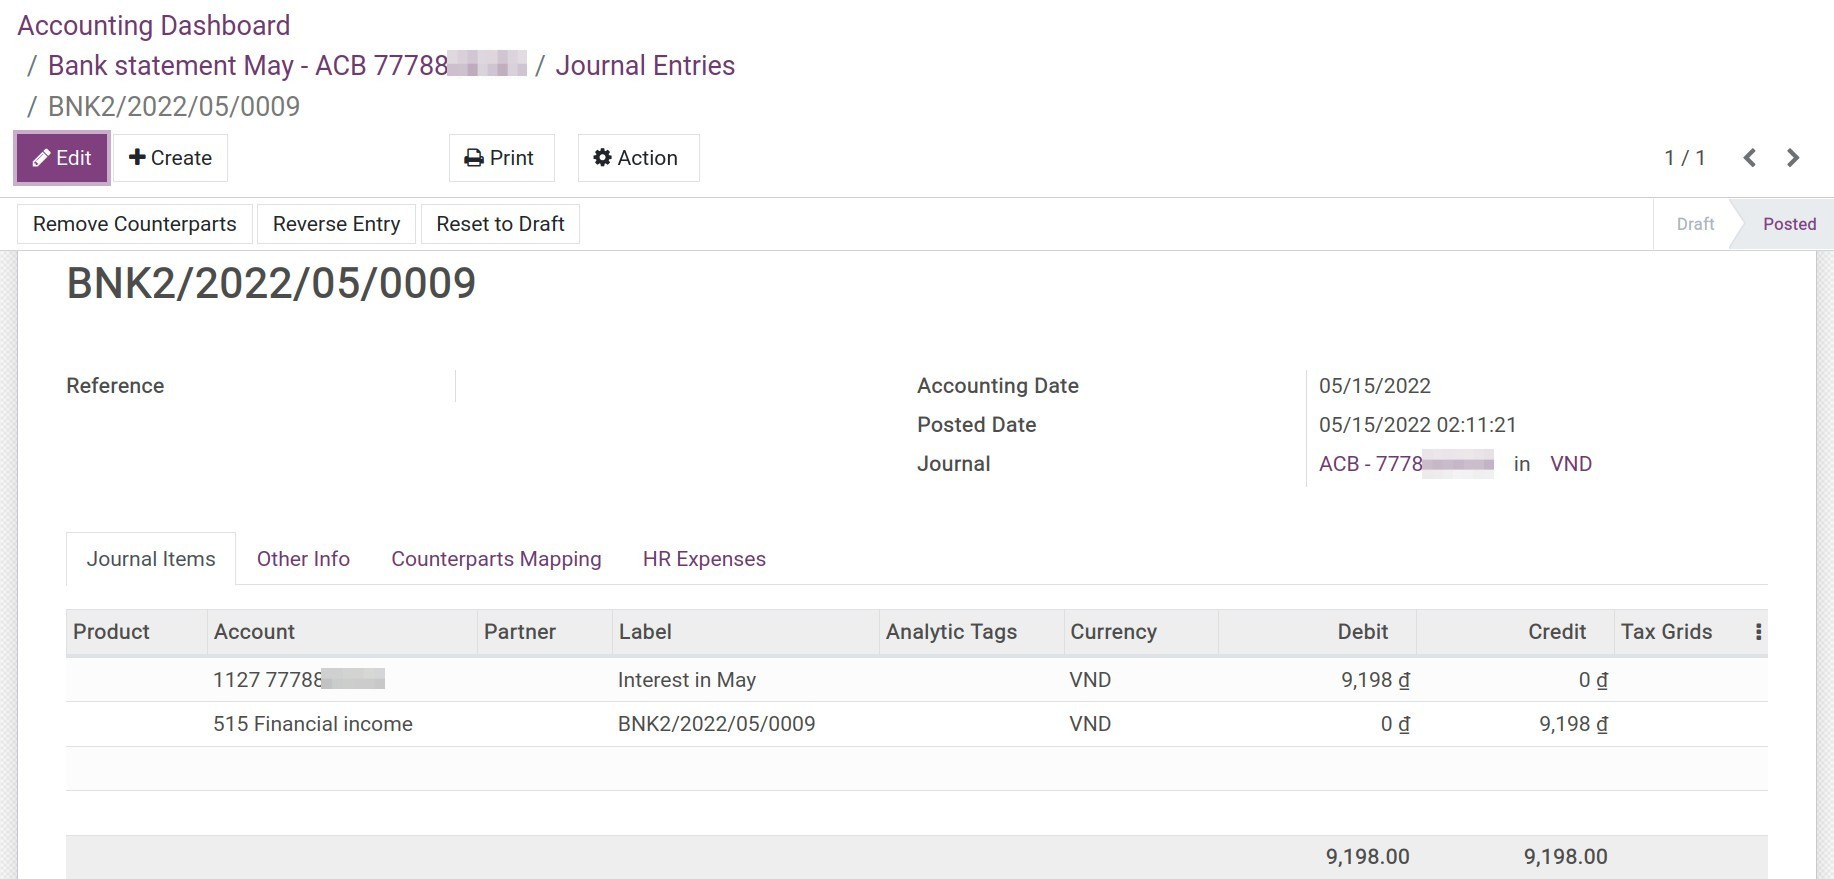
See also
Related article
Time deposit transactions
Steps in the bank reconciliation process
Steps in the bank reconciliation process
Accountants can generate many money transactions daily. When there is a difference between the balance in the bank accounts and the balance on the books of accounts, you must trace each line on the bank statement to reconcile. Let’s think about it: if the number of transactions is up to hundreds of lines, how will you compare it quickly and accurately? iSuite Accounting app will help you check and detect mistakes with just a few clicks.
Requirements
This tutorial requires the installation of the following applications/modules:
Accounting & Finance
Account counterparts
Steps in the bank reconciliation process
When you receive goods and make a payment to a supplier or finish a sale and receive money from a customer, proceed to create a payment. After that, the next step is to create a bank statement. On the bank statement form, you Post the bank statement to have its status changed from New to Processing.
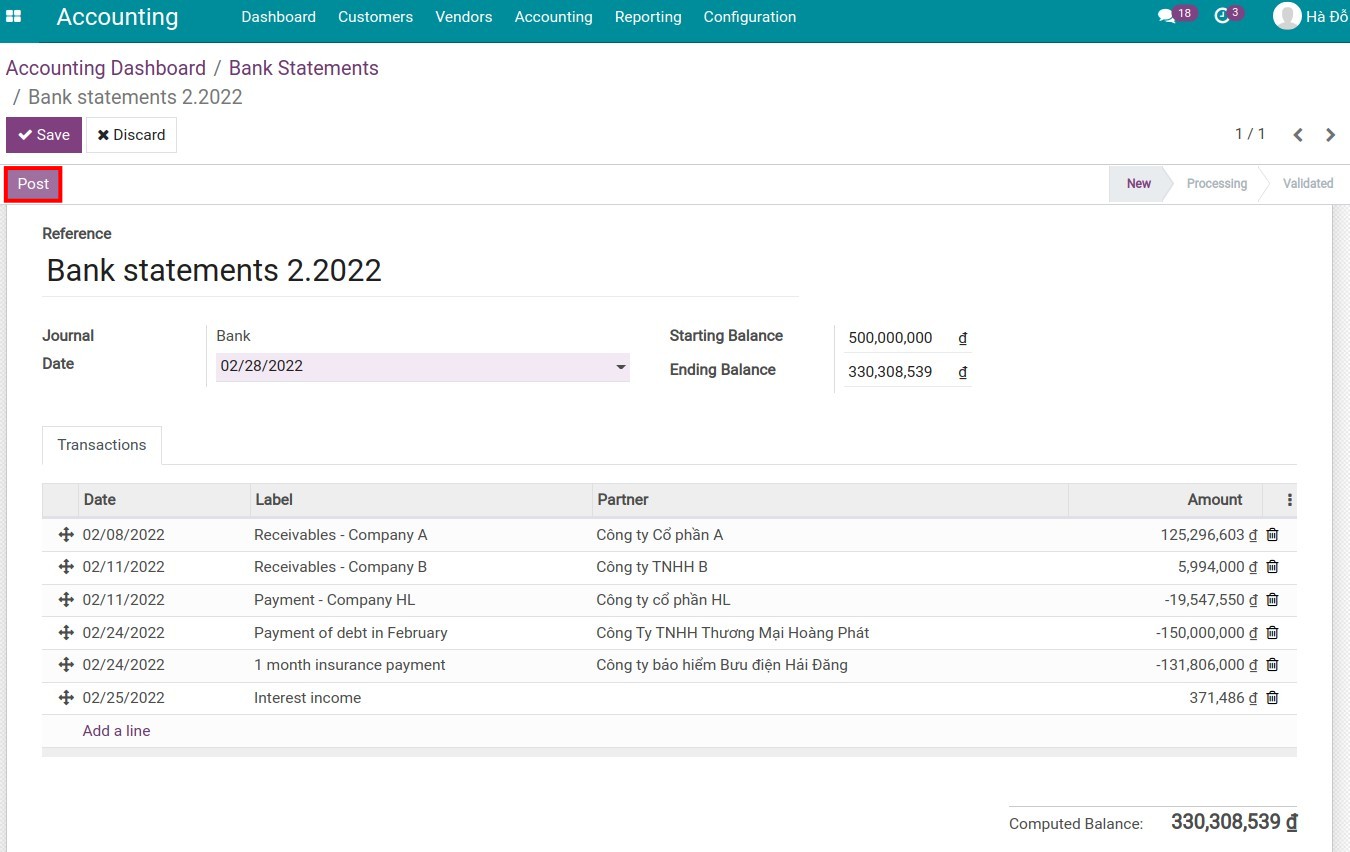
Press Reconcile to start the reconciliation process. At this step, the system will search for information on the statement such as the right partner, the right money amount, and the right account to match the payment made previously.
If all the information is perfect match, the reconciliation will be done automatically.

Review all the information on each reconciliation order to be confirmed. Click Validate to complete the reviewing process.
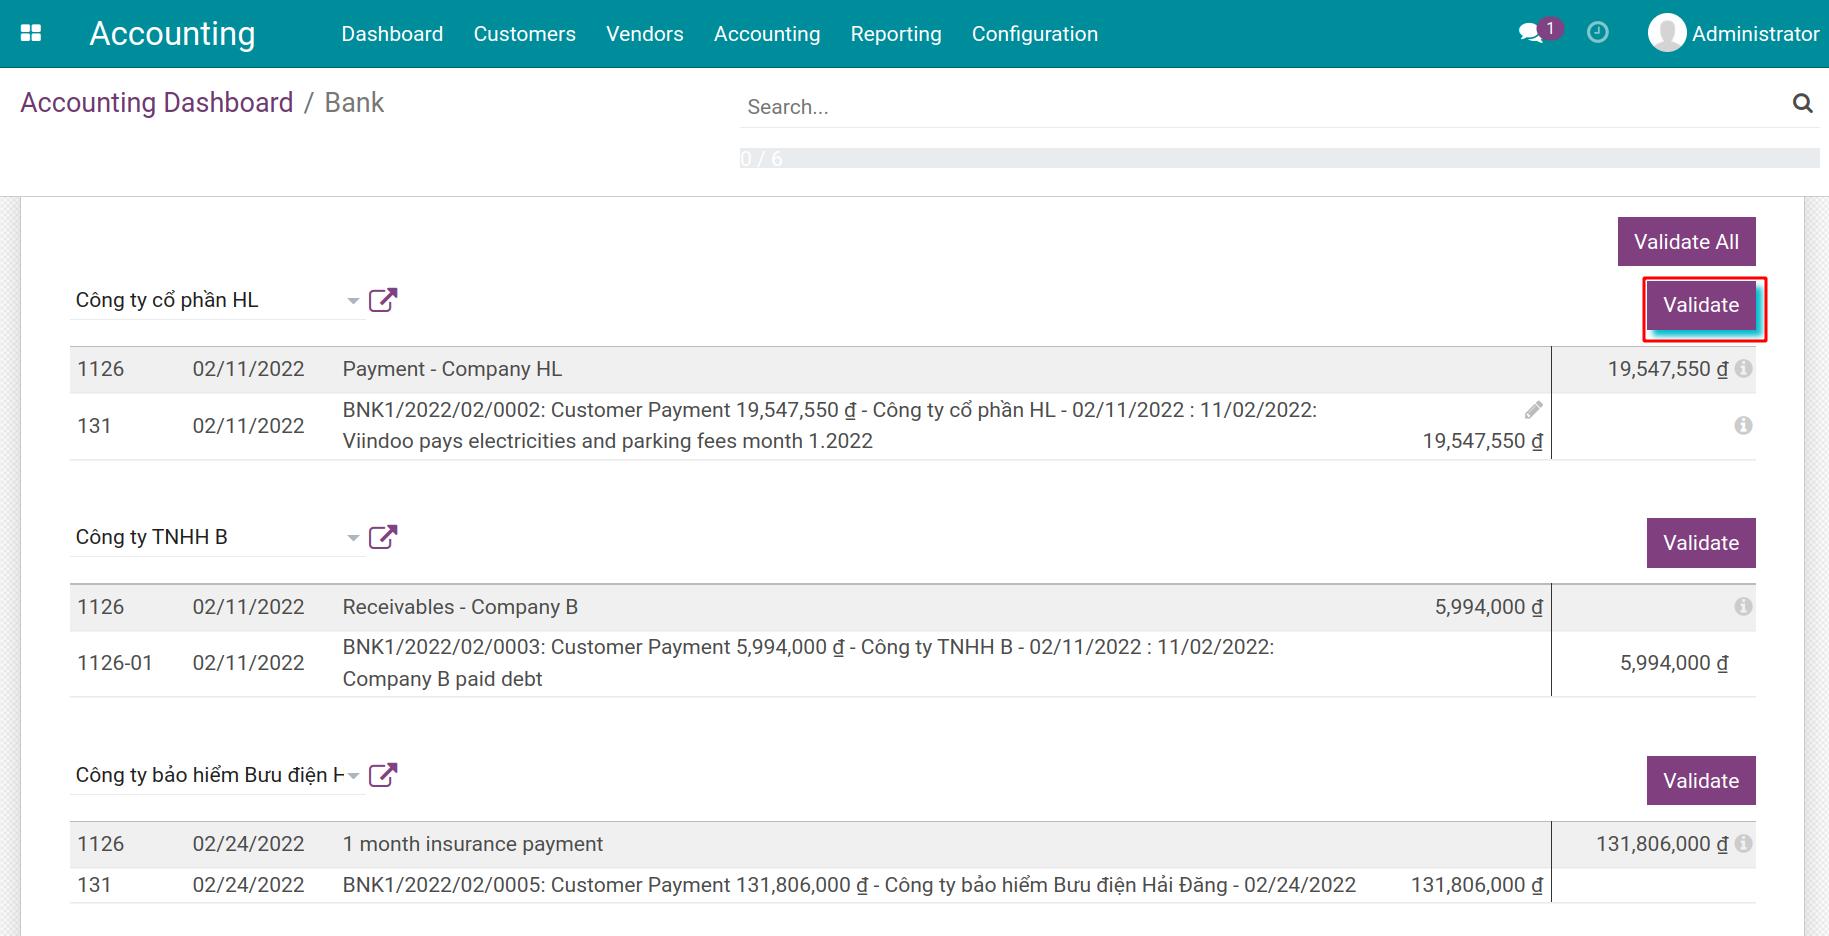
Besides, with bank statements that have multiple lines to reconcile, you don’t need to click Validate for each line. Check the information of the reconciliation orders thoroughly then click the Validate All button.

Journal entries of the bank statements
In Viindoo:
Money spent and received is recorded into an outstanding payment account when payment is confirmed on the system.
Cash in and out confirmed on the bank statement is recorded in a cash account and counter to a suspense account.
In bank statement reconciliation, the system automatically replaces the suspense account with the outstanding payment account.
Upon validating a payment, a journal entry will be generated. This account reflects the money automatically taken from the selected journal: when collecting money, it will go to the Outstanding Receipts account, when paying, it will go to the Outstanding Payments account.
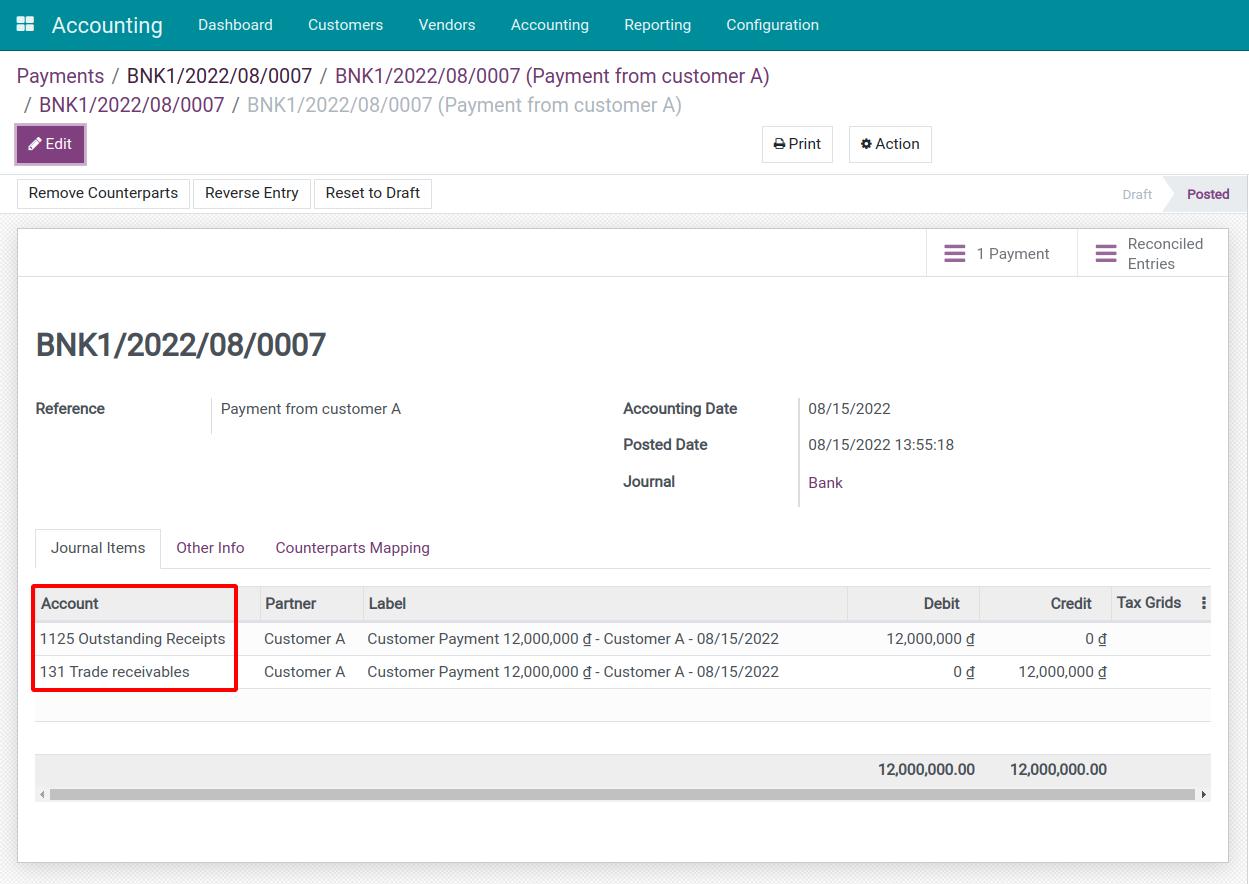
When the statement is Posted, the system will record the cash in - cash out through the Suspense Account.
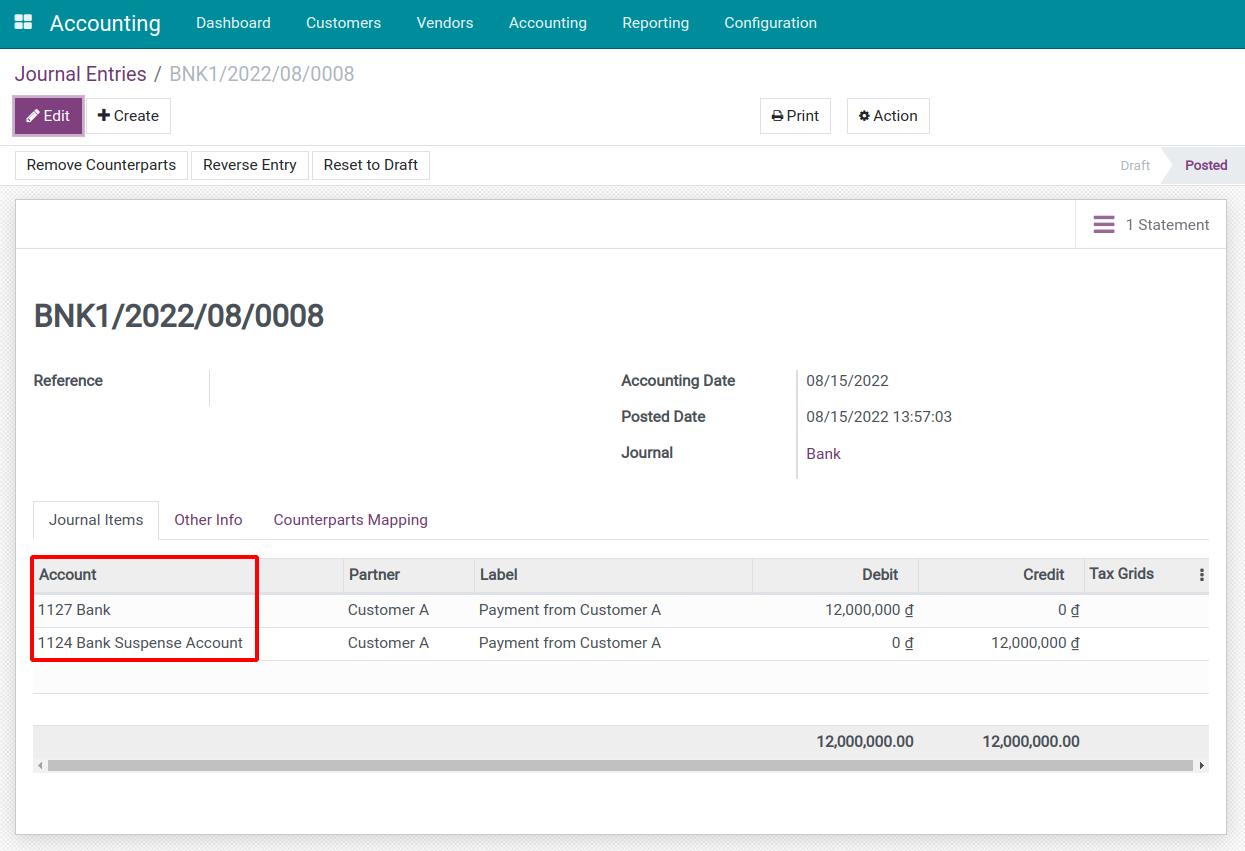
After the bank statement is reconciled, you will see the Suspense account is now replaced with the Outstanding Receipts account on the journal entry of the bank statement.
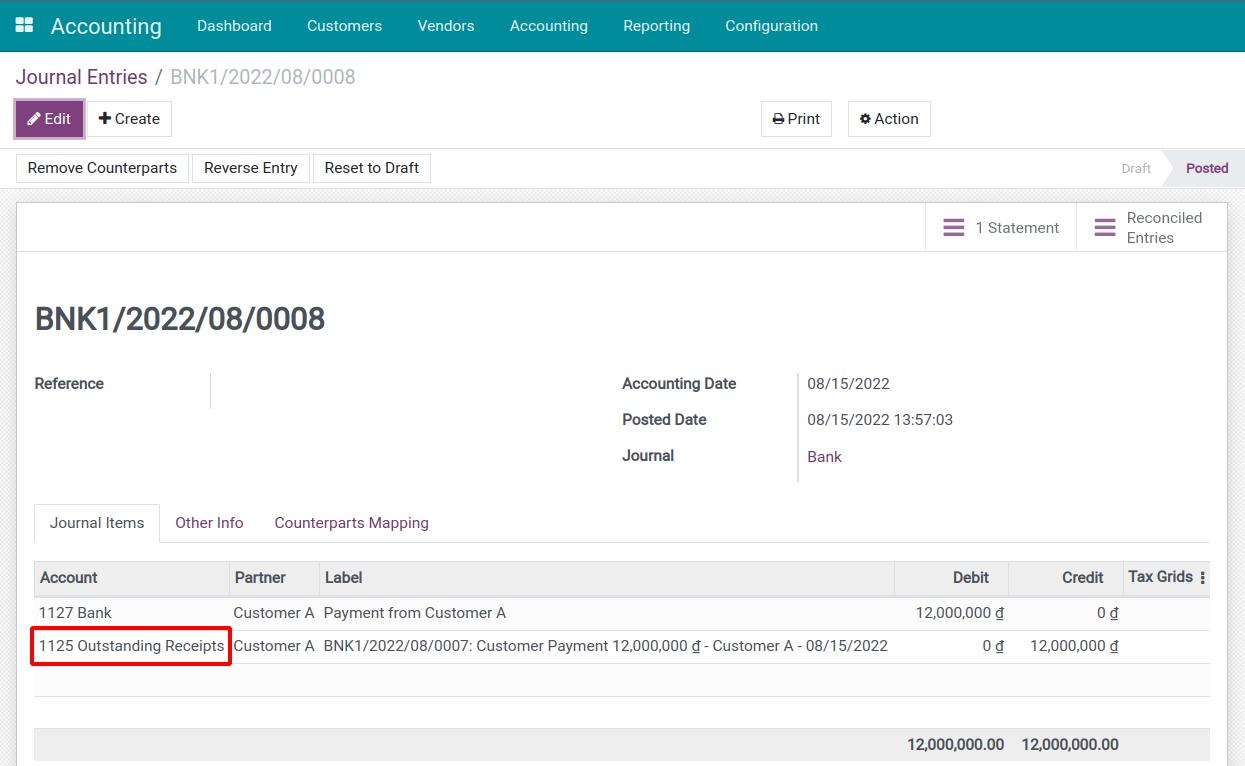
Some use cases in the reconciliation process
In the reconciliation process, occasionally you will encounter some situations as follows:
Situation 1: Invoice has been issued to the customer, on the bank statement there is a line for money receipt from that customer, but on the system, the payment has not been recorded and the debt has not been deducted yet. The system could not find the information to execute the reconciliation order.
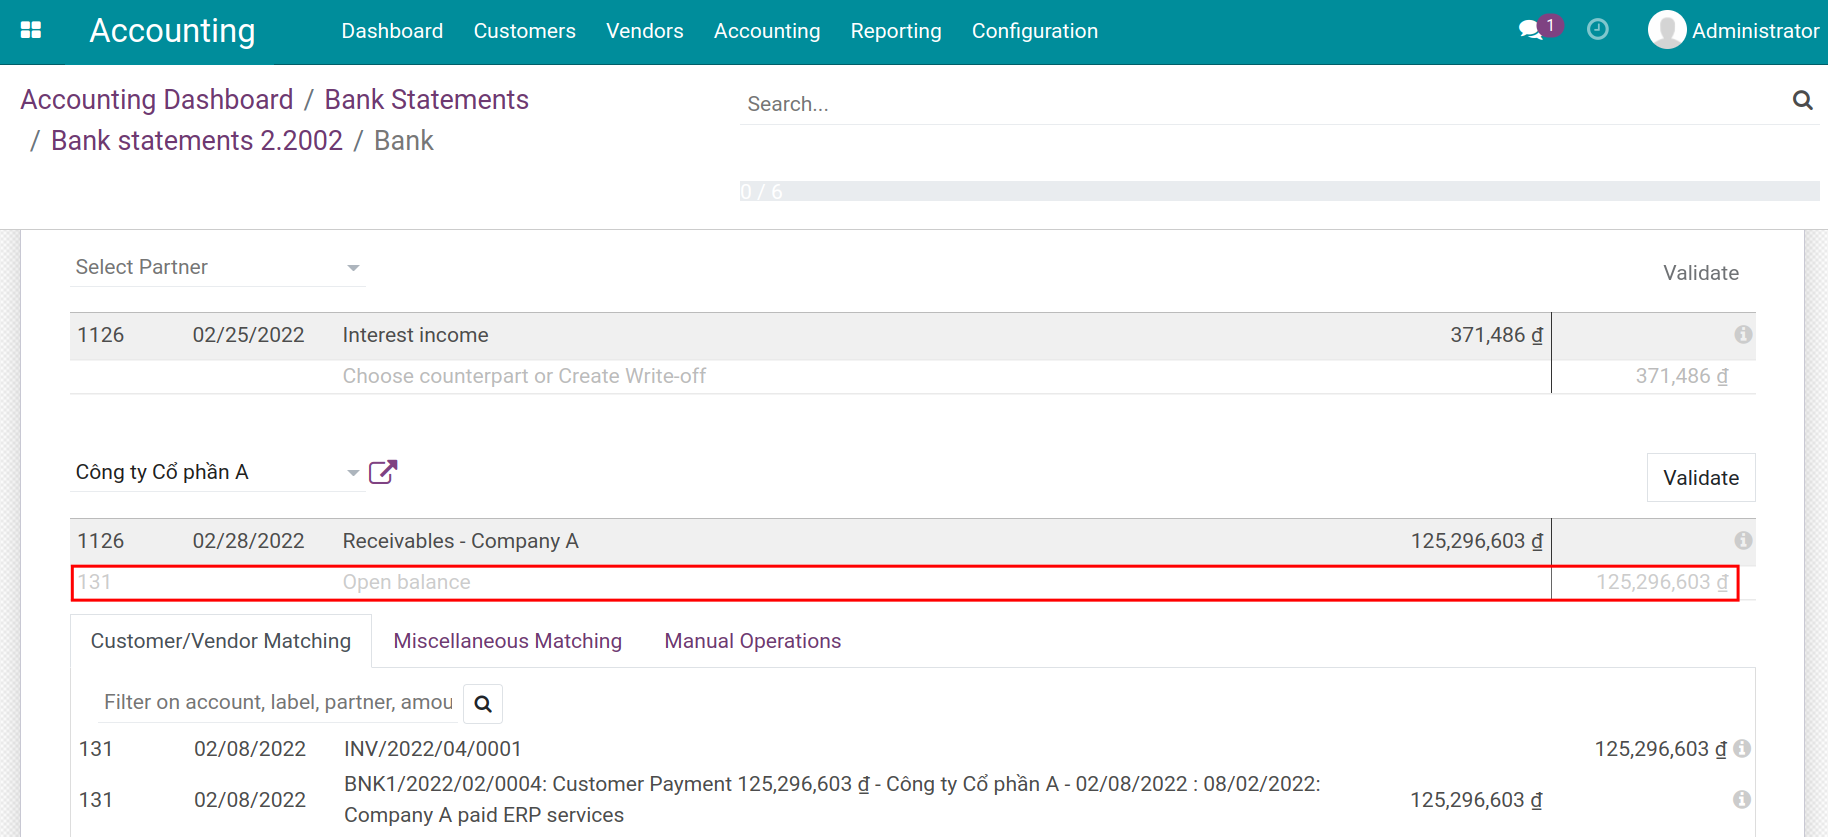
On reconciliation view of bank statement, go to tab Customer/Vendor Matching. Based on the information from the bank statements, choose the counterpart that matches these statement lines. Then click on Validate to reconcile.
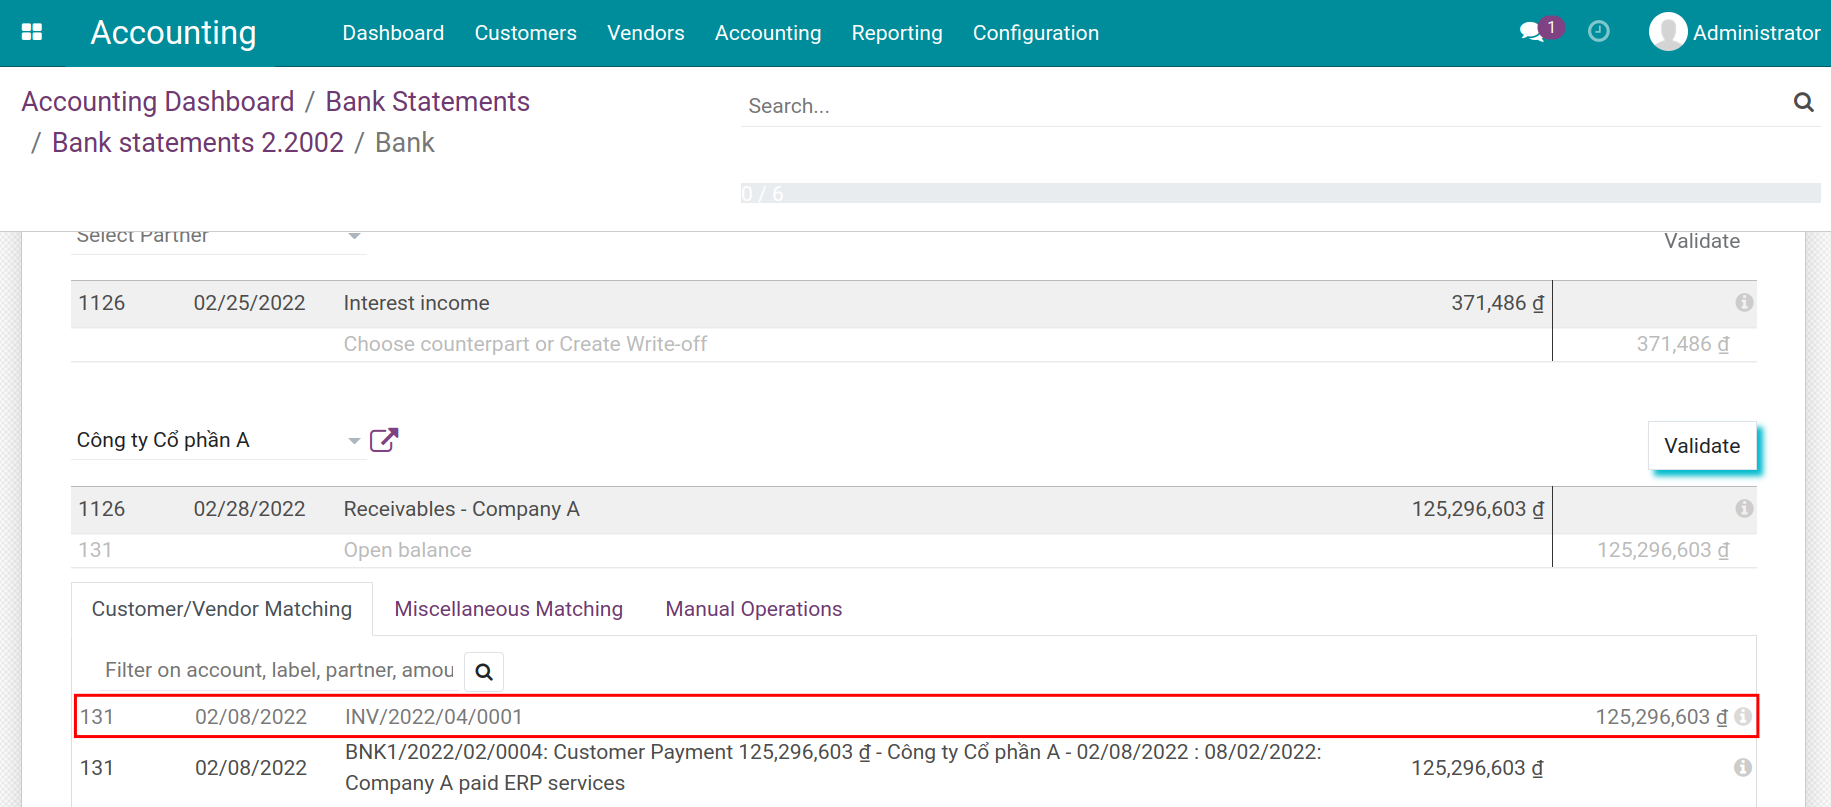
Navigate to the reconciled invoice, which is now marked with a Paid tag together with the payment information attached to it.
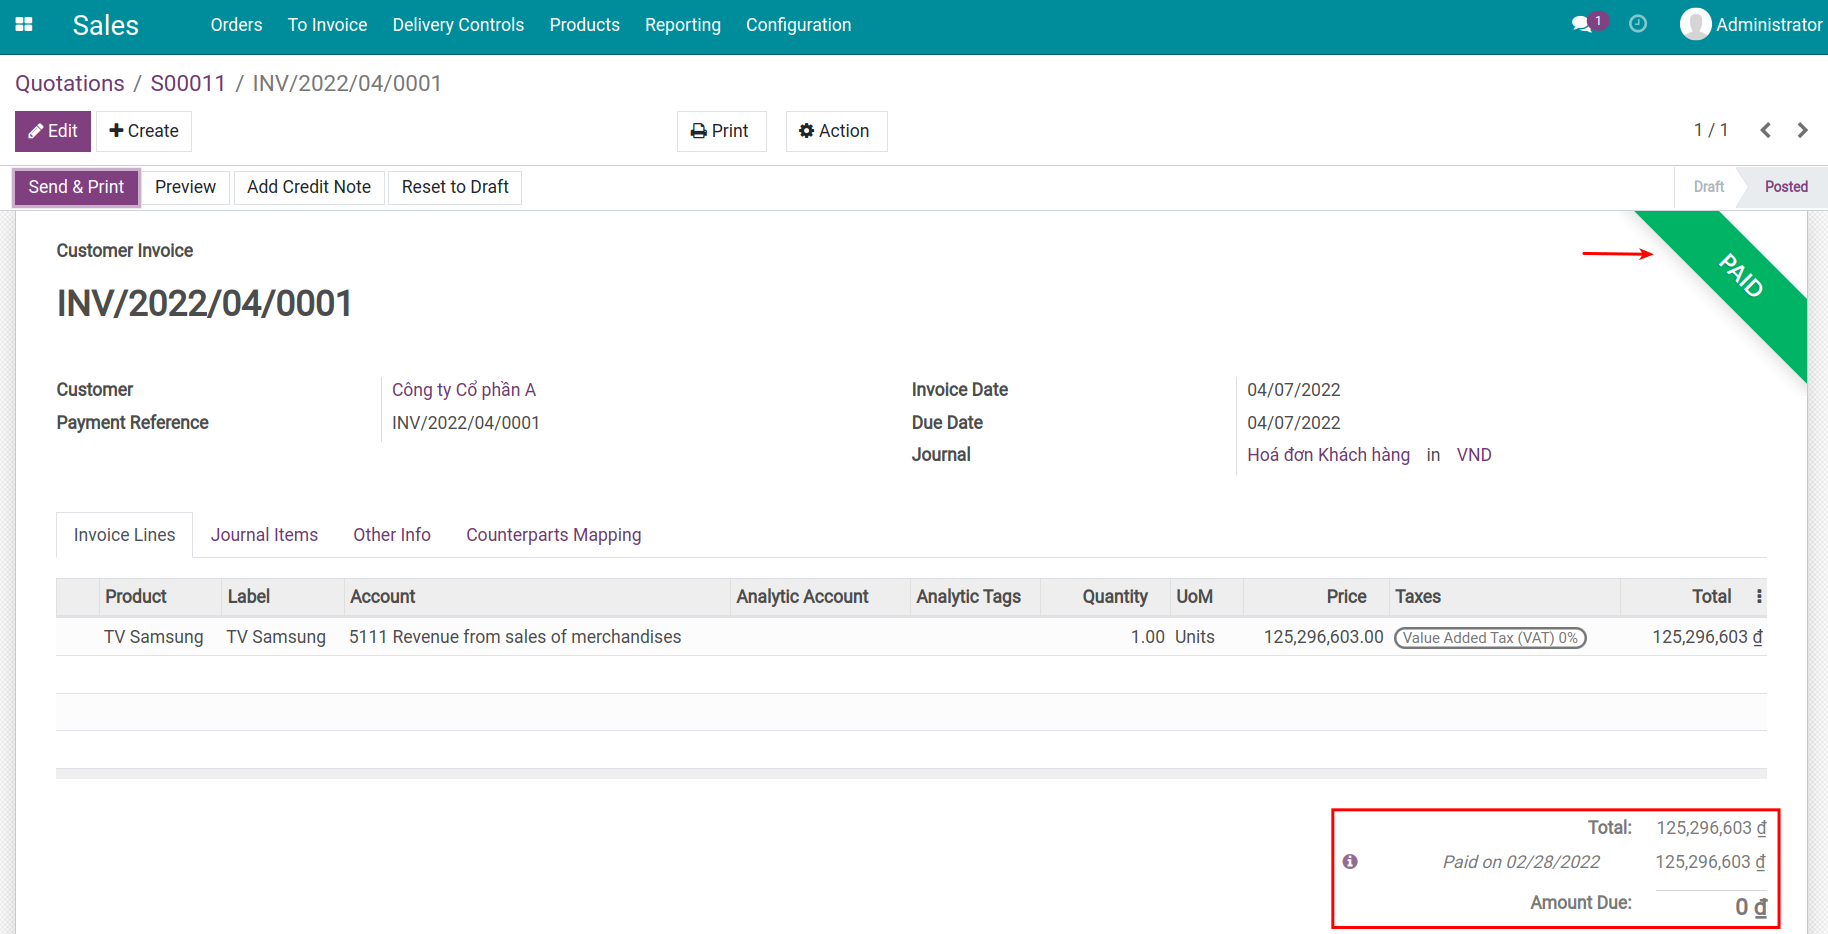
Situation 2: On the bank statements, there is a line of money received from the customer but the customer’s name is missing (Partner). The accountant also created a payment recording of that amount. When performing the reconciliation, the system could not find any information to suggest the matching.
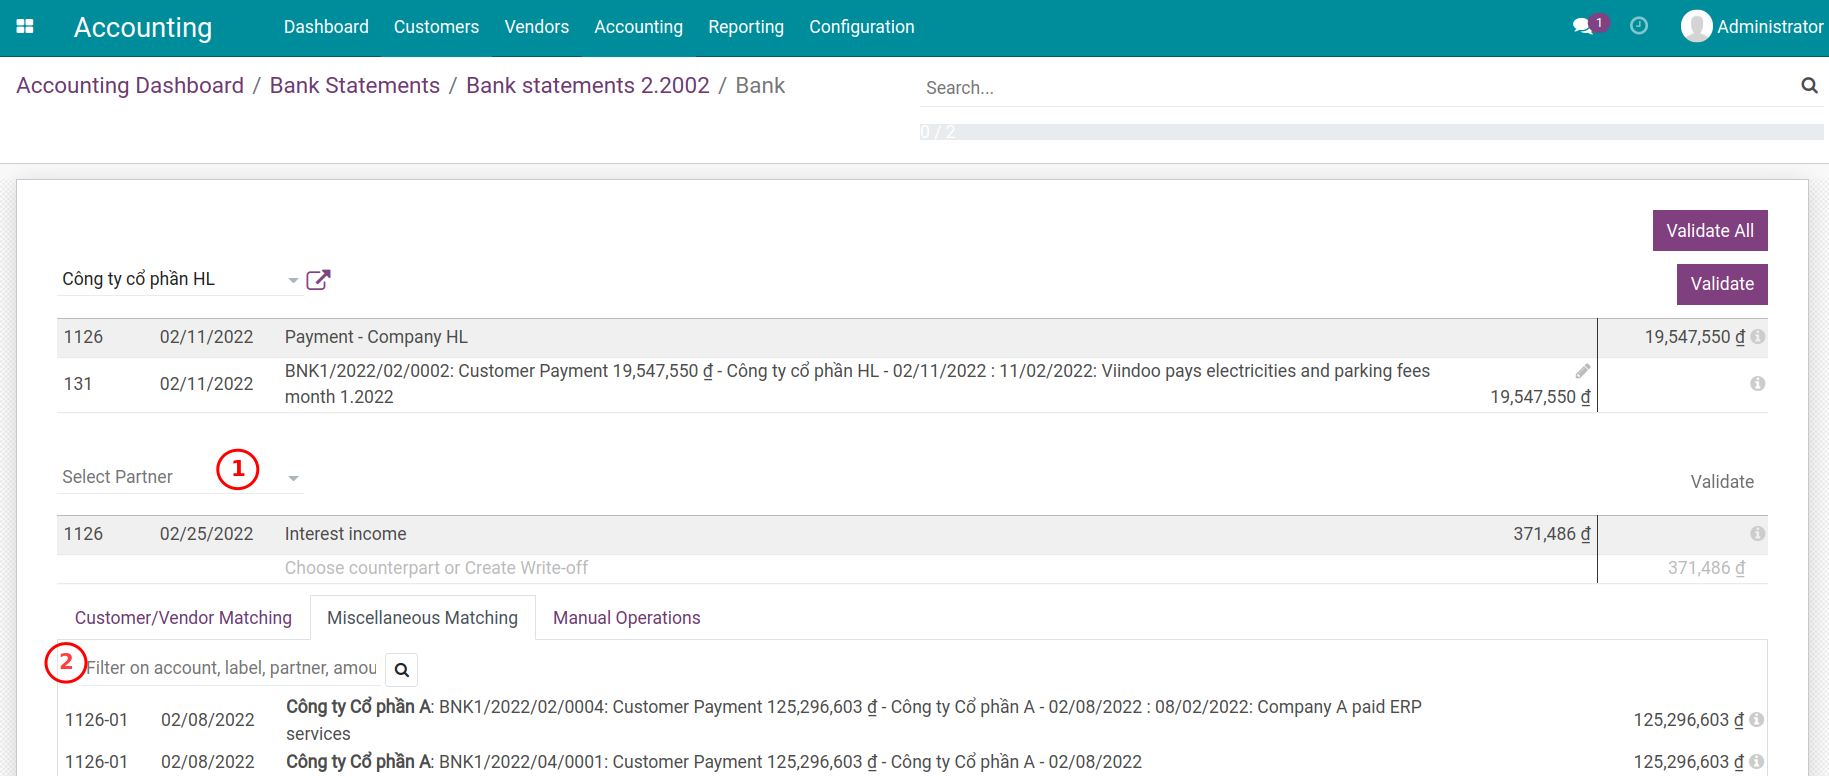
At this step, you can Select Partner (1) or use the search tool on the Miscellaneous Matching (2) tab. Search for the right information and the correct journal items that have already been recorded.
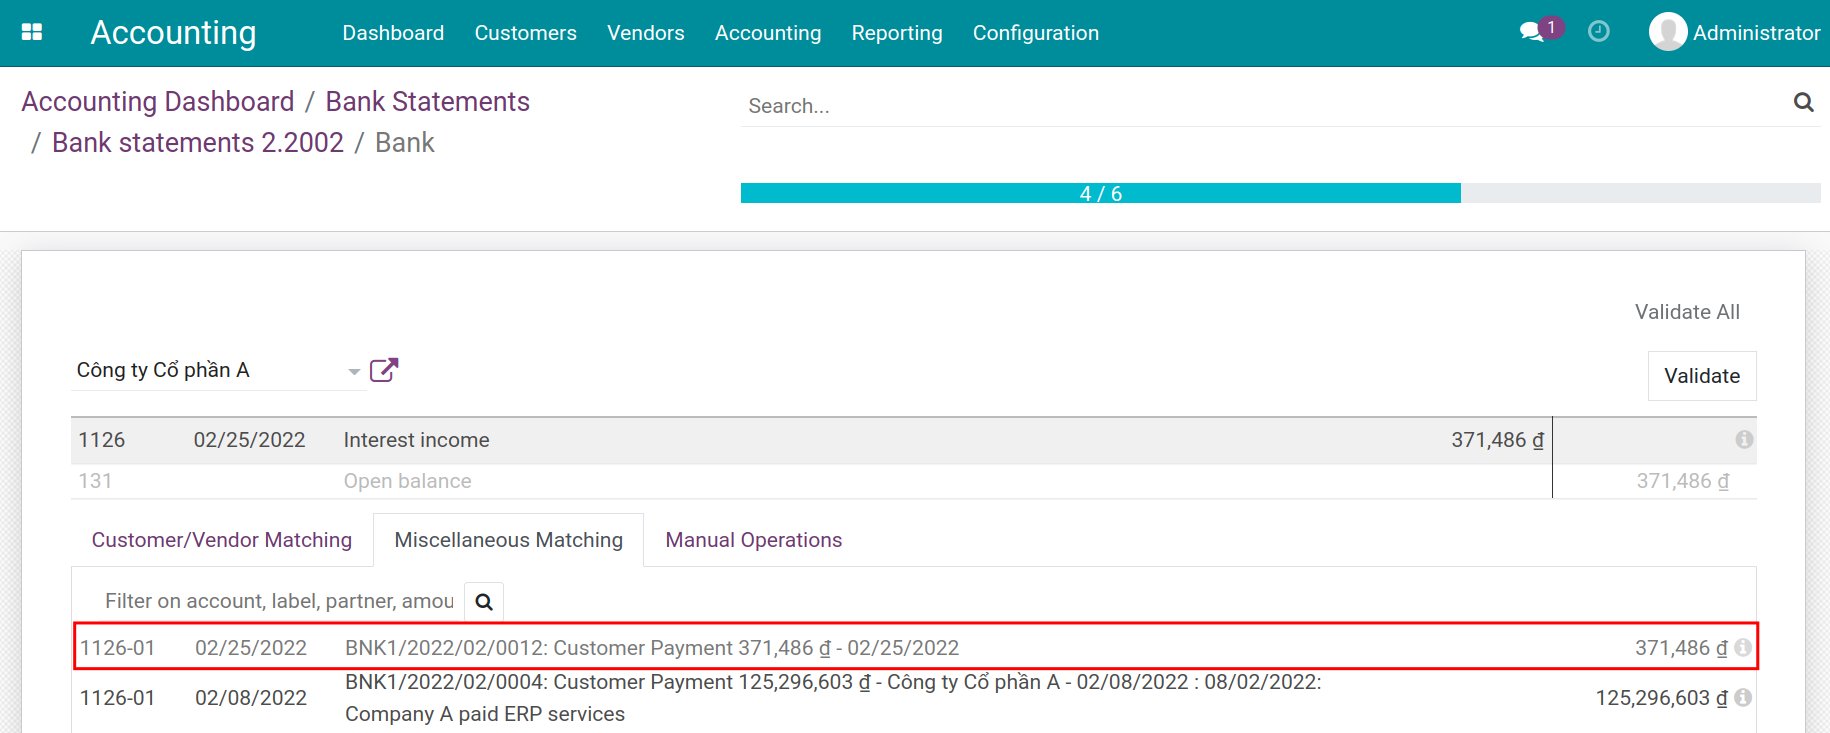
After being reconciled, the system will generate a matching number for the journal items. You can find this journal item matching number on the Accounting app by navigating to Accounting ‣ Miscellaneous ‣ Journal Items, filter the search by the partner’s name, and the reviewing is completed.
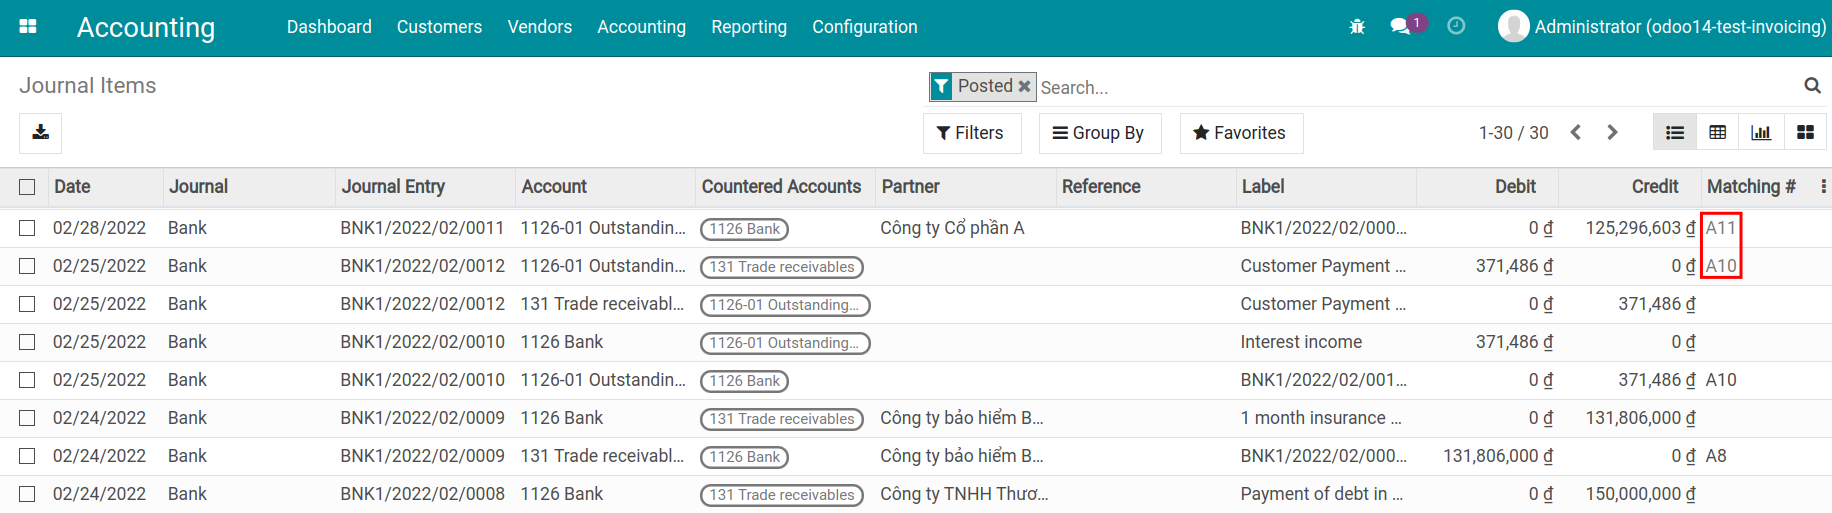
Note
To see the journal items and their matching number, you need to activate the developer mode. Read more on Activating developer mode article.
Situation 3: With payments that have a recurring cycle such as bank fees, capital gains, etc., which have not been recorded on the system, you can use the established reconciliation models. Read more on the Reconcile deposit interest and bank fees article.
At the reconciliation view of the bank statement, choose the suitable button corresponding to reconciliation models and press Validate.
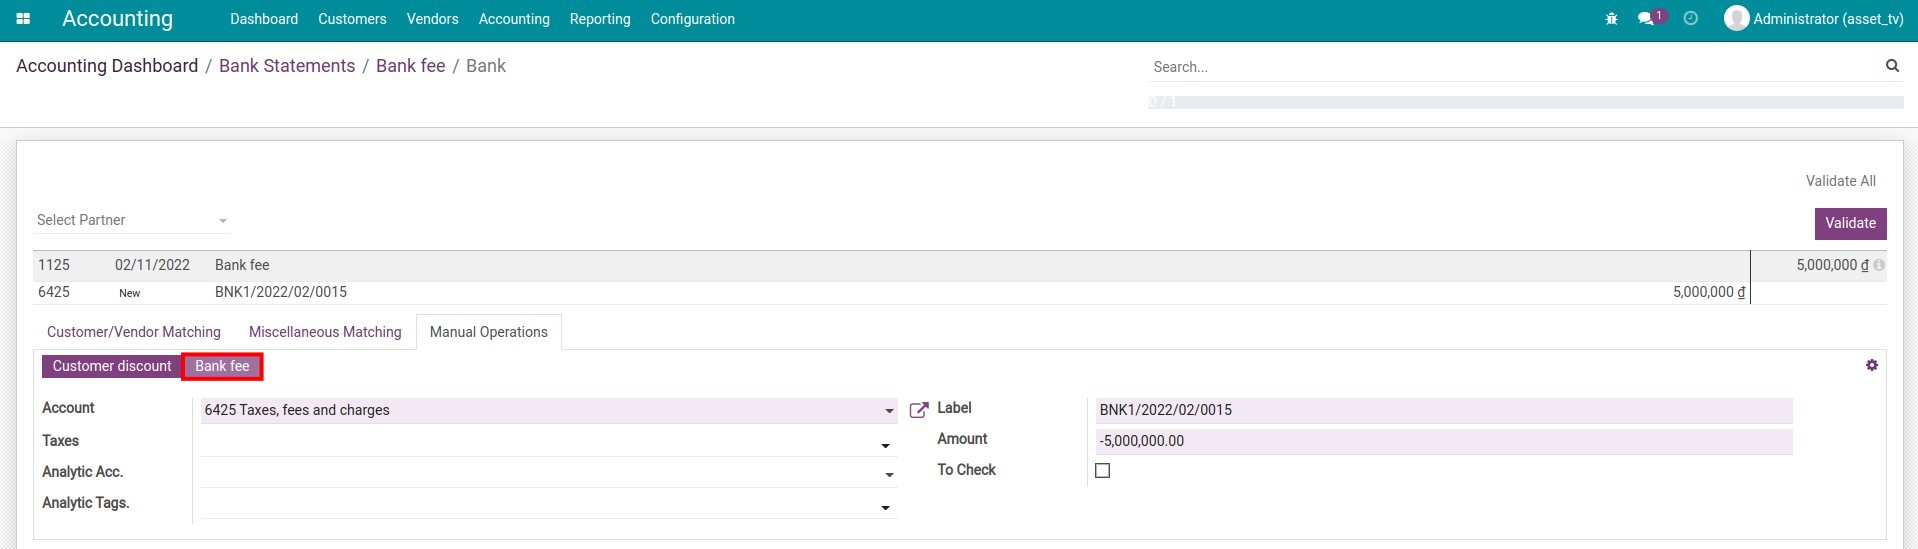
Once all the bank statement lines are reconciled, a notification will pop up as below.
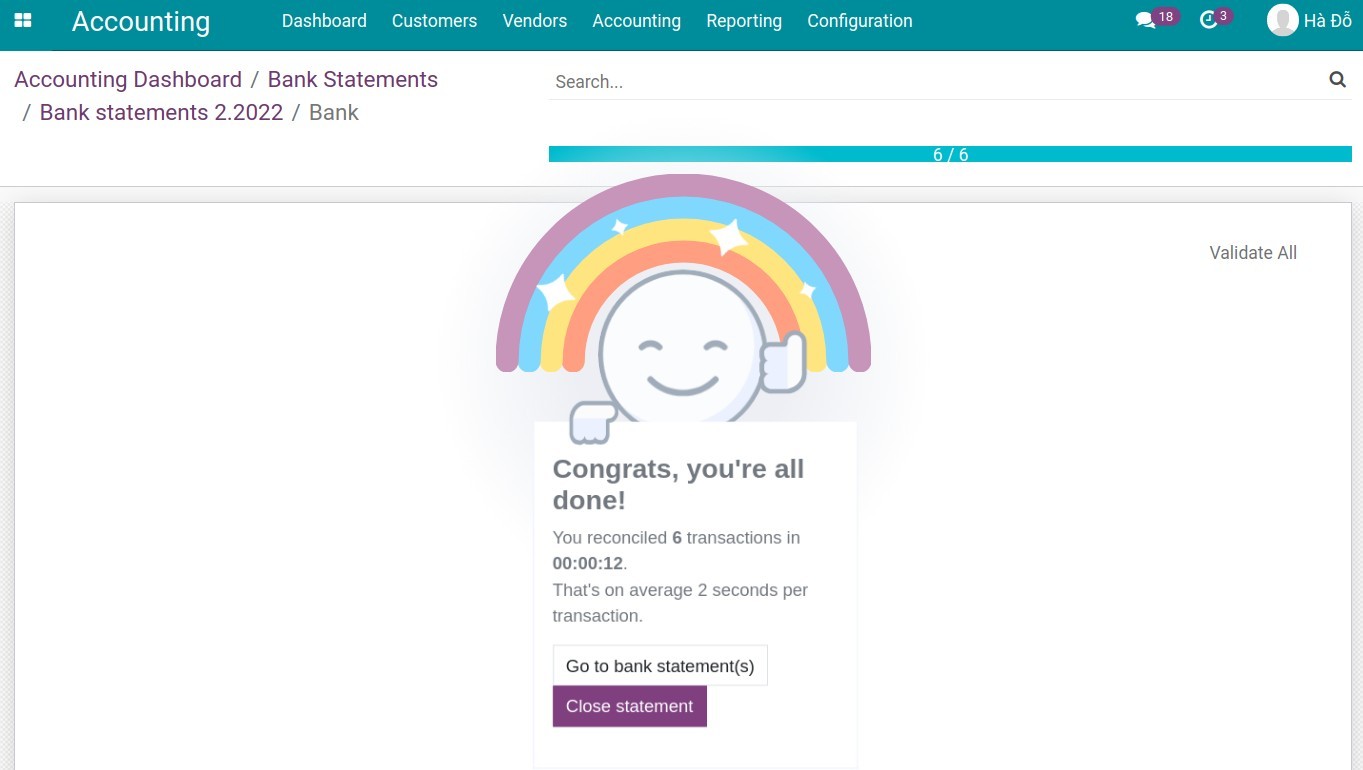
Do the final check for the starting and ending balance on the bank statement then press Validate. The bank statement status will be changed from Processing to Validated.
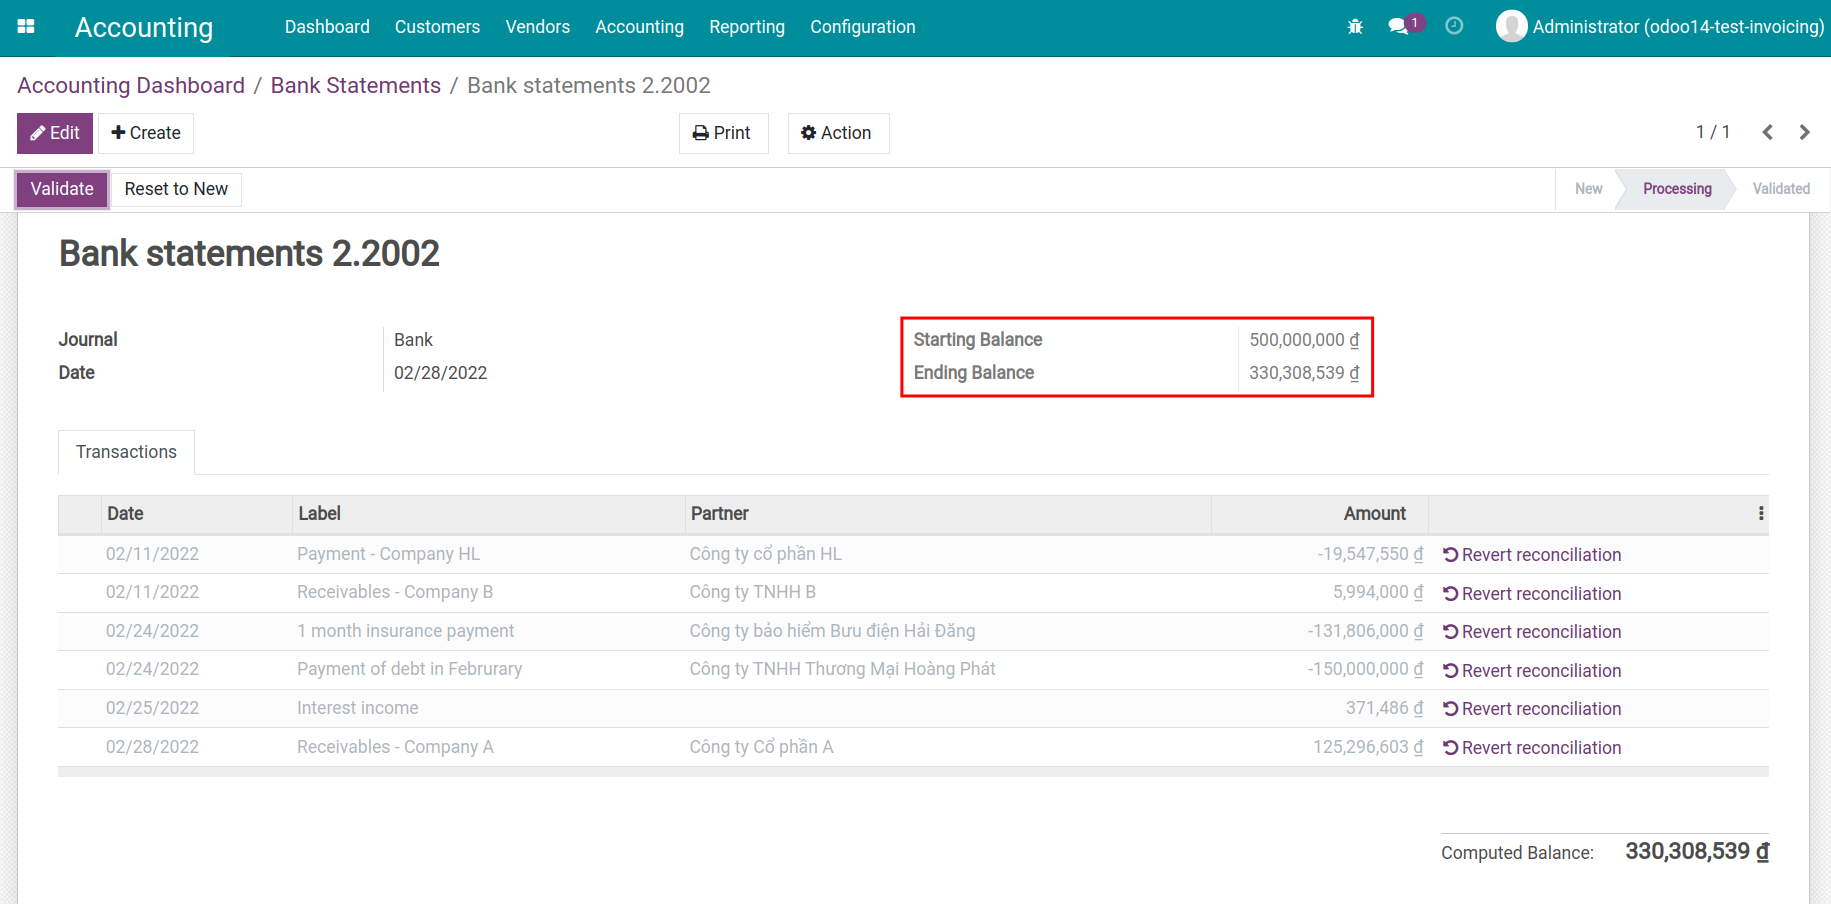
See also
Related article
Cash on hand management
Foreign currencies management
Foreign currencies management
Foreign currencies management
Requirements
This tutorial requires the installation of the following applications/modules:
Accounting & Finance
Bank Currency Rates
If you enable the multi-currencies feature in iSuite Enterprise Management Software , you can create sales orders , purchase orders , invoices or do accounting using different currencies besides the one your company is using. Refer to the article: How to configure a multi-currencies system.
Create a foreign currency bank account
In the iSuite Accounting & Finance Management , navigate to Configuration > Banks > Add a Bank Account and add a new account.
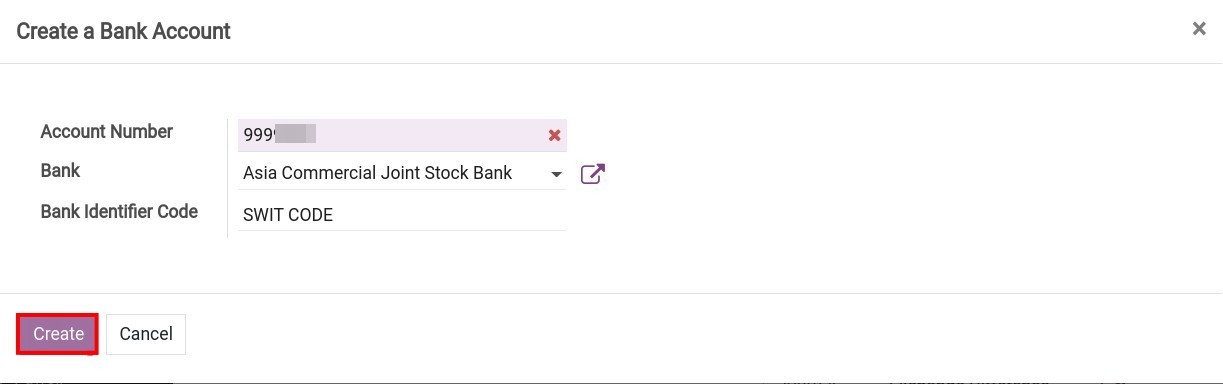
If this account is saved, Viindoo will auto-create the following records:
Journal: View this journal on the Accounting Dashboard and in the journals list.
Account: View this account on the Chart of Accounts. This account will have the same name as the Account Number you created. You can also edit the account if needed.
To set up a specific currency for the Account above, navigate to Configuration > Accounting > Journals, select the Journal that has just been created.
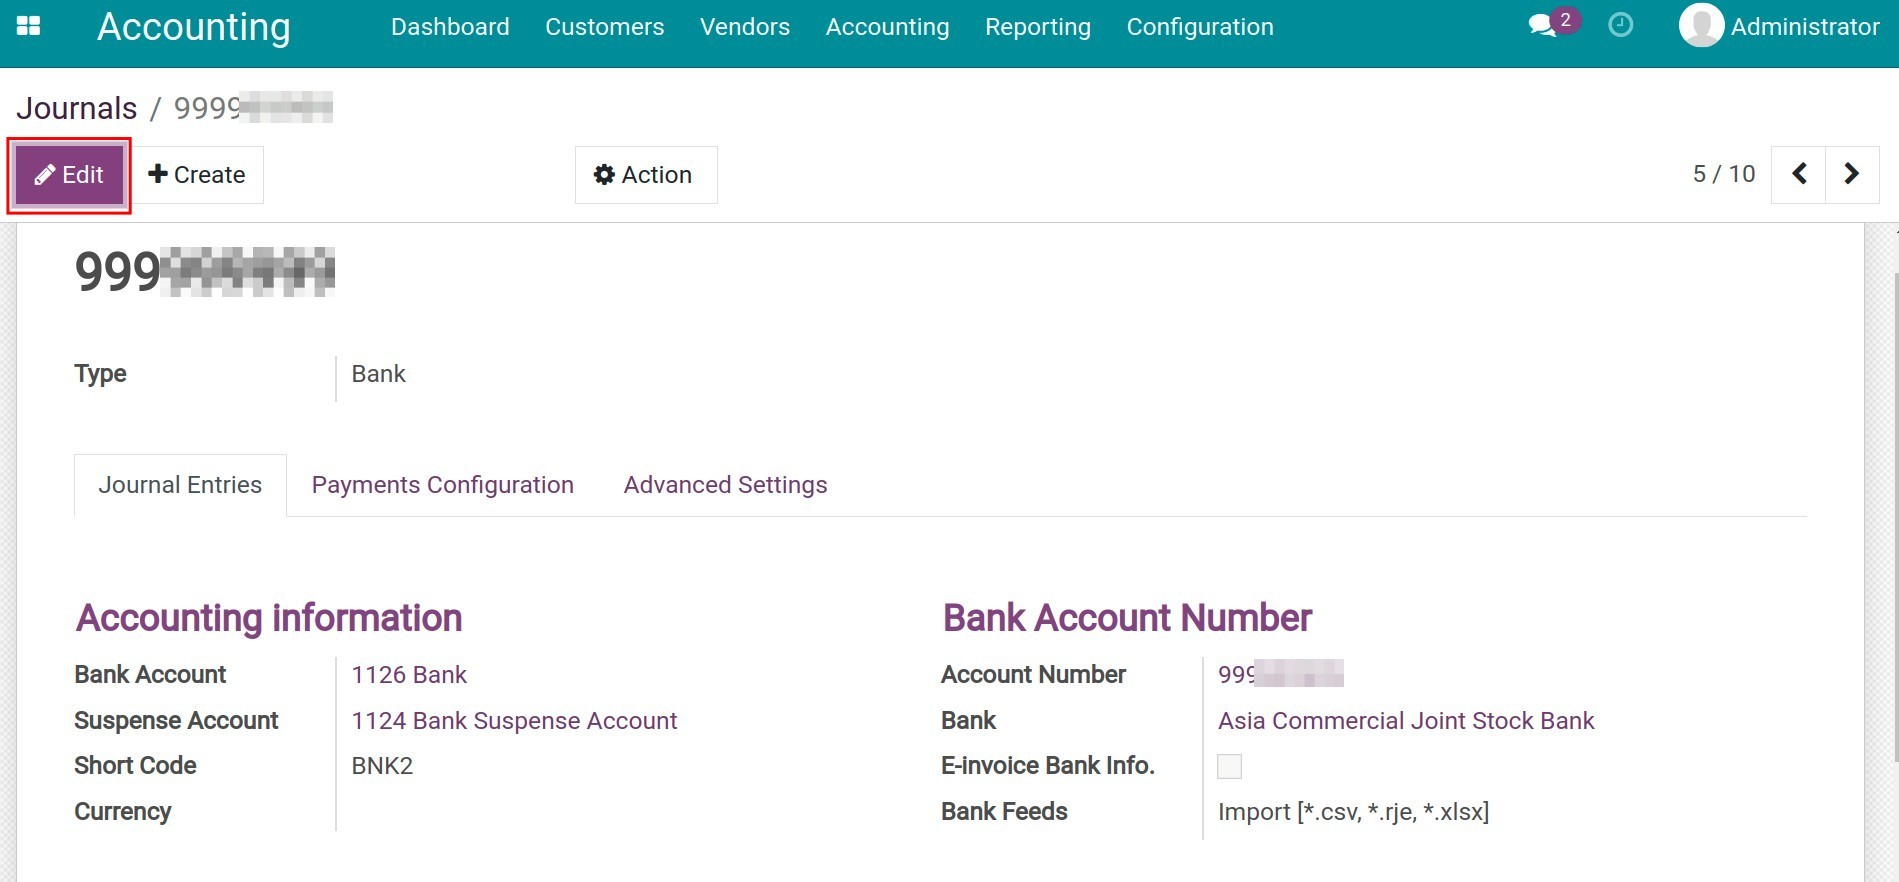
Press Edit to change the journal name and select a currency for the Currency field.
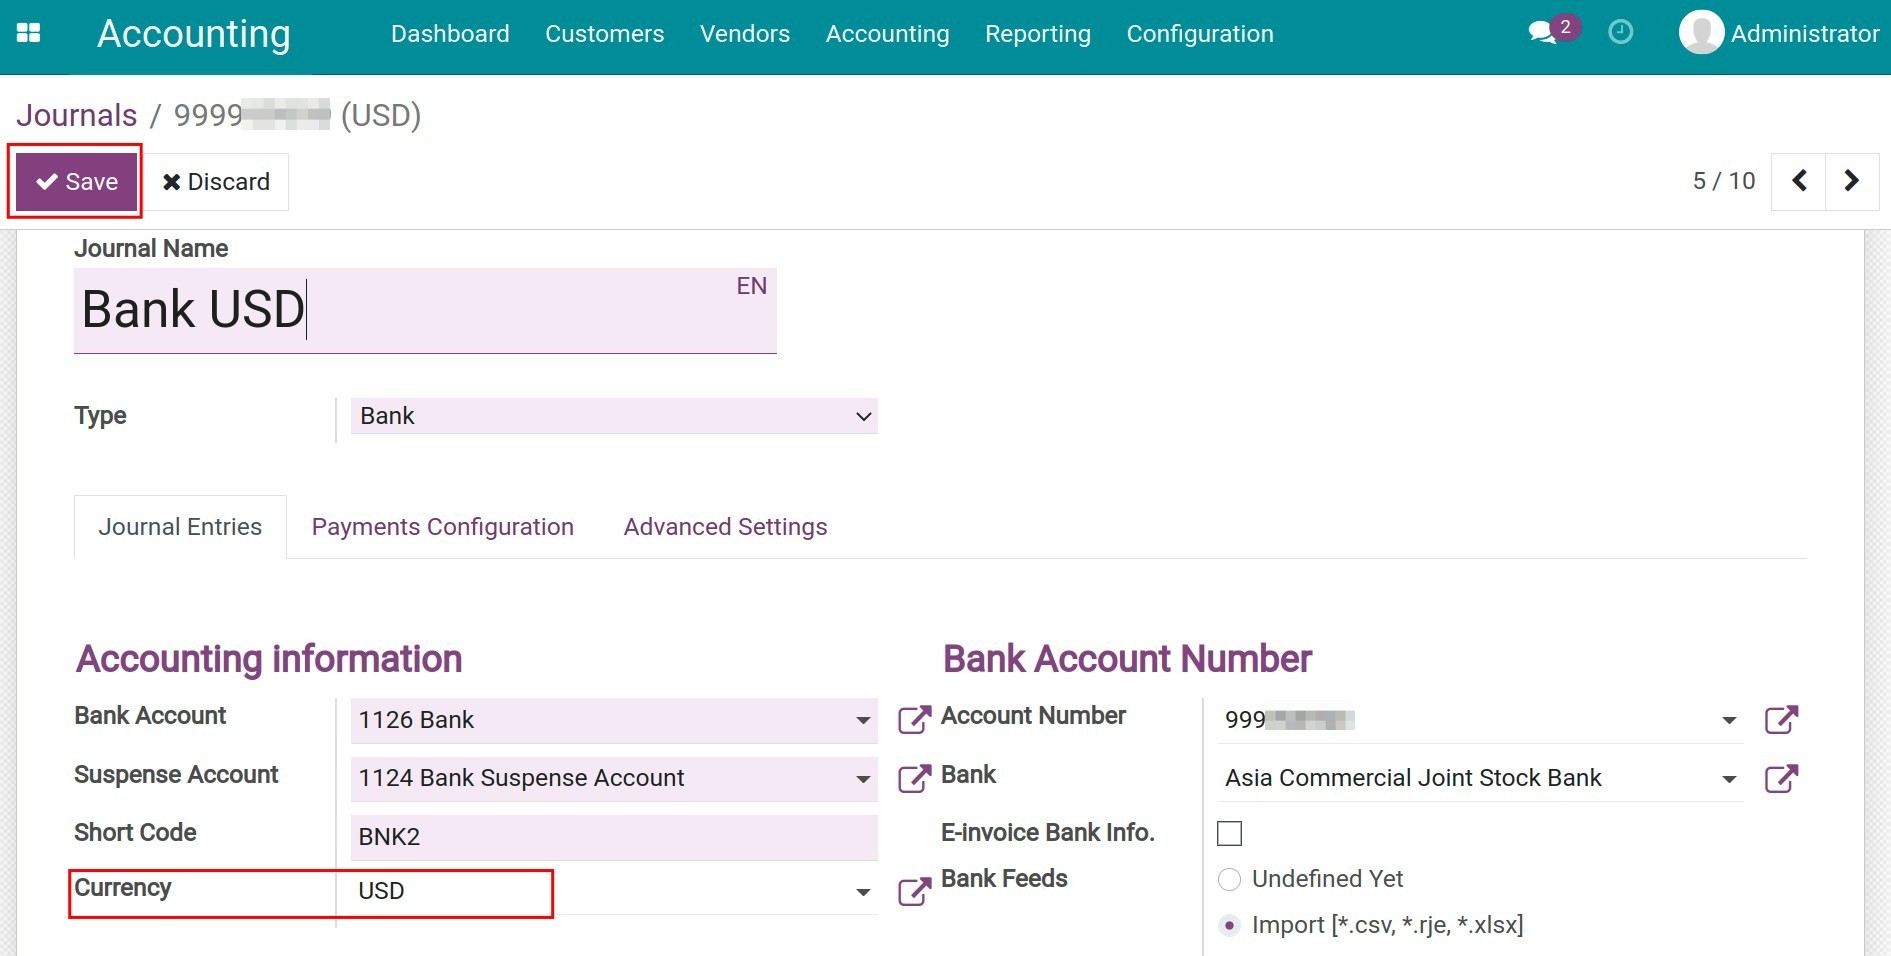
Click Save to record the changes.
Foreign currency transactions in Viindoo
Payment on foreign currency invoices
To learn how to record the payment, please refer to Manage invoices and make a payment in a multi-currencies system.
Currency exchange
Sell foreign currency
To sell foreign currency, navigate to Accounting > Customers > Payments or Accounting > Vendors > Payments.
Enter payments from the customers menu

Enter payment from the Vendors menu
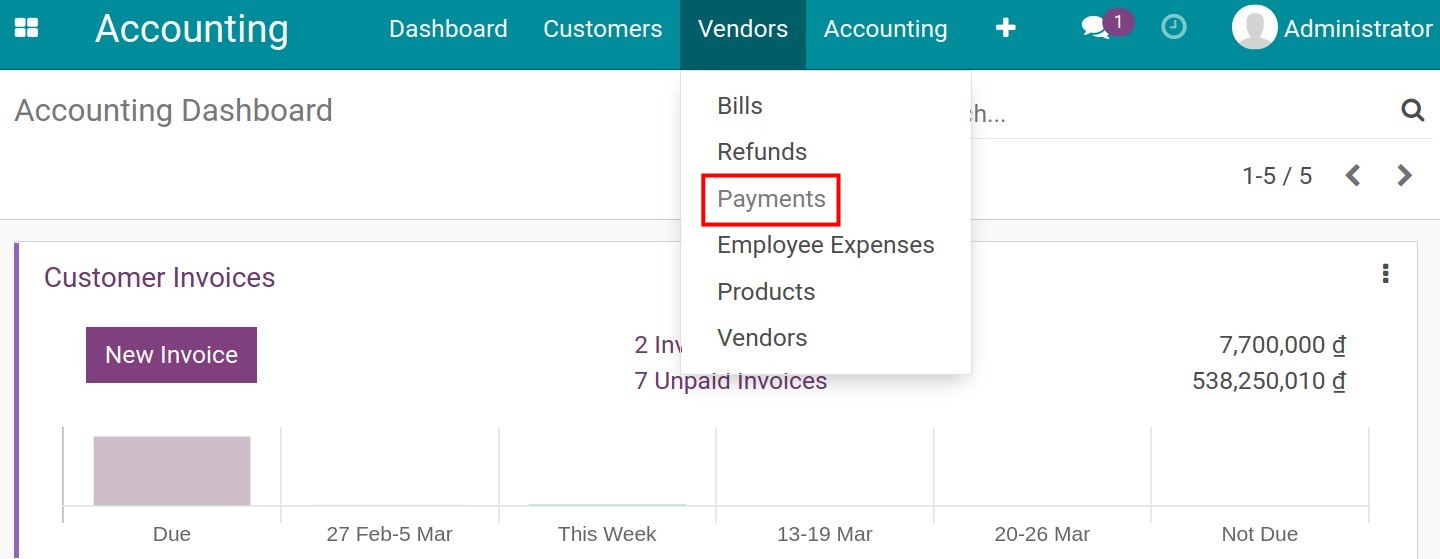
Press Create to create a payment.
Transferring money between the Company’s accounts is considered an internal transaction, so you should select “Internal transfer” first. Then, you will be notified about the creation of an automatic entry for this transaction in foreign currency.
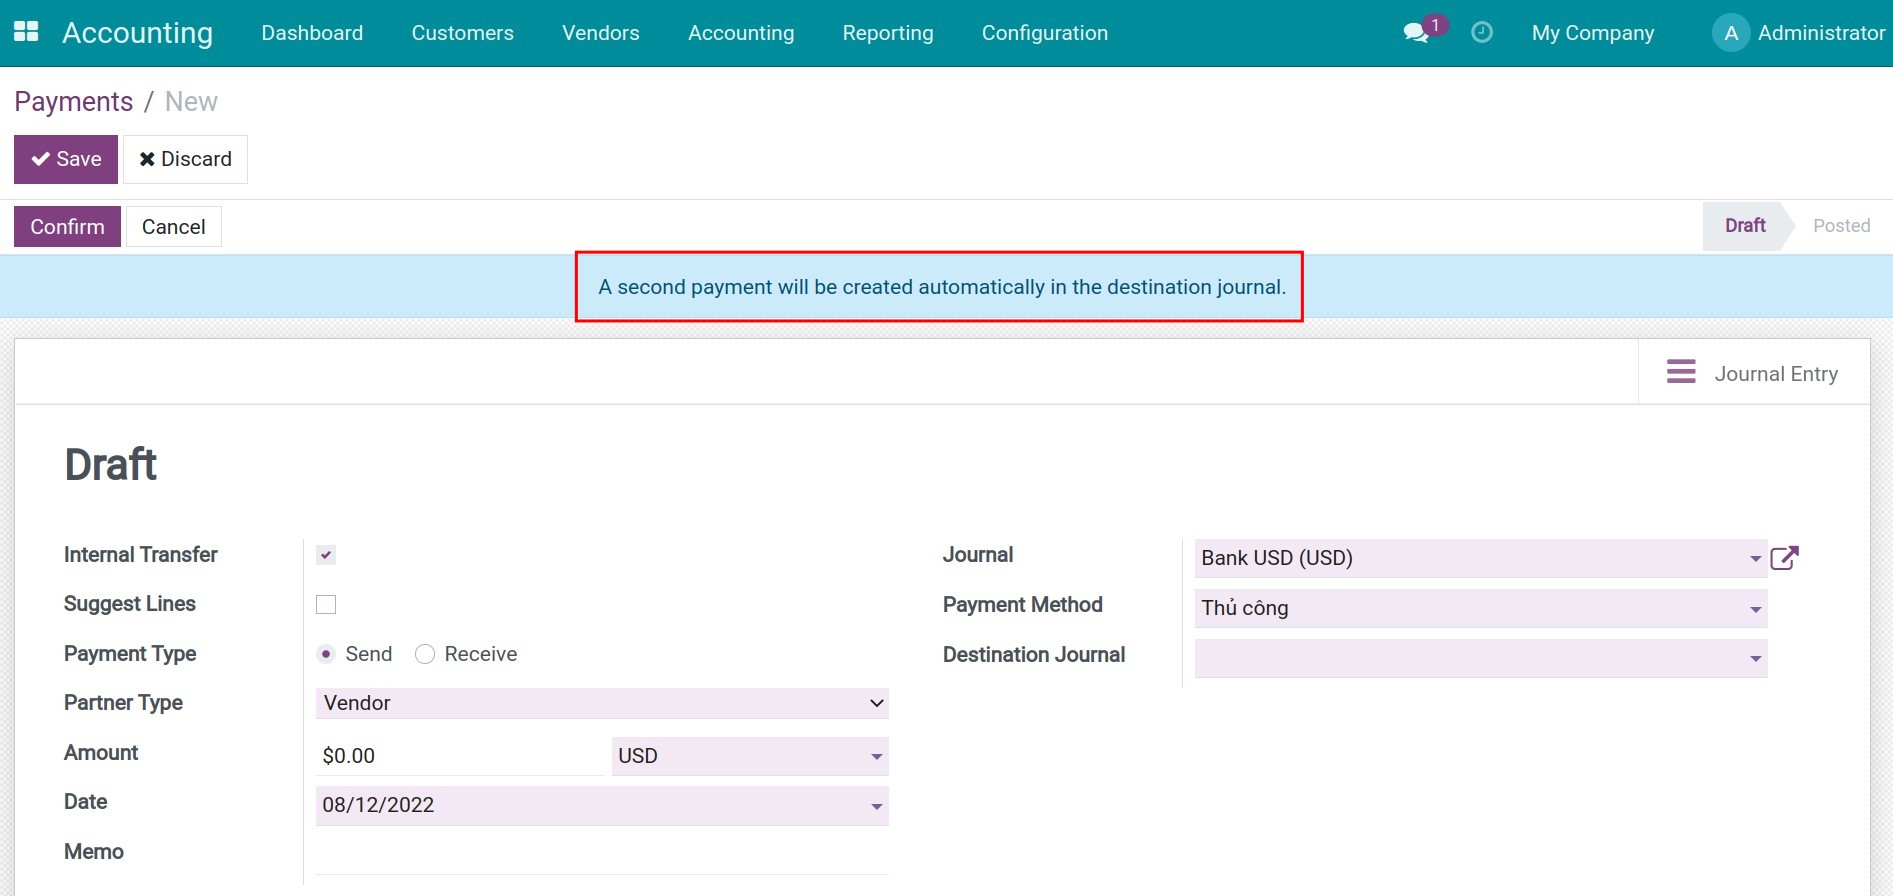
After that, complete the following information:
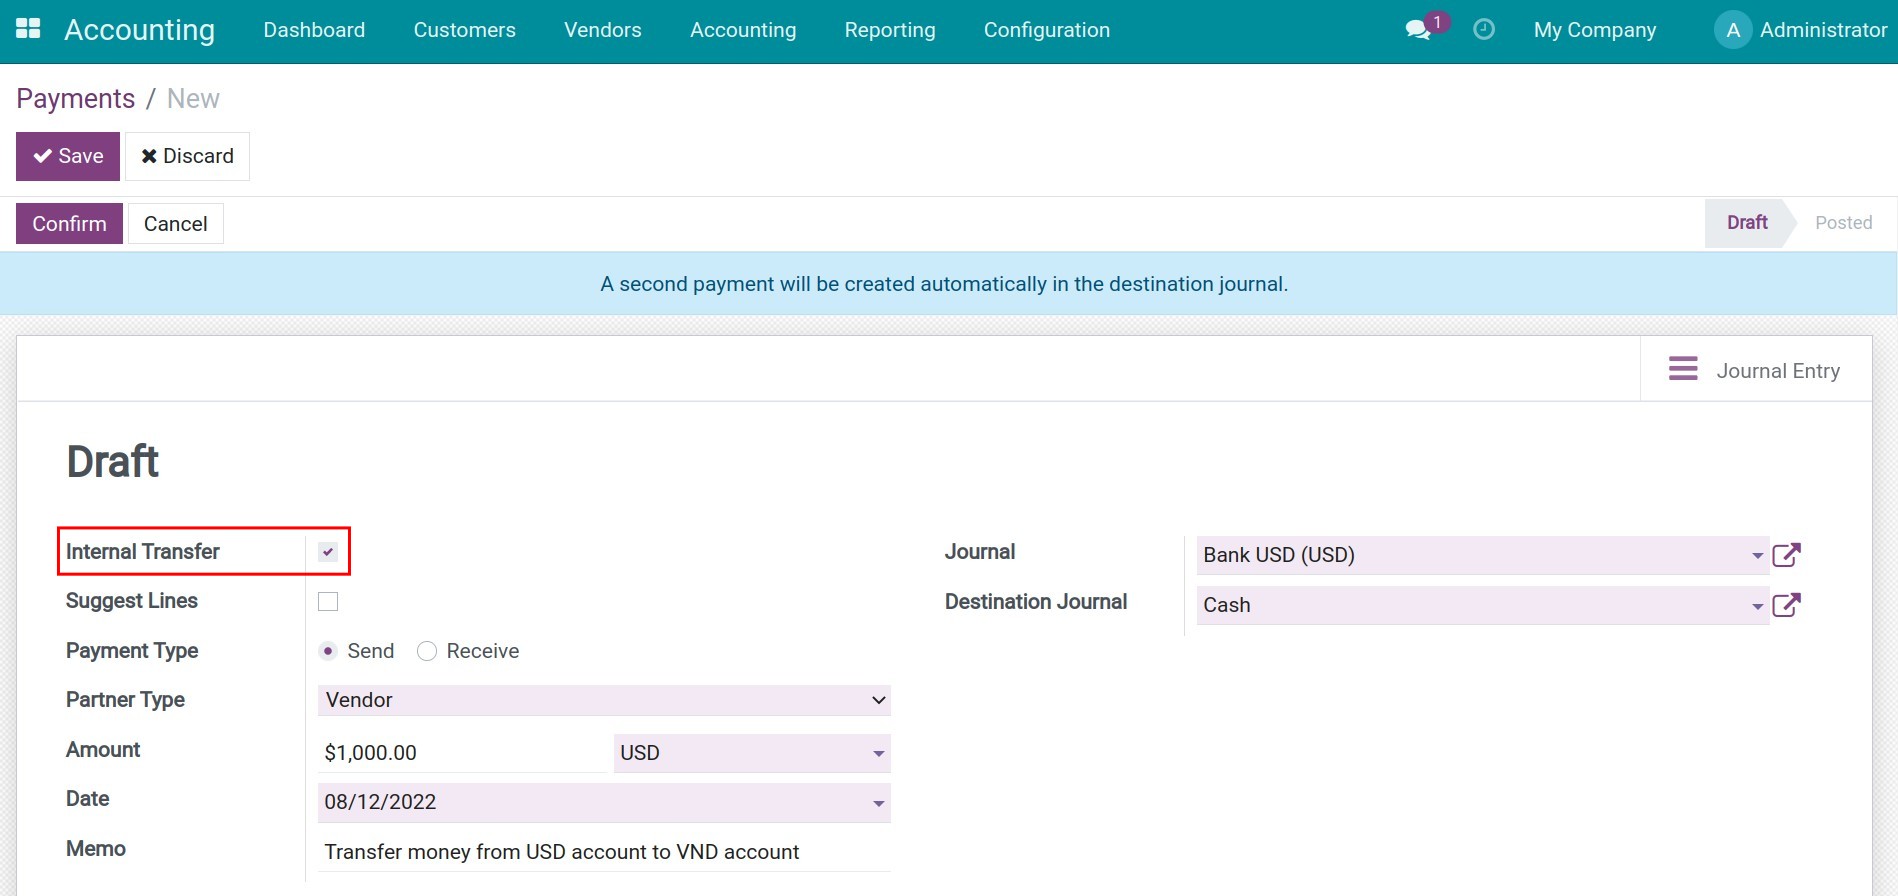
Payment Type: Select Send for the selling foreign currency transaction.
Amount: Enter the foreign currency amount that you need to sell. The currency type is updated based on the selected journal currency.
Date: The transfer date.
Memo: This information will appear as the journal entry’s reference.
Journal: Select the journal that you are sending the foreign currency from.
Destination Journal: Select the journal that receives the exchanged money from the foreign currency sale.
Save and Confirm the payment.
Click the Journal Entry button at the top right corner of the payment slip to view accounting generated from the foreign currency sale.
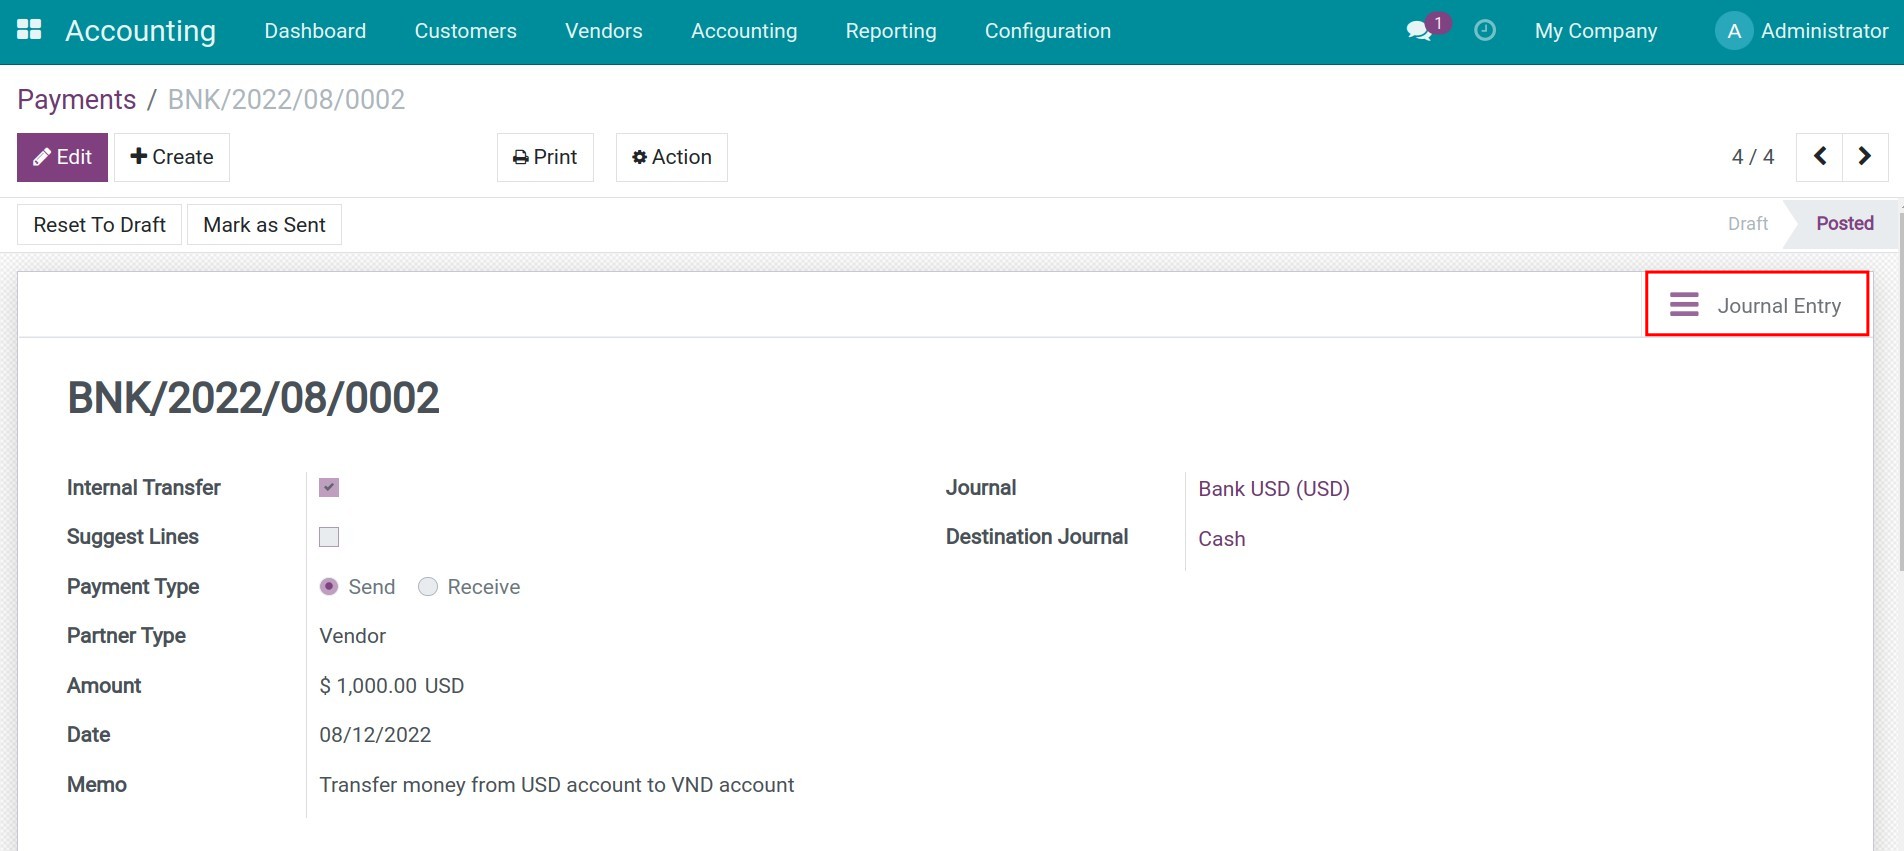
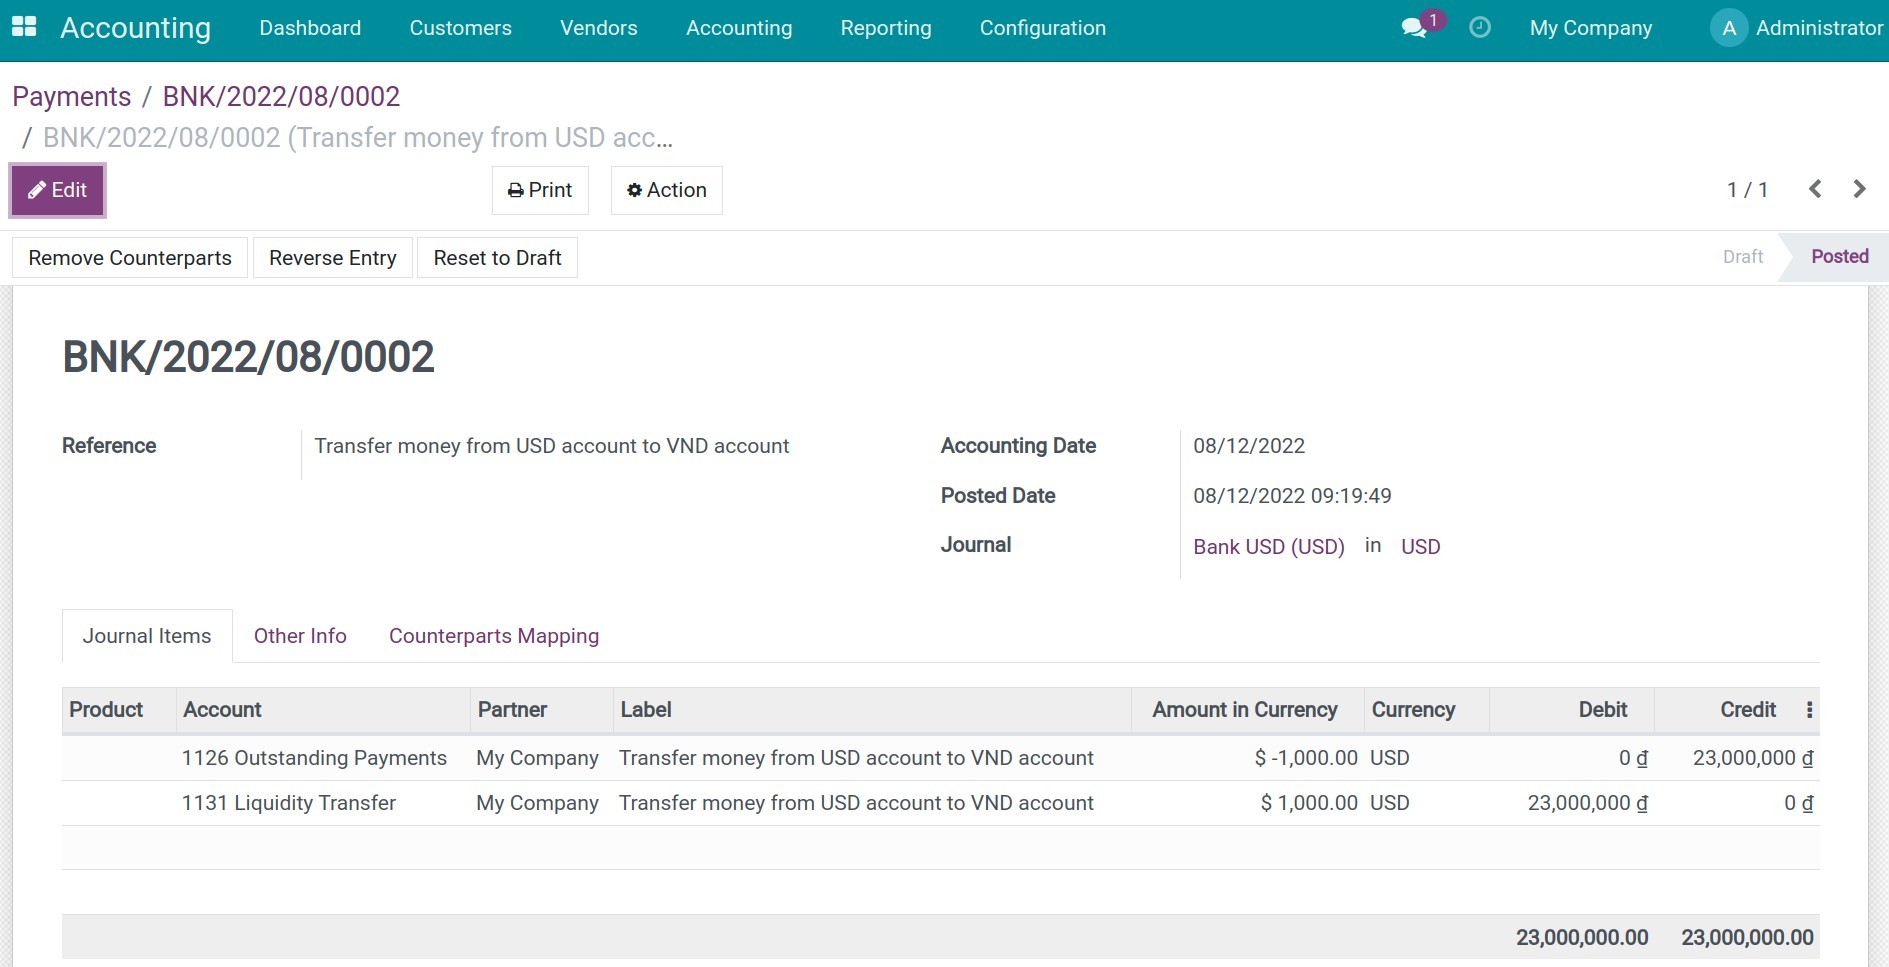
Go to Accounting > Vendors > Payments, remove the default filter, select the payment that is automatically generated from the currency conversion and view the resulting journal entry to receive the converted currency.
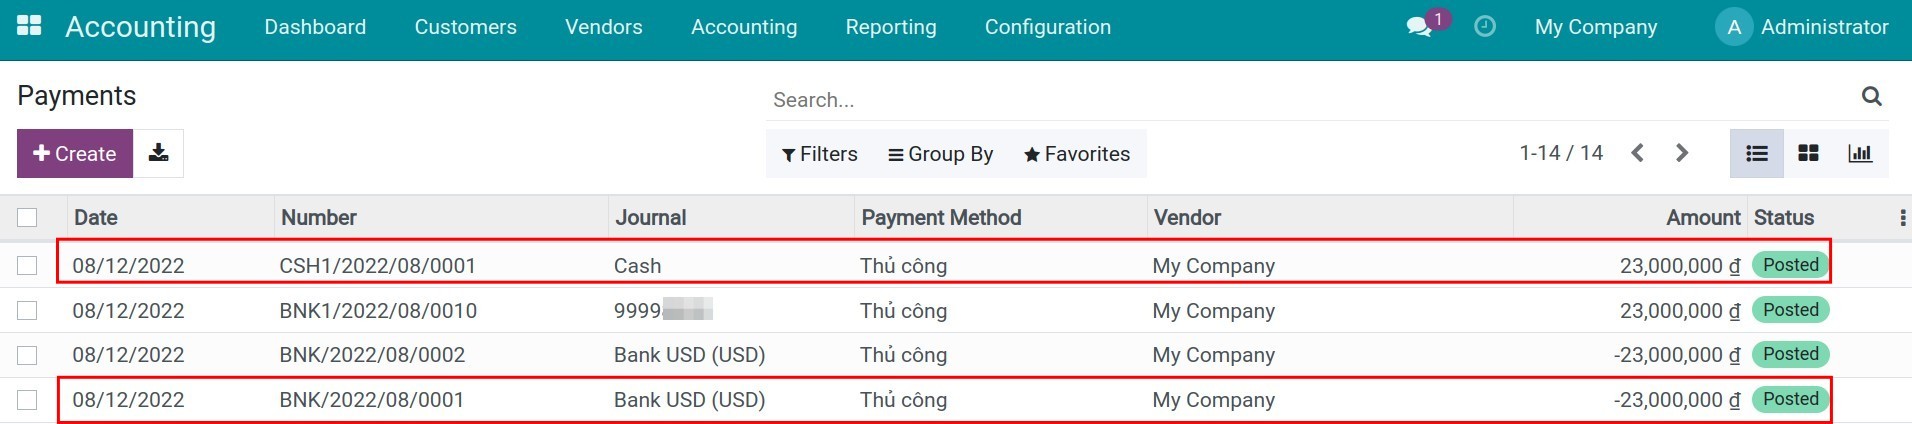
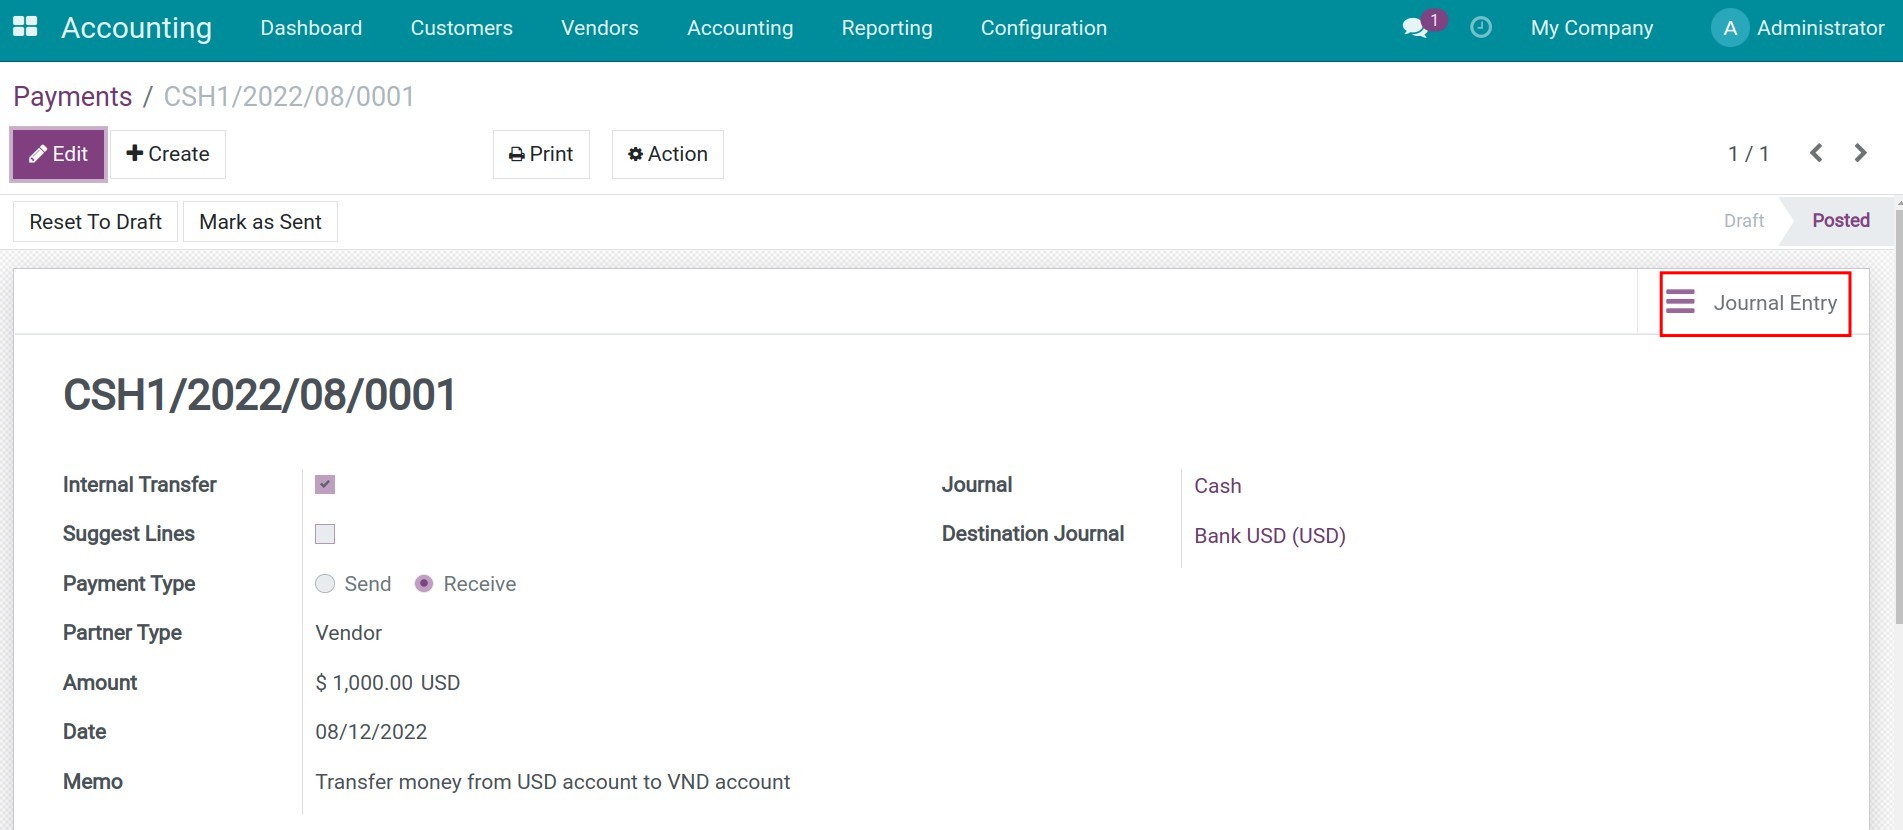

When the bank sends the credit notes or the bank statement then you can record that bank statement and start the reconciliation process.
Buy foreign currency
Do the same as in selling foreign currency but remember to select the correct Journal.
See also
Related article
Manage Bank Statements
Define your Fiscal Year
Define your Fiscal Years
Requirements
This tutorial requires the installation of the following applications/modules:
Viindoo Accounting & Finance
A fiscal year is an one-year period (12 months), which is used for business planning, budgeting, and reporting. Usually, a financial year is calculated according to the Gregorian calendar, starting from January 1st to December 31st. However, it can be defined for a different time period, depending on the specific circumstances of the business.
In Viindoo Accounting app, navigate to Configuration > Settings and find Fiscal Year section in the Fiscal Periods field to check settings information for a company’s fiscal year.

The date configured here will be taken as the last day of the fiscal year. On this date, if you have not carried forward the balance, when viewing the financial statements, balances of revenue and expense accounts will be set back to zero on the first day of the next fiscal year. In reality, these balances still exist, you have to carry forward them.
In addition, you can enable the Fiscal Years feature from here to create financial years with irregular cycles:
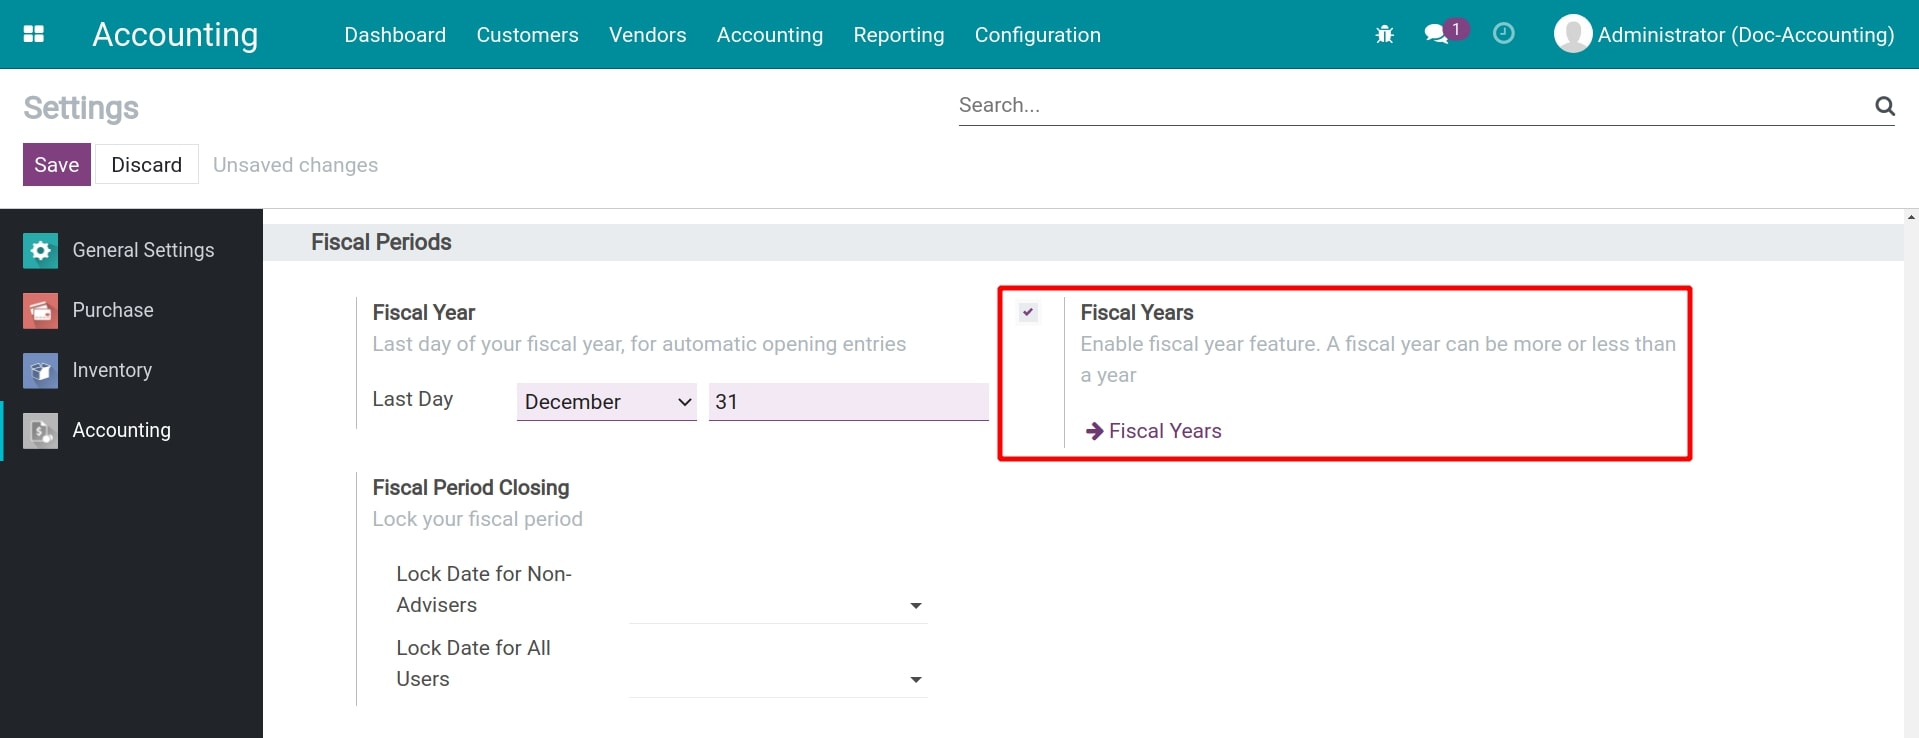
Note
Fiscal periods created with this feature cannot be overlapped with each other.
See also
Related article
Balance carrying forward
Balance carrying forward
Requirements
This tutorial requires the installation of the following applications/modules:
At the end of each accounting period by month, quarter, or year, it is necessary to make accounting entries to transfer revenue and expenses as well as close accounts to prepare for financial statements, analytic reports, etc. from which the company will track business progress. A balance carries forward is the transfer of balances of tax accounts and accounts type 5, 6, 7, 8 to accounts type 9 in order to determine revenue and expenses, from which to calculate the company income tax and measure business profit.
Balance carrying forward entries include:
Tax payables balance carry forward;
Costs of goods sold balance carry forward;
Revenue - Sales of goods balance carry forward;
Financial revenue balance carry forward;
Financial expenses balance carry forward;
Selling expenses balance carry forward;
Administrative expenses balance carry forward;
etc.
To use this feature, navigate to Viindoo Apps and install the following two modules:
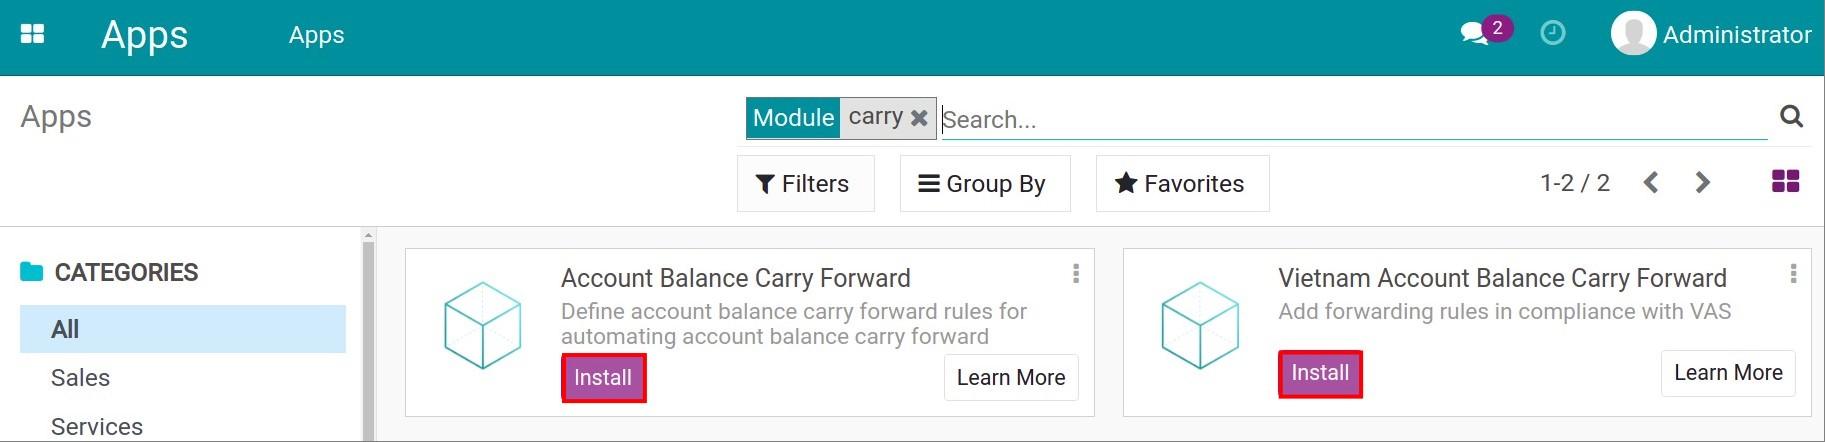
Configure balance carry forward rules in Viindoo
The balance carrying forward entries according to the Vietnam accounting standards are automatically generated. In case you want to check whether the carry forward rules are complete for your business type or not, or want to add another rule, you can navigate to Accounting > Configuration > Carry Forward Rules.
Balance carry forward rules according to the Vietnam accounting standards are configured as shown below:
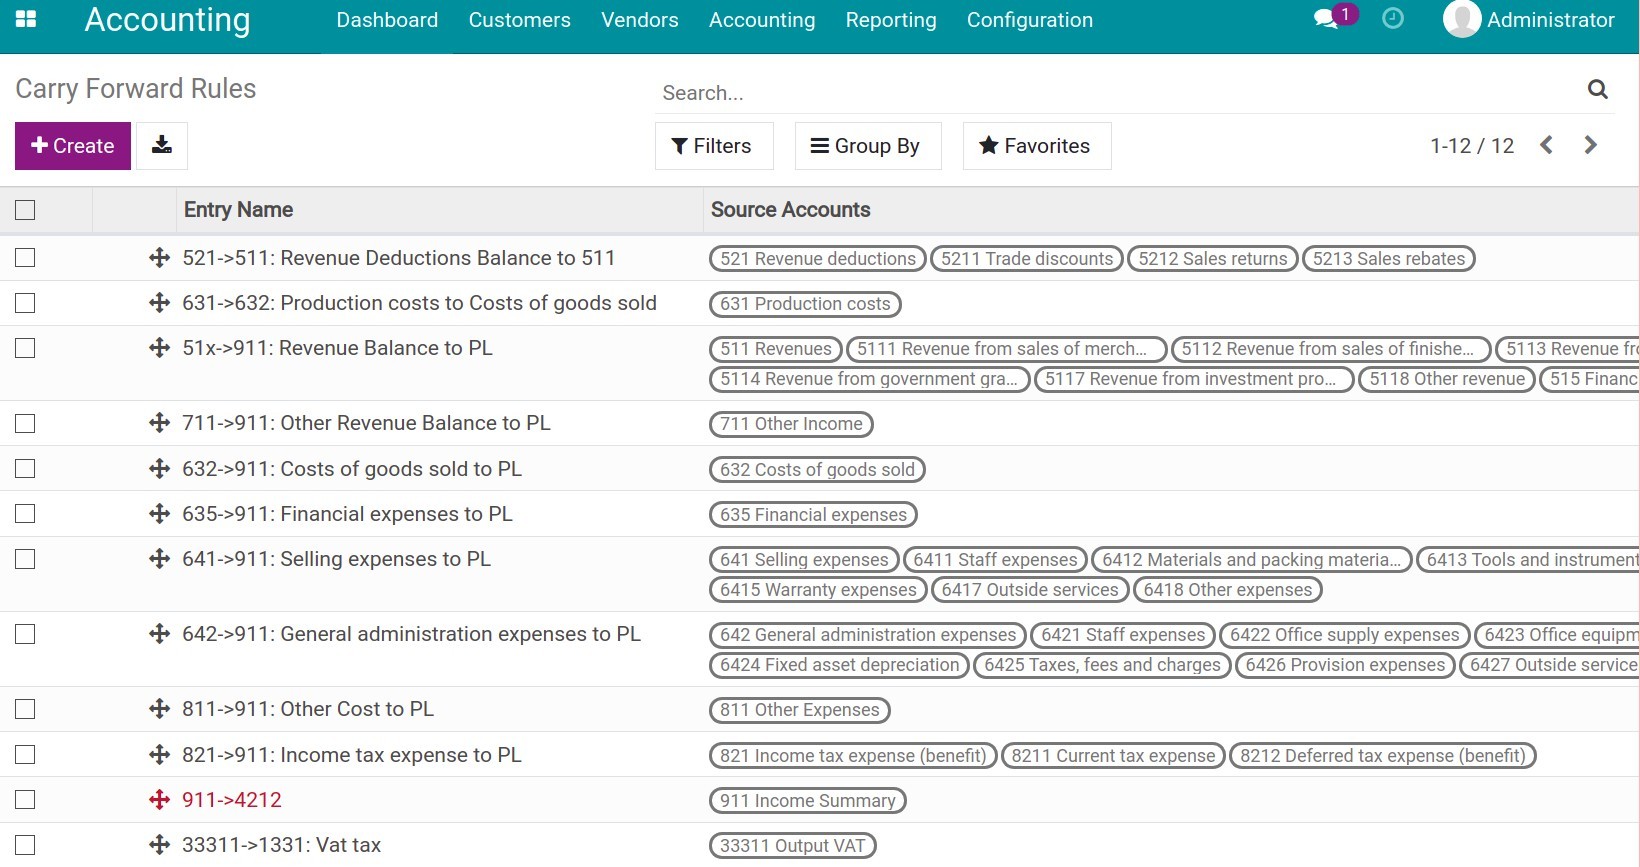
You can add another rule by pressing on Create and enter information:
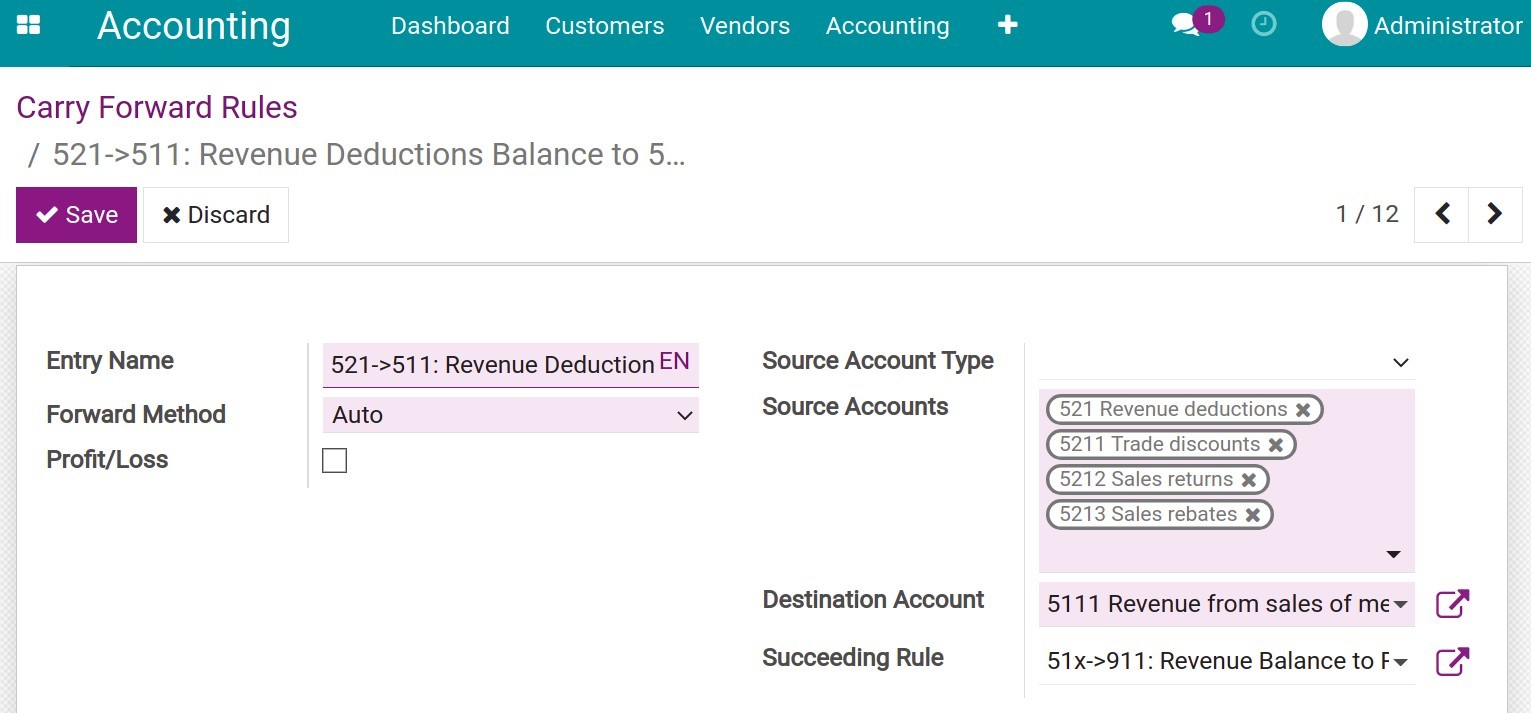
In which:
Entry name: Add a recognizable and searchable name.
Forward method:
Auto: Users are supported with automatic balance carry forward from Debit accounts to Credit accounts and vice versa.
Debit > Credit: Performs only the balance carry forward of entries that have:
The source account is Debit.
The destination account is Credit.
Credit > Debit: Performs only the balance carry forward of entries that have:
The source account is Credit.
The destination account is Debit.
Profit/Loss: This selection is used for the carry forward rules from account 911 to account 421 at the end of the financial year.
Source Accounts: Accounts that need to be carried forward.
Destination Account: Recipient account of the balance carried forward.
Succeeding Rule: This rule is executed immediately right after the rule being set up is executed.
Account balance carry forward
After the rules configuration, at the end of a period, the accountant performs the balance carry forward task by navigating to Accounting > Accounting > Account Balance Carry Forward and then clicking Create.
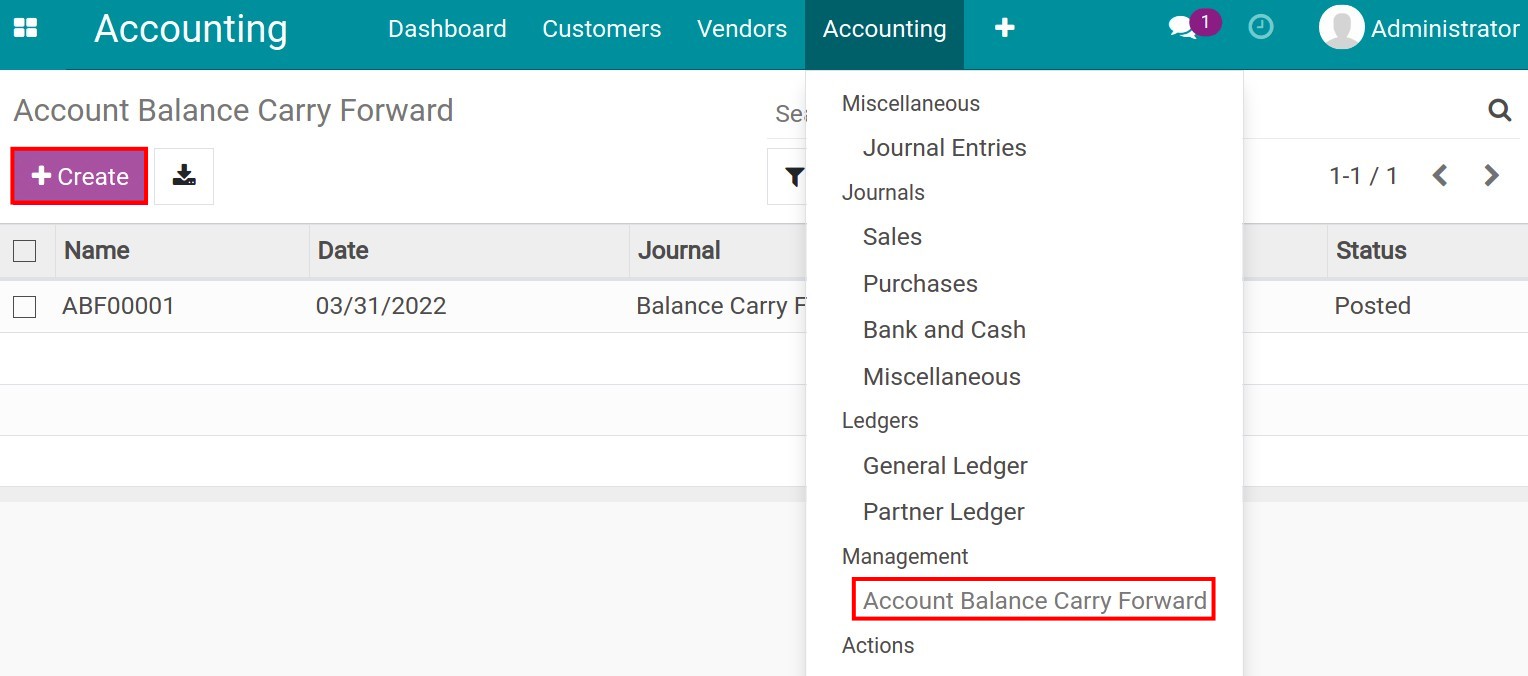
All the carry forward rules will be listed on this view. Add the carry forward Date, Journal and check the Balance at the Source Account Balance column in the details section of each rule.
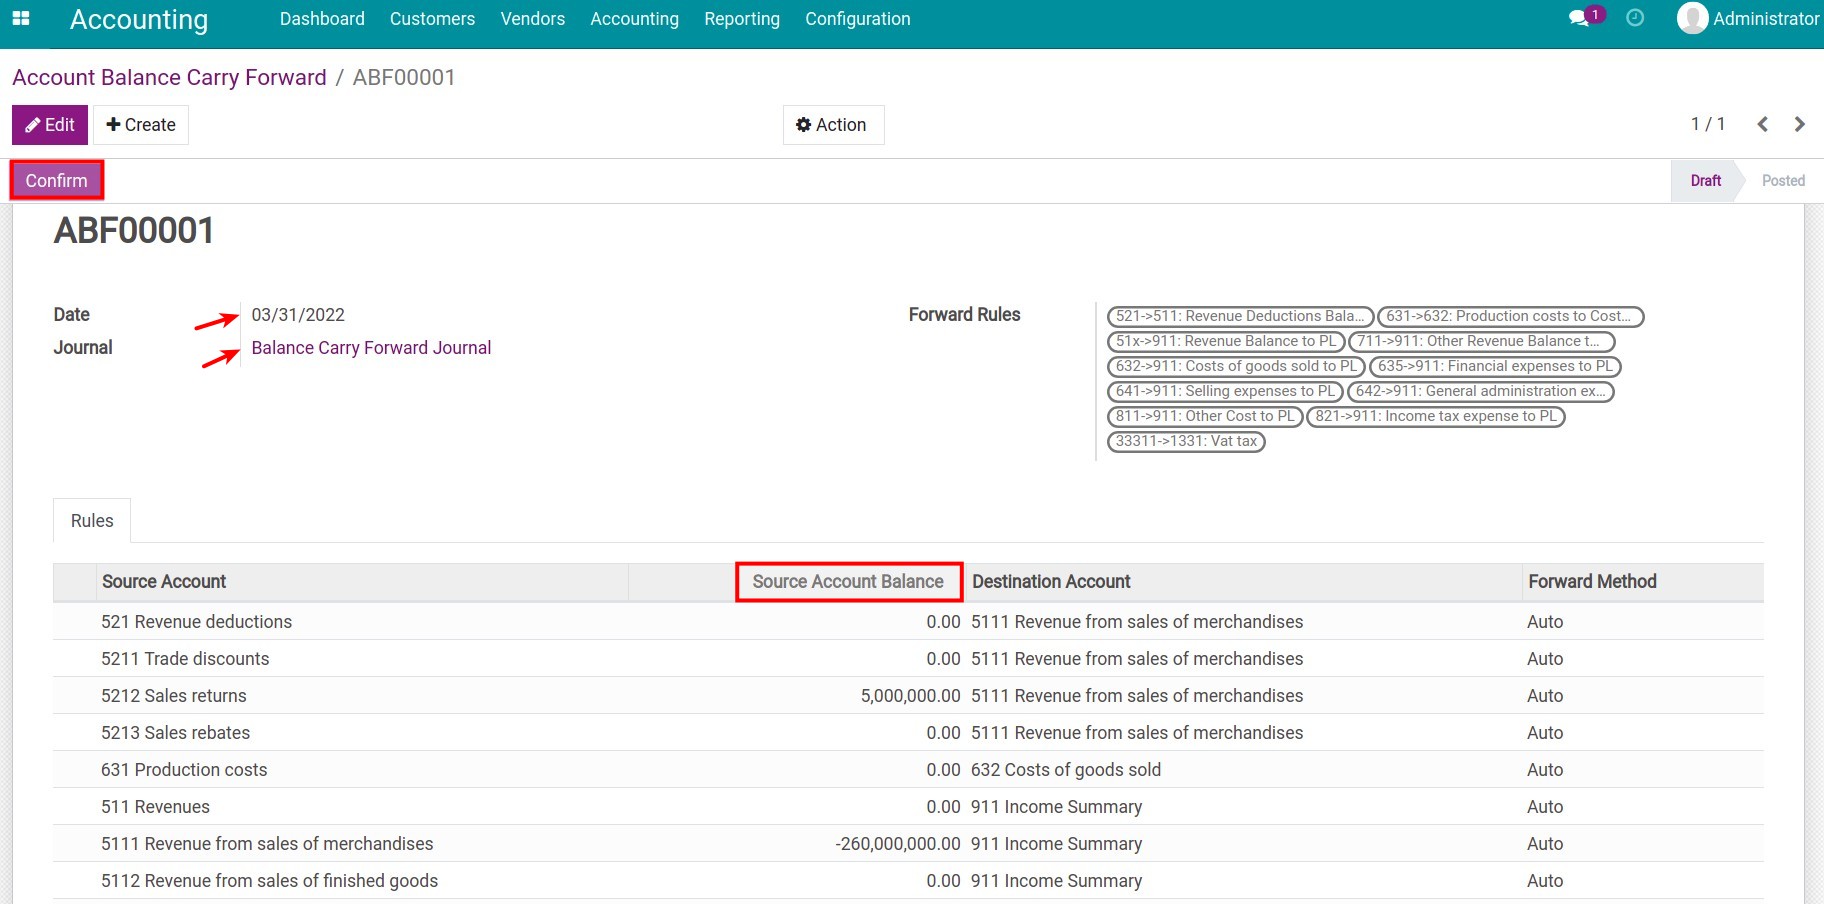
Press Confirm, and you will see a new interface with two newly added buttons which are Journal Entries and Journal Items. You can click on these two to view the new accounting entries in the Draft status.
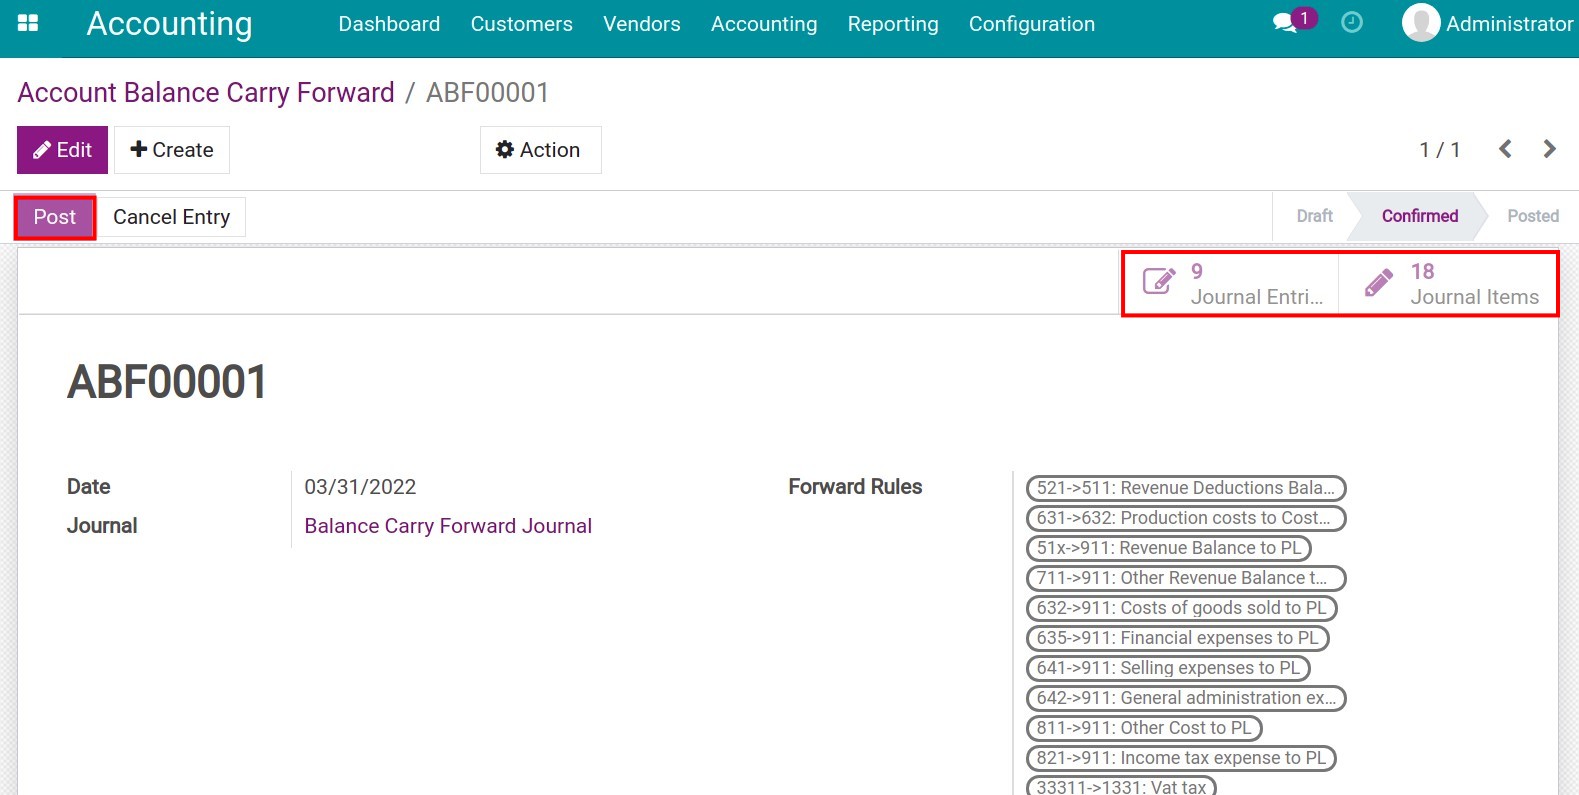
Press Post to complete the end-of-period balance carry forward. The journal entry status is also changed from Draft to Posted.
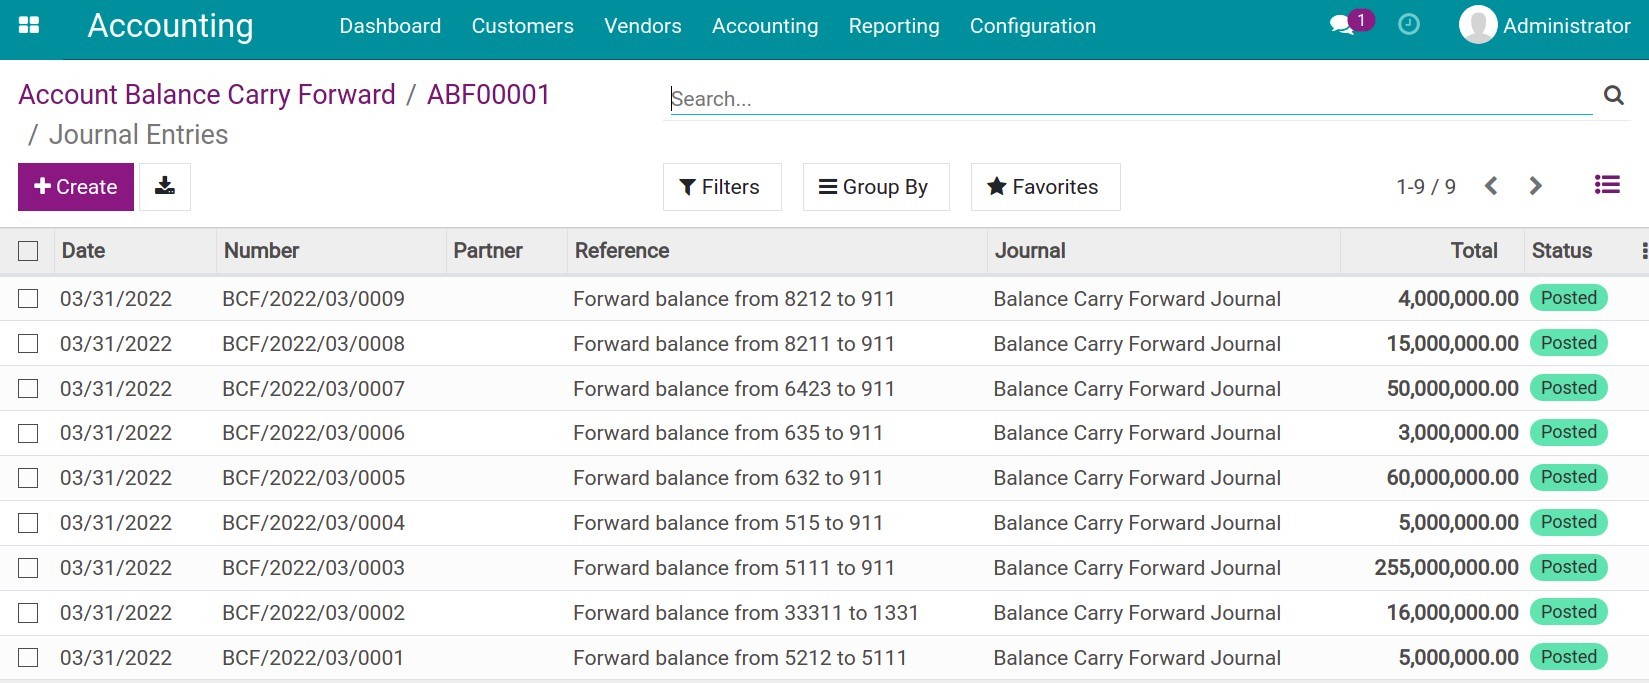
Note
If the carry forward date is the final day of the financial year, then the system will automatically add the profit/loss carry-forward rule to the list of rules to be carried forward on the Carry Forward Rules view.
See also
Related article
Accounting Analysis
Dual Journal Entries with Analytic Account Association
Create an accounting journal entry
Create an accounting journal entry
In daily accounting operations, there are some scenarios where the accountant needs to manually create journal entries to record generated transactions such as uncollectible debts, receiving the capital contribution, evaluating foreign exchange differences at the end of an accounting period, etc. Even though creating a journal entry separated from an accounting transaction is not encouraged, you can still do it quickly with the iSuite Accounting software.
Requirements
This tutorial requires the installation of the following applications/modules:
Accounting & Finance
Create a journal entry
To view all the journal entries in your system, navigate to Viindoo Accounting > Accounting > Journal Entries.
By default, this view displays all the miscellaneous and manually created entries in your system. However, you can use the filter and grouping tool to find the entries according to your needs.
Press Create to start generating a new journal entry.
First of all, you need to add the basic information for this journal entry such as Accounting Date and select a Journal to register this entry. Besides, we recommend adding a Reference to your journal entry to facilitate any future reconciliation task.
Journal Items
Click Add a line to generate all the journal items related to this journal entry by adding the following information:
Account: Select the account that will be debited/credited in this journal item.
Partner: Select the affected partner in this journal item. For example a customer, a vendor, a tax authority, etc.
Label: A brief description of this journal item.
Taxes: Taxes that applies on the base amount of this journal item.
Debit: The amount that will be debited by the transaction.
Credit: The amount that will be credited by the transaction.
Tax Grids: Select the tax grid applied to this journal item (if applicable).
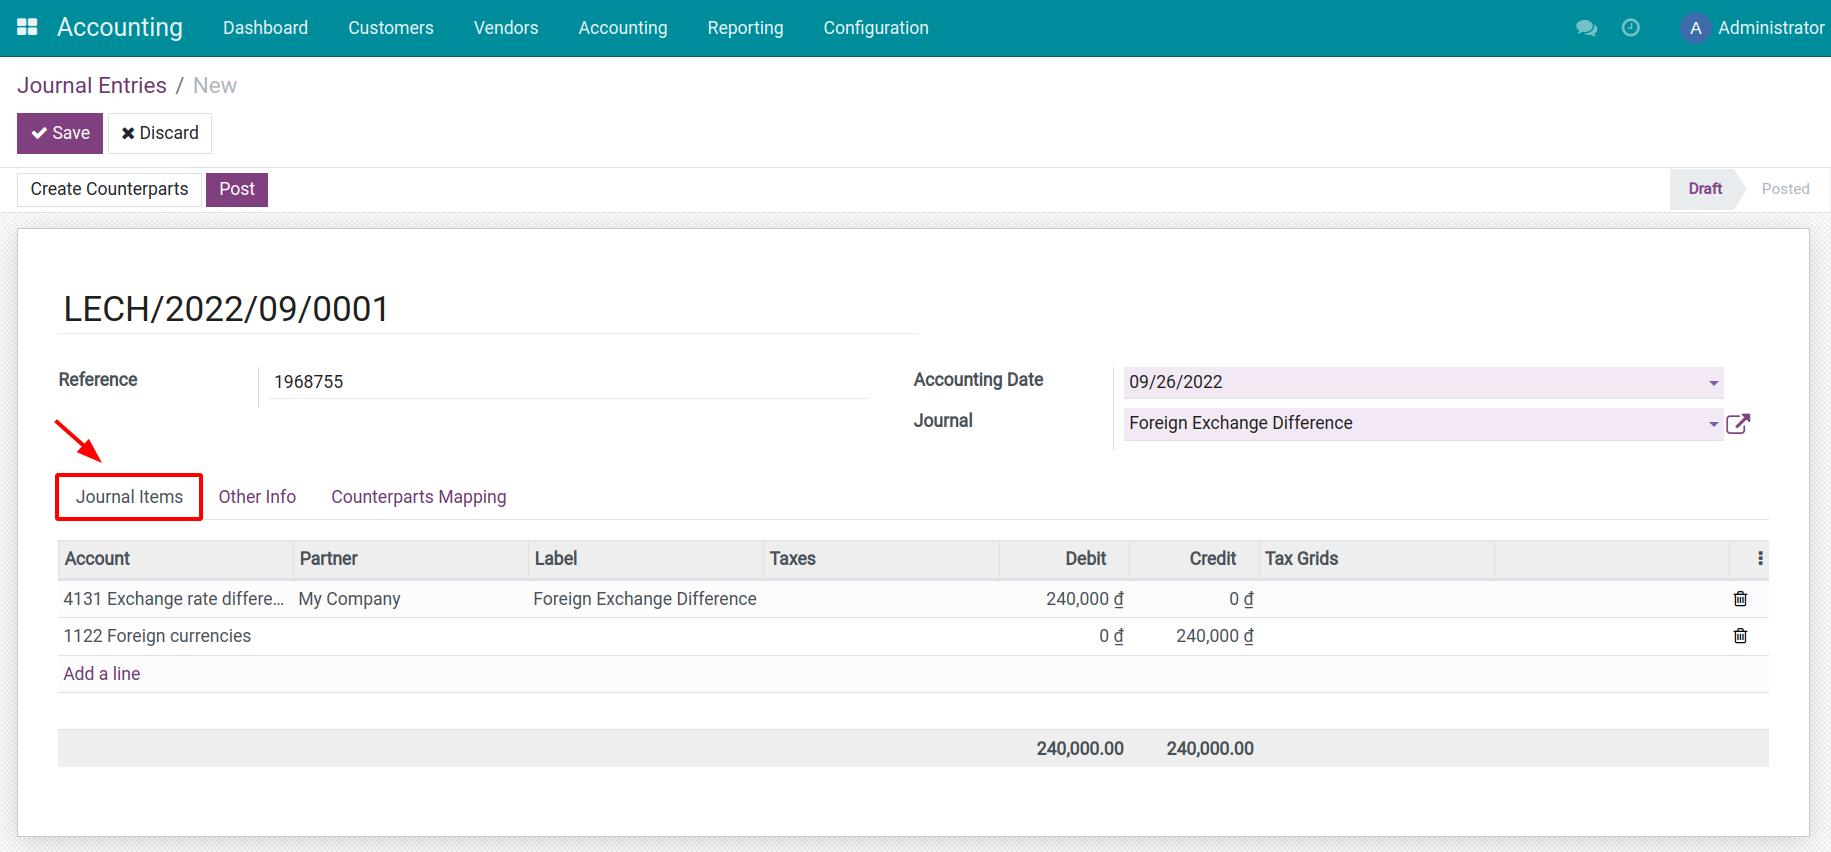
Make sure that the Debit balance is always equal to the Credit balance in order to be compliant with the accounting principles.
See also
Manage the price including or excluding taxes
Other Info
In this tab, you can define some other information and action for the journal entry that you are creating, such as:
Post Automatically: If enabled, this entry will be automatically posted at its accounting date.
Reversal of: Indicates the reverse journal entry of the one that is being created.
To Check: Enable when you are not sure of all the related information while creating this transaction and require further review.
Manual Direct Entry: For any manual journal entry, this checkbox will be automatically checked to identify journal entries of this type and also facilitate any future review.
Fiscal Position: Apply the default fiscal position of the partner.
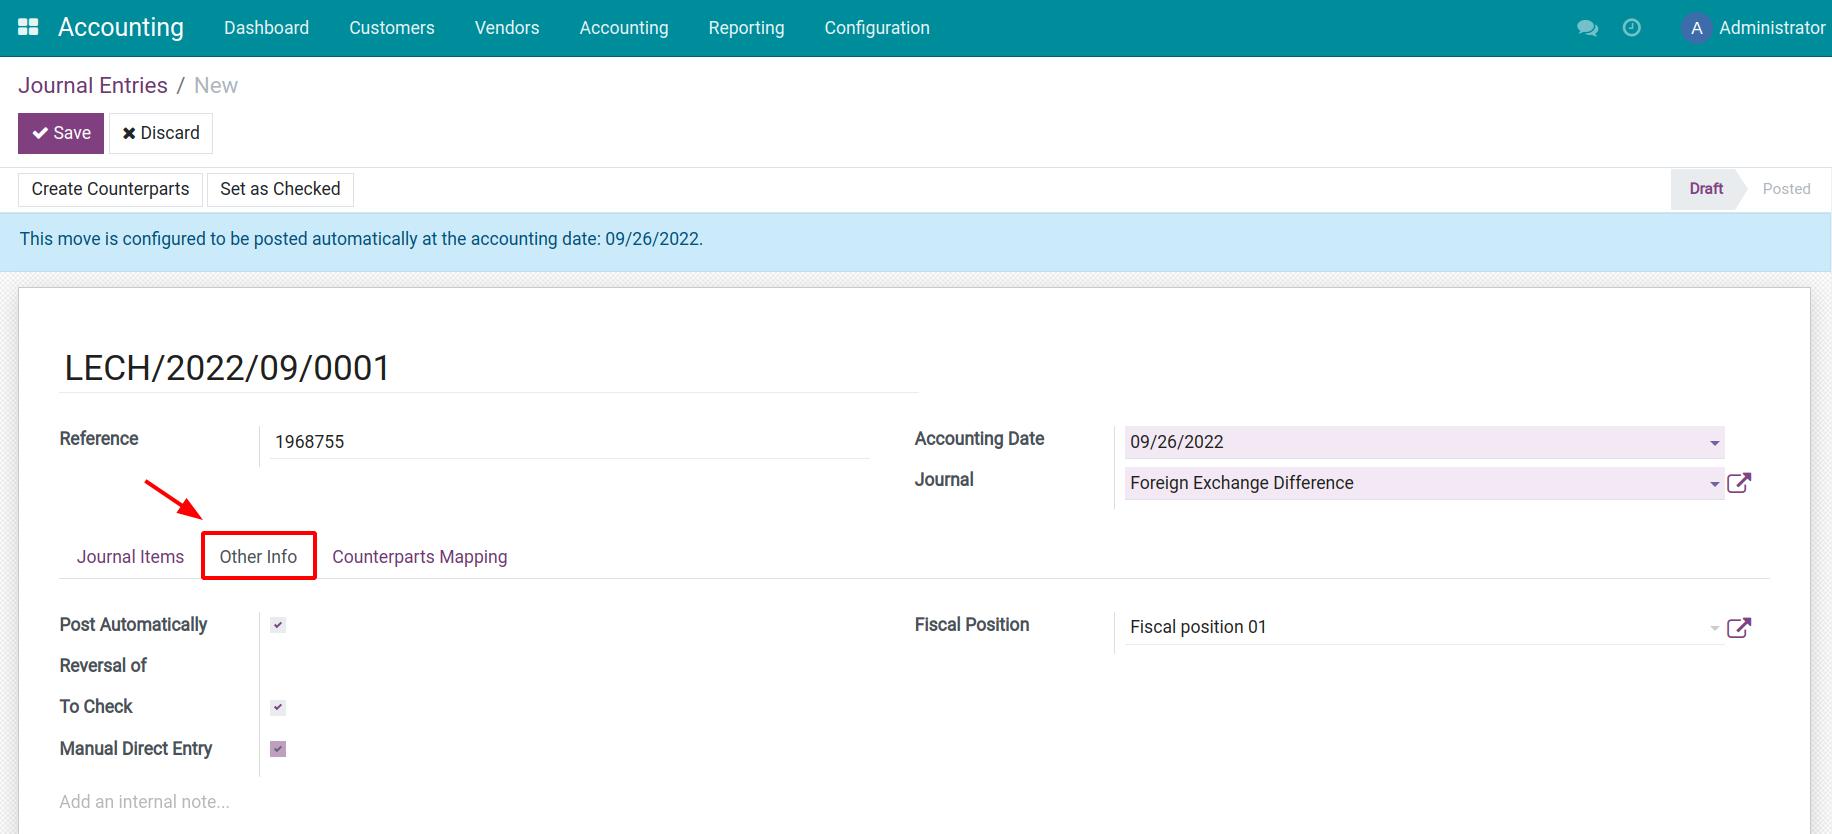
Counterparts Mapping
Press Create Counterparts to map the counterparts of this journal entry, all the information related to the entry will be displayed in the Counterparts Mapping tab.
The Countered Status indicates the current situation of the journal entry, whether it’s partially, fully, or not-yet-countered.
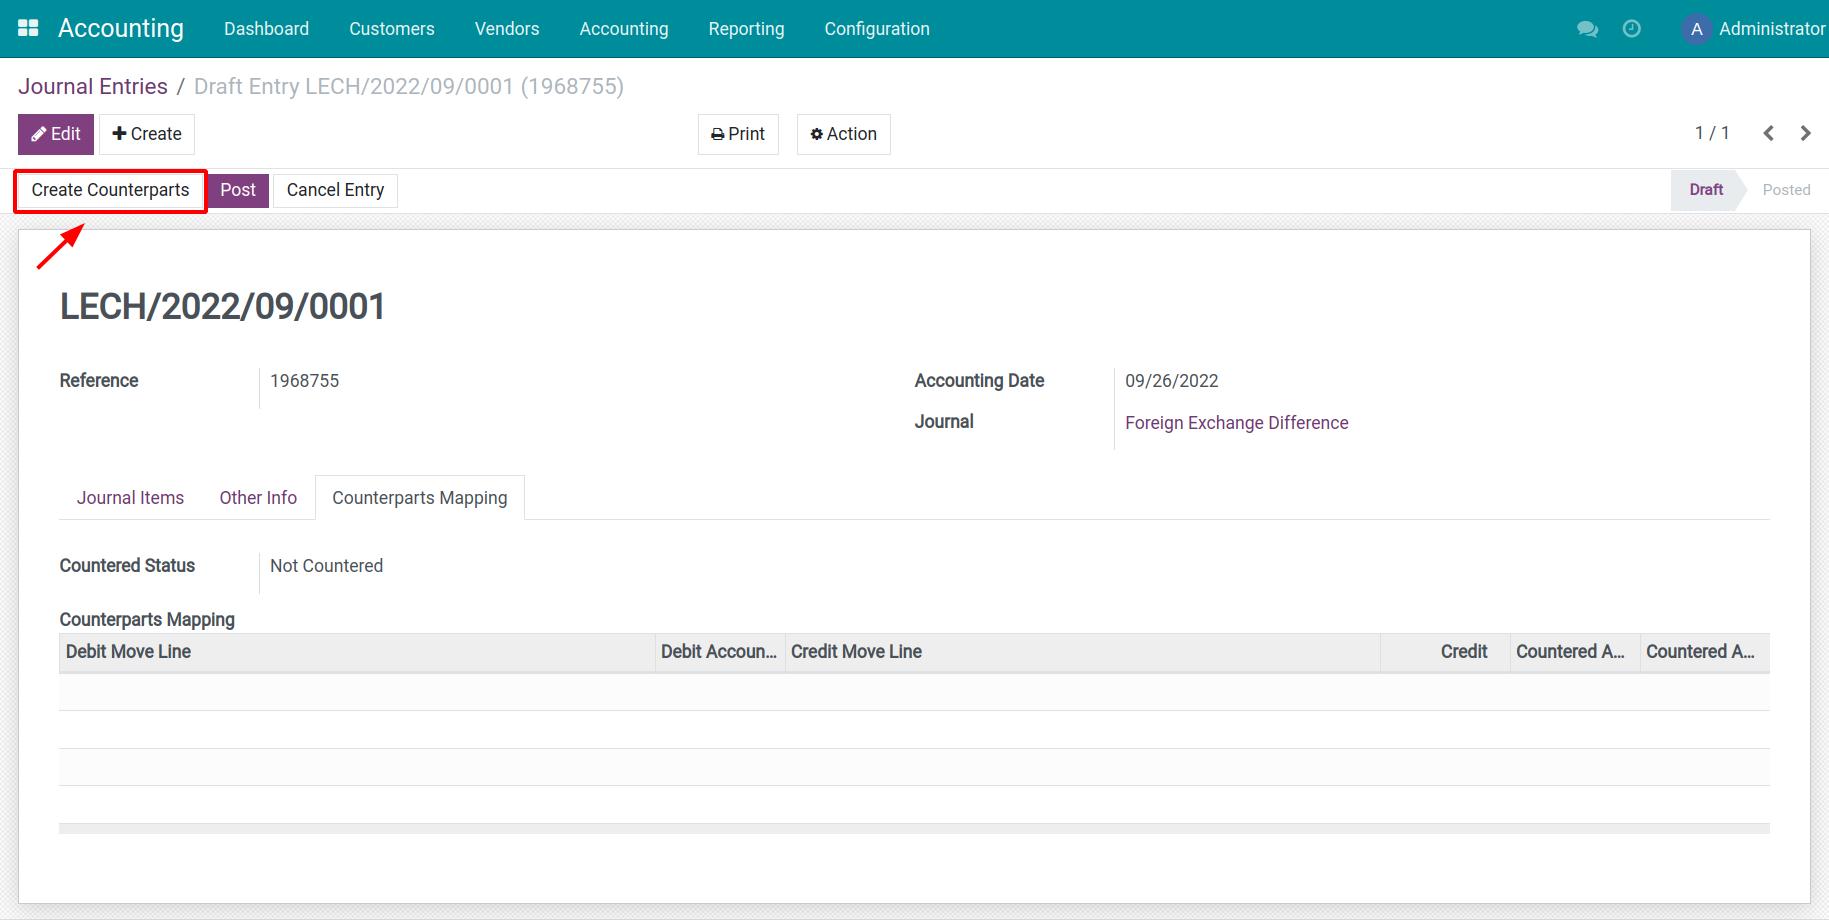
When you finish adding the necessary information to create a journal entry, press Save to register this journal entry in your system and Post it to the related accounting journal.
See also
Related article
How to exclude journal items from Financial Reports
Create reconciliation model for deposit interest and bank fees
Process of customer invoicing, payment and reconciliation
Steps to import opening balance for Asset
Steps to import opening balance for Asset
Requirement
This tutorial requires the installation of the following applications/modules:
Accounting & Finance
Assets Management
When you first start using the iSuite All-in-one Enterprise Management Software, there might be some data from your old bookkeeping system such as the balance of the accounting journals, bank accounts balance, payables/receivables balance, etc. This article will guide you through the opening balance importing process of assets in your business.
To import the opening balance of assets, do the following steps:
Prepare assets data;
Export the iSuite system data structure;
Add real data to the data template;
Import data to the system.
Prepare assets data
Example:
Software start date: 09/01/2022.
Assets opening balance import date: 08/31/2022.
Data collection date: end of 08/31/2022.
Export system data structure
Export the data structure of asset categories
After creating the asset categories, export the data to get the External ID of each asset category. Navigate to Accounting > Configuration > Asset Categories, on the list view, select the asset category that you want to work with.
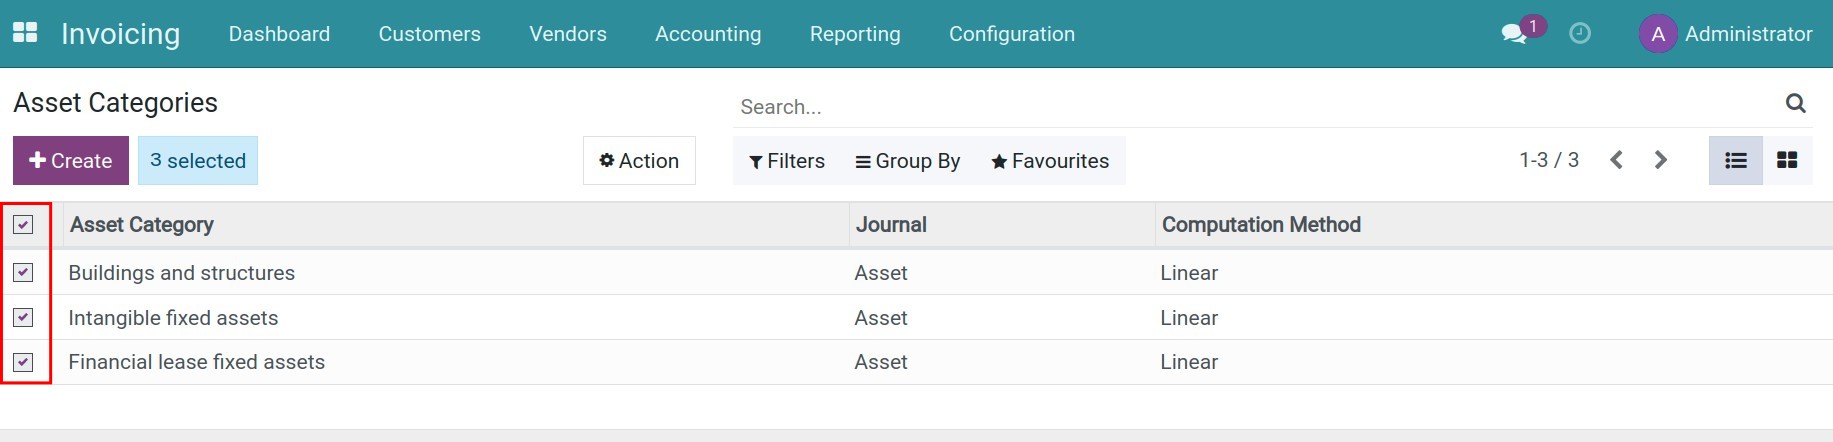
Press Action > Export, the Export Data window is displayed:
Enable the I want to update data (import-compatible export) option.
Export Format: Select XLSX or CSV.
Available fields: Select fields to import data in the XLSX or CSV format. Press + to add a desired field to the Fields to export column.
Fields to export: Indicates which fields will be exported. In this example, you will need to export the asset categories reference, including:
External ID;
Asset Category name.
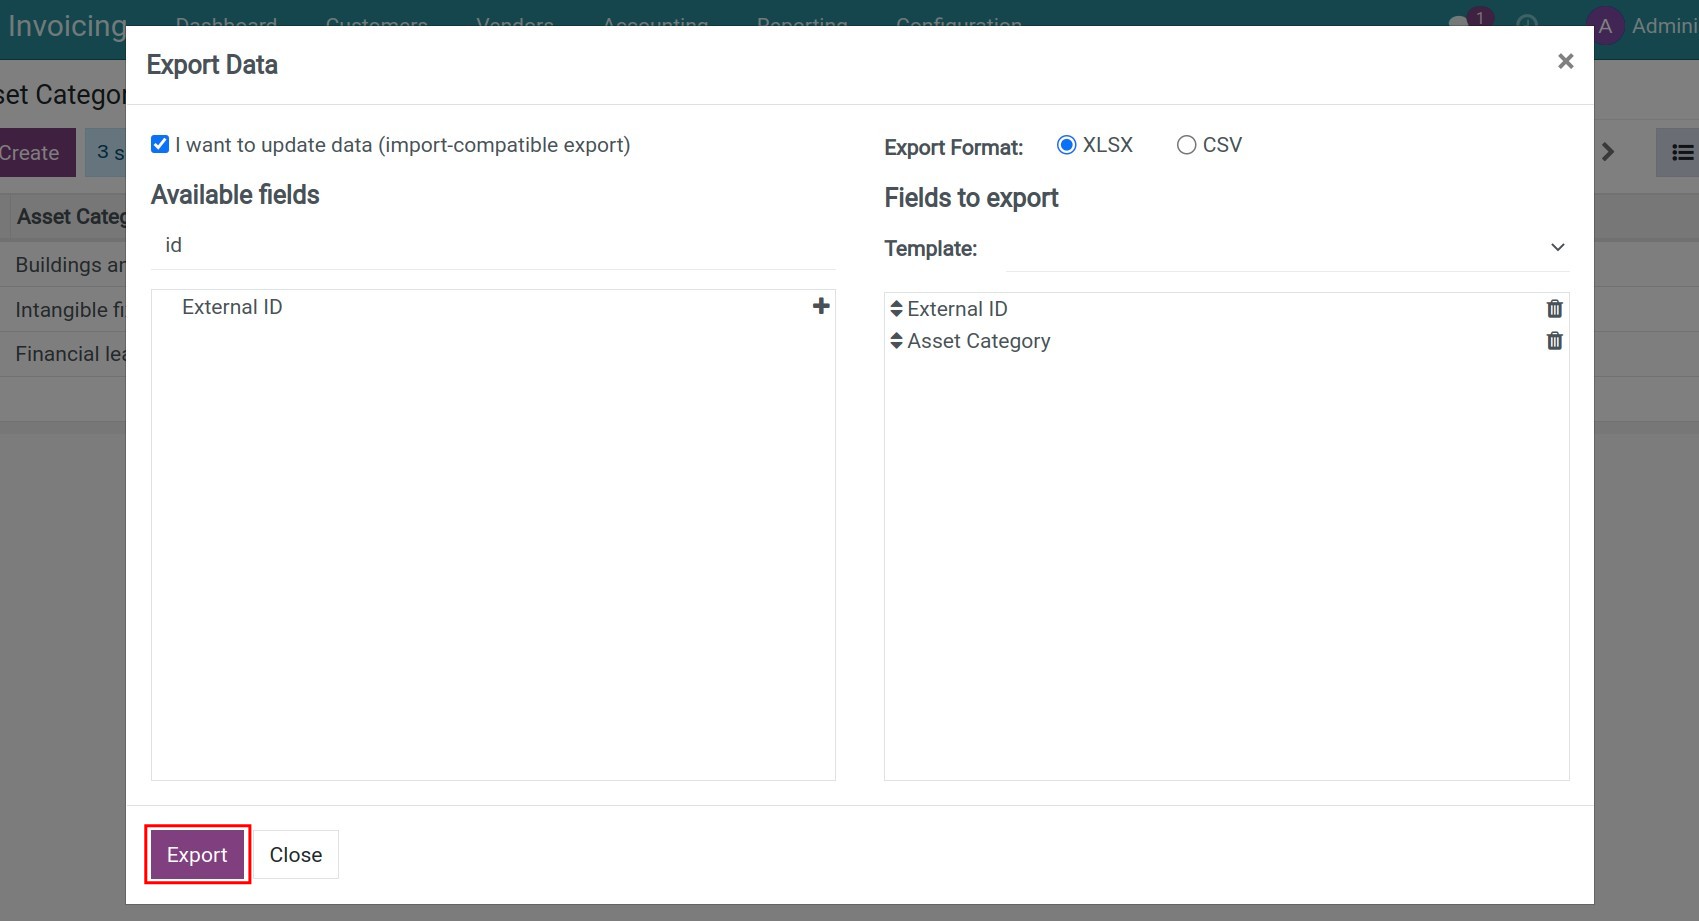
Press Export, a XLSX or CSV file will be exported with your selected information.
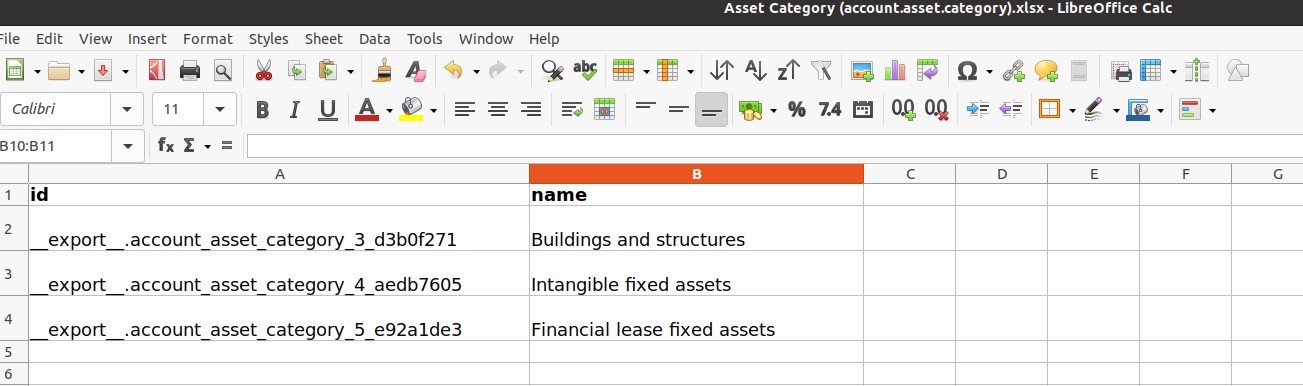
Similarly, export the External ID of accounting accounts that will be used automatically by the system during the depreciation period.
Export asset data structure template
Navigate to Accounting > Accounting > Assets > Create to create an asset template.
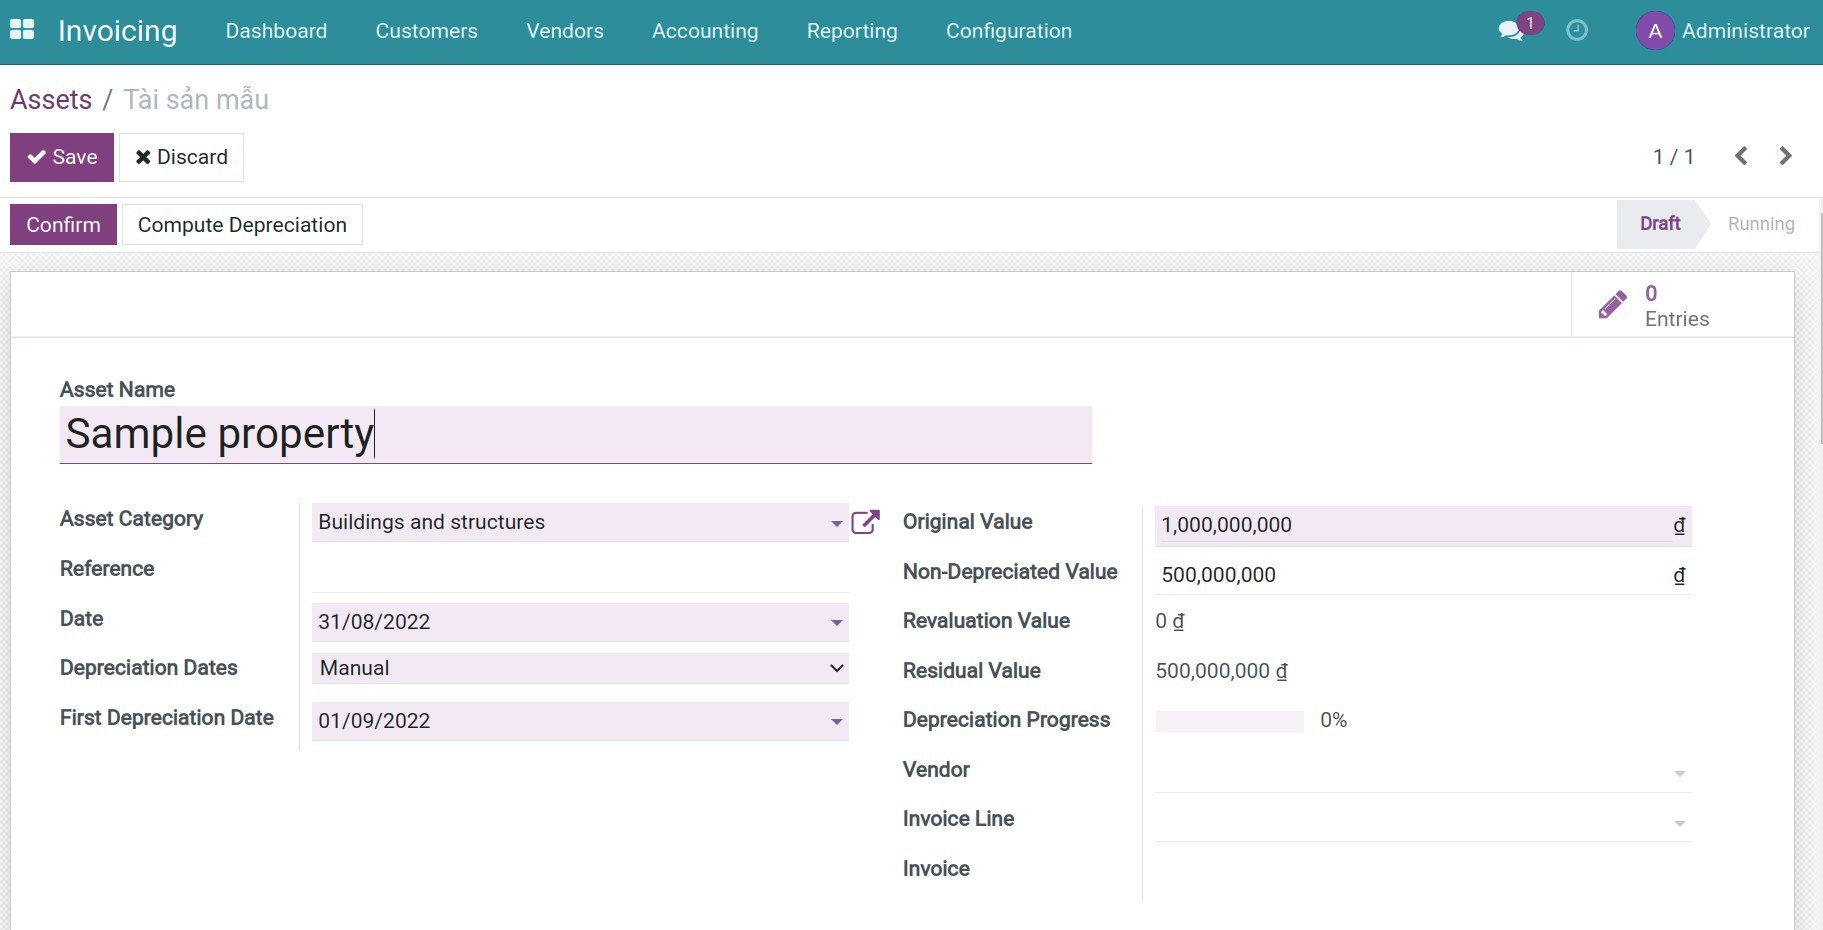
See also
Manually create an Asset in iSuite
Export the data structure using the asset template: navigate to Accounting > Accounting > Assets. From the assets list view, select this newly created asset template.

Press Action > Export, the Export Data will be displayed. Similar to exporting asset categories, select the asset template and export the following fields:
Asset Name;
Category/ID;
Category/Asset Category;
Date;
Depreciation Date;
First Depreciation Date;
Original Value;
Non-Depreciated Value;
Computation Method;
Number of Depreciations;
Expense Account/External ID;
Expense Account/Account Name.
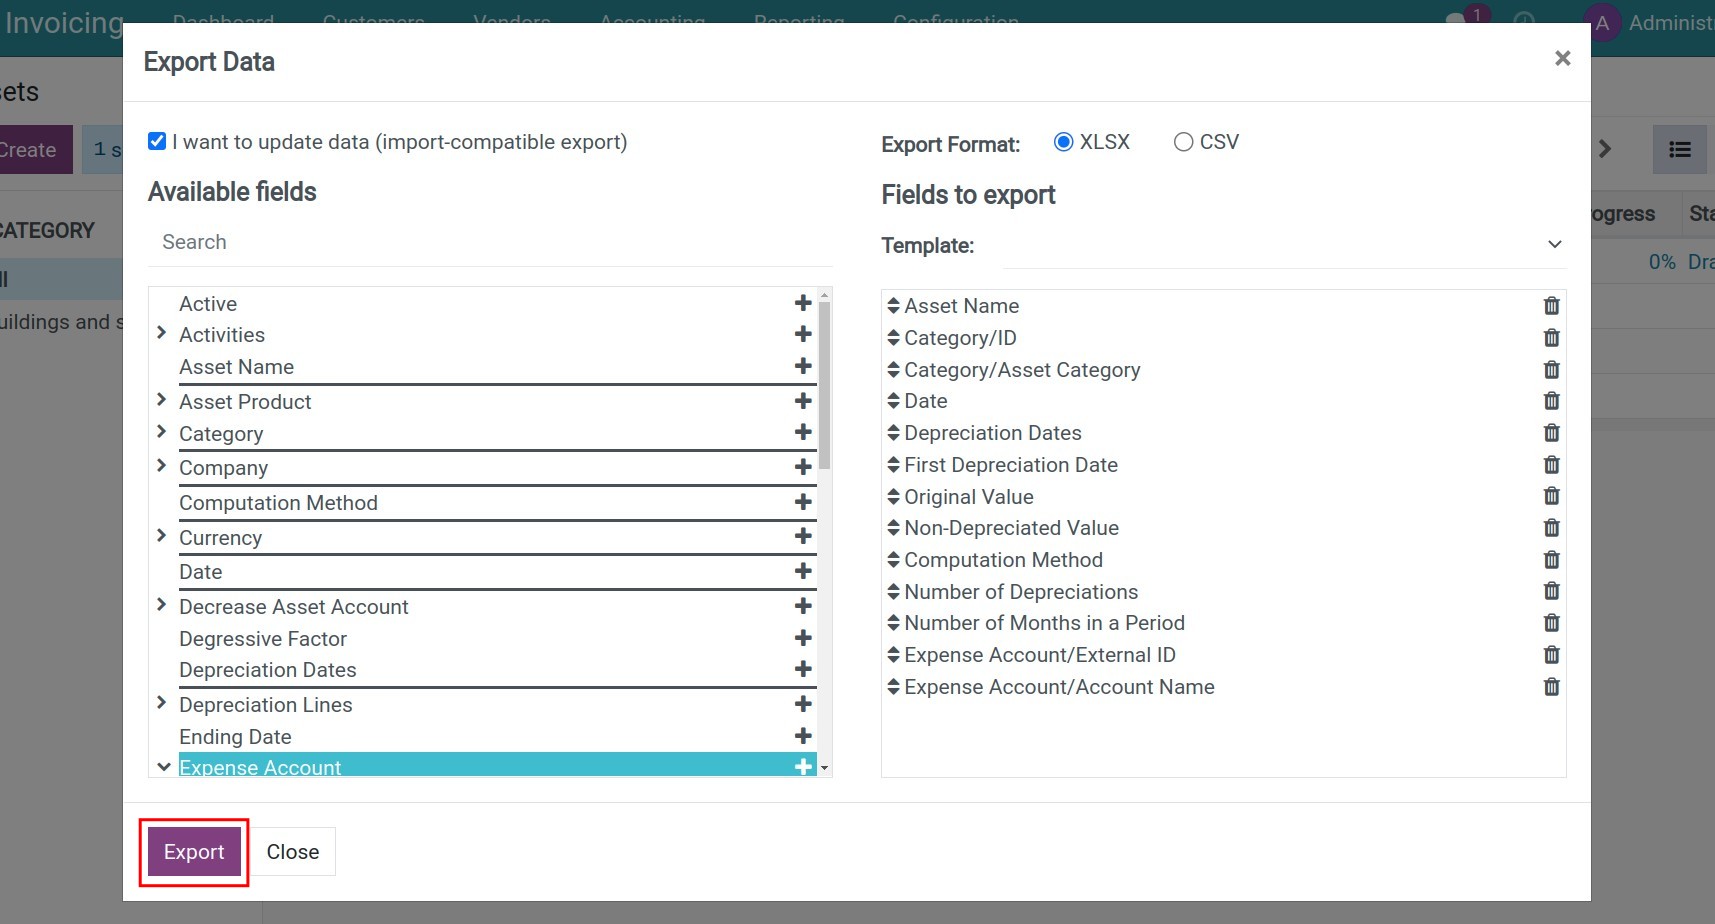
Press Export, a XLSX or CSV file will be exported with your selected information.

Add real data to the data template
Add information of asset fields to the exported data template. For our example, you need to add data as below:
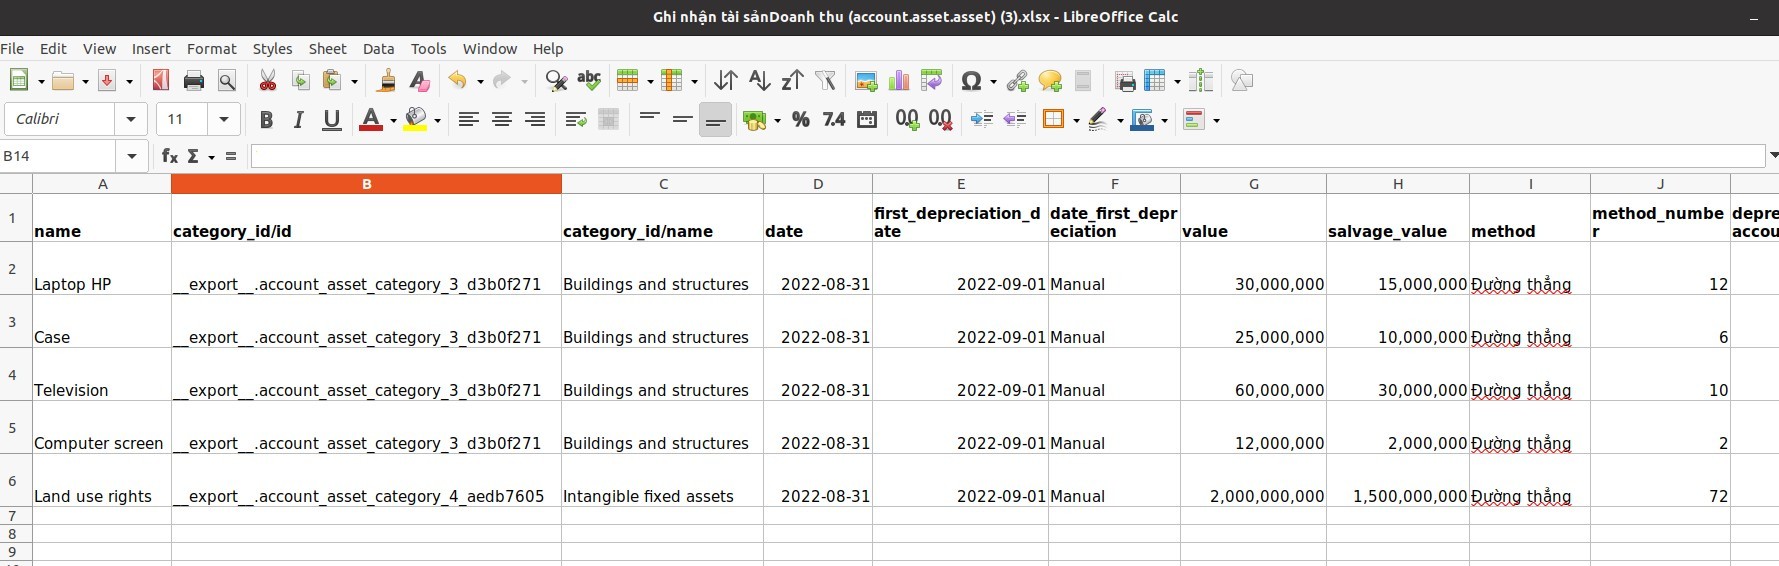
Note
Add data following the format on the template.
Select the correct External ID and accounting account of the asset categories.
Import data to the system
Once the data structure file is imported, navigate to Accounting > Accounting > Assets, go to Favourites > Import records.

Press Upload File and select the file with real data that you prepared in the previous step.

The data file will be uploaded and display the importing window, press Test to check your input data. If everything is ok, the Everything seems valid notification will be displayed.

Press Import to upload the oficial data to the system. Go back to the asset view to check the imported assets quantities and values.
See also
Related article
Process of customer invoicing, payment and reconciliation
Configure Cash Rounding method
Default Taxes
Default Taxes
Requirements
This tutorial requires the installation of the following applications/modules:
iSuite Invoicing
Accounting & Finance Management
Definition
Default taxes are pre-configured taxes that will be applied automatically in new product creation or tax-related transactions. For example, when an additional line is added to the invoices, orders, etc., if a product is selected then a tax rule is automatically added. The tax amount will be calculated according to the tax rate established on the chosen tax rule.
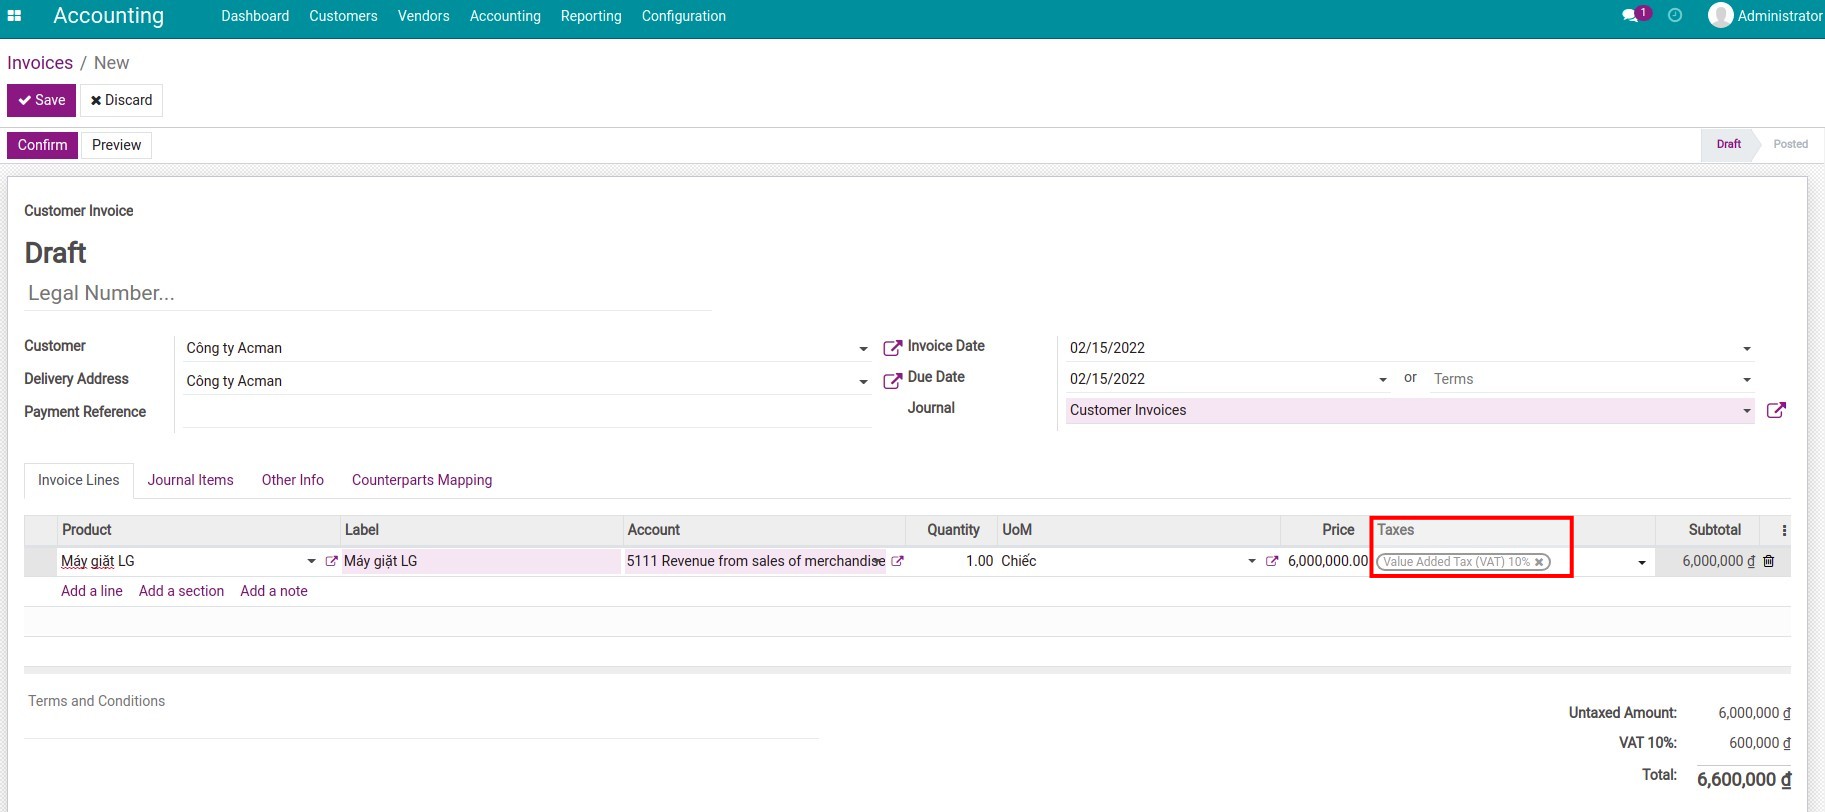
In the iSuite Accounting app, taxes will be configured by default when:
Set up the initial database and choose a country for the system.
Enable fiscal localizations packages.
Configure default taxes
To change the default taxes, navigate to Accounting ‣ Configuration ‣ Settings and search for Default Taxes.
Here you can configure two types of tax:
Sales Tax: Default tax applied only on sales operations.
Purchase Tax: Default tax applied only on purchase operations.
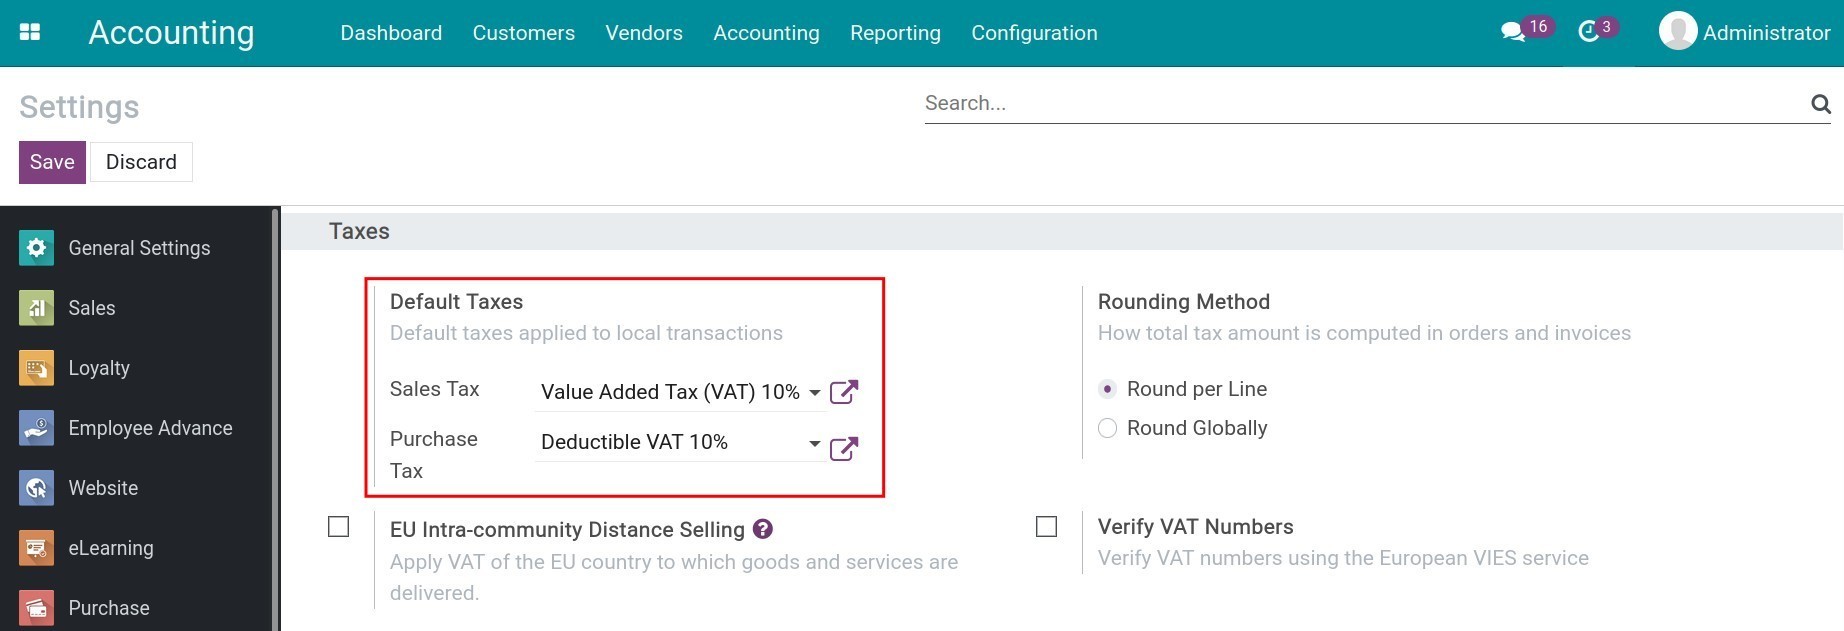
You can change the default taxes in accordance with your company’s tax and press Save. When you create a new product, these default taxes will be automatically added to the product.
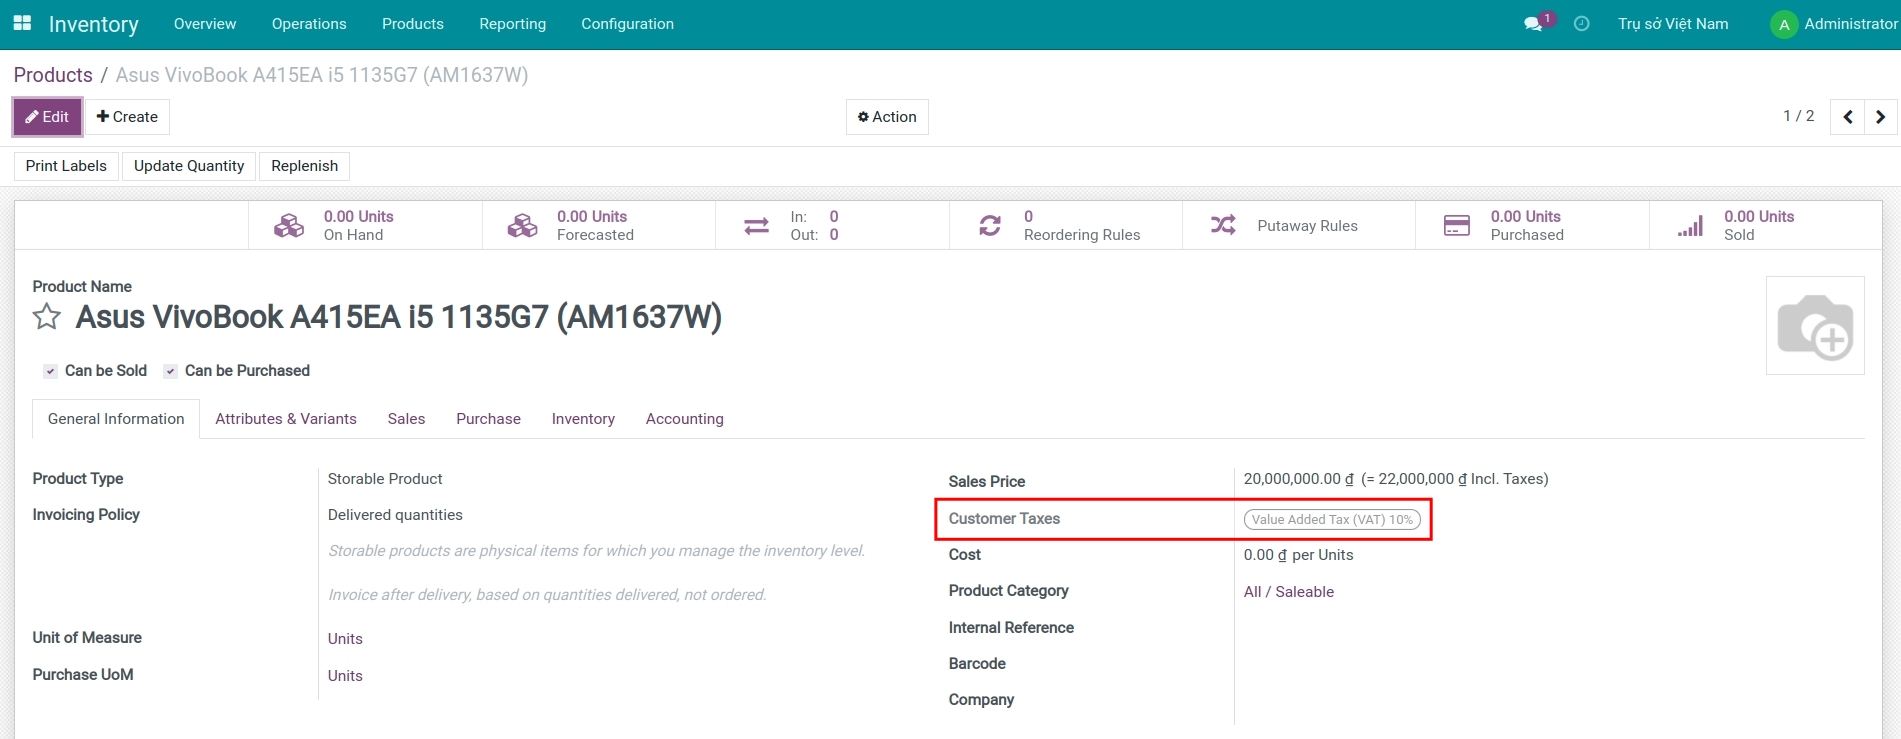
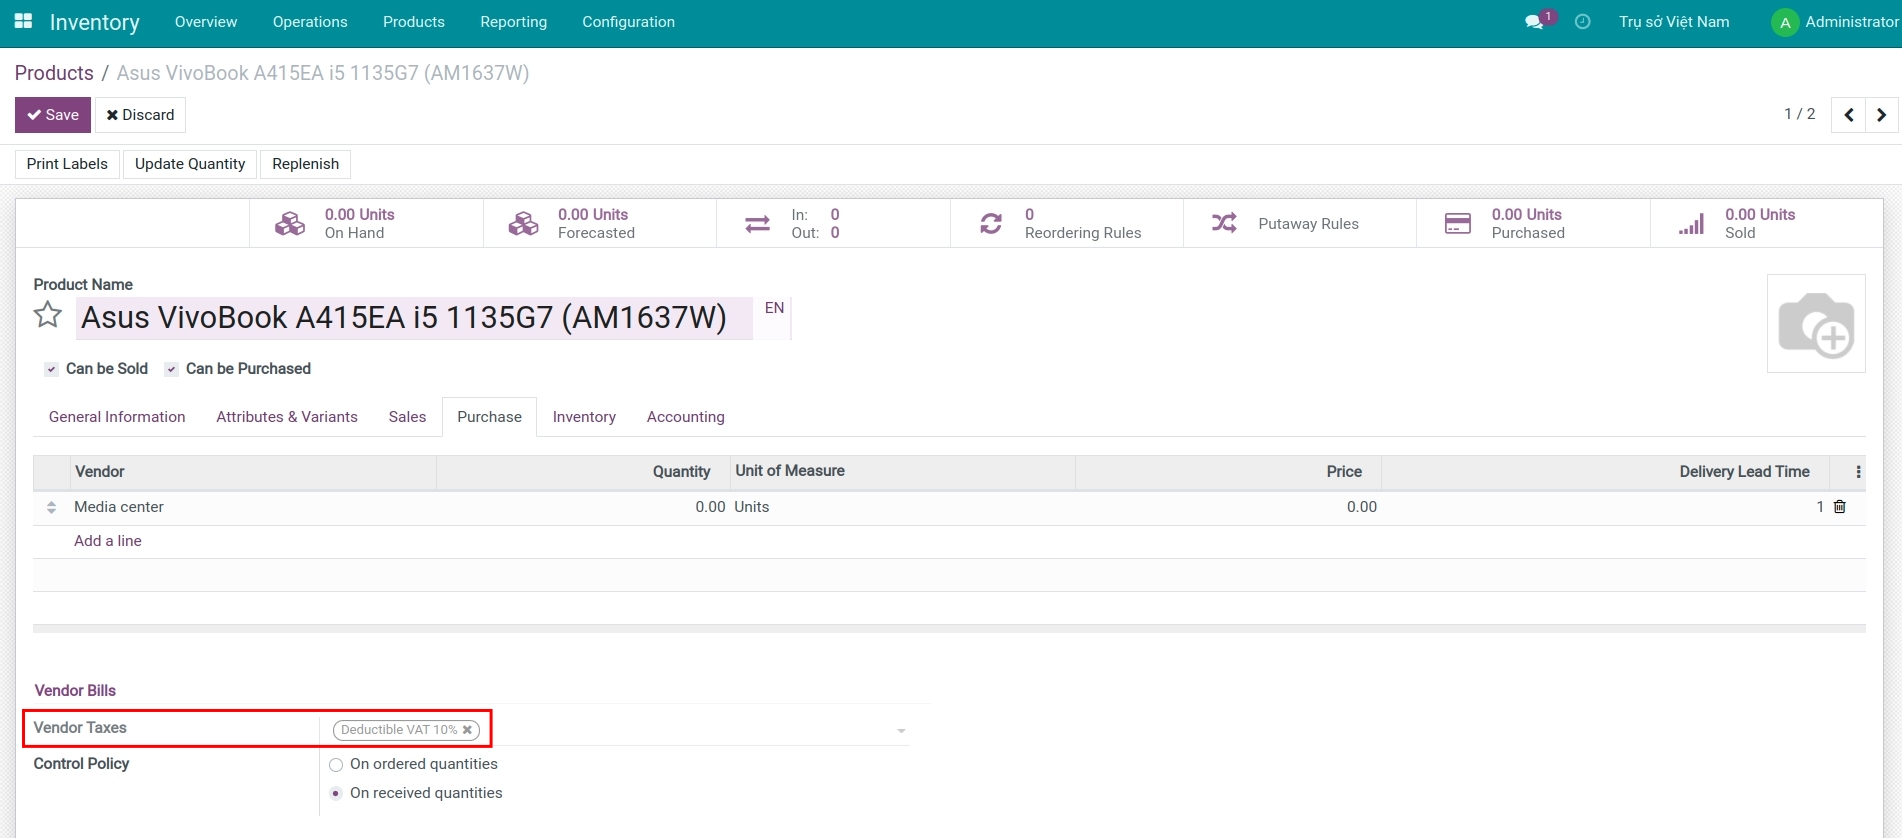
Note
If the database has multiple companies, then each company can set different default taxes.
See also
Related Article
Steps to setup Fiscal Position (Taxes and Accounts)
Manage Retention Taxes
Steps to setup Fiscal Position (Taxes and Accounts)
Steps to setup Fiscal Position (Taxes and Accounts)
The Fiscal Position feature in Viindoo allows you to easily set up taxes and accounting accounts on sales and purchase documents (sales orders, purchase orders , customer invoices , vendor bills ) with customers or providers who have different needs from the general settings. This feature could be applied in situations such as:
- The same type of goods, but when sold to subjects with tax incentives (tariff zones, tax-free zones, etc.) will have a different tax rate compared to normal partners (tax mapping).
- When buying/selling goods with a partner who wants a different transaction recording from the general rule, it is possible to map a different account from the one that is generally configured.
To use this feature, you will set up the information and rules for the fiscal position first, then we will explore its application to your business’s daily transactions.
Requirements
This tutorial requires the installation of the following applications/modules:
Invoicing
SYSCOHADA Chart of Accounts
Note
Only users with Administrator right in the Accounting app can access and configure this feature.
Configure fiscal position
Navigate to Accounting ‣ Configuration ‣ Fiscal Positions, click Create a new fiscal position.
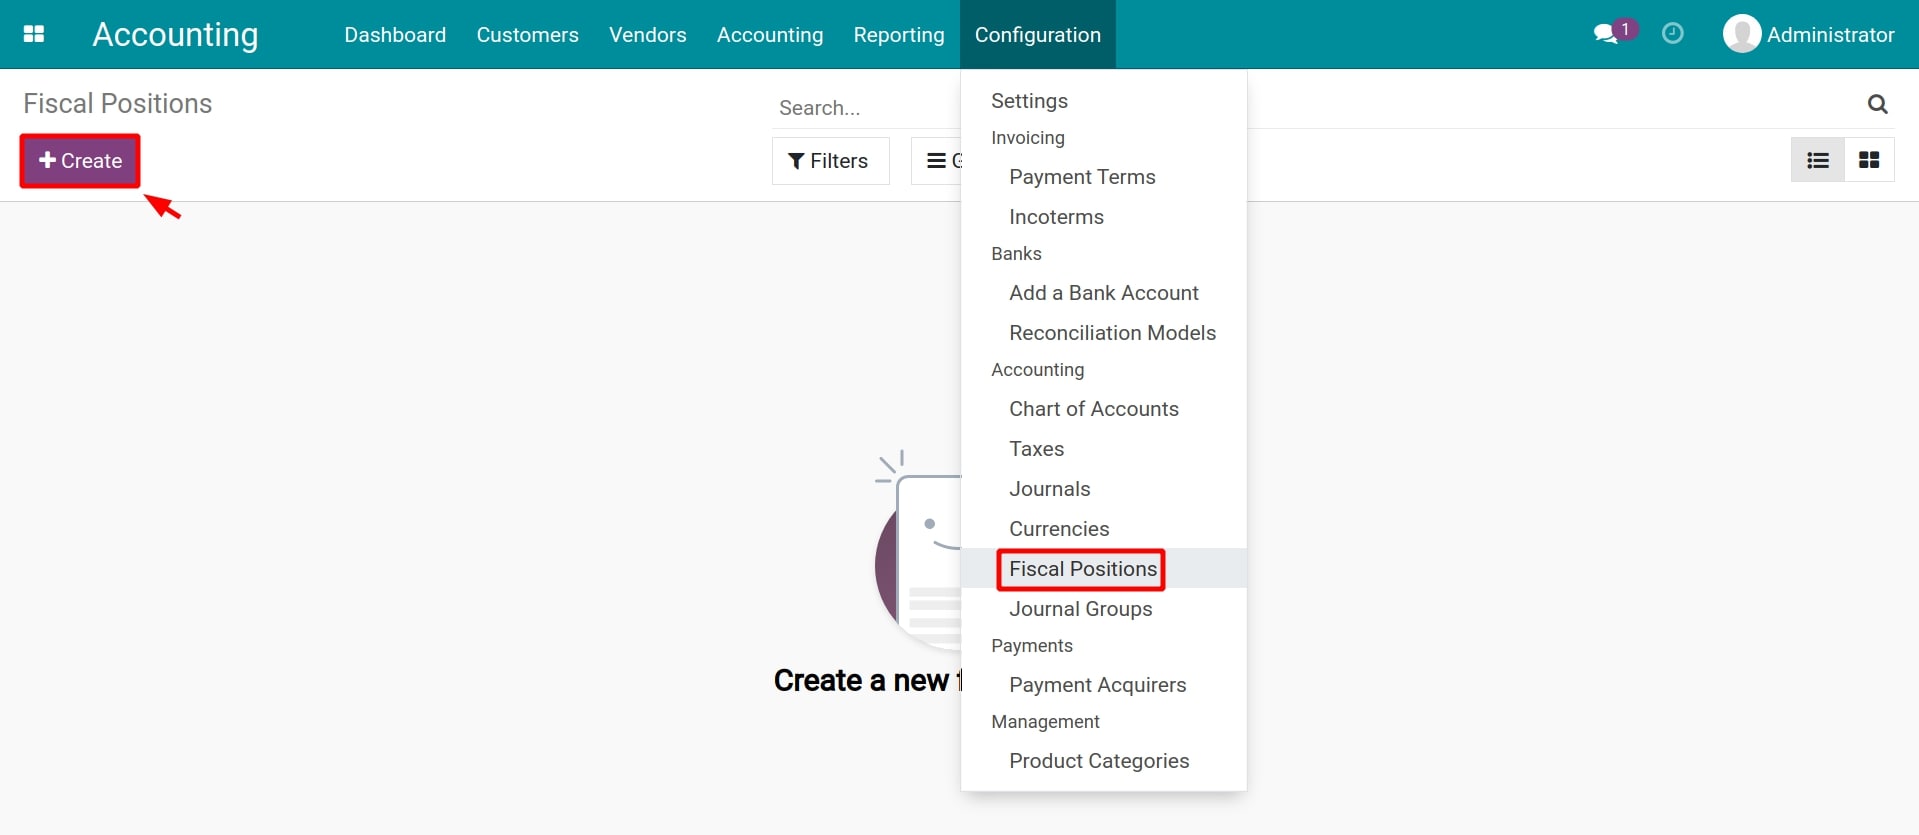
On the fiscal position, you need to add the following information:
- Fiscal Position: Add a name for this fiscal position rule (can be a recognizable name according to the way your business is organized. For example, tax reduction for the Asian region, under a trade agreement, etc.)
- Detect Automatically: Select to automatically apply this fiscal position based on the identified geographical location. The system will analyze the partners’ addresses on their contact details to apply the corresponding fiscal position.
- Foreign Tax ID: Declare the tax identification number of your company in the region mapped by this fiscal position (if applicable).
- Country Group: Select a group of countries to apply this fiscal position. The country group can be configured in the Contacts app. More details on Overview and configuration in Viindoo Contact.
- Country: Select a country to apply this fiscal position.
- Tax Mapping tab: Press on Add a line to incorporate a new tax mapping rule which includes:
- Tax on Product: The default tax rule configured on the product.
- Tax to Apply: The replacement tax rule to be applied in transactions that have this fiscal position configured.
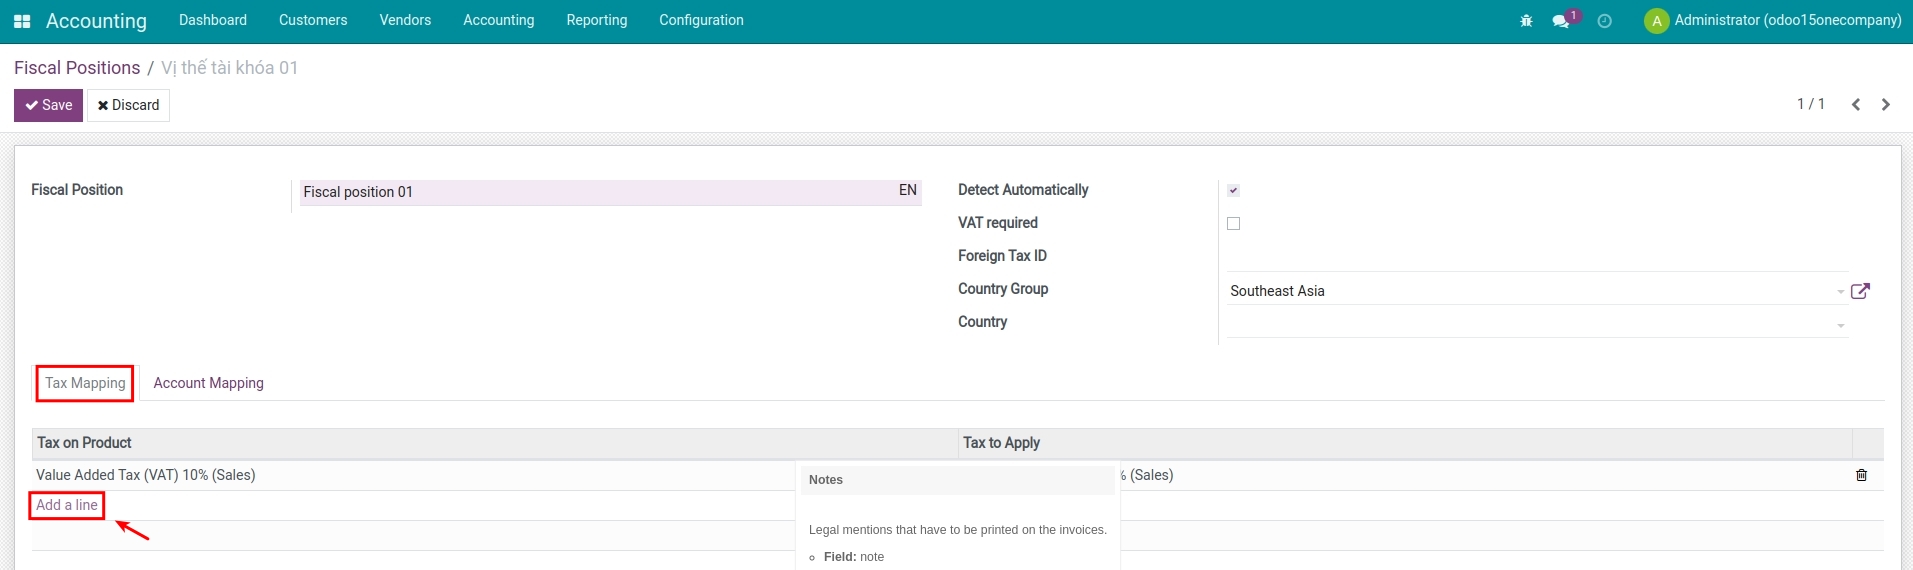
- Account Mapping tab: Click on Add a line to add a new account mapping rule which includes:
- Account on Product: The default account configured on the product.
- Account to Use instead: The replacement account to use on sales and purchase documents that have this fiscal position applied.

Once all the information is complete, click on Save to record this configuration.
Fiscal position application
The Fiscal Position feature allows you to apply the mapping rules automatically or manually on sales and purchase documents.
Automatic application
Fiscal positions can be applied to sales and purchase documents in the following two situations:
- Situation 01: Recognize partners whose address belongs to the configured Country Group or Country on the fiscal position.
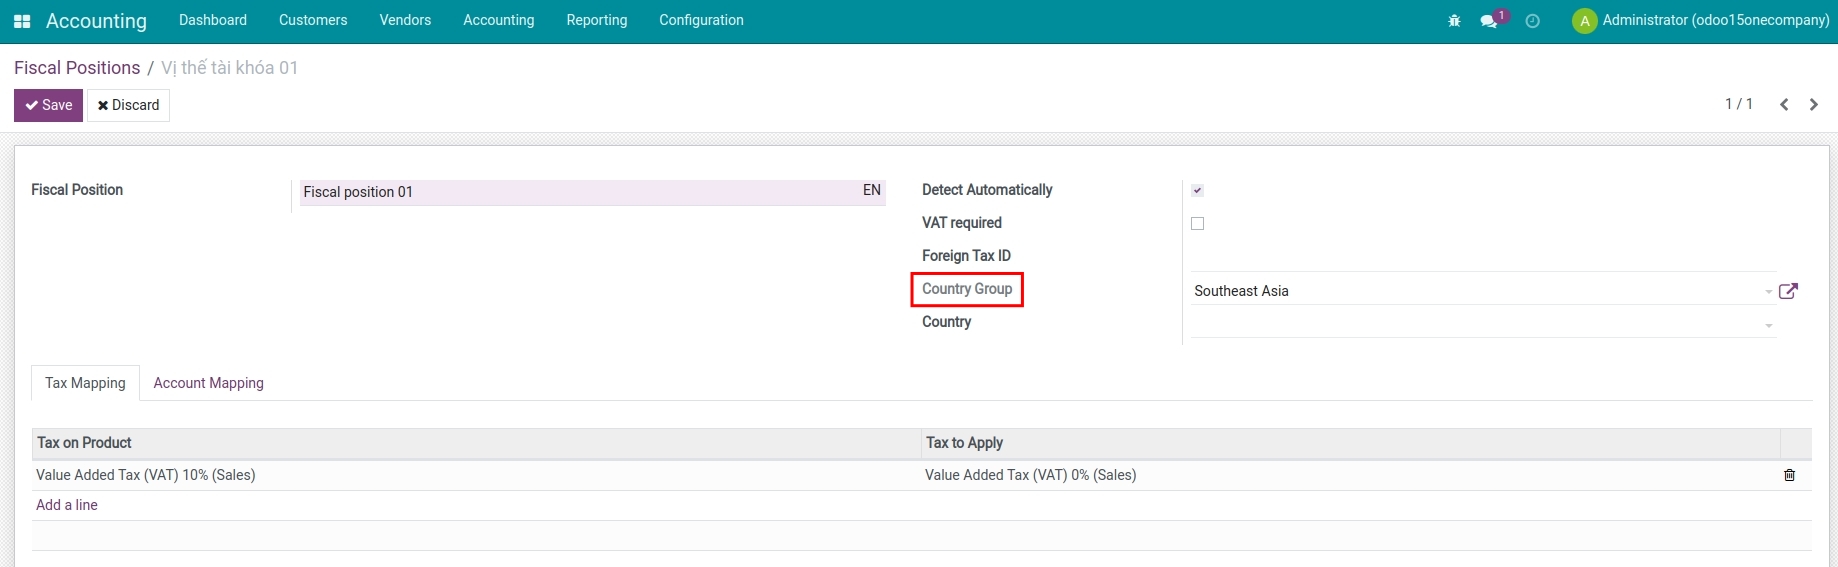
- Situation 02: Identify the chosen fiscal position on a partner’s contact.
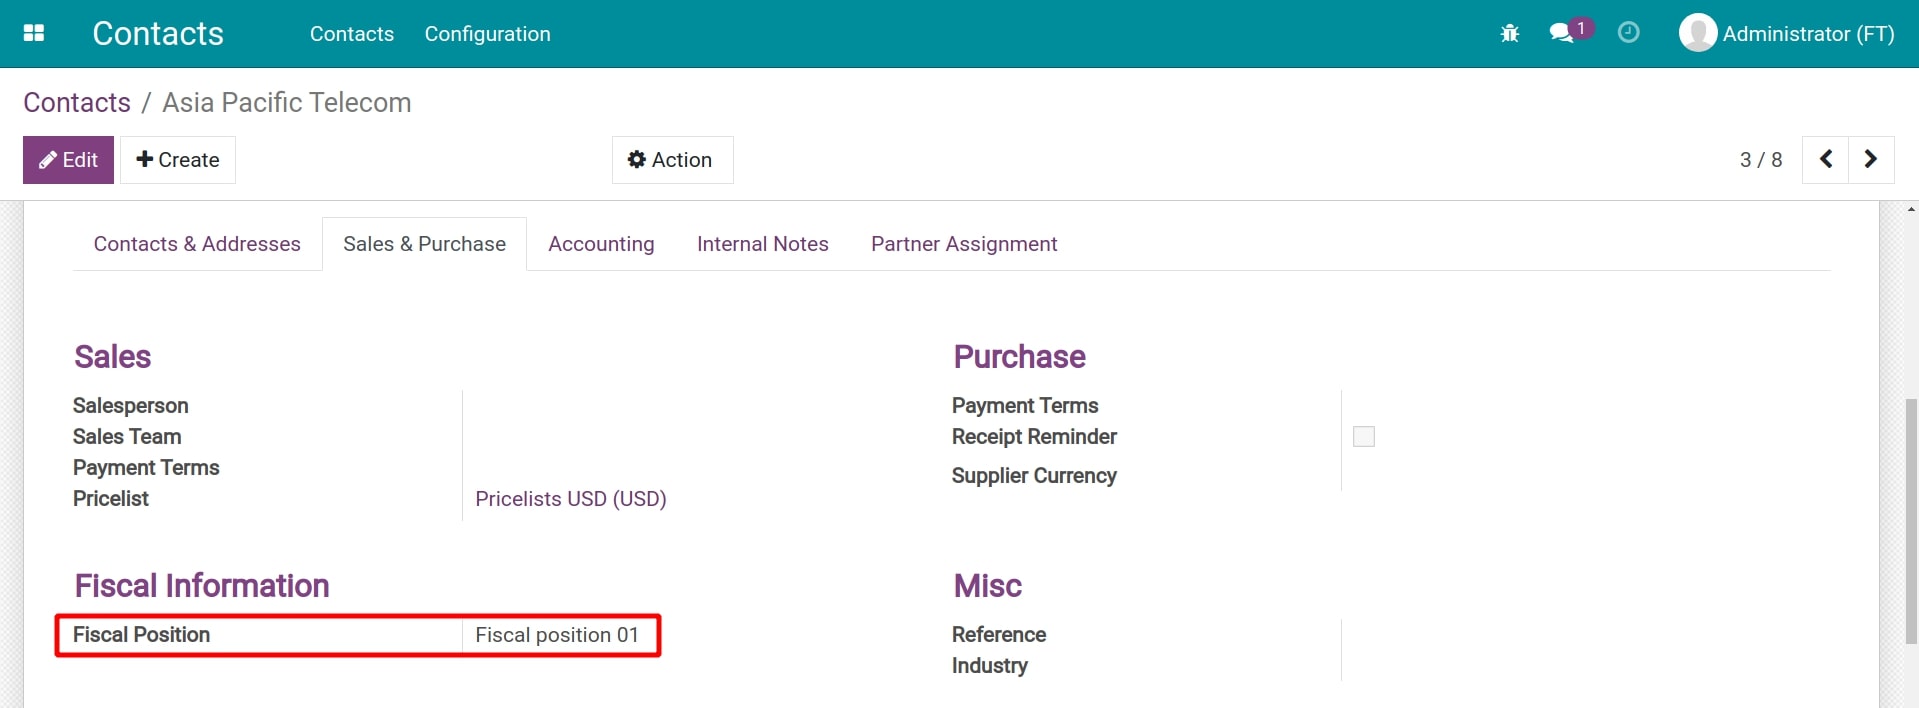
You need to configure a fiscal position on the partner’s contact.
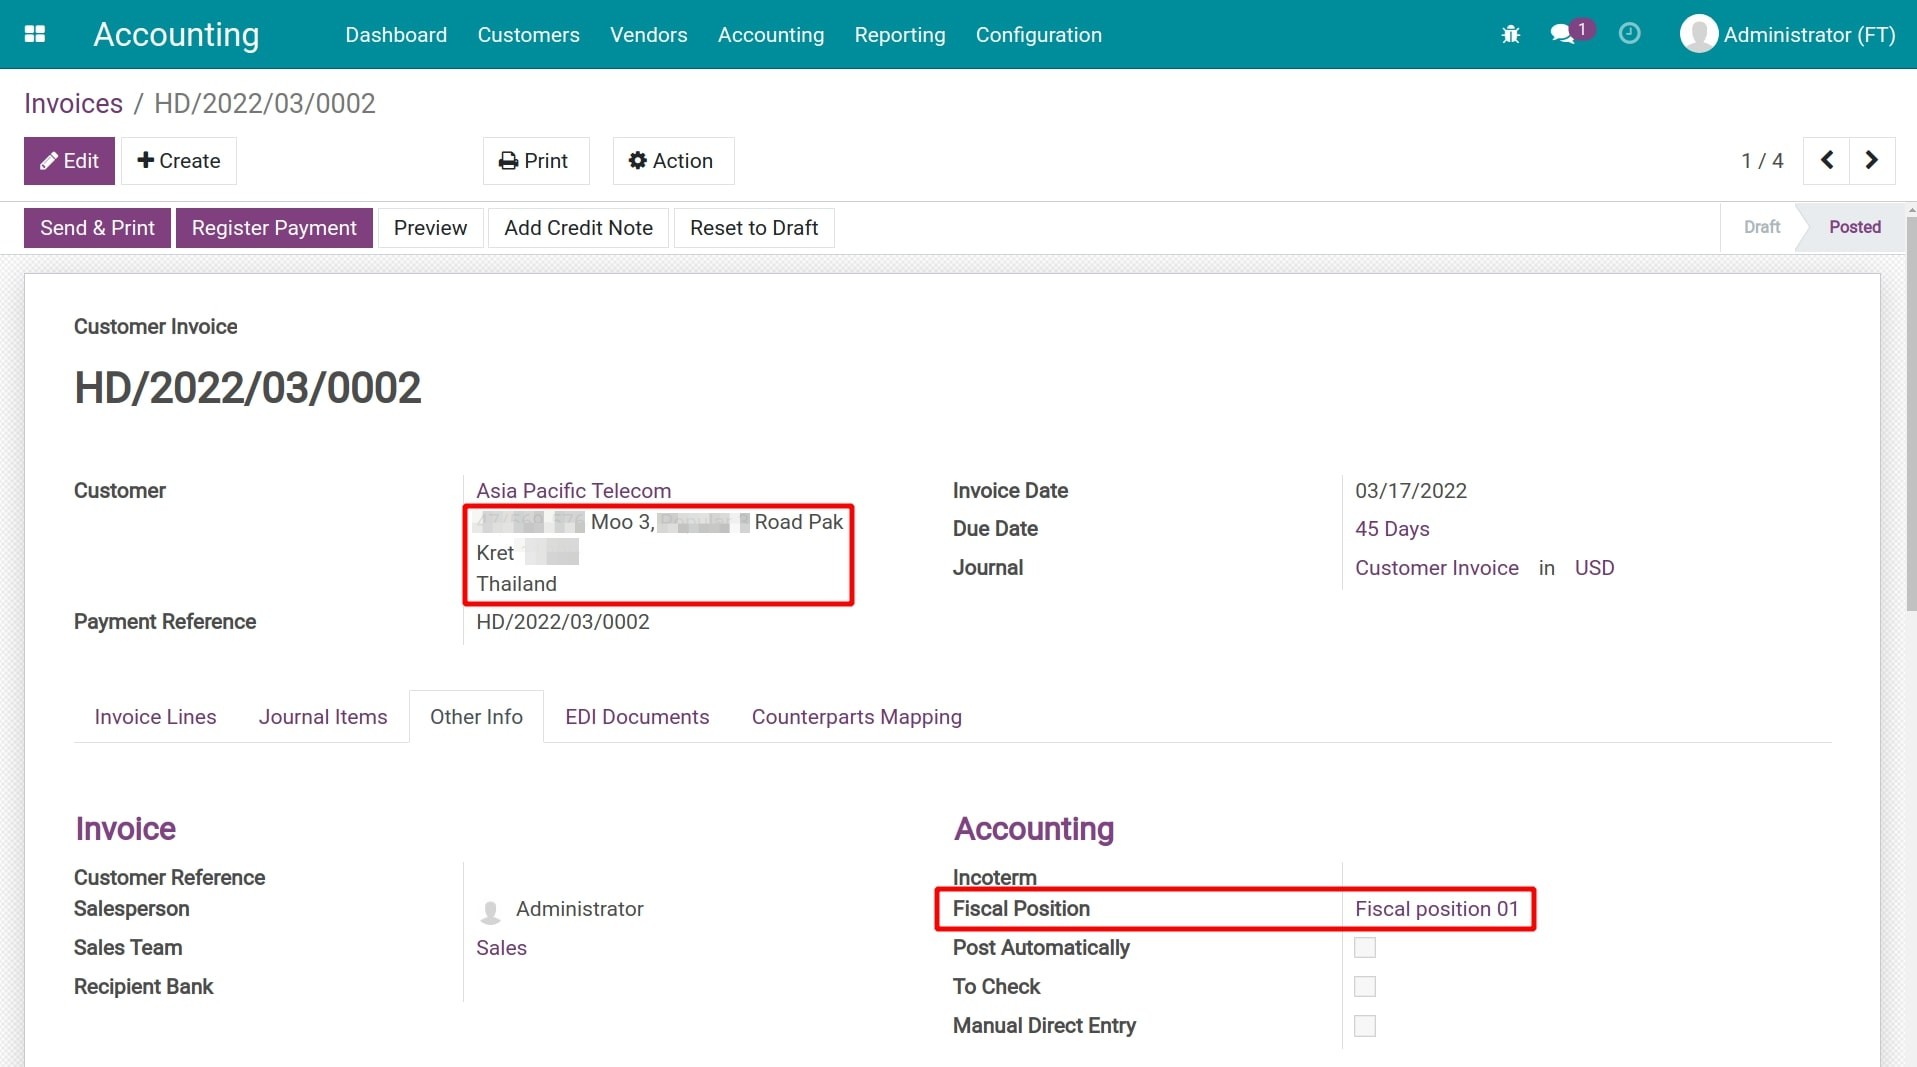
Your partners only need to satisfy one of the above conditions to have a fiscal position automatically applied with the mapped tax rules and accounts applied on sales and purchase documents.
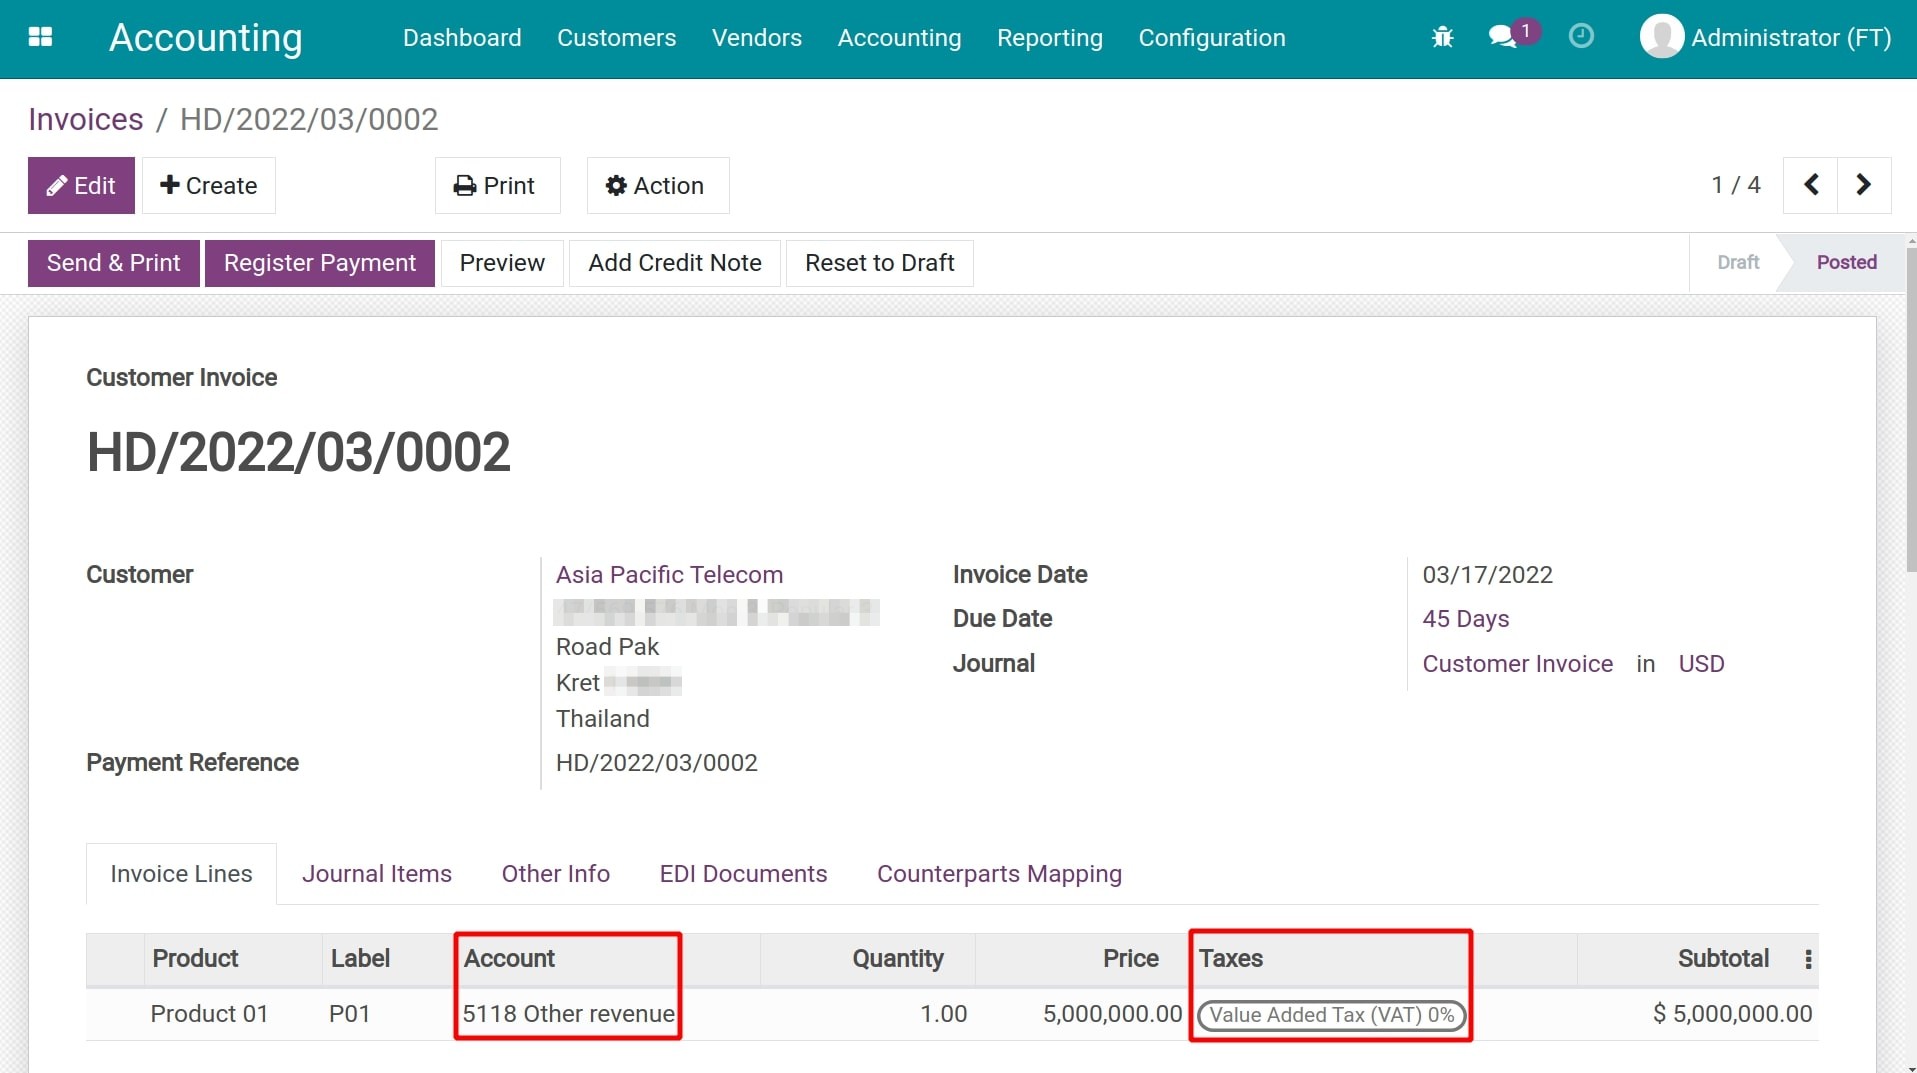
Warning
When the partner’s contact satisfies both country group and country fiscal position simultaneously, the country fiscal position will be preferred.
Manual application
You can also manually select a fiscal position on sales documents to apply the tax rules and accounting accounts configured on that fiscal position.
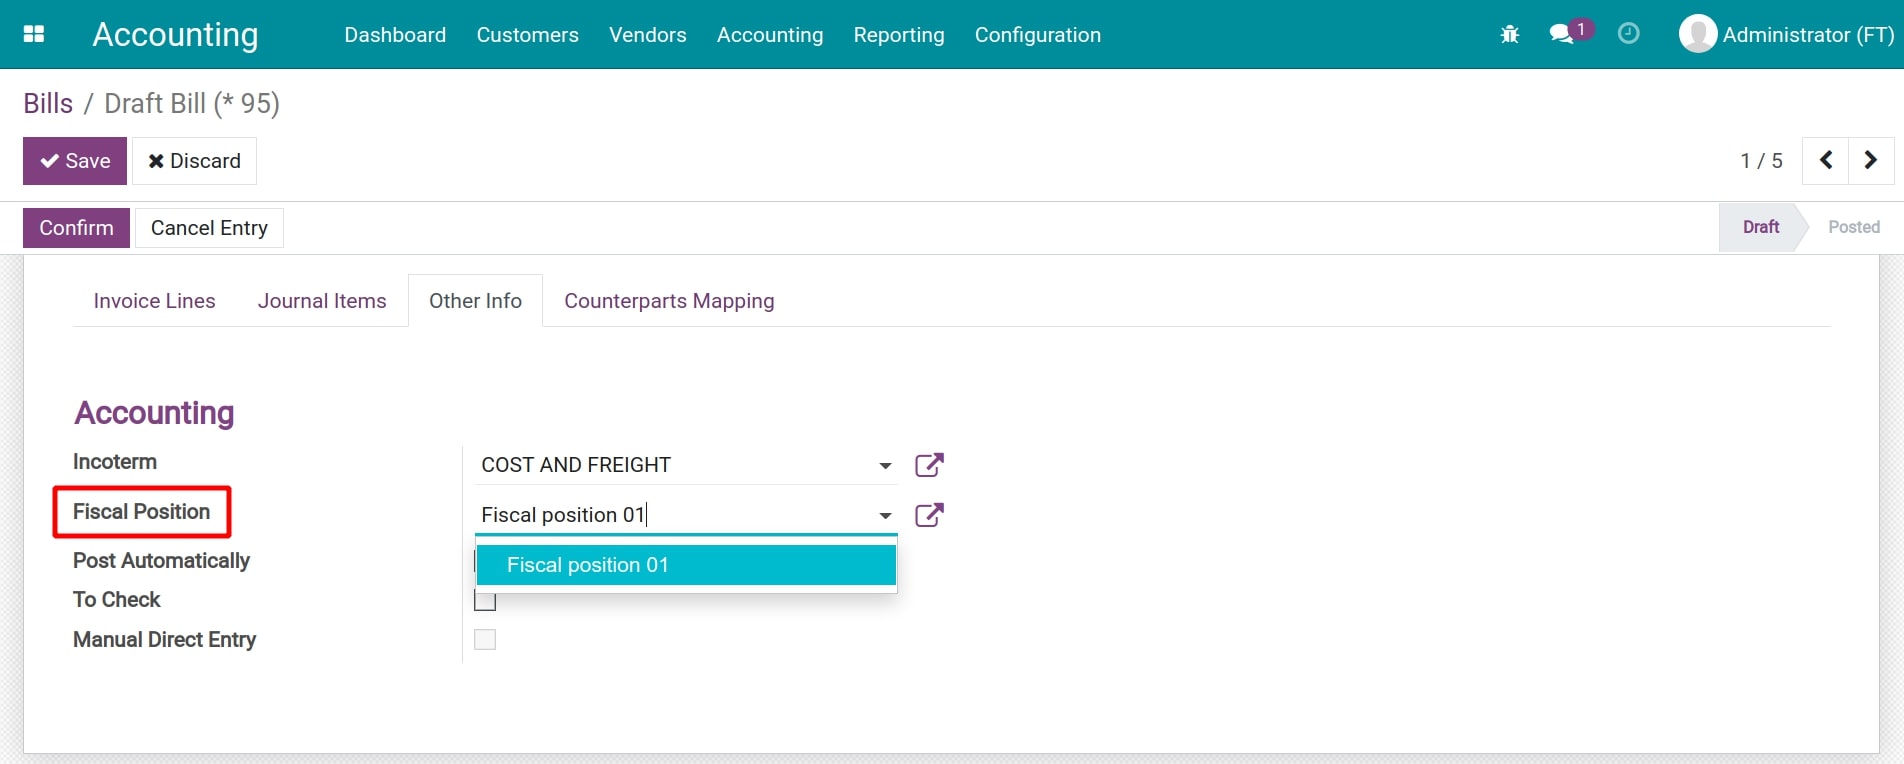
Note
- Tax mapping is only applicable to Active tax rules.
- Taxes applied to customers on e-commerce websites will be automatically recognized based on their geographical location.
- A fiscal position can be automatically generated when you use the fiscal localization packages feature.
See also
Related article
Taxes and tax rules configuration
Manage the price including or excluding taxes
Manage the price including or excluding taxes
In B2C transactions, businesses usually apply tax-included prices. However, for the B2B model, tax-excluded prices will be used in negotiations and transactions. The iSuite Accounting app supports you in both scenarios. Besides, you can configure these prices for each product.
Requirements
This tutorial requires the installation of the following applications/modules:
iSuite Invoicing
Accounting & Finance Management
To configure two price calculations on a product, you need to do as follows:
Default tax configuration
Navigate to Accounting ‣ Configuration ‣ Taxes to create a new tax. (See more at Taxes configuration). From here, at the Advanced Options tab, do not enable the Included in Price feature:
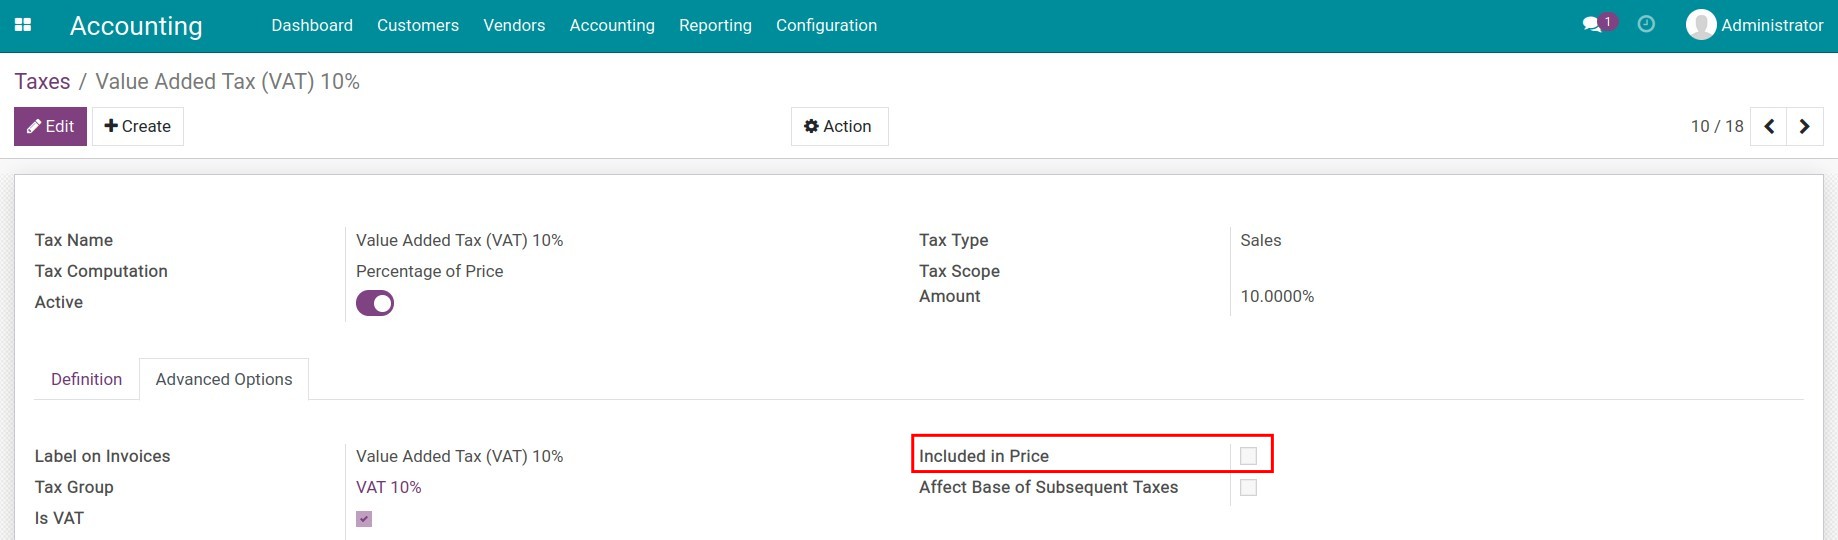
Next, set this tax as default for sales transactions by navigating to Accounting ‣ Configuration ‣ Setting, go to the Default Taxes section and select the tax created above in the Sales Tax field:
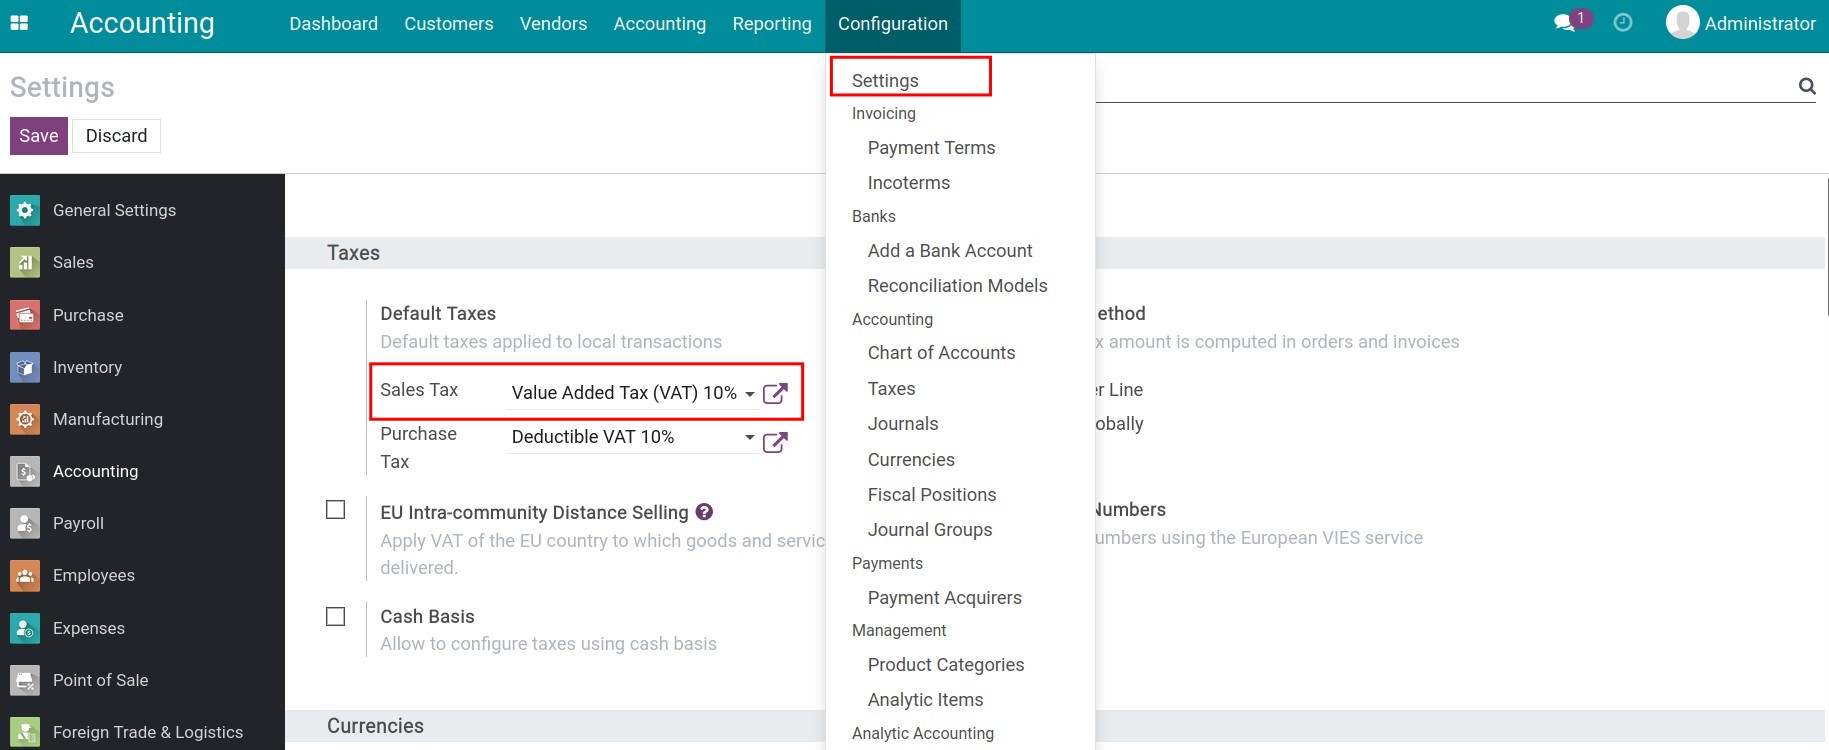
Besides, you can set a default tax on each product by navigating to Accounting ‣ Customers ‣ Products, choose the default tax in the Customer Taxes field:

Create a B2C pricelist with tax-included price
Navigate to Sales ‣ Products ‣ Pricelists to create a tax-included pricelist. (See more at Managing the pricelists in iSuite). Be aware that the price set on the pricelist is tax-included:
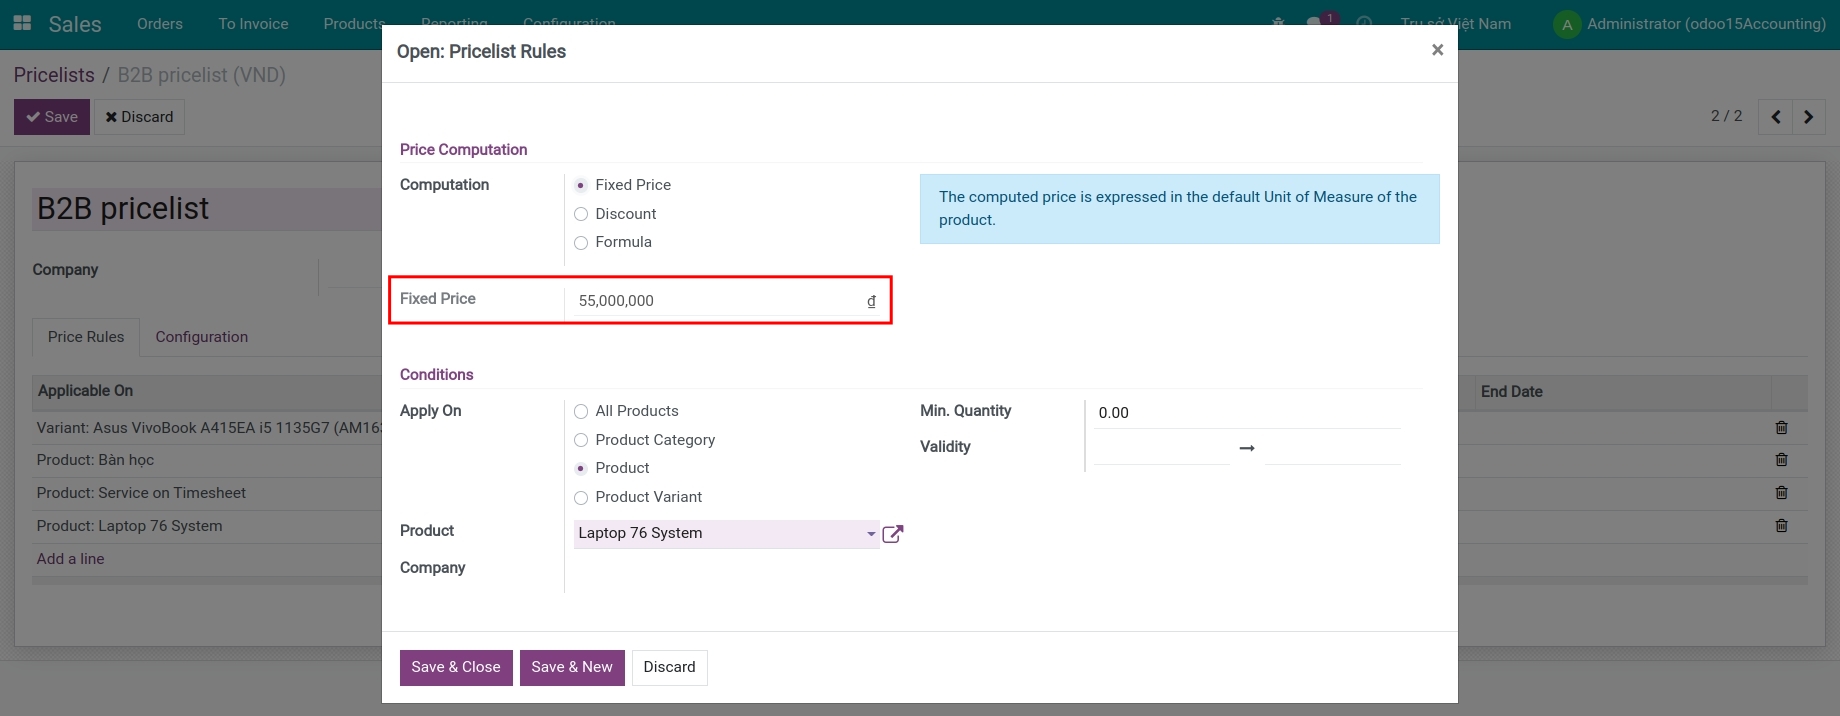
Configure fiscal position for tax-included price
First, you need to create a new tax which is included in Price.
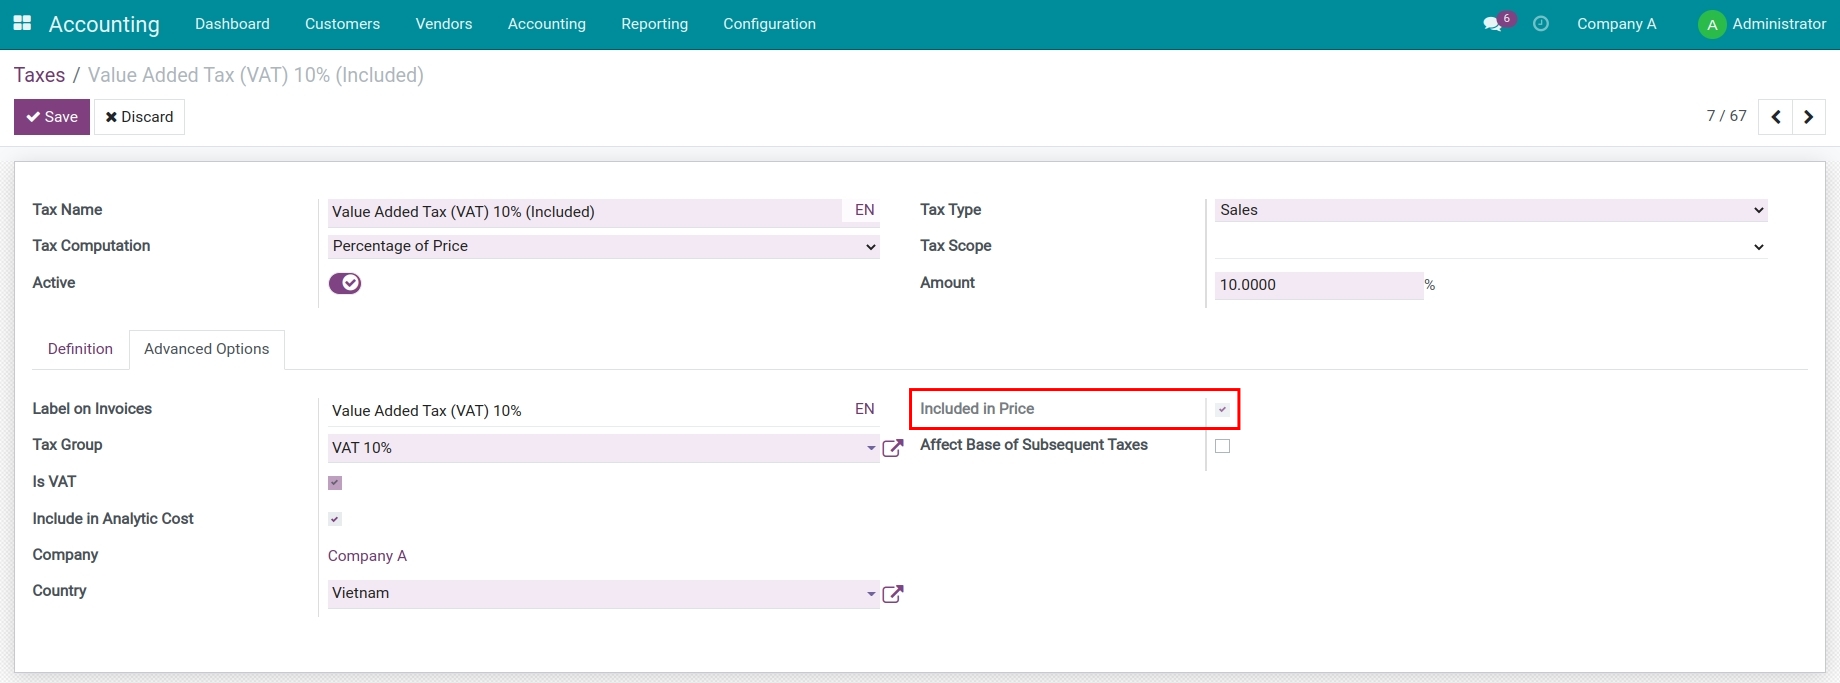
Navigate to Accounting ‣ Configuration ‣ Fiscal Positions to create a tax mapping rule to apply for sales transactions with tax-included price:
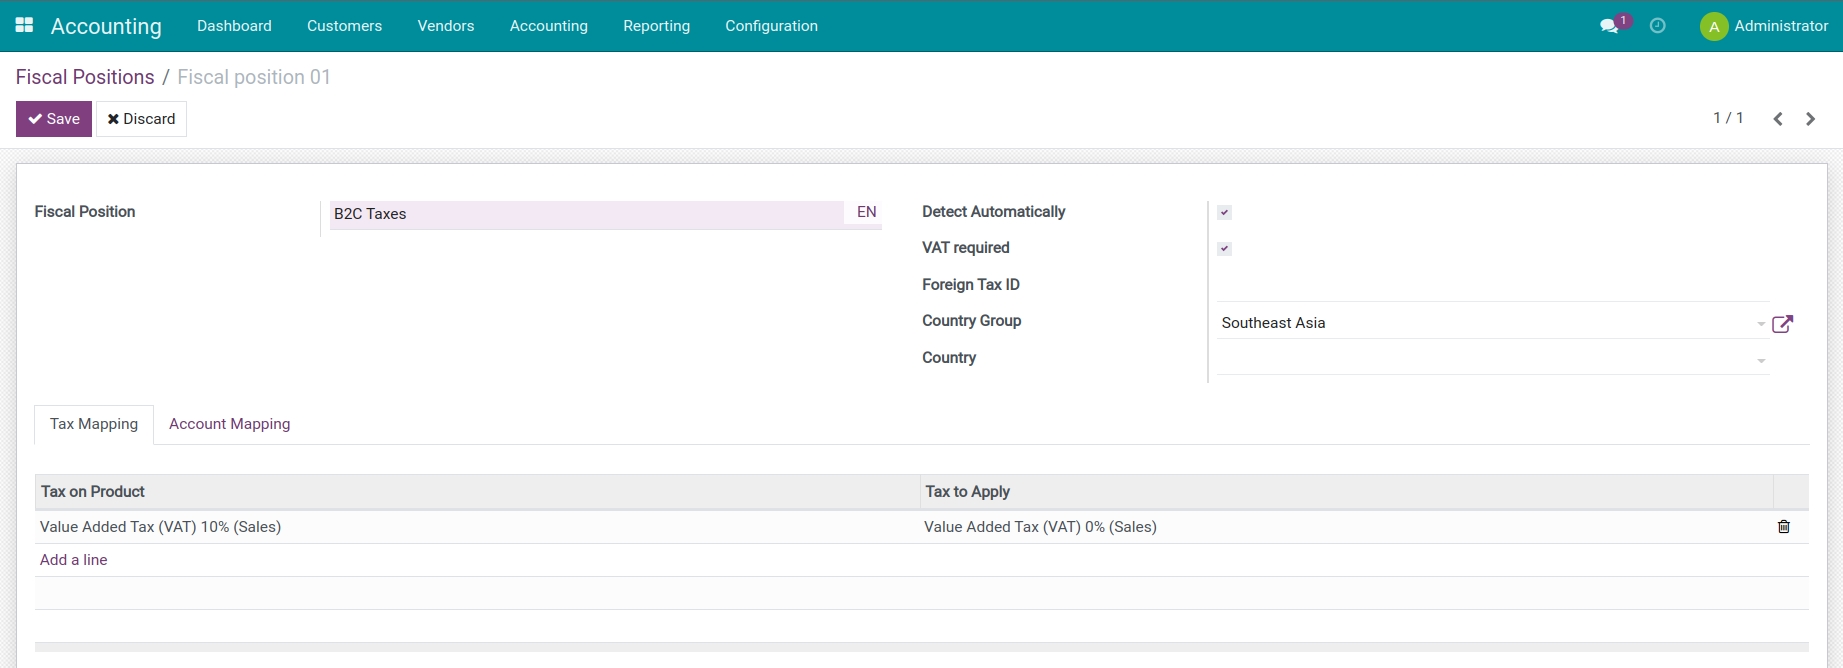
Navigate to Sales ‣ Orders ‣ Customers, choose the customer, at tab Sales & Purchase, set the tax-included pricelist and fiscal positions:
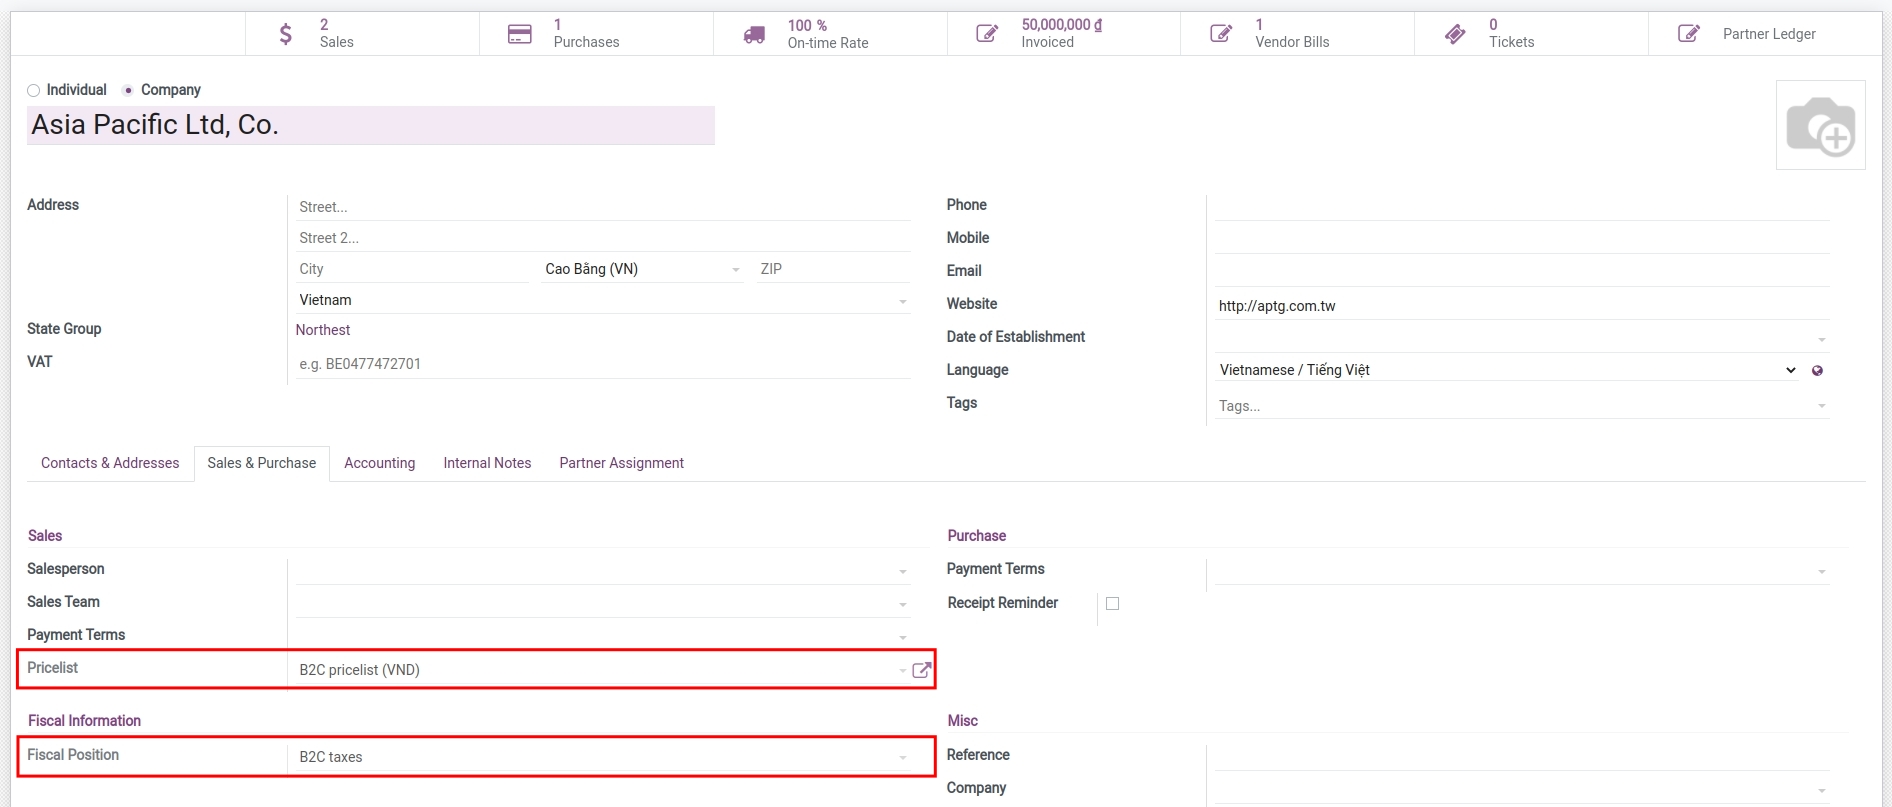
You can also set up the fiscal positions on sale orders by navigating to Sales ‣ Orders ‣ Quotations, and choosing the quotation. At the Other Info tab, set up fiscal positions:
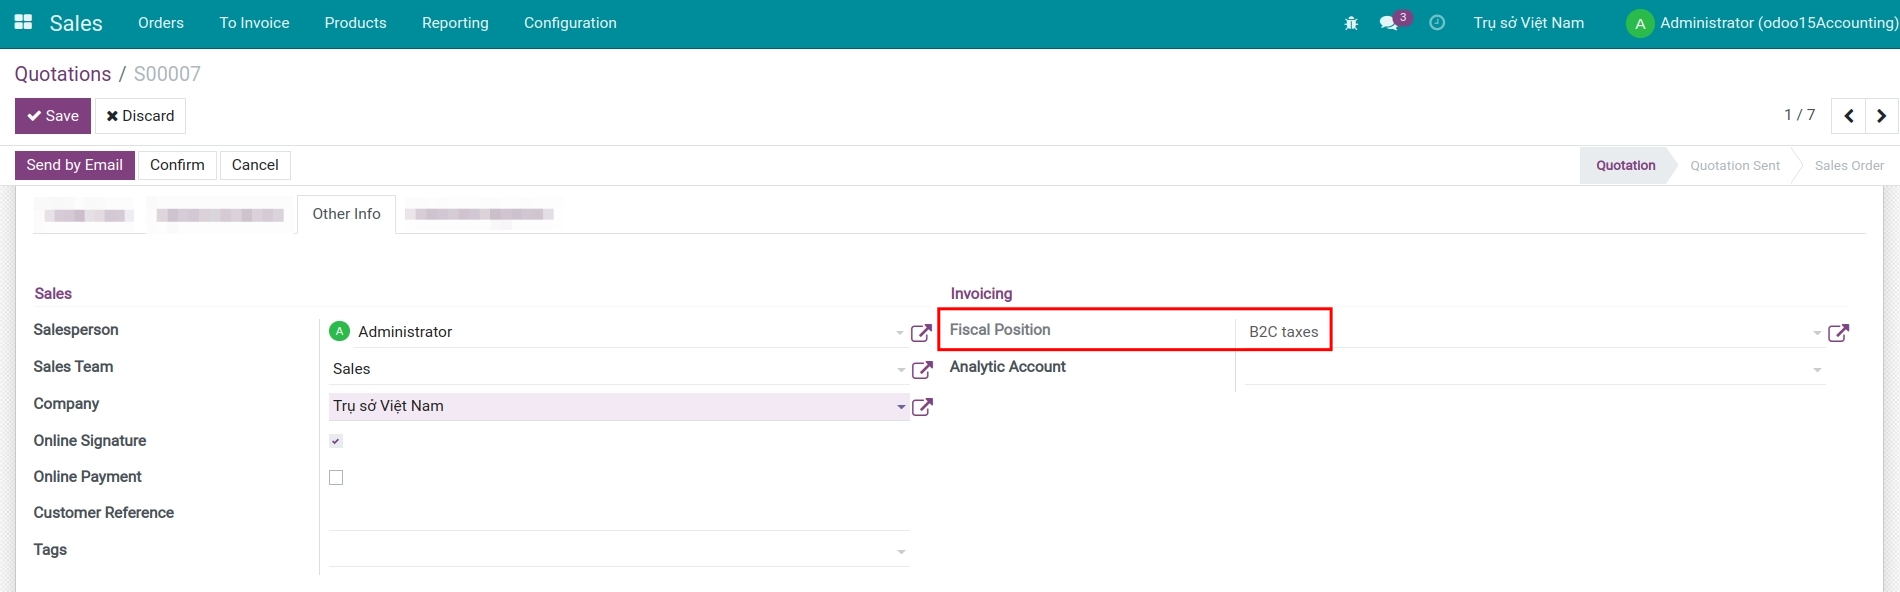
Apply to Sales transactions
B2B transactions
In transactions with businesses, sales orders will display the tax-excluded price on the Unit price column, and the taxes will be applied to this product on the Taxes column: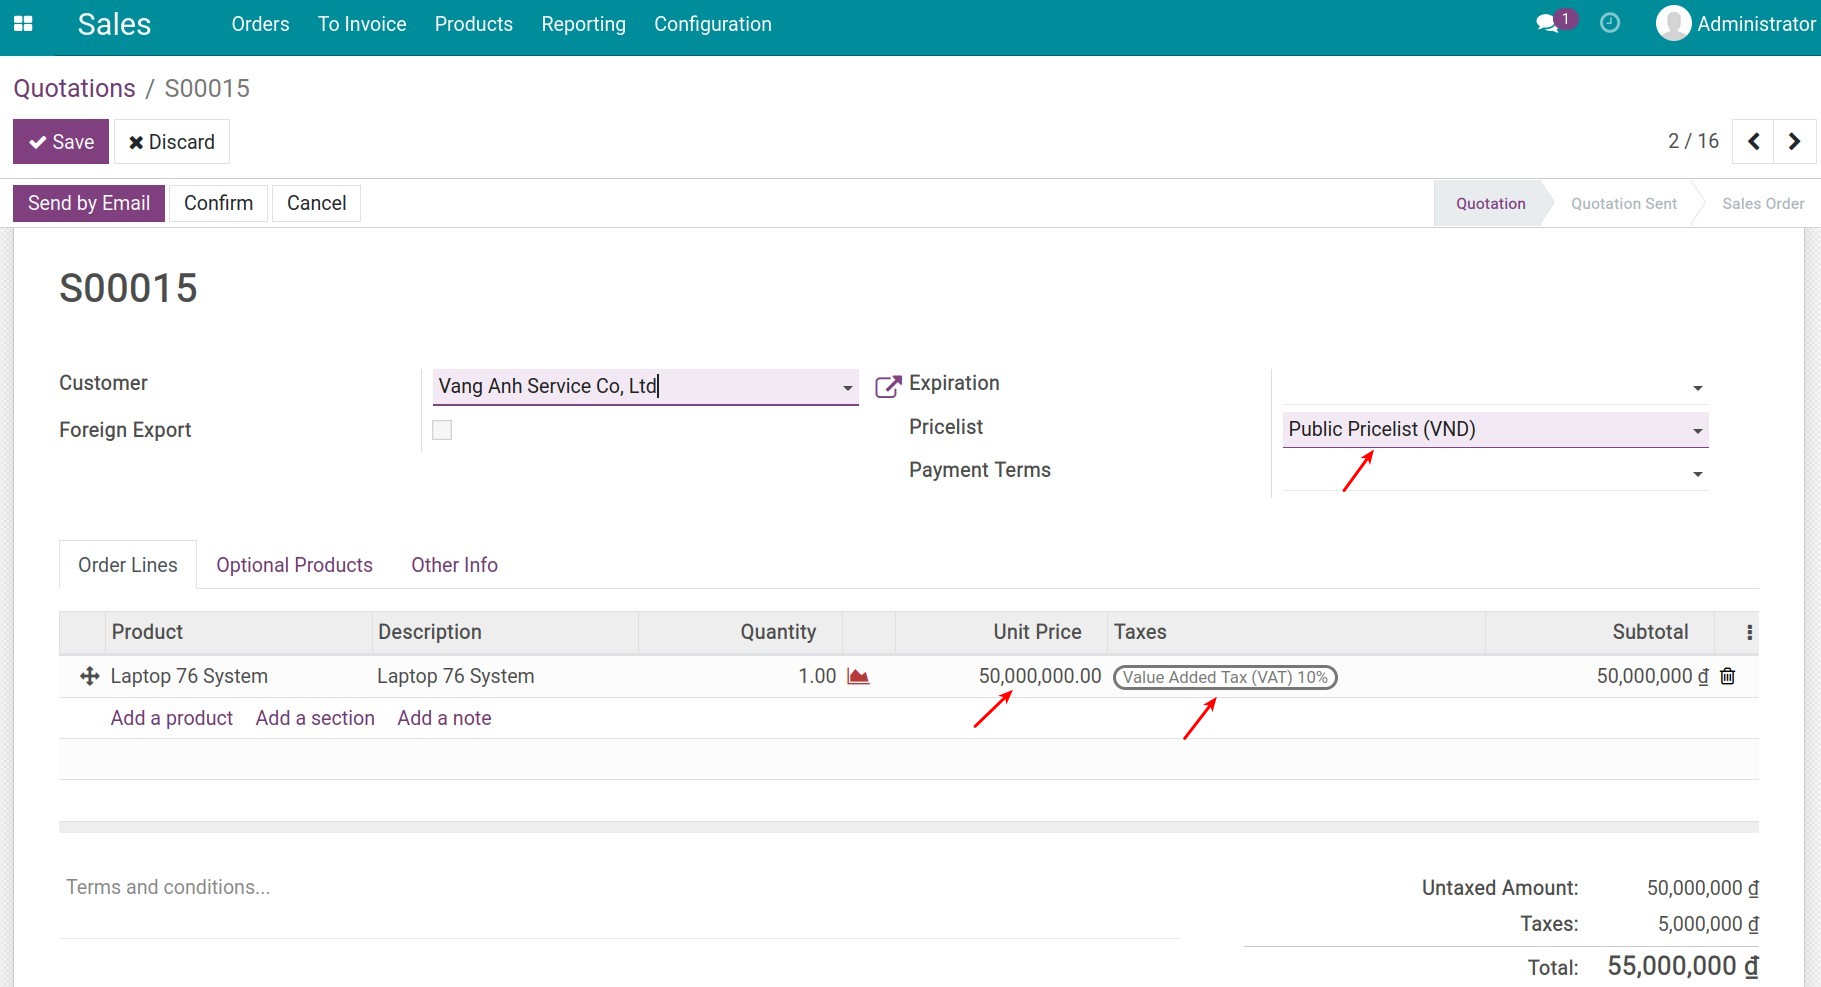
Note
To configure the default prices - tax-excluded for products, you can configure directly at the product form or create a public pricelist.
B2C transactions
With customers applying tax-included price, based on the default configuration, the tax-included price and the respective taxes will be displayed on the quotation as below:
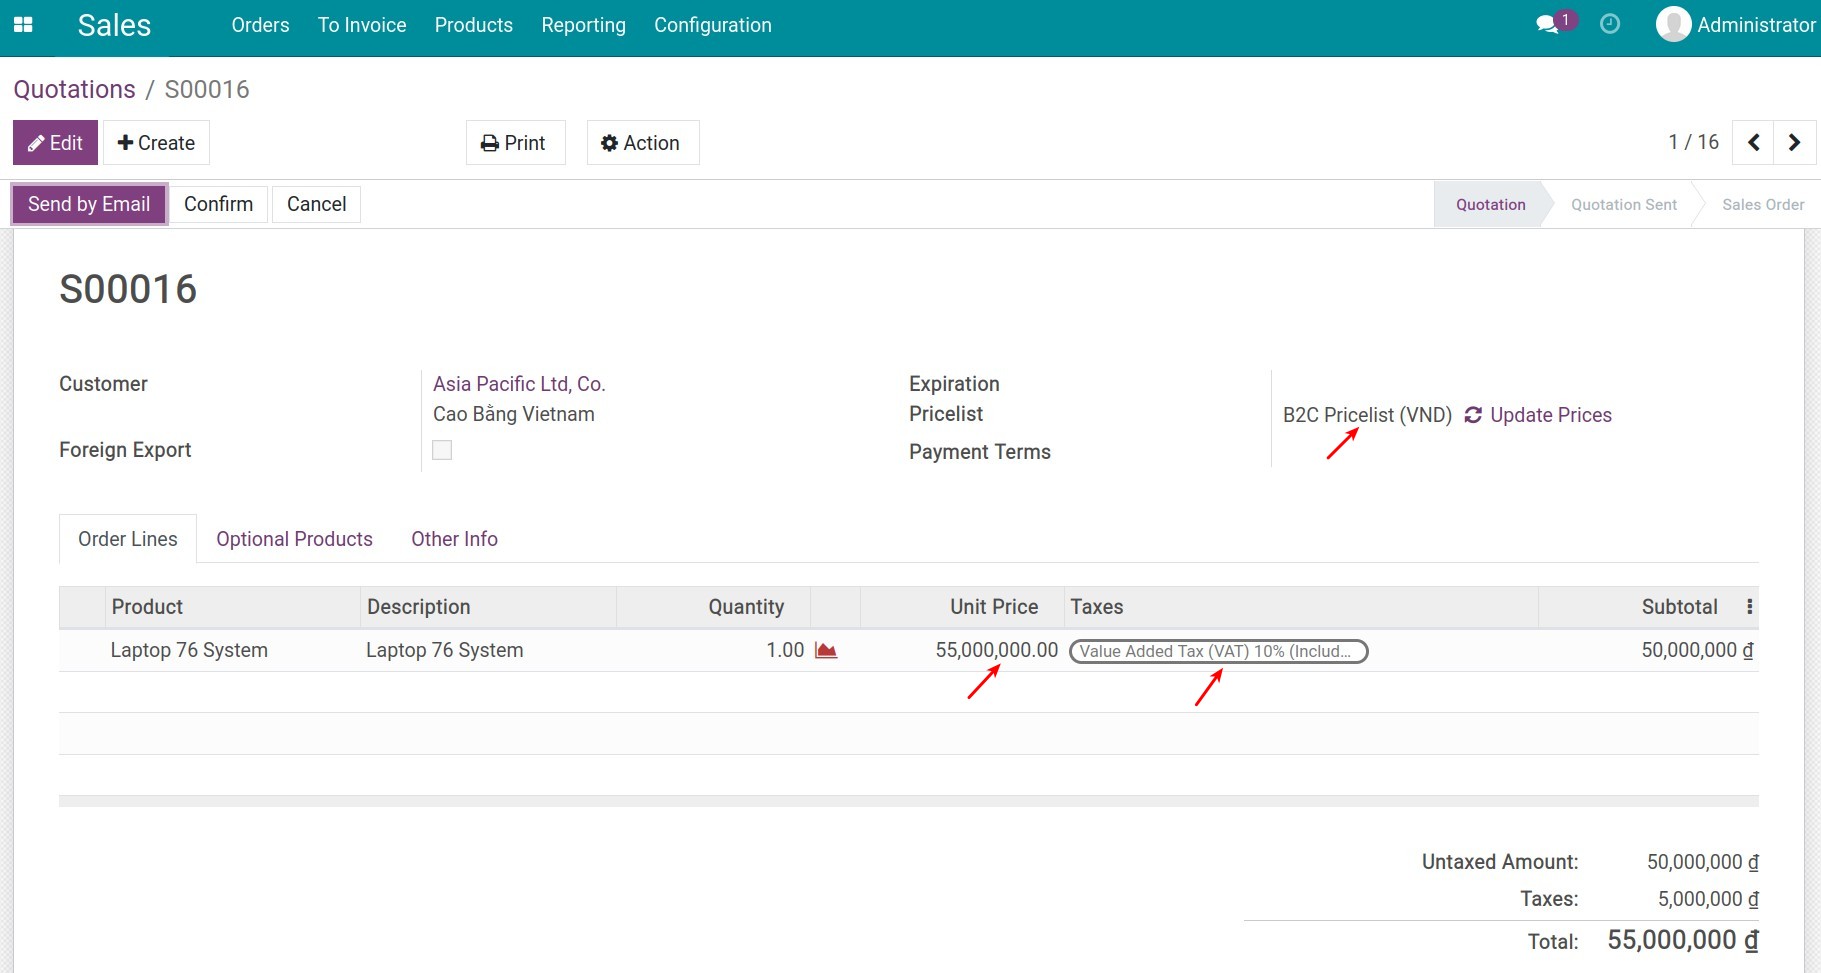
See also
Related Article
Apply VAT in EU intra-community
Manage Retention Taxes
Manage Retention Taxes
Retention tax (withholding tax) is a tax applied to foreign vendors when they do business and receive income in the host country.
Requirements
This tutorial requires the installation of the following applications/modules:
Viindoo Invoicing
Accounting & Finance Management
Normally when paying costs to vendors, businesses will keep the retention taxes to pay the tax authorities on behalf of foreign vendors. To do this on Viindoo software, have a look at the following example:
Company B (based in Vietnam) hires the equipment installation service of Company A (based in the United States). The total cost is $5000. During the recording of the accounts and making payments for this order, the accountant has the responsibility to calculate and deduct the tax amount of 5% that Company A has to pay to the tax authorities in Vietnam.
Total cost payables to Company A: $5,000.
5% retention taxes = $5,000 * 5% = $250.
Remaining amount must be paid to Company A = $5,000 - $250 = $4,750.
=> Retention taxes paid by Company A: $250
Retention taxes configuration in Viindoo
To keep the retention taxes from vendors, you need to create a new tax and define it as a negative tax. To create a new tax, navigate to Accounting ‣ Configuration ‣ Taxes. For more details, have a look at the article: Taxes and tax rule configuration. You also have to configure the linked account for this tax as below:
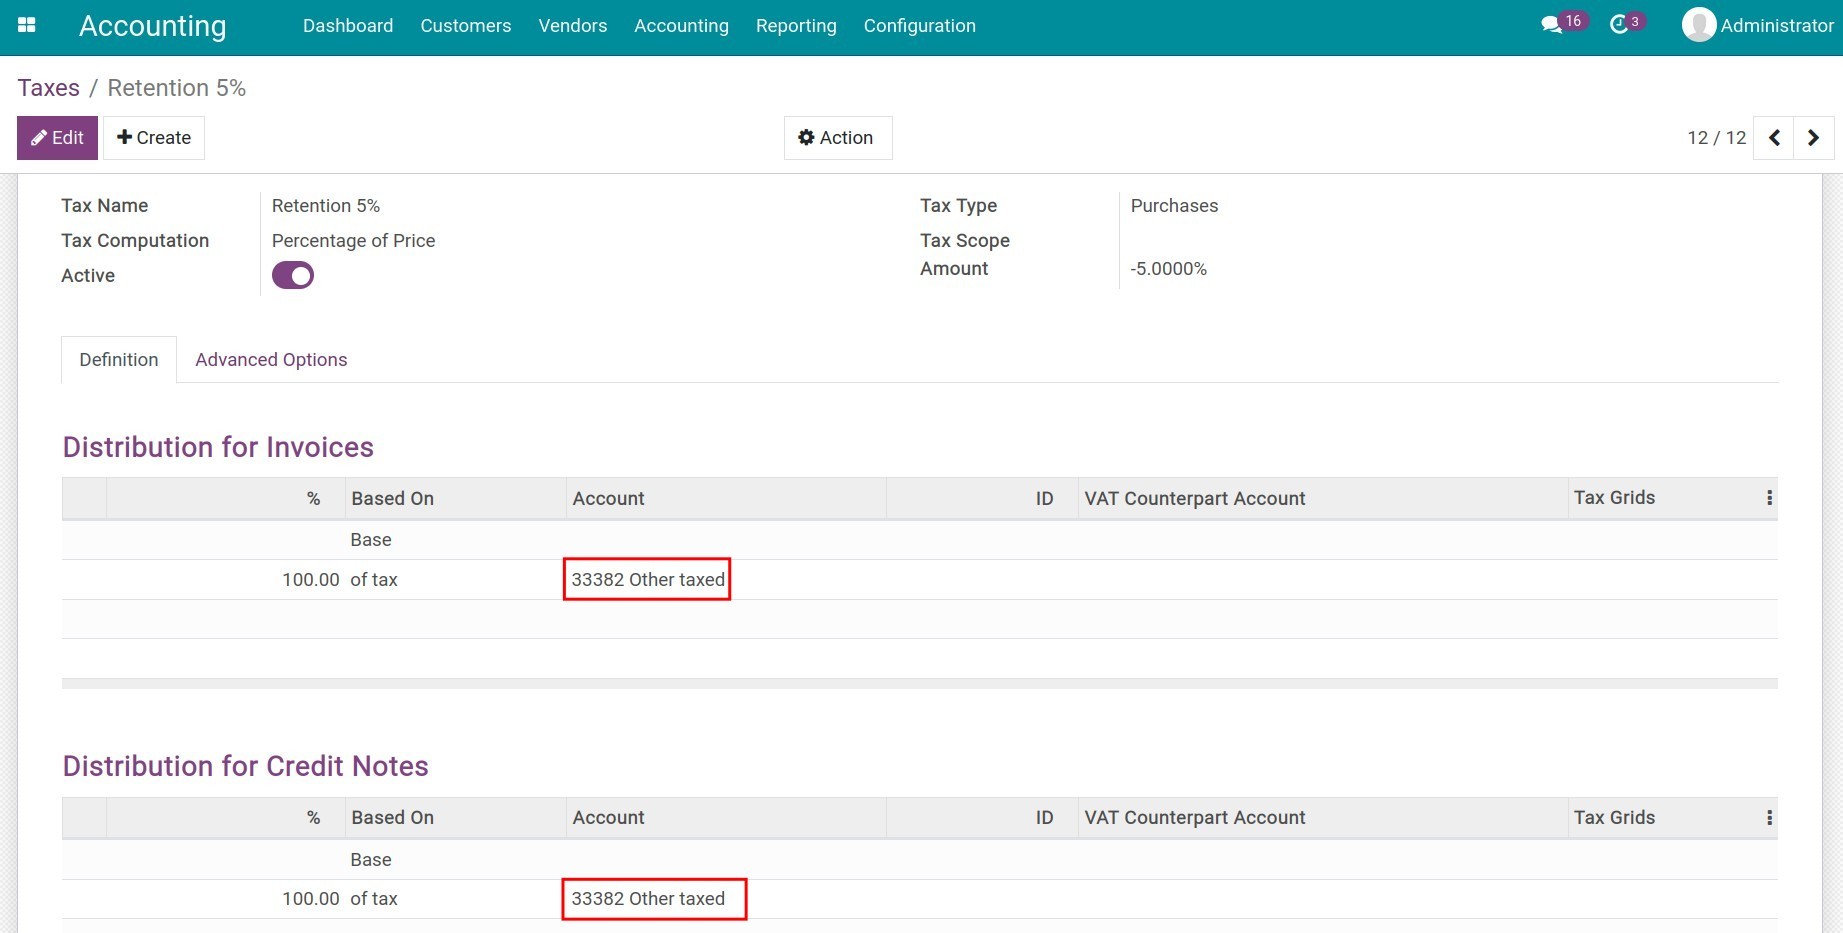
To display this new tax as a new tax group, go to the Advanced Options tab and create a new tax group.
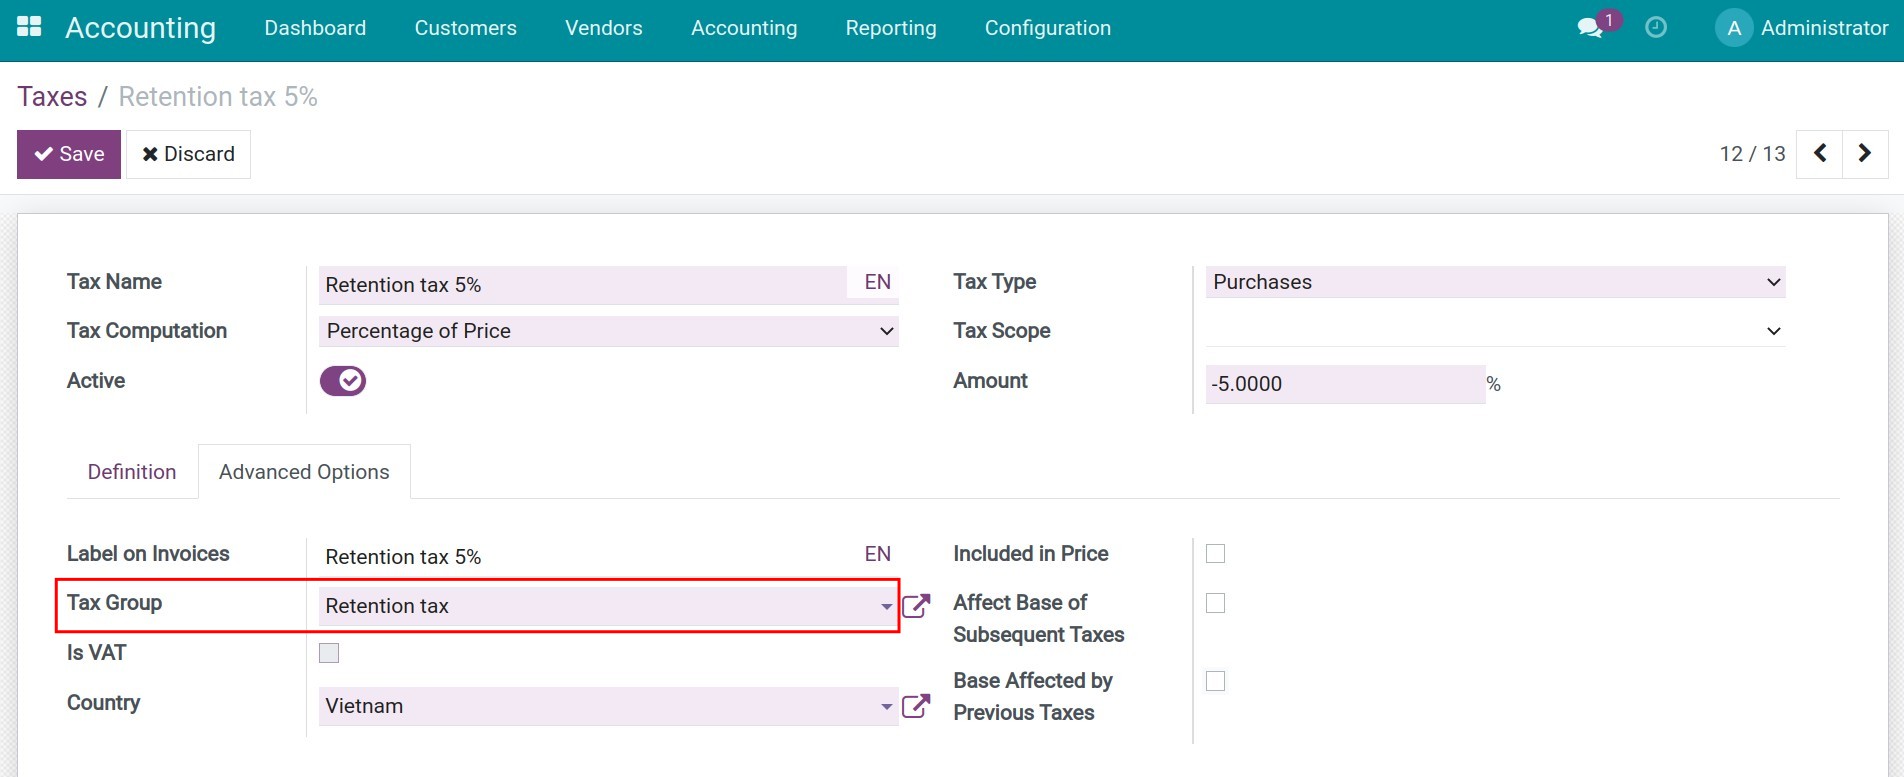
Press Save, and you can set this tax as default on the products, sales orders, or invoices that frequently has retention taxes.
Applying retention taxes on invoices
In the above example, when you receive the vendor bill, do the followings:
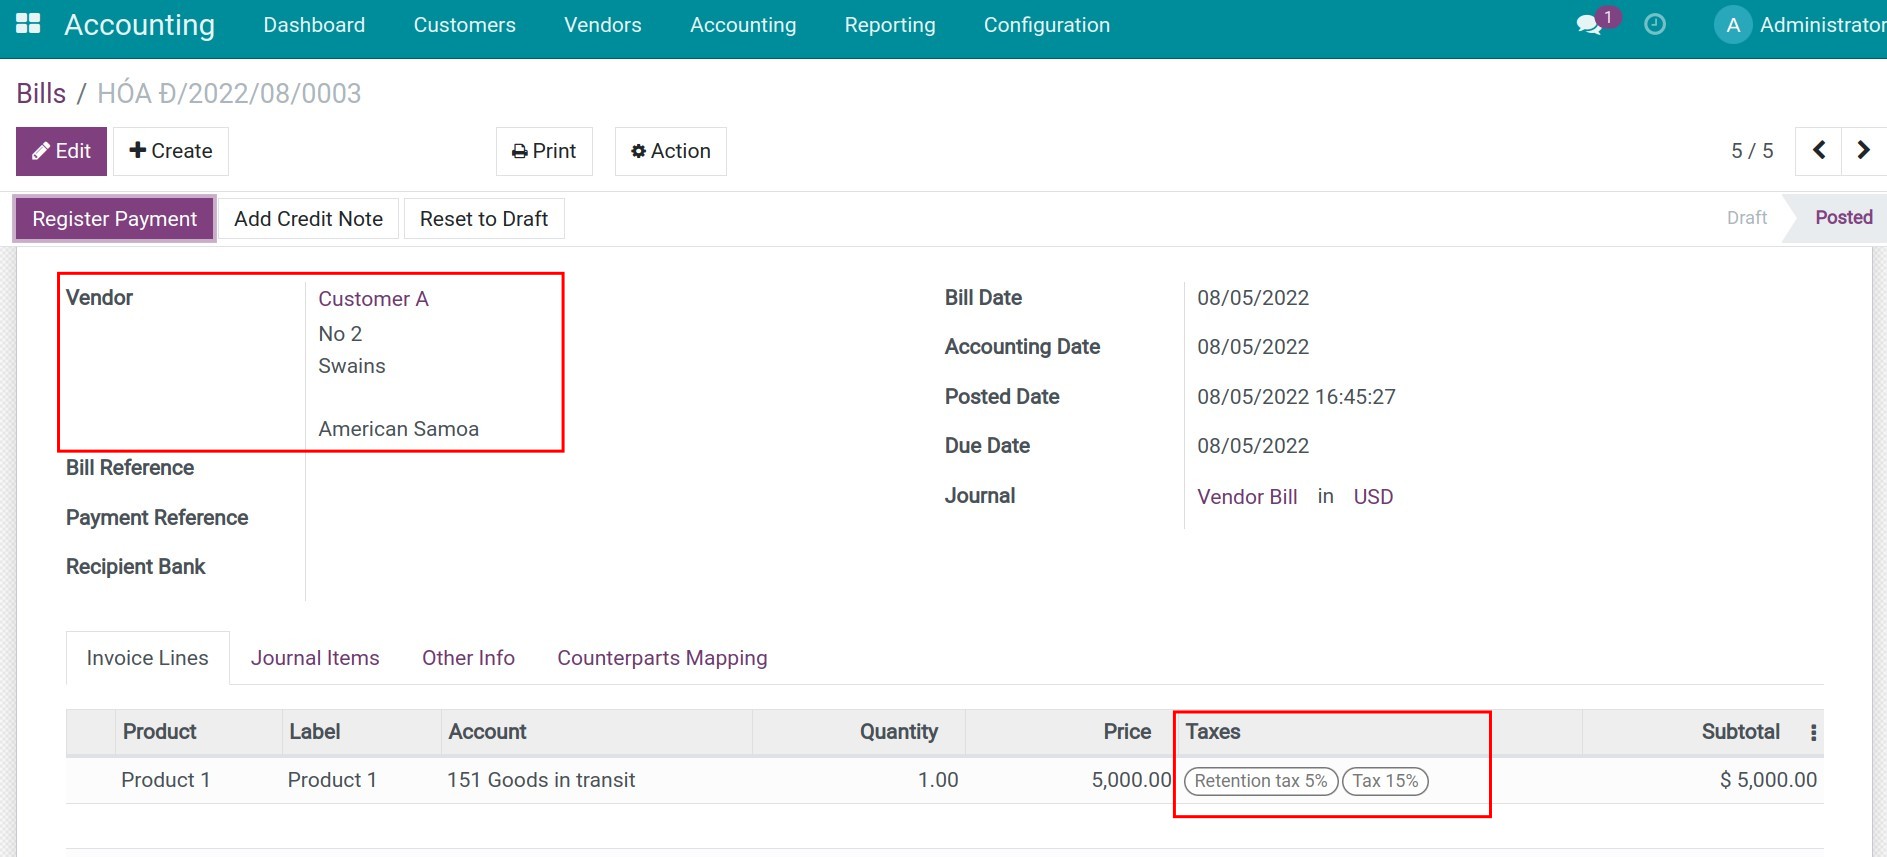
The confirmed invoice will have the different tax types displayed separately.
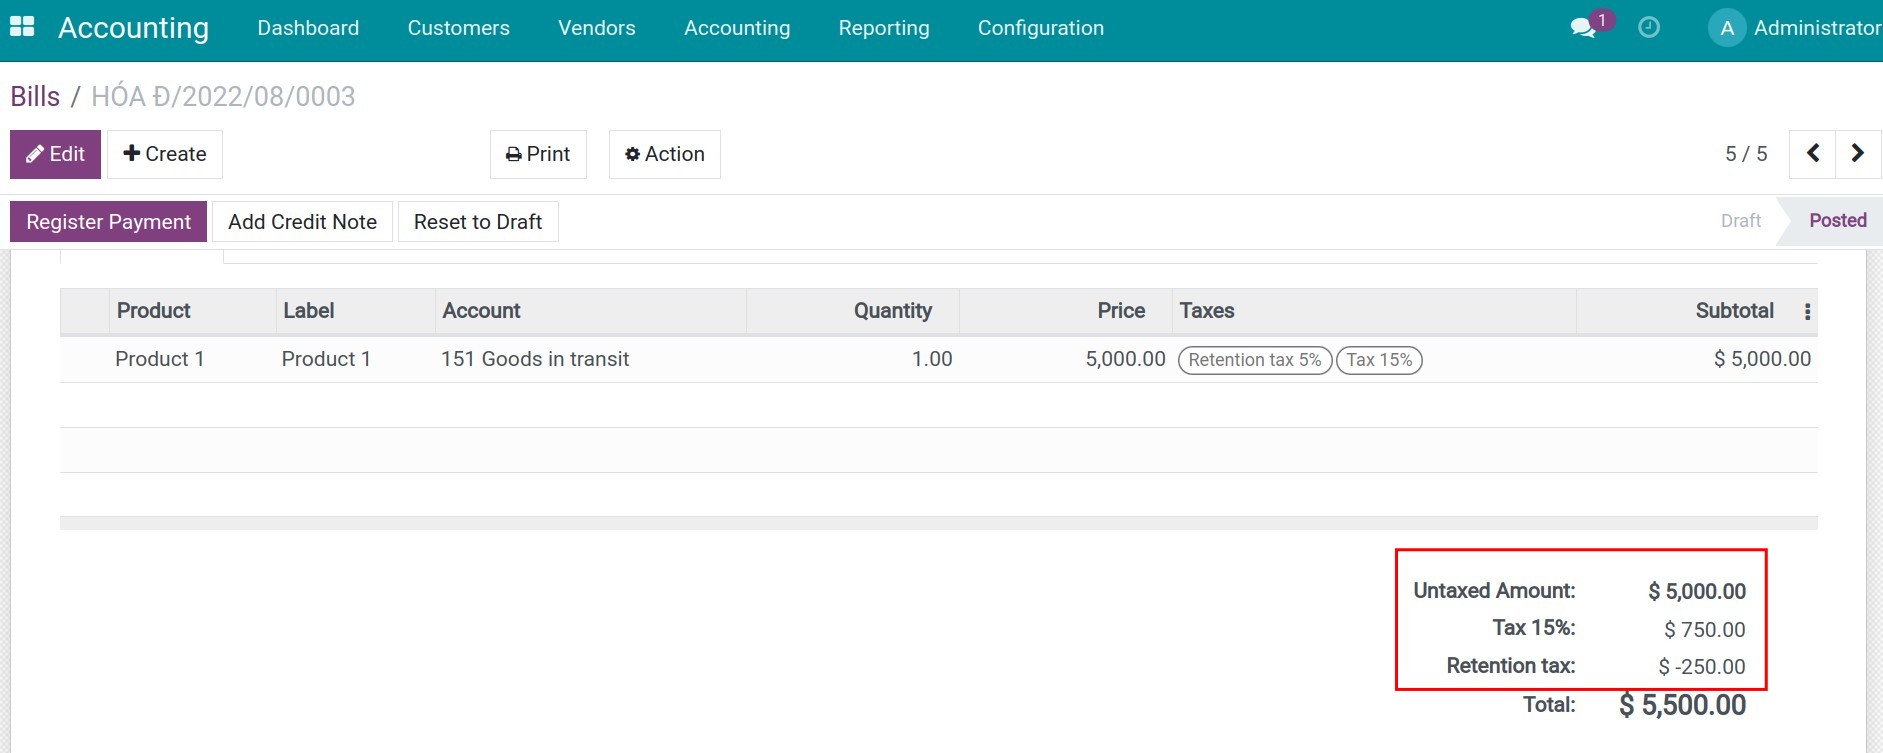
On the invoice, go to the Journal Items tab to review the automatically generated journal entries:
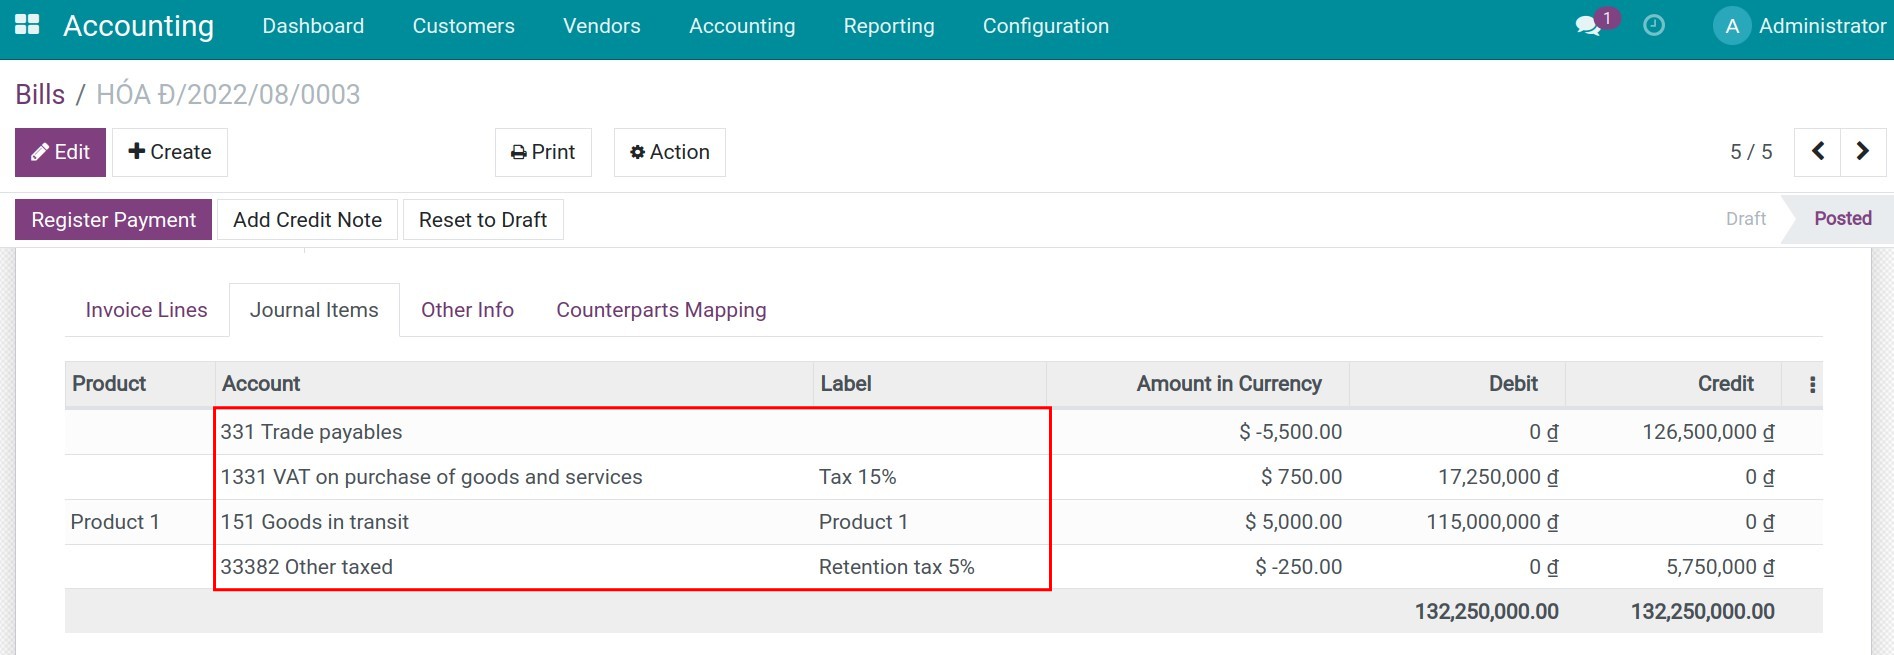
Pay retention taxes
When you need to pay taxes, you have two options:
Option 1: Navigate to Accounting ‣ Accounting ‣ Journal Entries and press Create to record the payable taxes.
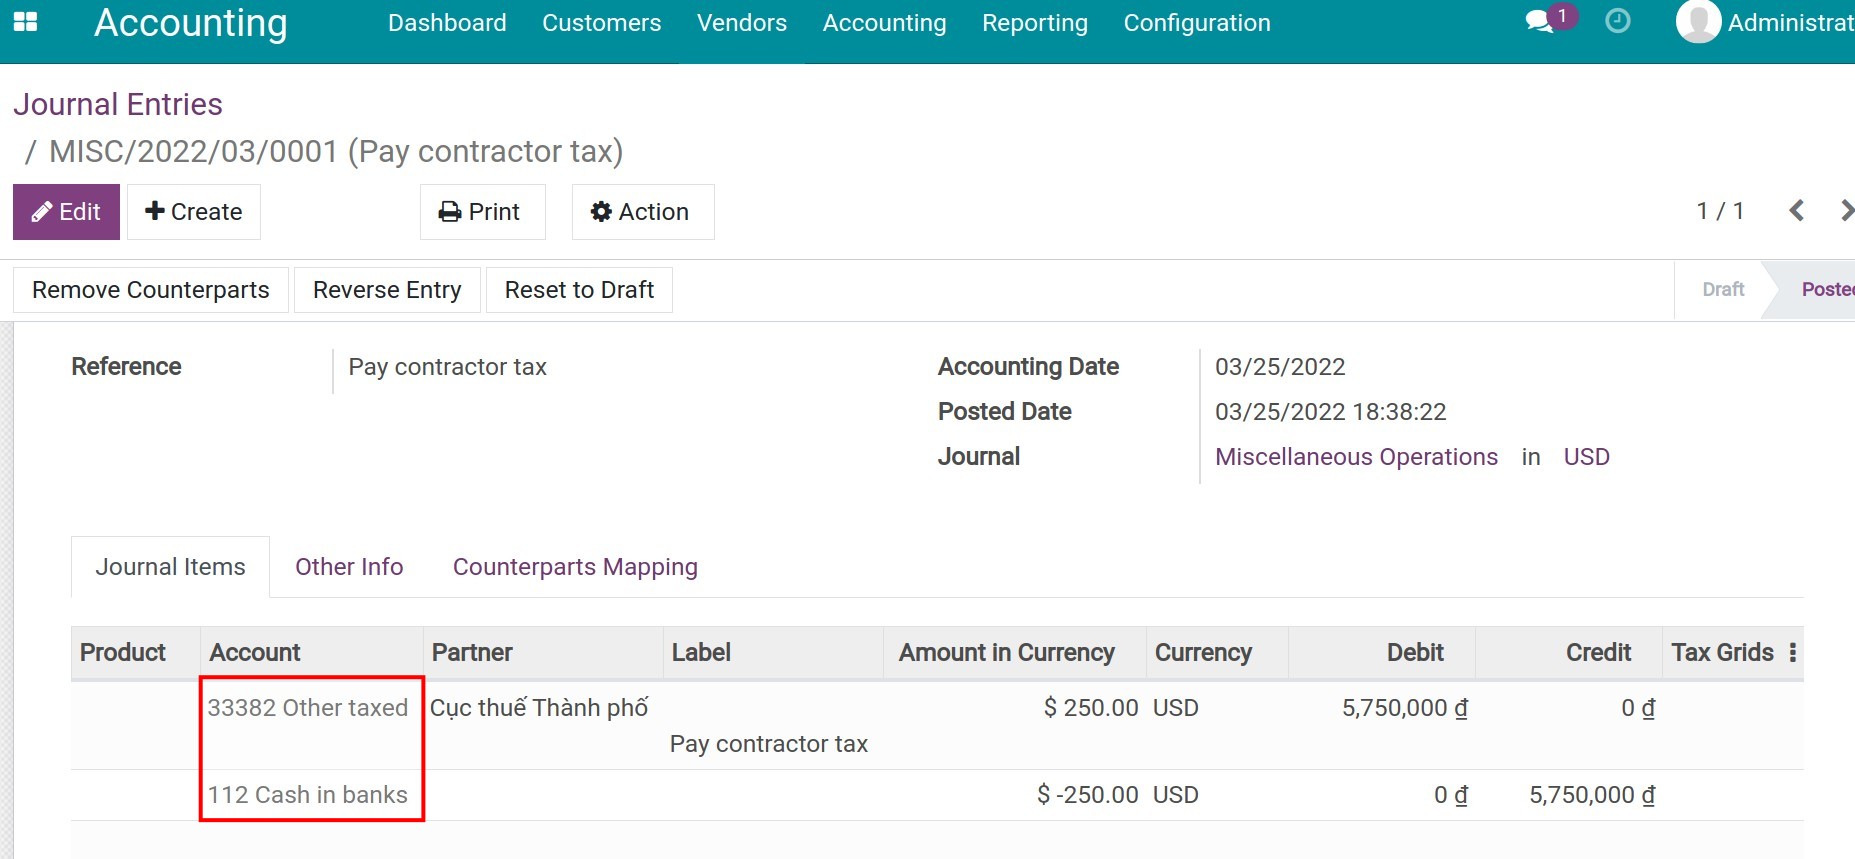
Option 2: Navigate to Accounting ‣ Vendors ‣ Payments and press Create to fill in the information to pay tax:
Payment Type: Send;
Vendor: Where to pay taxes;
Tab Payment Details:
Label: Fill in the content on the payment form;
Countered Account: Accounting accounts to record tax liabilities;
Amount: Amount of tax to be paid.
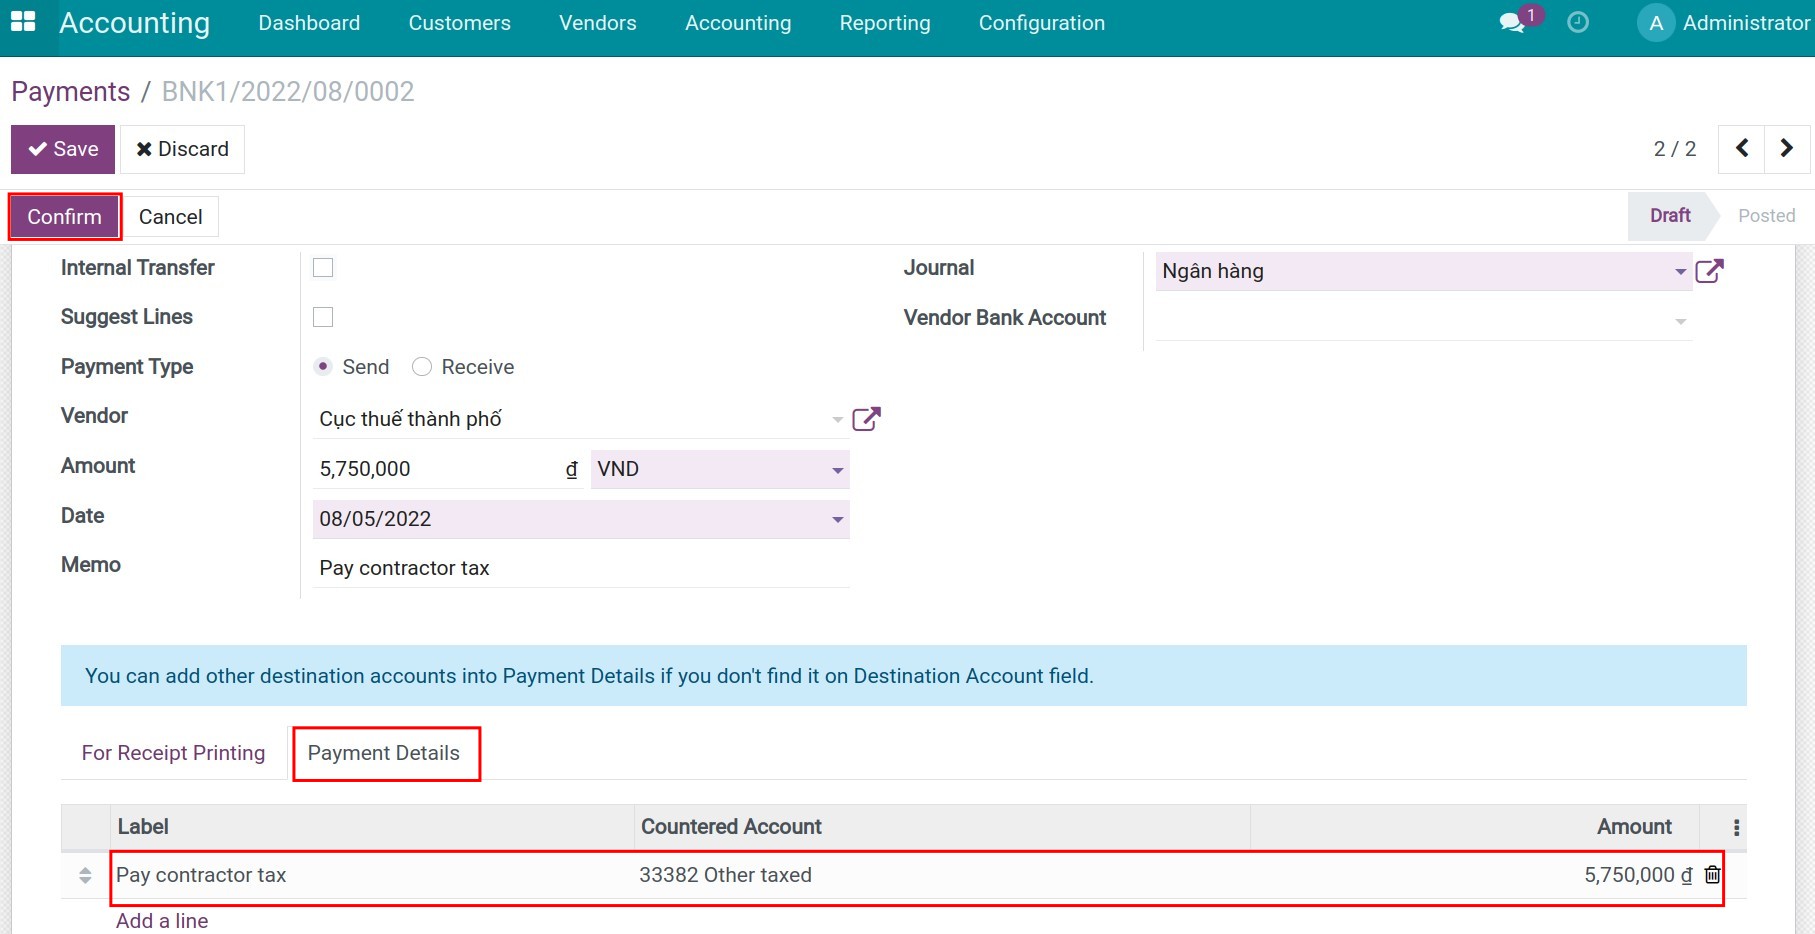
See also
Related Article
Manage taxes in a cash basis taxpayer
Tax reports using tax grids
Manage taxes in a cash basis taxpayer
Manage taxes in a cash basis taxpayer
iSuite Accounting Software provides the Cash Basis feature to help your business easily record taxes incurred when they are defined as valid according to the cash basis accounting method.
Requirements
This tutorial requires the installation of the following applications/modules:
iSuite Invoicing
Accounting & Finance Management
Related settings
To use the Cash Basis feature, navigate to Accounting ‣ Configuration ‣ Settings and select Cash Basis.
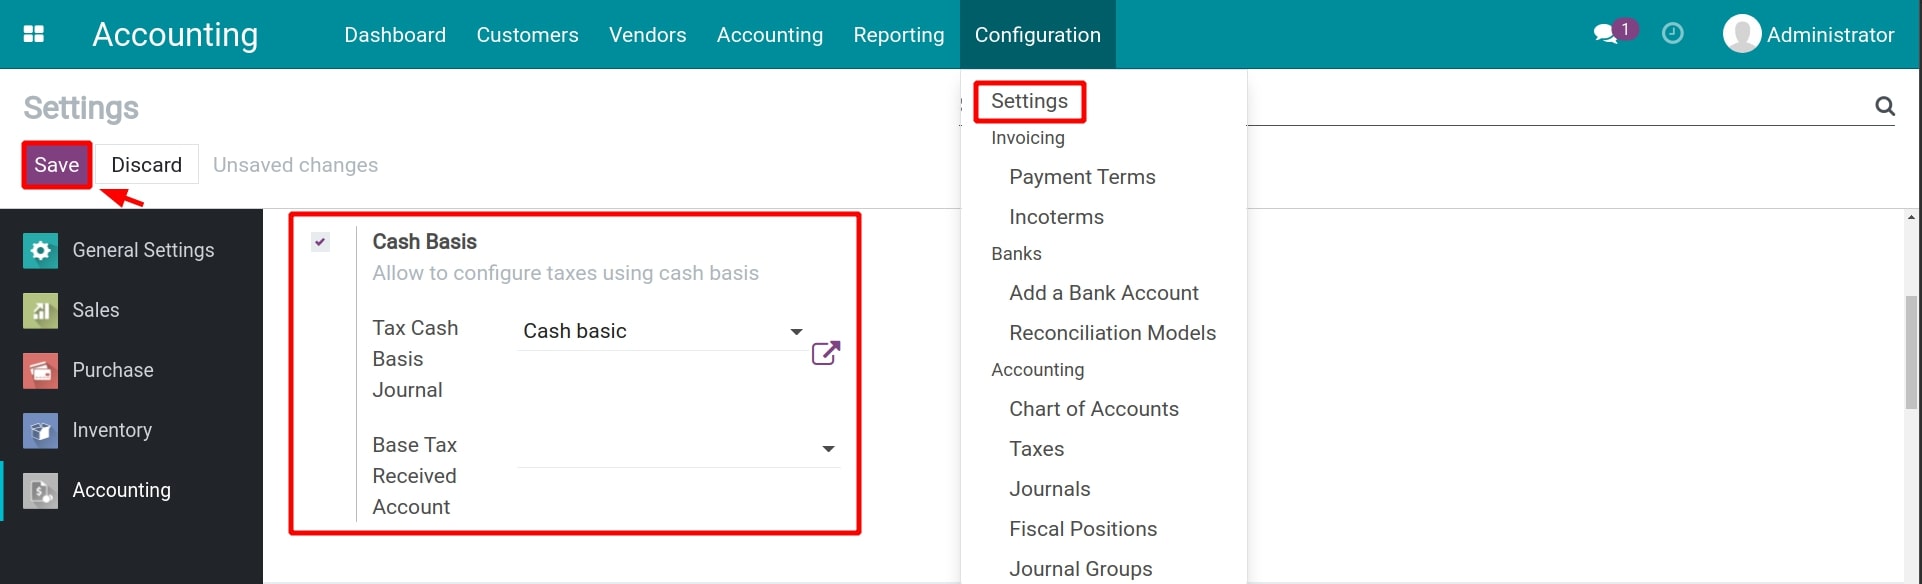
Warning
Only users with administration settings rights can access this interface.
After selecting the Cash basic function, the system automatically adds Tax Cash Basic Journal. This journal records taxes incurred while using the cash basis accounting method.
Then press Save to record the configuration.
Navigate to Accounting ‣ Configuration ‣ Taxes to modify the taxes settings.
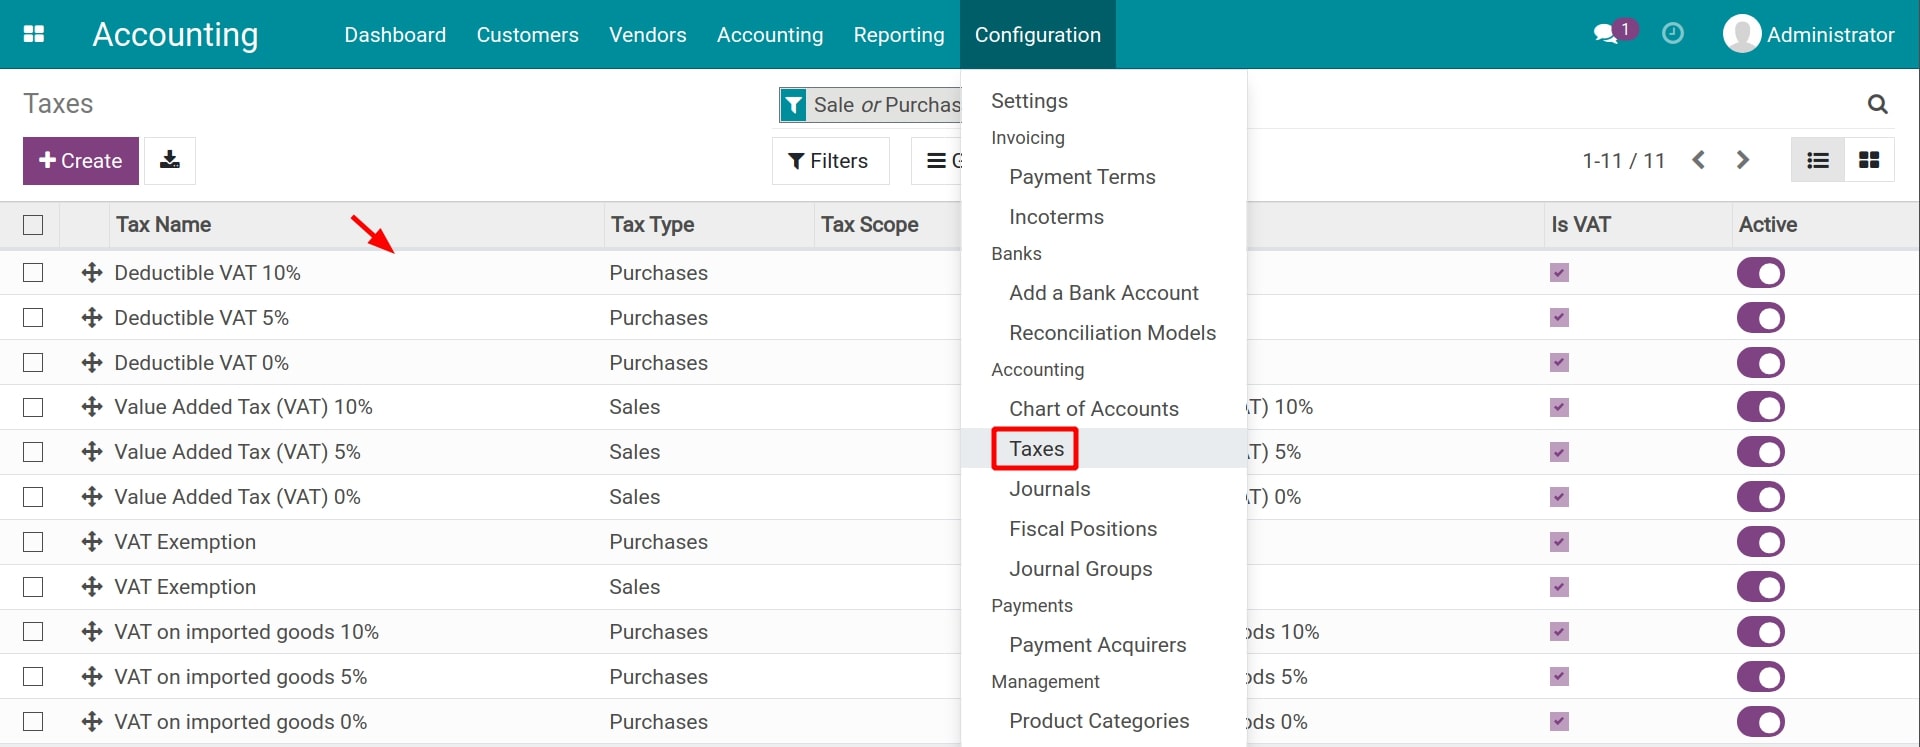
On the tax, pay attention to the followings:
- Advanced Options tab:
- Tax Exigibility: Select Based on Payment.
- Cash Basis Transition Account: This field appears when you select Based on Payment. You need to select a created transitional account to record the provisional tax amount once the invoice is posted and before recording the payment. Steps to create a new tax account on Chart of Accounts.
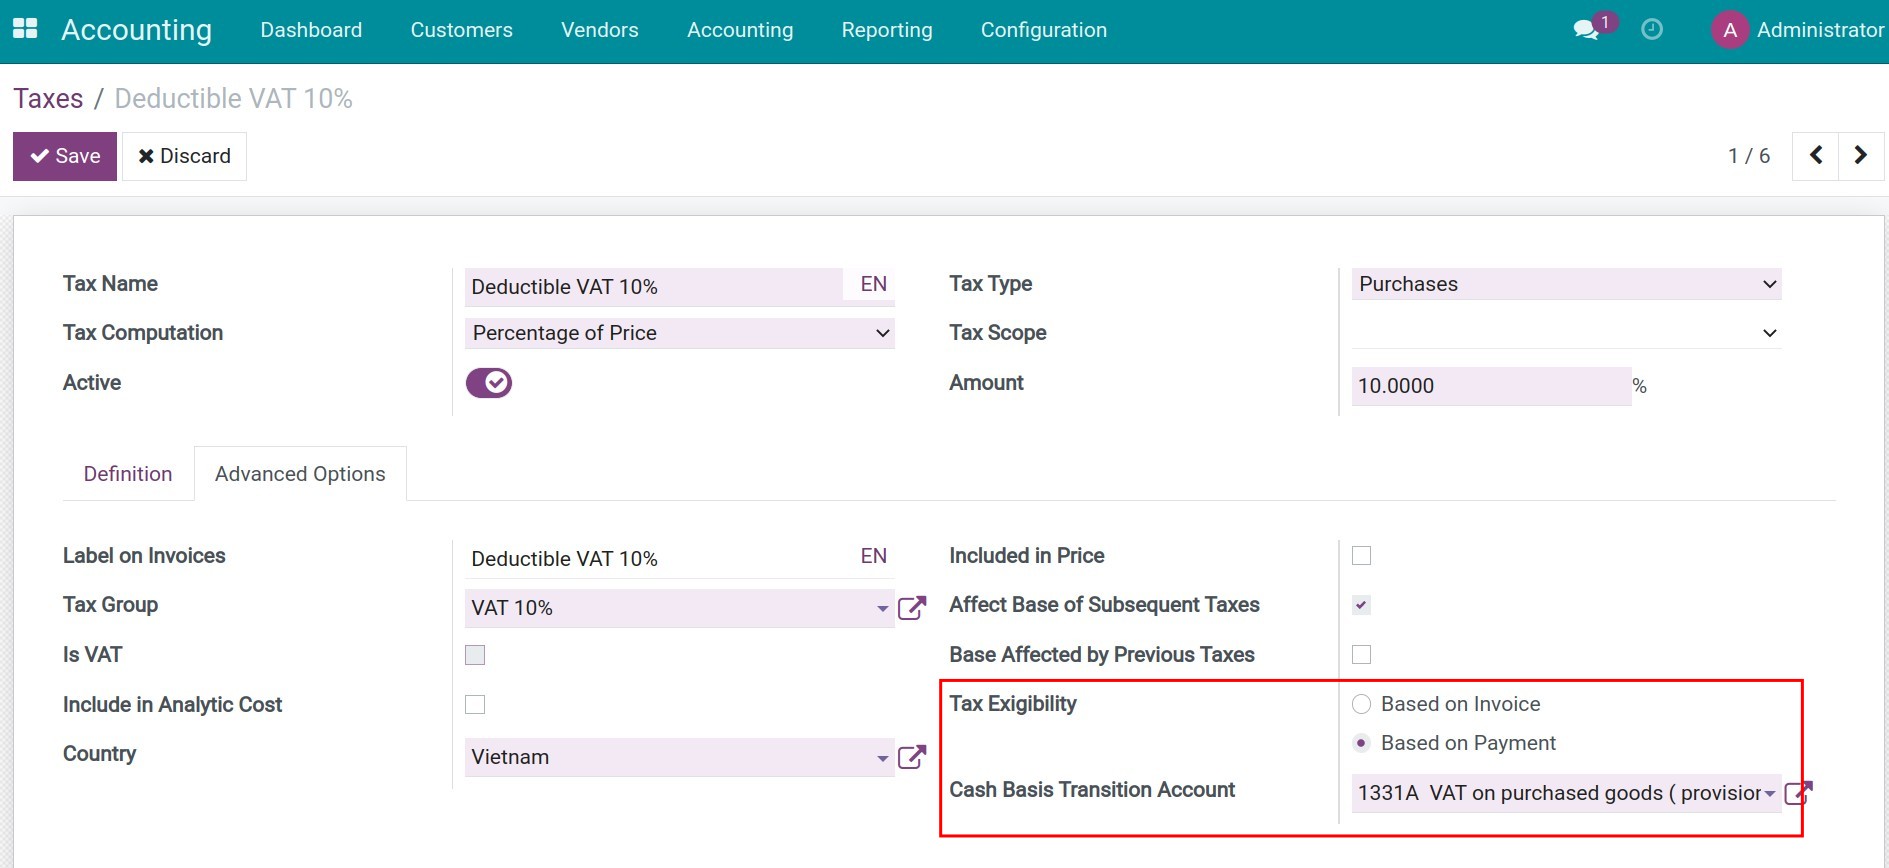
Note
A similar configuration is required for other sales and purchase taxes that your business needs to manage.
Manage cash basis taxes
With the cash basis taxes management, the taxes incurred on unpaid invoices and vendor bills will be recorded in the transitional account.
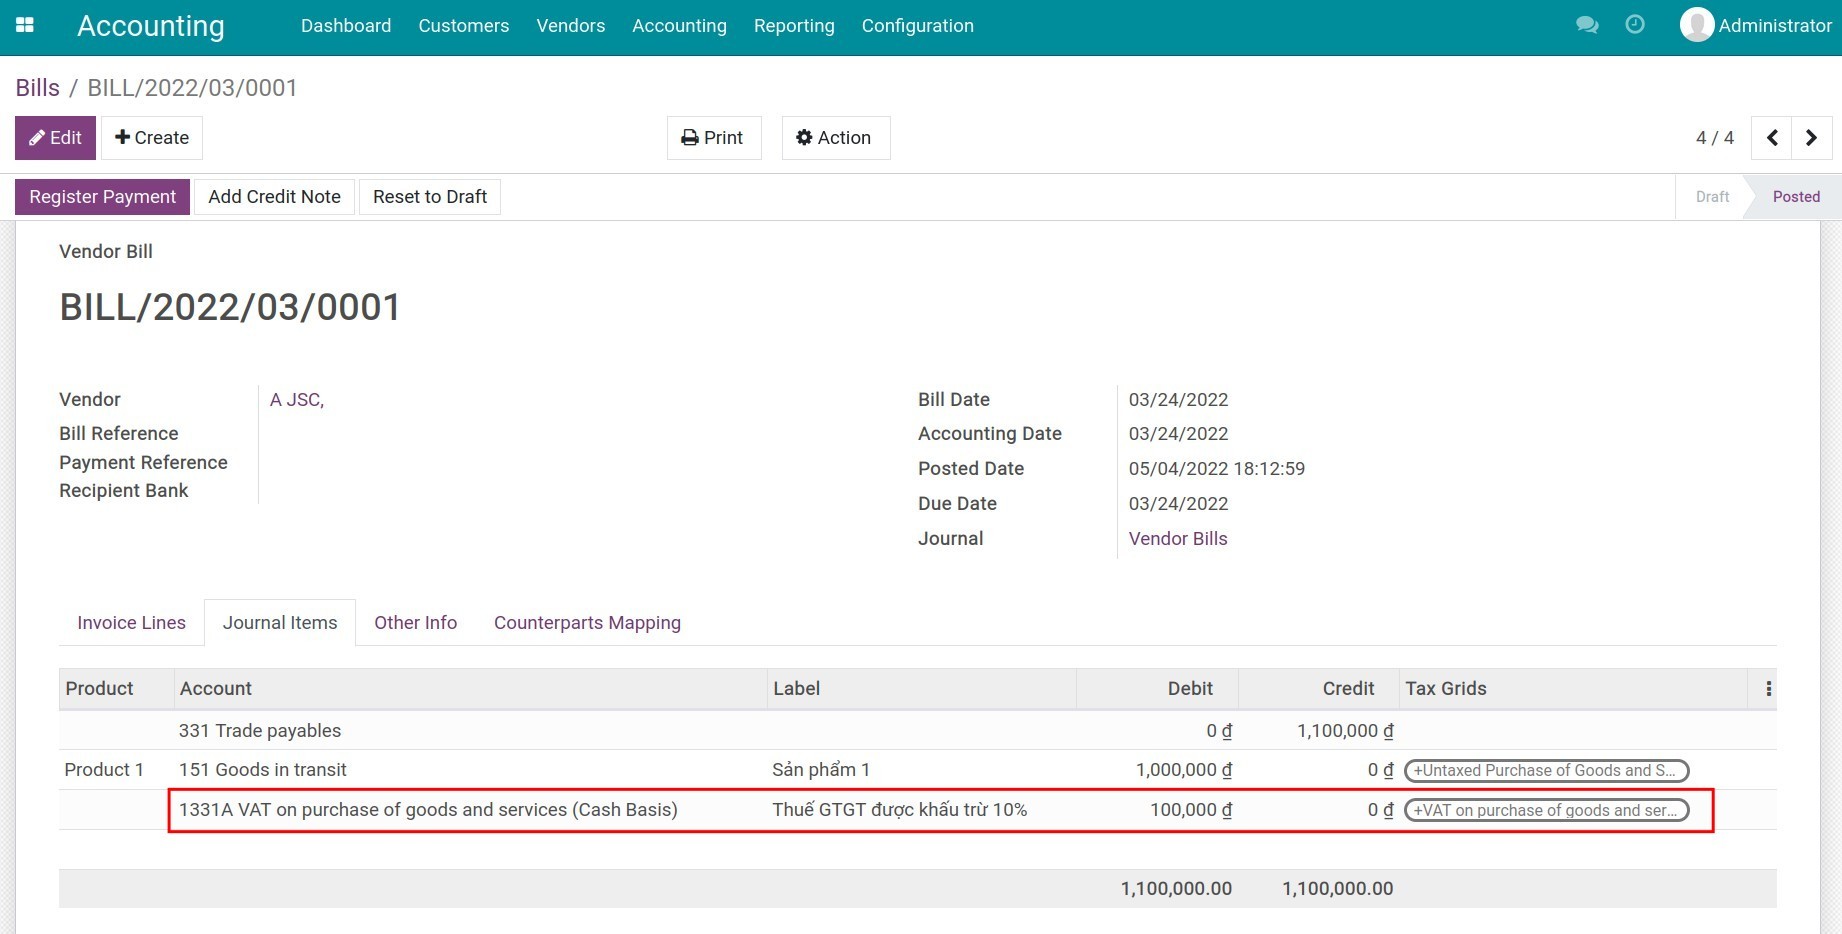
Once the invoice/bill is paid, a journal entry recording the transition of taxes from the transitional account to the main account will be created.
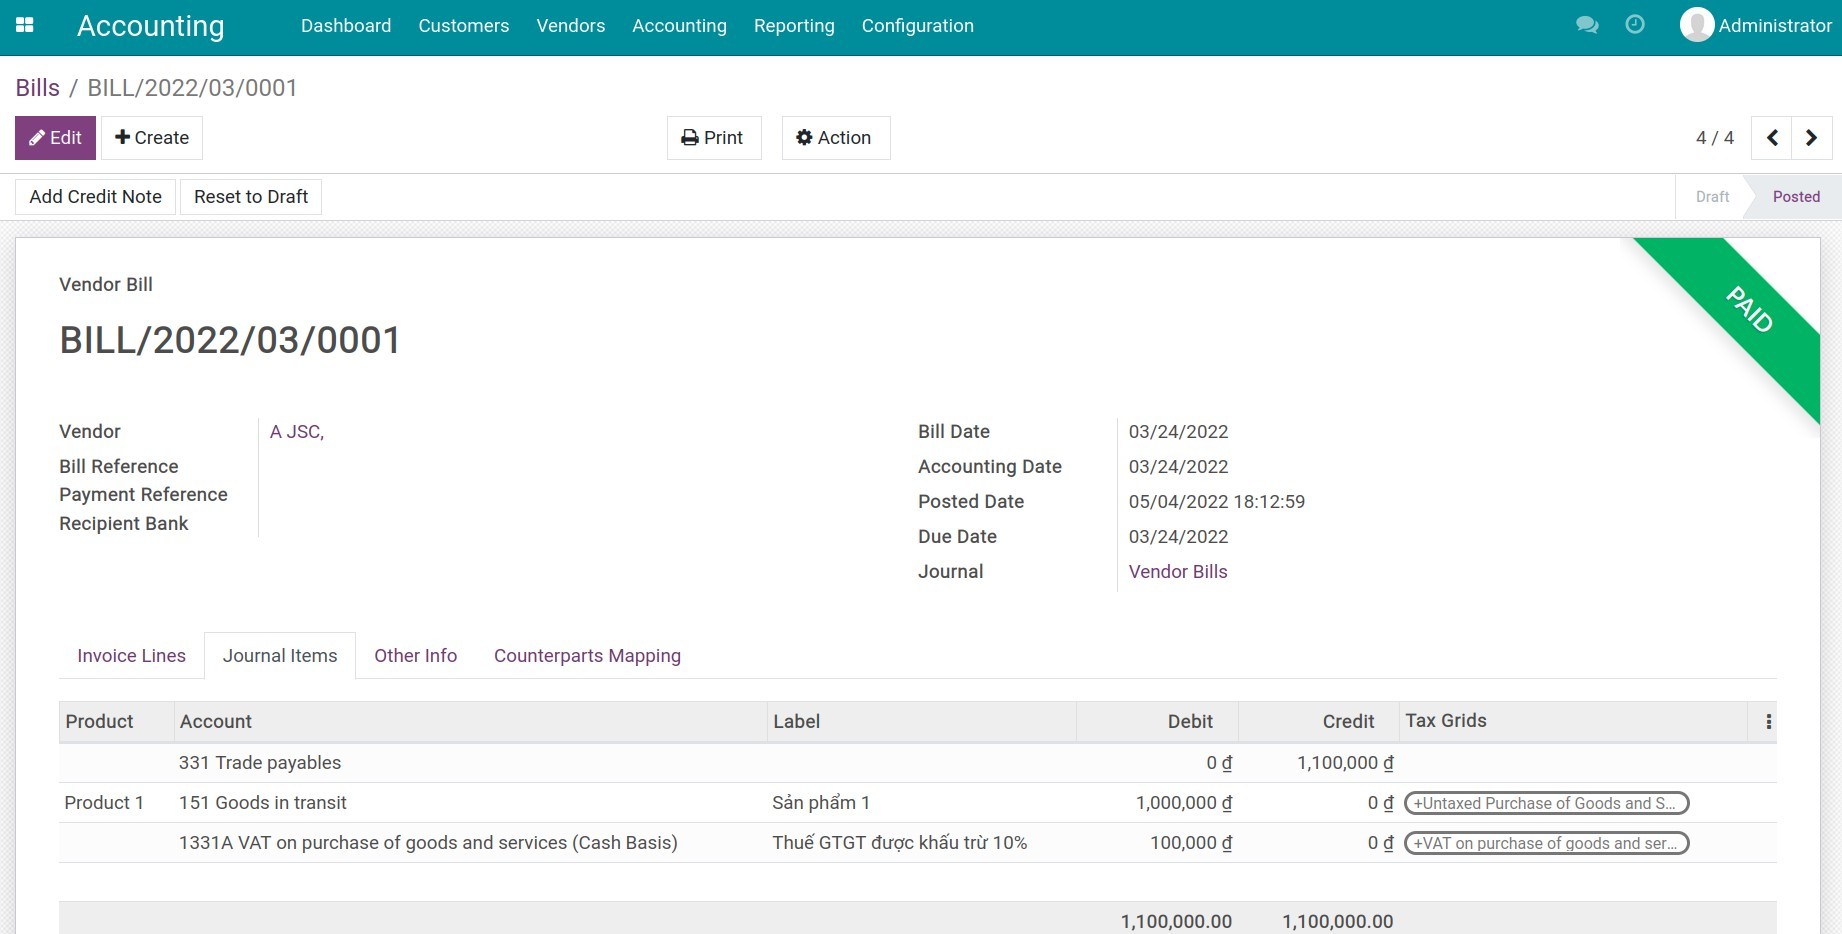
You can navigate to Accounting ‣ Accounting ‣ Journal Entries to group by Journal to easily review this newly created entry.
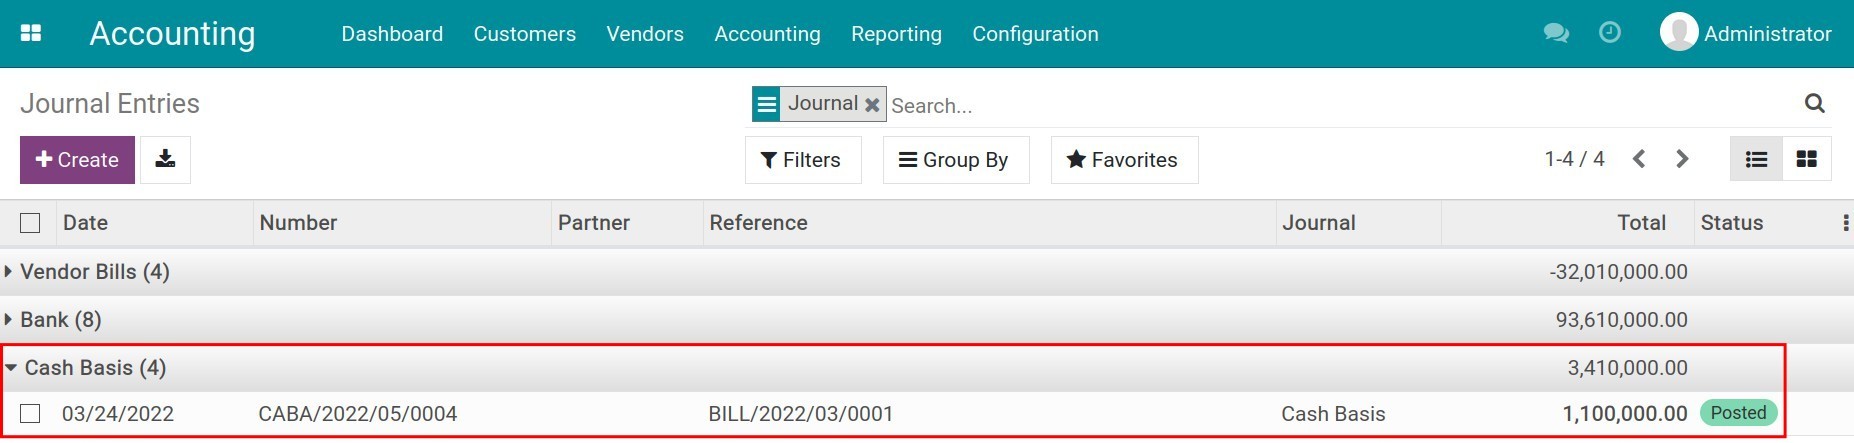
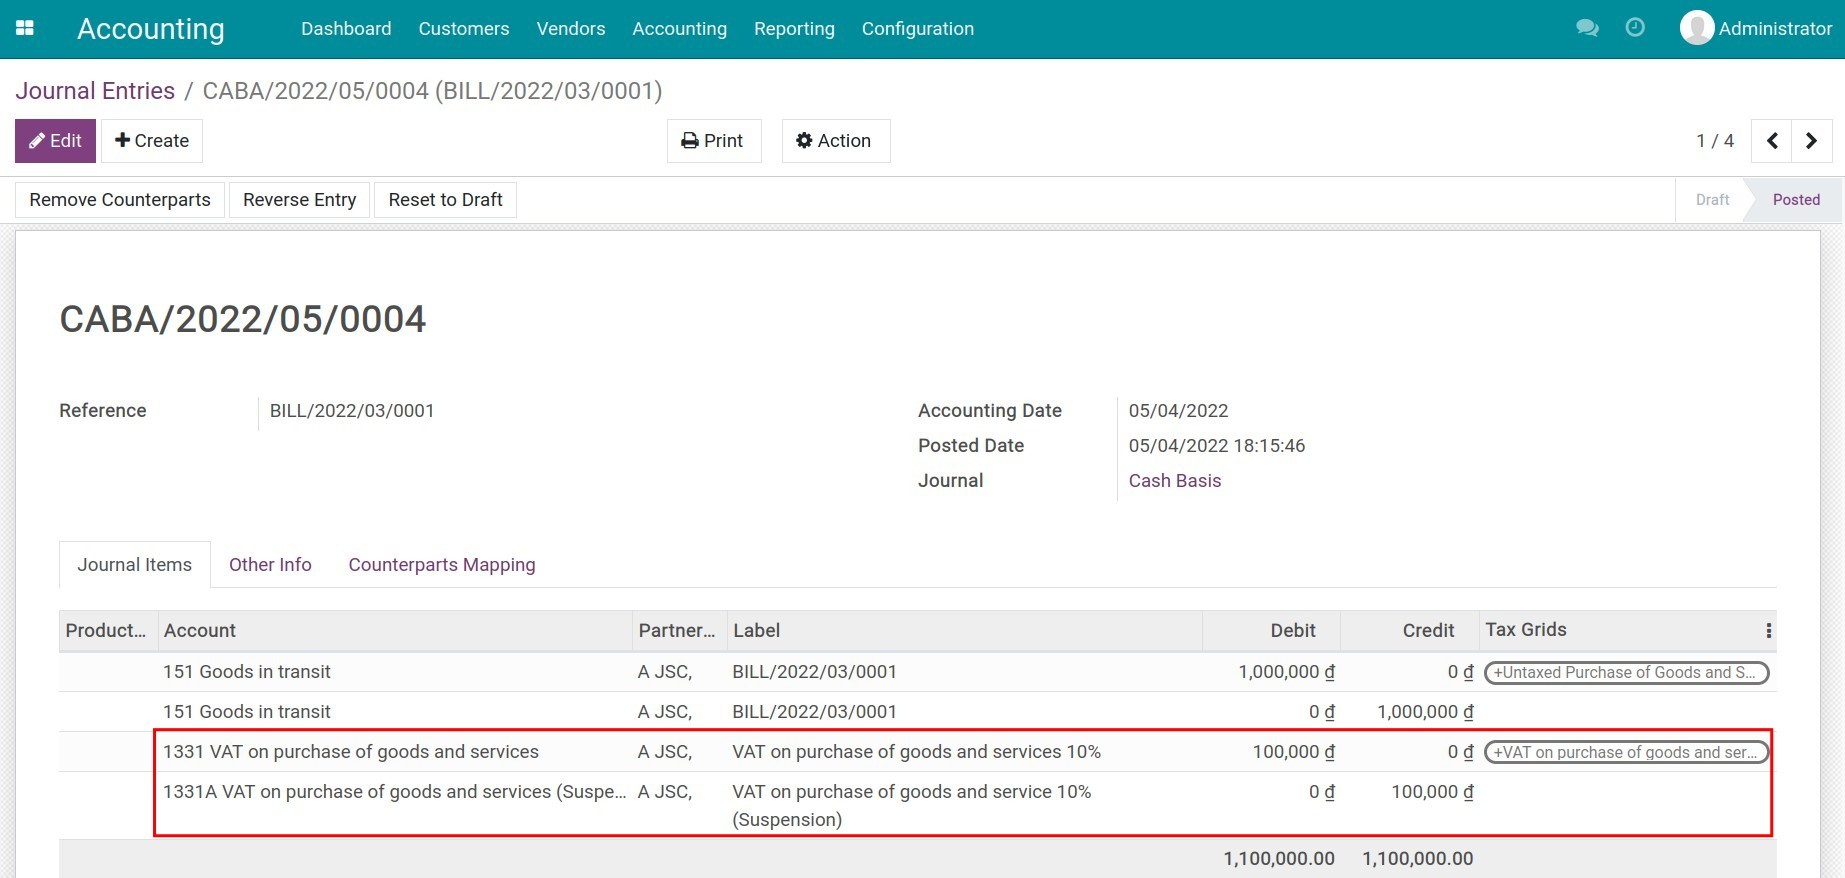
See also
Related Article
Tax reports using tax grids
Manage the price including or excluding taxes
Tax reports using tax grids
Tax reports using tax grids
In iSuite Accounting App, the Tax report had been built according to the Tax grids which are configured on each type of the Taxes.
Requirements
This tutorial requires the installation of the following applications/modules:
iSuite Invoicing
Accounting & Finance Management
When you use the SYSCOHADA Chart of Accounts which is set up in the configuration section of the Accounting app, the system has created several tax grids which frequently used by enterprises. However, you can adjust (add or subtract) the tax grid to get accurate information on the report, you do the following steps:
Create a tax grid on the Accounting app
A tax grid is created as a family tree. To make it easier to understand how to create a tax grid, let’s figure out the actual need that the enterprises want to track the expenses related to the taxes of the purchased goods and services. For example, you want to create a new purchase tax grid for 15% of goods and services. You do the steps below:
Create a Tax report
To create a tax grid, you enable the Developer mode, then access Accounting ‣ Configuration ‣ Tax Report. You can choose an existing tax report or create a new one by clicking Create.
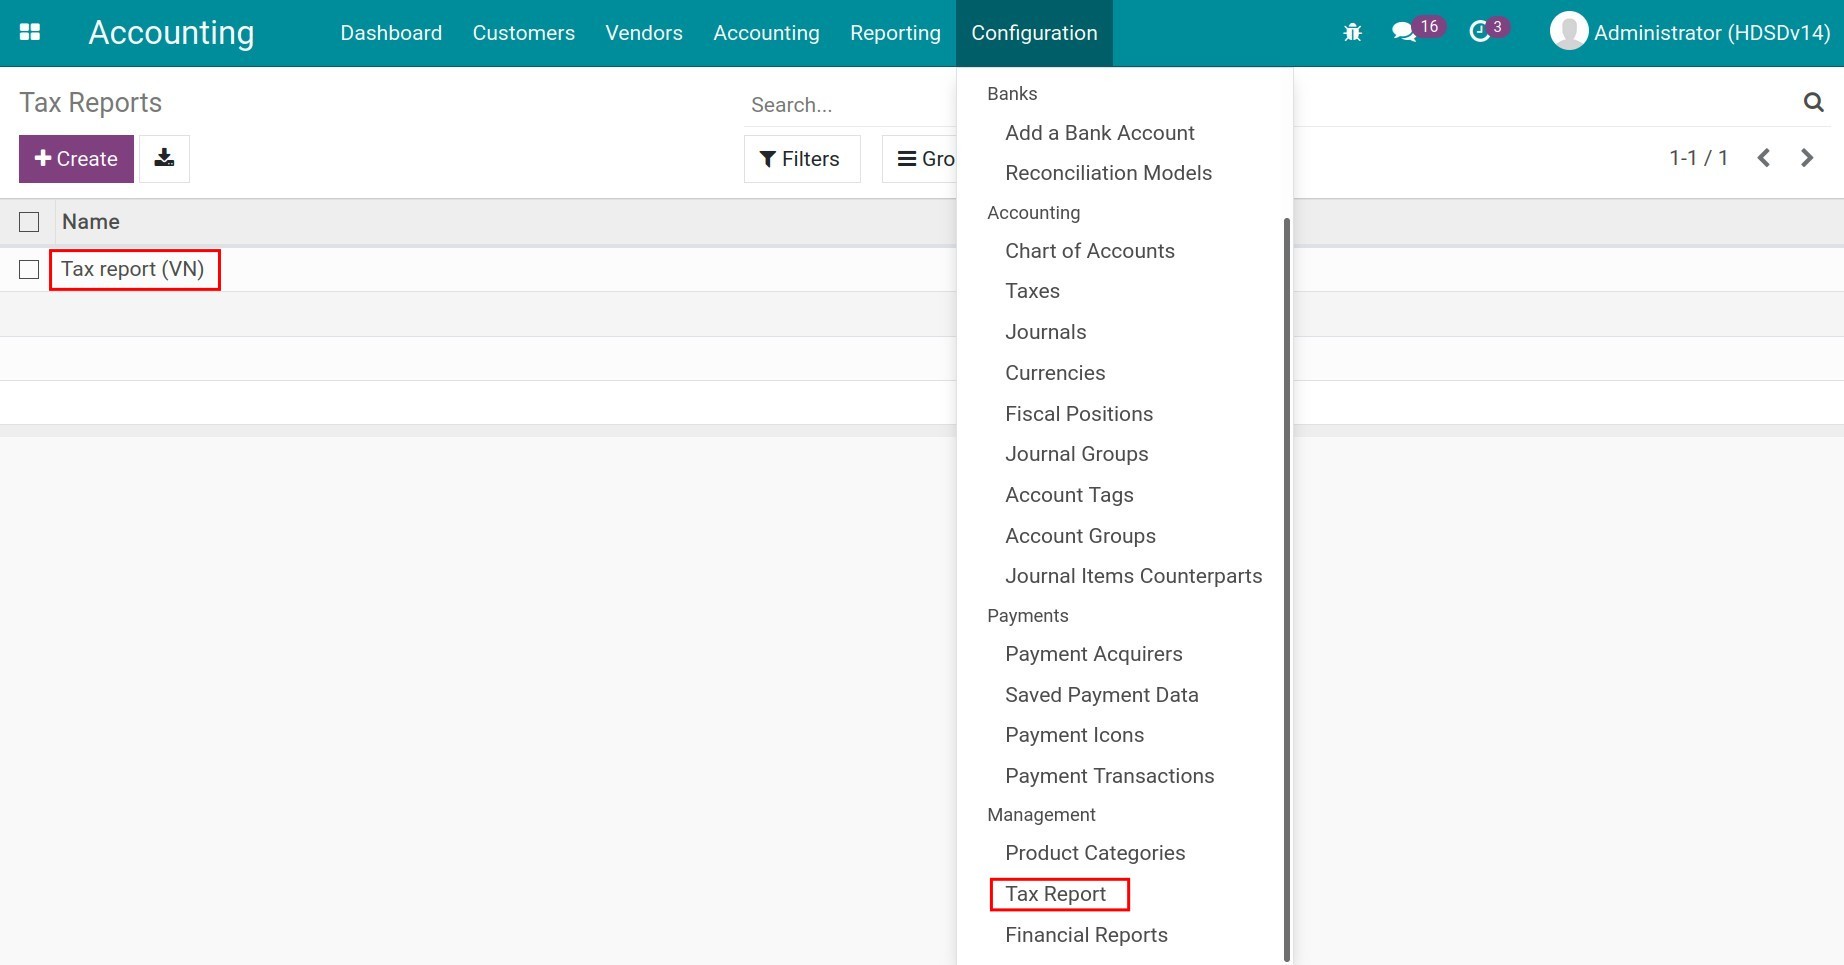
The system display the information as below:
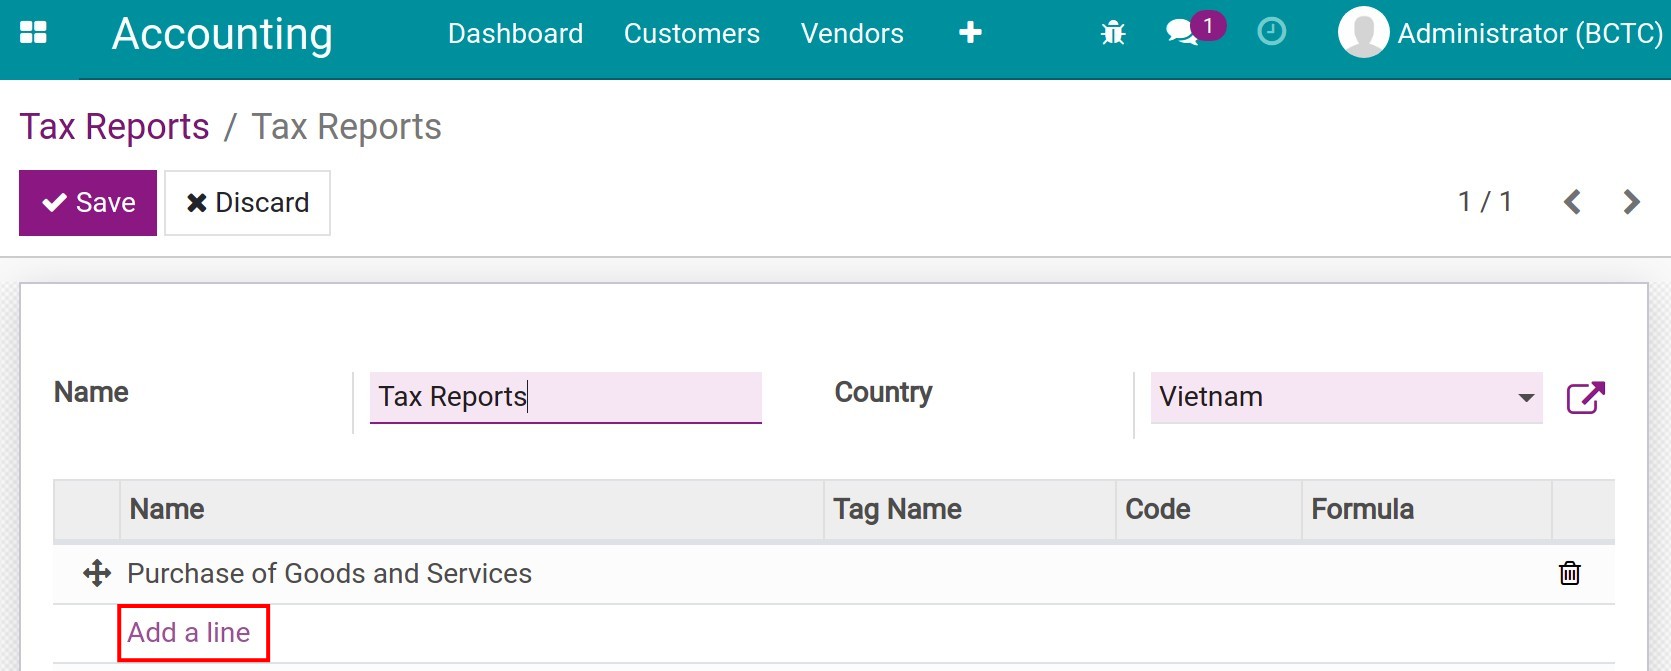
Name: Completed name for this report line. It will be used in the tax report.
Country: Select the country for which this report is available.
Click Add a line to create a root report line or choose an existing one to see details.
Create a root report line
The system display the details of root report line:
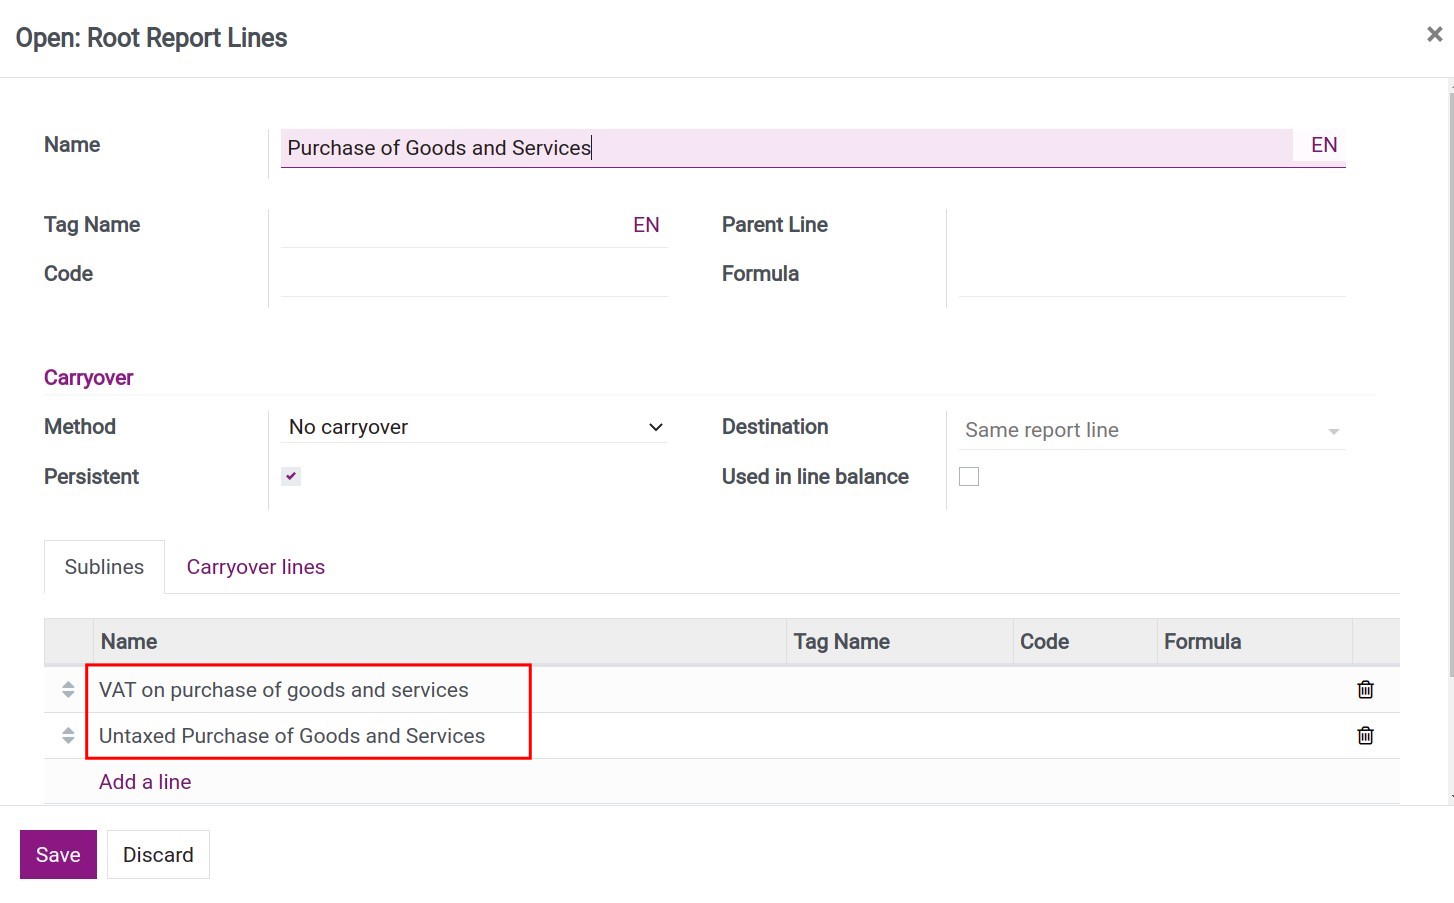
Name: Completed name of this report line.
Tag Name: Short name for tax grid corresponding to this report line. If you leave it empty, this report line doesn’t correspond to any grid.
Create a child line to display on the report
Select Add a line to add a group of purchased goods and services, which will include the groups of its value and related taxes.
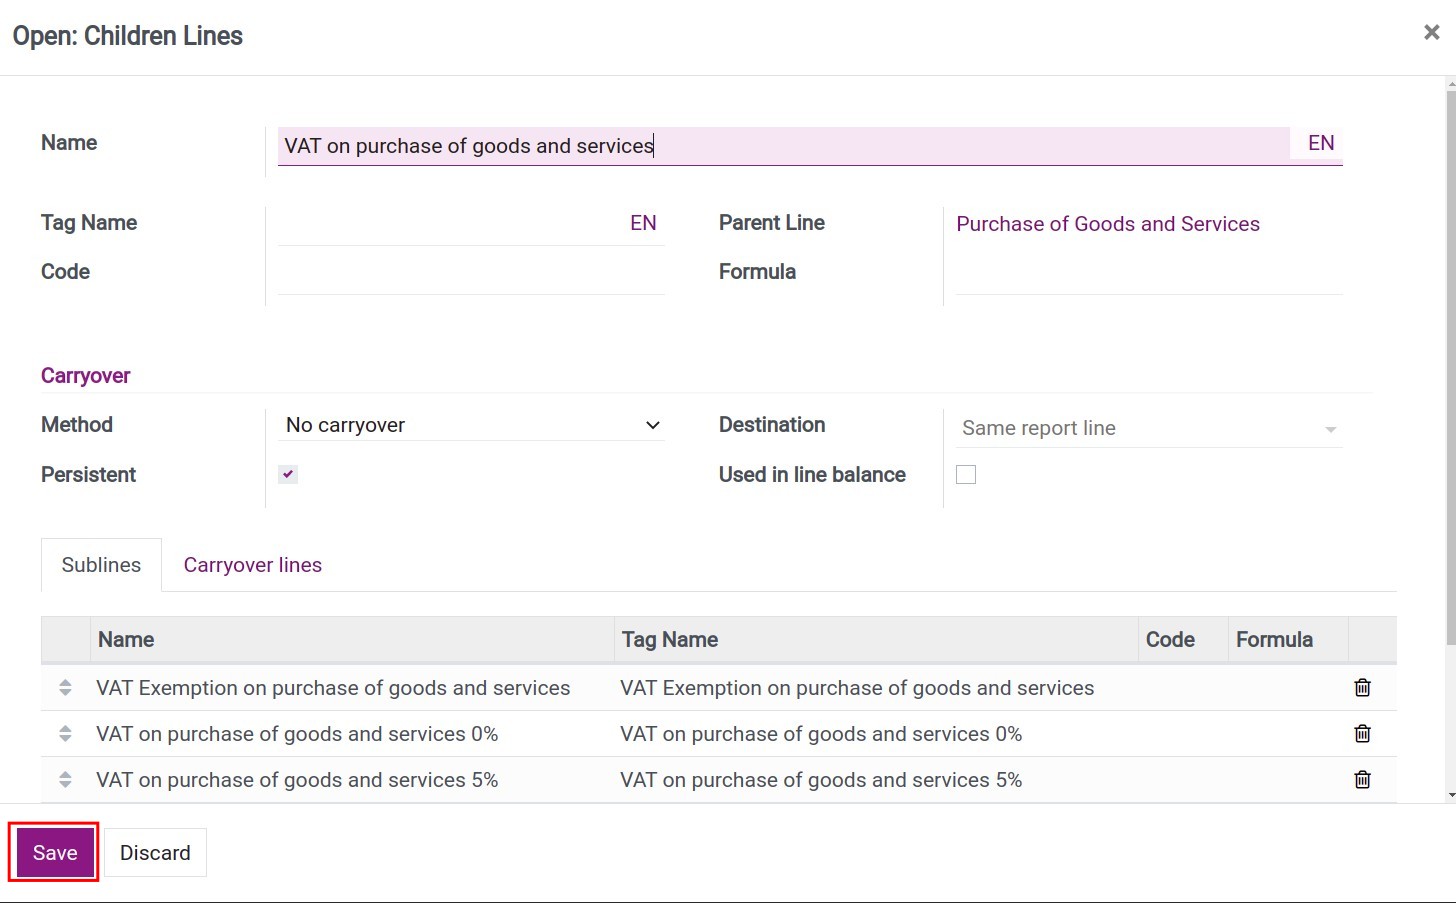
Name: Completed name of this report line.
Tag Name: Short name for tax grid corresponding to this report line. If you leave it empty, this report line doesn’t correspond to any such grid.
Parent line: Parent of this report line.
Click Save to save information.
Corresponding to the above example, we will have 2 different report lines as below:
Values of purchased goods and services:
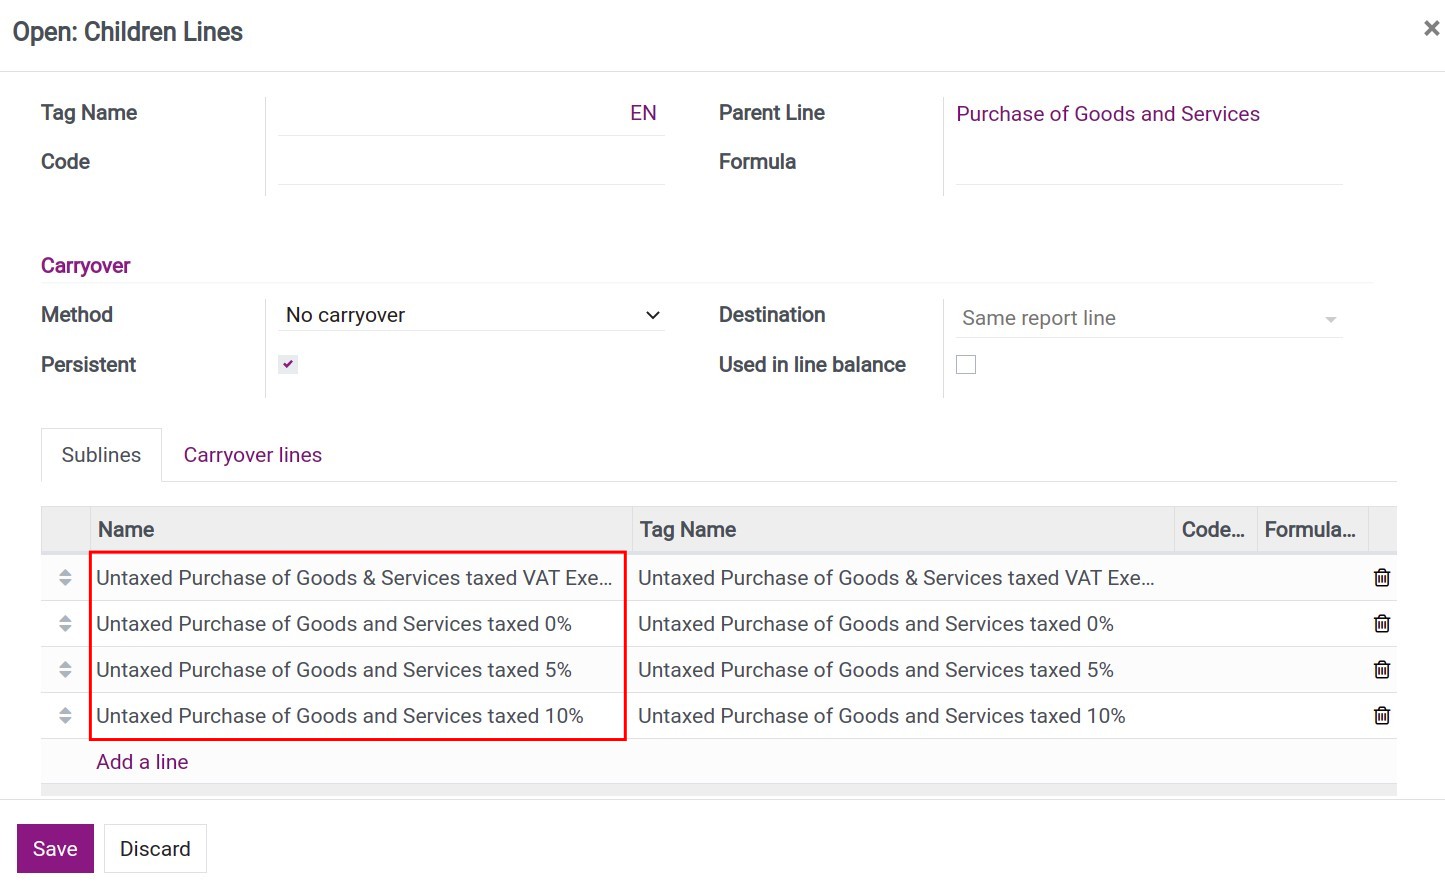
VATs on purchase of goods and services:
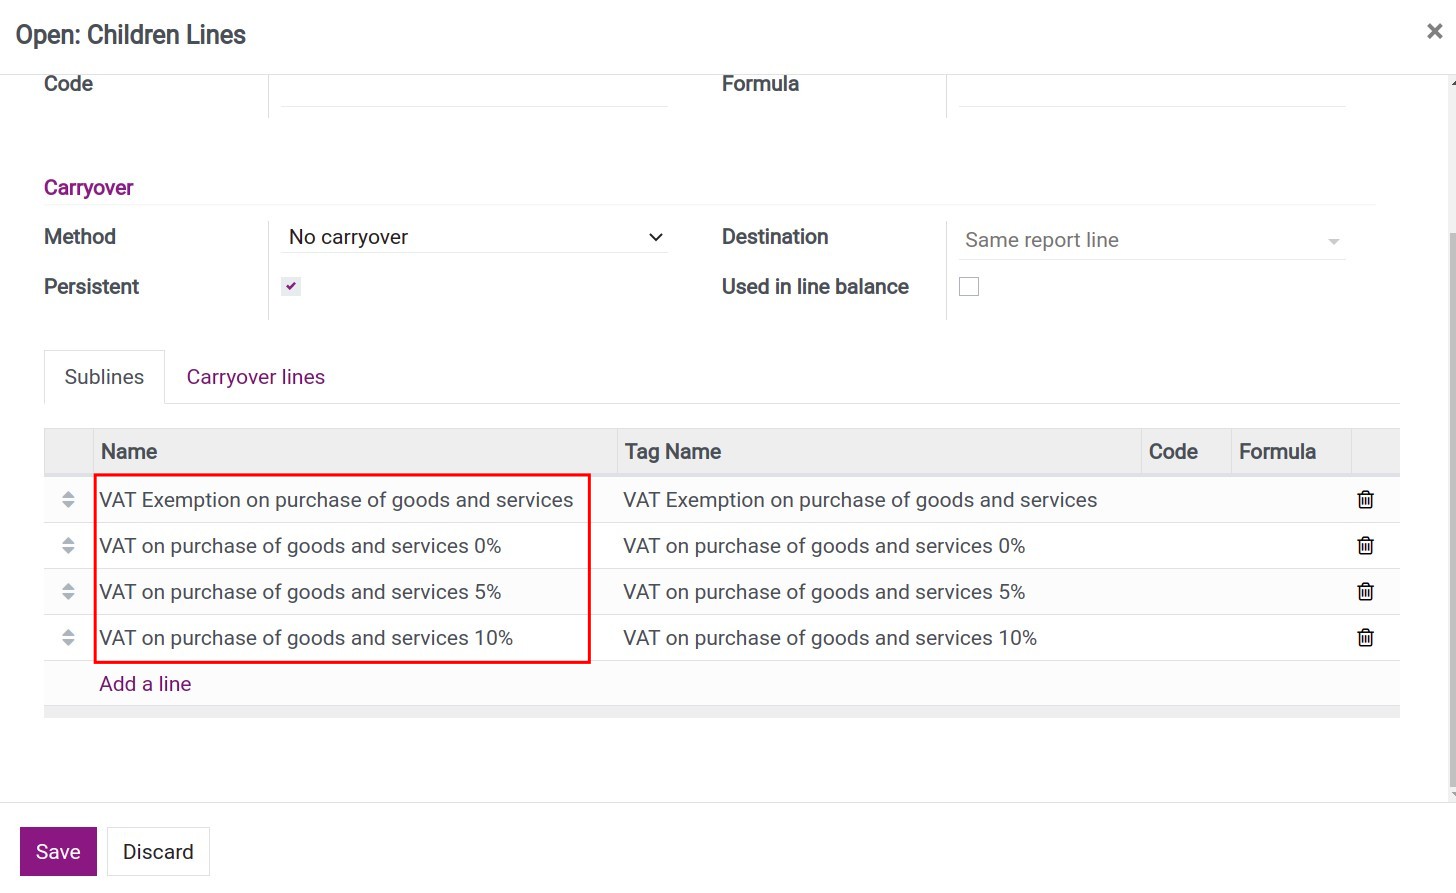
If you want to create more children lines, continue to use Add a line in each parent line.
Note
On the tax children lines, the Tag Name field is required to enter.
Hit on the Save button, the system will automatically generate the corressponded account tags for the Taxes configuration.
You navigate to Accounting ‣ Configuration ‣ Account Tags to view and verify the existed account tags.
Connection between taxes and tax grids
On the new tax creation view, you select the account tags to fill in the corresponding tax grid for the data collection on the tax report.
Note
Tags with the positive sign (+) are used for the invoices distribution.
Tags with the negative sign (-) are used for the credit notes distribution.
View Tax report
When you need to see the tax data, you can access Accounting ‣ Reporting ‣ Tax Report.

All the data related to the value of goods and the corresponding tax will be shown here.
See also
Related Article
Manage the price including or excluding taxes
How to configure a multi-currencies system
How to configure a multi-currencies system
Viindoo Enterprise Management Software helps businesses to manage and use multiple currencies in accounting. You need to enable this feature and configure the currencies information in a journal that manages all the items or in an accounting account.
Requirements
This tutorial requires the installation of the following applications/modules:
Accounting & Finance
Initial configuration
Enable Multi-Currencies feature
To activate a new foreign currency, navigate to Accounting > Configuration > Accounting > Currencies:
Currently, iSuite software supports approximately 170 currency units of different countries in the world. To use an available currency unit in this list, press the Active button, or click on Create to set up a new one.
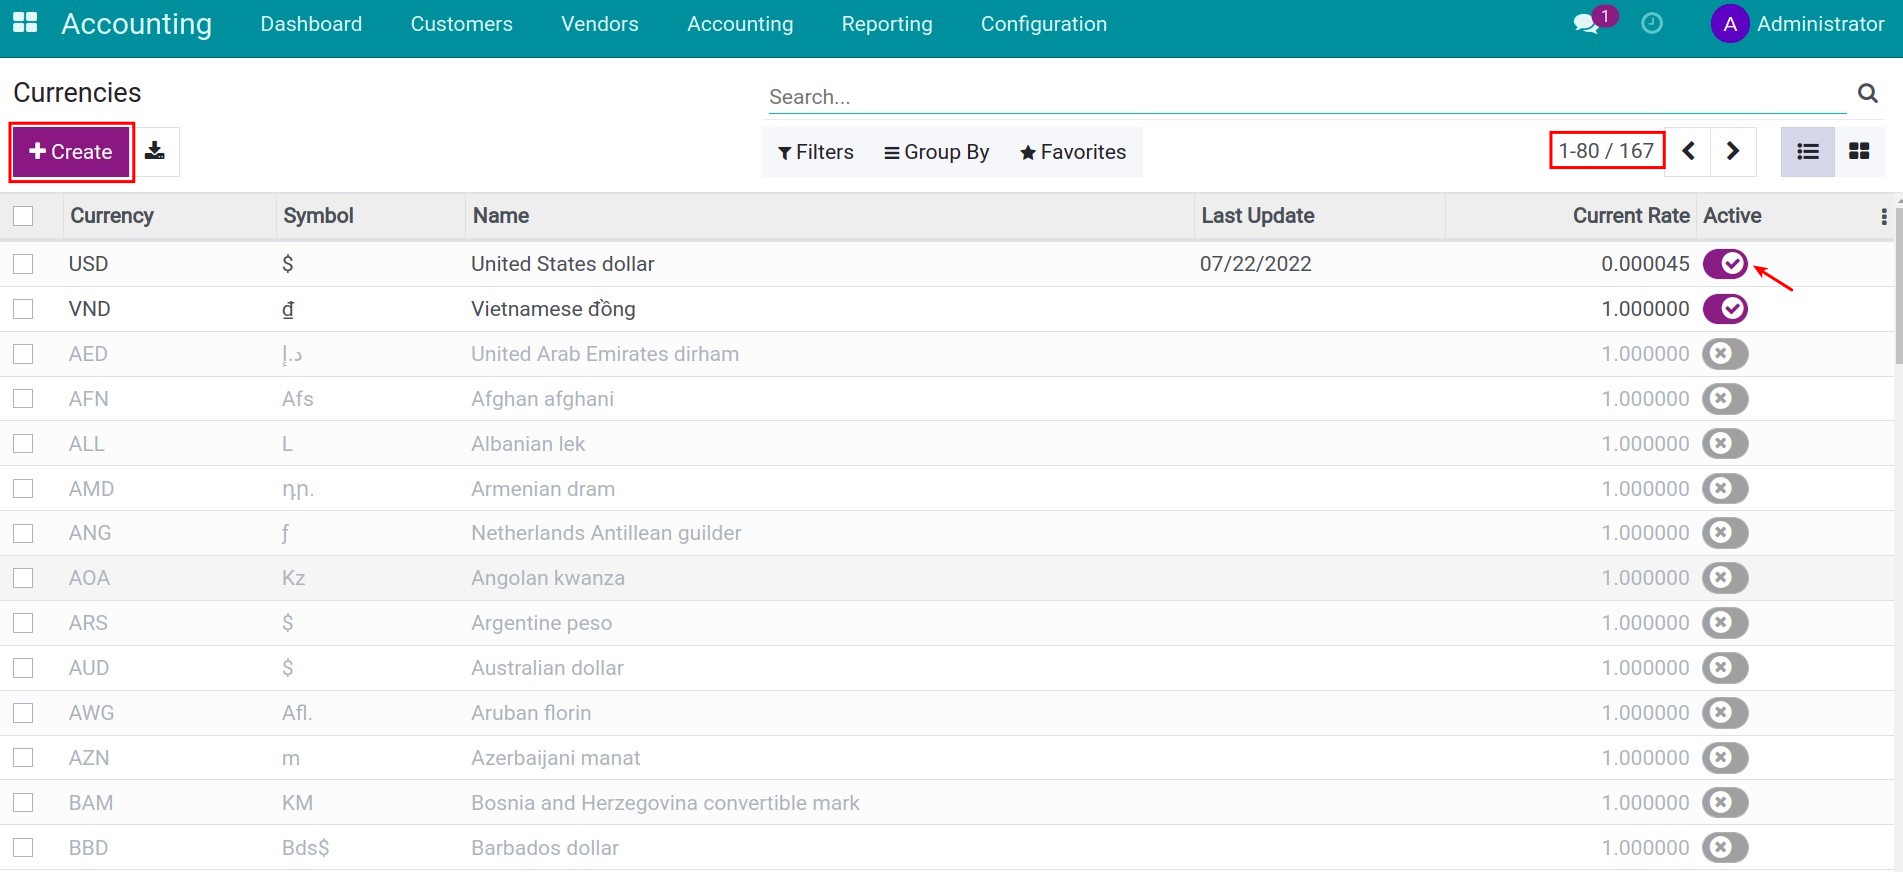
Record all the information of the new currency unit and update Rates, please refer to Automatically recording the exchange rate difference. Then, press Save to complete.
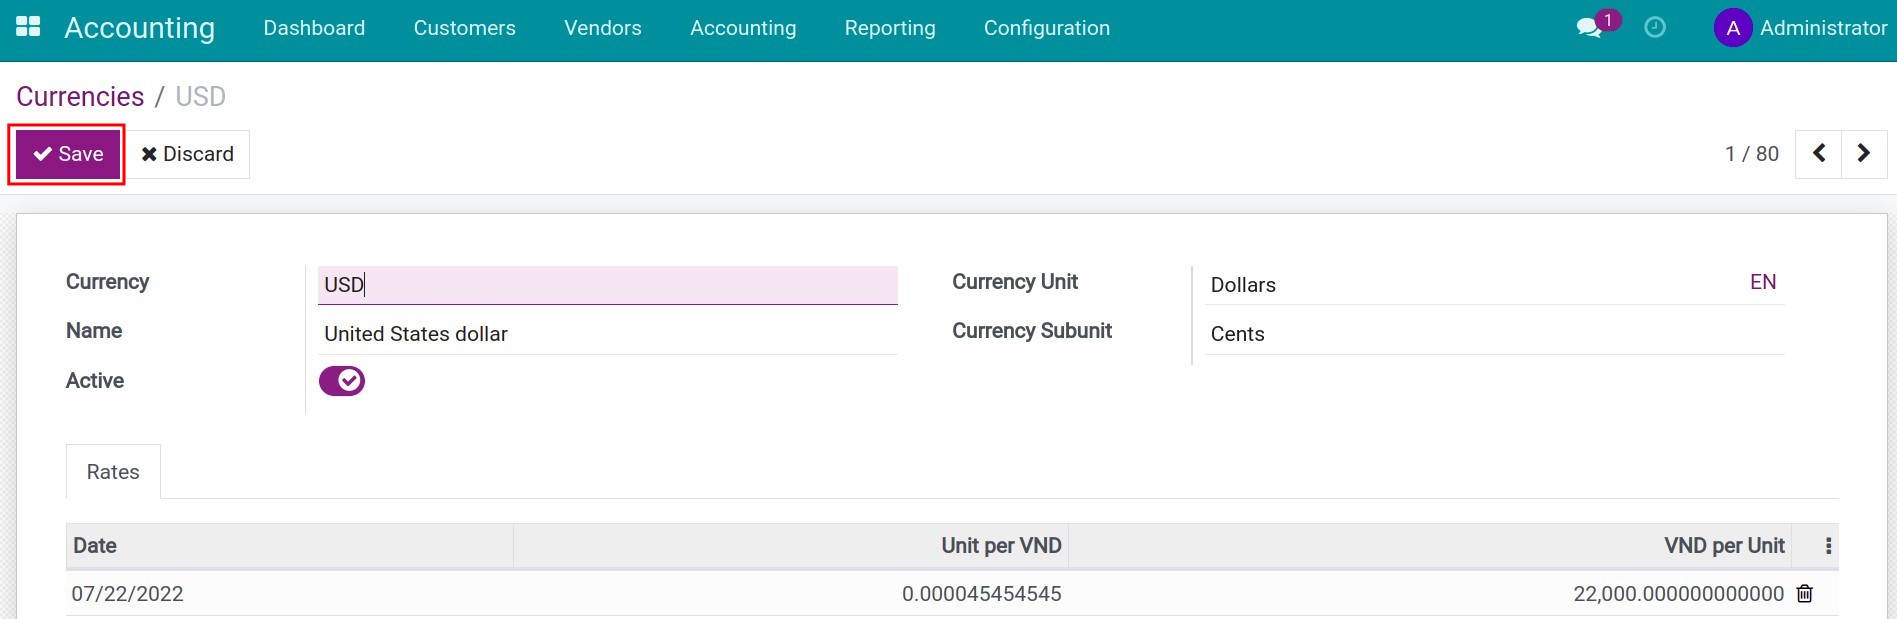
Exchange Difference journal
Tasks incurred during the multi-currencies accounting:
Evaluate exchange rate difference at the actual transactional moment;
Calculate the value difference of an item due to the exchange rate difference at the end of a period.
iSuite Accounting & Finance Management supports you in creating exchange rate difference evaluation entries right at the actual transactional moment. You only need to define accounts to record generated exchange rate difference items. Navigate to Accouting > Configuration > Settings > Post Exchange difference entries in select Journal and fill Gain account, Loss account.
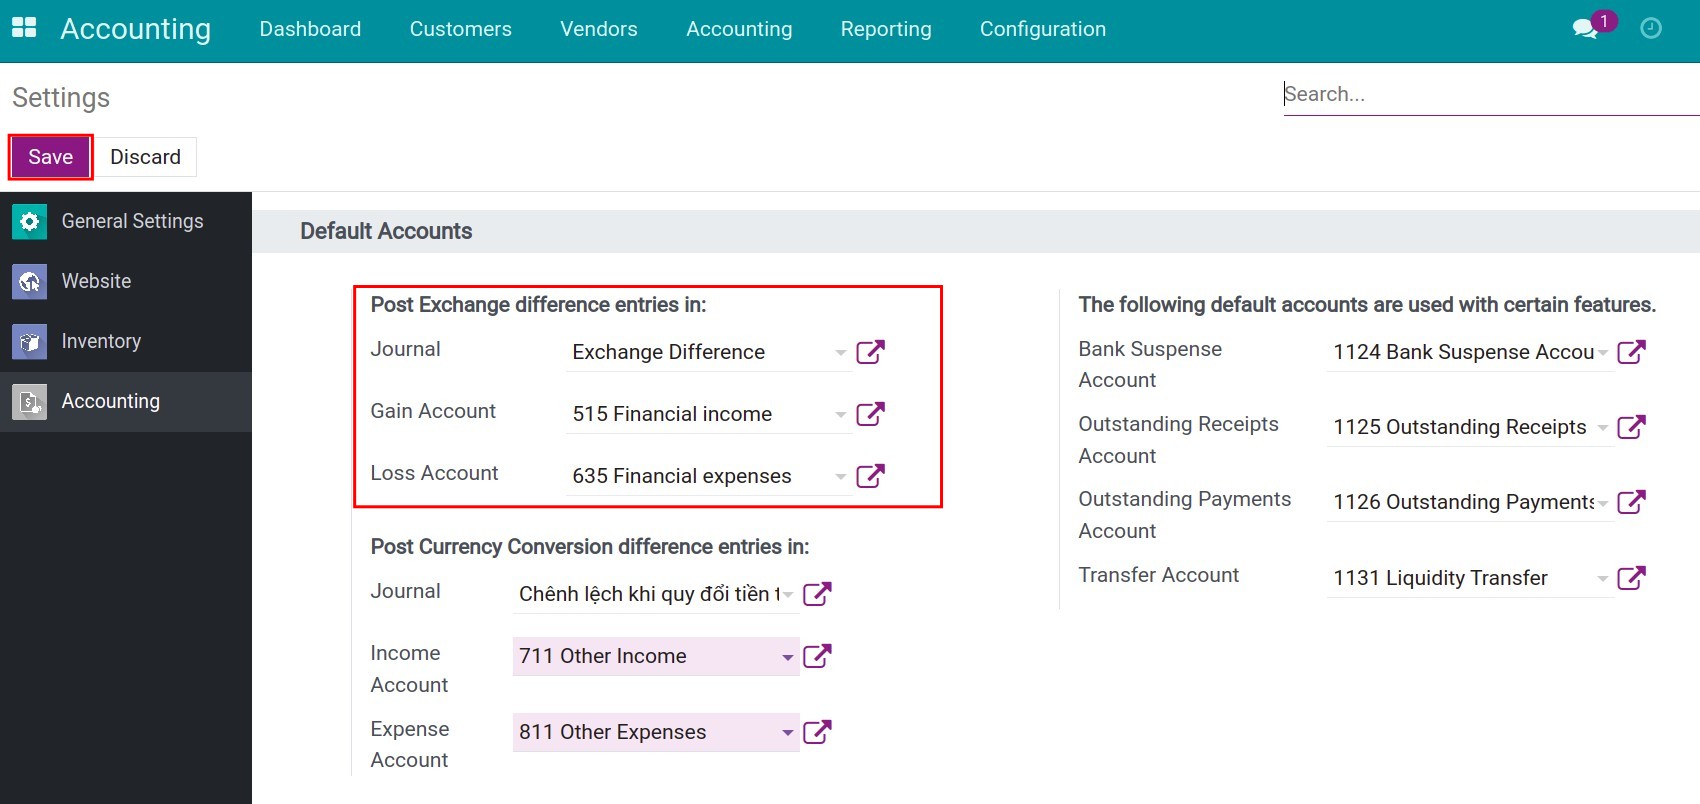
Here, you need to select this journal and fill in the suitable information.
Journal in foreign currencies
You can configure an accounting journal for items in foreign currency by navigating to Accounting > Configuration > Journals, and selecting the journal that needs to be configured.
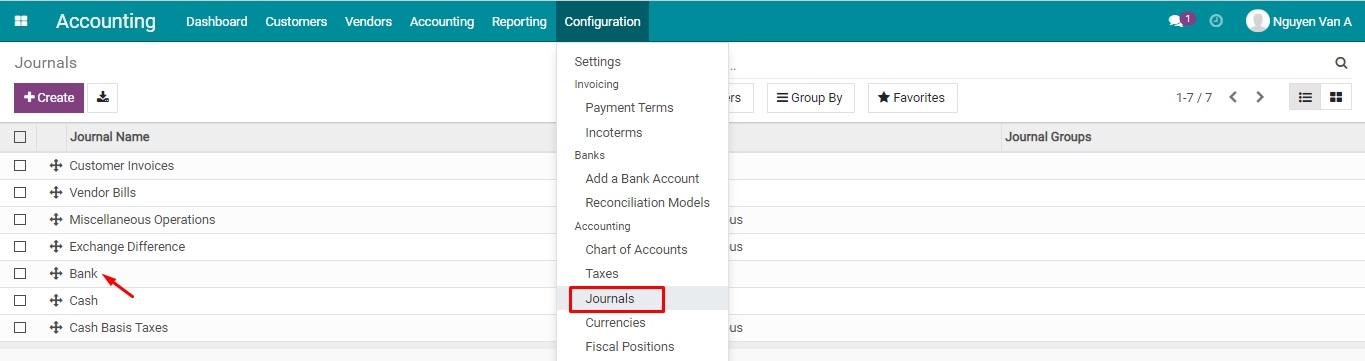
Or you can also set it up directly from Accounting > Dashboard, find your desired journal, click on the kebab menu on the top right corner of that journal, and press Configuration.
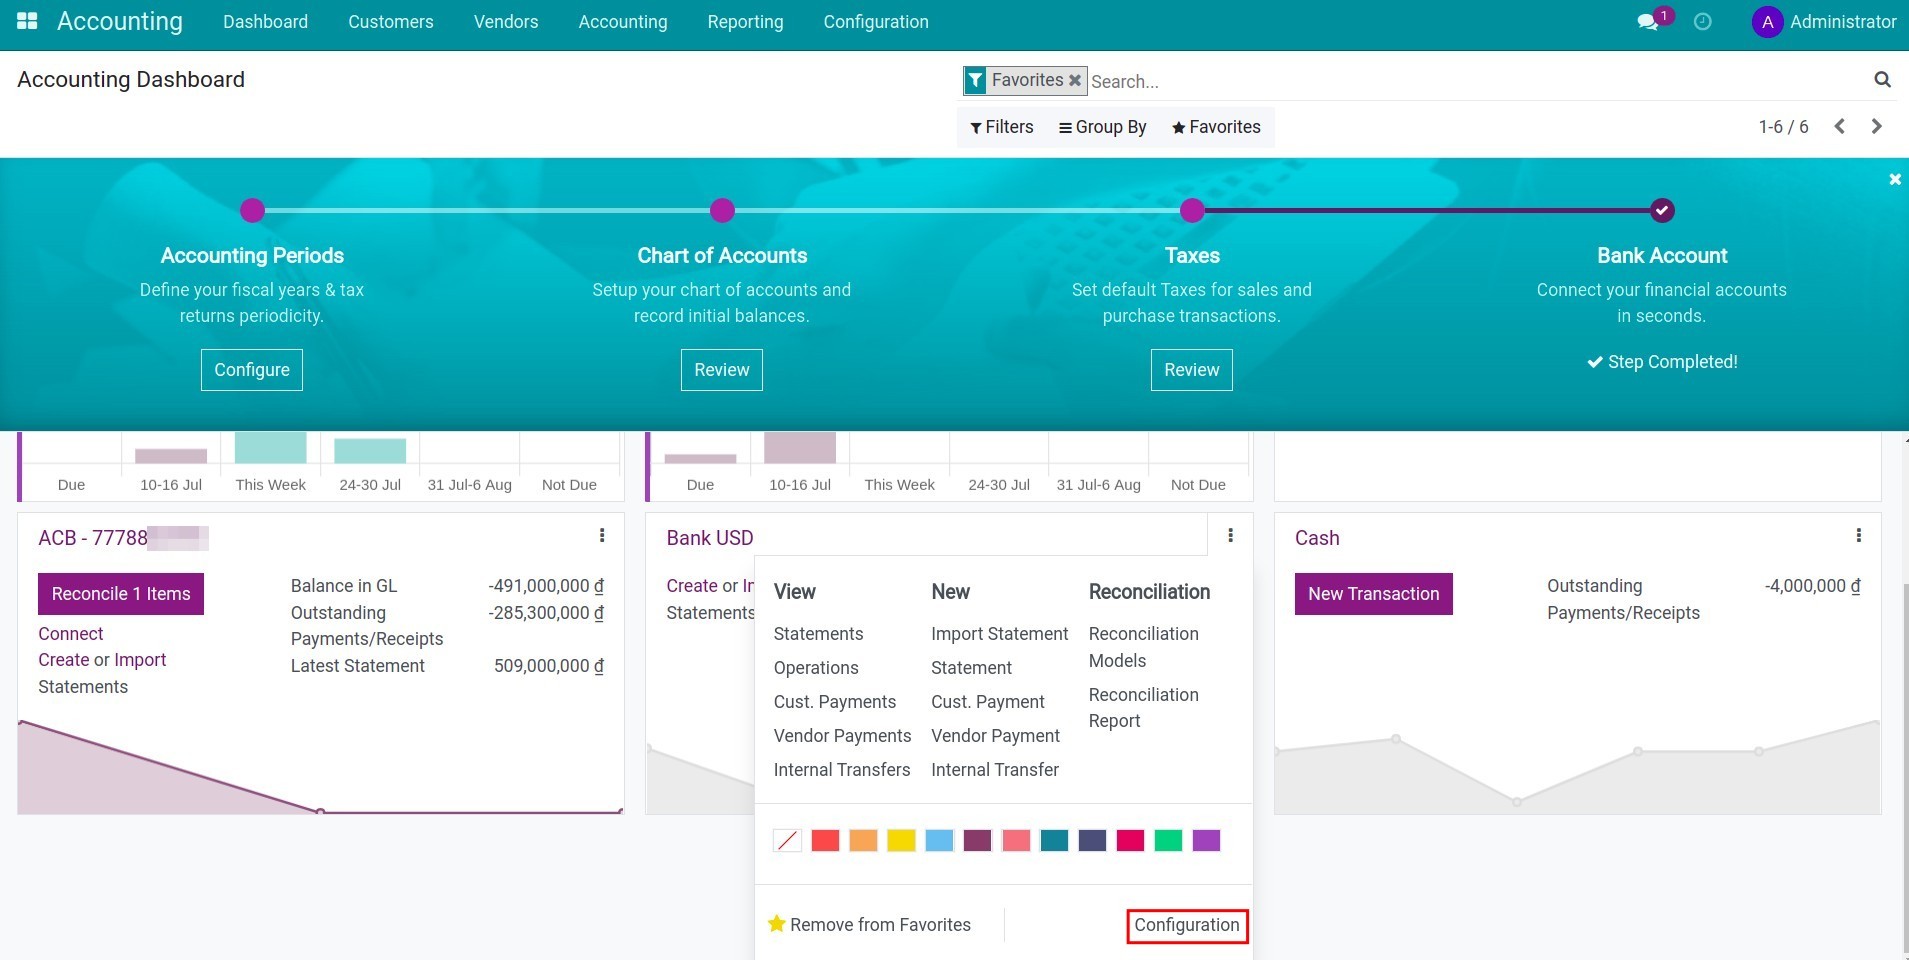
Configure required information for a journal, in the Currency field, select a currency and press Save.
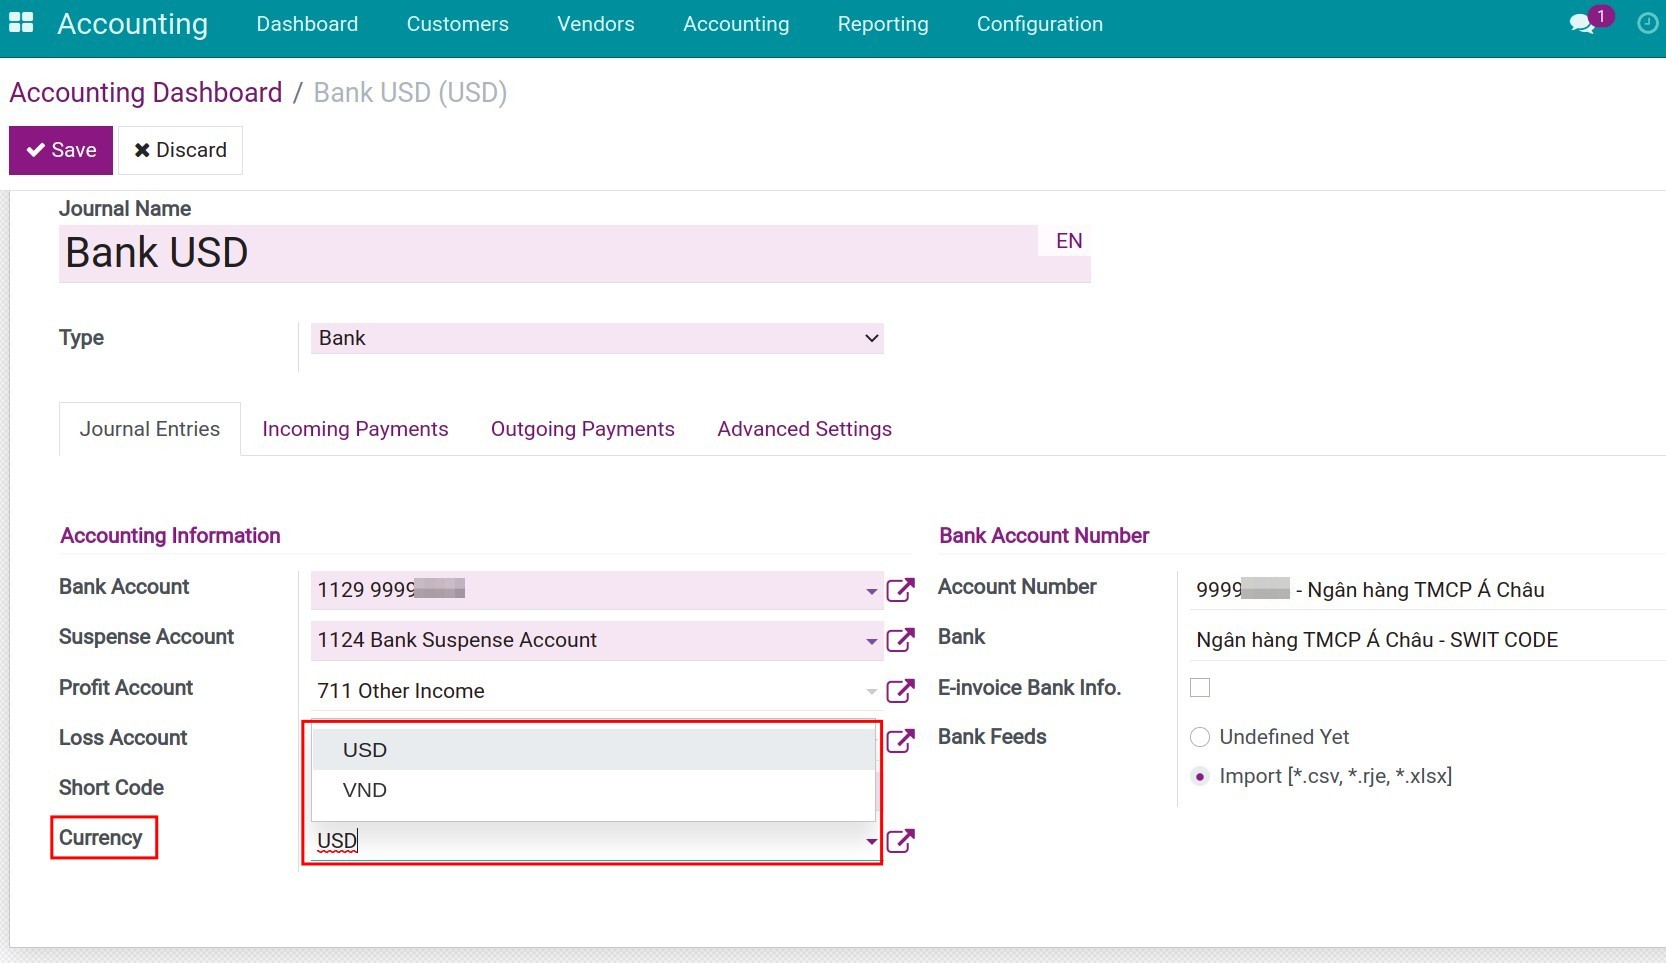
Set up foreign currency on an Accounting account
Navigate to Accounting > Configuration > Accounting > Chart of Accounts, in the desired account, select the suitable currency from the drop-down list, and press Save.
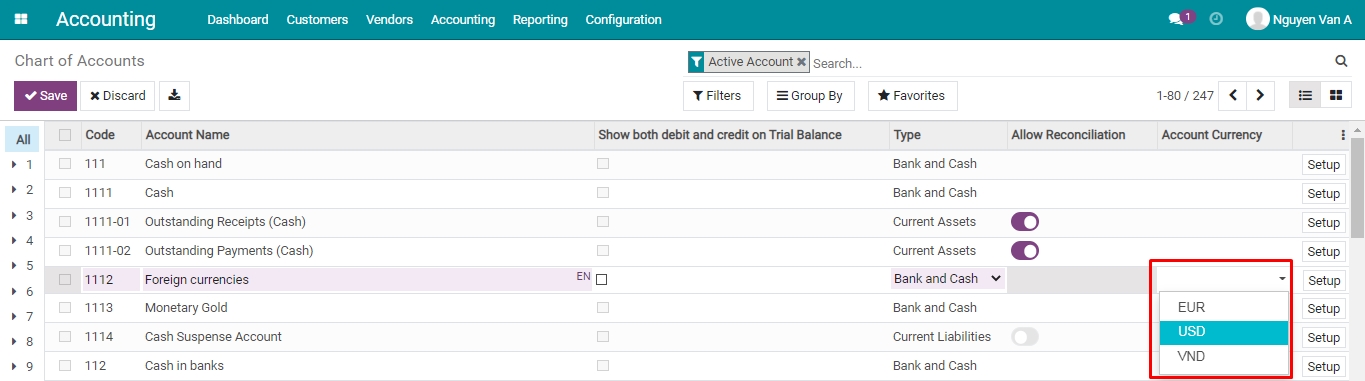
Besides, you can also click on Setup to configure a foreign currency.
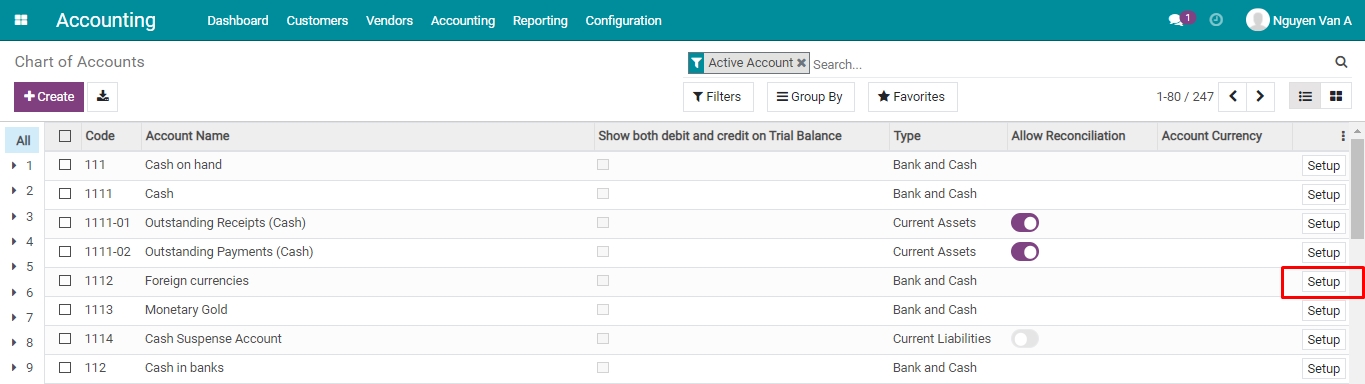
Select a foreign currency in the Account Currency field, then press Save to complete your configuration.
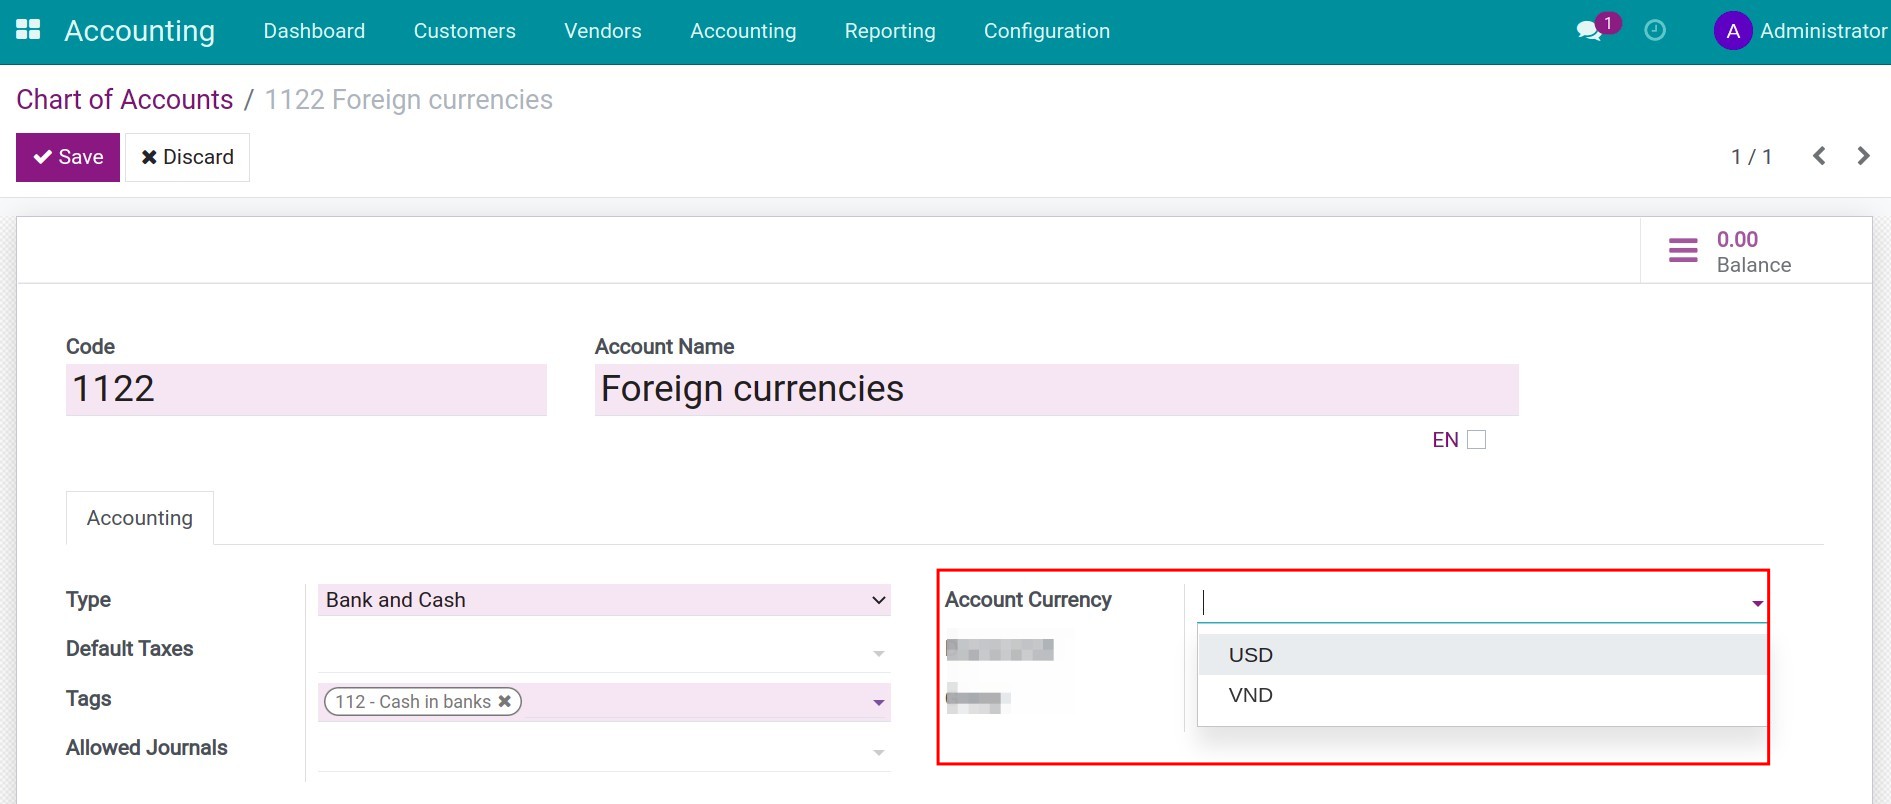
Note
If a currency is set up on an accounting account, all the transactions related to this account must be registered in the configured currency. Leave this field empty if you want to be able to choose different currencies on that account.
Multi-Currencies usage
Create customer invoice/vendor bill, Exchange difference journal entries
In the Multi-currencies environment, each item will be linked with a foreign currency. Right from the moment a journal is chosen, that currency is used automatically according to the configuration of that journal. If there’s no currency set up for that journal, the system will use the default currency of your company. However, the currencies list is still available and you can select your desired one as in the image below.
With invoices and journal entries in foreign currency, the Amount in Currency column in tab Journal Items is expressed in that foreign currency. This amount is automatically converted to the company’s currency based on the most recent updated exchange rate in the system.
Currencies related fields on a vendor bill.
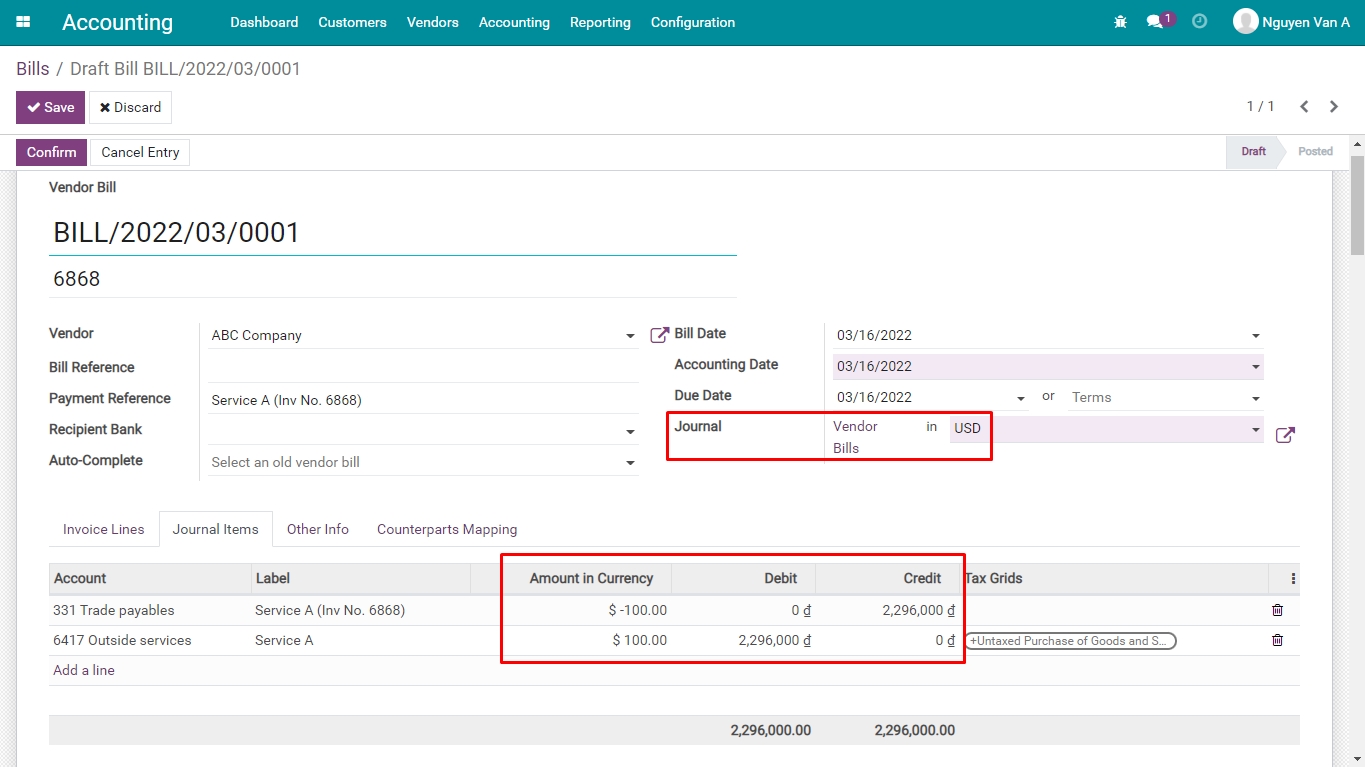
Currencies related fields on a customer invoice:
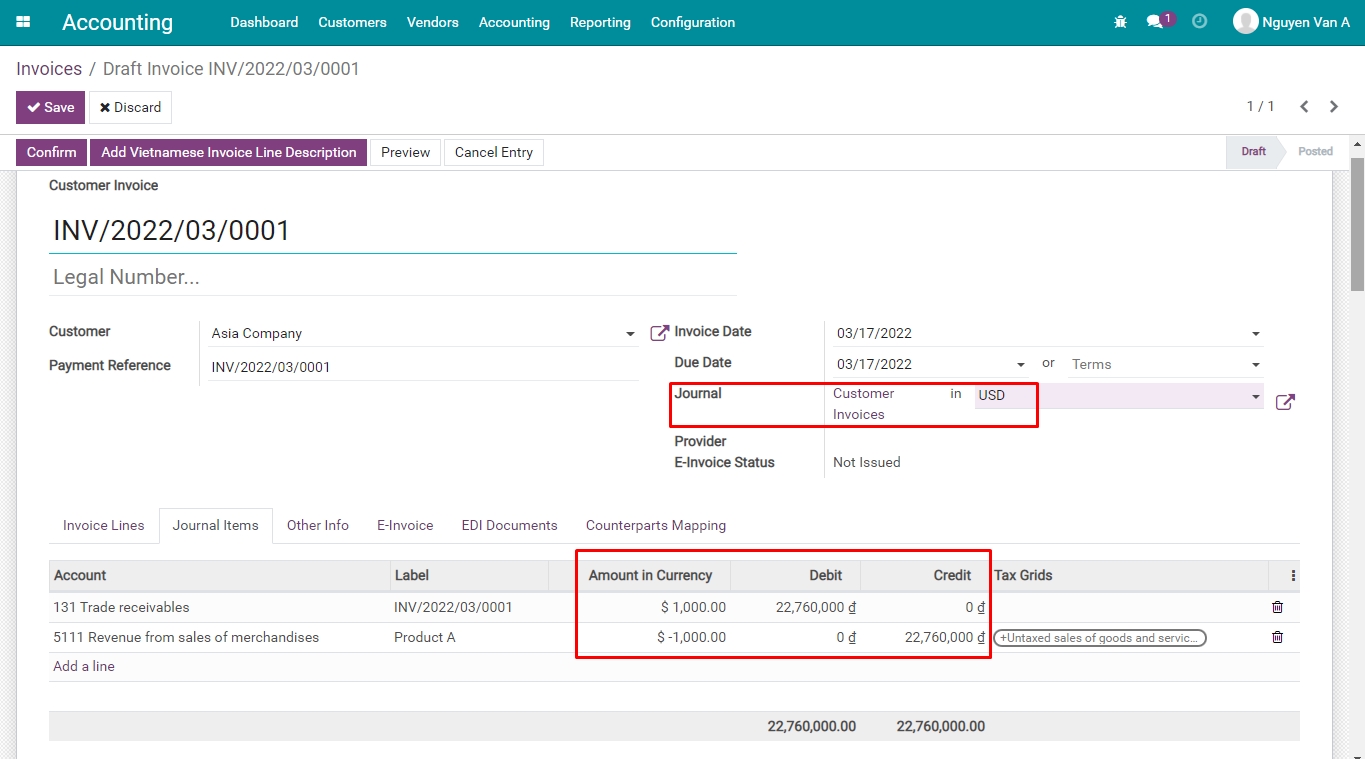
Currencies related fields on a journal entry in Viindoo:
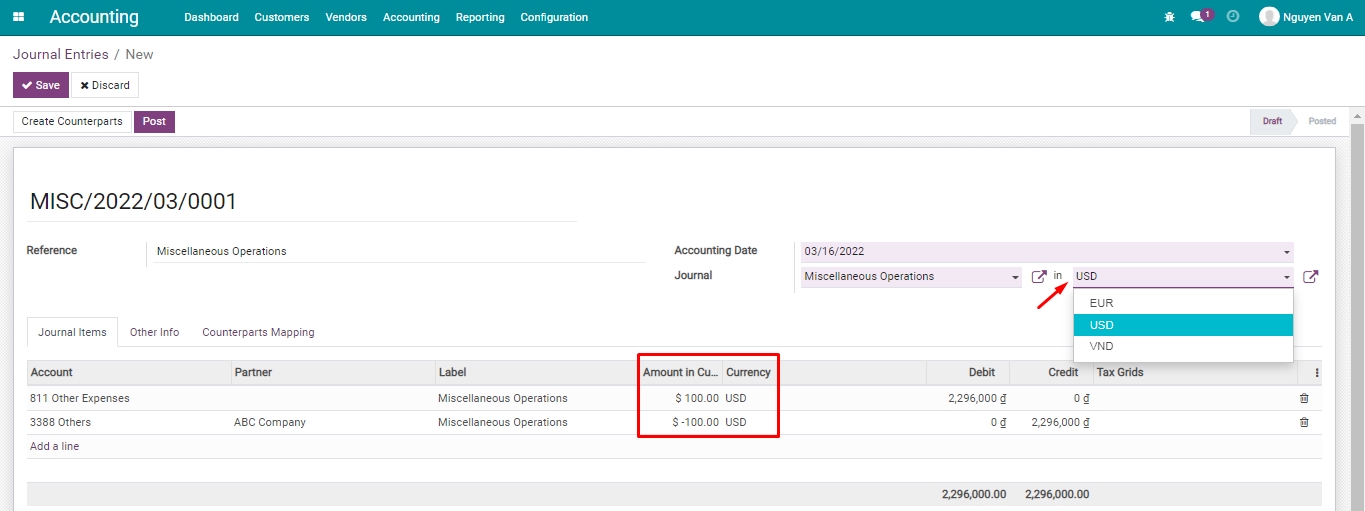
Create a payment in foreign currency
In the record of a customer payment, the currency field allows you to select a payment currency different from the default one of your company.
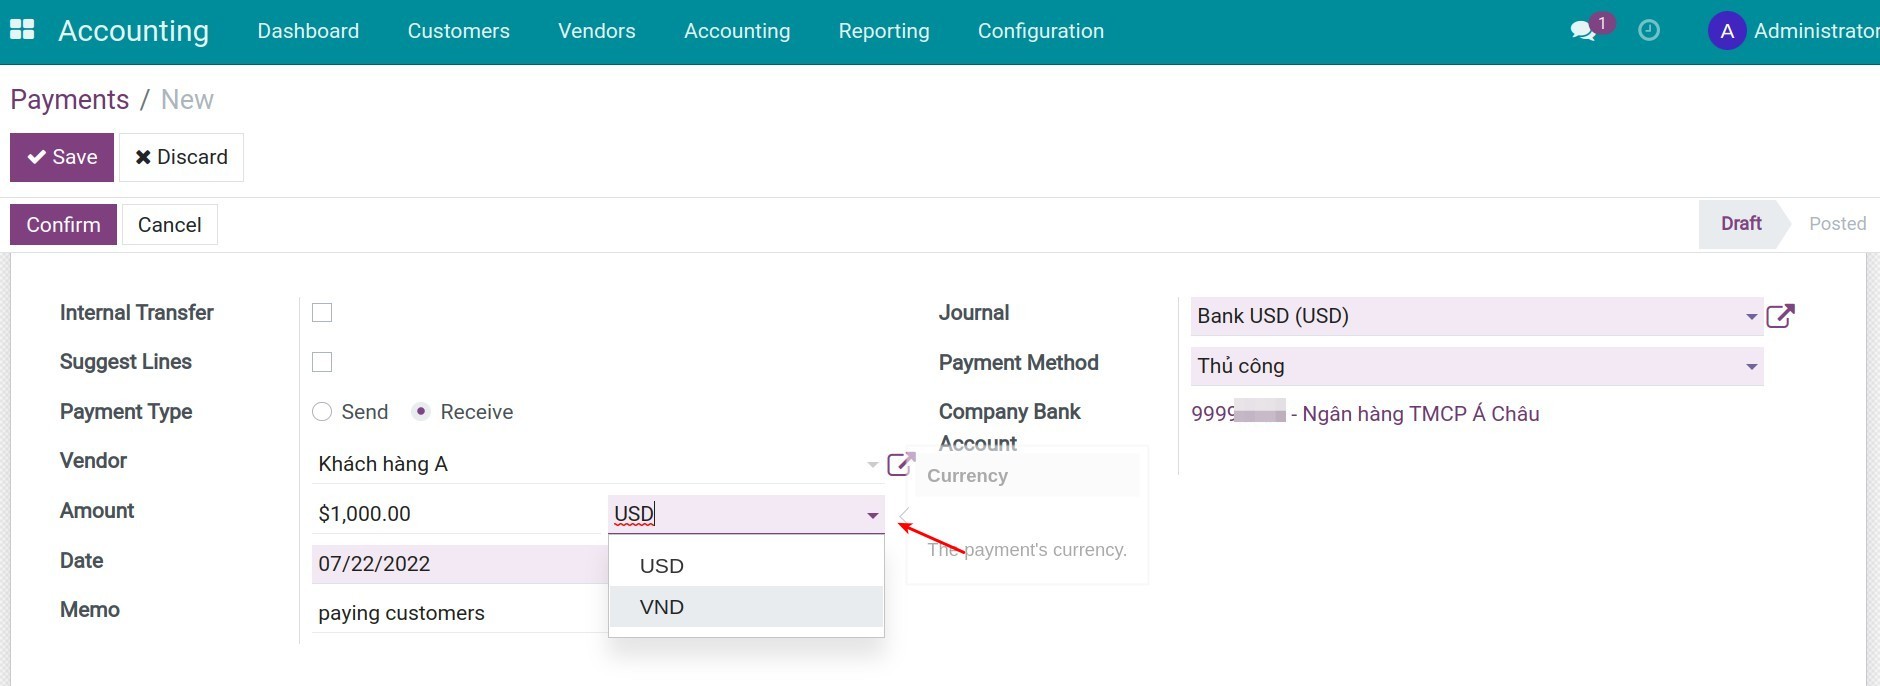
Create a bank statement in foreign currency
With a bank account set up in a foreign currency, you need to record bank statements in the configured currency for that bank account.
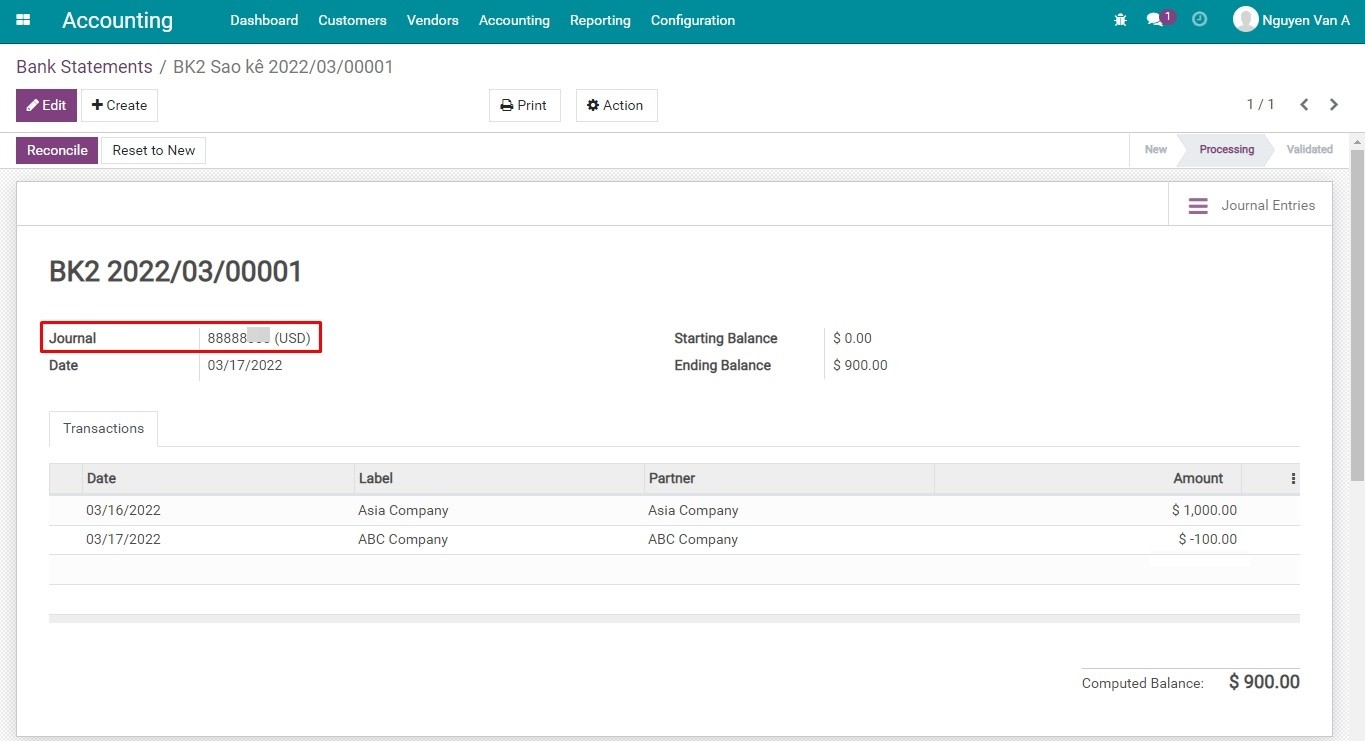
See also
Related article
Manage invoices and make a payment in a multi-currencies system
Automatically recording the exchange rate difference
Manage invoices and make a payment in a multi-currencies system
Manage invoices and make a payment in a multi-currencies system
Requirements
This tutorial requires the installation of the following applications/modules:
Accounting & Finance
Bank currency rates
In this article, Viindoo will show you how to manage foreign currency invoices and payments. However, before that you need to enable the multi-currencies feature, activate other currencies, and update their exchange rates.
To better understand, we will use the below exchange rate to figure out and do some examples as follow:
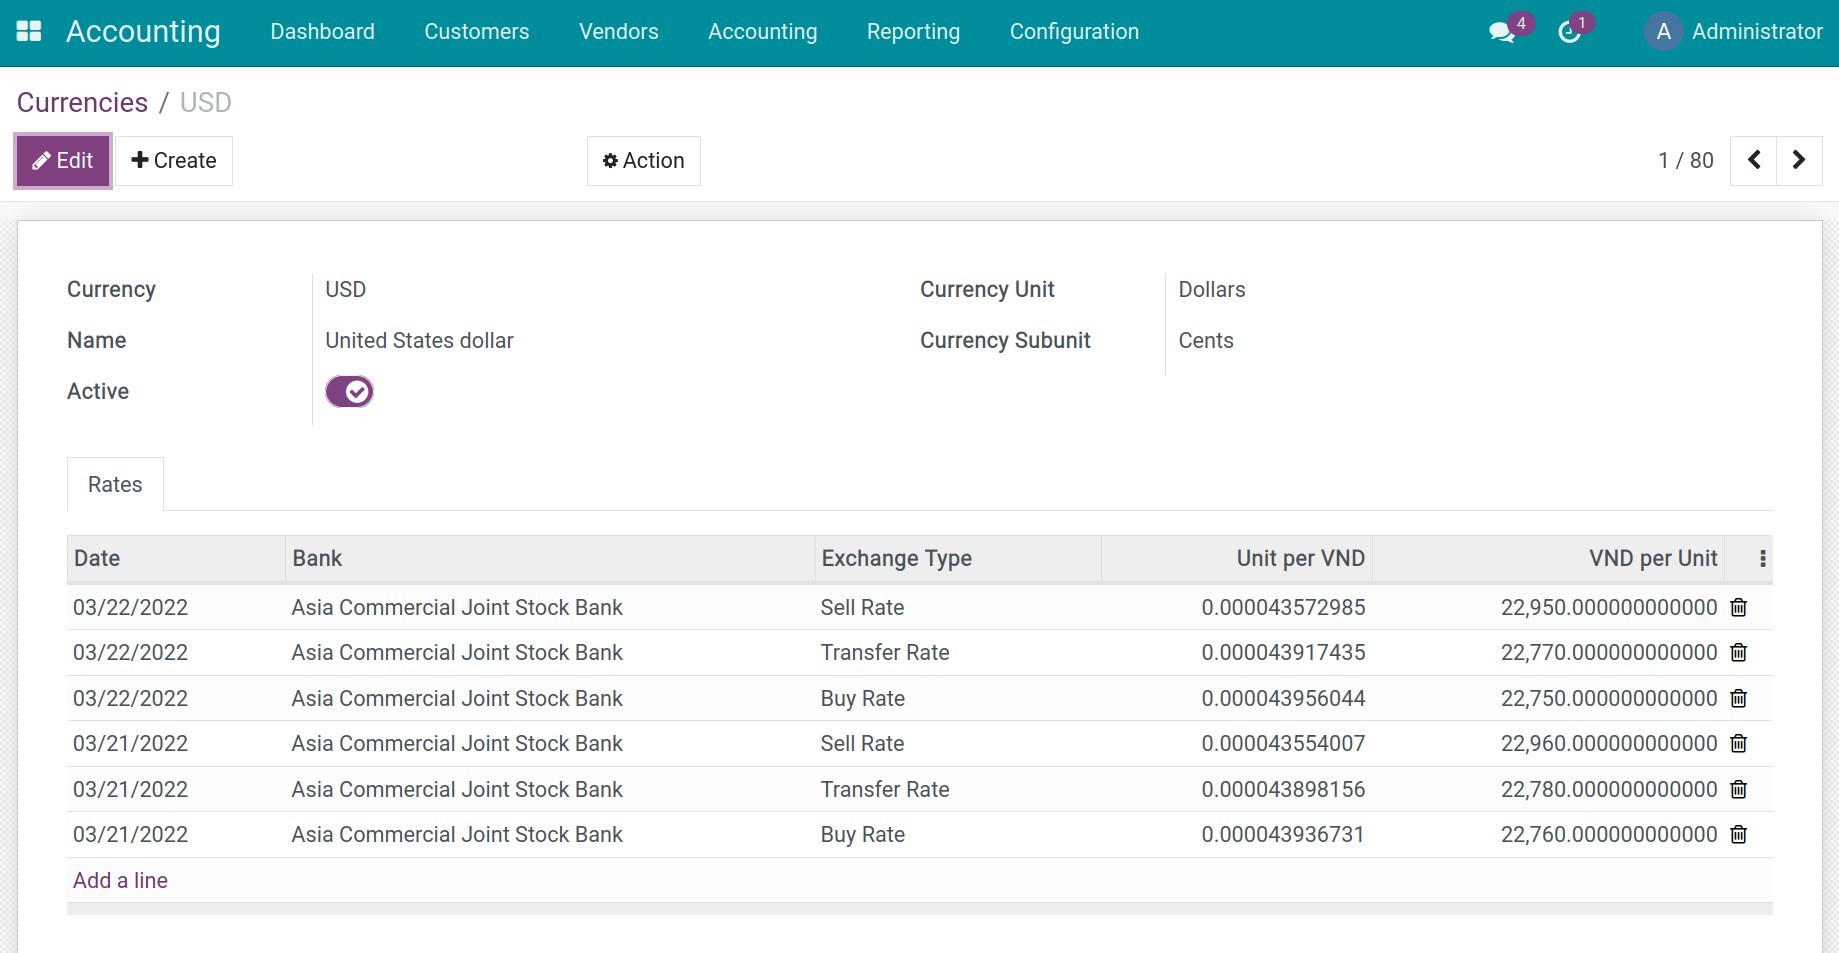
The foreign currency invoices in Viindoo
First of all, you need to know how to create a customer invoice and how to create a vendor bill.
After that, you can create a foreign currency invoice in two ways as below:
Method 01: If your Company manages a Journal for each currency.
Create a Journal for foreign currency.
On the invoice, select the journal configured in your desired foreign currency.
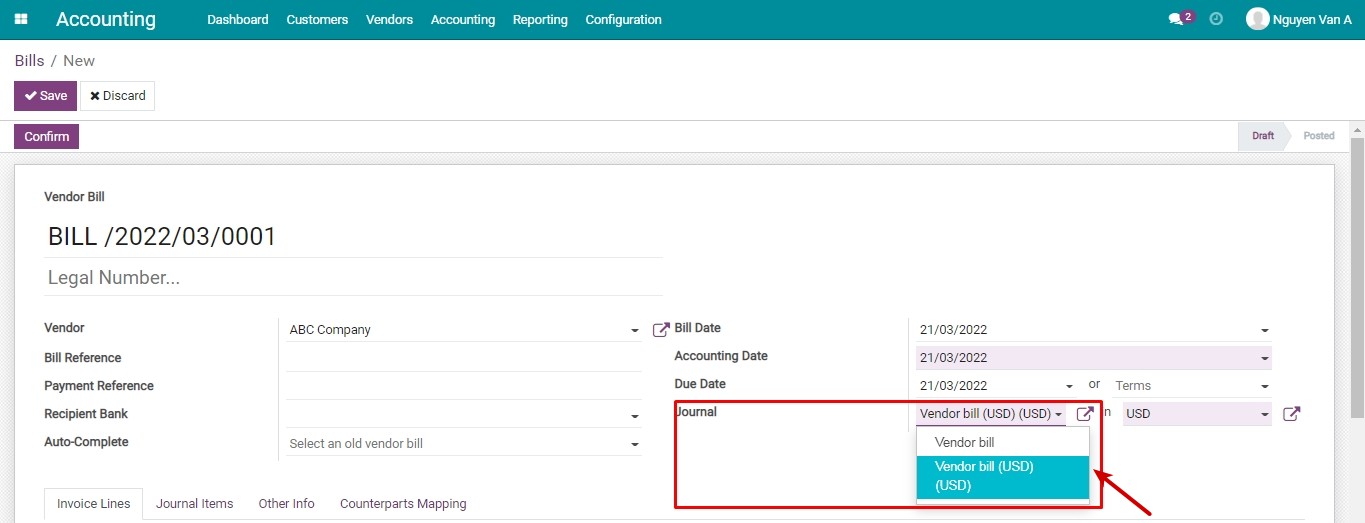
Method 02: If your Company manages a Journal for all of currencies.
Use the default Journal, choose a foreign currency right on this form.
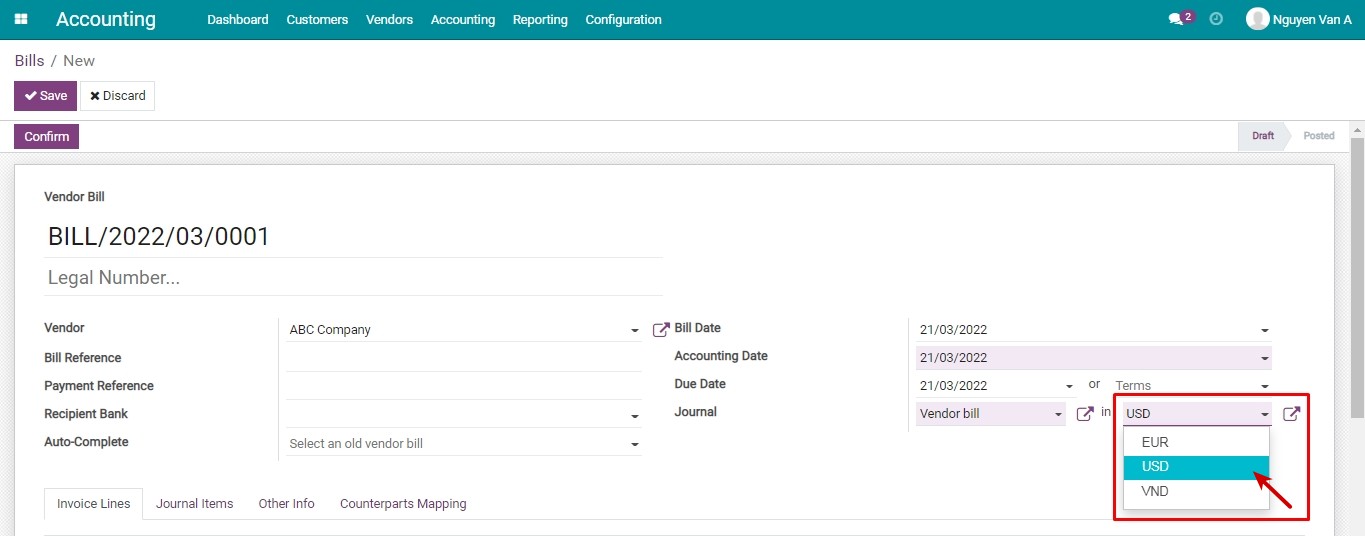
The exchange rate from the foreign currency to your company’s main currency will be decided based on the following rules:
Customer invoices: Based on the buying rate.
For example: On 22/03/2022, create an invoice for DEF Company with a value of 100 USD, the buying rate will be used automatically is 22.750 VND/USD:
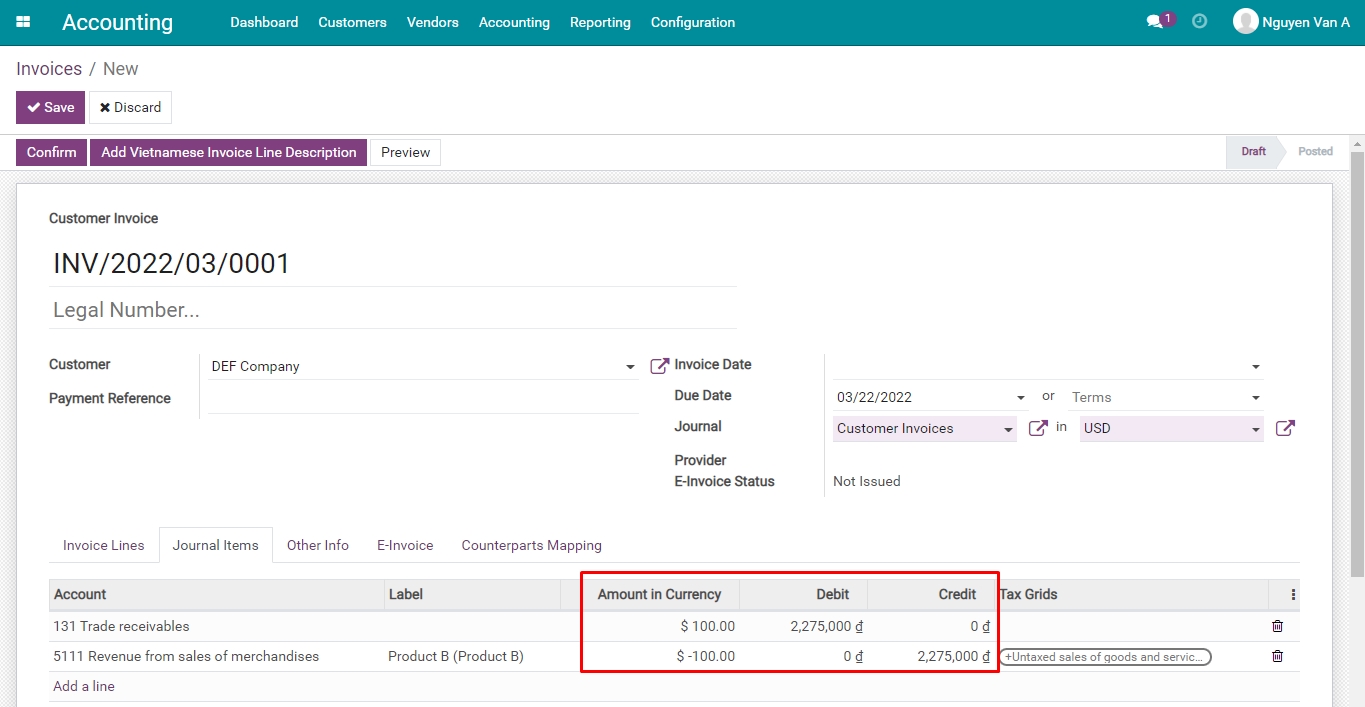
Vendor Bills: Based on the selling rate.
For example: On 21/03/2022, create a vendor bill of ABC Company with a value of 100 USD, the selling rate will be used automatically is 22.960 VND/USD:
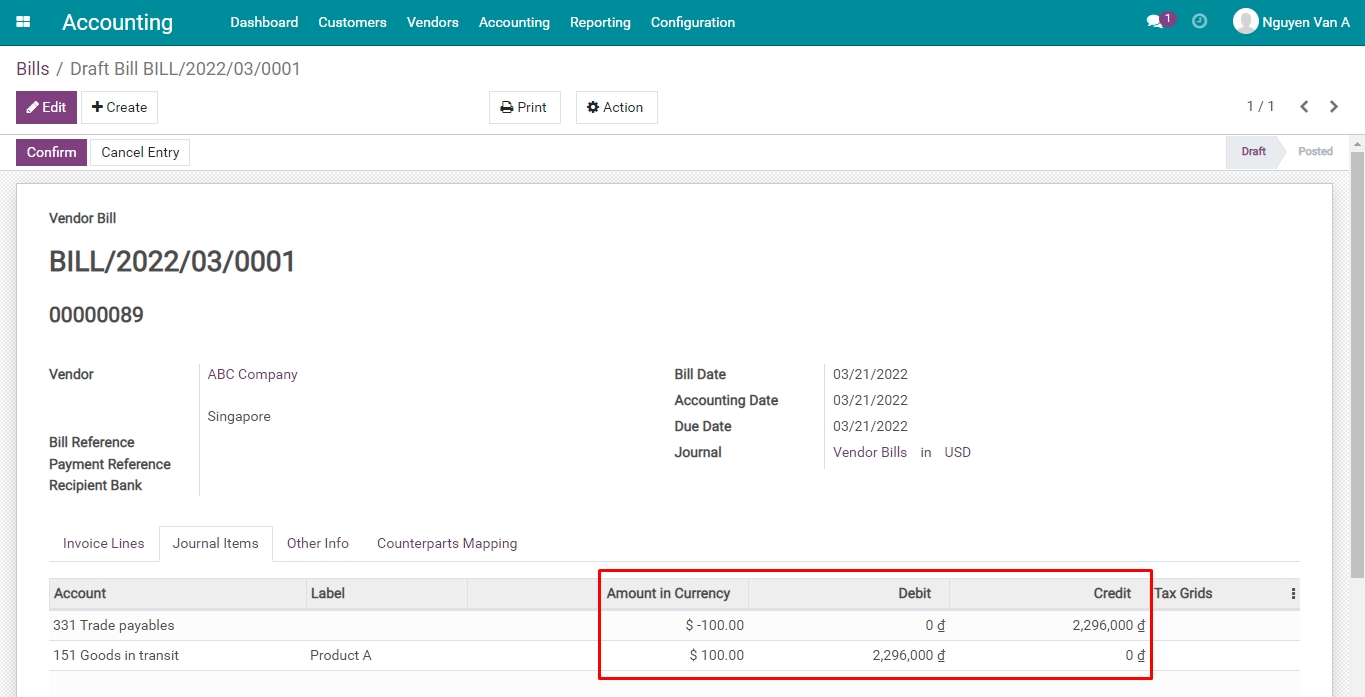
Payment for Vendor bills
Payment by the main currency of the company
Proceed a payment in the company’s main currency for a vendor bill in USD with ABC Company.
In the vendor bill form, press Register Payment, on the pop-up, choose the payment’s currency is VND, the total value in VND is equal to the recorded amount.
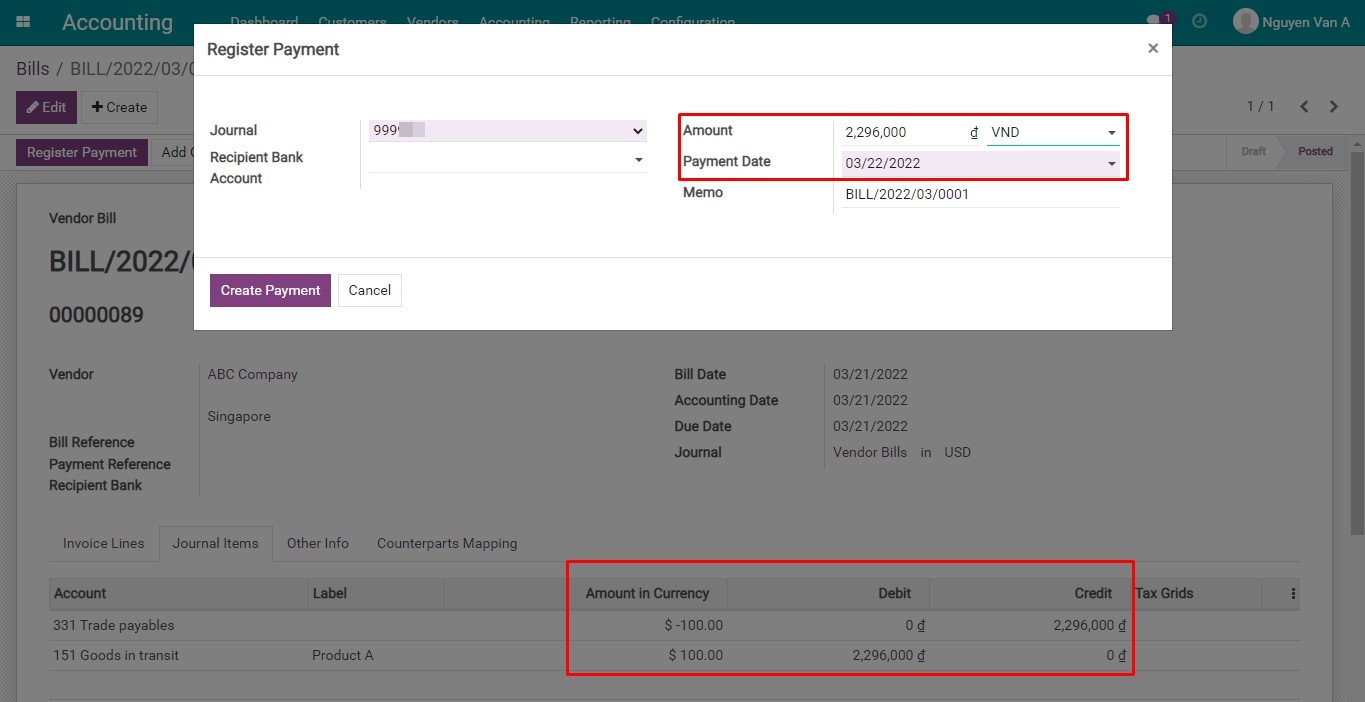
After pressing Create Payment, the status of the vendor bill will be changed to Paid.
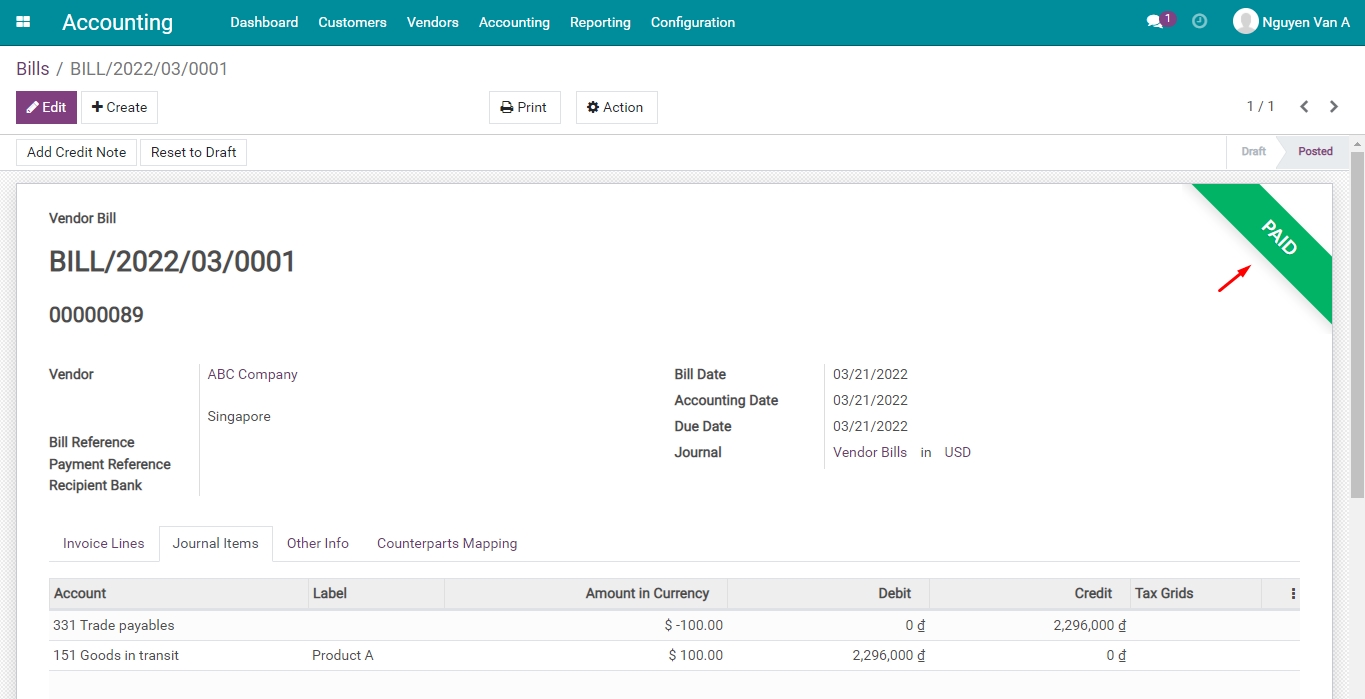
Navigate to Journal Entry to see: The payment entries and the exchange rate difference entries.
Note
The exchange rate difference entry will be generated automatically when any transaction happens.
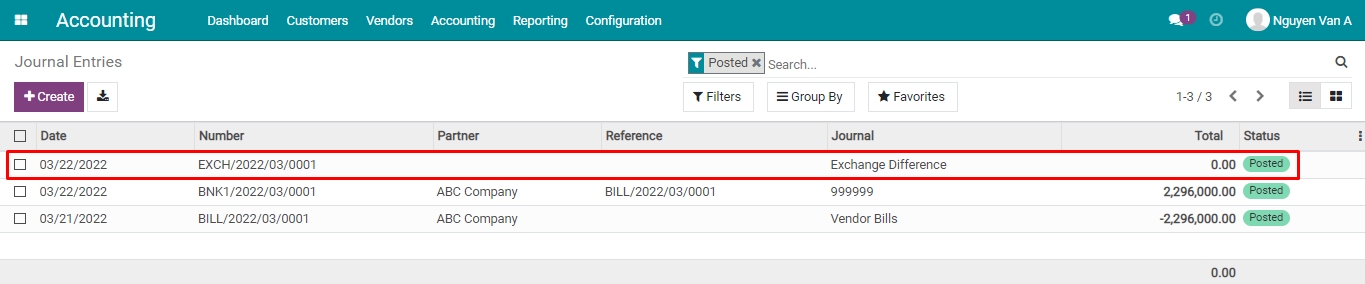
In this example: The exchange rate on the bill date is higher than the one on the date of payment, therefore, the entry for recording the loss of exchange rate difference will be as follows:
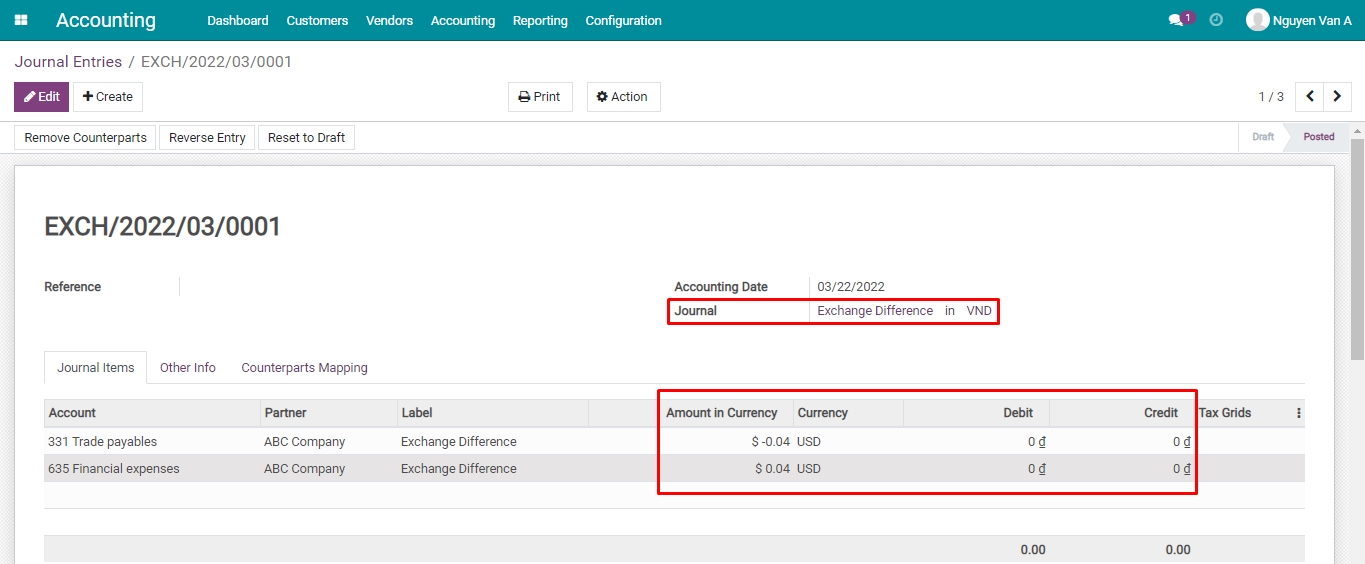
Payment in foreign currency
Do the same steps as paying by the company’s main currency, but choose the foreign currency in payment.
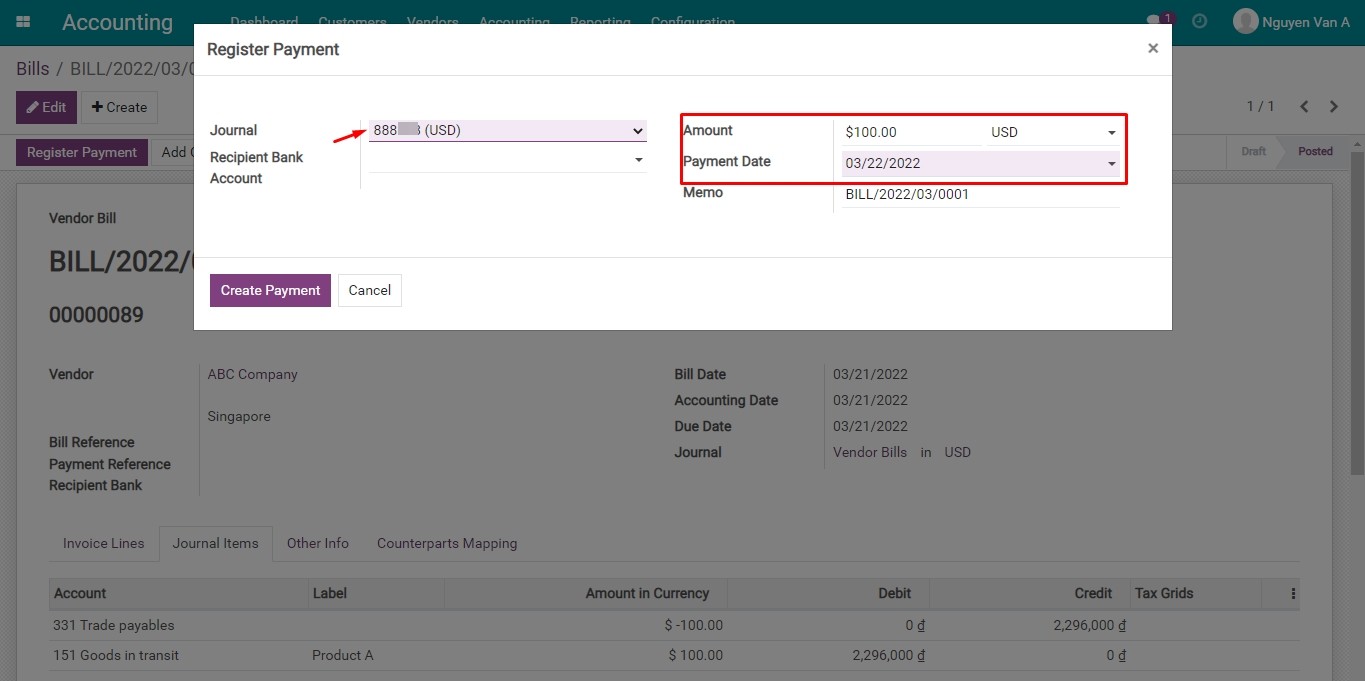
Once done, navigate to Journal Entry to see: The payment entry and the exchange rate difference entry.

In this situation: The exchange rate on the bill date is higher than the one on the payment date, therefore, the entry of gaining exchange rate difference will be:
Customer’s payment
Receiving payment in the company’s main currency
For example, on 21/03/2022, DEF Company made a payment in USD to your VND’s account.
On the Customer invoice, click Register Payment, the register payment window appears. Here, you choose the payment currency is VND and the payment date, the total value of VND is taken exactly as the debited debt.
Press Create Payment, and the status of the customer’s invoice will be Paid.
In Journal Entry, you can view related derivatives.
Payment journal entry:
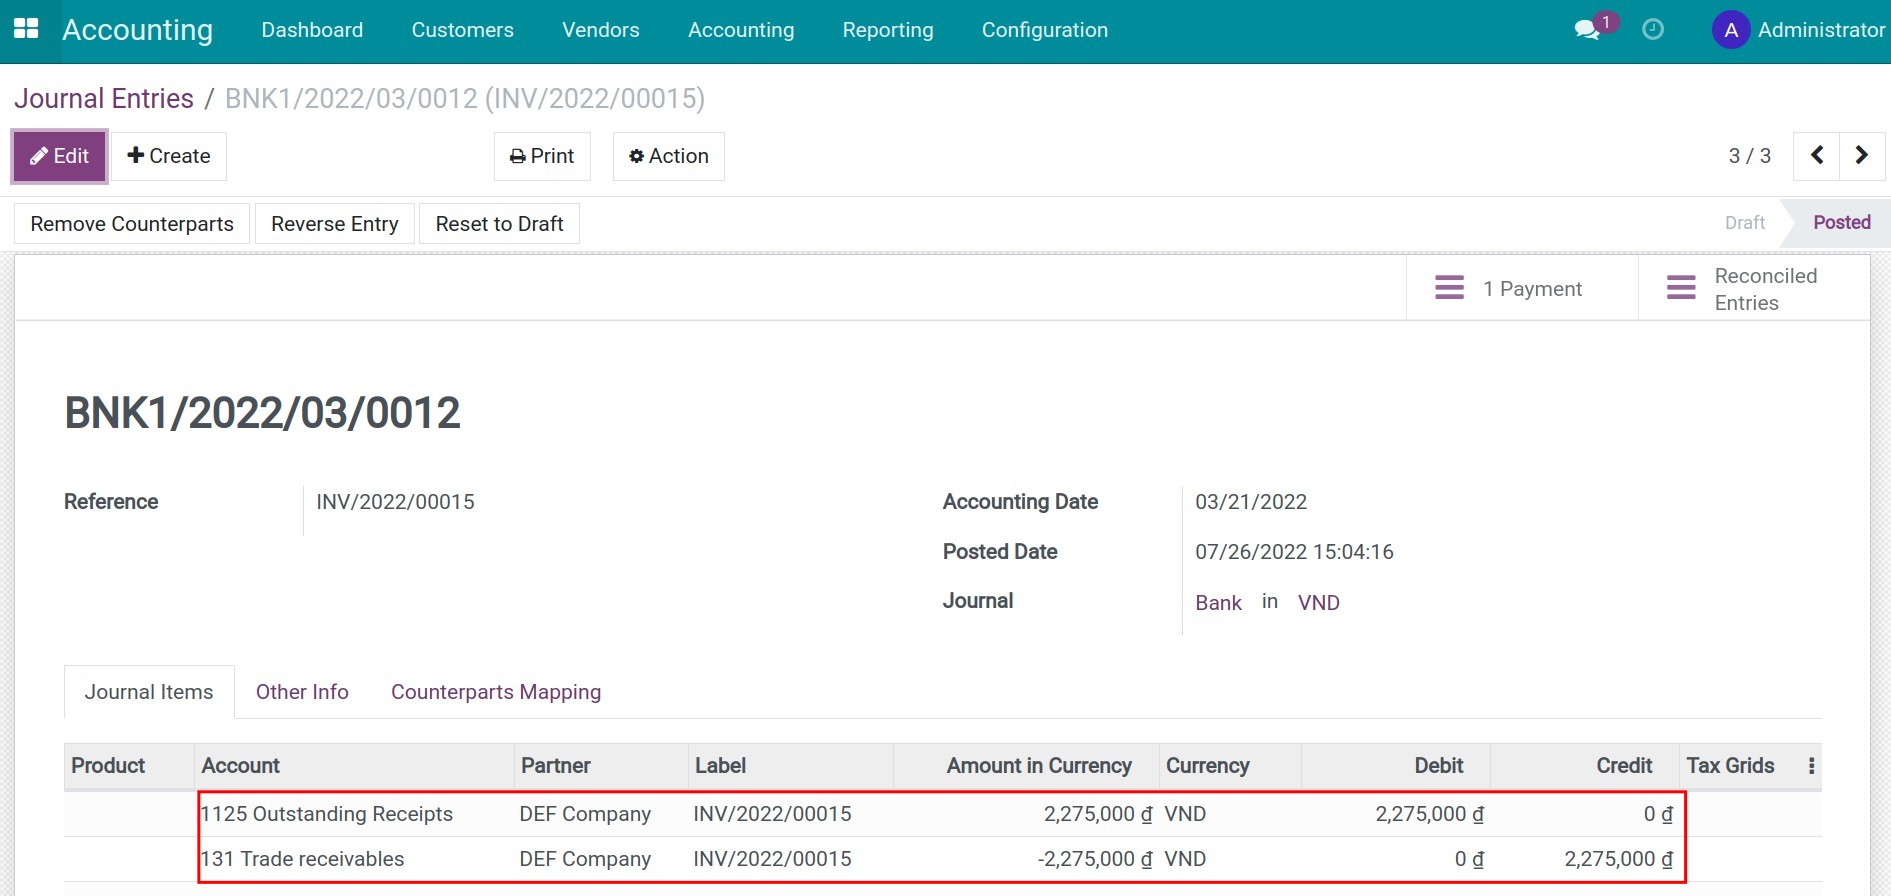
Exchange rate difference entry: The exchange rate on the invoice date is smaller than the one on the payment date, so, the entry of losing exchange rate difference will be:
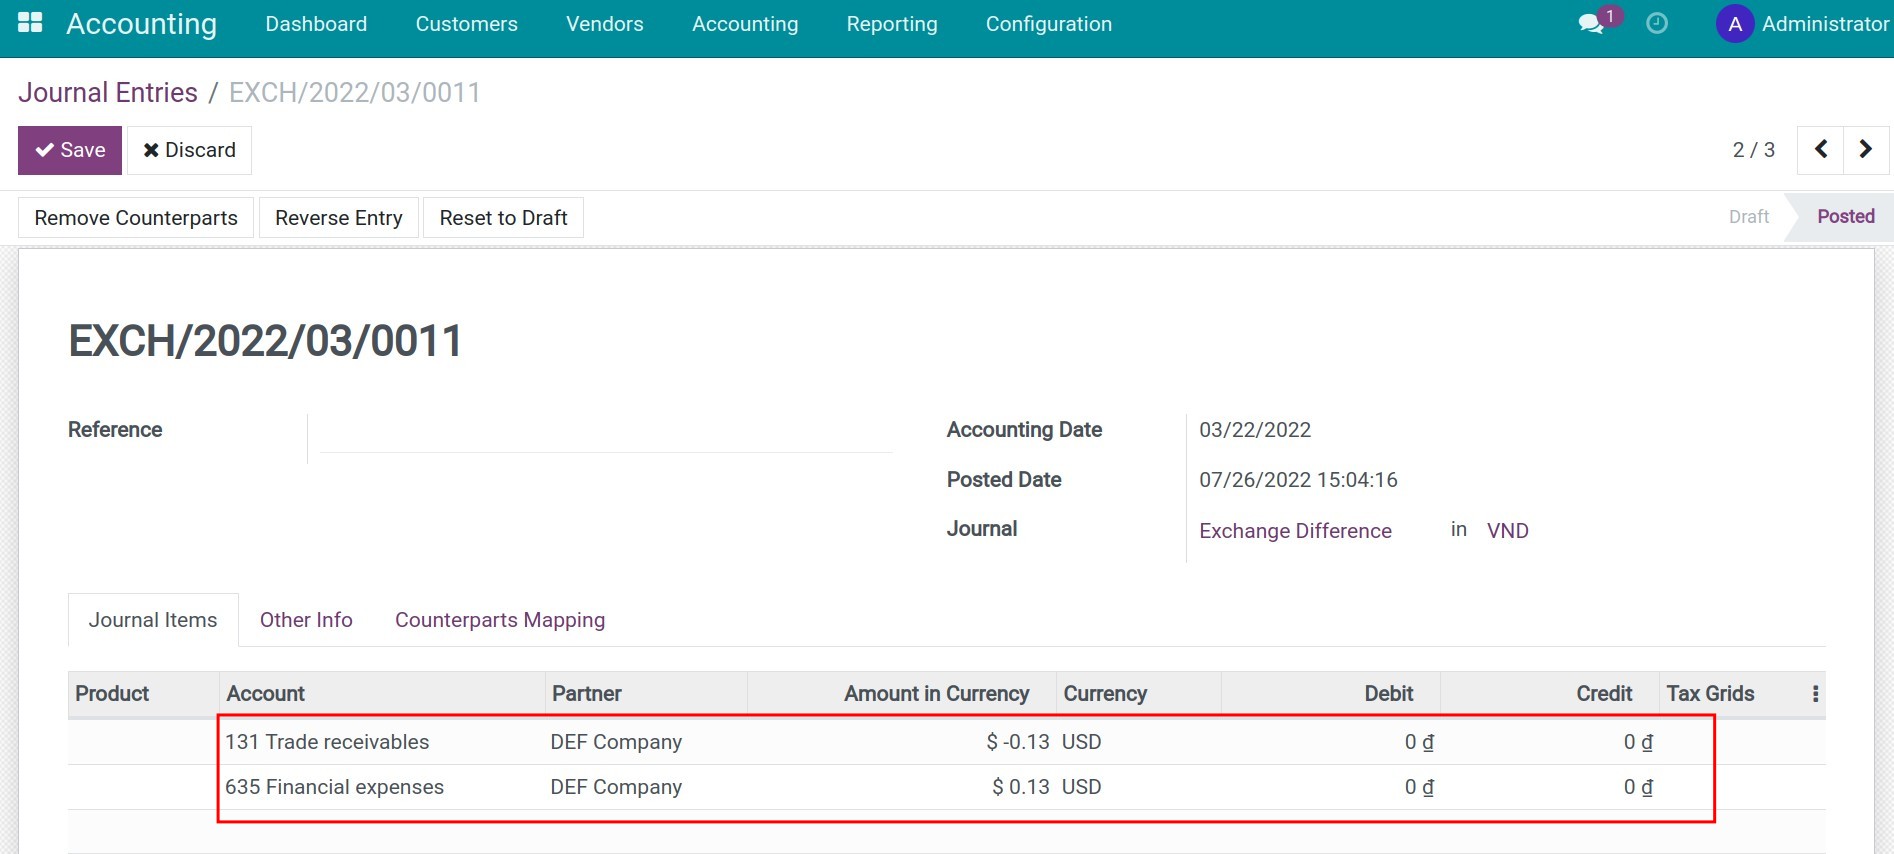
Receiving payment in foreign currency
Similar to previous scenarios, but this time, you need to record the payment from customer DEF Company to your foreign currency account in USD:
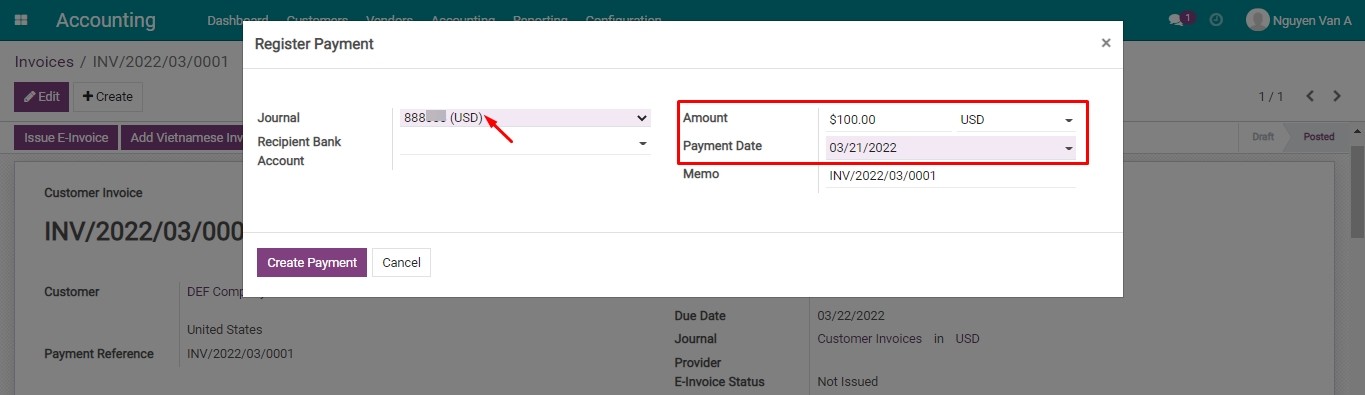
Once done, navigate to Journal Entry to see the payment and the different exchange rate entries.
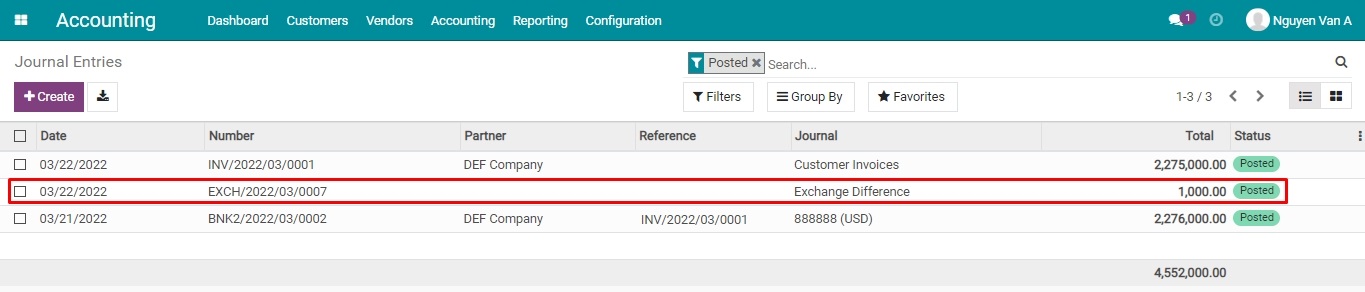
In this example: The exchange rate on the invoice date is smaller than the one on the payment date, the customer paid in foreign currency and the entry for the gain exchange rate difference will be:
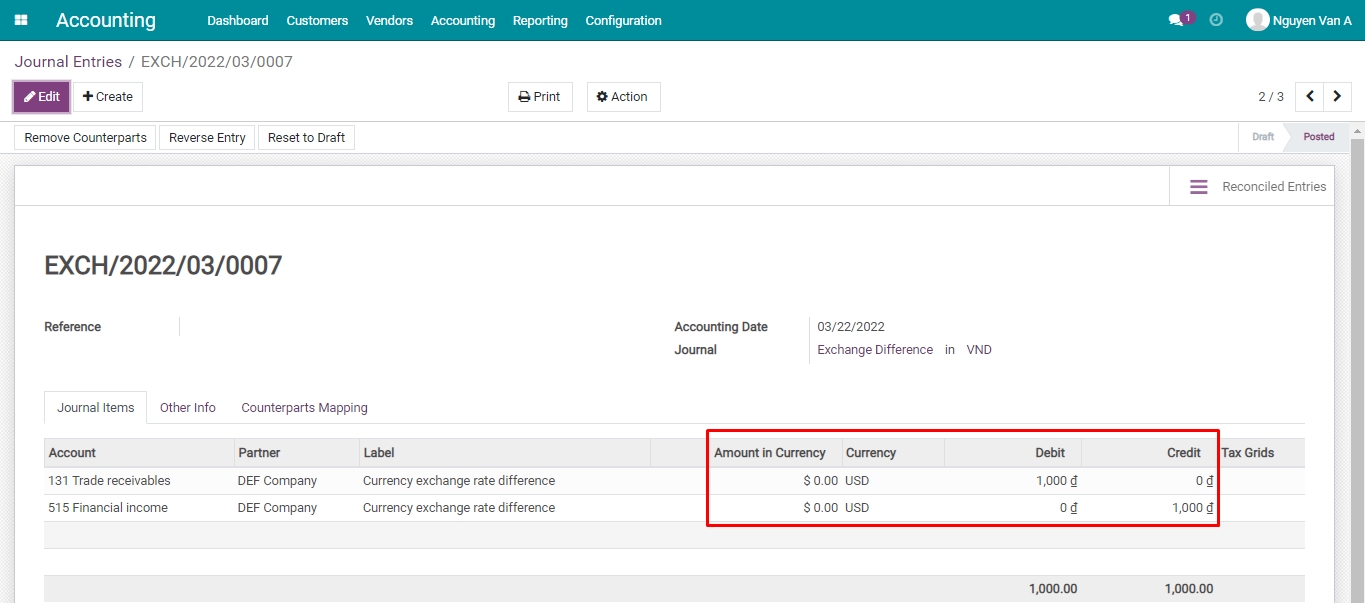
Note
In normal transactions, the currency used in payment is the same as the one used in invoices and contracts. However, if the payment is done via payment acquirers , the currency needs to be supported by them. Due to this reason, there are situations where the currency used on invoices is different from the one used on payments.
See also
Related article
Automatically recording the exchange rate difference
Automatically recording the exchange rate difference
Automatically recording the exchange rate difference
The exchange rates mentioned in this article are the exchange rates between the company’s currency and the foreign currencies.
Note
To be able to update the exchange rate of a particular currency, you need to enable the Multi-Currencies feature and activate that currency.
In Viindoo Enterprise Management Software , you can update the exchange rate in two ways:
Manual update;
Automatic update.
Requirements
This tutorial requires the installation of the following applications/modules:
Accounting & Finance
Bank currency rates
Manual currency rates update
All banks update the exchange rates every day, except on weekends and holidays. Accordingly, the accountants in your company also need to actively update the exchange rates in the system.
Navigate to Accounting ‣ Configuration ‣ Currencies, select a currency to update the exchange rate has been ticked Active.
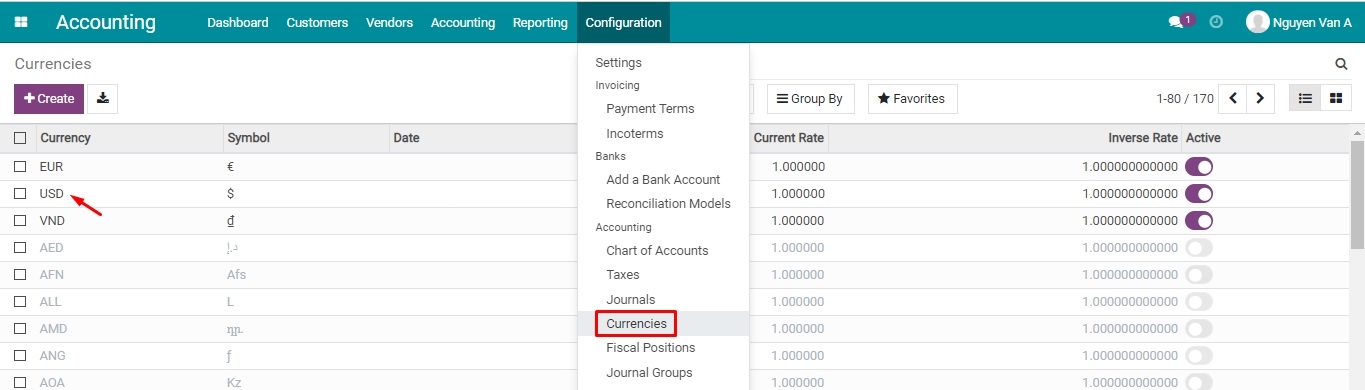
Click Edit and Add a line to record the new rate.
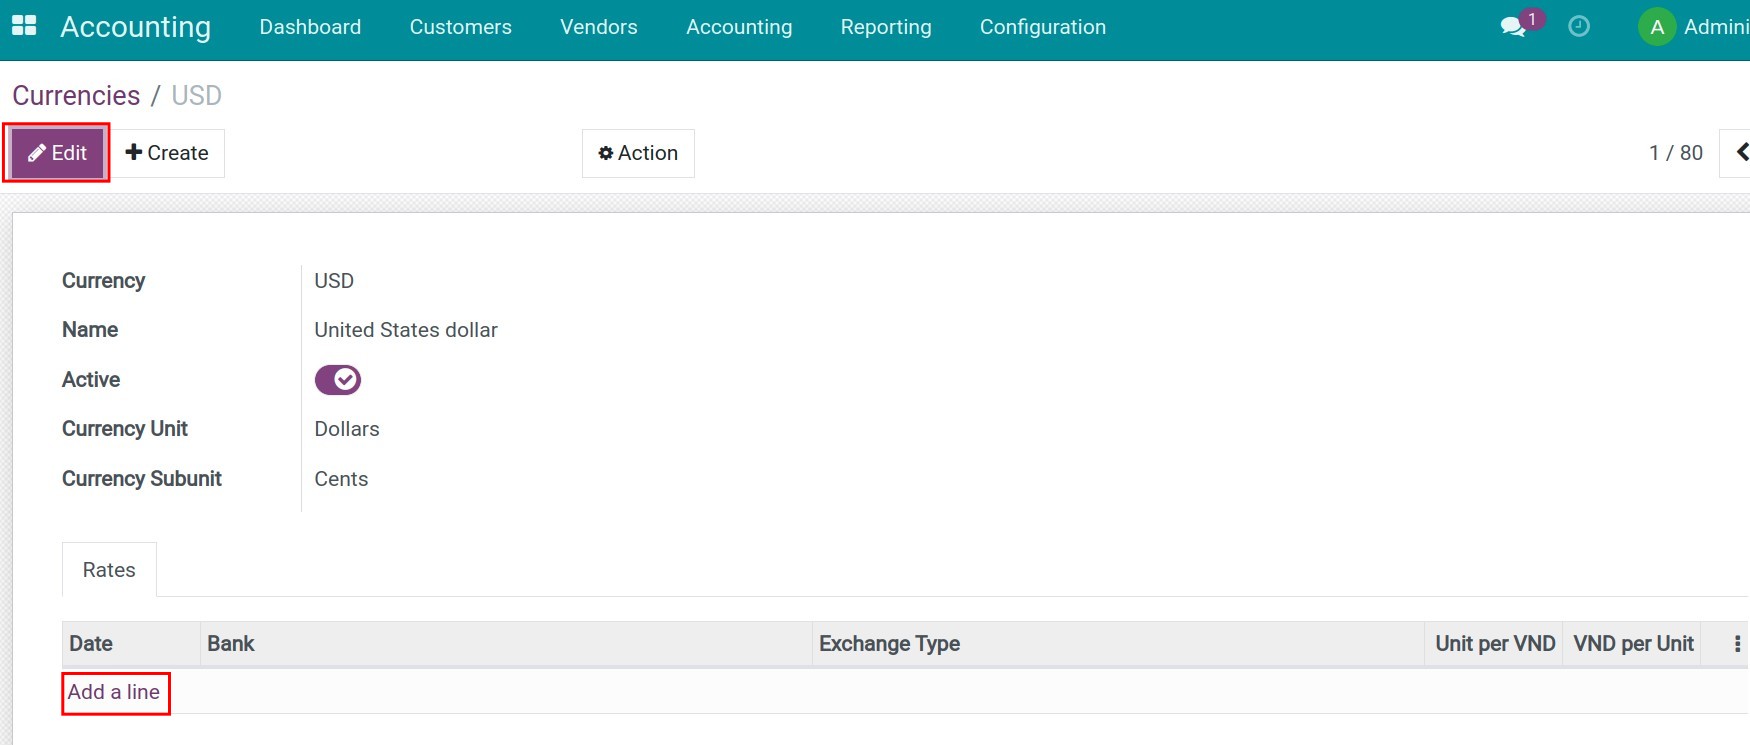
A new line is added on the list that you need to fill in the information below:
Date: The date when this rate is registered.
Unit per VND: The price of the company’s currency in relation to the foreign currency in exchange.
VND per Unit: The price of the foreign currency in relation to the company’s currency in exchange.
For example:
Update the exchange rate on 11/03/2022: 1 USD = 23.000 VND;
Update the exchange rate on 12/03/2022: 1 USD = 22.900 VND.
Press Save to save the manual update.
Note
On manual update, if:
Bank Currency Rates Update module is not installed: You can update 01 exchange type for each foreign currency every day.
Bank Currency Rates Update module is installed: You can update at the same time the Buy Rate, Transfer Rate, and Sell Rate for each foreign currency every day.
A particular foreign currency will always be exchanged according to the latest registered date.
Automatic currency rates update
This feature allows to automatically update the exchange rates in the system every day according to the rates of the Banks. It saves time and effort, avoids the risk of exchange rates not being fully updated by users, and ensures accurate accounting activities in each foreign currency.
Navigate to Apps, search the module Bank Currency Rates Update and click Install. This module provides these features:
Automatic update all the activated foreign currencies;
Manual update all the activated foreign currencies;
Configure exchange rates update intervals.
Currently, you can do the automatic update from these banks:
Joint Stock Commercial Bank For Foreign Trade Of Vietnam (Vietcombank) ;
Asia Commercial Joint Stock Bank (ACB) .
Now, let us take a look at an example to study this feature:
For example: Set up the automatic update from ACB bank, using the USD bank account with the number 1231xxxx.
Once the module Bank Currency Rates Update is installed, you need to follow these steps as follows:
Step 1: Add a Bank Account. Afterward, on the field Bank, hit on the icon found at the end of the line to fill in the information of the bank.
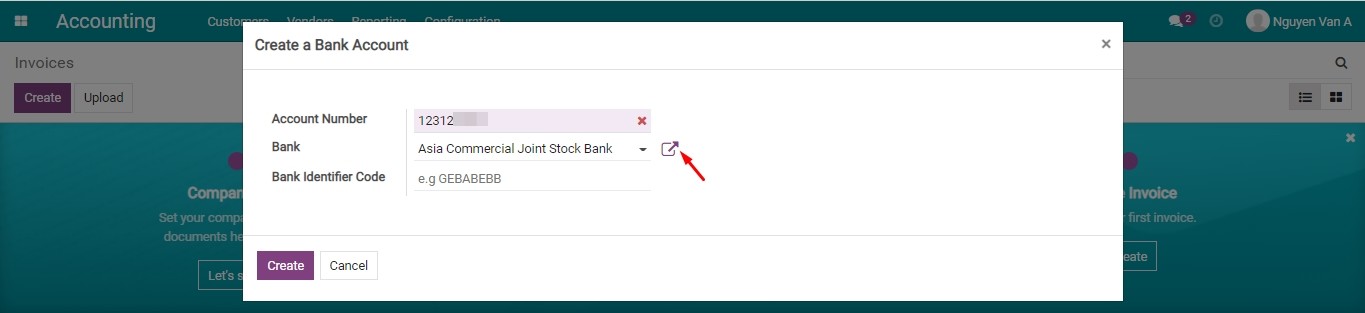
You can also access the bank info from the Contacts app. Navigate to Contacts ‣ Configuration ‣ Banks, then select the desired bank
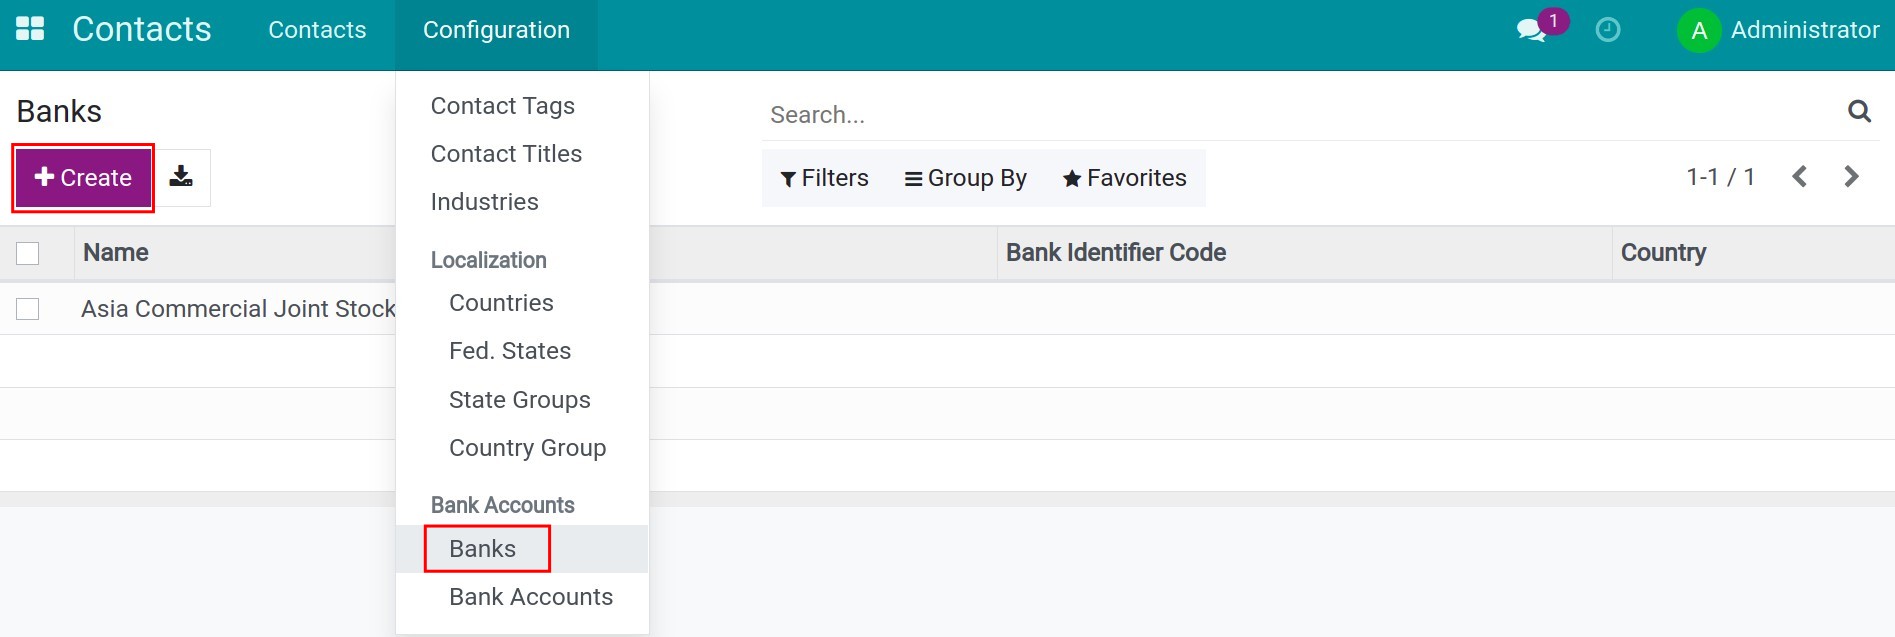
Step 2: The popup related to the bank information appears. Do the following:
Enter the bank information;
Check on the option Auto Currency Rates Update;
Select a bank at the field Auto Currency Rates Update Service Provider;
Hit Save.
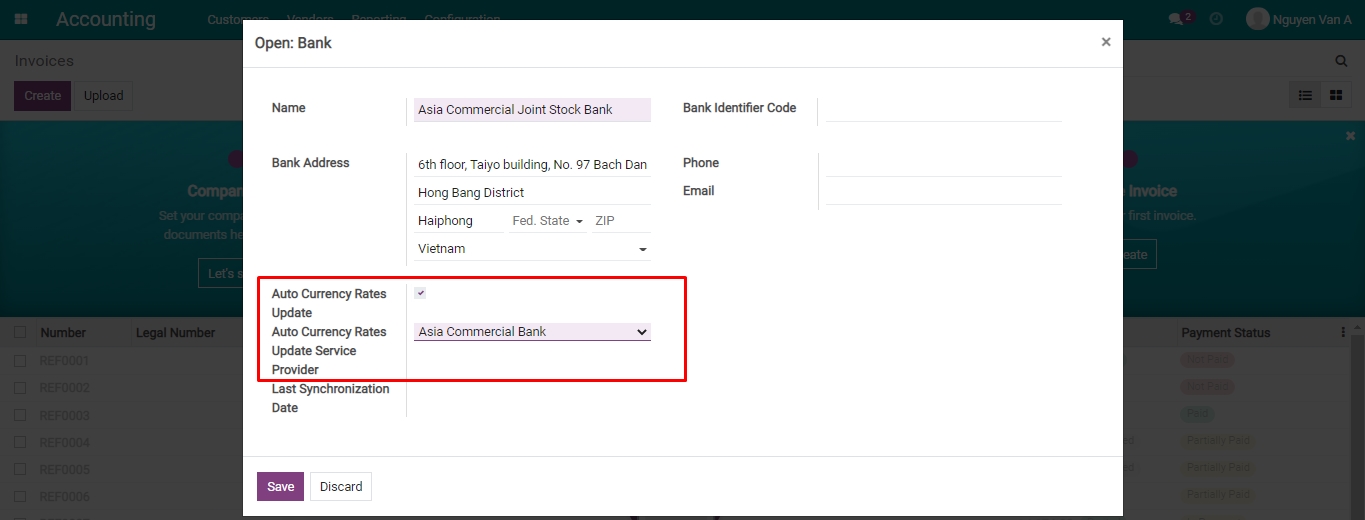
By default, the exchange rate is automatically updated once a day.

On each currency, the exchange rate will be updated automatically with the 03 types according to the rate of the bank, including Buy rate, Sell rate, and Transfer rate.

To enable the automatic update from Vietcombank, you also perform the same steps.
iSuite ERP software allows updating the foreign exchange rates from not only Vietcombank and ACB but also many other banks. When you have a need, please contact us.
See also
Related article
Configure charts of accounts and depreciation method for Assets Category
Manually create an Asset in iSuite
Buying and stocking assets
Salary and the deductions payments
Salary and the deductions payments
In this article, we will show you:
How to pay the employees’ salaries on Viindoo software.
Make payment for the salary deductions that the company has deducted from employee salaries as well as the one that the company has to bear with on Viindoo software.
Requirements
This tutorial requires the installation of the following applications/modules:
Accounting & Finance
Payroll
Payment with Payment Lines
Salary payments
First, you need to install the additional Payment with Payment Lines module. You go to Viindoo Apps, cancel the default filter, search for the to_account_payment module and proceed with the installation.
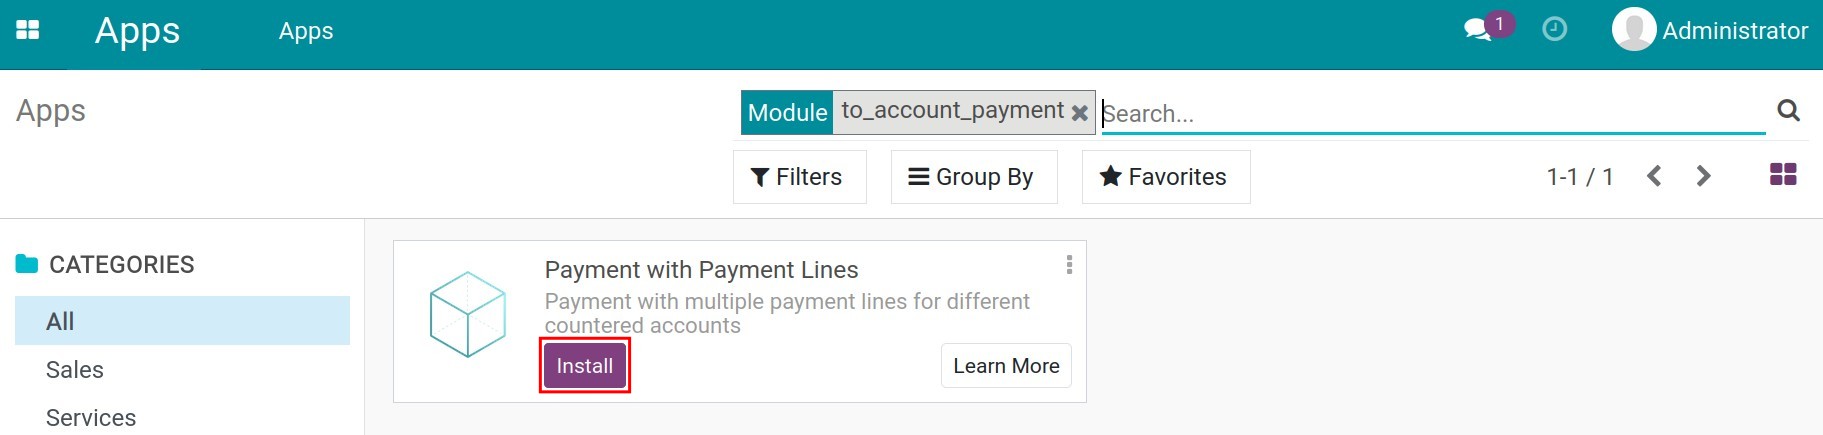
And then, similar to creating a payment, your company can also create a salary payment request on the system as follows:
Navigate to Accounting ‣ Vendors ‣ Payments ‣ Create:
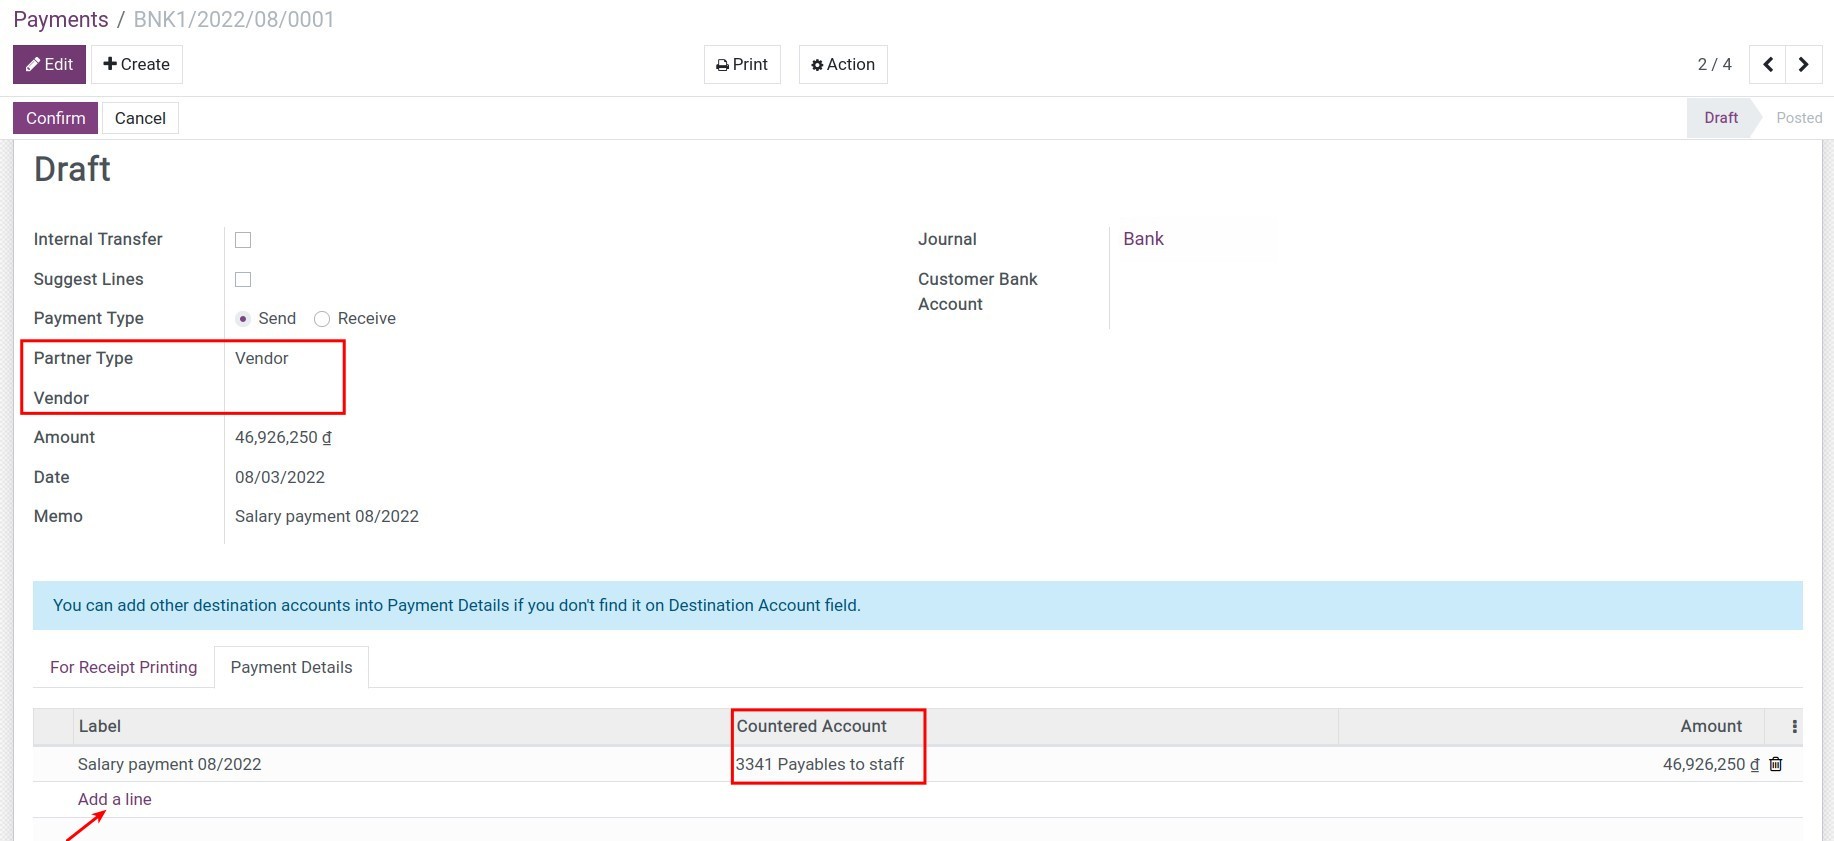
The information you need to pay attention to includes:
Partner Type: Vendor;
Vendor: Add the contact of a specific employee. Leave this field empty if your company pays for various employees and not to any specific person;
Memo: Enter the contents of the salary payment.
Move to tab Payment Details and press Add a line to enter the below information:
Label: Enter the contents of salary payment as above;
Countered Account: Choose the account of payable to staffs;
Amount: Enter the salary amount.
After fulfilling the information, press Confirm to complete. Then, you can access the Journal Entry to view the generated entries for the salary payment:
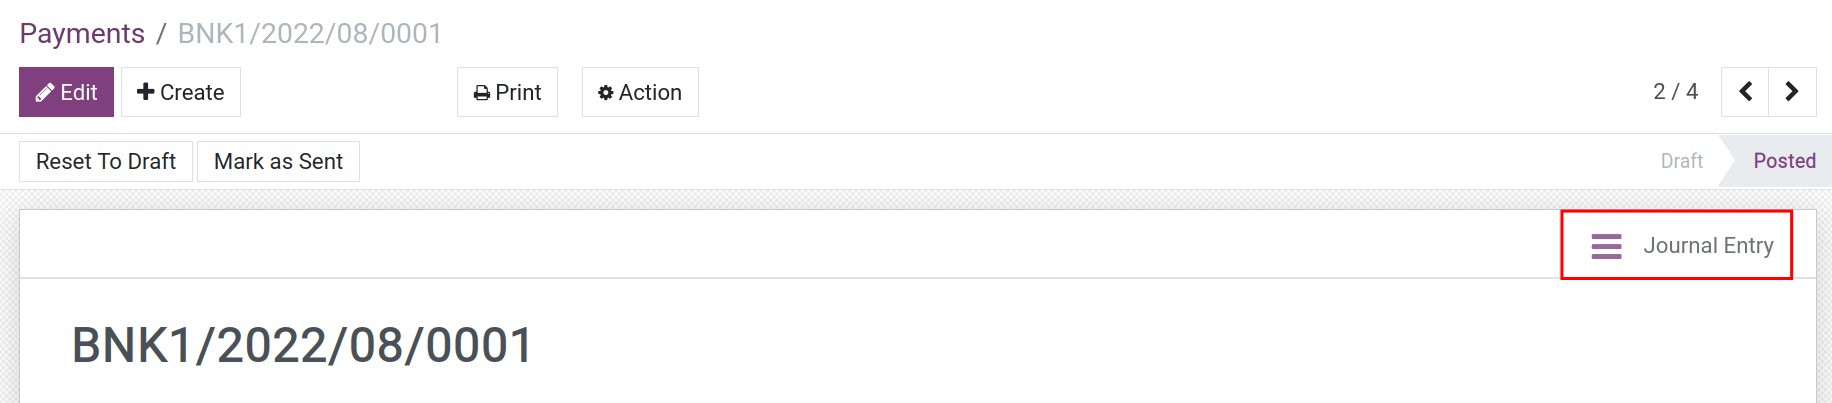
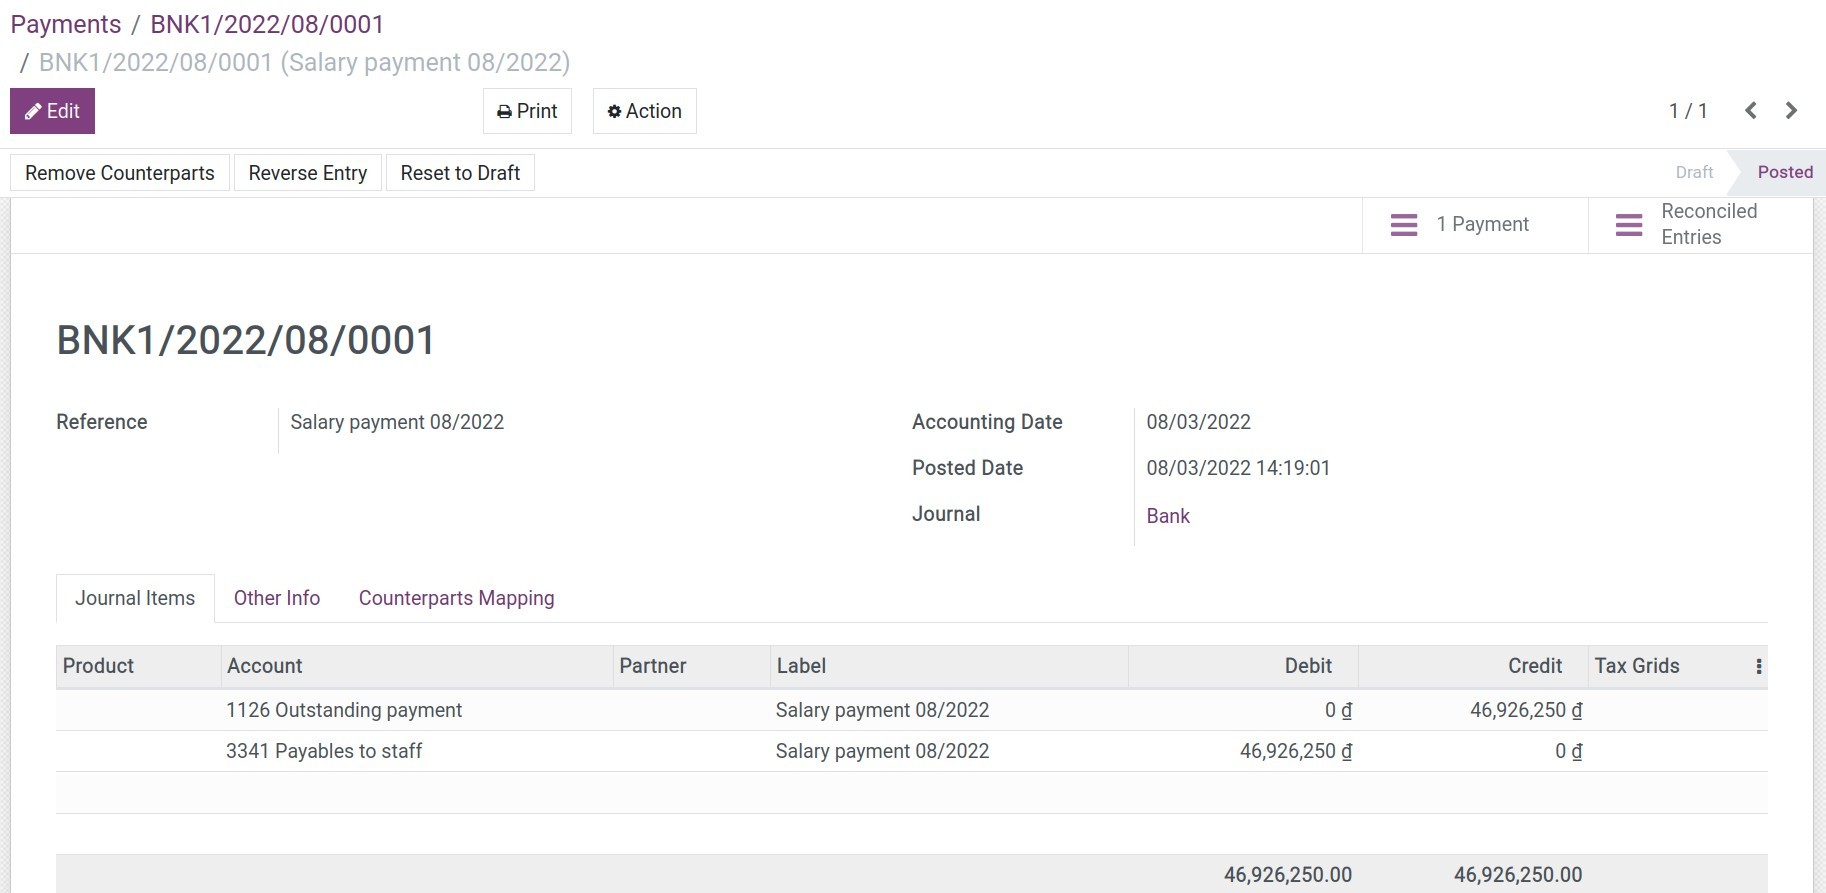
Salary deductions payment
In Vietnam, according to accounting law, you will need to track the details of the payroll contribution on different accounts. When paying to the insurance or tax authorities, etc., the enterprise will pay monthly, quarterly, or every six months, so one payment can be made for several recorded journal entries. Viindoo provides you with the feature of suggesting the amount to be paid to a partner according to the journal entries associated with that partner.
To pay for the salary deductions, you follow the same steps as record a payment:
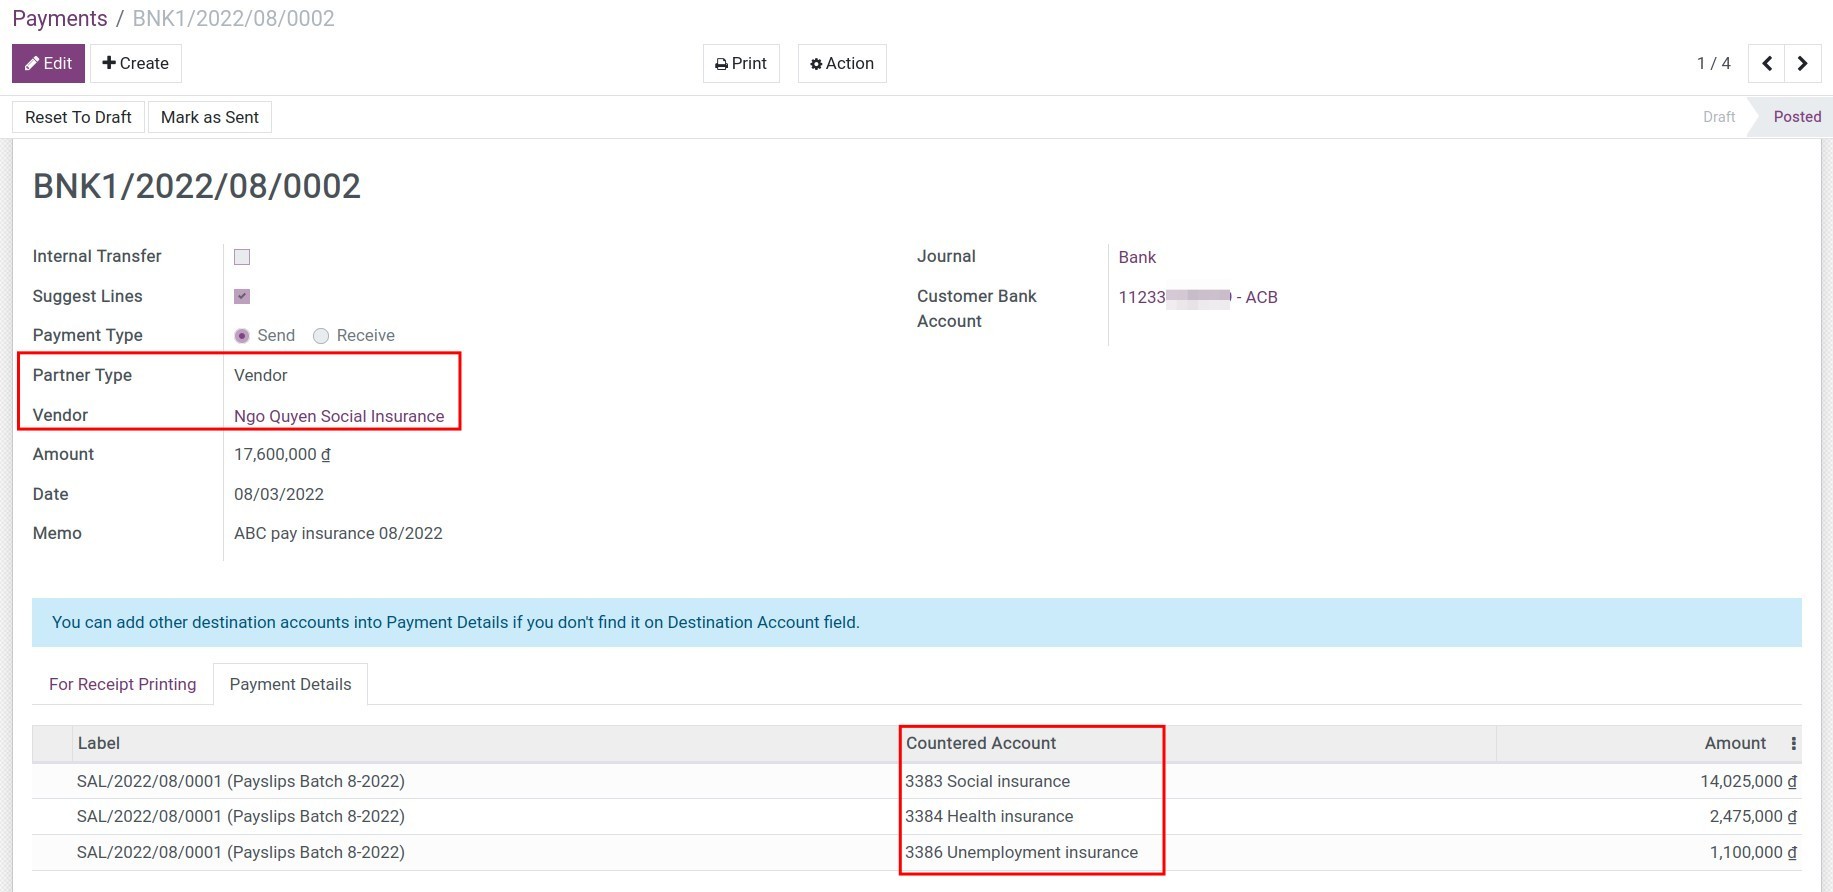
Partner Type: Vendor;
Vendor: Select the partner to create the payment;
Suggest Line: Check to enable the feature. At this time, the system will automatically search and suggest all the related journal entries to this partner in the payment details tab.
Memo: Enter the contents of the salary payment.
Note
The partner should be assigned to each accounting journal entry of the salary deductions. To assign partners, you make a declaration on the types of contributions register.
Click on the Confirm button to complete the payment and view the journal entries:

Note
The Outstanding payments account appearing in the payment entries will be replaced by Cash in banks account after the salary reconciliation.
See also
Related article
Salary reconciliation
Salary reconciliation
Salary reconciliation
When you need to create salary payment on the system
For the enterprises that have different permissions for each accounting position and multi-steps salary approval, you will need to create a payment on the system to perform each payment step. Then, when the bank accountant receives the statement document and enters it into the system, we will reconcile these two accounts with each other.
Requirements
This tutorial requires the installation of the following applications/modules:
Accounting & Finance
Payroll
To reconcile, navigate to Accounting ‣ Dashboard and follow the guide on Steps in the bank reconciliation process.
In addition, to reconcile the accounts that record payroll deductions such as Social Insurance, Health Insurance, Unemployment Insurance, Labor Union Fees, etc., navigate to Accounting ‣ Accounting ‣ Journal Items (to do this, you need to activate the developer mode):
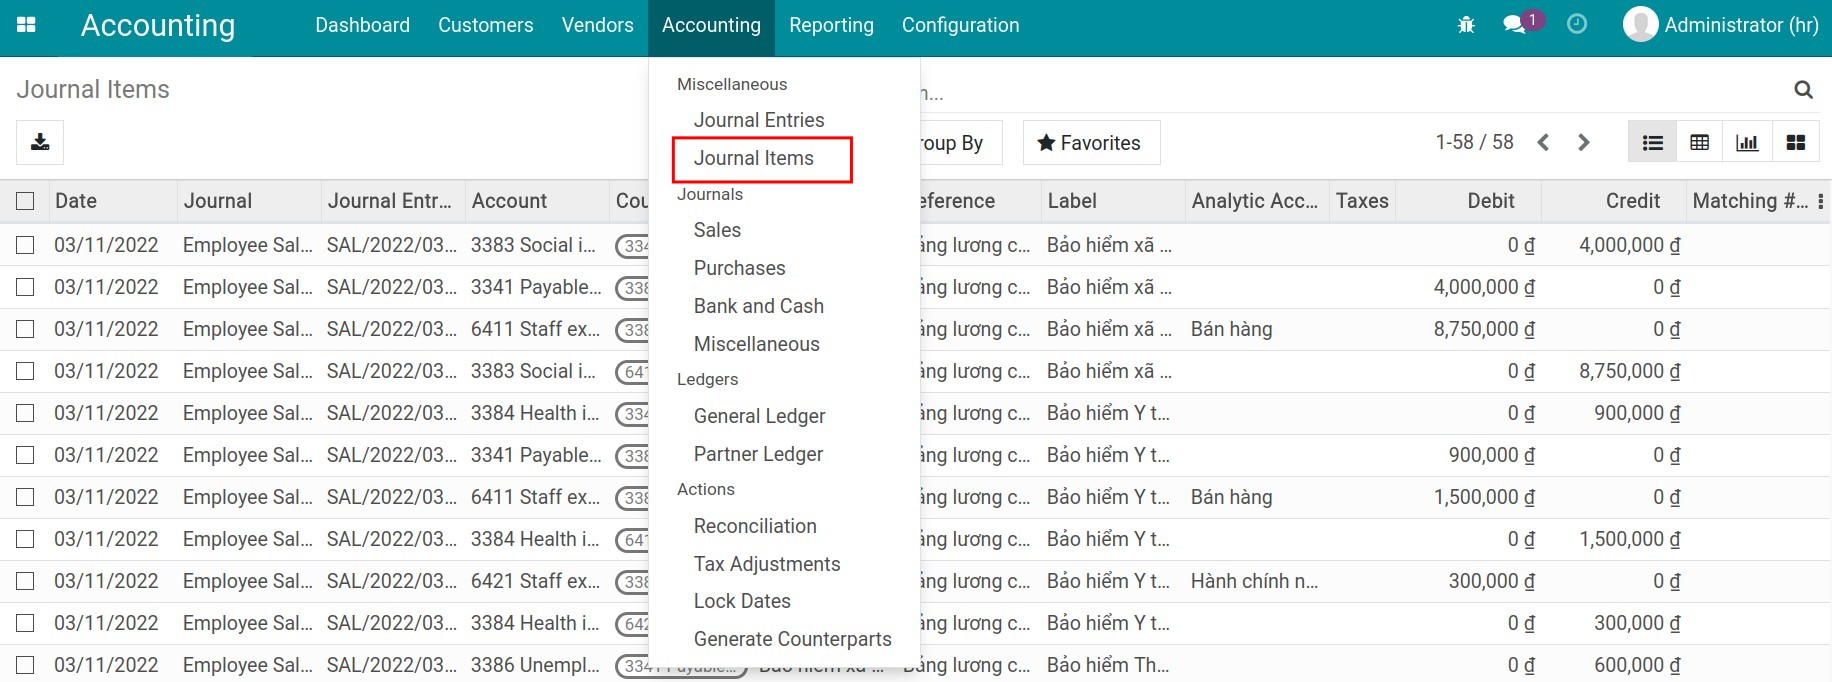
Use search tools to find the journal items of the accounts that need reconciling, select the corresponding items, press Action ‣ Reconcile:
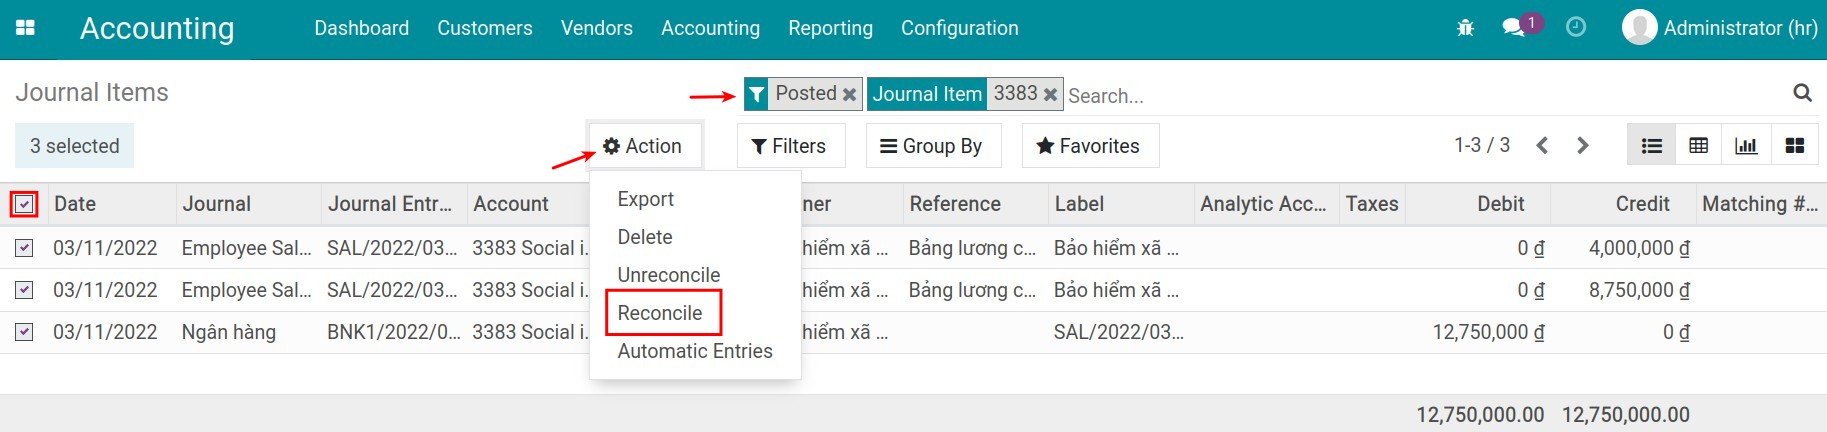
Press Reconcile or Validate All to manually reconciling the insurance and union accounts:
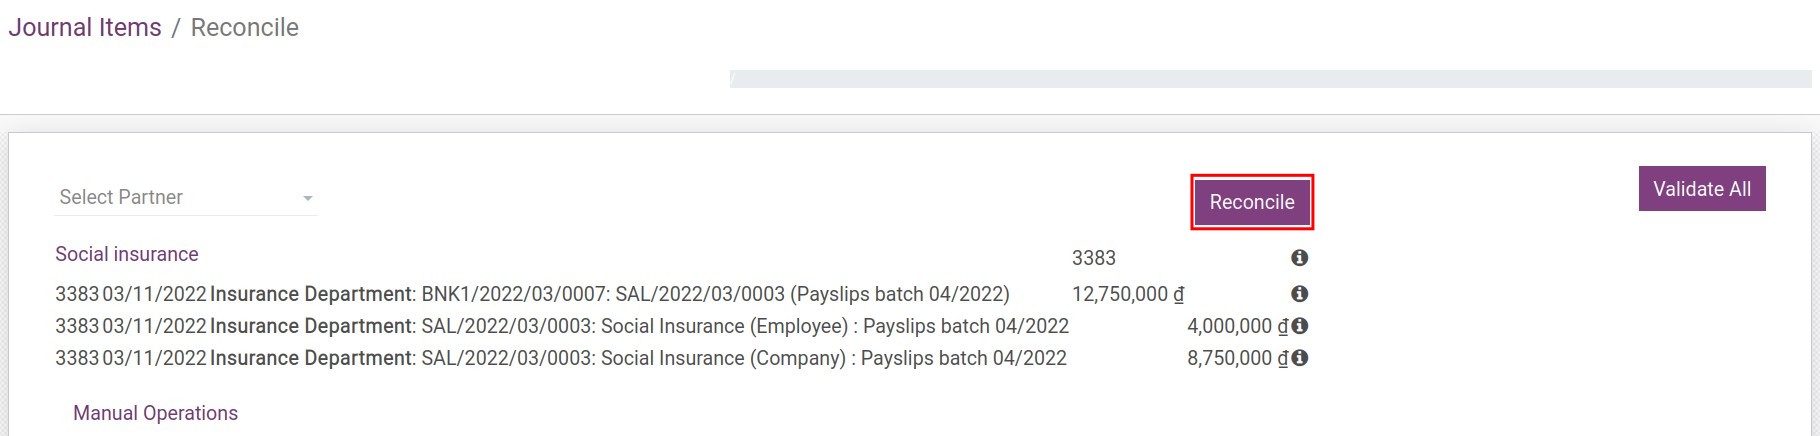
When you don’t need to create a salary payment on the system
For the enterprises with the small and medium accounting system, one accountant is in charge of many positions then the payment and the reconciliation can be done as follow:
Create a payslip and approve the payslip.
Use Internet banking for salary payment, and at the same time enter the bank statement with the same value as the Internet banking payment:
Navigate to Accounting ‣ Dashboard, select Create statement at the bank that you use to pay the salary.
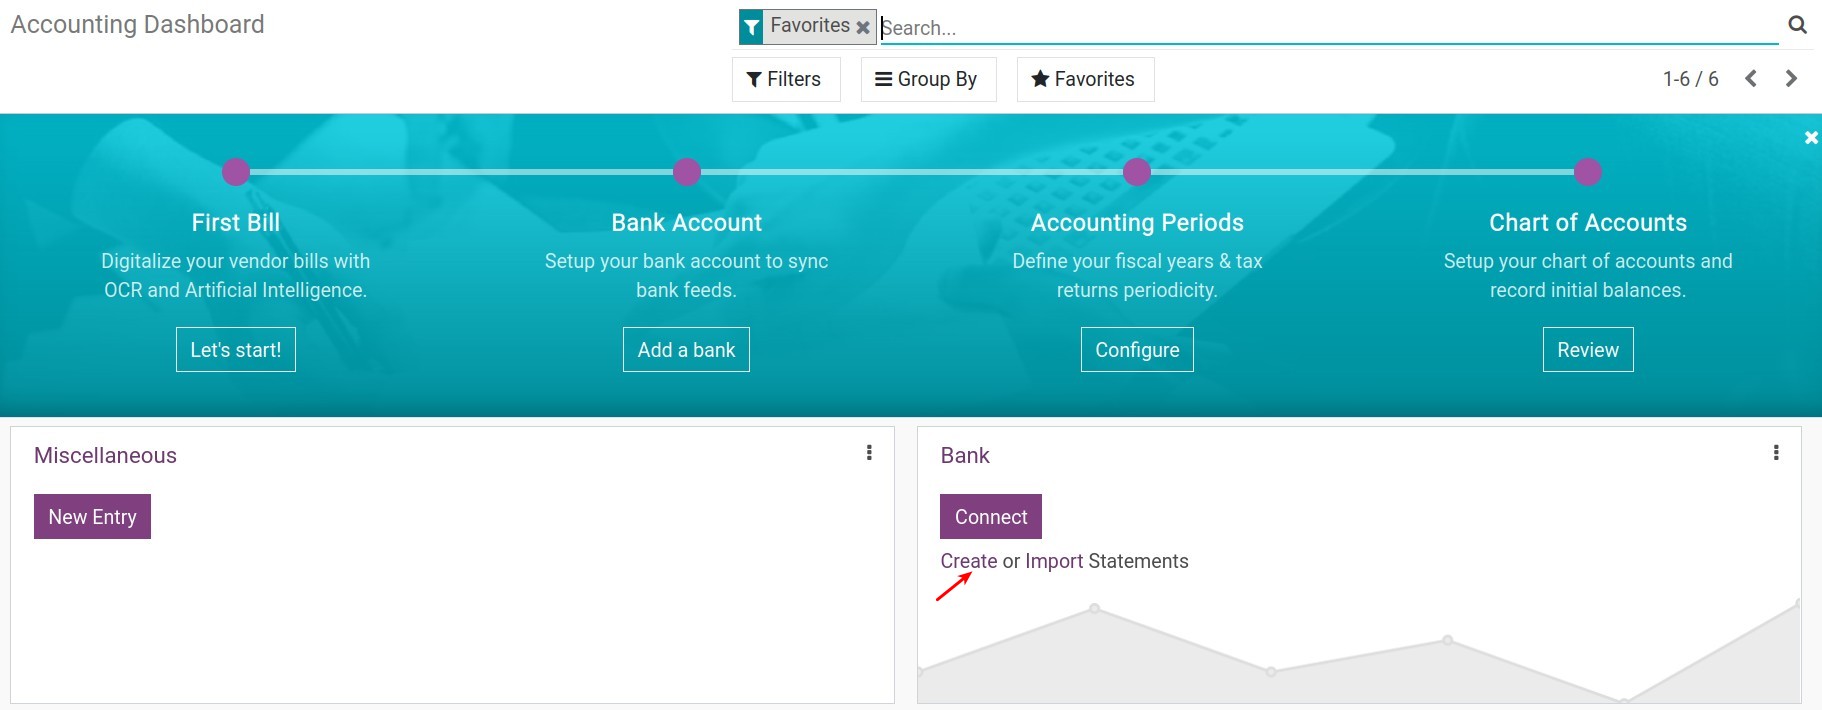
After entering the information in the statement, press Post.
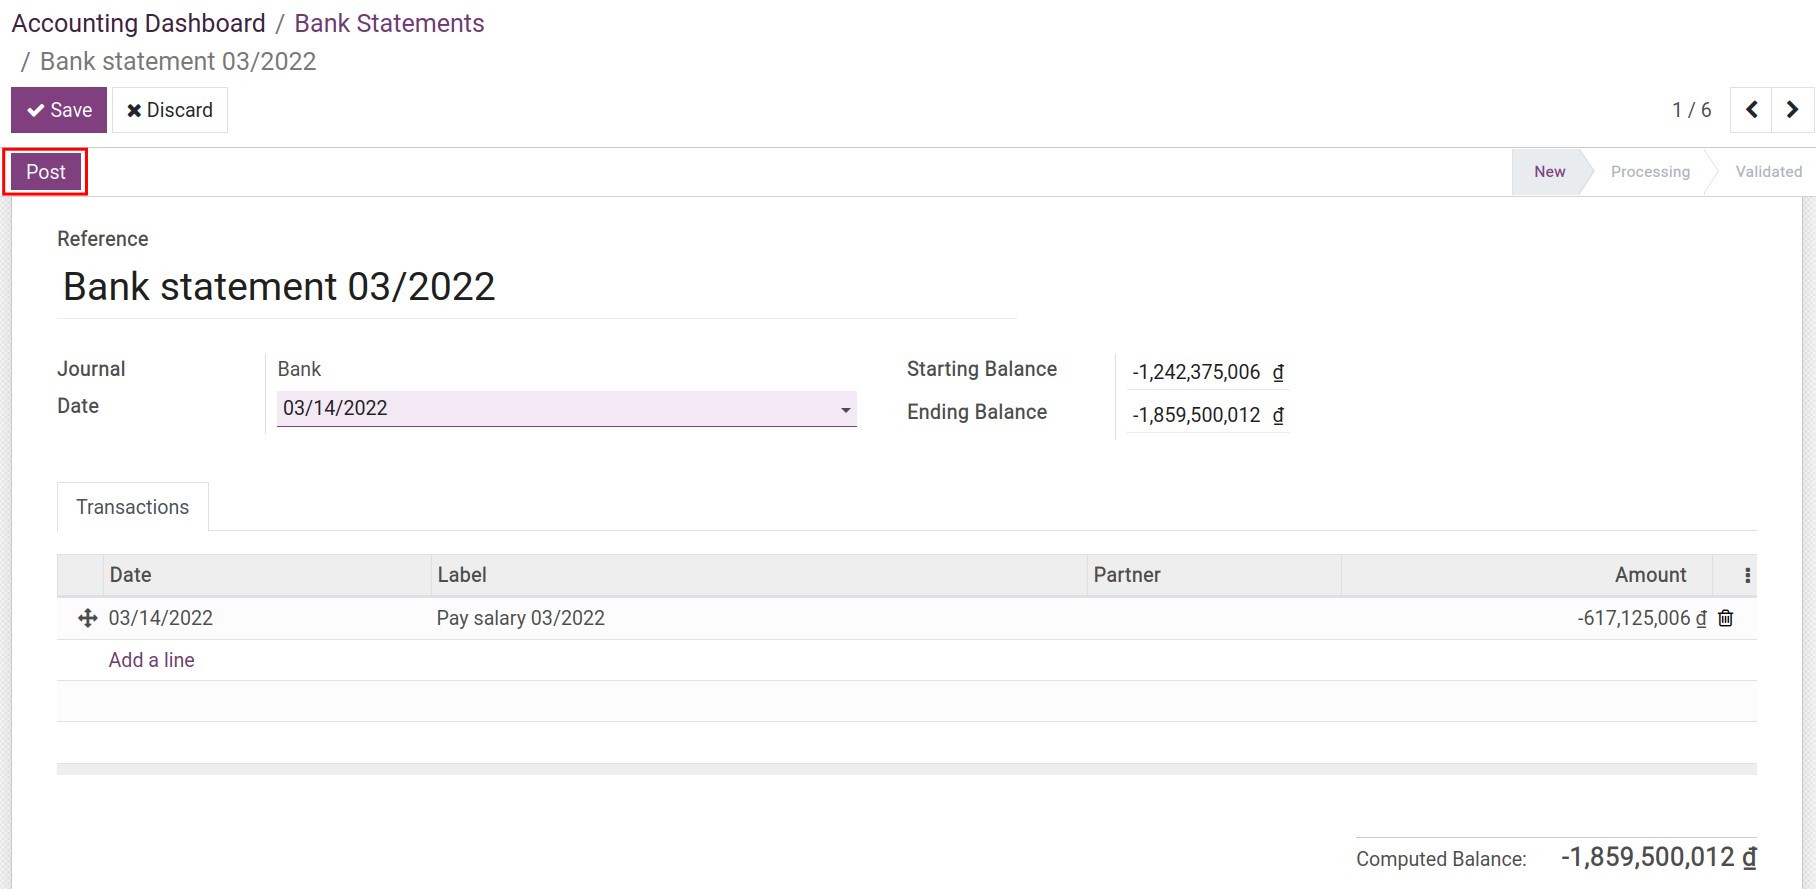
At the reconciliation view, you will reconcile the Bank Deposit account with the Employee Payable account:
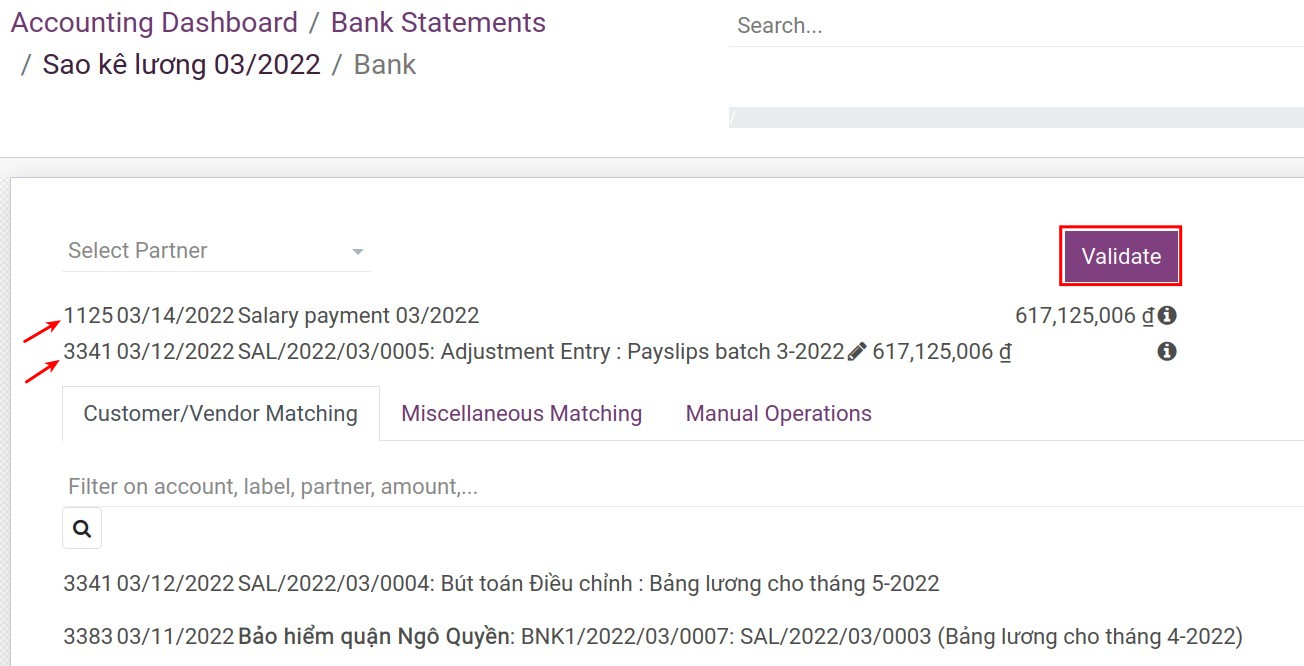
After reconciling, return to the reconciliation, you will be able to access the following salary payment entry:
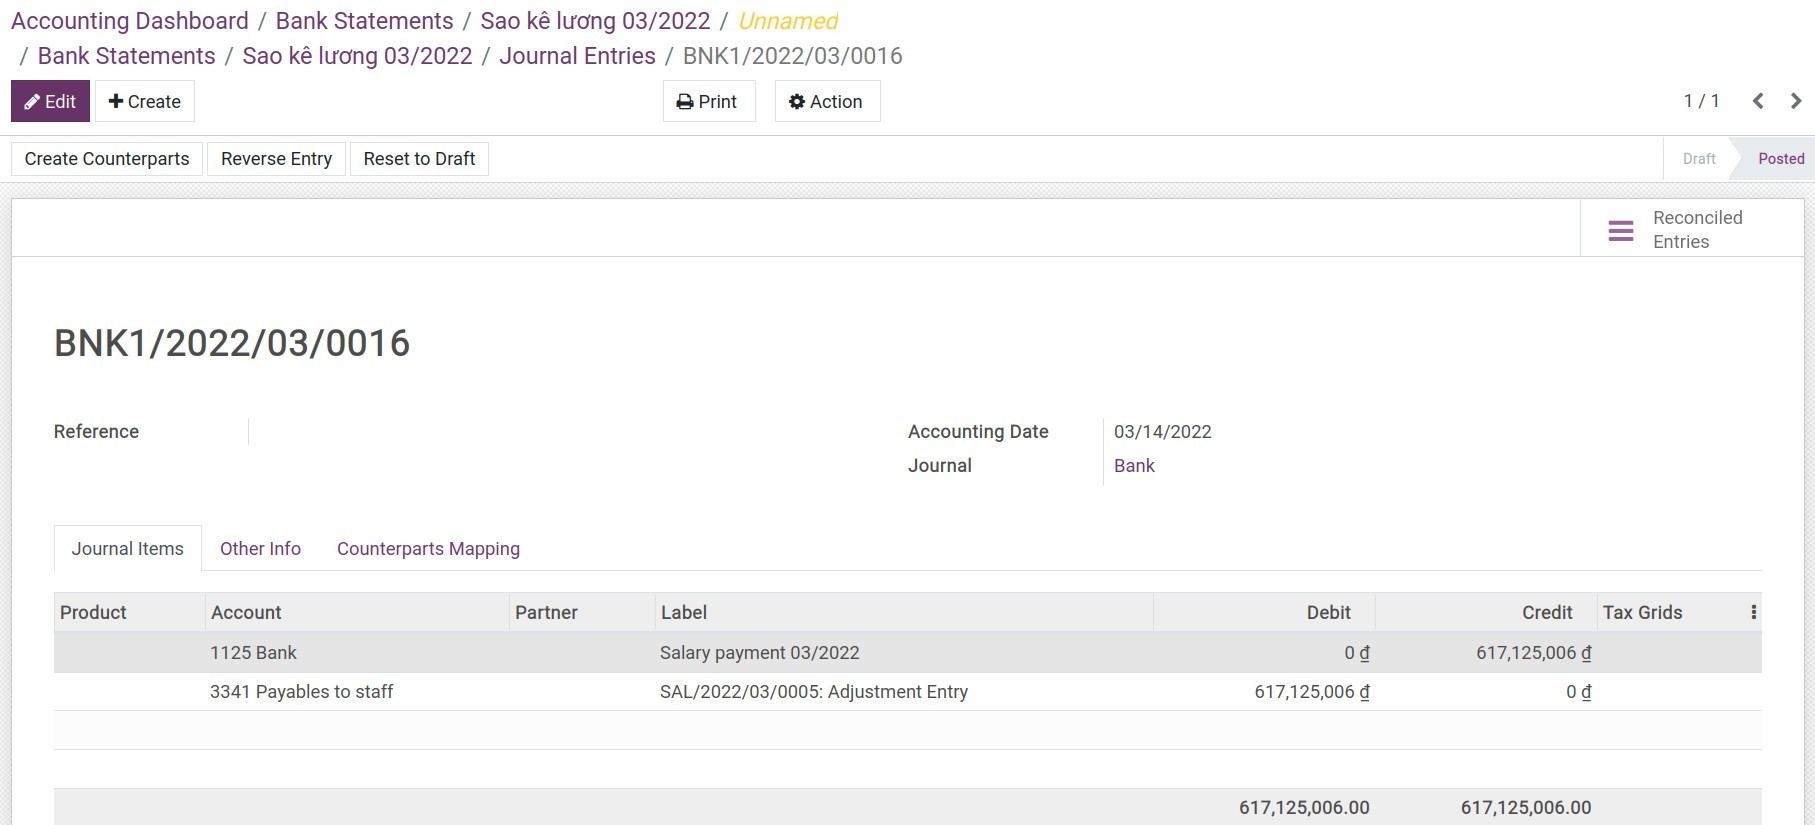
See also
Related article
Accounting configuration for salary rules
Accounting for landed cost
Accounting for landed cost
Overview
Managing and allocating the related costs in the process of purchasing is extremely important for businesses, due to it directly affects the cost of products as well as profits. To help the businesses manage this issue, Viindoo has developed and provided the feature of tracking and allocating the landed costs.
Requirements
This tutorial requires the installation of the following applications/modules:
Accounting & Finance
Purchase
Inventory
WMS Landed Costs
Configuration
To use this feature, you need to install the Landed costs module (stock_landed_costs). Navigate to Viindoo Apps, remove the default filter, and search for Landed costs to install:
Tip
If you have already installed the Viindoo Foreign Trade module, the Landed costs module would be installed automatically.
Supported landed costs allocation methods
The landed costs allocation feature in Viindoo supports five following split methods:
Equal: Total landed costs will be split equally to each product in receipt, without taking into consideration the quantity of each product.
By quantity: The landed cost of each product = Total landed costs * (Quantity of each product / Total quantity of products in the purchase order).
By current cost: The landed cost of each product = Total landed costs * (Total current cost of each product / Total purchasing cost).
By volume: The landed cost of each product = Total landed costs * (Total volume of each product / Total purchasing volume). The volume will be set at the product form - tab Inventory.
By weight: The landed cost of each product = Total landed costs * (Total weight of each product / Total purchasing weight). The weight will be set at the product form - tab Inventory.
Accounting for landed cost at the receipt of the goods
Let’s do the following example for a better understanding of those allocation methods:
Purchase order:
100 Nippon (blue), unit price 500.000 VND;
400 Nippon (silver), unit price 550.000 VND;
100 Nippon (pink), unit price giá 500.000 VND.
Nippon (blue): weight 10kg, 15 liters.
Nippon (silver): weight 15kg, 20 liters.
Nippon (pink): weight 12kg, 18 liters.
The shipping cost for this purchase order: 60.000.000 VND.
At the moment, these products are out of stock.
Unit price does not include VAT.
Here are the steps to follow:
Navigate to Purchase ‣ Orders to create and confirm a purchase order:
After that, confirm the linked Receipt: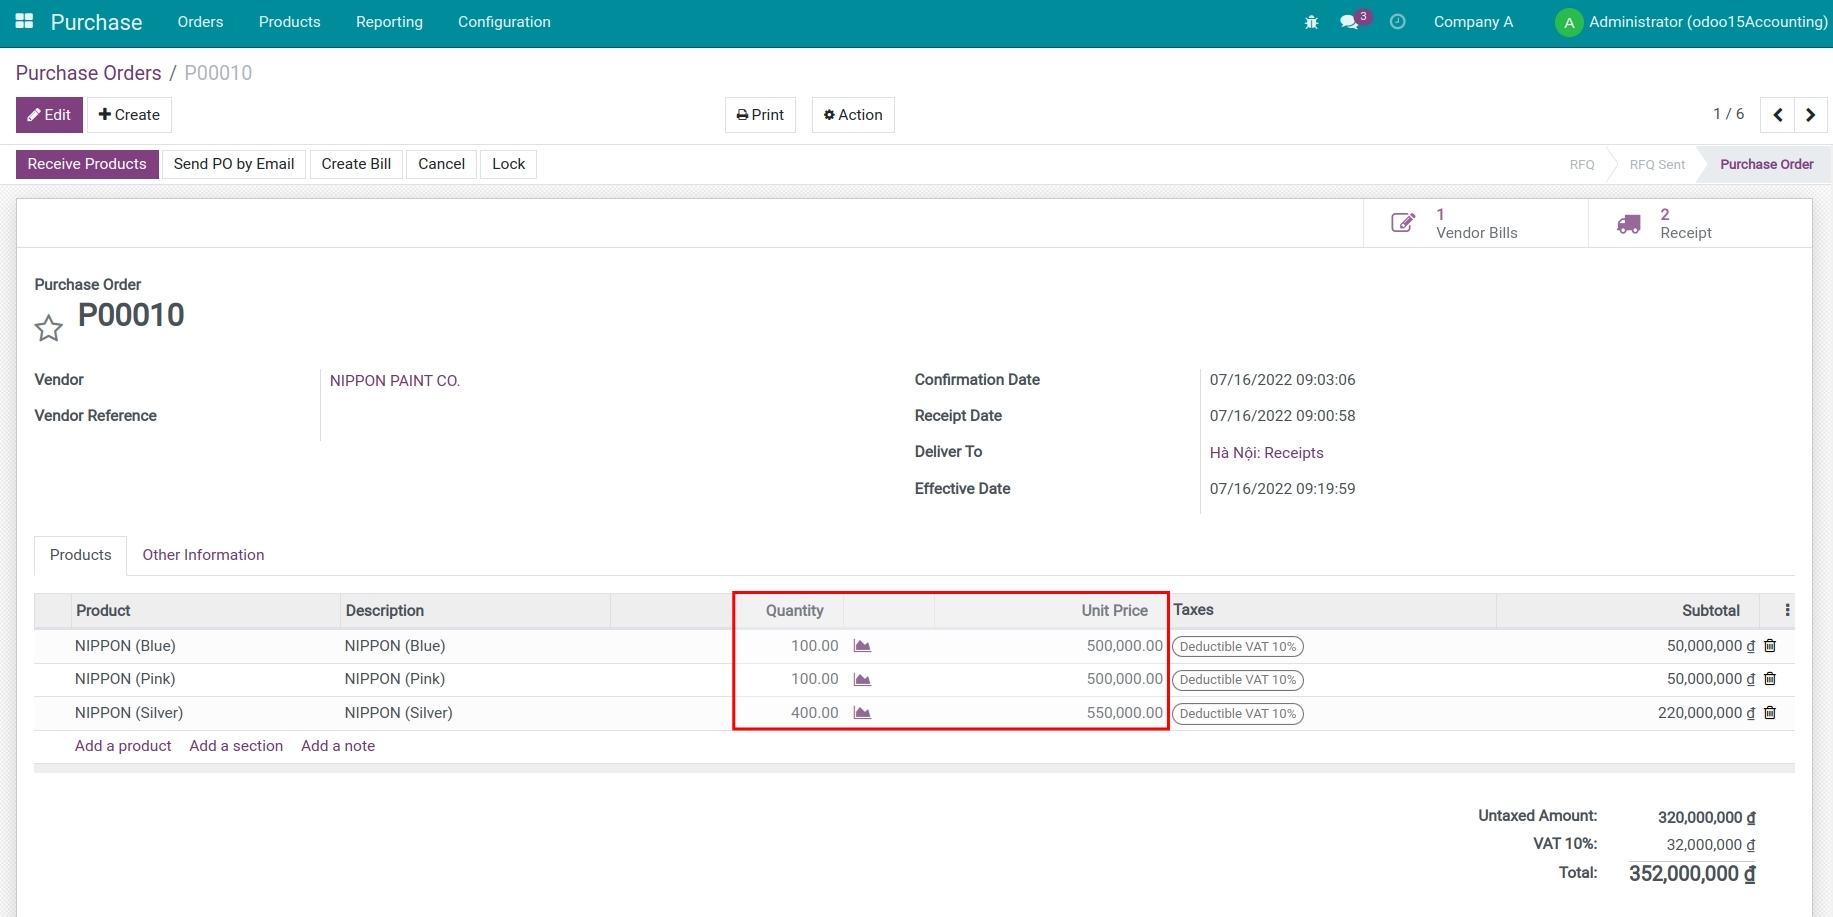
Before creating the purchase order, you need to navigate to Purchase ‣ Products ‣ Products to create the corresponding products. To record the weight and volume of these products, navigate to tab Inventory and add the information: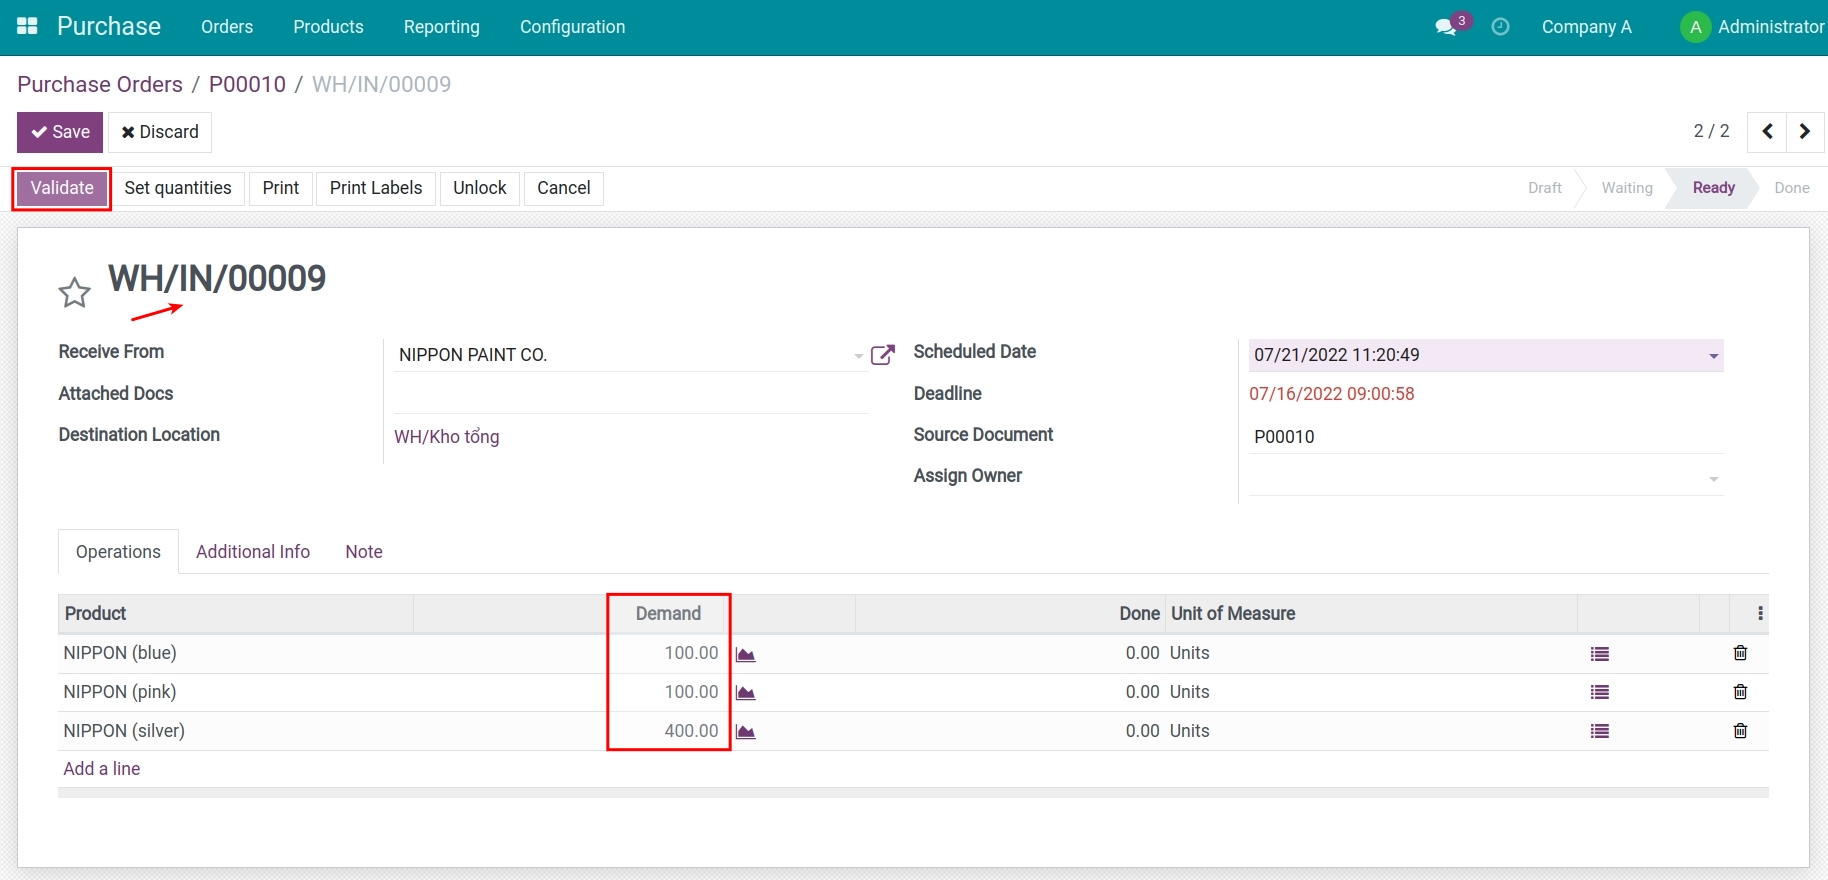
Tip
You don’t need to record this information if the chosen allocation method is not By Volume or By Weight.
Navigate to Accounting ‣ Vendors ‣ Bills to record the bill of shipping cost:
To record this cost, you need to create a product named Landed costs:
Product type: Service;
Product Category: Expenses;
Vendor bills control policy: On ordered quantities;
Is a Landed cost: Enabled;
Default split method: Choose a default allocation method for this Landed cost product.
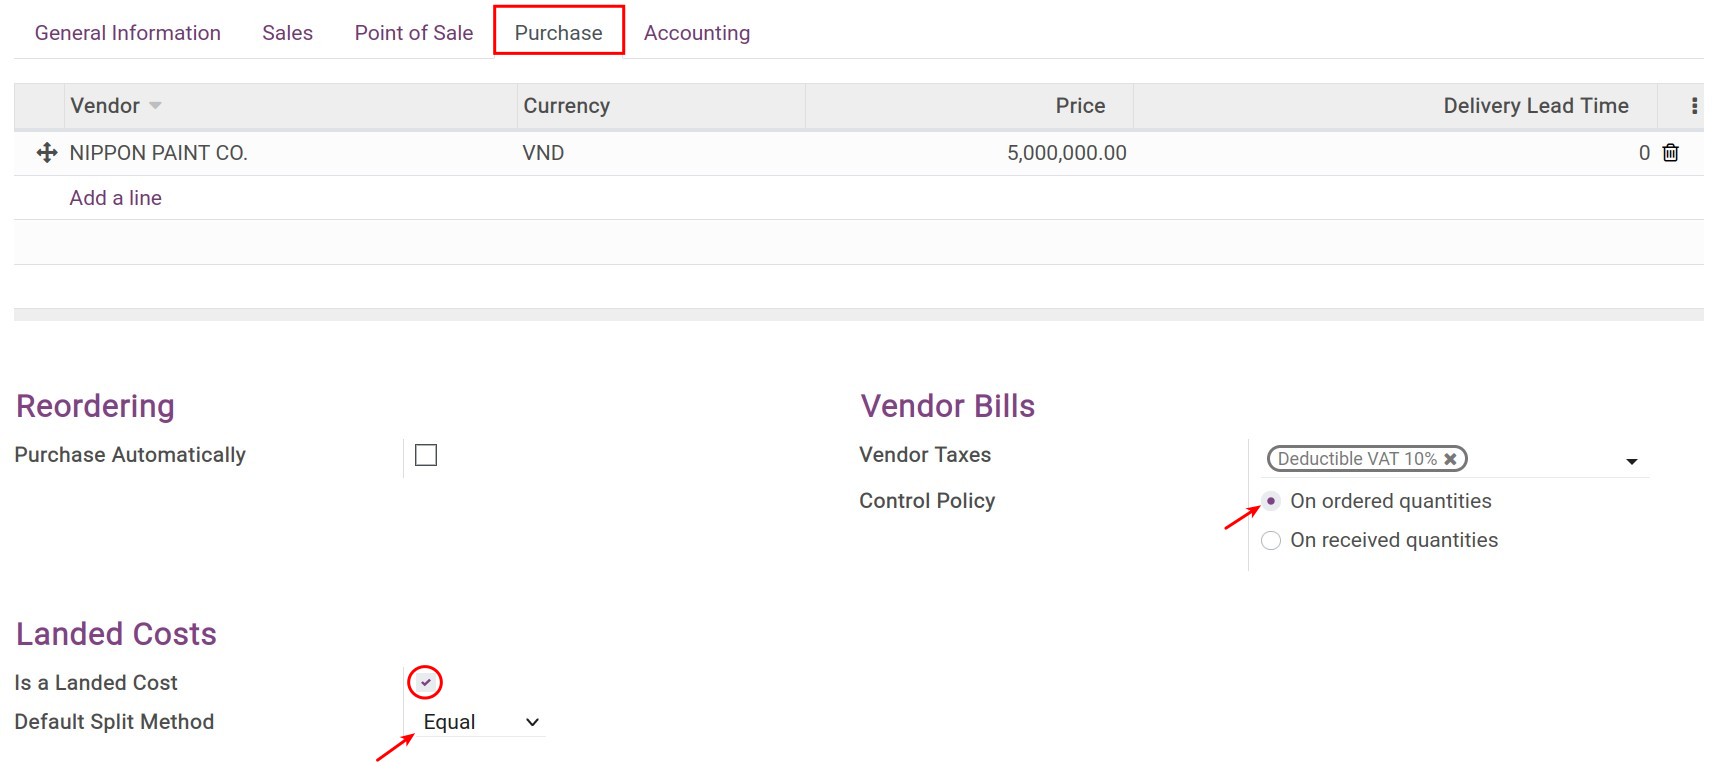
Press Create Landed Costs right on the above bill or go to Inventory ‣ Operations ‣ Laned costs ‣ Create to create a landed cost allocation document:
Add information for the following fields: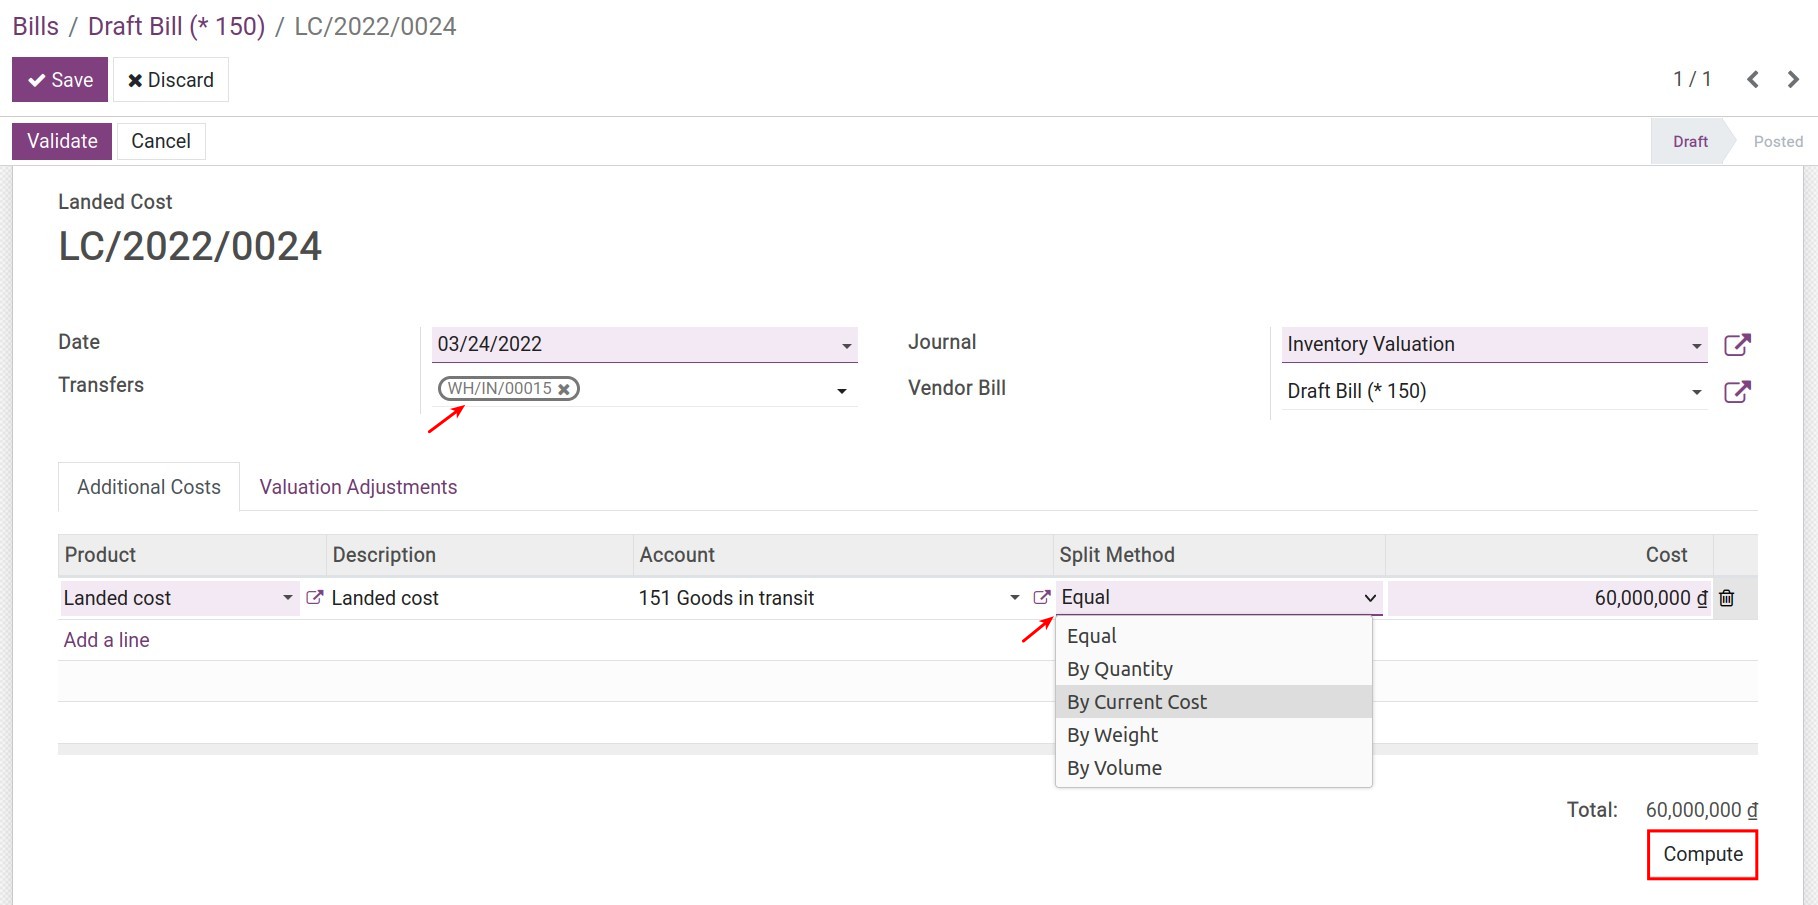
Transfer: Choose the corresponding receipt.
Split Method: A default split method is suggested but you can choose another allocation method.
Press Compute.
Move to tab Valuation Adjustments to see the result:
Equal
The allocation value of each product = 60.000.000 VND / 3 = 20.000.000 VND.
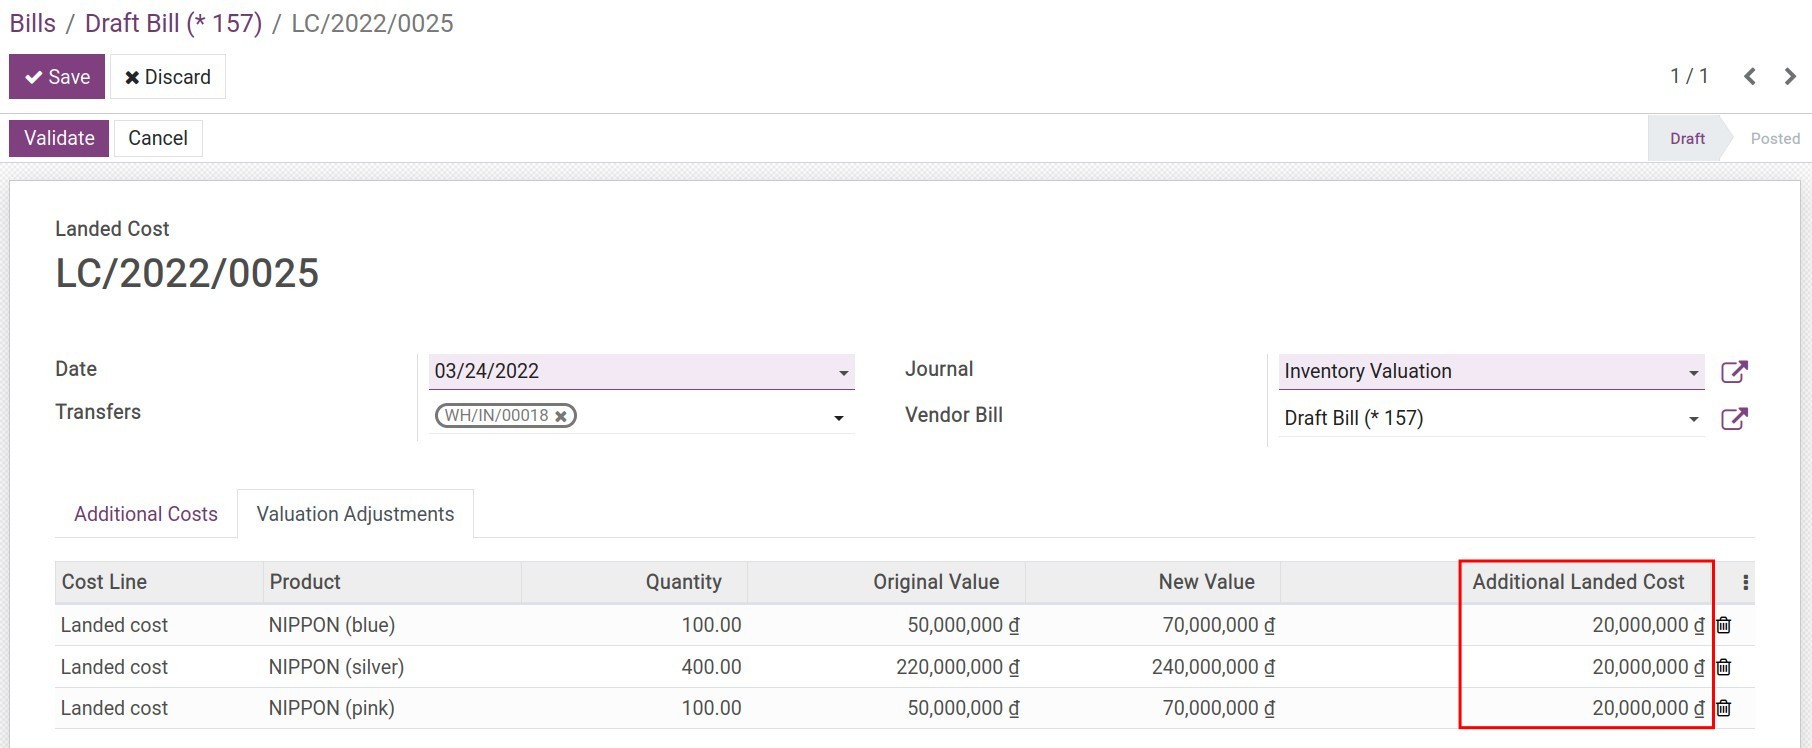
By quantity
The allocation value of each product is:
Nippon (blue) = 60.000.000 * (100 / (100 + 400 + 100)) = 10.000.000 VND
Nippon (silver) = 60.000.000 * (400 / (100 + 400 + 100)) = 40.000.000 VND
Nippon (pink) = 60.000.000 * (100 / (100 + 400 + 100)) = 10.000.000 VND
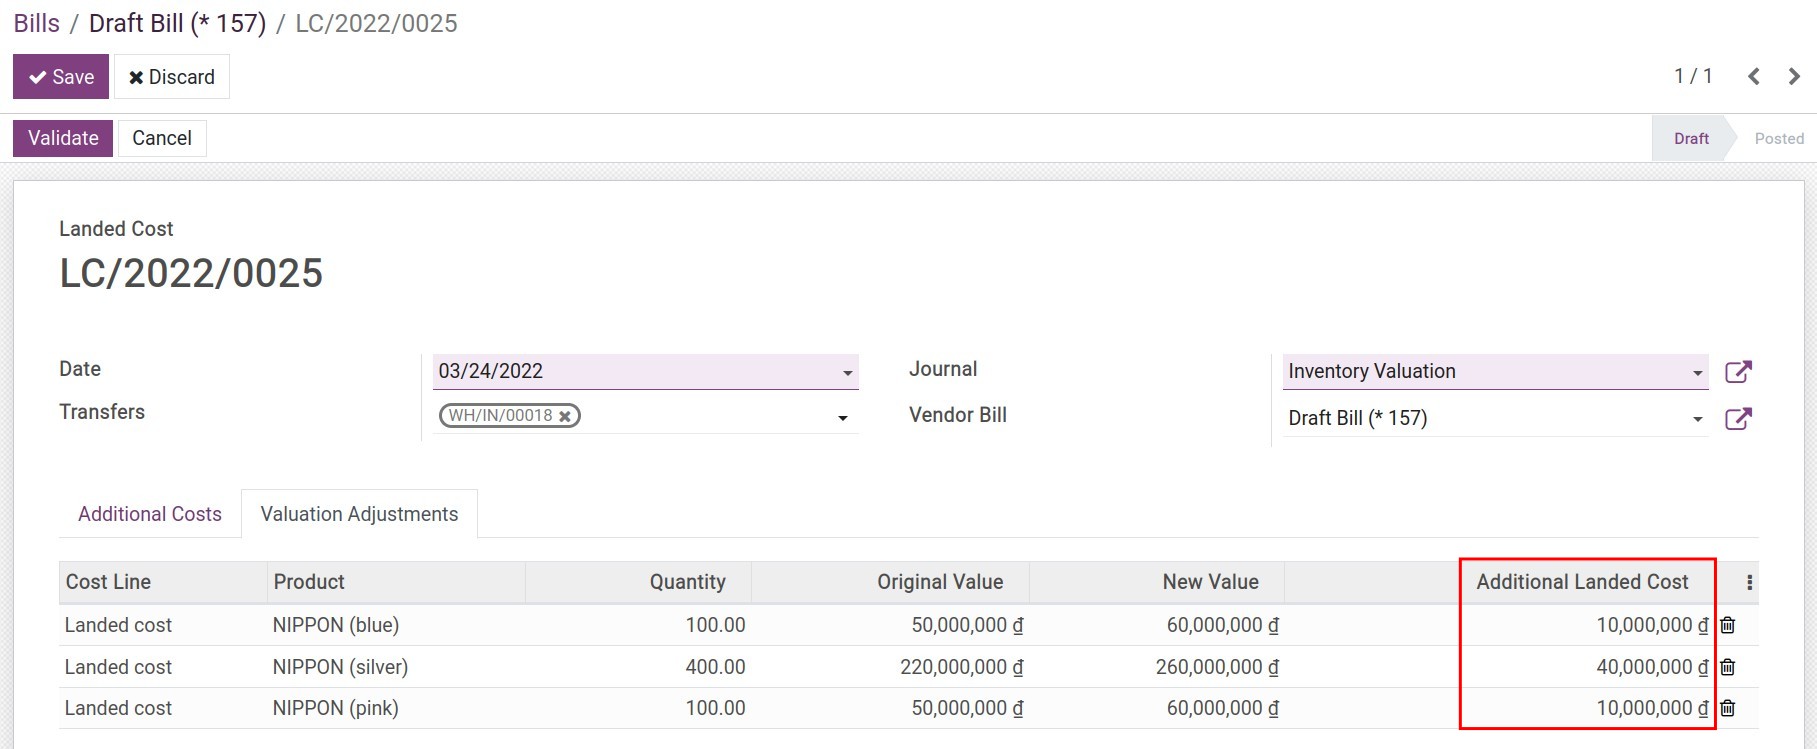
By current costs (until the landed cost allocation moment)
The allocation value of each product is:
Nippon (blue) = 60.000.000 * (50.000.000 / (50.000.000 + 220.000.000 + 50.000.000)) = 9.375.000 VND
Nippon (silver) = 60.000.000 * (220.000.000 / (50.000.000 + 220.000.000 + 50.000.000)) = 41.250.000 VND
Nippon (pink) = 60.000.000 * (50.000.000 / (50.000.000 + 220.000.000 + 50.000.000)) = 9.375.000 VND

By weight
The allocation value of each product is:
Nippon (blue) = 60.000.000 * (10 * 100) / ((10 * 100) + (15 * 400) + (12 * 100)) = 7.317.074 VND
Nippon (silver) = 60.000.000 * (15 * 400) / ((10 * 100) + (15 * 400) + (12 * 100)) = 43.902.440 VND
Nippon (pink) = 60.000.000 * (12 * 100) / ((10 * 100) + (15 * 400) + (12 * 100)) = 8.780.486 VND
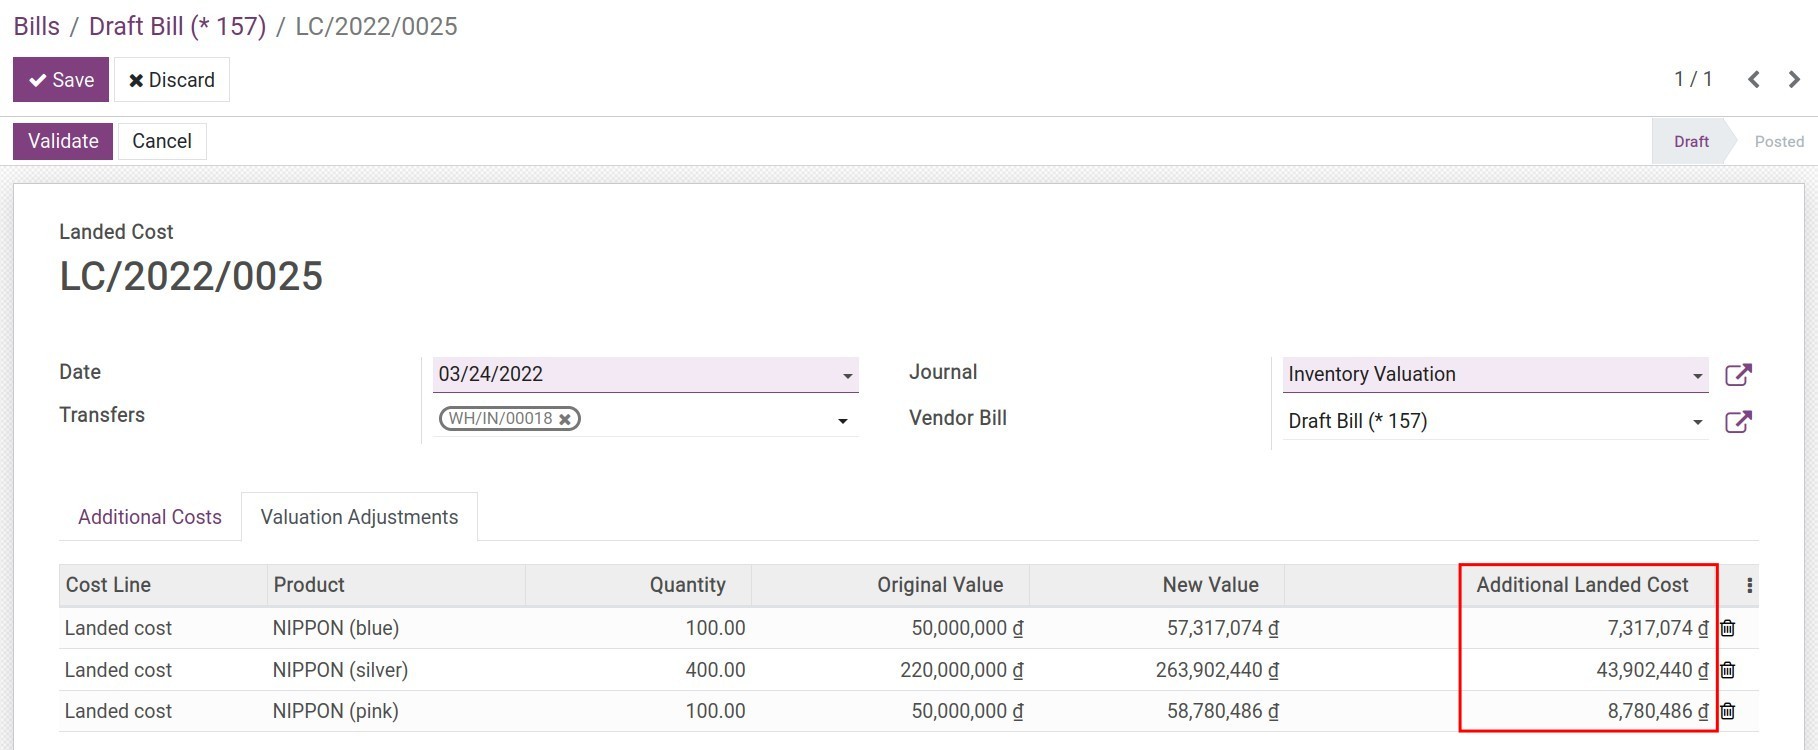
By volume
The allocation value of each product is:
Nippon (blue) = 60.000.000 * (0.015 * 100) / ((0.015 * 100) + (0.02 * 400) + (0.018 * 100)) = 7.964.602 VND
Nippon (silver) = 60.000.000 * (0.02 * 400) / ((0.015 * 100) + (0.02 * 400) + (0.018 * 100)) = 42.477.877 VND
Nippon (pink) = 60.000.000 * (0.018 * 100) / ((0.015 * 100) + (0.02 * 400) + (0.018 * 100)) = 9.557.521 VND
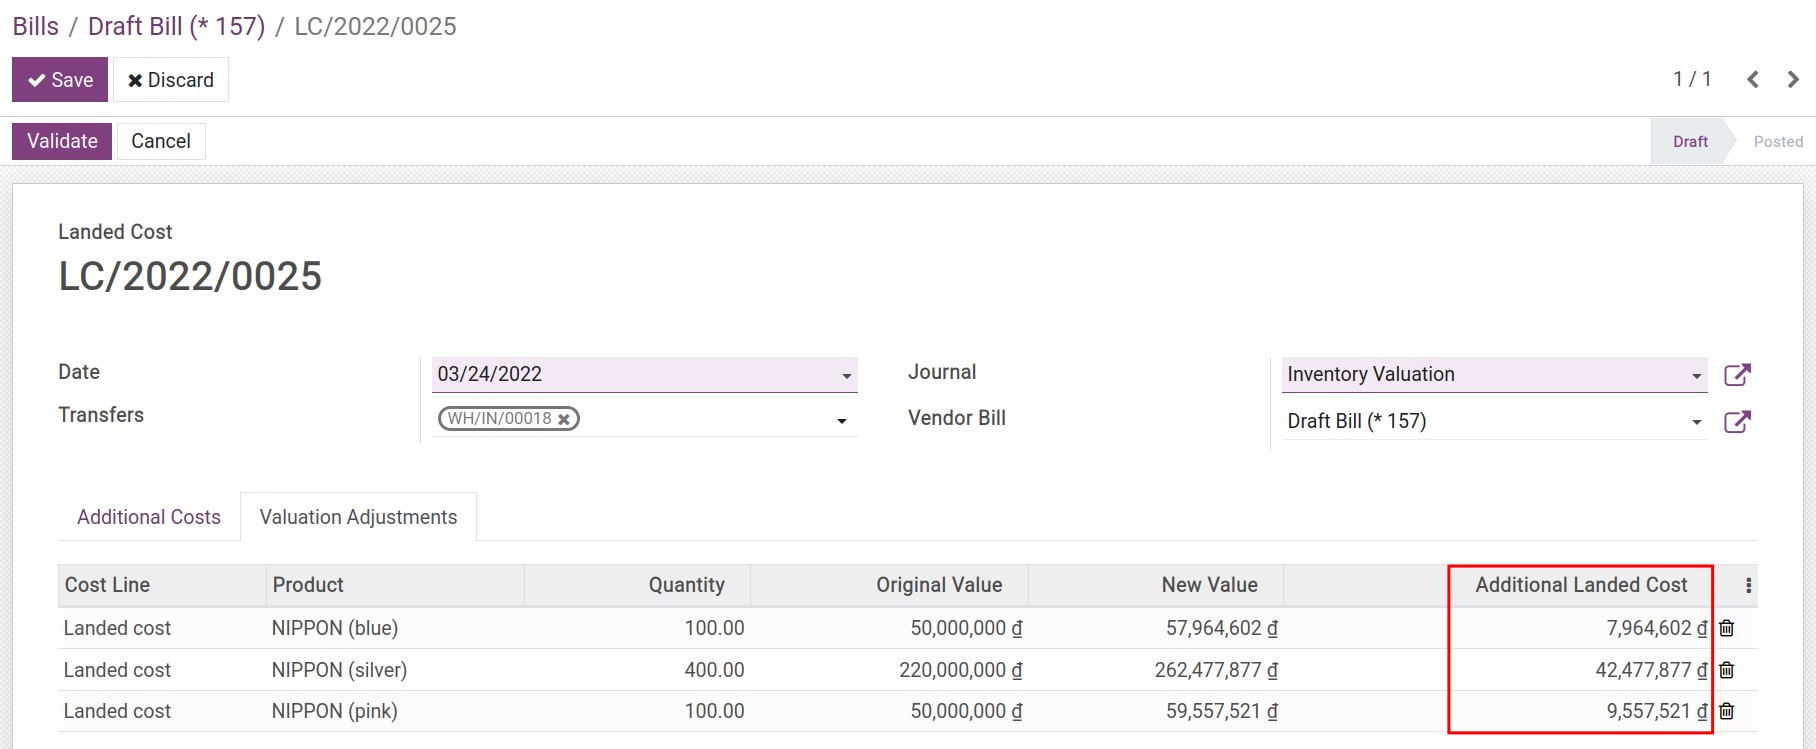
After pressing Confirm, on the allocation document view, click on the link displayed in the Journal Entry field to see the landed cost entry:

Accounting for landed cost for sold products
The above example is an ideal scenario when landed costs are recorded as soon as products arrive. In reality, landed costs can be recorded after a few days, even months later, when some sales orders and deliveries had been made. In this case, the business needs to record and allocate the landed costs for sold products as well. iSuite Accounting app will assist you in performing this operation.
Using the previous example, but now you receive the landed costs bill after selling and delivering 10 liters of Nippon (blue). You need to do as follows:
Navigate to Sales ‣ Orders to create and confirm a sales order for 10 Nippon (blue). Once done, confirm the linked delivery:
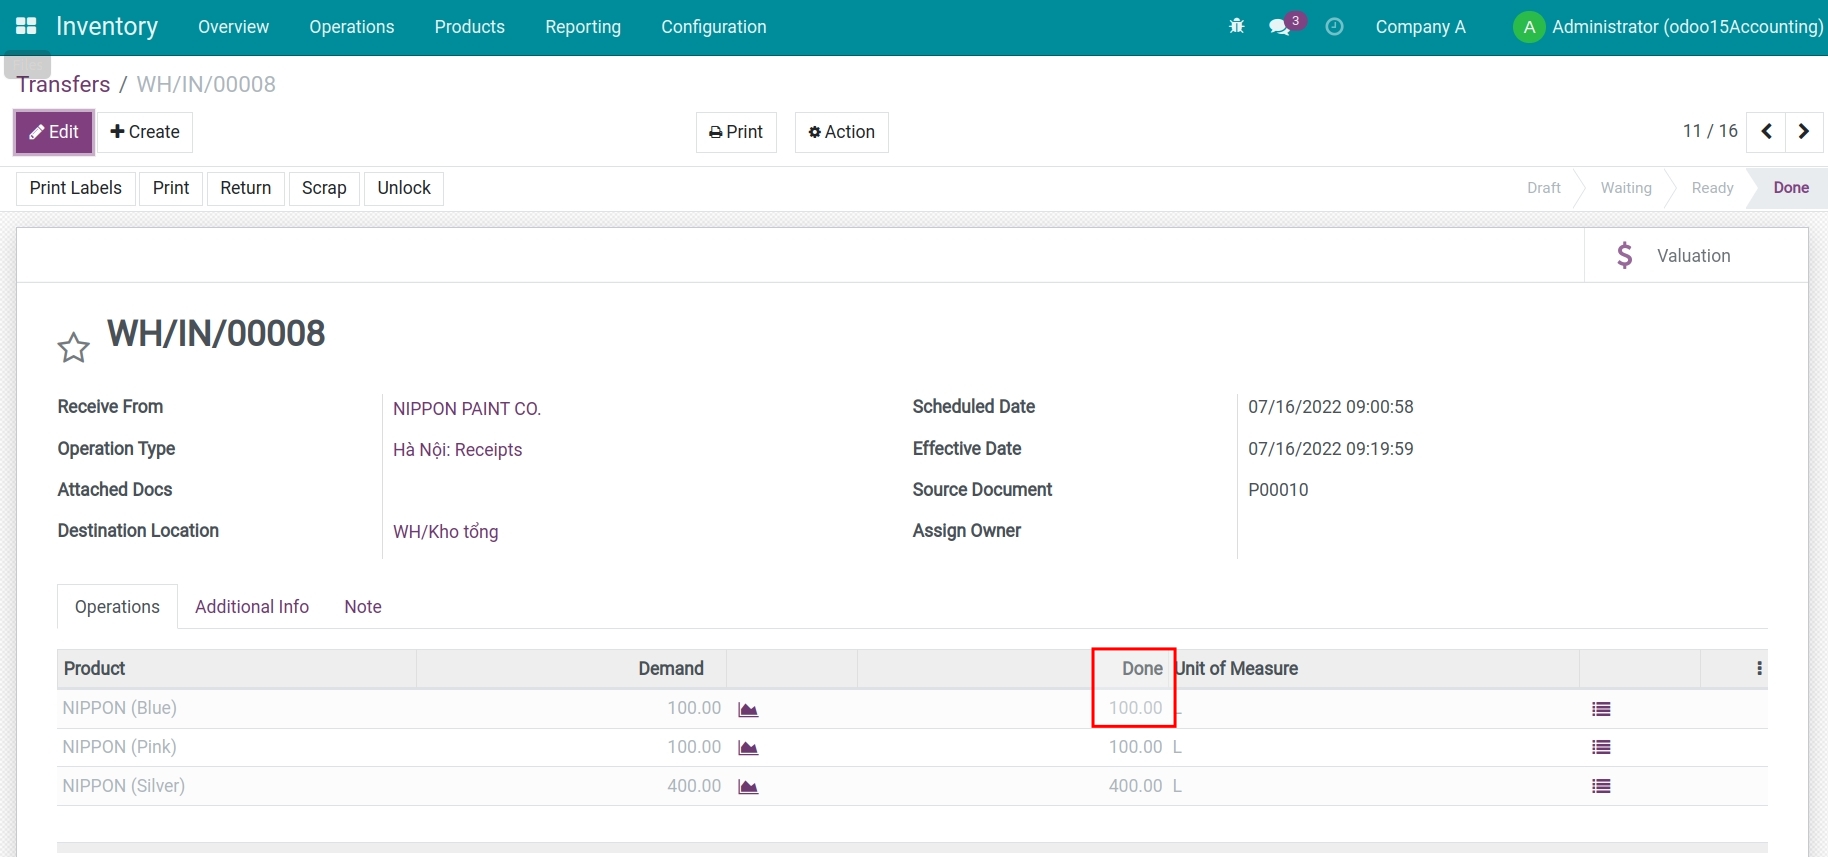
And when you receive the bill of landed cost, the adjustment entries recording costs for the 10 sold products will be generated automatically.
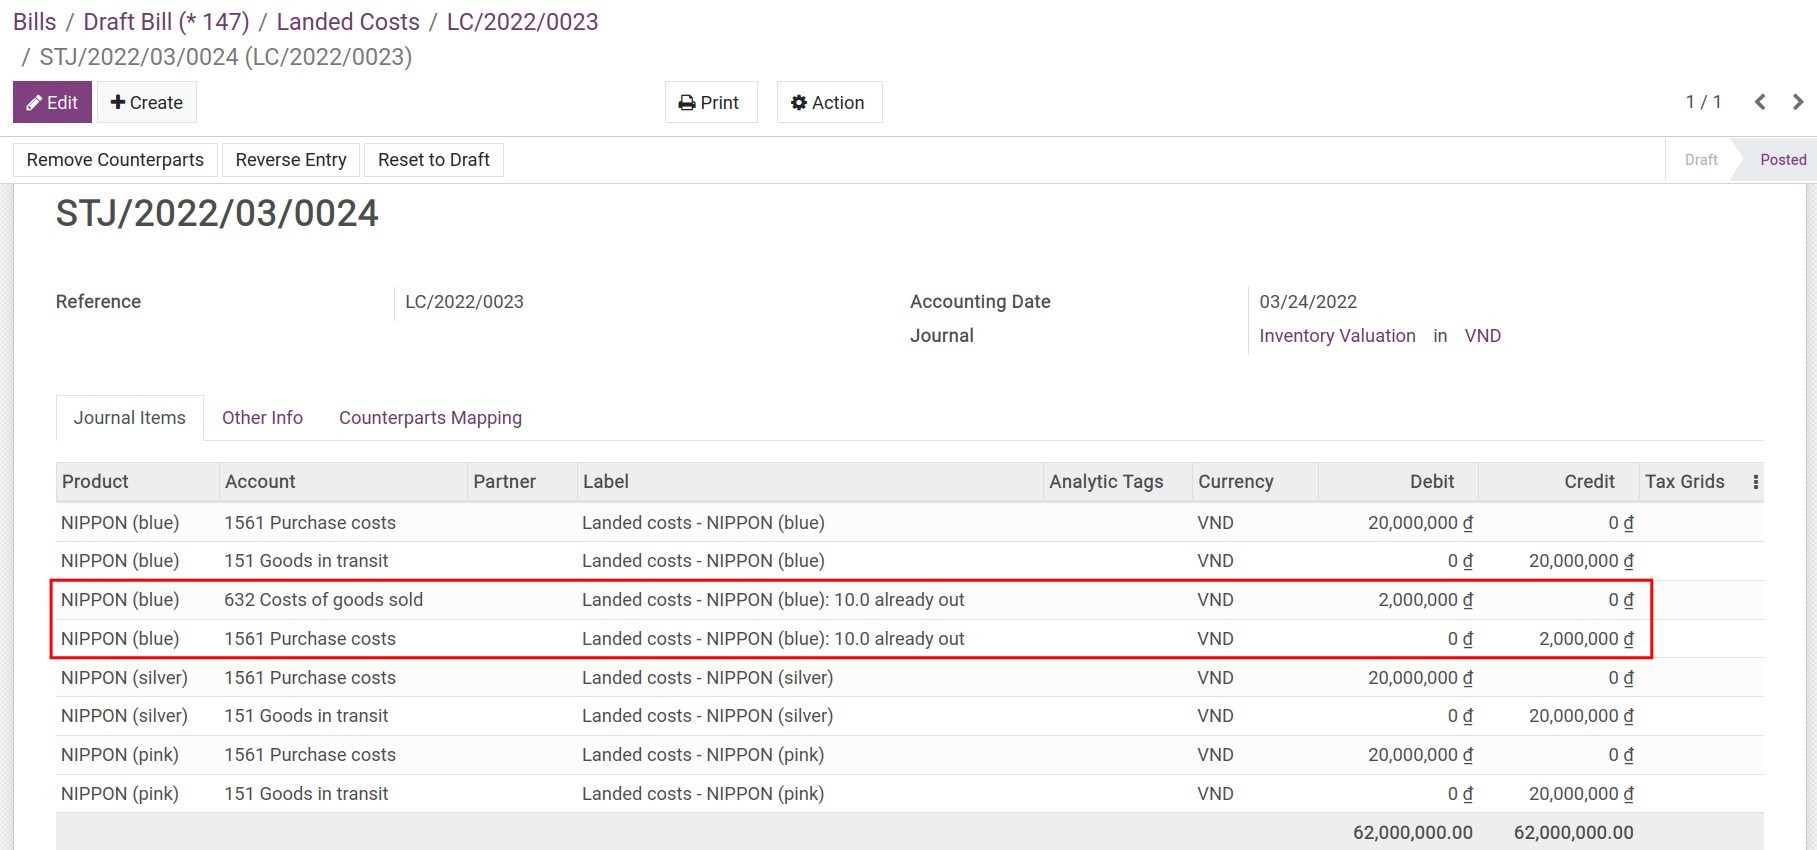
Note
You could use this feature to split manufacturing costs (labor costs, general manufacturing costs, etc.) for manufacturing orders as well.
To check the recorded landed costs allocated on the product cost, navigate to Inventory ‣ Reporting ‣ Inventory Valuation.
See also
Related article
Accounting for Stock Valuation
Accounting for Inventory Adjustment
Accounting for Stock Valuation
Accounting for Stock Valuation
For many businesses, Inventory is one of the most valuable assets, therefore managing the quantity and value of inventory is an important task.
In Viindoo software, Inventory Valuation is the configuration of the following two fields on the Product Categories:
Costing Method: A method to calculate the value of your goods.
Inventory Valuation: Record the inventory value in accounting books.
Requirements
This tutorial requires the installation of the following applications/modules:
Accounting & Finance
Purchase
Sales
Inventory
Costing Method
Based on the characteristics of production and business, the business chooses to apply the appropriate method of the following four costing methods:
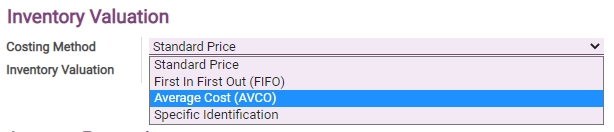
Standard Price
You need to add the price manually on each product.
When there is a price change, you must also update the price accordingly.
The value of outgoing and incoming inventories calculated at standard prices is not affected by the cost price.
Inventory value = Quantity on hand x Standard price.
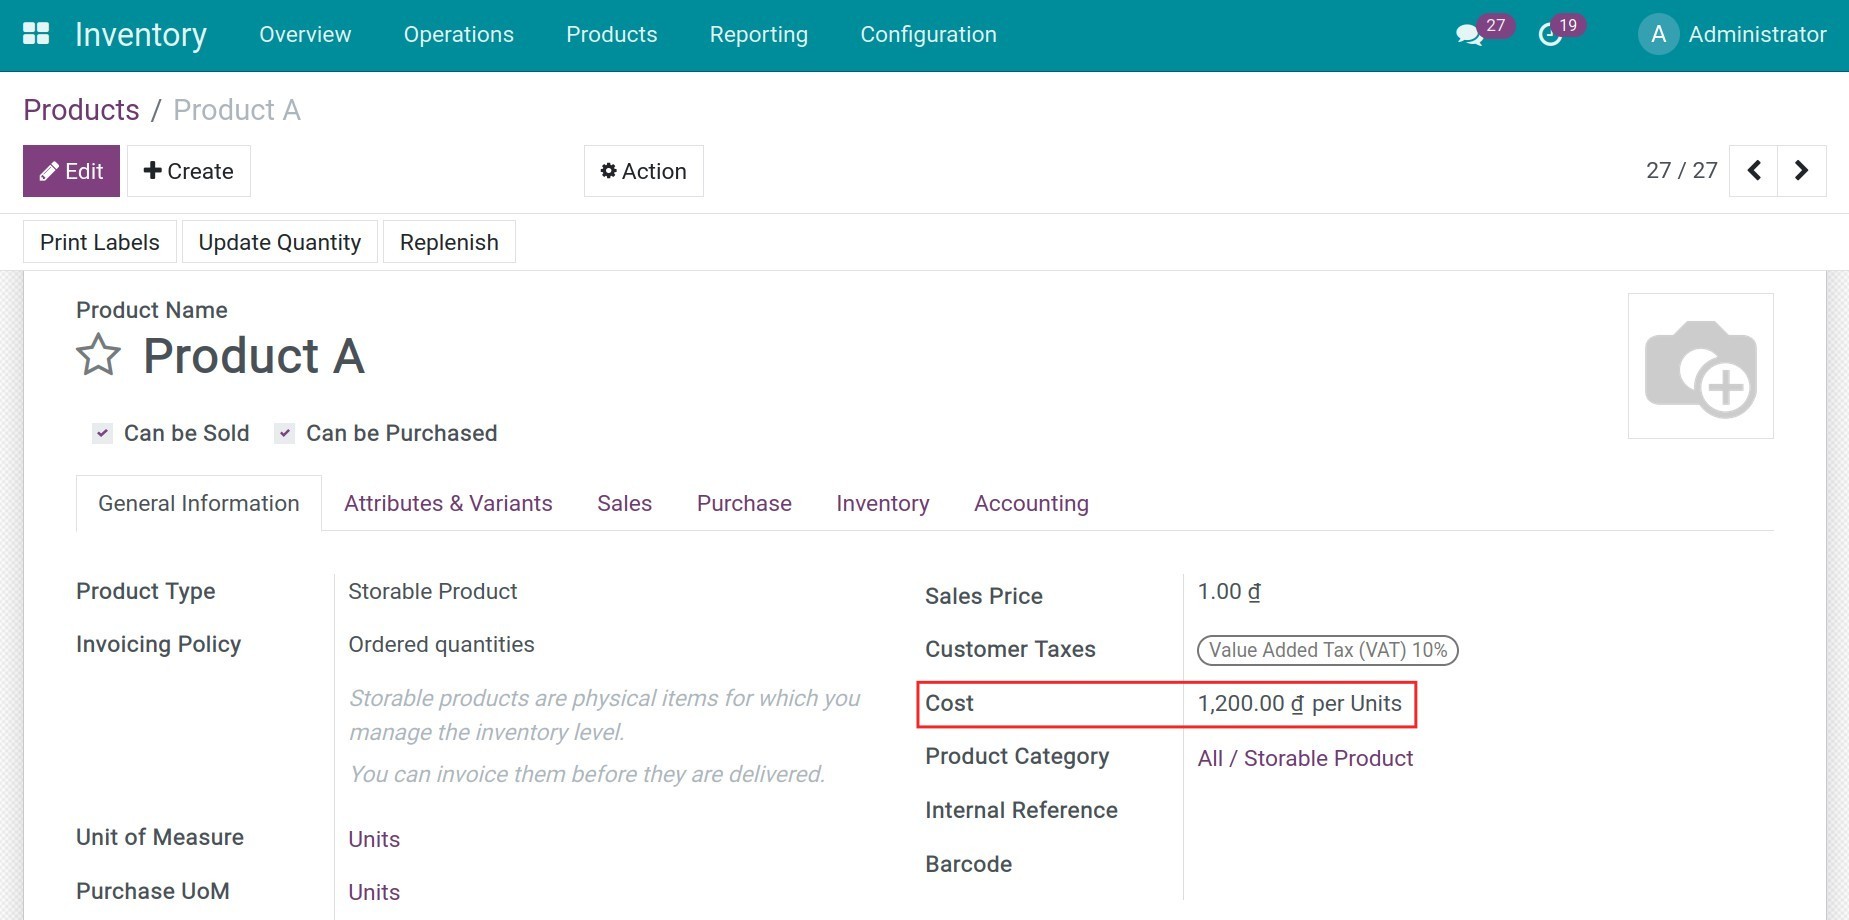
Date | Operation | Quantity on hand | Input/Output value | Inventory value | Unit cost |
|---|---|---|---|---|---|
Opening stock | 0 | 0 | 1200 | ||
01/12/2021 | Buy 10 units of product A - Price per unit: 1000đ | 10 | +10 x 1000 | 10 x 1200 | 1200 |
10/12/2021 | Buy 10 units of product A - Price per unit: 1500đ | 10 | +10 x 1500 | 20 x 1200 | 1200 |
11/12/2021 | Sell 05 units of product A | 05 | -05 x 1200 | 15 x 1200 | 1200 |
First In First Out (FIFO)
The value of the outgoing stock is calculated based on the value of the first-in or the first-manufactured goods continuously until they are sold out.
Date | Operation | Quantity on hand | Input/Output value | Inventory value | Unit cost |
|---|---|---|---|---|---|
Opening stock | 0 | 0 | 0 | ||
01/12/2021 | Buy 10 units of product A - Price per unit: 1000đ | 10 | +10 x 1000 | 10 x 1000 | 1000 |
10/12/2021 | Buy 10 units of product A - Price per unit: 1500đ | 10 | +10 x 1500 | 10 x 1000 + 10 x 1000 | 1500 |
11/12/2021 | Sell 05 units of product A | 05 | -05 x 1000 | 05 x 1000 + 10 x 1500 | 1000 |
Average Cost (AVCO)
This method automatically recalculates the product price every time there is a stock receipt.

Date | Operation | Quantity on hand | Input/Output value | Inventory value | Unit cost |
|---|---|---|---|---|---|
Opening stock | 0 | 0 | 0 | ||
01/12/2021 | Buy 10 units of product A - Price per unit: 1000đ | 10 | +10 x 1000 | 10 x 1000 | 1000 |
10/12/2021 | Buy 10 units of product A - Price per unit: 1500đ | 10 | +10 x 1500 | 20 x 1250 | 1250 |
11/12/2021 | Sell 05 units of product A | 05 | -05 x 1250 | 15 x 1250 | 1250 |
Specific Identification
This method revaluates the exact product value according to the price of each product or a product lot.
For the example above, the inventory value of the product A is calculated as follows:
Date | Operation | Quantity on hand | Input/Output value | Inventory value | Unit cost |
|---|---|---|---|---|---|
Opening stock | 0 | 0 | 0 | ||
01/12/2021 | Buy 10 units of product A - Price per unit: 1000đ | 10 | +10 x 1000 | 10 x 1000 | 1000 |
10/12/2021 | Buy 10 units of product A - Price per unit: 1500đ | 10 | +10 x 1500 | 10 x 1000 + 10 x 1500 | 1500 |
11/12/2021 | Sell 05 units of product A (Stock input on 01/12/2022) | 05 | -05 x 1000 | 05 x 1000 + 10 x 1000 | 1000 |
15/12/2021 | Sell 02 units of product A (Stock input on 10/12/2022) | 02 | -02 x 1500 | 05 x 1000 + 08 x 1500 | 1500 |
Inventory Valuation method
There are 2 options for recording inventory value in Viindoo software:
Manual:Automated:
The delivery orders and receipts validation does not generate journal entries.
You need to record journal entries manually when recording stock moves.
Journal entries are automatically created when the receipts or delivery orders are validated.

For a better understanding of Viindoo software’s behavior, let’s do an example with the Average Cost (AVCO) method:
On 01/12/2021, a purchase order for 10 units of product A, 1.000 dong per unit.
On 10/12/2021, a purchase order for 10 units of product A, 1.500 dong per unit.
On 11/12/2021, a sales order for 05 units of product A, the cost of goods sold is the average cost of the 2 purchase orders above.
View the inventory valuation report, the price of product A in the storage is also calculated by averaging the cost of the 2 purchase orders and multiple by the quantity on hand.
Inventory valuation with Viindoo software
Configuration of Product Categories
Set up the inventory valuation for product A with the following information:
Product Categories Storable Product;
Costing Method: Average Cost (AVCO);
Inventory Valuation: Automated.
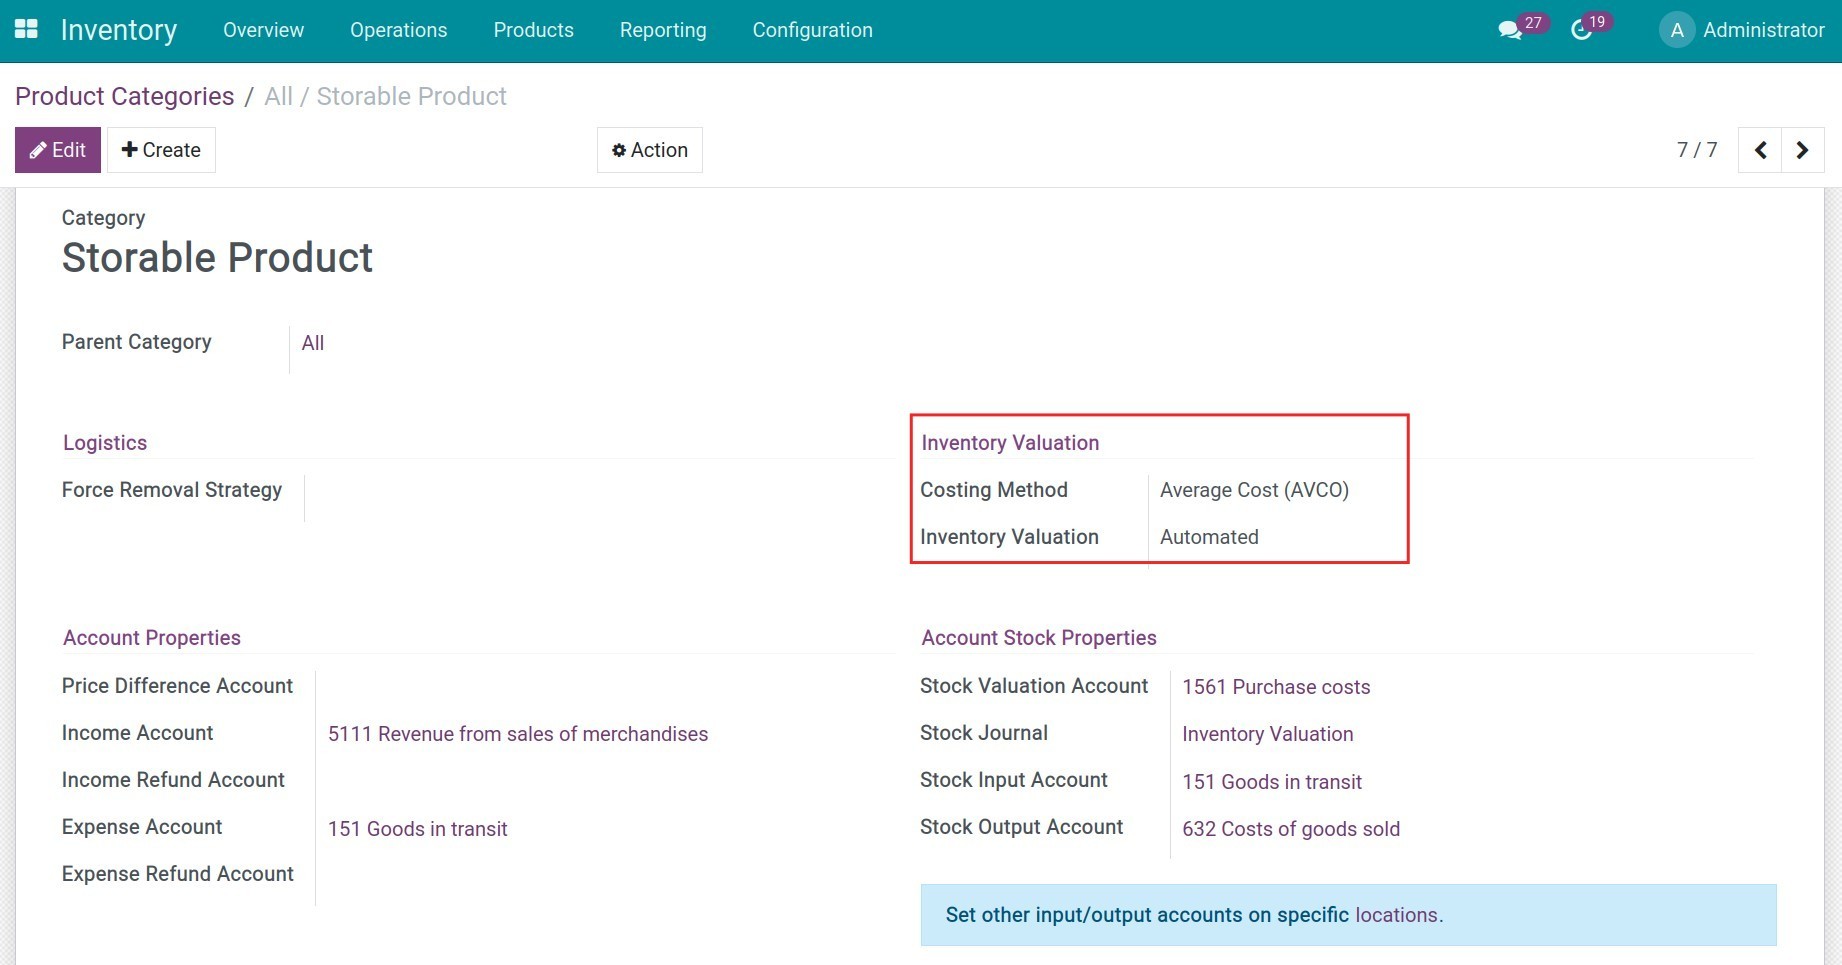
Configuration on Products
For product A, configure the General Information tab as follow:
Product Type: Storable Product;
Product Category: Storable Product.
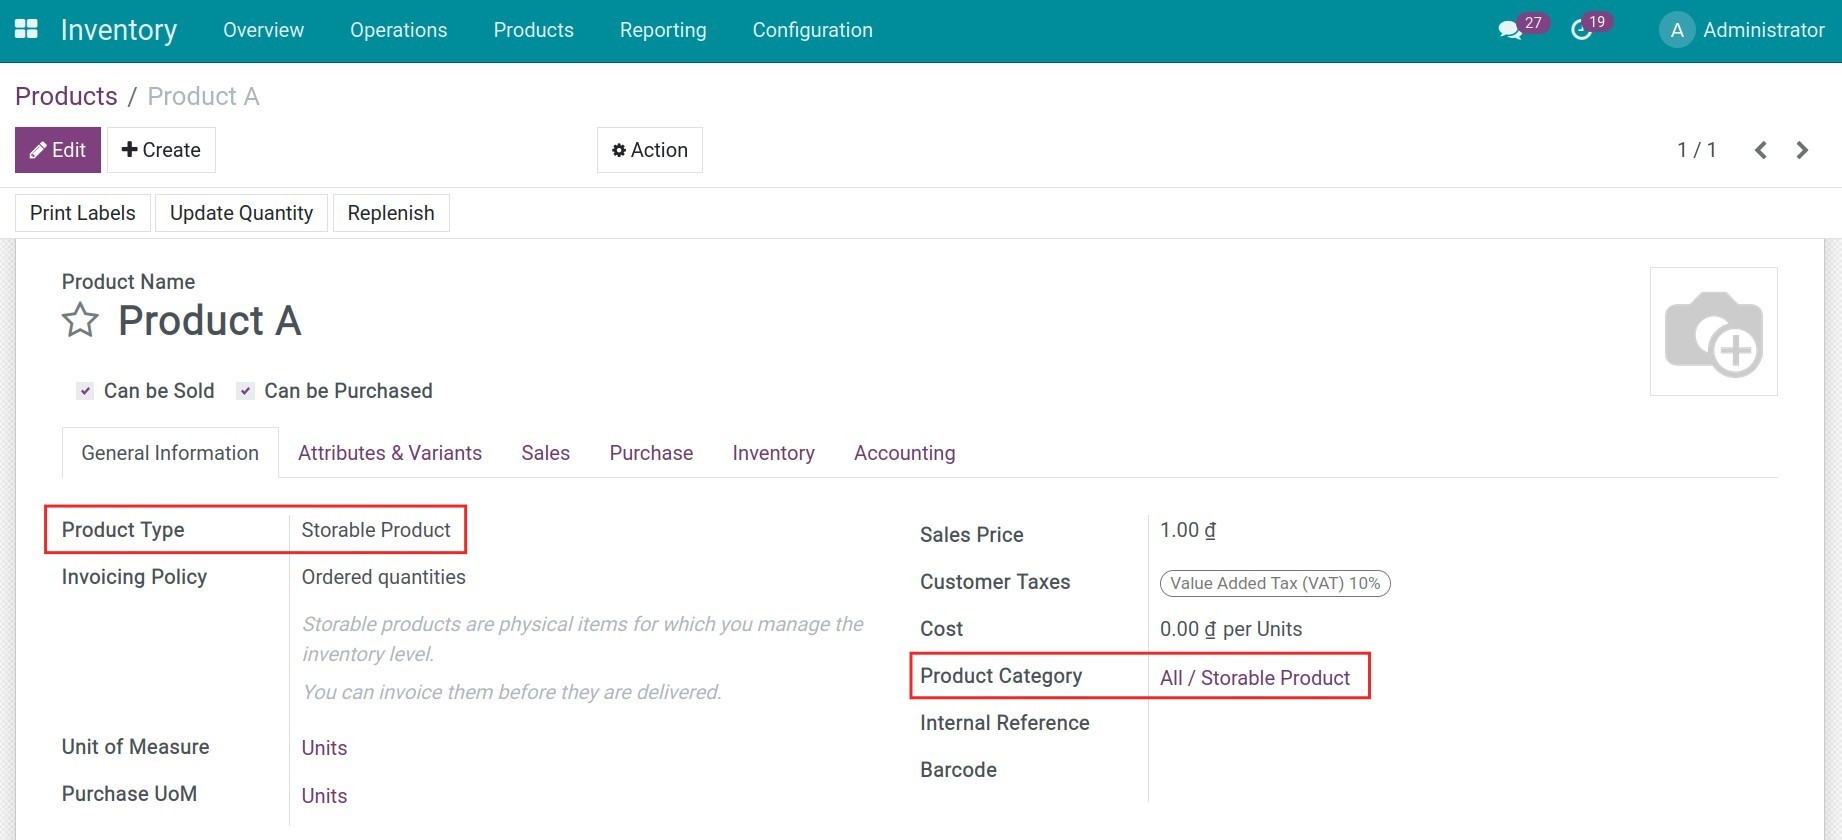
Journal entries generated from a validated receipt
Create a request for quotation on 01/12/2021, a Receipt button will appear on the view once this purchase order is confirmed:
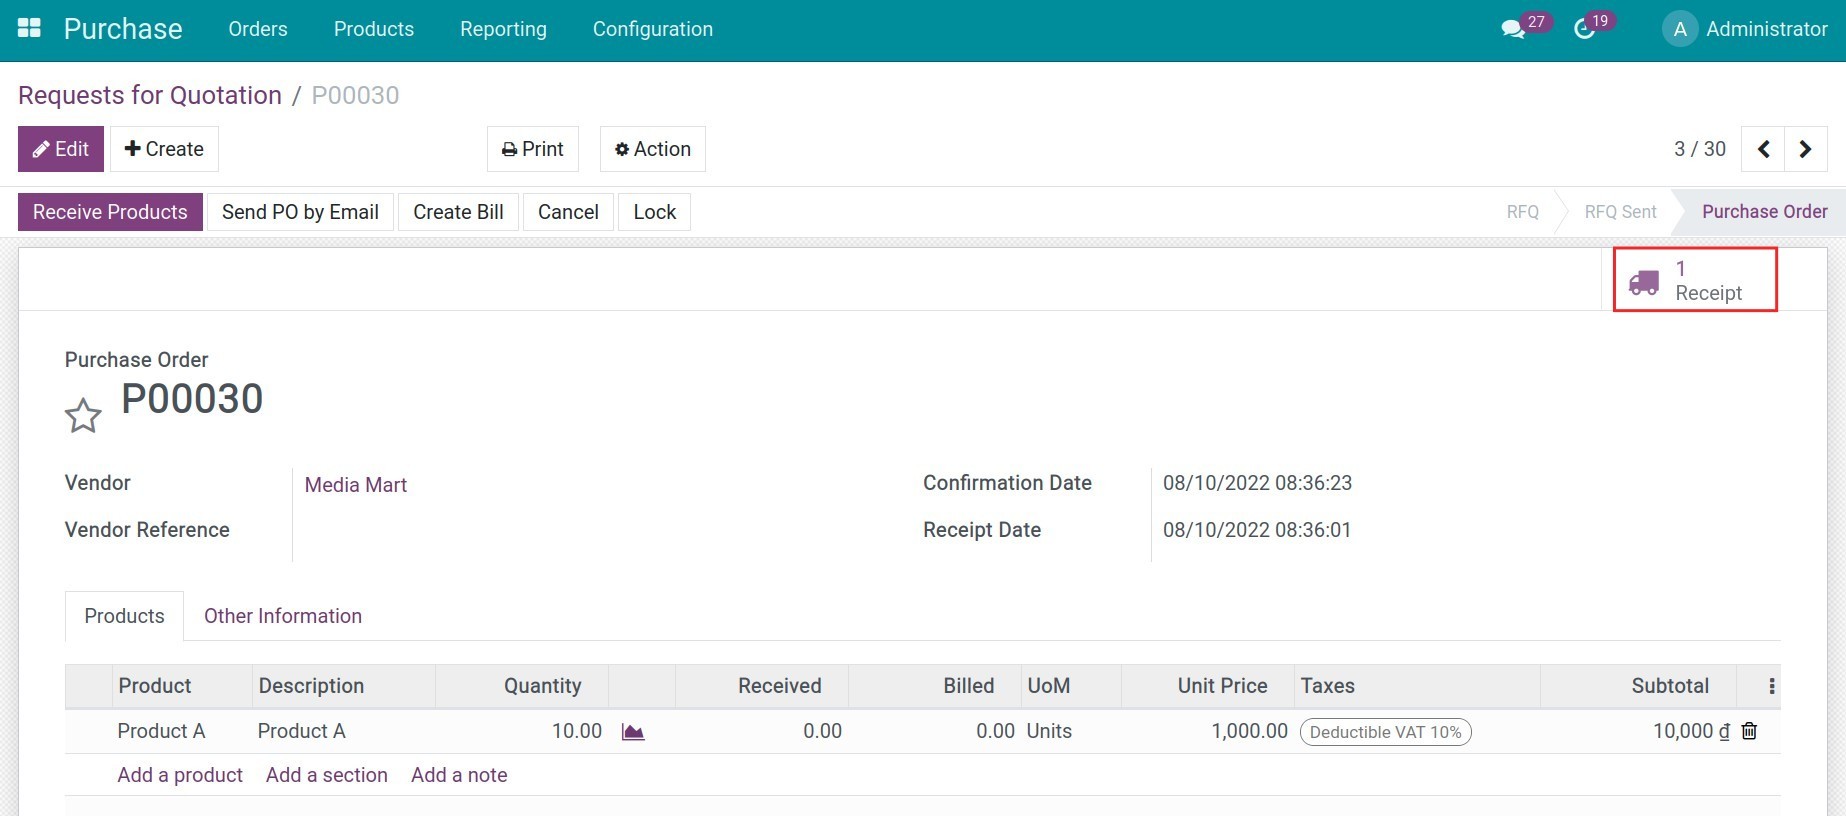
Press on the Receive Products button then click on Validate to complete the goods receiving.
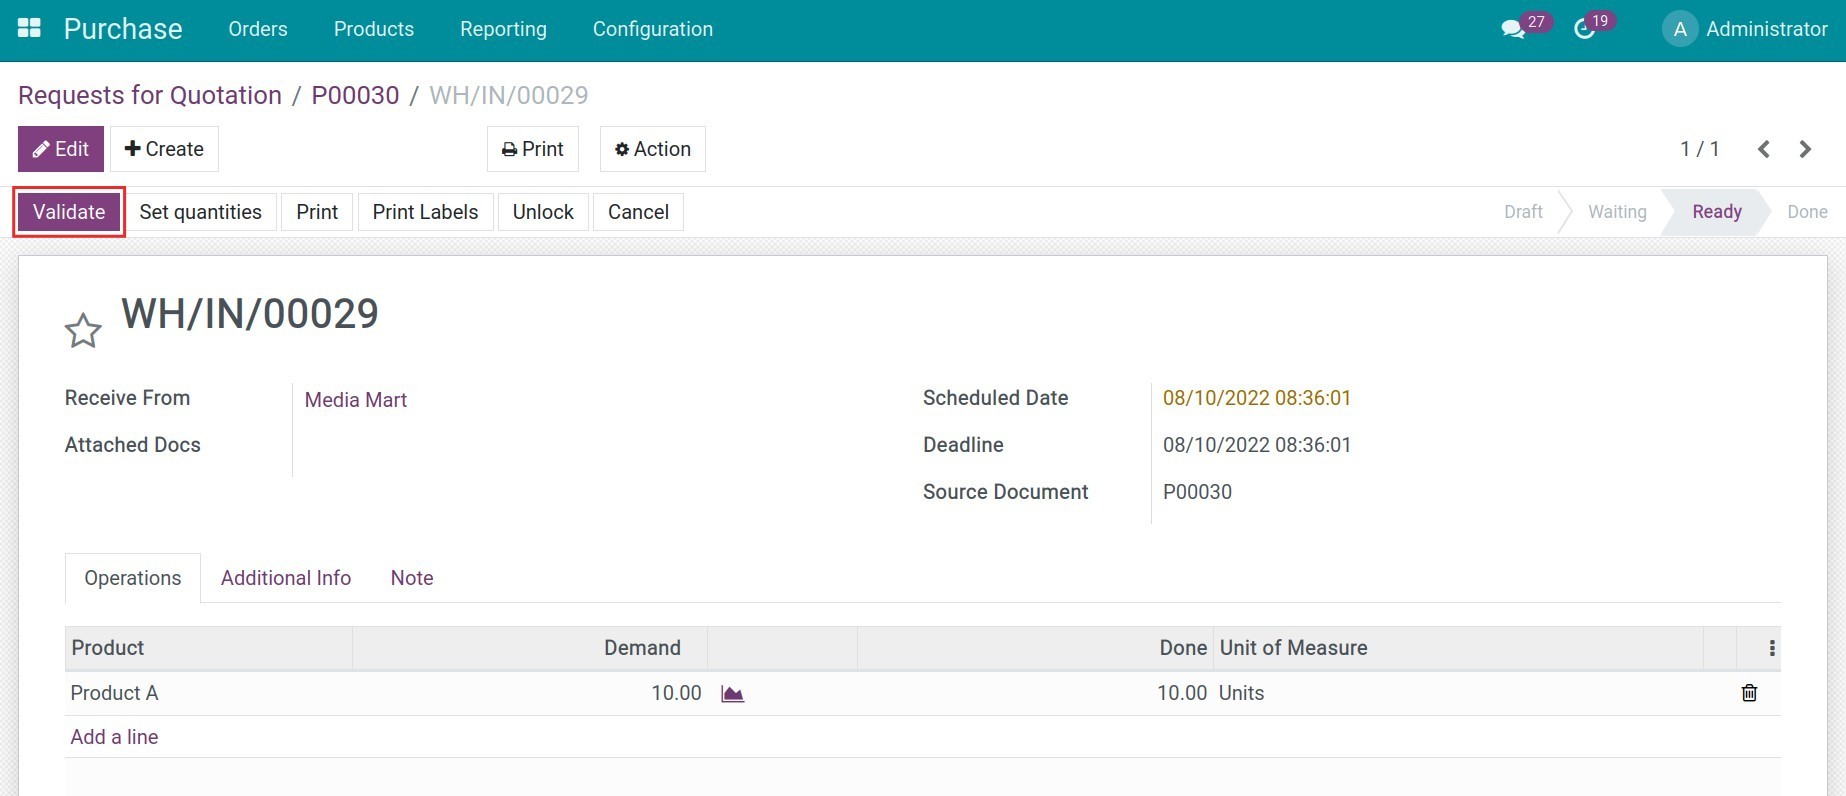
At this step, 01 journal entry will be displayed on the Receipt order.
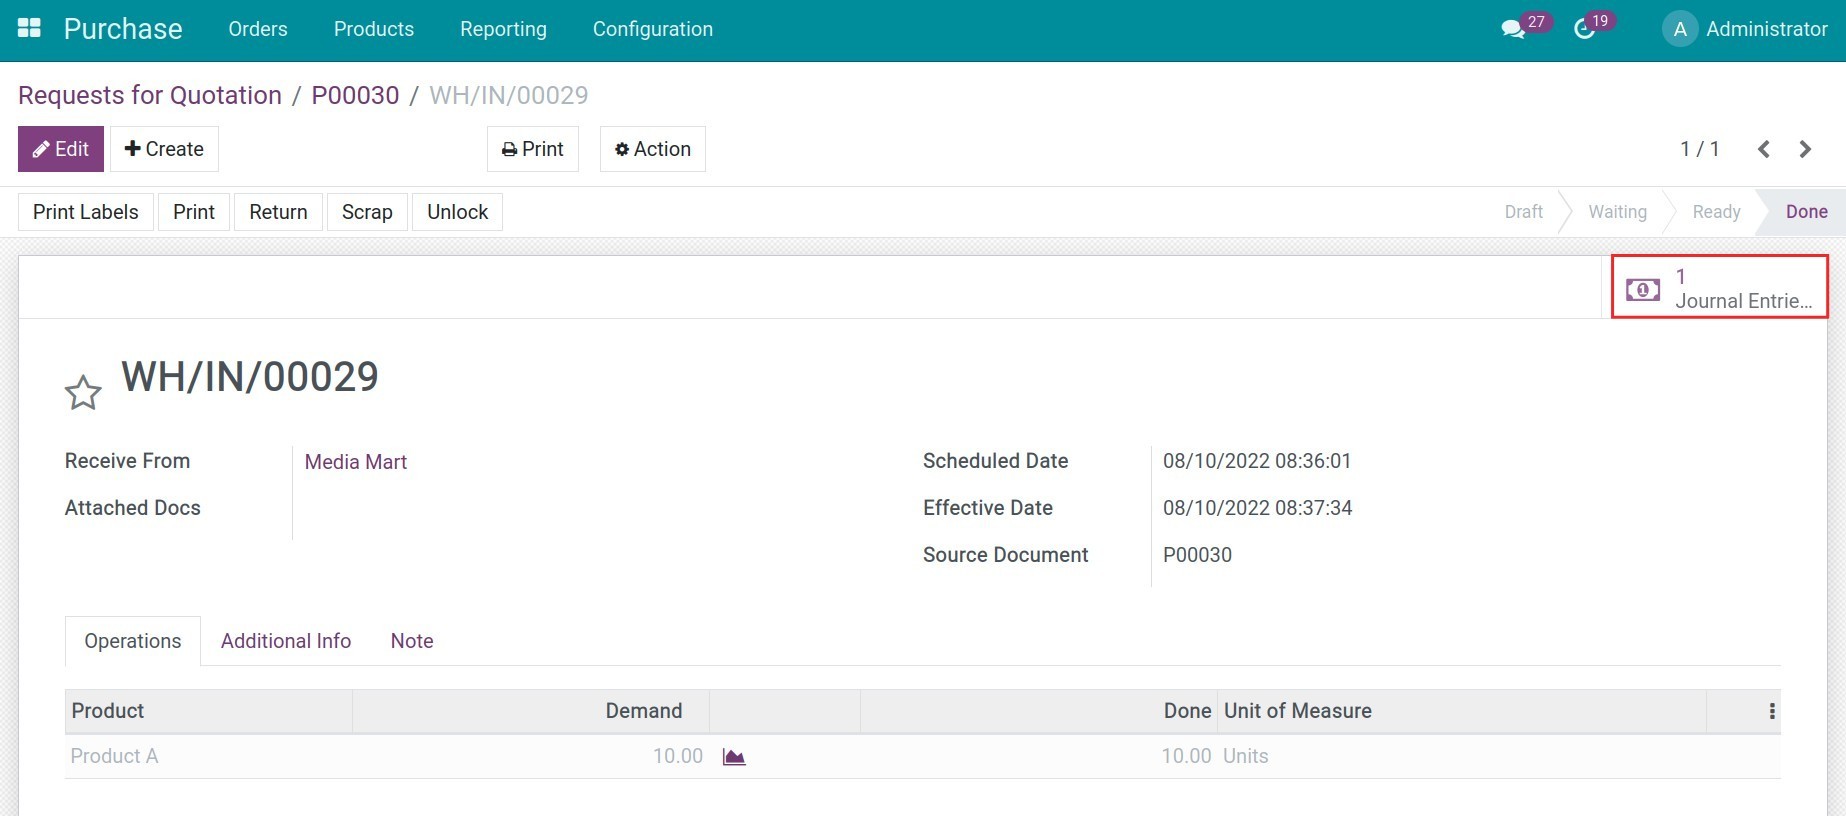
Click to view detailed information on this journal entry.
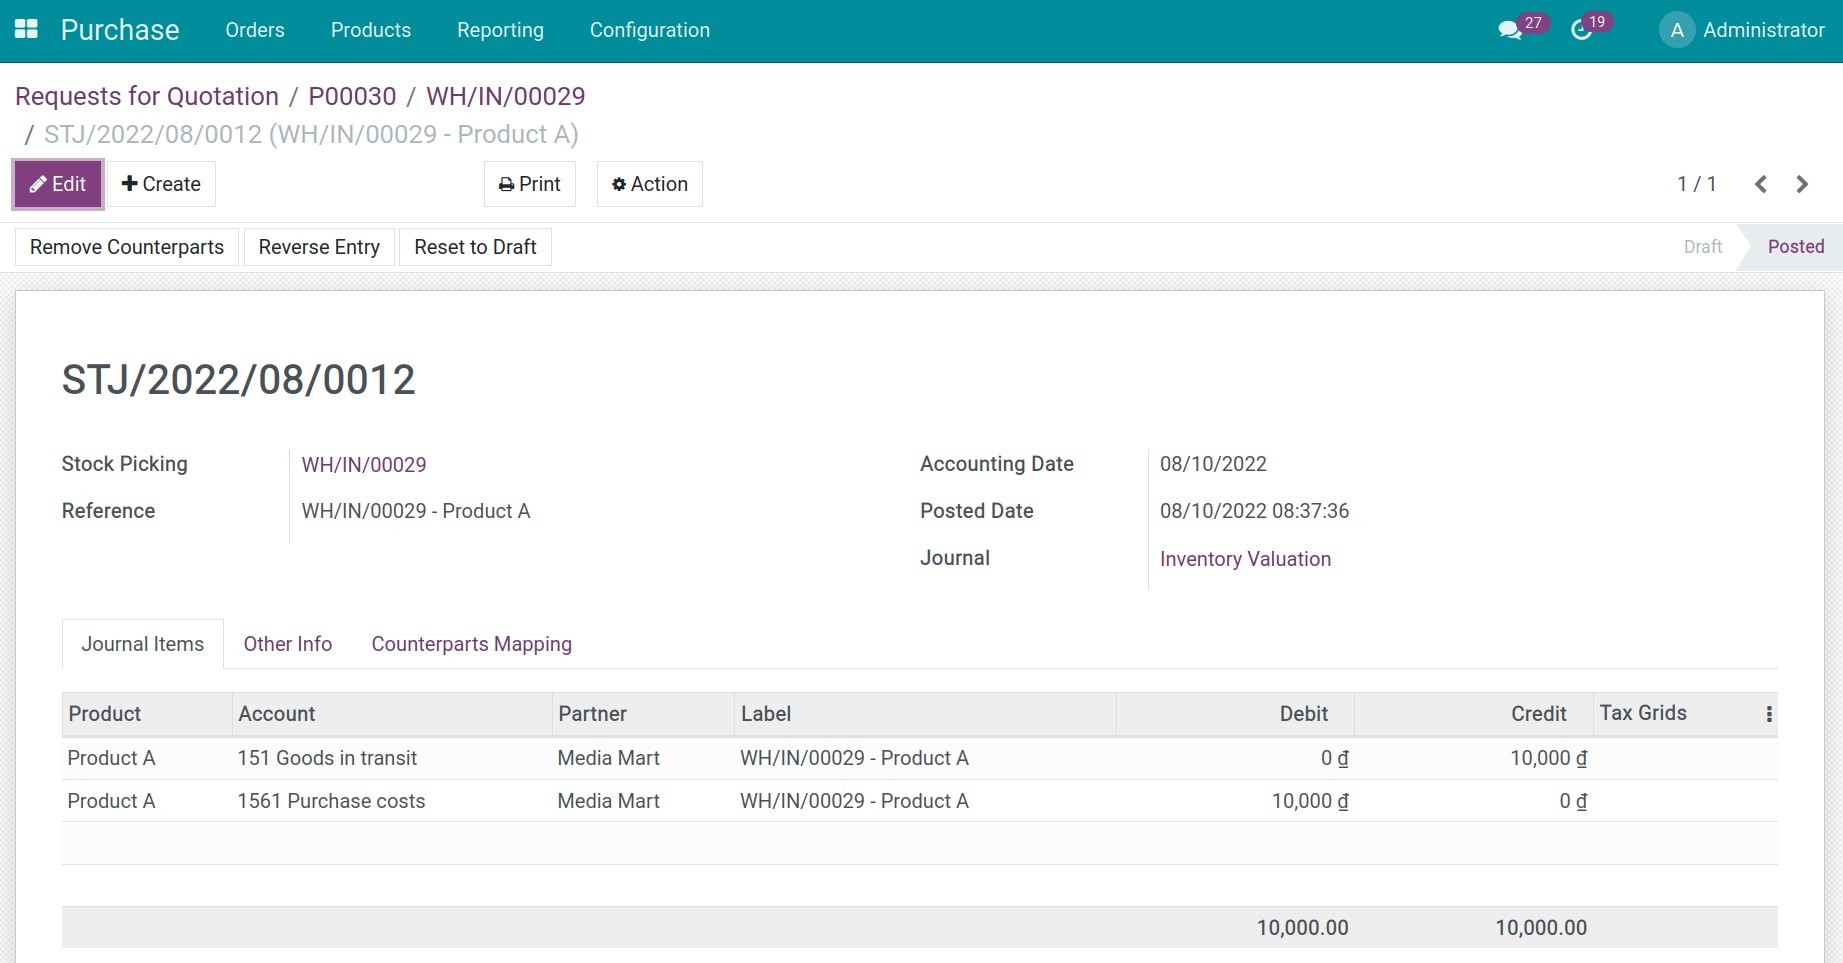
On the product information, you will also see the updated Cost of Product A.
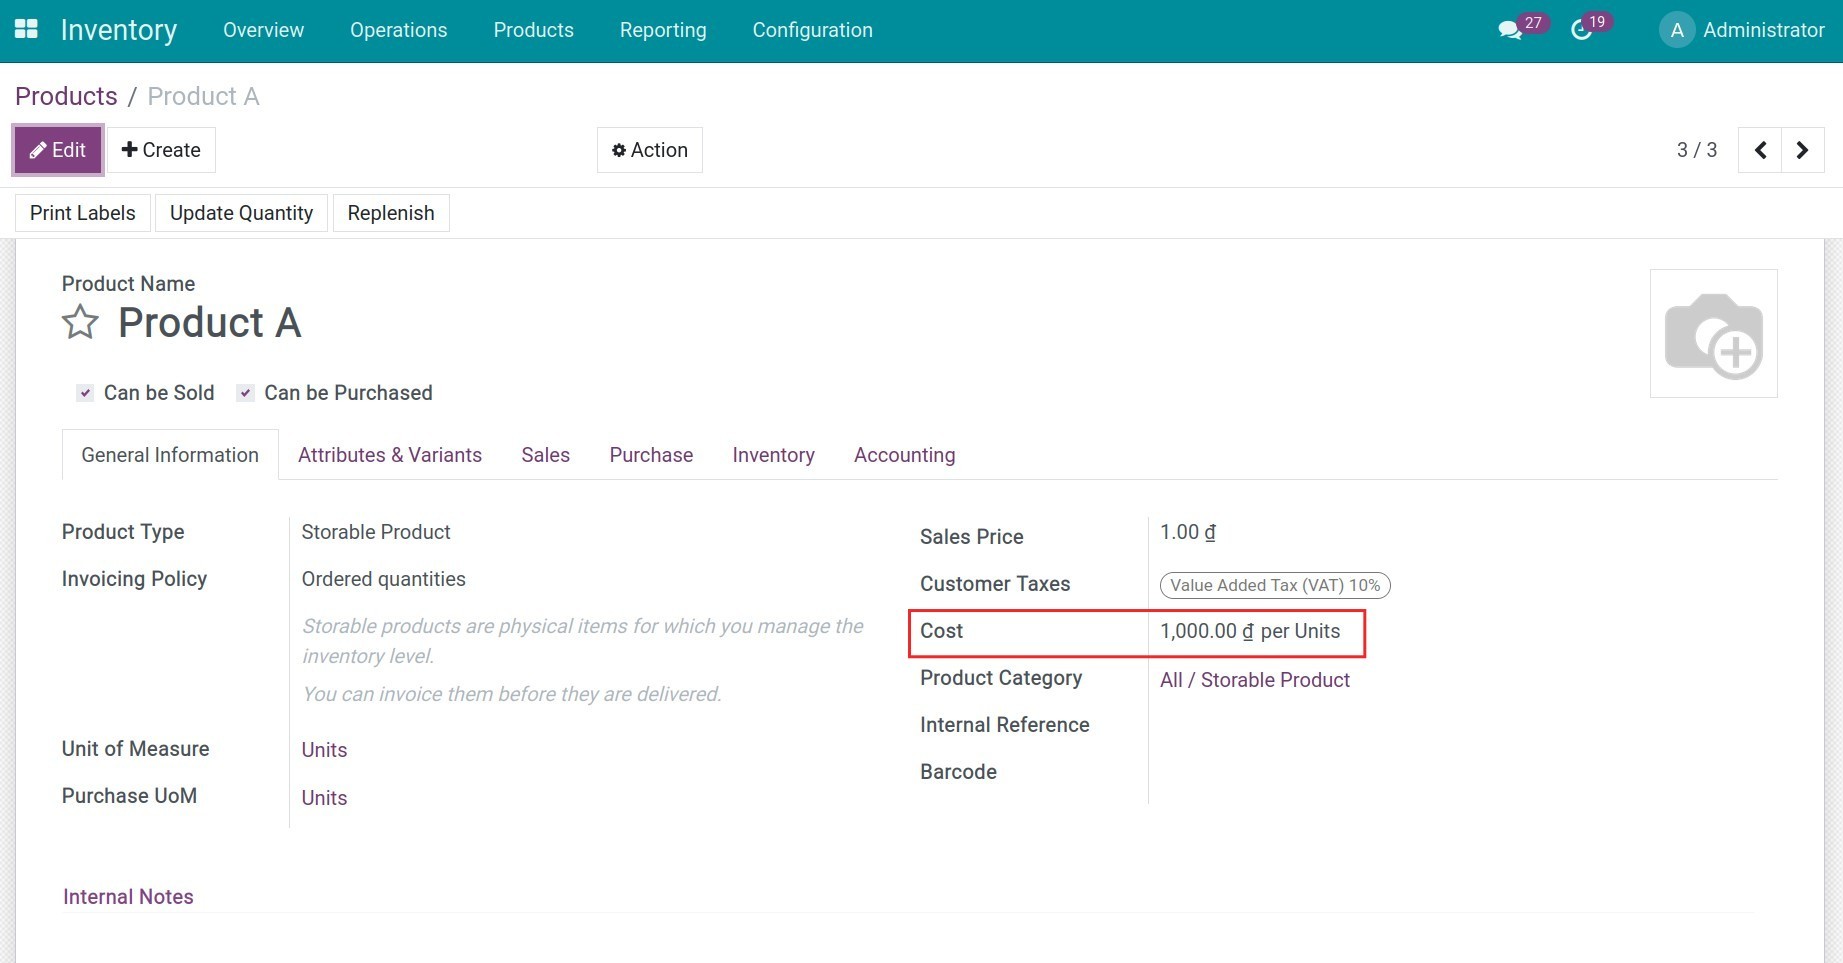
Similarly, you receive goods to the storage location for the order on 10/12/2021. On the product information, the cost is also updated by the software after this goods receipt.
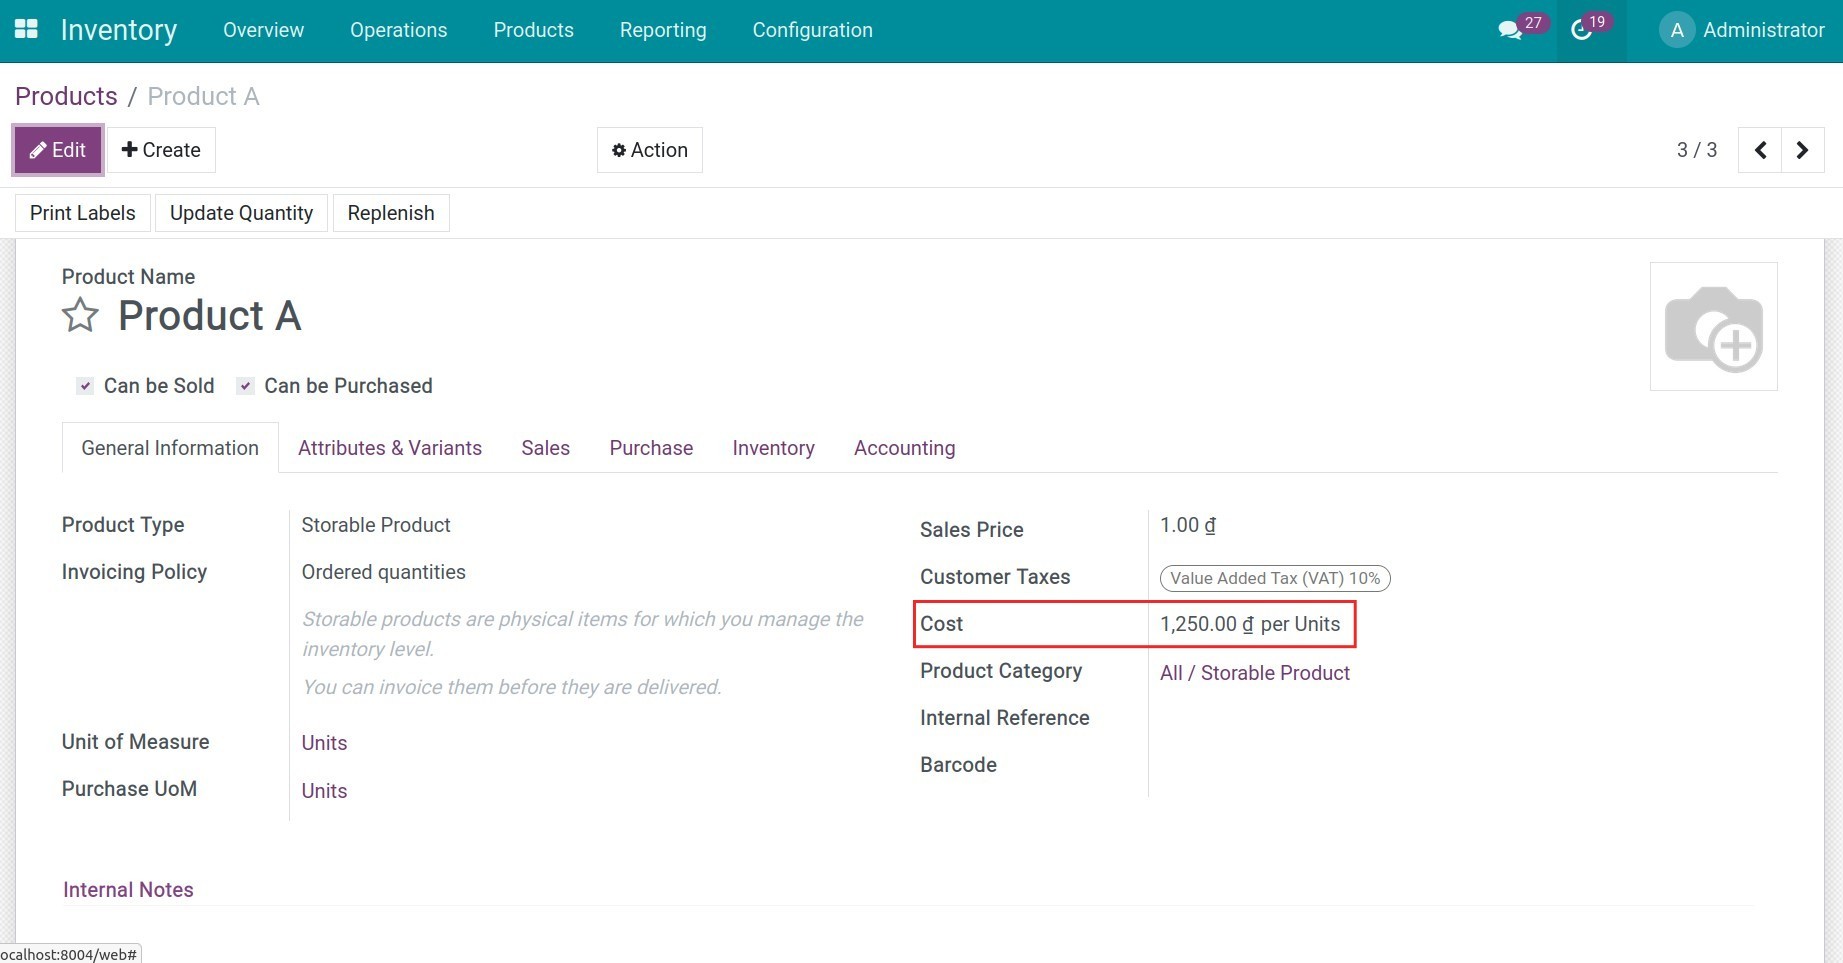
Journal entries generated from a validated delivery order
Create a quotation on 11/12/2021, confirming this sales order will activate the Delivery button on the view:
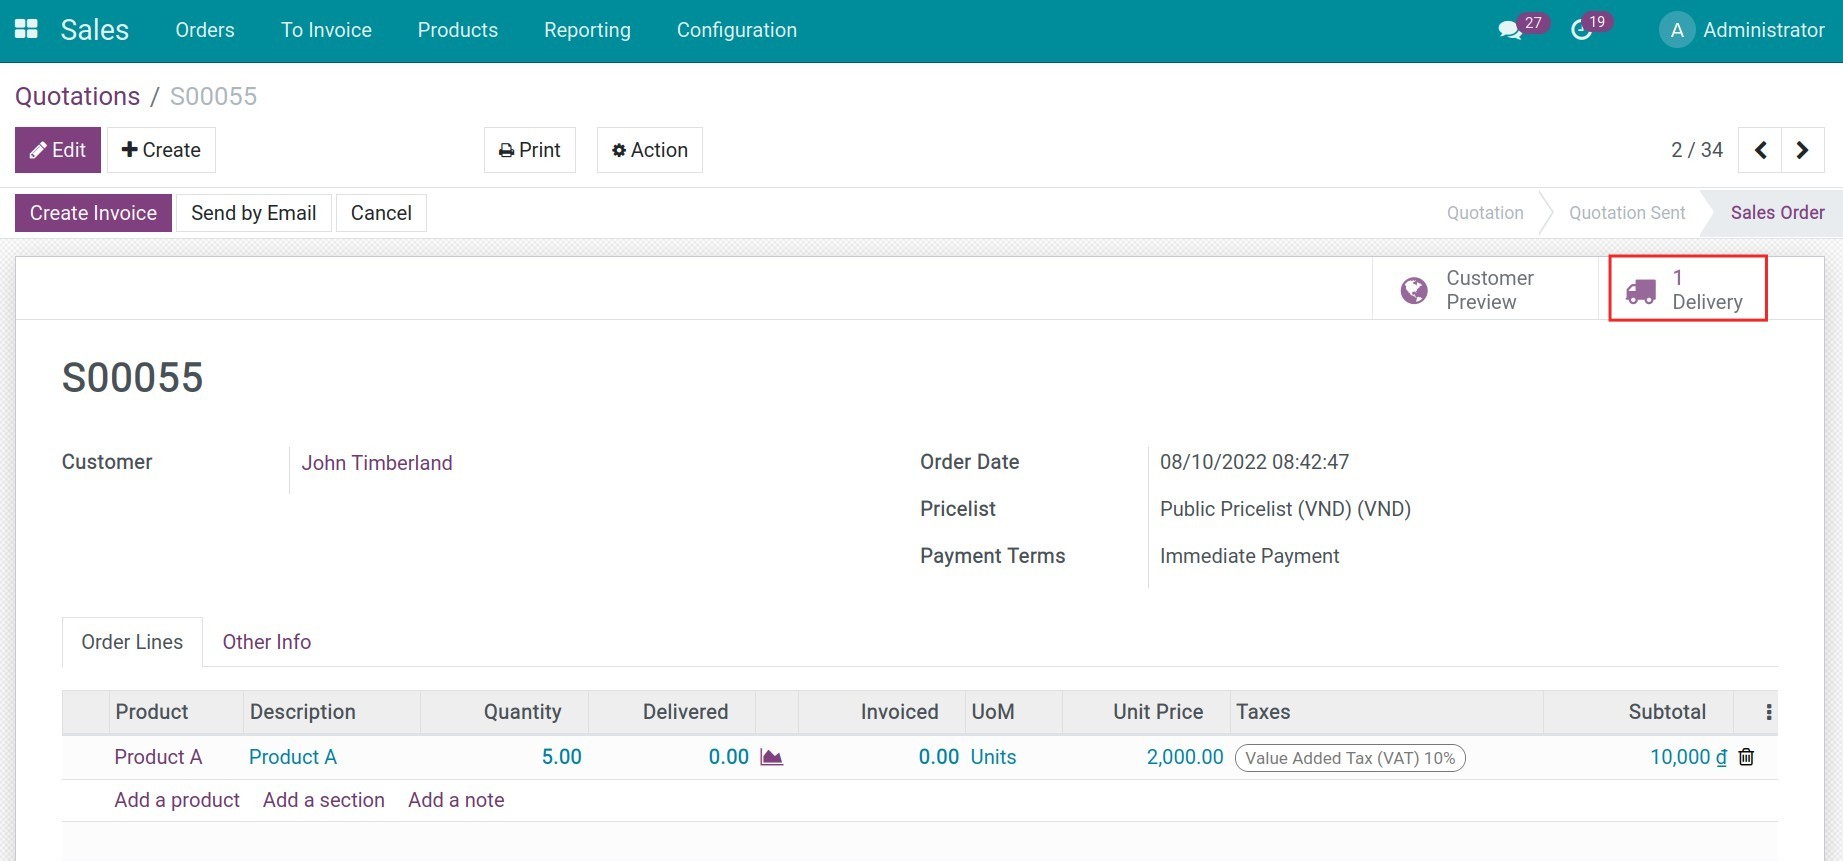
Click on Delivery then press Validate to complete the goods delivery.
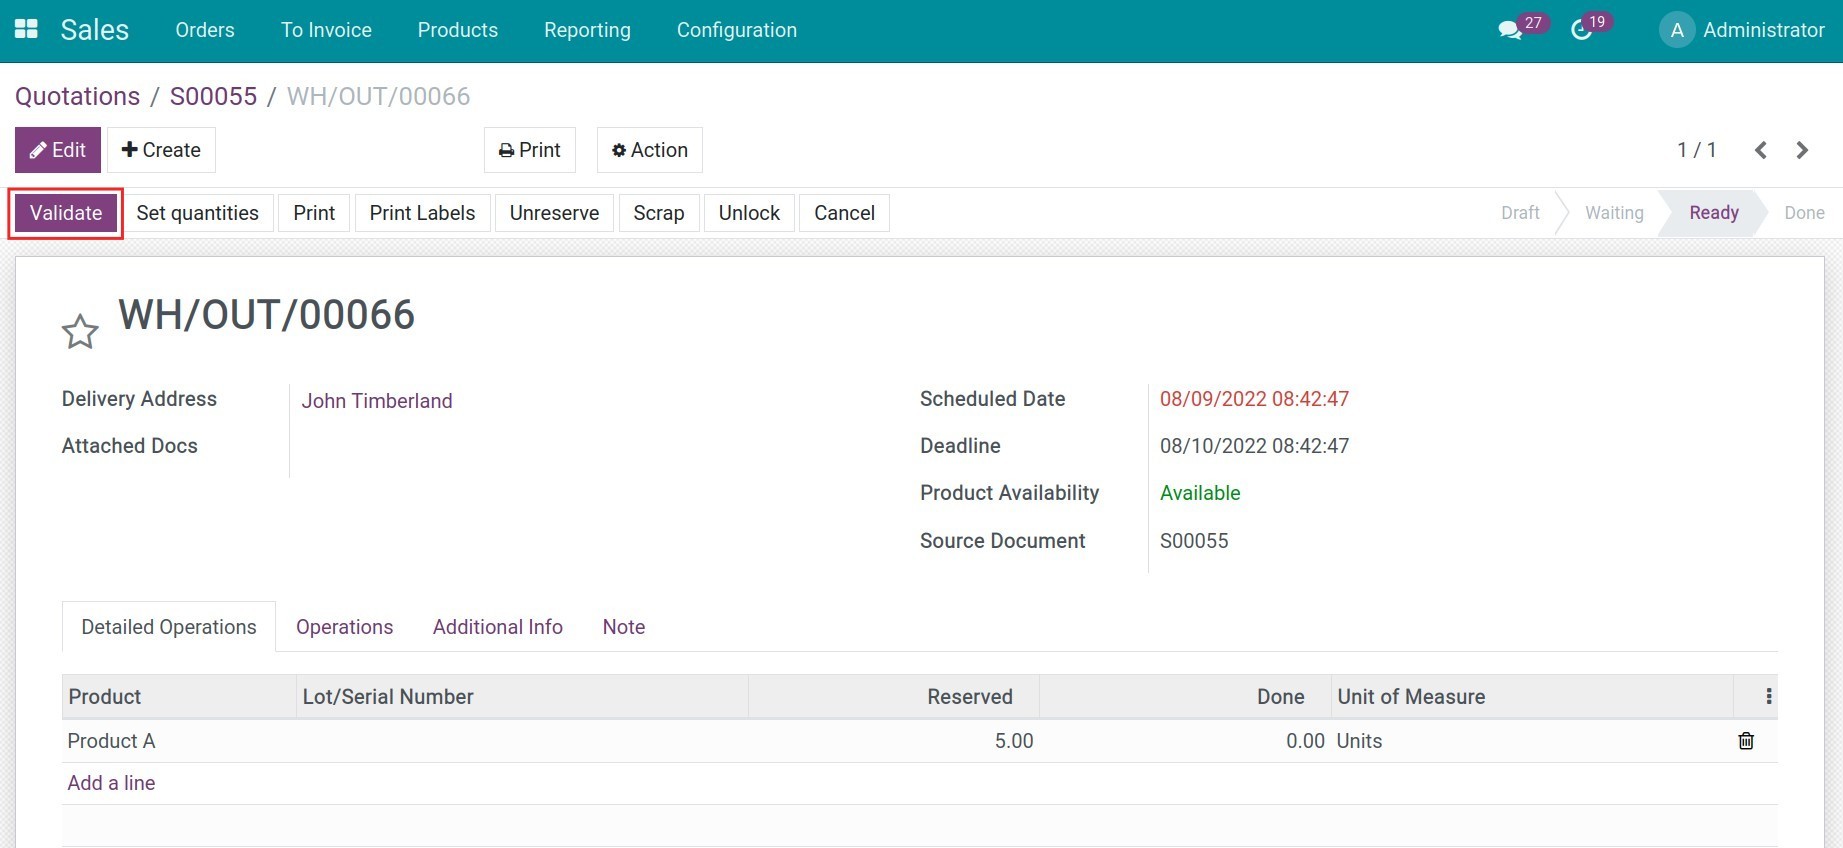
At this stage, 01 journal entry is generated on the delivery order.
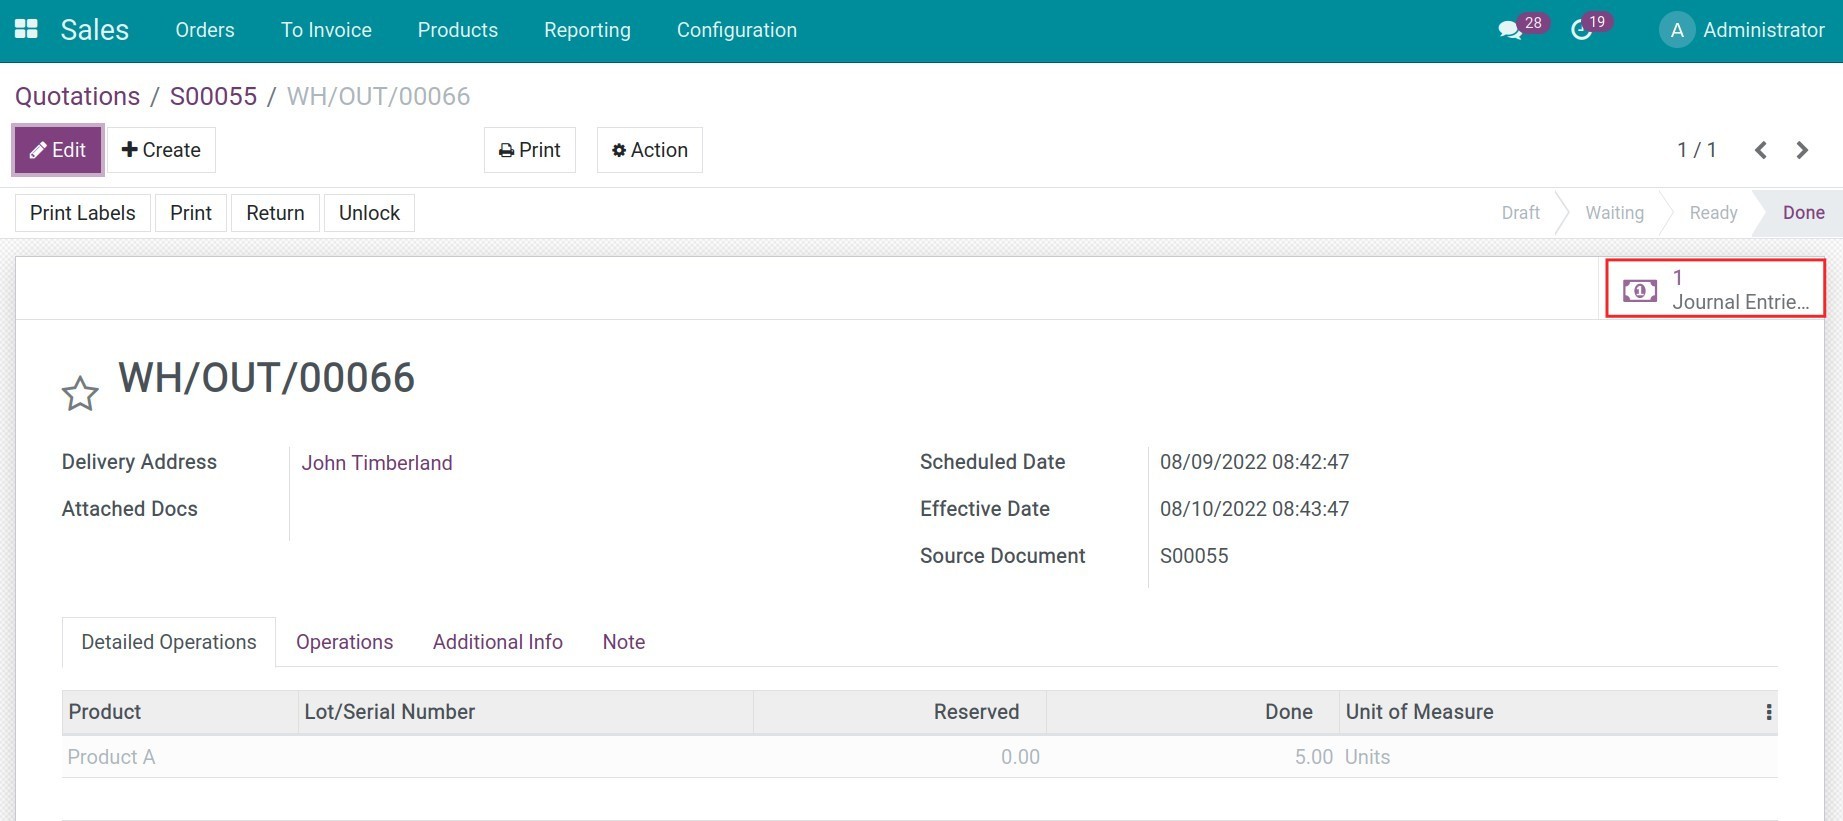
Click to see details, you will see the newly created journal entries that record the cost price for the stock output of Product A.
Stock output value = Quantity of stock output x Average Cost of product
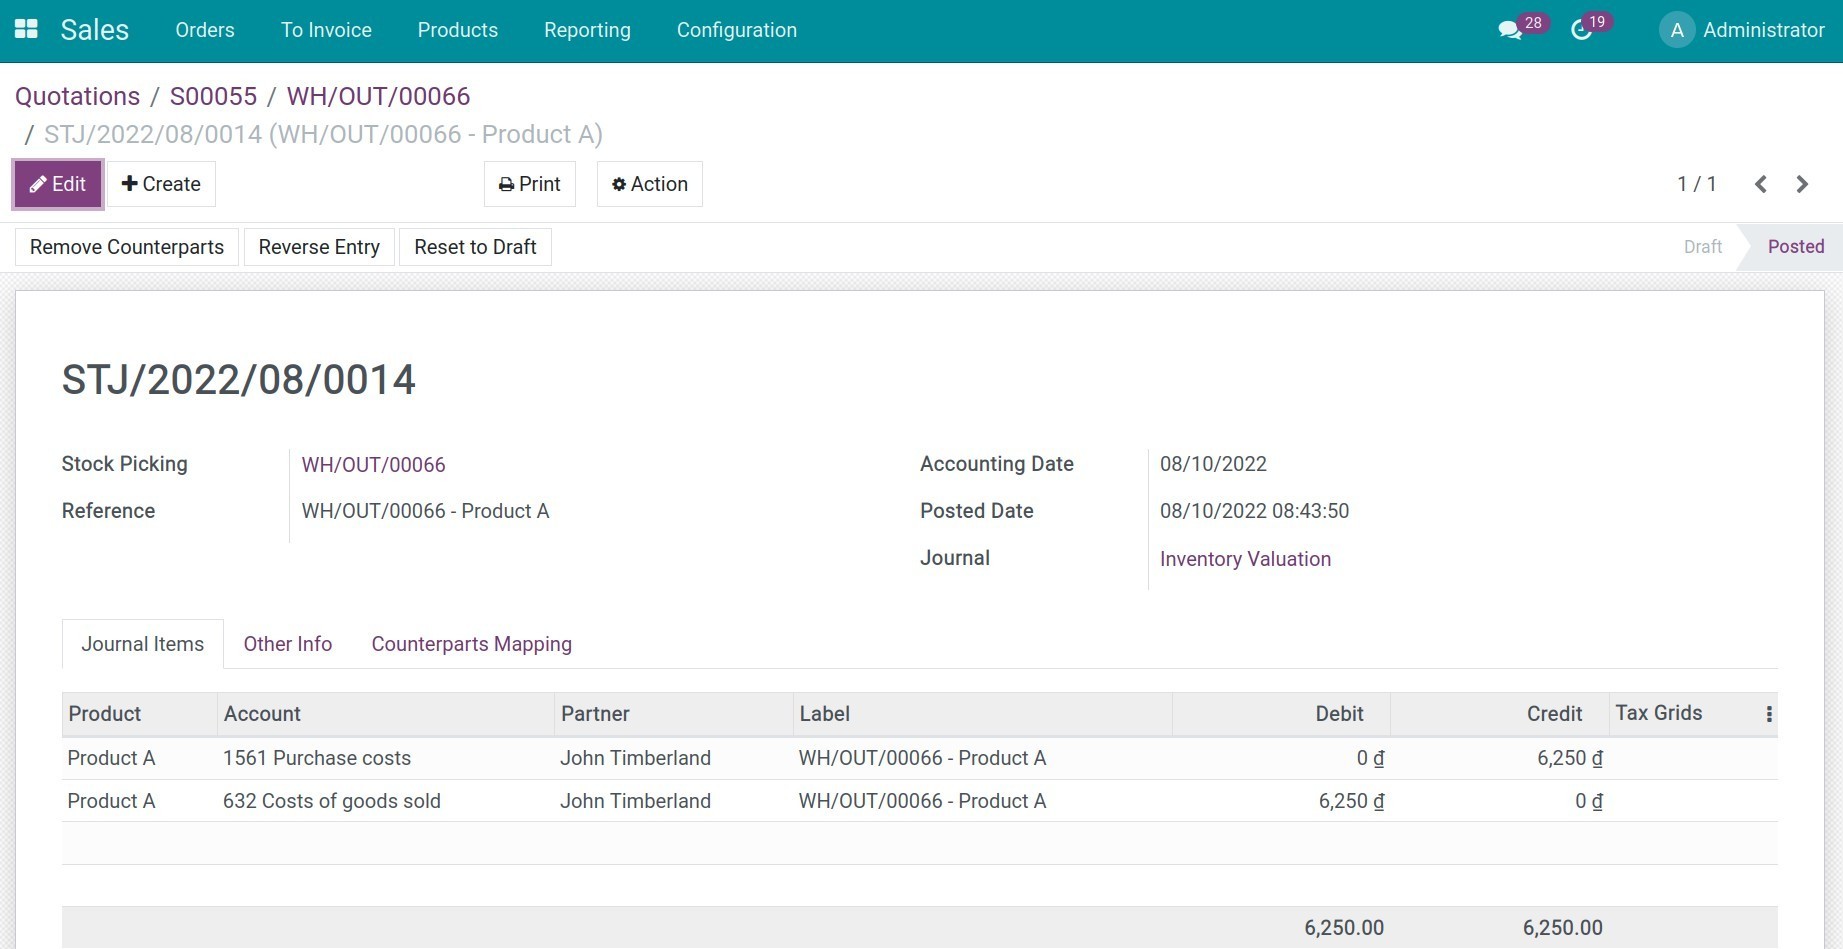
With manual inventory valuation, doing similar steps won’t generate any journal entries.
You perform the same operations for other costing methods and observe the creation of journal entries and updated costs on the product.
View Inventory Valuation reports
To view Inventory Valuation reports , navigate to Inventory > Reporting > Inventory Valuation.
Here is where you can find the stock quantity and inventory value of each product.
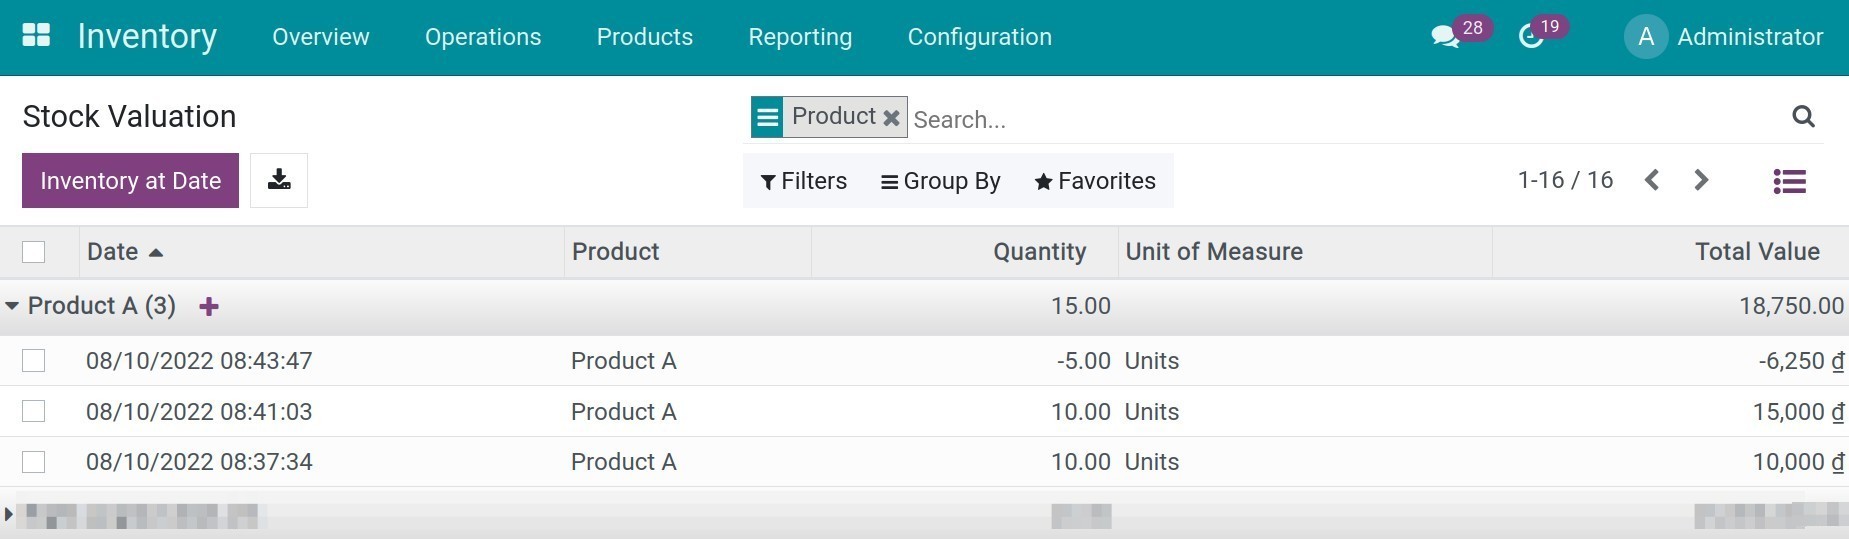
See also
Related article
Accounting for Inventory Adjustment
Accounting for Inventory Adjustment
The inspection and control of the quantity and quality of storable products in the warehouse is an important part of the business activities of the Enterprise. However, whether the product inventory is carried out at scheduled intervals or at any time according to the needs and the type of business that the Enterprise follows, the discovery of excess and loss of goods in the warehouse is inevitable.
Viindoo All-in-one Enterprise Management Solution supports accountants and warehouse managers in managing and dealing with the loss/excess of products during the inventory.
Requirements
This tutorial requires the installation of the following applications/modules:
Accounting & Finance
Inventory
Configuring Inventory Adjustment Location
After installing the Inventory module, you need to activate the Storage Locations feature by going to Settings > Inventory > Warehouse > Storage Locations > Save.
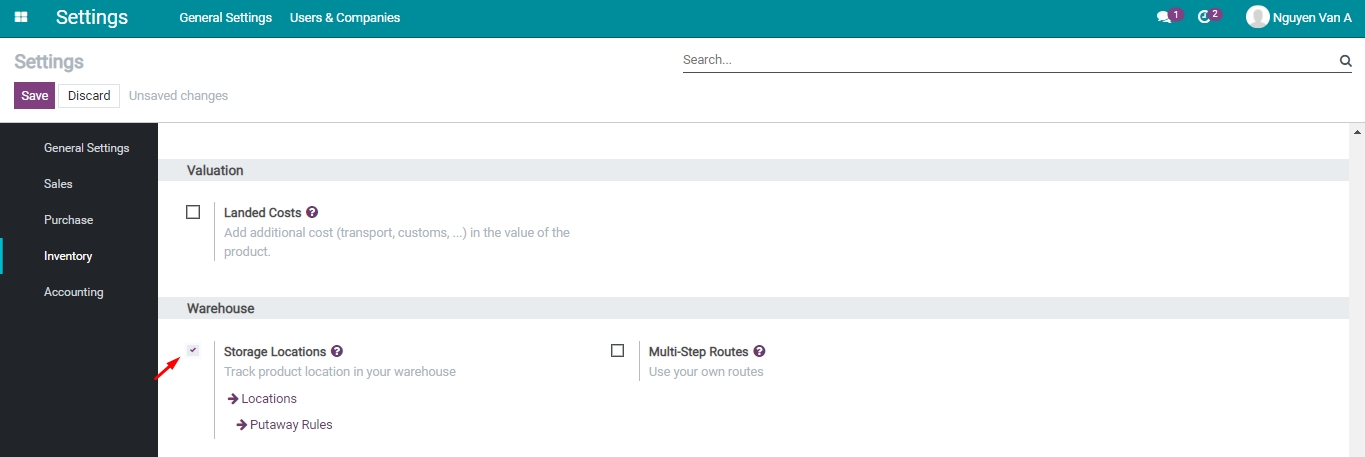
Next, you navigate to Inventory > Configuration > Locations, turn off the Internal filter then select the Virtual Locations/Inventory adjustment location.
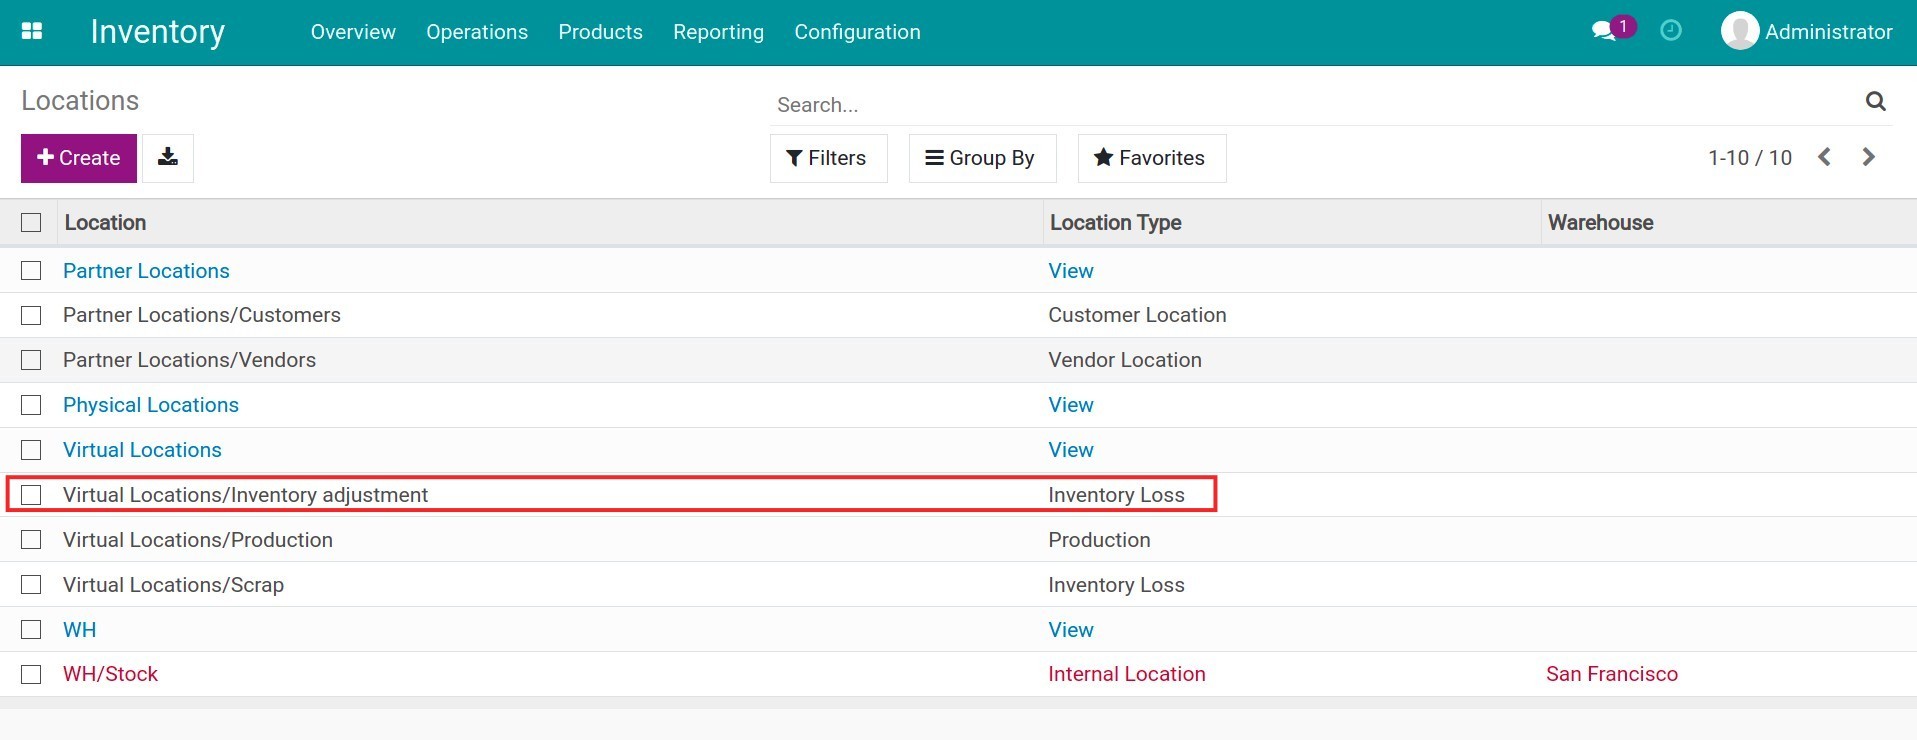
Click Edit then configure the following fields:
Location Type: Select Inventory Loss;
Accounting Information: Configure an account to record the accounting entries generated from the excess or lost value of goods.
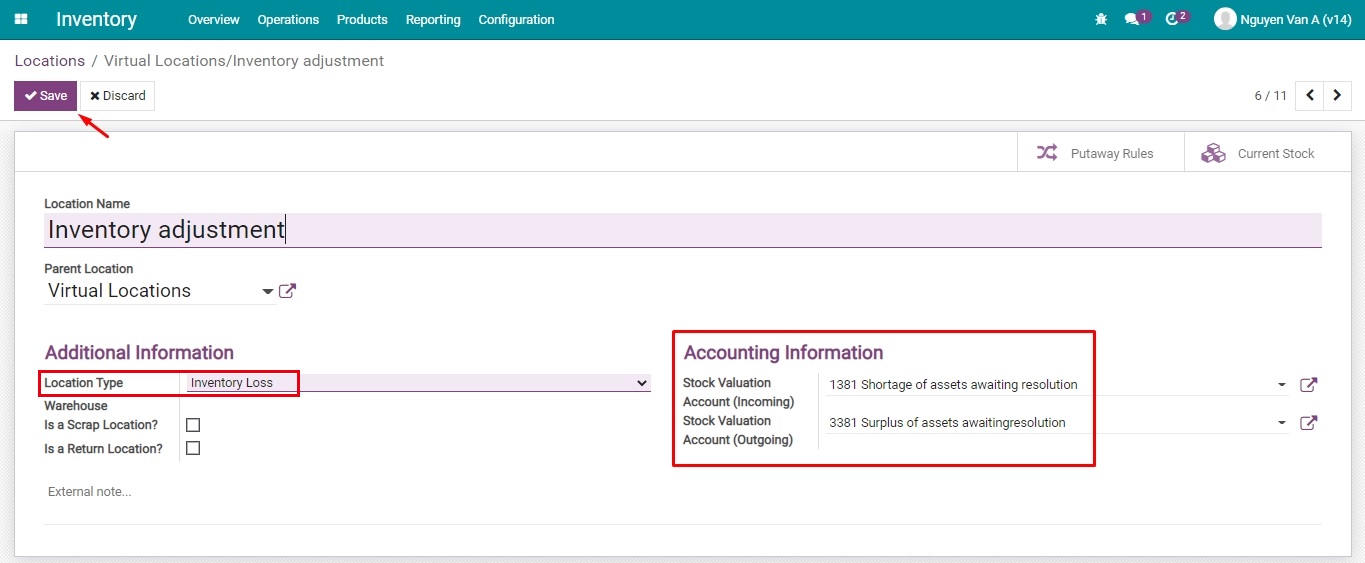
Accounting for loss/excess of products during Inventory Adjustment
On a monthly, quarterly, or annual basis, which depends on the plan or random warehouse inventory according to the needs of the Enterprise, you can record the inventory adjustment by navigating to Inventory > Operations > Inventory Adjustment.
To have journal entries created automatically right after a loss/excess of products is detected, you need to set up products with the Storable type and belong to a product category that has the automated inventory valuation configured.
See also
Creating a new product in Viindoo
Managing product categories

At this stage, you can create an inventory adjustment according to the adjustment time of the Enterprise.
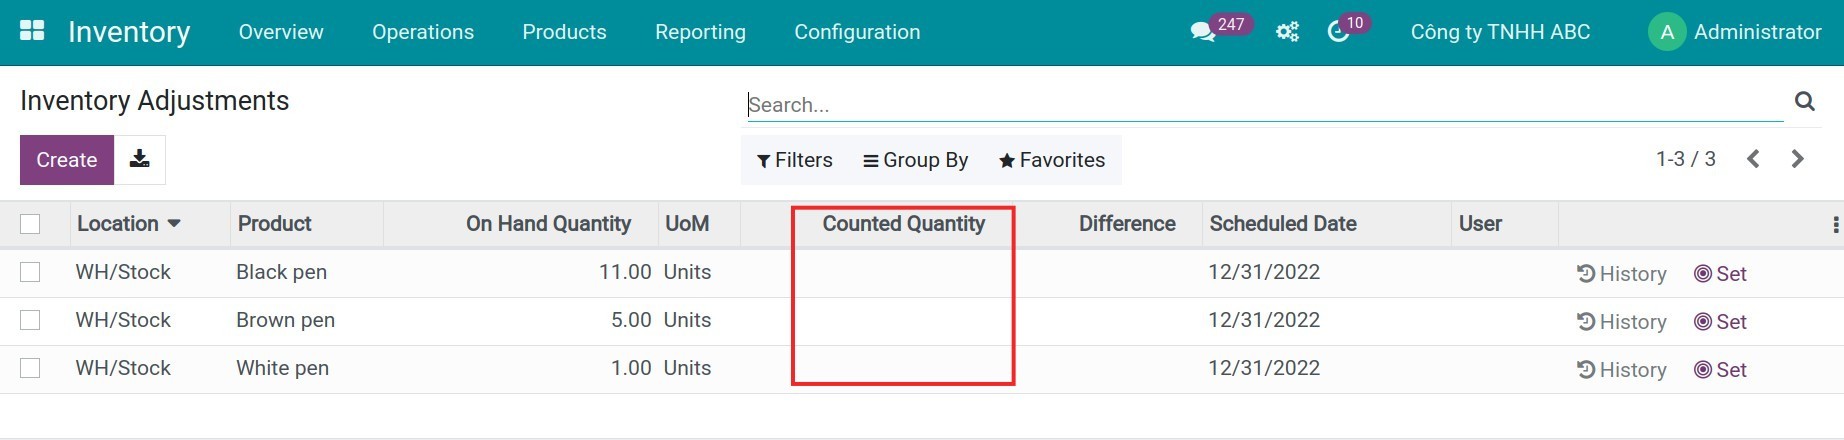
Details of the inventory will be listed by products, on-hand quantities, counted quantities, and the difference representing the loss/excess of products after the inventory. You click Apply.
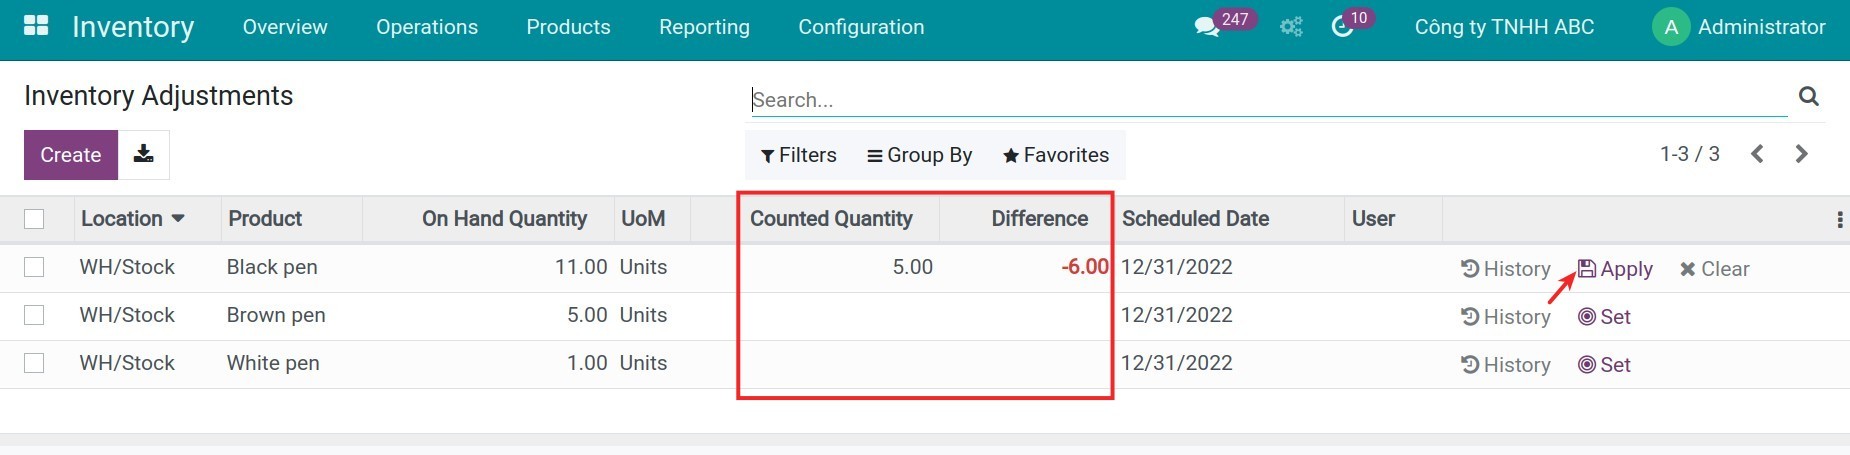
Once the On Hand Quantity is updated with the new value, an accounting entry will be automatically generated to record the value corresponding to the amount of excess and lost products that had occurred after the inventory.
You can view accounting entries details by navigating to Accounting > Accounting > Journal Entries and use the filter tool to search for accounting entries of the Inventory Adjustment journal.
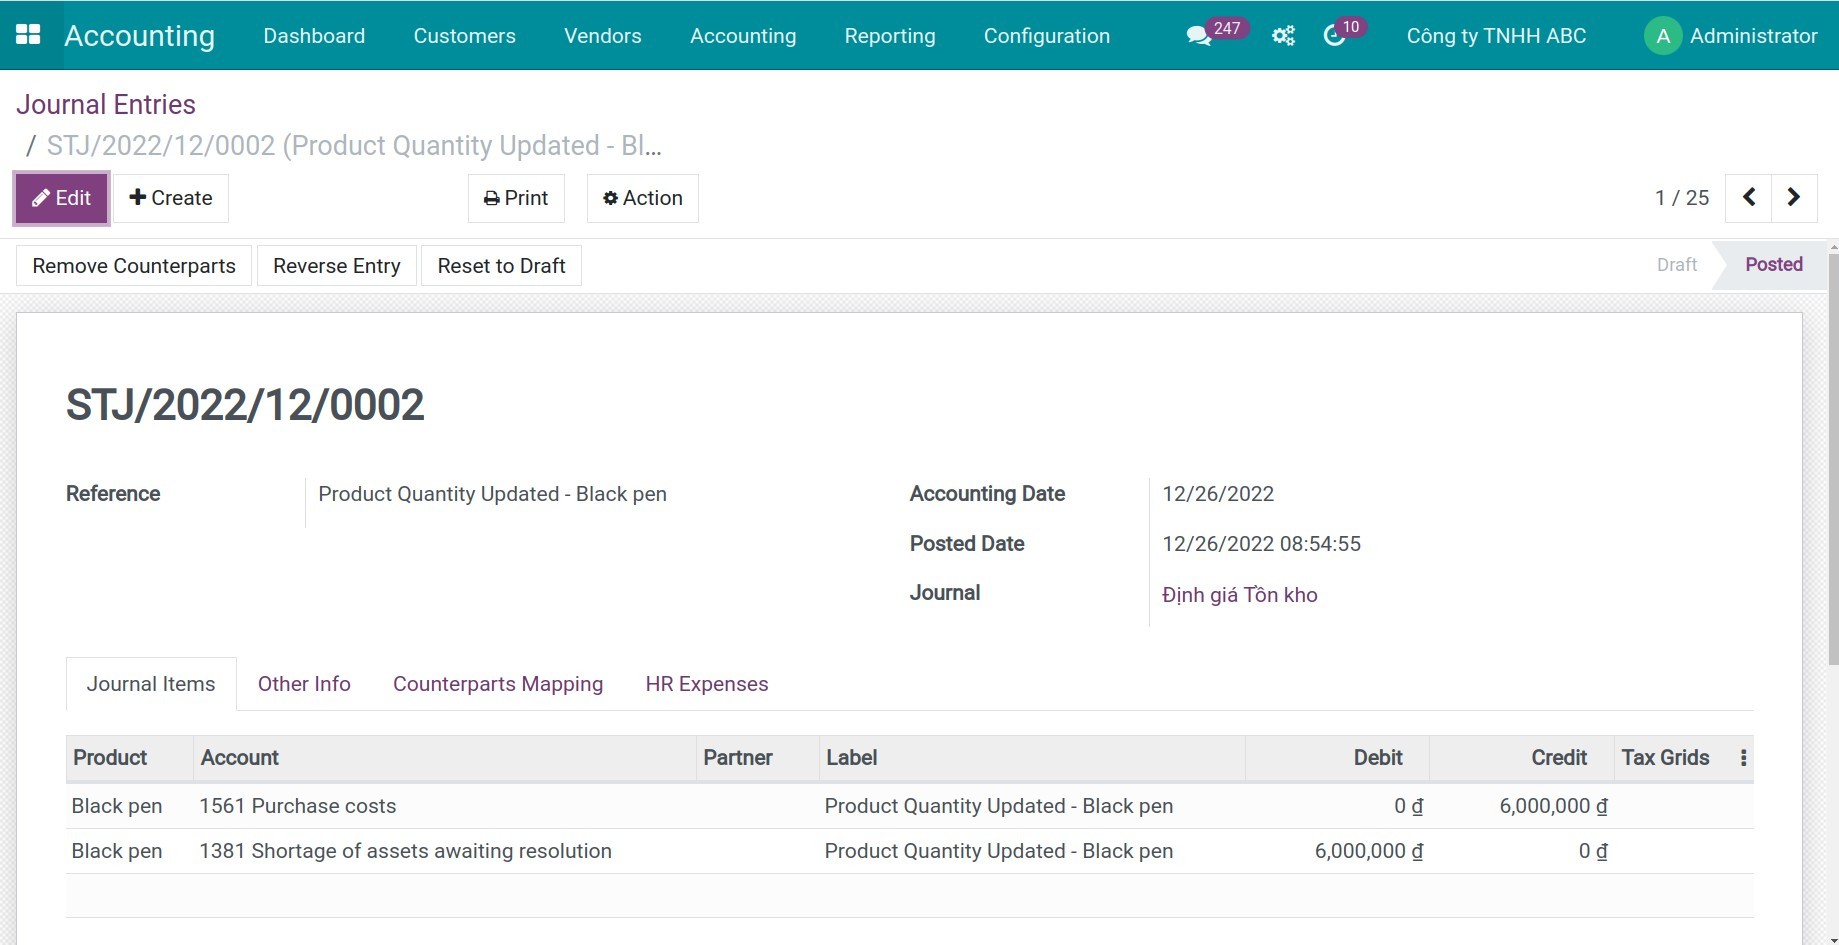 In which:
On-hand quantities > Counted quantities: Missing products after the inventory, the generated accounting entry records the decrease in the value of products in stock.
On-hand quantities < Counted quantities: Excessive products after the inventory, the generated accounting entry records the increase in the value of products in stock.
See also
Related article
Accounting for Inventory Scrap
Configure inventory accounting for multi-companies
Accounting for Inventory Scrap
Accounting for Inventory Scrap
From a business perspective, Scrap is a product or material that is discarded in the production or consumption process and withdrawn for other purposes or recycling.
When products and materials are removed, they are not considered inventory in the Viindoo Software. These items are sent to the damaged products and materials storage location known as Scrap Location.
Requirements
This tutorial requires the installation of the following applications/modules:
Viindoo Inventory
viindoo Accounting & Finance
Configure Scrap Location
After installing the Inventory application, you need to activate the Multi-Locations feature by navigating to Configuration > Setting > Warehouse > Storage Locationns > Save.

Next, you go to Inventory > Configuration > Locations, turn off the Internal filter then select Virtual Location/Scrap location.
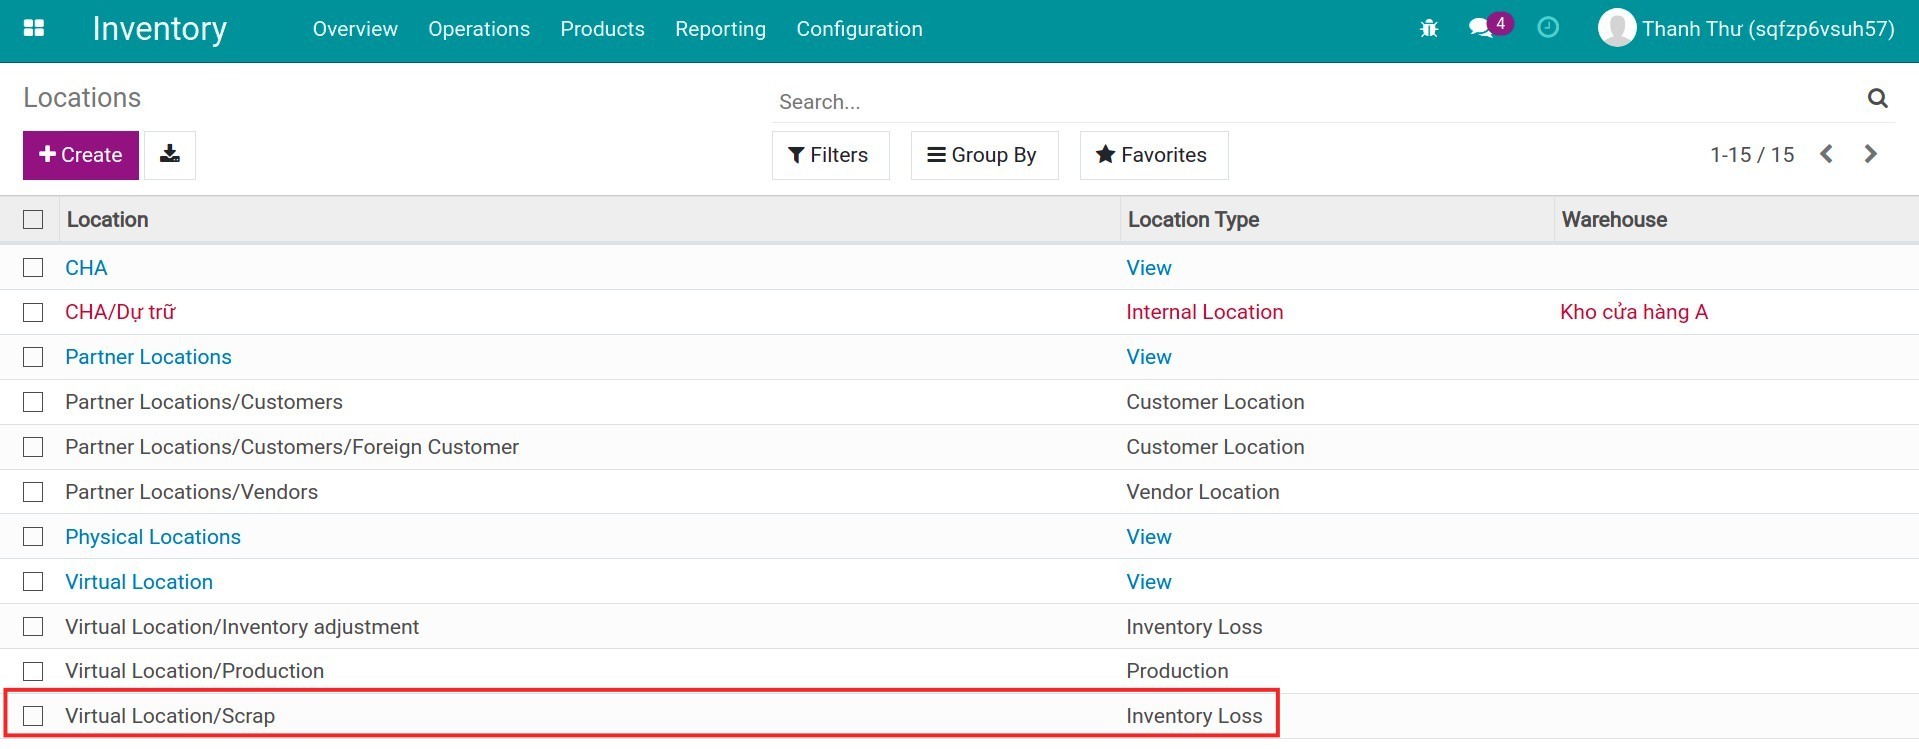
It is mandatory to check Is a Scrap Location?. In the Accounting Information, you need to set up Accounting Accounts to record the generated scrap’s product valuation.
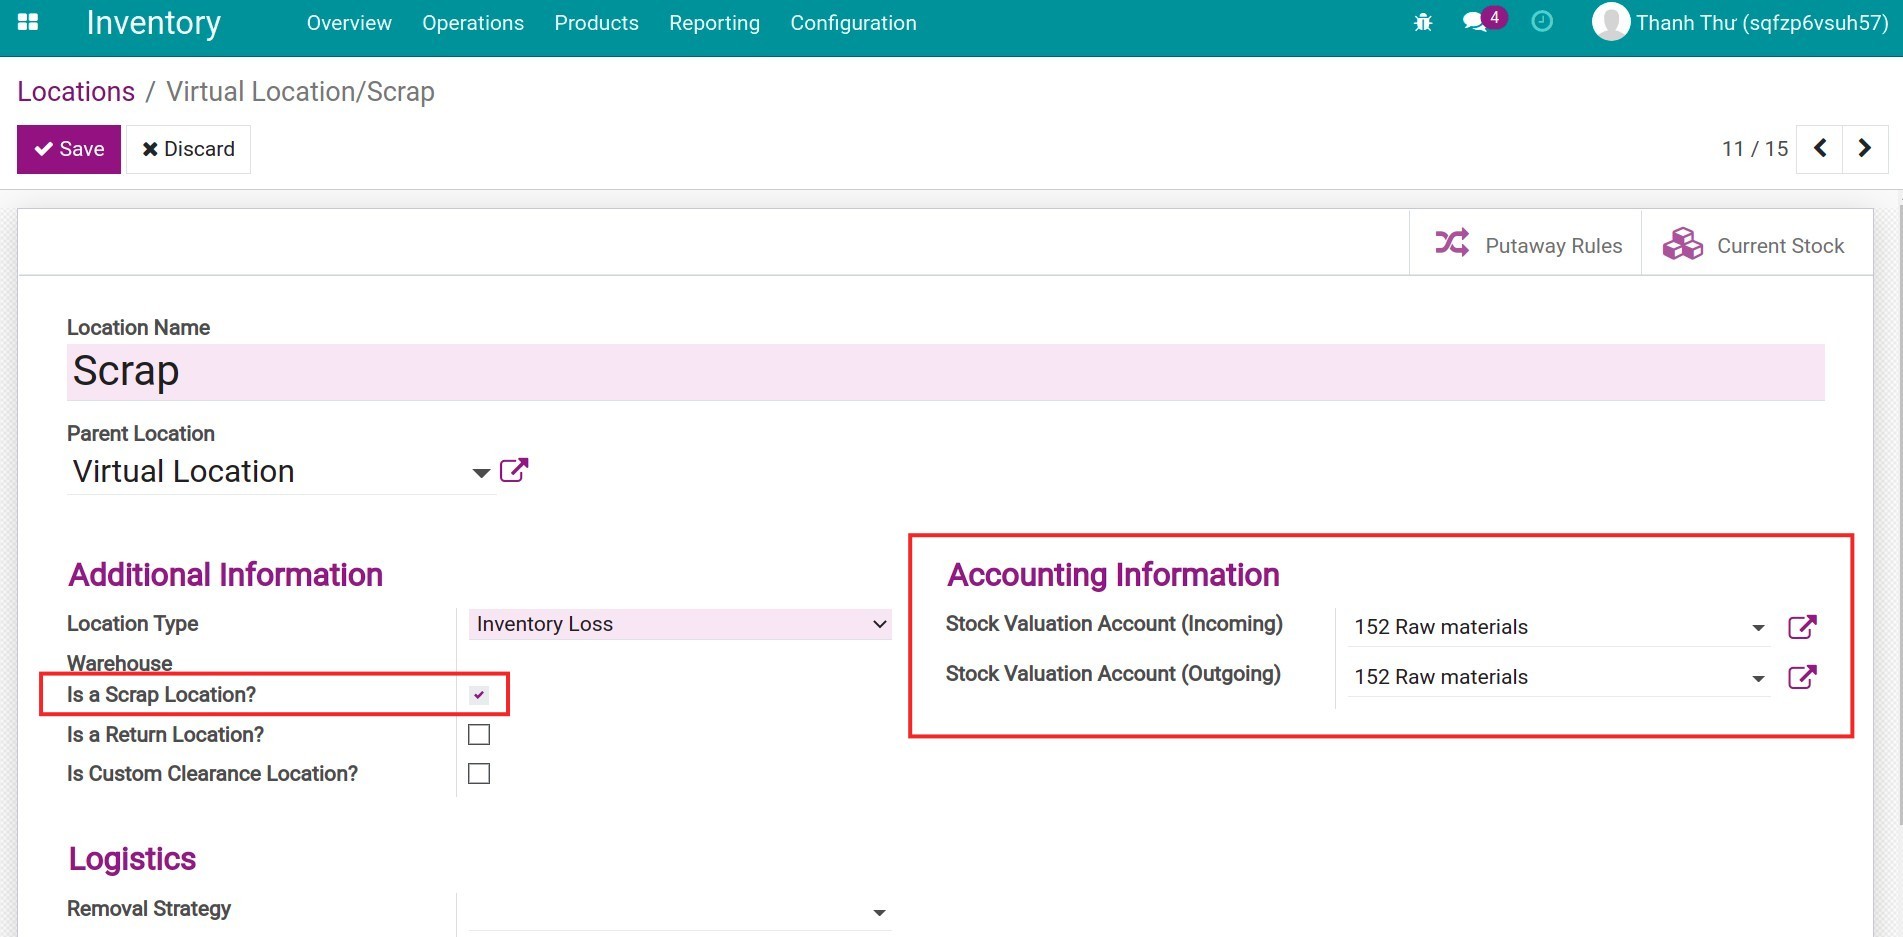
How to account for scrap in Viindoo?
Scrap can be generated during any of the receipt, delivery, or internal transfers of products and materials. However, with Viindoo All-in-one Enterprise Management Solution, the scrap recording action is similar for all of these operations. Due to that reason, this article will guide you through the Accounting for scrap in a receipt transfer.
Note
In order to have the automatic accounting entries generation as soon as scrap is created, you need to enable the Automatic Inventory Valuation on the Product category/Product settings.
In the Inventory application, click on Receipts to record a new receipt transfer or click on the To Process button to register the quantity of the products and materials received in a pending Receipts Transfer.

Once the inventory quantity is confirmed, the Scrap button appears.
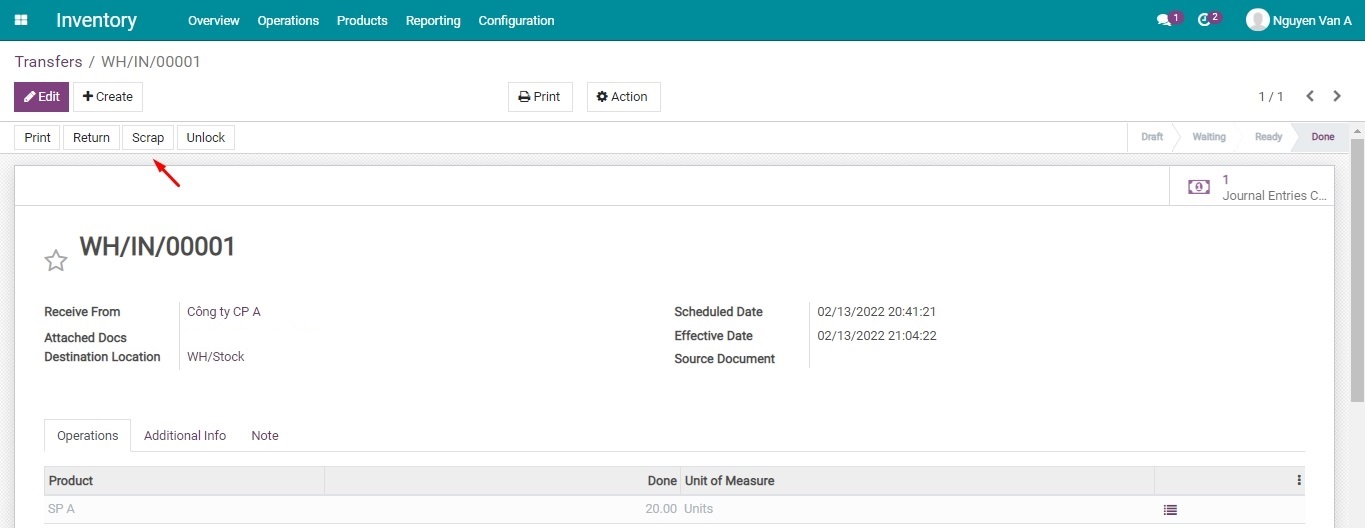
When scrap is generated, press the Scrap button to record the discarded products and materials to the Scrap location.
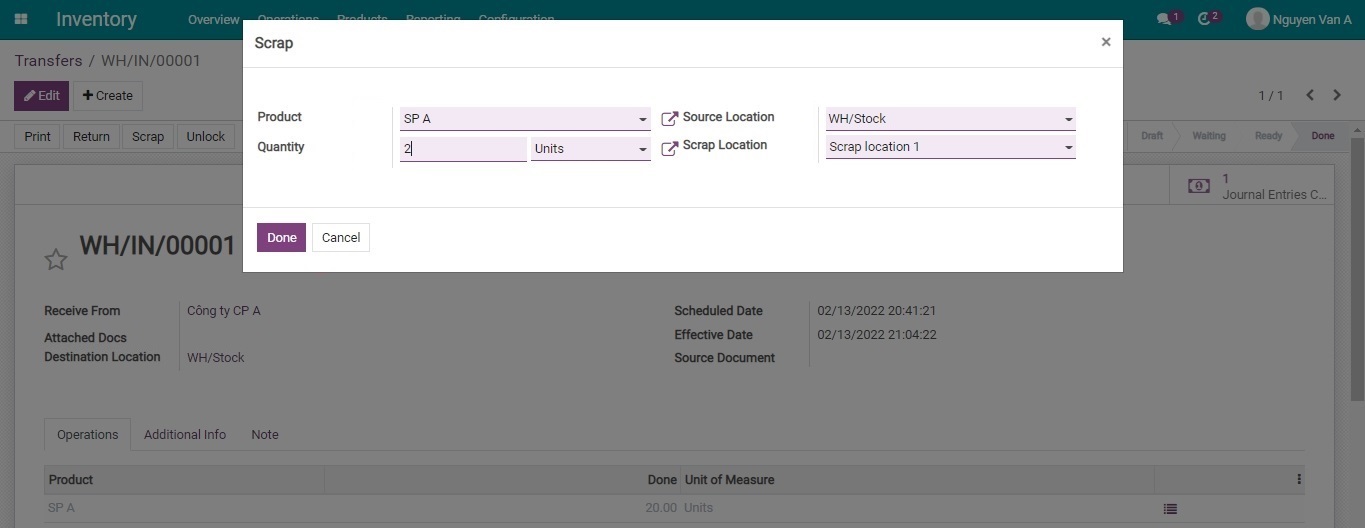 In which:
Product: Choose the product scrapped to a scrap location.
Quantity: The number of products to be scrapped.
Source Location: The storage location where the chosen product is taken.
Scrap Location: The location configured where the scrapped products are moved to.
Click Done to confirm the accounting for scrap. Now, the receipt slip is shown that this transfer has generated scrap, and simultaneously, the accounting entry related to the inventory valuation of the Scrap is registered.
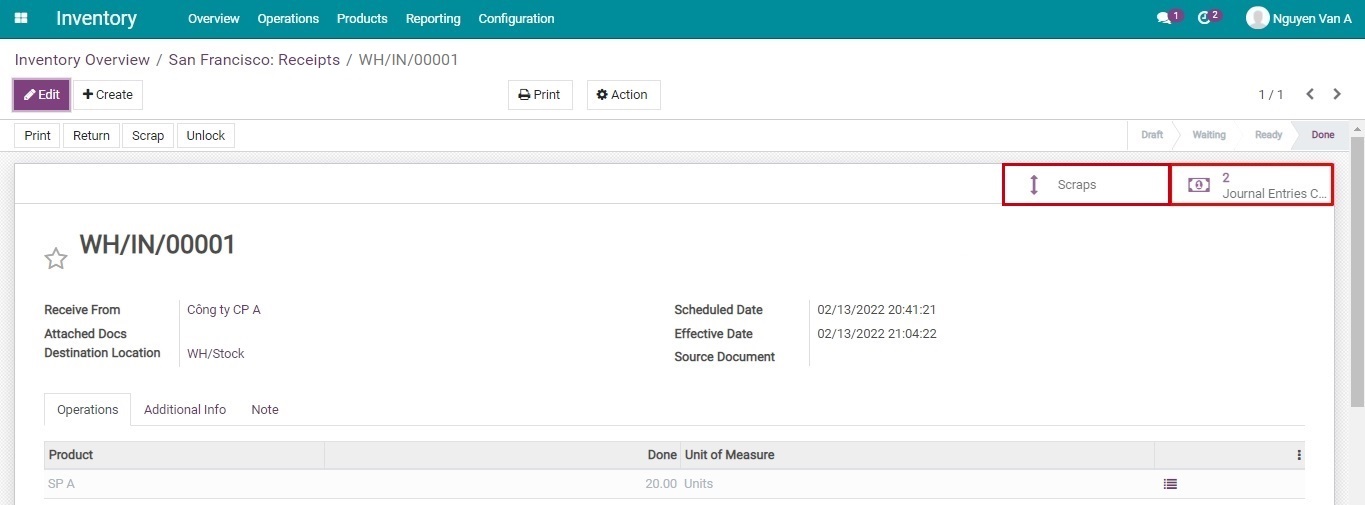
Click on Scraps to be redirected to a list of Scrap Orders created in Receipts.

Click on Journal Entries, you will see a list of journal entries generated in the Receipts.

Select the journal entries generated from this scrap transfer to see details of corresponding journal items.
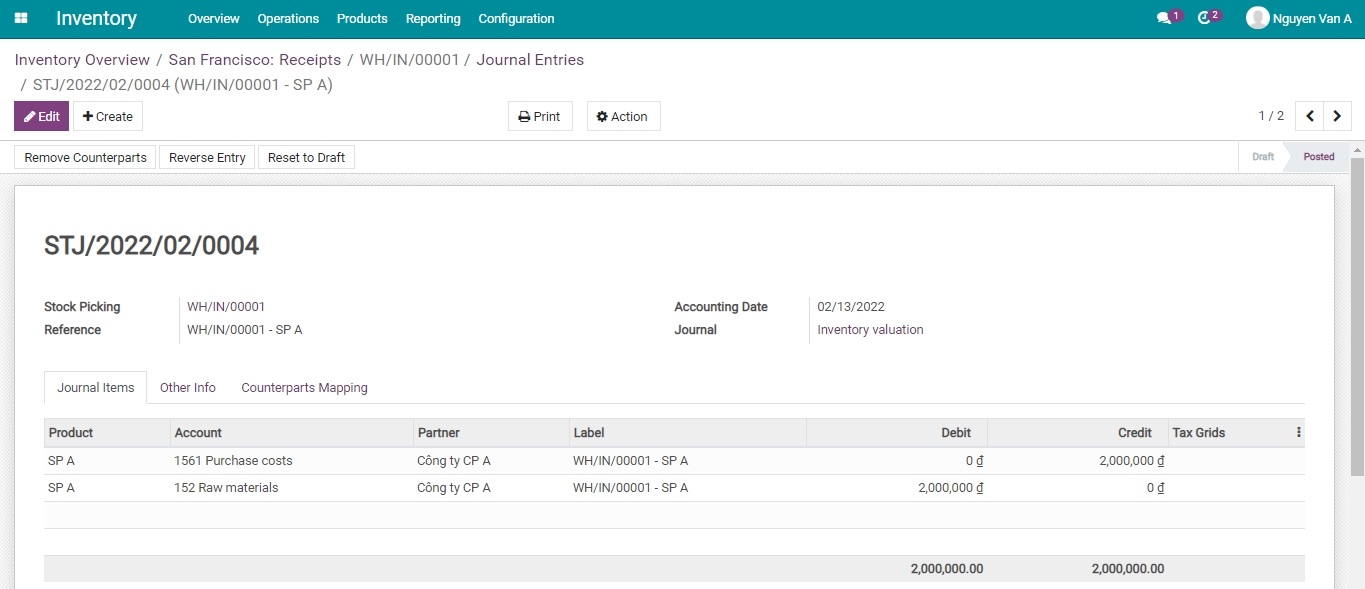
See also
Related article
Configure inventory accounting for multi-companies
Configure inventory accounting for multi-companies
In the multi-companies environment, you can set up an analytic account for each warehouse of each company.
To learn how to use this feature, let’s do the setup together in the following example:
The Accounting accounts for surplus and shortage of assets after an inventory activity are recorded by the 02 companies as follows:
Company A:
Excess assets after inventory: Account 3381 - Surplus of assets awaiting resolution.
Shortage assets after inventory: Account 1381 - Shortage of assets awaiting resolution.
Company B:
Excess assets after inventory: Account 711 - Other Income.
Shortage assets after inventory: Account 811 - Other Expenses.
Requirements
This tutorial requires the installation of the following applications/modules:
Configure accounts for a storage location
First of all, you need to enable the Storage Locations feature by navigating to: Configuration > Inventory > Warehouse > Storage Locations > Save.
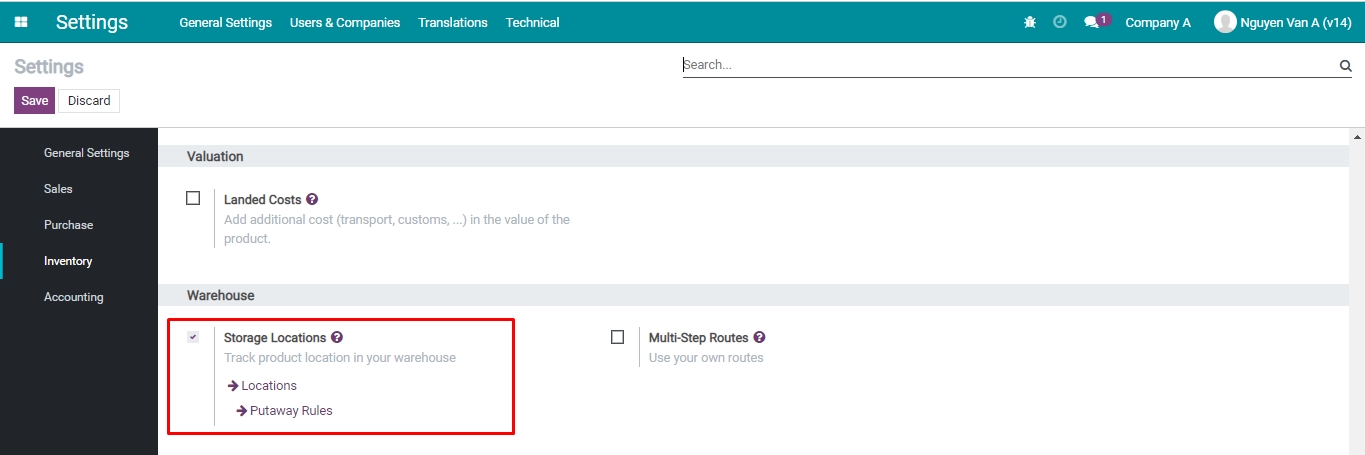
You can go to the storage locations list by navigating to: Inventory > Configuration > Locations.
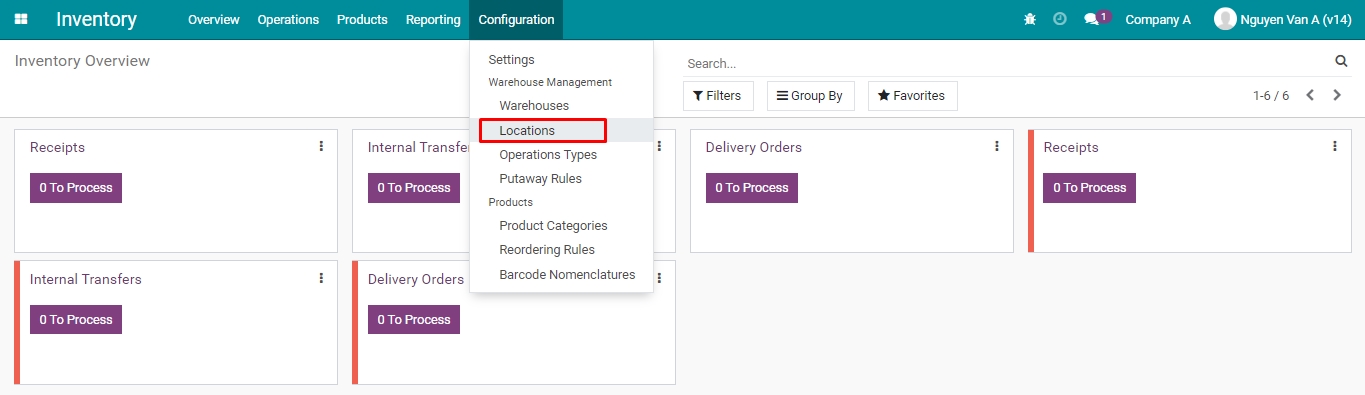
Here is where you can see the existing storage locations set up for the companies that you are looking at.

According to the example above, you need to choose the Inventory adjustment locations to configure the accounting information respectively for Company A and Company B.
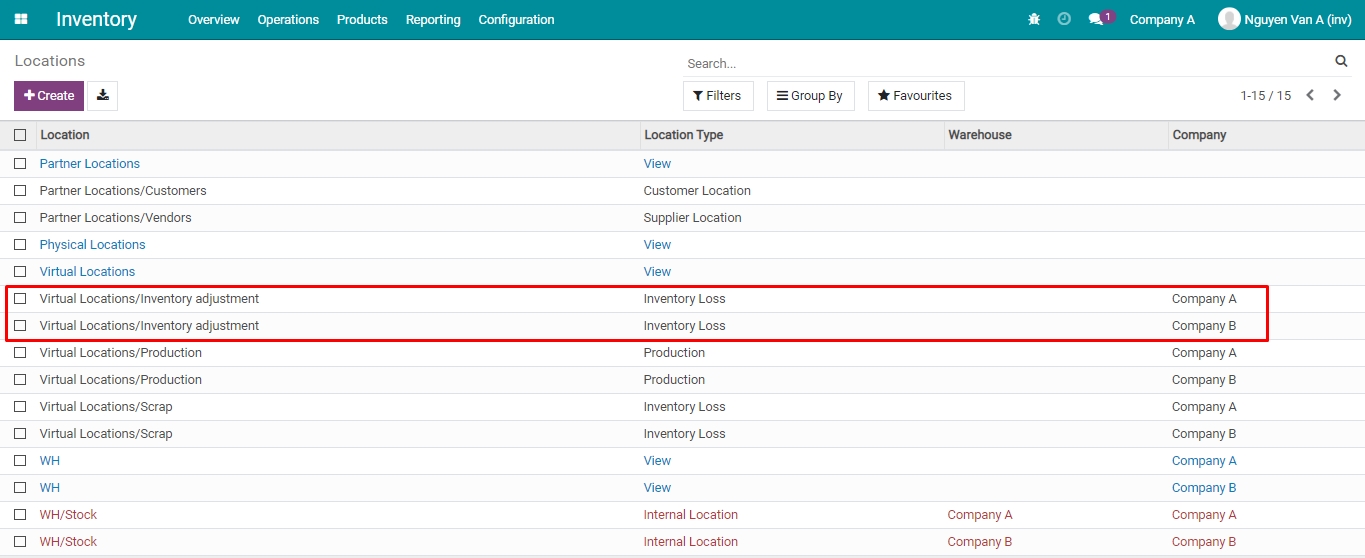
In the Accounting information section: Configure accounts for journal entries according to the information provided in the example above.
Press Save to finish the configuration.
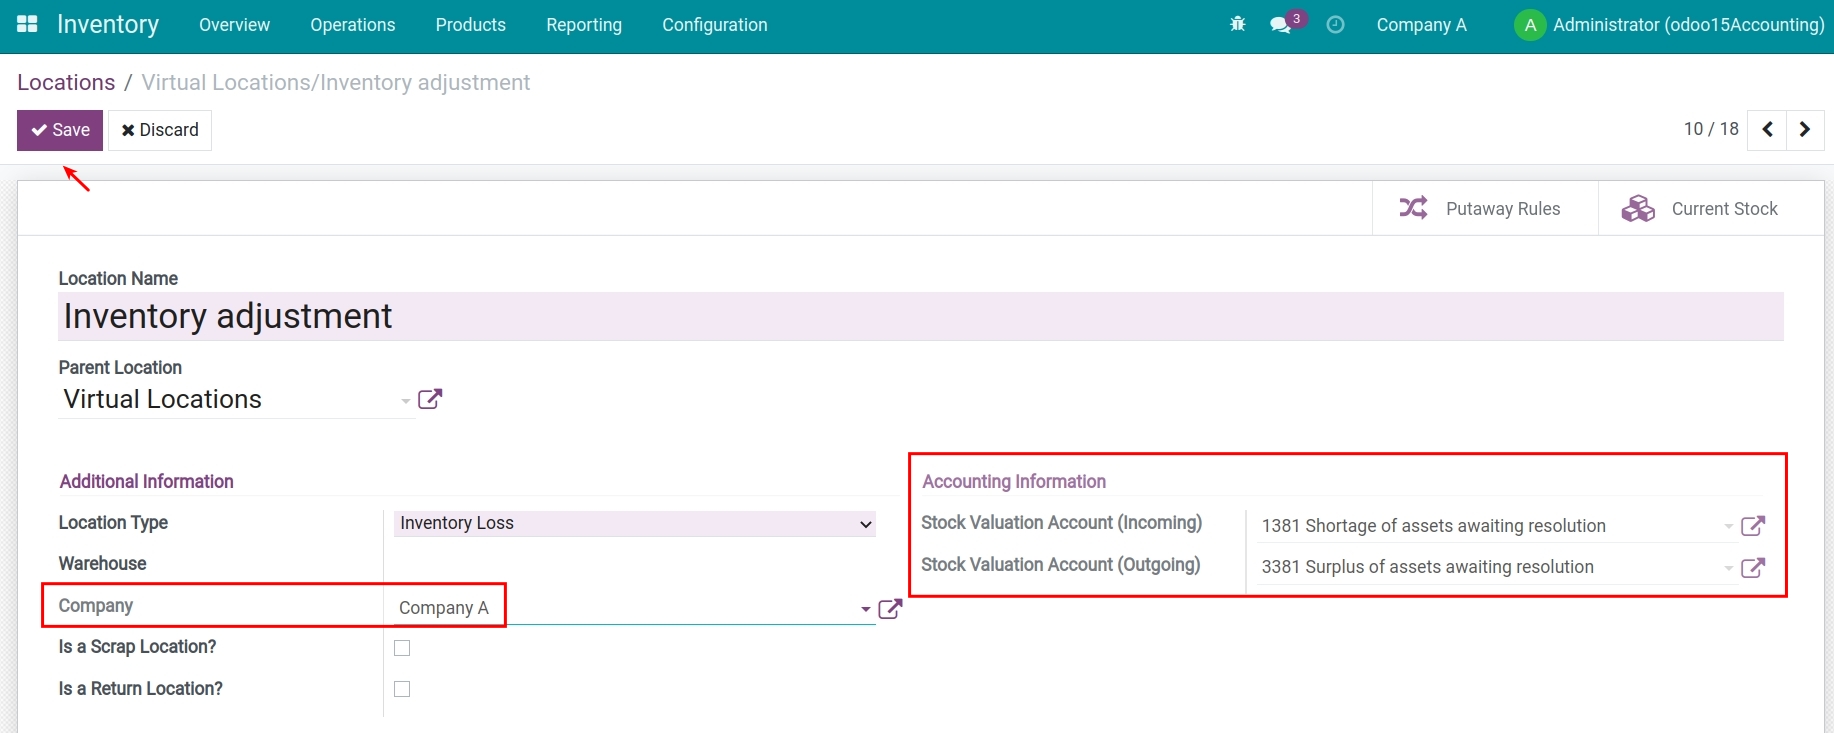
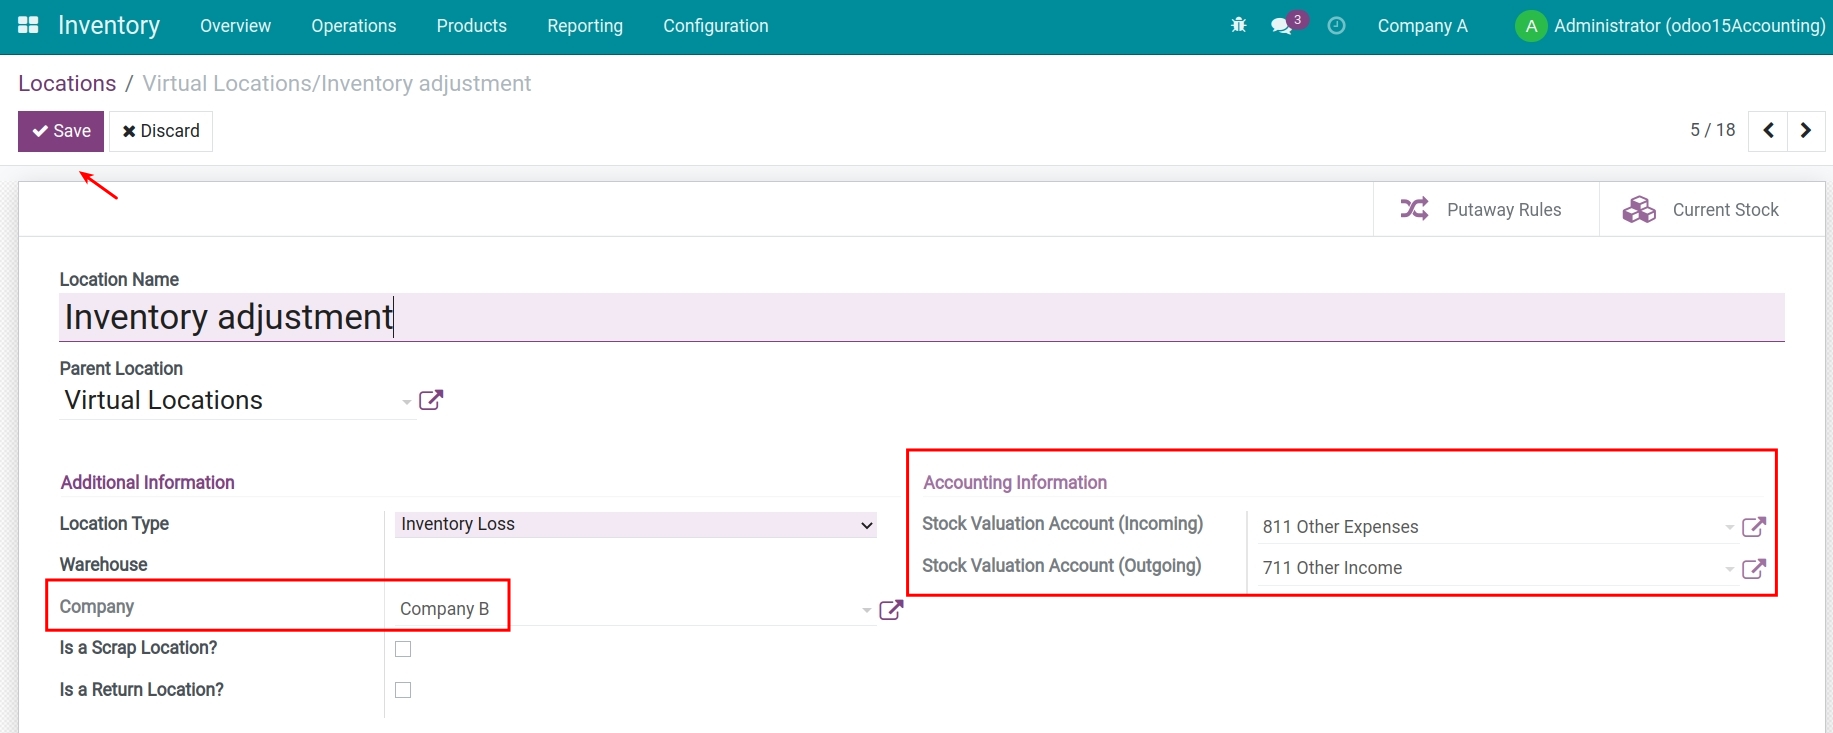
See also
View journal entries
Navigate to Accounting > Accounting > Journal Entries to see the list of generated journal entries.
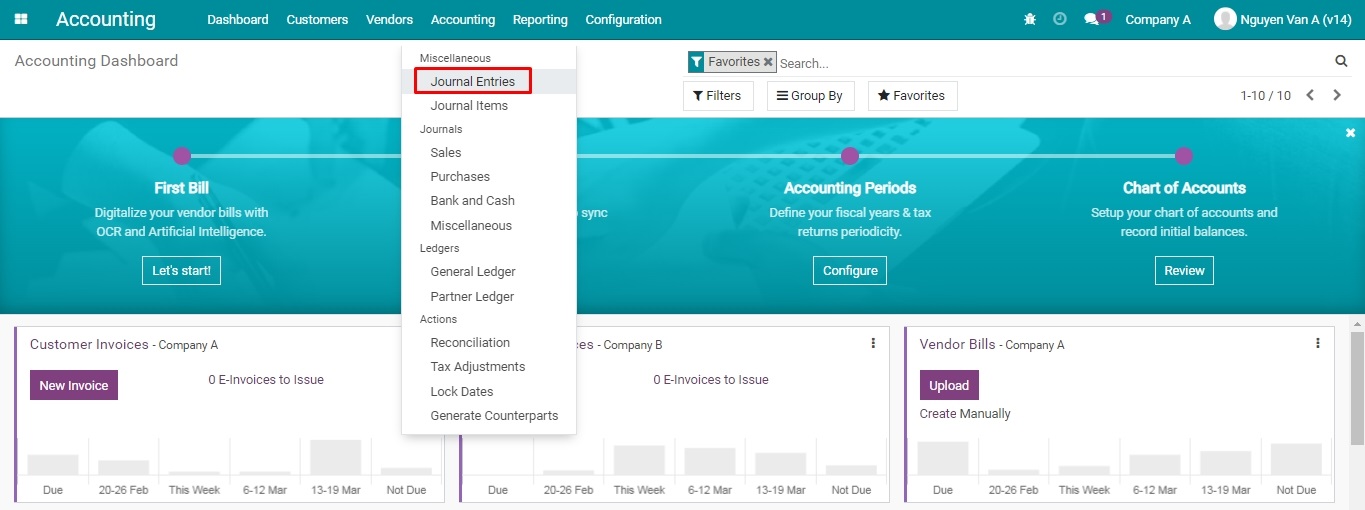
All the journal entries created from the inventory activities can be found here.
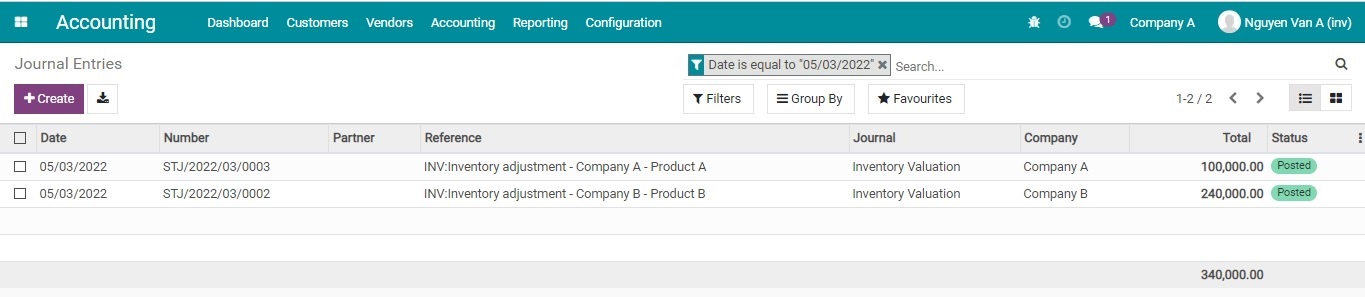
Click on each entry to view details, you will see that the journal entries recording surplus or shortage of assets after the inventory of each company are recorded differently, according to the accounting information set up initially.
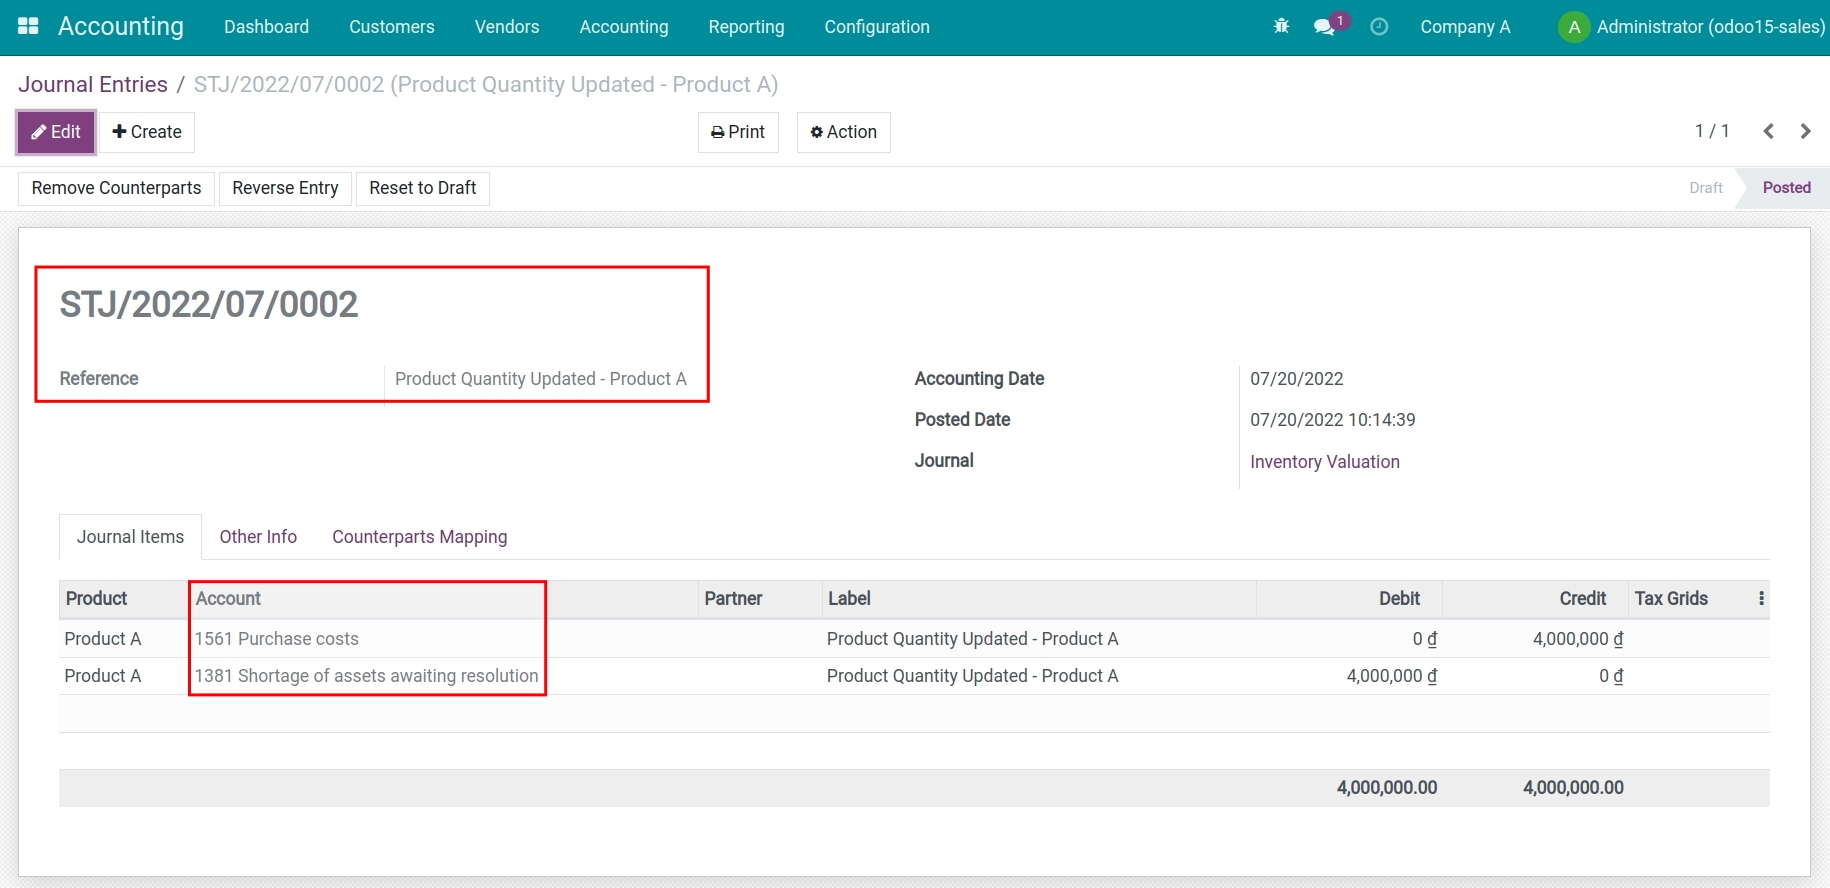
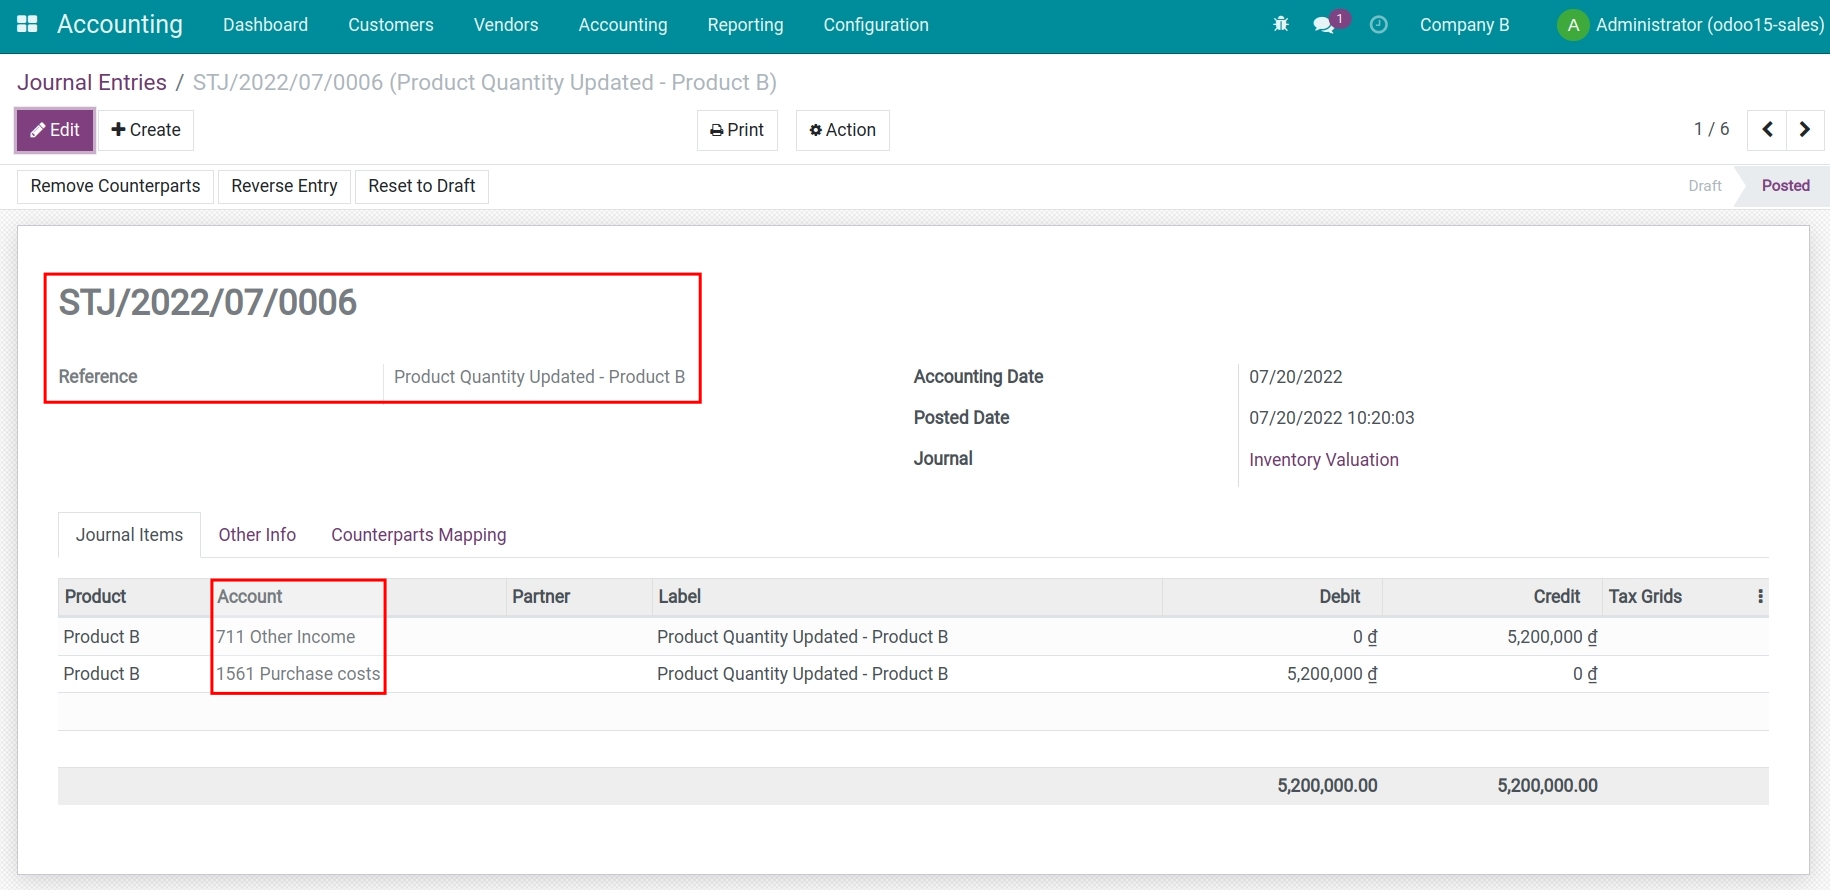
You need to do a similar configuration for the Production type storage locations.
See also
Related article
Accounting for Stock Valuation
Track employee costs in project management
Track employee costs in project management
Requirements
This tutorial requires the installation of the following applications/modules:
Viindoo Accouting & Finance
Viindoo Sales
Viindoo Project
Viindoo Timesheets
Viindoo Employees
Employee costs is an obvious cost in every production and business activity of a company. In order to come up with a plan to optimize profits, and accurately evaluate the efficiency of each business and production activity that a company performs, it is necessary to monitor this cost.
The Tracking employee costs by timesheet feature in Viindoo All-in-one Enterprise Management Solutions not only helps companies track labor costs accurately and transparently, but also easy to compare the performance result with the initial plan. From there, companies can come up with specific solutions and assessments for planning and planning for the next project.
We will show you how to use this feature on Viindoo software through the following example:
After analyzing the project, Viindoo Technology Joint Stock Company signs a contract for project ERP software implementation consulting for Customer ABC, with the following information:
Total value of the project: 40.000.000 VND;
Estimated working time: 40 hours;
Estimated Employee costs: 15.500.000 VND.
The Board of Directors decided to establish the ABC team, with 03 employees, and the cost per hour of each employee is as follows:
Phong Dao - Project Manager - Cost: 500.000 VND/hour;
Nguyet Do - Team member - Cost: 300.000 VND/hour;
Tam Vu - Team member - Cost: 250.000 VND/hour.
Then, you need to activate the Analytic account feature by navigating to Settings > Accounting > Analytic Accounting > Save.
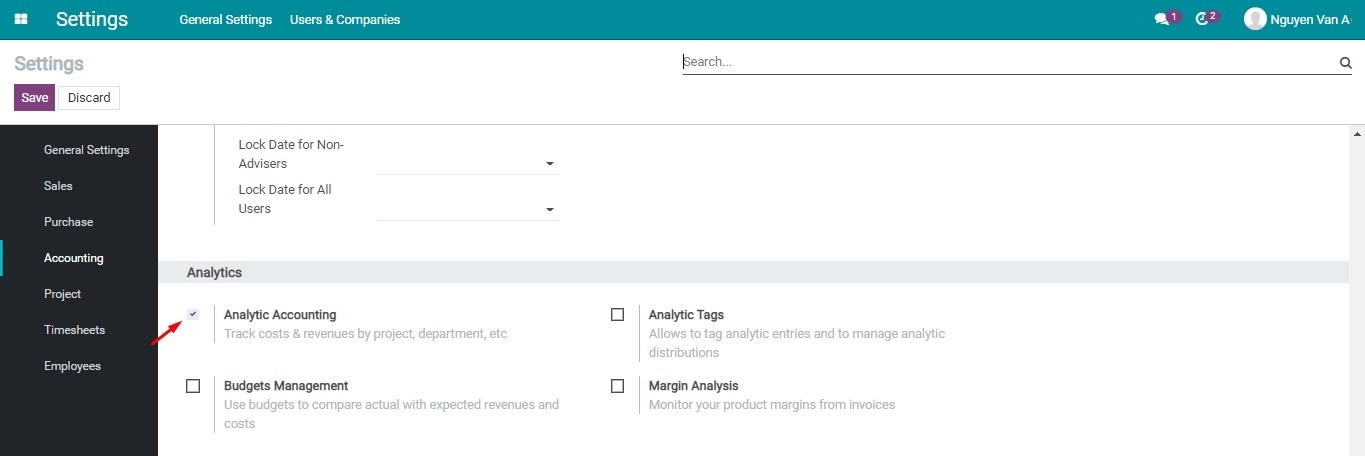
Once all the necessary modules are installed and the Analytic Accounting feature is activated, operate as instructed below:
Configure employee cost
Navigate to the Employees module and configure employee information by choosing an employee from the existing list to add more information or press on Create to set up a profile for a new employee.

In HR Settings tab, add the following information:
Timesheet Cost: Add employee cost per hour for Tam Vu as 250.000 VND per hour (1).
Related User: Add the Internal account of this user. This action will link the Employee with the corresponding related internal user. Once done, Tam Vu can start to add details to the timesheets (2).
Press Save to store these changes. Repeat the steps for other employees Phong Dao and Nguyet Do.
Create a Quotation
First, you need to create product ERP software implementation consulting.
Information to note includes:
Product Type: Service;
Create from order: Projects & Tasks;
Unit of Measure: Hours.
Next, you need to create a Sales order to register the profit of the project for Customer ABC.
When the S00004 quotation is confirmed, in the Other info tab on the sales order, an Analytic account is automatically created. This Analytic account is named after the sales order and partner, e.g. S00004 - Customer ABC.
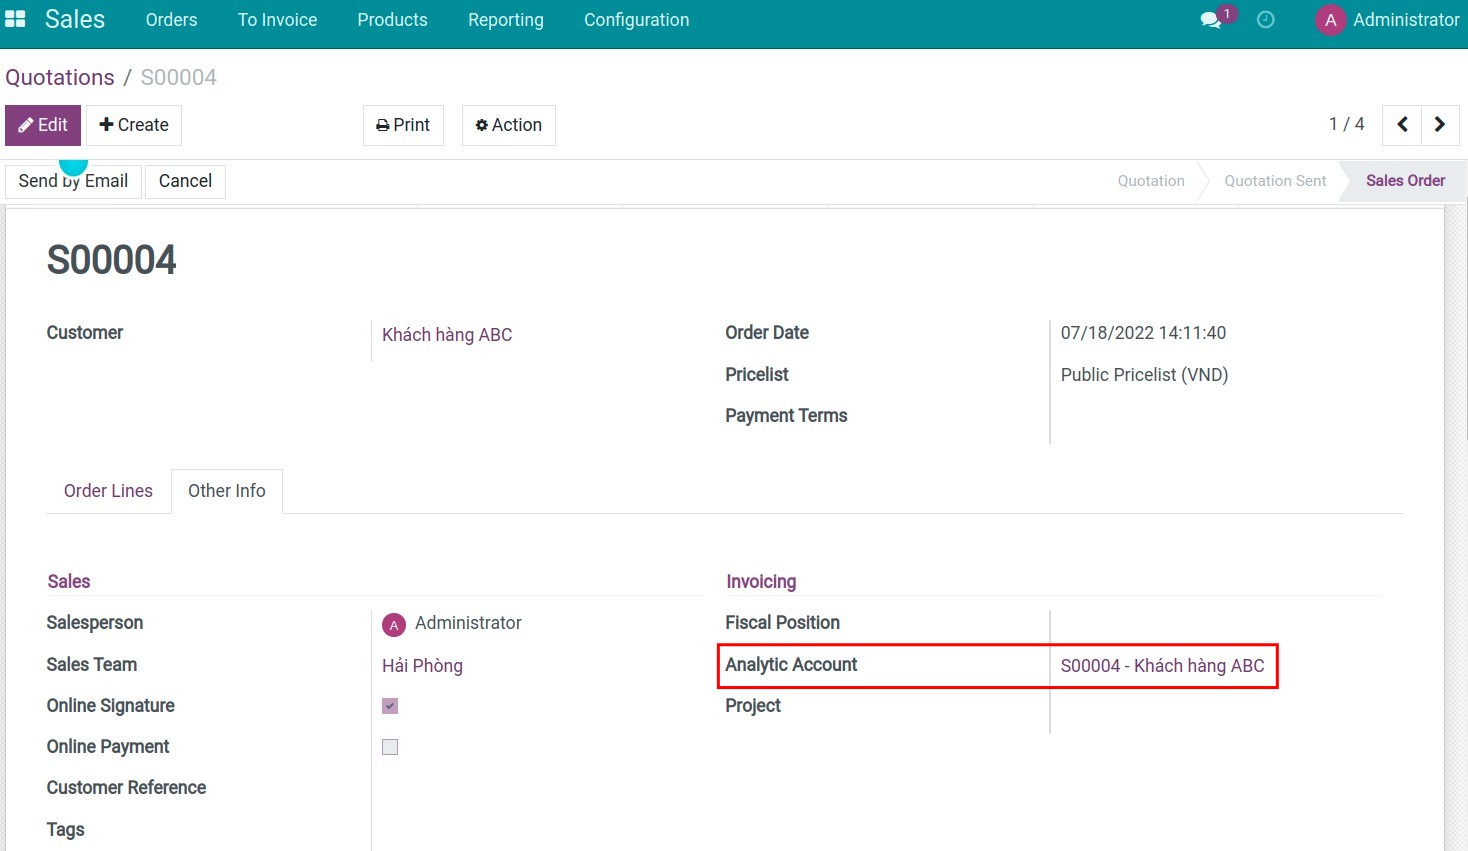
At the same time, a task is created for sales order S00004.
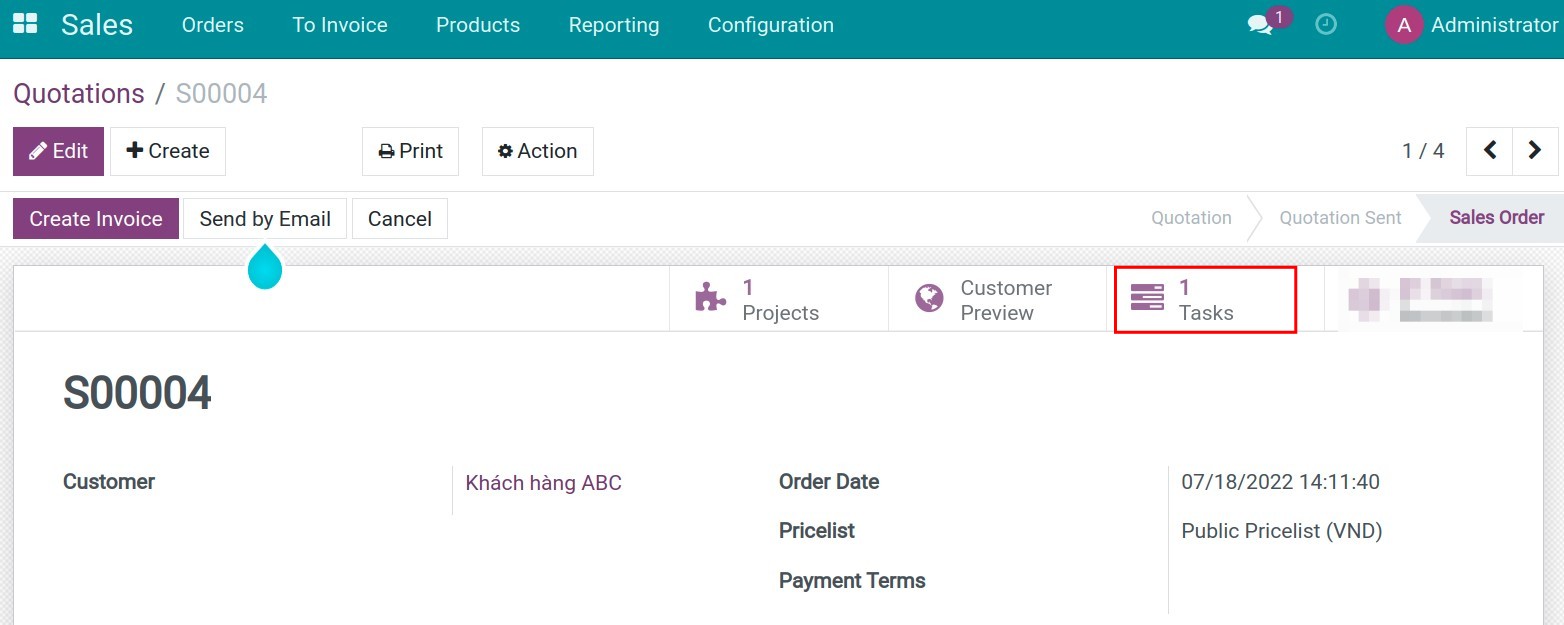
During the project, members of the ABC team have the responsibility to log their work on the Timesheets of the Task created from sales order S00004.
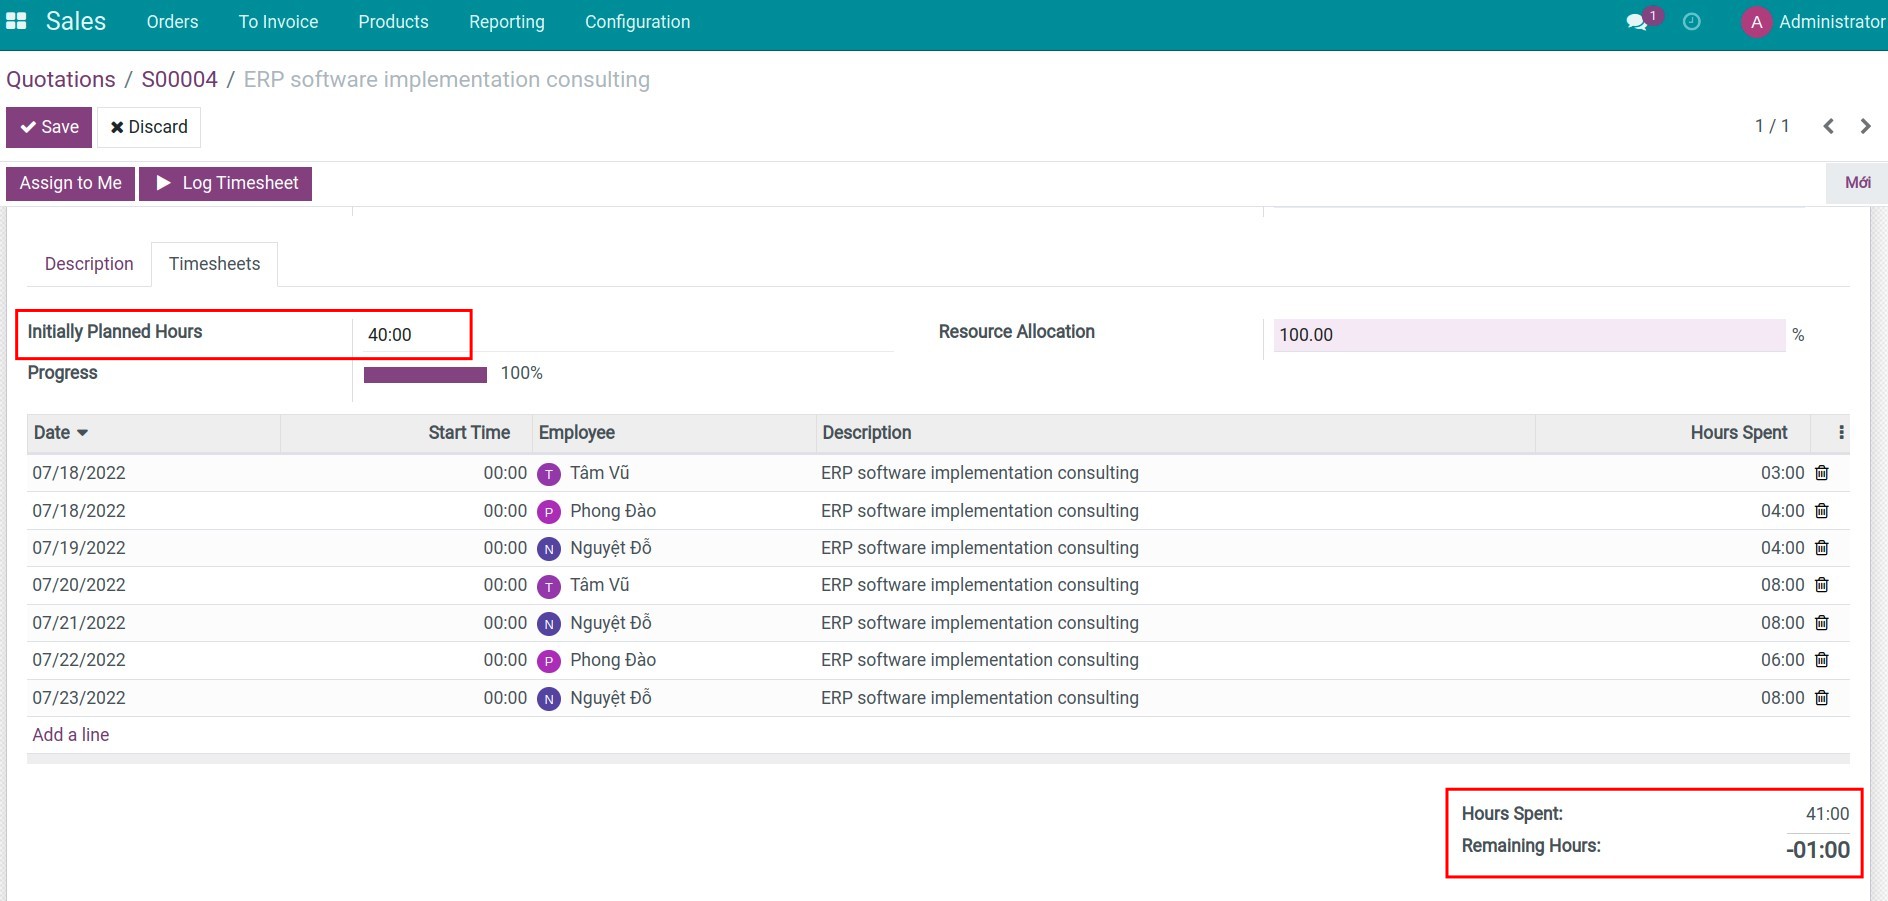
According to the Timesheet above, we can see that the real working hours spent by members of the ABC Team is 41 hours, 01 hours longer than the initial plan.
Cost and Revenue management
After the Invoice of this Sales order is confirmed, navigate to Accounting > Configuration > Analytic Accounts, search for the Analytic account S00004 of Project ERP software implementation consulting for Customer ABC to compare the Cost and Revenue of this project. In which, the Debit column represents the Employee cost and the Credit displays the Revenue from the project.

By choosing the Analytic account S00004, you will see the overall information of this sales order. Then, choose Gross Margin.
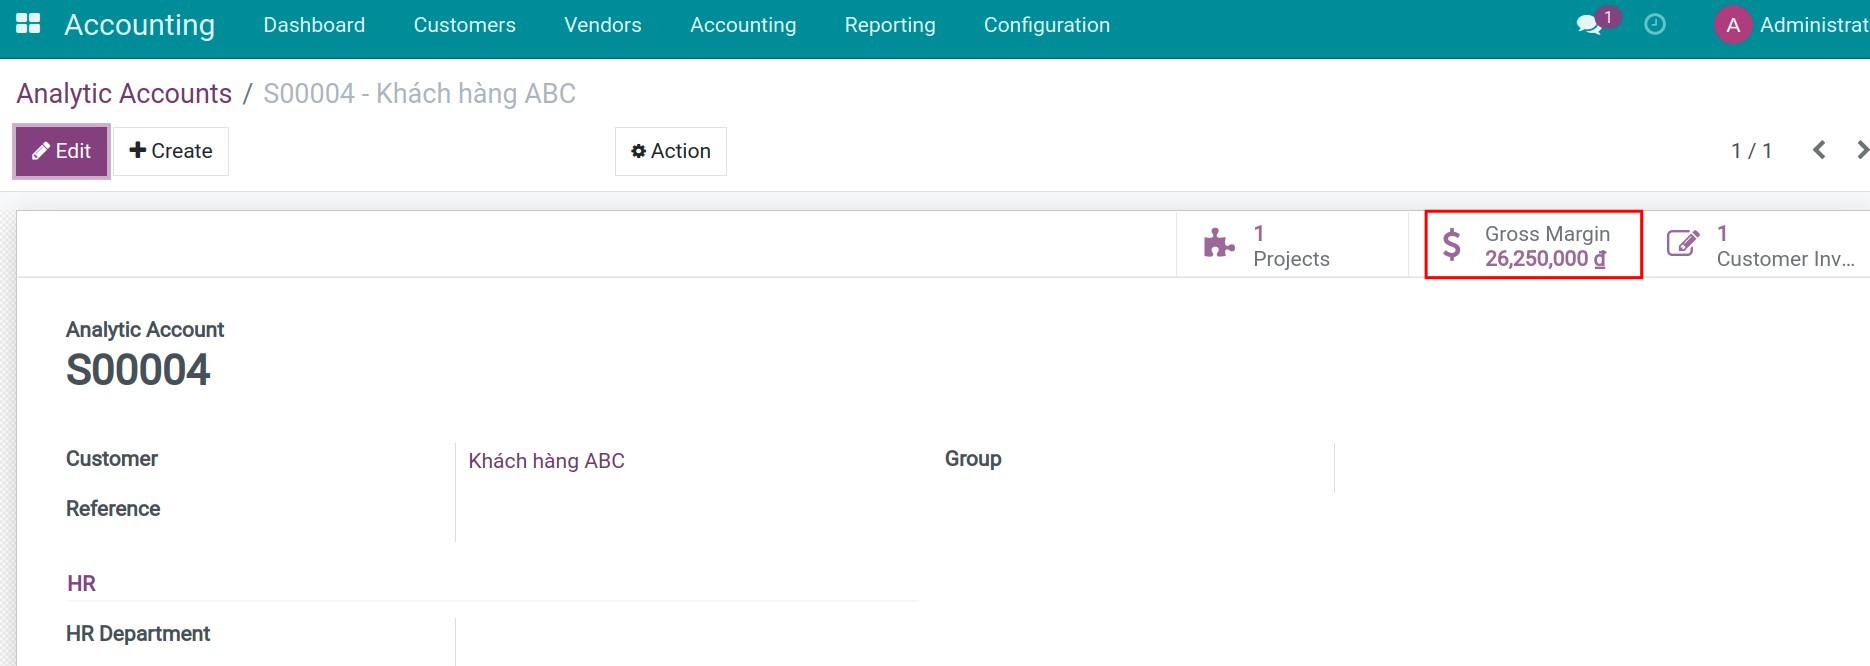
Here is where you can see details of the Revenue and Employee costs of the project.
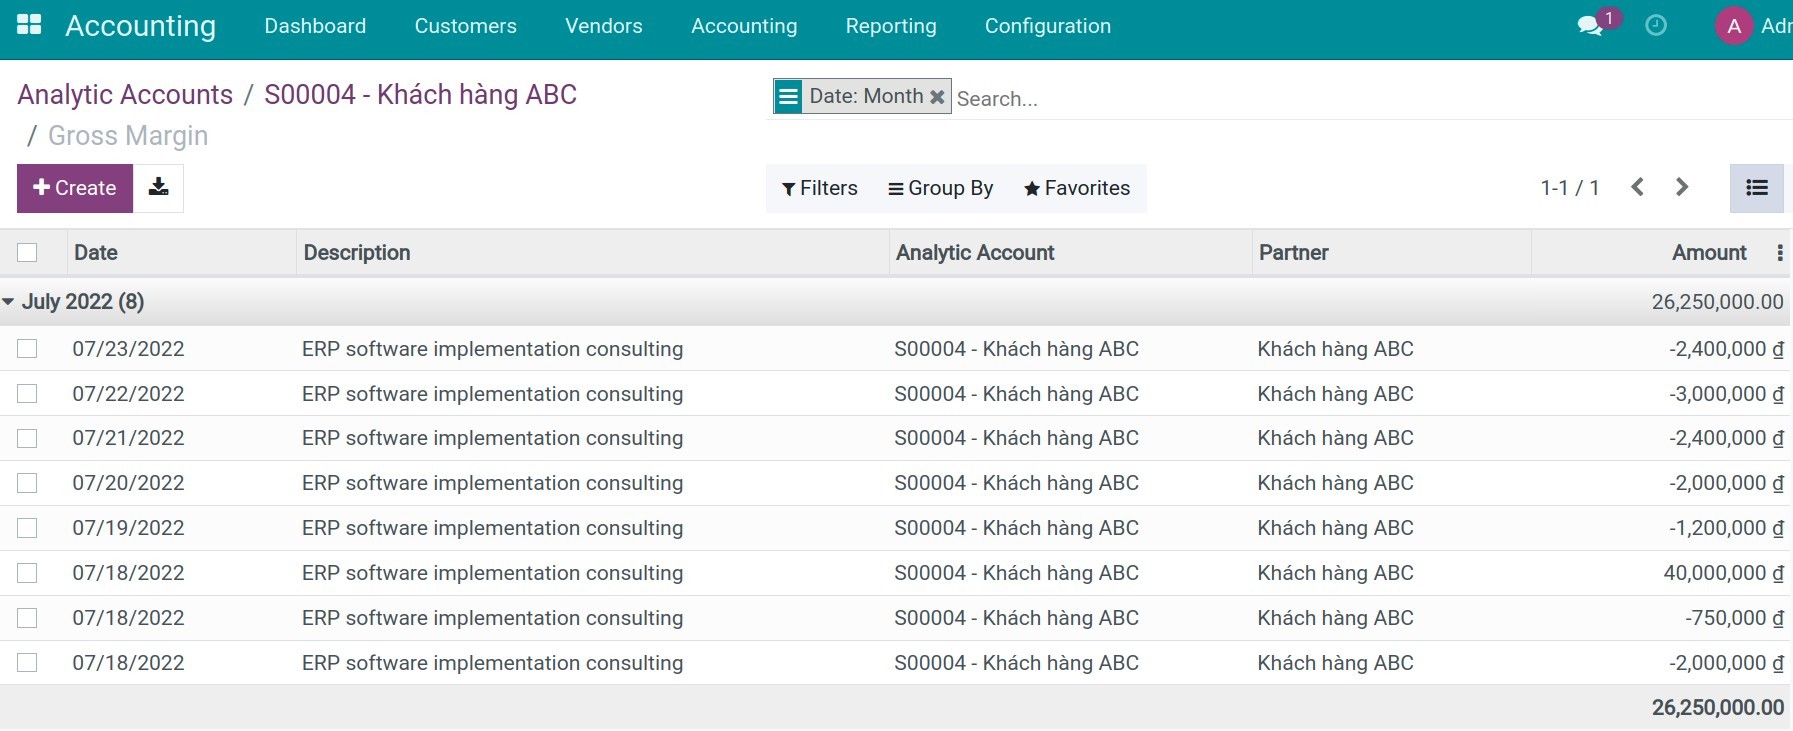
You can also see the Costs & Revenues report in a Pivot or Graph format according to your needs.
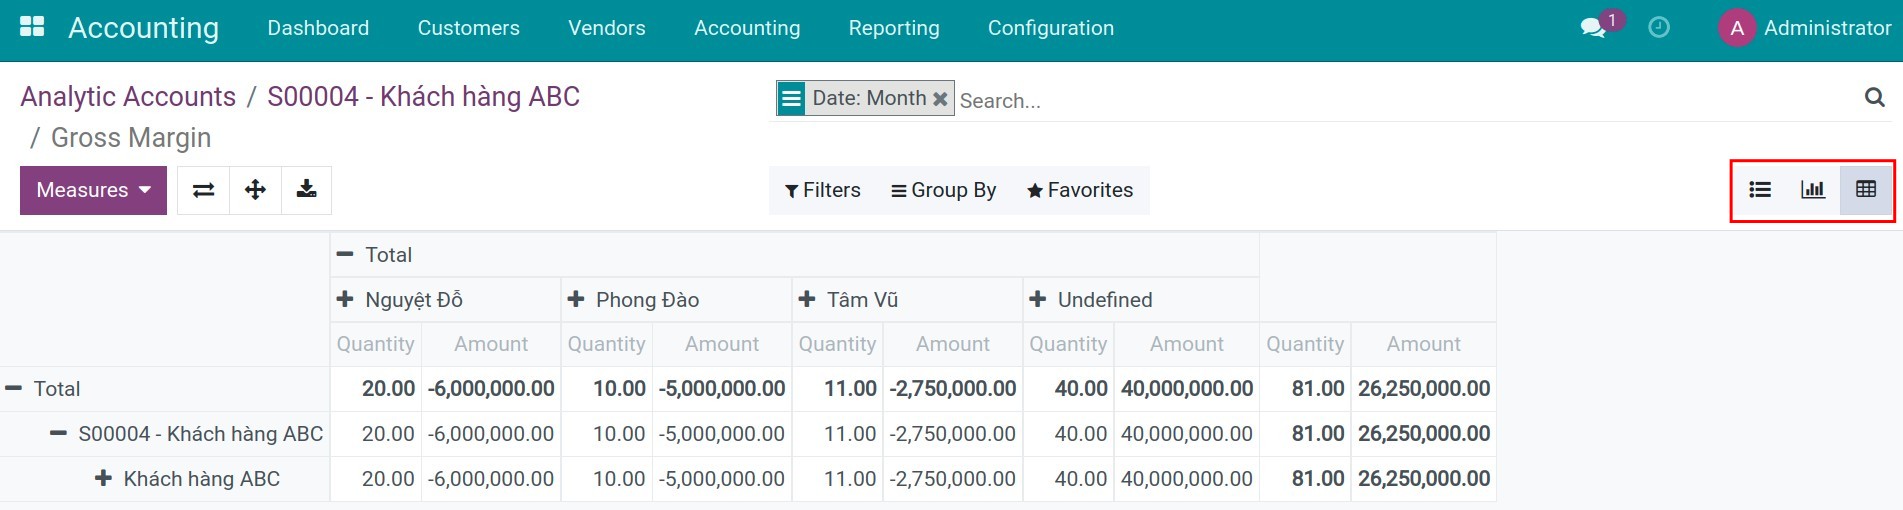
Besides, to see the Revenue and Costs items of a project, you can also navigate to Accounting > Configuration > Analytic Items.
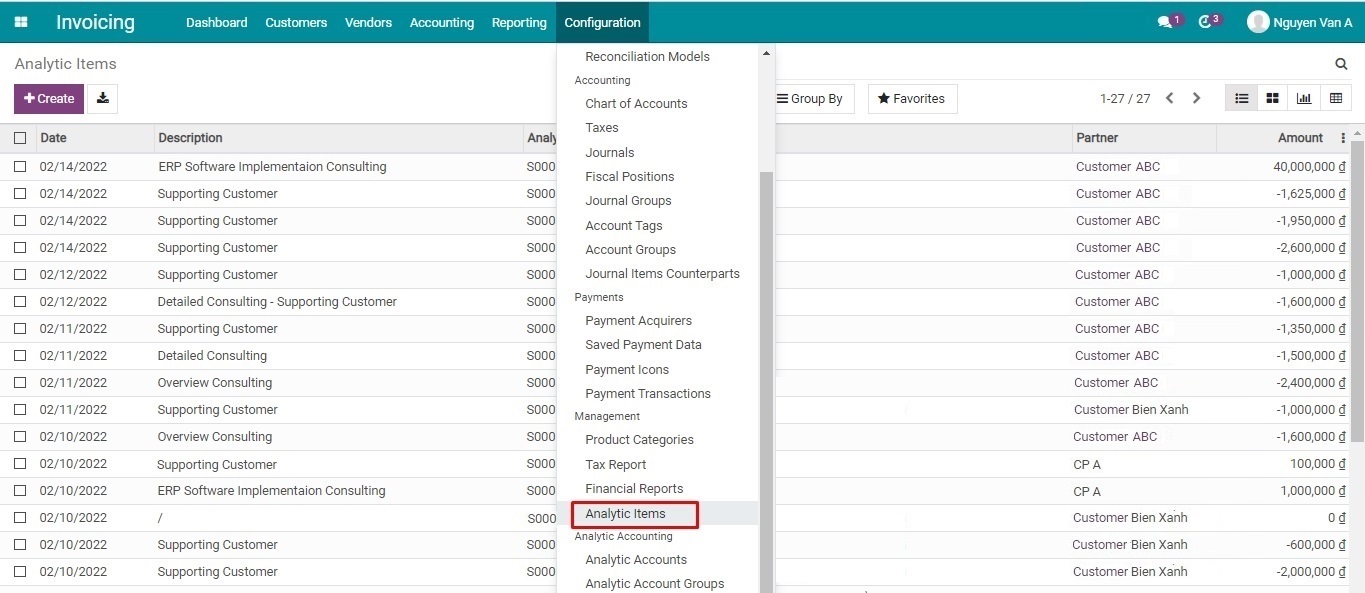
This is the list of existing Analytic items of all the Projects that the company has done. You can use filters to see details of your desired Analytic Account.
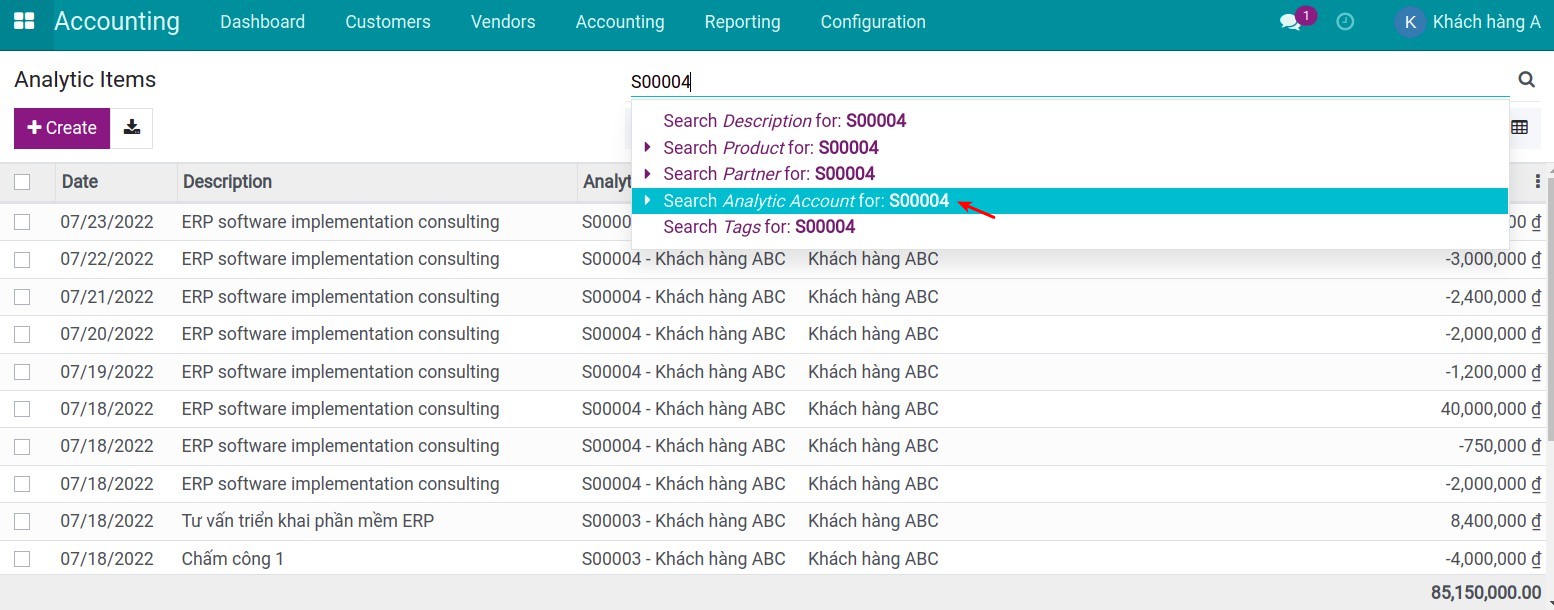
See also
Related article
Expenses and revenue management in Viindoo Accounting
Expenses and revenue management in Viindoo Accounting
Requirements
This tutorial requires the installation of the following applications/modules:
iSuite Accouting & Finance
iSuite Sales
iSuite Expense
iSuite Purchase
iSuite Employees
Introduction
Viindoo system provides analytic tools to help businesses track and manage accurately and transparently incurred costs, and compare the overall revenue/costs in the duration of orders/contracts. Analytic tools include Analytic Accounting and Analytic Tags.
In the Accounting module, you need to enable the analytics feature by navigating to Accounting ‣ Configuration ‣ Settings, going to the Analytics section, and enabling the following features:
Analytic Accounting;
Analytic Tags.
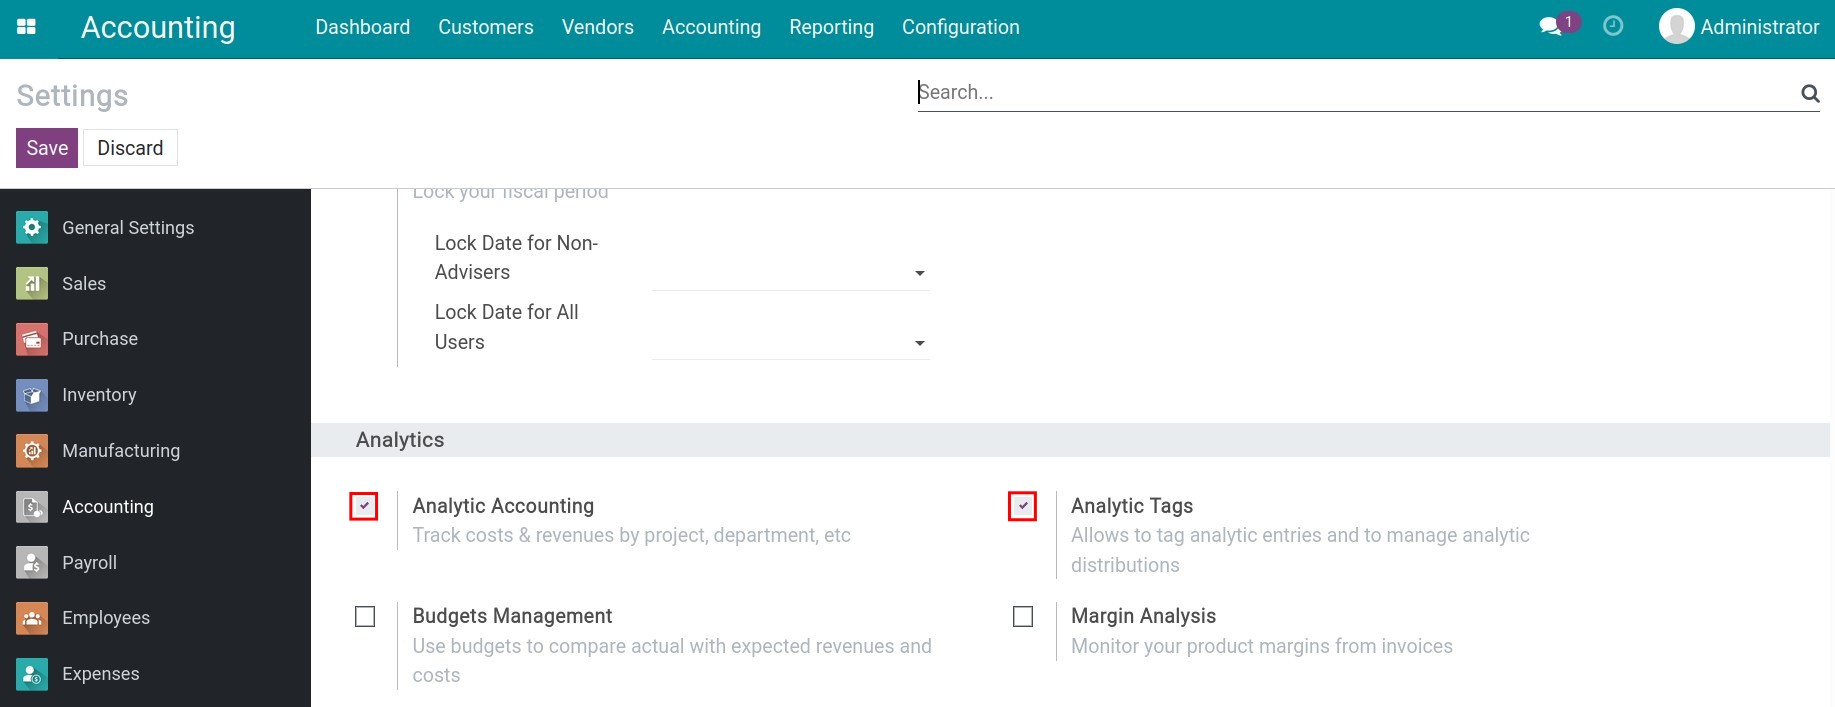
Tip
Analytic Tags are useful in situations where you need to allocate one cost item to various departments to monitor the cost/revenue of each department. For example company costs for air conditioners, water consumption, etc. From here, the administration can review and adjust the company budgets accordingly.
Analytic tools usage
Let’s use the analytic tools to track, and analyze revenue and incurred costs of a sales contract for the interior design service packages to the customer Asia Pacific as follows:
Record revenue of the contract
When the contract is signed by the customer, we will create and confirm the respective sales order by navigating to Sales ‣ Orders ‣ Orders. To analyze its revenue, we will assign an analytic account while recording the revenue as below:
Create an analytic account to track the revenue/costs of this contract.
Add the analytic account to the sales order in tab Other Info:
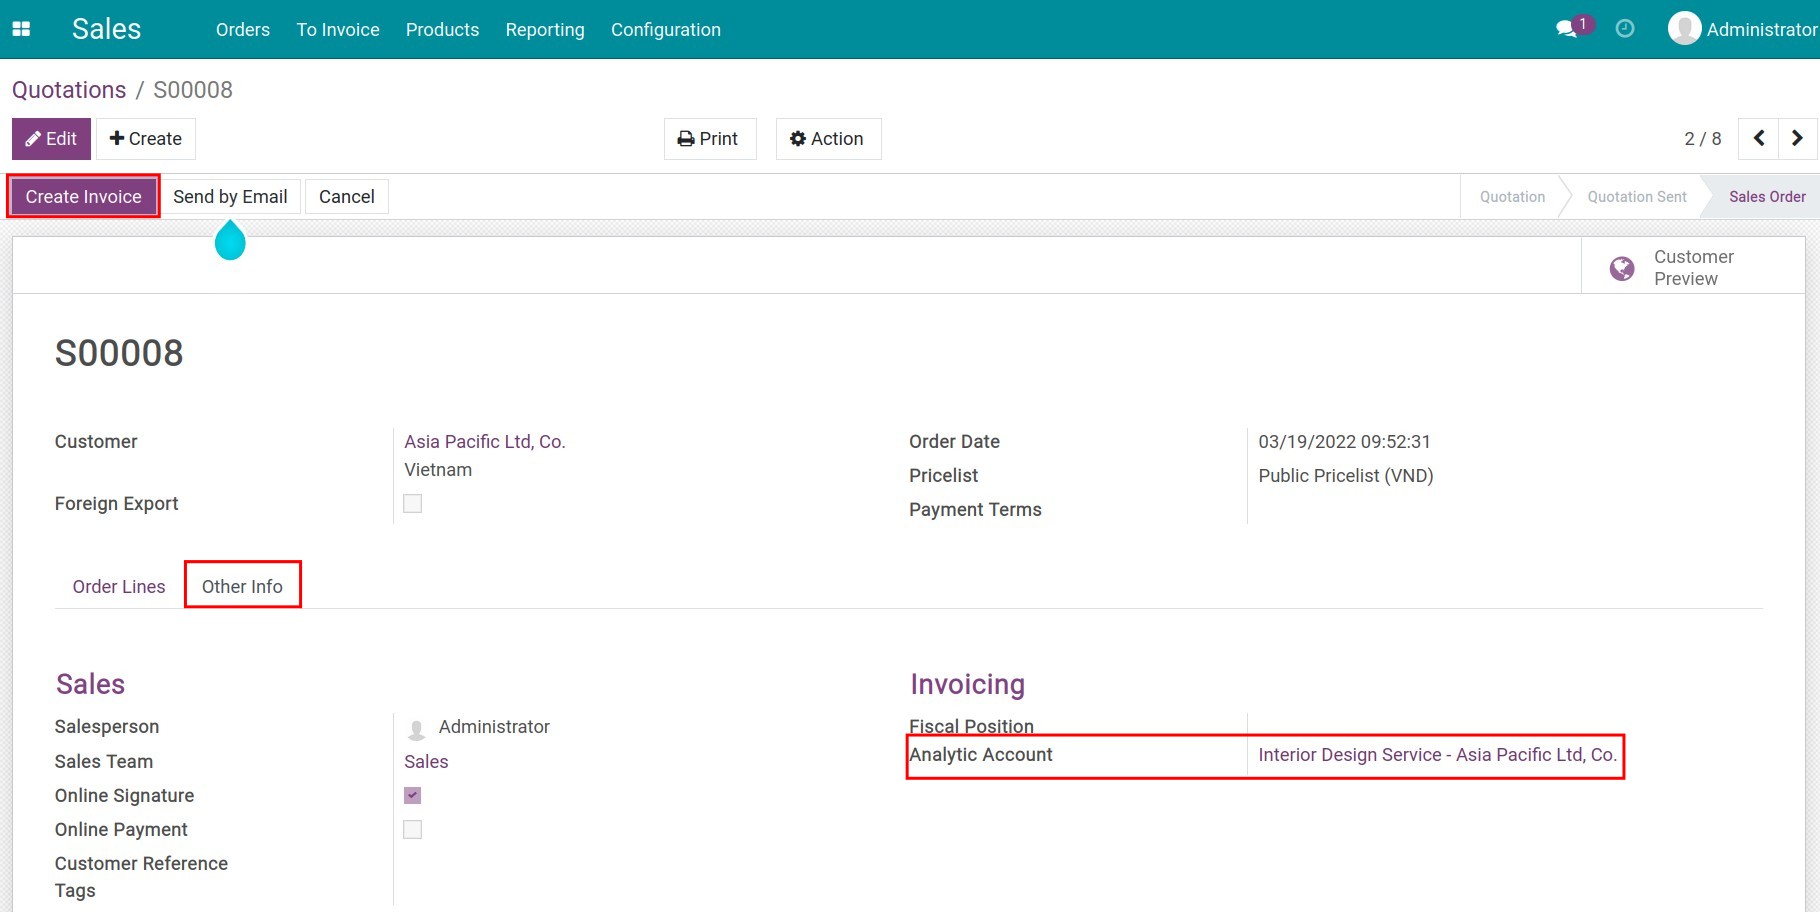
Then, when an invoice is created, this analytic account and revenue account will be automatically attached to the invoice lines to monitor the contract’s revenue:
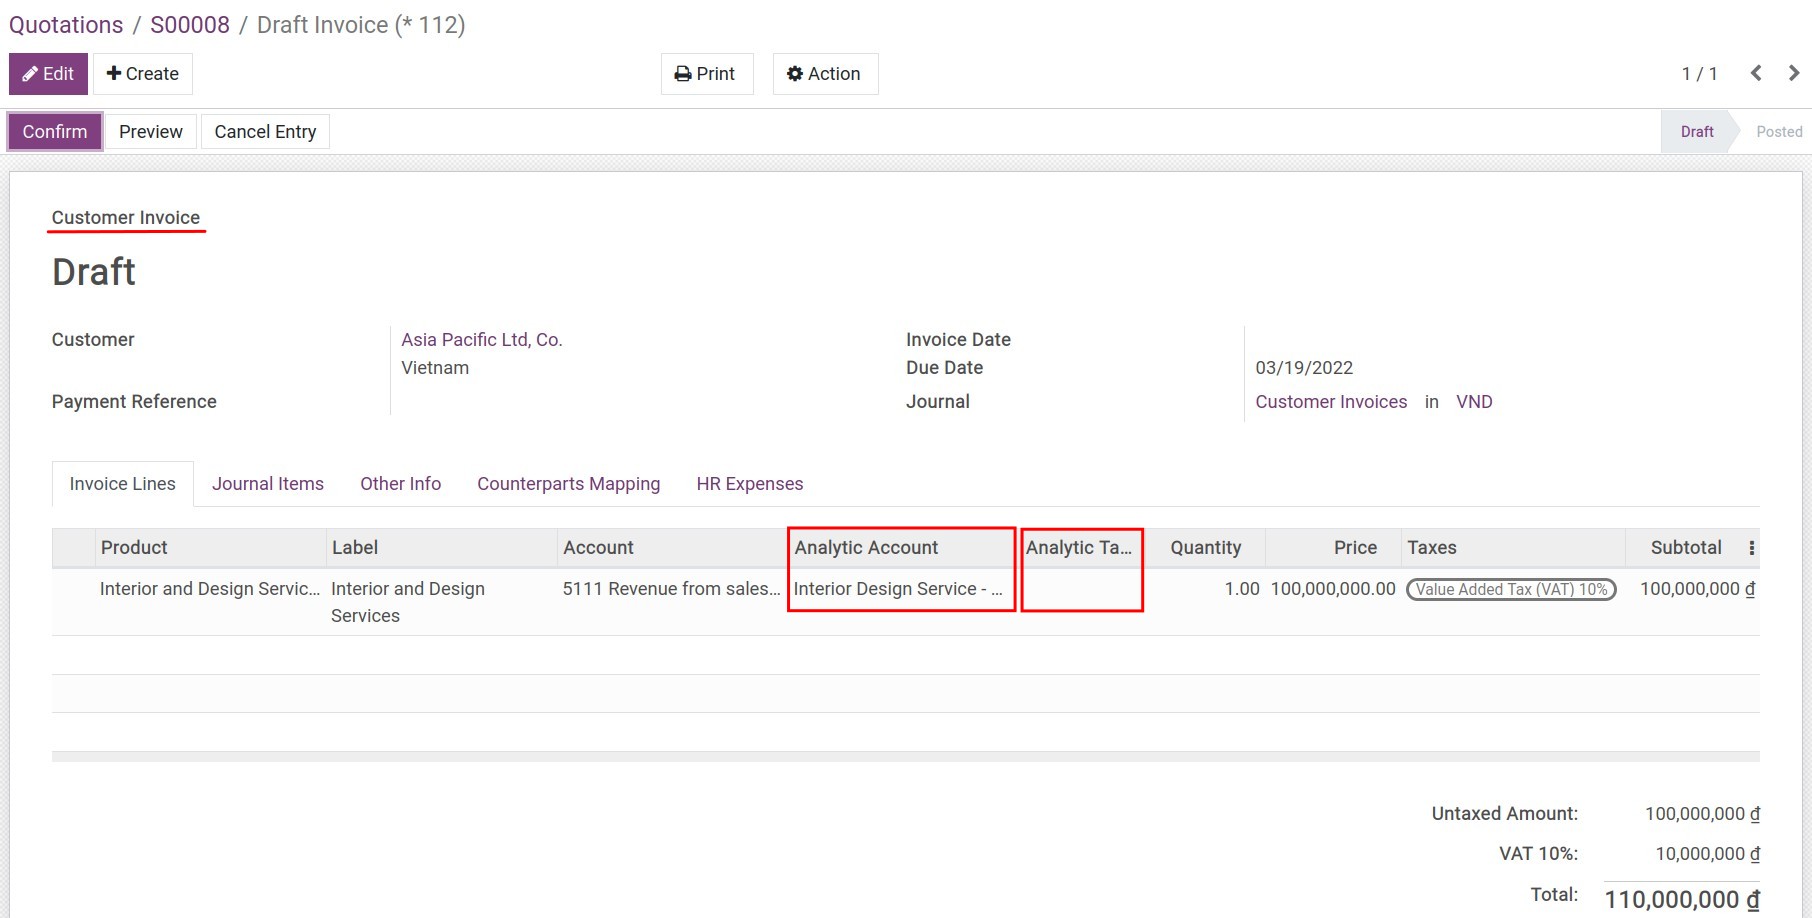
You can also add Analytic Tags to analyze with other criteria.
Record and track related costs
Costs related to the implementation of this contract may arise from the purchase of goods/services, raw materials from the supplier, or costs related to personnel, travel expenses, expenses of participating employees, etc.
Purchasing related costs
Create a purchase order as usual by navigating to Purchase ‣ Orders ‣ Orders. However, similar to a sales order, you need to add an analytic account to the purchase order. To analyze these costs in different criteria, you can use analytic tags:
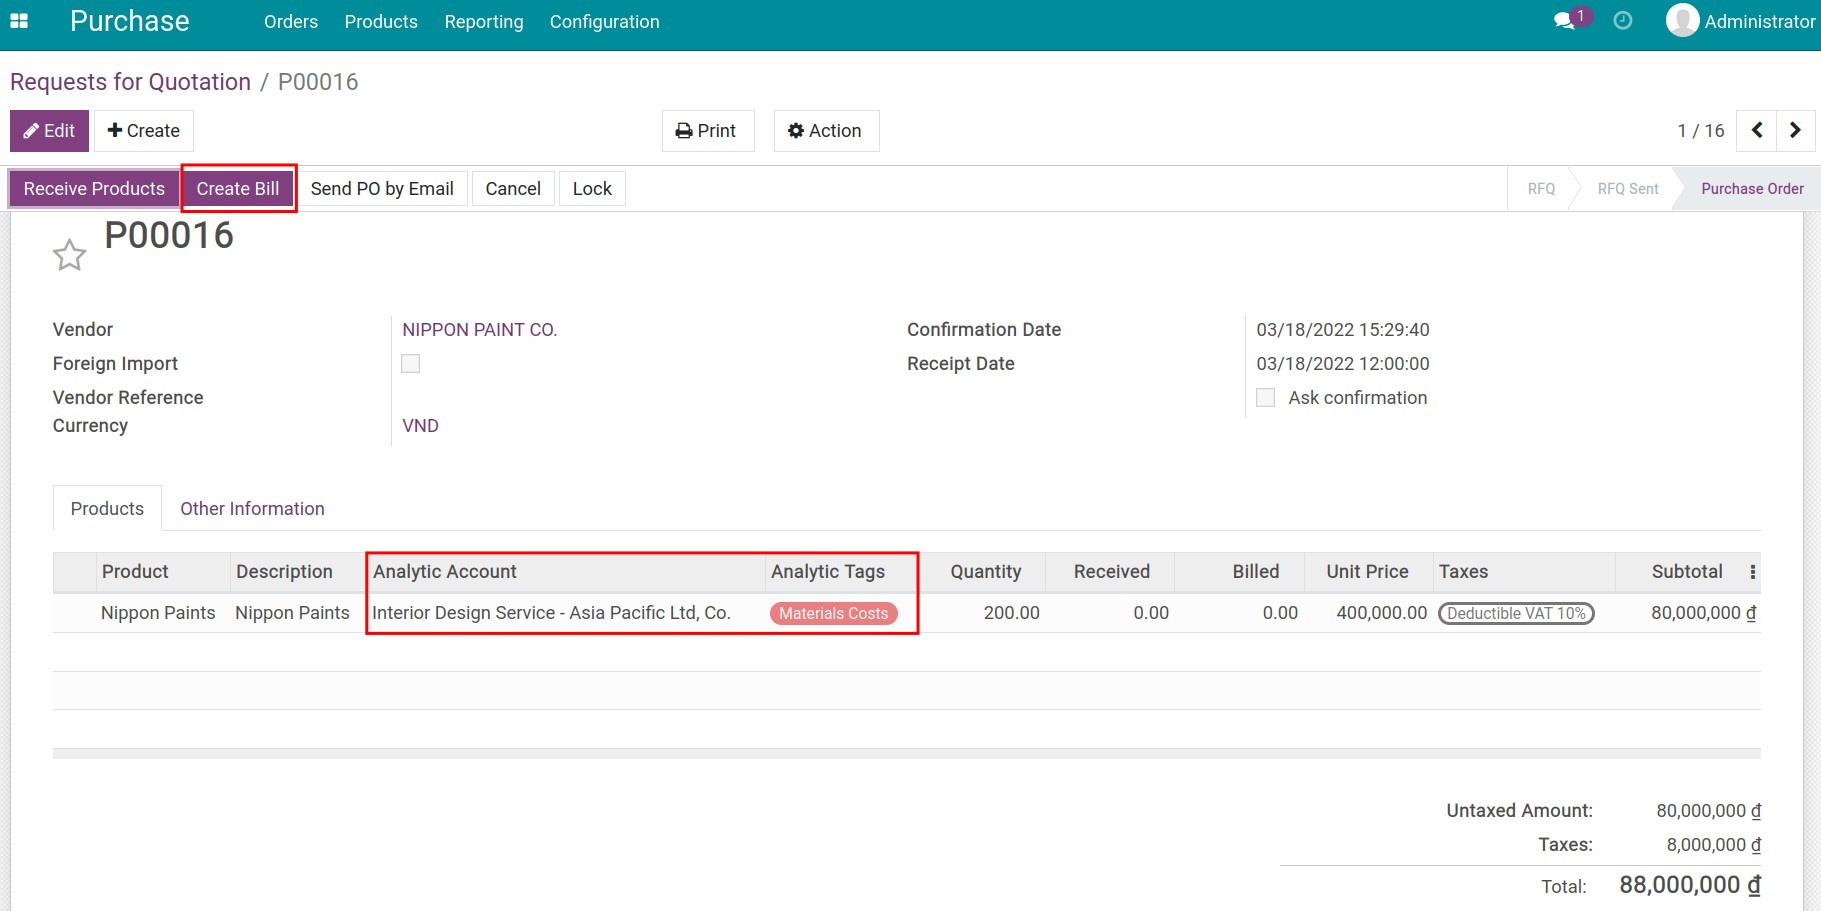
At this step, the newly generated vendor bill will also have the corresponding analytic account and analytic tags attached:
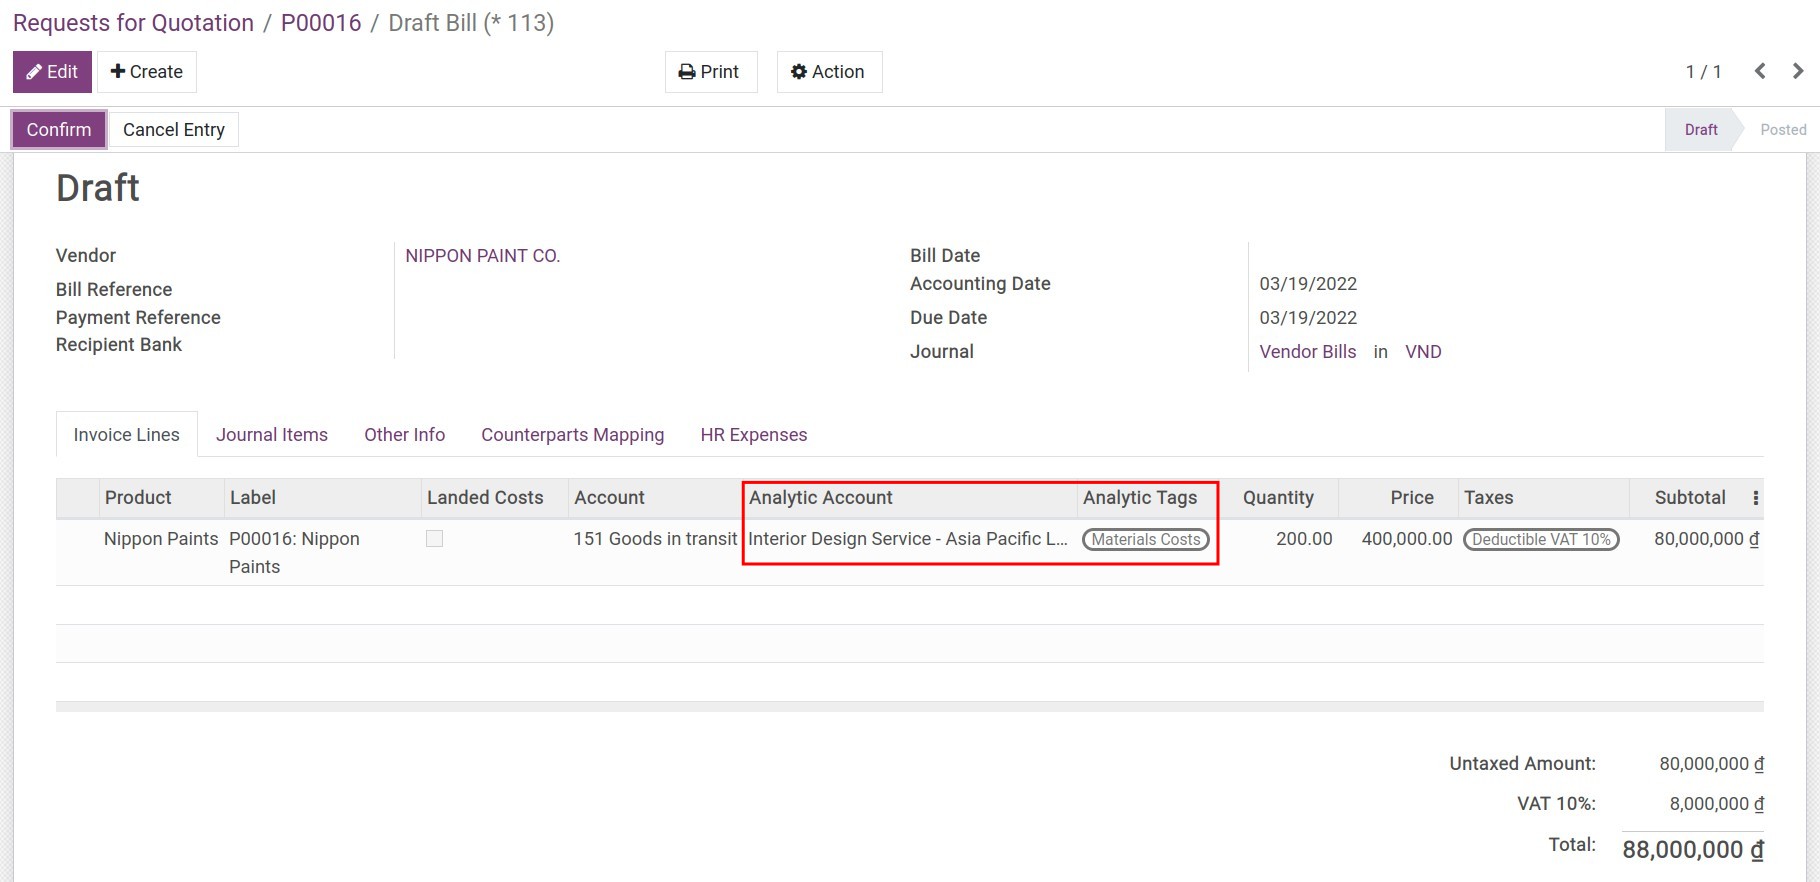
Employees expenses related costs
Navigate to the Expenses module ‣ My Expenses ‣ All My Expenses to create an expenses report of each employee. On this expenses report, add the analytic account and analytic tags to categorize, track and analyze the costs of a contract/project:
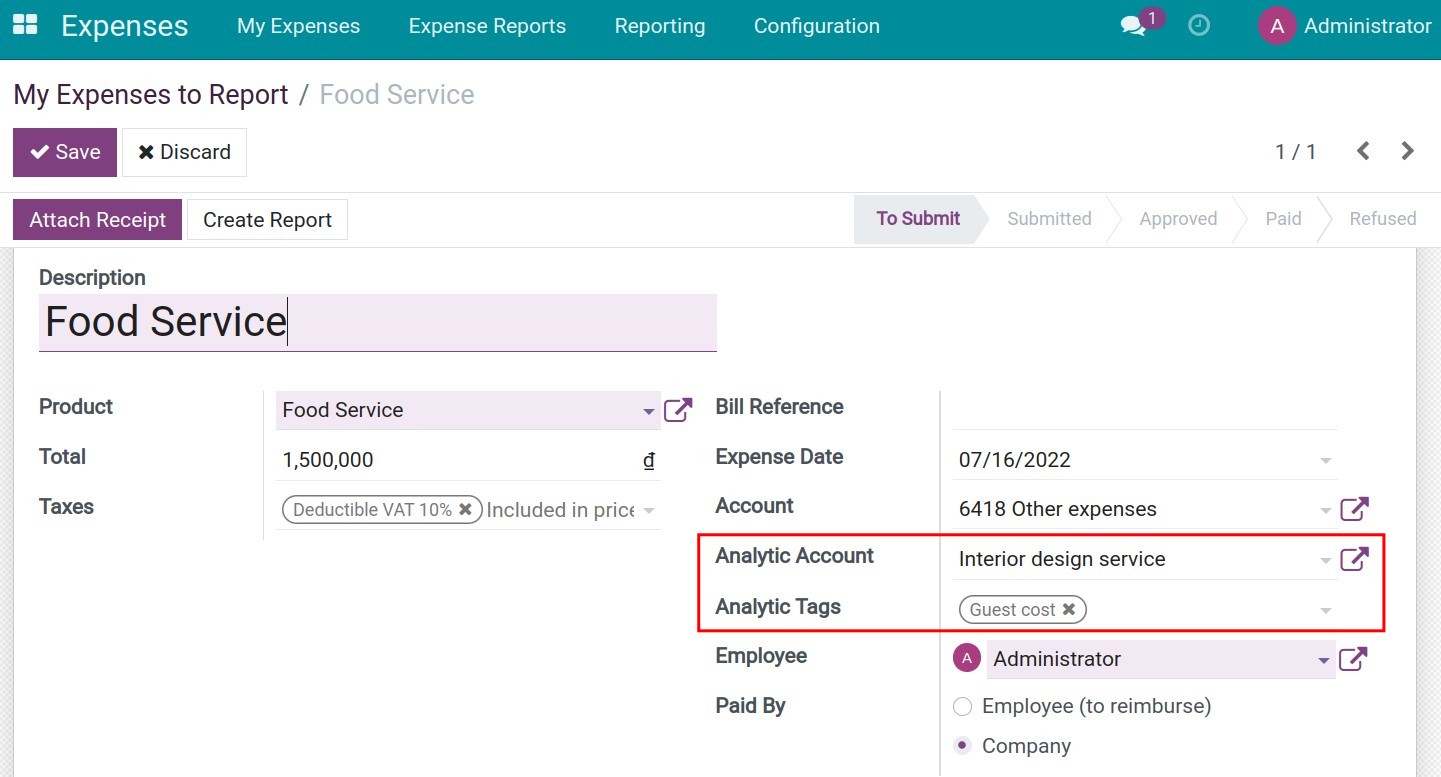
Note
Analytic accounts and analytic tags can be attached to the journal entries of situations such as customer payment delay penalty, contract violation penalty, etc. To do so, navigate to Accounting ‣ Accounting ‣ Journal Entries, create a new journal entry and attach the analytic account/analytic tags to it for tracking.
Analyze revenue/costs
Navigate to Accounting ‣ Configuration ‣ Analytic Accounts:
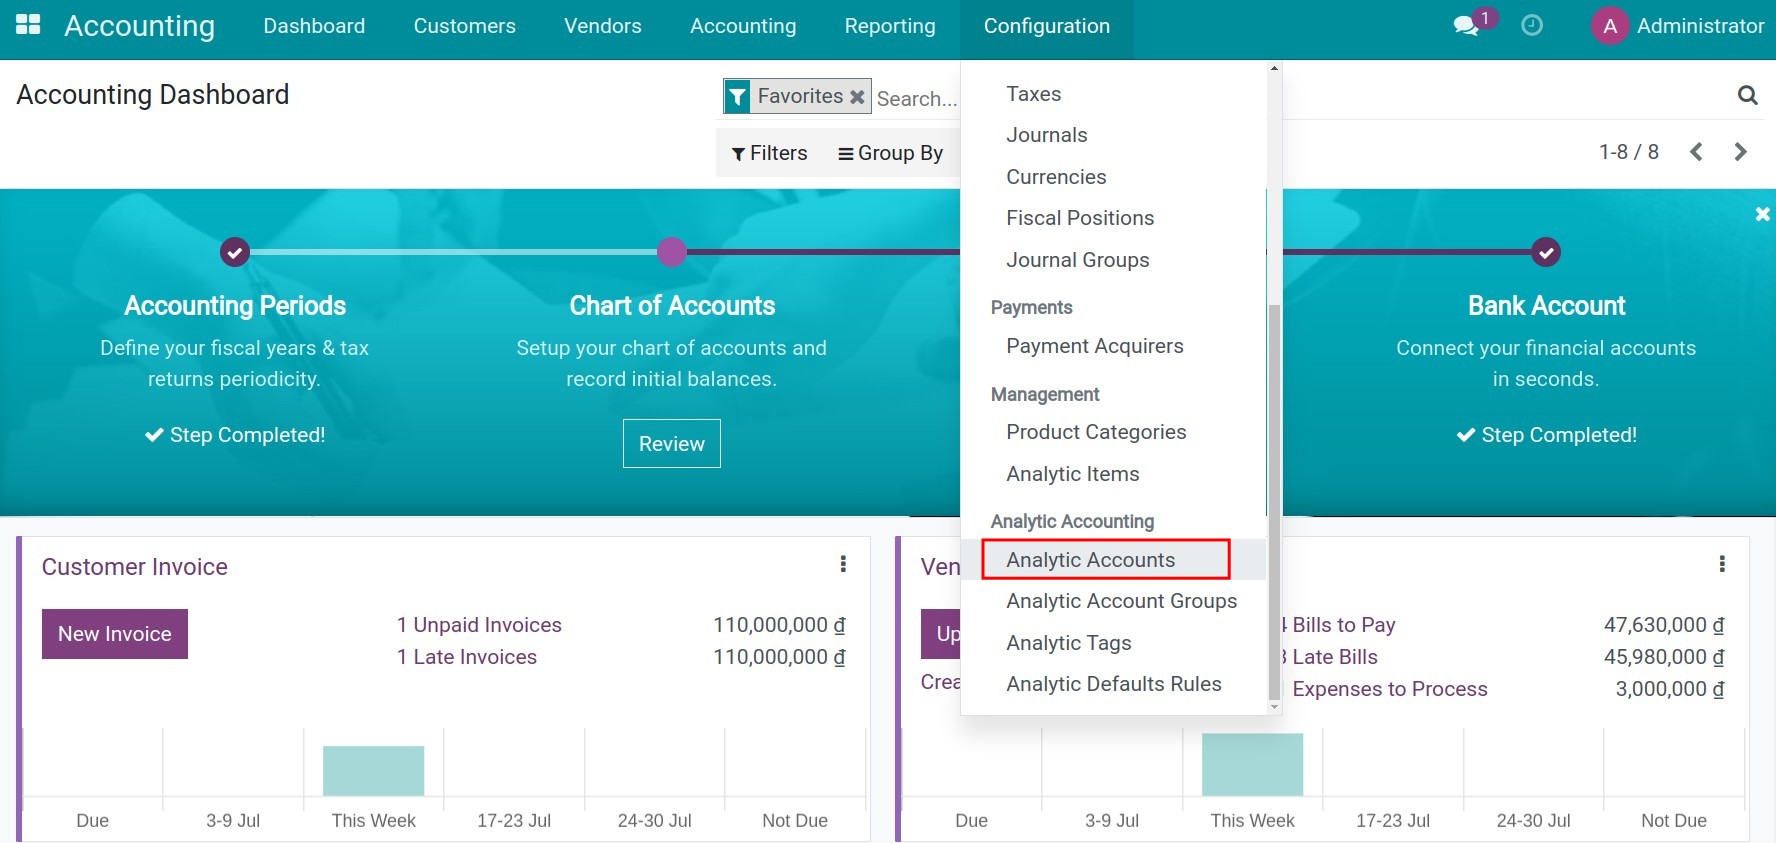
Use filters to seach and select the an analytic account for the sales order above. On this interface, the system will list all the related revenue and expense invoices, you click to select each item to view details.
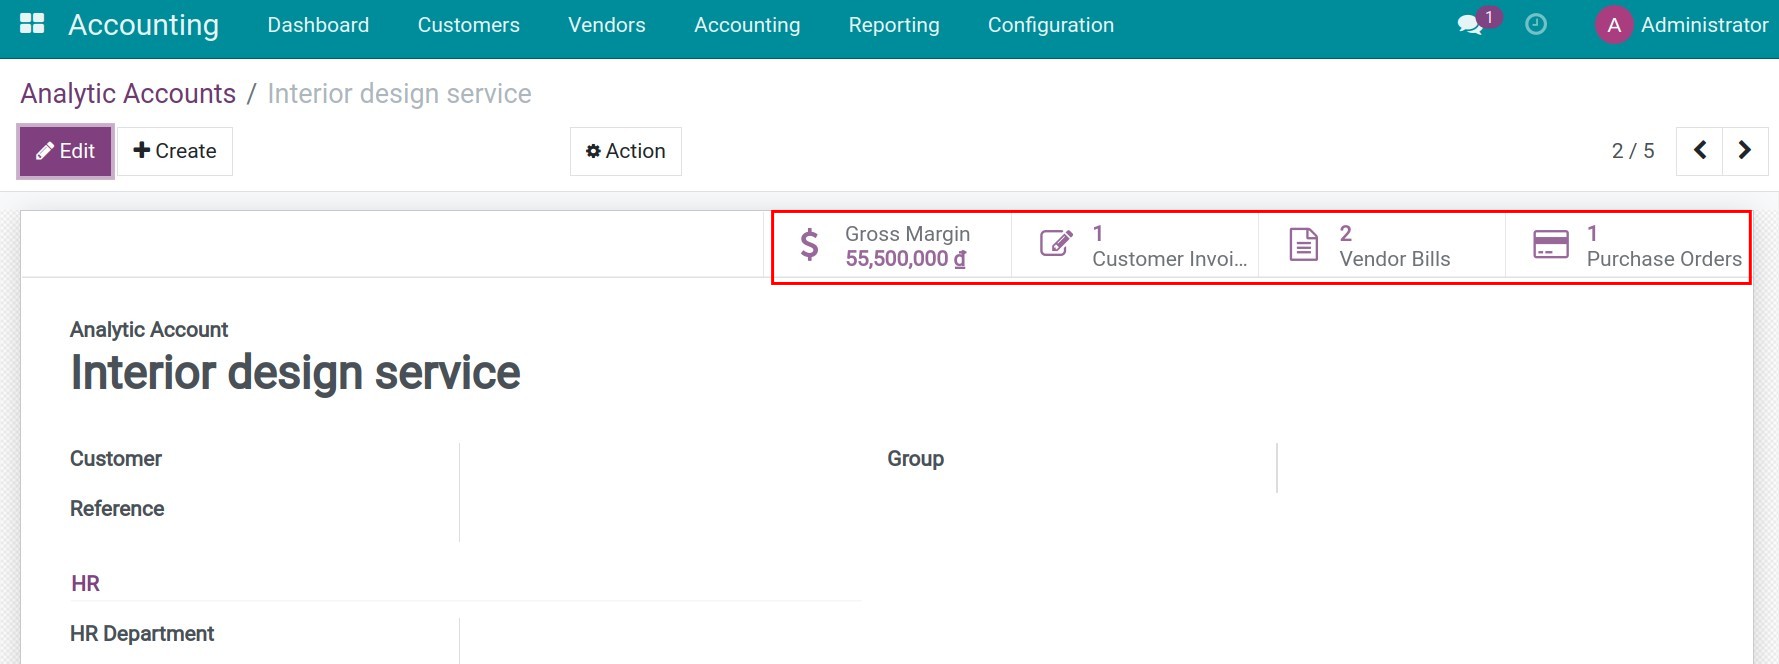
Here, you can view details of the incurred costs and revenue related to the order, as well as the gross profit of the same order by clicking Gross Margin.
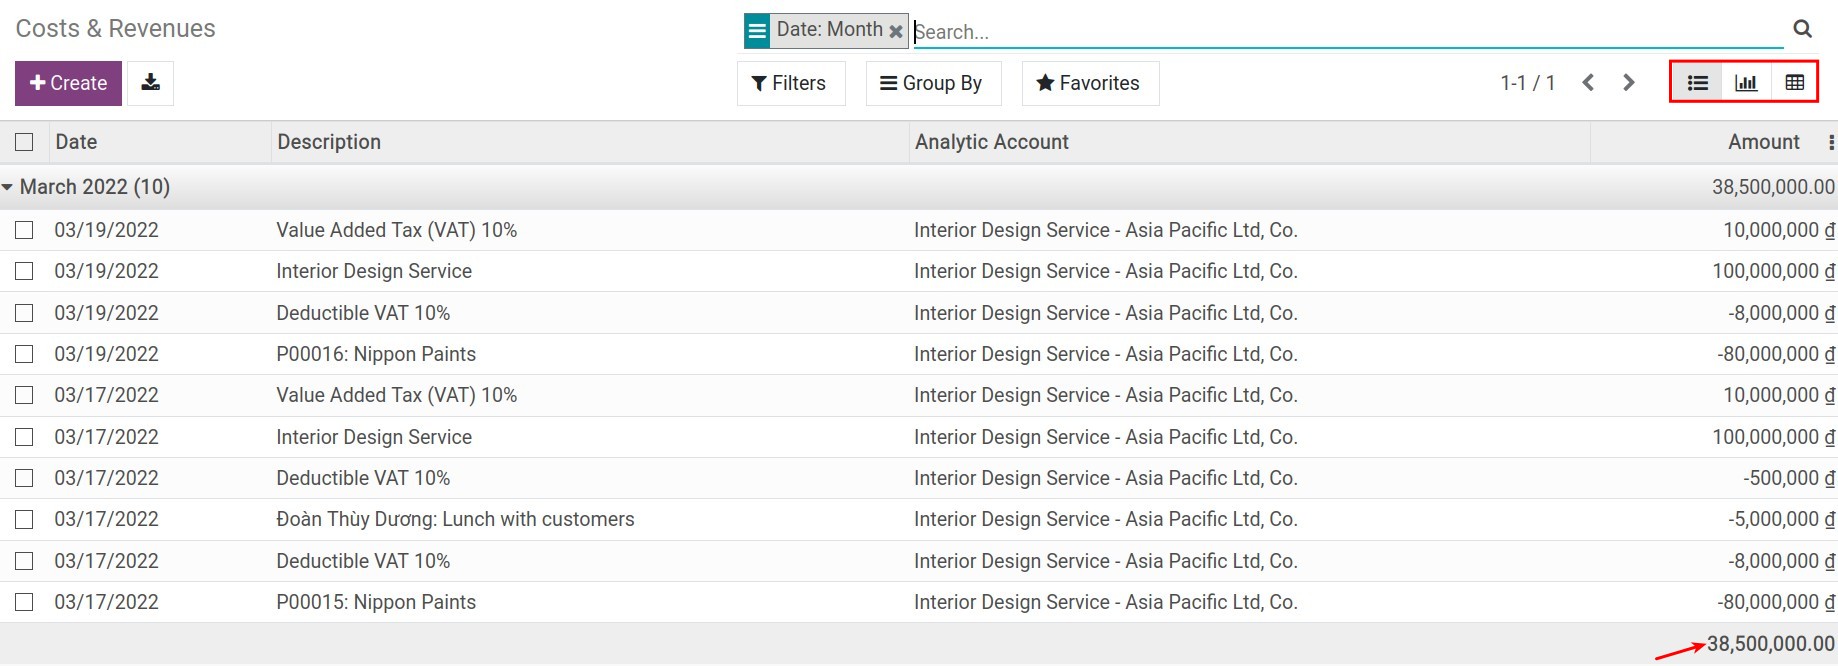
See also
Related article
Budget Management
Odoo Accounting Simplified
Contracts
Contracts Management
iSuite Contract Management helps to manage contracts and creates automatic recurring invoices out of contracts.
* You can create recurring invoice templates.
* You can create Contract Types and link Invoice Templates to Contract Types
* If you have a price change on products you can apply this price change to all your existing contracts or to contract invoice templates or to already created invoices in draft mode
* You can use Tag management to organize your Contracts also with tags
All other important links are linked in the menu of the Contract management App such as Contacts, Reporting, Invoices, Products.
Contract Management comes with 2 different access rights. (Contract User and Contract Manager)
Billing Options
There are 3 general options for billing clients:
- Advance billing is when you invoice a customer before the service or work is complete.
- Billing in arrears is when you bill a customer after the work is complete.
- Customized will be used for billing during the service


Set default email template for invoice notification
