Getting Started
Getting Started
iSuite software provides an effective Employee Management solution, helping your enterprise optimize human resources, improve work efficiency.
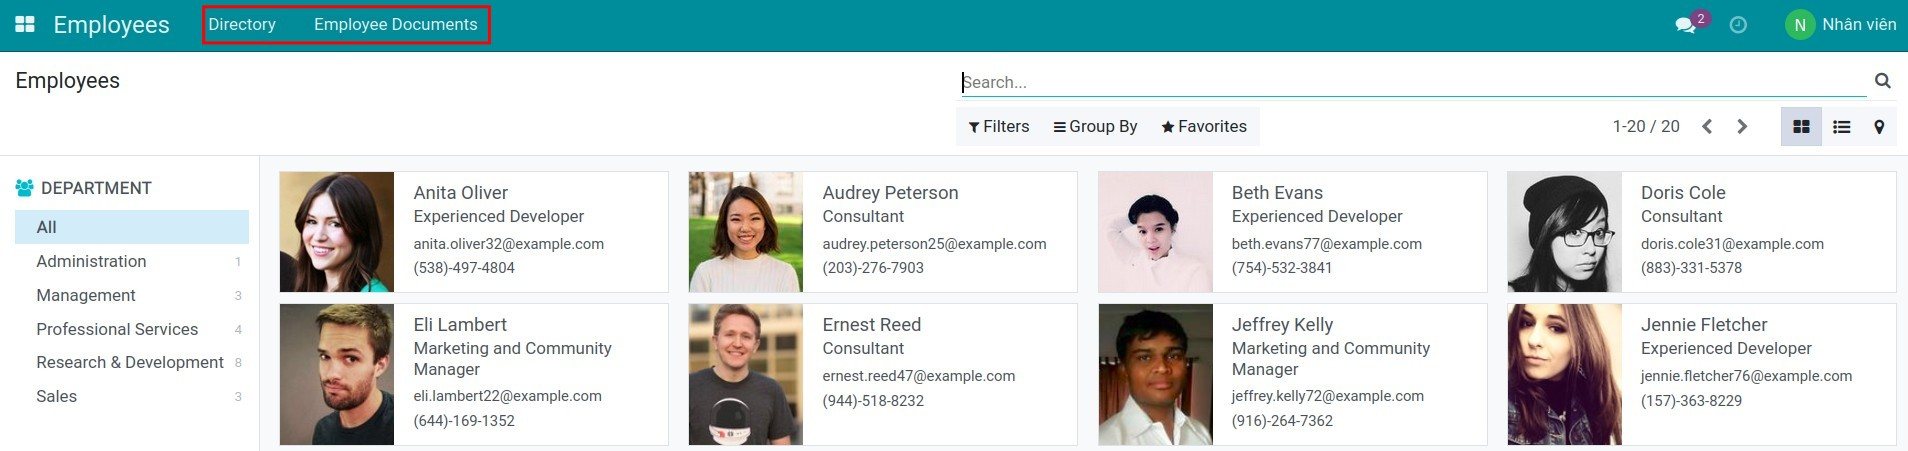
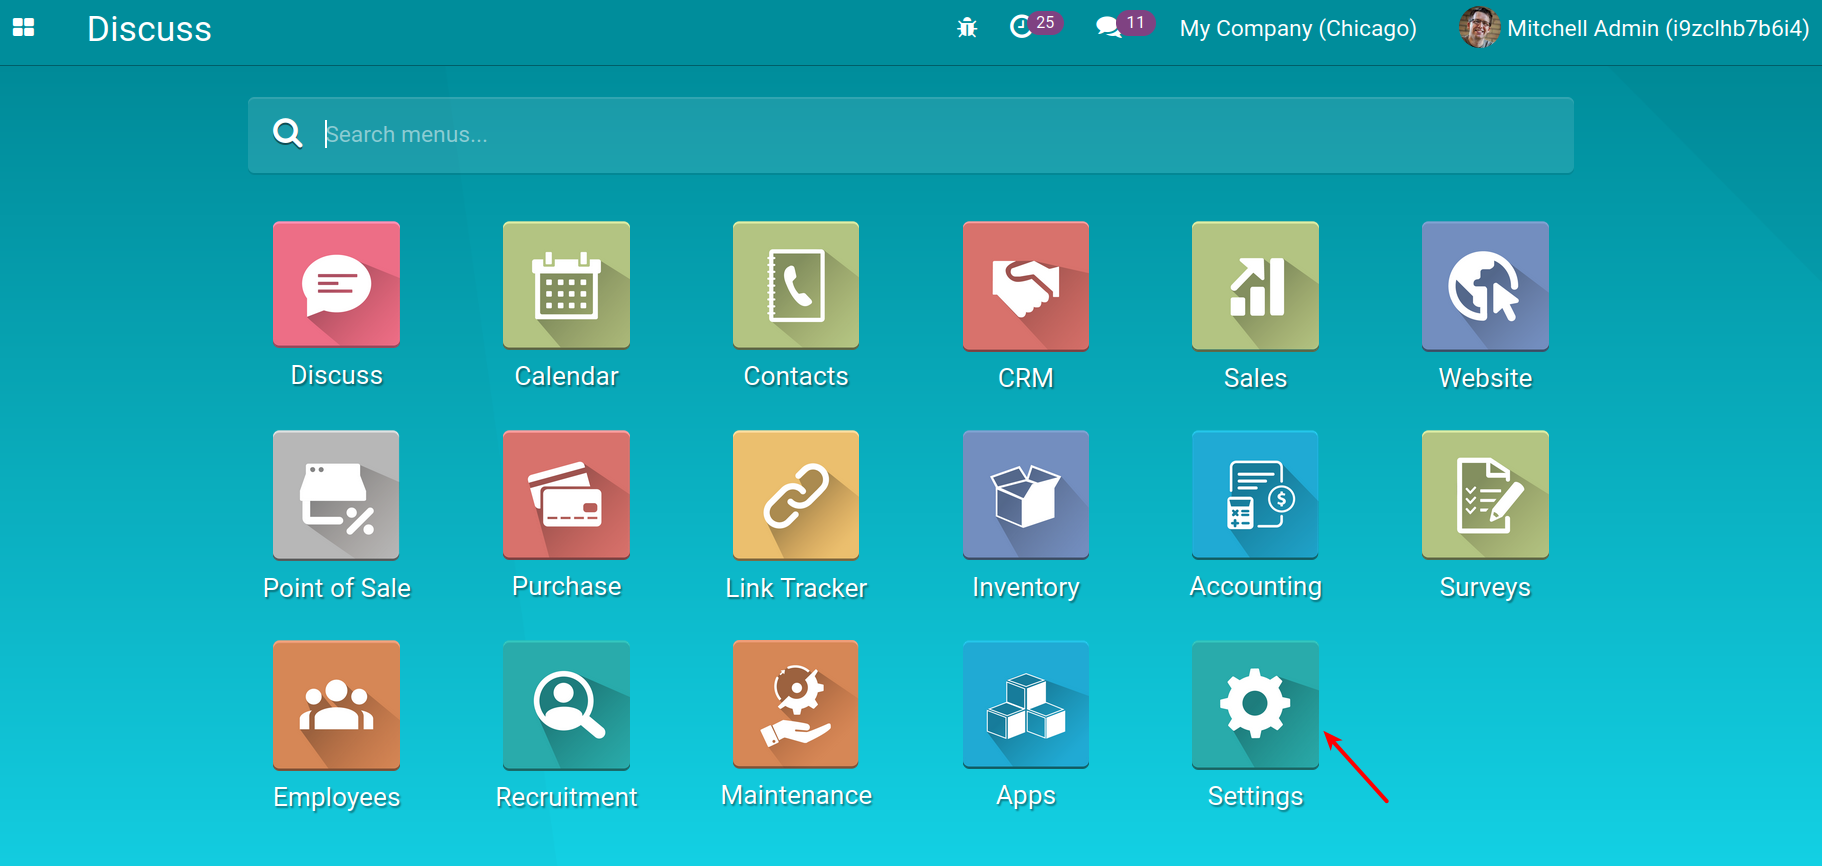
you can see the Employees’s icon on the main view.
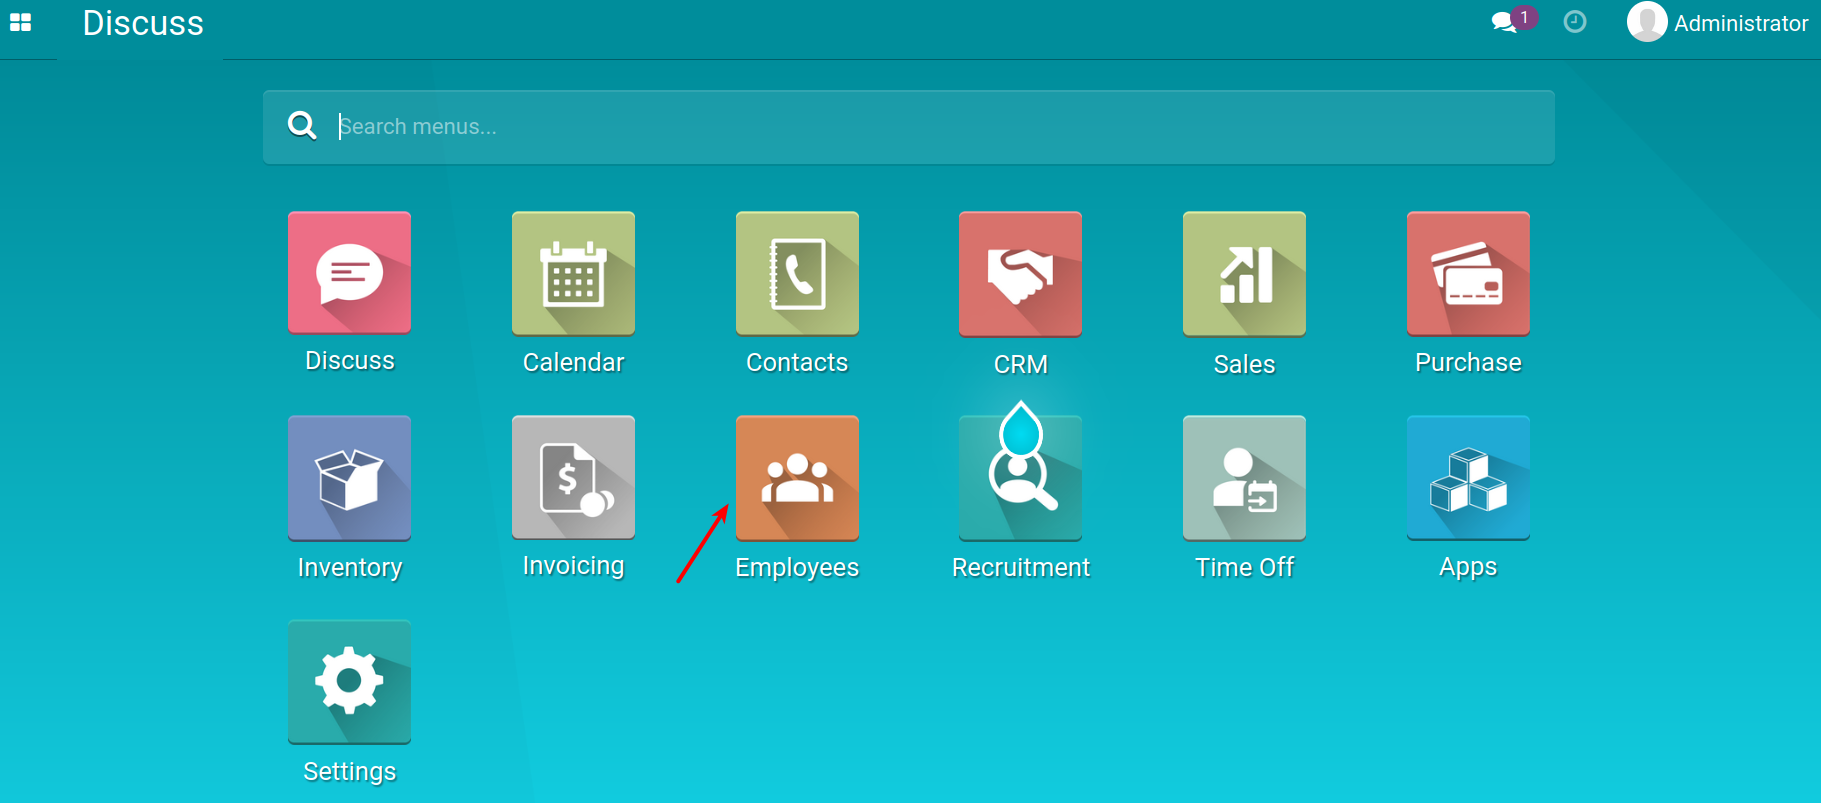
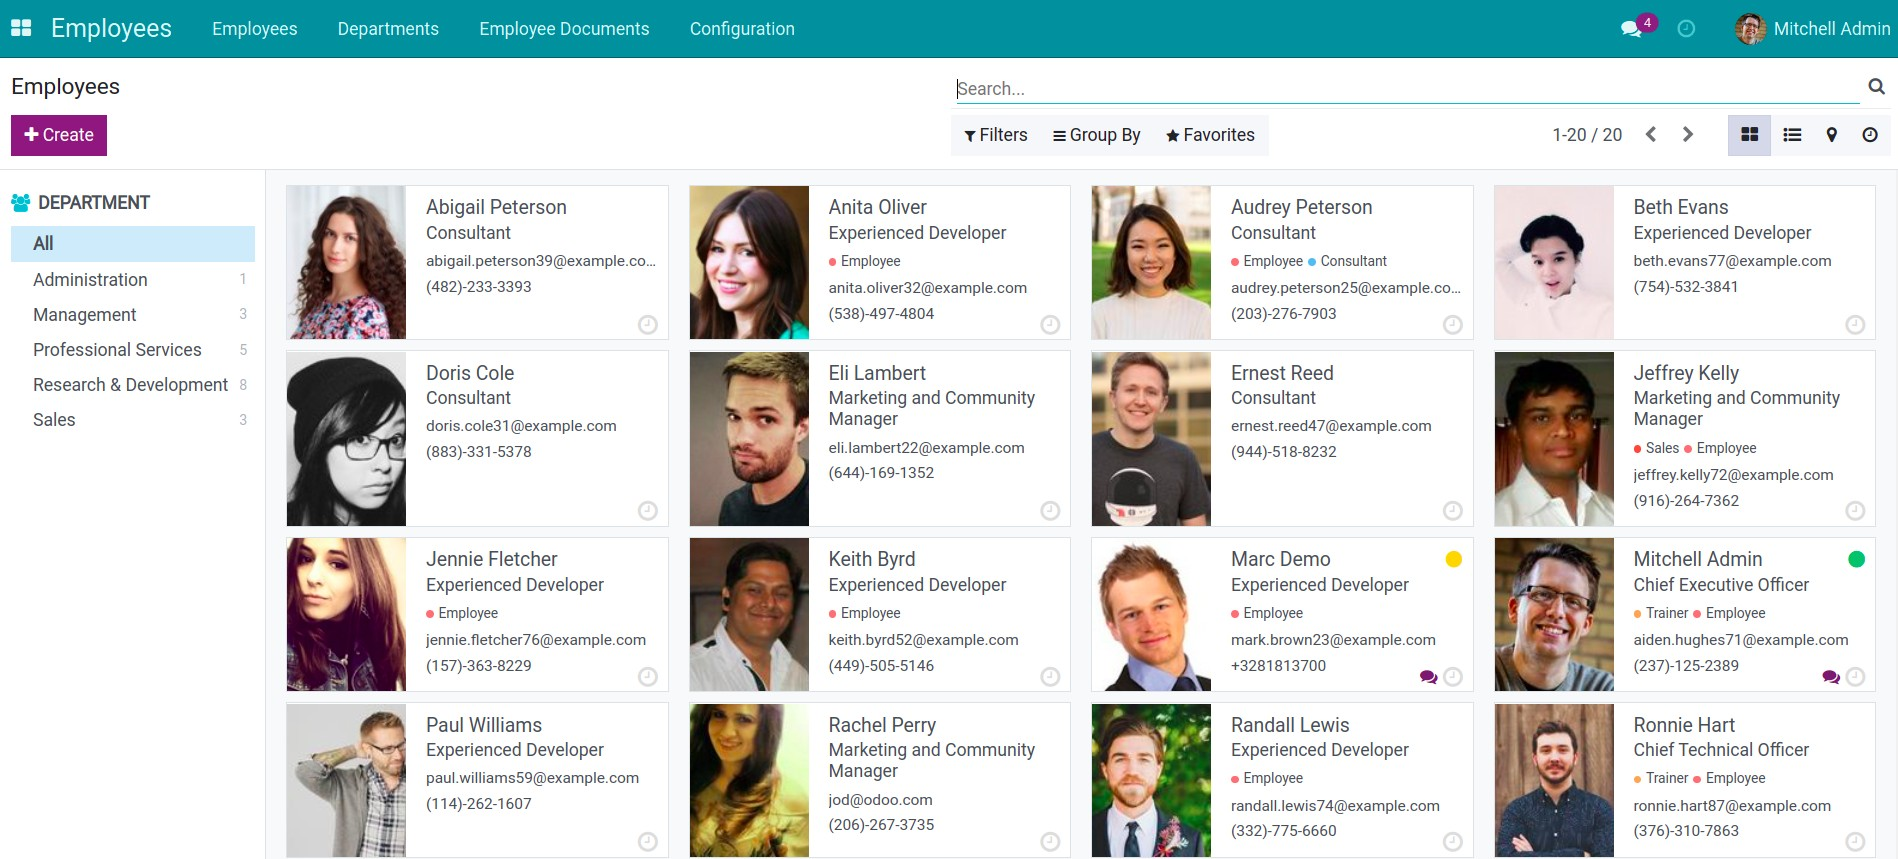
When accessing to Employees, the view then will be shown as:
User Access Rights
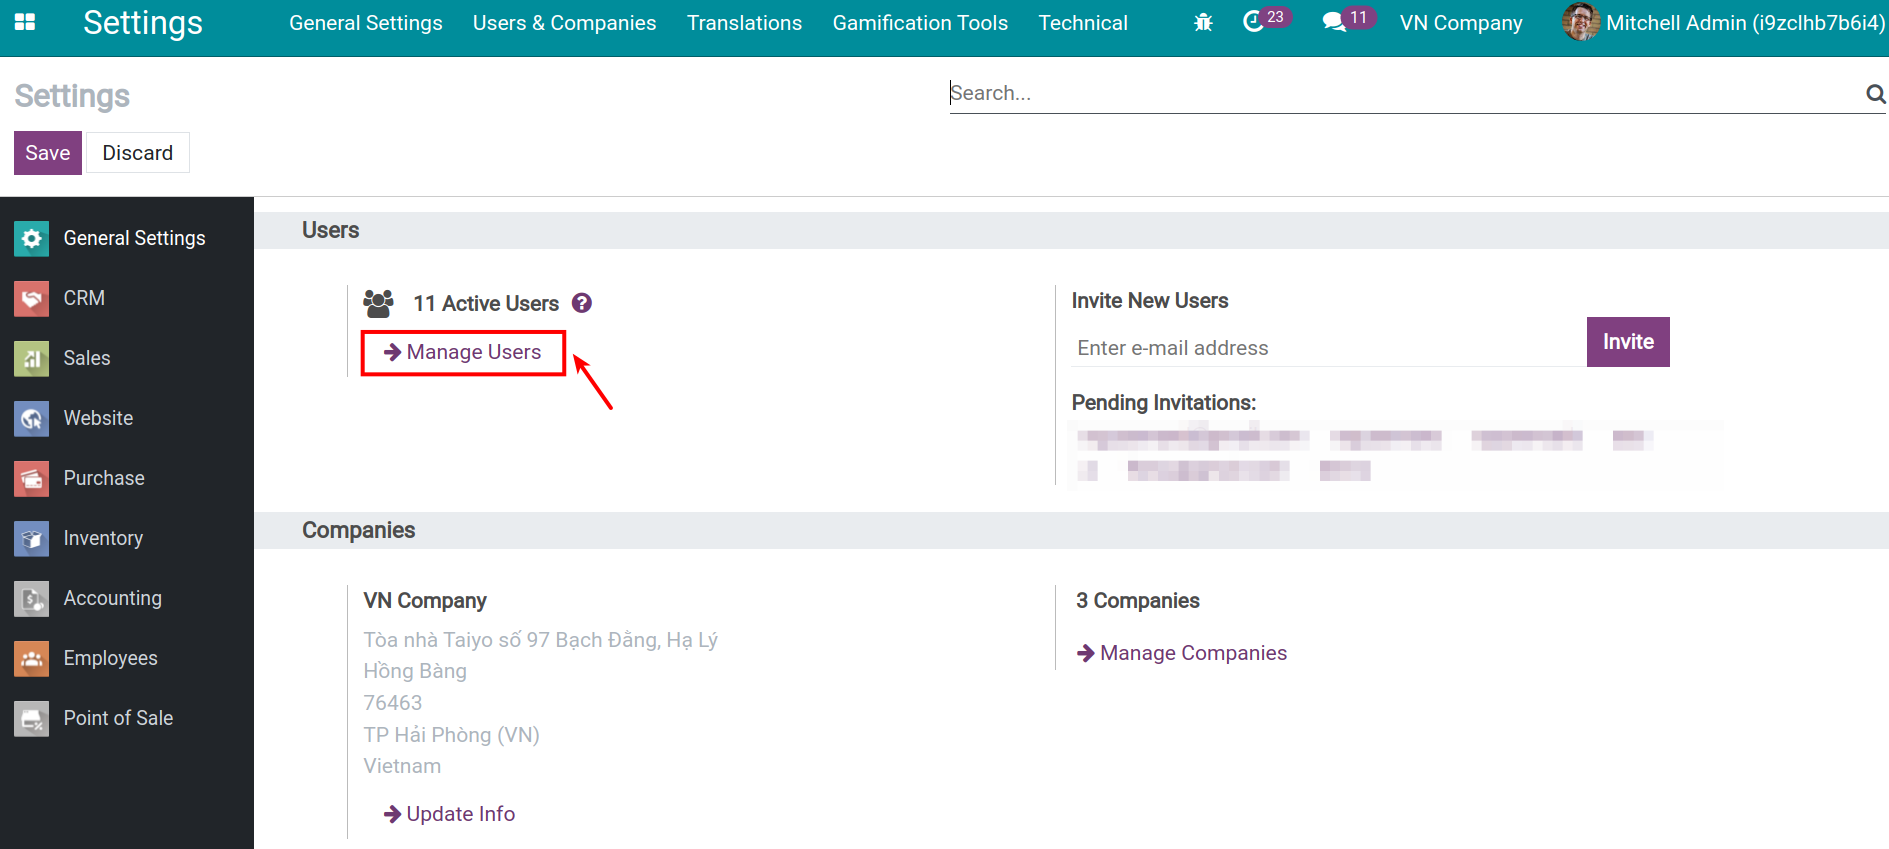
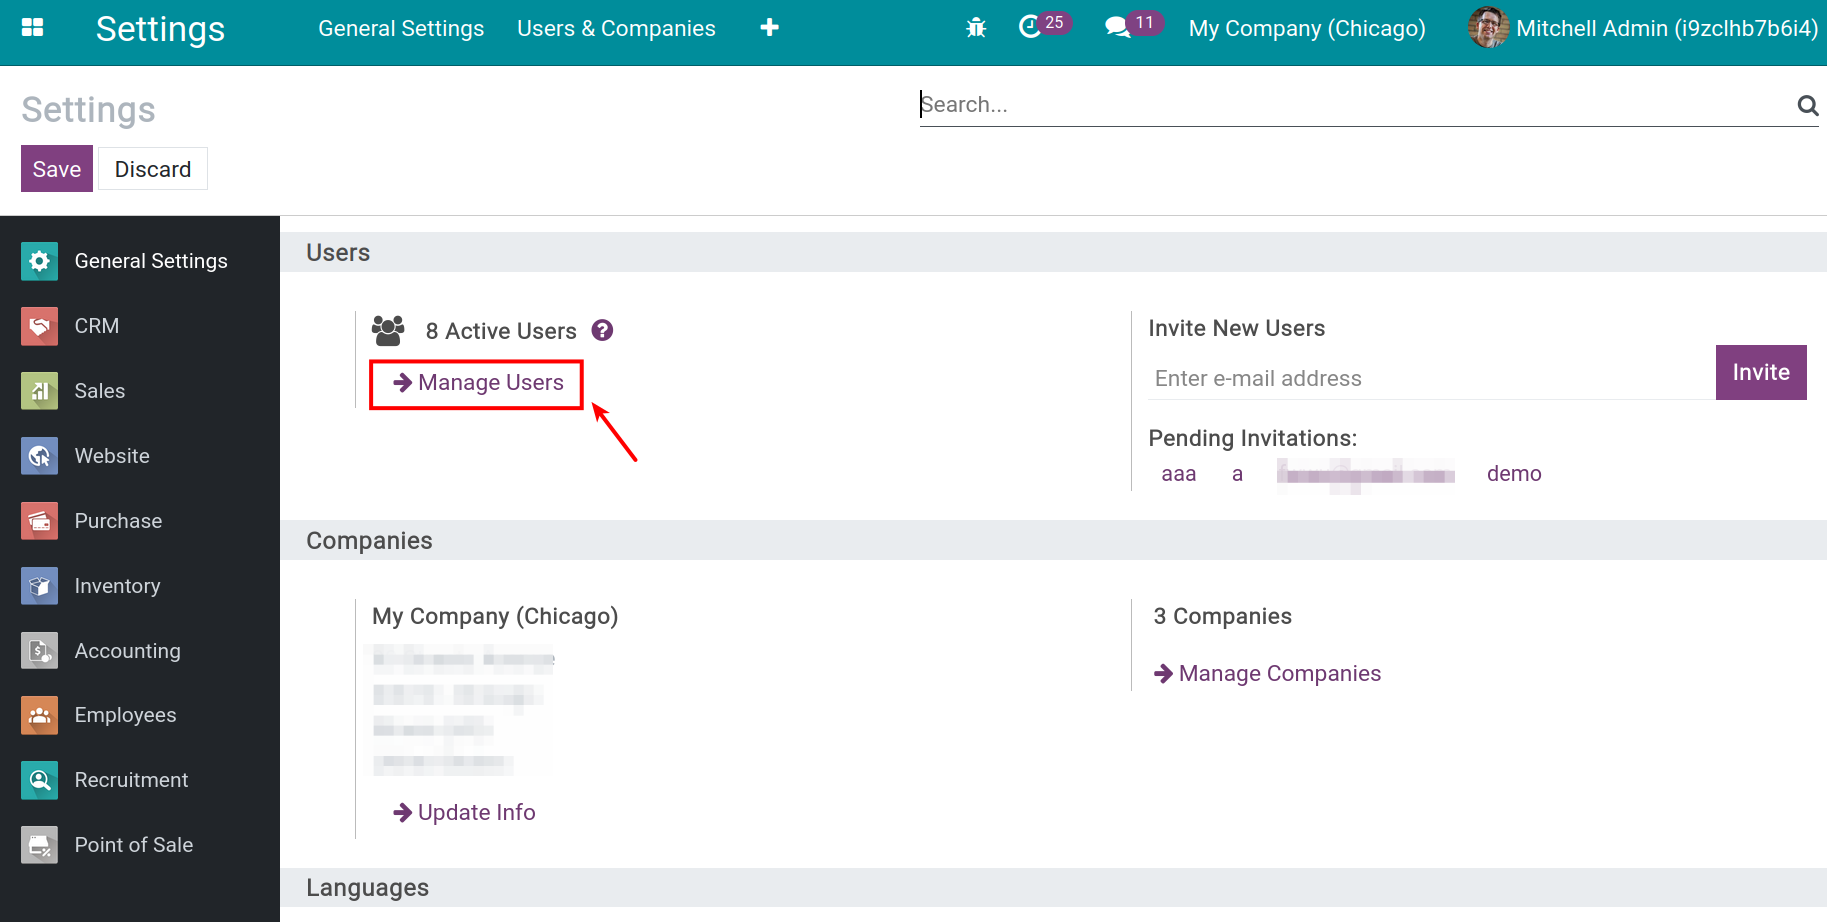
To grant Employees access rights to the user accounts, access to Settings module.
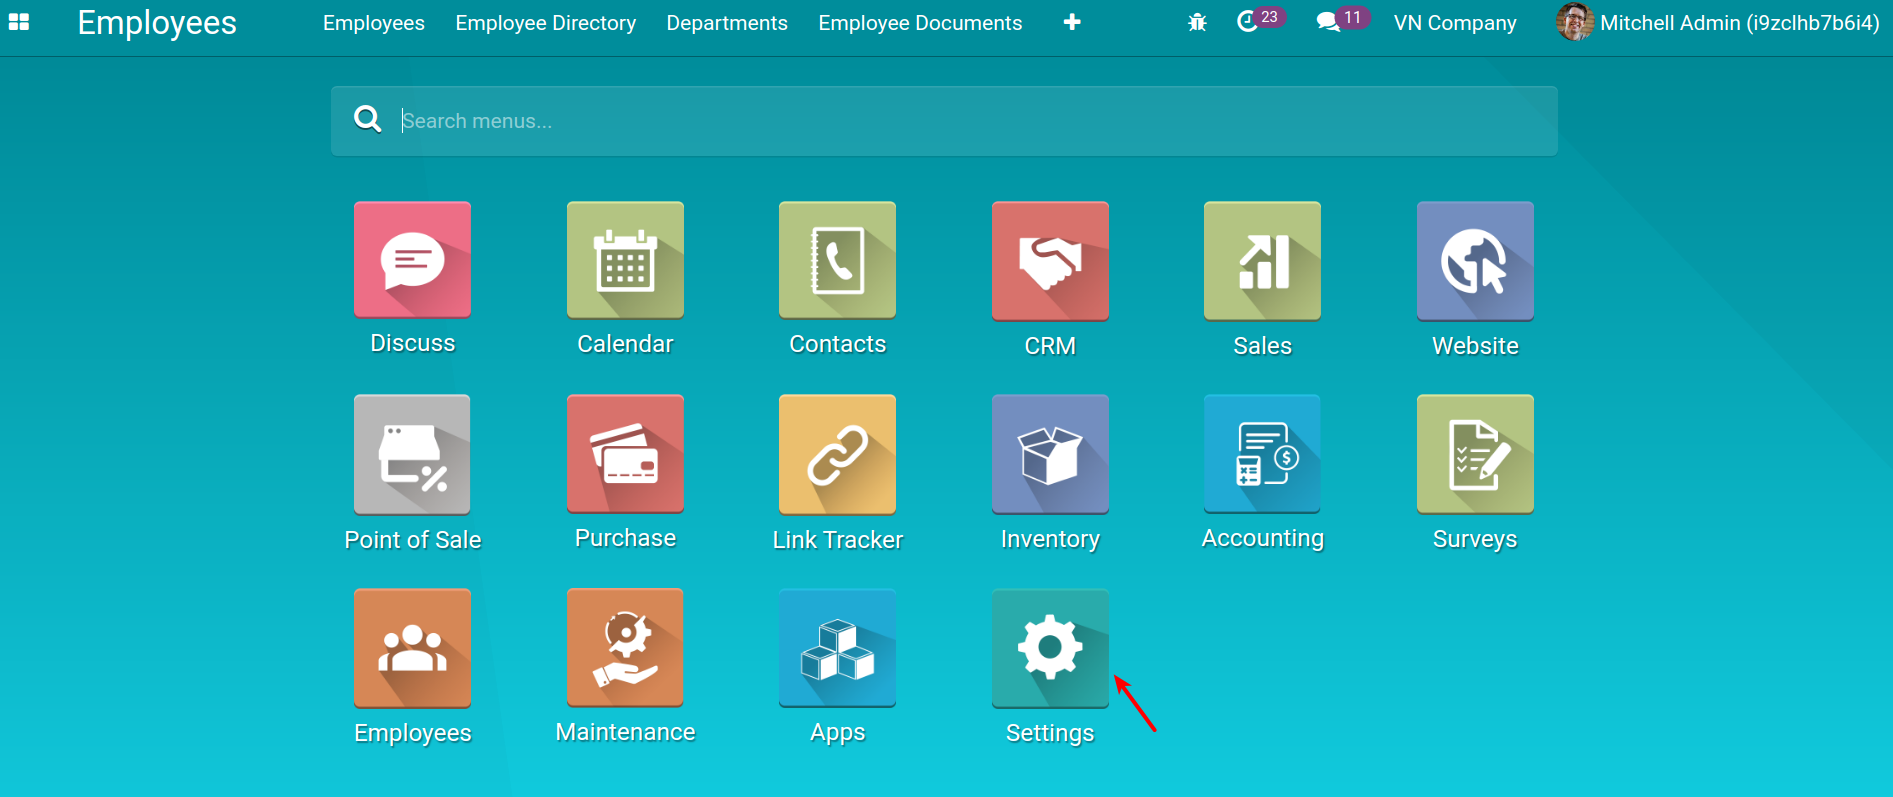
Click on Manage Users.
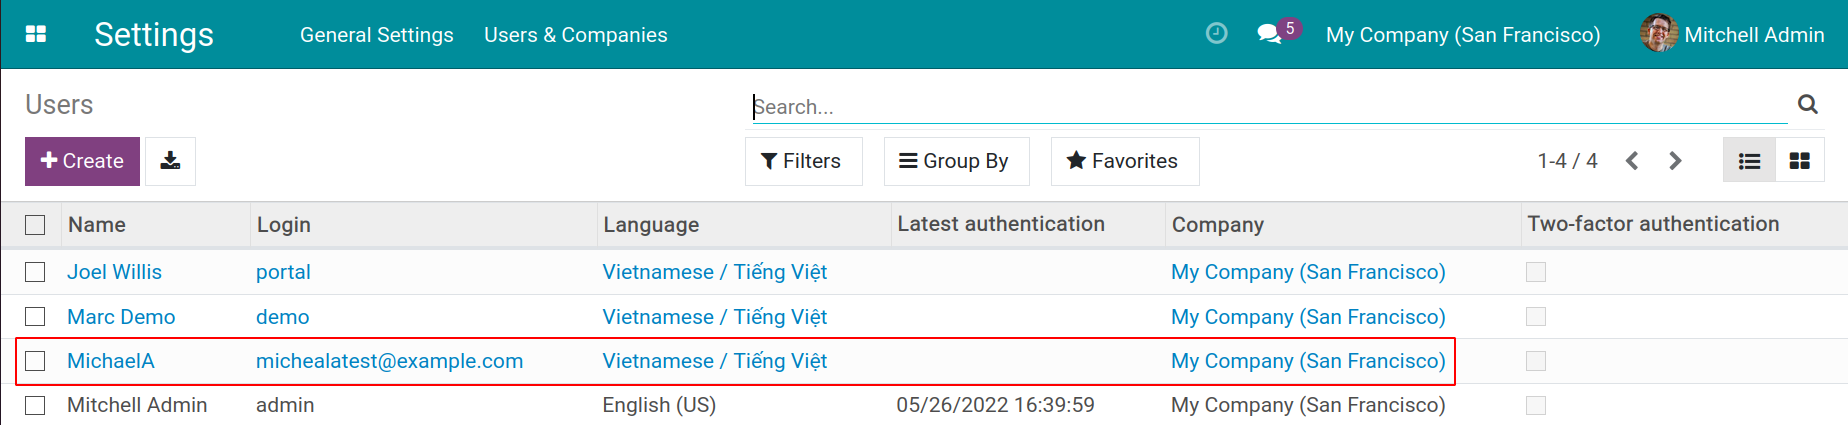
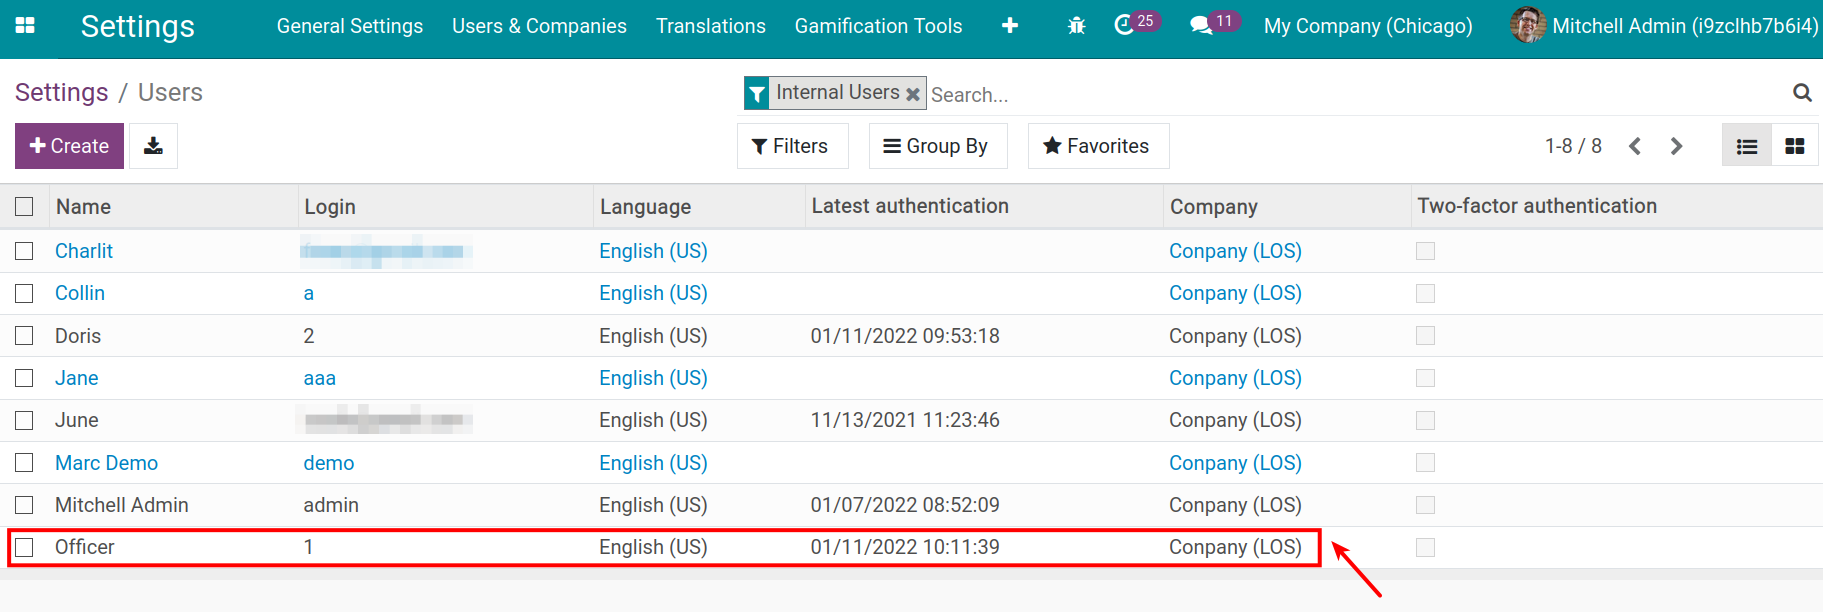
Find the user that you want to change his Employees access rights.
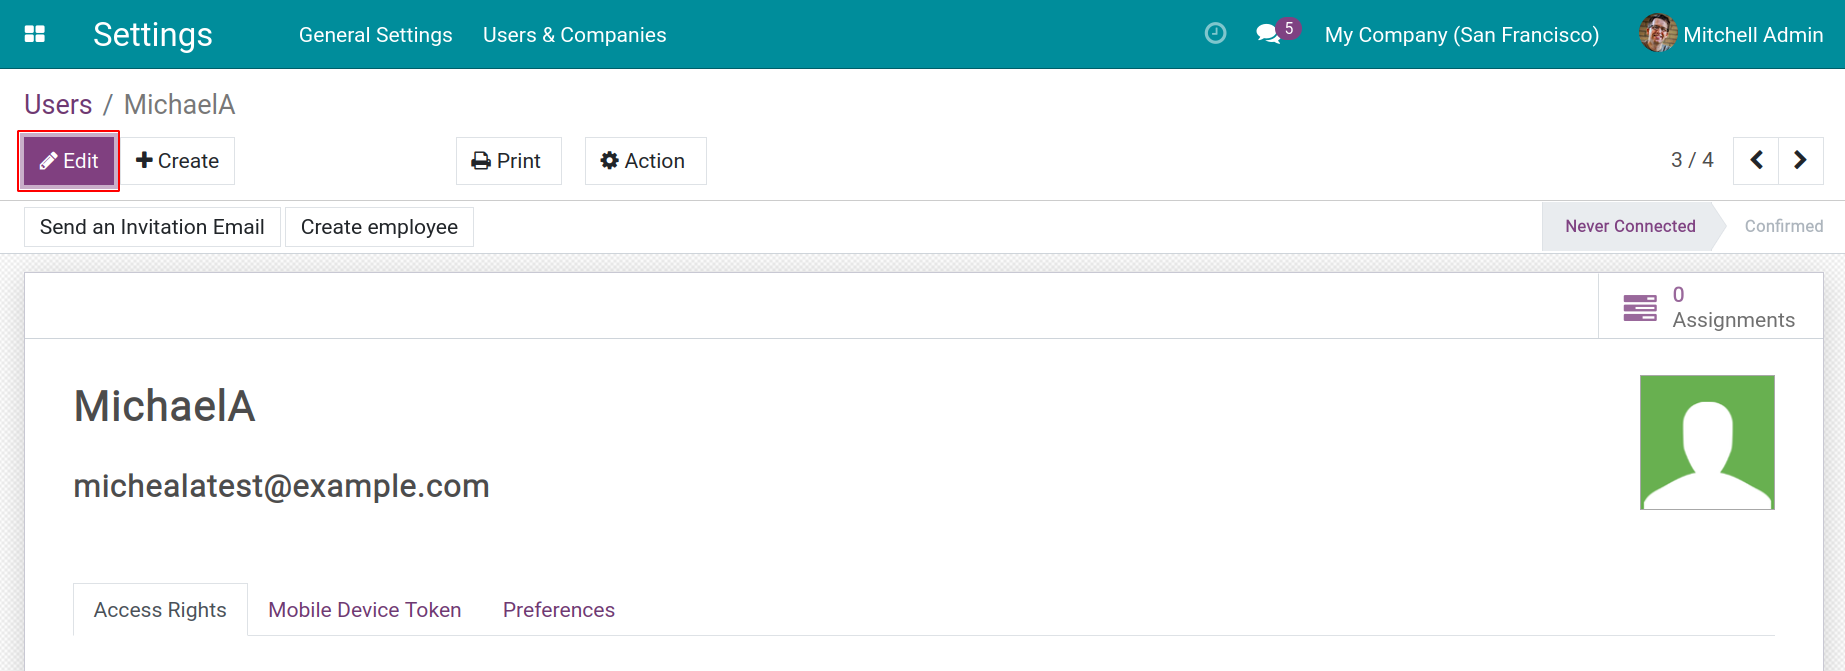
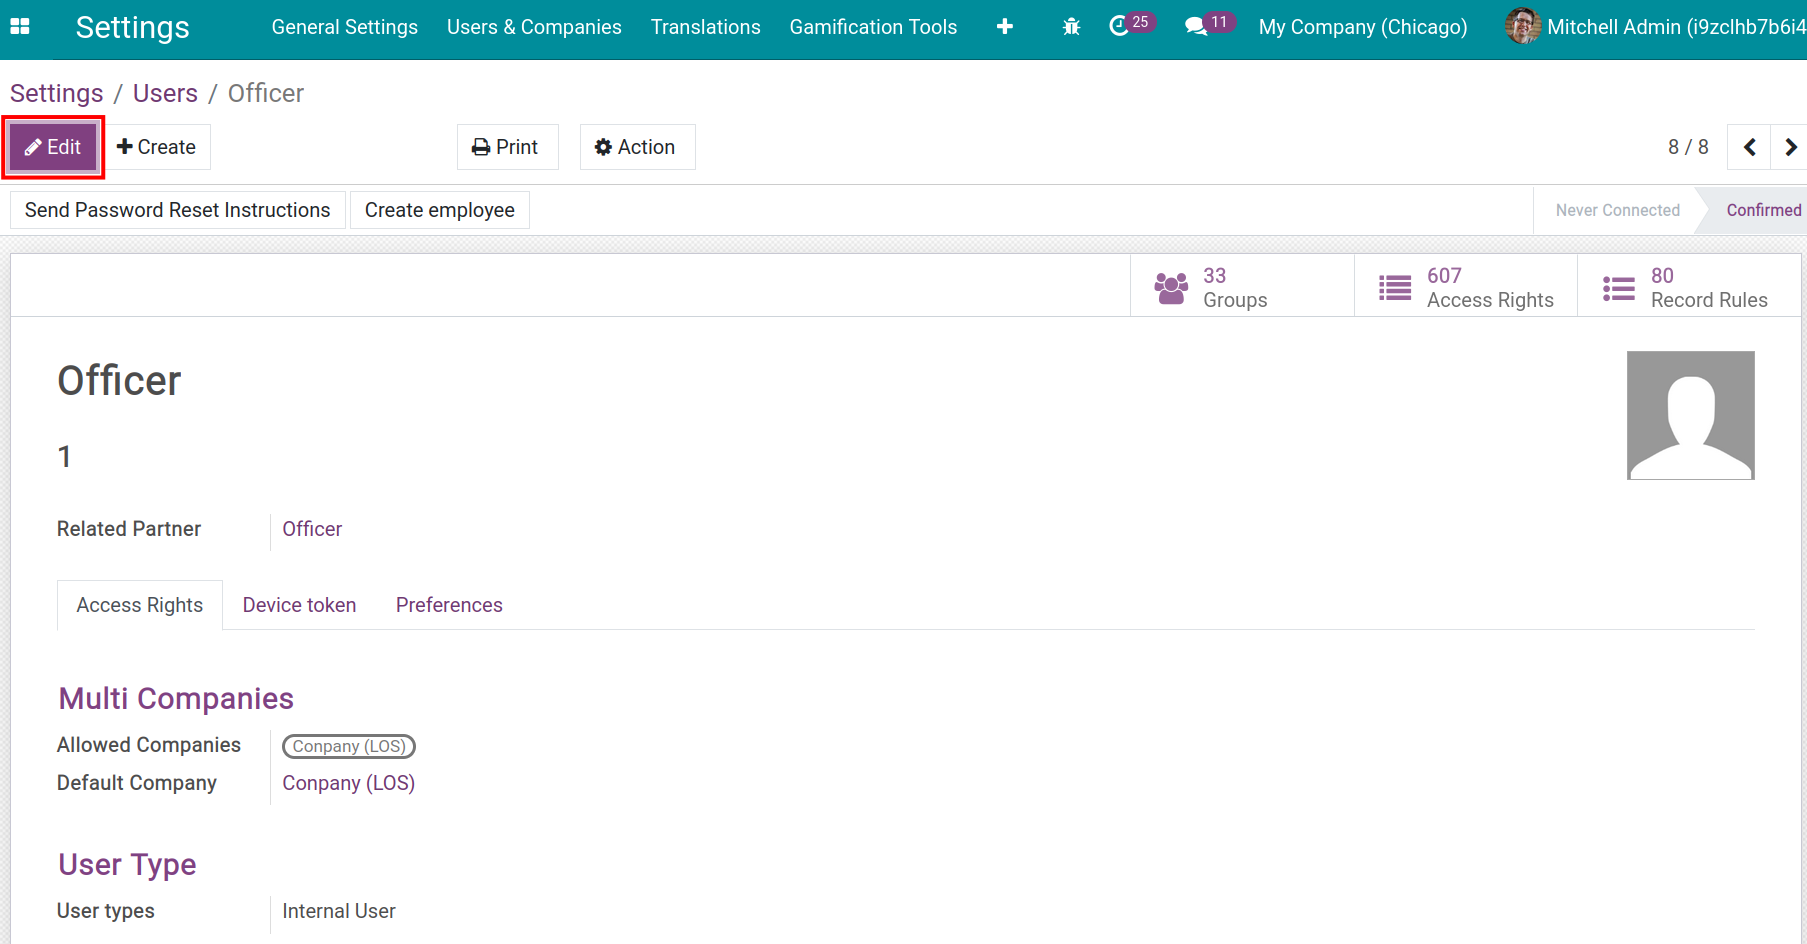
Click on the Edit button.
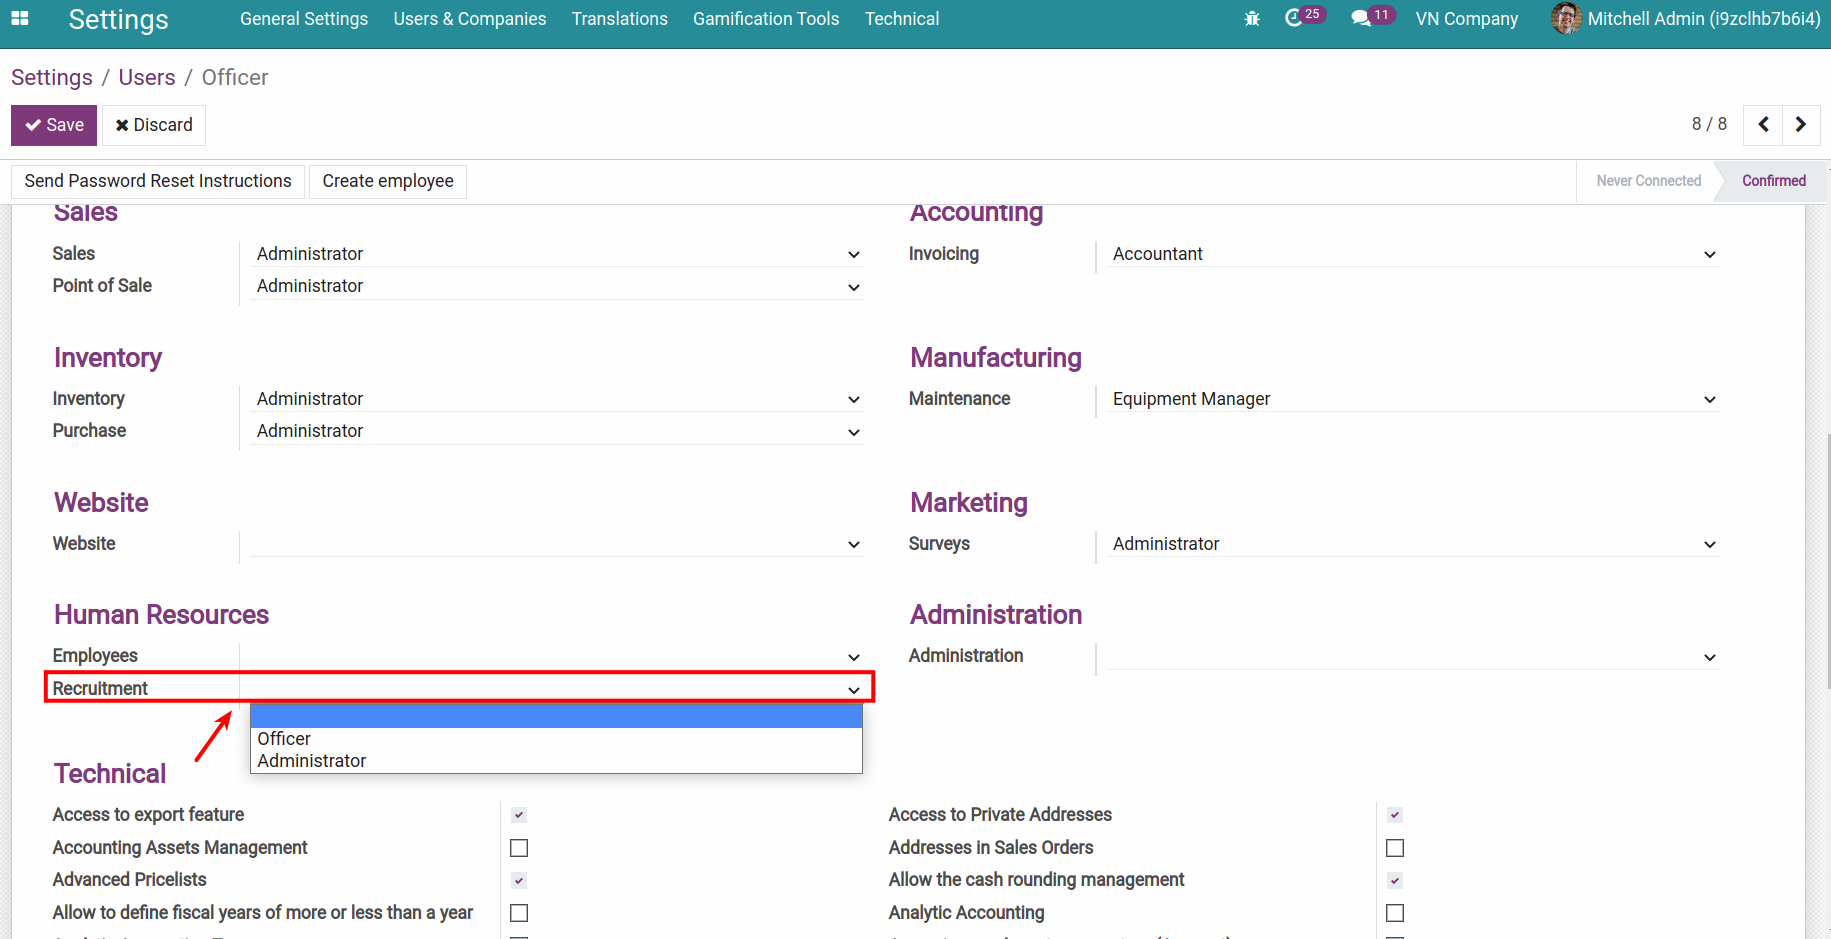
To grant Employees access rights to the user, you may choose one of the following options:
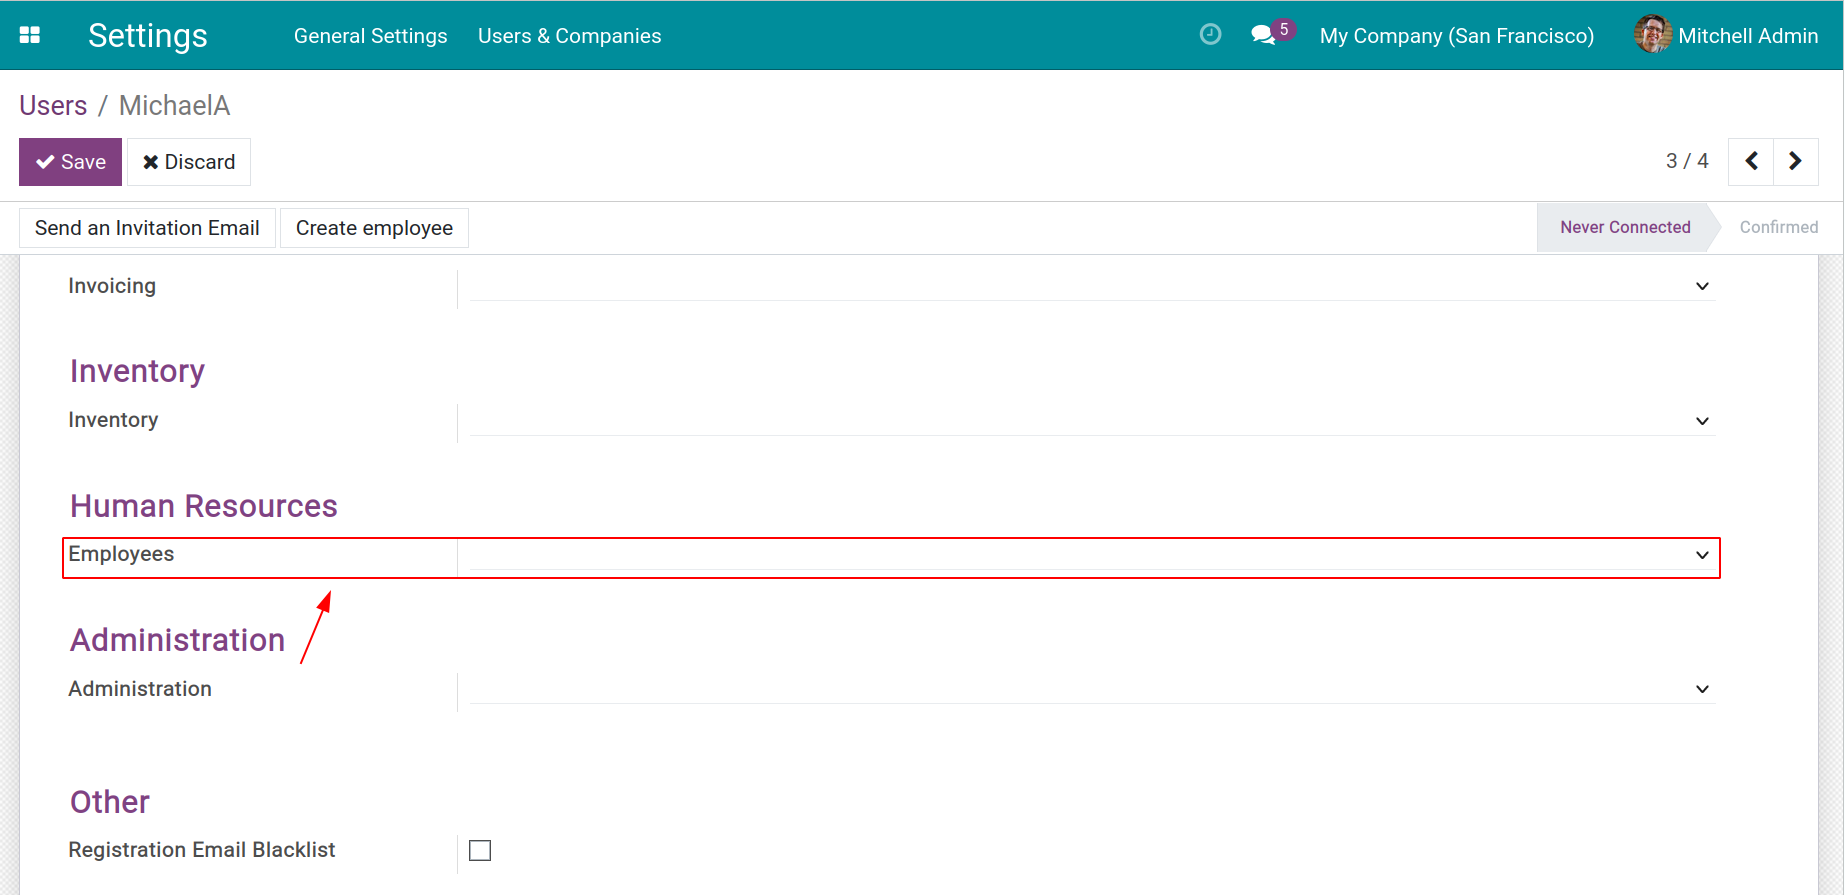
Blank: User account has no Employees access rights - but he can access, create, edit his Employee Documents and access to Directory.
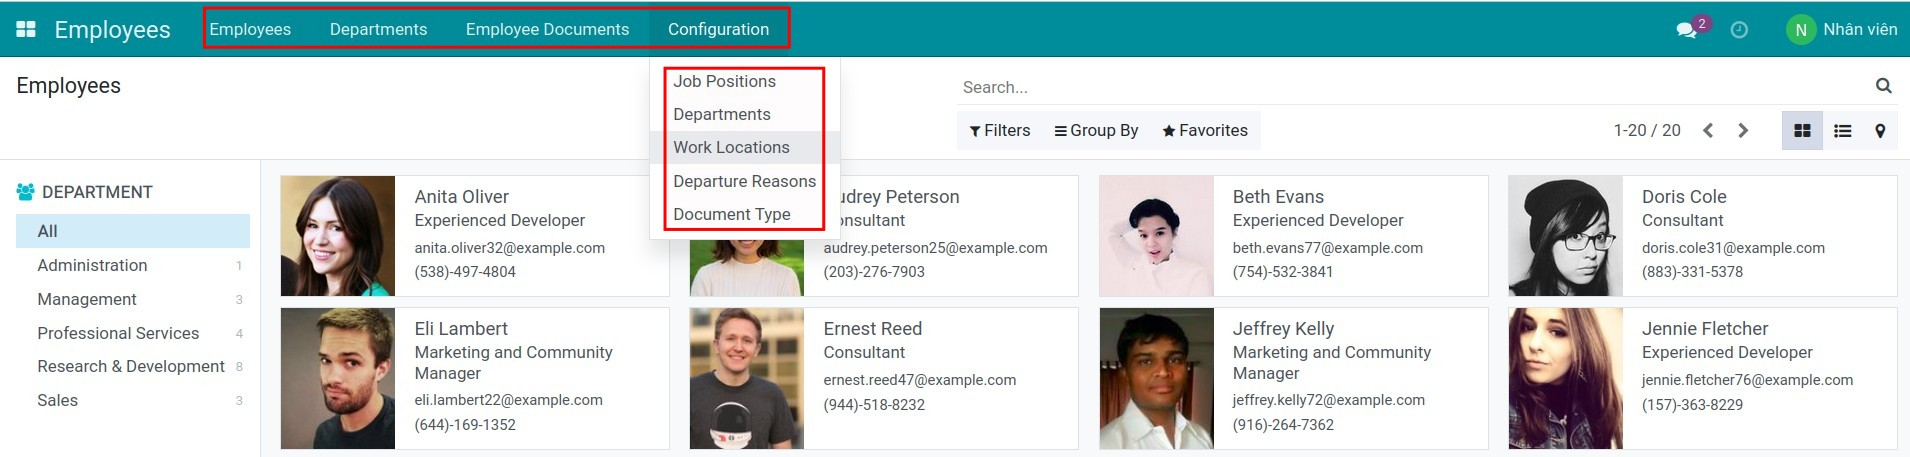
Officer: The user who has Officer Access Right can do the followings:
- Access, create, edit, delete Employee, Department and Employee Documents;
- Have the Configuration right for: Job Positions, Departments, Departure Reasons, Document Type, and view the Work Locations
Administrator: Having all Access Rights to Employees module.
See also
Related article
Departments
Job positions
Employee Seniority
What it does
Based on contract data, this module allows you to keep track of an employee's working history (e.g. boarding date, termination date, job position changes, department changes, service years, etc) in your company. it also allow you to request payment of employee seniority benefits, and calculate the corresponding amount using the engenious and flexible method of salary structure.
Key Features
Allow employees to see their working history over time.
Allow managers to see their subordinates working history over time.
HR Officers will be able to see all the employee seniority data.
Support analyzing employee seniority in multiple dimensions with pivot, list, and graph reports.
Display employee seniority data on employee records, which could be inherited in other modules. For example, the Payroll salary rule can take that data with:
- employee.employee_seniority_ids: for the records of seniority crossing all the contracts.
- employee.seniority_years: for the years of service counting from the first contract's start date (incl. trial contracts).
- employee.seniority_months: for the months of service counting from the first contract's start date (incl. trial contracts).
- employee.non_trial_seniority_years: for the years of service counting from the first contract's start date (excl. trial contracts).
- employee.non_trial_seniority_months: for the months of service counting from the first contract's start date (excl. trial contracts).
- employee.first_contract_date: for the employee's boarding date, which is also the first contract's start date.
- employee.first_non_trial_contract_date: for the first non-trial contract's start date.
- employee.termination_date: the employee's off-boarding date, which is also the last contract's end date.
- etc.
New employee filters: Hired last 30 days, Hire Last Year, Hire This Year, Terminated last 30 days, Terminated Last Year, Terminated This Year, etc.
Seniority benefit in Equatorial Guinea
In Equatorial guinea, Seniority benefit is one of the component of the employee End of Service benefits. After 3 years of continuous Service , the employee can request a payment of this rights. (also upon termination of the contract, it is calculated and included into the EOS benefits).It is the Company obligation to pay 1,5 of the monthly salary to the employee for each year of service.
To accurately calculate this value, we will need to track records of previous seniority payment.
Workflow for Seniority payment request
- The employee request the payment (draft document is created)
- Record verification is done when document is submited (During verification, the system will check for the previous seniority payment records, to avoid paying the same period several times and set the field Seniority start date)
- The seniority payslip is created by automatically selecting the seniority salary structure
- The payslip is calculated using the seniority salary structure
- The seniority payment report is printed

A seniority request document is created and submitted using the following form

Workflow for Seniority payslip batch
iSuite offers the possibility of generating Seniority payslips in batch. here is the workflow:
- Set the seniority payment date
- Select the employee list
- Generate the seniority payment request documents for the selected employees
- Generate the payslips using the period from each payment request document
Seniority payment report
The report is printable once the payslip is generated

pdf report

Settings

End Of Service benefits
End Of Service benefits
The end-of-service benefits is the obligation and commitment of the source (the labor law), according to which the employer, according to a regulation stipulated by the labor law, shall be required to hand over a sum in light of the period of his/her service and the last wage he/she received. This commitment is stipulated in all labor legislations that have labor regulations and membership in international and Central Africa labor organizations.
The end-of-service benefits is a security for the future of the worker after the end of his/her work, and his/her protection from the risk of unemployment and inability to work, and when for his/her old age, so that such benefits can help him/her in the future and the life of his/her family members.
The end-of-service benefits is disbursed to a worker at the end of his/her service, as it is called the end-of-service benefits.
To accurately calculate this value, we will use EOS request document and the salary rules
In Equatorial Guinea,The final wage shall be the basis for calculating the end-of-service benefits.
Workflow for EOS payment request
- The draft EOS payment request document is created
- Record verification is done when document is submited (During verification, the system will check for the previous seniority payment records, to avoid paying the same period several times and set the field Seniority start date)
- The EOS payslip is created by automatically selecting the EOS salary structure
- The payslip is calculated using the EOS salary structure
- The EOS payment report is printed
All EOS payment request documents are managed from here

This view is where all the EOS payment request can be managed (create, search, filter)
Standard Operating Procedure (SOP) for Odoo Human Resources (HR) Module
Recruitment
Getting started with Recruiment in iSuite
Getting started with Recruiment in iSuite
Recruitment is an essential process of every company. It plays an important role in operating the human resource system, generating assets and revenue for the company and contributing to the prosperity of the company. With that being said, iSuite software provides you with effective and detailed solutions by creating new recruitment requests, receiving new applications, communicating with the applicants until they become your employees.
Requirements
This tutorial requires the installation of the following applications/modules:
Recruitment
Module Installation
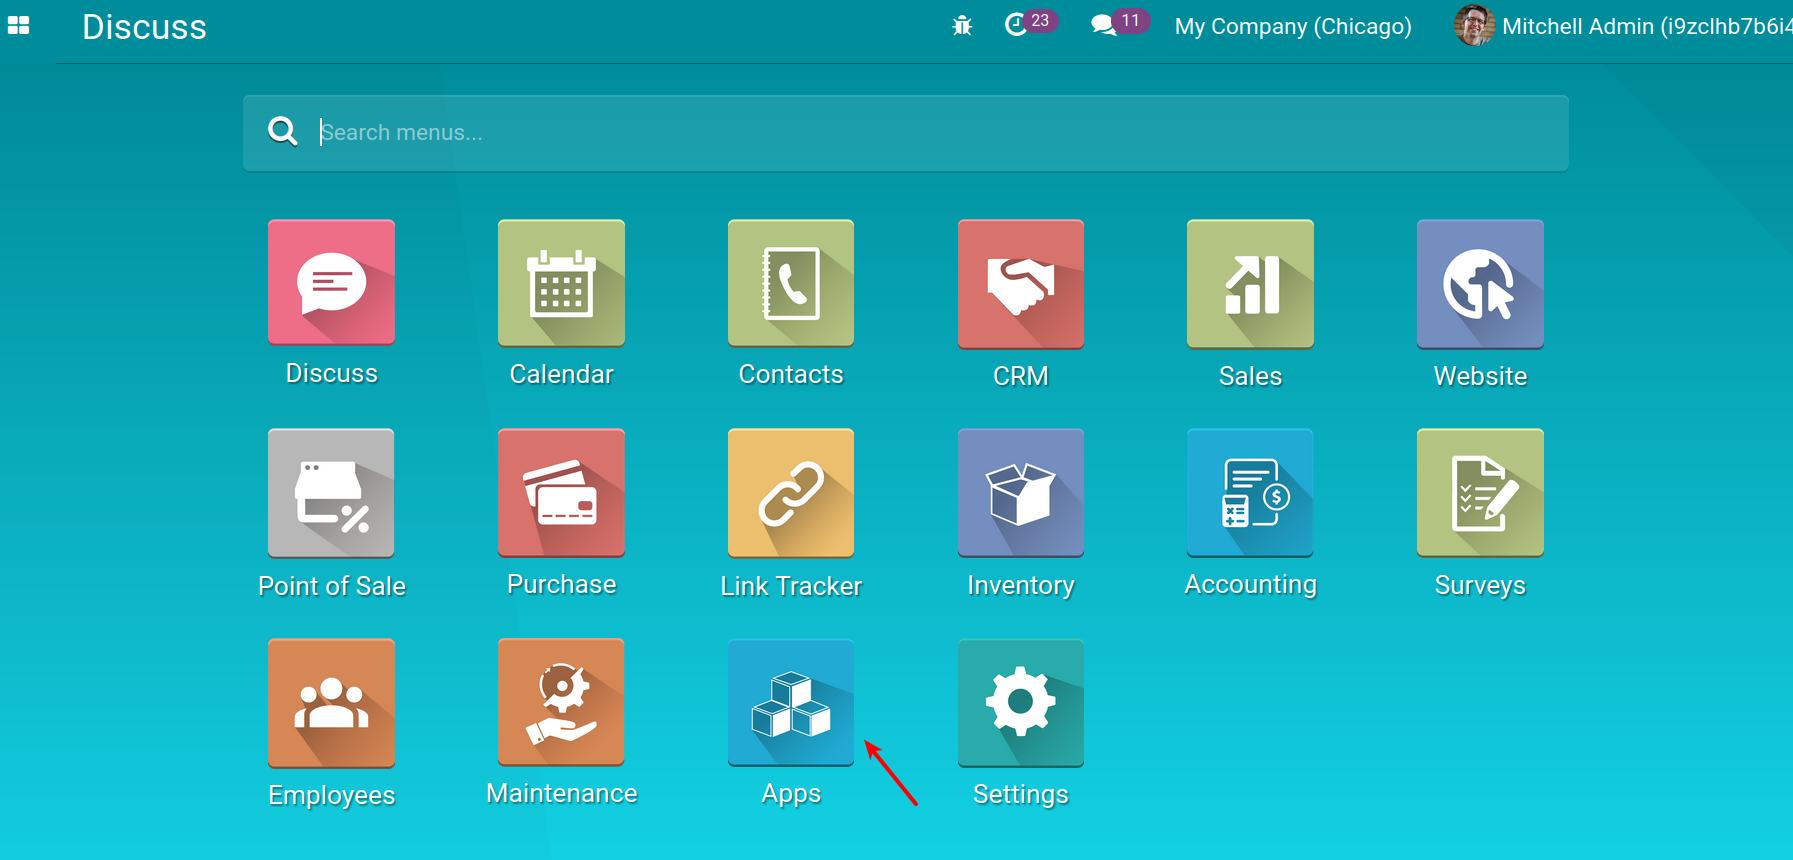
For using the features of Recruitment, you need to install the Recruitment (hr_recruitment) module by clicking to the Apps on the main interface.
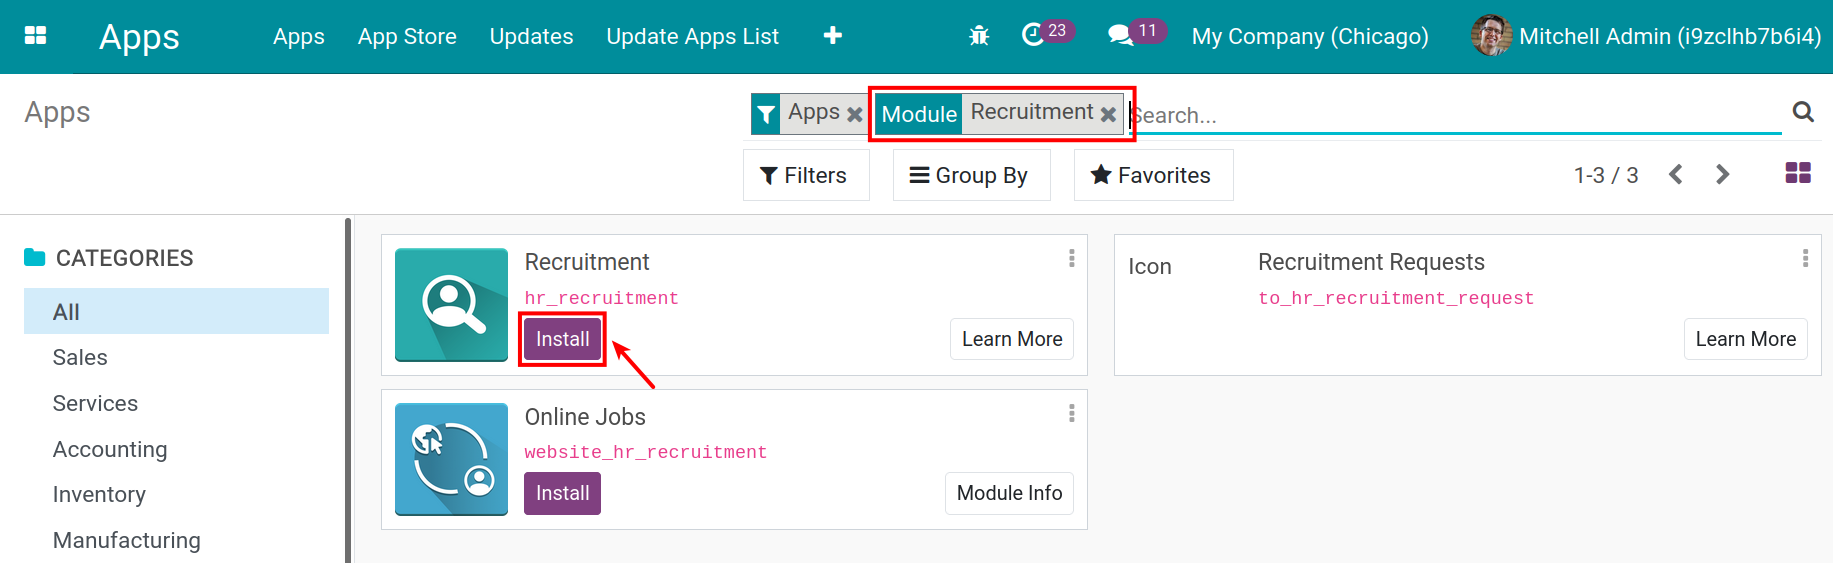
On the search bar, type the keyword Recruitment > click on Install.
After installing, the icon of Recruitment module will appear on the main interface.

Module Access Rights
To grant user access rights to the Recruitment module, you need to navigate to the Setting module.
Click on Manage Users.
Locate to the user you want to change the Recruitment Access Right.
Click on Edit button.
Set Recruitment Access Right for this user.
Blank: Users do not have the Recruitment Access Right - cannot see/access the Recruitment module.
Recruitment Officer:
Create, edit, delete Applicant.
View Recruitment Analysis Report.
Have the right configure menus but doesn’t have the right to create, edit, deleting Stage and Activity types.
Administrator: Have full access in Recruitment module.
See also
Related article
Source of applicants
Optional module
Recruitment Applicant Skills
Recruitment Requests/Approvals
Initial Configurations in Recruitment App
Departments
Requirements
This tutorial requires the installation of the following applications/modules:
Employee
iSuite software allows you to create departments flexibly, suitable for many different types of departmental structures, with no limit of departments and department levels, helps manage, assign and arrange work conveniently and effectively.
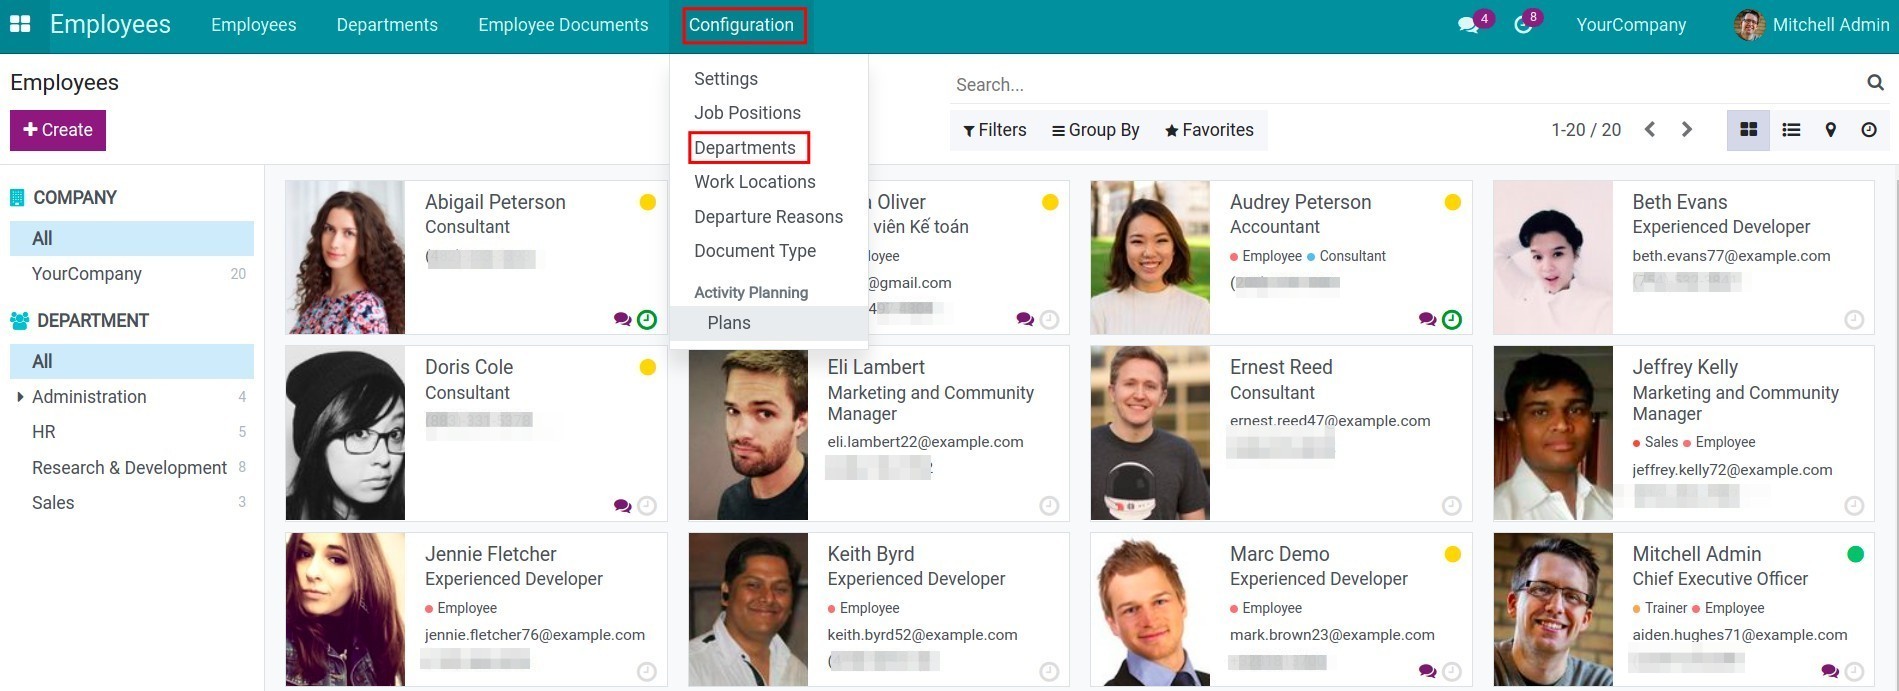
To create a Department, navigate to Employees > Configuration > Departments.
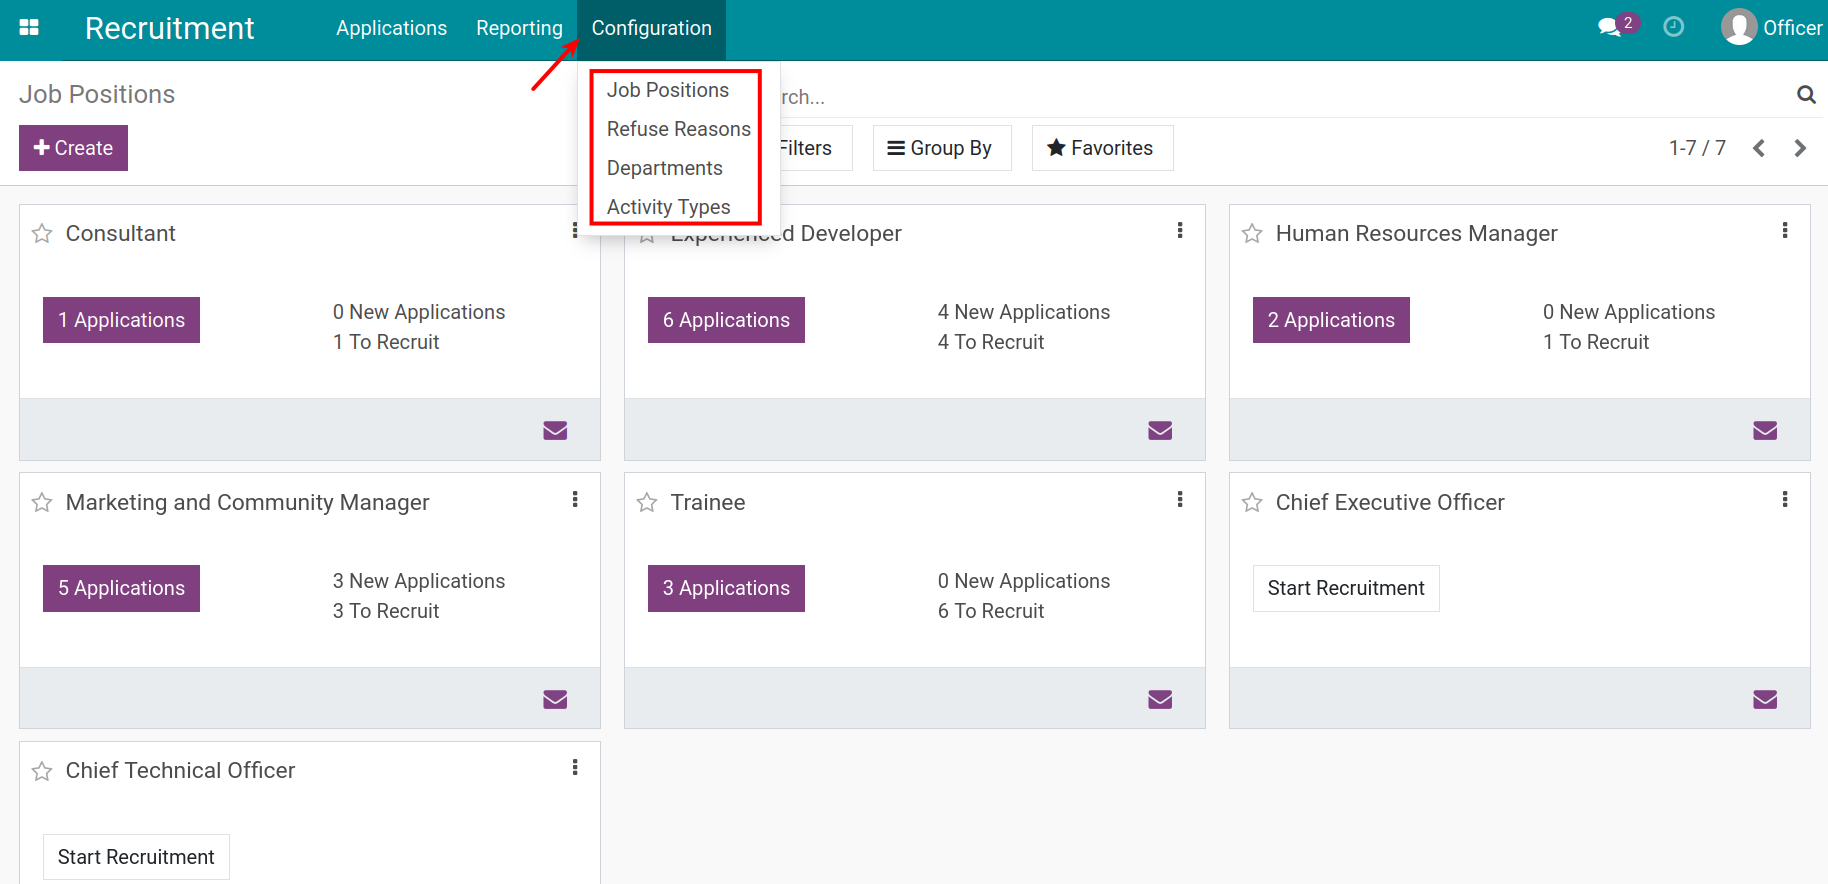
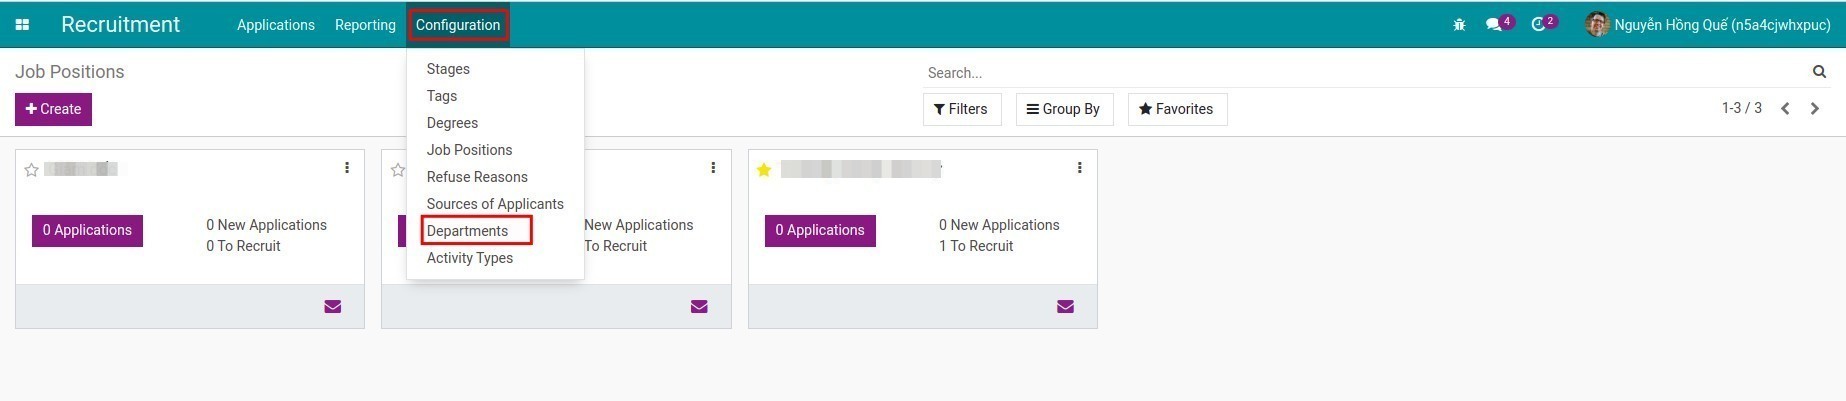
You can also create a department from module Recruitment, navigate to Recruitment > Configuration > Departments.
This is where the list of Departments is displayed, click Create to create Departments.
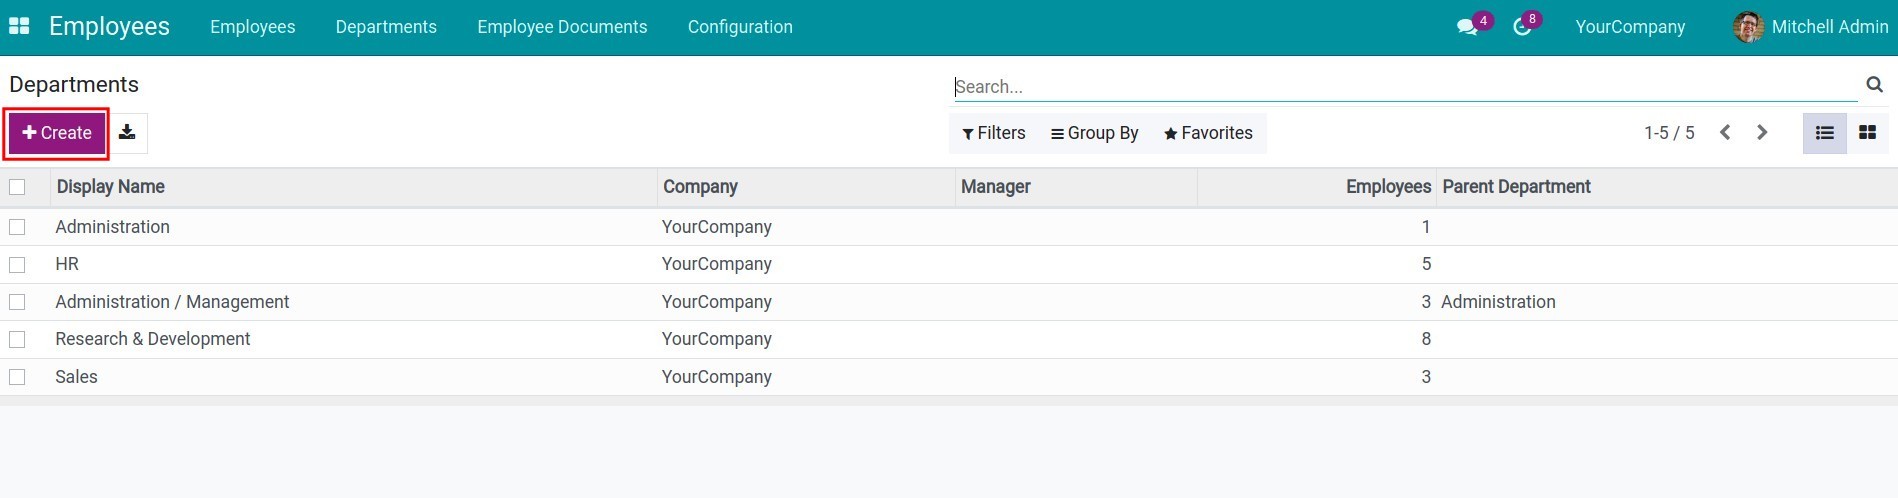
The interface of Departments is shown as follows:
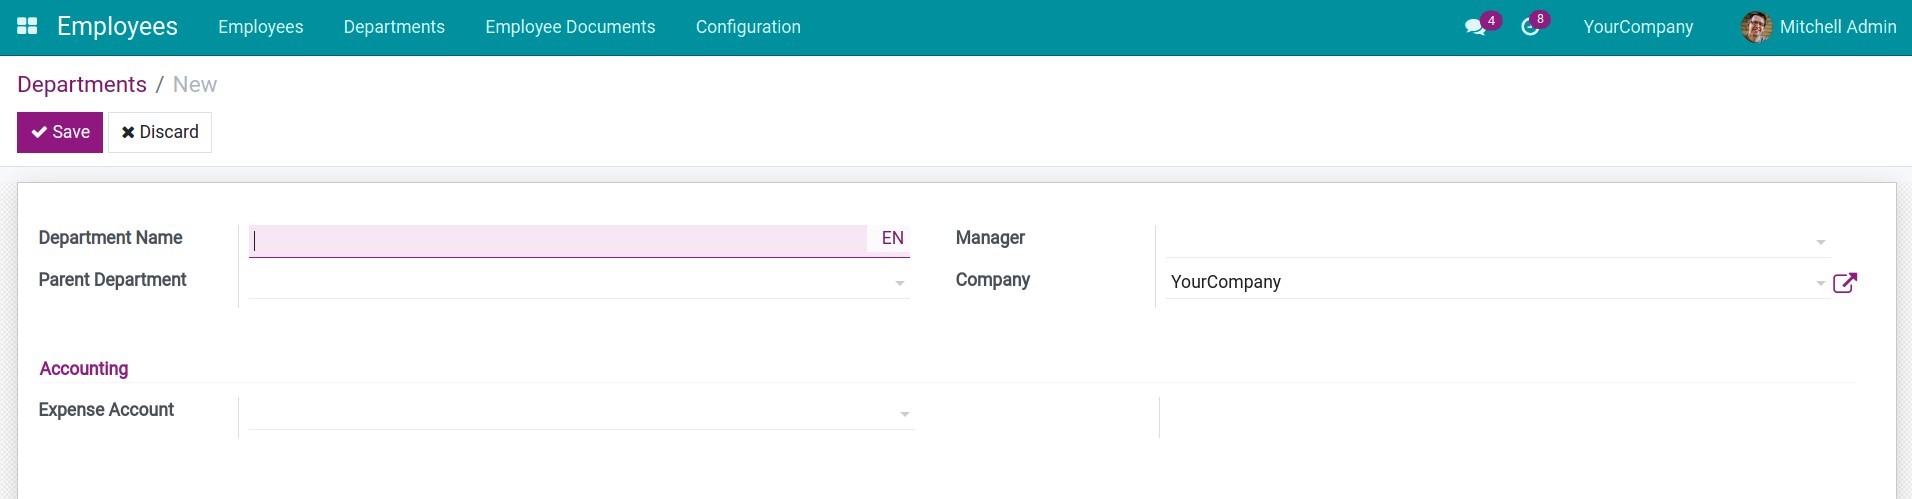
Enter the following information:
Department Name: Name of the department you want to create.
Parent Department: Select the Department which is the nearest parent level of the Department you want to create. If you don’t have one, click Create and Edit to create a Parent Department.
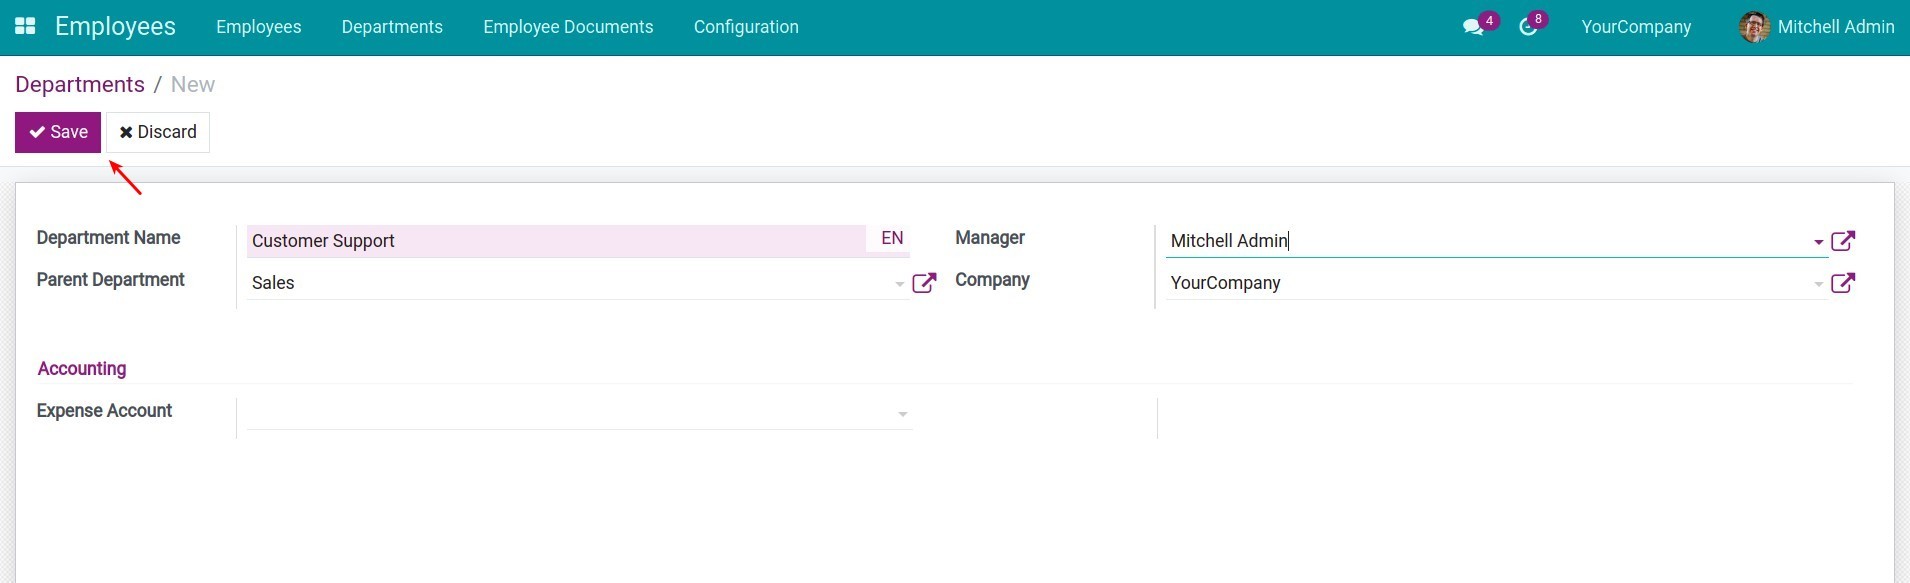
Manager: Manager of the Department. On the Employees interface, the employees of this Department will automatically enter this person as their manager.
Company: If you implement Multi-company feature in Odoo, you need to select the Company to which the Department belongs.
Accounting - Expense Account: Expenses for the department will be recorded in this account when accounting.
Click Save after filling in the information required.
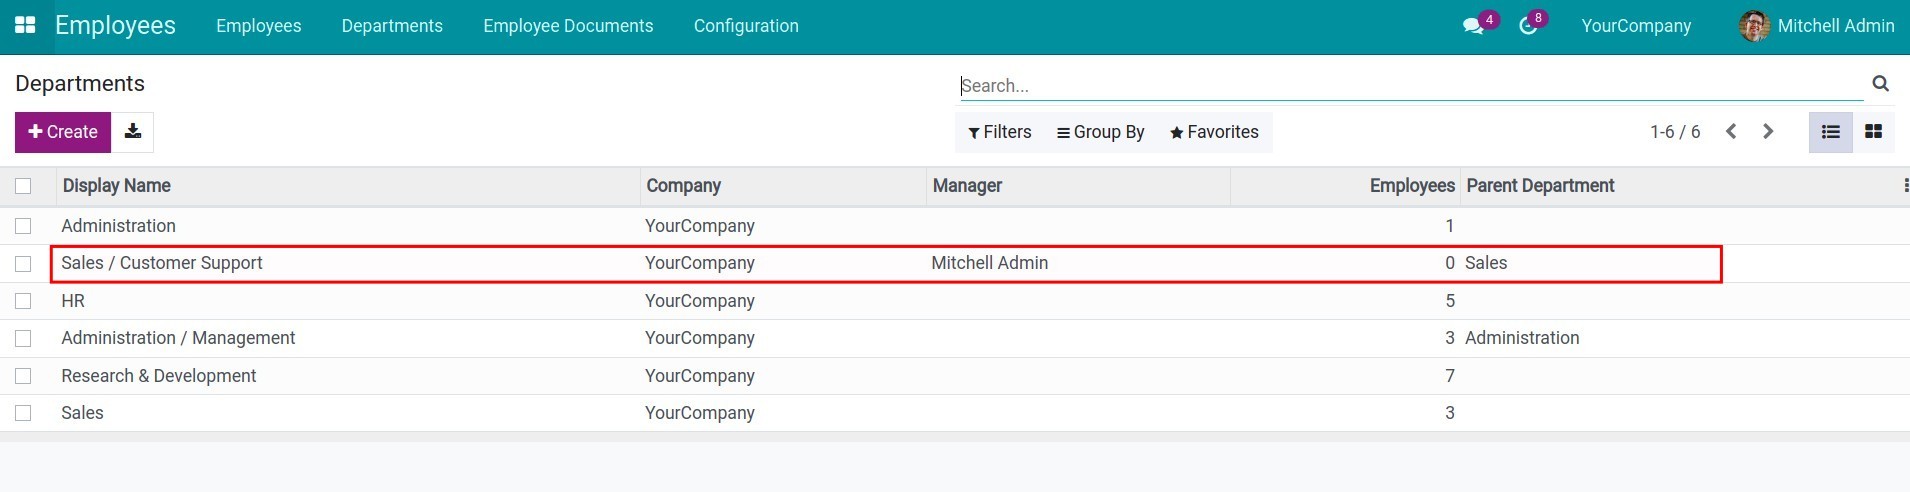
After setting up the Departments in Employees:
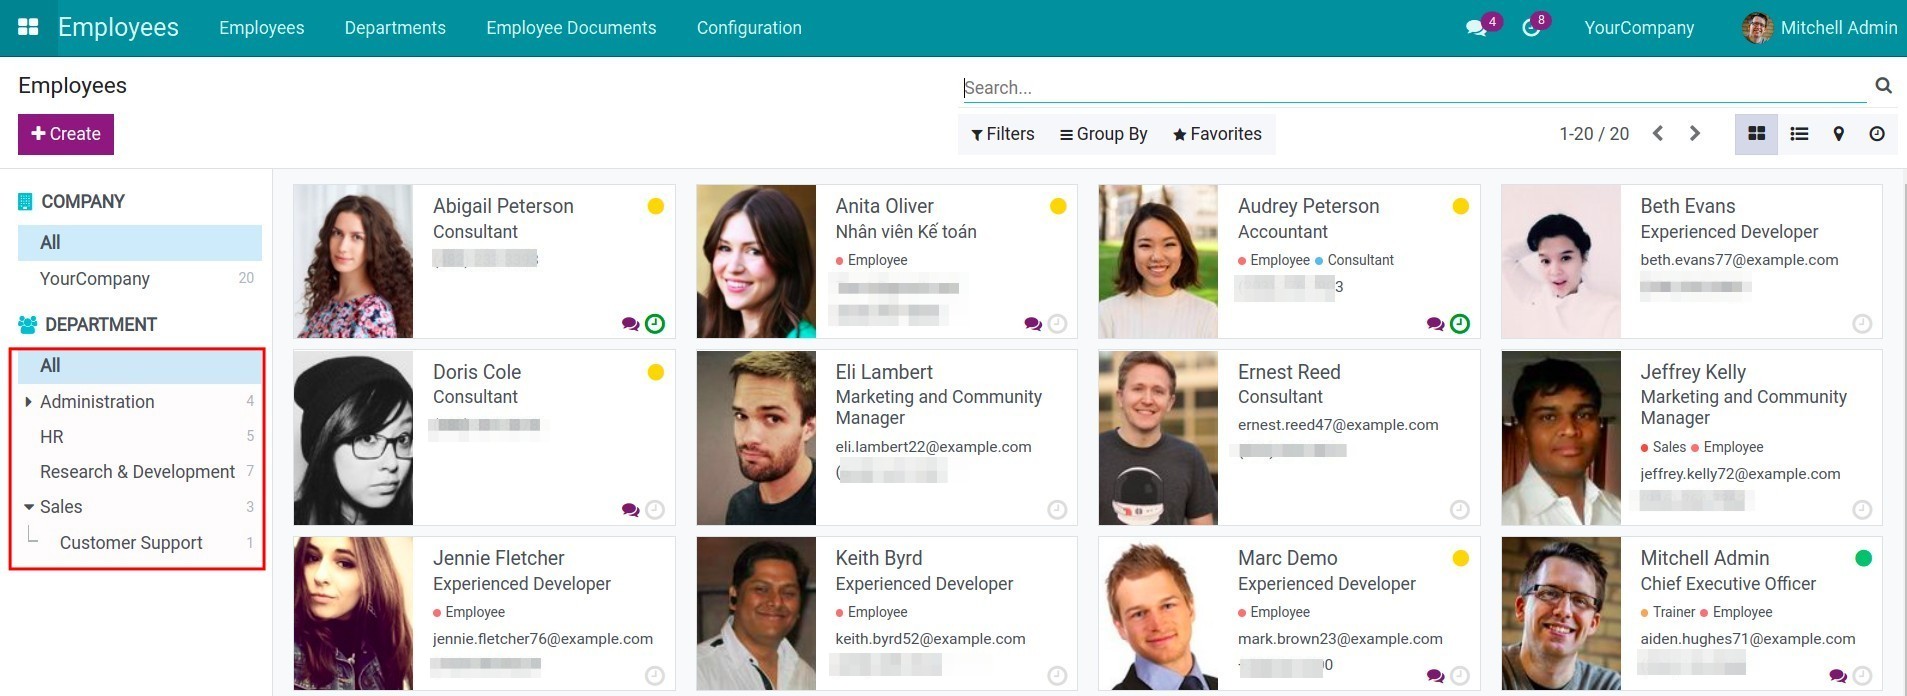
The Department name will be linked with the name of the Parent Department on the left side.
In the Employees menu, you will see a directory structure according to the levels of Departments that you have set up. You can click on each Department to see a list of its employees.
Job positions
Requirements
This tutorial requires the installation of the following applications/modules:
Employee
job position in odoo Software is the job title of an employee in an organizational structure, for example, Sales Director, Purchase Staff, Accountant, etc. It’s especially important and necessary to grant the Job Position for any employee to define their duties, job scopes, responsibilities and rights in the company. Similarly, odoo will help you to solve this subject with ease.
Navigate to Employees > Configuration > Job Positions to set up the Job Position for an employee.
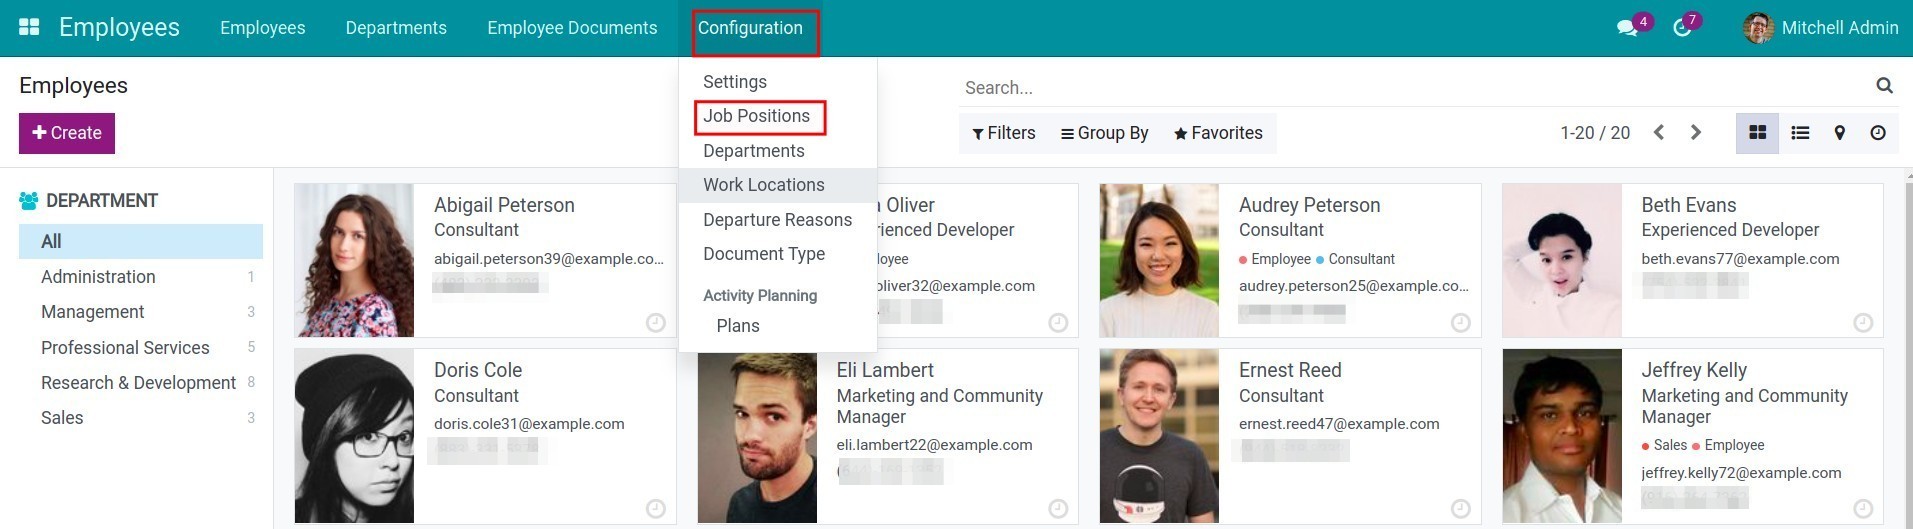
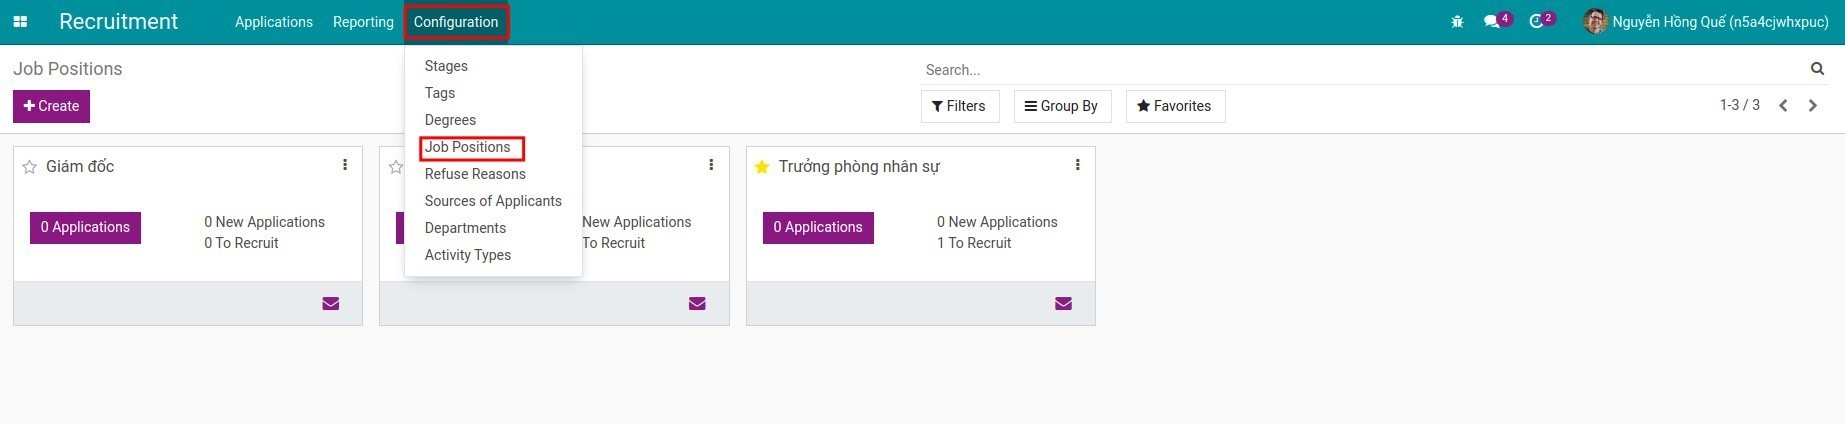
You can also create a Job Position from the module Recruitment, navigate to Recruitment > Configuration > Job Positions
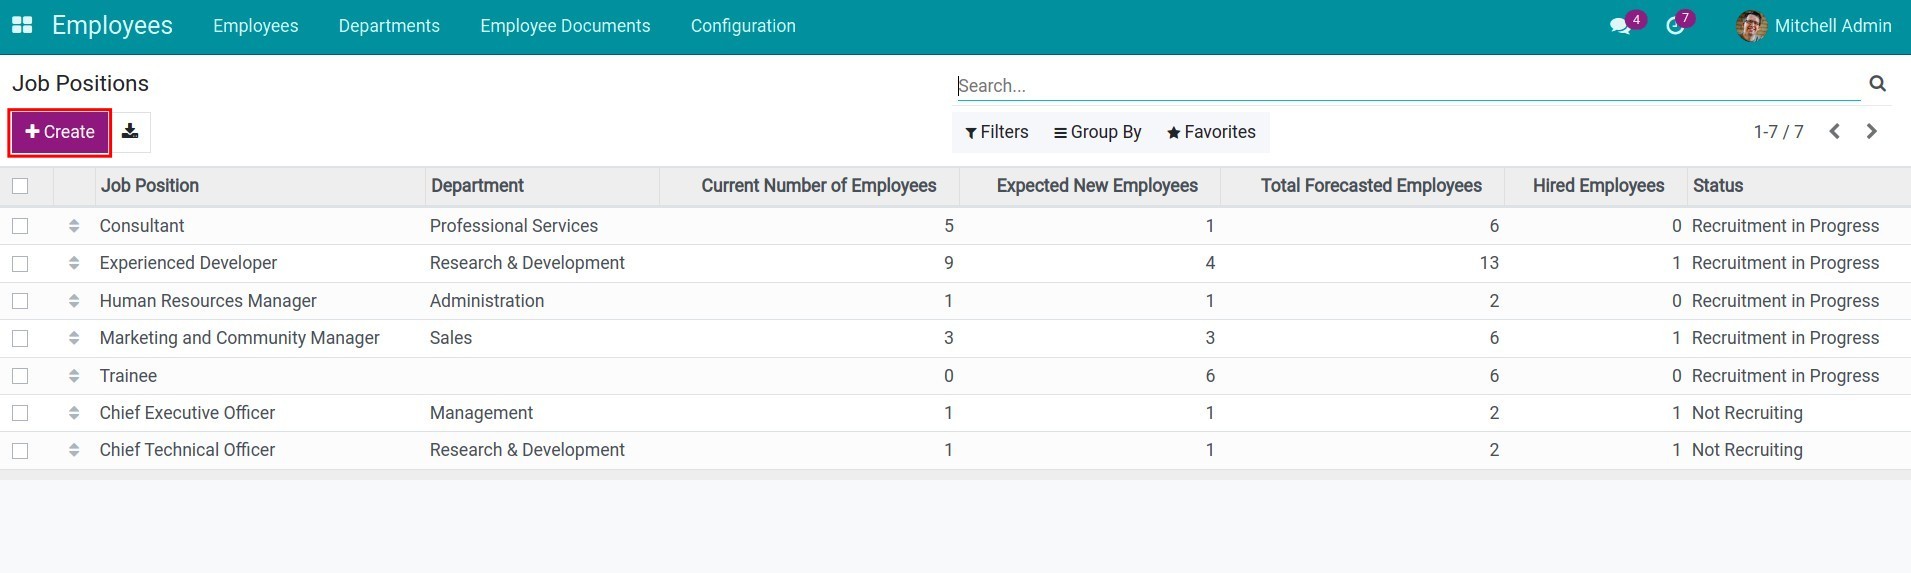
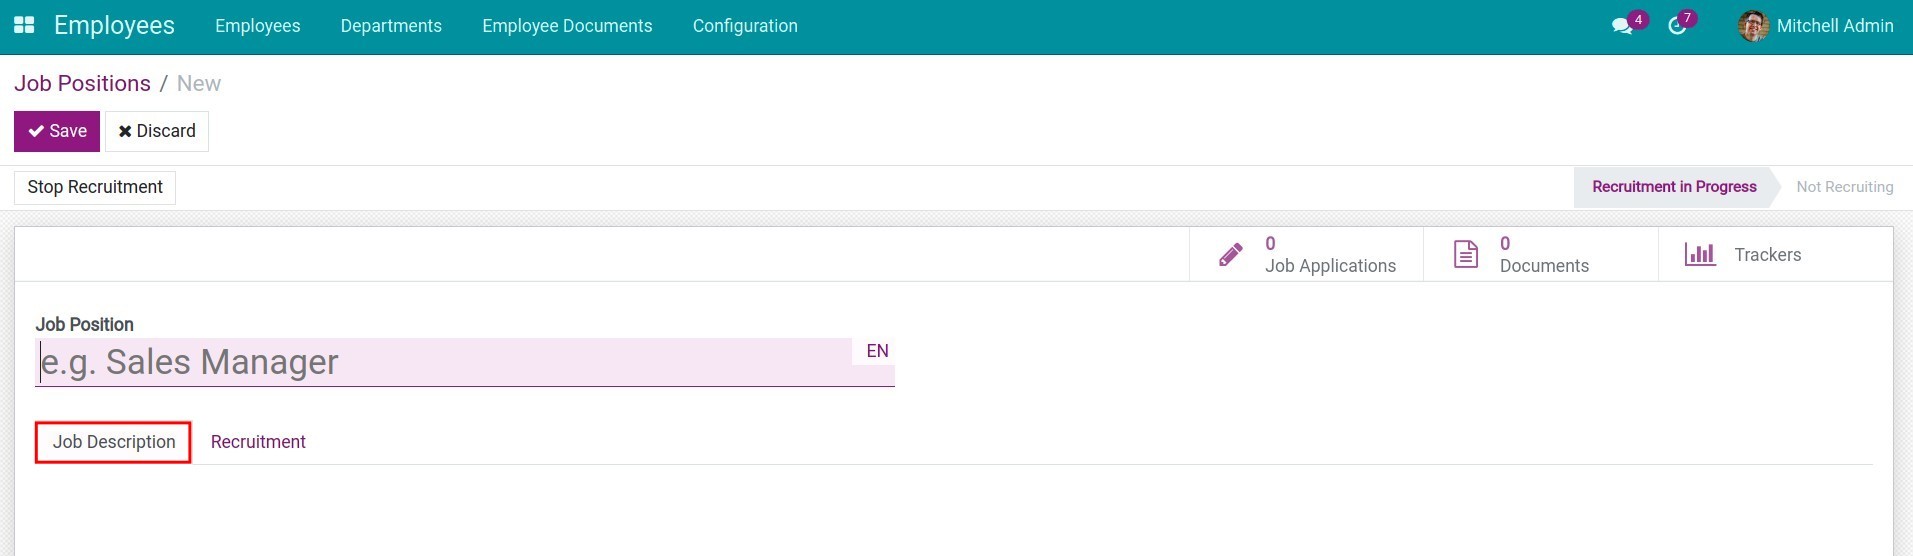
Click on Create after the view of the Job Position list is displayed.
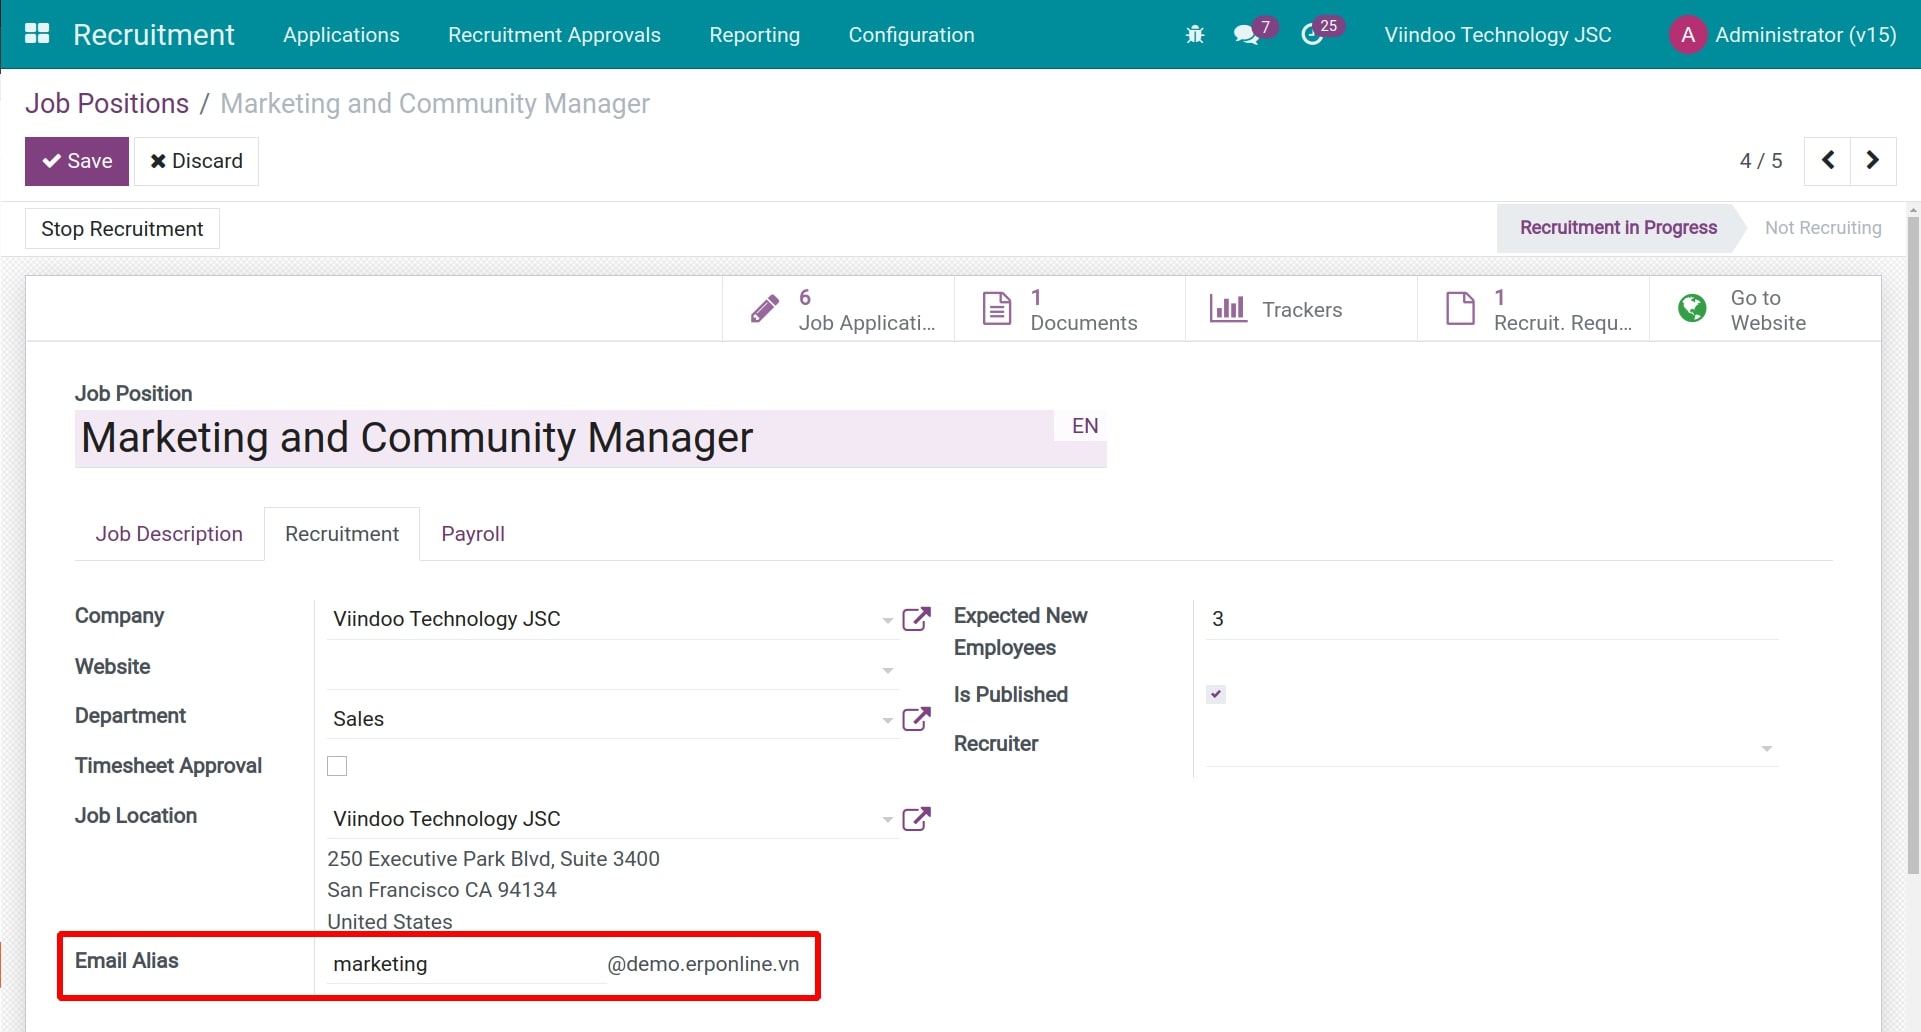
On the view of Job Positions, you need to fulfill the information as follows:
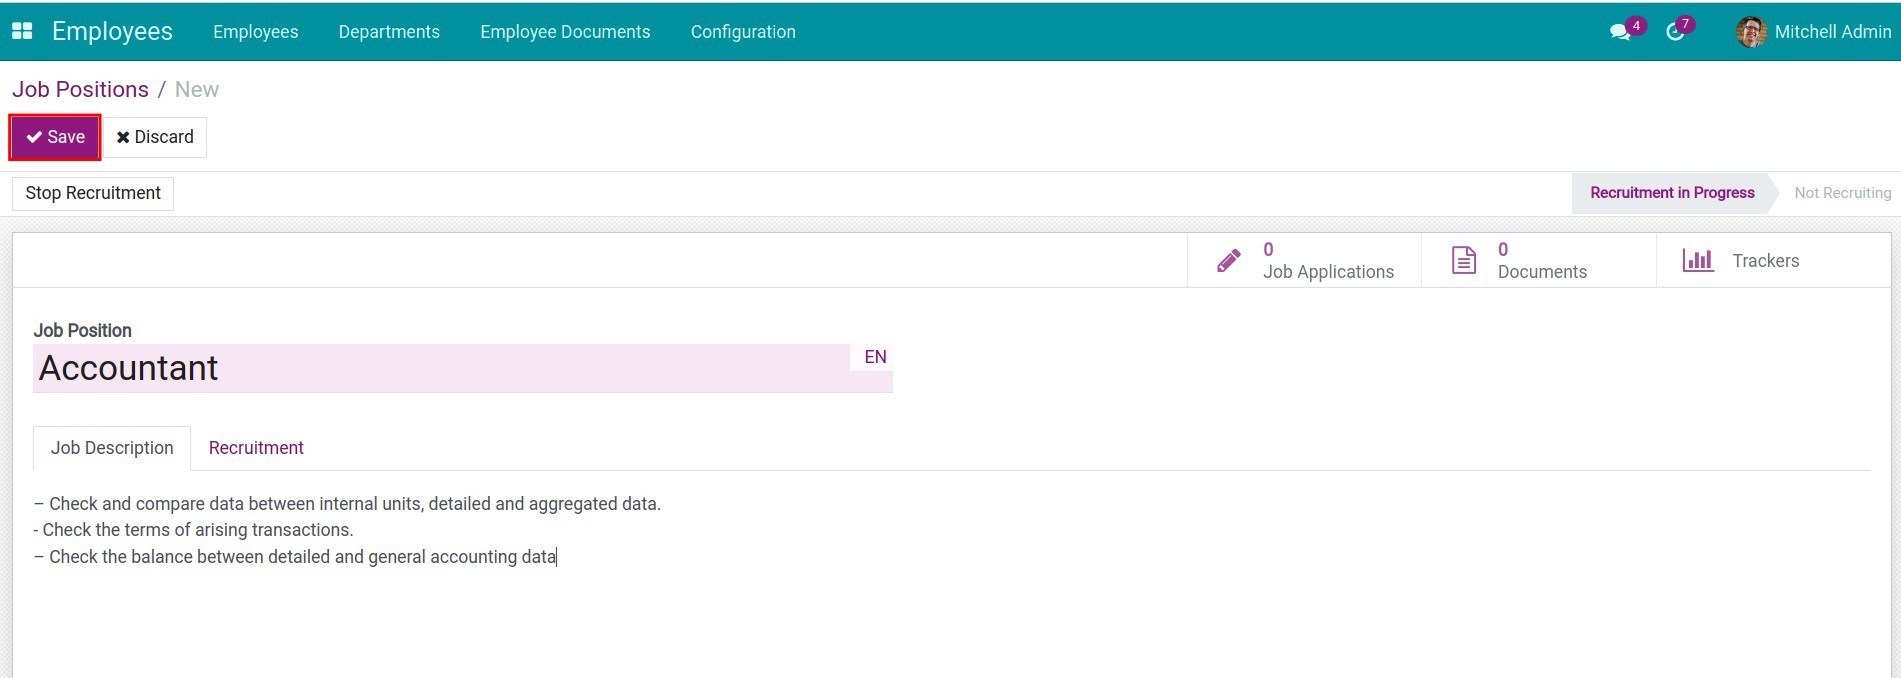
Title of Job Position: Enter a title which you need.
Job Descriptions tab: Fulfill the requirements, daily tasks and so on of this position.
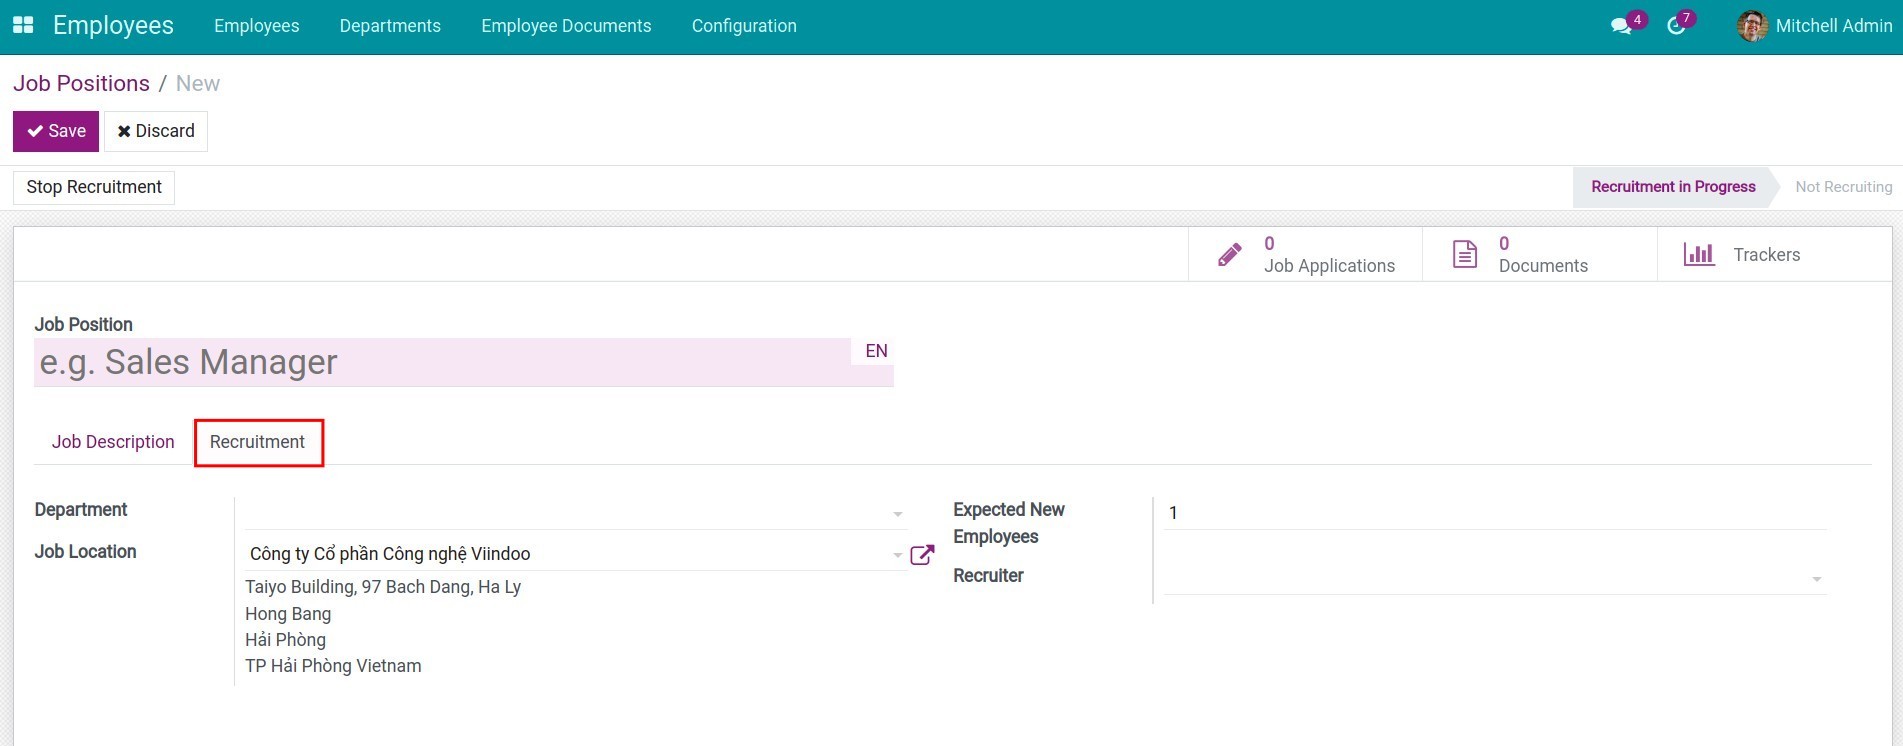
Recruitment tab: When the recruitment demand of this position arises, you need to configure as followings:
- Departments: Where this position belongs.
- Job Location: Enter the work address of this employee.
- Expected New Employees record the desired number of employees.
- Recruiter: Enter the name of the person in charge right here. Then, he will automatically track and get the notices of sending/receiving emails from the application’s position.
Click on Save after everything was done.
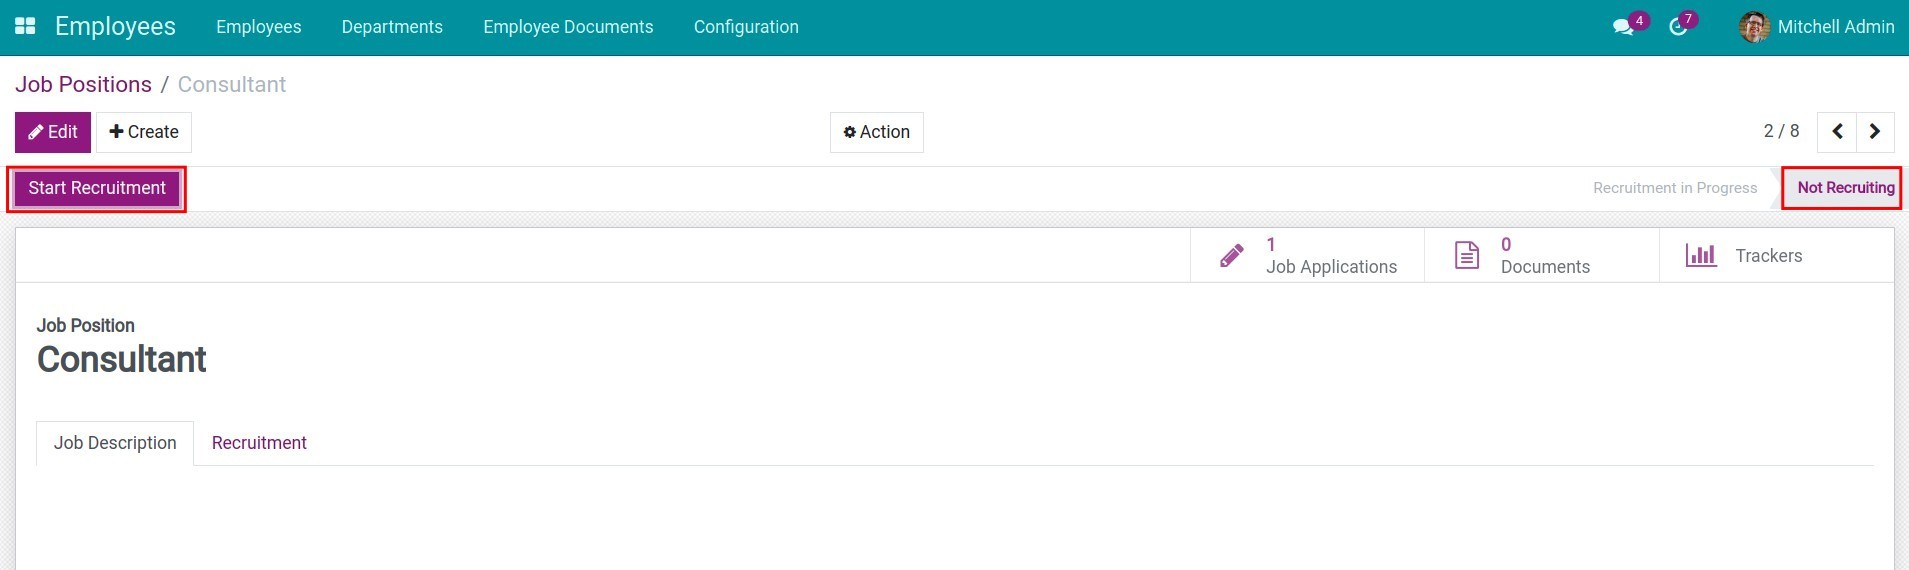
Additionally, there are some options on viewscreen such as:
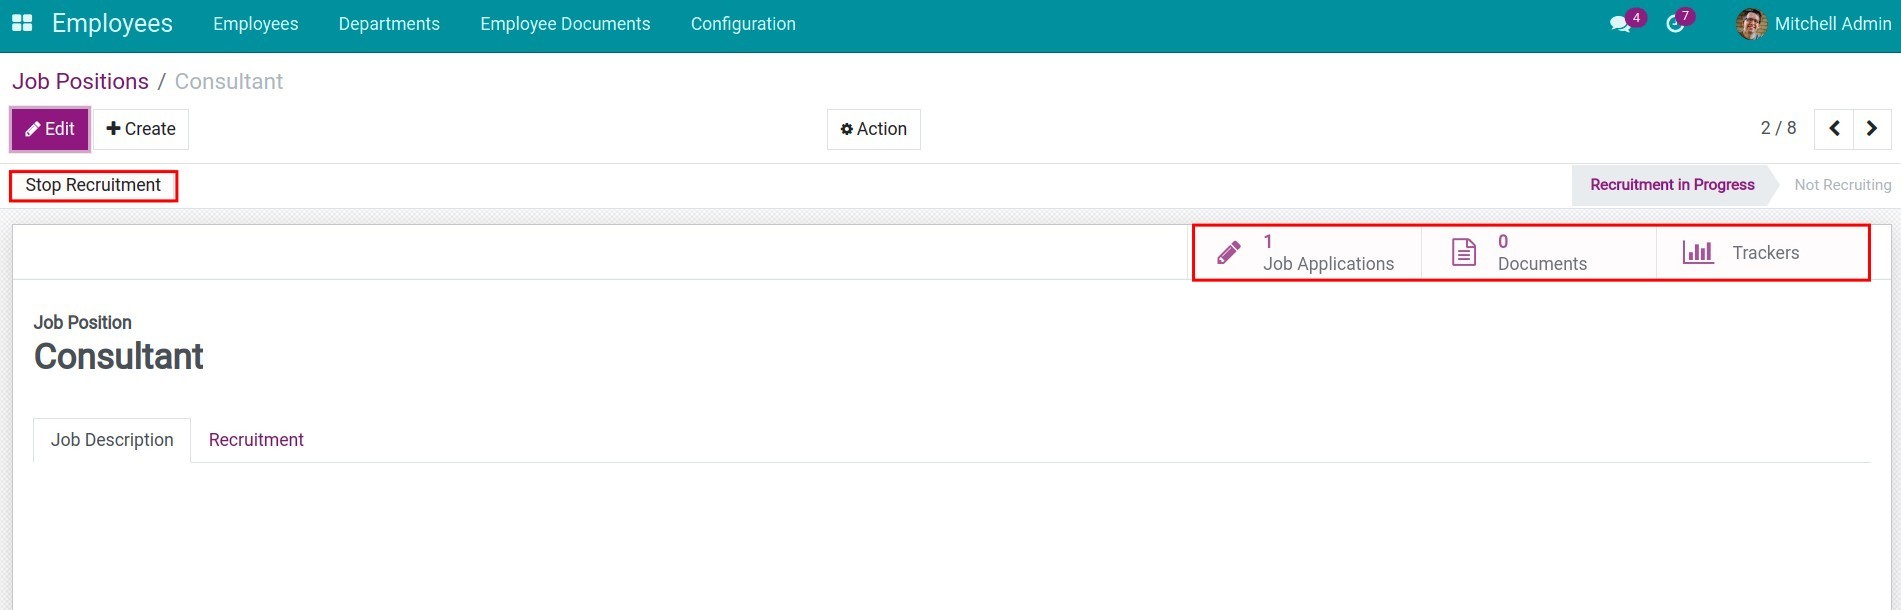
Applications show the number of applied candidates for this Job Position (is the Applied Job field on Applications view). Click on this field for more details.

Documents: This button helps to manage all the related documents of this Job Position. It’s similar to the Applications button, the detail lists will be shown by a click.
Trackers: The Job Sources list of all the candidates is contained in this field and configured on the Applications view.
Stop Recruitment allows the Users to stop the recruitment task of this position. The Job Positions state will be changed to Not Recruiting when you click on this button and the contrary, the Recruitment on Progress state will be returned when you click on Start Recruitment.
Source of applicants
If the company regularly recruits applicants from many different sources such as applying directly, using the recruitment website or social networks, etc. It’s essential to track and manage these recruitment sources to help you find which sources are really effective and focus the strategy on them.
Requirements
This tutorial requires the installation of the following applications/modules:
Recruitment
With Recruitment app, the above tasks can be done easily and give you accurate measurement results at once.
Settings of Applicants Sources
To set up the Source of Applicants feature, you have to activate the Developer mode at first.
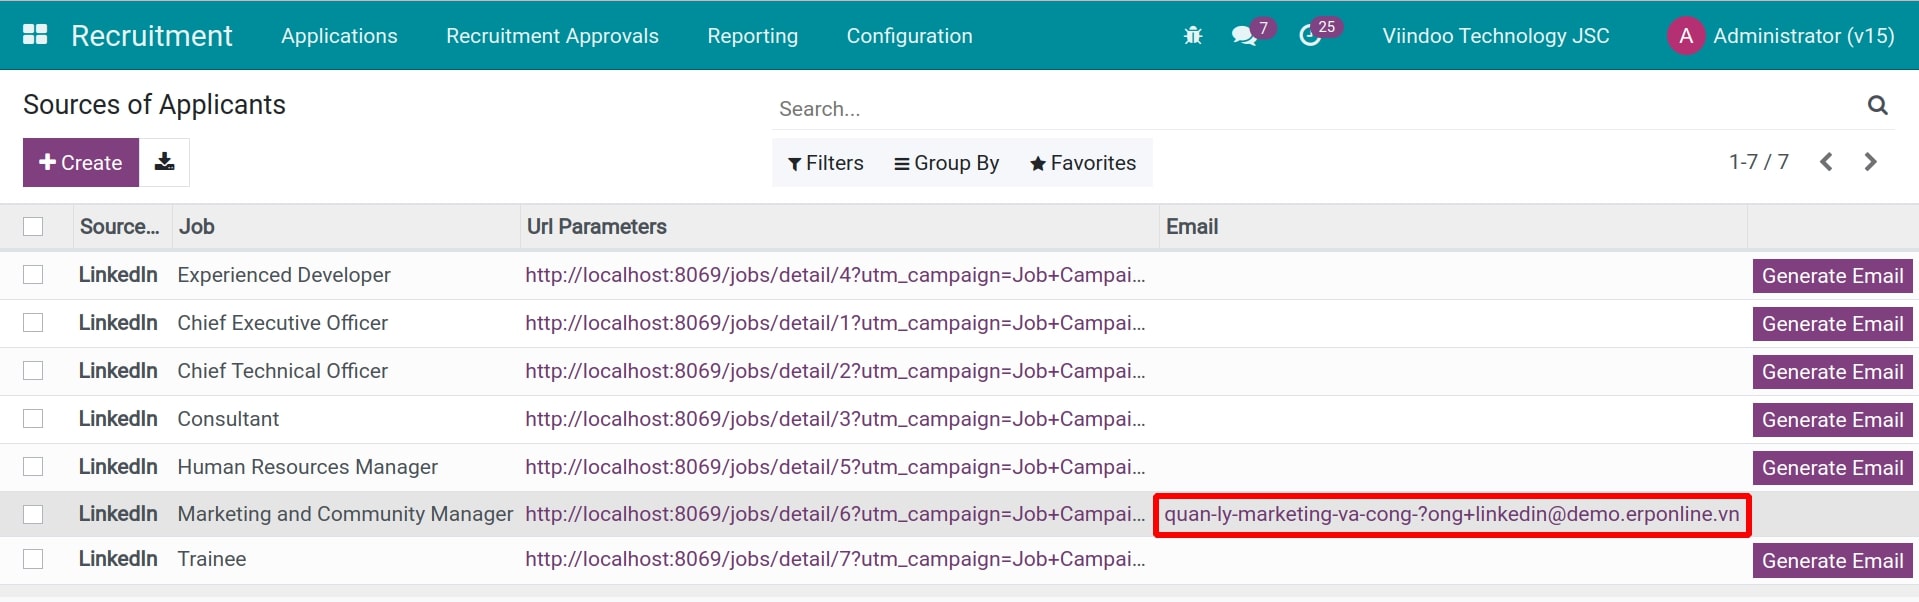
After successful activation, navigate to Recruitment module > Configuration > Sources of Applicants > Create and fulfil the following information as:
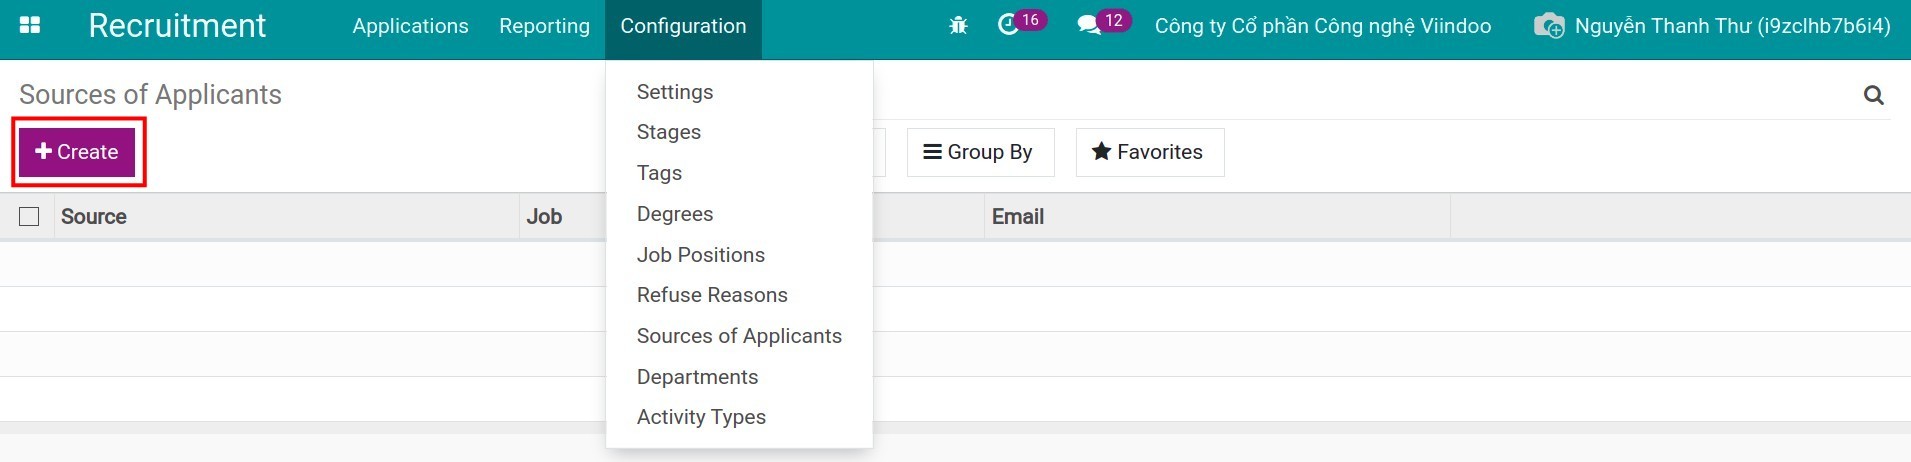
Source: enter the source name, such as: a survey, Facebook, Twitter, apply directly, etc.
Job: enter the Job Position/Title is recruited through this source.
Click on Save button.

Then, click on Generate Email button and an email for receiving applications is auto-generated after that. If you mention the email on the recruitment posts on Facebook, recruitment websites, etc. the system will automatically identify and classify the source of its applicant when an application is submitted.


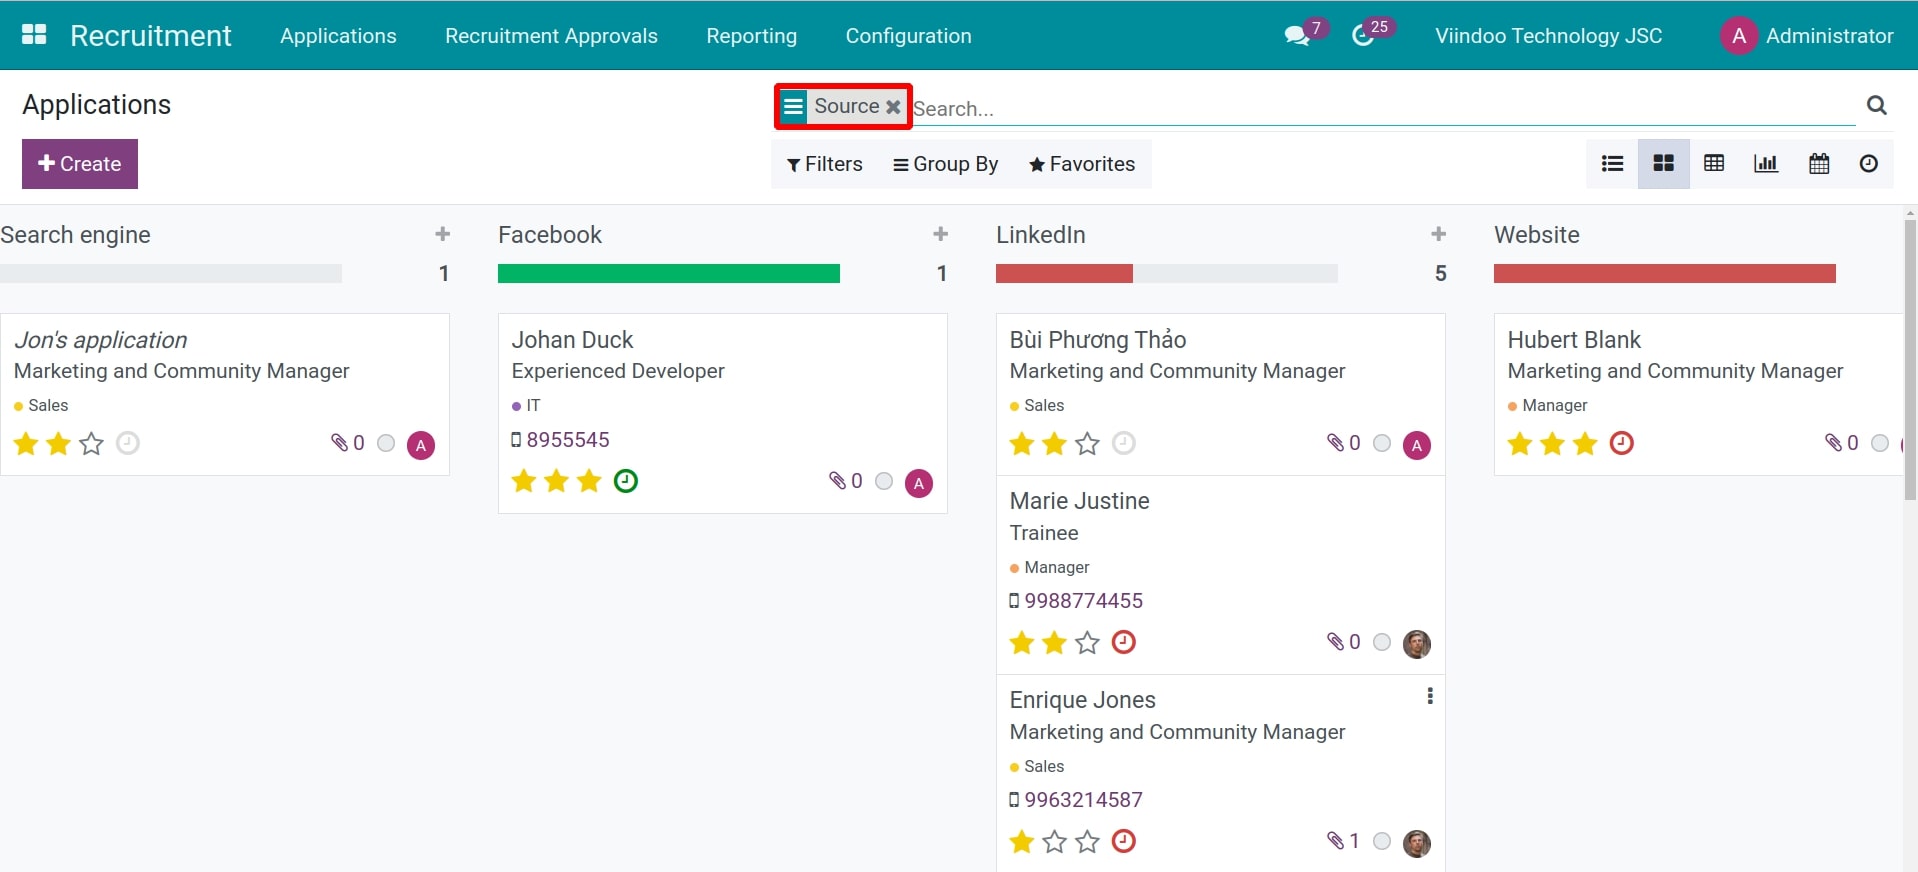
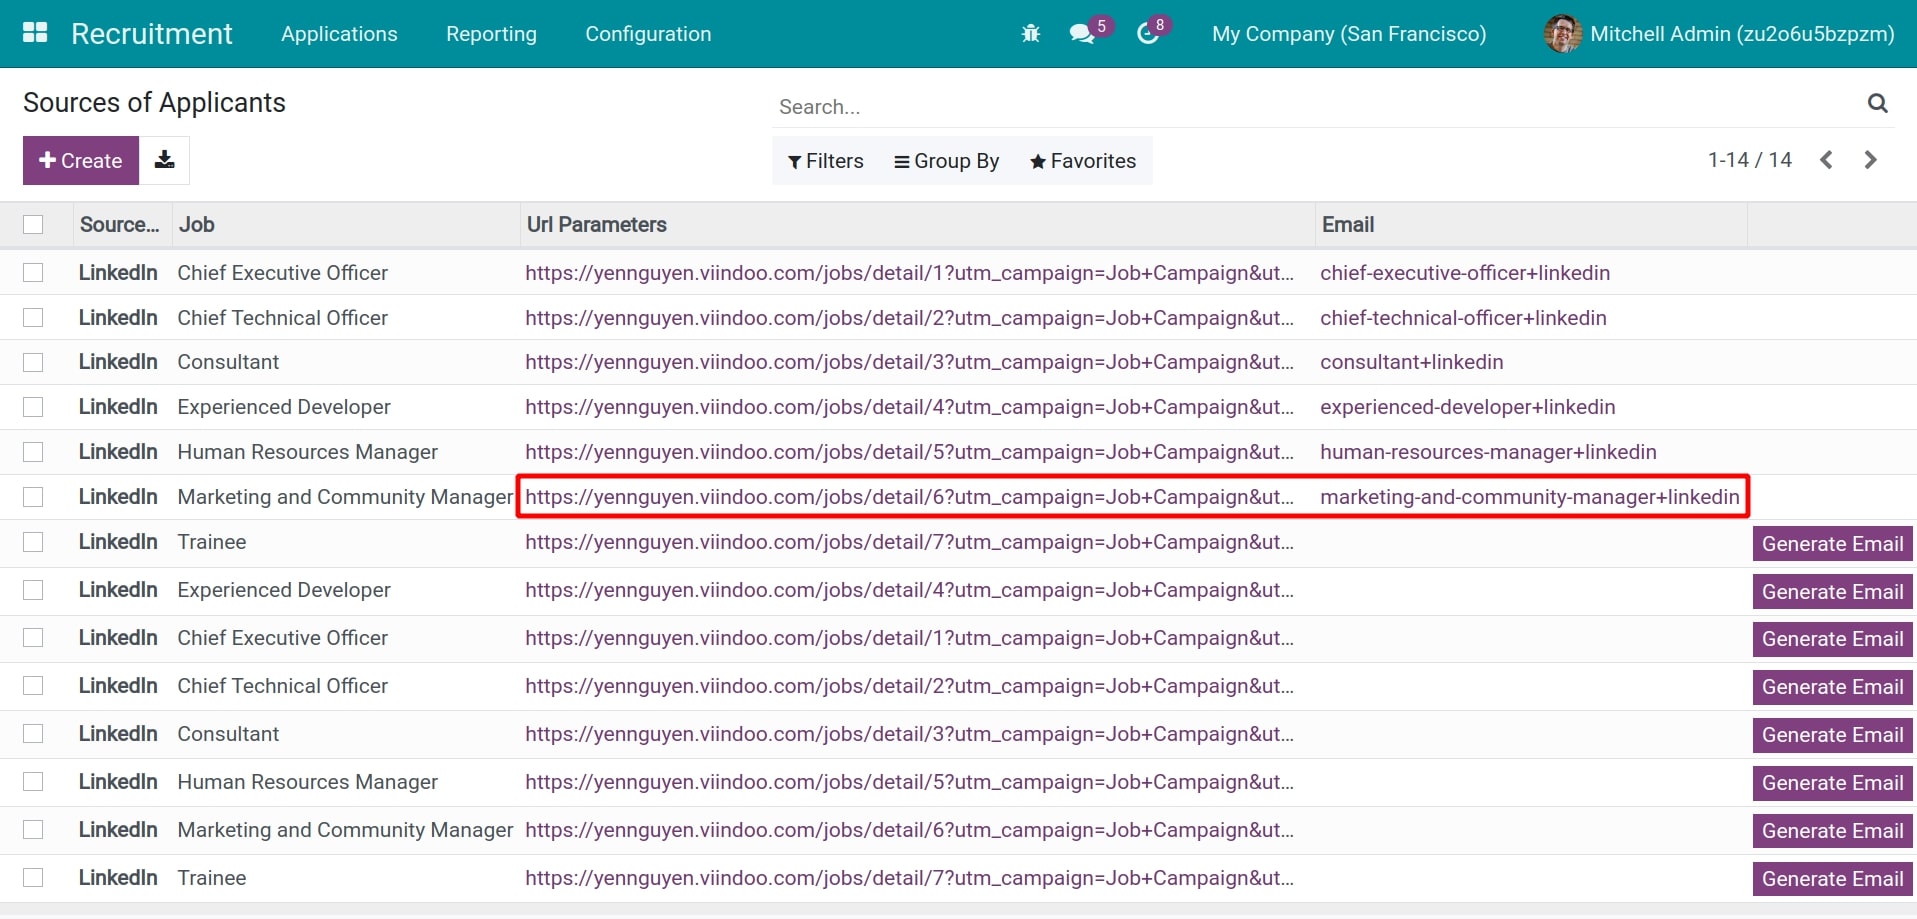
Management of Applicants Sources
The sources of applicants can be generated automatically when a candidate submits his/her application to the above email or from the company’s jobs site. However, you can also enter these sources manually.
Using the filters and grouping on the applications list helps you know which source the applicants come from and the number of applicants.
Recruitment approval
How to create a Recruitment request
Recruitment demands may come from two sides: the Board of Directors (when there are plans to scale up, found new departments and etc.) or from the heads of departments (when there are job vacancies, resigned employees, and etc.). odoo supports you to records all the recruitment demands and manage the whole recruitment process: request, approval, publish, receive applicants’CVs, interview and offer the jobs.
Requirements
This tutorial requires the installation of the following applications/modules:
Recruitment
Recruitment Requests/Approvals
Approvals
Install the Recruitment Requests/ Approvals module
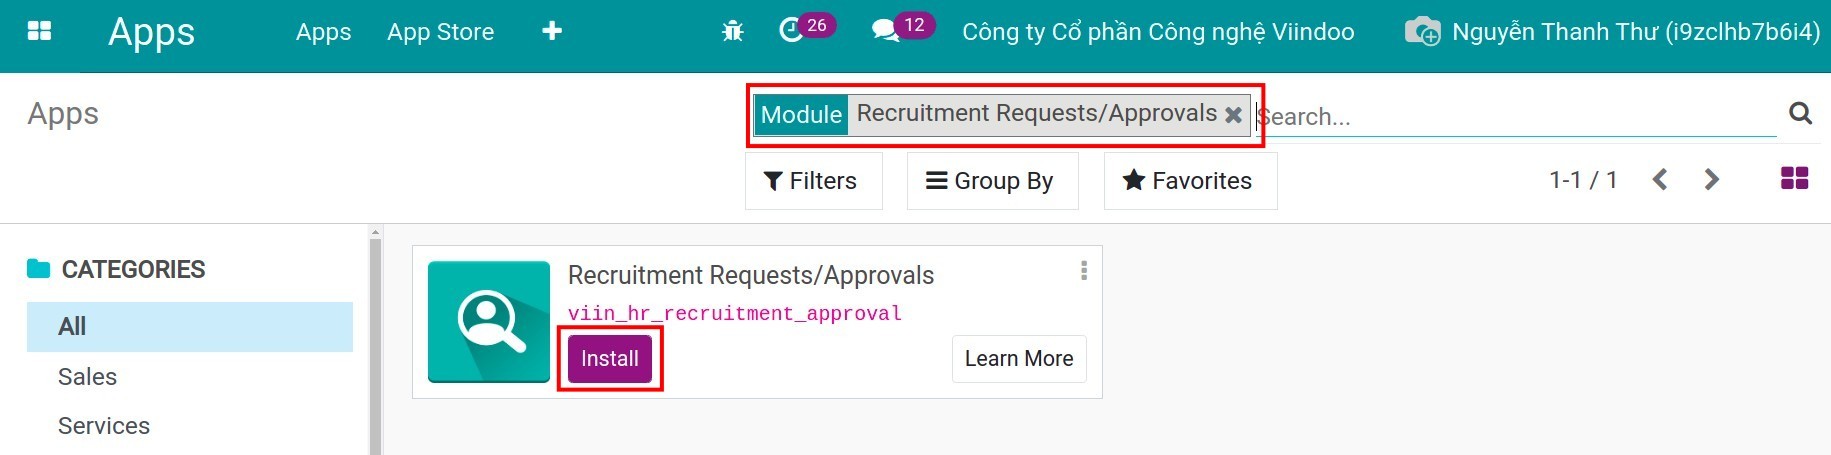
To apply recruitment request feature, you have to install the module Recruitment Requests/Approvals (viin_hr_recruitment_approval). Access to odoo Apps, remove the Apps filter, search the keyword “recruitment request” then click on the button Install.
Set Approval Types
First, you need to configure the approval request type. You need to have the Administrator access right of the Approval app in order to create Approval types.
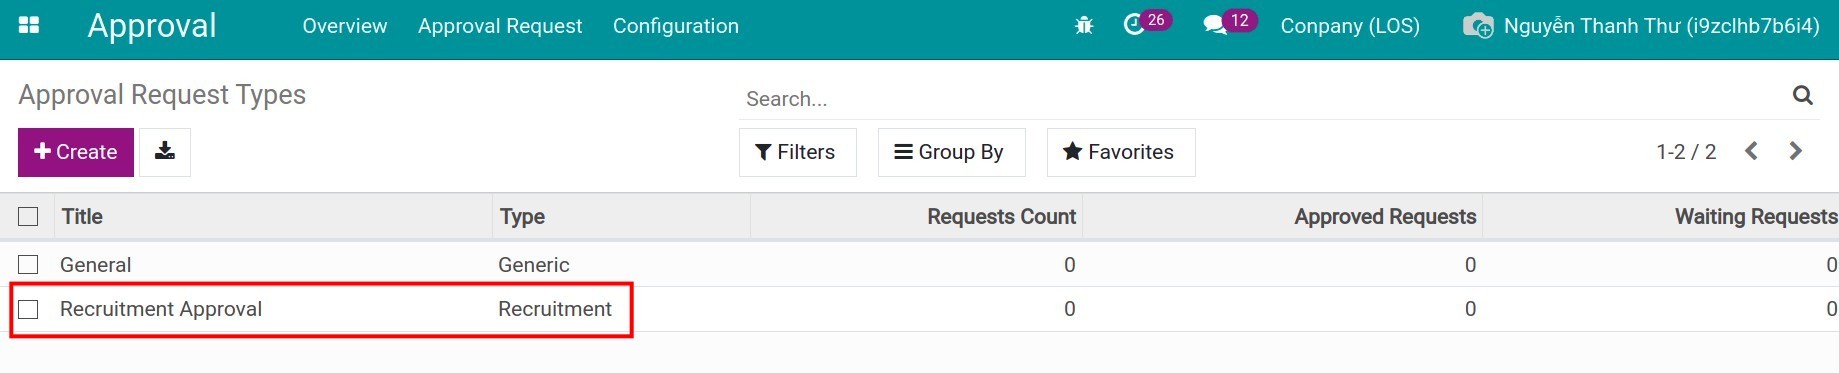
Go to Approval > Configuration > Approval Request Types. The system will recommend some types as shown in the below image. Click on Recruitment Approval and Edit (if need be).
Here are the information to configure the recruitment approval:
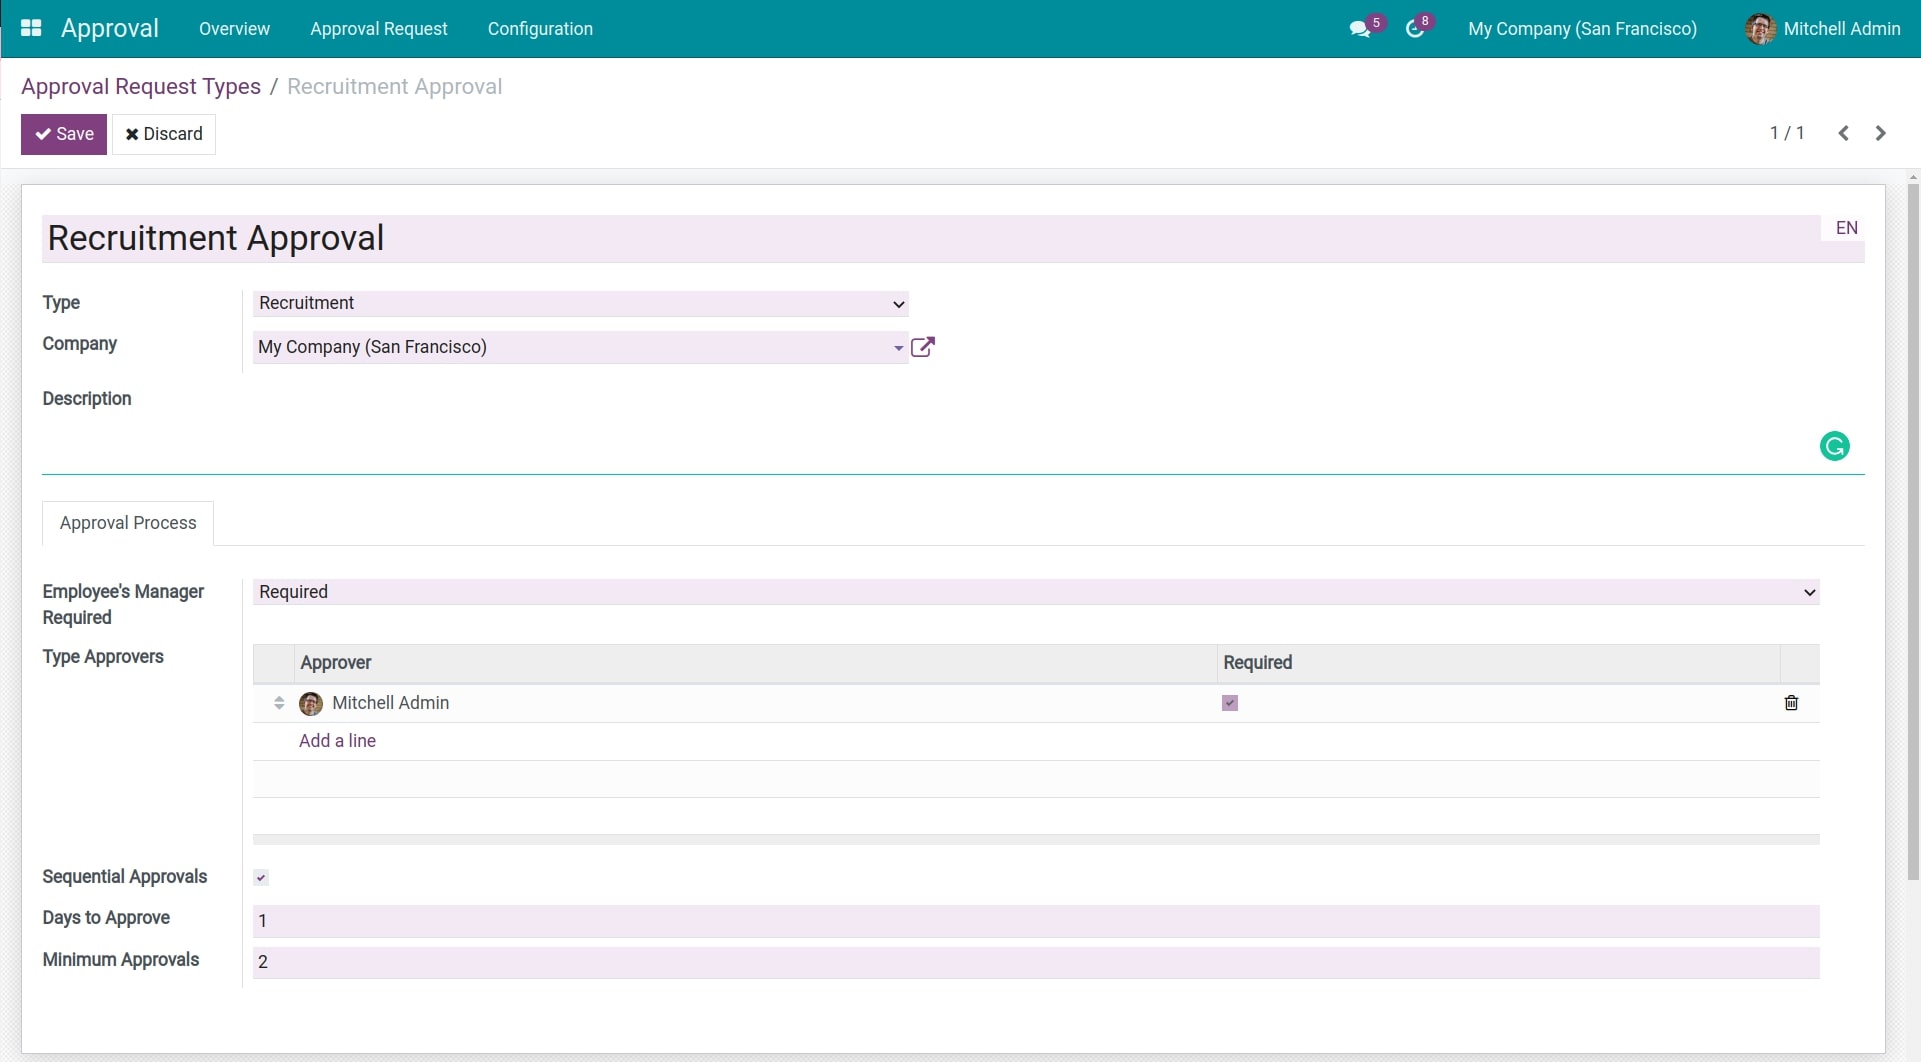
Name: The name should be short, for example: Recruitment Approval.
Type: The system shows you some options to choose, select “Recruitment”. This action is to add Recruitment approval onto the menu bar of Recruitment app. In this example, the option “Recruitment” is already selected.
Approval Process:
Employee’s Manager Required: This is to define whether the request need approving by the direct manager or not.
- None: There is no need to be approved by the direct manager.
Optional: The direct manager is in approver list below, however, if the request has got the minimum quantity of approvals, it can be done without that manager’s approval.
Required: The direct manager is required to approve the request before it goes to the other approver listed below. In this case, the field “Minimum approvals” equals the number of listed approvers plus one (the manager)
Note
The manager need to have the right of approval in his/her access rights. To edit the access rights, go to Settings > Manage Users, select the user, click on Edit, then select the option of “Team approver” in the field Approvals.
Type Approvers:
Approver: The users listed here will automatically have the right to approve the request.
Add a line in this column to add a approver.
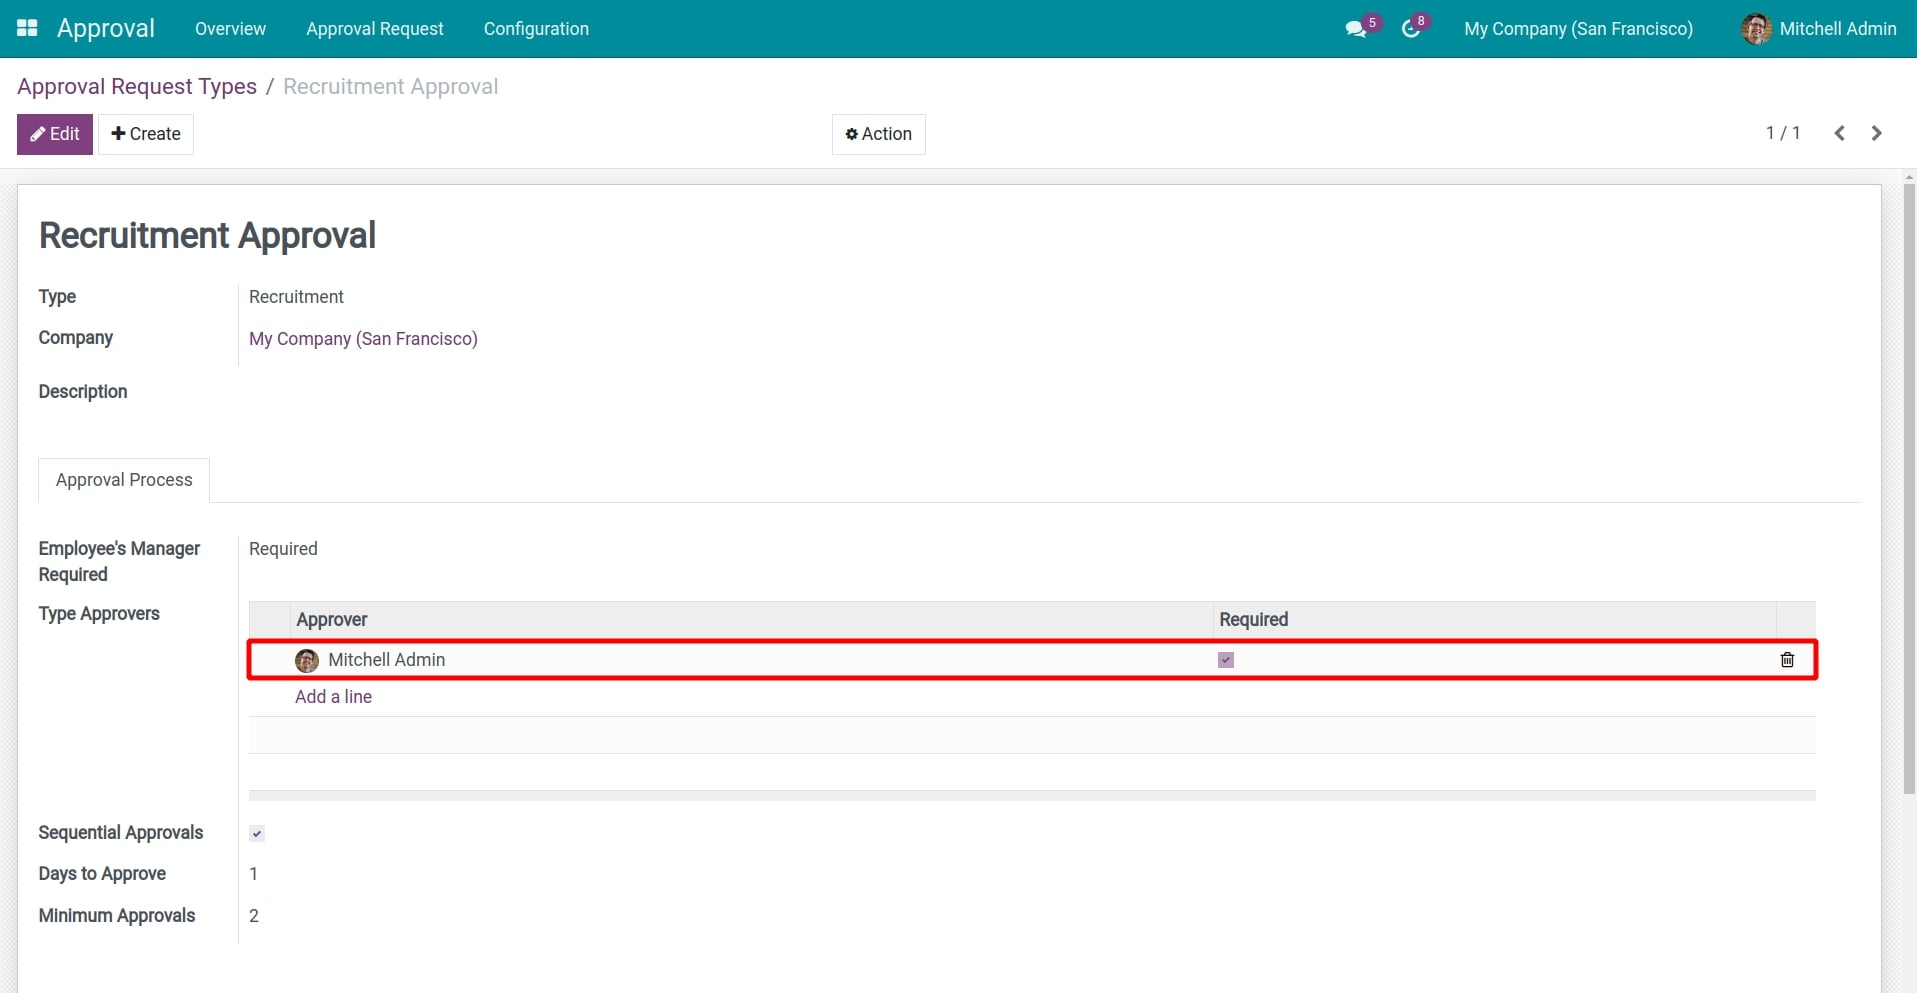
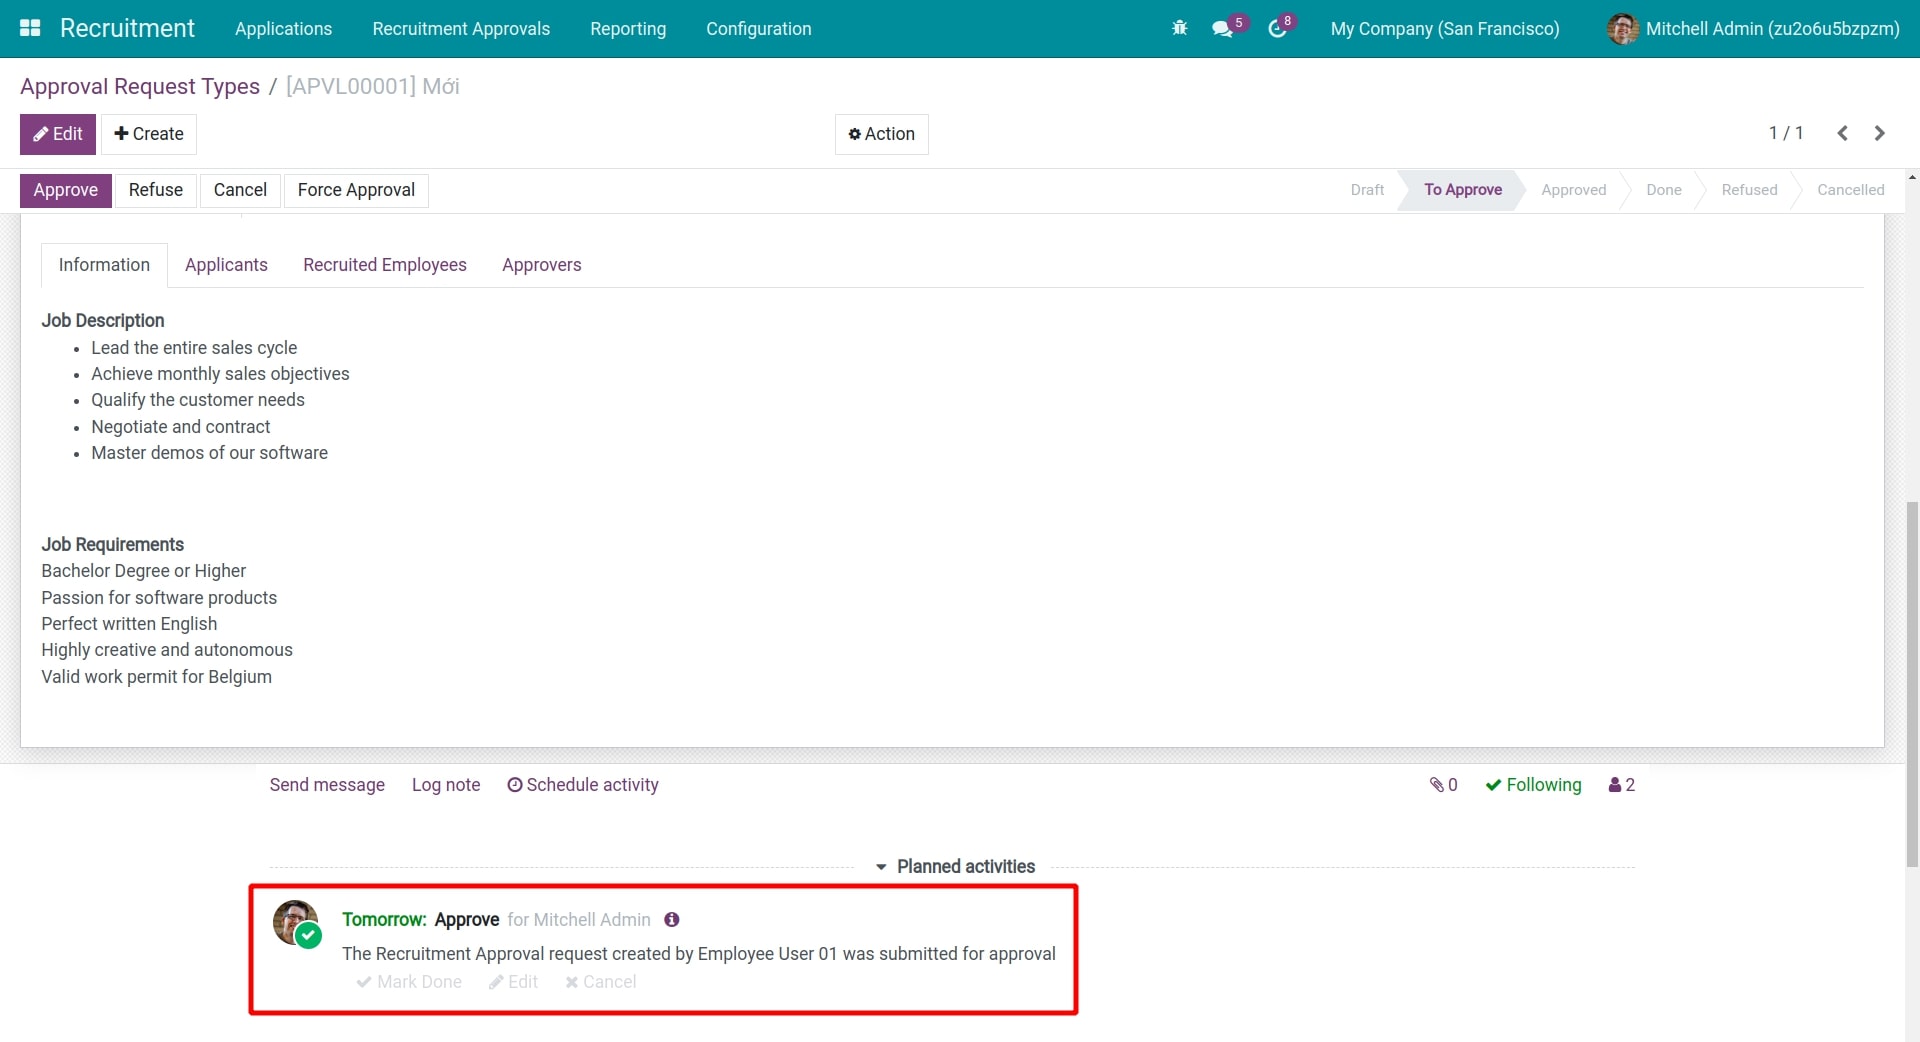
After a recruitment request is confirmed, the system will automatically generate a scheduled activity for the approver.
Required: By checking the box in this column, the approver is forced to approve the request in order for it to be done. Otherwise, the request can be done without his/her approval if it has got the minimum quantity of approvals.
Sequential Approvals: Check this box if you want the sequence of approvals follow the approver list. This will make the approval process clearer and easier to be tracked.
Days to Approve: This is the number of days for the request to be approved. The system will base on it to compute the deadline on the recruitment request.
Minimum Approvals: The number of approvals needed for the request to be moved in to the stage Approved. The system will compute this number by counting the required approvers.
After filling in this form, click the button Save.
Create a Recruitment request
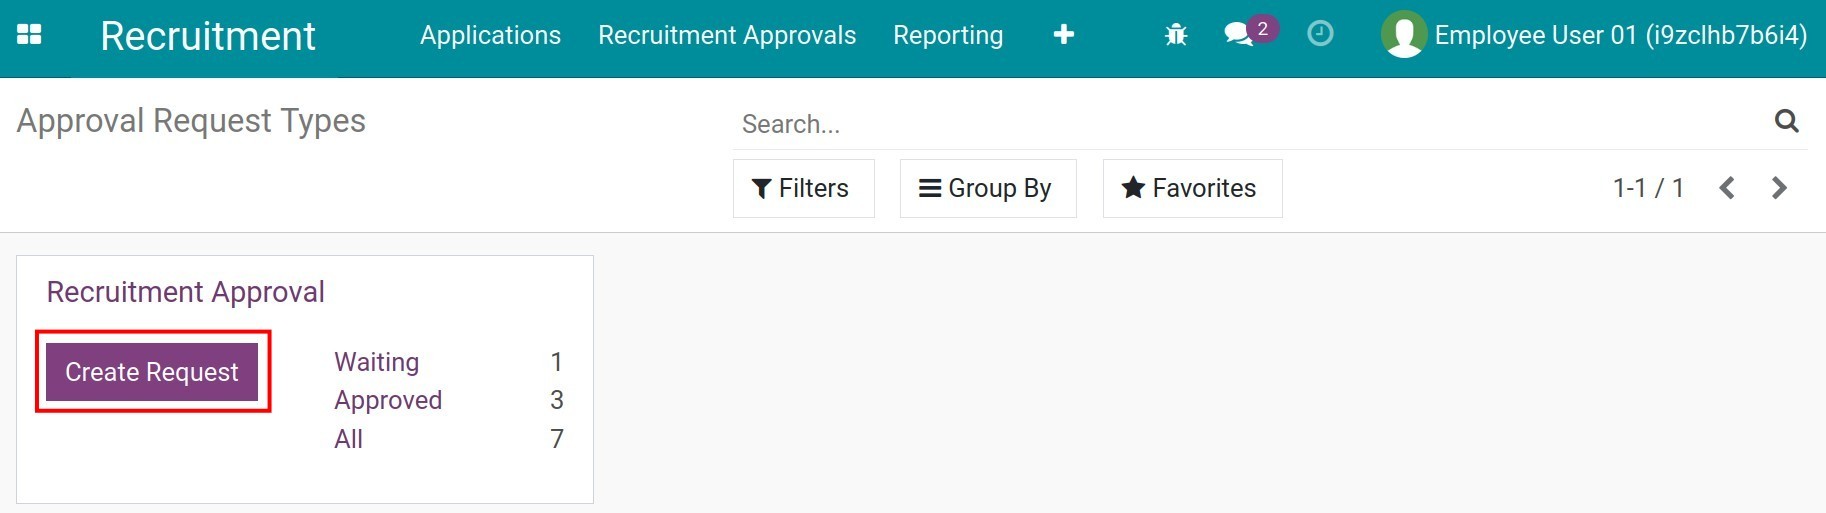
When recruitment demand arises from a department or a team, you need to make a recruitment request. Navigate to Recruitment > Recruitment Approvals > Approval Request > Create Request.
Note
To access Recruitment app, you need to have the access right. Read more at Introduction of Recruitment in odoo
Now you need to fill in the form of the recruitment request.
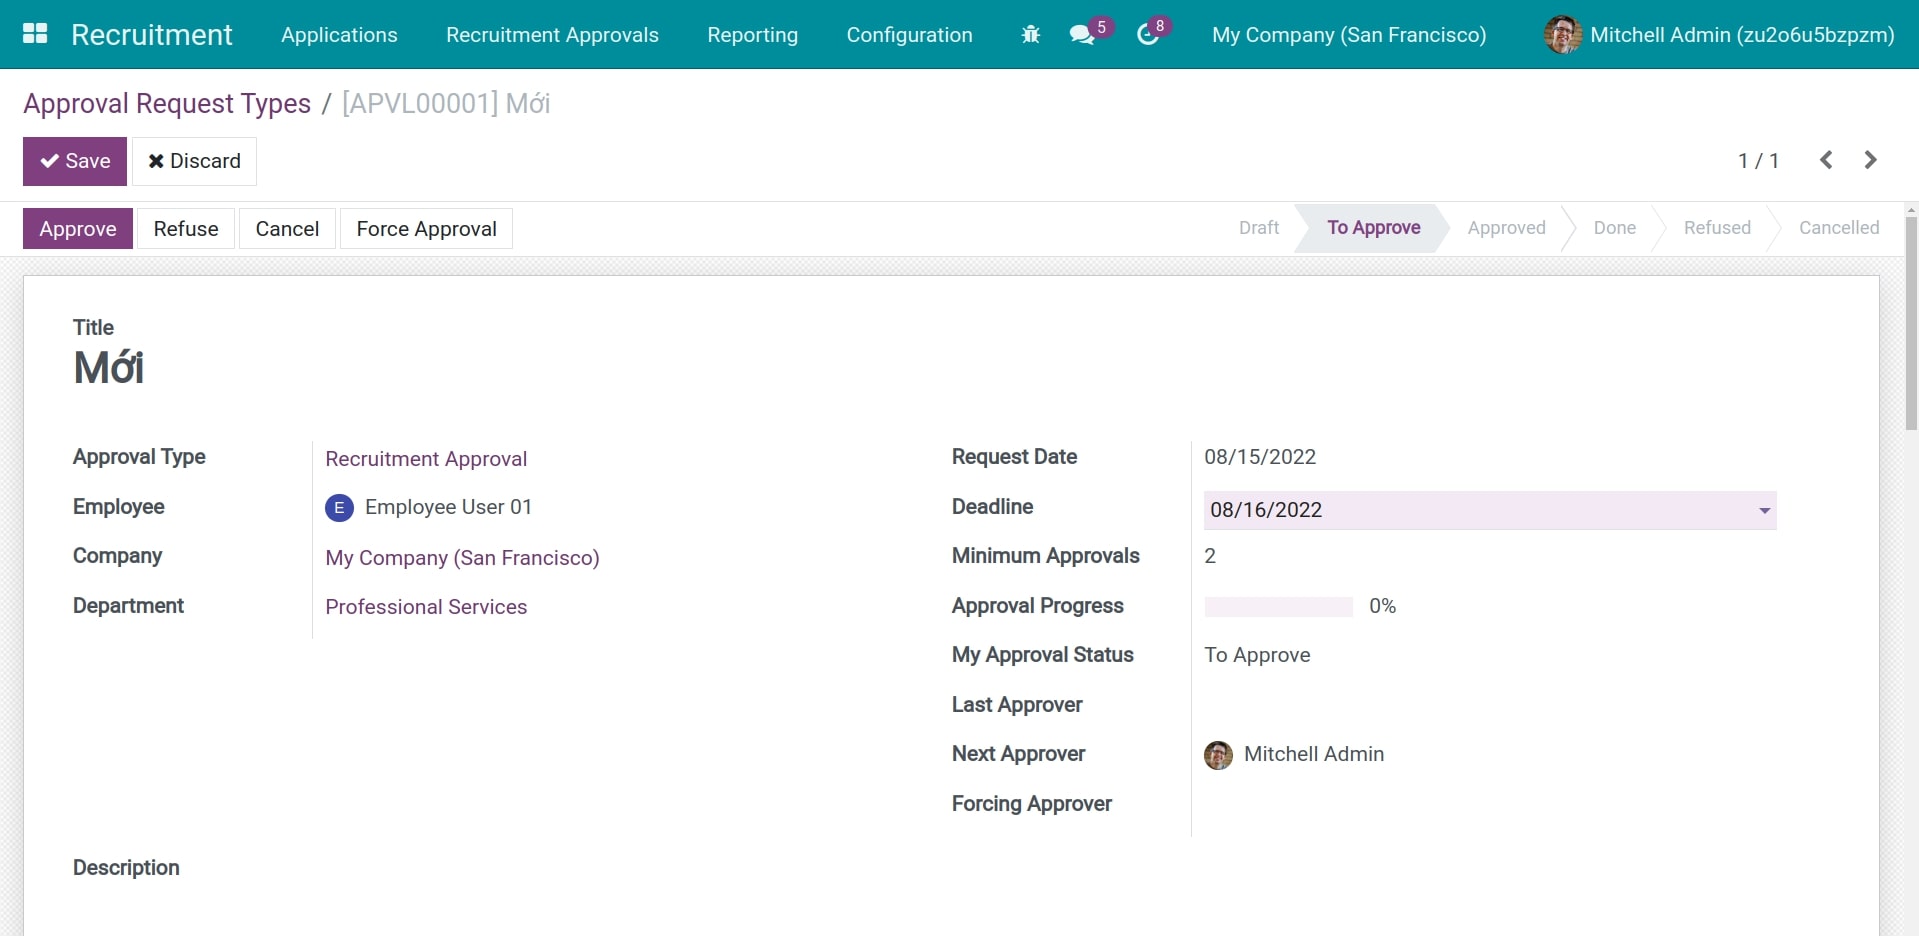
Title: The name of the recruitment request, for example: Recruit Sales manager.
Approval Type: Select the recruitment approval type.
Employee: The employee who makes request. The system will auto-select the employee creating the request, however, you can change it.
Department: The department that the employee belongs to. The system will auto-fill in this field basing on the information in the employee’s profile.
Request Date: The system will auto-fill in the current date.
Deadline: The final date for the request to be approved. The approvers will base on this date to take the action of approval.
Minimum Approvals: The system will pick the data from the Approval type as mentioned above.
Approval Progress: This field is in percentage (%) and caculated by the number of approvers who did approve the request out of the minimum approval number. For example: A request has two approvers (the direct manager and the approval officer), when the manager approve it, the progress will be 50%; then the approval officer aprrove it, the progress is 100% and ready to be Done.
My Approval Status: The approval status of the Recruiment request for the current account.
Last Approver: The person who approved this request most recently, which is updated automatically by the system.
Next Approver: When you confirm the request and when one approver click on the button Approve, the system will define the next approver as the information of the Approval type. For example: A recruitment request has two appovers (the direct manager and the approval officer), after you confirm the request, the next approver will be the mananger; after the manager approve it, the next one will be the approval officer.
Forcing Approver: The user mentioned here will have the right to click on the button Force Approval to move the request to the stage Approved without waiting for other approvers.
Description: You can type in more information about the request here, like: the reason, the purpose of recruitment and etc.
Recruitment Details:
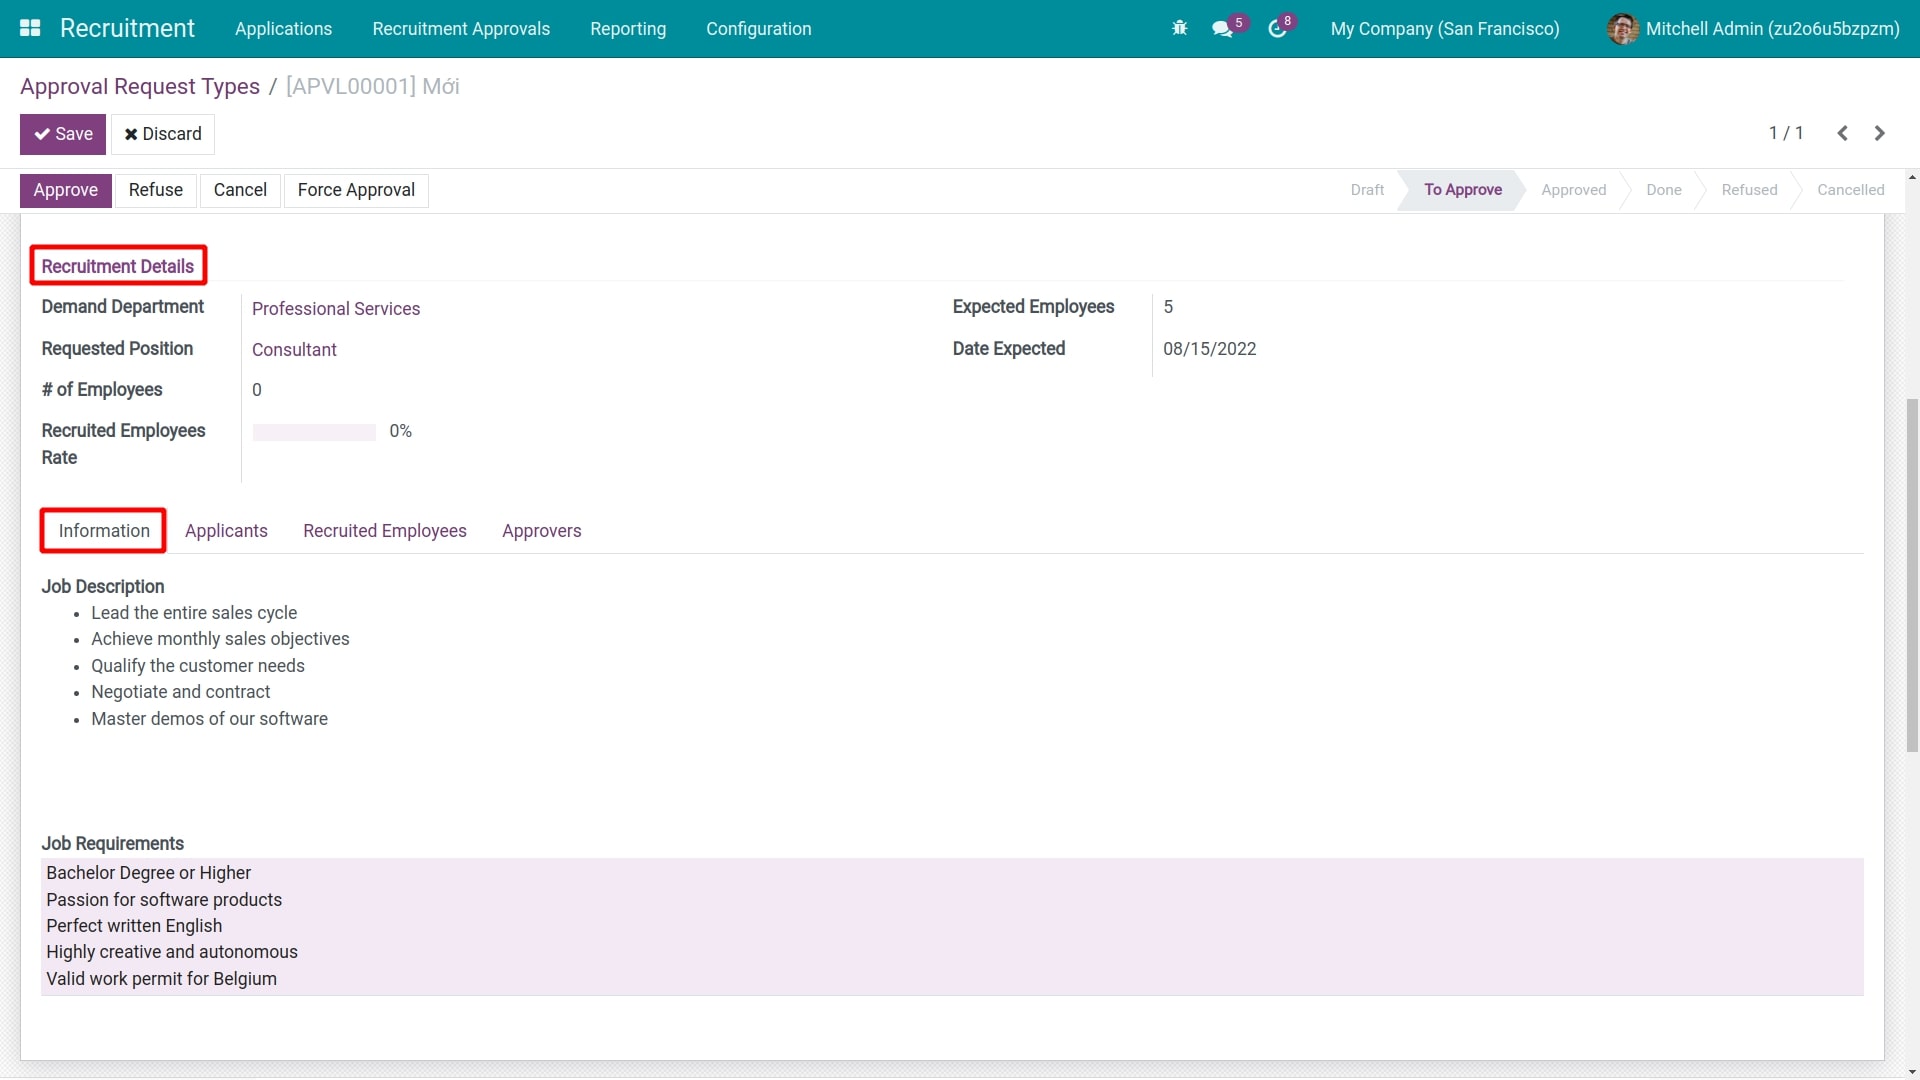
Demand Department: The system will auto-select the employee’s department, however, you can change it.
Requested Position: The system will show you all the current job positions to choose. If it is a new position, you can create it.
Number of Employees: The system will auto compute this number, when an applicant is recruited and changed into an employee, this number will be updated.
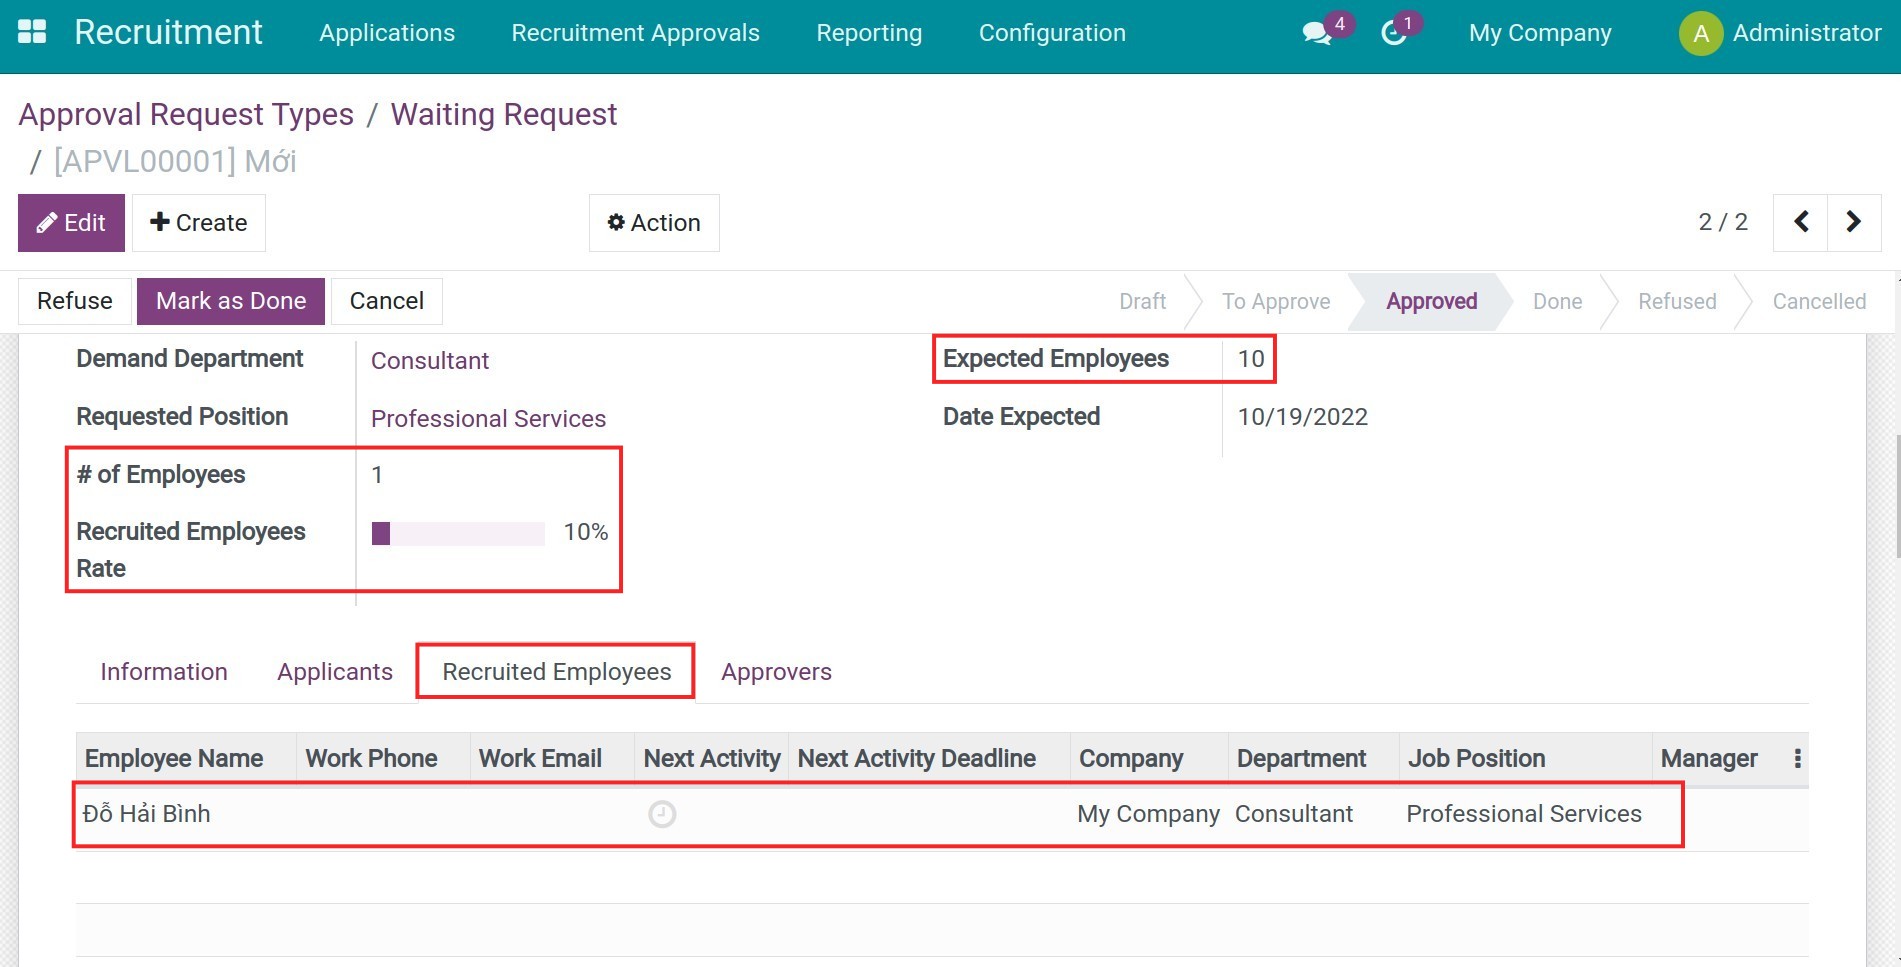
Recruited Employees Rate: This percentage is caculated by the Number of Employees out of the Expected Employees.
Expected Employees: The number of employees for this job position.
Date Expected: The date when the Number of Employees reach the Expected Employees.
Information tab: This is to describe the job and its requirements.
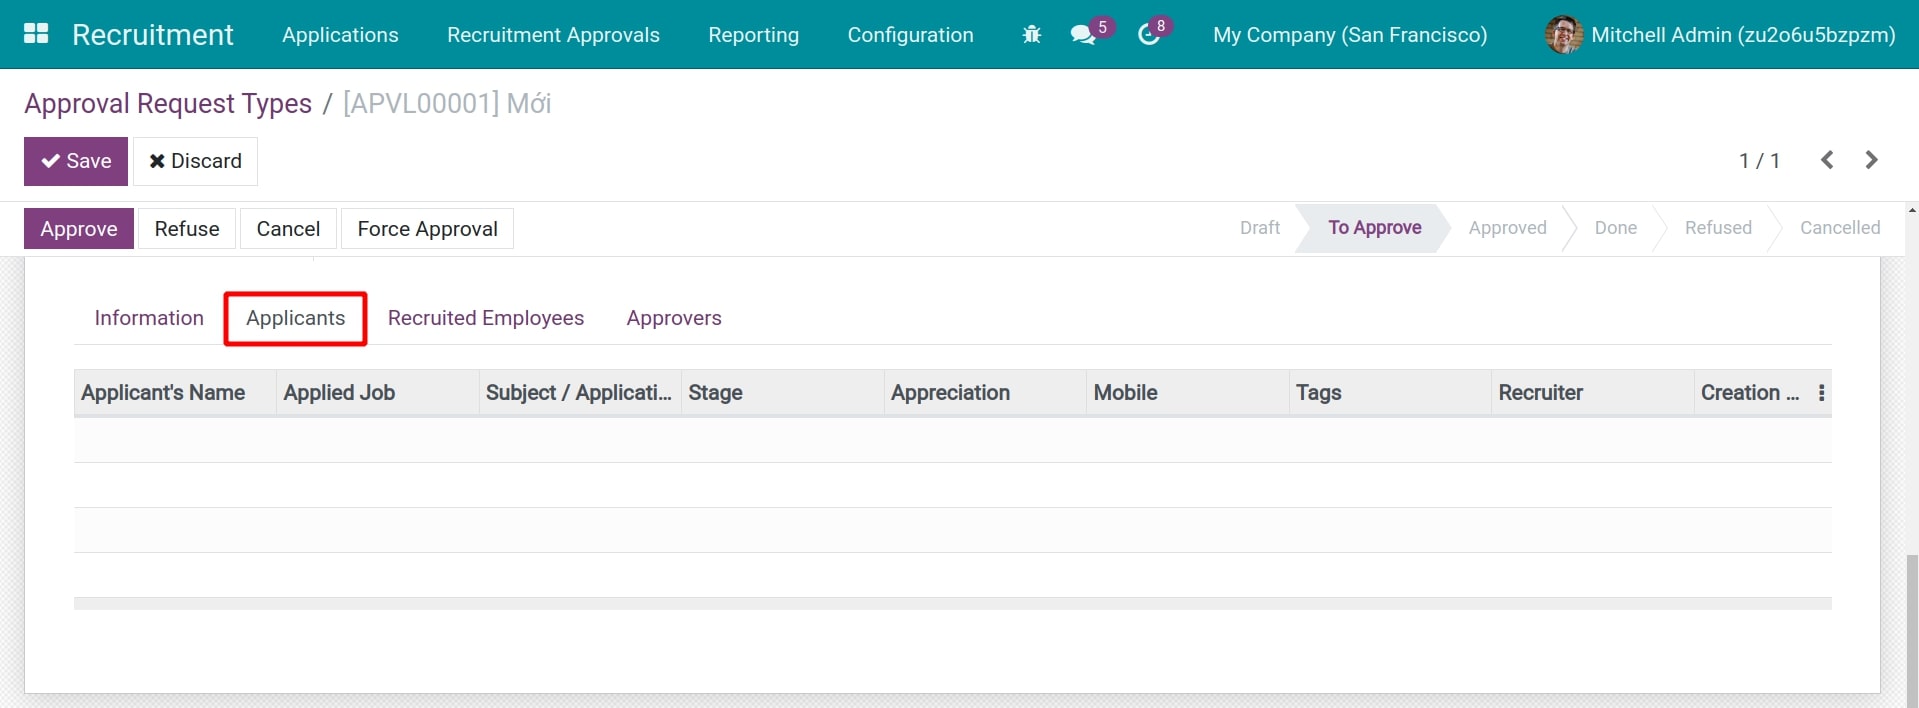
Applicants tab: The system will auto-list all the applicants here.
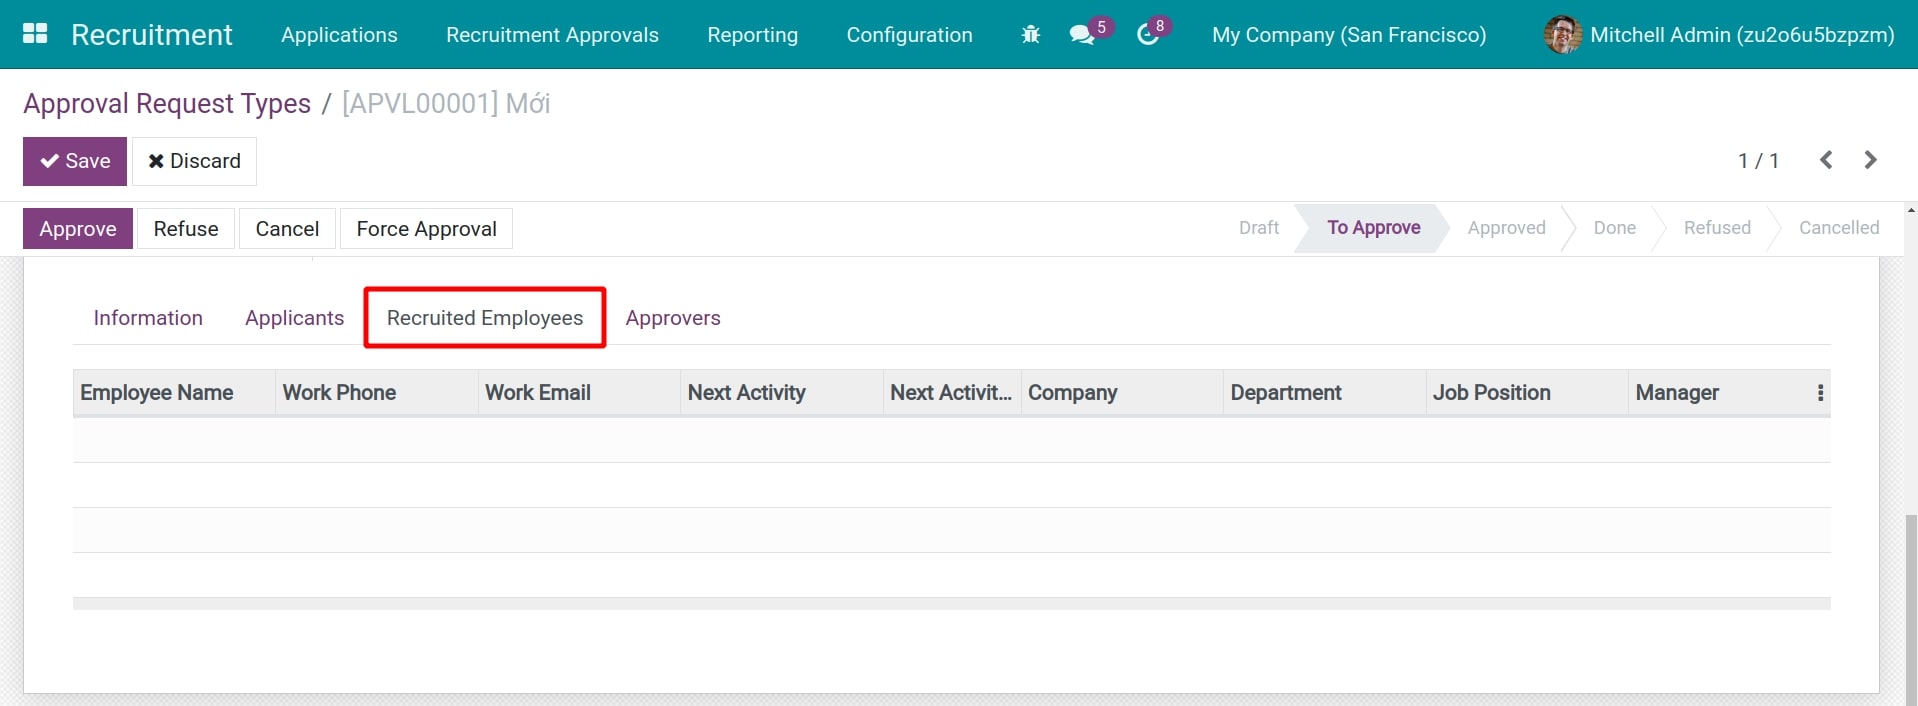
Recruited Emloyees tab: When an applicant is recruited, the system will list that applicant here and auto update the number and the rate of recruited employees.
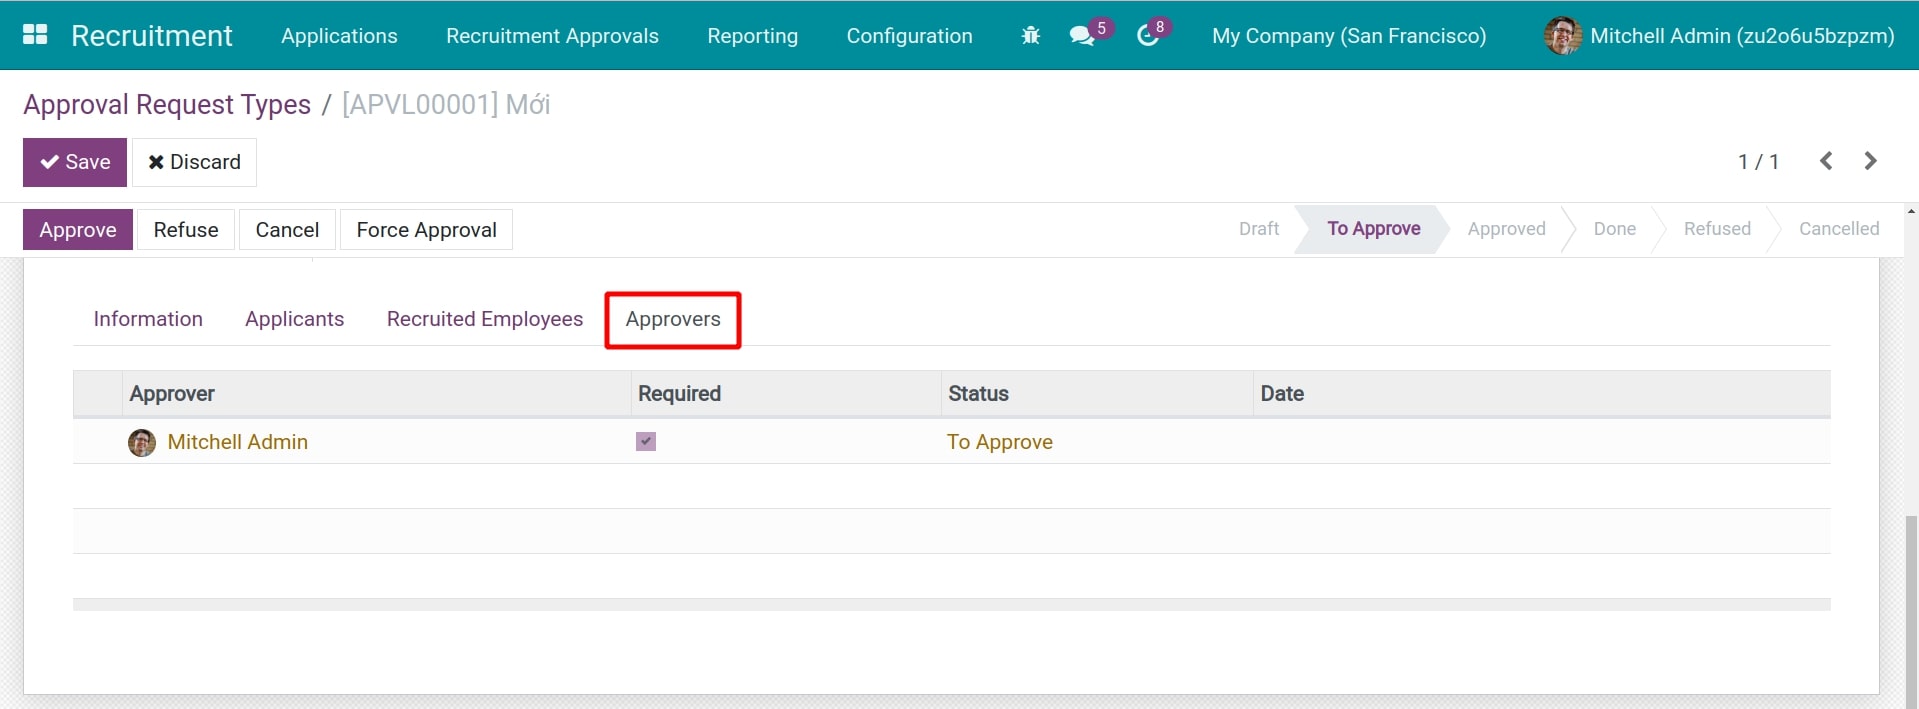
Approvers tab: This shows the approver list setting in the approval type before and update their latest approval date.
After fulfilling all the necessary information, you click on the button Save, now the stage of the request is Draft. If you are sure about the request information, click on the button Confirm to move stage to To Approve. In the meantime, the system will automatically set the scheduled action Approval to the approvers.
Recruitment Approval
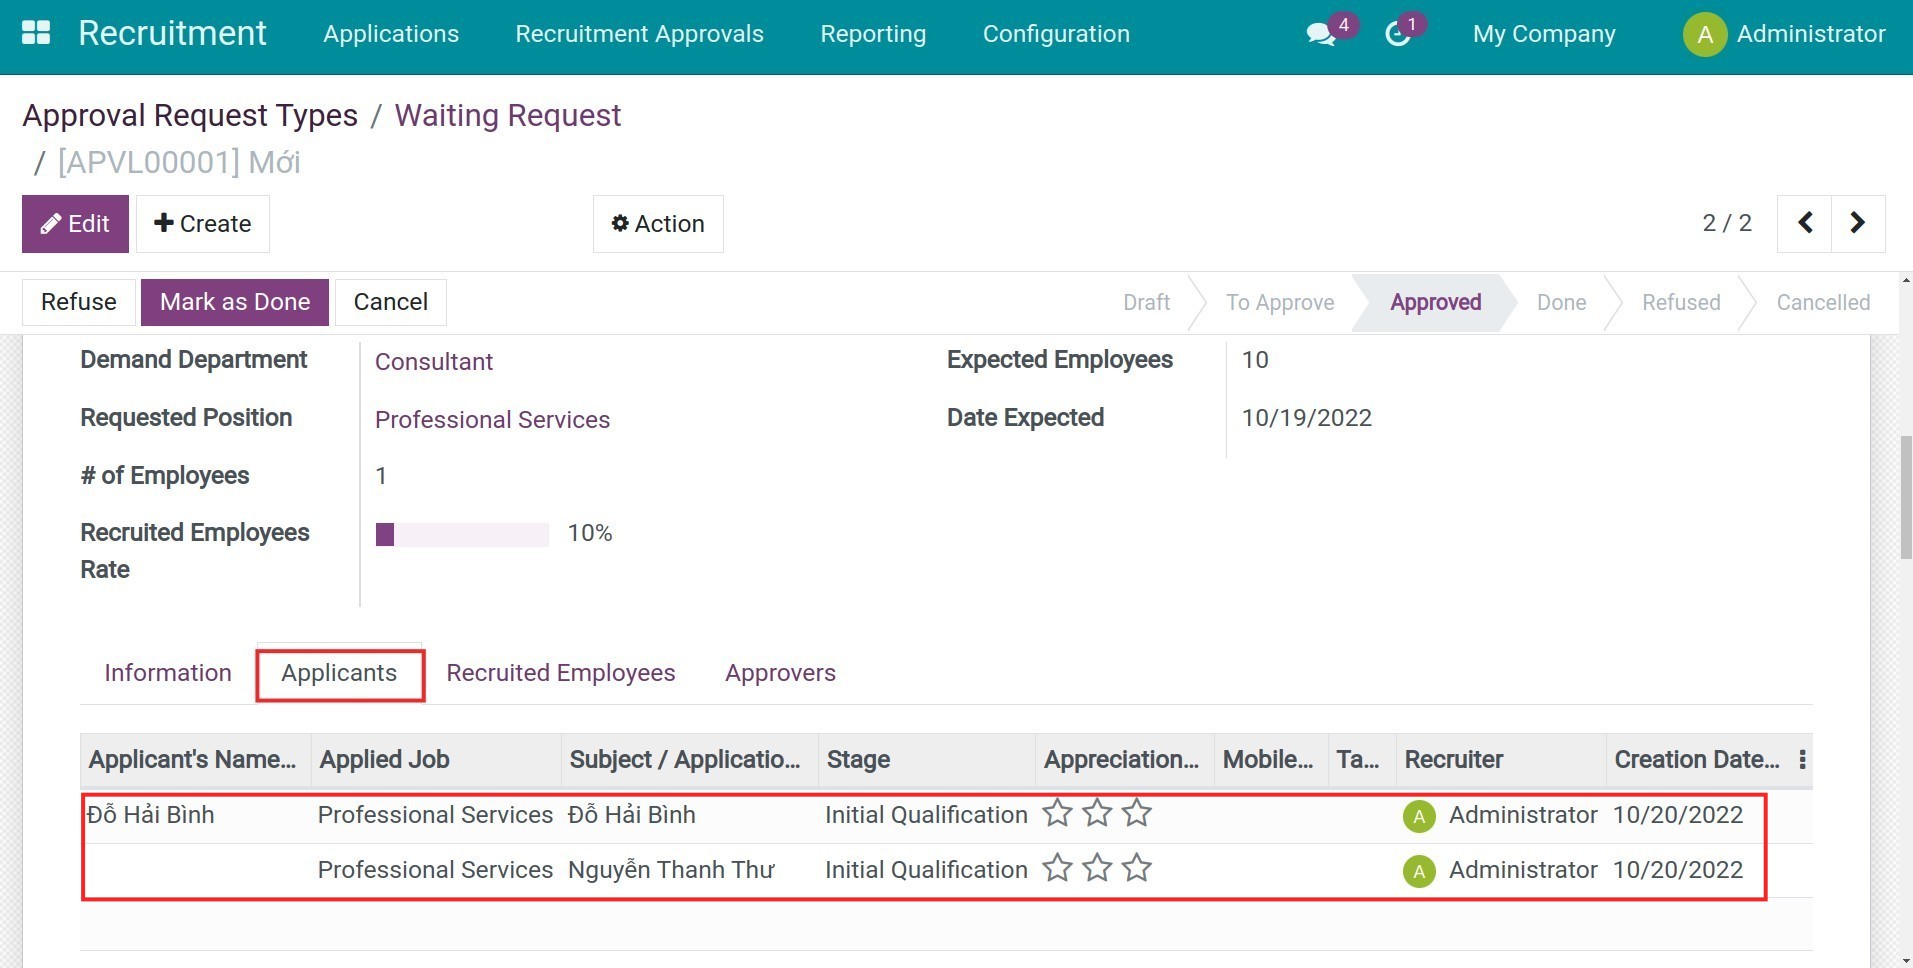
The manager approval the request. After the request is approved, you go to Recuitment > Configuration > Job positions then see Expected Employees amount is updated.

The HR department will proceed the recruitment process to recruit the employee. The system will au-update:
The Applicant applying for this position:
Recruited Employees and the recruited rate compare to the needs:
Refer to How to create an employee from an Applicant.
Recruitment Process Management
Publish recruitment post
Requirements
This tutorial requires the installation of the following applications/modules:
Recruitment
Website
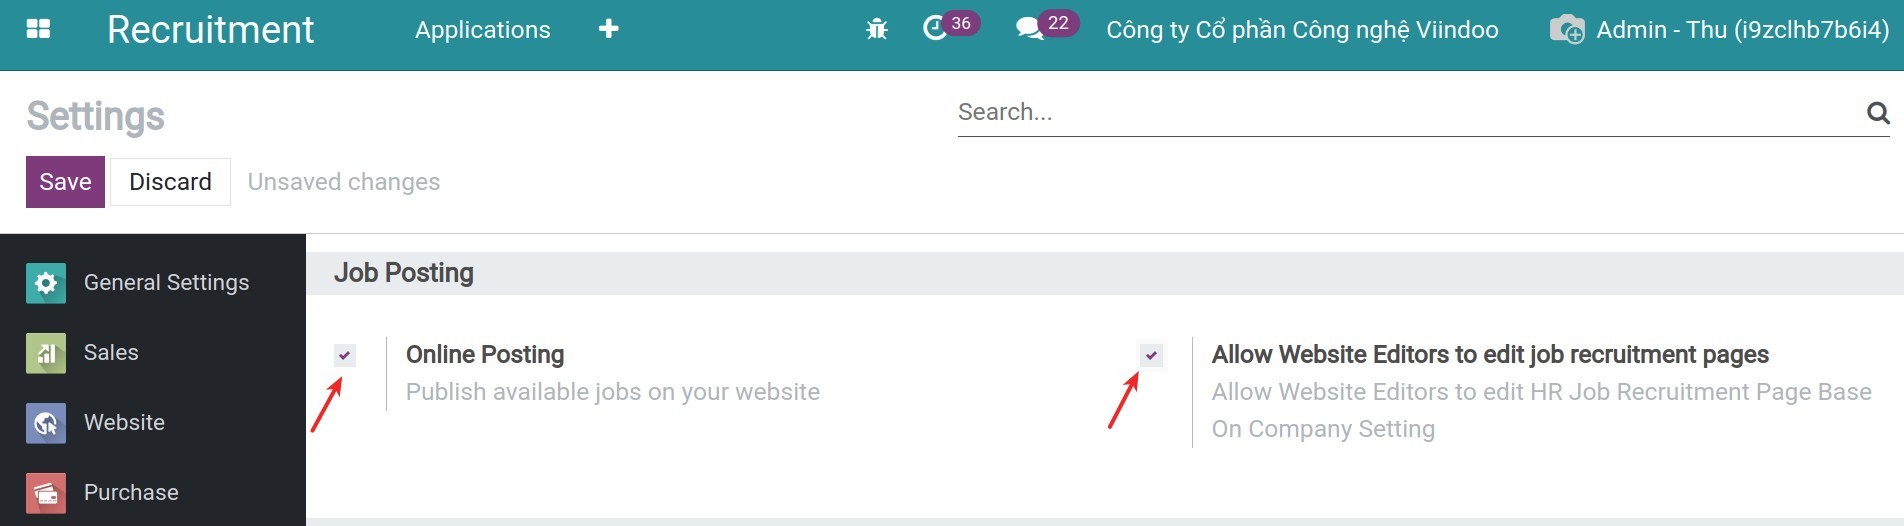
Firstly, you need to make sure that the Website module (website) is installed in the system. Then you navigate to Recruitment module > Configuration > Settings and enable the following features:
Online Posting: this feature allows to publish all the job vacancies that are in need of recruitment on the website.
Allow Website Editors to edit job recruitment pages: this feature allows the user having the Editor and Designer right to edit HR recruitment page based on the company settings.
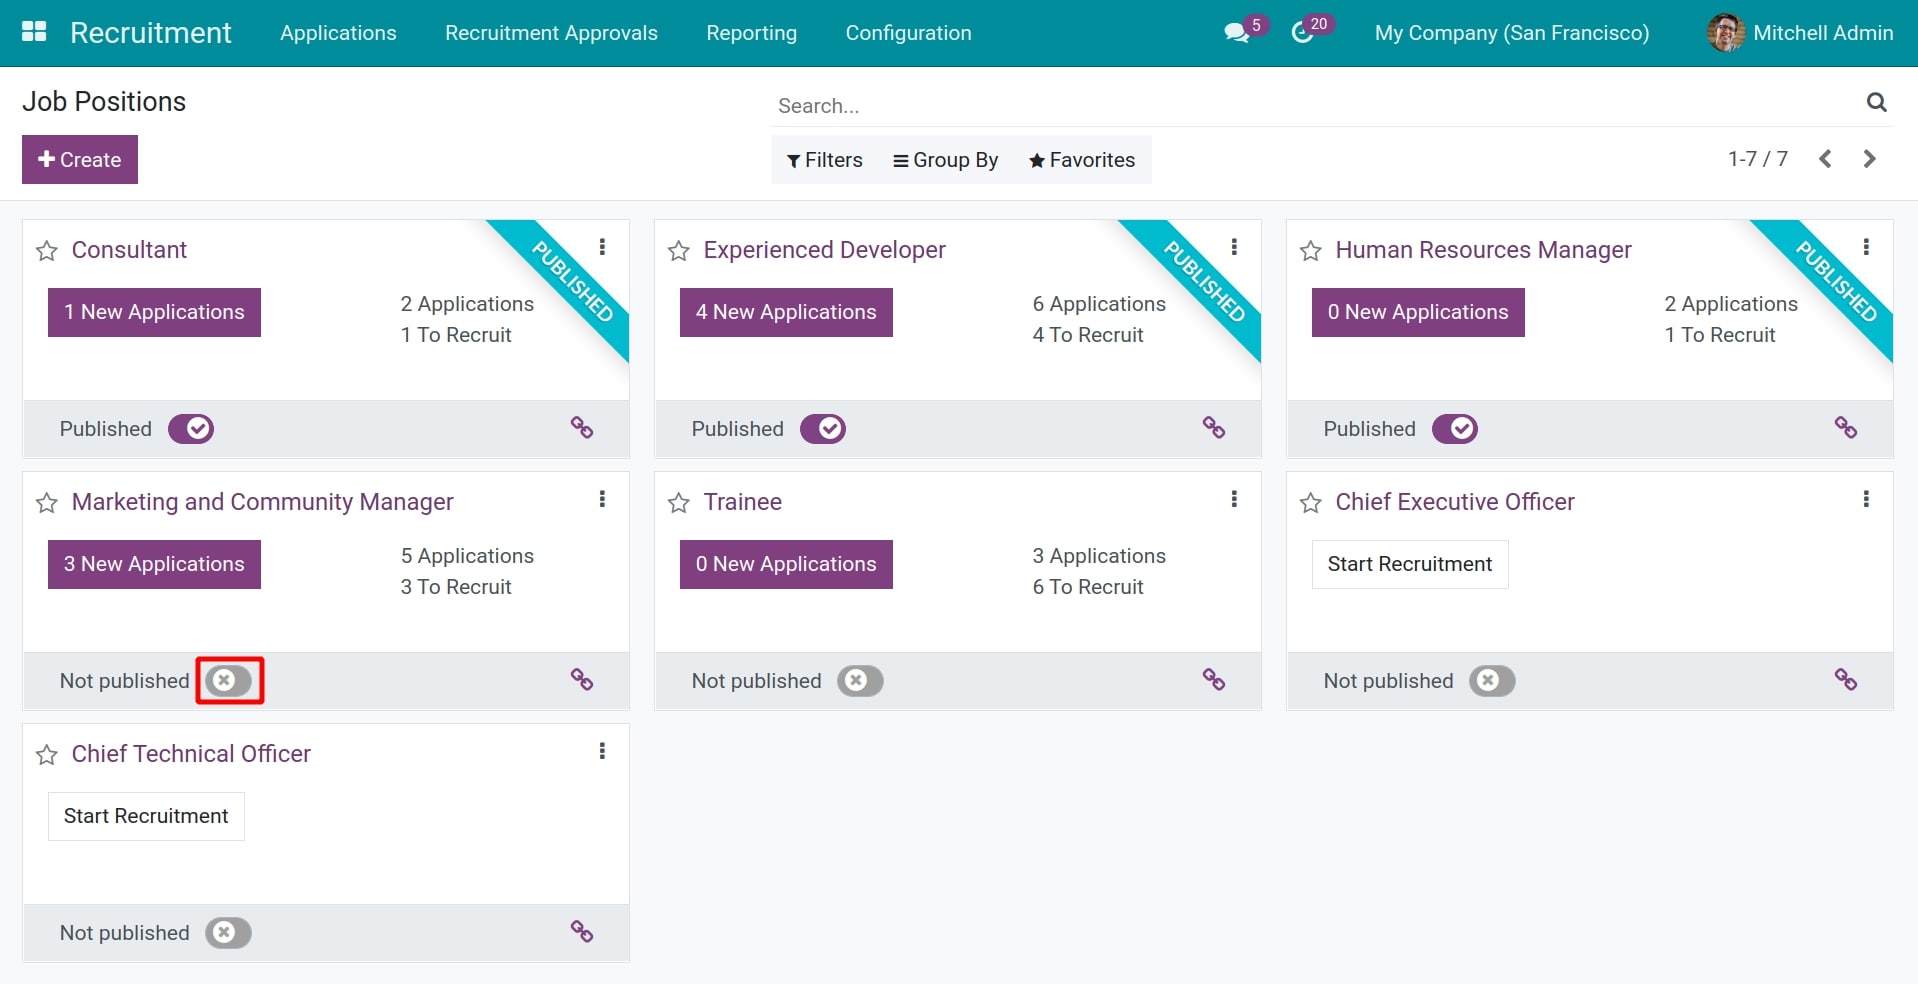
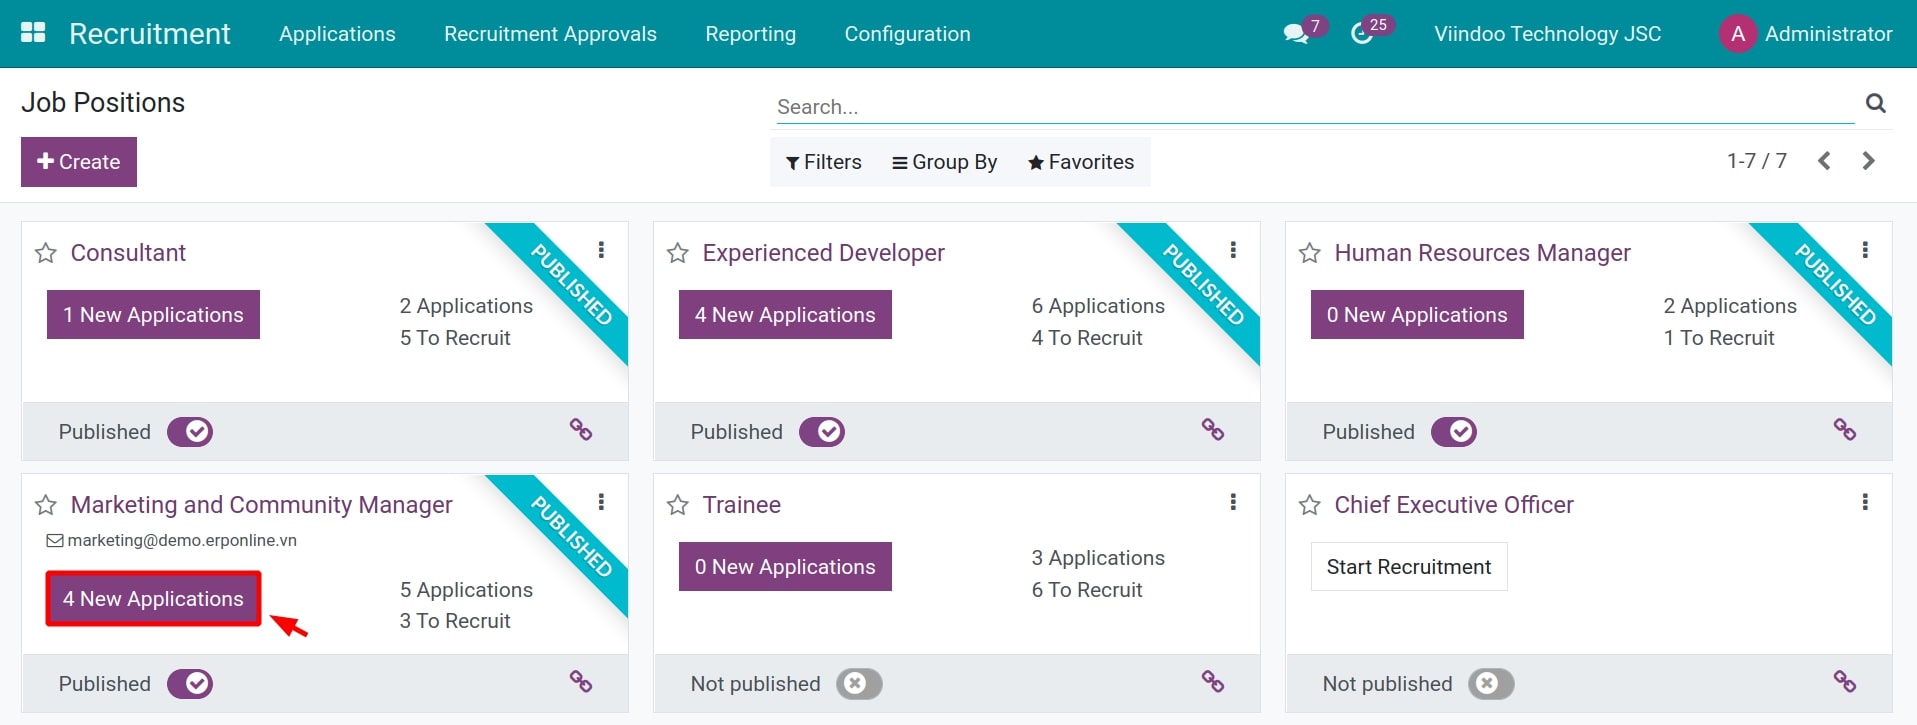
Navigate to Recruitment module > Applications > By Job Positions and enable the Not published item.
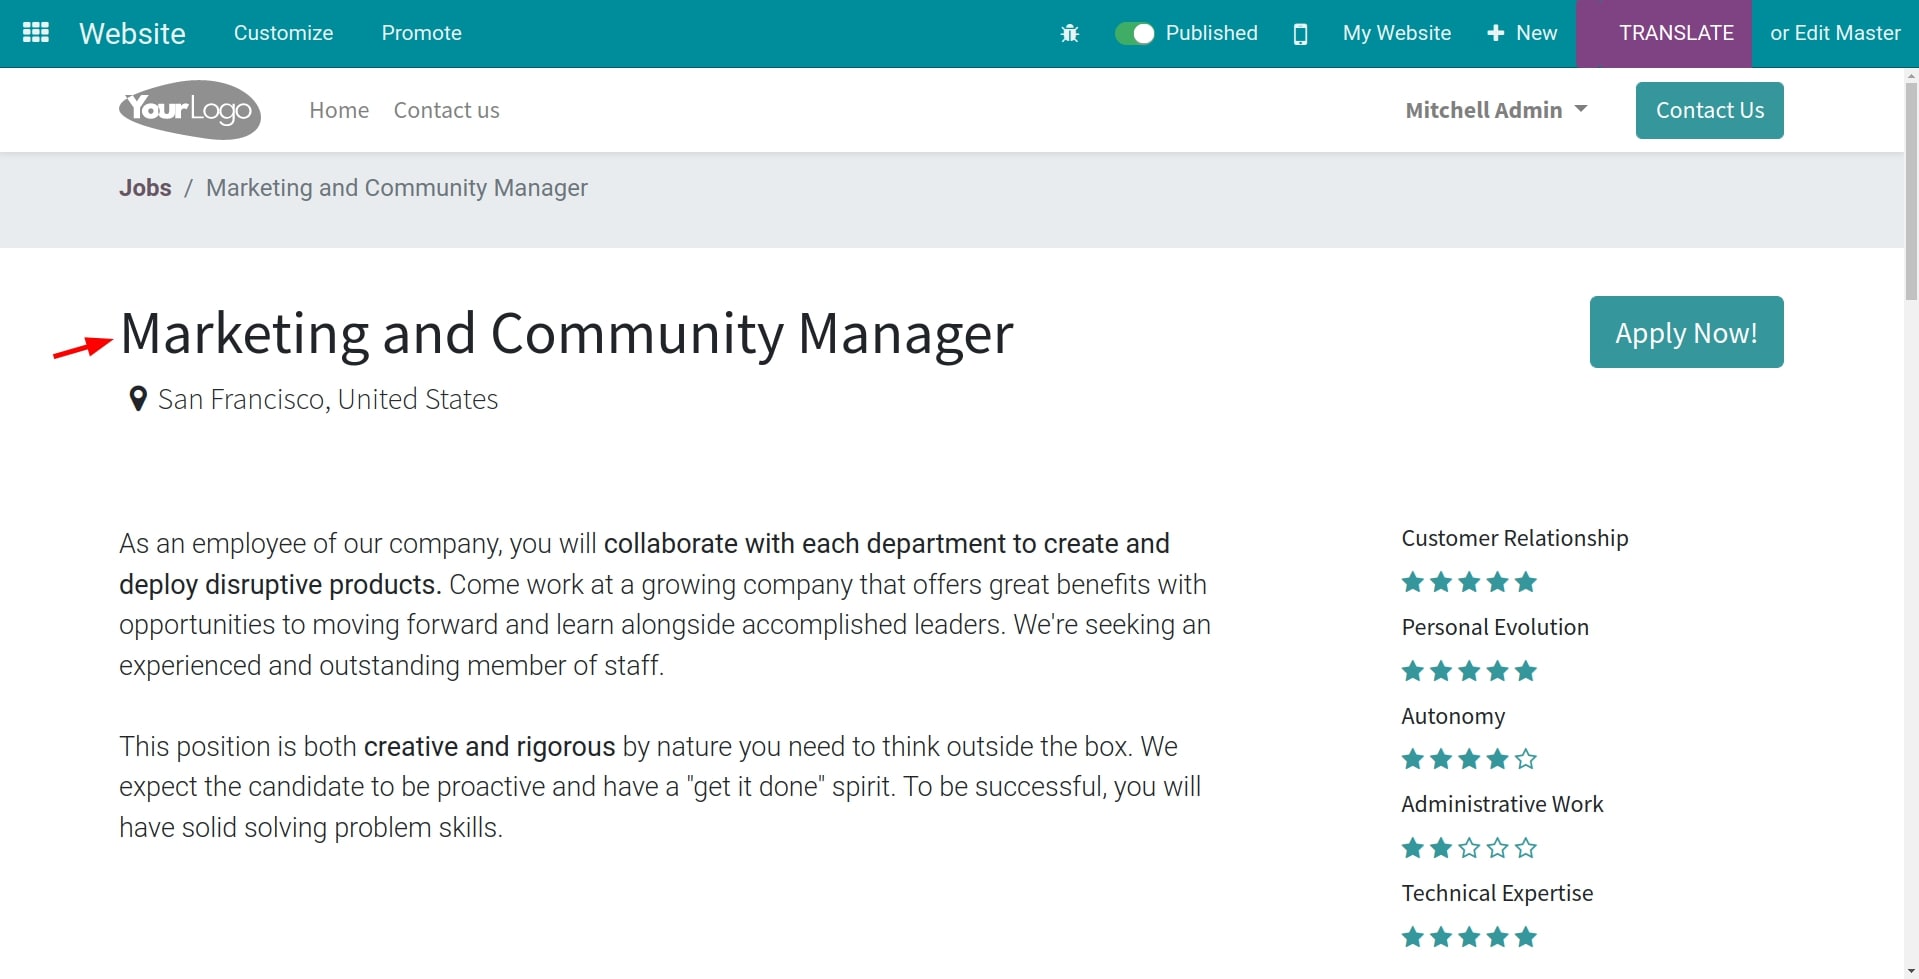
After that, the position you want to recruit has been published on the Website:
The state of this job position changes to PUBLISHED.
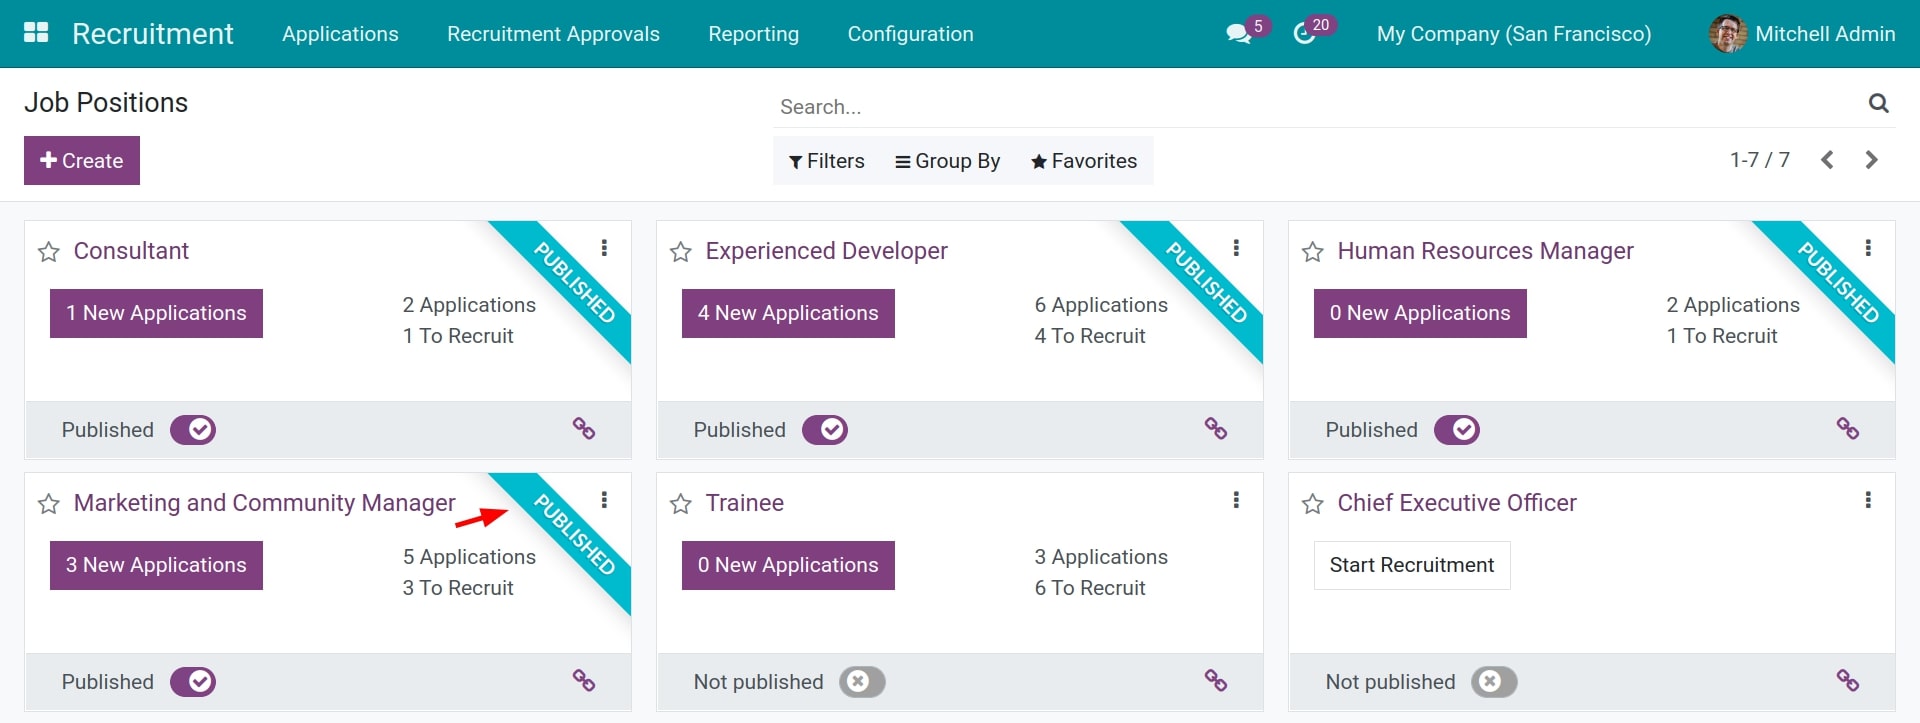
Applicants can find out recruitment information and submit their resume for this job position.

Note
Allowing the applicants to find this recruitment information on the website, the Recruitment menu should be supplemented. The user with the Editor and Designer access right can perform this task. Refer the instructions of Get started with Website Builder in odoo: overview and configuration.
You also can post the recruitment information on the other sites by using Link Tracker or/and Email configured in the Source of Applicants.
From the view of Job Positions, you also direct to the recruitment sites in either of the following ways:
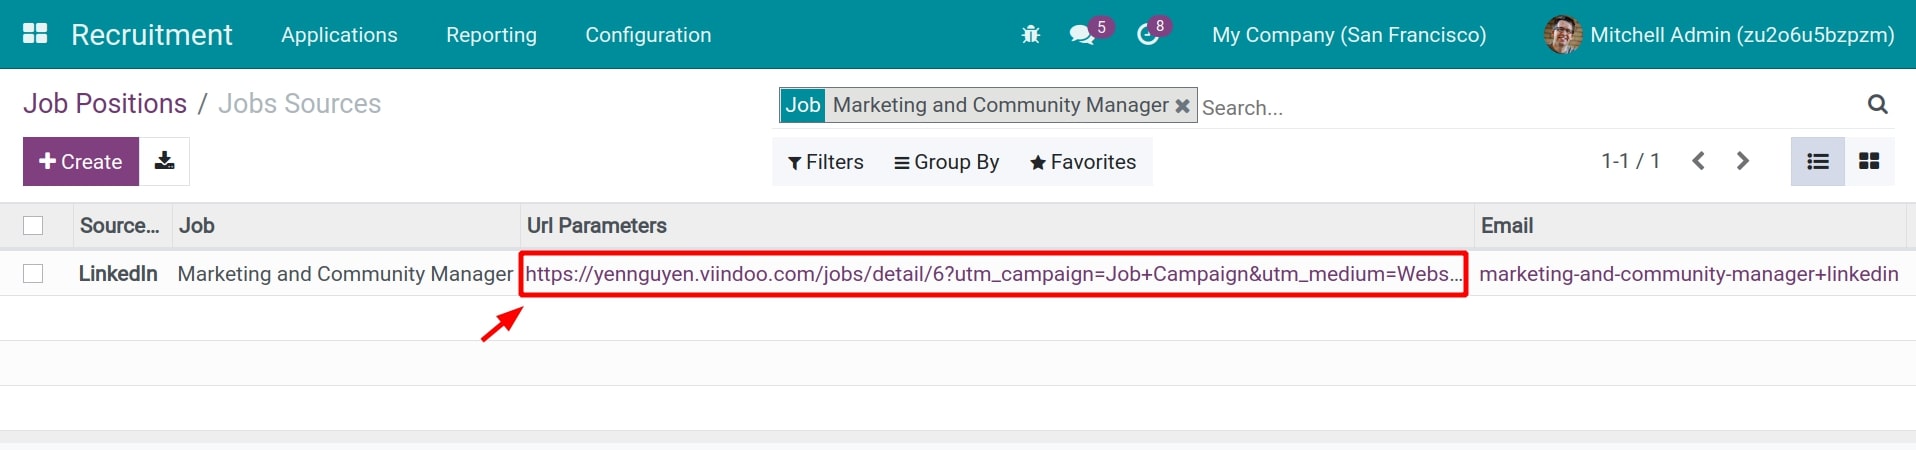
Click on the Link Tracker icon, then continuously click on Url link in the column of Url Parameters.
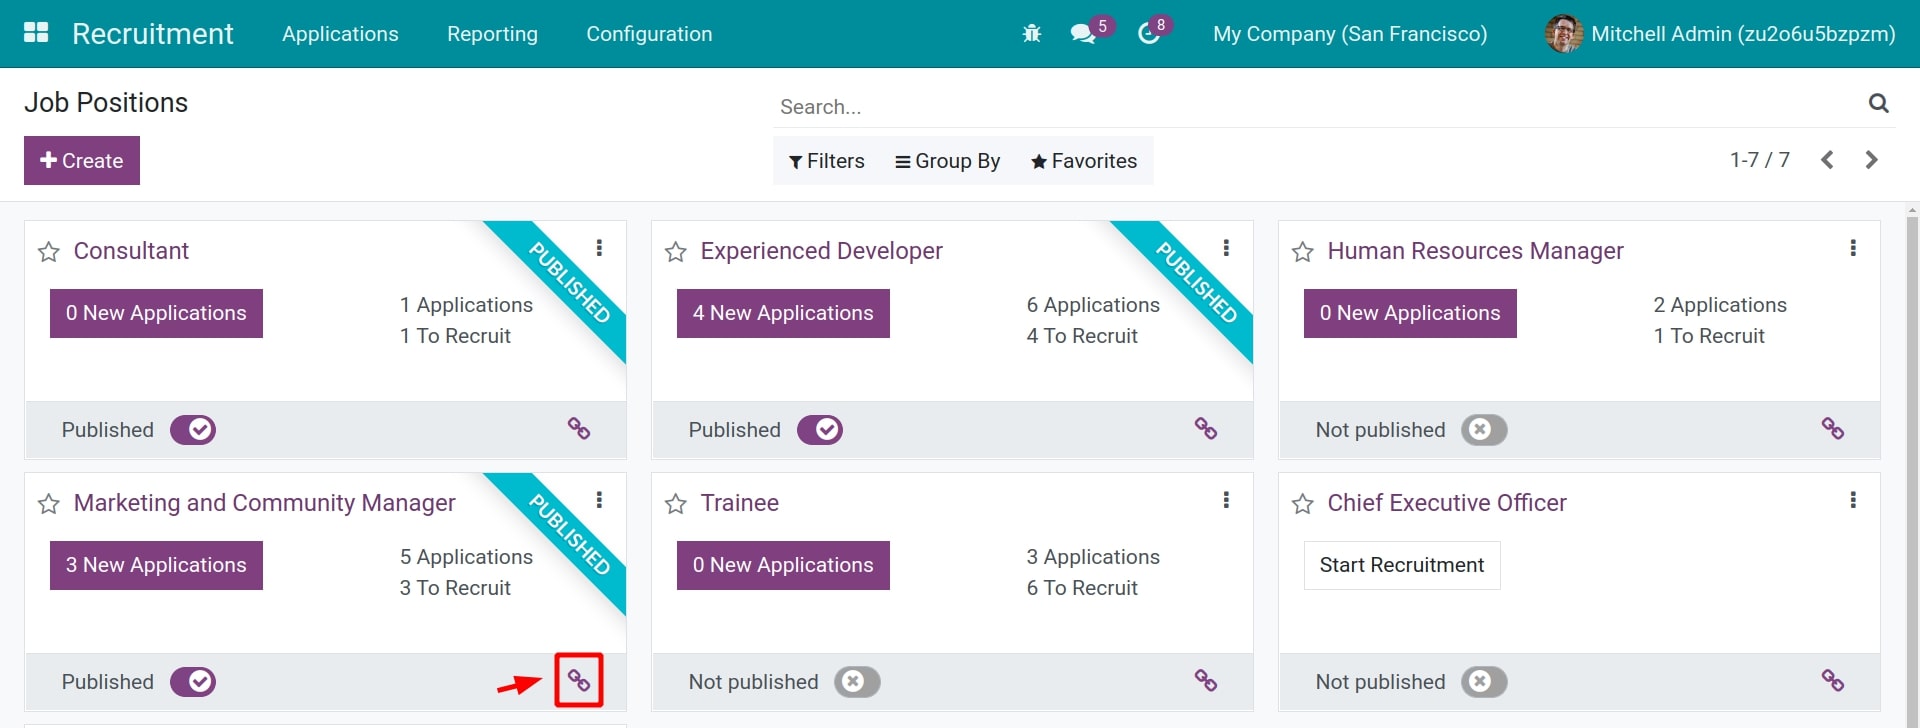
Click on the name of the Job position.
When the system receives the application from this Link Tracker, a new applicant will be generated.
Create new applicants
Applications can be created on odoo systems by two ways:
Manually create applications;
Automatically create applications.
Requirements
This tutorial requires the installation of the following applications/modules:
Recruitment
Website
Manually create applications
When applicants apply for a job in-person or directly via phone calls,… for recruiters, you need to create applications manually.
You can open the new application creation view by two ways below:
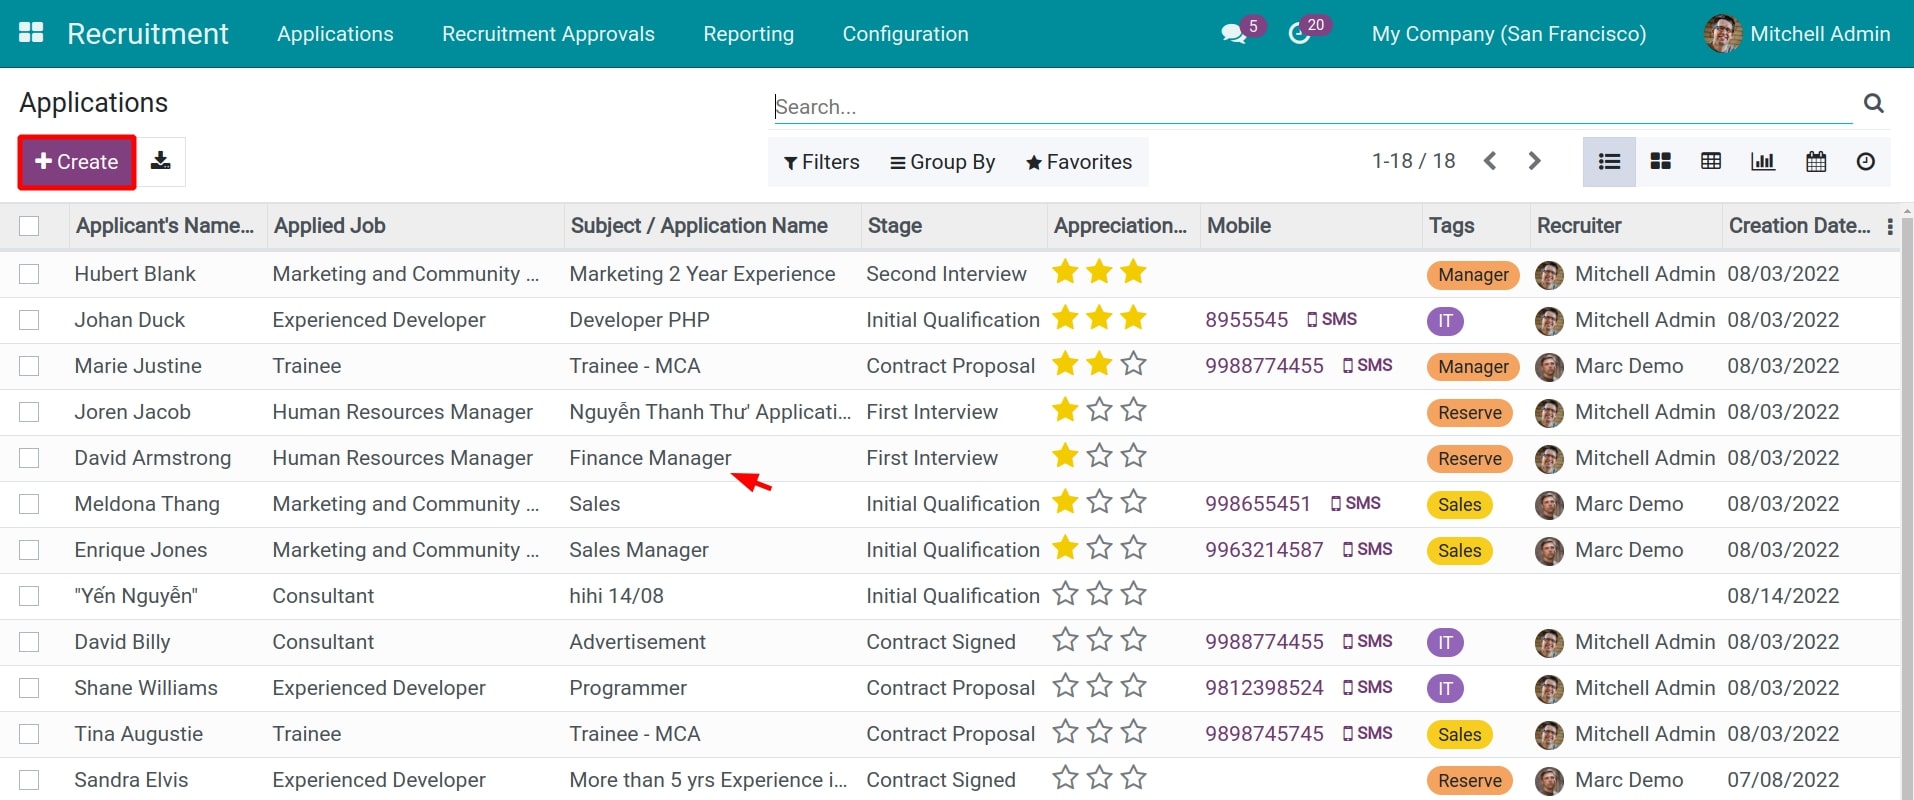
Create an application from applications list: Go to Recruitment > Applications > All Applications, click Create button. At here, you can see a list of applicants for all job positions divided by each stage.
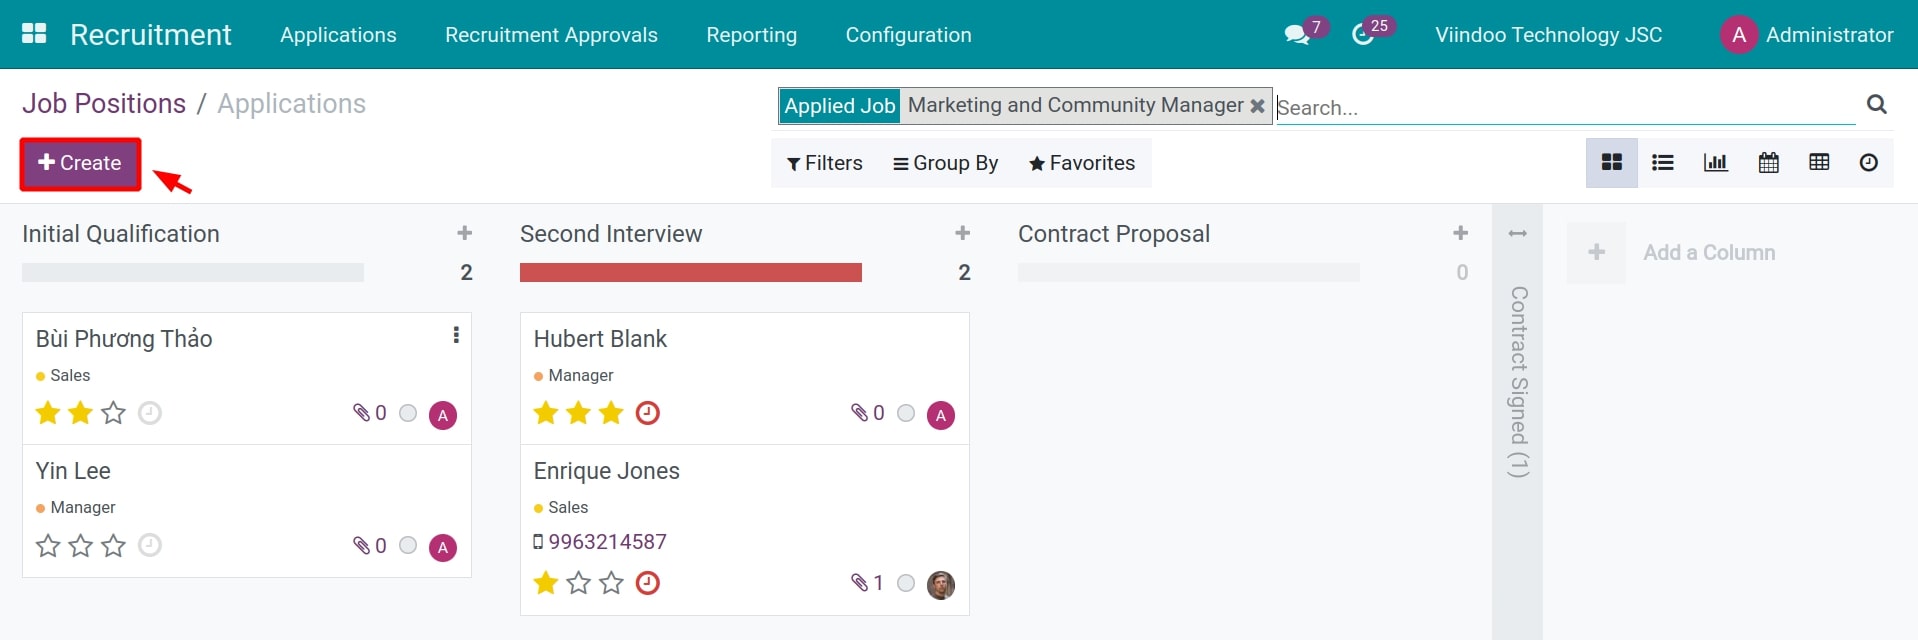
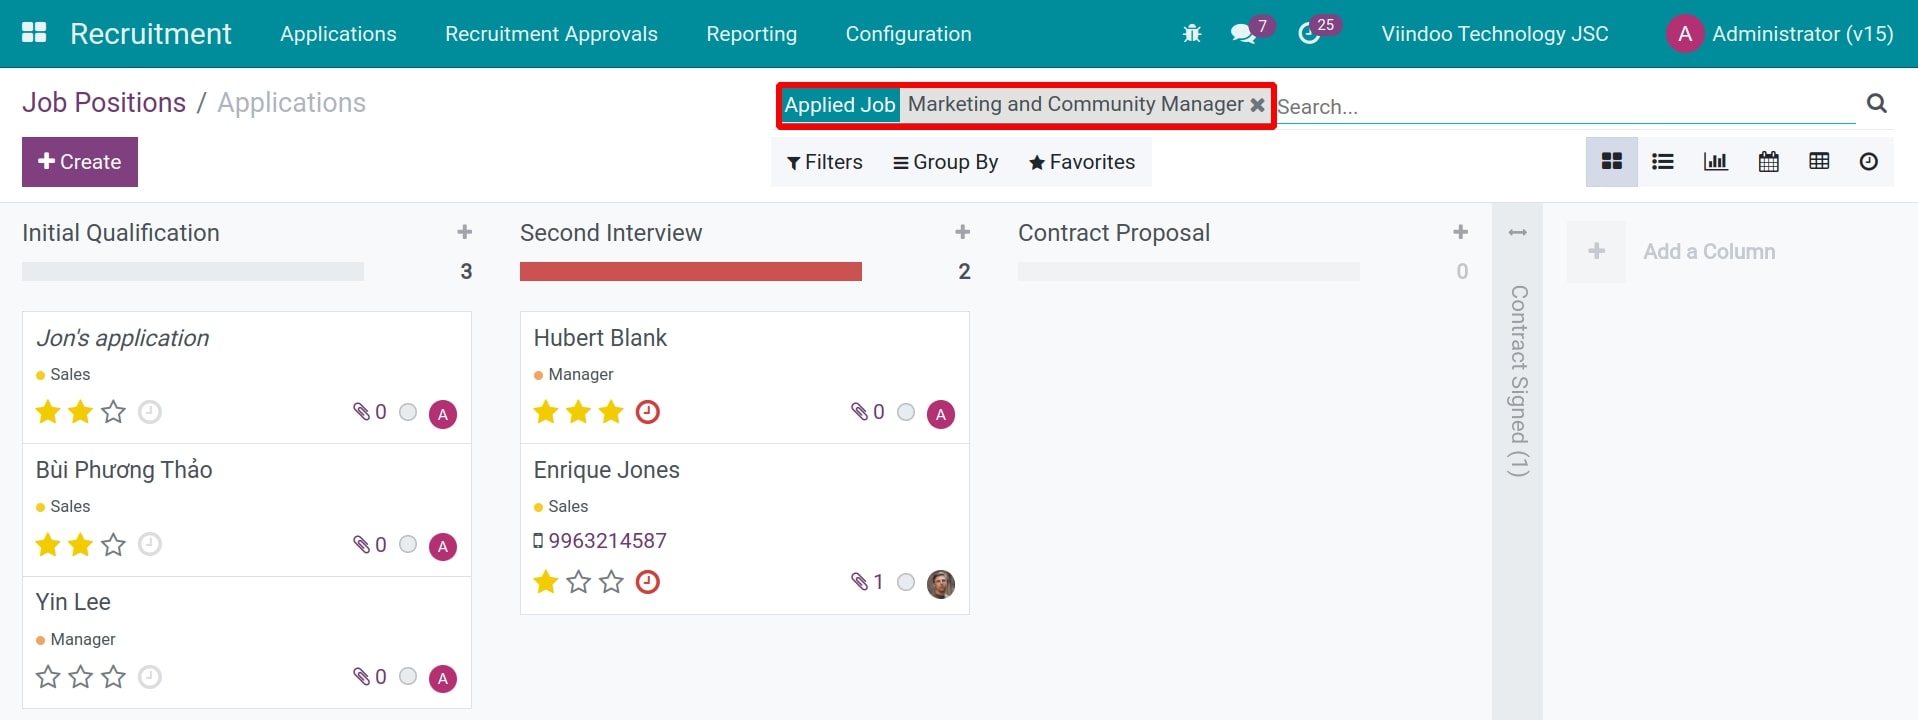
Create application by Job Positions:
Go to Recruitment > Applications, go to job position that you want to create applications and then click on the # Applications.
Click on Create to create an application for this job position.
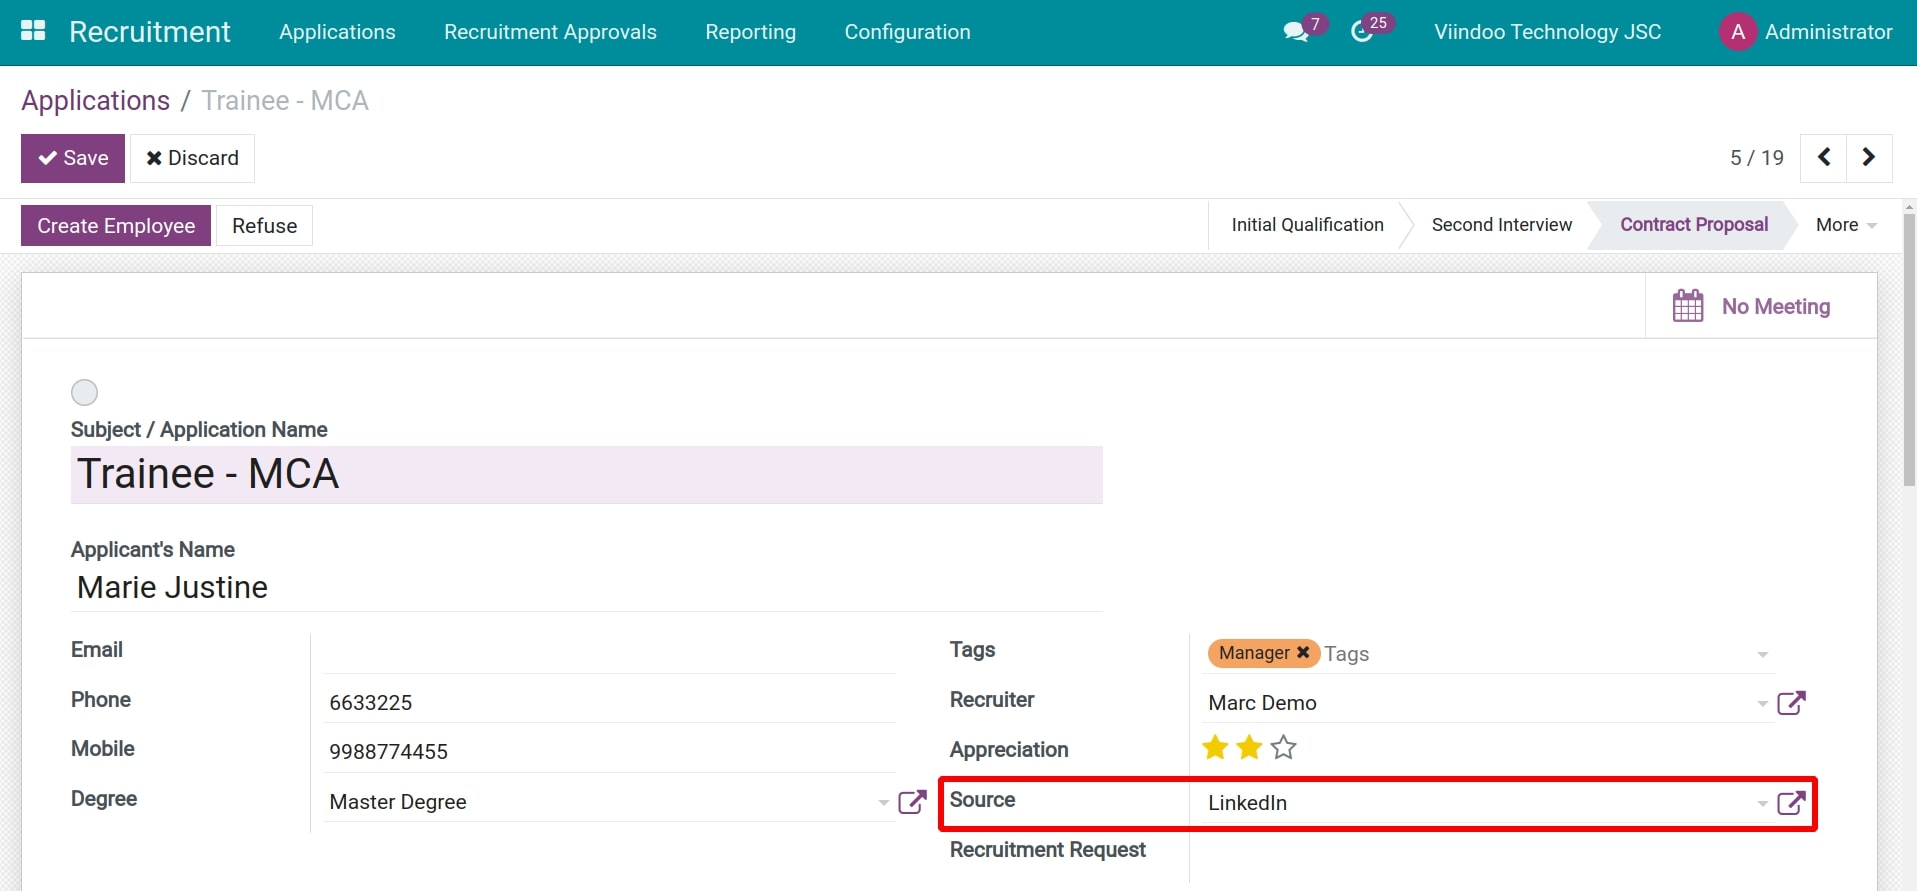
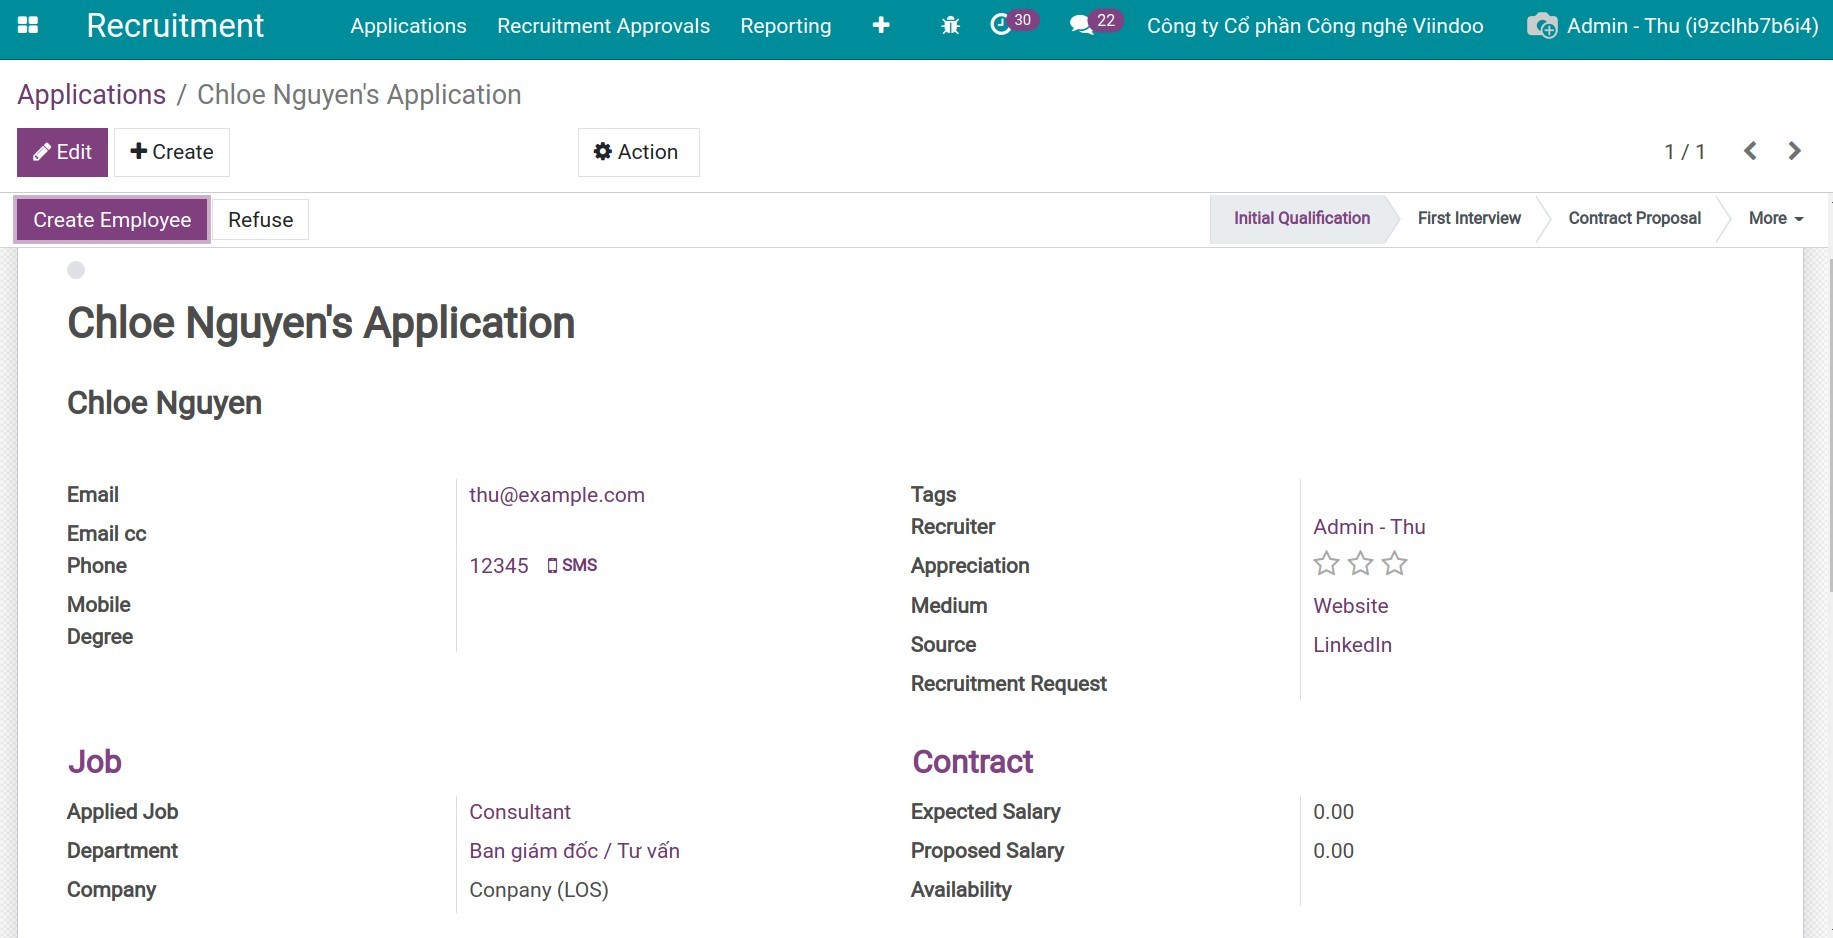
At the new application view, you need to fill below information:
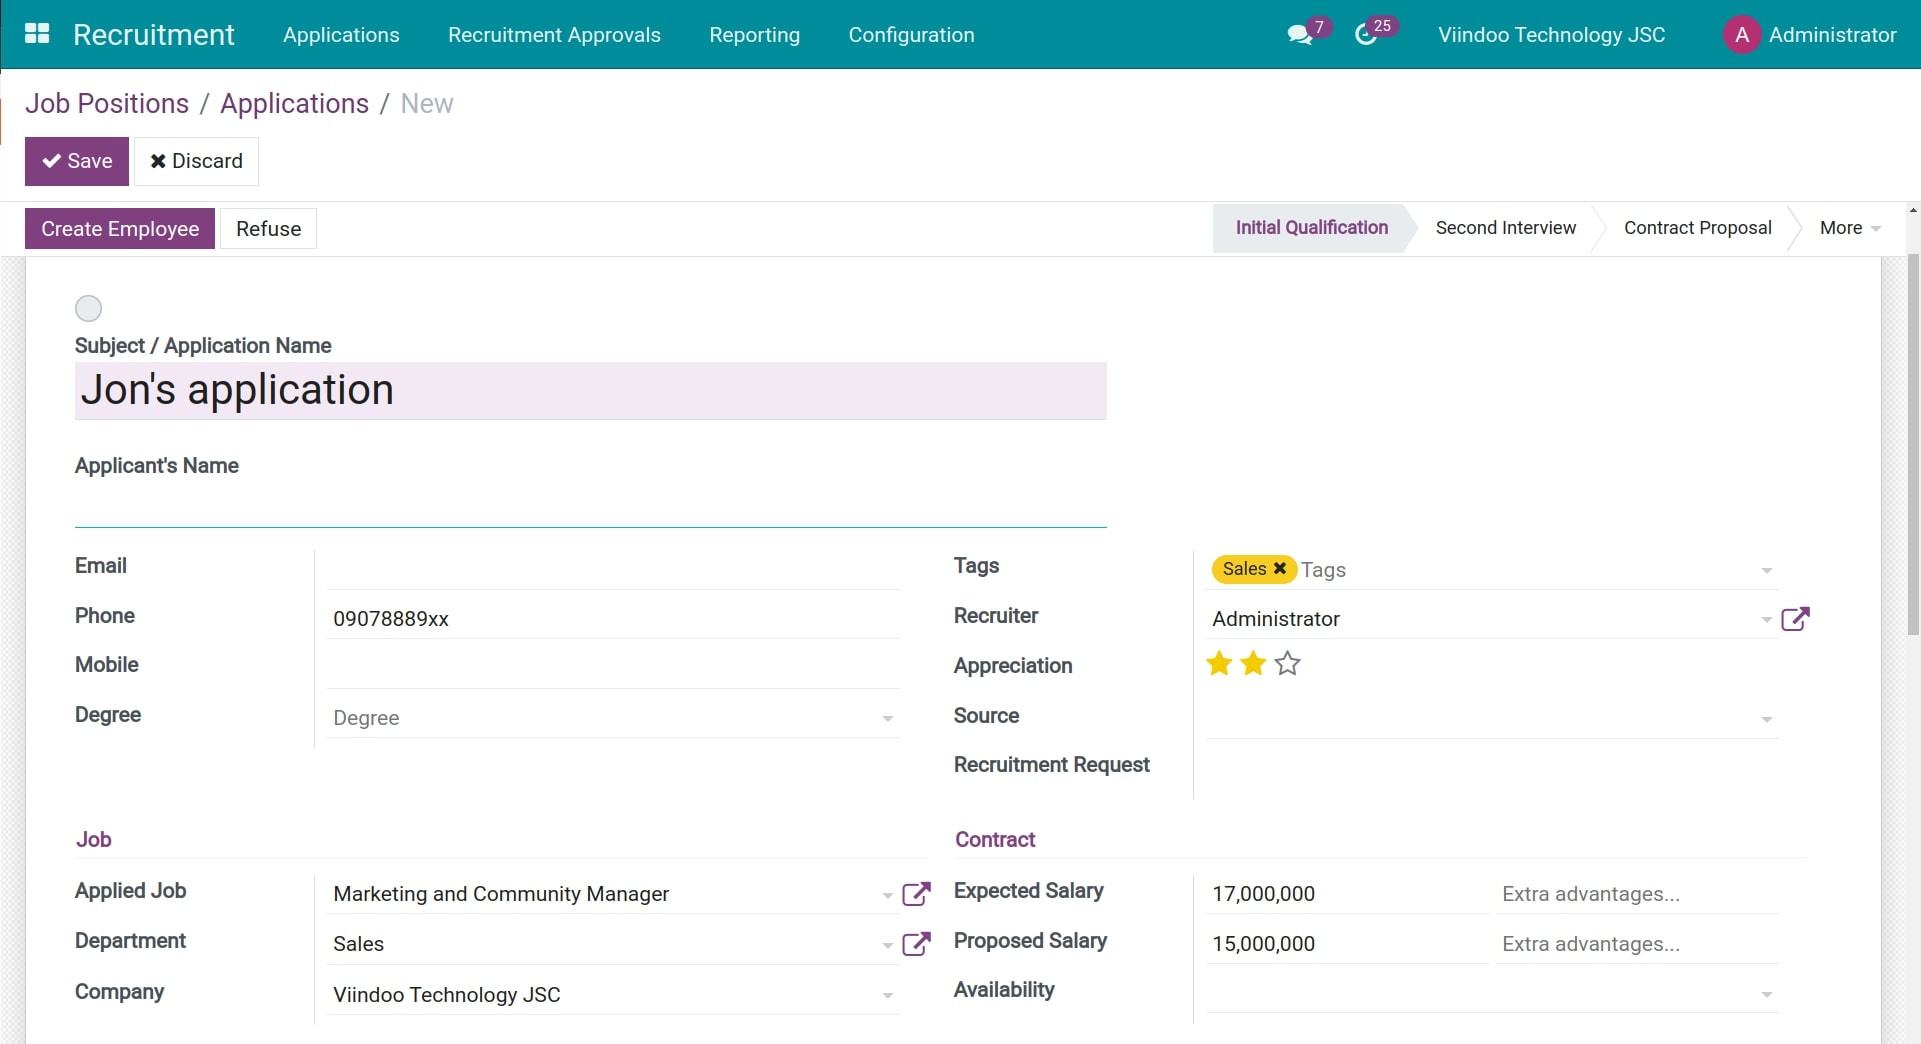
- Subject / Application name: the name of the application profile. You should enter the applicant’s name in a short, easy way to look up later.
Enter the candidate’s basic information in the fields of Email, Phone, Degree.
Tags: keywords for searching and filtering information.
Recruiter: the person in charge of recruiting this applicant, automatically filled in by the system according to the recruiter set up on the position that the applicant applied for.
Appreciation: your assessment in terms of opportunities to become an employee, attitude, ability,… of the applicant. This helps recruiters have more information for the next stage.
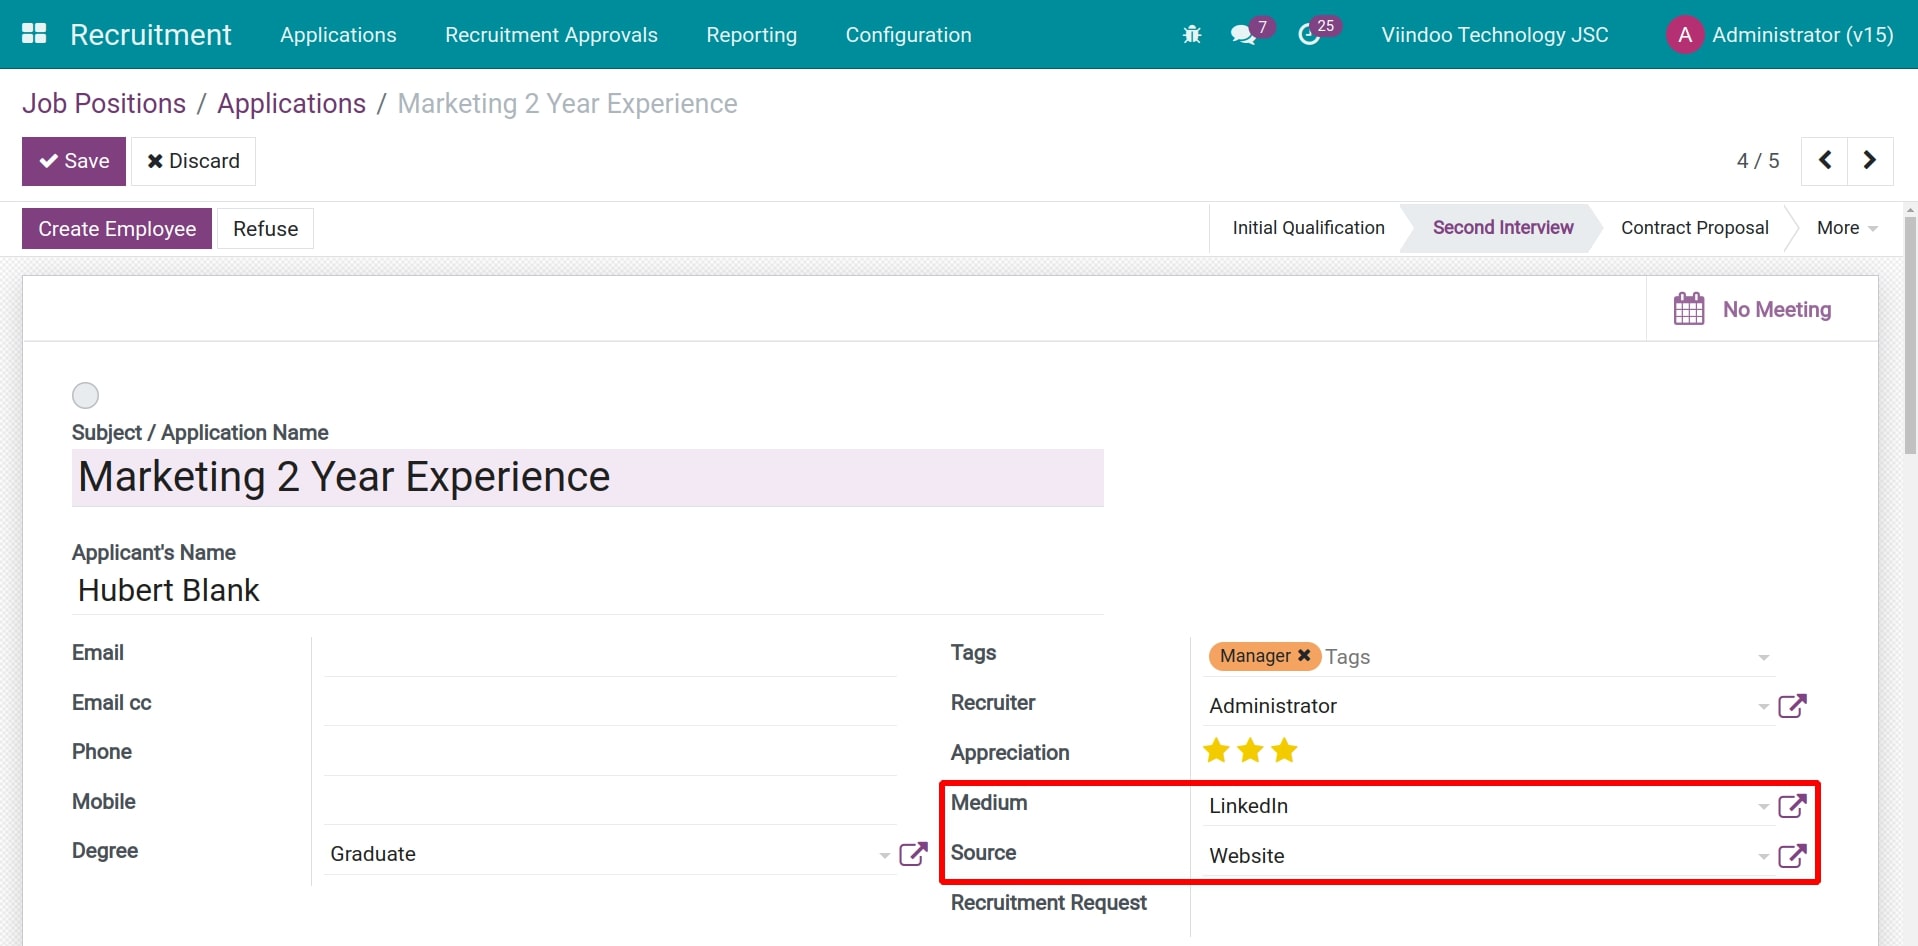
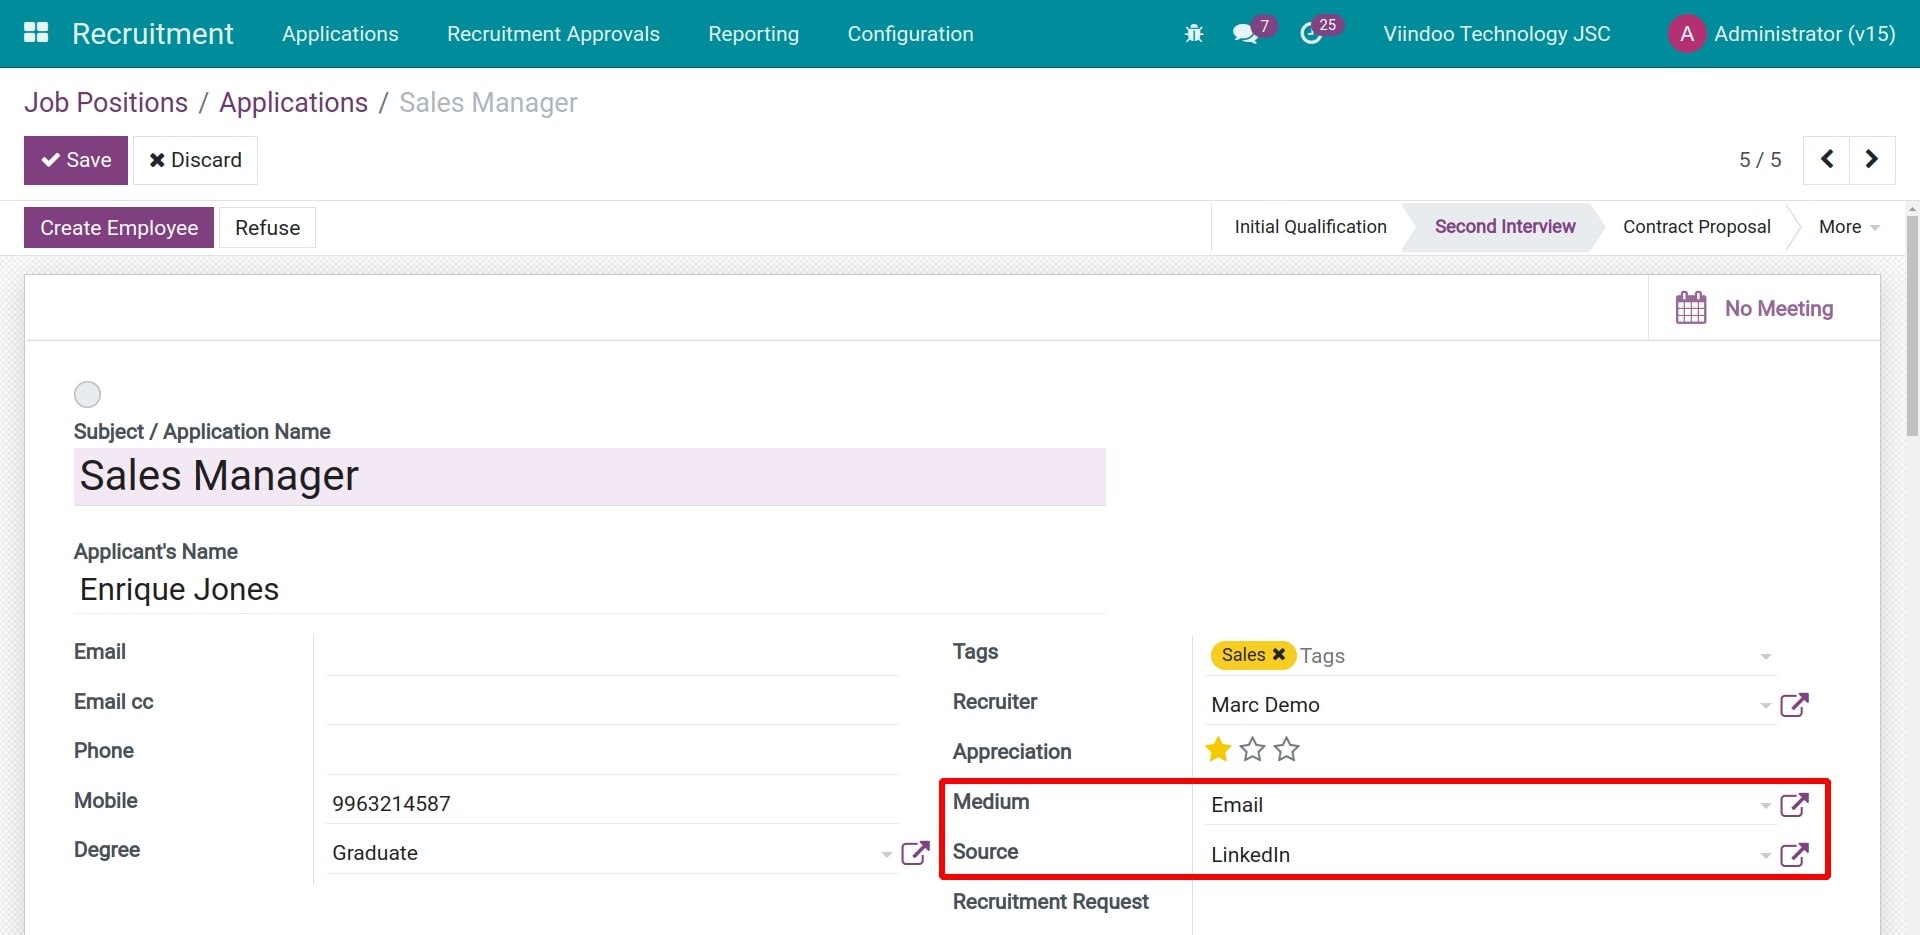
Sources: sources that recruiters receive applications, example: directly in-person, job fair at university,…
Medium: medium of receiving applications. For example: apply in-person, Website, Phone call,…
Jobs:
- Applied job: job position that applicant want to apply for.
Department/Division: Department/division of the applied job, automatically filled in by the system.
Contracts:
- Expected salary/Proposed salary: salary that the applicant expects or recruiters propose. This information helps the recruiter to make assessments and decisions for this candidate. For example: negotiation, salary agreement,…
Availability: date that applicant is ready to onboard.
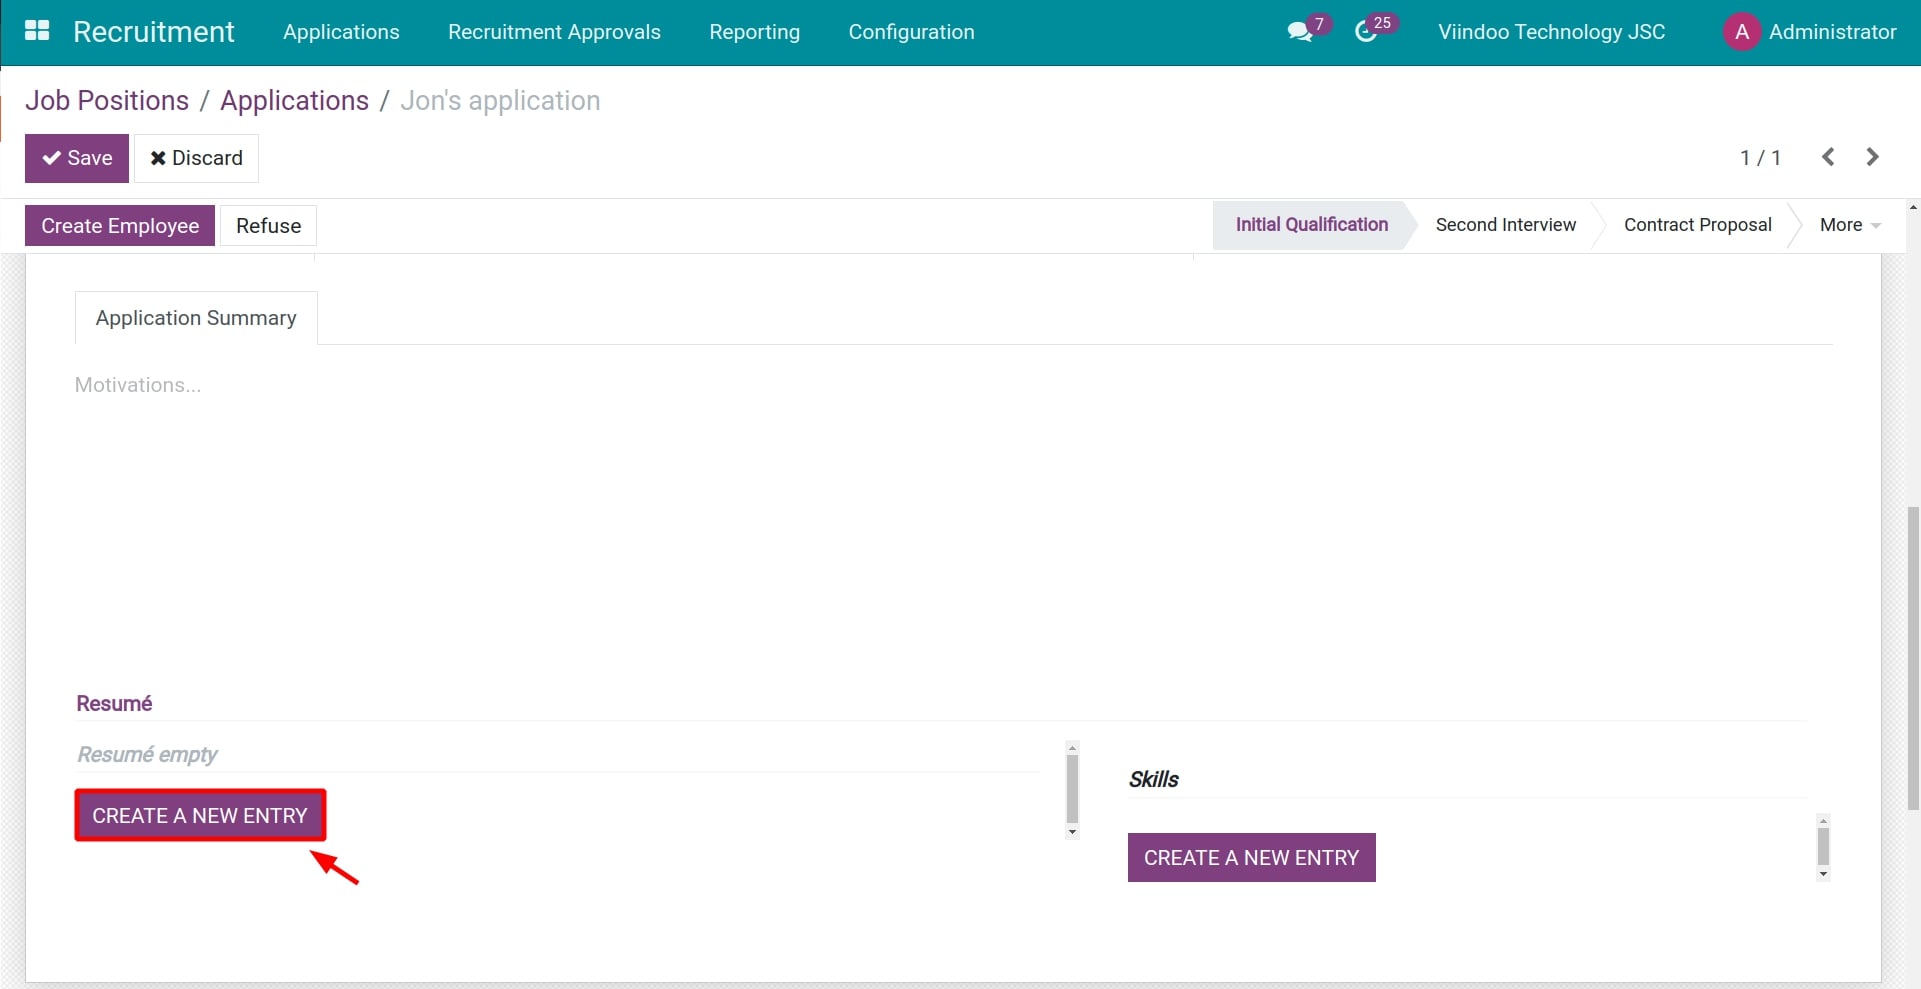
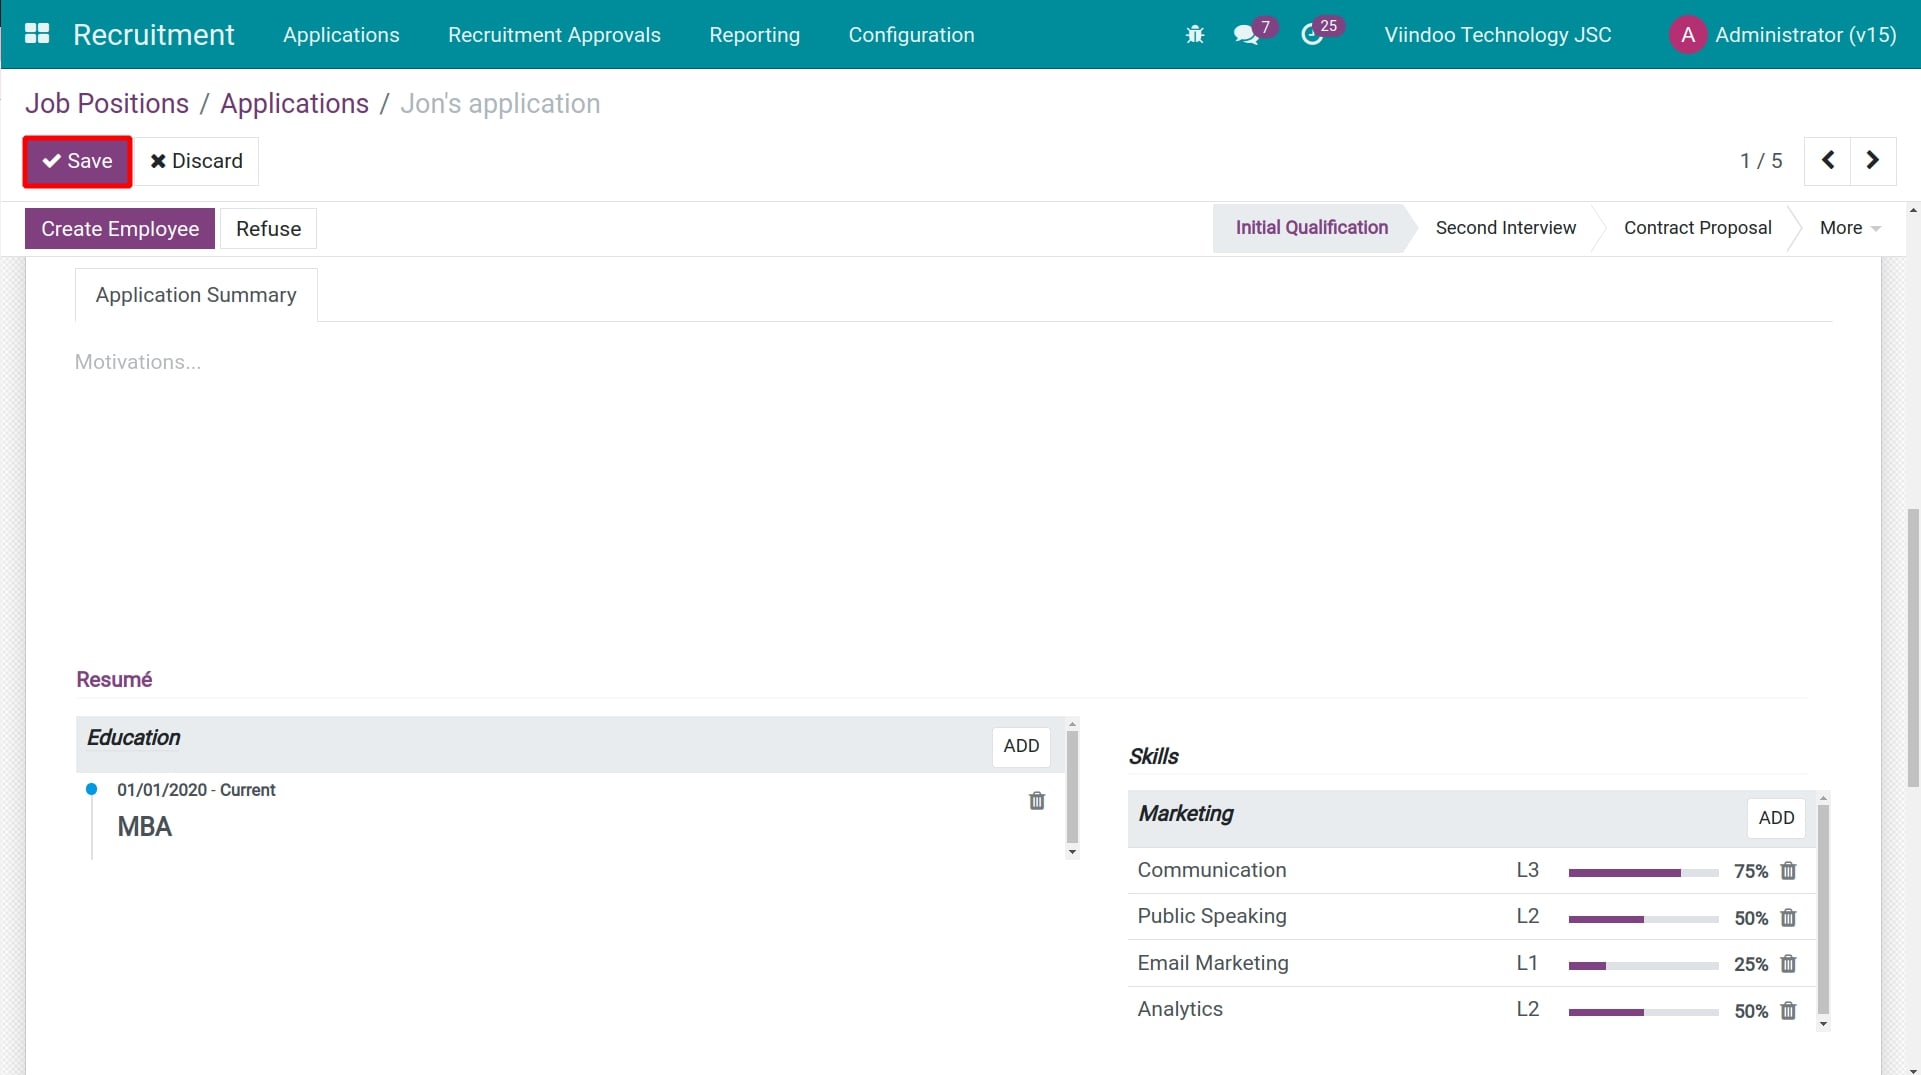
- Application Summary: you can fill the summary information of the applicant about education, experience, attitude,…
To manage Resumé and Skills, you need to install the Employee Skills module.
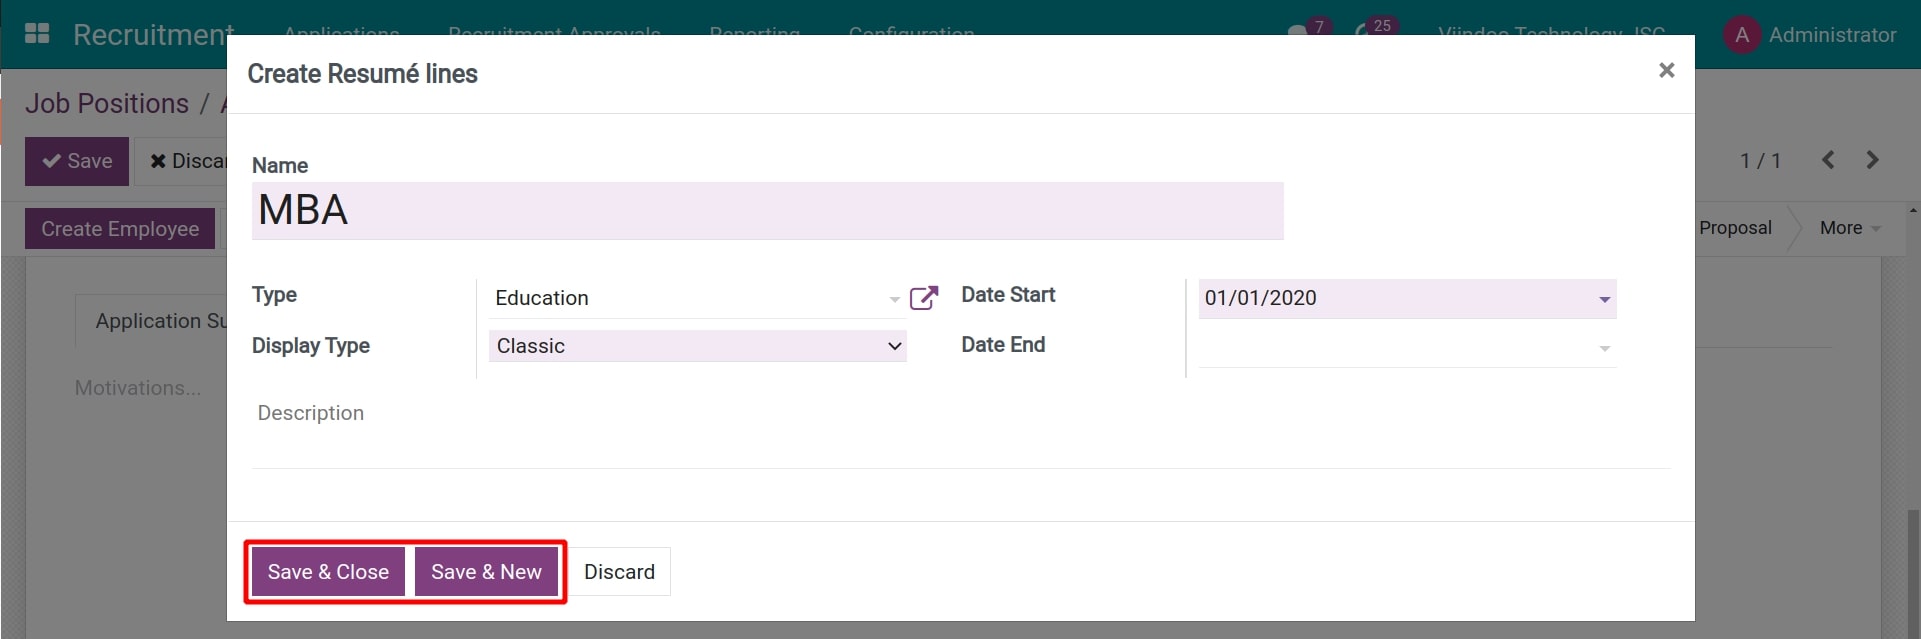
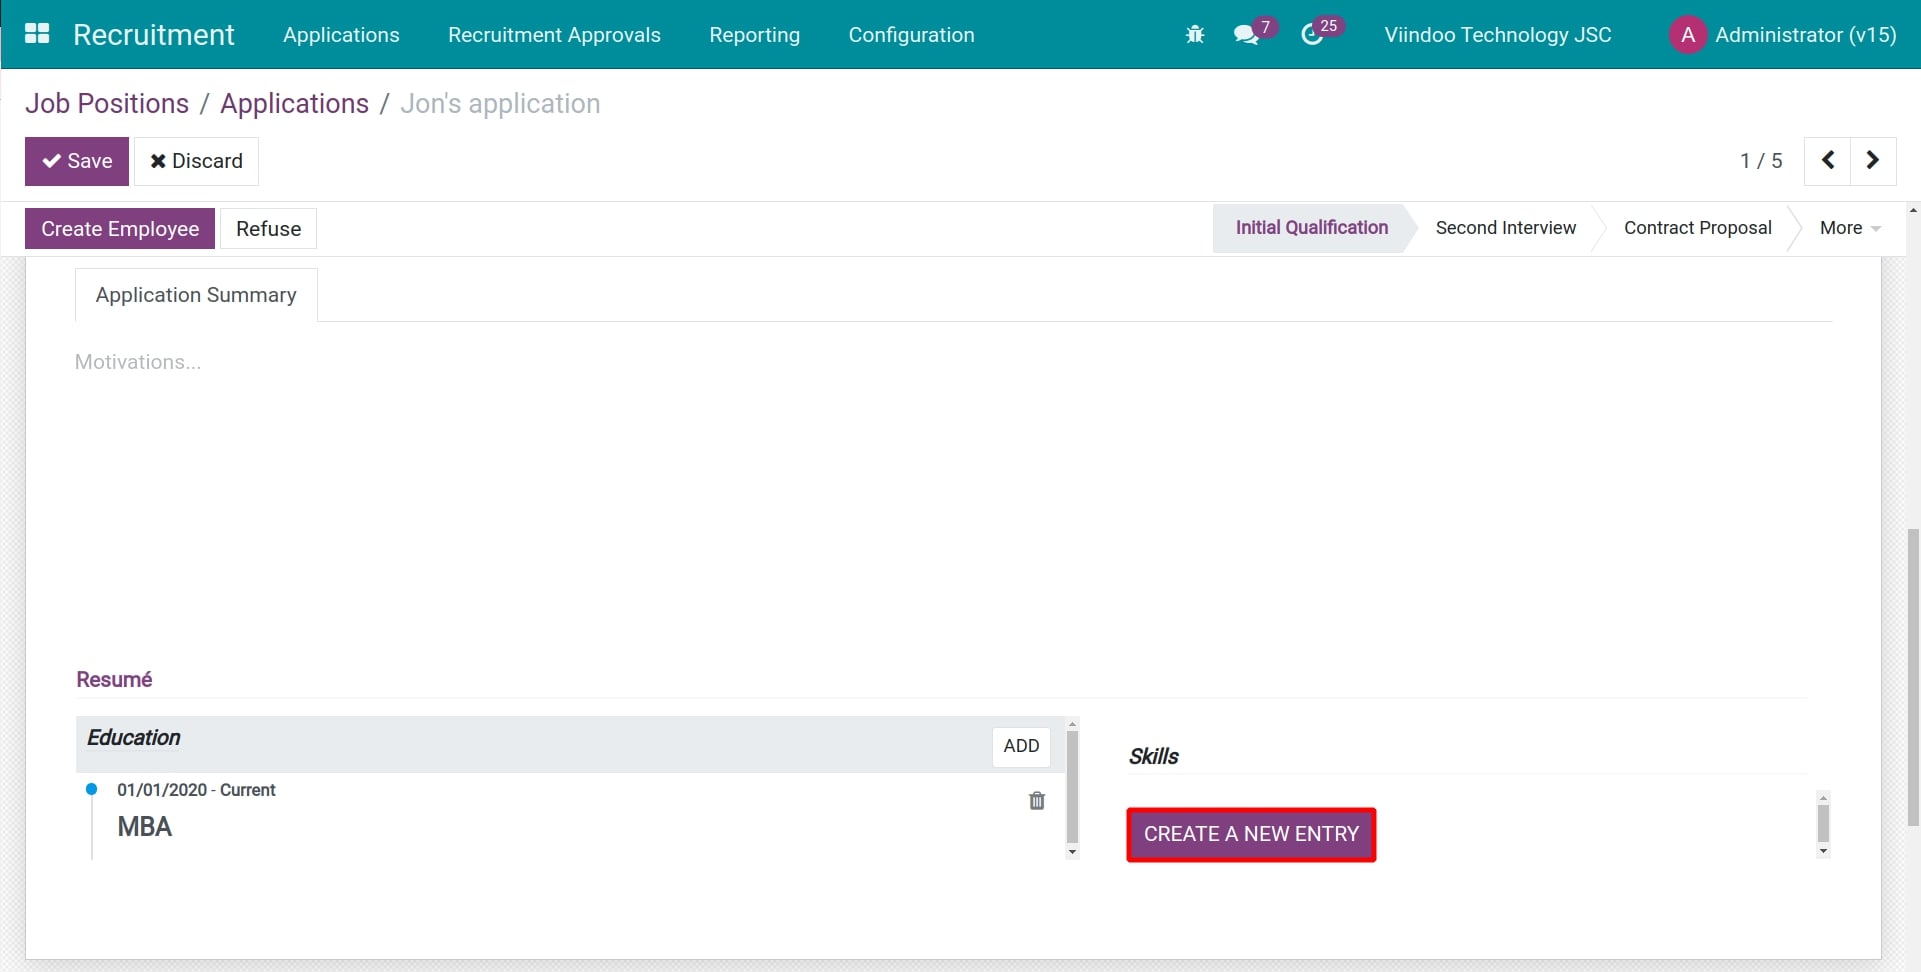
Resumé: information about degree, certifications, experiences,… You can click on CREAT A NEW ENTRY for filling Resumé of applicant.
- Name: title of Resumé, example: Hanoi National University of Education, Master of Psychology,….
Type: type of Resumé, example: Internal certification, degree, experience,… If the system doesn’t have the type you need, you can click on Create and Edit for creating new type:
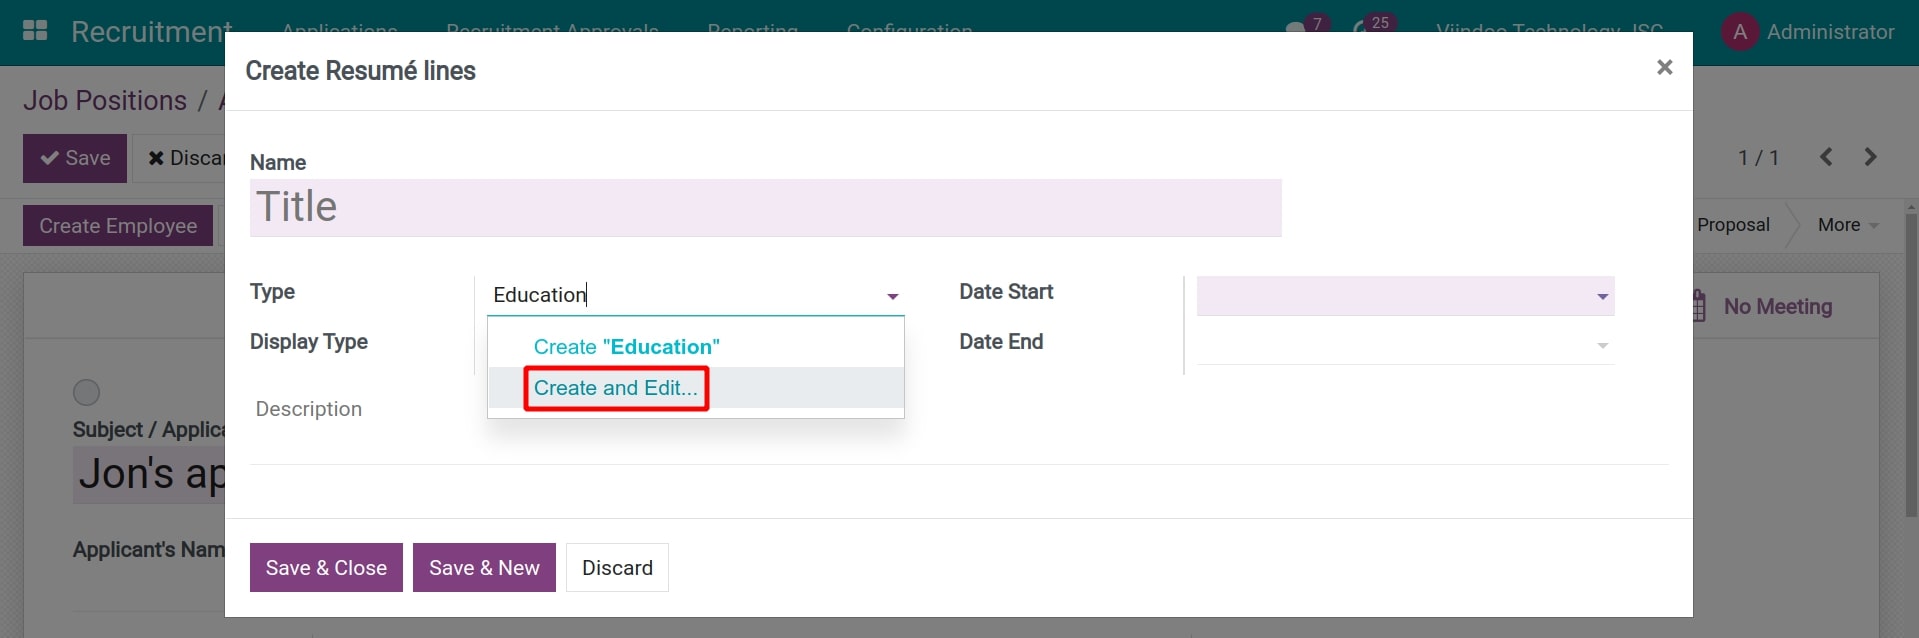
Display Type: at here, system allows you to display in Classic. After applicant becomes employee, you can choose other display types as Certifications, Training Courses,… (if you have installed Skills Certification (hr_skills_survey), E-learning (website_slides),…).
Date Start - Date End: enter the date start and end of this resumé line. If the process is not finished, the Date End field can be left blank.
Description: detailed description for resumé such as major, job title,…
After filling all information, click Save & New if you want to add the next record or click Save & Close.
- Skill Types: applicant’s outstanding skills such as language, presentation,…
- Set Skill Types: you need to create Skill Types first before filling skill information for applicants.
Navigate to Employees > Configuration > Skill Types, click Create.
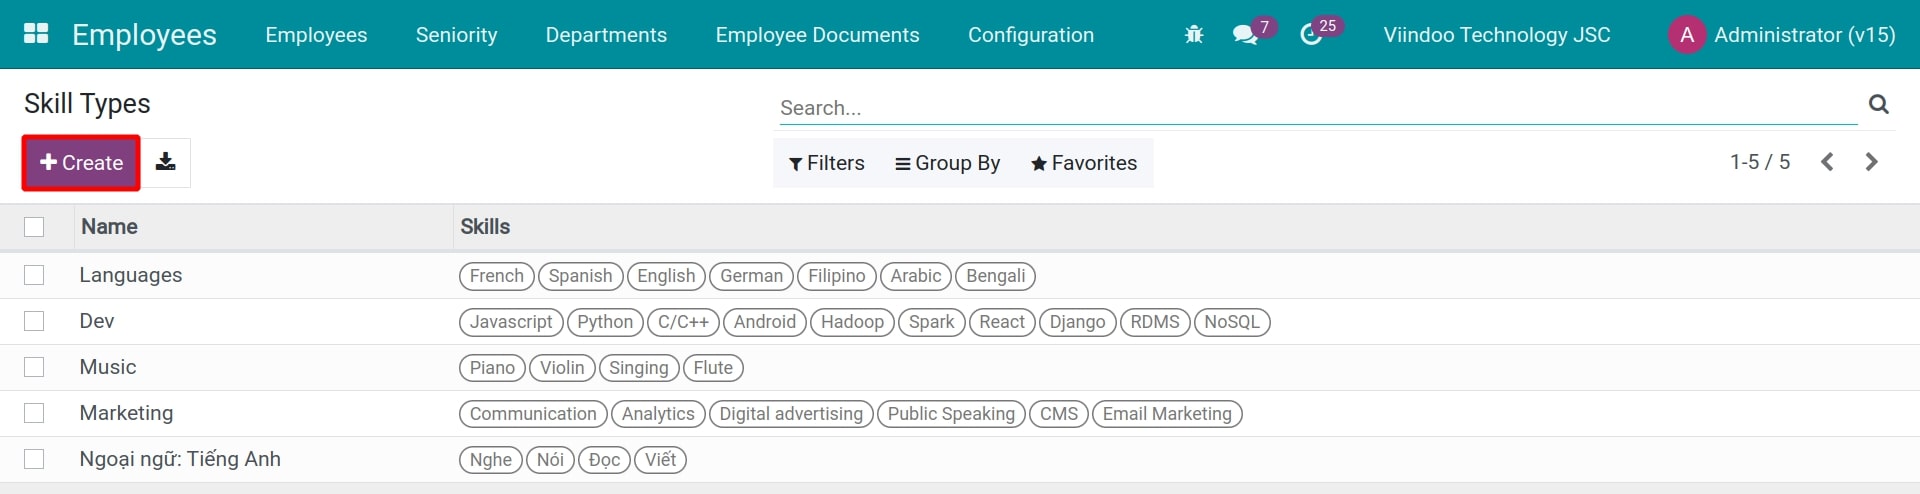
Name: the name of the Skill Types. For example: English, Computer skills, Soft skills,…
Skills: skills that belong to this Skill Type. You click Add a line or trash icon to add/remove a skill. For example, English skill type includes listening, speaking, reading, and writing; Soft skill type includes communication, personal planning,…
Levels: a skill can have multiple levels, each level is rated by percentage (%). You click Add a line or trash icon to add/remove a level. For example, Listening skill of English Skill Type, there are 3 levels of Beginner, Intermediate, and Advanced, respectively 25%, 50%, 75%.
After filling all the information, click Save.
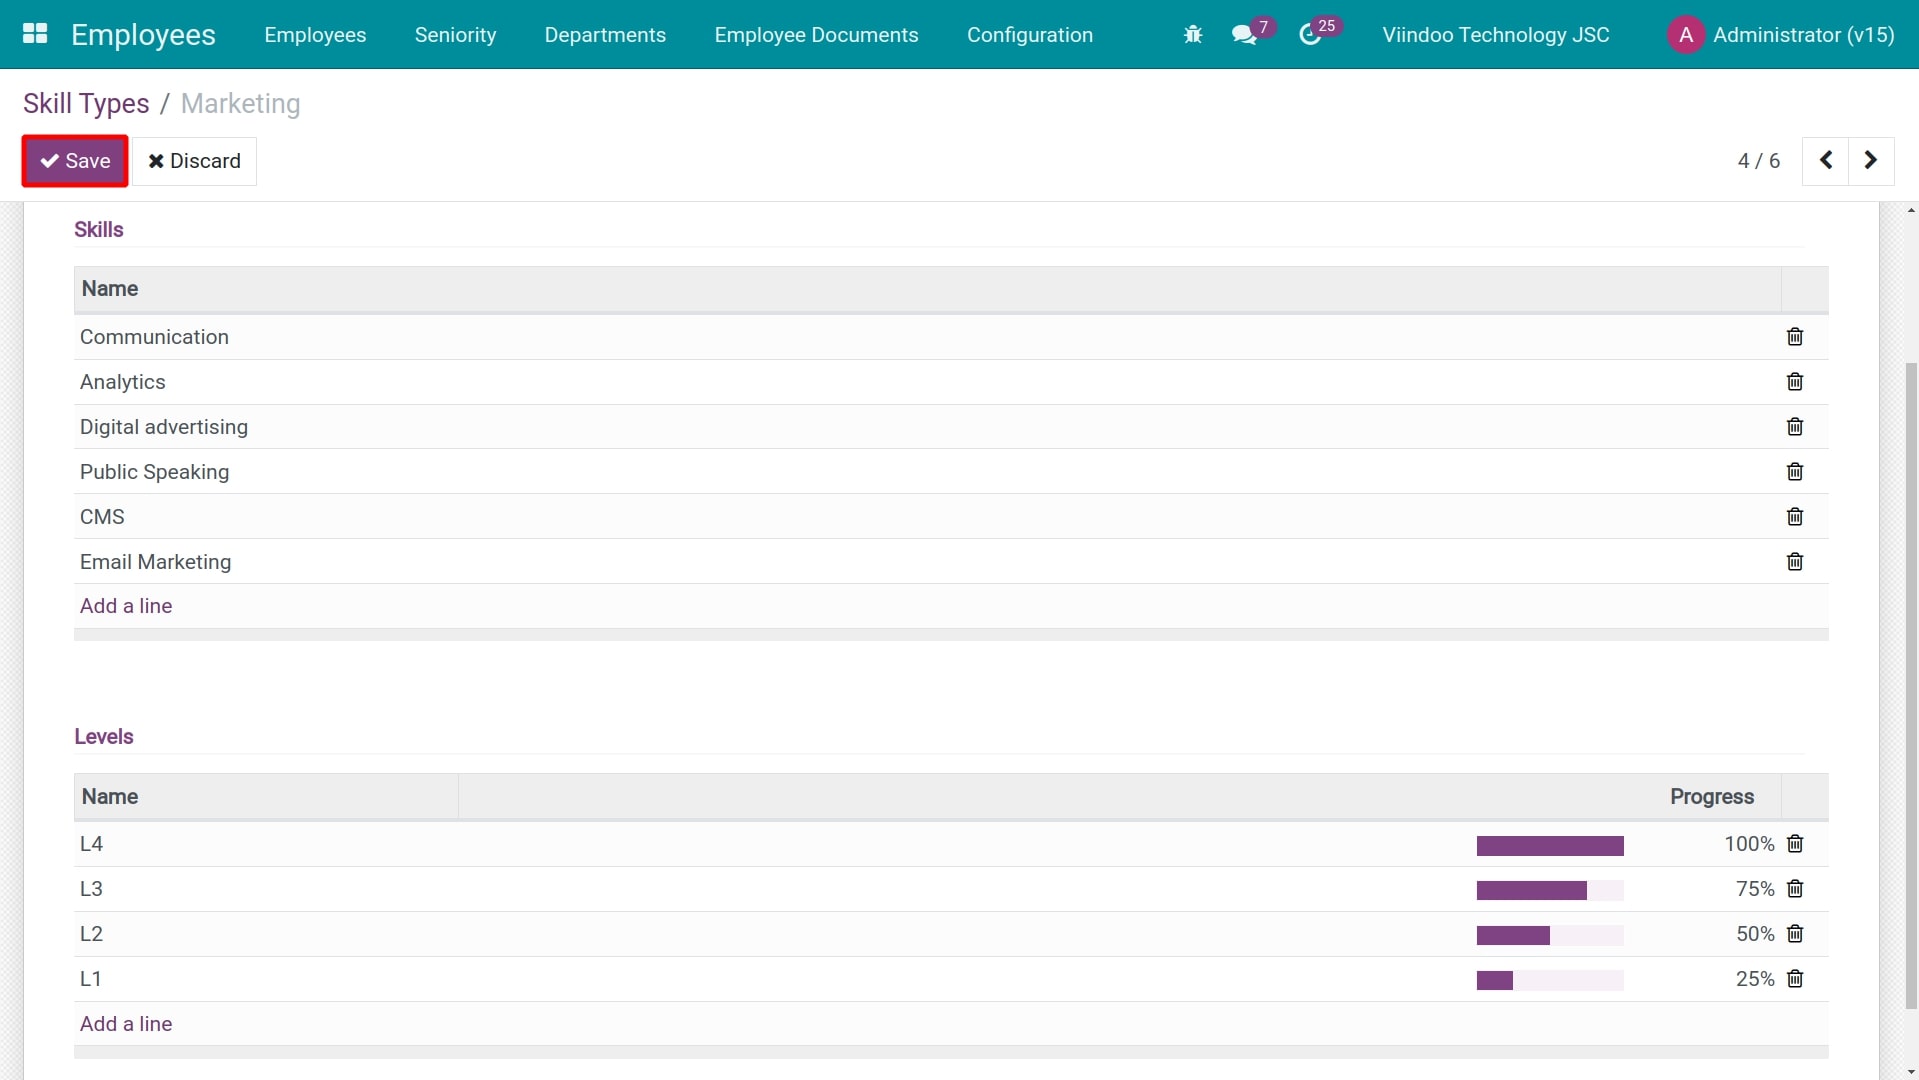
Create Skills for applicants: Click the button CREATE A NEW ENTRY to add skills for the applicant.
Skill Types, Skills, Levels: information about the applicant’s current skills. After you finish creating, the system shows the percentage of the current skill, according to the Skill Types set up above.

After filling all information, click Save & New if you want to add the next record or click Save & Close.
- Set Skill Types: you need to create Skill Types first before filling skill information for applicants.
Tip
You can also quickly create a skill type right on this create skills window by clicking create and edit in the same way as creating a new Resumé.
Finally, click Save to finish creating a new application.
Automatically create applications
Applications will be automatically create on the Viindoo system by one of the following ways:
Option 1: Applicants apply directly from the Website.
Applicants access the Recruitment view on the company’s website, click the Apply Now to submit their application.

Applications are automatically created on the system.
Option 2: Applicants access the link trackers.
Applicants access the URL link of the link trackers that you post on the recruitment pages, which is directed to the recruitment view on your website. From here applicants can submit their applications.
Applications are automatically created on the system. With this method you can identify the applicant’s source and method.
Option 3: Applicants send to the email address set up on the Sources of Applicants. When an applicant sends to this address, the system automatically creates an application. With this method you can identify the applicant’s source and method.
Option 4: Applicants send to the Email Alias address set up on the Job Positions. When an applicant sends to this address, the system will also automatically create an application.
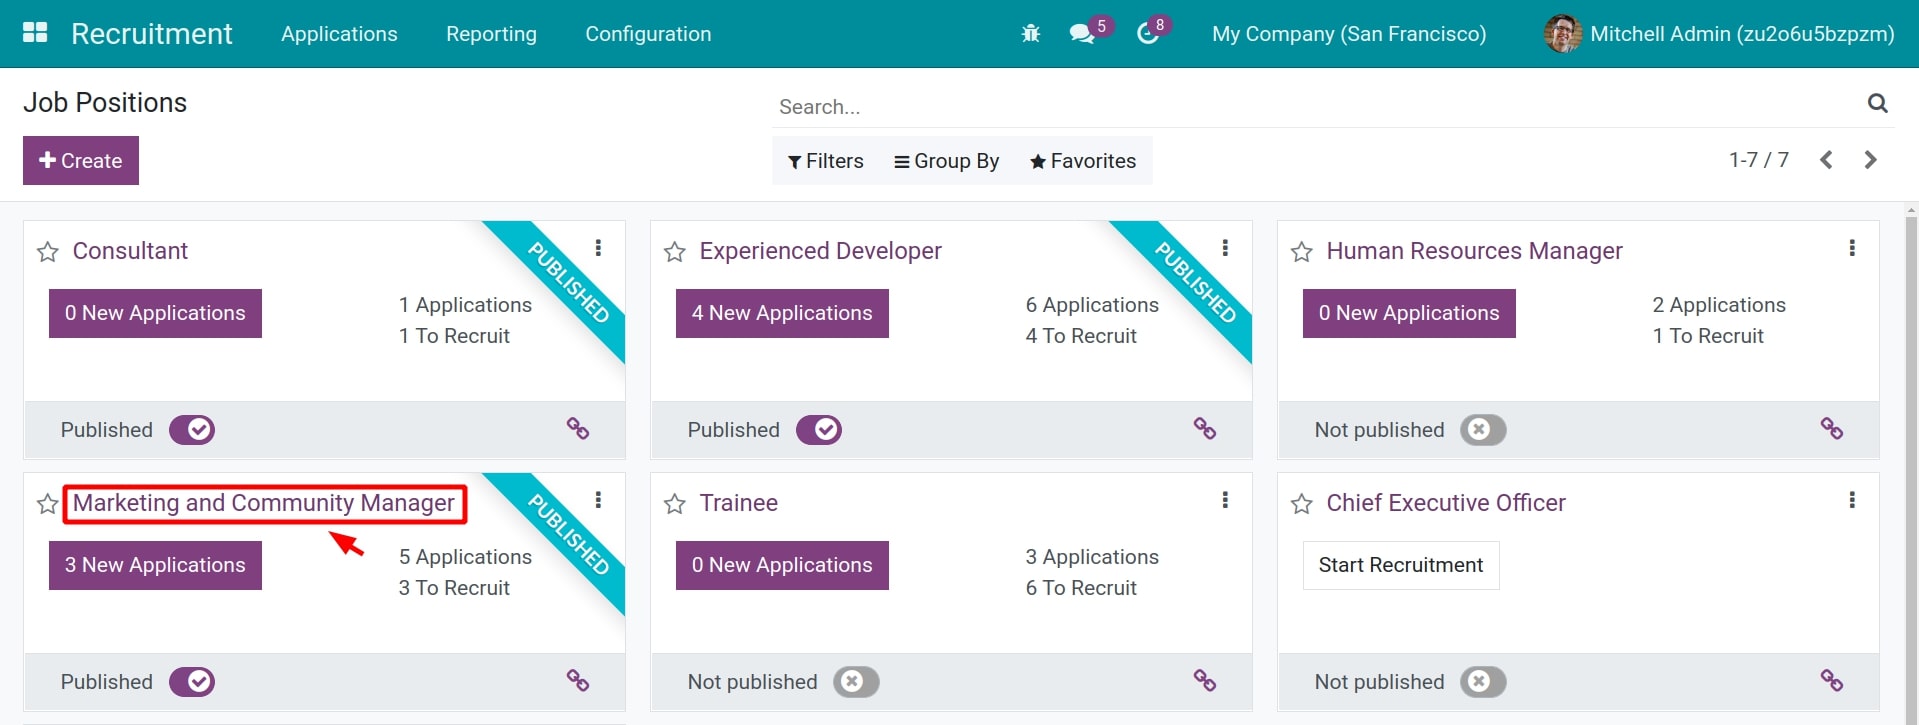
Right from the Recruitment overview, you can see the number of new applications for each position.
- You access the module Recruitment, the screen displays the Applications by Job Positions.
If a new applicant applies for this Job Position, the number of New Applications and Applications will increase. Recruiters can see how many applications have been recruited for each of these positions, including how many new applications have applied.
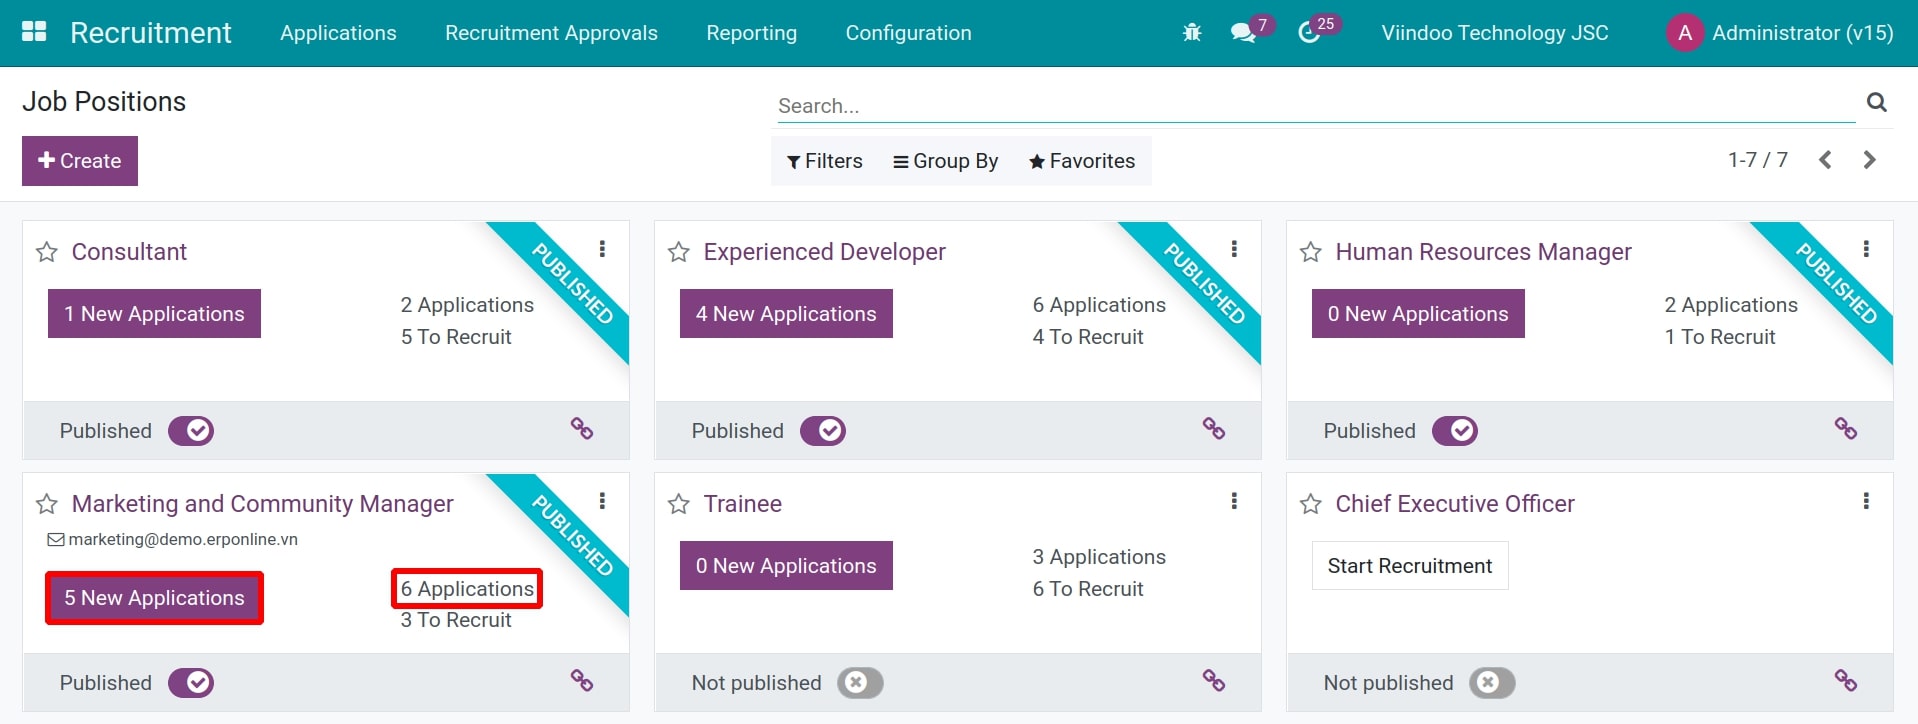
You click the button showing the number of applications, the screen navigates you to the Applications interface. At here you can view the list of applications for this Position.
Communicate with applicants and internal approval
In the odoo system, you can view and manage all contents exchanged with applicants via emails and internal approval at the Applications view in the Recruitment app.
Requirements
This tutorial requires the installation of the following applications/modules:
Recruitment
Exchange with applicants
Sending and receiving emails to/from applicants
Once a application is created, you can send emails to the applicant at the Applications view to invite he/she for direct interview, certification test, etc. Exchanged emails between you and the applicant will be gathered to help tracking and managing the recruitment conveniently, managers also can still have the information even when they’re unavailable for the interviews.
First of all, you access to the Applications view: Access to the Recruitment, negative to Applications > All Applications. You click on the application you want to exchange if it already have or click on Create to create new application.
At the Applications view, you need to check the followers to ensure that managers are informed before sending emails to the applicant. You can add related channels, other recruiters and managers to the followers list, so that they can view the application and exchange emails at the same time.
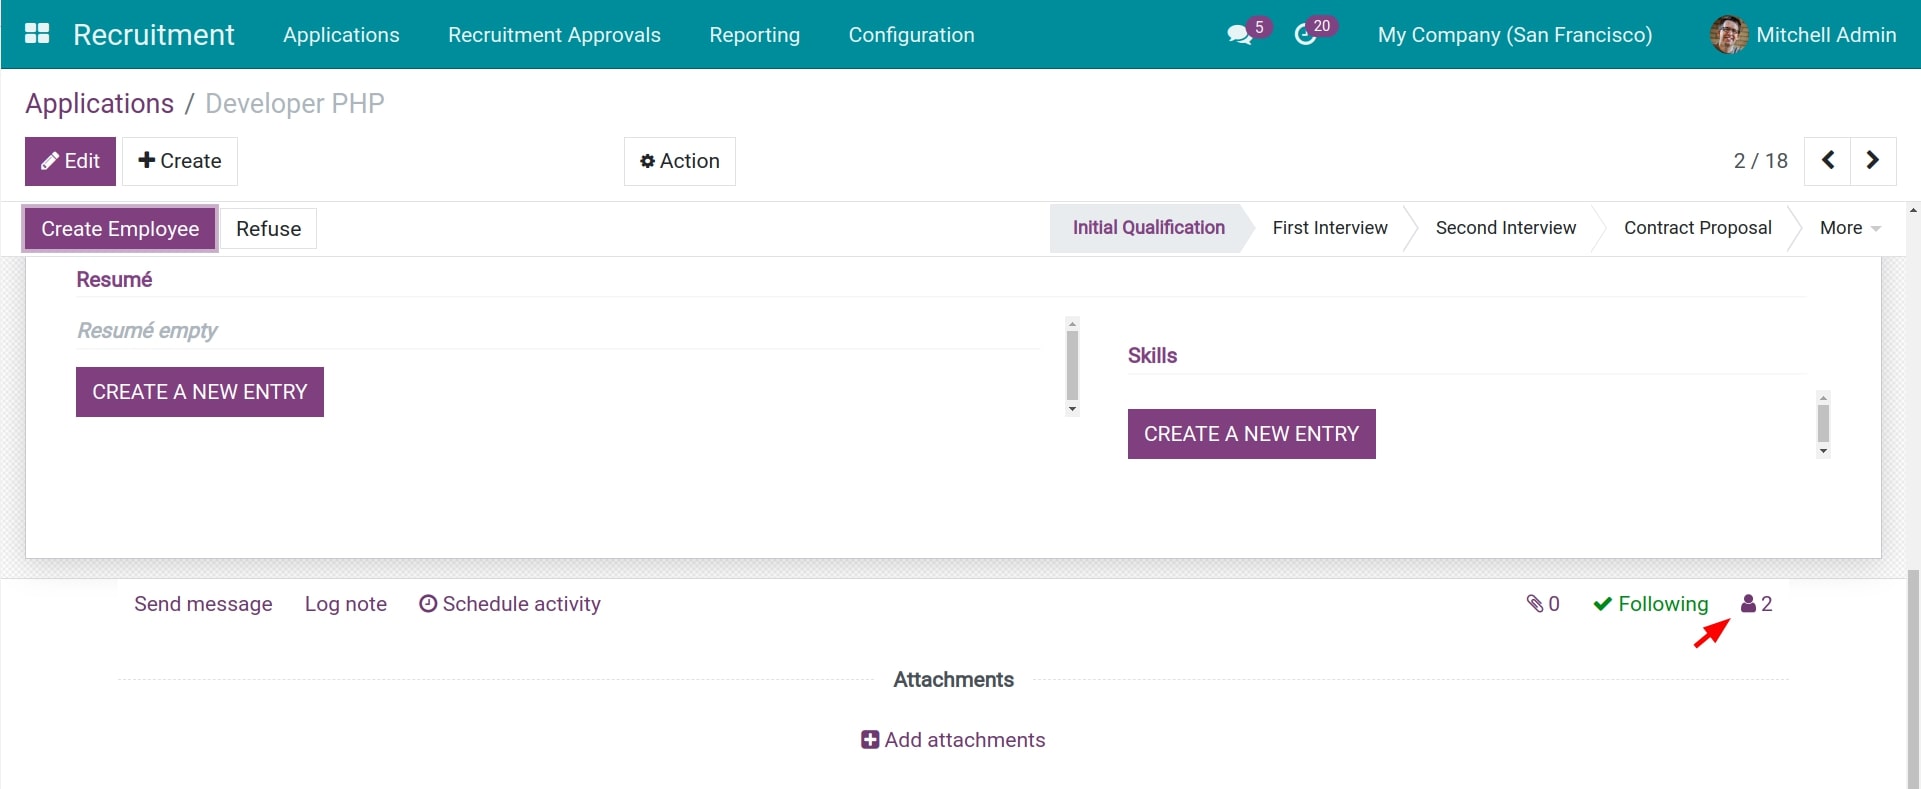
Click Send message to send an email to the applicant, check mark the applicant’s name and email. You need to be sure to enter an email address in the Email field on the application.

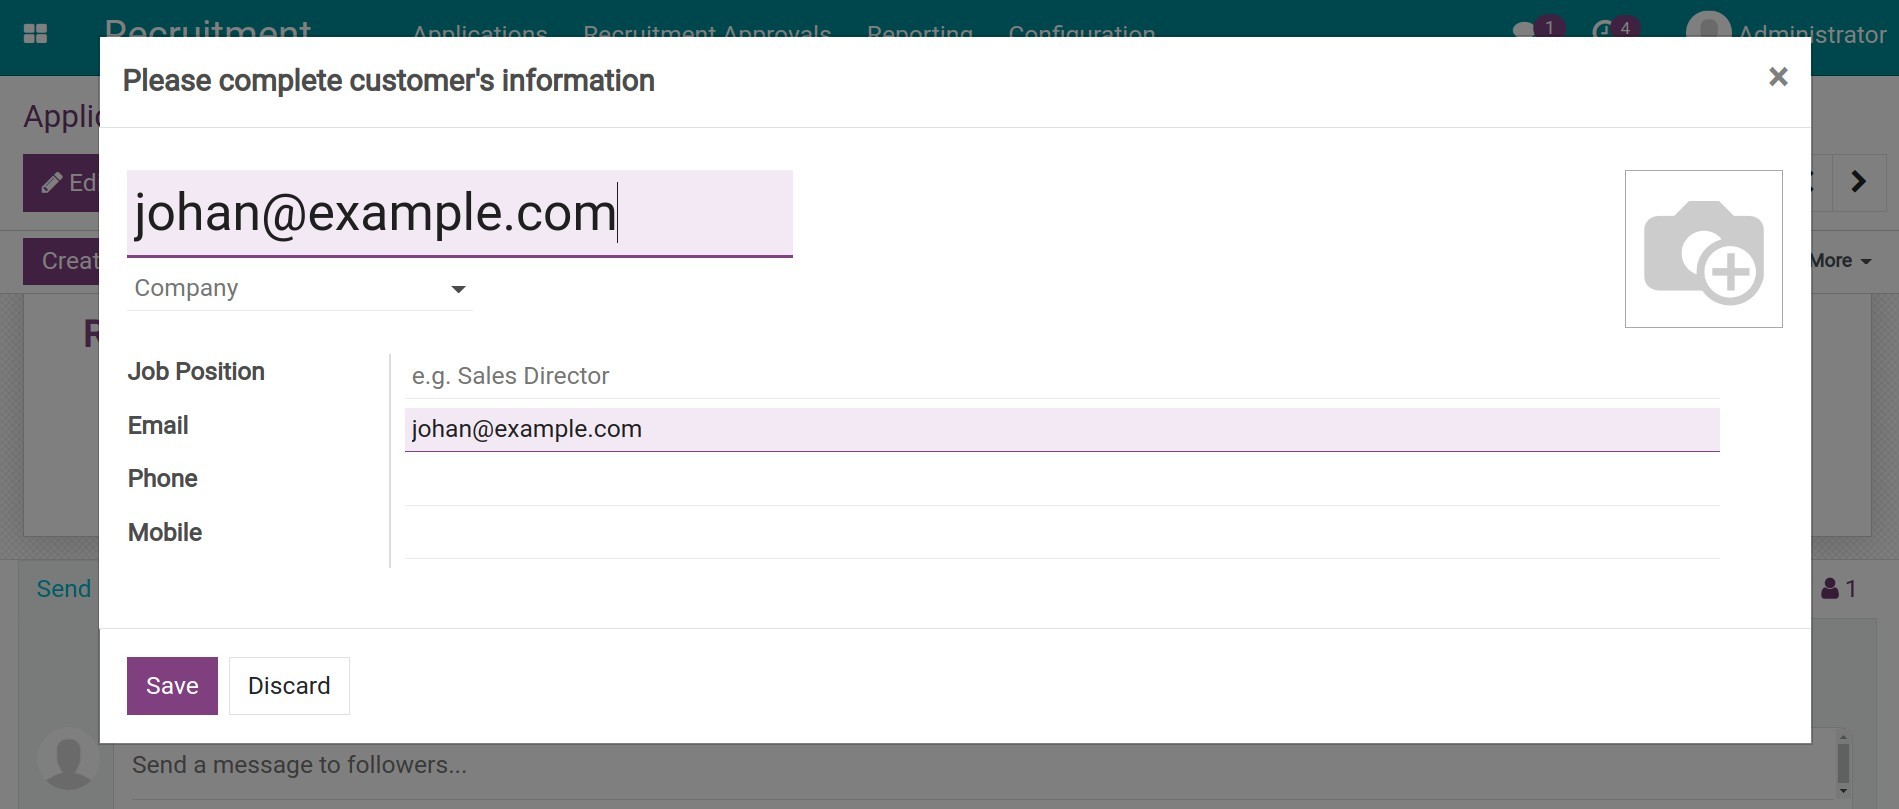
Once you check mark the applicant’s name and email address, a window pop up, you create a contact by entering the information and click Save. From the second time, the system will not ask for this information again.
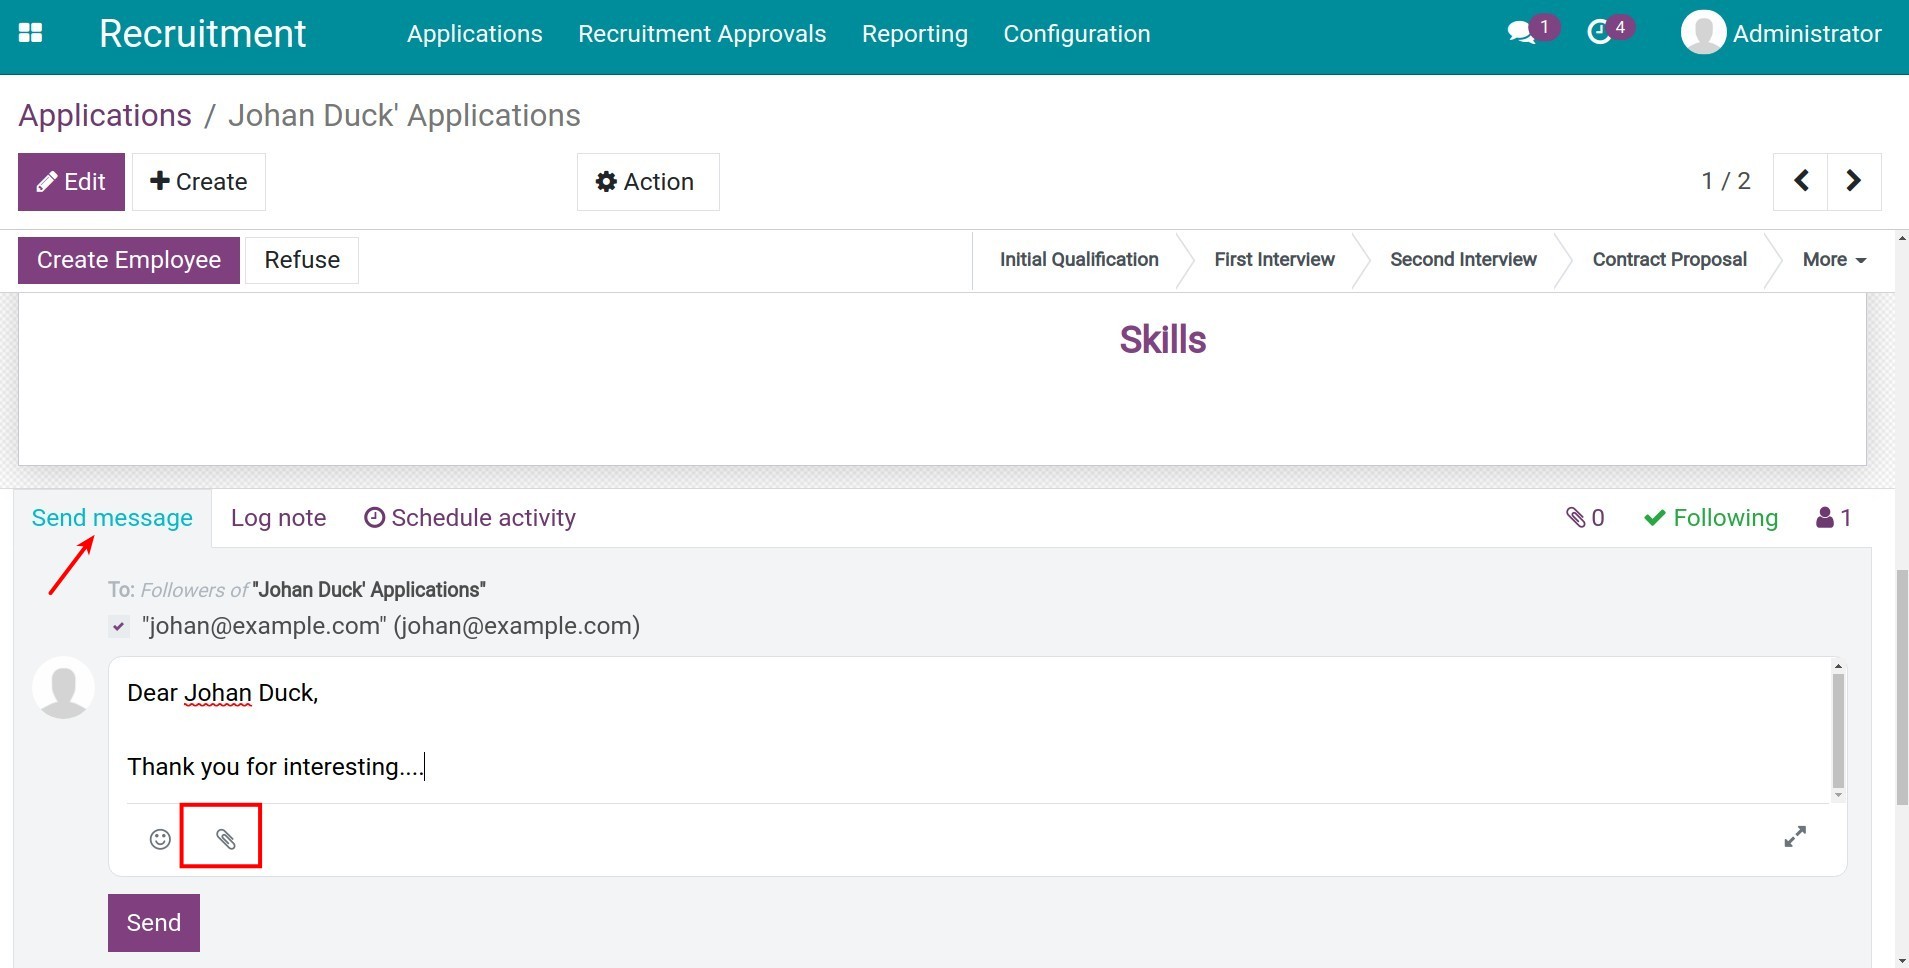
Composing an email: you need to type the email content and click on the attachment icon to attach files (resumé template, required documents for applicants, etc), you can click the expanded icon to use the toolbar if necessary.
On the expanded window, you can also add recipients, change the email subject to increase efficiency.
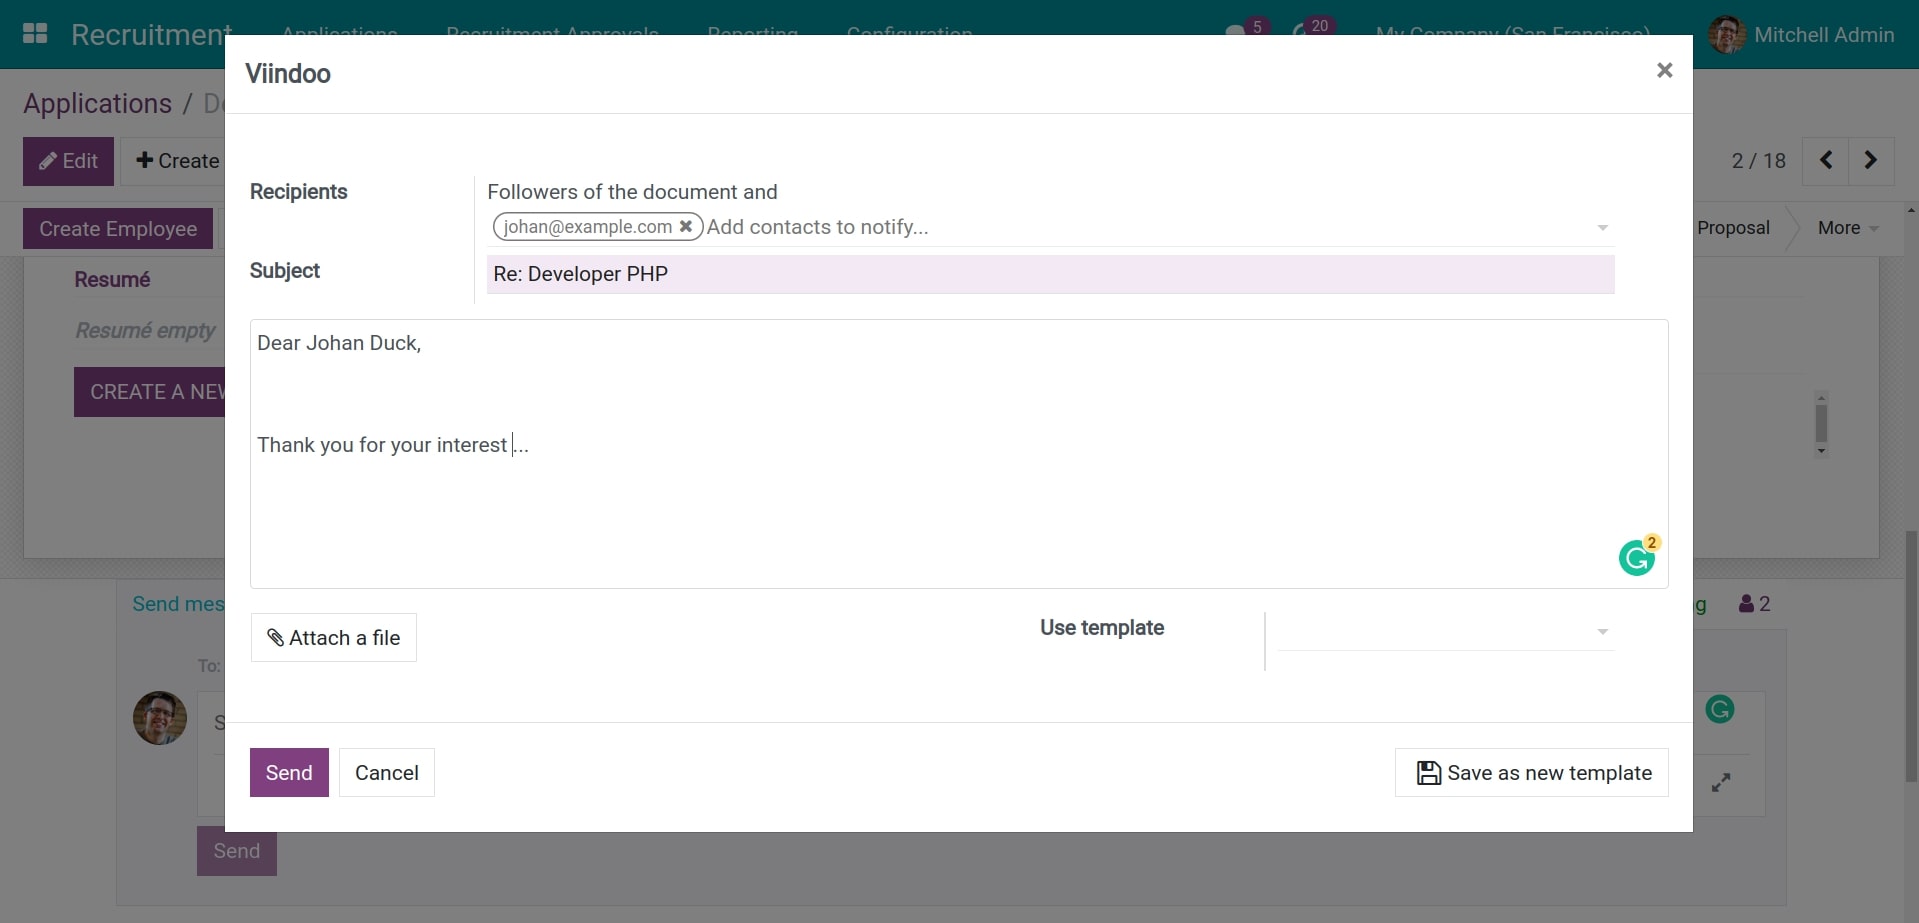
After composing the email, click Send to send an email to the applicant.
Book a meeting with an applicant
You can book a meeting with an applicant to invite them to the interview from the module Calendar or right from a Applications view.
From a Applications view: You have two options negative to Calendar view:
By clicking Schedule activity. Select Activity Type as Meeting, click Open Calendar, you will be navigated to the Calendar view.
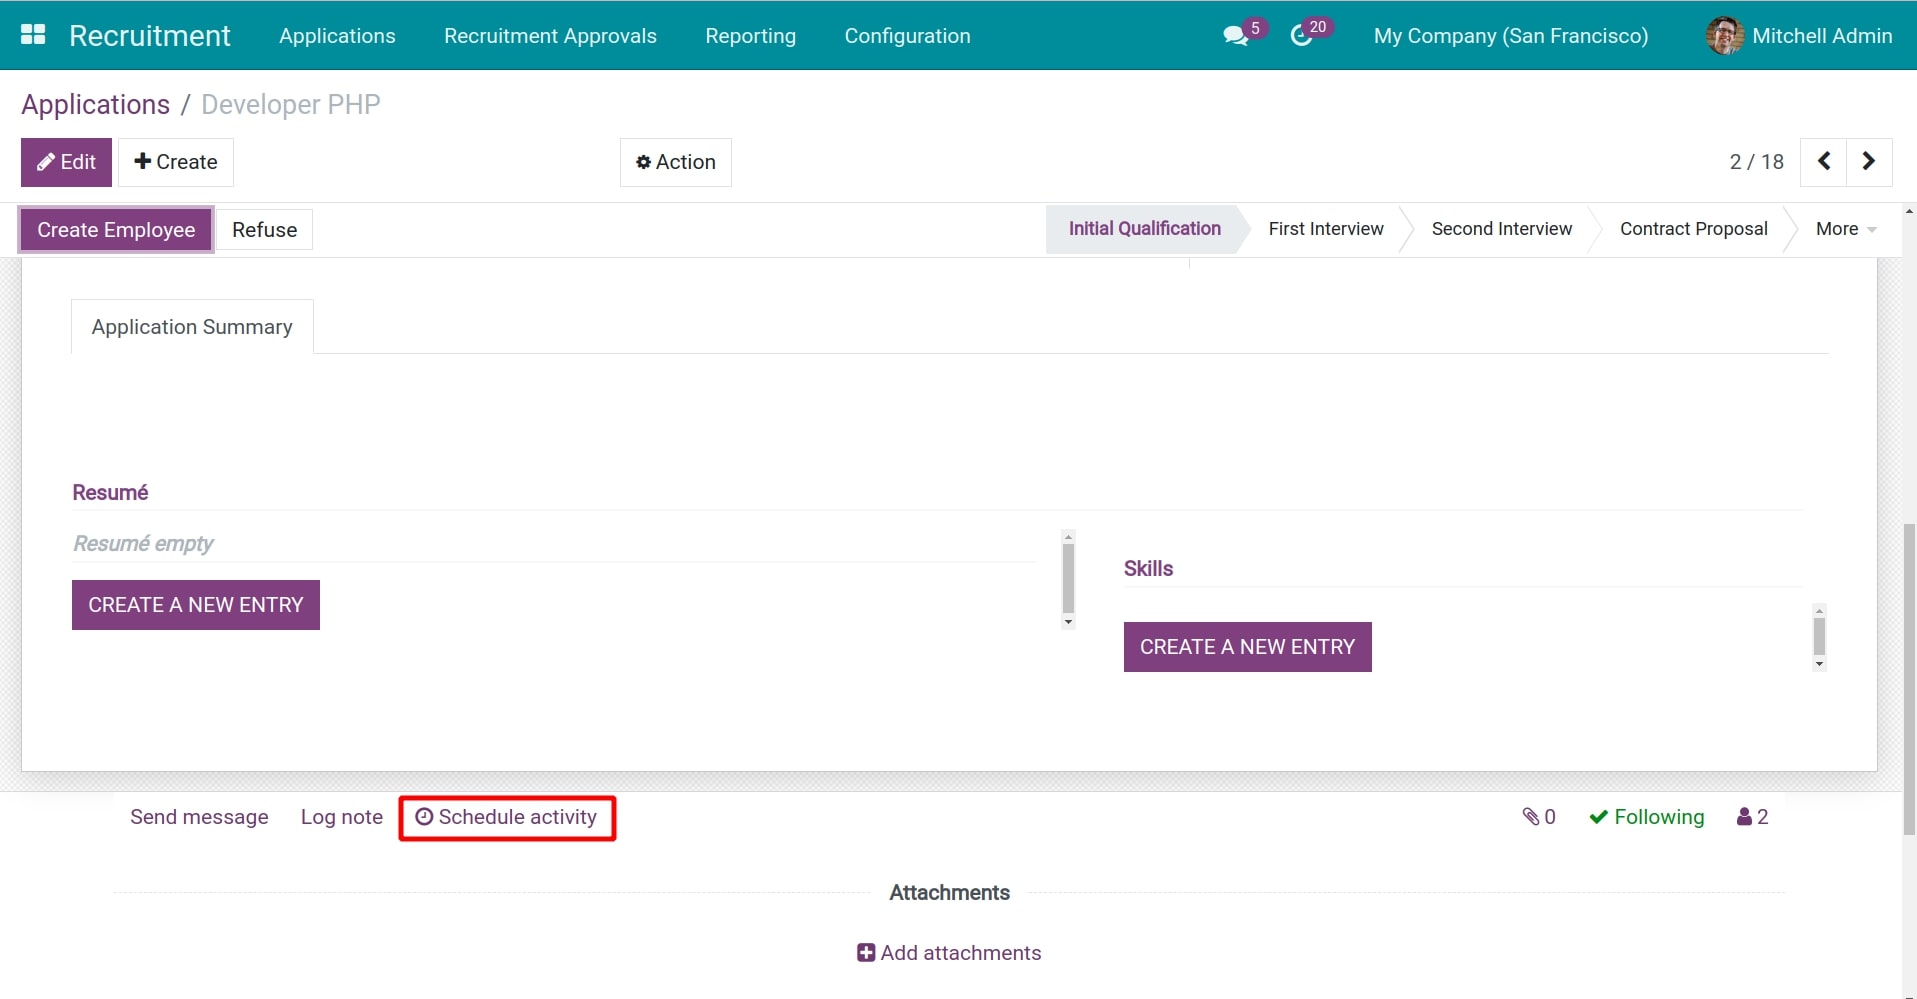
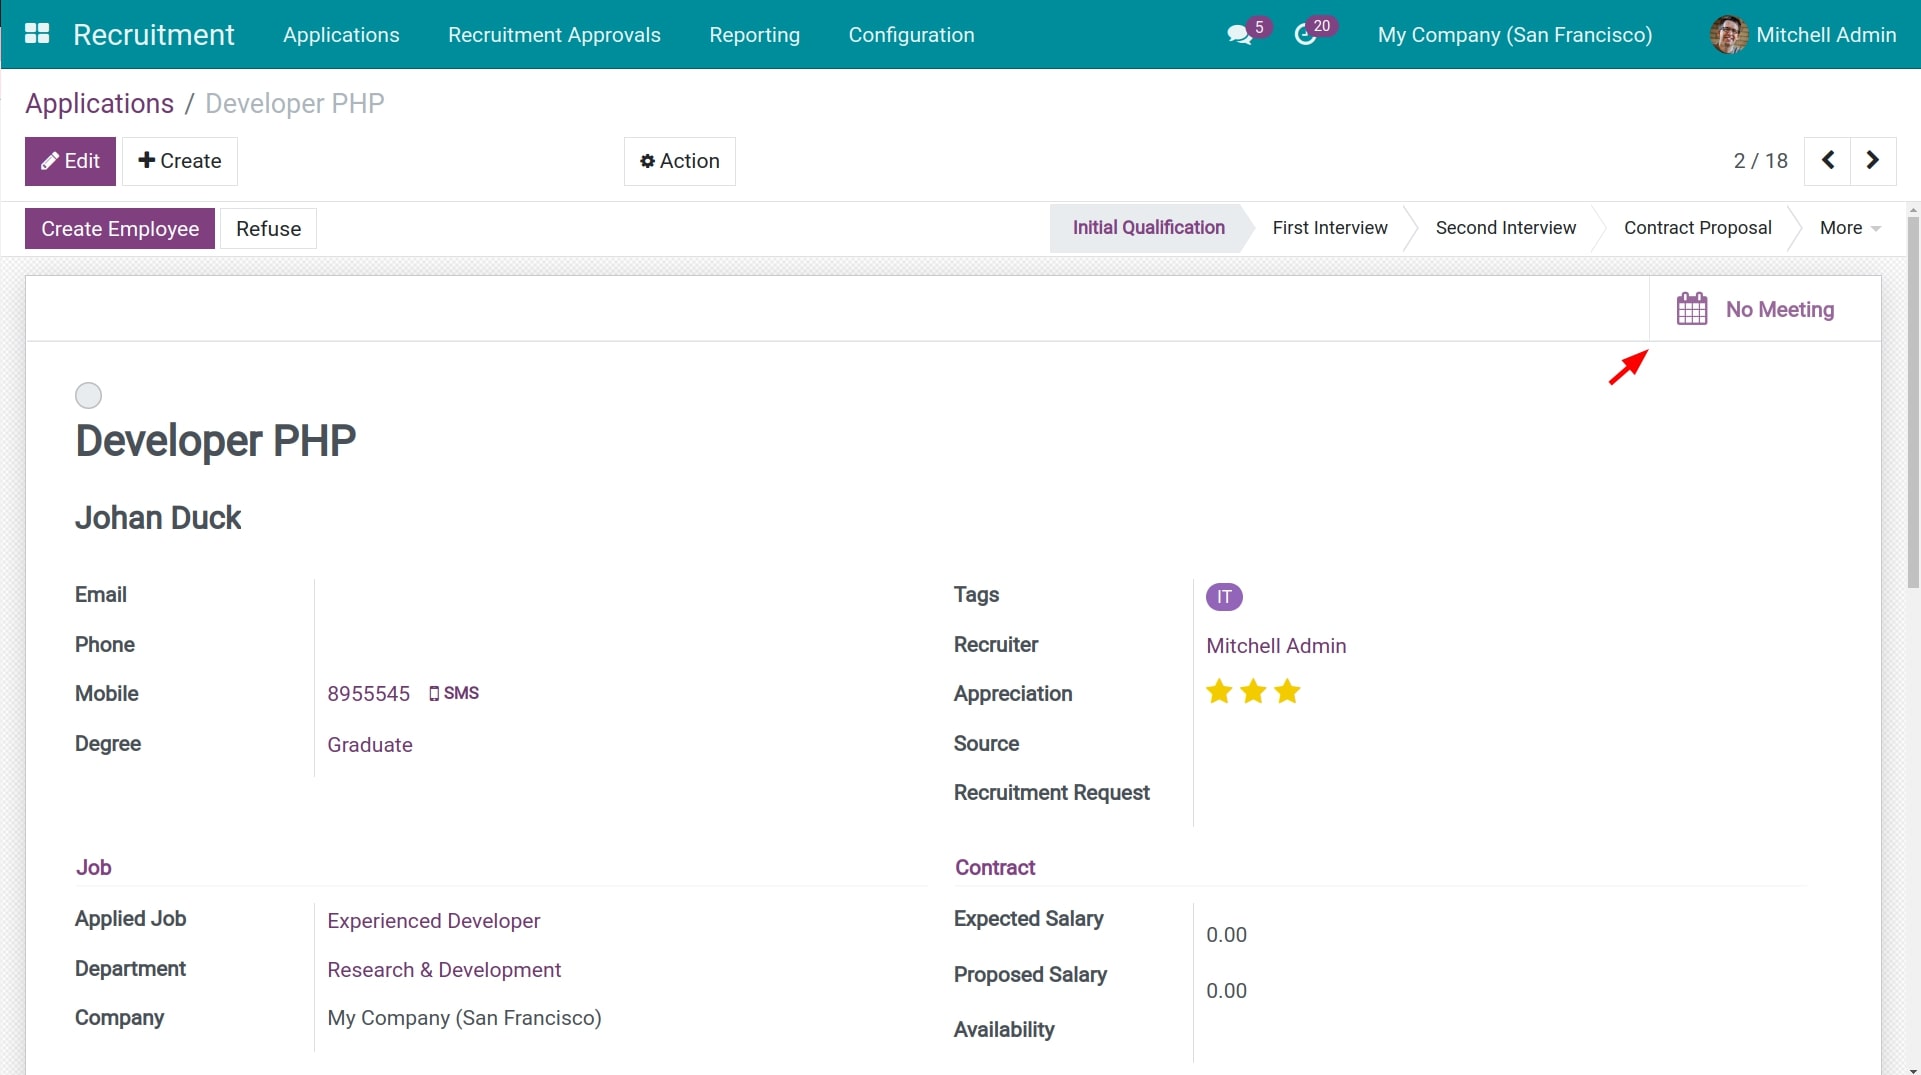
By clicking No Meeting, you also negative to the Calendar view.
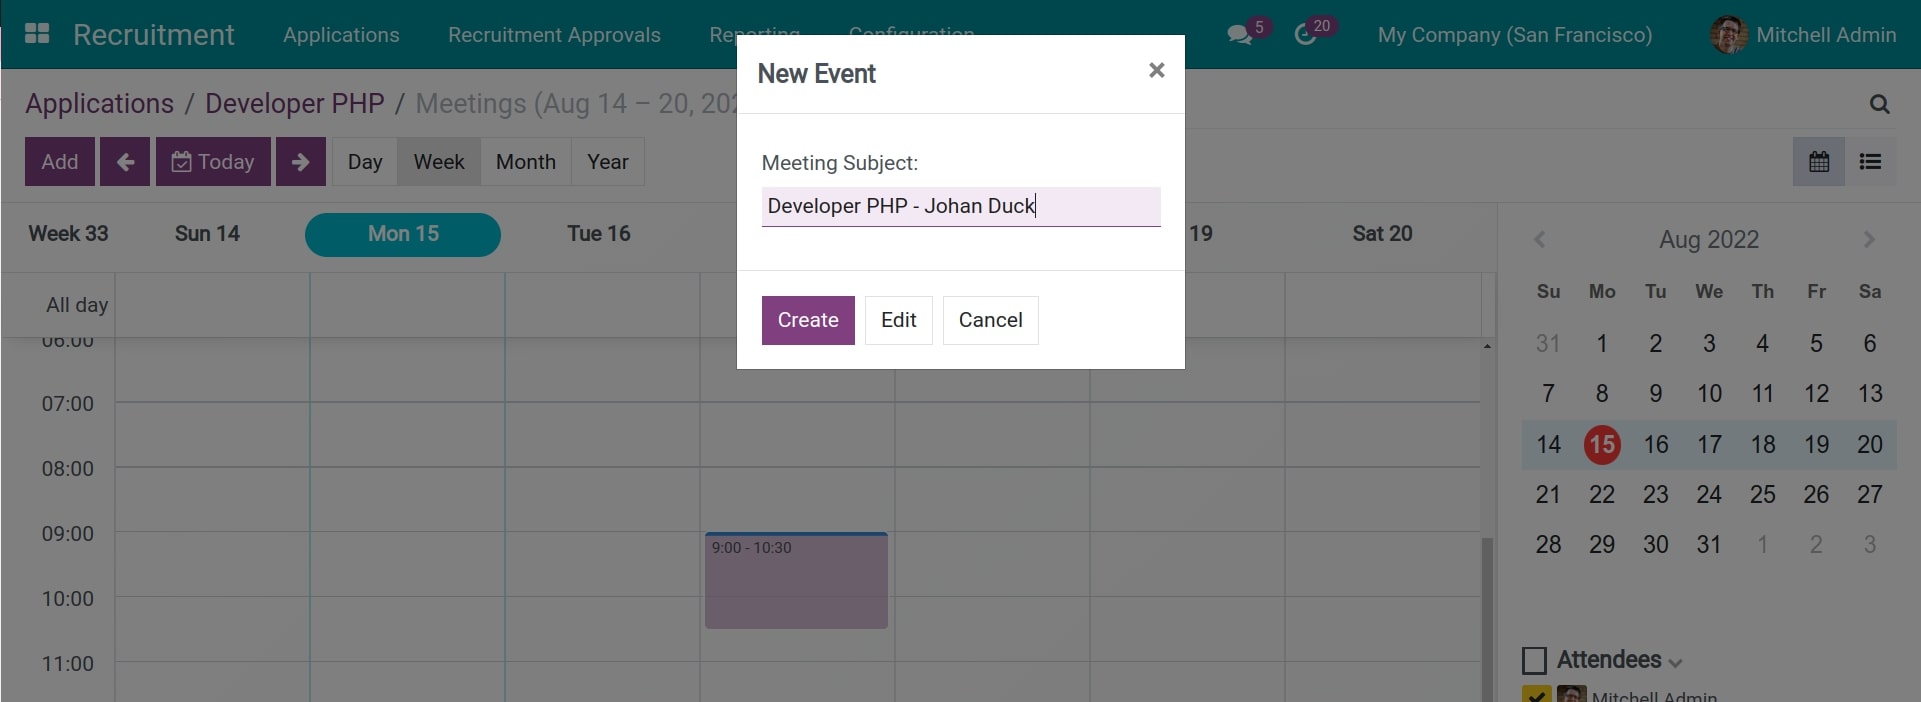
In the Calendar view, you click at the time you want to book a meeting, the system will automatically suggest the name of the interview based on the candidate’s name. This helps to reduce the amount of work as well as to avoid any mistake.
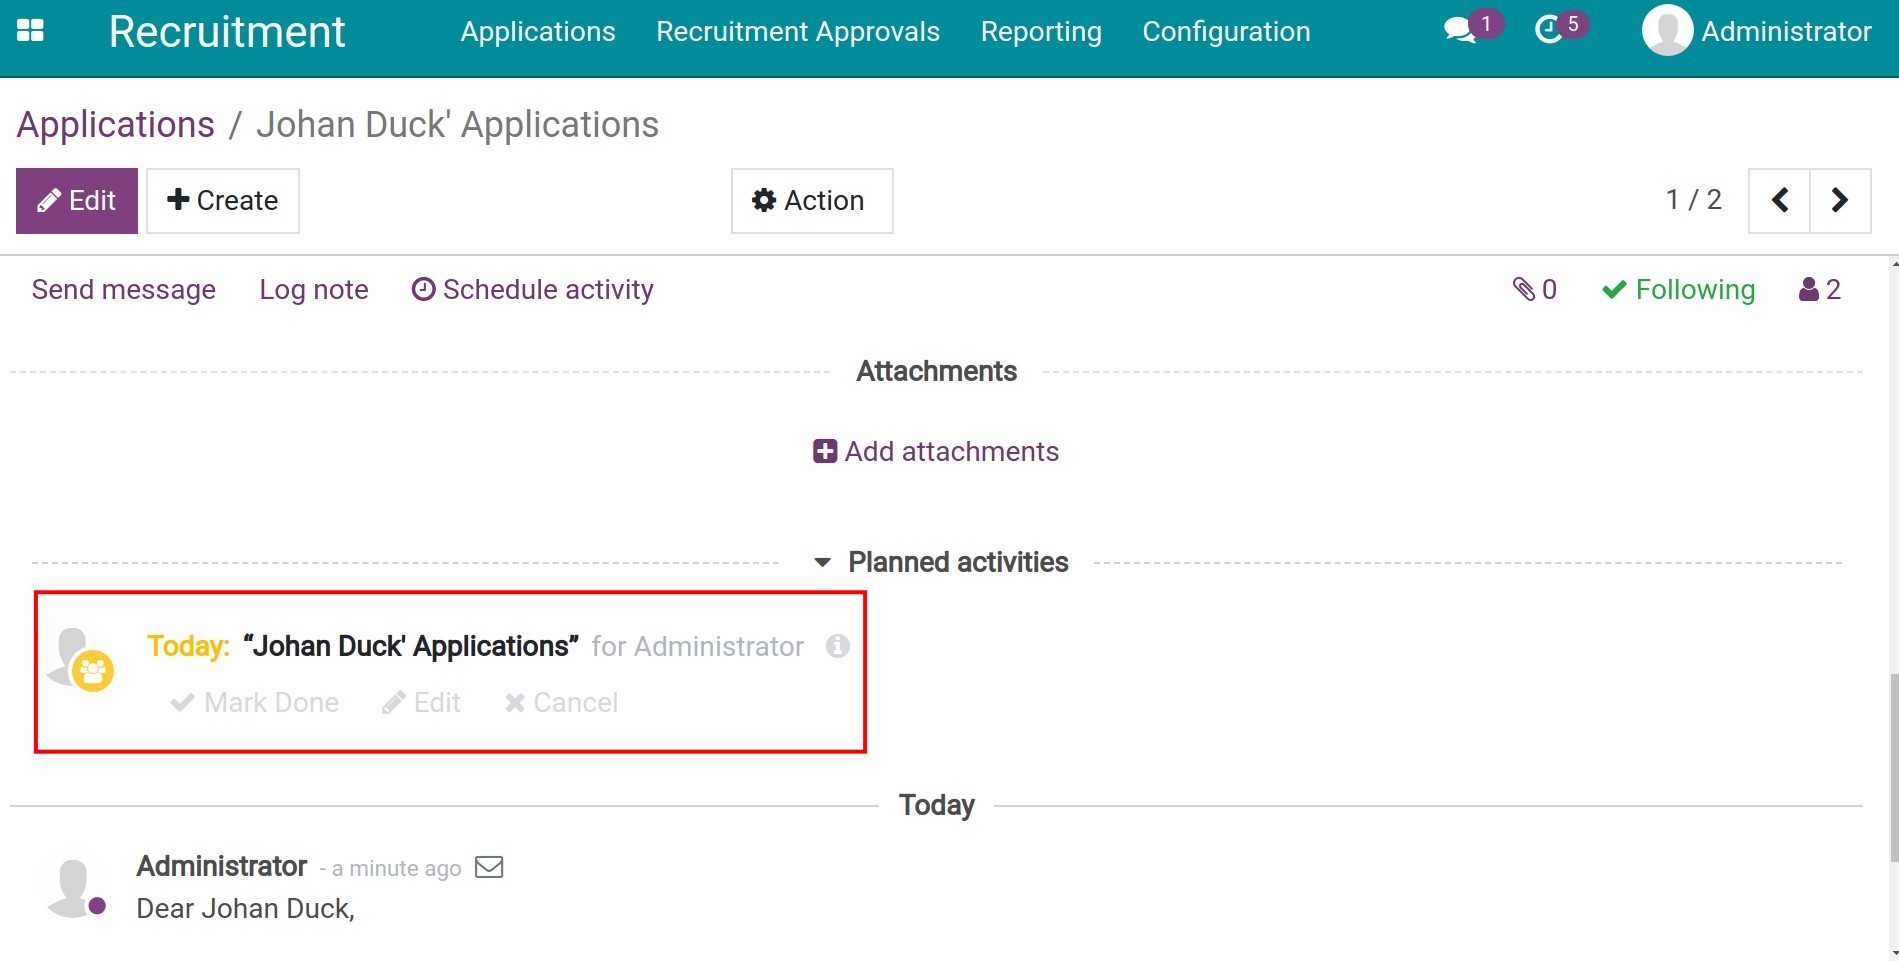
At the Application view, the system creates the corresponding Schedule activity, with the Due Date calculated based on the working days from the current date to the interview date you created. This will help you easily manage your work without missing any information.
From Calendar view: you can refer to the How to book a meeting in odoo post.
Internal exchange and approval
If you want to record comments, assessments, notes, etc. about the applicant or discuss with other members in the recruitment team, click Log note. You enter the content you want to discuss: assessing the applicant’s personality, knowledge and skills, asking managers about next steps, etc., then use the name tag feature (@) to tag anybody for reviewing and commenting.
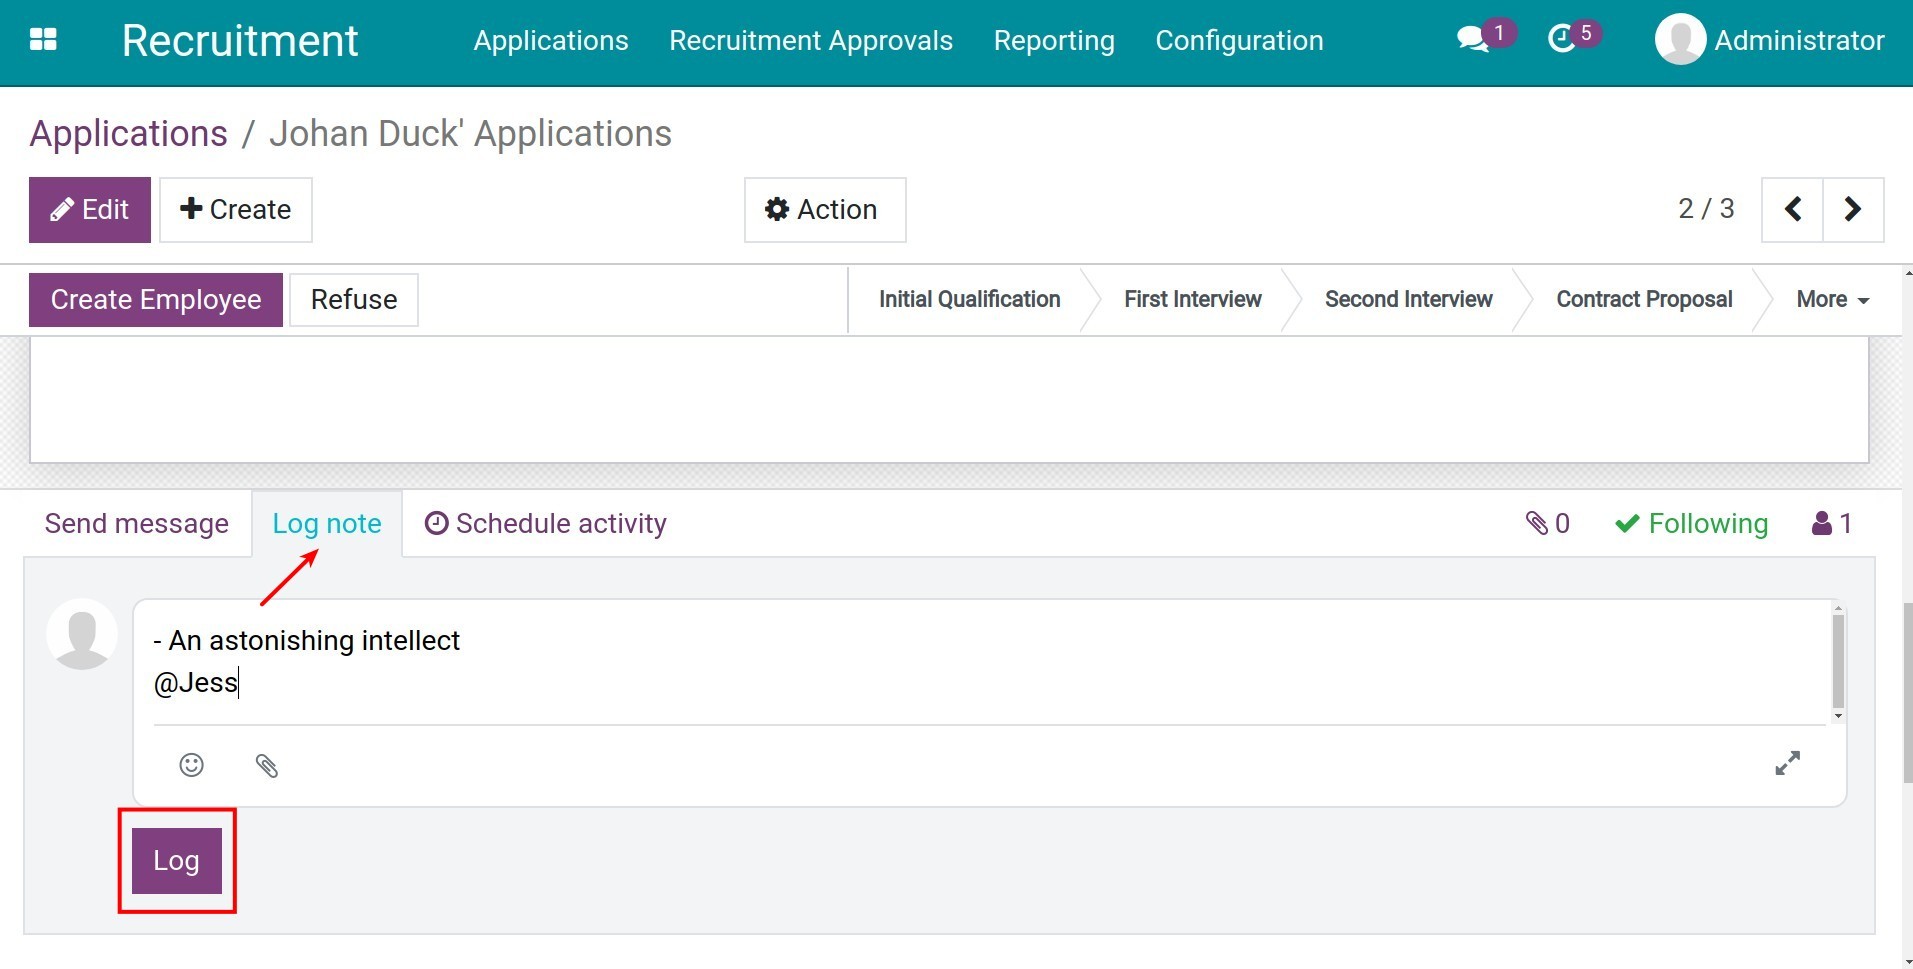
To avoid managers missing out on any tasks, you can use the Schedule activity feature to remind managers to comment.
Application goes through recruitment stages
Before becoming an employee of the company, an applicant will have to go through some recruitment rounds: review application, interview, professional exam, etc. odoo system provides the feature of recording and managing the recruitment stages corresponding to each round. This feature helps the company and HR department to closely follow each applicant, have an overview of the whole recruitment process and get information on what to do next with the applicant.
Requirements
This tutorial requires the installation of the following applications/modules:
Recruitment
Set up stages in the Recruitment module
To set up recruitment stages, you need Activating Developer Mode and have the Administrator access right of the Recruitment module.
Navigate to Recruitment > Configuration > Stages > Create.
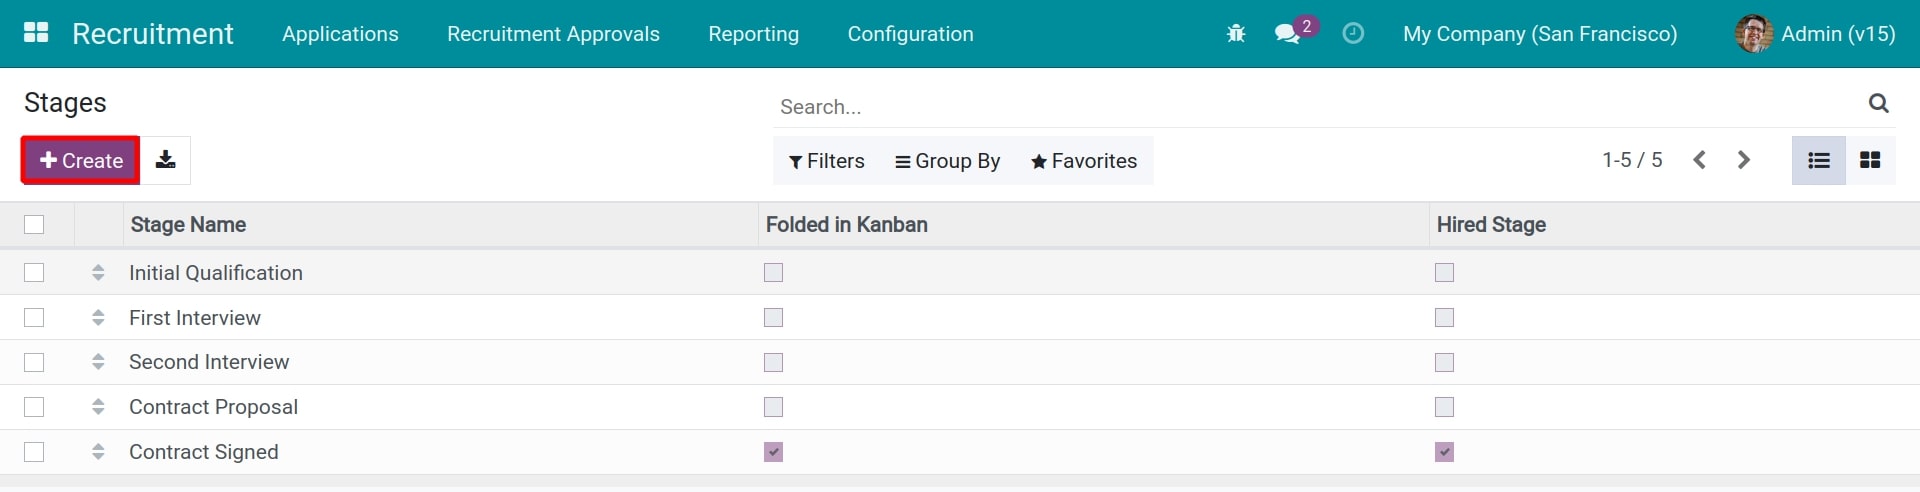
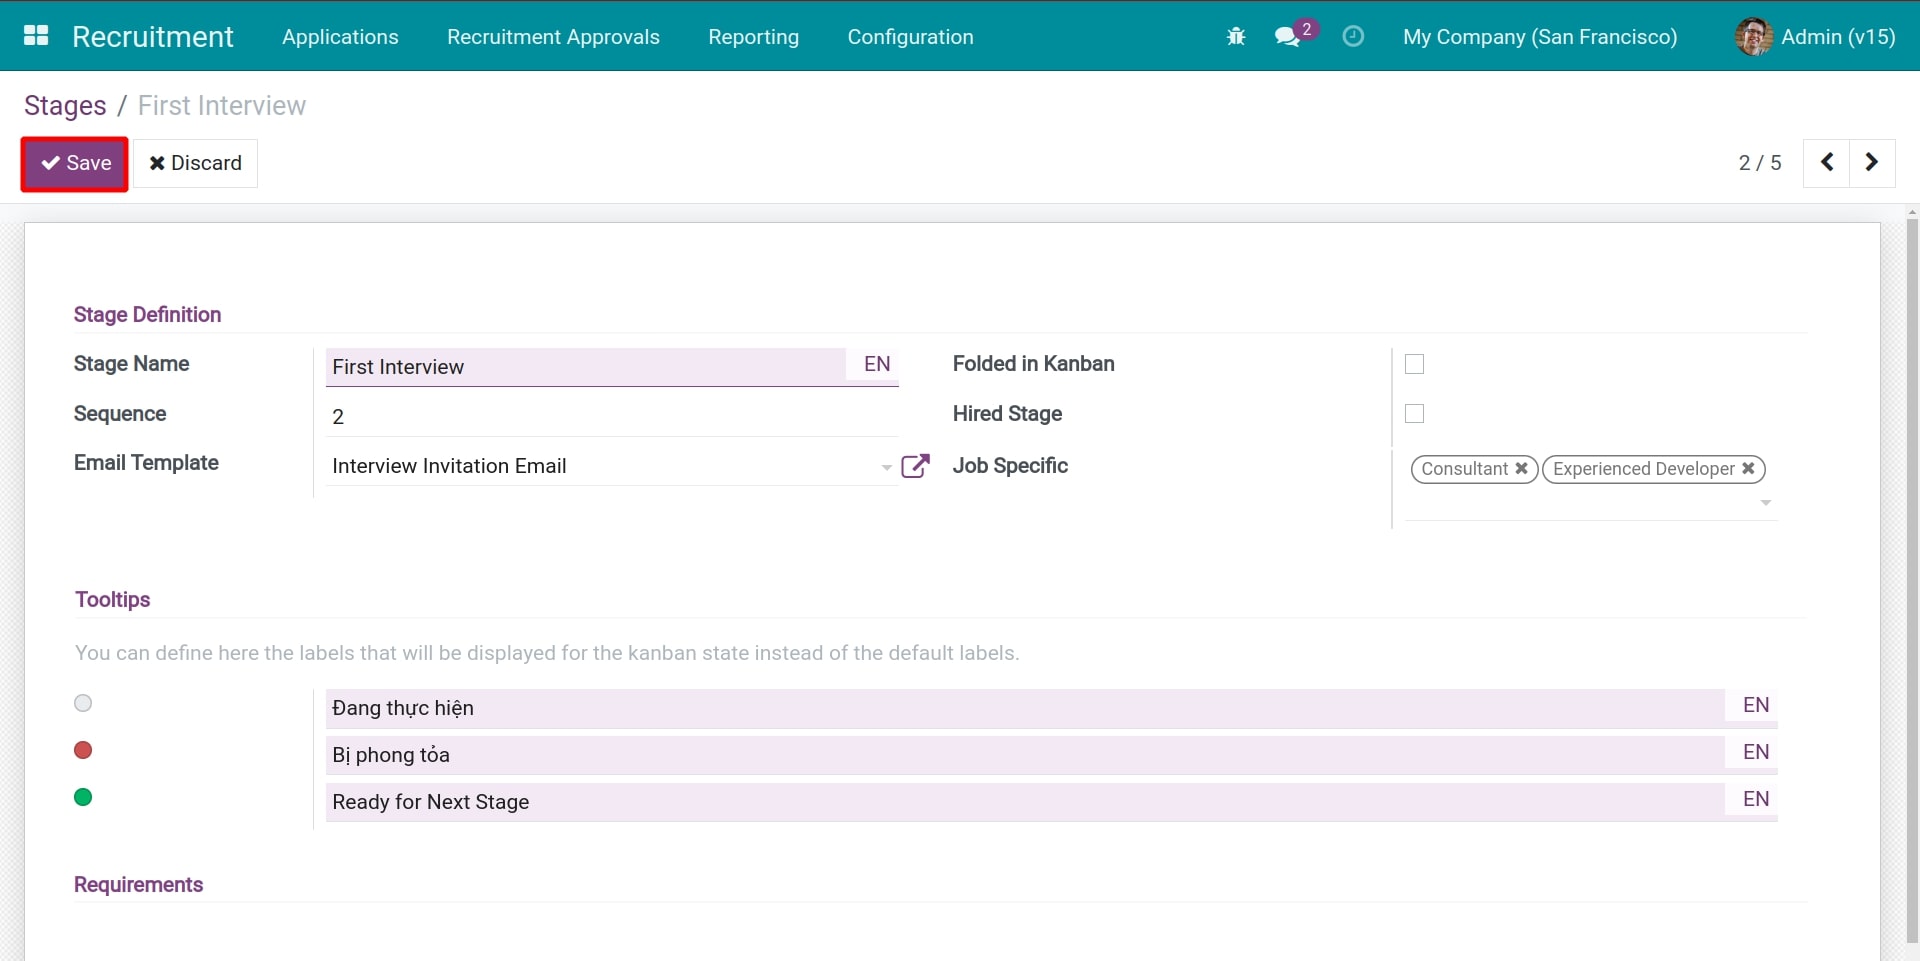
The stages creation will be displayed as the below photo:
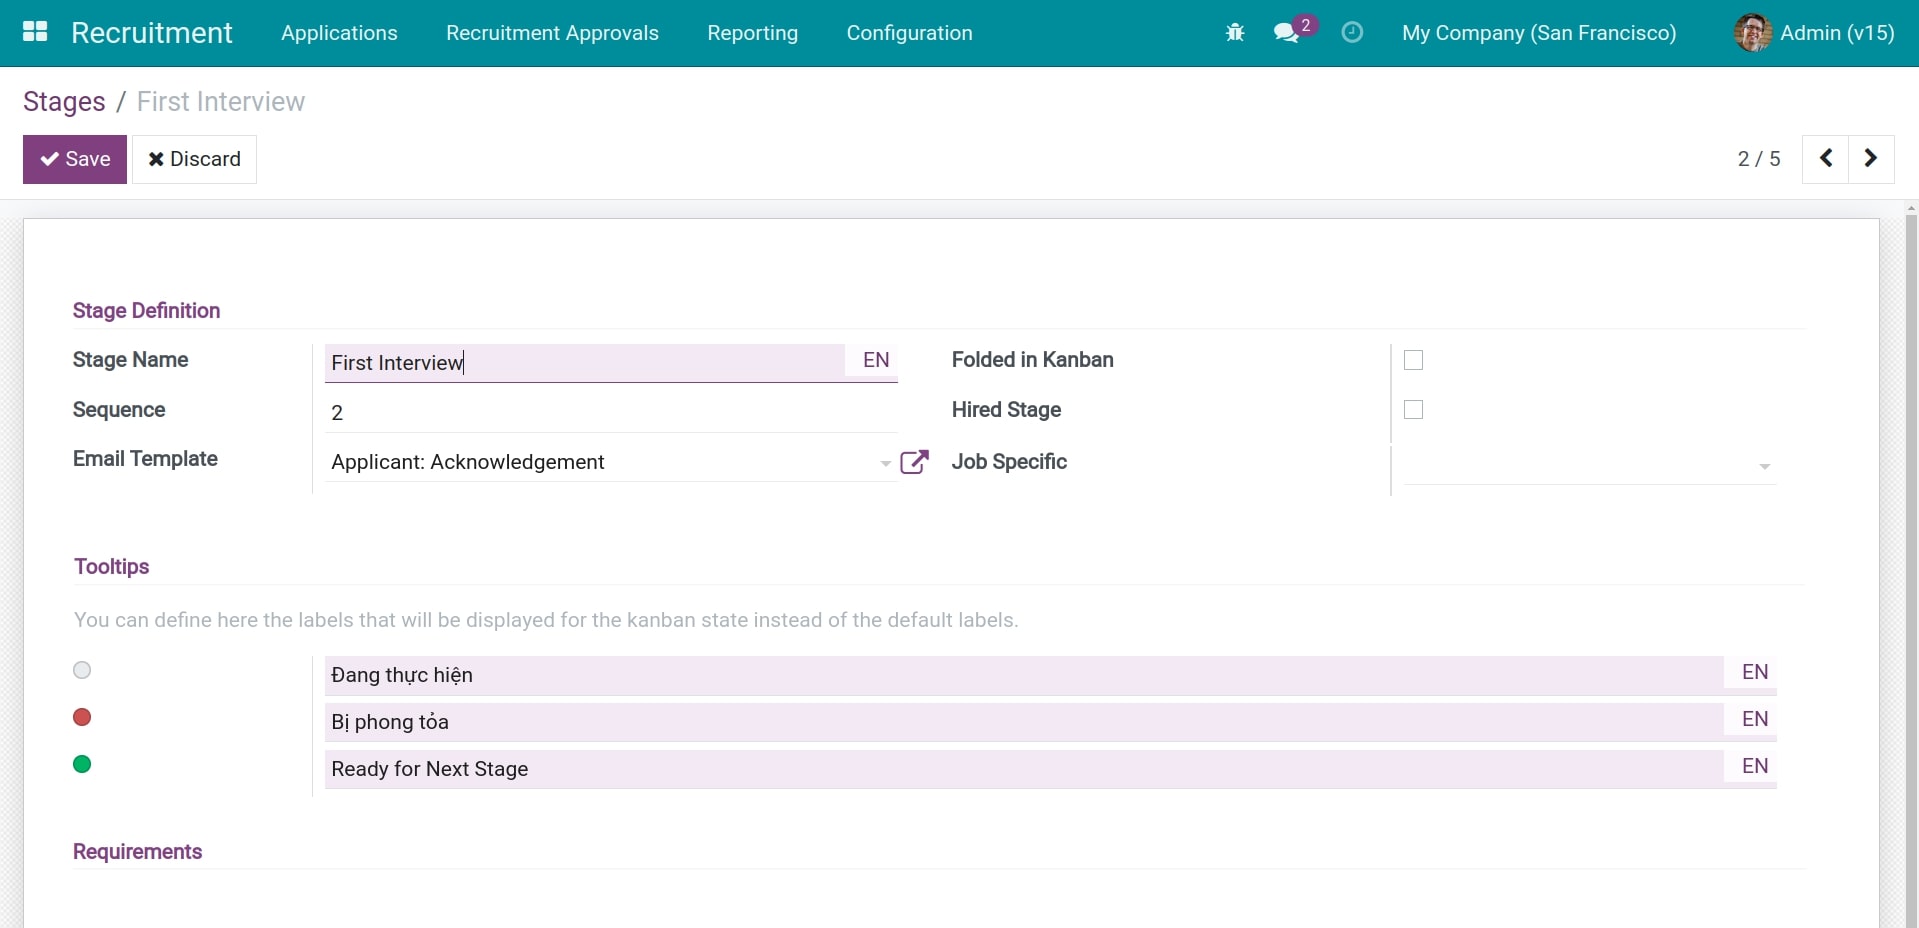
Stage Name: the name of each recruitment stage according to the company’s recruitment process in reality. Keep the stage name relatively short. E.g. Initial assessment, First interview, Professional test.
Sequence: the sequence of the stage. The stage with the lower sequence number will precede the stages with the higher sequence number in the recruitment process. The stages with lower numbers will precede the stages with higher numbers in the hiring process.
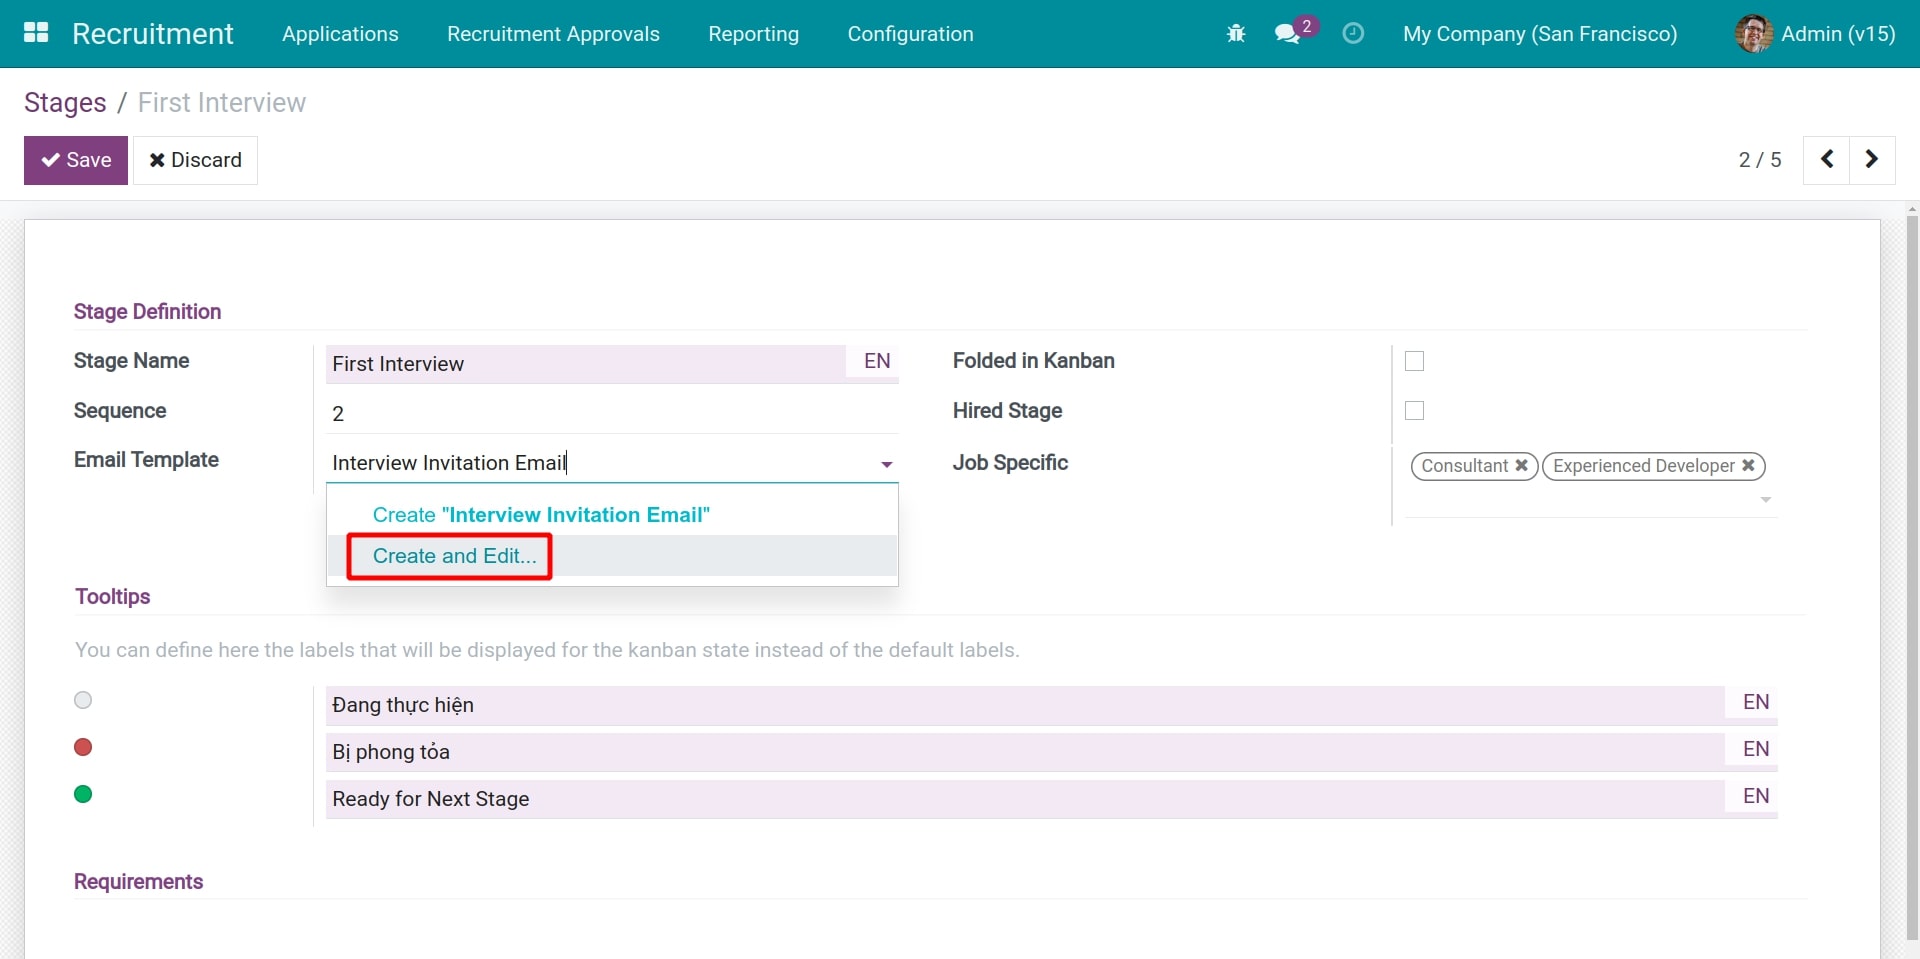
Email Template: the email template will be auto-send to the applicants when they come to this stage. Click on Create and Edit to create a new template or click on the purple arrow icon next to the email template to edit. Follow these instructions if you want to create an email template:
In the Email Template section, click on Create and Edit.
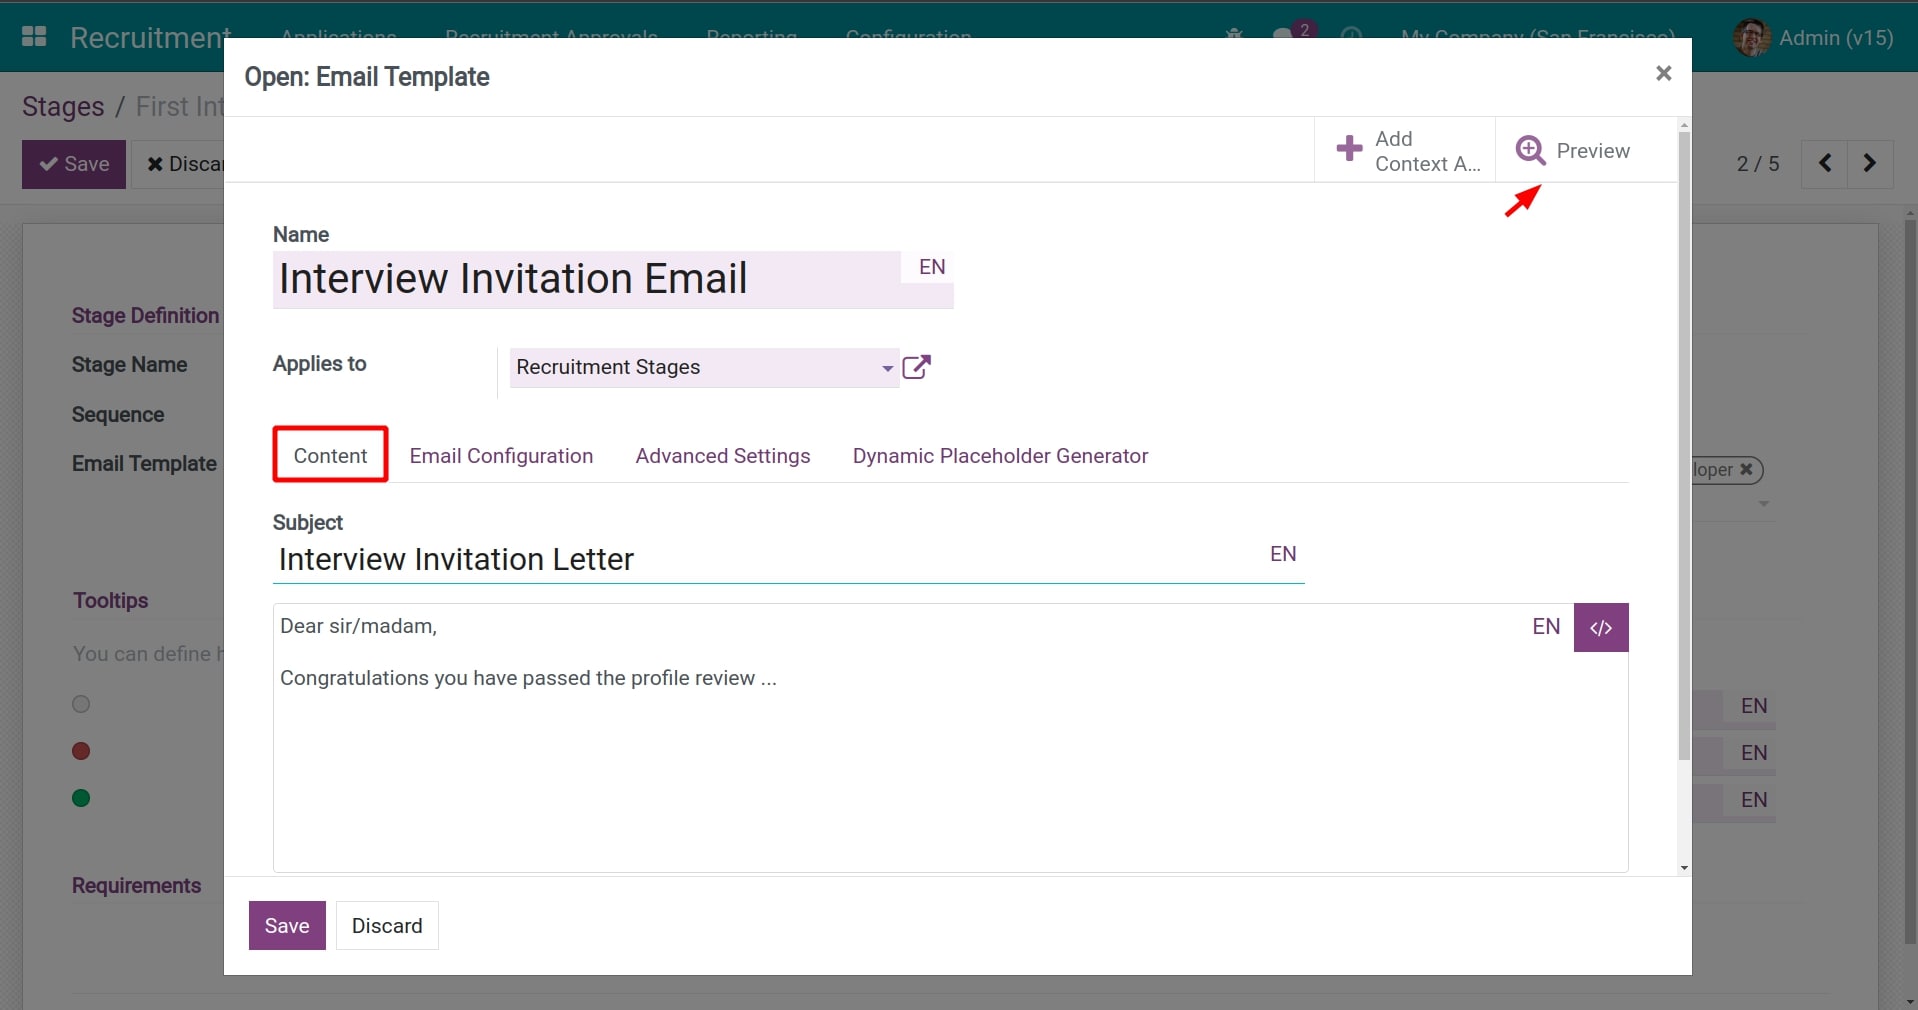
You need to enter the following information when an email template creation window pop out:
Name: name of the email template displayed on the system. You need to choose a name that is easy to understand and suitable for email content for each stage, so that colleagues looking at the name can understand the content inside.
Applies to: the model to which this Email Template is applied, in the case of creating an Email Template that applies to the Recruitment model, you select the Recruitment Stages.
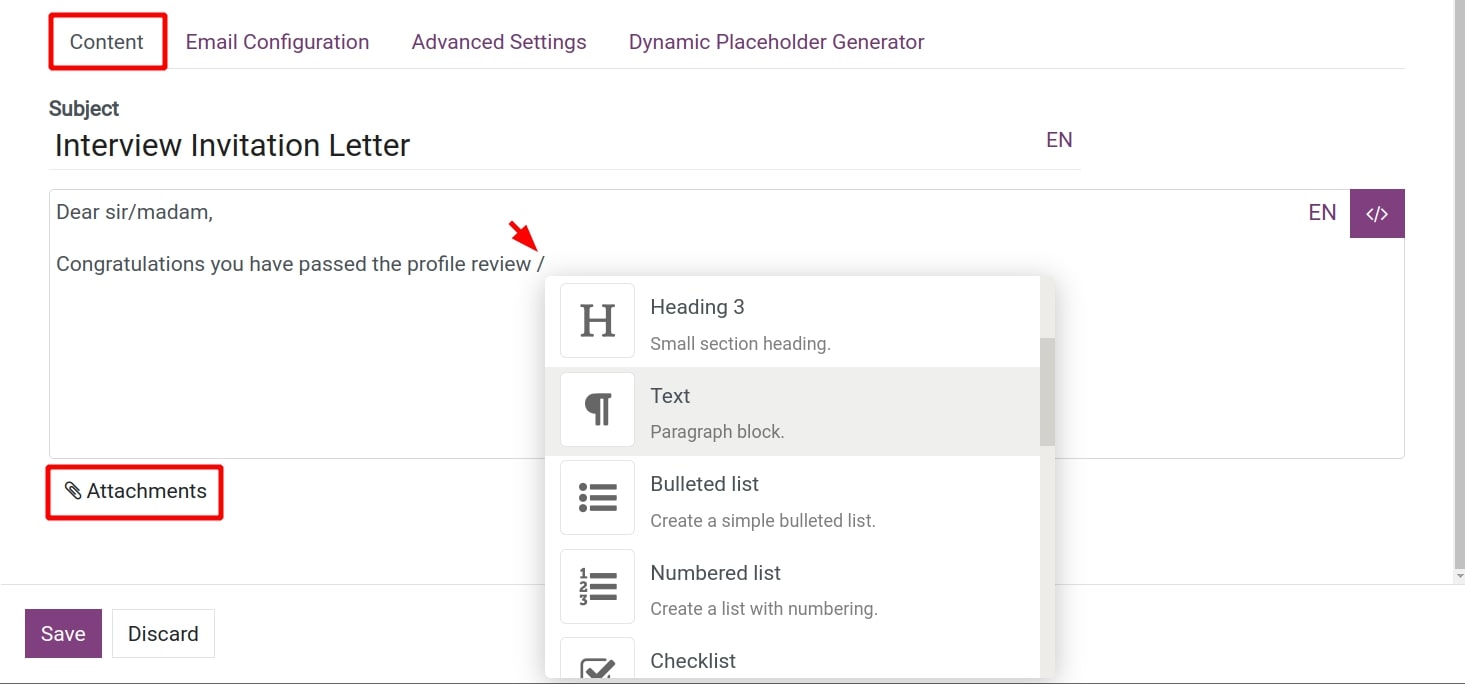
In the Content tab: enter the subject, type / for commands or click on Attachments button to upload to attach the files. All the information configured here is the email content sent to applicants. You also click on Preview to preview the content before it is sent.
After fulfil the above information, click on Save.
Folded in Kanban: check on this item if you want to fold this stage in the form of Kanban when viewing All Applications. This option is often used for the stages where you rarely review the applications. Examples: Contract Signed Stage, Cancel Stage.

Hired Stage: if checked, this stage is used to determine the hire date of an applicant.
Job Specific: job positions are applied in this stage. You could select multiple job positions applied in this stage, or leave this field information blank if it is applied to all job positions.
Tooltips: includes annotation and convention on tag colours of this stage in the Kanban view. E.g. The grey tag is in processing, the red tag is blocked and the green tag is already for the next stage. In the Kanban view, you could use these tag colours to mark each applicant and grasp the realities of the recruitment situation right in the view of the applicants list.

Requirements: enter the requirements for an application to reach this stage. Example requirements of the First Interview stage is the application has passed two approvals.
After fulfil information, click on Save.
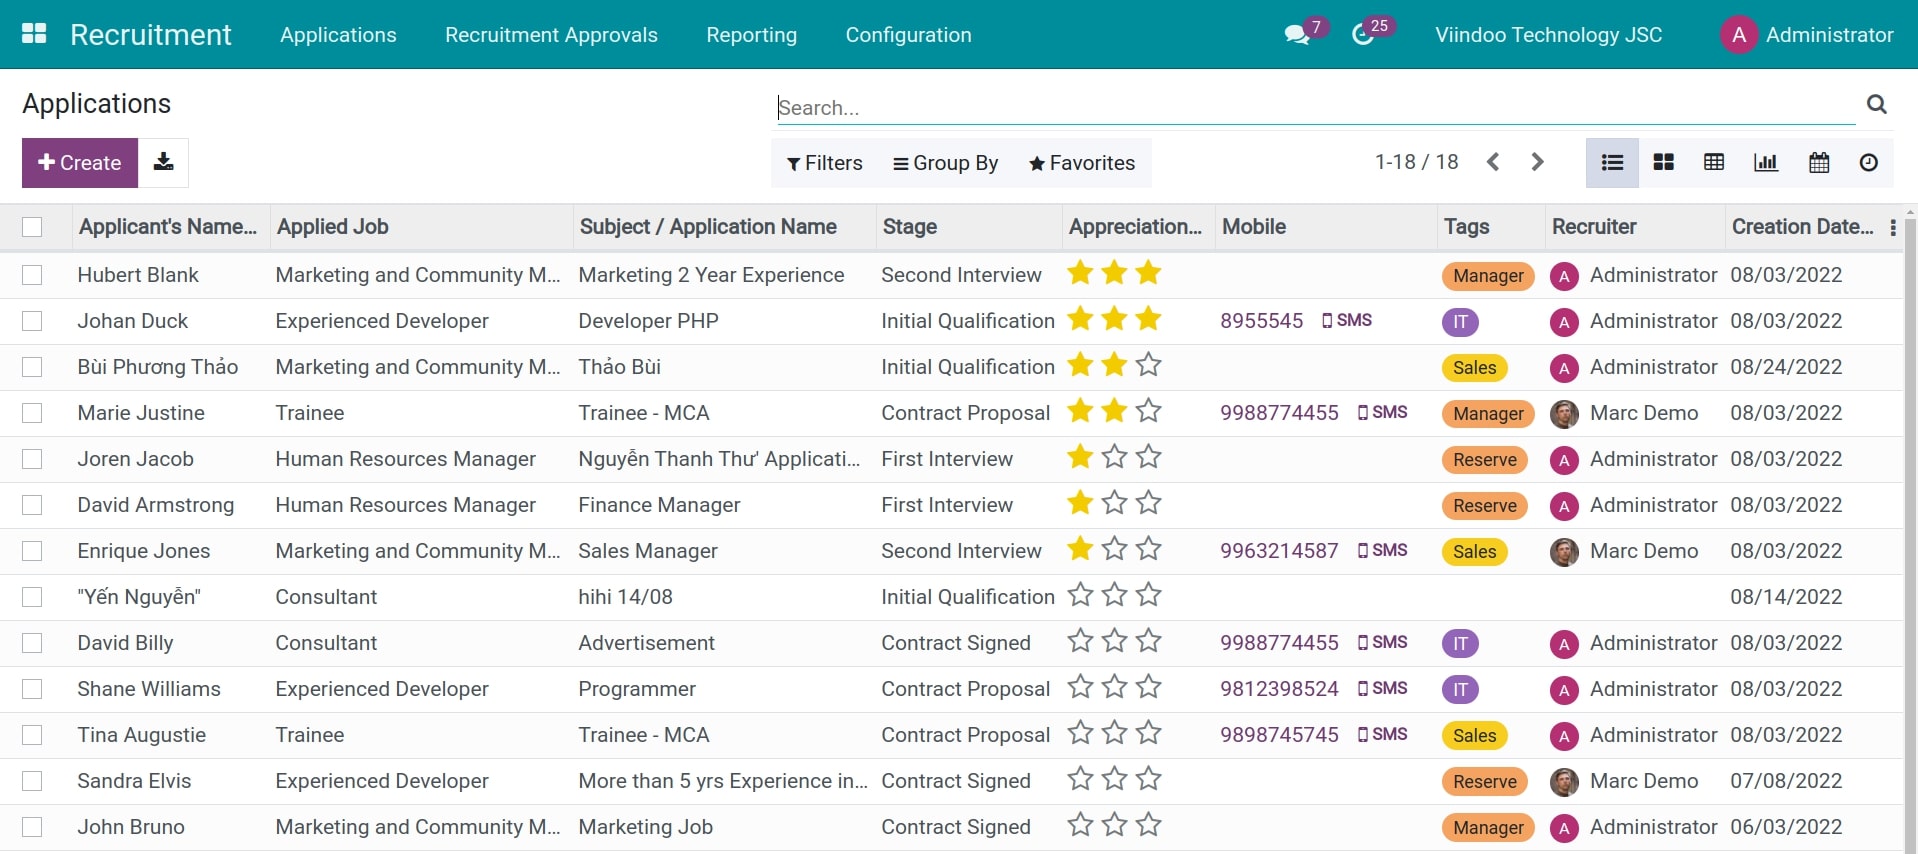
After creating the stages, you could get an overview of which stage an applicant is in Kanban view by navigating to Recruitment > Applications > All Applications.

Move stages for applications
You have to move the application to the next stage when the application pass one round. E.g. After successfully going through the Initial Qualification stage, the application will be moved to the next stage, the First Interview.
You could move the applications to another stage right in the Kanban view of the applications by dragging and dropping between the stages.

Or you also navigate to the application view, click on the stage that needs to be changed.

Recruitment Reports
Recruitment Analysis Reports
To view the recruitment reportings, access to the module Recruitment, navigate to Reporting > Recruitment Analysis.
Requirements
This tutorial requires the installation of the following applications/modules:
Recruitment
View reports in Graph
When you access the Recruitment Analysis view, the default system suggests you view reports in graph mode, group by Creation Date: Month > Jobs. You can turn off this condition to build the report you want.
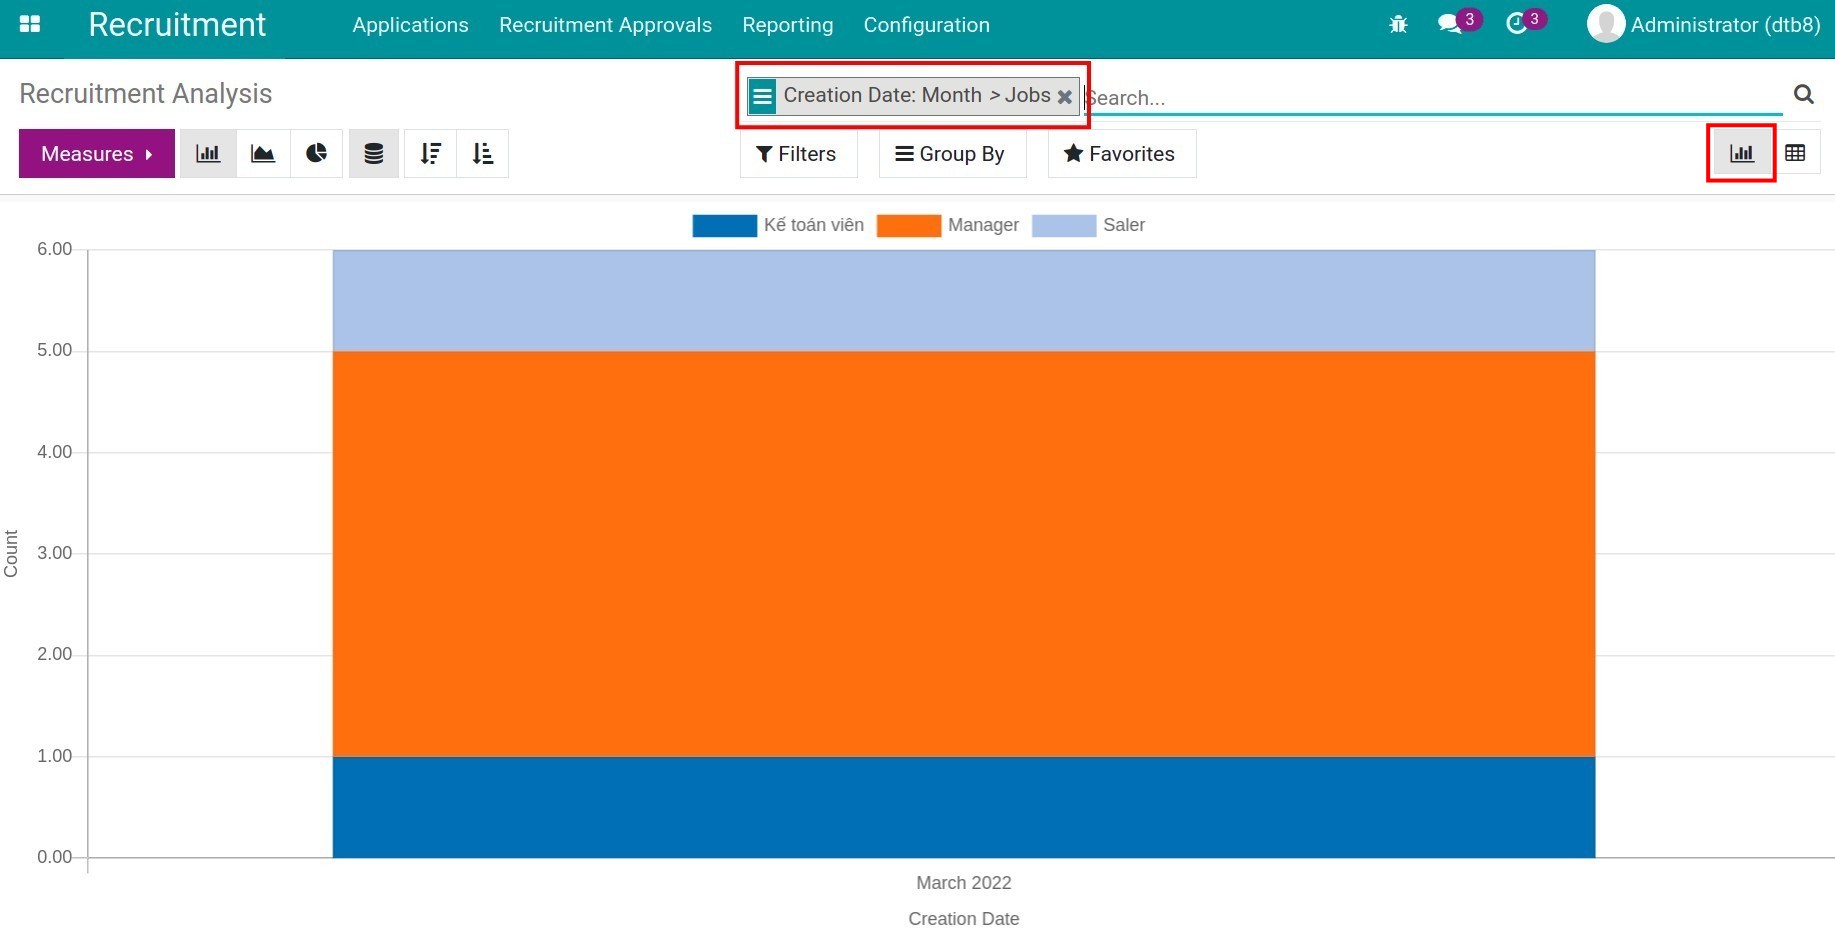
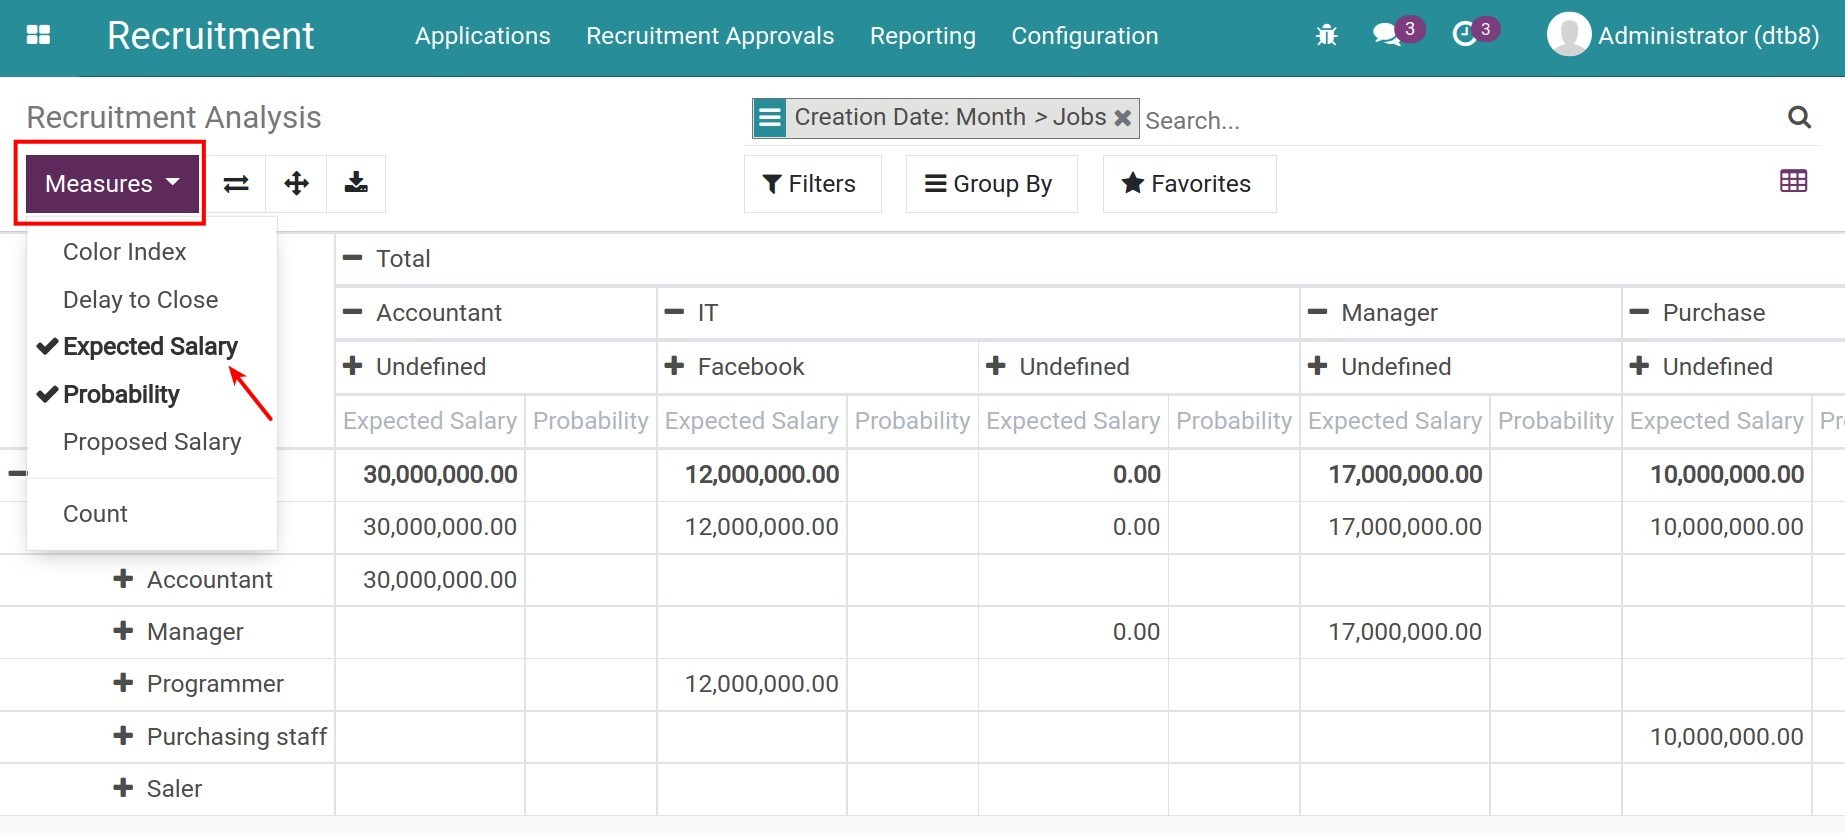
To change the value displayed on the vertical axis of the graph, use the Measures. In the list of measures, you check 1 value: Expected Salary, Proposed Salary, Count,…
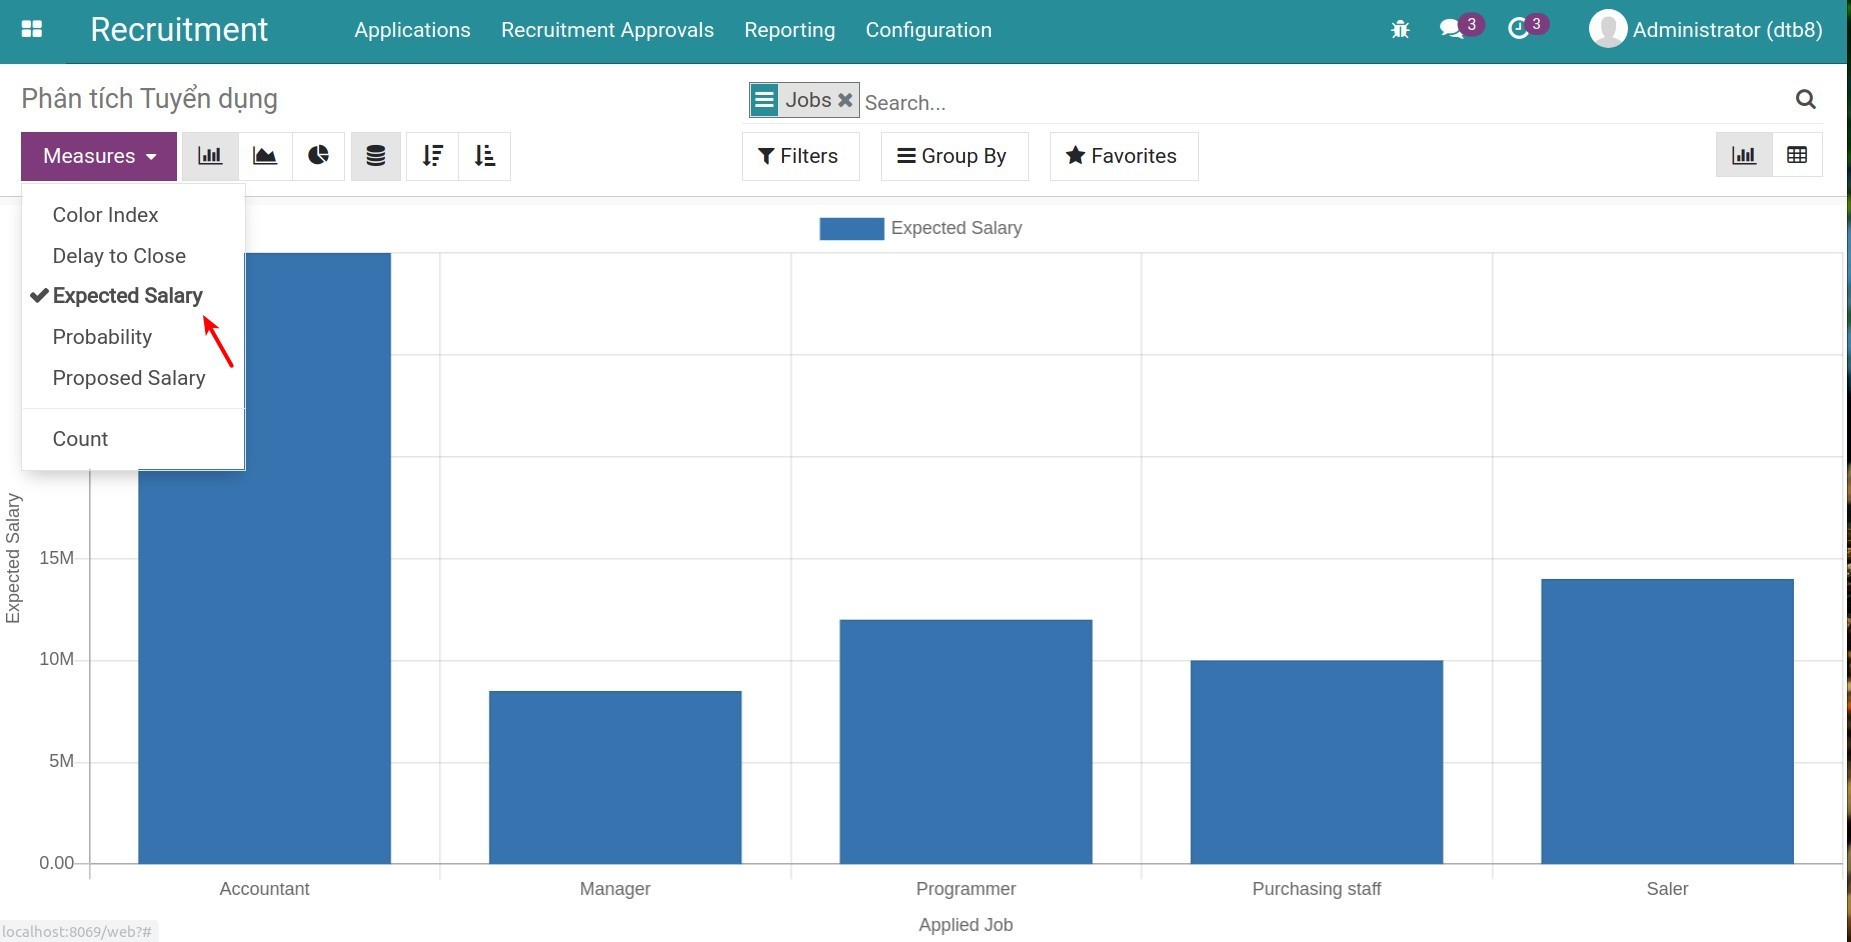
To change the value displayed on the horizontal axis of the graph, you use the Filters, Group By: Department, Stage, Responsible, ect.
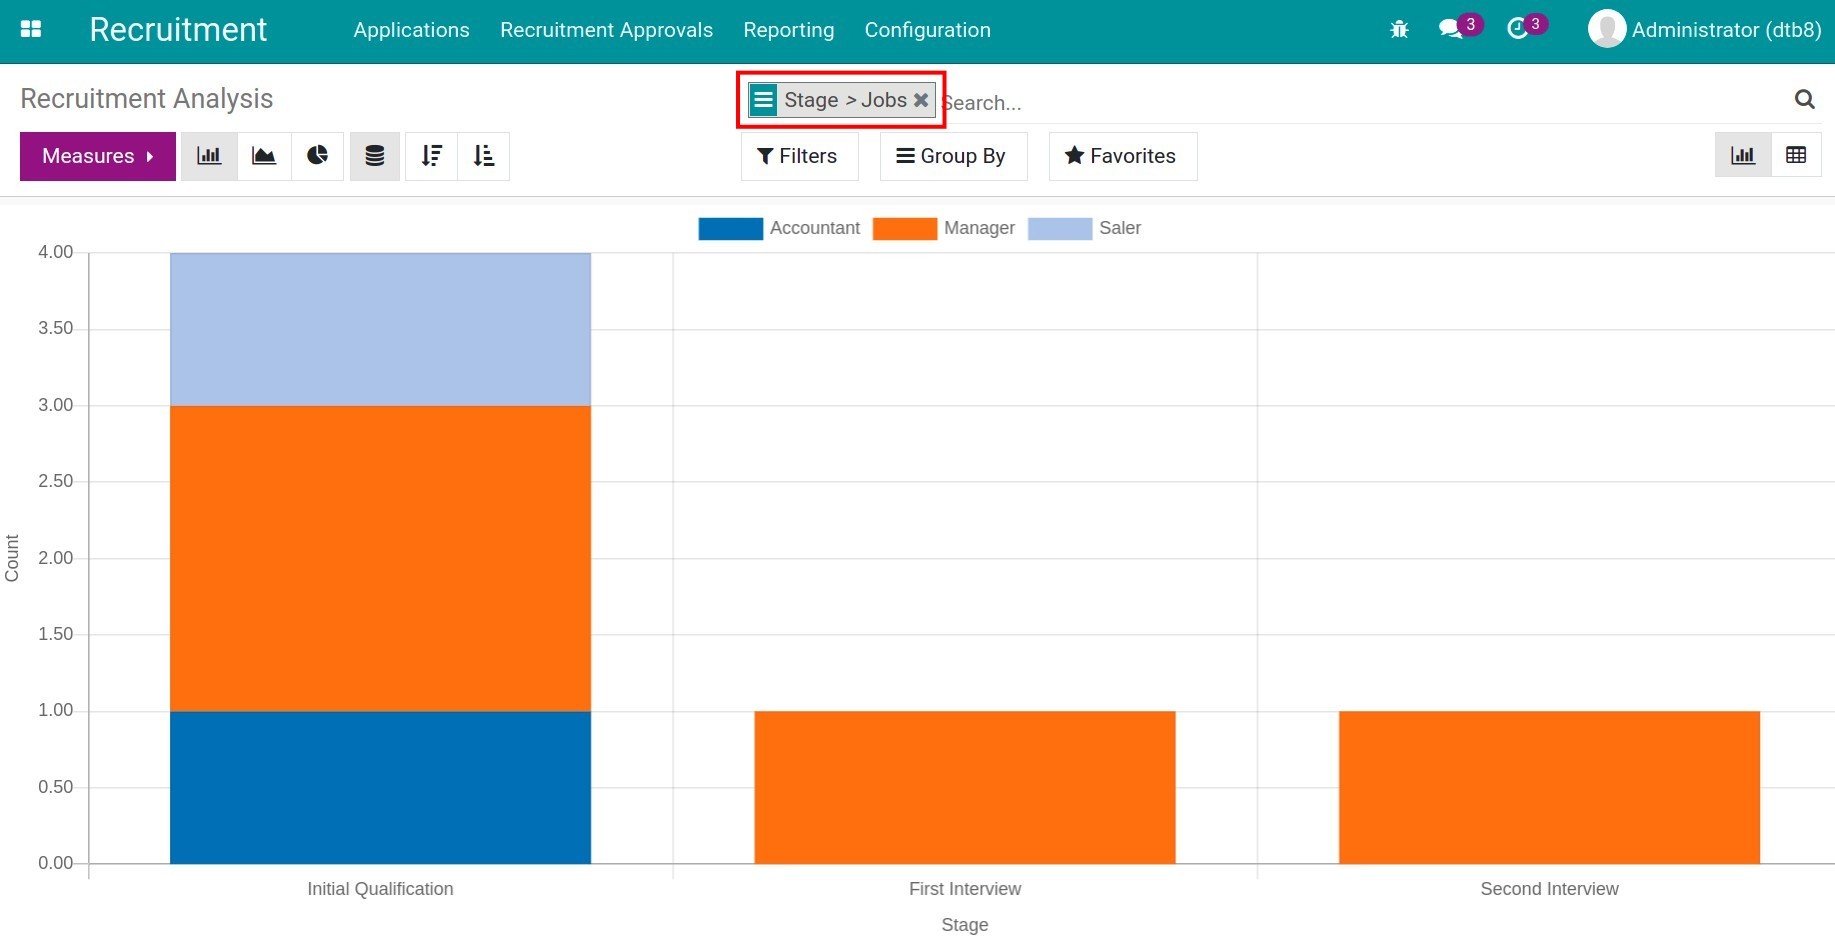
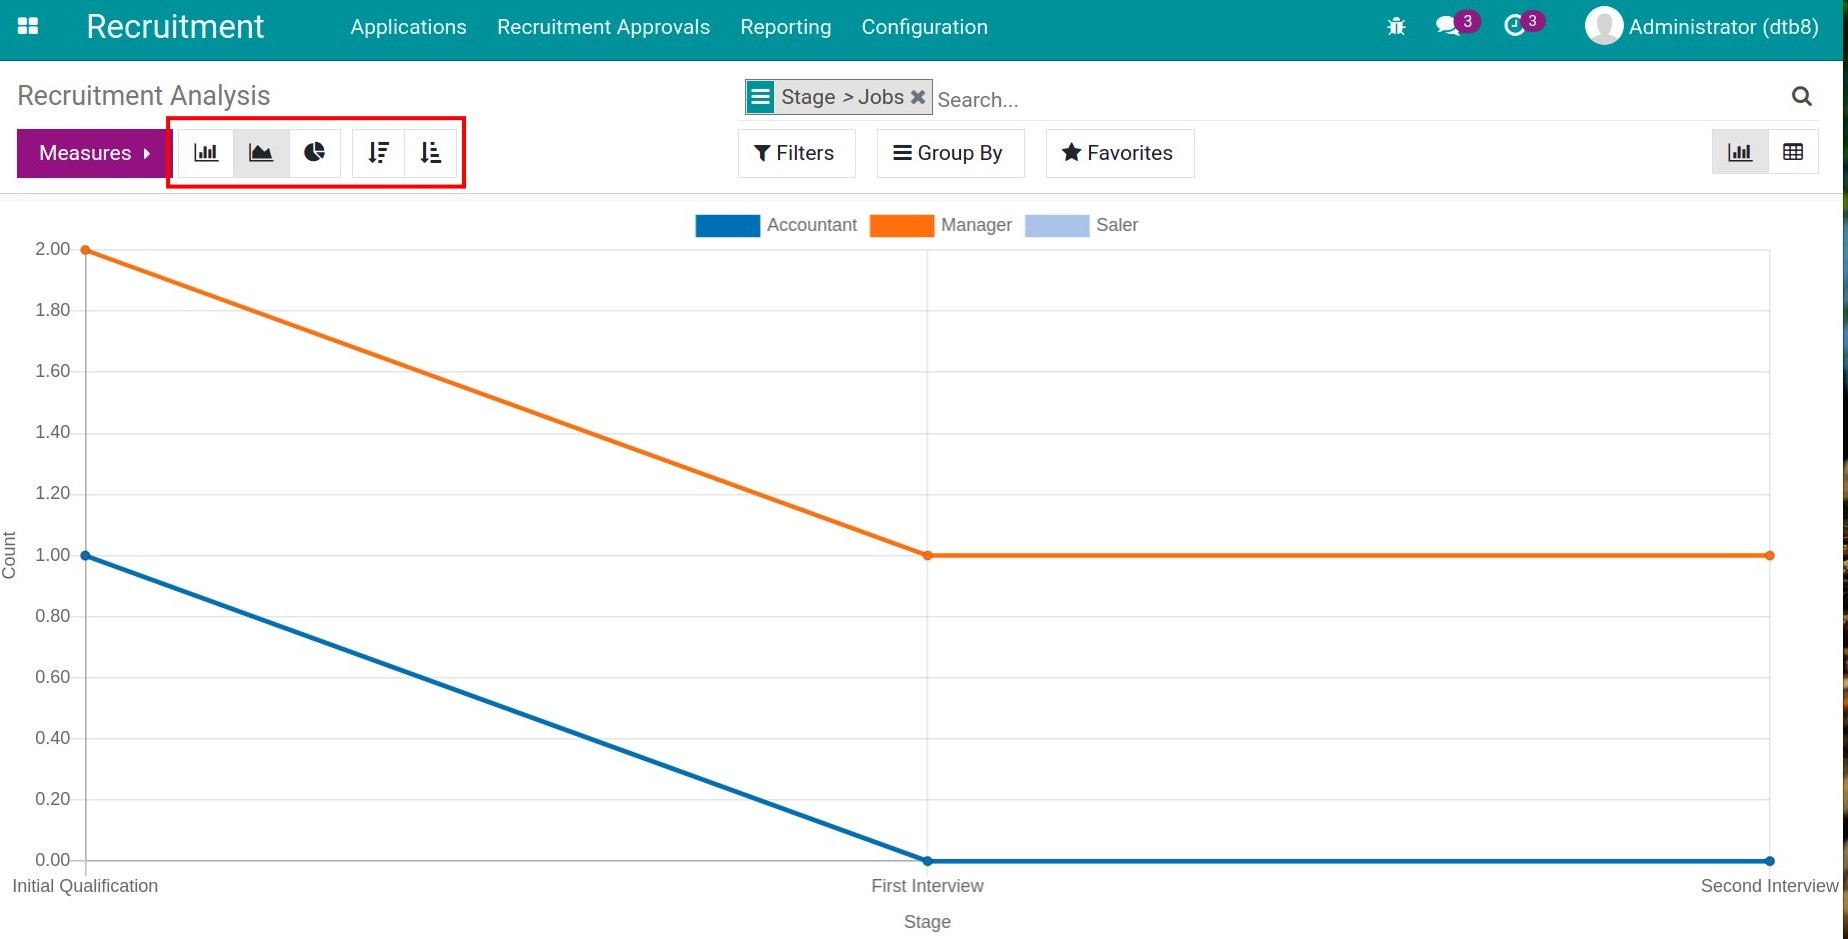
You can choose to view reports in other graph types, or by increasing/decreasing values by clicking the respective icons.
View reports in Pivot
You click the Pivot icon to view reports. The default system suggests you view reports by Creation Date: Month > Jobs. You can click the “+” icon to select the criteria displayed on reports, or click the “-” icon if you want to close those criteria.
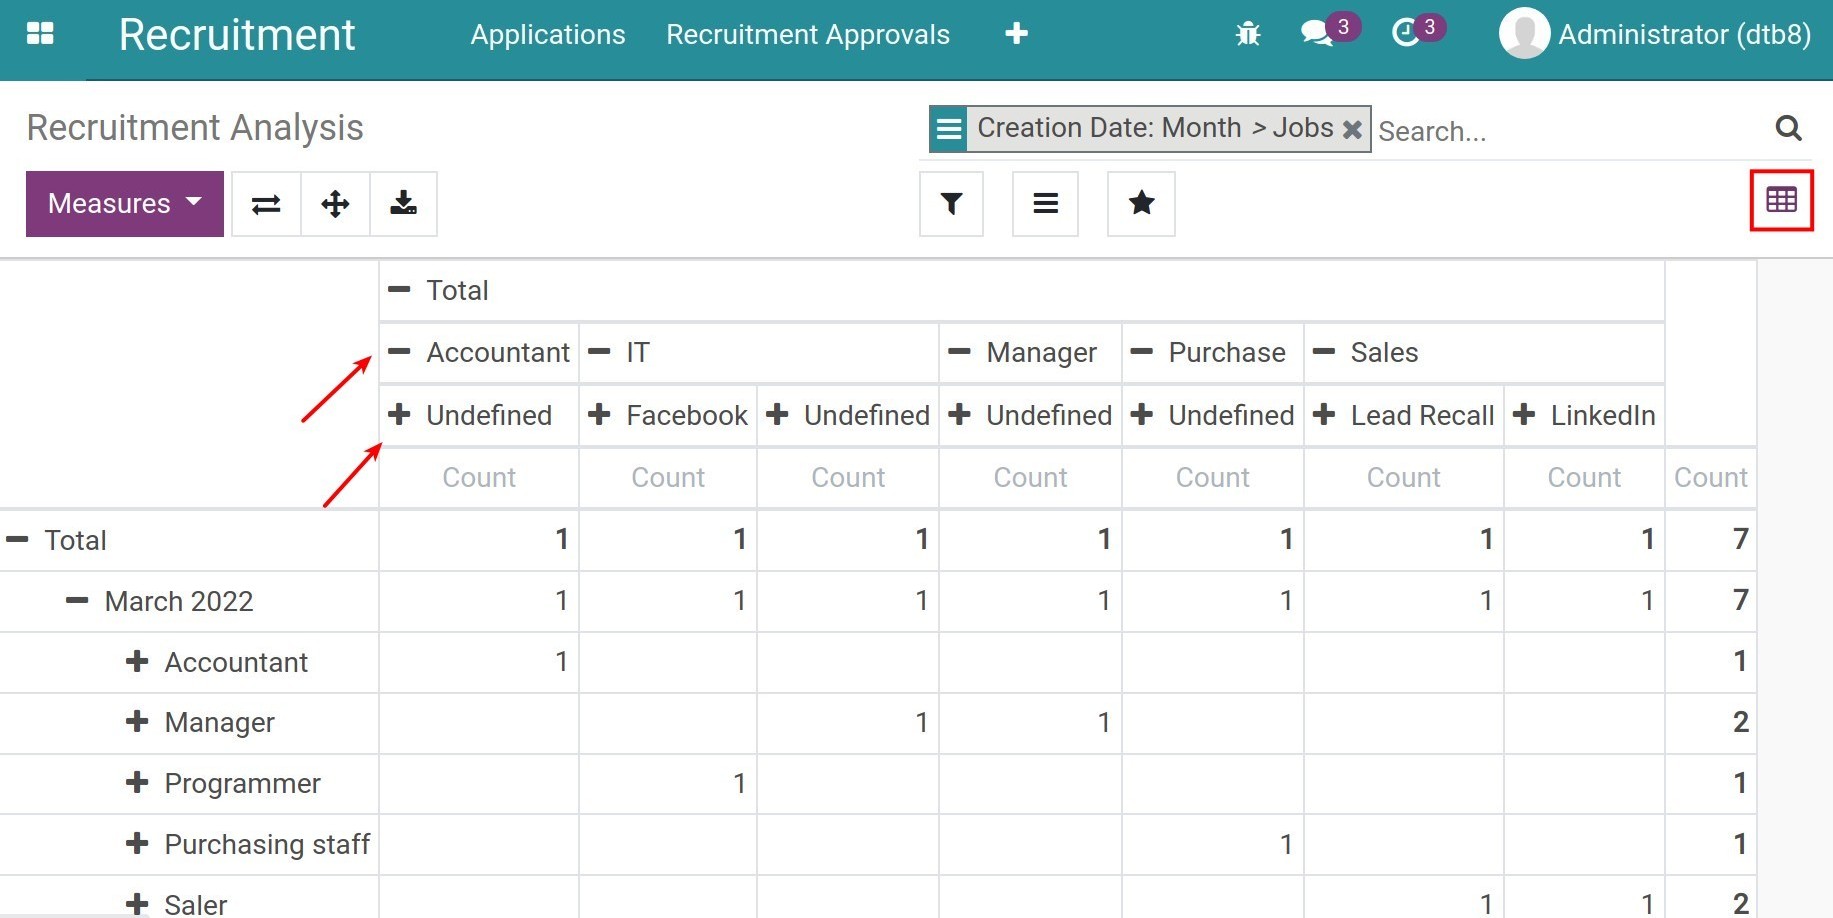
After you click on the “+” icon, the system displays a list of criteria. You click on criteria you want to display on the report: Company, Stage, Department, Responsible, Jobs, ect.
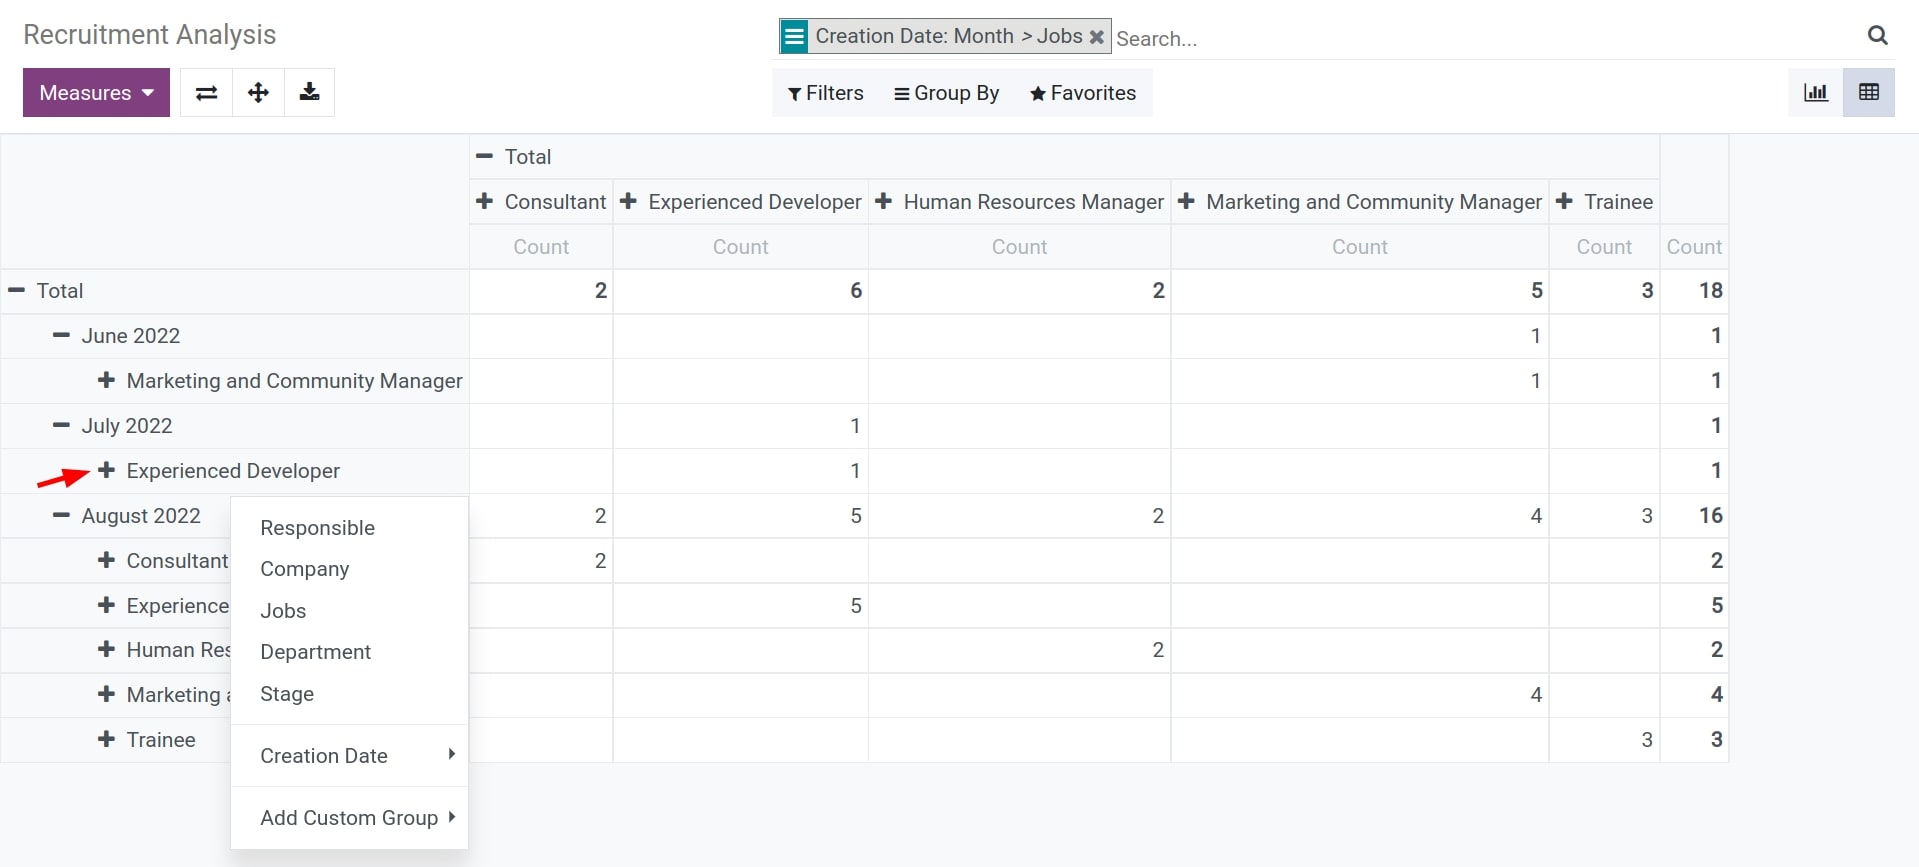
Unlike the Graph type, you can choose from multiple measures for reports. The reports will display according to these measures.