Overview Interface in Time off
Overview Interface in Time off
Requirements
This tutorial requires the installation of the following applications/modules:
iSuite Time-Off
After installing the Time Off application and assigning access rights, you will see this application on the main view. To start using the Time off management in iSuite software, you first need to set up a list of employees and some configurations such as time off types, time off allocations, etc.
See also
How to create Time off Types?
How to create Time off Allocation?
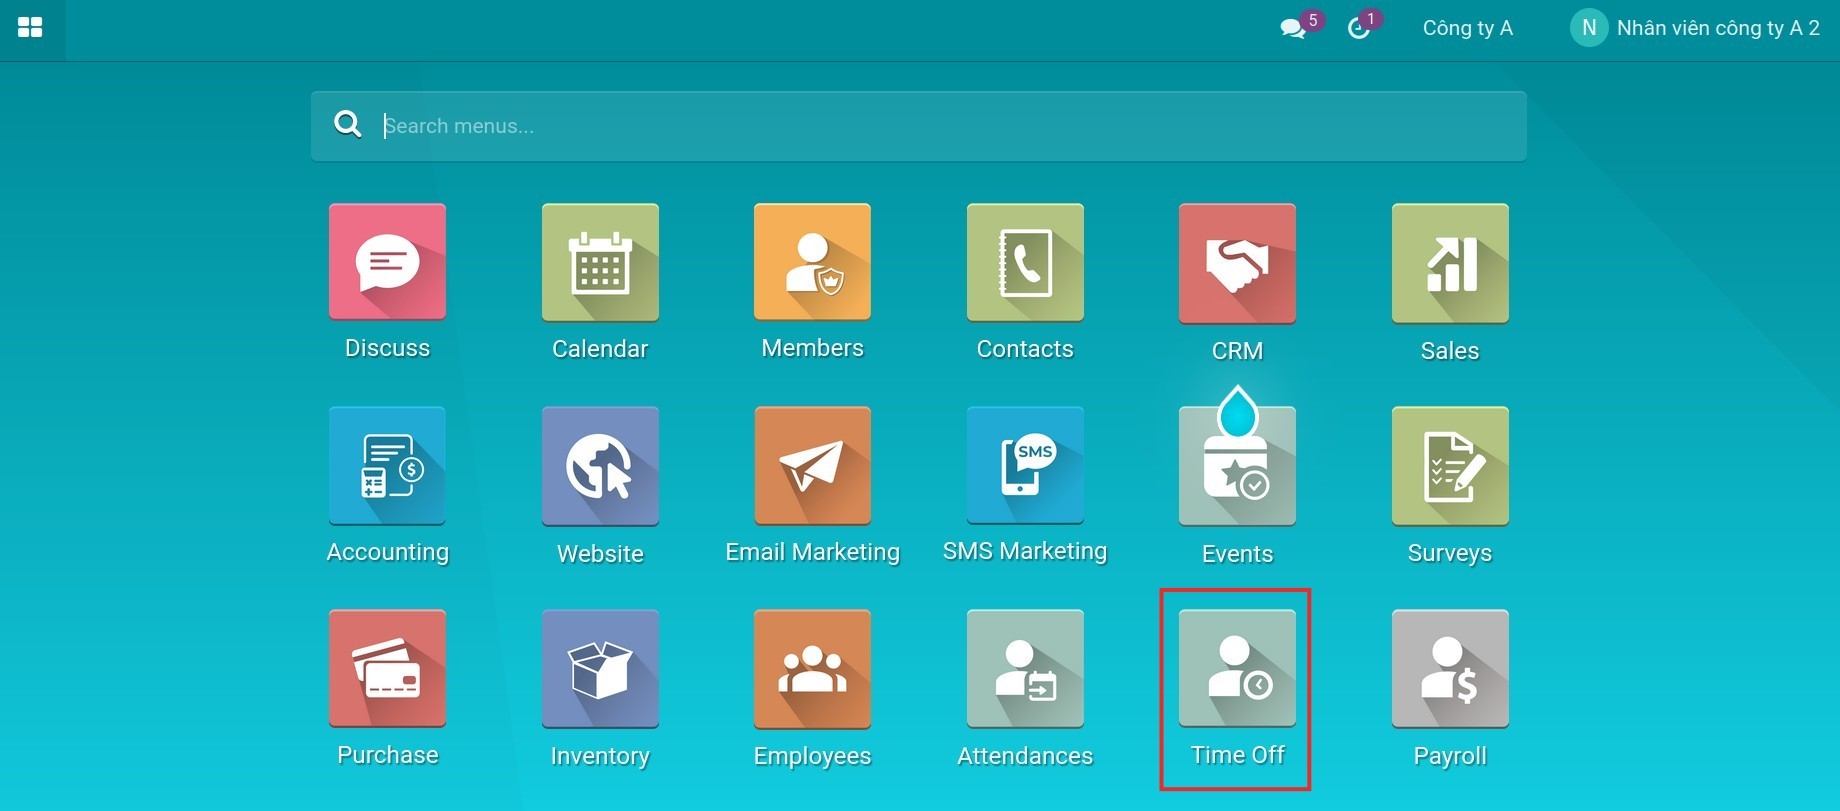
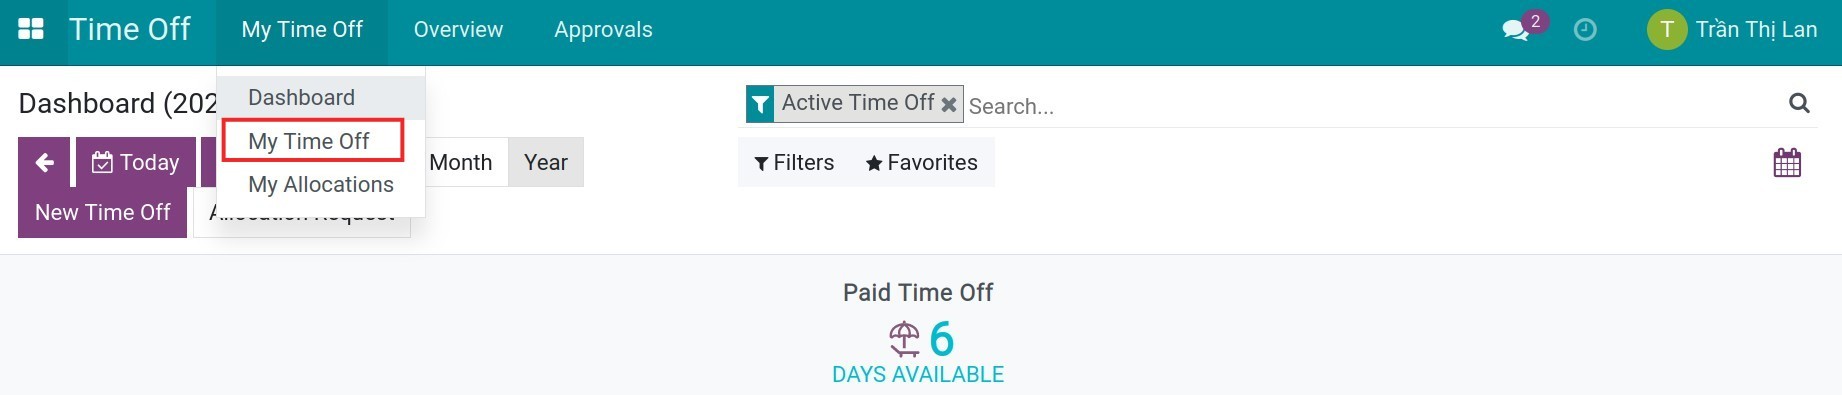
Navigate to the Time Off application to perform time off management operations.
At the menu bar, there are info menus such as My Time Off, Overview, Approvals, Reporting, Configuration. You may see a different number of menus depending on your access rights to this application. There will be submenus under each menu.
My Time Off: You can view your own list of time off requests and allocation requests.
Overview: Display the time off the calendar of all employees in the company.
Approvals: With manager rights, you can create time off request for employees/allocation requests for employees.
Reporting: The administrator of this module can view reports by employees, time off types.
Configuration: Only the administrator of this module can see this menu to configure Time Off Types, Accrual Plans, Public Holidays, Activity Types.

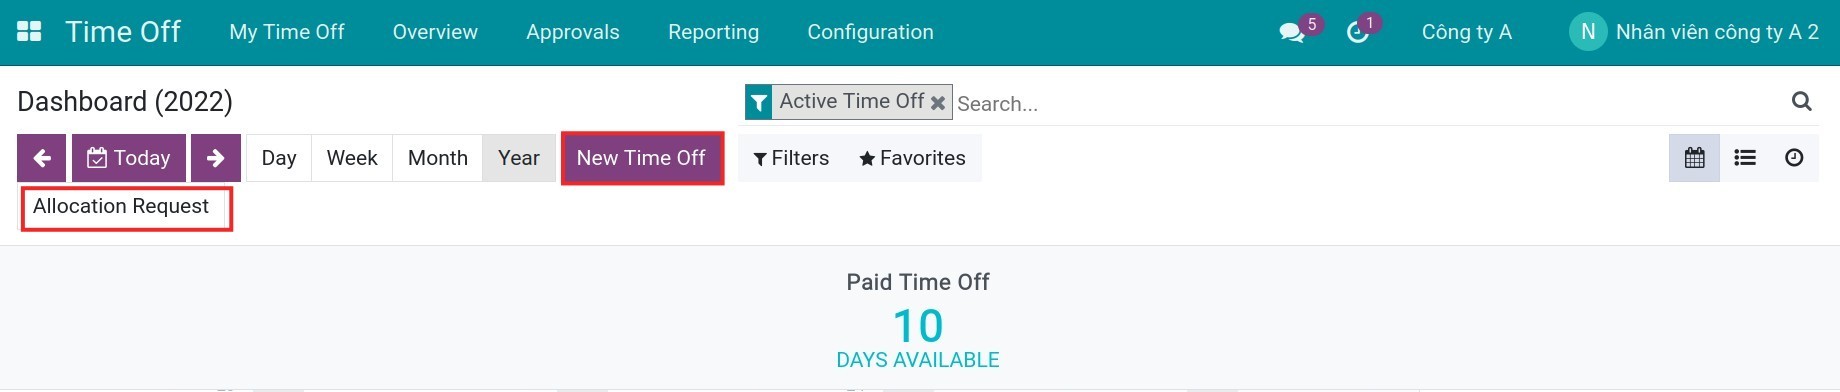
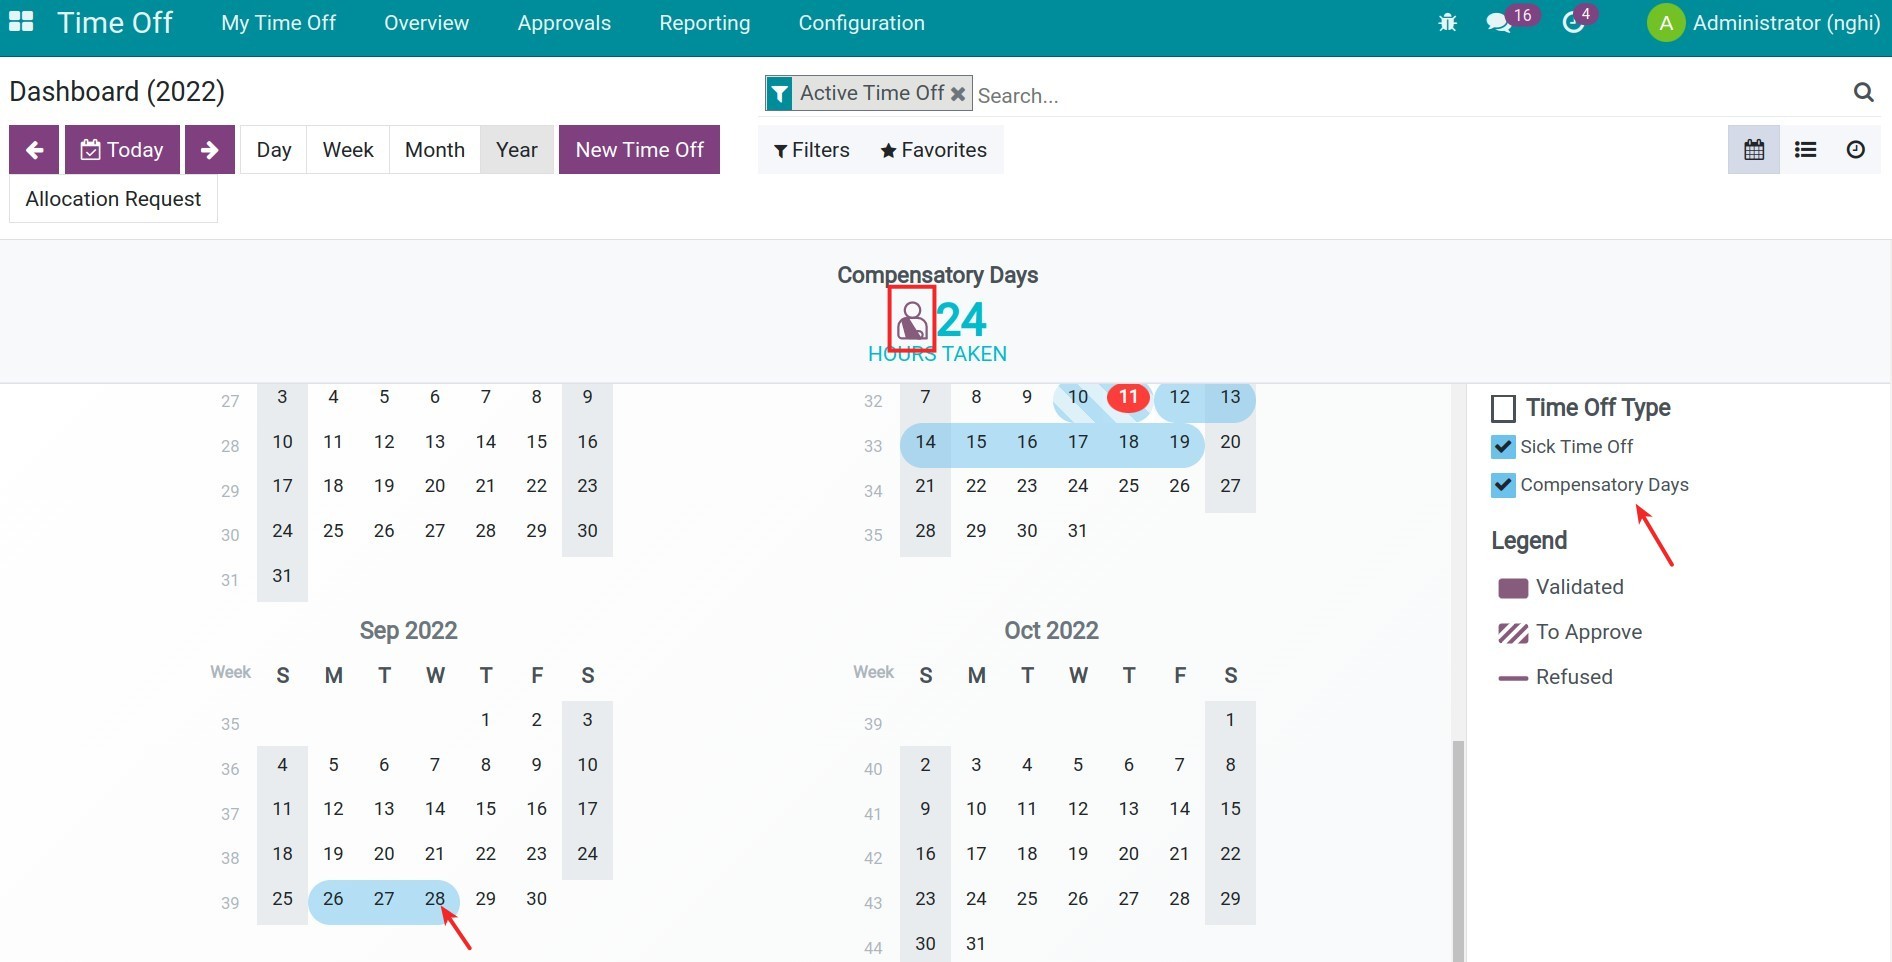
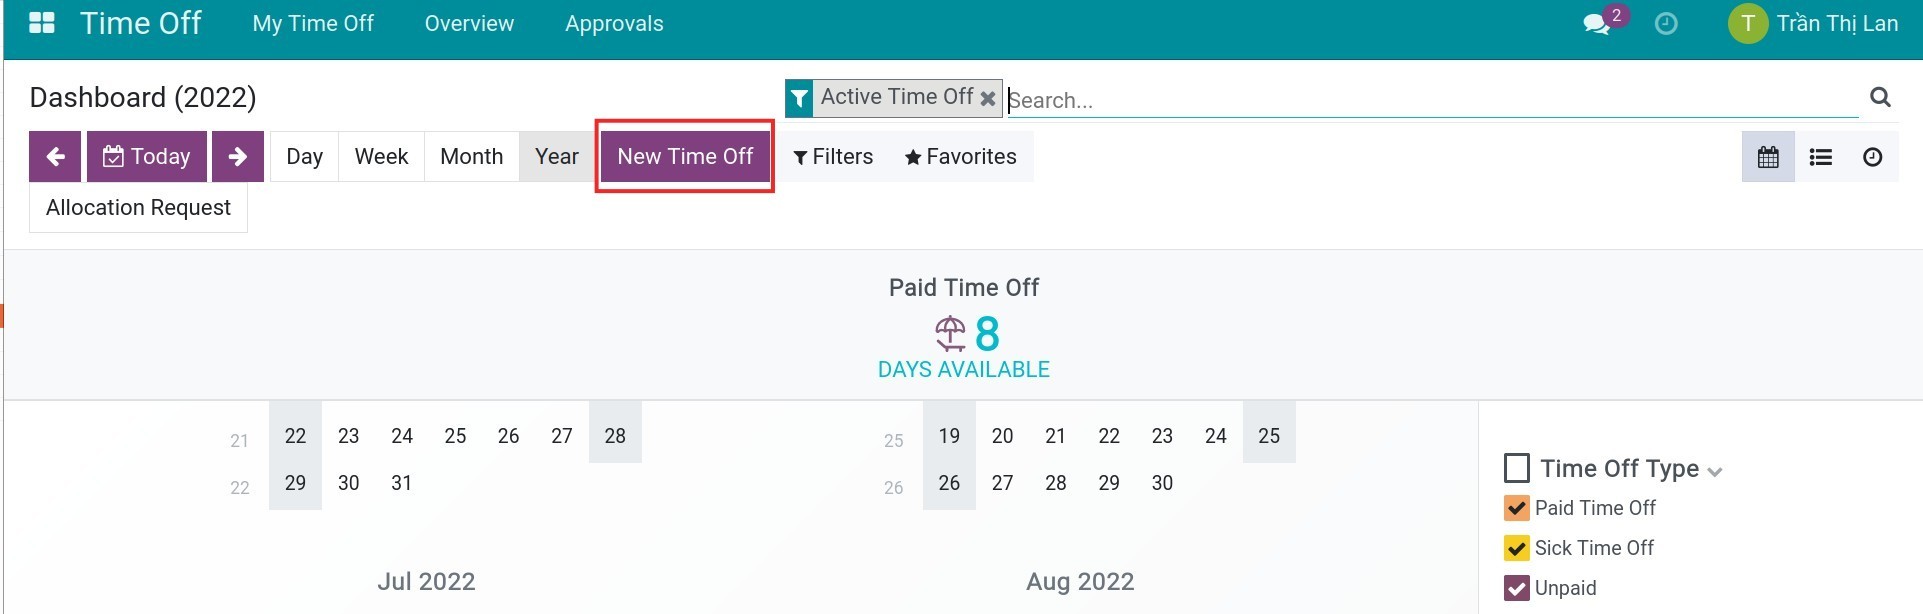
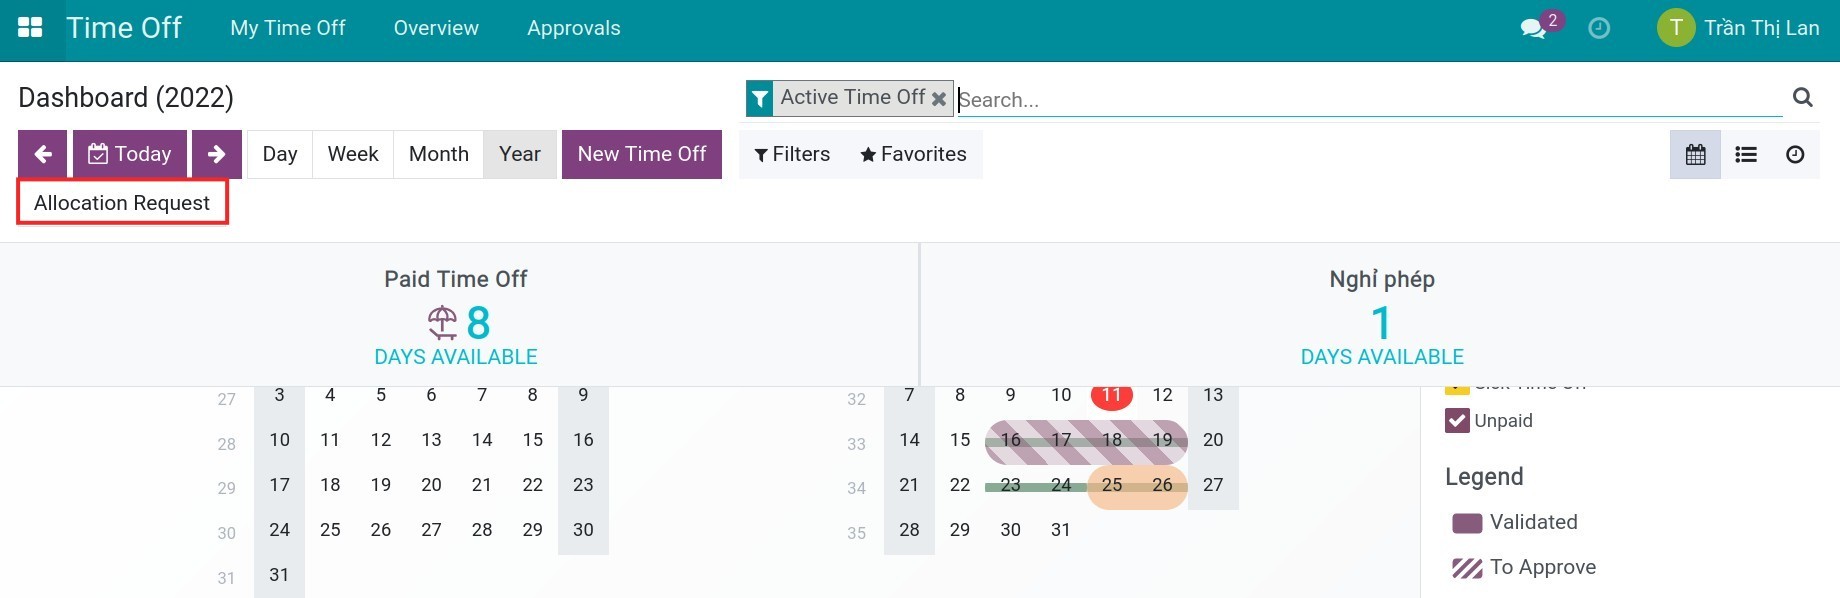
The default view when navigating to this application is a calendar view. You can view details by Day/Week/Month/Year. Each coloured date range is equivalent to one time off and the length of the date range will depend on the start/end time set on the time off request. Information of the time off duration and type will also be displayed in summary on each date range.
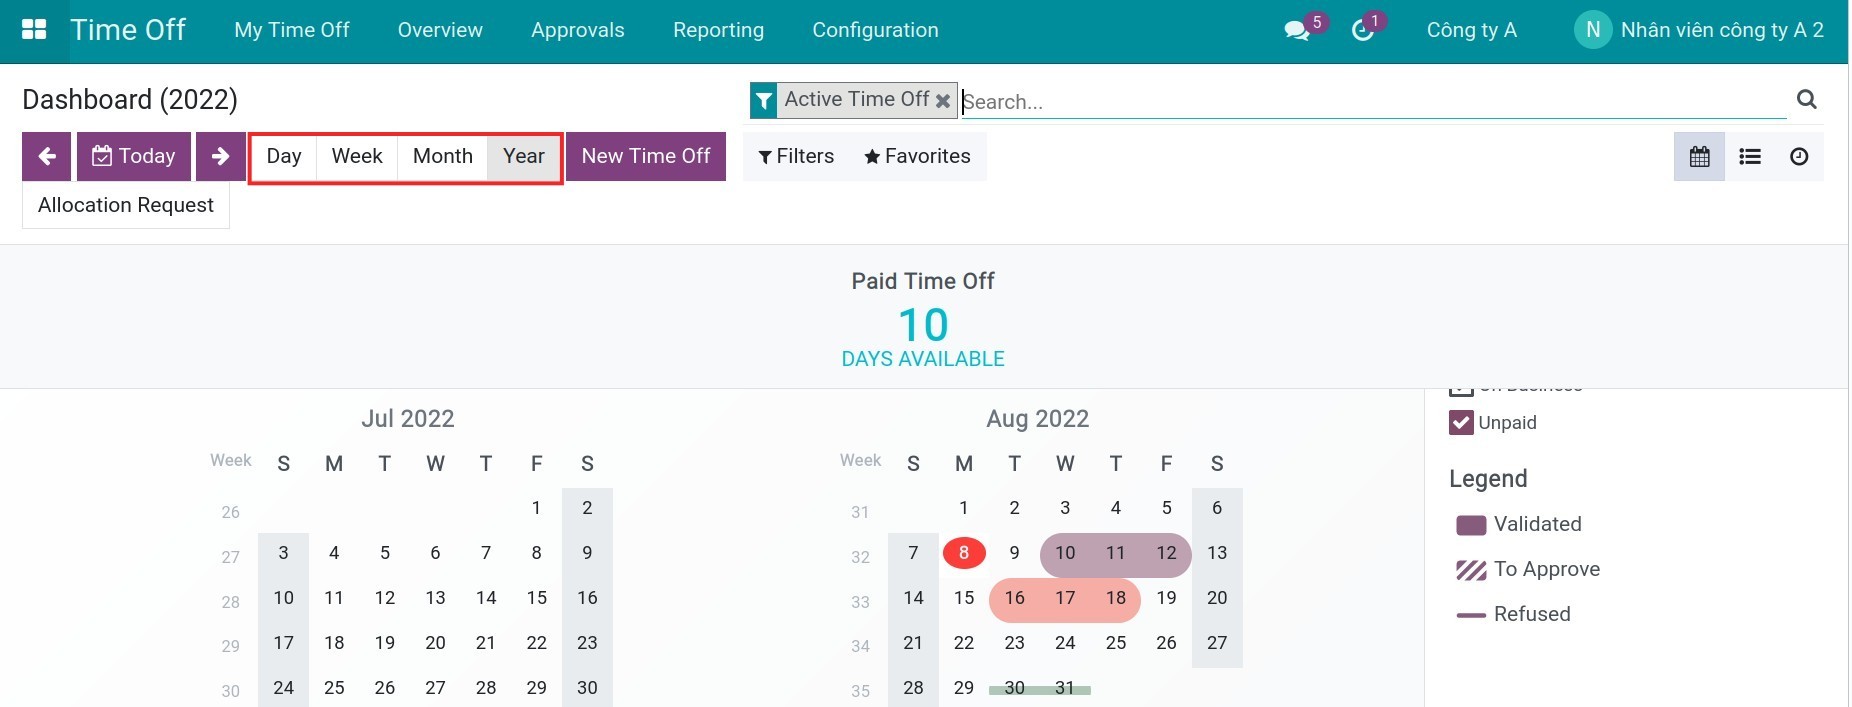
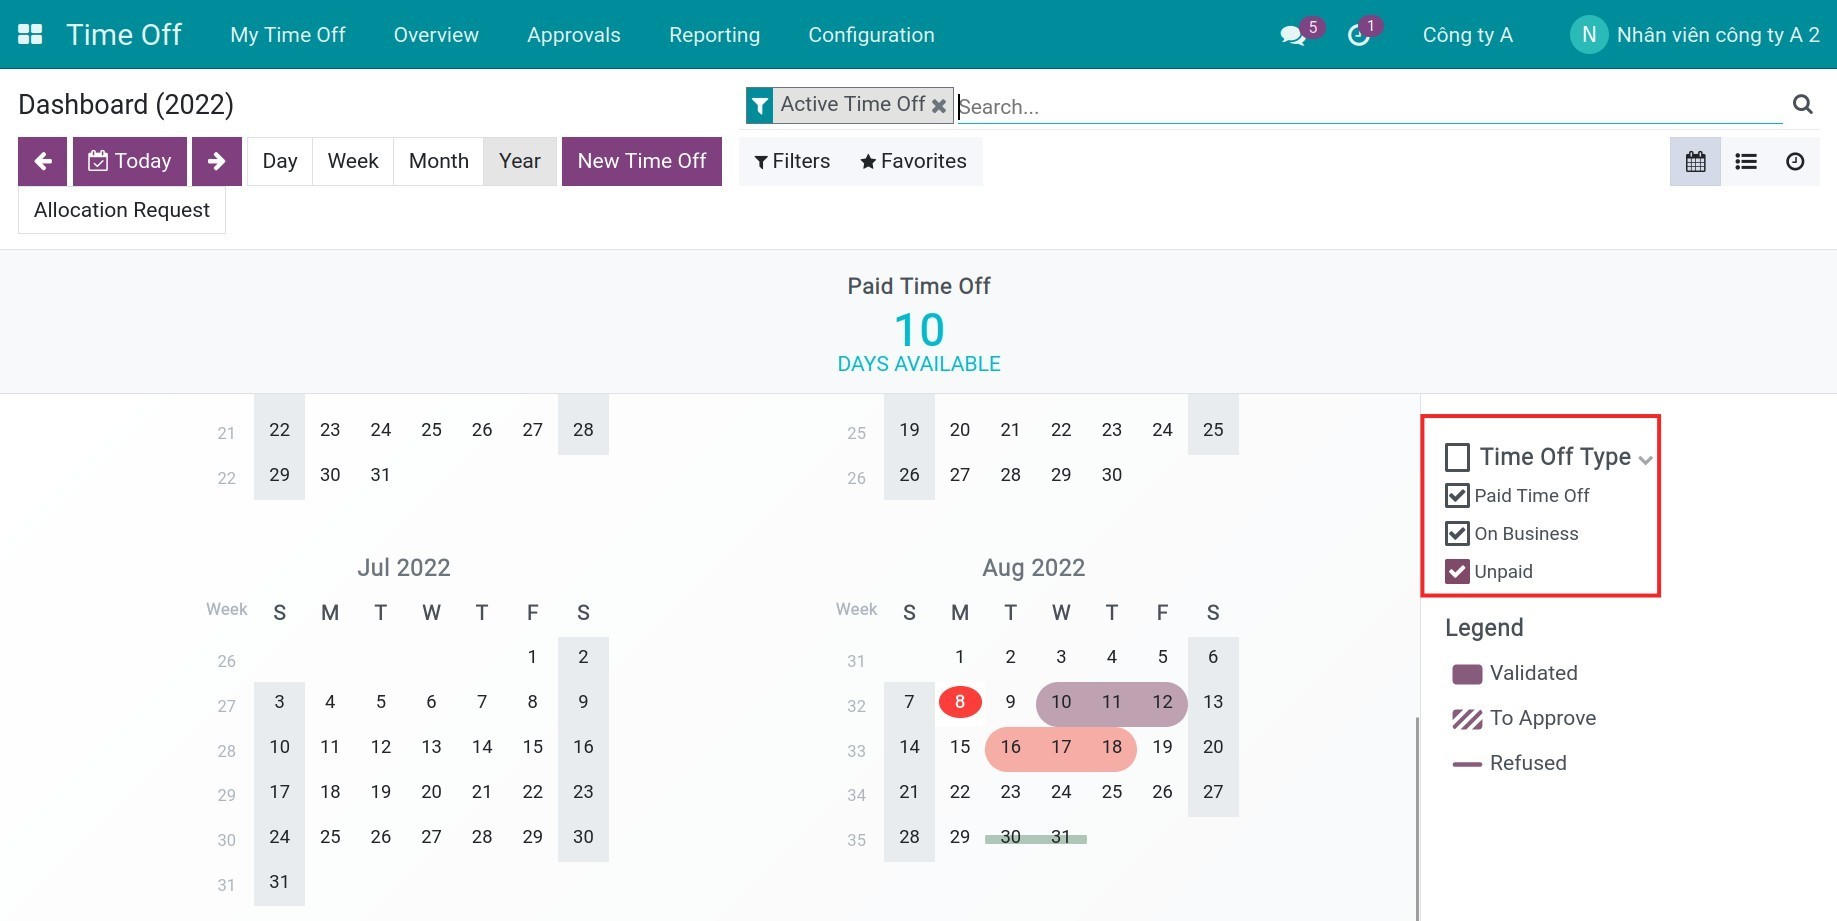
The right side of the screen will show the time off types you have used. You can uncheck the box to not display it on the calendar.
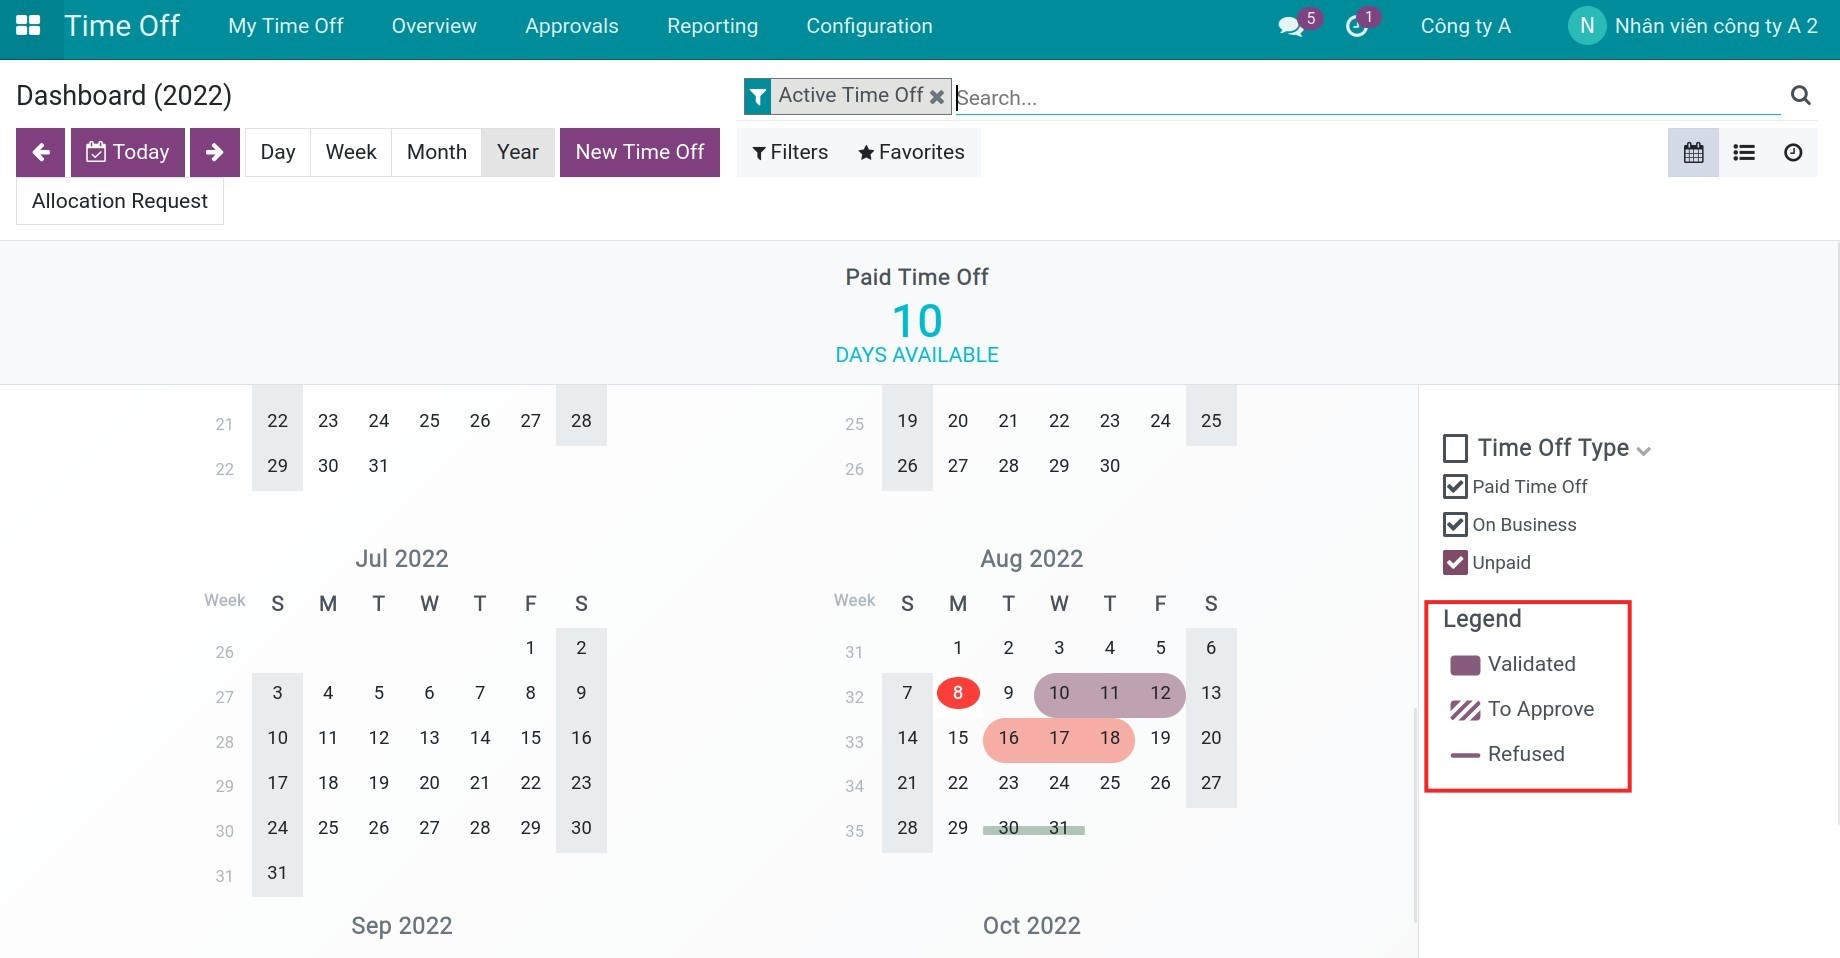
You can see the Legend status of your time off.
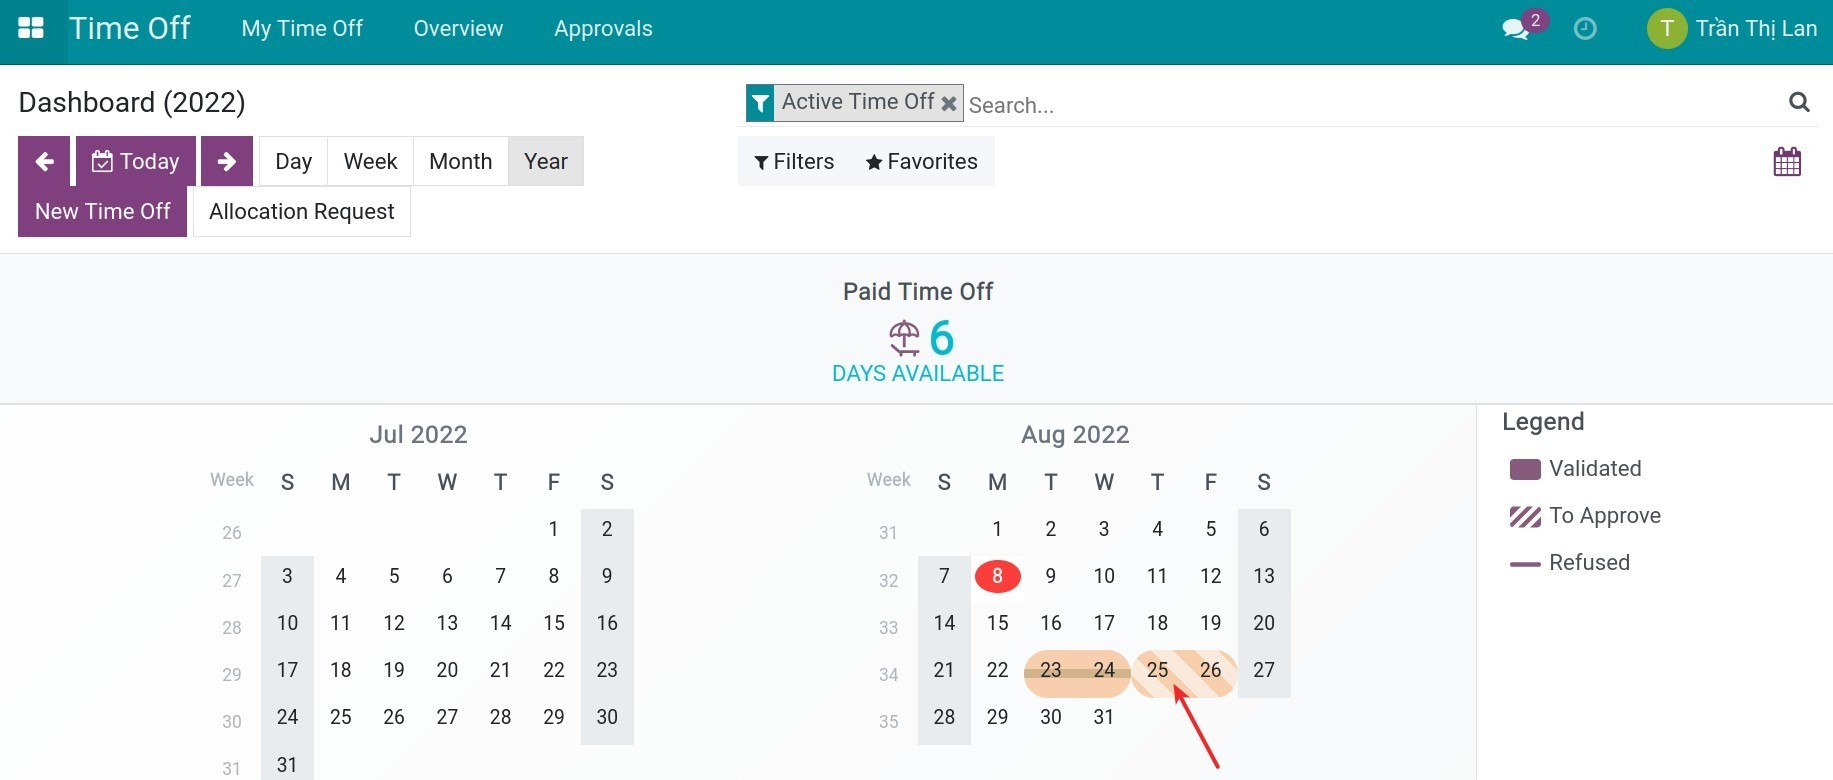
On the statistic bar, you can see Days available spent on the total amount of time allocated and time used for each time off type.
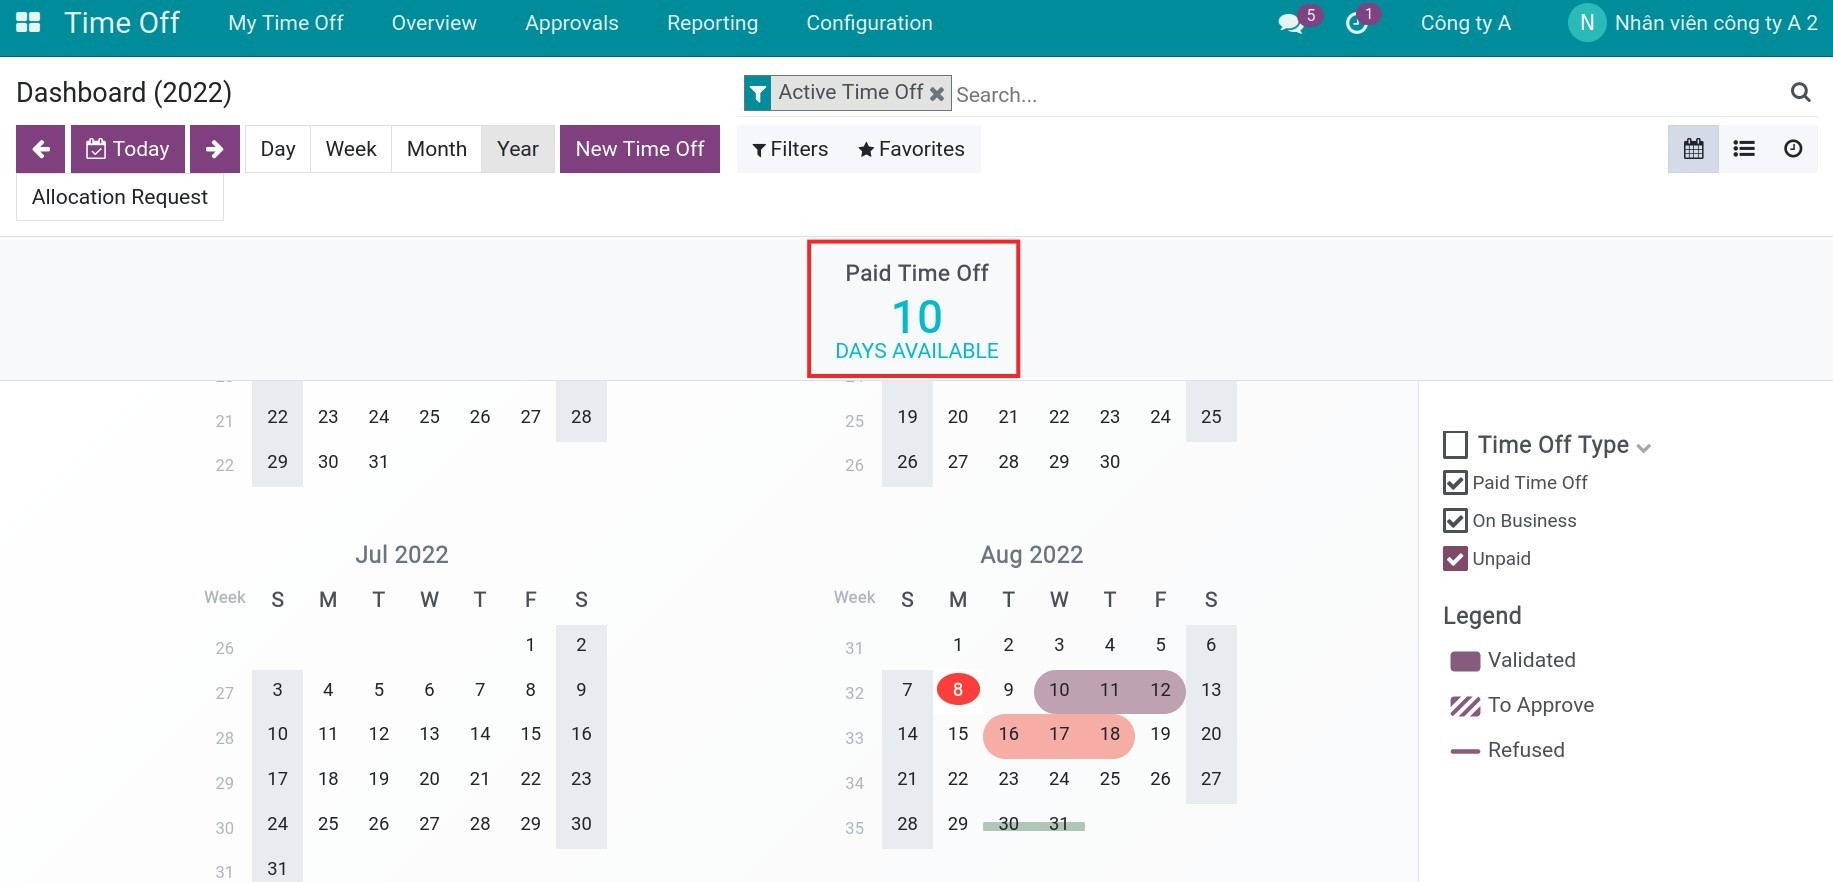
In addition, you can create time off request, allocation requests right on this view.
See also
Related article
How to adjust a Time off request?
Track and manage Time off reports
How to create Time off Types?
How to create Time off Types?
Requirements
This tutorial requires the installation of the following applications/modules:
Viindoo Time Off management app categorizes time off activities into Time Off Types with the same aspect for easy approval, payroll and reporting. Time Off Types will have different configurations depending on each business.
To create a time off type, navigate to Time Off ‣ Configuration ‣ Time Off Types ‣ Create.
At this stage, you need to fill in the following information:
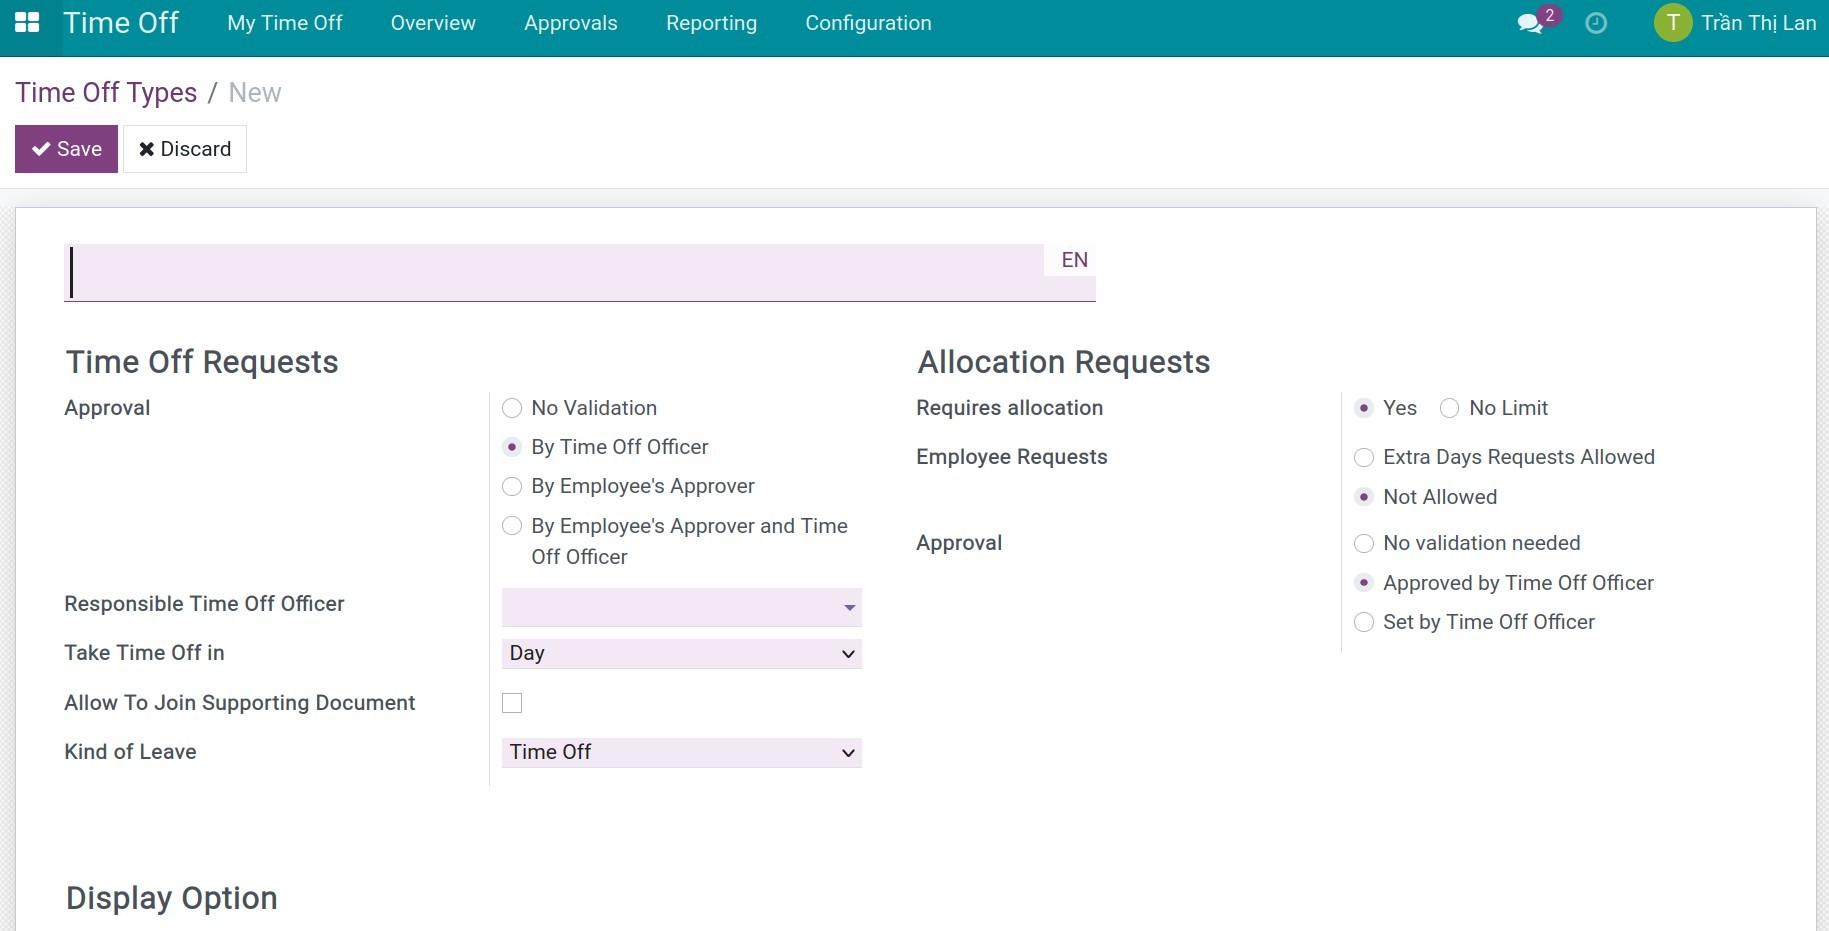
Name: Time off type name.
Time Off Requests:
Approval: Set the approval level for this time off type:
No Validation: There is no approval step for this time off type, once users create and confirm their time off requests, they will be valid immediately.
By Time Off Officer: Allow to Responsible Time Off Officer selected on this time off type configuration with approval permission (01 approval step) and this user must has at least Time Off Officer access right in Viindoo’s application.
By Employee’s Manager: The Time off Approvers field in the employee profiles. To set up time off approvers on employee profiles, see more at Work information of employee.
By Employee’s Manager and Time Off Officer: Set up 02 steps to approve time off requests. Once the employee’s time off request is created, the employee’s manager will approve it for the first time. After that, the time off officer will be the final approver.
Responsible Time Off Officer: Select the HR officer in charge of approving this time off type. This option is required only when using the By Time Off Officer and By Employee’s Manager and Time Off Officer approval options.
Take Time Off in: The duration of this time off type. You can select Day/Half Day/Hours, If you select Day, the minimum amount of time you can apply for the time off type is 1 day. If you want to take time off for shorter periods, select Half Day or Hours.
Allow To Join Supporting Document: If you check in this field, the software will support you to attach files on the Time off slip created with this Time off Type.
Kind of Leave: Choosing “Time off” or “Other”.
Allocation Resquests: An action to determine in advance how many days/hours each employee has for each type of time off:
Requires allocation:
No Limit: The number of days of this time off type for each employee is unlimited, users are free to request time off.
Yes: Allows users to create an allocation request or to be issued by a HR officer. Employees can only take time off within the number of days allocated.
Employee Requests:
Extra Days Requests Allowed: Allow employees to create allocation requests.
Not Allowed: Only allows the HR officer with Administrator access right of the module to create and approve time off allocation. Employees can only take time off within the number of days allocated.
Approval:
No validation needed: There is no approval step for this time off type, once users create and confirm their allocation requests, they will be valid immediately.
Approved by Time Off Officer: Allows Time Off Officer approve time off allocation. Employees can only apply for leave within the limit of the number of days that have been taken allocated. You must select Responsible Time Off Officer for this time off type.
Set by Time Off Officer: Only allows Time Off Officer set time off allocation. Employees can only take time off within the number of days allocated.
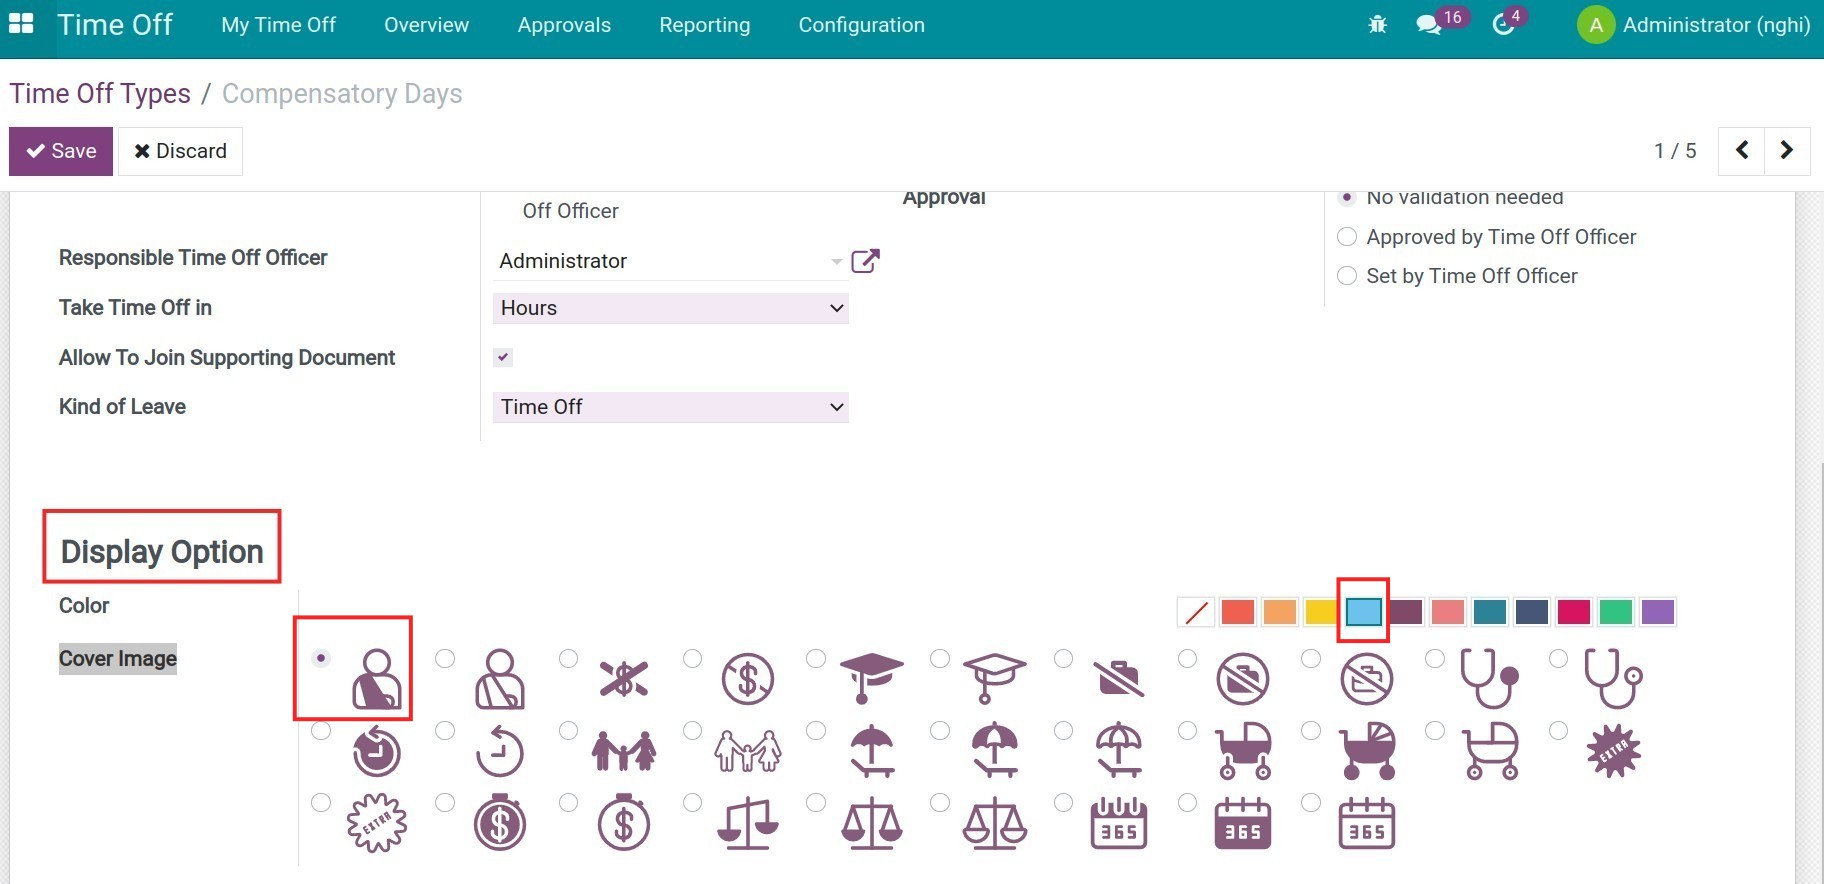
Display Option:
Color: Choose the color that you want to display in the Time off Dashboard help to distinguish.
Cover Image: Choose the icon that you want to display in the Time off Dashboard help to distinguish.
After filling in all the information, click Save to save the time off type you have just set up. Similarly, you can create time off types that are suitable for your business.
Tip
You can see the number of time off requests right on the statistic bar of that time off type.
In case the time off type needs to be allocated, before an employee can create a time off request, you need to allocate time off for that employee. See more of how to create a time off allocation at How to create Time off Allocation?
See also
Related article
How to create a Time off request?
How to create a Time off request?
Normally, whenever an employee takes time off, he or she needs to fill in a time off form and submit it to the HR staff. It will be a problem in losing time off documents or assigning work due to lacking information. With the Viindoo Time Off management app, the time off creating/approving operations will be performed and managed on the system and will be publicly displayed on the Calendar view to the entire company in order to have timely information, minimize the risk of losing information.
Requirements
This tutorial requires the installation of the following applications/modules:
Time off requests created by employees
All employees in the enterprise are allowed to create a time off request. To create a time off request, navigate to Time Off ‣ New Time Off.
Fill in the time off form as follows:
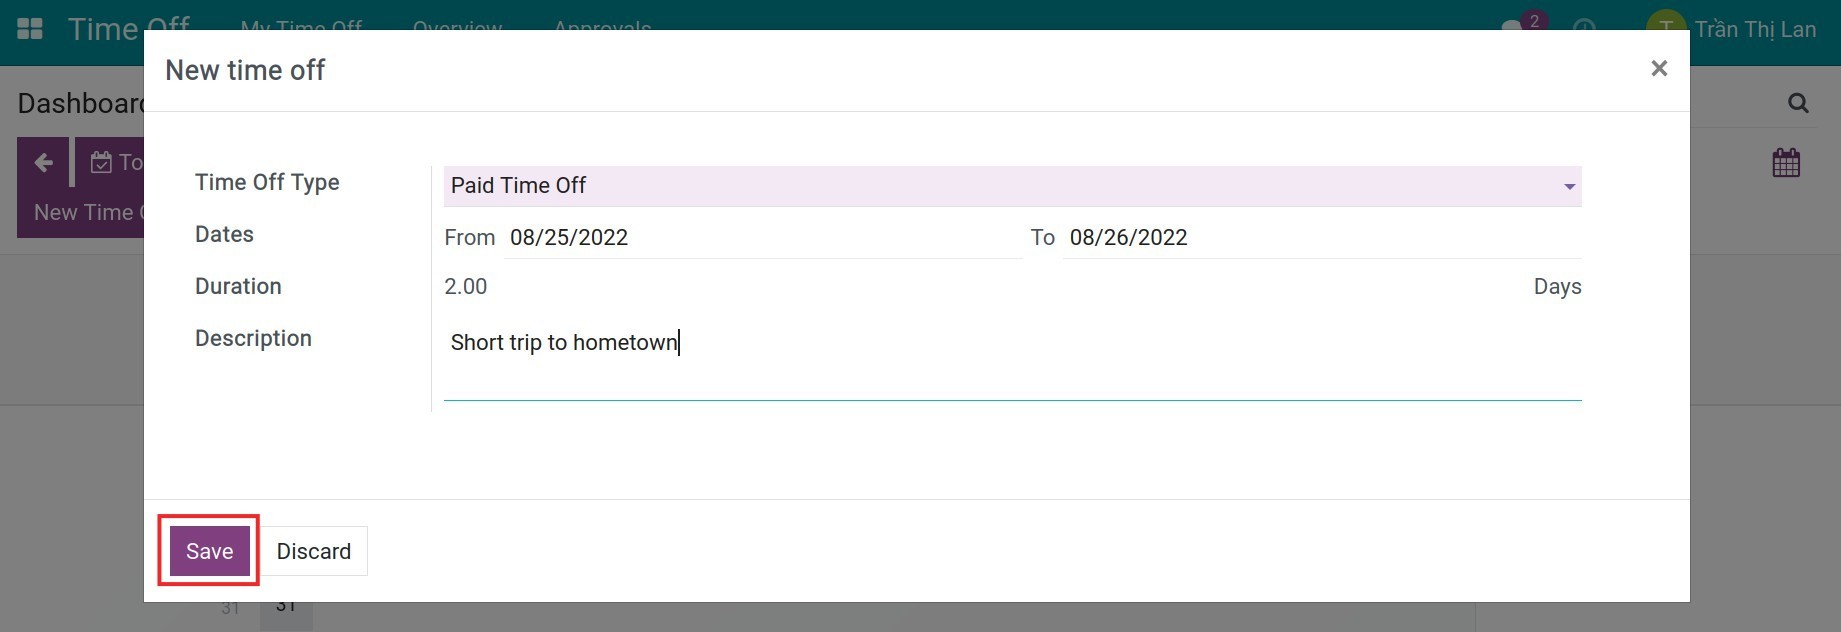
Name of the Time off type.
Dates: From .. To … : Enter the time you want to apply for time off. The unit of time depends on the configuration of the time off type. You can see more at How to create Time off Types?.
Duration: Based on the time entered in the Dates field, the system will calculate how long your time off is.
Description: Enter the reason for your time off request.
Click Save to save the time off request. The time off request will appear on Calendar on the Dashboard.
In addition, you can view details of your time off requests by navigating to Time Off ‣ My Time Off ‣ My Time Off Requests.
Your time off requests are displayed here.

Tip
You can also create a time off request here by clicking on the Create button.
After the employee has completed the time off request, it will be in To approve status and the system will automatically schedule an activity for the approver.
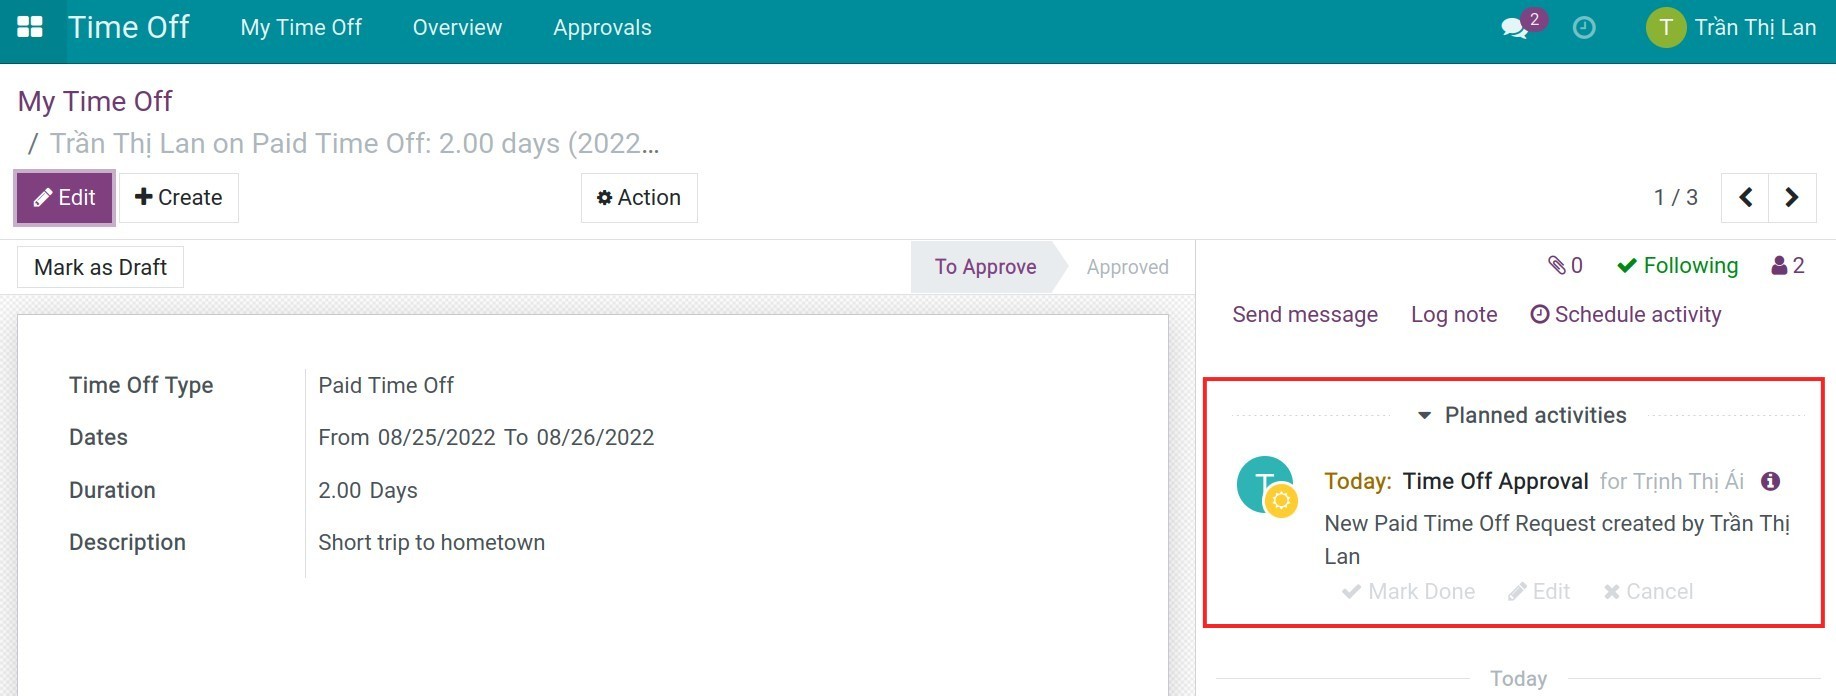
The approver’s account will receive the employee’s time off request approval notification.

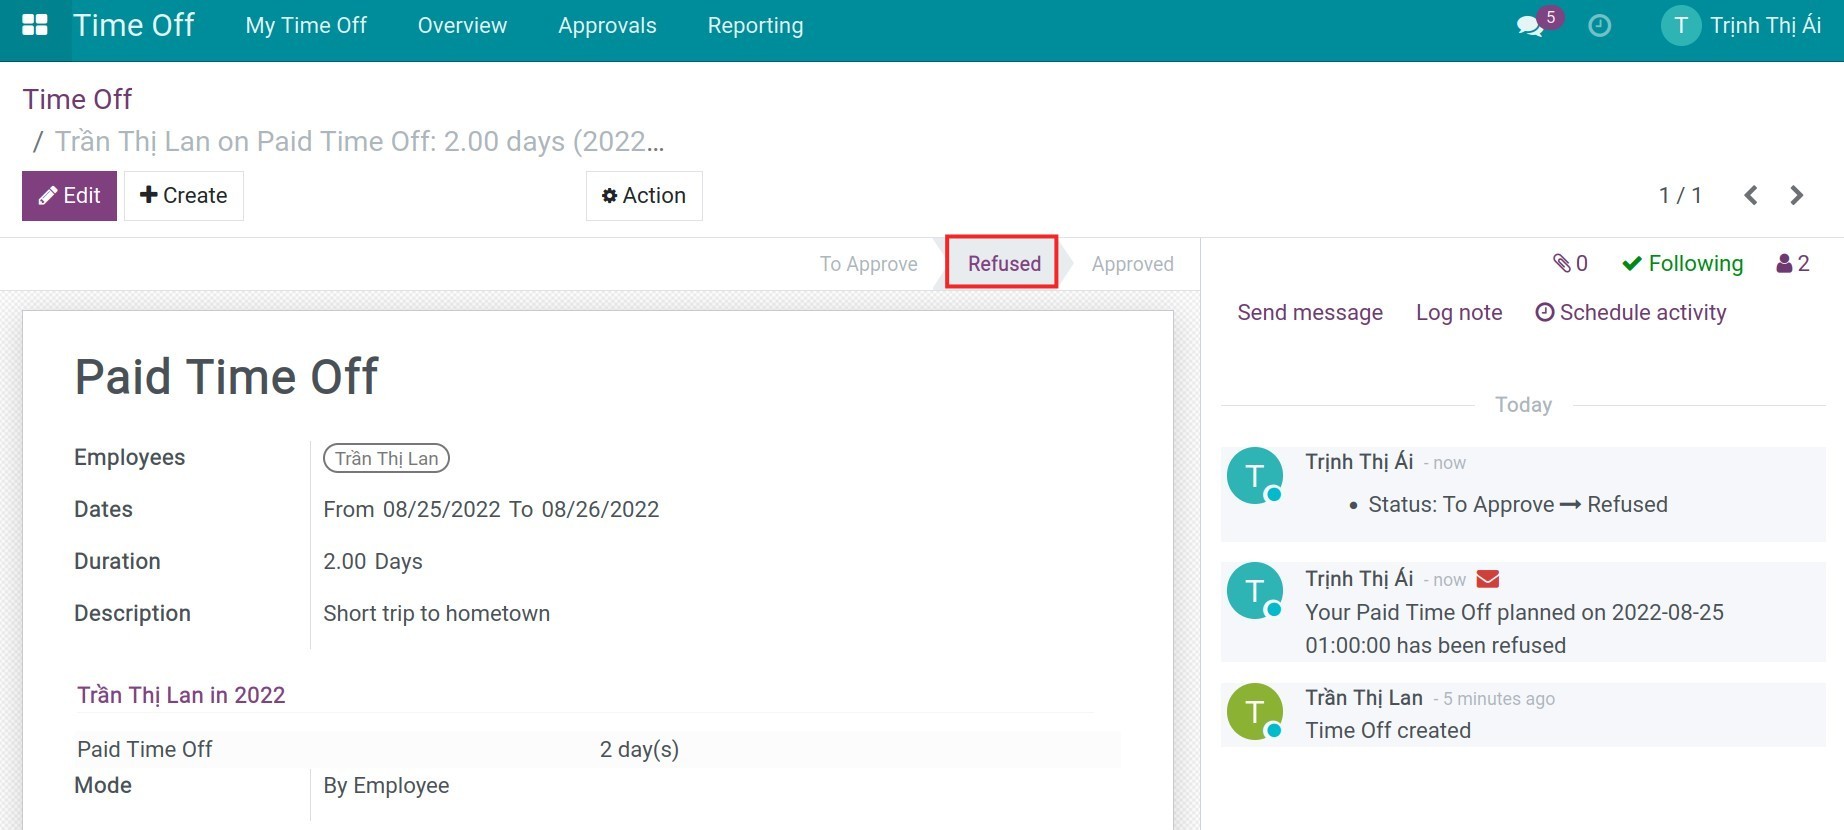
The approver can validate this time off here. If the approver agrees with the request, click Approve. At this stage, the employee’s time off request status will change to Approved and the approver’s schedule activity will automatically change to done status.
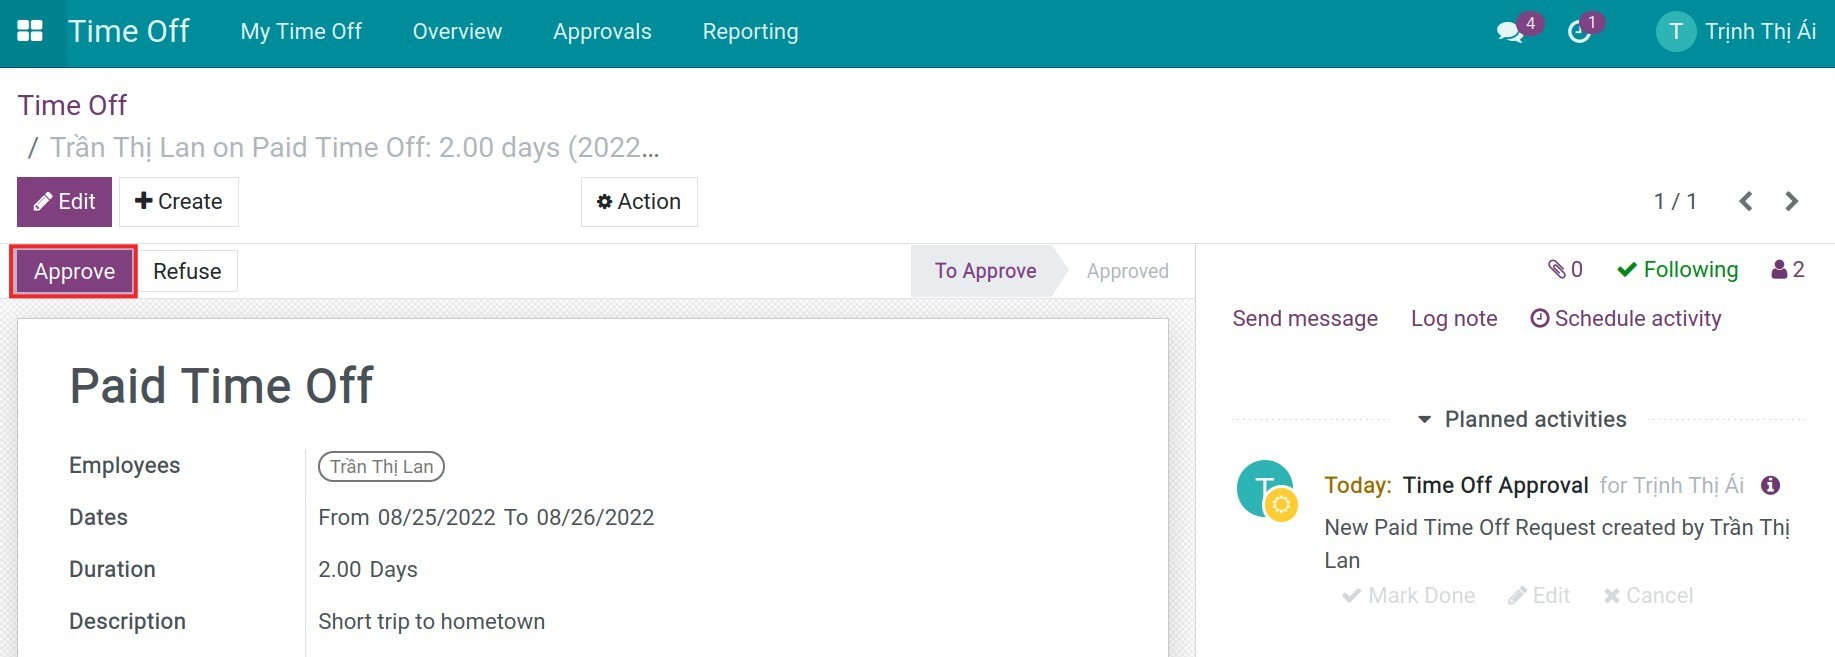
In case of setting up one approval step in Time off types, the time off request will be changed to Approved status. In case of setting up two approval steps, it will be changed to Second approval status.
If the approver does not agree to approve, click Refuse and the time off request status will be changed to Refused.
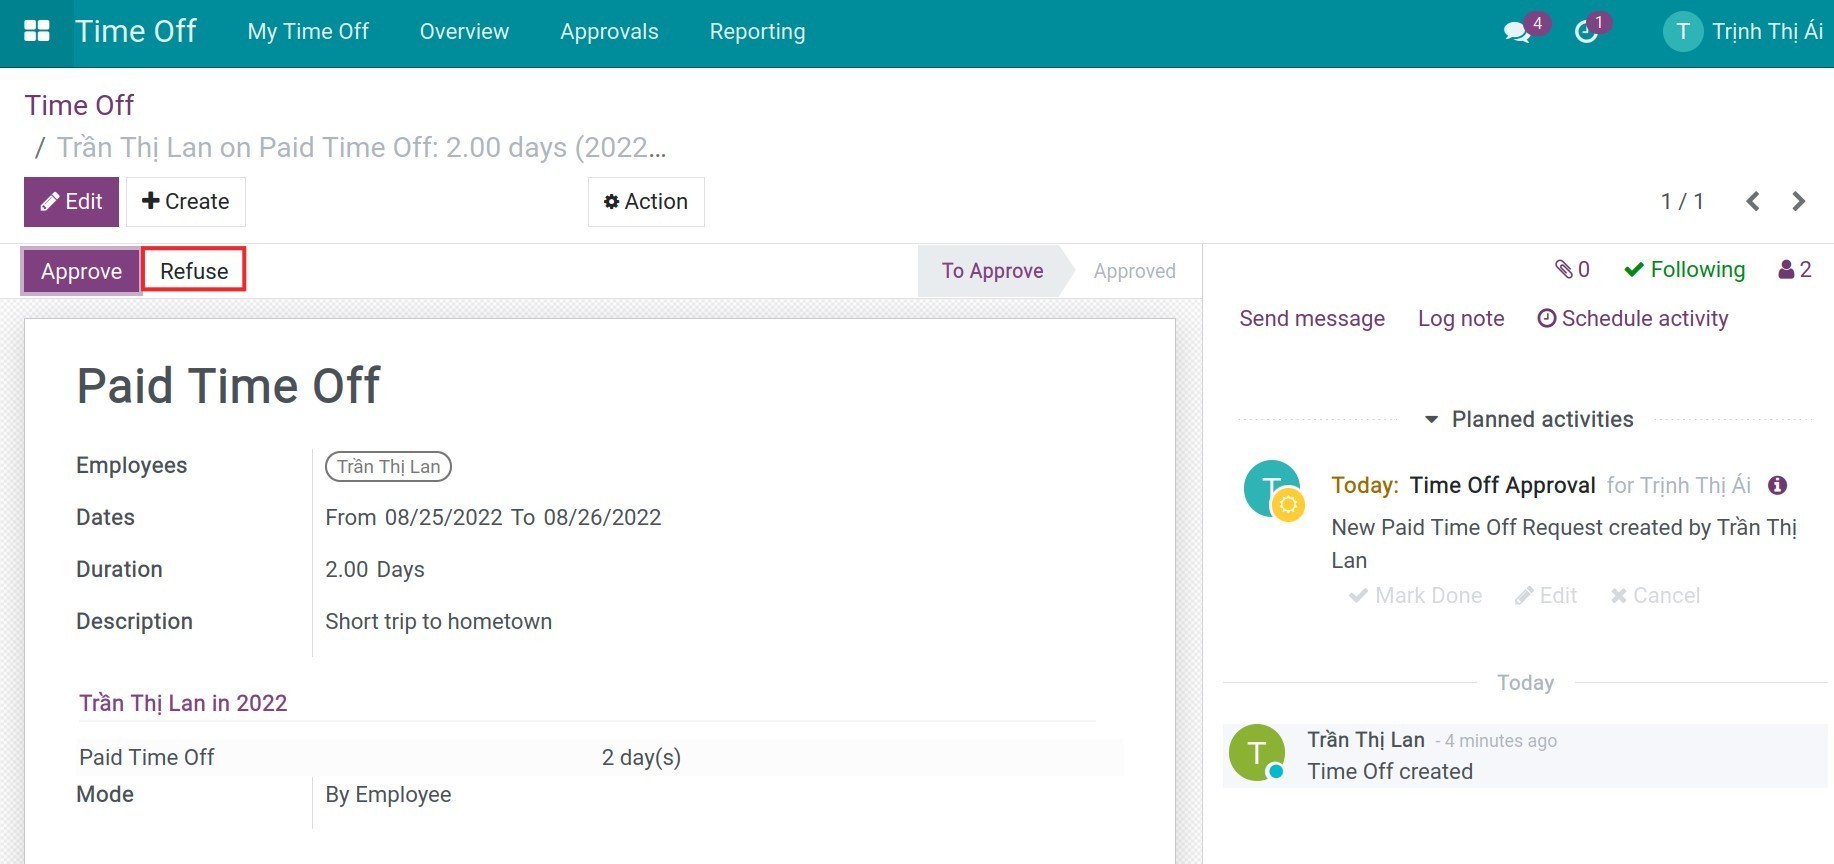
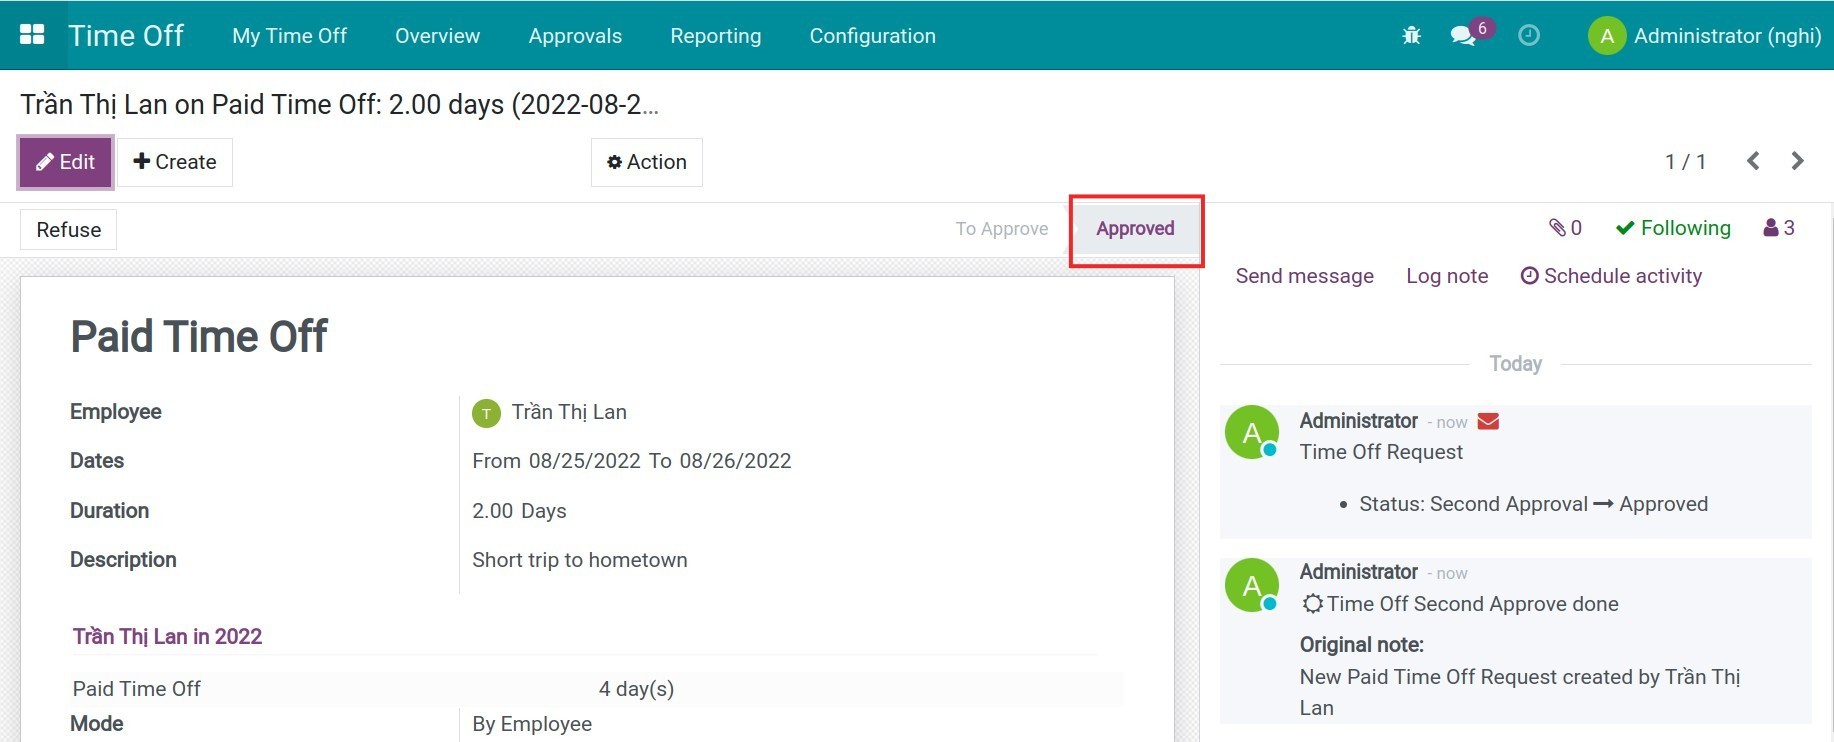
Similar to the first approval, the system will also automatically schedule an activity for the second approver.

After approving for the second time, the time off request status will be changed to Approved.
Note
Whenever the time off request status changes, the system sends a notification via software/email to the participants including the approver and the employee.
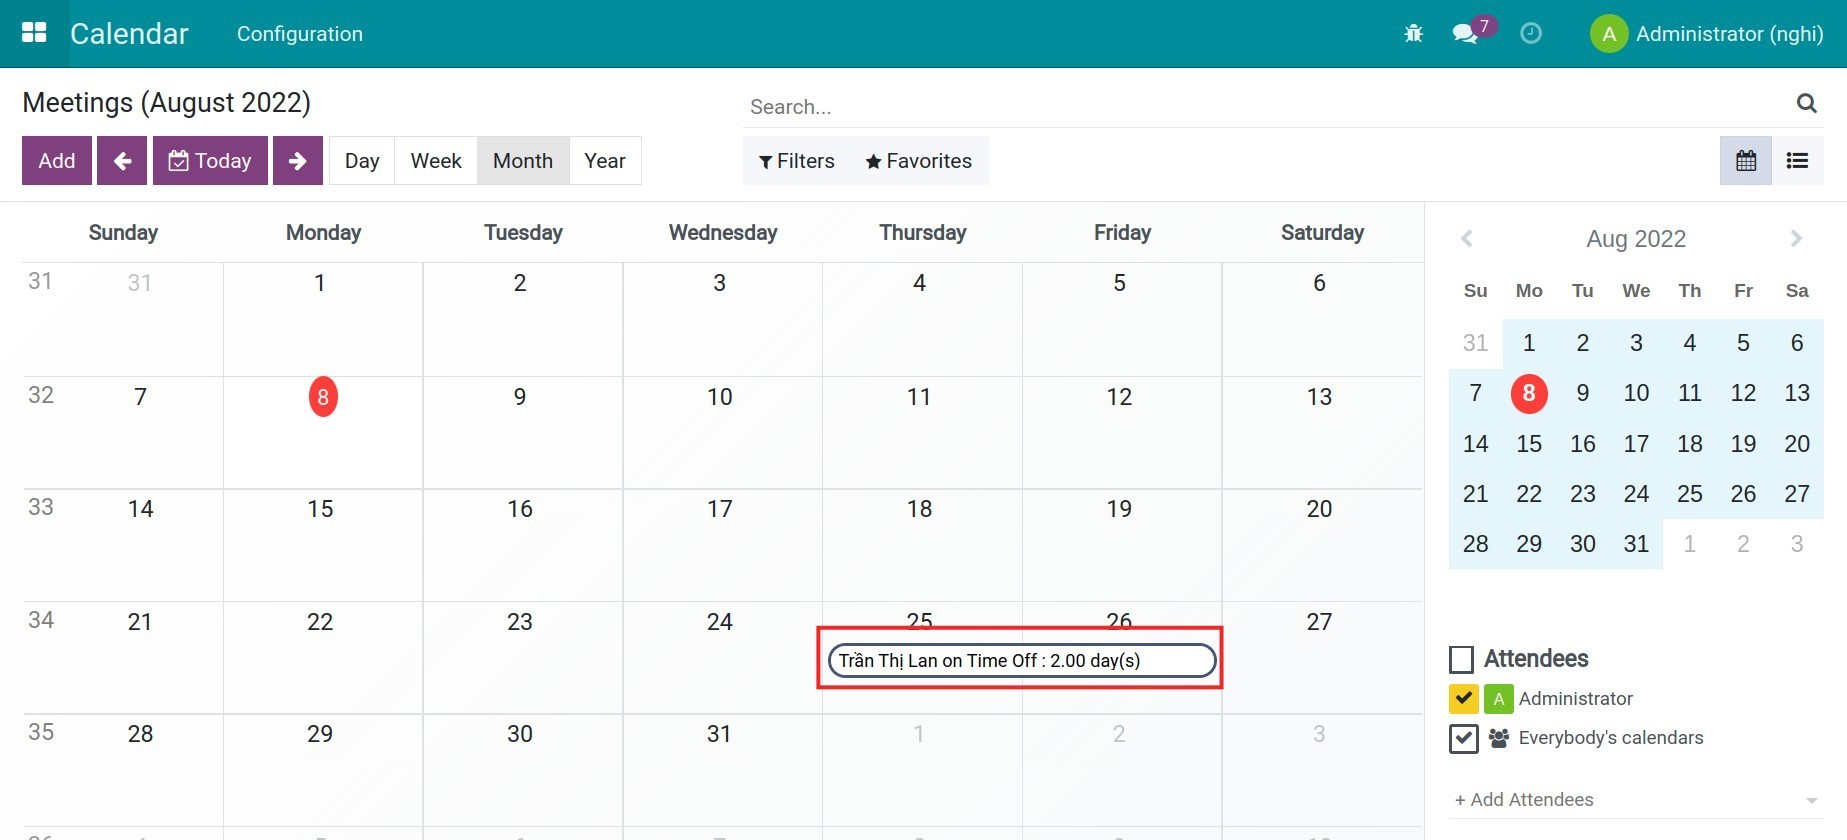
At this time, the employee’s time off request will be displayed in Calendar if this is allowed to display in Time off types configuration.
Time off requests created by managers
With manager access right, you can create time off requests for your employees by navigating to Time Off ‣ Approvals ‣ Time Off ‣ Create.

In the time off request form, the following fields will be displayed:
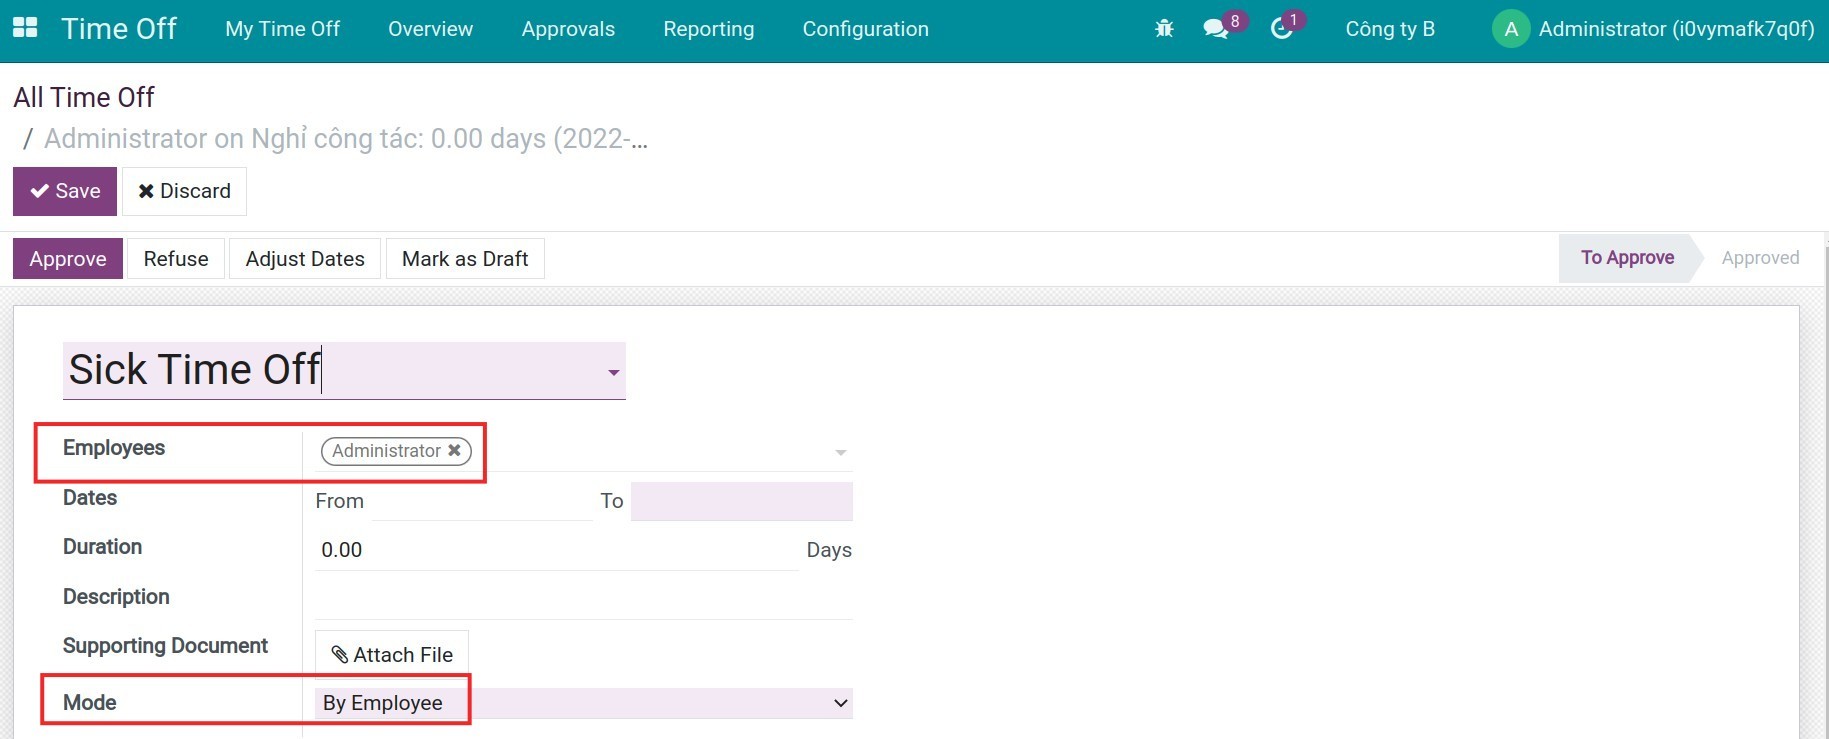
Mode: Choose the employee/department this time off request applies to. Time off requests can be applied to a specific employee or to each department, the company or employee by tag.
Employee/Department/Company/Employee Tag: Depending on the mode setting option, specific information fields are displayed for selection.
Once the time off requests are saved, the steps to approve the time off requests are similar to those created by employees.
See also
Related article
Track and manage Time off reports
Track and manage Time off reports
Through reports on time off, managers will have an overview of the total leave time their employees have taken, which type of time off is being used the most, or details of the time off of each employee by month. The Viindoo Time Off management app supports reporting tools with commonly used charts in formats such as line, bar charts, or pivot tables. Based on the real-time data available in the system, the most accurate information will be provided to help managers handle the leave time of their employees efficiently and in a timely manner.
Currently, there are 3 types of reports:
By Employee;
By Time off Type;
Time Off Details.
Requirements
This tutorial requires the installation of the following applications/modules:
Reporting by Employee
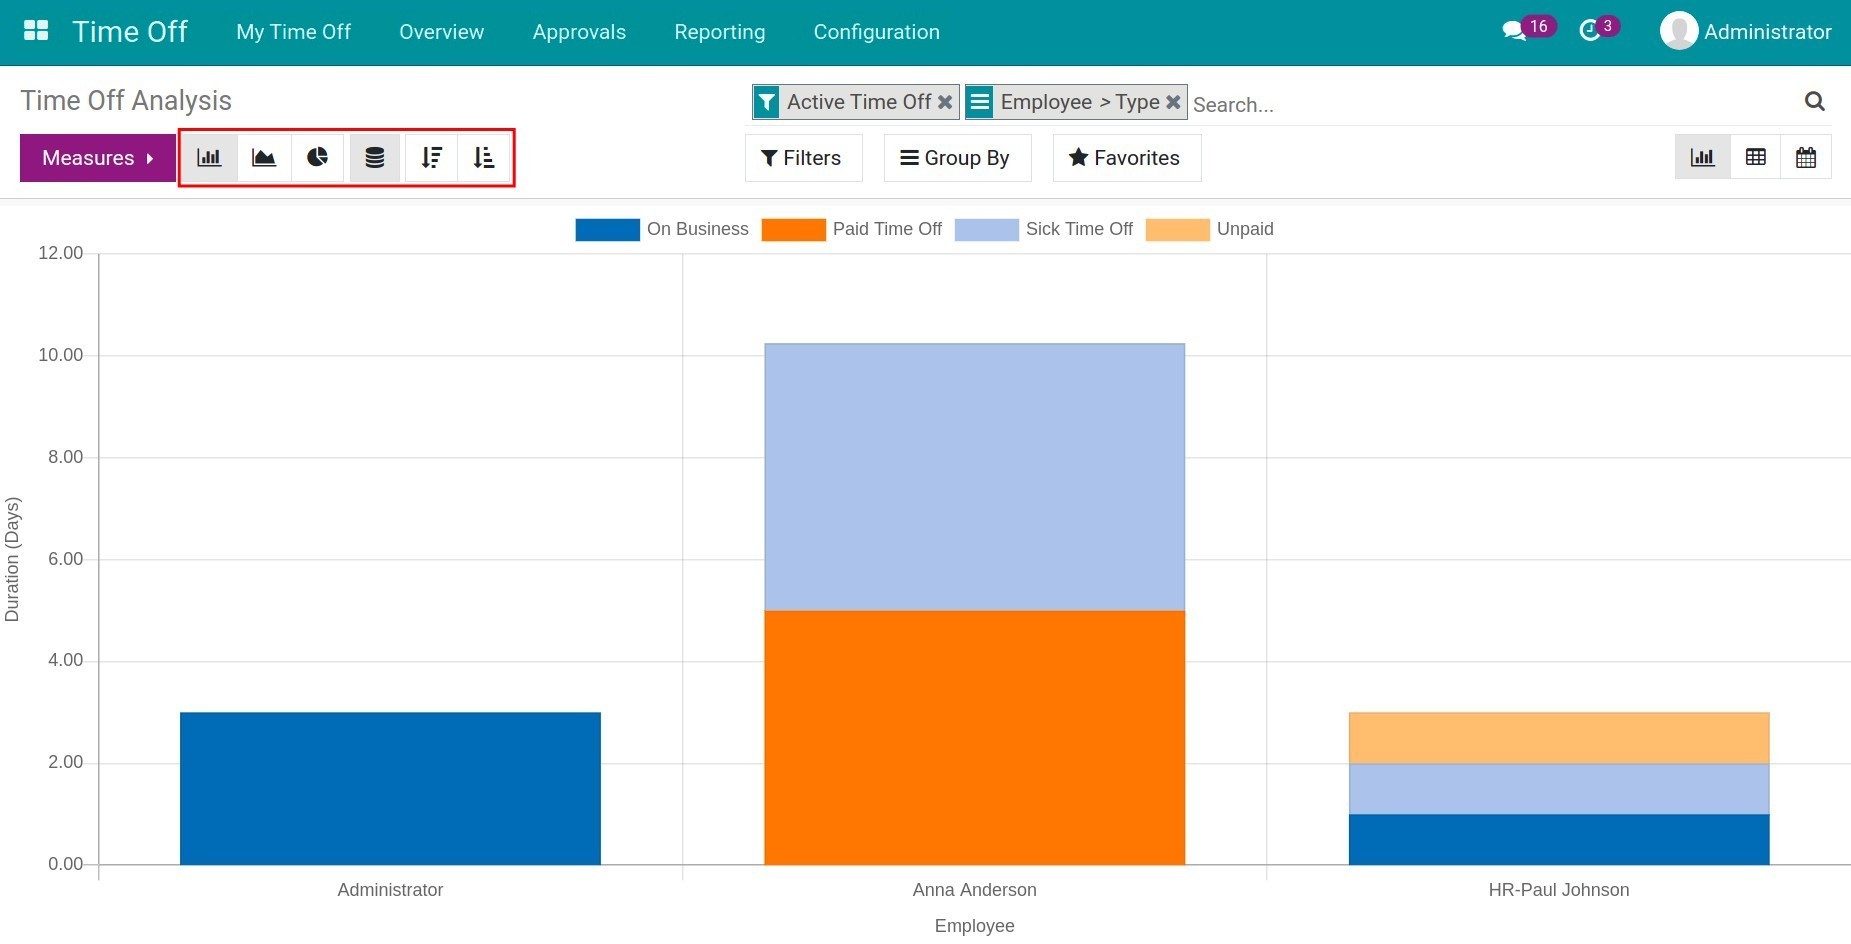
Starting with Reporting by Employee, you need to navigate to Time Off ‣ Reporting ‣ by Employee.
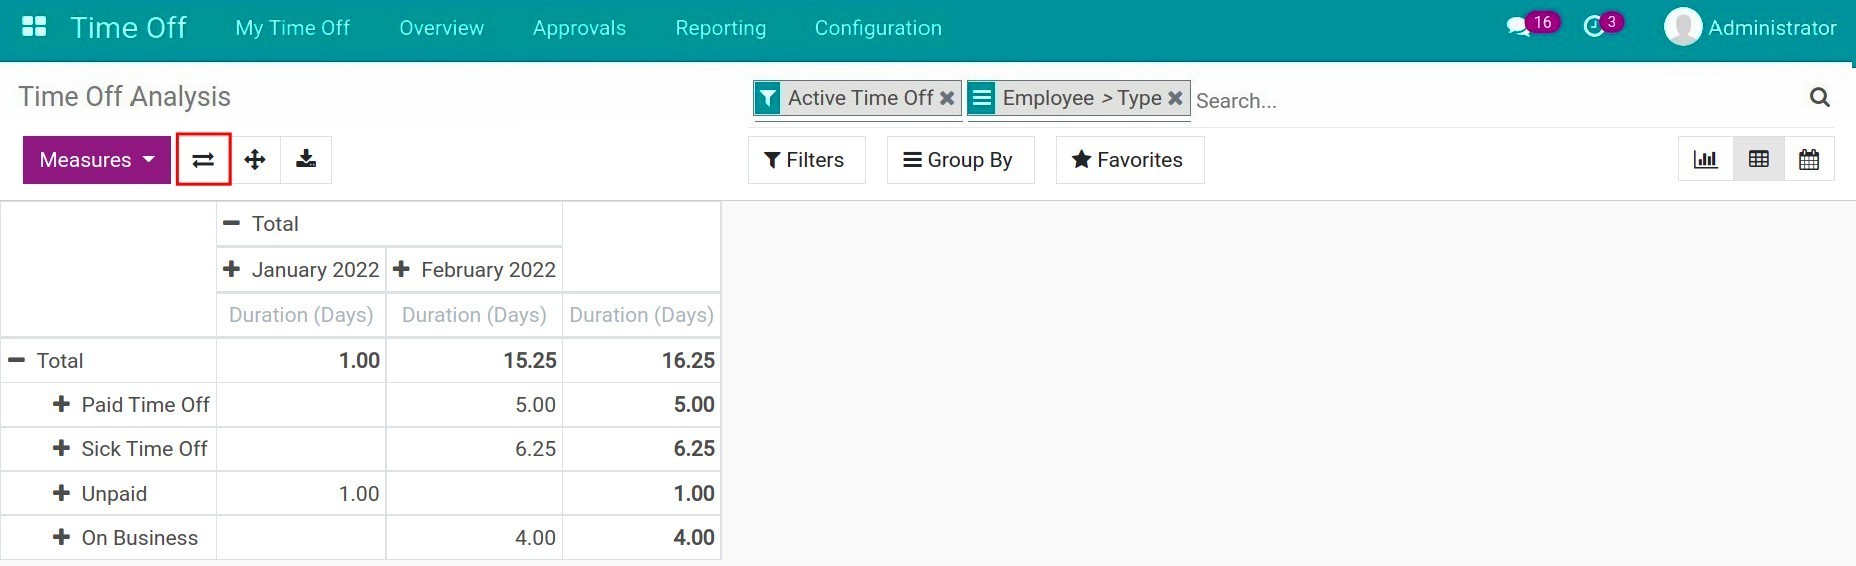
By default, a bar chart is shown with data grouped by Employee and Type and the measure is Duration (Days). In order to customize the criteria according to the intended use, you need to turn off the system default filters and groups then select the criteria as follows:
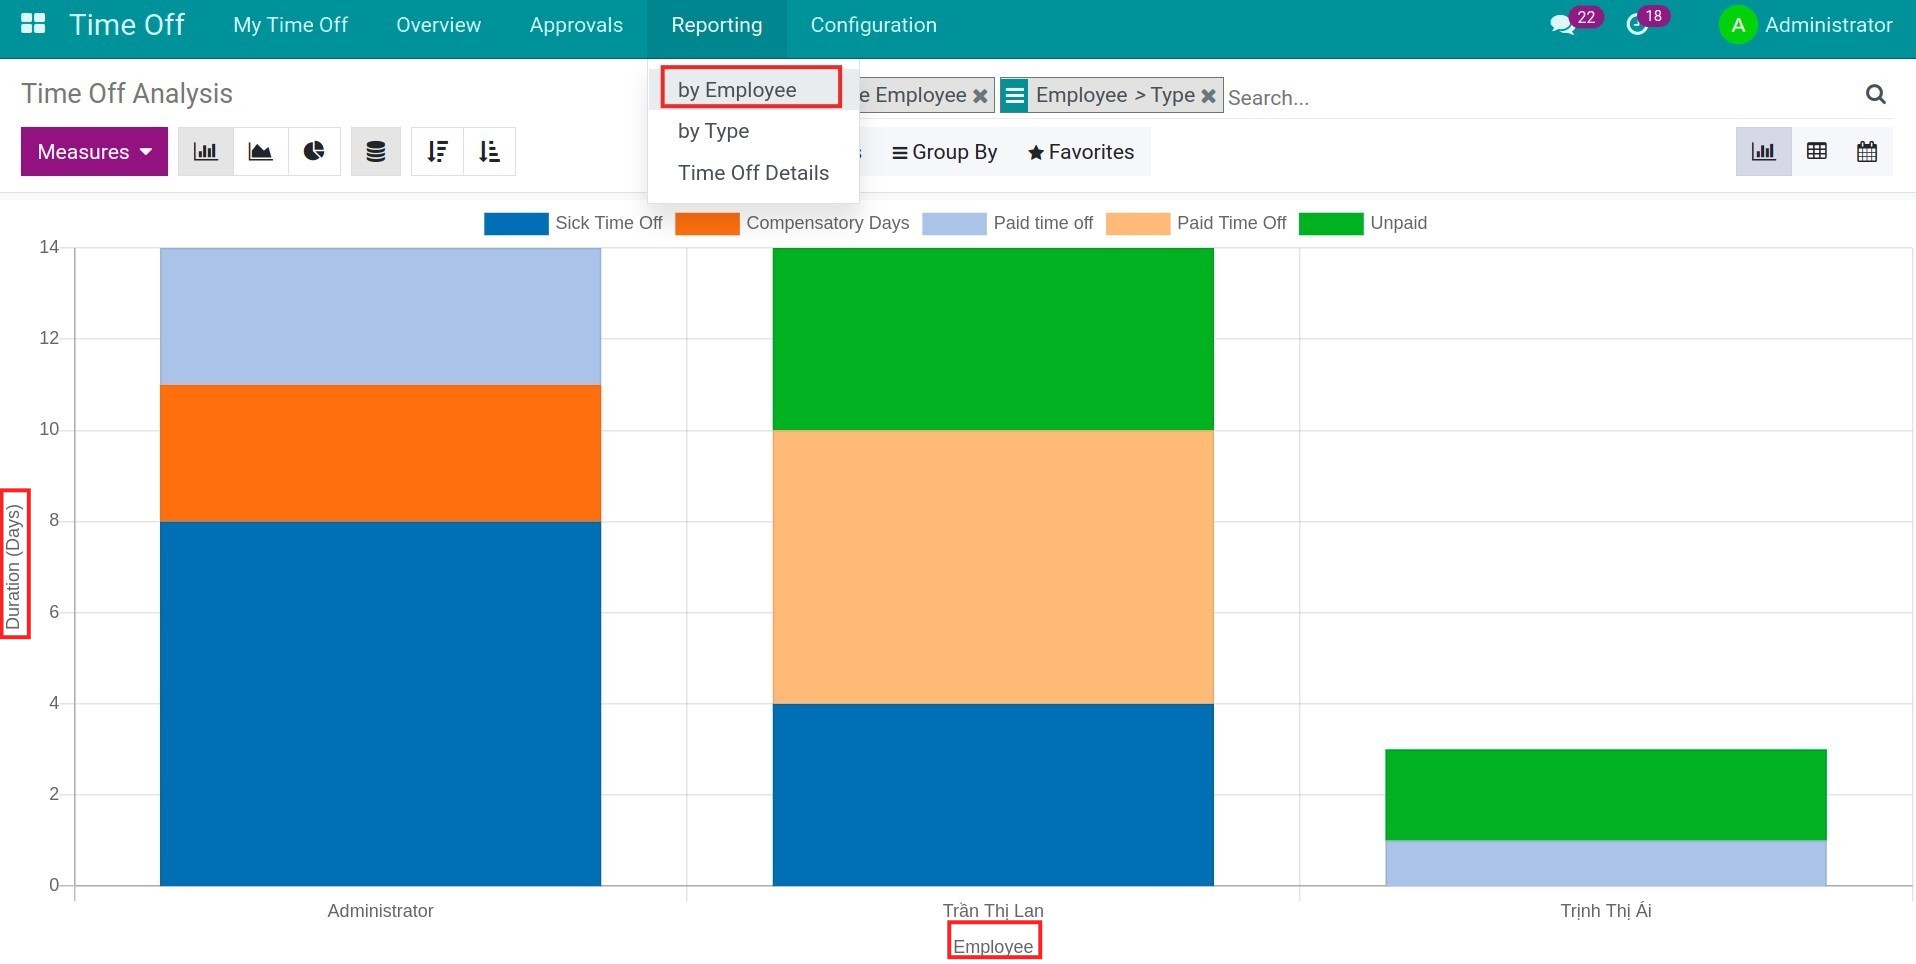
Vertical axis: Value displayed in the Measures list. The measures are Count (Number of time off sheets) and Durations (Days);
Horizontal axis: Use the Group feature to display the chart according to your desired criteria.
Viindoo software supports various types of charts such as bar, pie, or line charts. Use the respective icons to change the format of your report. Or you can also sort values of the horizontal axis in an ascending or descending order.
If graph view gives you an overview of leave time of all the existing employees in the system, then pivot view provides managers a time off analysis or a calendar view with time off requests of all employees in a determined period of time. To change to other reporting views, press on the respective icons.

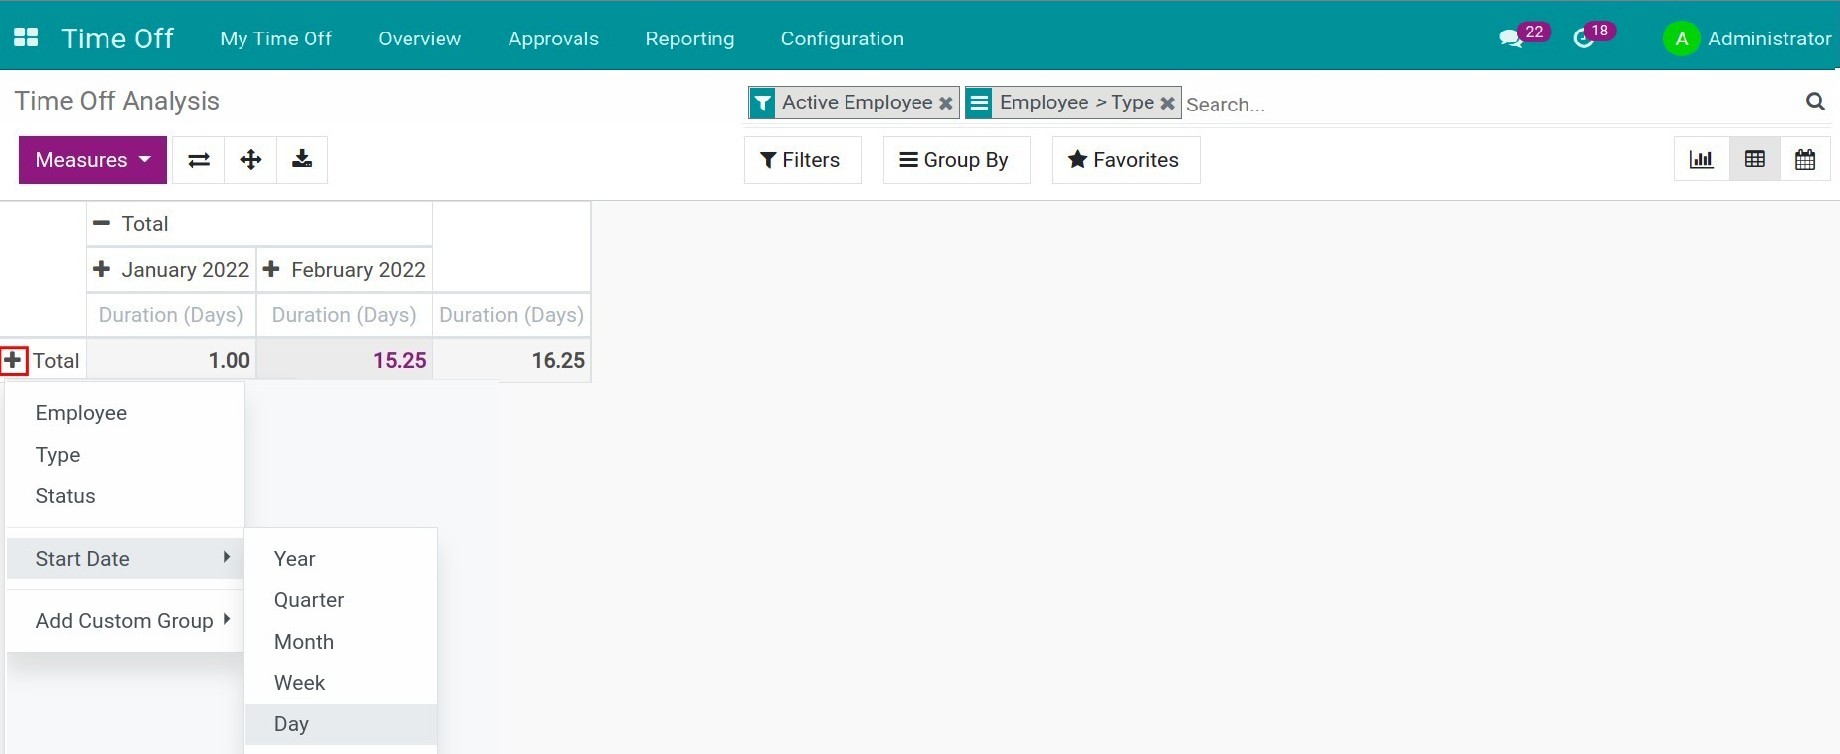
Similar to the graph view, pivot view also uses the measures value to display on the vertical axis. These measures are the same ones in the graph view. However, pivot view allows users combine various measures at the same time.
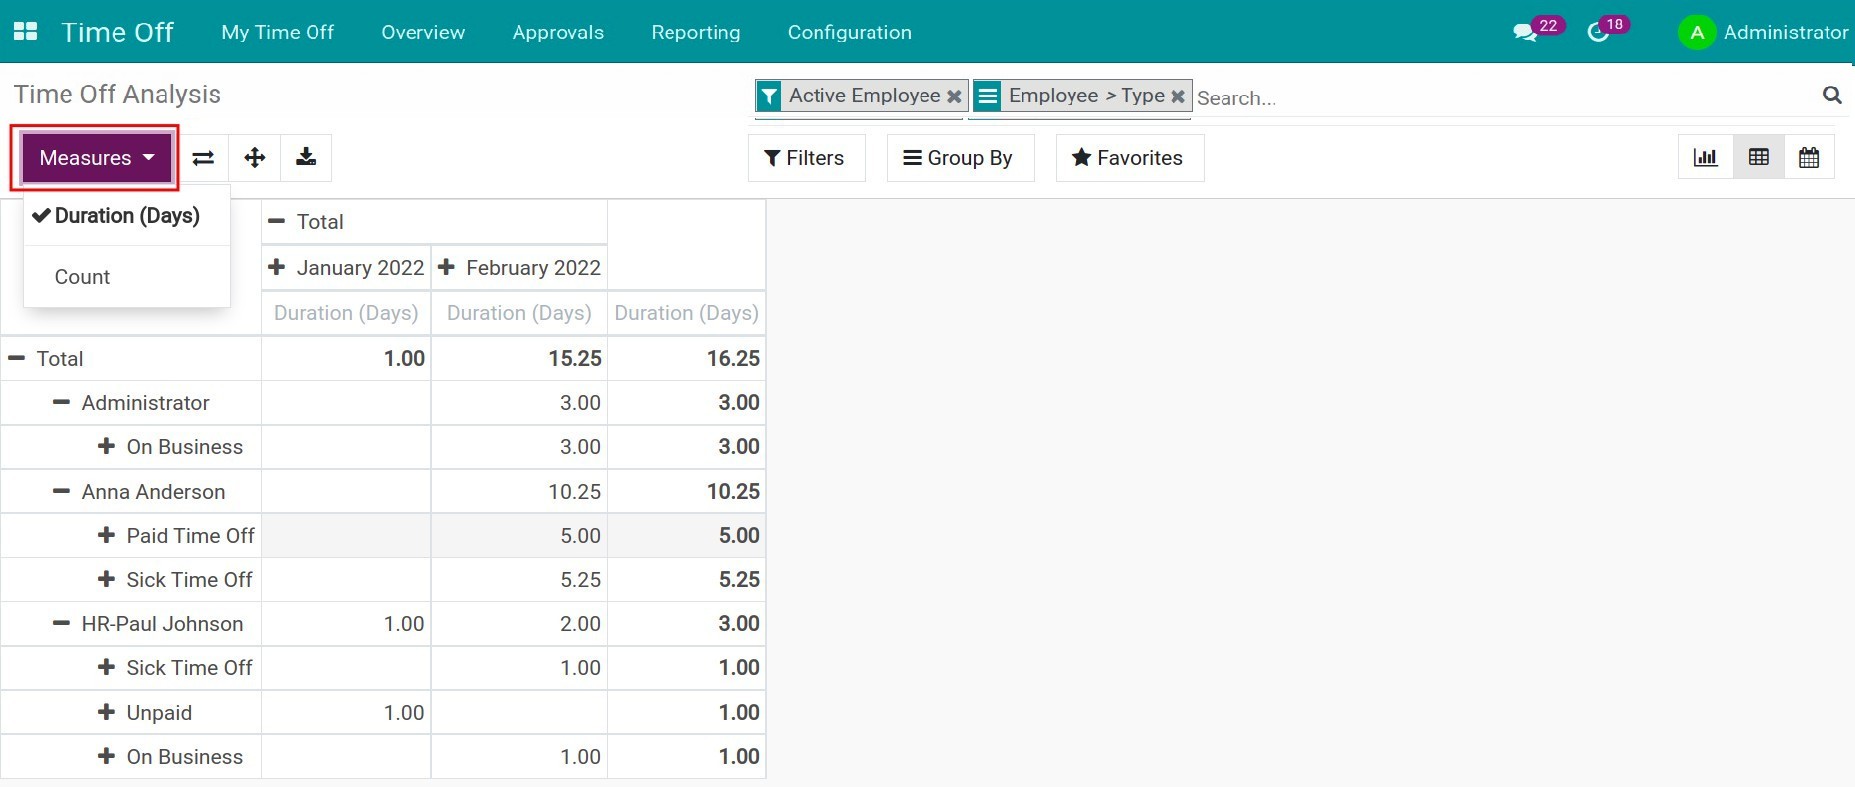
Press on the + icon to choose the criteria that you want to see on your report. For example, Reports by Time Off Type, Employee, Department, etc.
You are not only able to see reports directly on the software, but you also can export reports with your chosen criteria to an Excel file by pressing the Download xlsx button.
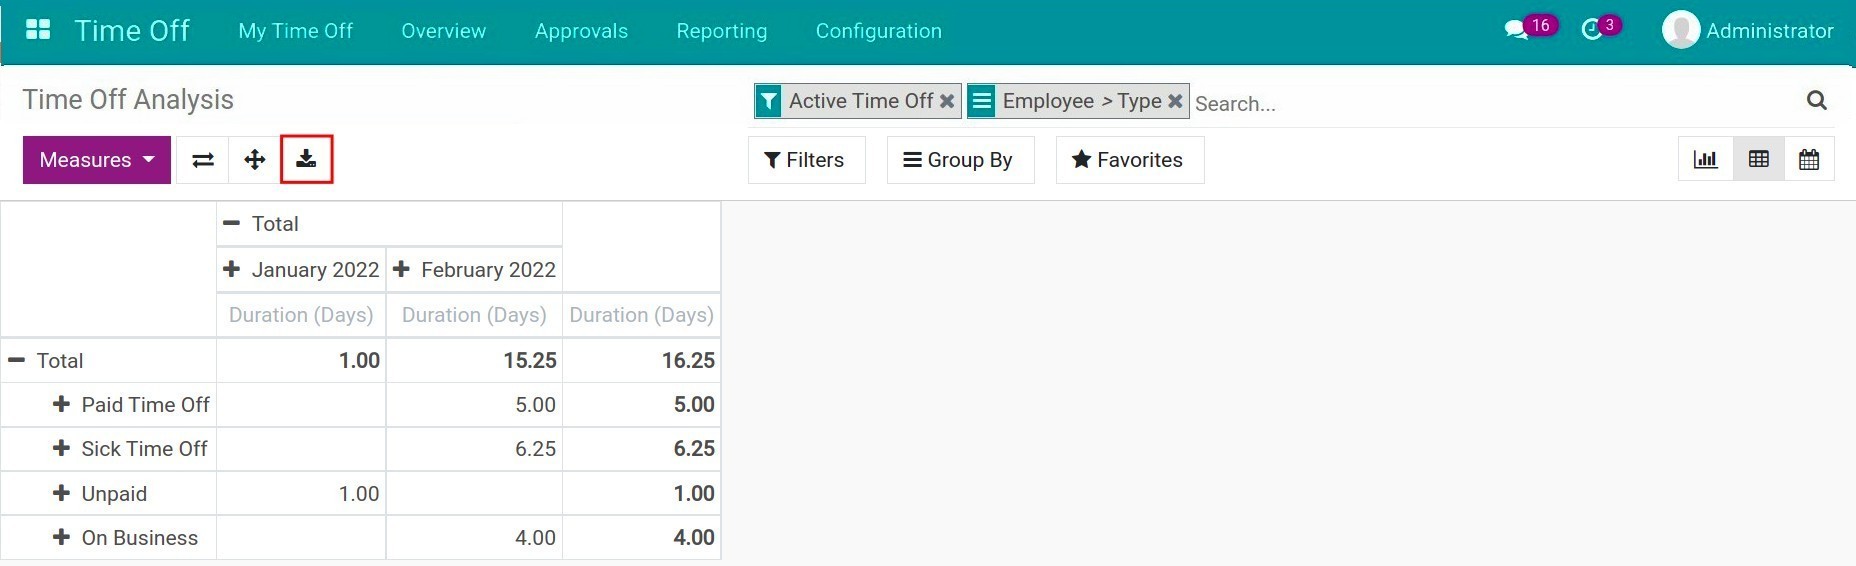
Besides, you can interchange the position of criteria of a column with a row.
Reporting by Type
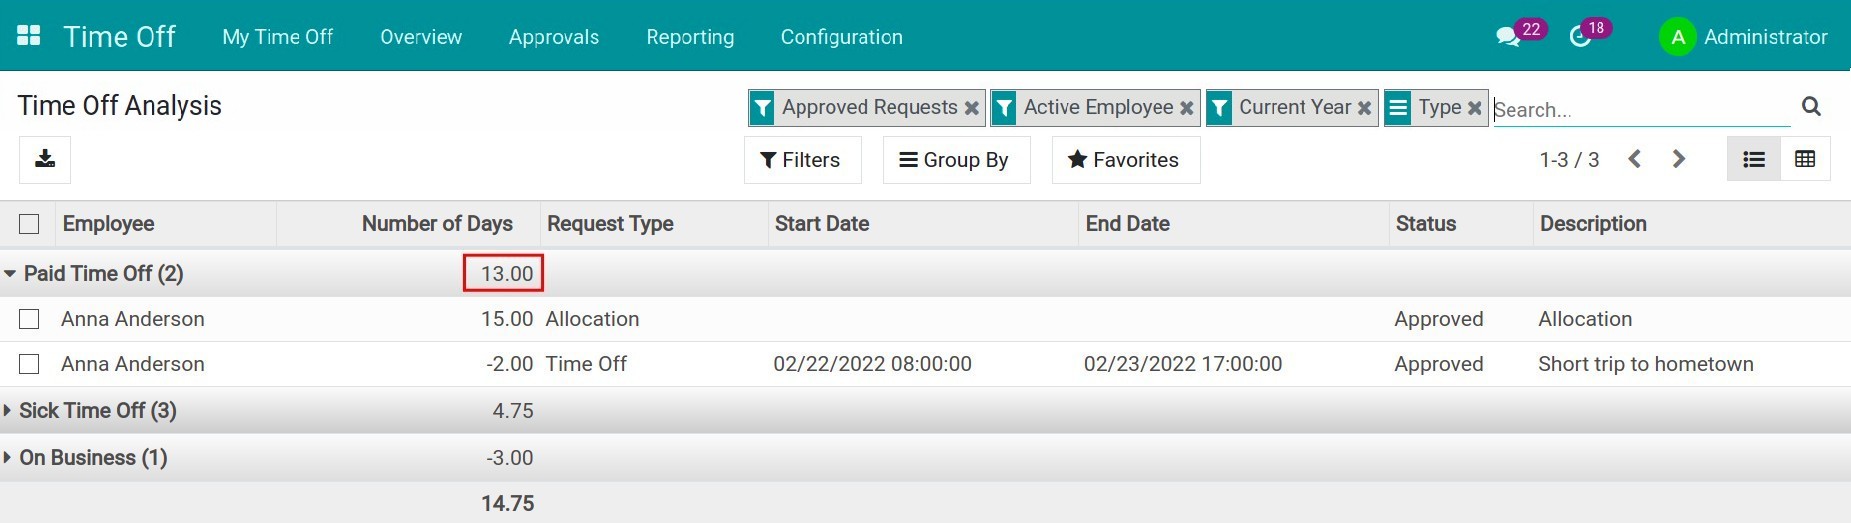
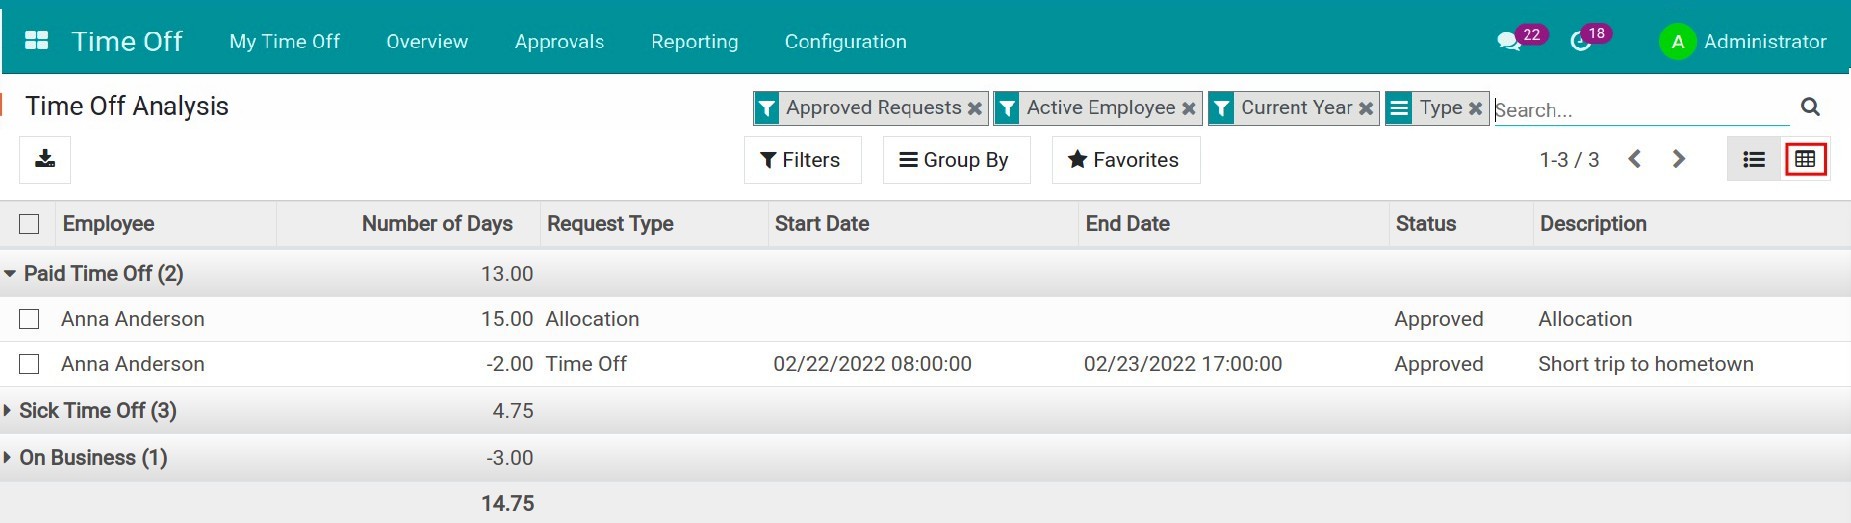
To see reports by type in the current year, navigate to Time Off ‣ Reporting ‣ by Type.
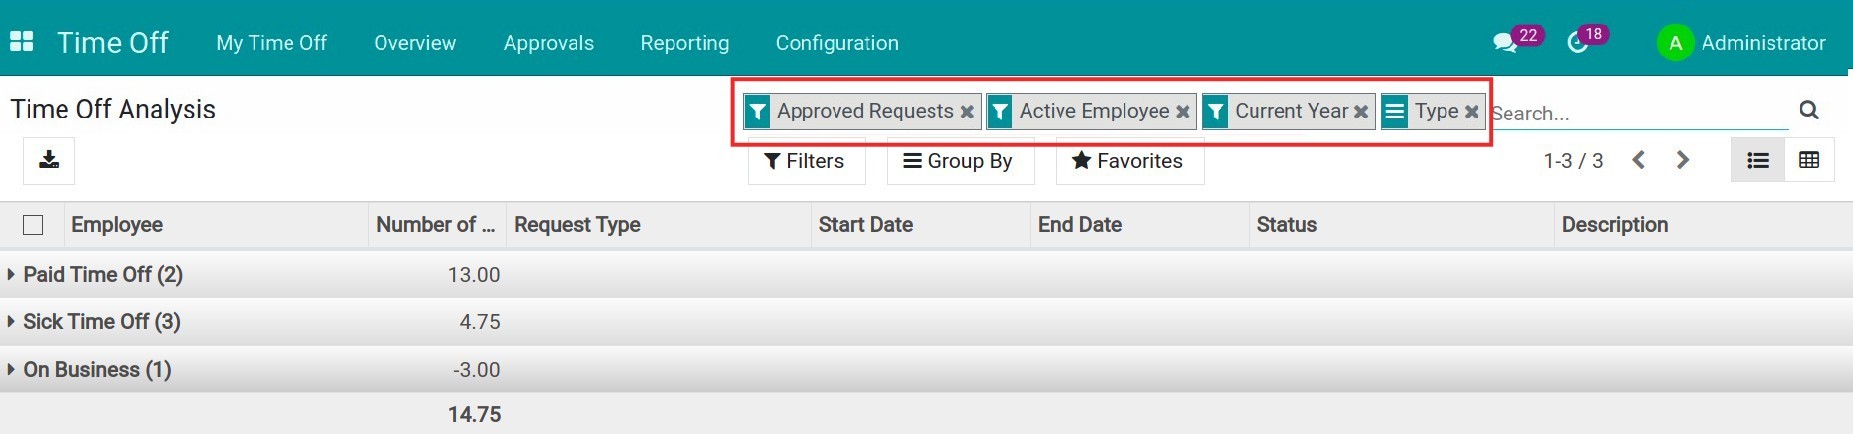
By default, a report in the list view is displayed with the criteria and group as shown in the image below. To display all the time off requests with the same type, press on ‣.

A time off request contains the following information: Number of Days, Request Type, Start Date/End Date, Status, and Description. On each time off type, the total number of days off of that particular type will be recorded.
You can turn off the system default filters and use the Filters and Group feature to gather data according to your needs.
Akin to the time off report by Employee, reports by Type also have a pivot view. To change to the pivot view, press on the respective icon.
Reporting on Time Off Details
Navigate to Time Off ‣ Reporting ‣ Time Off Details to see reports on time off details in a chosen period of time.

Just like previous reports, the system supports two display types: list and pivot. However, in the pivot view, Hours is added as another criterion for Measures.
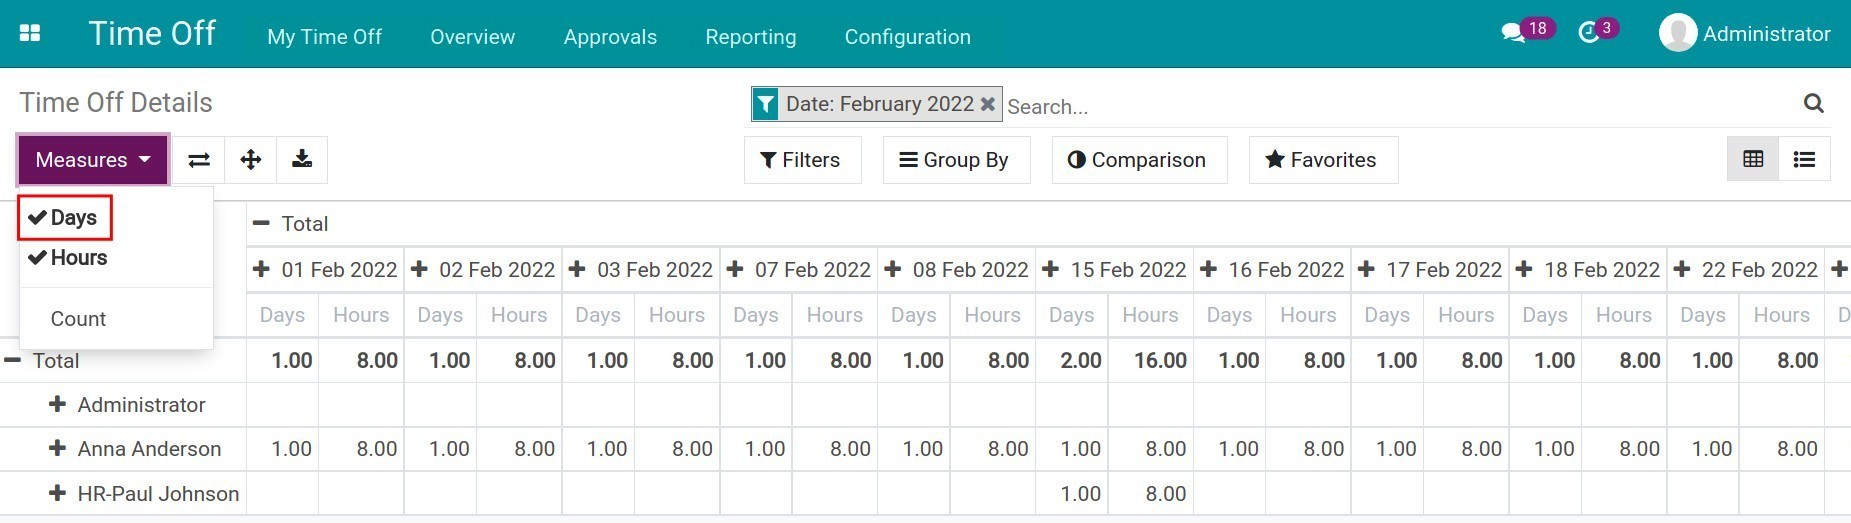
The usage of this report is similar to the previous ones.
See also
Optional module
How to adjust a Time off request?
How to adjust a Time off request?
Requirements
This tutorial requires the installation of the following applications/modules:
As the administrator of the Time Off app, you can adjust the date information right on the time off request at any stage. In case your employees have emergencies that ledge to prolonging their time off, instead of having to create a new time off or cancel the old one, the manager can make adjustments right on the employee’s time off.
To adjust the time-off date, access Time Off ‣ Approvals ‣ Time Off.

The system will use a default filter here to help the manager quickly find the needed time off.
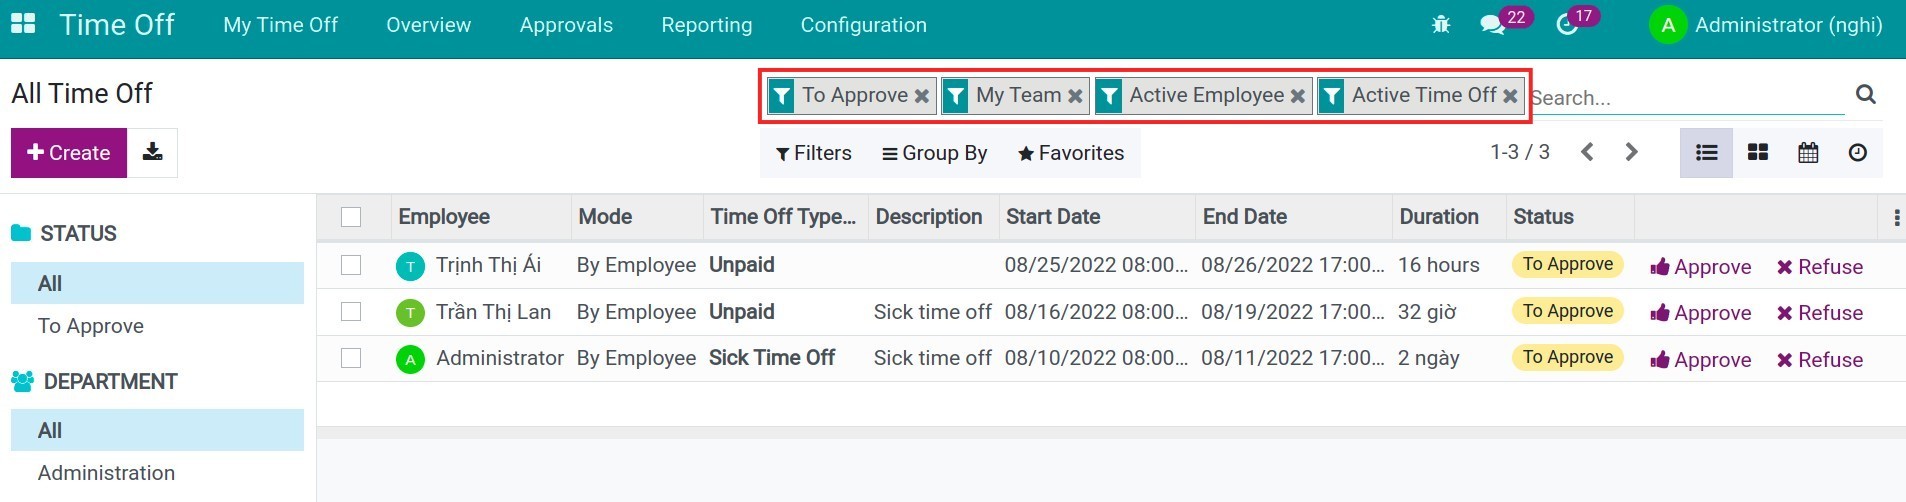
You can turn the default filter off and use Search, Filter or Group By feature to find easily the time off of the employees you want to adjust. For example, you can search the employee by name using the filter Employee contain employee name and Group by Type. Now, the system will filter all the time off of those employees and group them by the types that he/she created.

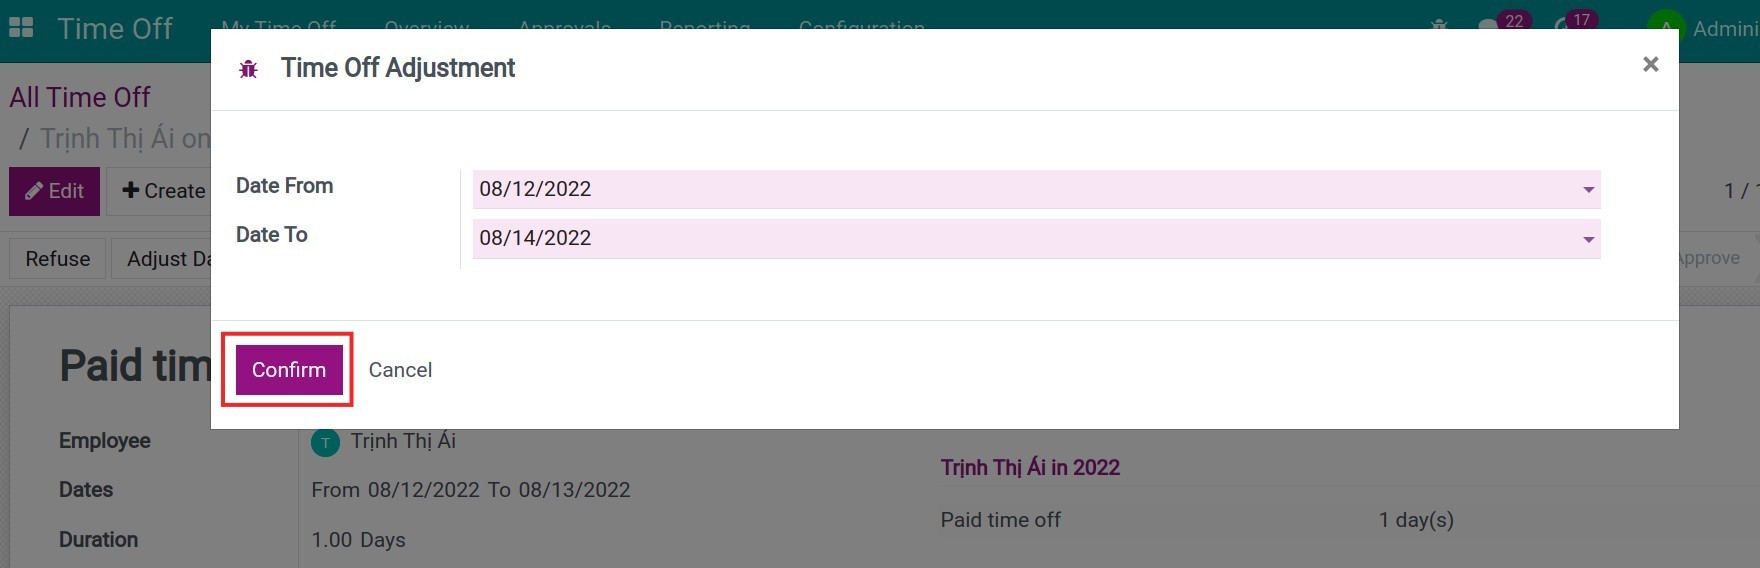
Select the time off you want to adjust and at the time off view, press Adjustment Date.
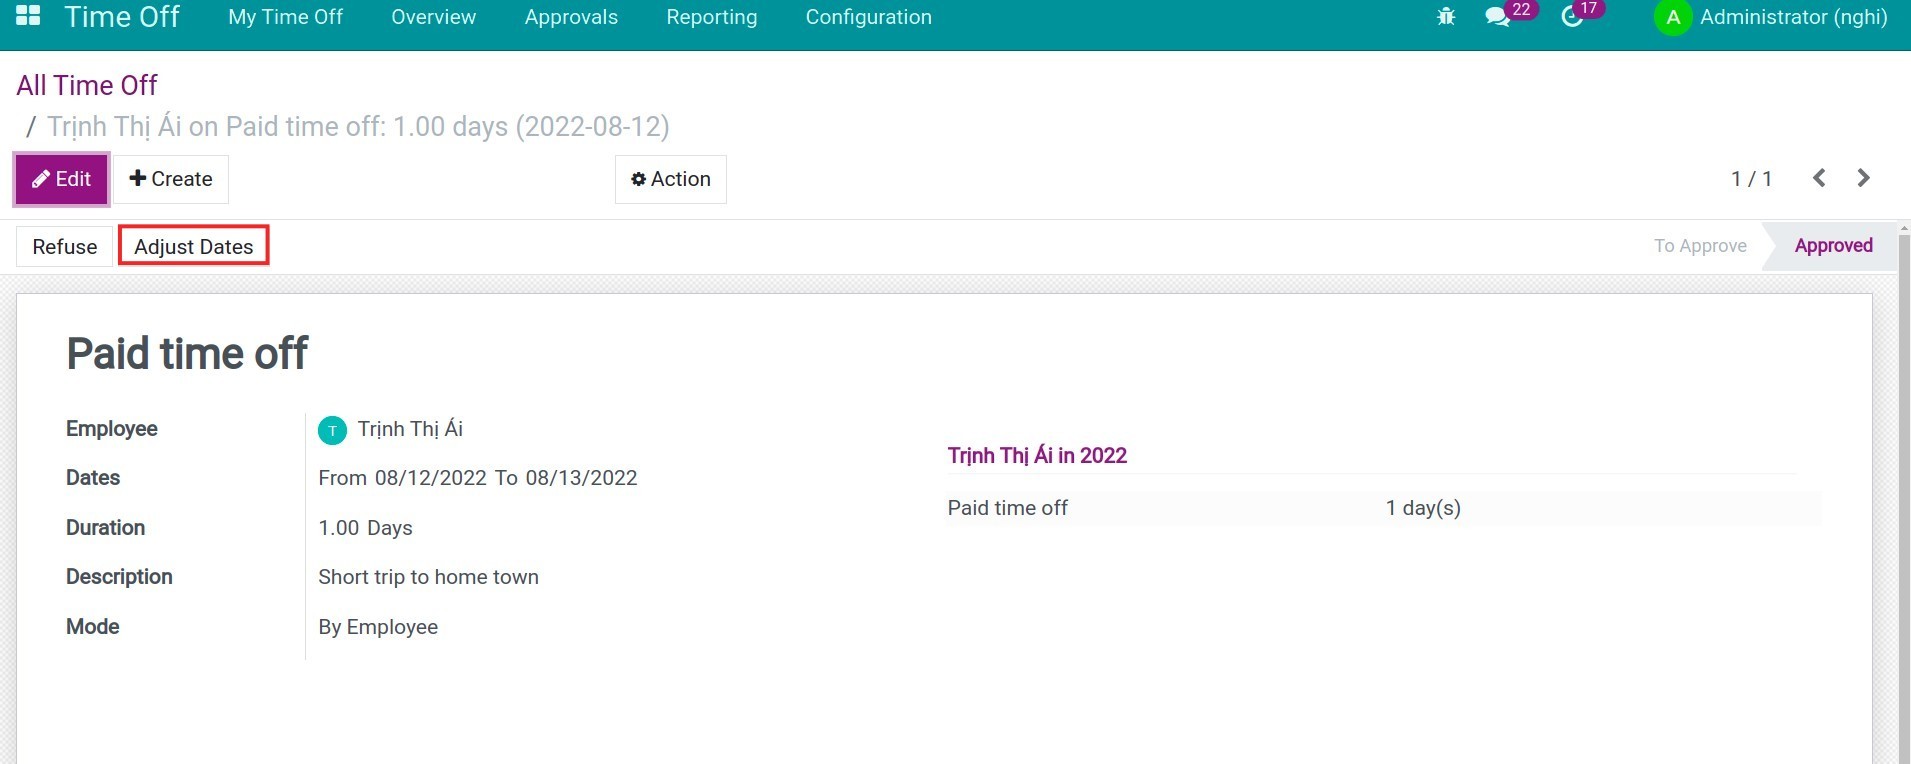
A pop-up window Time Off Adjustment appears so that you can enter the start date and end date for this time off. After filling in the information, press Confirm to save the information.
Note
Only the Time Off Type with mode calculated by day can be adjusted.
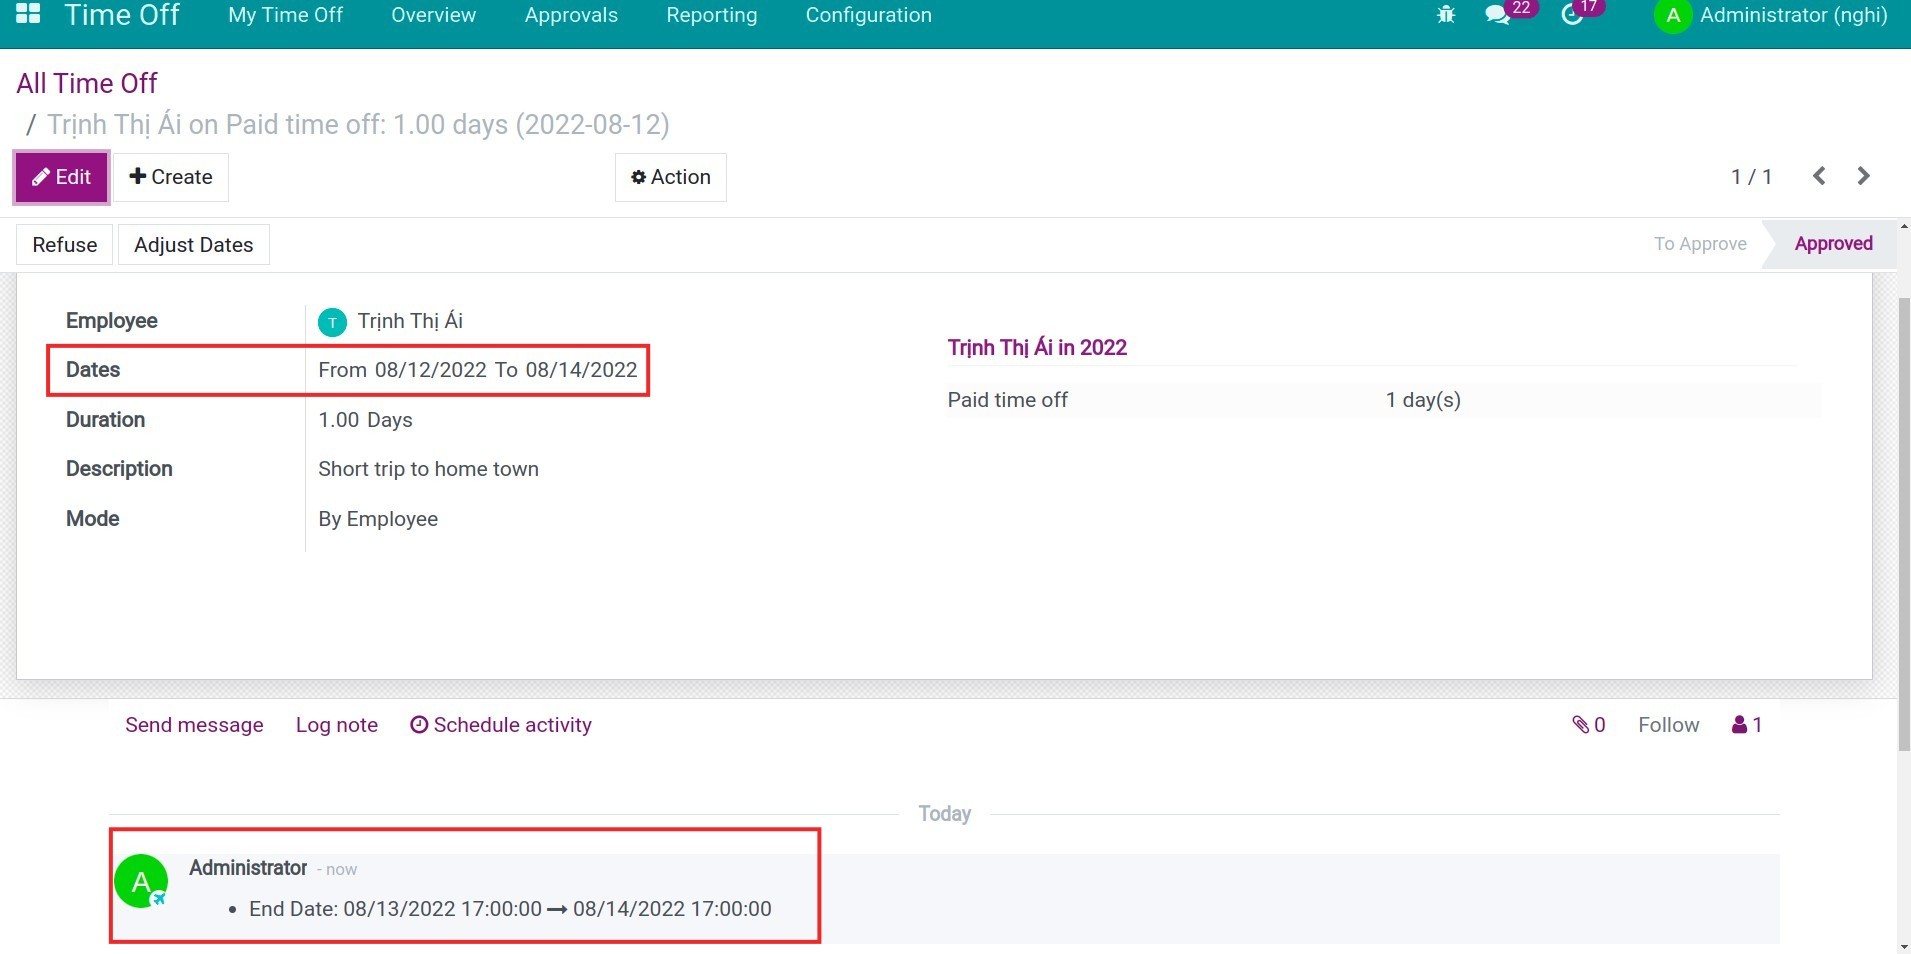
The dates on the time off have been updated, also the duration has been recalculated. Besides those, the system also tracks the time, information, as well as the person who changed the time off.
See also
Related article
How to create Time off Allocation?
How to create Time off Allocation?
In order to control the day off of employees, enterprises or the human resource officers need to allocate the employee’s time off. Viindoo Time-off Management Application will help enterprises allocate and control employees’ days off more efficiently.
Requirements
This tutorial requires the installation of the following applications/modules:
Time off Allocation Management
To create new time-off allocations for employees, first, you need to configure the time-off types. Read this article for more detail How to create Time off Types?
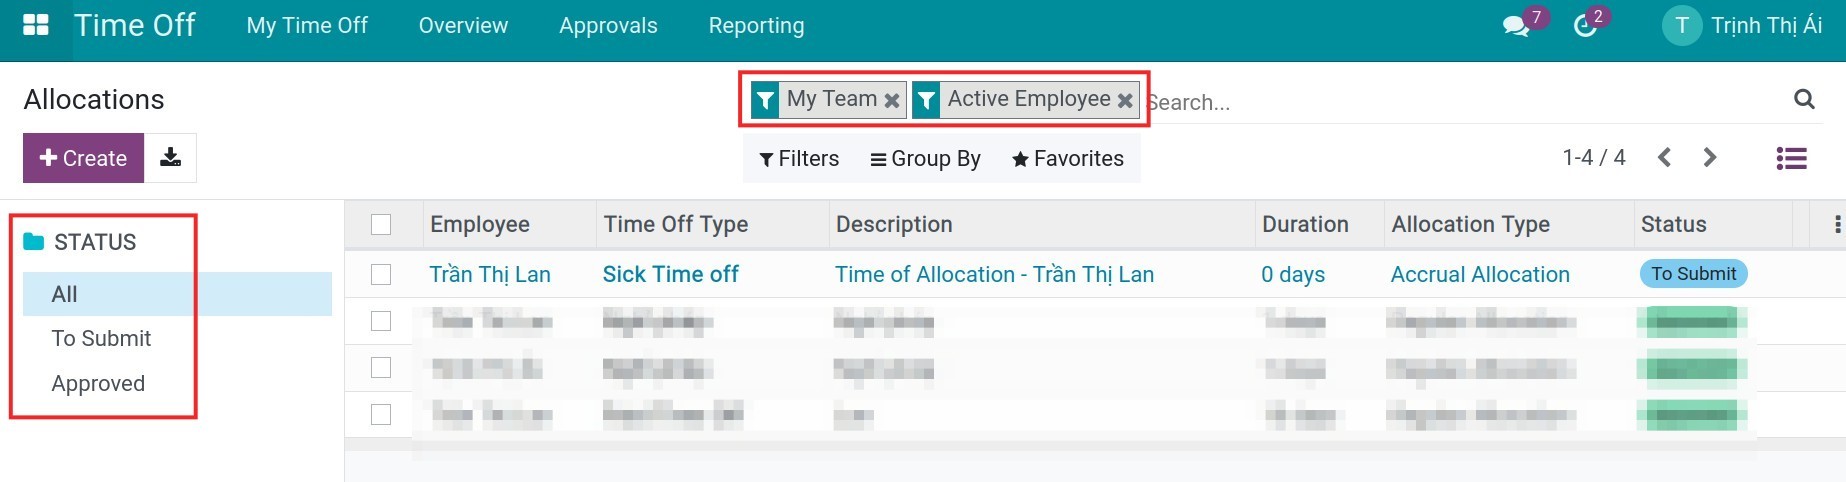
Next, you navigate to Time off ‣ Approvals ‣ Allocation.
In this section, the system currently applied the “My Team” and “Active Employee” filters which helps the manager filter the time-off requests of the employees that they are in charge of. It also displays the list of employees’ allocation requests with the following information: Employee, Time Off Type, Description, Duration, Status. The left column includes all the allocation statuses. When you select once, the system will automated filter depending on that choice.
Now, click on Create to create a new allocation request. You need to fill in the following information:
Allocation Title.
Time Off Type: Choosing the available time off type.
Mode: Allowing to create the allocation request by an employee, department, company, or employee tag. E.g: Allocating the Summer days off for the Teacher department.
Add a reason: Inputting a reason for the allocation request.
Allocation Type:
Regular Allocation: A certain number of days/time offs are manually allocated to employees. See details: Regular Allocation.
Accrual Allocation: The day-offs are allocated cumulatively and consecutively. See details: Accrual Allocation.
Note
Right at the view of the allocation request, you can see the time you have spent on the total allocated time in the statistics bar.
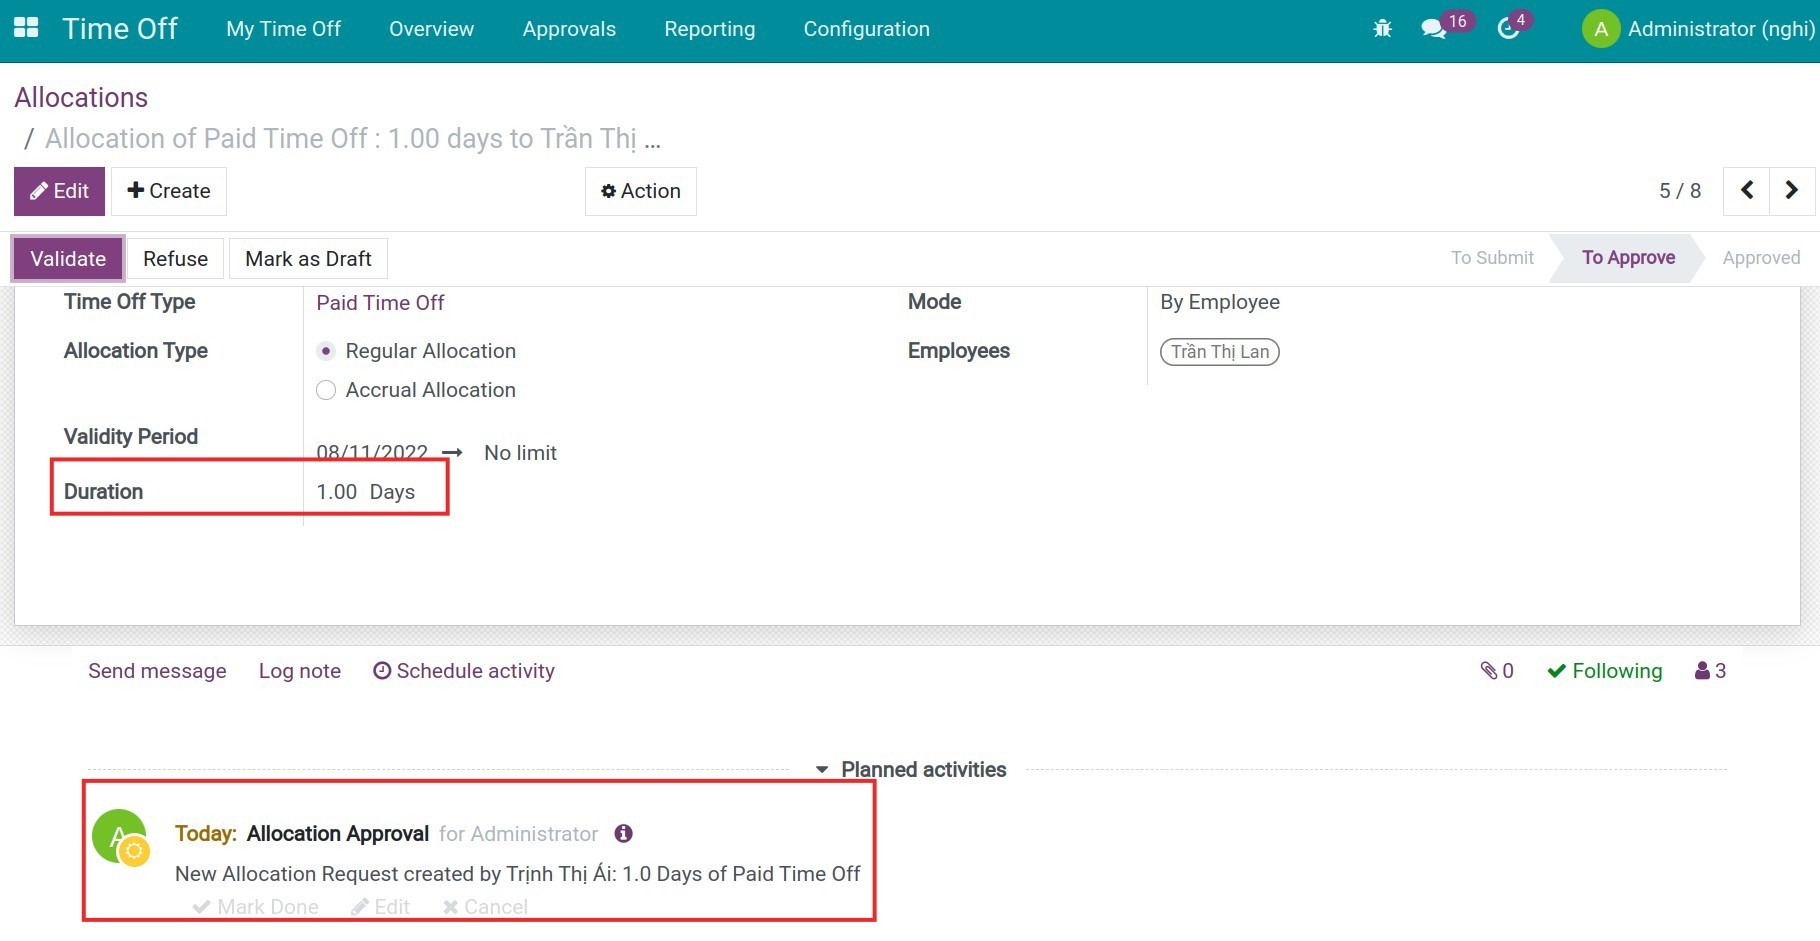
After you click on the Save button, the system will automatically schedule an activity to notify the manager to approve this allocation request.
Regular Allocation
Choosing Regular Allocation on the Allocation Type field.
At the Duration field, you enter the number of allocated days. The unit of measure depends on the Time Off Type configuration.
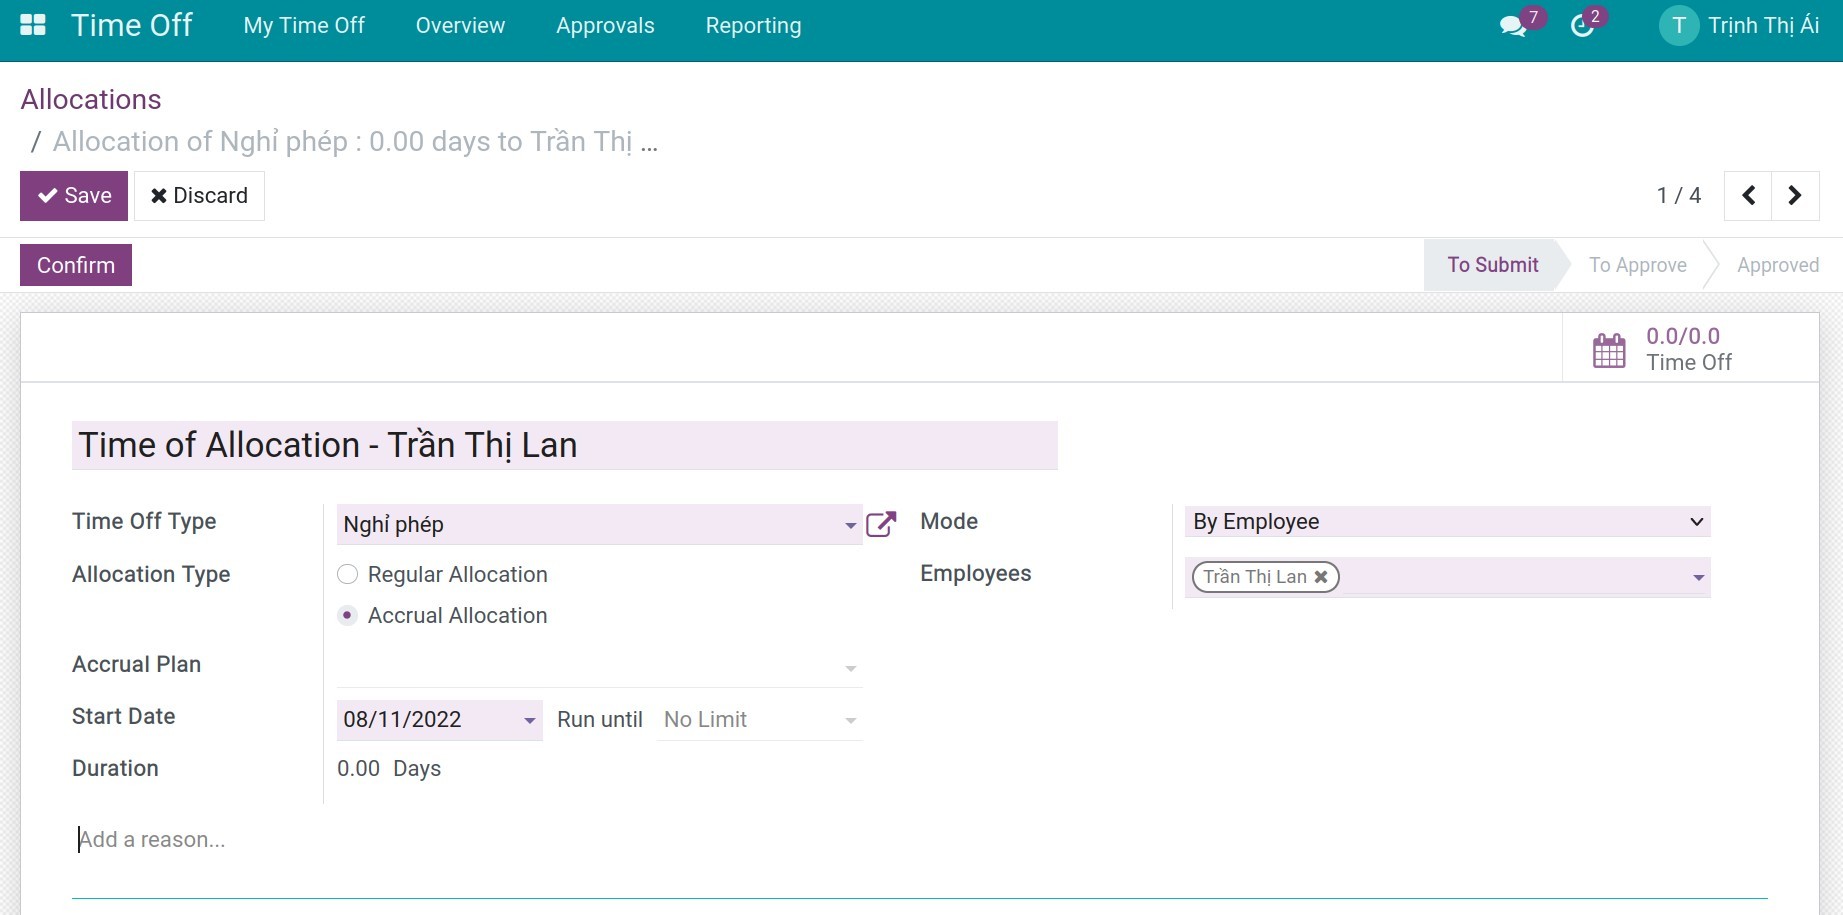
Accrual Allocation
To allocate Accrual Allocation for the employees, you need to configure Accrual Plan then add on the time-off allocation and enter the following details:
Configure Accrual Plans
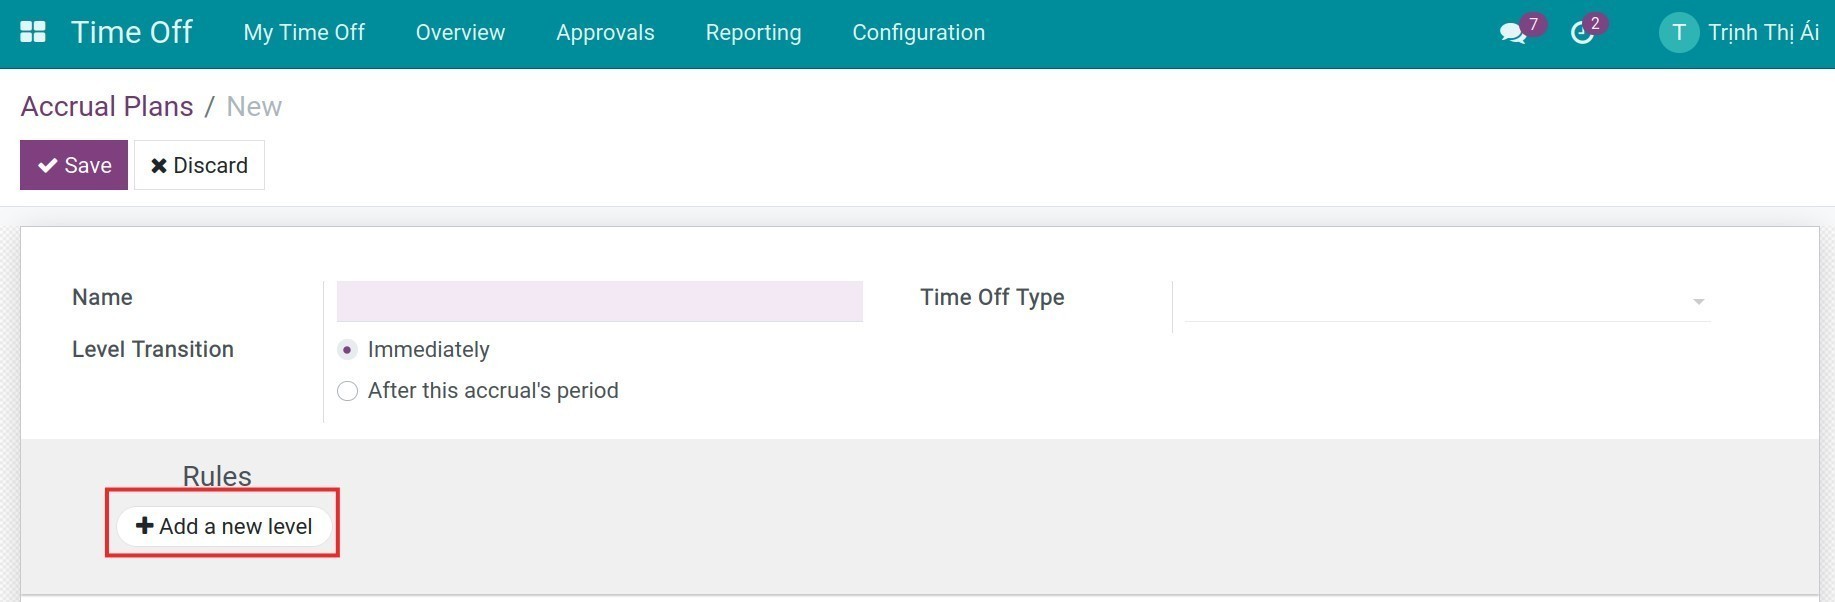
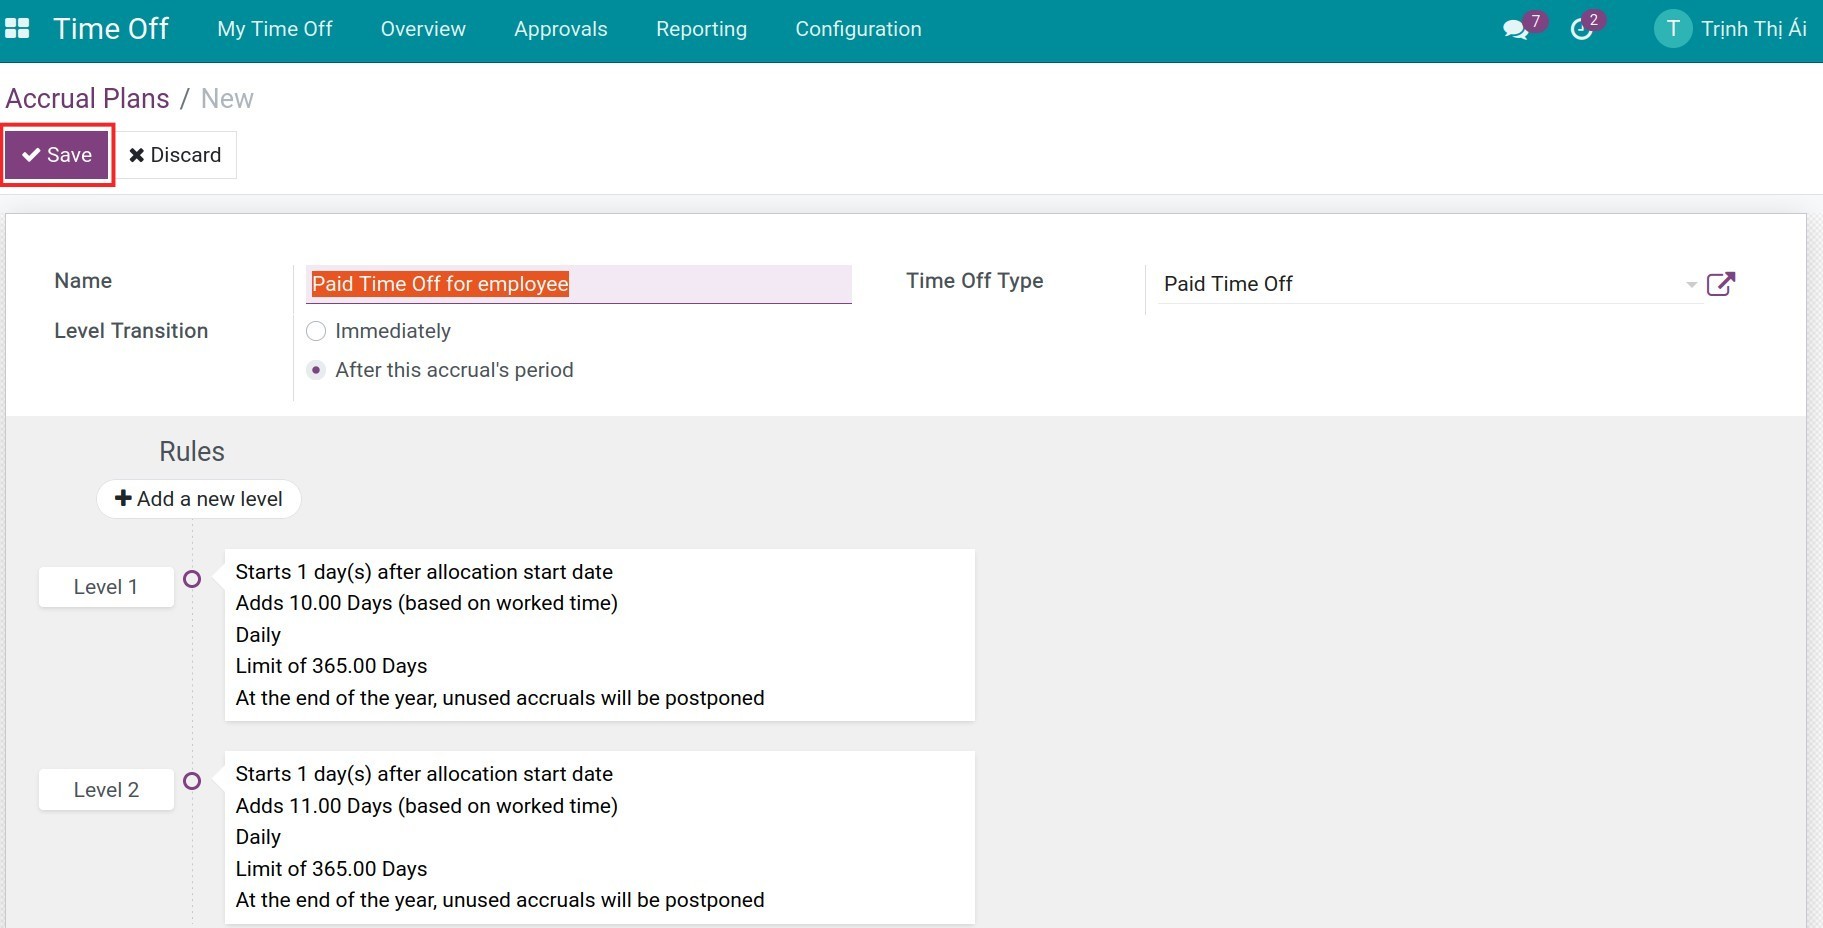
Navigate to Configuration > Accrual Plans > Create. Enter the following information:
Name: Enter the name of the Accrual Plans.
Time Off Type: Select the Time Off Type you want to apply.
Level Transition:
Immediately: When you reach the corresponding date to the new level, the accrual plan will be auto-computed, allocated and you switched to the new level.
After this accrual’s period: The accrual will be completed (weekly, monthly), allocated, and switched to the next level when you reach the allocation date. You need to configure the rule of time, rate, limit,… for these Accrual Plans.
Click on Add a new level.
Enter the following information:
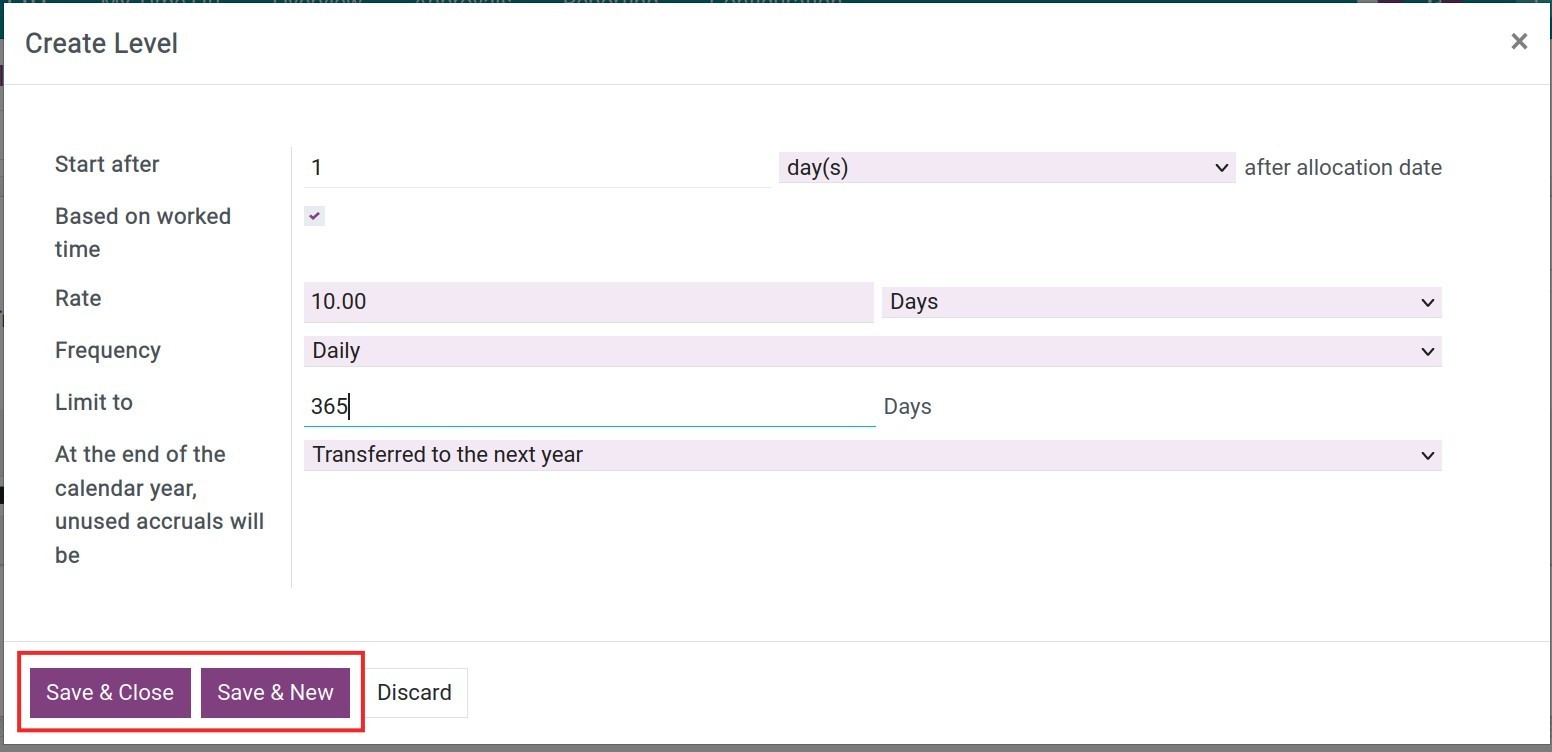
Start after: The accrual starts after a defined period from the employee Start date on the Allocation. The field defined the number of days, month(s) or year(s) which accrual will be used afterward.
Based on worked time: Only accrue for the employees’ working time. This is the time when the employee did not take time off.
Rate: The number of hours/days that will be incremented in the specified Time off Type for every period.
Frequency: The time-off will be allocated daily or every week/month, twice per week/month.
Limit to: Choose a limit for this accrual for which this Level is effective from the Start Date on the employment contract. If it is 0 that means no limit.
At the end of the calendar year, unused accruals will be: “Transferred to the next year” or “Lost” depending on your company’s regulations.
Click Save & Close if you have only one level or click Save & New if you want to create a new level.
Click on Save to save this record.
Apply Accrual Plans and fill Accrual Allocation period on Allocations
On the Allocation view, choose Accrual Allocation on the Allocation Type field.
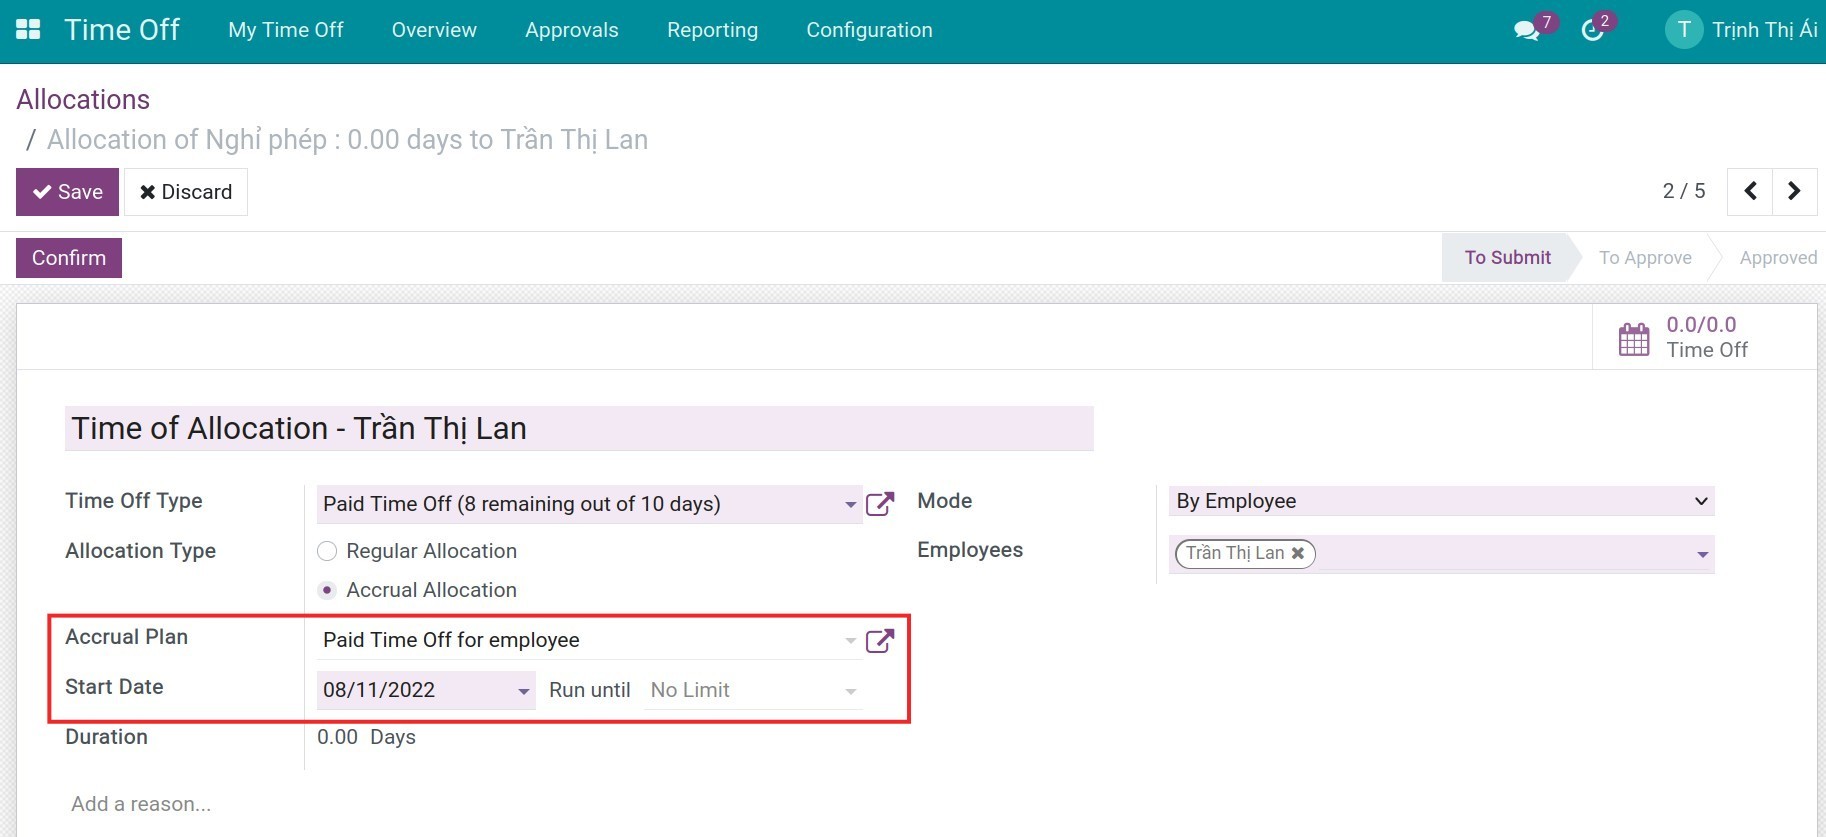
Accrual Plan: Choosing a suitable Accrual Plans for the Time off Type you chose.
Start Date: The day begin to allocate.
Run Until: On the day of stopping allocate, you can skip this field if there is no limit on the end date.
Note
Accrual Allocation will be run automatically according to the configured rule and with a delay depending on the Scheduled Actions setting of the system.
Time off Allocation requested by Employees
With the Extra Days Requests Allowed allocation configuration feature in Time Off Type, employees can create an allocation request for their day off. On the employee account, navigate to Time off application, then click on New allocation.
The system displays an Allocation request and you need to enter the following information:
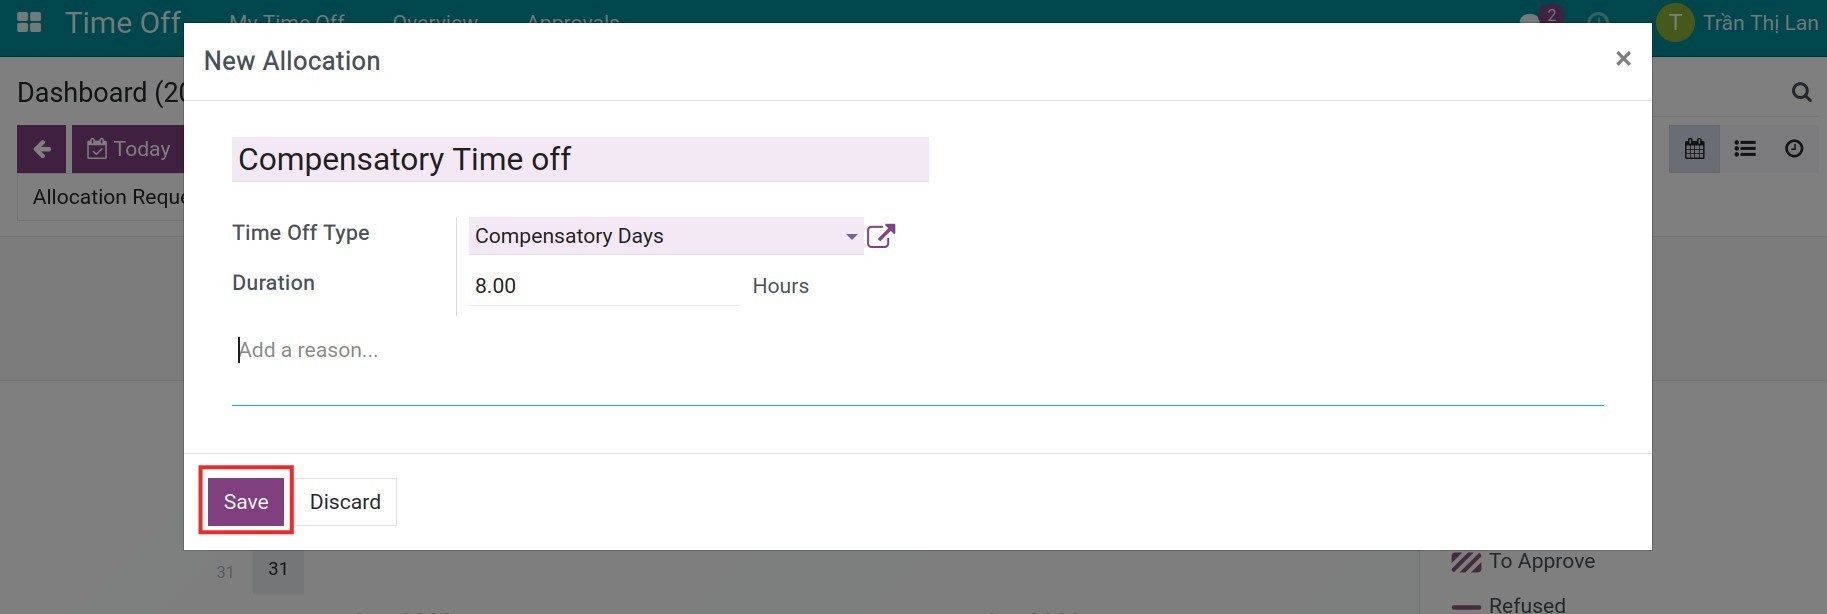
Allocation Title.
Time Off Type: Selecting the time-off type which had been configured in the Allow Employees Requests mode.
Duration: The duration of the allocated time-off you want to request. The unit of measure depends on the configuration in Time Off Type.
Add a reason: Entering the reason for an allocation request.
Clicking on Save. For detailed observation of your allocation request, you navigate to Time off ‣ My Time Off ‣ My Allocations.

By choosing a random allocation request, you will see the information which you have filled in. You can also track the status of the created allocation request:
To submit: When an allocation request is created.
To Approve: When an allocation request is confirmed.
Approved: When an allocation request is approved by the manager.
Refused: When an allocation request is refused by the manager (displayed only when the request is being declined).
After an allocation request had been confirmed, the system will automatically schedule an activity to notify the manager to approve this allocation request.
In case the manager approves the allocation request that the employee has created, the employee can proceed to create a time-off request.
See also
Related article
What to know to start with Time off?
What to know to start with Time off?
iSuite Time off Management Application helps the Enterprise in managing the time-off request of employees online, supporting the request approval process faster, tracking the time-off of employees visually and accurately for planning and allocating suitable human resources.
Requirements
This tutorial requires the installation of the following applications/modules:
iSuite Time-Off
Installing Time off application
At the dashboard interface, you navigate to Apps, then search by typing the keyword Time off.
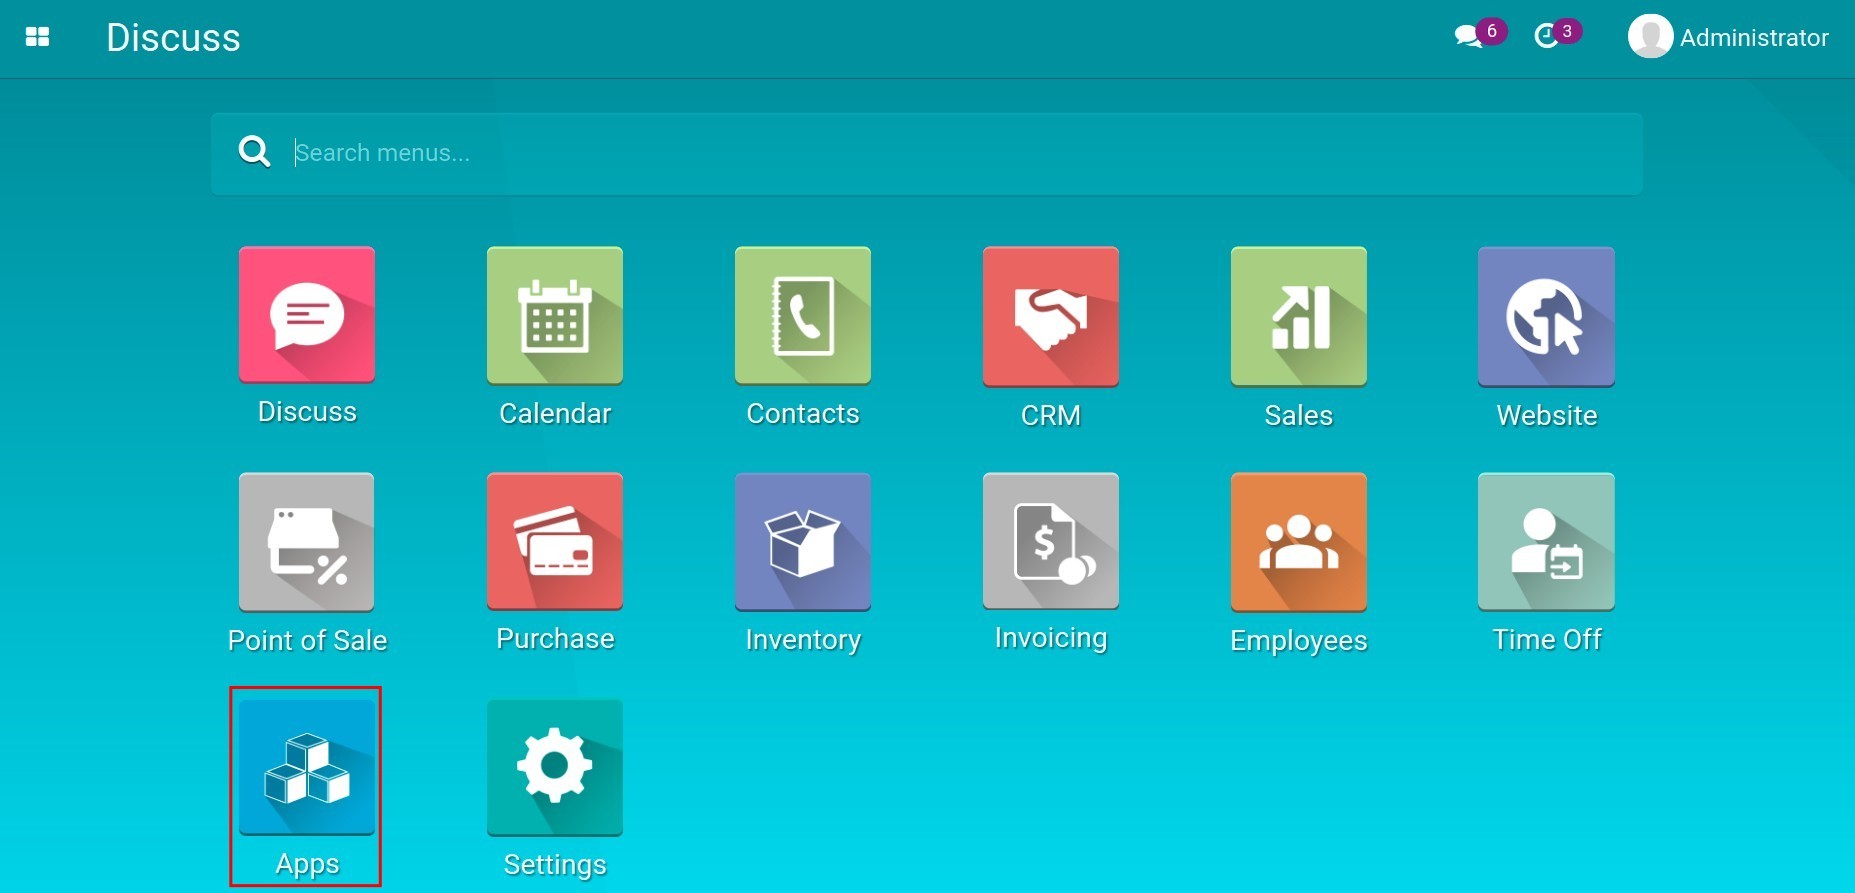

Clicking on Install for installing the application.

Access Right Configuration
Next, you need to set the corresponding authorization based on the position for each individual to ensure that they have full access rights to use this feature for work.
Navigate to Setting ‣ Users & Companies ‣ Users, select the needed User account to be configured, click on Edit, and head to the Time off section.

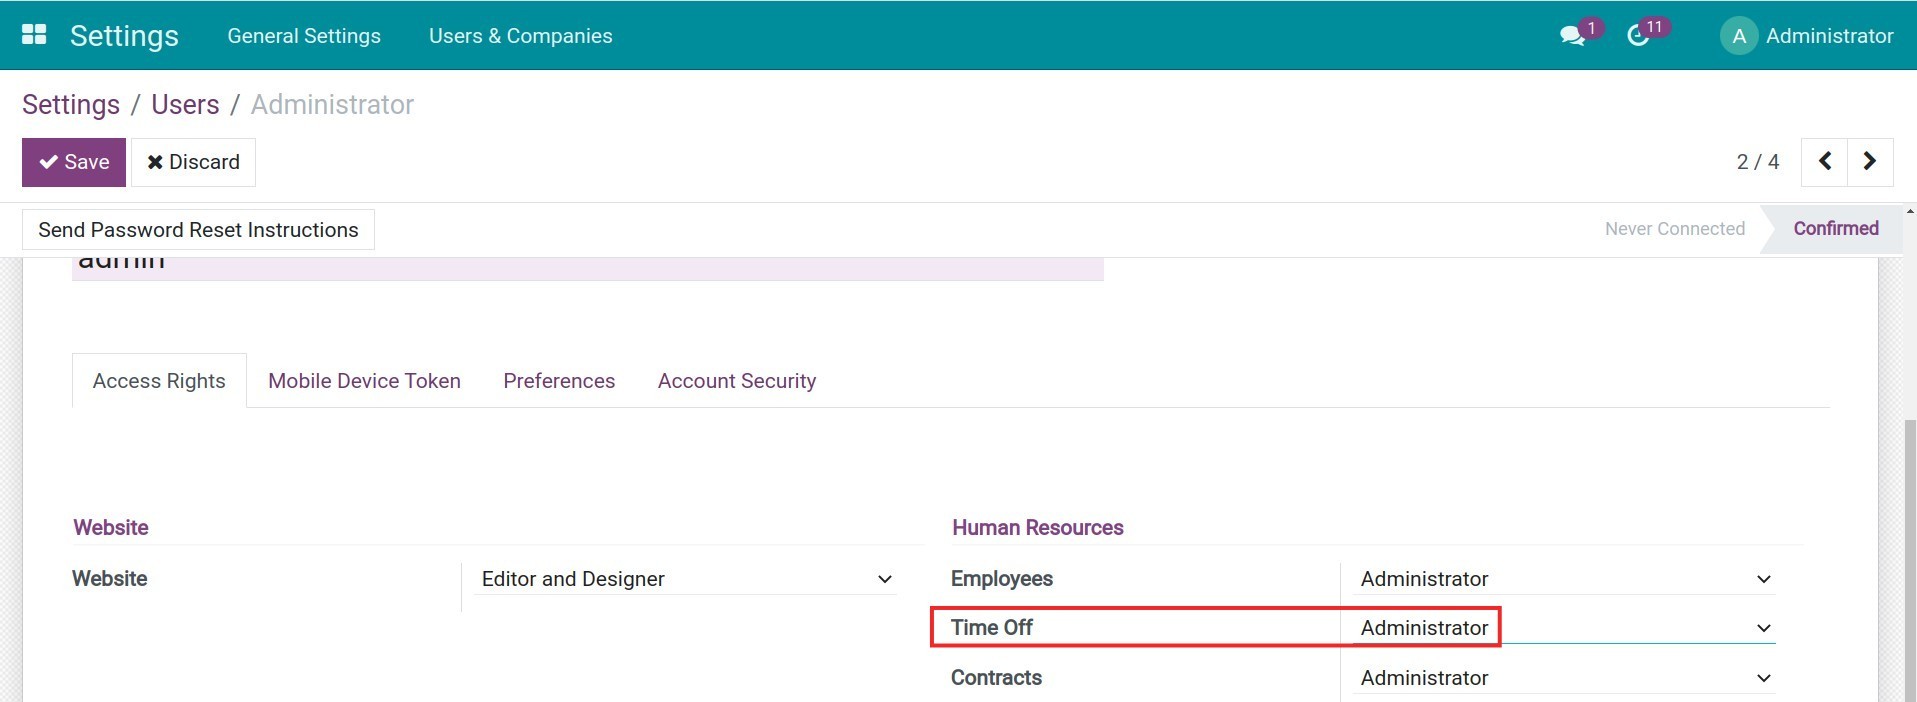
In Time off application, the system has been divided into 4 levels of access rights:
Blank: Have the right in creating/editing/deleting your own request at the draft status, and also can view the request created by yourself.
Time off Officer: Have the right in creating/approving the request of employees (except approving your own requests) and viewing time off report.
Administrator: Have full access to approving the requests, setting up the Time off types in the configuration menu, and viewing the reports.
Thank to this article, now you can understand how to install as well as configure the Time off application in iSuite.
See also
Related article
Overview Interface in Time off
How to create Time off Types?
How to create Time off Allocation?
How to create a Time off request?